I am using Ubuntu 16.04 LTS . I have python3 installed. There are two versions installed, python 3.4.3 and python 3.6 . Whenever I use python3 command, it takes python 3.4.3 by default. I want to use python 3.6 with python3.
python3 --version shows version 3.4.3
I am installing ansible which supports version > 3.5 . So, whenever, I type ansible in the terminal, it throws error because of python 3.4
sudo update-alternatives --config python3
update-alternatives: error: no alternatives for python3
GAD3R
61k30 gold badges126 silver badges189 bronze badges
asked Dec 13, 2017 at 9:13
8
From the comment:
sudo update-alternatives --config python
Will show you an error:
update-alternatives: error: no alternatives for python3
You need to update your update-alternatives , then you will be able to set your default python version.
sudo update-alternatives --install /usr/bin/python python /usr/bin/python3.4 1
sudo update-alternatives --install /usr/bin/python python /usr/bin/python3.6 2
Then run :
sudo update-alternatives --config python
Set python3.6 as default.
Or use the following command to set python3.6 as default:
sudo update-alternatives --set python /usr/bin/python3.6
answered Dec 14, 2017 at 12:11
GAD3RGAD3R
61k30 gold badges126 silver badges189 bronze badges
14
You can achieve this by applying below simple steps —
-
Check python version on terminal:
python --version -
Execute this command to switch to python 3.6:
sudo update-alternatives --install /usr/bin/python python /usr/bin/python3 1 -
Check python version:
python --version -
Done.
Kusalananda♦
307k35 gold badges598 silver badges896 bronze badges
answered Feb 2, 2019 at 9:37
Vineet JainVineet Jain
8036 silver badges2 bronze badges
2
if you have multiple version of python in your system. You just need to update the symbolic link of python inside /usr/bin/
root@irshad:/usr/bin# ls -lrth python*
lrwxrwxrwx 1 root root    9 Apr 16  2018 python -> python2.7
-rwxr-xr-x 1 root root 3.6M Nov 12  2018 python2.7
-rwxr-xr-x 2 root root 4.4M May  7 14:58 python3.6
In above example if you see the output of python --version you will get python2.7
Now update the python symlink using below command-
root@irshad:/usr/bin# unlink python
root@irshad:/usr/bin# ln -s /usr/bin/python3.6 python
root@irshad:/usr/bin# python --version
Python 3.6.8
answered May 25, 2019 at 18:03
IRSHADIRSHAD
5375 silver badges3 bronze badges
3
Using these commands can help you:
- check the version of python:
ls /usr/bin/python* - alias:
alias python='/usr/bin/pythonxx'(add this to. ~/.bashrc) - re-login or source
. ~/.bashrc - check the python version again:
python --version
answered Nov 8, 2018 at 11:44
NewtNewt
3692 silver badges4 bronze badges
3
First check that you have a python3.6 folder?
ls /usr/bin/python3.6
If you have «python3.6» folder, you are good to go. Now update-alternatives
sudo update-alternatives --install /usr/bin/python3 python3 /usr/bin/python3.6 1
then update new config for python3
sudo update-alternatives --config python3
Finally, check default python3 version:
python3 --version
Stewart
11.1k1 gold badge36 silver badges67 bronze badges
answered May 21, 2019 at 10:29
mmblackmmblack
1471 silver badge4 bronze badges
3
Create symlink for /usr/bin/python3.
In my LinuxMint:
# ls -lh /usr/bin/python3 /usr/bin/python
lrwxrwxrwx 1 root root 9 ноя 24  2017 /usr/bin/python -> python2.7
lrwxrwxrwx 1 root root 9 сен  6  2017 /usr/bin/python3 -> python3.5

# mv /usr/bin/python /usr/bin/python.bak
# cp /usr/bin/python3 /usr/bin/python
# python --version
Python 3.5.2
answered Dec 4, 2018 at 11:13
1
An easy answer would be to add an alias for python3.6.
Just add this line in the file ~/.bashrc : alias python3="python3.6", then close your terminal and open a new one. Now when you type python3 xxx it gets translated to python3.6 xxx.
This solution fixes your problem without needing to tweak your system too heavily.
EDIT :
As Mikael Kjær pointed out, this is a misconfiguration of ansible with your system.
As seen here :
Set the
ansible_python_interpreterconfiguration option to
/usr/bin/python3. The ansible_python_interpreter configuration option
is usually set per-host as an inventory variable associated with a
host or group of hosts:# Example inventory that makes an alias for localhost that uses python3 [py3-hosts] localhost-py3 ansible_host=localhost ansible_connection=local [py3-hosts:vars] ansible_python_interpreter=/usr/bin/python3
As seen here about the config file :
Changes can be made and used in a configuration file which will be processed in the following order:
* ANSIBLE_CONFIG (an environment variable)
* ansible.cfg (in the current directory)
* .ansible.cfg (in the home directory)
* /etc/ansible/ansible.cfg
answered Dec 13, 2017 at 9:27
3
update-alternatives is to change system symlinks to user-defined/admin-defined symlinks.
If you have multiple versions of python3 installed in your system and want to control which python3 version to invoke when python3 is called. Do the following
sudo update-alternatives --install /usr/bin/python3 python3 /usr/bin/python3.4 1
sudo update-alternatives --install /usr/bin/python3 python3 /usr/bin/python3.5 2
Run below command if you want to change priority in the future.
update-alternatives --config python3
Explanation:-
sudo update-alternatives --install <symlink_origin> <name_of_config> <symlink_destination> <priority>
You can go on change name_of_config to python4, but then you have to invoke update-alternatives —config with python4 to reconfigure.
Using this approach you are able to control system python version and python3 version separately.
answered Mar 13, 2019 at 20:02
1
You can change the simbolic link by ln -sf python3.6 python3 inside /usr/bin. With this when you call python3 it will execute python3.6
answered May 21, 2019 at 10:42
On our Kali Linux (or any other Linux distribution) we might have installed different versions of Python. For using Python version 2.x we generally use python2 command, same as for using Python 3.x versions we use python3 command.
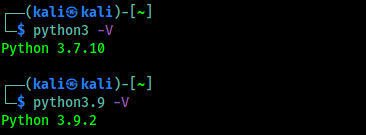
Here assume that we have installed multiple versions of Python3 installed on our system, like we have installed Python3.7 and Python 3.9 both on our Linux system for any reason. So whenever we want to use Python 3.9 we need to type command python3.9 because python3 command using Python 3.7 version as default.
Our advanced Linux users may know this problem and the solution, but this is for beginners.
How to check installed Python versions on Linux?
This can be easily done with a simple command on our Terminal window. The command is following:
ls /usr/bin/python*In the following screenshot we can see that we have Python2.7, Python3.7 and Python3.9 installed on our system.
Problem
But we can see that python3 command is choosing Python3.7 version as default. But some updated tools needs Python3.9 to run. We can run python3.9 command, but it is annoying we should run python3 to run Python3 latest version, we may modify our .bashrc/.zshrc file but that will not be the correct solution.
We need to set our update-alternatives for python3.
We can check for the alternatives of python3 by running following command:
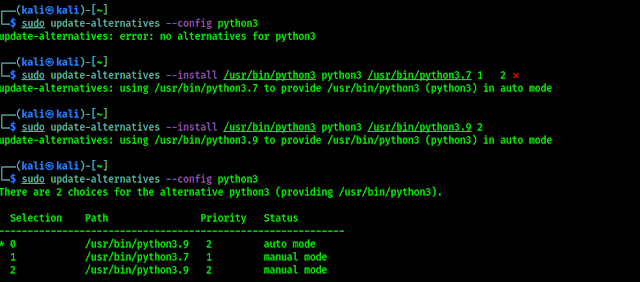
sudo update-alternatives --config python3But here we might get an error «update-alternatives: error: no alternatives for python3«.
It means, first we need to set alternatives for python3.
Solved
To set the alternatives for python3 we need to run some commands on our terminal.
First of all we need to run the following command:
sudo update-alternatives --install /usr/bin/python3 python3 /usr/bin/python3.7 1This command will add Python 3.7 on option 1.
Then we need to run following command:
sudo update-alternatives --install /usr/bin/python3 python3 /usr/bin/python3.9 2This command will add Python 3.9 on option 2
We can see this on the following screenshot:
Now we can again run the configure command to check and set the alternatives:
sudo update-alternatives --config python3In the following screenshot we can see that now we can save the configurations now.
Here we can set the default version for the python3. Here automatically 0 is chosen for Python 3.9 version, we can go for it, otherwise instead of choosing by numbers we can run following command to choose the default python3 version:
sudo update-alternatives --set python3 /usr/bin/python3.9Now we can check python3 default version by using following command:
python3 -VWe can see that now our Python 3.9 version is set as default for python3 command:
«update-alternatives: error: no alternatives for python3» is a very common problem for beginners so we thought to write an entire article for it we got too much request to solve this on our Telegram DM. When Python 4 will release some versions of Python 4, we can use the same as we did for Python 3.
Love our articles? Make sure to follow us to
get all our articles directly on inbox. We are also available on Twitter and GitHub, we post article updates there. To join our family, join our Telegram Group. We are trying to build a community for Linux and Cybersecurity. For anything we always happy to help everyone on the comment section. As we know our comment section is always open to everyone. We read each and every comment and we always reply.
The other day I decided that I wanted the command python to default to firing up python3 instead of python2.
So I did this:
$ sudo update-alternatives --install /usr/bin/python python /usr/bin/python2.7 2

$ sudo update-alternatives --install /usr/bin/python python /usr/bin/python3.5 3

$ sudo update-alternatives --config python

$ sudo update-alternatives --config python
There are 2 choices for the alternative python (providing /usr/bin/python).

  Selection    Path                Priority   Status
------------------------------------------------------------
* 0            /usr/bin/python3.5   3         auto mode
  1            /usr/bin/python2.7   2         manual mode
  2            /usr/bin/python3.5   3         manual mode

Press <enter> to keep the current choice[*], or type selection number: 0
And that all worked. Great! 
$ python -V
Python 3.5.2
But it wasn’t long before I realised I had broken apt/aptitude when it comes to installing and removing python packages because apt was expecting python2 it transpired.
This is what happened.
$ sudo apt remove  python-samba
Reading package lists... Done
Building dependency tree
Reading state information... Done
The following package was automatically installed and is no longer required:
  samba-libs
Use 'sudo apt autoremove' to remove it.
The following packages will be REMOVED:
  python-samba
0 upgraded, 0 newly installed, 1 to remove and 0 not upgraded.
After this operation, 5,790 kB disk space will be freed.
Do you want to continue? [Y/n]
(Reading database ... 187285 files and directories currently installed.)
Removing python-samba (2:4.3.11+dfsg-0ubuntu0.16.04.5) ...
  File "/usr/bin/pyclean", line 63
    except (IOError, OSError), e:
                             ^
SyntaxError: invalid syntax
dpkg: error processing package python-samba (--remove):
 subprocess installed pre-removal script returned error exit status 1
Traceback (most recent call last):
  File "/usr/bin/pycompile", line 35, in <module>
    from debpython.version import SUPPORTED, debsorted, vrepr,
  File "/usr/share/python/debpython/version.py", line 24, in <module>
    from ConfigParser import SafeConfigParser
ImportError: No module named 'ConfigParser'
dpkg: error while cleaning up:
 subprocess installed post-installation script returned error exit status 1
Errors were encountered while processing:
 python-samba
E: Sub-process /usr/bin/dpkg returned an error code (1)
Eventually I guessed it wanted python2 as the default, so I undid my changes as follows:
$ sudo update-alternatives --config python
There are 2 choices for the alternative python (providing /usr/bin/python).

  Selection    Path                Priority   Status
------------------------------------------------------------
* 0            /usr/bin/python3.5   3         auto mode
  1            /usr/bin/python2.7   2         manual mode
  2            /usr/bin/python3.5   3         manual mode

Press <enter> to keep the current choice[*], or type selection number: 1

$ python -V
Python 2.7.12
And then apt worked again
$ sudo apt remove  python-samba
Reading package lists... Done
Building dependency tree
Reading state information... Done
The following package was automatically installed and is no longer required:
  samba-libs
Use 'sudo apt autoremove' to remove it.
The following packages will be REMOVED:
  python-samba
0 upgraded, 0 newly installed, 1 to remove and 0 not upgraded.
1 not fully installed or removed.
After this operation, 5,790 kB disk space will be freed.
Do you want to continue? [Y/n]
(Reading database ... 187285 files and directories currently installed.)
Removing python-samba (2:4.3.11+dfsg-0ubuntu0.16.04.5) ...
So I have had to leave it as defaulting to python 2 but I develop in python 3 and so would like my system to default to python 3 for when I run python and idle.
Can anyone tell me how I can achieve this without breaking apt?
My system is a Raspberry Pi 3B running Ubuntu:
Linux mymachine 4.4.38-v7+ #938 SMP Thu Dec 15 15:22:21 GMT 2016 armv7l armv7l armv7l GNU/Linux
(It’s actually an arm v8)
$ cat /etc/lsb-release
DISTRIB_ID=Ubuntu
DISTRIB_RELEASE=16.04
DISTRIB_CODENAME=xenial
DISTRIB_DESCRIPTION="Ubuntu 16.04.2 LTS"
Learn how to use the PPA repository to install Python’s old versions such as 3.9. 3.8, 3.7, and more on Ubuntu 22.04 Jammy JellyFish using the command terminal.
Python is freely available for the common operating systems. The programming language is standard equipment in many Linux distributions. Python can also be used on many mobile operating systems. For web servers, WSGI (Web Server Gateway Interface) is a universal interface between the server and Python.
It offers clear syntax and good readability. It is considered easy to learn and can be interpreted in the common operating systems. Python supports several programming paradigms such as functional, object-oriented, or aspect-oriented programming and can also be used as a scripting language.
Since Python is a so-called multiparadigm language, programmers are not tied to a specific programming style. The optimal programming style can be selected for the various tasks. Python allows Python programs to be embedded in other languages as individual modules.
There are many scenarios when we especially the developers need to have an old python version to work with some particular application or on the project. In this tutorial, we learn how to get that…
1. Start with the system update
Execute the system update command to ensure our Ubuntu 22.04 has the latest security and package versions. Open your terminal and run:
sudo apt update && sudo apt upgrade
2. Add PPA for Python old versions
The old versions of Python such as 3.9, 3.8, 3.7, and older are not available to install using the default system repository of Ubuntu 22.04 LTS Jammy JellyFish or 20.04 Focal Fossa. Hence, we need to add a PPA offered by the “deadsnakes” team to get the old archived Python versions easily.
sudo apt install software-properties-common
sudo add-apt-repository ppa:deadsnakes/ppa
3. Check Python Versions you want
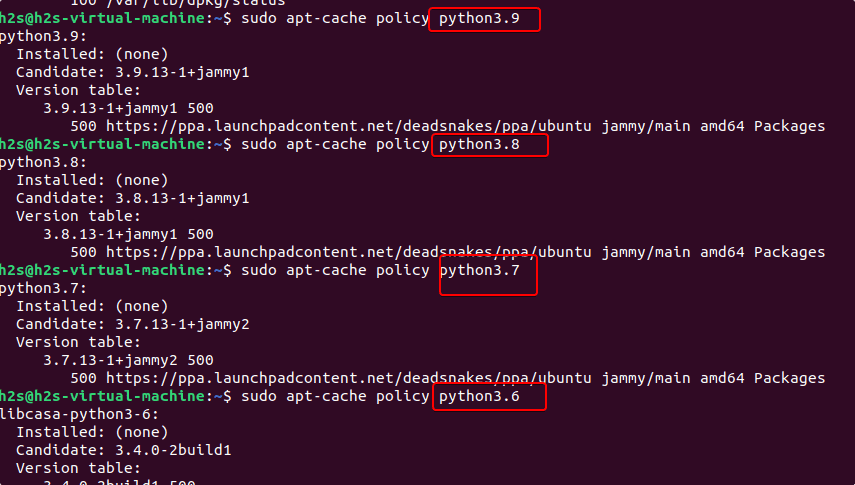
Once you have added the PPA repository, we can install most of the old python versions with just one command. To confirm the version you want is available to install or not, you can run:
sudo apt-cache policy python(version)
Example:
sudo apt-cache policy python3.9
4. Install Python 3.9 on Ubuntu 22.04
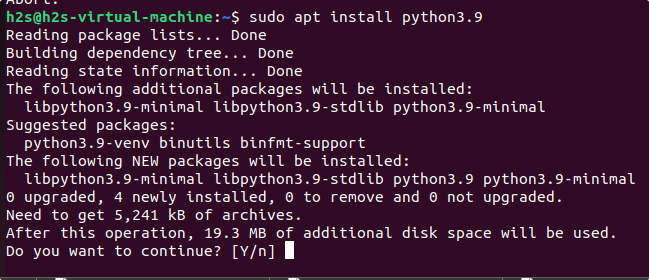
Well, once you have confirmed the version you want of Python is available to install using the added repository, next use the given command syntax to install it.
For example, you want to install version 3.9
sudo apt install python3.9
5. Install Python 3.8 on Ubuntu
The way we have installed version 3.9 using the PPA, we can go for the 3.8 as well.
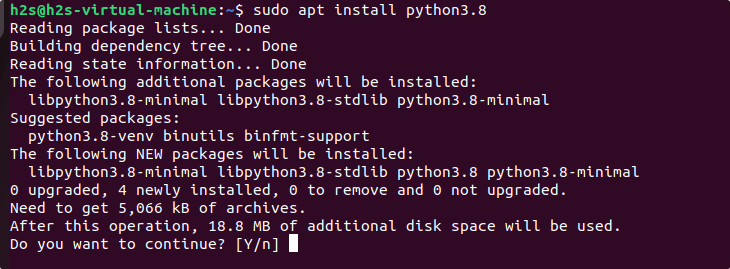
sudo apt install python3.8
In the same way, we can install Python other versions such as 3.7, 3.6, and more…
6. Set the default Python version
If you have installed multiple versions of Python and want to set any of them as the default version of the system then that can be possible as well. For example, you have the latest version of Python 3.10 (was while doing this article) and also have installed python 3.9 and 3.8; now to set any of them are system’s default use Update-alternatives command:
Check what python versions are available on your systems:
ls /usr/bin/python*
To know whether any version is configured as python alternatives or not. For that run:
sudo update-alternatives --list python
If the output is:
“update-alternatives: error: no alternatives for python”
Then it means there are no alternatives that have been configured, hence let’s do some.
Here we are setting up two versions as alternatives, later we will be able to choose between them to set one of them as the system default one.
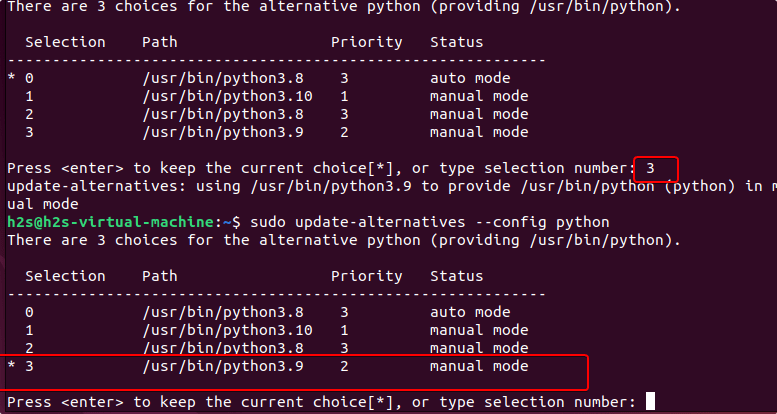
sudo update-alternatives --install /usr/bin/python python /usr/bin/python3.10 1
sudo update-alternatives --install /usr/bin/python python /usr/bin/python3.9 2
sudo update-alternatives --install /usr/bin/python python /usr/bin/python3.8 3
Switch the default Python version
sudo update-alternatives --config python
This time you will see several options including Python 3.9 and 3.8. Enter the Selection number of the Python you want to set as the system’s default one. For example, here Python3.9 is at number 3, hence we type that and Enter key.
When you check the version of Python this time, you will have 3.9. For that use:
python -V
7. Uninstall Python and PPA
Those who don’t want to the installed python version on the system and also want to remove the PPA if doesn’t require any more, use the given commands.
sudo apt remove --purge python3.9
In the same way for 3.8:
sudo apt remove --purge python3.8
To remove PPA:
sudo add-apt-repository --remove ppa:deadsnakes/ppa
Other Articles:
5 Redhat enterprise-based alternatives for CentOS 8
Install Python 3.x or 2.7 on Debian 11 Bullseye Linux
6 Best Ubuntu Linux Alternatives for Beginners to use in 2022
Ubuntu 22.10 Kinetic Kudu – Daily Build ISO Download
Set Default Version of Python : [SOLVED] update-alternatives: error: no alternatives for python3
Set Default Version of Python : [SOLVED] update-alternatives: error: no alternatives for python3
On our Kali Linux (or any other Linux distribution) we might have installed different versions of Python. For using Python version 2.x we generally use python2 command, same as for using Python 3.x versions we use python3 command.
Here assume that we have installed multiple versions of Python3 installed on our system, like we have installed Python3.7 and Python 3.9 both on our Linux system for any reason. So whenever we want to use Python 3.9 we need to type command python3.9 because python3 command using Python 3.7 version as default.
Our advanced Linux users may know this problem and the solution, but this is for beginners.
How to check installed Python versions on Linux?
This can be easily done with a simple command on our Terminal window. The command is following:
In the following screenshot we can see that we have Python2.7, Python3.7 and Python3.9 installed on our system.
Problem
But we can see that python3 command is choosing Python3.7 version as default. But some updated tools needs Python3.9 to run. We can run python3.9 command, but it is annoying we should run python3 to run Python3 latest version, we may modify our .bashrc/.zshrc file but that will not be the correct solution.
We need to set our update-alternatives for python3.
We can check for the alternatives of python3 by running following command:
Code:
sudo update-alternatives --config python3But here we might get an error «
update-alternatives: error: no alternatives for python3
«.
It means, first we need to set alternatives for python3.
Solved
To set the alternatives for python3 we need to run some commands on our terminal.
First of all we need to run the following command:
Code:
sudo update-alternatives --install /usr/bin/python3 python3 /usr/bin/python3.7 1This command will add Python 3.7 on option 1.
Then we need to run following command:
Code:
sudo update-alternatives --install /usr/bin/python3 python3 /usr/bin/python3.9 2This command will add Python 3.9 on option 2
We can see this on the following screenshot:
Now we can again run the configure command to check and set the alternatives:
Code:
sudo update-alternatives --config python3In the following screenshot we can see that now we can save the configurations now.
Here we can set the default version for the python3. Here automatically 0 is chosen for Python 3.9 version, we can go for it, otherwise instead of choosing by numbers we can run following command to choose the default python3 version:
Code:
sudo update-alternatives --set python3 /usr/bin/python3.9Now we can check python3 default version by using following command:
We can see that now our Python 3.9 version is set as default for python3 command:
«update-alternatives: error: no alternatives for python3» is a very common problem for beginners so we thought to write an entire article for it we got too much request to solve this on our Telegram DM. When Python 4 will release some versions of Python 4, we can use the same as we did for Python 3.
Love our articles? Make sure to follow us to get all our articles directly on inbox. We are also available on Twitter and GitHub, we post article updates there. To join our family, join our Telegram Group. We are trying to build a community for Linux and Cybersecurity. For anything we always happy to help everyone on the comment section. As we know our comment section is always open to everyone. We read each and every comment and we always reply.
In this article, we will upgrade to python 3.10 and configure it as the default version of python in Ubuntu 18.04 and 20.04 LTS.
The current stable version of python was released on 06 Dec. 2021. Many ubuntu users are facing problems during upgrading python to the latest version. Python 3.9 is available as default when we install Ubuntu 20.04 LTS and Python 3.8 is available in Ubuntu 18.04. Python 3.10.0 is not available in default Ubuntu 18.04 and 20.04 repositories.
- Also Read: How to upgrade to Python 3.9 on Ubuntu 18.10
So let’s start with checking the currently installed version of Python on your system.
python3 -VAs seen in the image above, my currently installed Python version is 3.8.10 but yours may differ.
Install Python 3.10
Follow the simple steps to install and configure Python 3.10
Step 1: Add the repository and update
Latest Python 3.10 is not available in Ubuntu’s default repositories. So, we have to add an additional repository. On launchpad repository named deadsnakes is available for Python Packages.
Add the deadsnakes repository using the below commands.
sudo add-apt-repository ppa:deadsnakes/ppa
sudo apt-get update
Update the package list using the below command.
apt-get updateVerify the updated Python packages list using this command.
apt list | grep python3.10As seen in the image above, Now we have Python 3.10 available for installation.
Step 2: Install the Python 3.10 package using apt-get
install Python 3.10 by using the below command :
sudo apt-get install python3.10Step 3: Add Python 3.8 & Python 3.10 to update-alternatives
Add both old and new versions of Python to Update Alternatives.
sudo update-alternatives --install /usr/bin/python3 python3 /usr/bin/python3.8 1
sudo update-alternatives --install /usr/bin/python3 python3 /usr/bin/python3.10 2
Step 4: Update Python 3 for point to Python 3.10
By default, Python 3 is pointed to Python 3.8. That means when we run python3 it will execute as python3.8 but we want to execute this as python3.10.
Type this command to configure python3:
sudo update-alternatives --config python3You should get the above output. Now type 2 and hit enter for Python 3.10. Remember the selected number may differ so choose the selection number which is for Python 3.10.
Step 5: Test the version of python
Finally, test the current version of python by typing this :
python3 -VYou should get Python 3.10 as output.
In this article, we learn how to upgrade python to the latest version that is 3.10 in Ubuntu 20.04 and 18.10.
Share your thoughts in the comment section. Happy Learning …!!
- Also Read: How to Install Asterisk 16 on Ubuntu 18.04 LTS
how to install python in ubuntu, how to install python in ubuntu 20.04, how to upgrade python in ubuntu, install latest python in ubuntu, install python 3.10, install python 3.10 ubuntu, install python in ubuntu, python 3.10, python in ubuntu 18, python in ubutnu, ubuntu 18.04 lts bionic beaver, Ubuntu 20.04 LTS, upgrade python in ubuntu, upgrade to python 3.10 ubuntu 18.04, upgrade to python 3.10 ubuntu 20.04
This div height required for enabling the sticky sidebar

