Установление подлинности пользователей
Информационная безопасность
Разграничение доступа
Авторизация и аутентификация
Трансляция сетевых адресов
Проверка содержания потоков данных
Безопасность операционной системы
Управление списками доступа маршрутизаторов
Обнаружение попыток неавторизованного доступа
Check Point FireWall-1 обеспечивает пользователям, в том числе и удаленным и dial-up клиентам, защищенный доступ к сетевым ресурсам организации с установлением подлинности пользователя при помощи различных схем ее проверки.
Прежде чем соединение пользователя будет разрешено, механизм установления подлинности FireWall-1 безопасно установит, что это за пользователь пытается установить соединение и как он себя авторизует. Заметим, что для этого не потребуется каких-либо изменений на серверах и в клиентских приложениях.
Средства установления подлинности пользователей полностью интегрированы в средства работы с политикой безопасности масштаба предприятия и, соответственно, могут централизованно управляться посредством графического интерфейса администратора безопасности. Используя программу просмотра статистики, можно отслеживать любые сессии установления подлинности клиента.
FireWall-1 предоставляет три метода установления подлинности пользователя:
- User Authentication
- Client Authentication
- Transparent Session Authentication
User Authentication
Прозрачный метод установления подлинности пользователя системы FireWall-1 предоставляет возможность определять привилегии доступа для каждого пользователя в отдельности (даже если это многопользовательская ЭВМ) для протоколов FTP, TELNET, HTTP и RLOGIN, независимо от IP-адреса клиентского компьютера. Например, если пользователь вынужден работать с серверами организации удаленно, то администратор безопасности может разрешить ему доступ во внутреннюю сеть без того, чтобы его привилегии распространялись на всех других пользователей его рабочего компьютера.
FireWall-1 выполняет проверку подлинности пользователя при помощи специального Сервера Безопасности, функционирующего на шлюзовом компьютере. FireWall-1 перехватывает все попытки авторизации пользователя на сервере и перенаправляет их соответствующему Серверу Безопасности. После того, как подлинность пользователя установлена, Сервер Безопасности FireWall-1 открывает второе соединение на необходимый сервер приложения. Все последующие пакеты сессии также перехватываются и инспектируются FireWall-1 на шлюзе.
Client Authentication
Client Authentication позволяет администратору предоставлять привилегии доступа определенным IP адресам, пользователи, которых, прошли соответствующие процедуры установления подлинности. В противовес User Authentication, Client Authentication не ограничена только определенными службами, и может обеспечить аутентификацию любого приложения, как стандартного, так и специфичного.
Client Authentication системы FireWall-1 не является прозрачным для пользователя, но, в тоже время, не требуется какого-либо дополнительного программного обеспечения или модификации существующего. Для такого вида установления подлинности администратор может указать, как каждый из пользователей должен будет авторизоваться, какой сервер и какие службы будут доступны, сколько времени, в какие часы и дни и сколько сессий может быть открыто.
Transparent Session Authentication
Механизм Transparent Session Authentication можно использовать для любых служб. При этом установление подлинности будет происходить для каждой сессии.
После того, как пользователь инициировал соединение непосредственно с сервером, шлюз с установленным FireWall-1 распознает, что требуется установление подлинности клиента, и инициирует соединение с Агентом Авторизации Сессий.
Агент производит необходимую авторизацию, после чего FireWall-1 разрешает данное соединение, если подлинность клиента установлена.
Поддерживаемые схемы авторизации пользователя
FireWall-1 поддерживает разнообразные варианты авторизации пользователей:
- SecurID — пользователь набирает номер, высвечивающийся на электронной карточке Security Dynamics SecurID.
- S/Key — от пользователя требуется набрать соответствующую запрашиваемому номеру комбинацию S/Key ключа.
- OS Password — пользователь должен набрать пароль операционной системы.
- Internal — пользователь набирает специальный пароль, хранимый в FireWall-1 шлюза.
- Axent — требуется ввод в соответствии с инструкциями сервера Axent.
- RADIUS — требуется ввод в соответствии с инструкциями сервера RADIUS.
Для систем на базе RADIUS-серверов существует несколько реализаций, сертифицированных в рамках OPSEC и предлагаемых для использования официальными партнерами.
© ООО «Корпорация «ЮНИ», 1998
Now that I have discussed passwords, I can talk about the various ways FireWall-1 asks users for passwords. Demonstrations of each method are provided in the following subsections.
Explaining User Authentication
User Authentication allows you to provide authentication for five different services: Telnet, rlogin, HTTP, HTTPS, and FTP. FireWall-1 provides user-level authentication via the appropriate Security Server processes. These processes are invoked when FireWall-1 needs to authenticate a connection. The Security Server authenticates the session, then passes it on to the remote server.
For example, if you wanted to Telnet to 172.29.0.44 and you want FireWall-1 to require authentication, the following exchange would occur:
$ telnet 172.29.0.44 Trying 172.29.0.44... Connected to 172.29.0.44. Escape character is '^]'. Check Point FireWall-1 authenticated Telnet server running on mrhat User: dwelch FireWall-1 password: abc123 User dwelch authenticated by FireWall-1 authentication Connected to 172.29.0.44 Red Hat Linux release 6.0 (Hedwig) Kernel 2.2.12-20 on an i486 login:
The following list explains the steps taken in the previous code.
-
FireWall-1 intercepts the communication between the client and the server.
-
FireWall-1 prompts for a username and password.
-
If the user successfully authenticates with FireWall-1, the connection is then passed on to the destination host. The remote host then prompts for a username and password, which will likely be different from the one given to the firewall.
Because rlogin works in almost exactly the same way, a specific rlogin example is not needed. HTTP and HTTPS use the standard authentication screen you would see in your Web browser when accessing a password-protected Web site (see Figure 8.3).
Figure 8.3. Sample HTTP authentication
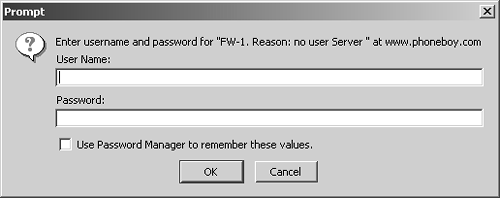
You must enter your username and password. If a specific challenge is needed before you can enter your password (e.g., for S/Key), just enter your username and click OK. You are then presented with the challenge as the «reason» shown in the dialog box.
FTP is a bit more complicated. Even though you can FTP directly to a specific host and FireWall-1 will intercept it, you must still tell the FTP Security Server where to go:
$ ftp 172.29.0.44 Connected to 172.29.0.44. 220 aftpd: Check Point FireWall-1 Secure FTP server running on mrhat Name (172.29.0.44:dwelch):
At this point, you must enter a username in the following format: Site User@FireWall-1 User@Remote Host . If the FireWall-1 user and the FTP site user are the same, you can enter the username in this format: User@Remote Host .
Here is an example of an FTP authentication:
Name (172.29.0.44:dwelch): anonymous@dwelch@172.29.0.44 331 aftpd: FireWall-1 password: you can use password@FW-1-password Password:
The password is in the following format: FTP Site Password@FireWall-1 Password .
Anonymous login to an e-mail server usually asks for an e-mail address; dwelch@phoneboy.com is the e-mail address used in the following example. Note that if either the username or password contains an @ symbol, you need to enter the @ twice.
Password: dwelch@@phoneboy.com@abc123 230-aftpd: User dwelch authenticated by FireWall-1 authentication 230-aftpd: Connected to 172.29.0.44. Logging in... 230-aftpd: 220 stinkpot Microsoft FTP Service (Version 3.0). 230-aftpd: 331 Anonymous access allowed, send identity (e-mail name) as password. 230 aftpd: 230 Anonymous user logged in. Remote system type is Windows_NT. ftp>
A different interface is available by making a change via dbedit or the GUIdbedit tool. See FAQ 4.2 in Chapter 4 for instructions on how to do this. In dbedit , you would enter the following commands:
dbedit> modify properties firewall_properties new_ftp_interface true dbedit> update properties firewall_properties
In this case, the FTP to 172.29.0.44 is a bit easier to access via the command line:
$ ftp 172.29.0.44 Connected to 172.29.0.44. 220 aftpd: Check Point FireWall-1 Secure FTP server running on mrhat Name (172.29.0.44:dwelch):
At this point, you must enter a username in the following format: FireWall-1 User@Remote Host , which is used in the example below:
Name (172.29.0.44:dwelch): dwelch@172.29.0.44 331 aftpd: FireWall-1 password: you can use FW-1-password
Next, simply enter the FireWall-1 Password:
Password: abc123 230-aftpd: User dwelch authenticated by FireWall-1 authentication 230-aftpd: Connected to 172.29.0.44. Logging in... 230-aftpd: 220 stinkpot Microsoft FTP Service (Version 3.0). ftp>
You should then be connected to the remote FTP server. You must log in by using the user command as follows :
ftp> user anonymous 331 Anonymous access allowed, send identity (e-mail name) as password. Password: dwelch@phoneboy.com 230 Anonymous user logged in. ftp>
Explaining Session Authentication
Session Authentication can be used for any service. Authentication relies on the presence of an agent on the client, which prompts users for authentication as they make the connection request. When necessary, the firewall contacts the agent, which either transparently provides authentication to the firewall or prompts the user for authentication if it cannot provide authentication. Check Point includes agents for all supported platforms (Windows, Solaris, AIX, and HP).
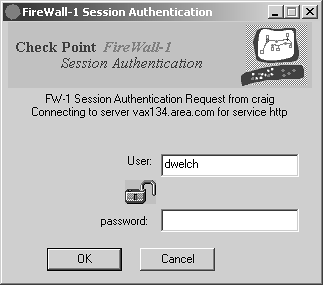
Figure 8.4 illustrates an example of what happens when a user tries to use Session Authentication on a Windows platform. In Figure 8.4, the user tries to access vax134.area.com via HTTP. Once the username is entered, FireWall-1 prompts the user for a password, as shown in Figure 8.5.
Figure 8.4. Session Authentication user prompt
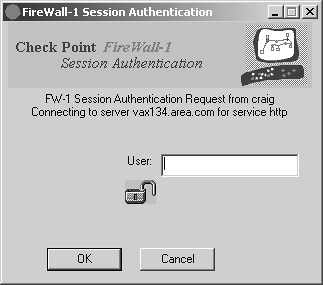
Figure 8.5. Session Authentication password prompt
Explaining Client Authentication
Client Authentication can be used to authenticate any service. The user must authenticate with the firewall before using the service. The service is then provided to the user a specific number of times and/or for a specific period of time. A user can authenticate in four ways, depending on how Client Authentication is configured:
-
A Telnet connection to the firewall on port 259
-
An HTTP connection to the firewall on port 900
-
An HTTPS connection to the firewall on port 950
-
User or Session Authentication
For the latter case, the authentication looks no different from the example shown earlier in the Explaining User Authentication subsection. However, you have two other choices to make with respect to Client Authentication:
-
Standard Sign-On
-
Specific Sign-On
Standard Sign-On lets users simply authenticate once and do whatever the authentication allows. Specific Sign-On requires users to specify each destination and service they want to use when they authenticate. Users are allowed to access only those services and destinations they specify, even if the rule allows for more. For simplicity’s sake, most administrators are satisfied with simply allowing users to use Standard Sign-On because it requires less end-user training.
Manual authentication via Telnet using Standard Sign-On looks like this:
$ telnet 10.0.0.1 259 Trying 10.0.0.1... Connected to 10.0.0.1 Escape character is '^]'. Check Point FireWall-1 Client Authentication Server running on craig User: dwelch password: abc123 User dwelch authenticated by FireWall-1 authentication Choose: (1) Standard Sign-on (2) Sign-off (3) Specific Sign-on Enter your choice: 1 User authorized for standard services (1 rules) Connection to host lost. $
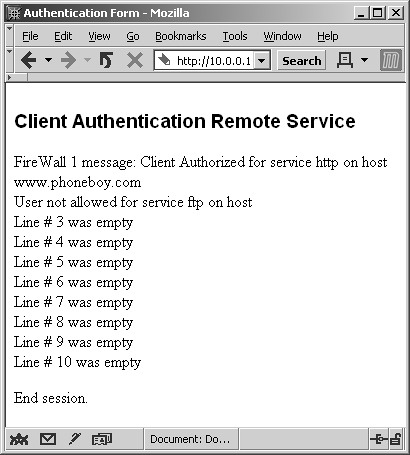
As mentioned, with Specific Sign-On, users must specify each service and destination they want to access. The following example attempts to set up HTTP and FTP access to www.phoneboy.com. Only HTTP will be permitted; FTP will not.
$ telnet 10.0.0.1 259 Trying 10.0.0.1... Connected to 10.0.0.1 Escape character is '^]'. Check Point FireWall-1 Client Authentication Server running on craig User: dwelch password: abc123 User dwelch authenticated by FireWall-1 authentication Choose: (1) Standard Sign-on (2) Sign-off (3) Specific Sign-on Enter your choice: 3 Service (^D to Quit): http Host: www.phoneboy.com Client Authorized for service Service (^D to Quit): ftp Host: www.phoneboy.com User not allowed for service ftp on host Service (^D to Quit): Connection to host lost. $
HTTP authentication to port 900 on the firewall is shown in Figure 8.6. Note that a username has already been entered into the form. When you click Submit, the screen shown in Figure 8.7 appears.
Figure 8.6. Manual Client Authentication over HTTP, username entry
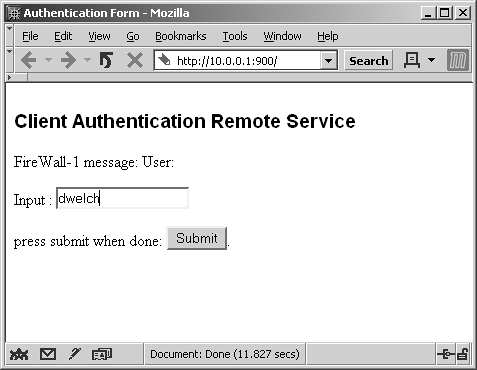
Figure 8.7. Manual Client Authentication over HTTP, password entry
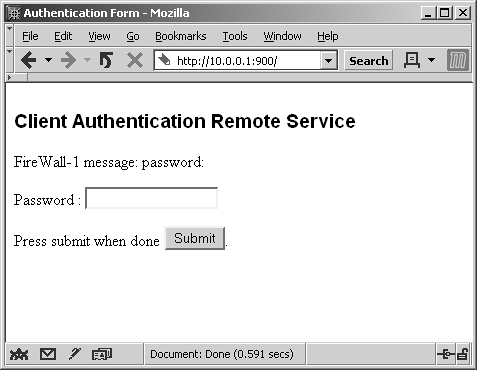
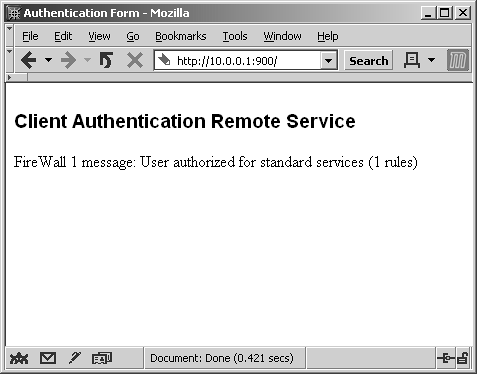
Type in your password, and click the Submit button. You are then presented with the screen shown in Figure 8.8. Select Standard Sign-On and click Submit to complete the authentication, as shown in Figure 8.9.
Figure 8.8. Manual Client Authentication over HTTP, method selection
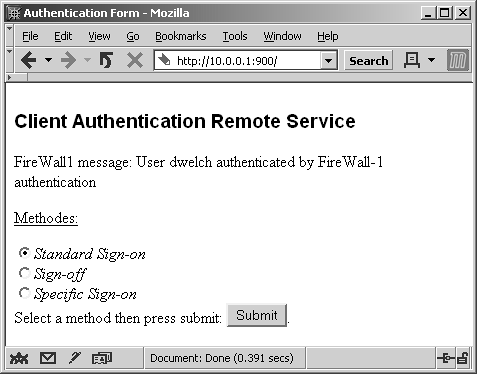
Figure 8.9. Manual Client Authentication over HTTP, Standard Sign-On authorization
When you select Specific Sign-On, a screen appears allowing you to enter the services and hosts you want to access. Figure 8.10 shows entries for using both FTP and HTTP to www.phoneboy.com. The response to this authentication request is shown in Figure 8.11.
Figure 8.10. Manual Client Authentication over HTTP, Specific Sign-On details
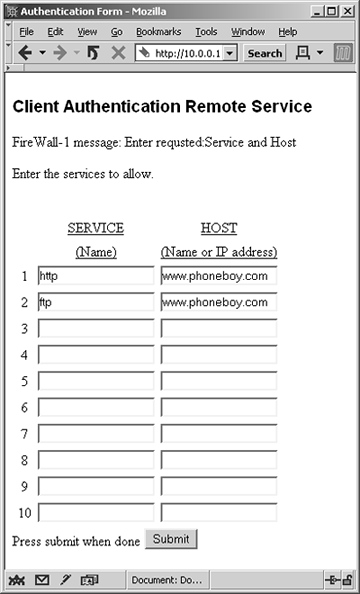
Figure 8.11. Manual Client Authentication over HTTP, Specific Sign-On completed
Which Authentication Type Should You Use?
Usually, the application you need to authenticate and the operating system of the client in question dictate the type of authentication you need to perform. Table 8.1 provides you with a guide to the various authentication schemes.
Client and Session Authentication have a limitation: Only a single user can come from an IP address you want to authenticate from. Typical UNIX systems and NAT gateways present situations where more than one person can potentially come from a single IP address. In the case of Client Authentication, a user who authenticates from such an IP address could potentially be letting in more users than just him- or herself. Client Authentication can be dangerous in this situation. With Session Authentication, the problem is that it is not clear whom to prompt for Session Authentication on a multiuser system. Because the Session Authentication agent typically caches the login and password information, you have a situation where either the user is constantly entering in (or having to cancel) authentication requests for connections he is not making or more than just the authorized user is allowed to perform a service. In these cases, the only appropriate authentication mechanism is User Authentication because each individual session is authenticated in- band , which means you are limited to what you can reasonably authenticate.
Table 8.1. Authentication schemes
|
Use This Method |
Under These Circumstances |
|---|---|
|
User Authentication |
|
|
Client Authentication |
|
|
Session Authentication |
|
IPSO does not support Axent Pathways Defender authentication except via RADIUS authentication. All other authentication mechanisms are explained below. To use either RADIUS, SecurID, ActiveCard or AssureNet authentication, the configuration steps (covered in the Check Point documentation) are:
- The FireWall-1 User Database would use the generic* user definition to represent all authentication attempts. This user definition would use either the RADIUS or SecurID method of authentication.
- If the generic* user’s Authentication Method is RADIUS:
- The Radius server is defined under the Manage->Servers and OPSEC Applications pull down menu in the FireWall-1 Security Policy Editor.
- A user defined in the RADIUS database would have to be configured to use an Auth-Type of SecurID or AssureNet. Good information about Radius is available from Livingston Enterprises.
If the generic* user’s Authentication Method is SecurID:
- WARNING: If you are planning to use SecurID with the NG Feature Pack 1 or 2 release on IPSO, you cannot use native SecurID mode to communicate with the SecurID server. The ACE server also provides a RADIUS front-end, which must be enabled. You then configure FireWall-1 as if it were talking to a RADIUS server instead of a SecurID server. Native SecurID support is available in NG FP3 and later.
- The sdconf.rec file from the SecurID’s ACE server must be copied into /var/ace (which must be created) on VPN-1/FW-1 Gateway. FireWall-1 must be restarted (fwstop;fwstart). Follow the instructions that come with the ACE server.
An ACE server may be configured to interact with both DES and SDI ACE Clients.
The default encryption for the ACE Server is DES, which they are able to export outside of the US and Canada. In order to support clients using SDI encryption, such as FireWall-1 (FWZ), the ACE server must be configured to use SDI for sole purpose of creating a sdconf.rec file for the FireWall-1 (FWZ) system.
You should rename the sdconf.rec created in the %ACE_ROOT%data directory to sdconf.sdi.rec. You then must set the ACE server back to DES, which will create a new sdconf.rec file. You now have two sdconf.rec files and then may interact with DES and SDI clients.
- It is important that the ACE server itself can resolve proper hostnames to all the IP addresses of the firewall. Authentication has been known to fail because of this.
- There is only ONE way to properly define an ACE client in the ACE Server database relative to the IP address and the Secondary Nodes descriptions.The IP address in the ACE client definition must be the primary IP address of the firewall. (The primary IP address is that which the system name resolves to. This is set in the Host Address Assignment page in Voyager.)The Secondary Nodes are the other IP addresses assigned to the firewall’s network interfaces. If you set this up any other way, the ACE server will log that the password is incorrect. Do not define any VRRP v2 or Monitored Circuit IP addresses as Secondary Nodes.
- In a case where a Lucent Technologies product was used as a SecurID server, there is no concept of secondary nodes.It was necessary, then, to go back to Host Address Assignment in Voyager and associate the system name of the firewall with the IP address that the SecurID server sees in the source field of the packet header in packets coming from the firewall.
- FireWall-1 works with an ACE server in Native Mode. However, in ACE Server 5.0 or later, you must configure FireWall-1 nodes as «legacy mode» clients, i.e. a primary and secondaryACE server must be explicitly defined for these clients. If you fail to do this, SecurID authentication will fail. (See below under Known Problems)
- Make sure that you do not apply Network Address Translation rules to the IP addresses of the firewall or the internal ACE server may see a request coming from an IP address that is not defined as a client.
A user defined in the ACE server database who is in New PIN mode will likely require three authentication attempts to change the current PIN to a new user-defined PIN. Look at the Authentication window carefully.
Be careful with the rules in your security policy. If the network connection you are authenticating is HTTP, make sure you look at the Action field Properties. Use your right mouse button to display the menu for this field. Select Properties at the top of the menu. You have a choice between Predefined HTTP Servers and All HTTP Servers:
- Predefined Servers — Use this if you are authenticating external HTTP access to your own internal WWW servers. You must explicitly define these servers in the Properties -> Servers window.
- AllServers — Use this if you are authenticating internal HTTP access to the Internet.
You may find that you have to explicitly allow services of type SecurID to pass between the firewall and the ACE server.
For VRRP or IP Cluster, avoid using the cluster IP address by adding the following entry to $FWDIR/lib/table.def file on the SmartCenter Server:
no_hide_services_ports = {.., <service_port, IP_protocol> };
For example for RSA traffic this entry should look like
no_hide_services_ports = {.., <5500, 17> };
where 5500 is a service port number and 17 means UDP
WARNING: When Security Management Server is upgraded, the changes made to the table.def file will be lost.
Note: A FireWall-1 log entry with an Info field that includes «Not allowed by Rule Base» is an indication that the HTTP connection is not going to an allowed destination. Either you have not correctly selected All Servers, or you have correctly select Predefined Servers, but the server is not yet defined.
A FireWall-1 log entry with an Info field that includes «Access Denied by SecurID» is an indication that authentication has failed, but it will also be displayed following the «Not allowed by Rule Base» message, so it is not used consistently.
Known Problems
Config steps for RSA Ace Server version 5.0.1
When running into problems configuring SecureID authentication, always test with RADIUS authentication to confirm the firewall can talk to the ACE server.
- The ‘Agent host’ name should be DNS resolvable.
- The sdconf.rec is usually generated following these steps: Agent host -> Generate Configuration File
- In order for FireWall-1 to work with RSA Ace Server version 5.0.1, follow these additional steps:
- In «RSA Database Administrator» application menu, select «Agent Host->Edit Agent Host»
- Once on that menu:
- Select «Double click on the FireWall-1 host name and click on the «Assign Acting Servers».
- In the «Master:» selection list, choose the ACE/Server hostname.
- Click on «Generate Config File ..» button and save the «sdconf.rec» to a file.
Make sure the sdconf.rec file that is generated is an older build and not 5.0. - Place the «sdconf.rec» file on the FireWall-1 machine in /var/ace.
|
Imported from Nokia support database |
«Ошибка: аутентификация не удалась» – ExpressVPN
«VPN-соединение: аутентификация пользователя не удалась» – NordVPN
Вы не одиноки, когда сталкиваетесь с ошибкой «VPN Authentication Failed» – это одна из наиболее часто сообщаемых проблем VPN. Как пользователь VPN, я знаю, как важно оставаться защищенным в сети, а не идти на компромисс в отношении безопасности. Так что не волнуйтесь – я придумала 11 методов, которые вы можете использовать, чтобы исправить эту ошибку и быстро восстановить и запустить VPN .
Сообщения об ошибках проверки подлинности на NordVPN и ExpressVPN
1. Перезагрузите компьютер
Иногда самые простые решения являются лучшими. Как и многие технические проблемы, ошибку «VPN Authentication Failed» иногда можно решить, перезагрузив устройство . Это очищает кэш памяти и останавливает любой код, который не работает должным образом, чтобы VPN мог начать заново.
2. Отключите ваш брандмауэр
Если вы используете брандмауэр, он может блокировать ваш VPN-клиент. Чтобы выяснить, является ли это проблемой, вам нужно временно отключить брандмауэр, чтобы убедиться, что он что-то исправляет . Убедитесь, что вы отключили как сторонние, так и встроенные брандмауэры (например, брандмауэр Защитника Windows). Это необходимо сделать для публичных и частных сетей – эта опция должна быть в настройках вашего брандмауэра.
Это не постоянное решение, и отключение брандмауэра может сделать ваш компьютер уязвимым для угроз безопасности. Если проблема связана с вашим брандмауэром, вам нужно изменить настройки или переключиться на другой брандмауэр .
3. Попробуйте проводное соединение
Иногда проблемы с вашим маршрутизатором могут помешать правильному подключению VPN . Это не часто, но это случается, особенно если вы используете два связанных маршрутизатора. Попробуйте подключиться к маршрутизатору с помощью кабеля Ethernet вместо беспроводного подключения и посмотрите, решит ли это проблему.
Если использование двух маршрутизаторов вызывает проблемы, вы можете исправить это, включив режим моста . Метод для этого варьируется в зависимости от модели, поэтому проверьте руководство вашего маршрутизатора.
4. Используйте другой протокол VPN
В большинстве VPN вы можете выбрать, какой протокол IP использовать . Наиболее распространенными являются TCP (протокол управления передачей) и UDP (протокол пользовательских дейтаграмм). Основное отличие состоит в том, что TCP включает исправление ошибок , то есть он отправляет все, что повреждено или не получено из-за проблем с соединением. Поскольку UDP этого не делает, он быстрее, но может быть менее надежным.
Переключение между протоколами может устранить ошибку «VPN Authentication Failed» , ускоряя ваше соединение, особенно если вы переходите с TCP на UDP . Вы найдете эту опцию в настройках вашего VPN-приложения. Обратите внимание, что качество вашего соединения может ухудшиться, если вы переключите протоколы.
5. Попробуйте альтернативный DNS-сервер
По умолчанию ваш VPN-клиент, вероятно, будет использовать DNS-серверы вашего VPN-провайдера. Это снижает риск утечек DNS, но иногда вызывает проблемы с подключением . Чтобы проверить, является ли это проблемой, попробуйте использовать другие DNS-серверы . В настройках вашего VPN-приложения вам нужно отключить опцию «Использовать только DNS-серверы VPN». Имейте в виду, что это может немного увеличить риск утечки DNS.
6. Попробуйте другую сеть WiFi
Если ни одно из предыдущих решений не помогло вам, возможно, проблема в вашей сети Wi-Fi. Чтобы узнать, так ли это, попробуйте использовать VPN в общедоступной точке доступа WiFi или в доме друга . Если VPN работает в этих других сетях, ваша проблема может быть в этом. Взгляните на настройки Интернета и WiFi и попытайтесь определить причины проблем с VPN.
7. Подключитесь к другому серверу VPN
Если вы пытаетесь подключиться, возможно, сервер VPN, который вы используете, слишком медленный или имеет слишком много пользователей . Большинство приложений VPN позволяют выбирать между несколькими серверами в каждом доступном месте. Попробуйте перейти на другой и посмотреть, поможет ли это.
Помните, что чем ближе вы находитесь к серверу, тем быстрее он будет . Например, если вы находитесь в Европе и вам необходимо подключиться к американскому серверу, серверы на восточном побережье должны быть быстрее, чем на западе.
Если вы используете VPN на своем маршрутизаторе, а не через клиент на вашем устройстве, переключение между серверами более сложное . Способ зависит от вашего роутера и провайдера VPN. Если вы не уверены, как это сделать, проверьте документацию для вашего маршрутизатора и VPN .
8. Переустановите свой VPN
Поврежденная установка вашей VPN может привести к ошибке «VPN Authentication Failed» . Если вы подозреваете, что это может быть проблемой, попробуйте удалить и переустановить VPN-клиент . Избегайте других ошибок, используя программное обеспечение для удаления, чтобы удалить все записи реестра и файлы из первой установки.
9. Убедитесь, что ваша VPN-подписка активна
Если вы используете платный VPN-сервис, срок действия вашей подписки истек . Кроме того, вы, возможно, создали учетную запись, но еще не купили подписку.
Чтобы решить эту проблему, войдите в свою учетную запись на веб-сайте вашего провайдера VPN и убедитесь, что ваша подписка была оплачена .
10. Убедитесь, что не слишком много одновременных подключений
Большинство VPN-сервисов ограничивают количество устройств, которые могут быть подключены к VPN одновременно . Если вы подключили несколько устройств, возможно, вы превысили лимит. Посетите веб-сайт вашего поставщика услуг VPN, чтобы подтвердить количество одновременных подключений. Если вы превысили лимит, отключите все устройства, которые вы не используете .
11. Попробуйте лучше VPN
Если вы перепробовали все вышеперечисленные решения и у вас все еще есть проблемы, вы можете подумать о более качественном VPN-сервисе . Бесплатные VPN более низкого уровня могут быть медленными и подвержены другим проблемам с подключением. Напротив, услуги премиум-класса очень быстрые и гораздо реже вызывают проблемы . Например, ExpressVPN предлагает неограниченную пропускную способность и имеет встроенную функцию проверки скорости, которая поможет вам выбрать самый быстрый сервер.
Для тех, кто ограничен в бюджете, NordVPN имеет много тех же функций, что и ExpressVPN, по более доступной цене . Сервис не такой быстрый, но он известен своей надежностью. Или, если вы смотрите много онлайн-контента, вы можете попробовать CyberGhost . Компания гарантирует, что вы всегда будете подключены к самому быстрому доступному серверу, а также имеет серверы, оптимизированные для различных потоковых сервисов .
Все эти VPN предоставляют гарантии возврата денег, так что вы можете попробовать их некоторое время и получить полный возврат средств, если вы не удовлетворены .
Получите лучший VPN сейчас!
Вывод
Ошибка «VPN Authentication Failed» может быть распространена, но исправить ее просто. С этими решениями вы скоро снова будете в безопасности.
Испытываете другие проблемы с подключением? Ознакомьтесь с этим руководством по исправлению наиболее распространенных кодов ошибок VPN .
Статья была переведена для сайта https://vpn.inform.click
Источник: www.wizcase.com
Unfortunately this blog has passed away (don’t worry it was peaceful), but just like Jesus we have a resurrection, go take a peak at the future https://theworldsgonemad.net/2018/checkpoint-identity-awareness/
The 3 main elements that run identity awareness under the hub are Active Directory Query (ADQ), PDP and PEP. The all intertwine to allow the different blades of the checkpoint to track and restrict access based on AD user and machine name.
PDP – The process on the Security Gateway responsible for collecting and sharing identities.
PEP – The process on the Security Gateway responsible for enforcing network access restrictions. Decisions are made according to identity data collected from the PDP.
AD Query – Is the module responsible for acquiring identities of entities (users or computers) from the Active Directory (AD).
PDP and PEP
PDP uses PEP and ADLOG to gather security information about a person/system and stores it in the PDP database.
- PEP inspects packets looking at the IP address and checks in its own internal table to see if there was an existing association.
- If not it asks PDP if it knows about the packet.
- If not, then PDP asks ADLOG if there were any WMI events with this IP.
- If ADLOG has WMI events, the PDP asks the LDAP server if it has any more information about the user.
- If the user exists in AD, then this USER/IP/MACHINE are somewhat trusted under your AD environment.
If based on the source IP address the firewall is able to identity (not necessarily authenticate) a user associated with this address, the firewall will put the user into the PDP user table. At a minimum this association will be used to tag each log entry with the username.
Before a user is allowed to pass through firewall must:
1. Identity
2. Verify identity (authentication)
3. Groups belong to (authorization)
4. System user is currently using (IP address)
5. Permitted time period
4. Application
netstat -nop | fgrep pdp   See if pdp is communicating with ldap
pdp monitor all      Lists pkts the fw has attempted to identify
pdp monitor ip [ip]
pdp monitor user [name]
pdp monitor groups [name]
pdp connections pep      Conn status of all PEPs that should be updated by PDP
pdp control sync         Force an initiated synchronization operation between the PDPs and the PEPs. At the end the PDP and the PEPs will contain the same info
pdp control revoke_ip [ip]     Remove a single IP mapping
There is no easy way to remove ALL user to IP address mappings. Need to use bash one-liner!
pep show user all | egrep -o ‘[0-9]{1,3}.[0-9]{1,3}.[0-9]{1,3}.[0-9]{1,3}’ | grep -v ‘127.0.0.1’ | xargs -i -p pdp revoke_ip {}
The outputs from the above cmds show a list of user-to-ip mappings of both firewall AUTHENICATED users and users just passing through minding their own business.
PDP will show all the users associated, be it Kerberos or ADquery.
When the reauth time times out it will be removed from PDP table.
>[Expert@ckp-gw1:0]# pdp monitor all
 Session:  83531e33
 Session UUID:  {3B8C8AA4-1FE2-1BD3-A65F-0A831E183F23}
 Ip:  10.10.10.195
 Users:
 bob@STESWORLD.COM {dee7a1c9}
  Groups: ad_user_bob;All Users;ad_group_InternalUsers
 Roles: Bob;Vcef3d17b-8fd8-4bab-bfc1-41084f244002
 Client Type: portal
 Authentication Method: Kerberos
 Connect Time: Wed May 10 21:16:28 2017
 Next Reauthentication: Wed May 10 21:21:28 2017
 Next Connectivity Check: Wed May 10 21:21:28 2017
–IP: The computer the user is connected to
-Groups: AD groups relevant to fw access (not all groups)
-Roles: The smartdashboard access role
-Auth method: Type can be Kerberos, AD query, username password (portal)
-Next Reauthentication: When user will next need to reauth.
PEP is responsible for enforcement of the rulebase which allows/ permits AD users and AD machines (not IP addresses) through a firewall. So just like PDP, PEP keeps a table/ cache of IP/ Users that it has seen pass through the firewall.
pep show pdp all               Number of users
pep show user all              Names of users & IP
Active Directory Query (ADQ) and SSO (Kerberos)
Keeps track of users by reading the Active Directory Event logs. Therefore it will see if a user logins into a laptop, uses MS services like mounting a file share, RDPs to a server or uses an Internet browser.
It does not see log out events, to track this it relies on:
-The user / IP association (default 720mins)
-Assume that only 1 user is connected per comp (disabled by default)
The 4 AD events tracked by ADQ are:
4624: Local login
4768: Kerberos ticket was requested from DC. This identifies the user/machine in Kerberos
4769: Kerberos Service Ticket was requested: User/machine requires access to resource like file system mapping or web server
4770: Kerberos Service was renewed: Kerberos will auto renew service ticket if user still logged in
ADLOG is like an external cache of WMI events for AD. Because an IP is in this cache doesn’t mean the firewall cares or uses the IP addresses. With no Access roles configured within checkpoint this will be just a list of users, machines and the associations.
The cache is there so that PDP and PEP can refer to the IP list in the future when needed.
In a HA gateway setup the ADLOG tables are not replicated to the standby member, however the PDP/PEP tables are.
“Identity Source: AD Query” in checkpoint logs is the ADQ (WMI events)
adlog a dc
adlog a query all | more
adlog a service_accounts      Suspected to be "service accounts" based on number of logins
adlogconfig
You don’t NEED ADQ enabled if you plan on using Captive Portal or SSO to authenticate users. However, the logs might be somewhat barren of user-to-IP address mappings without it.
If ADQ and SSO are both enabled, ADQ is only one that is updated in PDP table and used by Identity awareness. Therefore if using them both, SSO Identity awareness will only used (added to pdp database) when it is a non-corporate machine (not in AD).
With SSO when a user logs out and a different user logs in on the same computer (IP) the PEP or PDP table are not updated until the old users PDP entry times out. The default for this timer is 720 minutes but can be reduced to 5 minutes. As soon as this expires the new user is added to the PDP database.
“Identity Source: Captive Portal” in logs are captive portal or SSO (not WMI)
Caveats
“Run as” will generate a new log so update the ADLOG, however when original user attempts another action it will still be seen as the “run as” user until an action is done to generate a new AD event (for example lock screen). With SSO it doesn’t even register the “run as” as a new user.
If you need to use a proxy or load balancer that hides the true source IP you can add the XFF header and Identity Awareness will recognise this. However the checkpoint can only identify IPs from the XFF header, if you all add anything else such as usernames the checkpoint will ignore these.
XFF only works for HTTP traffic, with HTTPS traffic even if you are using HTTPS inspection on the checkpoint so it can decrypt the packet, the checkpoint cant read the XFF header. I feel this is a major flaw, I had cases open with checkpoint about this and in the end they said it is expected behaviour and the only thing I could do is put in a feature request. The XFF header is there, the checkpoint is already decrypting the packet, so why not allow it to read it. With the amount of sites now being HTTPS think is very shortsighted by checkpoint.
Setting Up the Firewall for AD Authentication
Setting up your firewall for Active Directory is easier than 4.1 configurations. With the help of the integrated LDAP account management GUI, you need nothing but the SmartDashboard.The extended properties of the Account Unit object in VPN-1/FireWall-1 allow load sharing and high availability. On the other hand, it is possible to delegate account units per gateway, which will ease the geographically distributed configurations.
The setup steps are very simple:
1. Configure Global Properties.
2. Configure the account unit.
3. Configure LDAP administrators.
4. Configure user groups.
5. Configure the Rule Base.
Configuring Global Properties for Active Directory
When you have the proper license from Check Point, you can activate LDAP Account Management from the SmartDashboard.The SmartDashboard imports a limited number of users from the LDAP source at a time; you may define the size and the timeout variables for the imported list. After a timeout, you need to fetch the user table again. If authentication is set through the Active Directory unit properties, this action will require entering the password each time.
The Password Expires variable is FW-1 specific.This variable is introduced to Active Directory with schema modification so the third-party user management tools or original Microsoft user administration utilities are not aware of the fw1pwdLastMod variable. During the implementation, you may choose not to use this property. Users can log on with either their usernames or logon names.
When password strength is configured from Global Properties (see Figure 3.38) on FireWall-1, the configuration does not affect Active Directory security policies. During password-related operations, all LDAP users will be checked against these Global Properties. When you try to change a user’s password, you will get the ldap error -10 message (see Figure 3.39) if you do not comply with Password Strength settings rules. You have an option to force these rules on LDAP administrators, too.
Figure 3.38 LDAP Account Management Global Settings
Figure 3.39 The Password Strength Error Message
Defining the Active Directory Account Unit
Here are the basic steps in defining the Active Directory account unit on Check Point FireWall-1:
1. From the Objects tree (shown in Figure 3.40) or the Manage | Servers menu, create an Active Directory unit. For high availability and load sharing, LDAP account units allow grouping of multiple LDAP servers in a single server object.
Figure 3.40 The Object Tree Servers Tab
2. On the initial definition screen (see Figure 3.41), define the unit properties, usage type, and matching profile for the unit. OPSEC PKI based CA servers are able to store and retrieve CRL’s from LDAP trees.This function is enabled only if the CRL Retrieval property is checked. In our case, we will use the account unit for user management. If this property is not modifiable, that indicates Global Properties setup for LDAP account management has not been completed. Go back to Global Properties and enable LDAP account management to activate these fields. In the objects.C file, the attributes for each directory server are predefined, so you should choose the matching profile.
Figure 3.41 LDAP Account Unit Properties
3. Prior to NG FP3, LDAP account units had identical priorities; gateways would query all servers, and once the first answer was received, the rest of the queries were dropped. In NG FP3, it is possible to add multiple replicated directory servers. If load sharing is desired, all LDAP servers should be defined with identical priorities, but for failover purposes, lower priorities are always an option.
It is also possible to use external user (LDAP) groups in place of regular user groups, which will ease security management. Since the administrators can restrict the account units to be queried, it is possible to direct authentication requests to predefined servers and optimize your network traffic to build an optimized network.
All gateway objects can be configured to use specific account units with specific priorities. In geographically distributed installations or under heavy load, you can configure your LDAP account units. Apply your localized units from your gateway’s properties under LDAP Account Management.
From the Servers tab, click the Add button to define your LDAP servers. If you have a previous version of NG FP3 gateways in your network, they won’t be able to recognize multiple servers and the priorities, so you should assign a specific server for your «aged» gateway. Choose this gateway from the Early Versions Compatibility Server drop-down list, available from the Servers tab. (See Figure 3.42.)
Figure 3.42 LDAP Account Unit Properties Servers Tab
4. Click the Add button to add LDAP servers to the account unit. In the LDAP server definition screen (see Figure 3.43), you should describe the LDAP host and the access privileges to connect to the directory services.The Login DN will be used to connect to the directory services.This Login DN serves another purpose, too. If LDAP user management is handled by a different organizational group, the Login DN may add additional security. Accessing directory information is bound to Login DN and the password. Since this value is also kept in the management server, you can restrict querying LDAP servers based on Login DNs.
Figure 3.43 LDAP Server Definition
5. SmartDashboard and account unit communication can be encrypted with LDAP SSL.The default SSL port is 686.You can verify the LDAP server’s fingerprint with the Fetch button. For Active Directory, you must choose Strong for Min/Maximum Encryption Strength from the LDAP Server Properties | Encryption tab (see Figure 3.44).
Figure 3.44 The LDAP Server Properties Encryption Tab
6. As shown in Figure 3.45, when displaying users on the on GUI, you can define the branches to be fetched. Clicking the Fetch button gets the default list.You may also limit the number of users to be returned. As discussed, you can enforce authentication on the account unit by checking the Prompt for password when opening this Account Unit option.
Figure 3.45 The LDAP Account Unit Management Objects Management Tab
7. It is possible to filter the authentication methods on the account unit.This tab is critical for Active Directory integrations. When AD does not have the VPN-1/FireWall-1 specific attributes in its schema, VPN-1/FireWall-1 will use the default templates. The user template chosen in the Authentication tab will apply to all users authenticated from the account unit. User templates have many options, and you may utilize these features without modifying your schema.The most important setting is authentication. If you need to integrate certificate or pre-shared, secret-based authentication, you can choose this global property. Another option is to choose Default Authentication Schema. This option is feasible when basic Active Directory authentication is required. The following authentication methods can be used with AD integration. If you choose a RADIUS or TACACS server, you need to define the server as well.The authentication options are:
■ SecureID
■ RADIUS
■ TACACS
■ OS Password
Tools & Traps…
Verifying the Fingerprint of the Certification Authority
Authenticity of the certificate authority is verified by the fingerprint. To verify the CA fingerprint, follow these steps:
1. On the Active Directory server (or your CA), run the Certification Authority console.
2. In the Issued Certificates list, double-click the certificate issued to the domain controller serving as the LDAP account unit.
3. In the Details tab, click Copy to File….
4. Make sure the DER encoded binary X.509(.CER) option is selected and click Next.
5. Specify a name for the file that the certificate will be written to. (The extension .CER will be added automatically.)
6. Click Finish and then click OK to close the Certificate Export wizard.
7. Use any MD5 utility to calculate the exported file’s MD5 fingerprint. The fingerprint fetched in the Encryption tab of LDAP Account Unit should be compared to the output string.
To use IKE preshared secrets or public key certificates, you should use user templates. When SecureID is used, usernames are checked against the user’s AD personal identification number (PIN) and the tokens are checked against the ACE server.There are other user control options, such as limiting login failures in the Authentication tab. Secure Authentication API (SAA) supported applications can also be integrated with Active Directory.
S/Key is not an option in Default Authentication Schema, since it cannot be used globally. It is not recommended that you use S/KEY in security policy authentication rules, since S/Key authentication will be phased out by the upcoming FP4 release.
When an IKE secret key is used for SecuRemote users, the user’s password must be stored encrypted in the Active Directory database. To do this, first define the secret key in the account unit by selecting the Properties | Authentication | Encryption | IKE pre-shared secret authentication key field (see Figure 3.46).Then you can generate the encrypted passwords with the fwm ikecrypt command. The resulting string is then stored in Active Directory.The syntax for fwm ikecrypt is as follows:
Figure 3.46 The LDAP Account Unit Management Authentication Tab
After you finish configuring your account unit, you will notice that your LDAP tree appears on the Users and Administrators tab of the Objects tree (see Figure 3.47). When you open the tree by double-clicking it, you will see your Active Directory users and groups in your SmartDashboard.
Figure 3.47 Displaying Active Directory in SmartDashboard
When adding an authentication action to a rule there are 3 types,
- User
- Session
- Client
User authentication works by intercepting connects going through the FW-1 and prompting the user for authentication. To do this the firewall has to modify the traffic, so this authentication type can only be used with FTP, HTTP, Telnet and RLOGIN.
- Advantages – Most secure, as authenticating is done on each connection
- Disadvantages – Only available on FTP, HTTP, Telnet and RLOGIN protocols
Session authentication uses software installed on the clients machine. When the rule with session authentication is hit, the firewall tries to connect to the agent on the clients machine on port 261, a authentication dialog box is then presented to the user. This works on all protocol.
- Advantages – Works on all protocols
- Disadvantages – Software has to be installed on the clients machine (Windows only)
Client authentication acts on authenticating the machine. The user is required to connect to the FW-1 gateway address on either port 259 (telnet) or 900 (HTTP). Once the user has authenticated the machine IP will be permitted.
- Advantages – Works on all protocols
- Disadvantages – Not as secure as the previous 2 as it is associated with an IP rather then a user. We recommend this is only used on single-user machine.
Rule Base Order
With authentication rules the standard top to bottom doesn’t apply. The firewall will check to see if there are any rules that match any non authentication rules first.
So where do I put my rules ??
- Add them above your stealth rule (stealth rule being the rules that allow access to your firewall) so that it allows the user to authenticate with the firewall (Client Authentication).
- Place the authentication rule above the accept rule. Then add a deny rule for the spefic host. As you can see below.
Using the above example access to any host would be accepted using the accept rule. Where as access to 64.20.35.155 would use the client auth rule.
- Author
- Recent Posts
Rick Donato is a Network Automation Architect/Evangelist and the founder of Packet Coders.
Want to become an IT Security expert?
Here is our hand-picked selection of the best courses you can find online:
Internet Security Deep Dive course
Complete Cyber Security Course – Hackers Exposed
CompTIA Security+ (SY0-601) Certification Complete course
and our recommended certification practice exams:
AlphaPrep Practice Tests — Free Trial


