Сейчас мы разберем еще одну ошибку в CS:GO, которую пользователи могут встретить на своем компе.
Содержание
- Как устранить ошибку связанную с VAC проверкой
- Способ №1: Перезапуск клиента STEAM
- Способ №2: Переустановка CS:GO
- Способ №3: Ручной запуск Сервисов Steam
- Способ №4: Активация DEP
- Способ №5: Очистка кэша загрузки
- Способ №6: Соответствие вашего региона
- Способ №7: Проверка фаерволов и антивирусов
- Способ №8: Перезапуск роутера
- Способ №9: обновление нужных файлов проверки
- Способ №10: проверка целостности файлов
- Что такое VAC в STEAM
Сейчас мы разберем практически все нюансы, которые помогут нам исправить данную проблему. Начнем с самых простых и легких.
ПОЛЕЗНЫЕ СТАТЬИ: Лагает кс го и Не запускается игра!
Способы исправления ошибки связанные с ВАК проверкой в кс го:
Способ №1: Перезапуск клиента STEAM
Бывает такое, что банально клиент не успел запустить проверку файлов. Ну, или вариантом также может быть то, что оно запустилось некорректно. В таком случае достаточно будет полностью перезапустить Стим и программа сама перезапустит нужный модуль для проверки файлов. Только выйти нужно полностью. Не просто закрыть, а именно Выйти.
Чтобы выйти и з стима, то в трее системы нужно нажать правой кнопкой мыши и выбрать соответствующий пункт: 
После этого запустить заново (от имени Администратора системы Windows).
Учитывайте то, что может быть Стим заблокировал полностью данный аккаунт. В таком случае ни один из перечисляемых способом не поможет. И лучшим решением будет — зарегистрировать новый аккаунт.
РЕКОМЕНДУЕМ ПОЧИТАТЬ: Проблемы с микрофоном и правильная его настройка!
Способ №2: Переустановка CS:GO
Такой способ может помочь в связи с тем, что были нарушены файлы игры, или же заблокированы системой после чего они не могут корректно пройти проверку. Соответственно, лучшим решением будет полностью снести кс го и установить его заново. Перед началом сохраните свой конфиг и ваши настройки.
Инструкцию по переустановке мы разместили в отдельной статье касательно проблем запуска кс го
Способ №3: Ручной запуск Сервисов Steam
Так как система не смогла выполнить проверки каких-то файлов самостоятельно, то сейчас разберем один из методов ручной запуск сервиса. Для этого запускаем строку Выполнить (нажатием клавиш win+r) и прописываем следующие строки:
«E:SteambinSteamService.exe» /repair
Причем выполнение этой команды производим именно с таким синтаксисом. То есть, адрес стима может меняться в зависимости от того, куда вы его установили. В моем случае у меня диск Е, в вашем это может быть и С и D. Также сама папка стим может находиться не в корне диска (сразу). Как только вы запустите сервис, то будет произведена повторная проверка нужных файлов системой безопасности VAC. Скорость будет зависеть от мощности компьютера. В среднем вы на 2-10 секунды увидите вот такое окно:
После чего повторно перезапускаете клиент и пробуйте запустить игру.
ЧИТАЙТЕ ТАКЖЕ: Убираем отдачу во время стрельбы!
Способ №4: Активация DEP
VAC очень сильно взаимодействует с системой работы процессоров, потому необходимо будет провести его проверку и сделать необходимые шаги, которые помогут вам исправить ситуацию.
Полностью весь этап мы изложили в статье касательно пробемы запуска CS:GO по причине VAC-блокировке.
Способ №5: Очистка кэша загрузки
В определенных случаях клиент может закешировать нужные файлы, которые должны были пройти проверку. Для того, чтобы программа смогла заново наполнить свежий кеш, то необходимо очистить старый. Переходим в настройки Стима:
Далее открываем пукнт «Загрузки» и нажимаем кнопку очистки кэша:
Способ №6: Соответствие вашего региона
Вы знаете, что во всех странах мира есть свои ограничения, правила и нюансы касательно того, в каком регионе вы проживаете. Платформа в обязательном порядке привязана ко времени и вашего места расположения. Соответственно, необходимо проверить корректность вашего времени на компьютере, а также выставленного региона. Все должно совпадать с реальными данными. После правильной выставленной даты и времени необходимо перезапустить Стим.
ЧИТАЙТЕ ТАКЖЕ: Переключаем язык в кс го!
Способ №7: Проверка фаерволов и антивирусов
На вашем комьютере могут стоять запрещенные программы или антивирусы блокирующие определенные порты или трафик интернета. Потому и выбивает ошибку «Система VAC не смогла проверить вашу игровую сессию в CS:GO»
Для исправления проблемы необходимо:
- Временно отключить все антивирусы и фаерволы запущенные с системой;
- Отключить Брандмауэр Виндовс;
- Выключить читы или дополнительные программы для игры;
- Перезагрузить компьютер и запустить заново стим.
Способ №8: Перезапуск роутера
В связи с тем, что все компьютеры вашей внутренней сети находятся под одним внешним айпи адресом, то не исключена временная блокировка. Может быть такое, что один из участников получаемых услуг в вашей сети делает мощную файловую нагрузку на сеть. Потому система может временно остановить подачу сигнала и коннекта со Steam серверами. При перезагрузке вы можете получить новый внутренний адрес, что поможет вам заново повторить VAC проверку файлов
ЧИТАЙТЕ ТАКЖЕ: Как говорить и общаться в кс го!
Способ №9: обновление нужных файлов проверки
Главными файлами в платформе, которые отвечают VAC проверку — clientregistry.blob, Steam.dll и SteamUI.dll.
- Нужно выключить полностью Стим и через поиск Виндовса (win+s) найти эти файлы. Желательно уточните место где вы собираетесь их искать. Так как поиск по всему компьютеру и локальным дискам будет только лишняя трата времени;
- Удалите их полностью с компьютера;
- Заново запустите стим и пускай система сама попробует скачать их заново.
Такое решение проблемы в частых случаях помогает. Так как не всегда понятно как система проверки VAC работает.
Способ №10: проверка целостности файлов
Последним и неплохим решением будет проверить целостность файлов всей игры. Может быть такое, что они попросту слетели или удалились какой-то вашей отдельной программой. В платформе есть специальная кнопка, которая может сама в автоматическом режиме сделать всю необходимую работу.
Как это сделать мы описали в статье по проверки файлов
Также мы подготовили для вас видеоматериал, который поможет вам наглядно посмотреть, как ребята избавляются от данной проблемы:
Что такое VAC в STEAM
VAC — стандартная система защиты от вирусов и запрещенного софта (читов) в платформе Steam. Разработчики компании VALVE стараются (к сожалению не так успешно, но все же) бороться с игроками, которые используют сторонние программы, которые создают преимущество против соперников. Большинство сторонних платформ (faceit, esea и другие) стараются дополнительно подключать свои программы, которые проверяют использование читов на их серверах.
ЧИТАЙТЕ ТАКЖЕ: Параметры запуска кс го!
Часто можно встретить такую ошибку «.Система VAC не смогла проверить вашу игровую сессию в CS:GO» (“VAC was unable to verify the game session“ — английская версия ошибки) . Это напрямую связано с тем, что CS:GO разделен частями — так называемыми компонентами. При установке игры система делает свои личные подписи каждому компоненту. И каждый запуск VAC сверяет свои подписи, проставленные ранее, в соответствии. Если что-то не сходится или не соответствует алгоритму данной программы, то она блокирует и запрещает запуск. Таким образом усложняет и создает трудности нечестным игрокам. В другом случае все игроки бы могли использовать и менять полностью все параметры и тонкости игры под свой вкус и лад. Создавая большие проблемы честным игрокам, которые хотят насладиться нашим любимым шутером.
Такая ошибка может появляться не только потому, что вы используете сторонний софт или запрещенные модули. А просто получился банальный сбой в сверке файлов. Самой банальной причиной — изменения и сбой по настройкам операционной системы. Такое может случаться по различным причинам связанными с обновлениями, конфликтом с другим ПО или сбоев кластеров на винчестере (если у вас HDD). У VAC системы есть доступ практически ко всем файлом игрового пространства STAEM. Потому проблемой даже может стать фактически ошибка при загрузке файла из интернета при обновлении. Какую-то часть файла скачало, но получила ошибку. И защита ВАК вас остановит.
БУДЕТ ПОЛЕЗНЫМ: Как правильно стрелять. Тренировка стрельбы
Важно понимать, что это на блокировка вашего аккаунта. Просто есть небольшой сбой, который мы сейчас вместе с вами исправим. Некоторые игроки получают именно VAC-ban — это другое. То есть фактически эта ошибка говорит о том, что есть какие-то файлы, которые мешают вам пройти проверку. Сейчас разберемся какие. А может и не разберемся, но точно исправим проблему.
Подписывайтесь на нас в социальных сетях (ВК, Телеграмм)!
И будьте в теме Киберспорта вместе с GOCSGO.NET
Table of Contents
- What does it mean when VAC was unable to verify your game session?
- How to Fix VAC Authentication Error in 2021?
- Verify Integrity of Game Files and Restart PC
- Repair the Steam Client
- Exclude the CSGO Game Directory from Antivirus Scans
- Verify DLL File
- Delete Temporary Files
- Update Your Drivers
- Completely Reinstall CSGO
- Summary
If you are here, it means that you have likely received the VAC error stating that it was unable to verify the game session. Don’t be alarmed, this is a very common issue, and it can be caused by many things, however, fixing it is very easy. Another popular CSGO issue is the CSGO Mic Issue which we have covered in a separate article. Regardless, let’s take a closer look at the VAC matter, what causes it, as well as the potential solutions.
What does it mean when VAC was unable to verify your game session?
This means that the VAC (Valve Anti-Cheat System) has detected some anomalies within the installation file of your game, in our case, CSGO. While this feature is meant to stop players from modifying and messing around with file of the game, however, the system can come to a false tampering report from time to time, even when there was no tampering done, which causes the vac was unable to verify the game session message to appear.
How to Fix VAC Authentication Error in 2021?
Since the widespread of the “vac was unable to verify your game session” message, numerous threads on various websites have suggested different things on how to potentially solve this issue. In order to help you out with this Counter-Strike: Global Offensive VAC error, we have compiled a list of all potential fixes for it, as well as detailed guides for each of them.
Verify Integrity of Game Files and Restart PC
When faced with the “vac was unable to verify your game session” message, the first thing that you can attempt to do in order to fix this game session error is to verify the integrity of game files which may sound complicated, but is in fact extremely easy to do.
The first step in performing this fix is to open up your Steam and head to the Library tab which is located on the left side on top of your Steam window. Once you are in your Steam library, find Counter-Strike Global Offensive, right-click on it and then left-click on “Properties”.
Once you locate the Counter-Strike Global Offensive and select properties, click on the local files tab and then click: “Verify Integrity of Game Files” button. Wait for the popup menu to close, then restart your computer. After the restart, run CSGO again and see if the problem is fixed.
Repair the Steam Client
Another fix that you can attempt if the first one doesn’t work, is to repair the Steam client which is also what Valve officially recommends doing. This is a very easy fix that you can apply and the first thing you need to do when applying it is close your Steam client. To close the Steam client right-click on the Steam icon in your system tray and then click “Exit”.
Once this is done, open your Start menu and type in “run”. Once the run app is selected, press “Enter” to open it and then enter the following command: “C:Program Files x86SteambinSteamService .exe” /repair. This will launch an empty command prompt terminal. Once the command prompt terminal closes, open Steam and check if the fix worked. If the matter still persists and the game session error keeps appearing, try the next fix on the list.
Exclude the CSGO Game Directory from Antivirus Scans
One more thing that could be causing the “vac was unable to verify your game session” message is the antivirus that could be running in the background. If in fact your antivirus software is running in the background and is scanning your CSGO game files, it could be making VAC unable to verify the game files, which would cause you to see the game session error whenever when you try to launch CSGO on your computer. To prevent this, you can whitelist the CSGO local files in your antivirus settings. The exact way of fixing this problem via this method may vary depending on the antivirus that you are using.
Verify DLL File
If any of the previous fixes mentioned above did not solve the issue, fear not because we still have a couple of potential fixes for the problem, so let’s take a look at the next one which will require you to verify the DLL file.
To use this method, first, find and open your Steam installation folder which by default is C>Program Files (x86)> Steam > Bin. When you open it, locate a file called “Steamservice.dll”, right-click it, and click copy. Afterward, go to C>Program Files (x86)>Common Files> Steam, right-click, and then click “Paste” to paste the file that you have just copied. Your windows might prompt you an error message stating that the file already exists. Simply click “Replace”. Once all of this is done, try launching the game and see if the problem persists. If so, see our next CSGO fix.
Delete Temporary Files
During use, the Windows on your PC tends to store files for later use, and sometimes, those files can become corrupt which can cause this problem to occur. An easy fix for this issue is to simply delete temporary files. Start by opening the Run command by pressing “Windows + R” and type in “%temp%”. Press “Enter” or click the OK button. A large list will appear. Select all items on it by pressing Ctrl + A and then remove them by pressing Shift + Delete. Click yes in the pop-up menu. Reboot your windows and launch Steam again to check if the problem is fixed.
Update Your Drivers
Another common reason why CSGO won’t run properly could be the drivers on your computer. To fix this, you are going to need some third-party driver detecting software like Auslogics Driver Updater so the first thing you need to do is download it and install it on your PC. Once this is done, the program will automatically open and scan your PC for drivers and any update that is available. Afterward, you can run a scan for any bad drivers, just press the “Scan now” button. Click the “Update” button next to the faulty drivers to update each of them or simply press the “Update all” button. Restart your computer after the program finishes.
Completely Reinstall CSGO
If the verify game fix, bin steamservice exe repair fix, and every other attempt to fix VAC error fail, then your final option is to completely reinstall CSGO on your computer. To do this, open Steam and head to your game library, right-click on CSGO, and click “Uninstall”.A new window will pop up, click “Delete”. Now you have completely removed CSGO from your computer and you can install it again from your game library, just restart your PC before you do so.
Summary
This article focus on discussing the appearance of the “vac was unable to verify your game session” message upon launching CSGO, as well as potential reasons that could be causing an issue and this error message to appear. Furthermore, the article will also cover numerous things that you can try to fix this game session error, as well as provide you detailed guides on each of them.
У тебя возникла проблема с системой VAC, которая выдает ошибки, хотя никаких читов и сторонних программ ты не используешь? Есть самый простой способ решения этой проблемы — это перезагрузить Steam, зайти в игру и ошибка пропадет, но это лишь временная мера. О том, как убрать данное предупреждение раз и навсегда, далее в этом гайде.
Первый способ и самый действенный — очистить кэш загрузки
Итак, начнем сразу с того способа, который по мнению многих игроков помогает решить данную проблему. Решение заключается в следующем:

- Заходим в Steam и в левом верхнем углу находим вкладку «Steam».
- Переходим в «Настройки».
- В настройках переходим во вкладку «Загрузки».
- В данной вкладке в самом низу жмем на«Очистить кэш загрузки».
- Готово, многие говорят о том, что способ рабочий.
Если все-таки данный способ не сработал, то переходим к другим способам.
Другие способы решения этой проблемы — проверить целостность кэша
Следующий метод борьбы состоит в том, чтобы проверить целостность кэша, обычно это помогает при любой ошибке игры, поэтому можно использовать всегда.
- Заходим в «Библиотеку» в Steam, далее «Свойства» игры CS:GO.
- Затем переходим в закладку «Локальные файлы».
- Жмем на«Проверить целостность файлов игры».
- Ждем и готово.

В других случаях советуем попробовать следующее:
— Причиной может быть лишнее программное обеспечение, установленное на вашем компьютере, поэтому зайдите в свой антивирус и добавьте папку Steam (всю) в исключения. А также не забудьте просканировать весь локальный диск на наличие вирусов.
— Открываем командную строку комбинацией WIN+R и прописываем: «C:Program Files (x86)SteambinSteamService.exe /repair». Данный путь по умолчанию у вас может быть другой.
— Выходим из Steam, открываем консольную строку в Windows и прописываем туда следующее без кавычек: «bcdedit.exe /set {current} nx Optln».
— Перезапускаем игру и проверяем.
На этом все, надеемся мы помогли вам с решением вашей проблемы. Также почитайте о репорт ботах, читах в CS:GO и других гайдах.
Заглавное фото: theloadout.com
Do you play Counter-Strike: Global Offensive (CS: GO)? Have you received “VAC was unable to verify your game session”? Here are 3 solutions offered by MiniTool Software and you can have a try if you’re bothered by this issue.
Counter-Strike: Global Offensive, developed by Valve and Hidden Path Entertainment, is a multiplayer first-person shooter video game. Recently, many players complain that they encountered VAC was unable to verify your game session on CS: GO. It is quite annoying because matchmaking will fail once this error happens.
What is VAC and why does this error happen? Let’s see in the following contents.
For a fair and non-ludicrous experience in online settings, some games have provided a protection technique, Valve Anti-cheat System (VAC). It is designed to protect users from the masses that some users who cheat codes to improve the chances of winning.
It sounds like a wonderful technique. However, it seems that there are some problems with the VAC program especially for the popular games like CS: GO.
Don’t worry. You can fix “VAC was unable to verify your game session” error easily and quickly by yourself. Just try the following solutions one by one.
Solution 1: Re-Login into or Restart Your Steam Client
There may be some changes in the regular operating system framework, which leads to “VAC was unable to verify your game session” error eventually. An easy way to solve the problem is to re-login into your Steam account. If it doesn’t work, you can try restarting your Steam.
Let’s see the detailed steps.
Step 1: Open Steam.
Step 2: Click your profile name at the top right corner of Steam. Then select Log out of account from the drop-down menu.
Step 3: There will a pup-up window reminding you that this will log you out of Steam and you will need to re-enter your account name and password to use Steam again. Just click LOGOUT to continue.
Step 4: Re-login into your account by following the onscreen instructions.
Then you can try opening CS: GO or the other program that receives the error “VAC was unable to verify your game session” and check if the error disappears. If it still exists, you can following the steps below to restart your Steam client.
Step 1: In your Steam client, click Steam from the upper left corner. Then click Exit.
Step 2: Open Steam again. In the interface, click Steam and choose Go Offline.
Step 3: In the following window, click RESTART IN OFFLINE MODE.
Step 4: Click Steam option and select Go Online. Then in the pop-up window, click RESTART AND GO ONLINE.
Step 5: Once Steam is restarted, launch you game and check if the error “VAC was unable to verify your game session” disappears.
If you still see VAC was unable to verify your game session on CS: GO, you can move on to the next solution.
Solution 2: Restart the PC
If the certain computer items which are utilized to protect the game rights of users are already used by other third-party programs, errors like “VAC was unable to verify your game session” might appear. To solve the problem, you can restart your device to end all the programs which might lead to this error.
Then launch Steam and check if your CS: GO works properly without the error message about VAC.
Solution 3: Verify the Game Files
When you encounter “VAC was unable to verify the game session” error, there may be some missing or corrupted game files. You should check them with Steam client.
Step 1: In Steam, click LIBRARY from the tool bar.
Step 2: Right-click your game Counter-Strike: Global Offensive and select Properties.
Step 3: Choose LOCAL FILES tab, and then click VERIFY INTEGRITY OF GAME FILES.
Step 4: Wait for a while patiently. When the process is completed, click CLOSE.
Then you can launch your game and the issue should have been fixed.
Solution 4: Updated Your Device Drivers
Corrupted or outdated drivers could also lead to “VAC was unable to verify the game session” issue. You need to keep your device drivers up-to-date, especially graphics card driver and sound driver.
Here is the tutorial on how to update graphics card driver. If the problem still exists, you may also need to update other drivers.
Step 1: Press Win + R to open Run window. Then input devmgmt.msc and click OK to enter Device Manager.
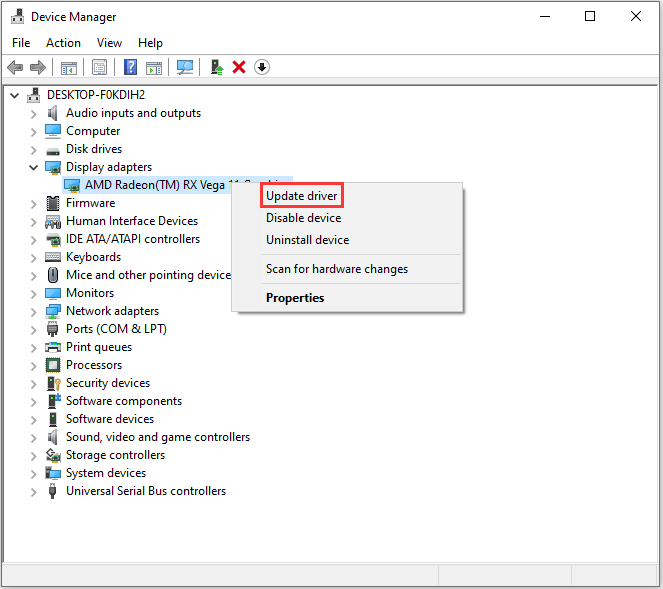
Step 2: Double-click Display adapters to expand it.
Step 3: Now right-click your graphics card and select Update driver. Then, choose Search automatically for updated driver software and follow the onscreen instructions to finish the process.
Step 4: You will be asked to restart your computer after the update is installed. Just click Restart now.
After you update the driver, you can run your game and check if the problem has been solved.
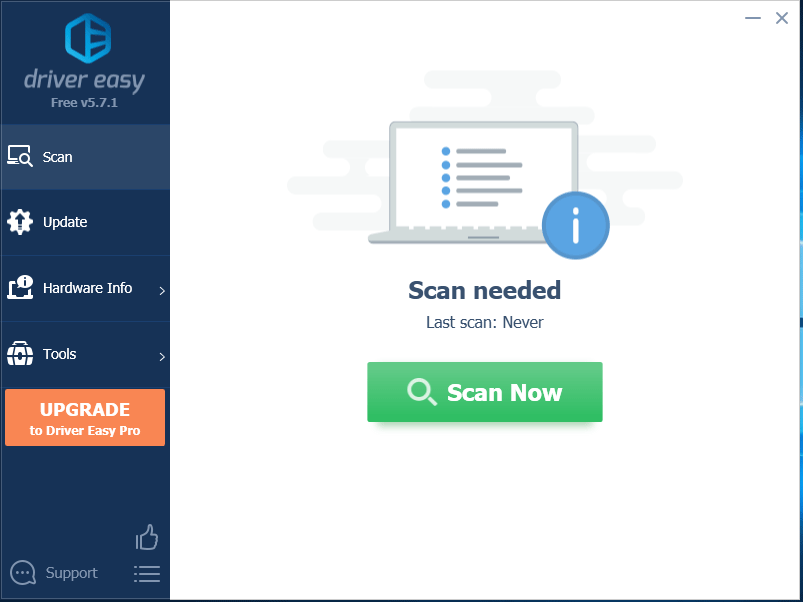
If the above method failed to update drivers, you can use a professional third-party program to do that. Driver Easy Pro can detect all outdated drivers and update them with just one click. Here is the guide:
Step 1: Install Driver Easy and launch it. Click the Scan Now button.
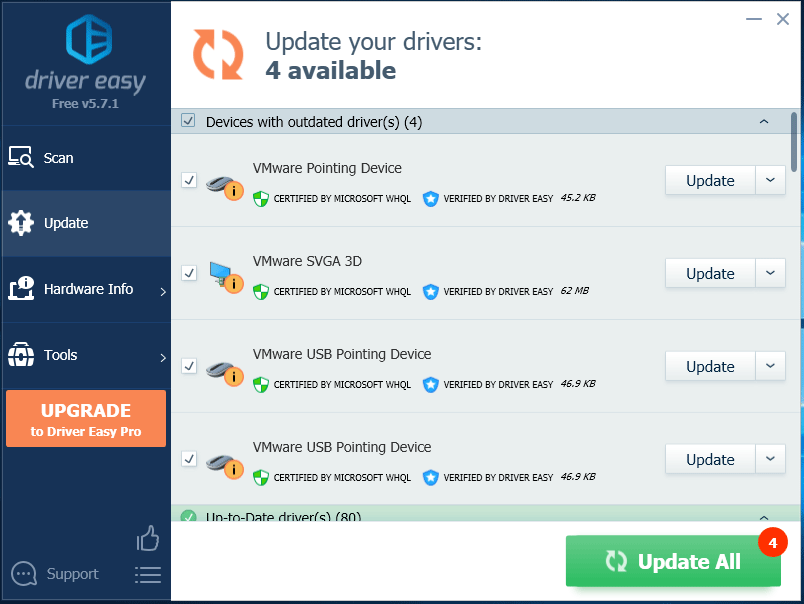
Step 2: After the scanning process is completed, click the Update All button to download and install the latest drivers for all devices with outdated drivers.
Receive “VAC was unable to verify your game session” error message on CS: GO? Here is how to solve the problem.Click to Tweet
Solution 5: Repair the Steam.exe via Command Prompt
Another reason for “VAC was unable to verify the game session” problem is that there are errors on the Steam client itself. When there are any damaged or corrupted files or incomplete system configuration files in the client, you might see the mentioned error. In this case, you can repair the Steam.exe with Command Prompt.
Here are the detailed steps.
Step 1: Press Win + R to invoke Run window.
Step 2: In the pop-up Run window, input cmd in the box and press Enter to open Command Prompt.
Step 3: Type the following command or copy and paste it to the command and then press Enter to execute it:
C:Program Files (x86)SteambinSteamService.exe» /repair
This might take some time. You need to wait patiently until the process is completed. Then restart your PC to make the changes to take effect. Launch Steam and open the game that was stopped by “VAC was unable to verify your game session error” to check if this solution works.
Solution 6: Disable or Uninstall Your Antivirus Temporarily
Antivirus software could also be the factor which leads to this “VAC was unable to verify the game session” issue. Because it may disrupt the VAC settings when it is scanning and repairing applications in the background to protect your computer from virus attack.
To solve the problem, you should remove the Steam application from the scanning process. You just need to navigate to the settings of your antivirus application and add the Steam to the excluded files folder. If you still keep receiving the mentioned error, try disabling your antivirus temporarily or even reinstalling the antivirus.
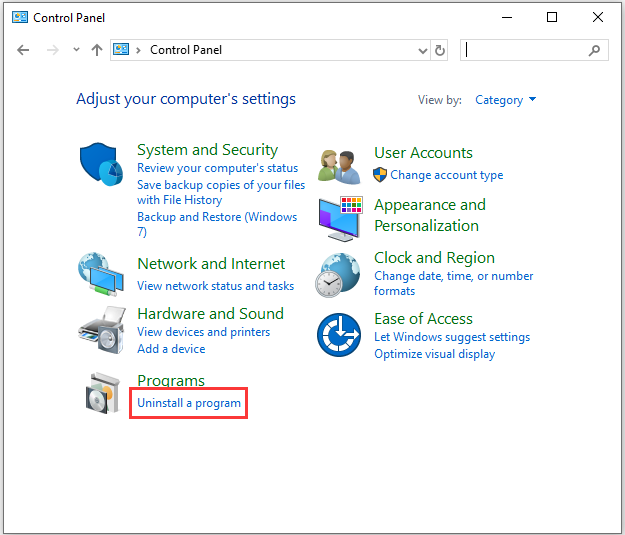
Here is how to uninstall a program on PC.
Step 1: Press Win + S to open Search. Then search for Control Panel and open the app.
Step 2: In the top right corner, select View by: Category. Then click Uninstall a program.
Step 3: In the list of programs and features, right-click your antivirus and select Uninstall. Then follow the onscreen instructions to finish the process.
If the problem is fixed after uninstalling the antivirus, you might need to give up this antivirus program and use another reliable one, or contact the support of your antivirus program to get solutions.
If you get the error “VAC was unable to verify your game session” while trying to play a certain game, you can follow the solutions in this post to remove it.Click to Tweet
Bottom Line
Don’t worry if you see “VAC was unable to verify your game session” error message when you want to launch a game like CS: GO. These solutions above are tried by plenty of users and they have fixed the problem successfully. Hope one of the solutions could also be helpful for you.
If you have better ideas about this topic, please don’t hesitate to send us an email via [email protected] or leave a message in the following comment section.
What does verifying integrity of game files do?
Steam offers a built-in feature to verify the integrity of game files. It is usually used when any errors happens on the Steam games due to corrupted or missing game files. It will compare the files on your computer with the ones on the Steam servers. If any files different are scanned, Steam will change or repair them automatically.
What is VAC?
VAC, short for Valve Anti-Cheat, is an automated system designed to detect cheats installed on users’ computer. It works for the fairness in the game world. If a user connects to a VAC-Secured server from a computer with cheats installed, the VAC system will ban the user from playing that game.
How do I fix VAC unable to verify my game?
“VAC was unable to verify the game session” error could be caused by various factors. To solve the problem, you can try:
- Re-login into your Steam account or relaunch Steam client
- Restart the PC
- Verify the game files
- Update your device drivers
- Repair the Steam.exe via Command Prompt
- Disable antivirus temporarily
For more detailed information, you can refer to the solutions introduced in this post.
Do you play Counter-Strike: Global Offensive (CS: GO)? Have you received “VAC was unable to verify your game session”? Here are 3 solutions offered by MiniTool Software and you can have a try if you’re bothered by this issue.
Counter-Strike: Global Offensive, developed by Valve and Hidden Path Entertainment, is a multiplayer first-person shooter video game. Recently, many players complain that they encountered VAC was unable to verify your game session on CS: GO. It is quite annoying because matchmaking will fail once this error happens.
What is VAC and why does this error happen? Let’s see in the following contents.
For a fair and non-ludicrous experience in online settings, some games have provided a protection technique, Valve Anti-cheat System (VAC). It is designed to protect users from the masses that some users who cheat codes to improve the chances of winning.
It sounds like a wonderful technique. However, it seems that there are some problems with the VAC program especially for the popular games like CS: GO.
Don’t worry. You can fix “VAC was unable to verify your game session” error easily and quickly by yourself. Just try the following solutions one by one.
Solution 1: Re-Login into or Restart Your Steam Client
There may be some changes in the regular operating system framework, which leads to “VAC was unable to verify your game session” error eventually. An easy way to solve the problem is to re-login into your Steam account. If it doesn’t work, you can try restarting your Steam.
Let’s see the detailed steps.
Step 1: Open Steam.
Step 2: Click your profile name at the top right corner of Steam. Then select Log out of account from the drop-down menu.
Step 3: There will a pup-up window reminding you that this will log you out of Steam and you will need to re-enter your account name and password to use Steam again. Just click LOGOUT to continue.
Step 4: Re-login into your account by following the onscreen instructions.
Then you can try opening CS: GO or the other program that receives the error “VAC was unable to verify your game session” and check if the error disappears. If it still exists, you can following the steps below to restart your Steam client.
Step 1: In your Steam client, click Steam from the upper left corner. Then click Exit.
Step 2: Open Steam again. In the interface, click Steam and choose Go Offline.
Step 3: In the following window, click RESTART IN OFFLINE MODE.
Step 4: Click Steam option and select Go Online. Then in the pop-up window, click RESTART AND GO ONLINE.
Step 5: Once Steam is restarted, launch you game and check if the error “VAC was unable to verify your game session” disappears.
If you still see VAC was unable to verify your game session on CS: GO, you can move on to the next solution.
Solution 2: Restart the PC
If the certain computer items which are utilized to protect the game rights of users are already used by other third-party programs, errors like “VAC was unable to verify your game session” might appear. To solve the problem, you can restart your device to end all the programs which might lead to this error.
Then launch Steam and check if your CS: GO works properly without the error message about VAC.
Solution 3: Verify the Game Files
When you encounter “VAC was unable to verify the game session” error, there may be some missing or corrupted game files. You should check them with Steam client.
Step 1: In Steam, click LIBRARY from the tool bar.
Step 2: Right-click your game Counter-Strike: Global Offensive and select Properties.
Step 3: Choose LOCAL FILES tab, and then click VERIFY INTEGRITY OF GAME FILES.
Step 4: Wait for a while patiently. When the process is completed, click CLOSE.
Then you can launch your game and the issue should have been fixed.
Solution 4: Updated Your Device Drivers
Corrupted or outdated drivers could also lead to “VAC was unable to verify the game session” issue. You need to keep your device drivers up-to-date, especially graphics card driver and sound driver.
Here is the tutorial on how to update graphics card driver. If the problem still exists, you may also need to update other drivers.
Step 1: Press Win + R to open Run window. Then input devmgmt.msc and click OK to enter Device Manager.
Step 2: Double-click Display adapters to expand it.
Step 3: Now right-click your graphics card and select Update driver. Then, choose Search automatically for updated driver software and follow the onscreen instructions to finish the process.
Step 4: You will be asked to restart your computer after the update is installed. Just click Restart now.
After you update the driver, you can run your game and check if the problem has been solved.
If the above method failed to update drivers, you can use a professional third-party program to do that. Driver Easy Pro can detect all outdated drivers and update them with just one click. Here is the guide:
Step 1: Install Driver Easy and launch it. Click the Scan Now button.
Step 2: After the scanning process is completed, click the Update All button to download and install the latest drivers for all devices with outdated drivers.
Receive “VAC was unable to verify your game session” error message on CS: GO? Here is how to solve the problem.Click to Tweet
Solution 5: Repair the Steam.exe via Command Prompt
Another reason for “VAC was unable to verify the game session” problem is that there are errors on the Steam client itself. When there are any damaged or corrupted files or incomplete system configuration files in the client, you might see the mentioned error. In this case, you can repair the Steam.exe with Command Prompt.
Here are the detailed steps.
Step 1: Press Win + R to invoke Run window.
Step 2: In the pop-up Run window, input cmd in the box and press Enter to open Command Prompt.
Step 3: Type the following command or copy and paste it to the command and then press Enter to execute it:
C:Program Files (x86)SteambinSteamService.exe» /repair
This might take some time. You need to wait patiently until the process is completed. Then restart your PC to make the changes to take effect. Launch Steam and open the game that was stopped by “VAC was unable to verify your game session error” to check if this solution works.
Solution 6: Disable or Uninstall Your Antivirus Temporarily
Antivirus software could also be the factor which leads to this “VAC was unable to verify the game session” issue. Because it may disrupt the VAC settings when it is scanning and repairing applications in the background to protect your computer from virus attack.
To solve the problem, you should remove the Steam application from the scanning process. You just need to navigate to the settings of your antivirus application and add the Steam to the excluded files folder. If you still keep receiving the mentioned error, try disabling your antivirus temporarily or even reinstalling the antivirus.
Here is how to uninstall a program on PC.
Step 1: Press Win + S to open Search. Then search for Control Panel and open the app.
Step 2: In the top right corner, select View by: Category. Then click Uninstall a program.
Step 3: In the list of programs and features, right-click your antivirus and select Uninstall. Then follow the onscreen instructions to finish the process.
If the problem is fixed after uninstalling the antivirus, you might need to give up this antivirus program and use another reliable one, or contact the support of your antivirus program to get solutions.
If you get the error “VAC was unable to verify your game session” while trying to play a certain game, you can follow the solutions in this post to remove it.Click to Tweet
Bottom Line
Don’t worry if you see “VAC was unable to verify your game session” error message when you want to launch a game like CS: GO. These solutions above are tried by plenty of users and they have fixed the problem successfully. Hope one of the solutions could also be helpful for you.
If you have better ideas about this topic, please don’t hesitate to send us an email via [email protected] or leave a message in the following comment section.
What does verifying integrity of game files do?
Steam offers a built-in feature to verify the integrity of game files. It is usually used when any errors happens on the Steam games due to corrupted or missing game files. It will compare the files on your computer with the ones on the Steam servers. If any files different are scanned, Steam will change or repair them automatically.
What is VAC?
VAC, short for Valve Anti-Cheat, is an automated system designed to detect cheats installed on users’ computer. It works for the fairness in the game world. If a user connects to a VAC-Secured server from a computer with cheats installed, the VAC system will ban the user from playing that game.
How do I fix VAC unable to verify my game?
“VAC was unable to verify the game session” error could be caused by various factors. To solve the problem, you can try:
- Re-login into your Steam account or relaunch Steam client
- Restart the PC
- Verify the game files
- Update your device drivers
- Repair the Steam.exe via Command Prompt
- Disable antivirus temporarily
For more detailed information, you can refer to the solutions introduced in this post.