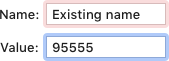
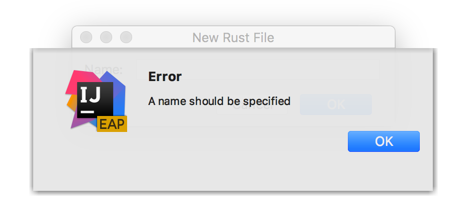
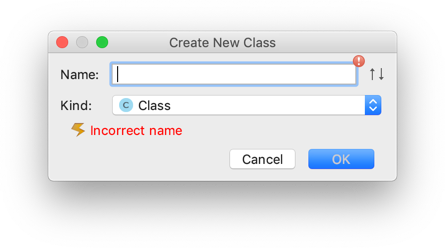
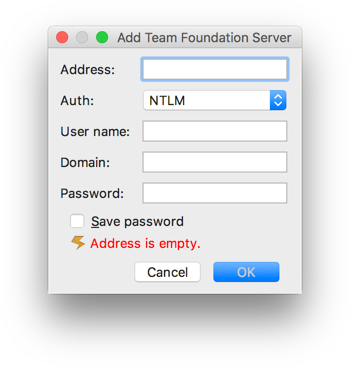
Validation is the process of checking the values specified by the user, and displaying the errors that are found.
An error can appear in a tooltip:
Or inline, above the confirmation buttons:
Principles
Always try not to let the user enter invalid data. To achieve this:
Use controls that are constrained to valid values. For example, use a combo box or a slider instead of the input field.
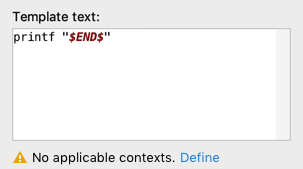
Limit the characters users can enter. For example, if only numbers are supported in a field, and this is obvious to the user, ignore input of letters instead of showing an error:

If it’s not obvious that only numbers can be entered, allow to enter any sign and perform validation.

Provide a default value if possible. Even if the user decides to change the default value, it gives a clue on the expected input format.
Write instructions and examples on how to fill a form using сontext help.
If it’s not possible to limit input, try to show an error as soon as possible so that the user can quickly return and fix it.
Validation types and usage
| What to validate | Validation type | Format | |
|---|---|---|---|
|
1 |
Non-allowed characters
Too big or long values |
Immediately on input | Tooltip |
|
2 |
Non-allowed values in dialogs For example, an existing file name, a value that does not match the pattern, or a value that’s too small |
On sending the form or on focus loss | Tooltip |
|
3 |
Empty required fields in dialogs | Disable the confirmation button or check on sending the form | Tooltip |
|
4 |
Non-allowed or empty values in the main window | On Enter or focus loss | Tooltip |
|
5 |
Remote connection | On sending the form | Tooltip or inline |
|
6 |
Complex values in multi-page dialogs | On reopening the form or when the values are used | Tooltip, inline or notification |
1. Non-allowed characters or too big values
If a non-allowed character is entered, or the maximum input size or value is exceeded, validate it immediately on input.
How it works
The field is highlighted with red and the error appears in the tooltip.
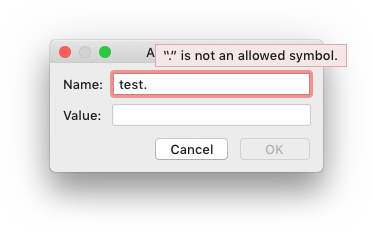
If the maximum value is exceeded, specify what values are allowed (e.g. a range for numeric values, or the number of symbols):

Hide the error when the incorrect symbol is deleted.
Implementation
// Fields initializers
private JTextField myPort = new JTextField();
private static final String MESSAGE = "The port number should be between 0 and 65535";

// Components initialization
new ComponentValidator(project).withValidator(() -> {
  String pt = myPort.getText();
  if (StringUtil.isNotEmpty(pt)) {
    try {
      int portValue = Integer.parseInt(pt);
      if (portValue >= 0 && portValue <= 65535) {
        return null;
      }
      else {
        return new ValidationInfo(MESSAGE, myPort);
      }
    }
    catch (NumberFormatException nfe) {
      return new ValidationInfo(MESSAGE, myPort);
    }
  }
  else {
    return null;
  }
}).installOn(myPort);

myPort.getDocument().addDocumentListener(new DocumentAdapter() {
  @Override
  protected void textChanged(@NotNull DocumentEvent e) {
    ComponentValidator.getInstance(myPort).ifPresent(v -> v.revalidate());
  }
});
2. Non-allowed values in dialogs
A non-allowed value is a value that can be checked only when fully entered. For example, an existing file name, value that does not match the pattern or a value that’s too small/short.
If a non-allowed value is entered, validate it on focus loss or on sending the form, depending on what happens faster.
Do not validate non-allowed values on input, it will interrupt the user.
Do not validate empty fields on focus loss. Users should be able to fill the form in a random order, so do not interrupt them.
How it works
On sending the form, the field is highlighted in red and the error tooltip appears.
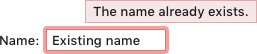
If validated on focus loss, highlight the field in light-red. Do not return focus to the field with the error automatically.
The error tooltip appears when the invalid field gets the focus or on hovering over the field.
When the user changes the value, the tooltip disappears and error highlighting is replaced with the regular focus:

When the focus is returned to the field with an error, use validation on input. Otherwise, it can be unclear for the user how to initiate validation.
Implementation
Add andStartOnFocusLost() call on ComponentValidator before installing it on a component:
new ComponentValidator(getDisposable()).withValidator(...).
    andStartOnFocusLost().installOn(component);
3. Empty required fields in dialogs
Simple form
If a form is simple, move the focus to the first required field and disable the confirmation button until all required fields have been filled. It is clear from the form behavior that input is required, showing validation messages is redundant.
Complex form
If a form is complex, always enable the confirmation button. Otherwise, it can be hard to understand what should be done to complete the form.
Complex forms are:
- Forms with more than 3 input fields or combo boxes.
- Forms with at least one control (checkbox, table, and so on) apart from an input field and a combo box.
Never validate empty required fields on input or focus loss. Users should be able to fill the form in a random order, so do not interrupt them.
How to use
Validation is performed when the user clicks the confirmation button (for example, the “Add” button).
Highlight all invalid fields, move the focus to the first invalid field and show the tooltip.
Hide the tooltip and the red highlighting when the user starts editing the invalid value or entering symbols into the empty required field.
Show the error tooltip for the next field when it gets the focus, hover or the user clicks the “Add” button one more time.
Implementation
By default DialogWrapper disables “OK” button until all fields that participate in validation
become valid. Explicitly enable “OK” button for each input field:
new ValidationInfo("The host cannot be reached", myHostField)
.withOkEnabled();
4. Non-allowed or empty values in the main window
If a non-allowed or an empty value is entered into a field that’s within the Properties view, for example, in UI Designers like the Android Studio Layout Editor, validate it on pressing Enter or focus loss.
How it works
On Enter, the field is highlighted with red and the error tooltip appears.
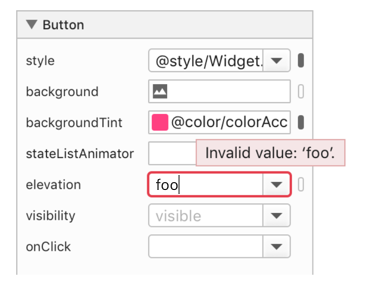
If validated on focus loss, the field is highlighted with light-red. The focus is not returned to the field automatically.
Hide the field highlighting and the tooltip when the user fixes the invalid value.
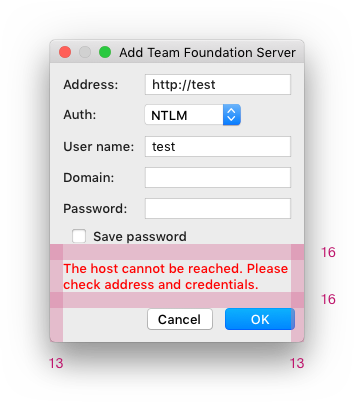
5. Remote connection
If validation is slow or attempts are limited, for example, due to connection to a remote server, validate values on sending the form.
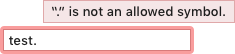
If it’s not possible to detect the fields with errors, show the error message inline under the fields:
An inline error only appears on clicking the confirmation button. The dialog is resized to fit the error message. Do not leave an empty space for the error in advance.
Hide the error messages once any field related to the error is edited. Set the dialog to its original size when the error disappears.
Implementation
ValidationInfo for messages in inline area is created with null component:
 new ValidationInfo("The host cannot be reached. Check the address and
     credentials.");
6. Complex values in multi-page dialogs
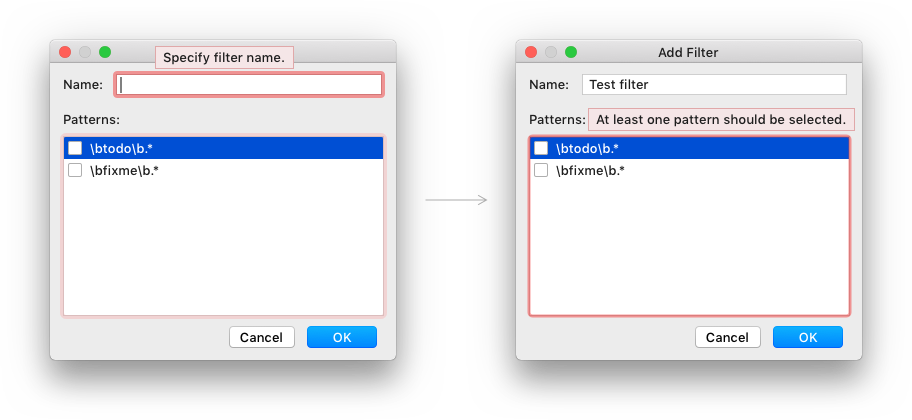
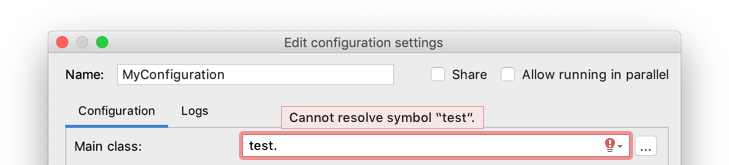
If a value is complex, for example, a list of values, a regexp, or a value copied from another place, and it appears in a multi-page dialog, such as Settings, Project Structure or Run Configurations, show a dialog informing the user about an error on clicking the confirmation button.
For example, in a complex Resource patterns field

show the following dialog on pressing the confirmation button:
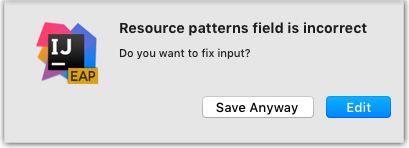
It should be possible to close the Settings dialog and save the entered data if the user wants to fix the values later or needs additional data outside of the modal Settings dialog.
If an invalid field is not empty, highlight it on reopening the Settings dialog or report the error when the entered data is used.
An error tooltip appears in two cases:
If the field with an error gets focus:
If the field loses focus, hide the tooltip and highlight the field with light-red:

On hover over the field or the element with an error:
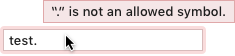
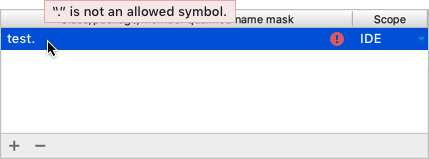
Show the tooltip above the field and move it 40px right, so that the controls above it are not overlapped.
If there is an important info above the field, the tooltip can be shown on the right.
Error message text
An error message describes the problem and provides the way to solve it if it’s not clear from the problem description.

It’s clear how to fix the error from the error description.

The way to solve the problem is provided.
Describe the problem in terms of target users’ actions or goals, not in terms of the program’s architecture.
|
Incorrect |
Invalid Git Executable. Error running «git.exe». File not found: «git.exe». |
|
Correct |
Cannot run «git.exe». The file is not found. |
Provide specific names, locations, and values of the objects involved:
|
Incorrect |
|
|
Correct |
|
For a period at the end of an error message, see Punctuation.
Make the error message short and descriptive. See Writing short and clear.
Examples of common errors and corresponding error messages:
| Error type | Error message |
|---|---|
| Empty required field | Specify the port number |
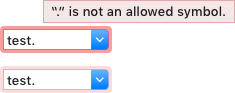
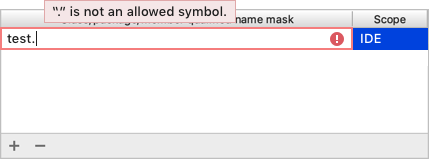
| Incorrect symbol | “/” is not an allowed symbol |
| Incorrect value | The port number should be between XXX and XXXX
The file name should be at least 4 symbols The name is already in use The user name or password is incorrect |
| Incorrect format | The email format should be xxx@xxx.com |
| Missing file | The file is not found |
Use encouraging tone:
| Use | Do not use |
|---|---|
| Problem | Error, failure |
| Unable | Failed to |
| Incorrect | Illegal, invalid, bad |
| Should be | Must |
Warning

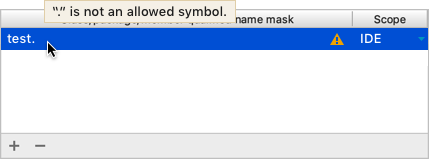
A warning informs the user that something is configured incorrectly, but does not prevent them from applying the changes.
A warning can appear on input, focus loss, or on reopening a filled form. For example, make the empty field Target name as warning on reopening:
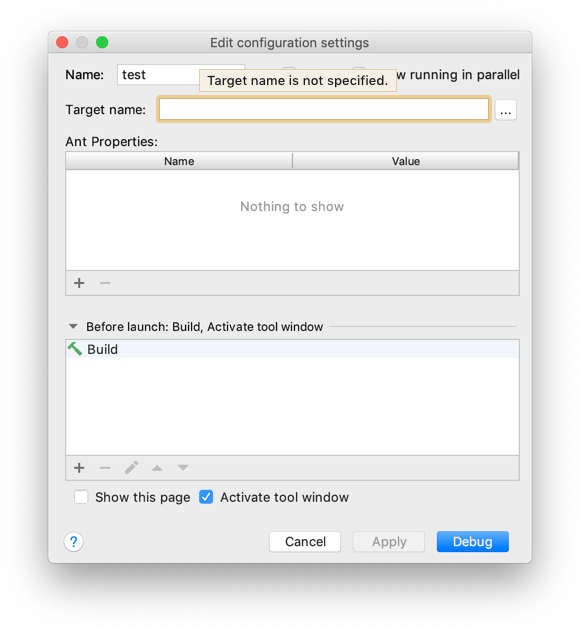
The warning can be shown:
In a tooltip for a specific field. Follow the rules for the error tooltip.
new ValidationInfo("Target name is not specified", myNameField)
.asWarning();
On the form under the controls. Show the message with the yellow warning icon.
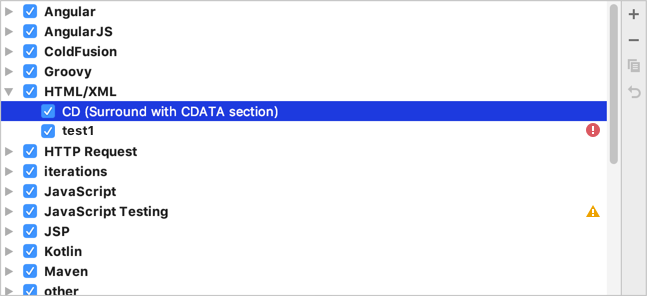
On the “Problems” page in complex multi-page dialogs. Show warnings and fix options:
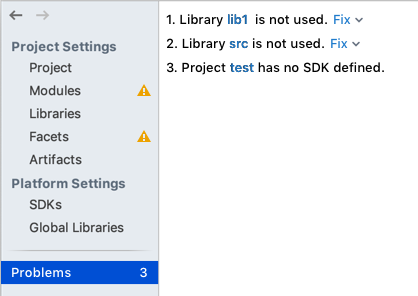
Problems page in the Project Structure dialog.
Mark all navigation elements for areas that contain warnings with yellow icons.
Update the problems counter when a problem is detected. When all problems have been fixed, do not show the “Problems” tab.
On a particular page, highlight the element that contains a warning in yellow or add warning icon next to it.
UI elements with validation errors
Input field
Add a red light bulb on the right side of the input field if an action to fix the error is available:
Combo box
Tables and lists
When the field in a table loses focus, show an error icon. An error tooltip appears on mouse hover or when the line gets focus:
Use a warning icon for warnings:
Implementation
JTextField cellEditor = new JTextField();
cellEditor.putClientProperty(DarculaUIUtil.COMPACT_PROPERTY, Boolean.TRUE);
cellEditor.getDocument().addDocumentListener(new DocumentAdapter() {
    @Override
    protected void textChanged(@NotNull DocumentEvent e) {
      Object op = cellEditor.getText().contains(".") ? "error": null;
      cellEditor.putClientProperty("JComponent.outline", op);
    }
});

TableColumn col0 = table.getColumnModel().getColumn(0);
col0.setCellEditor(new DefaultCellEditor(cellEditor));
col0.setCellRenderer(new DefaultTableCellRenderer() {
    @Override
    public Dimension getPreferredSize() {
      Dimension size = super.getPreferredSize();
      Dimension editorSize = cellEditor.getPreferredSize();
      size.height = Math.max(size.height, editorSize.height);
      return size;
    }
});
Trees and lists
Add an error or warning icon on the right side of the invalid line.
Multi-page dialog
If validation in a multi-page form can be performed only on clicking the confirmation button, then:
- Use red highlighting for navigation elements such as tabs, menu and list items for areas that contain errors so that the user can quickly locate the error.
- Open the first page with an error or stay on the opened page if it has errors on clicking the confirmation button.
Avoid mistakes
Do not show an error in a message box. Users are pulled out of the context, they need to close the dialog and locate the invalid field.
Do not allow to click “OK” button if a form contains empty required fields. For this, the Cancel button should be used, and the OK button should be disabled. Otherwise, if users accidentally leave the field empty, they can expect that the value was entered correctly.
Do not show error message inside the empty required field. It looks like a prefilled field, not like an error message.
Do not underline the field label. It looks like a spell error and poorly visible.

Do not shake a form and show an error with a delay. A shaking form is distracting and time-consuming.
Do not show an error immediately after opening a form. It distracts the user from filling the form.
Do not allow to submit the form with the error. When the form is opened again, the value is reset, so users don’t know
if they entered incorrect data.

Insets and colors

- Previous
- Overview: Forms
- Next
Before submitting data to the server, it is important to ensure all required form controls are filled out, in the correct format.
This is called client-side form validation, and helps ensure data submitted matches the requirements set forth in the various form controls.
This article leads you through basic concepts and examples of client-side form validation.
| Prerequisites: |
Computer literacy, a reasonable understanding of HTML, CSS, and JavaScript. |
|---|---|
| Objective: |
To understand what client-side form validation is, why it’s important, and how to apply various techniques to implement it. |
Client-side validation is an initial check and an important feature of good user experience; by catching invalid data on the client-side, the user can fix it straight away.
If it gets to the server and is then rejected, a noticeable delay is caused by a round trip to the server and then back to the client-side to tell the user to fix their data.
However, client-side validation should not be considered an exhaustive security measure! Your apps should always perform security checks on any form-submitted data on the server-side as well as the client-side, because client-side validation is too easy to bypass, so malicious users can still easily send bad data through to your server.
Read Website security for an idea of what could happen; implementing server-side validation is somewhat beyond the scope of this module, but you should bear it in mind.
What is form validation?
Go to any popular site with a registration form, and you will notice that they provide feedback when you don’t enter your data in the format they are expecting.
You’ll get messages such as:
- «This field is required» (You can’t leave this field blank).
- «Please enter your phone number in the format xxx-xxxx» (A specific data format is required for it to be considered valid).
- «Please enter a valid email address» (the data you entered is not in the right format).
- «Your password needs to be between 8 and 30 characters long and contain one uppercase letter, one symbol, and a number.» (A very specific data format is required for your data).
This is called form validation.
When you enter data, the browser and/or the web server will check to see that the data is in the correct format and within the constraints set by the application. Validation done in the browser is called client-side validation, while validation done on the server is called server-side validation.
In this chapter we are focusing on client-side validation.
If the information is correctly formatted, the application allows the data to be submitted to the server and (usually) saved in a database; if the information isn’t correctly formatted, it gives the user an error message explaining what needs to be corrected, and lets them try again.
We want to make filling out web forms as easy as possible. So why do we insist on validating our forms?
There are three main reasons:
- We want to get the right data, in the right format. Our applications won’t work properly if our users’ data is stored in the wrong format, is incorrect, or is omitted altogether.
- We want to protect our users’ data. Forcing our users to enter secure passwords makes it easier to protect their account information.
- We want to protect ourselves. There are many ways that malicious users can misuse unprotected forms to damage the application. See Website security.
Warning: Never trust data passed to your server from the client. Even if your form is validating correctly and preventing malformed input on the client-side, a malicious user can still alter the network request.
Different types of client-side validation
There are two different types of client-side validation that you’ll encounter on the web:
-
Built-in form validation uses HTML form validation features, which we’ve discussed in many places throughout this module.
This validation generally doesn’t require much JavaScript. Built-in form validation has better performance than JavaScript, but it is not as customizable as JavaScript validation. -
JavaScript validation is coded using JavaScript.
This validation is completely customizable, but you need to create it all (or use a library).
Using built-in form validation
One of the most significant features of modern form controls is the ability to validate most user data without relying on JavaScript.
This is done by using validation attributes on form elements.
We’ve seen many of these earlier in the course, but to recap:
required: Specifies whether a form field needs to be filled in before the form can be submitted.minlengthandmaxlength: Specifies the minimum and maximum length of textual data (strings).minandmax: Specifies the minimum and maximum values of numerical input types.type: Specifies whether the data needs to be a number, an email address, or some other specific preset type.pattern: Specifies a regular expression that defines a pattern the entered data needs to follow.
If the data entered in a form field follows all of the rules specified by the above attributes, it is considered valid.
If not, it is considered invalid.
When an element is valid, the following things are true:
- The element matches the
:validCSS pseudo-class, which lets you apply a specific style to valid elements. - If the user tries to send the data, the browser will submit the form, provided there is nothing else stopping it from doing so (e.g., JavaScript).
When an element is invalid, the following things are true:
- The element matches the
:invalidCSS pseudo-class, and sometimes other UI pseudo-classes (e.g.,:out-of-range) depending on the error, which lets you apply a specific style to invalid elements. - If the user tries to send the data, the browser will block the form and display an error message.
Built-in form validation examples
In this section, we’ll test out some of the attributes that we discussed above.
Simple start file
Let’s start with a simple example: an input that allows you to choose whether you prefer a banana or a cherry.
This example involves a simple text <input> with an associated <label> and a submit <button>.
Find the source code on GitHub at fruit-start.html and a live example below.
<form>
  <label for="choose">Would you prefer a banana or cherry?</label>
  <input id="choose" name="i-like" />
  <button>Submit</button>
</form>
input:invalid {
  border: 2px dashed red;
}

input:valid {
  border: 2px solid black;
}
To begin, make a copy of fruit-start.html in a new directory on your hard drive.
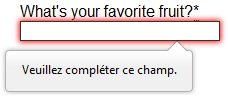
The required attribute
The simplest HTML validation feature is the required attribute.
To make an input mandatory, add this attribute to the element.
When this attribute is set, the element matches the :required UI pseudo-class and the form won’t submit, displaying an error message on submission when the input is empty.
While empty, the input will also be considered invalid, matching the :invalid UI pseudo-class.
Add a required attribute to your input, as shown below.
<form>
  <label for="choose">Would you prefer a banana or cherry? (required)</label>
  <input id="choose" name="i-like" required />
  <button>Submit</button>
</form>
Note the CSS that is included in the example file:
input:invalid {
  border: 2px dashed red;
}

input:invalid:required {
  background-image: linear-gradient(to right, pink, lightgreen);
}

input:valid {
  border: 2px solid black;
}
This CSS causes the input to have a red dashed border when it is invalid and a more subtle solid black border when valid.
We also added a background gradient when the input is required and invalid. Try out the new behavior in the example below:
Try submitting the form without a value.
Note how the invalid input gets focus, a default error message («Please fill out this field») appears, and the form is prevented from being sent.
The presence of the required attribute on any element that supports this attribute means the element matches the :required pseudo-class whether it has a value or not. If the <input> has no value, the input will match the :invalid pseudo-class.
Note: For good user experience, indicate to the user when form fields are required.
It isn’t only good user experience, it is required by WCAG accessibility guidelines.
Also, only require users to input data you actually need: For example, why do you really need to know someone’s gender or title?
Validating against a regular expression
Another useful validation feature is the pattern attribute, which expects a Regular Expression as its value.
A regular expression (regex) is a pattern that can be used to match character combinations in text strings, so regexps are ideal for form validation and serve a variety of other uses in JavaScript.
Regexps are quite complex, and we don’t intend to teach you them exhaustively in this article.
Below are some examples to give you a basic idea of how they work.
a— Matches one character that isa(notb, notaa, and so on).abc— Matchesa, followed byb, followed byc.ab?c— Matchesa, optionally followed by a singleb, followed byc. (acorabc)ab*c— Matchesa, optionally followed by any number ofbs, followed byc. (ac,abc,abbbbbc, and so on).a|b— Matches one character that isaorb.abc|xyz— Matches exactlyabcor exactlyxyz(but notabcxyzoraory, and so on).
There are many more possibilities that we don’t cover here.
For a complete list and many examples, consult our Regular expressions documentation.
Let’s implement an example.
Update your HTML to add a pattern attribute like this:
<form>
  <label for="choose">Would you prefer a banana or a cherry?</label>
  <input id="choose" name="i-like" required pattern="[Bb]anana|[Cc]herry" />
  <button>Submit</button>
</form>
input:invalid {
  border: 2px dashed red;
}

input:valid {
  border: 2px solid black;
}
This gives us the following update — try it out:
In this example, the <input> element accepts one of four possible values: the strings «banana», «Banana», «cherry», or «Cherry». Regular expressions are case-sensitive, but we’ve made it support capitalized as well as lower-case versions using an extra «Aa» pattern nested inside square brackets.
At this point, try changing the value inside the pattern attribute to equal some of the examples you saw earlier, and look at how that affects the values you can enter to make the input value valid.
Try writing some of your own, and see how it goes.
Make them fruit-related where possible so that your examples make sense!
If a non-empty value of the <input> doesn’t match the regular expression’s pattern, the input will match the :invalid pseudo-class.
Note: Some <input> element types don’t need a pattern attribute to be validated against a regular expression. Specifying the email type, for example, validates the inputs value against a well-formed email address pattern or a pattern matching a comma-separated list of email addresses if it has the multiple attribute.
Constraining the length of your entries
You can constrain the character length of all text fields created by <input> or <textarea> by using the minlength and maxlength attributes.
A field is invalid if it has a value and that value has fewer characters than the minlength value or more than the maxlength value.
Browsers often don’t let the user type a longer value than expected into text fields. A better user experience than just using maxlength is to also provide character count feedback in an accessible manner and let them edit their content down to size.
An example of this is the character limit seen on Twitter when Tweeting. JavaScript, including solutions using maxlength, can be used to provide this.
Constraining the values of your entries
For number fields (i.e. <input type="number">), the min and max attributes can be used to provide a range of valid values.
If the field contains a value outside this range, it will be invalid.
Let’s look at another example.
Create a new copy of the fruit-start.html file.
Now delete the contents of the <body> element, and replace it with the following:
<form>
  <div>
    <label for="choose">Would you prefer a banana or a cherry?</label>
    <input
      type="text"
      id="choose"
      name="i-like"
      required
      minlength="6"
      maxlength="6" />
  </div>
  <div>
    <label for="number">How many would you like?</label>
    <input type="number" id="number" name="amount" value="1" min="1" max="10" />
  </div>
  <div>
    <button>Submit</button>
  </div>
</form>
- Here you’ll see that we’ve given the
textfield aminlengthandmaxlengthof six, which is the same length as banana and cherry. -
We’ve also given the
numberfield aminof one and amaxof ten.
Entered numbers outside this range will show as invalid; users won’t be able to use the increment/decrement arrows to move the value outside of this range.
If the user manually enters a number outside of this range, the data is invalid.
The number is not required, so removing the value will still result in a valid value.
input:invalid {
  border: 2px dashed red;
}

input:valid {
  border: 2px solid black;
}

div {
  margin-bottom: 10px;
}
Here is the example running live:
Note: <input type="number"> (and other types, such as range and date) can also take a step attribute, which specifies what increment the value will go up or down by when the input controls are used (such as the up and down number buttons).
In the above example we’ve not included a step attribute, so the value defaults to 1. This means that floats, like 3.2, will also show as invalid.
Full example
Here is a full example to show usage of HTML’s built-in validation features.
First, some HTML:
<form>
  <p>
    <fieldset>
      <legend>Do you have a driver's license?<span aria-label="required">*</span></legend>
      <!-- While only one radio button in a same-named group can be selected at a time,
           and therefore only one radio button in a same-named group having the "required"
           attribute suffices in making a selection a requirement -->
      <input type="radio" required name="driver" id="r1" value="yes"><label for="r1">Yes</label>
      <input type="radio" required name="driver" id="r2" value="no"><label for="r2">No</label>
    </fieldset>
  </p>
  <p>
    <label for="n1">How old are you?</label>
    <!-- The pattern attribute can act as a fallback for browsers which
         don't implement the number input type but support the pattern attribute.
         Please note that browsers that support the pattern attribute will make it
         fail silently when used with a number field.
         Its usage here acts only as a fallback -->
    <input type="number" min="12" max="120" step="1" id="n1" name="age"
           pattern="d+">
  </p>
  <p>
    <label for="t1">What's your favorite fruit?<span aria-label="required">*</span></label>
    <input type="text" id="t1" name="fruit" list="l1" required
           pattern="[Bb]anana|[Cc]herry|[Aa]pple|[Ss]trawberry|[Ll]emon|[Oo]range">
    <datalist id="l1">
      <option>Banana</option>
      <option>Cherry</option>
      <option>Apple</option>
      <option>Strawberry</option>
      <option>Lemon</option>
      <option>Orange</option>
    </datalist>
  </p>
  <p>
    <label for="t2">What's your email address?</label>
    <input type="email" id="t2" name="email">
  </p>
  <p>
    <label for="t3">Leave a short message</label>
    <textarea id="t3" name="msg" maxlength="140" rows="5"></textarea>
  </p>
  <p>
    <button>Submit</button>
  </p>
</form>
And now some CSS to style the HTML:
form {
  font: 1em sans-serif;
  max-width: 320px;
}

p > label {
  display: block;
}

input[type="text"],
input[type="email"],
input[type="number"],
textarea,
fieldset {
  width: 100%;
  border: 1px solid #333;
  box-sizing: border-box;
}

input:invalid {
  box-shadow: 0 0 5px 1px red;
}

input:focus:invalid {
  box-shadow: none;
}
This renders as follows:
See Validation-related attributes for a complete list of attributes that can be used to constrain input values and the input types that support them.
Validating forms using JavaScript
You must use JavaScript if you want to take control over the look and feel of native error messages.
In this section we will look at the different ways to do this.
The Constraint Validation API
The Constraint Validation API consists of a set of methods and properties available on the following form element DOM interfaces:
HTMLButtonElement(represents a<button>element)HTMLFieldSetElement(represents a<fieldset>element)HTMLInputElement(represents an<input>element)HTMLOutputElement(represents an<output>element)HTMLSelectElement(represents a<select>element)HTMLTextAreaElement(represents a<textarea>element)
The Constraint Validation API makes the following properties available on the above elements.
validationMessage: Returns a localized message describing the validation constraints that the control doesn’t satisfy (if any). If the control is not a candidate for constraint validation (willValidateisfalse) or the element’s value satisfies its constraints (is valid), this will return an empty string.validity: Returns aValidityStateobject that contains several properties describing the validity state of the element. You can find full details of all the available properties in theValidityStatereference page; below is listed a few of the more common ones:patternMismatch: Returnstrueif the value does not match the specifiedpattern, andfalseif it does match. If true, the element matches the:invalidCSS pseudo-class.tooLong: Returnstrueif the value is longer than the maximum length specified by themaxlengthattribute, orfalseif it is shorter than or equal to the maximum. If true, the element matches the:invalidCSS pseudo-class.tooShort: Returnstrueif the value is shorter than the minimum length specified by theminlengthattribute, orfalseif it is greater than or equal to the minimum. If true, the element matches the:invalidCSS pseudo-class.rangeOverflow: Returnstrueif the value is greater than the maximum specified by themaxattribute, orfalseif it is less than or equal to the maximum. If true, the element matches the:invalidand:out-of-rangeCSS pseudo-classes.rangeUnderflow: Returnstrueif the value is less than the minimum specified by theminattribute, orfalseif it is greater than or equal to the minimum. If true, the element matches the:invalidand:out-of-rangeCSS pseudo-classes.typeMismatch: Returnstrueif the value is not in the required syntax (whentypeisemailorurl), orfalseif the syntax is correct. Iftrue, the element matches the:invalidCSS pseudo-class.valid: Returnstrueif the element meets all its validation constraints, and is therefore considered to be valid, orfalseif it fails any constraint. If true, the element matches the:validCSS pseudo-class; the:invalidCSS pseudo-class otherwise.valueMissing: Returnstrueif the element has arequiredattribute, but no value, orfalseotherwise. If true, the element matches the:invalidCSS pseudo-class.
willValidate: Returnstrueif the element will be validated when the form is submitted;falseotherwise.
The Constraint Validation API also makes the following methods available on the above elements and the form element.
checkValidity(): Returnstrueif the element’s value has no validity problems;falseotherwise. If the element is invalid, this method also fires aninvalidevent on the element.reportValidity(): Reports invalid field(s) using events. This method is useful in combination withpreventDefault()in anonSubmitevent handler.setCustomValidity(message): Adds a custom error message to the element; if you set a custom error message, the element is considered to be invalid, and the specified error is displayed. This lets you use JavaScript code to establish a validation failure other than those offered by the standard HTML validation constraints. The message is shown to the user when reporting the problem.
Implementing a customized error message
As you saw in the HTML validation constraint examples earlier, each time a user tries to submit an invalid form, the browser displays an error message. The way this message is displayed depends on the browser.
These automated messages have two drawbacks:
- There is no standard way to change their look and feel with CSS.
- They depend on the browser locale, which means that you can have a page in one language but an error message displayed in another language, as seen in the following Firefox screenshot.
Customizing these error messages is one of the most common use cases of the Constraint Validation API.
Let’s work through a simple example of how to do this.
We’ll start with some simple HTML (feel free to put this in a blank HTML file; use a fresh copy of fruit-start.html as a basis, if you like):
<form>
  <label for="mail">
    I would like you to provide me with an email address:
  </label>
  <input type="email" id="mail" name="mail" />
  <button>Submit</button>
</form>
And add the following JavaScript to the page:
const email = document.getElementById("mail");

email.addEventListener("input", (event) => {
  if (email.validity.typeMismatch) {
    email.setCustomValidity("I am expecting an email address!");
  } else {
    email.setCustomValidity("");
  }
});
Here we store a reference to the email input, then add an event listener to it that runs the contained code each time the value inside the input is changed.
Inside the contained code, we check whether the email input’s validity.typeMismatch property returns true, meaning that the contained value doesn’t match the pattern for a well-formed email address. If so, we call the setCustomValidity() method with a custom message. This renders the input invalid, so that when you try to submit the form, submission fails and the custom error message is displayed.
If the validity.typeMismatch property returns false, we call the setCustomValidity() method with an empty string. This renders the input valid, so the form will submit.
You can try it out below:
A more detailed example
Now that we’ve seen a really simple example, let’s see how we can use this API to build some slightly more complex custom validation.
First, the HTML. Again, feel free to build this along with us:
<form novalidate>
  <p>
    <label for="mail">
      <span>Please enter an email address:</span>
      <input type="email" id="mail" name="mail" required minlength="8" />
      <span class="error" aria-live="polite"></span>
    </label>
  </p>
  <button>Submit</button>
</form>
This simple form uses the novalidate attribute to turn off the browser’s automatic validation; this lets our script take control over validation.
However, this doesn’t disable support for the constraint validation API nor the application of CSS pseudo-classes like :valid, etc.
That means that even though the browser doesn’t automatically check the validity of the form before sending its data, you can still do it yourself and style the form accordingly.
Our input to validate is an <input type="email">, which is required, and has a minlength of 8 characters. Let’s check these using our own code, and show a custom error message for each one.
We are aiming to show the error messages inside a <span> element.
The aria-live attribute is set on that <span> to make sure that our custom error message will be presented to everyone, including it being read out to screen reader users.
Note: A key point here is that setting the novalidate attribute on the form is what stops the form from showing its own error message bubbles, and allows us to instead display the custom error messages in the DOM in some manner of our own choosing.
Now onto some basic CSS to improve the look of the form slightly, and provide some visual feedback when the input data is invalid:
body {
  font: 1em sans-serif;
  width: 200px;
  padding: 0;
  margin: 0 auto;
}

p * {
  display: block;
}

input[type="email"] {
  appearance: none;

  width: 100%;
  border: 1px solid #333;
  margin: 0;

  font-family: inherit;
  font-size: 90%;

  box-sizing: border-box;
}

/* This is our style for the invalid fields */
input:invalid {
  border-color: #900;
  background-color: #fdd;
}

input:focus:invalid {
  outline: none;
}

/* This is the style of our error messages */
.error {
  width: 100%;
  padding: 0;

  font-size: 80%;
  color: white;
  background-color: #900;
  border-radius: 0 0 5px 5px;

  box-sizing: border-box;
}

.error.active {
  padding: 0.3em;
}
Now let’s look at the JavaScript that implements the custom error validation.
// There are many ways to pick a DOM node; here we get the form itself and the email
// input box, as well as the span element into which we will place the error message.
const form = document.querySelector("form");
const email = document.getElementById("mail");
const emailError = document.querySelector("#mail + span.error");

email.addEventListener("input", (event) => {
  // Each time the user types something, we check if the
  // form fields are valid.

  if (email.validity.valid) {
    // In case there is an error message visible, if the field
    // is valid, we remove the error message.
    emailError.textContent = ""; // Reset the content of the message
    emailError.className = "error"; // Reset the visual state of the message
  } else {
    // If there is still an error, show the correct error
    showError();
  }
});

form.addEventListener("submit", (event) => {
  // if the email field is valid, we let the form submit
  if (!email.validity.valid) {
    // If it isn't, we display an appropriate error message
    showError();
    // Then we prevent the form from being sent by canceling the event
    event.preventDefault();
  }
});

function showError() {
  if (email.validity.valueMissing) {
    // If the field is empty,
    // display the following error message.
    emailError.textContent = "You need to enter an email address.";
  } else if (email.validity.typeMismatch) {
    // If the field doesn't contain an email address,
    // display the following error message.
    emailError.textContent = "Entered value needs to be an email address.";
  } else if (email.validity.tooShort) {
    // If the data is too short,
    // display the following error message.
    emailError.textContent = `Email should be at least ${email.minLength} characters; you entered ${email.value.length}.`;
  }

  // Set the styling appropriately
  emailError.className = "error active";
}
The comments explain things pretty well, but briefly:
-
Every time we change the value of the input, we check to see if it contains valid data.
If it has then we remove any error message being shown.
If the data is not valid, we runshowError()to show the appropriate error. -
Every time we try to submit the form, we again check to see if the data is valid. If so, we let the form submit.
If not, we runshowError()to show the appropriate error, and stop the form submitting withpreventDefault(). - The
showError()function uses various properties of the input’svalidityobject to determine what the error is, and then displays an error message as appropriate.
Here is the live result:
The constraint validation API gives you a powerful tool to handle form validation, letting you have enormous control over the user interface above and beyond what you can do with HTML and CSS alone.
Validating forms without a built-in API
In some cases, such as custom controls, you won’t be able to or won’t want to use the Constraint Validation API. You’re still able to use JavaScript to validate your form, but you’ll just have to write your own.
To validate a form, ask yourself a few questions:
- What kind of validation should I perform?
-
You need to determine how to validate your data: string operations, type conversion, regular expressions, and so on. It’s up to you.
- What should I do if the form doesn’t validate?
-
This is clearly a UI matter. You have to decide how the form will behave. Does the form send the data anyway?
Should you highlight the fields that are in error?
Should you display error messages? - How can I help the user to correct invalid data?
-
In order to reduce the user’s frustration, it’s very important to provide as much helpful information as possible in order to guide them in correcting their inputs.
You should offer up-front suggestions so they know what’s expected, as well as clear error messages.
If you want to dig into form validation UI requirements, here are some useful articles you should read:- Help users enter the right data in forms
- Validating input
- How to Report Errors in Forms: 10 Design Guidelines
An example that doesn’t use the constraint validation API
In order to illustrate this, the following is a simplified version of the previous example without the Constraint Validation API.
The HTML is almost the same; we just removed the HTML validation features.
<form>
  <p>
    <label for="mail">
      <span>Please enter an email address:</span>
      <input type="text" id="mail" name="mail" />
      <span class="error" aria-live="polite"></span>
    </label>
  </p>
  <button>Submit</button>
</form>
Similarly, the CSS doesn’t need to change very much; we’ve just turned the :invalid CSS pseudo-class into a real class and avoided using the attribute selector that doesn’t work on Internet Explorer 6.
body {
  font: 1em sans-serif;
  width: 200px;
  padding: 0;
  margin: 0 auto;
}

form {
  max-width: 200px;
}

p * {
  display: block;
}

input.mail {
  appearance: none;
  width: 100%;
  border: 1px solid #333;
  margin: 0;

  font-family: inherit;
  font-size: 90%;

  box-sizing: border-box;
}

/* This is our style for the invalid fields */
input.invalid {
  border-color: #900;
  background-color: #fdd;
}

input:focus.invalid {
  outline: none;
}

/* This is the style of our error messages */
.error {
  width: 100%;
  padding: 0;

  font-size: 80%;
  color: white;
  background-color: #900;
  border-radius: 0 0 5px 5px;
  box-sizing: border-box;
}

.error.active {
  padding: 0.3em;
}
The big changes are in the JavaScript code, which needs to do much more heavy lifting.
const form = document.querySelector("form");
const email = document.getElementById("mail");
const error = email.nextElementSibling;

// As per the HTML Specification
const emailRegExp =
  /^[a-zA-Z0-9.!#$%&'*+/=?^_`{|}~-]+@[a-zA-Z0-9-]+(?:.[a-zA-Z0-9-]+)*$/;

// Now we can rebuild our validation constraint
// Because we do not rely on CSS pseudo-class, we have to
// explicitly set the valid/invalid class on our email field
window.addEventListener("load", () => {
  // Here, we test if the field is empty (remember, the field is not required)
  // If it is not, we check if its content is a well-formed email address.
  const isValid = email.value.length === 0 || emailRegExp.test(email.value);
  email.className = isValid ? "valid" : "invalid";
});

// This defines what happens when the user types in the field
email.addEventListener("input", () => {
  const isValid = email.value.length === 0 || emailRegExp.test(email.value);
  if (isValid) {
    email.className = "valid";
    error.textContent = "";
    error.className = "error";
  } else {
    email.className = "invalid";
  }
});

// This defines what happens when the user tries to submit the data
form.addEventListener("submit", (event) => {
  event.preventDefault();

  const isValid = email.value.length === 0 || emailRegExp.test(email.value);
  if (!isValid) {
    email.className = "invalid";
    error.textContent = "I expect an email, darling!";
    error.className = "error active";
  } else {
    email.className = "valid";
    error.textContent = "";
    error.className = "error";
  }
});
The result looks like this:
As you can see, it’s not that hard to build a validation system on your own. The difficult part is to make it generic enough to use both cross-platform and on any form you might create. There are many libraries available to perform form validation, such as Validate.js.
Test your skills!
You’ve reached the end of this article, but can you remember the most important information? You can find some further tests to verify that you’ve retained this information before you move on — see Test your skills: Form validation.
Summary
Client-side form validation sometimes requires JavaScript if you want to customize styling and error messages, but it always requires you to think carefully about the user.
Always remember to help your users correct the data they provide. To that end, be sure to:
- Display explicit error messages.
- Be permissive about the input format.
- Point out exactly where the error occurs, especially on large forms.
Once you have checked that the form is filled out correctly, the form can be submitted.
We’ll cover sending form data next.
- Previous
- Overview: Forms
- Next
In this module
Advanced Topics
Version
![]()
![]()
Validation
- Introduction
-
Validation Quickstart
- Defining The Routes
- Creating The Controller
- Writing The Validation Logic
- Displaying The Validation Errors
- Repopulating Forms
- A Note On Optional Fields
- Validation Error Response Format
-
Form Request Validation
- Creating Form Requests
- Authorizing Form Requests
- Customizing The Error Messages
- Preparing Input For Validation
-
Manually Creating Validators
- Automatic Redirection
- Named Error Bags
- Customizing The Error Messages
- After Validation Hook
- Working With Validated Input
-
Working With Error Messages
- Specifying Custom Messages In Language Files
- Specifying Attributes In Language Files
- Specifying Values In Language Files
- Available Validation Rules
- Conditionally Adding Rules
-
Validating Arrays
- Validating Nested Array Input
- Error Message Indexes & Positions
- Validating Files
- Validating Passwords
-
Custom Validation Rules
- Using Rule Objects
- Using Closures
- Implicit Rules
Introduction
Laravel provides several different approaches to validate your application’s incoming data. It is most common to use the validate method available on all incoming HTTP requests. However, we will discuss other approaches to validation as well.
Laravel includes a wide variety of convenient validation rules that you may apply to data, even providing the ability to validate if values are unique in a given database table. We’ll cover each of these validation rules in detail so that you are familiar with all of Laravel’s validation features.
Validation Quickstart
To learn about Laravel’s powerful validation features, let’s look at a complete example of validating a form and displaying the error messages back to the user. By reading this high-level overview, you’ll be able to gain a good general understanding of how to validate incoming request data using Laravel:
Defining The Routes
First, let’s assume we have the following routes defined in our routes/web.php file:
use AppHttpControllersPostController;
Route::get('/post/create', [PostController::class, 'create']);
Route::post('/post', [PostController::class, 'store']);
The GET route will display a form for the user to create a new blog post, while the POST route will store the new blog post in the database.
Creating The Controller
Next, let’s take a look at a simple controller that handles incoming requests to these routes. We’ll leave the store method empty for now:
<?php
namespace AppHttpControllers;
use AppHttpControllersController;
use IlluminateHttpRequest;
class PostController extends Controller
{
/**
* Show the form to create a new blog post.
*
* @return IlluminateViewView
*/
public function create()
{
return view('post.create');
}
/**
* Store a new blog post.
*
* @param IlluminateHttpRequest $request
* @return IlluminateHttpResponse
*/
public function store(Request $request)
{
// Validate and store the blog post...
}
}
Writing The Validation Logic
Now we are ready to fill in our store method with the logic to validate the new blog post. To do this, we will use the validate method provided by the IlluminateHttpRequest object. If the validation rules pass, your code will keep executing normally; however, if validation fails, an IlluminateValidationValidationException exception will be thrown and the proper error response will automatically be sent back to the user.
If validation fails during a traditional HTTP request, a redirect response to the previous URL will be generated. If the incoming request is an XHR request, a JSON response containing the validation error messages will be returned.
To get a better understanding of the validate method, let’s jump back into the store method:
/**
* Store a new blog post.
*
* @param IlluminateHttpRequest $request
* @return IlluminateHttpResponse
*/
public function store(Request $request)
{
$validated = $request->validate([
'title' => 'required|unique:posts|max:255',
'body' => 'required',
]);
// The blog post is valid...
}
As you can see, the validation rules are passed into the validate method. Don’t worry — all available validation rules are documented. Again, if the validation fails, the proper response will automatically be generated. If the validation passes, our controller will continue executing normally.
Alternatively, validation rules may be specified as arrays of rules instead of a single | delimited string:
$validatedData = $request->validate([
'title' => ['required', 'unique:posts', 'max:255'],
'body' => ['required'],
]);
In addition, you may use the validateWithBag method to validate a request and store any error messages within a named error bag:
$validatedData = $request->validateWithBag('post', [
'title' => ['required', 'unique:posts', 'max:255'],
'body' => ['required'],
]);
Stopping On First Validation Failure
Sometimes you may wish to stop running validation rules on an attribute after the first validation failure. To do so, assign the bail rule to the attribute:
$request->validate([
'title' => 'bail|required|unique:posts|max:255',
'body' => 'required',
]);
In this example, if the unique rule on the title attribute fails, the max rule will not be checked. Rules will be validated in the order they are assigned.
A Note On Nested Attributes
If the incoming HTTP request contains «nested» field data, you may specify these fields in your validation rules using «dot» syntax:
$request->validate([
'title' => 'required|unique:posts|max:255',
'author.name' => 'required',
'author.description' => 'required',
]);
On the other hand, if your field name contains a literal period, you can explicitly prevent this from being interpreted as «dot» syntax by escaping the period with a backslash:
$request->validate([
'title' => 'required|unique:posts|max:255',
'v1.0' => 'required',
]);
Displaying The Validation Errors
So, what if the incoming request fields do not pass the given validation rules? As mentioned previously, Laravel will automatically redirect the user back to their previous location. In addition, all of the validation errors and request input will automatically be flashed to the session.
An $errors variable is shared with all of your application’s views by the IlluminateViewMiddlewareShareErrorsFromSession middleware, which is provided by the web middleware group. When this middleware is applied an $errors variable will always be available in your views, allowing you to conveniently assume the $errors variable is always defined and can be safely used. The $errors variable will be an instance of IlluminateSupportMessageBag. For more information on working with this object, check out its documentation.
So, in our example, the user will be redirected to our controller’s create method when validation fails, allowing us to display the error messages in the view:
<!-- /resources/views/post/create.blade.php -->
<h1>Create Post</h1>
@if ($errors->any())
<div class="alert alert-danger">
<ul>
@foreach ($errors->all() as $error)
<li>{{ $error }}</li>
@endforeach
</ul>
</div>
@endif
<!-- Create Post Form -->
Customizing The Error Messages
Laravel’s built-in validation rules each have an error message that is located in your application’s lang/en/validation.php file. Within this file, you will find a translation entry for each validation rule. You are free to change or modify these messages based on the needs of your application.
In addition, you may copy this file to another translation language directory to translate the messages for your application’s language. To learn more about Laravel localization, check out the complete localization documentation.
XHR Requests & Validation
In this example, we used a traditional form to send data to the application. However, many applications receive XHR requests from a JavaScript powered frontend. When using the validate method during an XHR request, Laravel will not generate a redirect response. Instead, Laravel generates a JSON response containing all of the validation errors. This JSON response will be sent with a 422 HTTP status code.
The @error Directive
You may use the @error Blade directive to quickly determine if validation error messages exist for a given attribute. Within an @error directive, you may echo the $message variable to display the error message:
<!-- /resources/views/post/create.blade.php -->
<label for="title">Post Title</label>
<input id="title"
type="text"
name="title"
class="@error('title') is-invalid @enderror">
@error('title')
<div class="alert alert-danger">{{ $message }}</div>
@enderror
If you are using named error bags, you may pass the name of the error bag as the second argument to the @error directive:
<input ... class="@error('title', 'post') is-invalid @enderror">
Repopulating Forms
When Laravel generates a redirect response due to a validation error, the framework will automatically flash all of the request’s input to the session. This is done so that you may conveniently access the input during the next request and repopulate the form that the user attempted to submit.
To retrieve flashed input from the previous request, invoke the old method on an instance of IlluminateHttpRequest. The old method will pull the previously flashed input data from the session:
$title = $request->old('title');
Laravel also provides a global old helper. If you are displaying old input within a Blade template, it is more convenient to use the old helper to repopulate the form. If no old input exists for the given field, null will be returned:
<input type="text" name="title" value="{{ old('title') }}">
A Note On Optional Fields
By default, Laravel includes the TrimStrings and ConvertEmptyStringsToNull middleware in your application’s global middleware stack. These middleware are listed in the stack by the AppHttpKernel class. Because of this, you will often need to mark your «optional» request fields as nullable if you do not want the validator to consider null values as invalid. For example:
$request->validate([
'title' => 'required|unique:posts|max:255',
'body' => 'required',
'publish_at' => 'nullable|date',
]);
In this example, we are specifying that the publish_at field may be either null or a valid date representation. If the nullable modifier is not added to the rule definition, the validator would consider null an invalid date.
Validation Error Response Format
When your application throws a IlluminateValidationValidationException exception and the incoming HTTP request is expecting a JSON response, Laravel will automatically format the error messages for you and return a 422 Unprocessable Entity HTTP response.
Below, you can review an example of the JSON response format for validation errors. Note that nested error keys are flattened into «dot» notation format:
{
"message": "The team name must be a string. (and 4 more errors)",
"errors": {
"team_name": [
"The team name must be a string.",
"The team name must be at least 1 characters."
],
"authorization.role": [
"The selected authorization.role is invalid."
],
"users.0.email": [
"The users.0.email field is required."
],
"users.2.email": [
"The users.2.email must be a valid email address."
]
}
}
Form Request Validation
Creating Form Requests
For more complex validation scenarios, you may wish to create a «form request». Form requests are custom request classes that encapsulate their own validation and authorization logic. To create a form request class, you may use the make:request Artisan CLI command:
php artisan make:request StorePostRequest
The generated form request class will be placed in the app/Http/Requests directory. If this directory does not exist, it will be created when you run the make:request command. Each form request generated by Laravel has two methods: authorize and rules.
As you might have guessed, the authorize method is responsible for determining if the currently authenticated user can perform the action represented by the request, while the rules method returns the validation rules that should apply to the request’s data:
/**
* Get the validation rules that apply to the request.
*
* @return array
*/
public function rules()
{
return [
'title' => 'required|unique:posts|max:255',
'body' => 'required',
];
}
Note
You may type-hint any dependencies you require within therulesmethod’s signature. They will automatically be resolved via the Laravel service container.
So, how are the validation rules evaluated? All you need to do is type-hint the request on your controller method. The incoming form request is validated before the controller method is called, meaning you do not need to clutter your controller with any validation logic:
/**
* Store a new blog post.
*
* @param AppHttpRequestsStorePostRequest $request
* @return IlluminateHttpResponse
*/
public function store(StorePostRequest $request)
{
// The incoming request is valid...
// Retrieve the validated input data...
$validated = $request->validated();
// Retrieve a portion of the validated input data...
$validated = $request->safe()->only(['name', 'email']);
$validated = $request->safe()->except(['name', 'email']);
}
If validation fails, a redirect response will be generated to send the user back to their previous location. The errors will also be flashed to the session so they are available for display. If the request was an XHR request, an HTTP response with a 422 status code will be returned to the user including a JSON representation of the validation errors.
Adding After Hooks To Form Requests
If you would like to add an «after» validation hook to a form request, you may use the withValidator method. This method receives the fully constructed validator, allowing you to call any of its methods before the validation rules are actually evaluated:
/**
* Configure the validator instance.
*
* @param IlluminateValidationValidator $validator
* @return void
*/
public function withValidator($validator)
{
$validator->after(function ($validator) {
if ($this->somethingElseIsInvalid()) {
$validator->errors()->add('field', 'Something is wrong with this field!');
}
});
}
Stopping On First Validation Failure Attribute
By adding a stopOnFirstFailure property to your request class, you may inform the validator that it should stop validating all attributes once a single validation failure has occurred:
/**
* Indicates if the validator should stop on the first rule failure.
*
* @var bool
*/
protected $stopOnFirstFailure = true;
Customizing The Redirect Location
As previously discussed, a redirect response will be generated to send the user back to their previous location when form request validation fails. However, you are free to customize this behavior. To do so, define a $redirect property on your form request:
/**
* The URI that users should be redirected to if validation fails.
*
* @var string
*/
protected $redirect = '/dashboard';
Or, if you would like to redirect users to a named route, you may define a $redirectRoute property instead:
/**
* The route that users should be redirected to if validation fails.
*
* @var string
*/
protected $redirectRoute = 'dashboard';
Authorizing Form Requests
The form request class also contains an authorize method. Within this method, you may determine if the authenticated user actually has the authority to update a given resource. For example, you may determine if a user actually owns a blog comment they are attempting to update. Most likely, you will interact with your authorization gates and policies within this method:
use AppModelsComment;
/**
* Determine if the user is authorized to make this request.
*
* @return bool
*/
public function authorize()
{
$comment = Comment::find($this->route('comment'));
return $comment && $this->user()->can('update', $comment);
}
Since all form requests extend the base Laravel request class, we may use the user method to access the currently authenticated user. Also, note the call to the route method in the example above. This method grants you access to the URI parameters defined on the route being called, such as the {comment} parameter in the example below:
Route::post('/comment/{comment}');
Therefore, if your application is taking advantage of route model binding, your code may be made even more succinct by accessing the resolved model as a property of the request:
return $this->user()->can('update', $this->comment);
If the authorize method returns false, an HTTP response with a 403 status code will automatically be returned and your controller method will not execute.
If you plan to handle authorization logic for the request in another part of your application, you may simply return true from the authorize method:
/**
* Determine if the user is authorized to make this request.
*
* @return bool
*/
public function authorize()
{
return true;
}
Note
You may type-hint any dependencies you need within theauthorizemethod’s signature. They will automatically be resolved via the Laravel service container.
Customizing The Error Messages
You may customize the error messages used by the form request by overriding the messages method. This method should return an array of attribute / rule pairs and their corresponding error messages:
/**
* Get the error messages for the defined validation rules.
*
* @return array
*/
public function messages()
{
return [
'title.required' => 'A title is required',
'body.required' => 'A message is required',
];
}
Customizing The Validation Attributes
Many of Laravel’s built-in validation rule error messages contain an :attribute placeholder. If you would like the :attribute placeholder of your validation message to be replaced with a custom attribute name, you may specify the custom names by overriding the attributes method. This method should return an array of attribute / name pairs:
/**
* Get custom attributes for validator errors.
*
* @return array
*/
public function attributes()
{
return [
'email' => 'email address',
];
}
Preparing Input For Validation
If you need to prepare or sanitize any data from the request before you apply your validation rules, you may use the prepareForValidation method:
use IlluminateSupportStr;
/**
* Prepare the data for validation.
*
* @return void
*/
protected function prepareForValidation()
{
$this->merge([
'slug' => Str::slug($this->slug),
]);
}
Likewise, if you need to normalize any request data after validation is complete, you may use the passedValidation method:
use IlluminateSupportStr;
/**
* Handle a passed validation attempt.
*
* @return void
*/
protected function passedValidation()
{
$this->replace(['name' => 'Taylor']);
}
Manually Creating Validators
If you do not want to use the validate method on the request, you may create a validator instance manually using the Validator facade. The make method on the facade generates a new validator instance:
<?php
namespace AppHttpControllers;
use AppHttpControllersController;
use IlluminateHttpRequest;
use IlluminateSupportFacadesValidator;
class PostController extends Controller
{
/**
* Store a new blog post.
*
* @param Request $request
* @return Response
*/
public function store(Request $request)
{
$validator = Validator::make($request->all(), [
'title' => 'required|unique:posts|max:255',
'body' => 'required',
]);
if ($validator->fails()) {
return redirect('post/create')
->withErrors($validator)
->withInput();
}
// Retrieve the validated input...
$validated = $validator->validated();
// Retrieve a portion of the validated input...
$validated = $validator->safe()->only(['name', 'email']);
$validated = $validator->safe()->except(['name', 'email']);
// Store the blog post...
}
}
The first argument passed to the make method is the data under validation. The second argument is an array of the validation rules that should be applied to the data.
After determining whether the request validation failed, you may use the withErrors method to flash the error messages to the session. When using this method, the $errors variable will automatically be shared with your views after redirection, allowing you to easily display them back to the user. The withErrors method accepts a validator, a MessageBag, or a PHP array.
Stopping On First Validation Failure
The stopOnFirstFailure method will inform the validator that it should stop validating all attributes once a single validation failure has occurred:
if ($validator->stopOnFirstFailure()->fails()) {
// ...
}
Automatic Redirection
If you would like to create a validator instance manually but still take advantage of the automatic redirection offered by the HTTP request’s validate method, you may call the validate method on an existing validator instance. If validation fails, the user will automatically be redirected or, in the case of an XHR request, a JSON response will be returned:
Validator::make($request->all(), [
'title' => 'required|unique:posts|max:255',
'body' => 'required',
])->validate();
You may use the validateWithBag method to store the error messages in a named error bag if validation fails:
Validator::make($request->all(), [
'title' => 'required|unique:posts|max:255',
'body' => 'required',
])->validateWithBag('post');
Named Error Bags
If you have multiple forms on a single page, you may wish to name the MessageBag containing the validation errors, allowing you to retrieve the error messages for a specific form. To achieve this, pass a name as the second argument to withErrors:
return redirect('register')->withErrors($validator, 'login');
You may then access the named MessageBag instance from the $errors variable:
{{ $errors->login->first('email') }}
Customizing The Error Messages
If needed, you may provide custom error messages that a validator instance should use instead of the default error messages provided by Laravel. There are several ways to specify custom messages. First, you may pass the custom messages as the third argument to the Validator::make method:
$validator = Validator::make($input, $rules, $messages = [
'required' => 'The :attribute field is required.',
]);
In this example, the :attribute placeholder will be replaced by the actual name of the field under validation. You may also utilize other placeholders in validation messages. For example:
$messages = [
'same' => 'The :attribute and :other must match.',
'size' => 'The :attribute must be exactly :size.',
'between' => 'The :attribute value :input is not between :min - :max.',
'in' => 'The :attribute must be one of the following types: :values',
];
Specifying A Custom Message For A Given Attribute
Sometimes you may wish to specify a custom error message only for a specific attribute. You may do so using «dot» notation. Specify the attribute’s name first, followed by the rule:
$messages = [
'email.required' => 'We need to know your email address!',
];
Specifying Custom Attribute Values
Many of Laravel’s built-in error messages include an :attribute placeholder that is replaced with the name of the field or attribute under validation. To customize the values used to replace these placeholders for specific fields, you may pass an array of custom attributes as the fourth argument to the Validator::make method:
$validator = Validator::make($input, $rules, $messages, [
'email' => 'email address',
]);
After Validation Hook
You may also attach callbacks to be run after validation is completed. This allows you to easily perform further validation and even add more error messages to the message collection. To get started, call the after method on a validator instance:
$validator = Validator::make(/* ... */);
$validator->after(function ($validator) {
if ($this->somethingElseIsInvalid()) {
$validator->errors()->add(
'field', 'Something is wrong with this field!'
);
}
});
if ($validator->fails()) {
//
}
Working With Validated Input
After validating incoming request data using a form request or a manually created validator instance, you may wish to retrieve the incoming request data that actually underwent validation. This can be accomplished in several ways. First, you may call the validated method on a form request or validator instance. This method returns an array of the data that was validated:
$validated = $request->validated();
$validated = $validator->validated();
Alternatively, you may call the safe method on a form request or validator instance. This method returns an instance of IlluminateSupportValidatedInput. This object exposes only, except, and all methods to retrieve a subset of the validated data or the entire array of validated data:
$validated = $request->safe()->only(['name', 'email']);
$validated = $request->safe()->except(['name', 'email']);
$validated = $request->safe()->all();
In addition, the IlluminateSupportValidatedInput instance may be iterated over and accessed like an array:
// Validated data may be iterated...
foreach ($request->safe() as $key => $value) {
//
}
// Validated data may be accessed as an array...
$validated = $request->safe();
$email = $validated['email'];
If you would like to add additional fields to the validated data, you may call the merge method:
$validated = $request->safe()->merge(['name' => 'Taylor Otwell']);
If you would like to retrieve the validated data as a collection instance, you may call the collect method:
$collection = $request->safe()->collect();
Working With Error Messages
After calling the errors method on a Validator instance, you will receive an IlluminateSupportMessageBag instance, which has a variety of convenient methods for working with error messages. The $errors variable that is automatically made available to all views is also an instance of the MessageBag class.
Retrieving The First Error Message For A Field
To retrieve the first error message for a given field, use the first method:
$errors = $validator->errors();
echo $errors->first('email');
Retrieving All Error Messages For A Field
If you need to retrieve an array of all the messages for a given field, use the get method:
foreach ($errors->get('email') as $message) {
//
}
If you are validating an array form field, you may retrieve all of the messages for each of the array elements using the * character:
foreach ($errors->get('attachments.*') as $message) {
//
}
Retrieving All Error Messages For All Fields
To retrieve an array of all messages for all fields, use the all method:
foreach ($errors->all() as $message) {
//
}
Determining If Messages Exist For A Field
The has method may be used to determine if any error messages exist for a given field:
if ($errors->has('email')) {
//
}
Specifying Custom Messages In Language Files
Laravel’s built-in validation rules each have an error message that is located in your application’s lang/en/validation.php file. Within this file, you will find a translation entry for each validation rule. You are free to change or modify these messages based on the needs of your application.
In addition, you may copy this file to another translation language directory to translate the messages for your application’s language. To learn more about Laravel localization, check out the complete localization documentation.
Custom Messages For Specific Attributes
You may customize the error messages used for specified attribute and rule combinations within your application’s validation language files. To do so, add your message customizations to the custom array of your application’s lang/xx/validation.php language file:
'custom' => [
'email' => [
'required' => 'We need to know your email address!',
'max' => 'Your email address is too long!'
],
],
Specifying Attributes In Language Files
Many of Laravel’s built-in error messages include an :attribute placeholder that is replaced with the name of the field or attribute under validation. If you would like the :attribute portion of your validation message to be replaced with a custom value, you may specify the custom attribute name in the attributes array of your lang/xx/validation.php language file:
'attributes' => [
'email' => 'email address',
],
Specifying Values In Language Files
Some of Laravel’s built-in validation rule error messages contain a :value placeholder that is replaced with the current value of the request attribute. However, you may occasionally need the :value portion of your validation message to be replaced with a custom representation of the value. For example, consider the following rule that specifies that a credit card number is required if the payment_type has a value of cc:
Validator::make($request->all(), [
'credit_card_number' => 'required_if:payment_type,cc'
]);
If this validation rule fails, it will produce the following error message:
The credit card number field is required when payment type is cc.
Instead of displaying cc as the payment type value, you may specify a more user-friendly value representation in your lang/xx/validation.php language file by defining a values array:
'values' => [
'payment_type' => [
'cc' => 'credit card'
],
],
After defining this value, the validation rule will produce the following error message:
The credit card number field is required when payment type is credit card.
Available Validation Rules
Below is a list of all available validation rules and their function:
accepted
The field under validation must be "yes", "on", 1, or true. This is useful for validating «Terms of Service» acceptance or similar fields.
accepted_if:anotherfield,value,…
The field under validation must be "yes", "on", 1, or true if another field under validation is equal to a specified value. This is useful for validating «Terms of Service» acceptance or similar fields.
active_url
The field under validation must have a valid A or AAAA record according to the dns_get_record PHP function. The hostname of the provided URL is extracted using the parse_url PHP function before being passed to dns_get_record.
after:date
The field under validation must be a value after a given date. The dates will be passed into the strtotime PHP function in order to be converted to a valid DateTime instance:
'start_date' => 'required|date|after:tomorrow'
Instead of passing a date string to be evaluated by strtotime, you may specify another field to compare against the date:
'finish_date' => 'required|date|after:start_date'
after_or_equal:date
The field under validation must be a value after or equal to the given date. For more information, see the after rule.
alpha
The field under validation must be entirely Unicode alphabetic characters contained in p{L} and p{M}.
To restrict this validation rule to characters in the ASCII range (a-z and A-Z), you may provide the ascii option to the validation rule:
'username' => 'alpha:ascii',
alpha_dash
The field under validation must be entirely Unicode alpha-numeric characters contained in p{L}, p{M}, p{N}, as well as ASCII dashes (-) and ASCII underscores (_).
To restrict this validation rule to characters in the ASCII range (a-z and A-Z), you may provide the ascii option to the validation rule:
'username' => 'alpha_dash:ascii',
alpha_num
The field under validation must be entirely Unicode alpha-numeric characters contained in p{L}, p{M}, and p{N}.
To restrict this validation rule to characters in the ASCII range (a-z and A-Z), you may provide the ascii option to the validation rule:
'username' => 'alpha_num:ascii',
array
The field under validation must be a PHP array.
When additional values are provided to the array rule, each key in the input array must be present within the list of values provided to the rule. In the following example, the admin key in the input array is invalid since it is not contained in the list of values provided to the array rule:
use IlluminateSupportFacadesValidator;
$input = [
'user' => [
'name' => 'Taylor Otwell',
'username' => 'taylorotwell',
'admin' => true,
],
];
Validator::make($input, [
'user' => 'array:name,username',
]);
In general, you should always specify the array keys that are allowed to be present within your array.
ascii
The field under validation must be entirely 7-bit ASCII characters.
bail
Stop running validation rules for the field after the first validation failure.
While the bail rule will only stop validating a specific field when it encounters a validation failure, the stopOnFirstFailure method will inform the validator that it should stop validating all attributes once a single validation failure has occurred:
if ($validator->stopOnFirstFailure()->fails()) {
// ...
}
before:date
The field under validation must be a value preceding the given date. The dates will be passed into the PHP strtotime function in order to be converted into a valid DateTime instance. In addition, like the after rule, the name of another field under validation may be supplied as the value of date.
before_or_equal:date
The field under validation must be a value preceding or equal to the given date. The dates will be passed into the PHP strtotime function in order to be converted into a valid DateTime instance. In addition, like the after rule, the name of another field under validation may be supplied as the value of date.
between:min,max
The field under validation must have a size between the given min and max (inclusive). Strings, numerics, arrays, and files are evaluated in the same fashion as the size rule.
boolean
The field under validation must be able to be cast as a boolean. Accepted input are true, false, 1, 0, "1", and "0".
confirmed
The field under validation must have a matching field of {field}_confirmation. For example, if the field under validation is password, a matching password_confirmation field must be present in the input.
current_password
The field under validation must match the authenticated user’s password. You may specify an authentication guard using the rule’s first parameter:
'password' => 'current_password:api'
date
The field under validation must be a valid, non-relative date according to the strtotime PHP function.
date_equals:date
The field under validation must be equal to the given date. The dates will be passed into the PHP strtotime function in order to be converted into a valid DateTime instance.
date_format:format,…
The field under validation must match one of the given formats. You should use either date or date_format when validating a field, not both. This validation rule supports all formats supported by PHP’s DateTime class.
decimal:min,max
The field under validation must be numeric and must contain the specified number of decimal places:
// Must have exactly two decimal places (9.99)...
'price' => 'decimal:2'
// Must have between 2 and 4 decimal places...
'price' => 'decimal:2,4'
declined
The field under validation must be "no", "off", 0, or false.
declined_if:anotherfield,value,…
The field under validation must be "no", "off", 0, or false if another field under validation is equal to a specified value.
different:field
The field under validation must have a different value than field.
digits:value
The integer under validation must have an exact length of value.
digits_between:min,max
The integer validation must have a length between the given min and max.
dimensions
The file under validation must be an image meeting the dimension constraints as specified by the rule’s parameters:
'avatar' => 'dimensions:min_width=100,min_height=200'
Available constraints are: min_width, max_width, min_height, max_height, width, height, ratio.
A ratio constraint should be represented as width divided by height. This can be specified either by a fraction like 3/2 or a float like 1.5:
'avatar' => 'dimensions:ratio=3/2'
Since this rule requires several arguments, you may use the Rule::dimensions method to fluently construct the rule:
use IlluminateSupportFacadesValidator;
use IlluminateValidationRule;
Validator::make($data, [
'avatar' => [
'required',
Rule::dimensions()->maxWidth(1000)->maxHeight(500)->ratio(3 / 2),
],
]);
distinct
When validating arrays, the field under validation must not have any duplicate values:
'foo.*.id' => 'distinct'
Distinct uses loose variable comparisons by default. To use strict comparisons, you may add the strict parameter to your validation rule definition:
'foo.*.id' => 'distinct:strict'
You may add ignore_case to the validation rule’s arguments to make the rule ignore capitalization differences:
'foo.*.id' => 'distinct:ignore_case'
doesnt_start_with:foo,bar,…
The field under validation must not start with one of the given values.
doesnt_end_with:foo,bar,…
The field under validation must not end with one of the given values.
The field under validation must be formatted as an email address. This validation rule utilizes the egulias/email-validator package for validating the email address. By default, the RFCValidation validator is applied, but you can apply other validation styles as well:
'email' => 'email:rfc,dns'
The example above will apply the RFCValidation and DNSCheckValidation validations. Here’s a full list of validation styles you can apply:
-
rfc:RFCValidation -
strict:NoRFCWarningsValidation -
dns:DNSCheckValidation -
spoof:SpoofCheckValidation -
filter:FilterEmailValidation -
filter_unicode:FilterEmailValidation::unicode()
The filter validator, which uses PHP’s filter_var function, ships with Laravel and was Laravel’s default email validation behavior prior to Laravel version 5.8.
Warning
Thednsandspoofvalidators require the PHPintlextension.
ends_with:foo,bar,…
The field under validation must end with one of the given values.
enum
The Enum rule is a class based rule that validates whether the field under validation contains a valid enum value. The Enum rule accepts the name of the enum as its only constructor argument:
use AppEnumsServerStatus;
use IlluminateValidationRulesEnum;
$request->validate([
'status' => [new Enum(ServerStatus::class)],
]);
Warning
Enums are only available on PHP 8.1+.
exclude
The field under validation will be excluded from the request data returned by the validate and validated methods.
exclude_if:anotherfield,value
The field under validation will be excluded from the request data returned by the validate and validated methods if the anotherfield field is equal to value.
If complex conditional exclusion logic is required, you may utilize the Rule::excludeIf method. This method accepts a boolean or a closure. When given a closure, the closure should return true or false to indicate if the field under validation should be excluded:
use IlluminateSupportFacadesValidator;
use IlluminateValidationRule;
Validator::make($request->all(), [
'role_id' => Rule::excludeIf($request->user()->is_admin),
]);
Validator::make($request->all(), [
'role_id' => Rule::excludeIf(fn () => $request->user()->is_admin),
]);
exclude_unless:anotherfield,value
The field under validation will be excluded from the request data returned by the validate and validated methods unless anotherfield‘s field is equal to value. If value is null (exclude_unless:name,null), the field under validation will be excluded unless the comparison field is null or the comparison field is missing from the request data.
exclude_with:anotherfield
The field under validation will be excluded from the request data returned by the validate and validated methods if the anotherfield field is present.
exclude_without:anotherfield
The field under validation will be excluded from the request data returned by the validate and validated methods if the anotherfield field is not present.
exists:table,column
The field under validation must exist in a given database table.
Basic Usage Of Exists Rule
'state' => 'exists:states'
If the column option is not specified, the field name will be used. So, in this case, the rule will validate that the states database table contains a record with a state column value matching the request’s state attribute value.
Specifying A Custom Column Name
You may explicitly specify the database column name that should be used by the validation rule by placing it after the database table name:
'state' => 'exists:states,abbreviation'
Occasionally, you may need to specify a specific database connection to be used for the exists query. You can accomplish this by prepending the connection name to the table name:
'email' => 'exists:connection.staff,email'
Instead of specifying the table name directly, you may specify the Eloquent model which should be used to determine the table name:
'user_id' => 'exists:AppModelsUser,id'
If you would like to customize the query executed by the validation rule, you may use the Rule class to fluently define the rule. In this example, we’ll also specify the validation rules as an array instead of using the | character to delimit them:
use IlluminateSupportFacadesValidator;
use IlluminateValidationRule;
Validator::make($data, [
'email' => [
'required',
Rule::exists('staff')->where(function ($query) {
return $query->where('account_id', 1);
}),
],
]);
You may explicitly specify the database column name that should be used by the exists rule generated by the Rule::exists method by providing the column name as the second argument to the exists method:
'state' => Rule::exists('states', 'abbreviation'),
file
The field under validation must be a successfully uploaded file.
filled
The field under validation must not be empty when it is present.
gt:field
The field under validation must be greater than the given field. The two fields must be of the same type. Strings, numerics, arrays, and files are evaluated using the same conventions as the size rule.
gte:field
The field under validation must be greater than or equal to the given field. The two fields must be of the same type. Strings, numerics, arrays, and files are evaluated using the same conventions as the size rule.
image
The file under validation must be an image (jpg, jpeg, png, bmp, gif, svg, or webp).
in:foo,bar,…
The field under validation must be included in the given list of values. Since this rule often requires you to implode an array, the Rule::in method may be used to fluently construct the rule:
use IlluminateSupportFacadesValidator;
use IlluminateValidationRule;
Validator::make($data, [
'zones' => [
'required',
Rule::in(['first-zone', 'second-zone']),
],
]);
When the in rule is combined with the array rule, each value in the input array must be present within the list of values provided to the in rule. In the following example, the LAS airport code in the input array is invalid since it is not contained in the list of airports provided to the in rule:
use IlluminateSupportFacadesValidator;
use IlluminateValidationRule;
$input = [
'airports' => ['NYC', 'LAS'],
];
Validator::make($input, [
'airports' => [
'required',
'array',
],
'airports.*' => Rule::in(['NYC', 'LIT']),
]);
in_array:anotherfield.*
The field under validation must exist in anotherfield‘s values.
integer
The field under validation must be an integer.
Warning
This validation rule does not verify that the input is of the «integer» variable type, only that the input is of a type accepted by PHP’sFILTER_VALIDATE_INTrule. If you need to validate the input as being a number please use this rule in combination with thenumericvalidation rule.
ip
The field under validation must be an IP address.
ipv4
The field under validation must be an IPv4 address.
ipv6
The field under validation must be an IPv6 address.
json
The field under validation must be a valid JSON string.
lt:field
The field under validation must be less than the given field. The two fields must be of the same type. Strings, numerics, arrays, and files are evaluated using the same conventions as the size rule.
lte:field
The field under validation must be less than or equal to the given field. The two fields must be of the same type. Strings, numerics, arrays, and files are evaluated using the same conventions as the size rule.
lowercase
The field under validation must be lowercase.
mac_address
The field under validation must be a MAC address.
max:value
The field under validation must be less than or equal to a maximum value. Strings, numerics, arrays, and files are evaluated in the same fashion as the size rule.
max_digits:value
The integer under validation must have a maximum length of value.
mimetypes:text/plain,…
The file under validation must match one of the given MIME types:
'video' => 'mimetypes:video/avi,video/mpeg,video/quicktime'
To determine the MIME type of the uploaded file, the file’s contents will be read and the framework will attempt to guess the MIME type, which may be different from the client’s provided MIME type.
mimes:foo,bar,…
The file under validation must have a MIME type corresponding to one of the listed extensions.
Basic Usage Of MIME Rule
'photo' => 'mimes:jpg,bmp,png'
Even though you only need to specify the extensions, this rule actually validates the MIME type of the file by reading the file’s contents and guessing its MIME type. A full listing of MIME types and their corresponding extensions may be found at the following location:
https://svn.apache.org/repos/asf/httpd/httpd/trunk/docs/conf/mime.types
min:value
The field under validation must have a minimum value. Strings, numerics, arrays, and files are evaluated in the same fashion as the size rule.
min_digits:value
The integer under validation must have a minimum length of value.
multiple_of:value
The field under validation must be a multiple of value.
missing
The field under validation must not be present in the input data.
missing_if:anotherfield,value,…
The field under validation must not be present if the anotherfield field is equal to any value.
missing_unless:anotherfield,value
The field under validation must not be present unless the anotherfield field is equal to any value.
missing_with:foo,bar,…
The field under validation must not be present only if any of the other specified fields are present.
missing_with_all:foo,bar,…
The field under validation must not be present only if all of the other specified fields are present.
not_in:foo,bar,…
The field under validation must not be included in the given list of values. The Rule::notIn method may be used to fluently construct the rule:
use IlluminateValidationRule;
Validator::make($data, [
'toppings' => [
'required',
Rule::notIn(['sprinkles', 'cherries']),
],
]);
not_regex:pattern
The field under validation must not match the given regular expression.
Internally, this rule uses the PHP preg_match function. The pattern specified should obey the same formatting required by preg_match and thus also include valid delimiters. For example: 'email' => 'not_regex:/^.+$/i'.
Warning
When using theregex/not_regexpatterns, it may be necessary to specify your validation rules using an array instead of using|delimiters, especially if the regular expression contains a|character.
nullable
The field under validation may be null.
numeric
The field under validation must be numeric.
password
The field under validation must match the authenticated user’s password.
Warning
This rule was renamed tocurrent_passwordwith the intention of removing it in Laravel 9. Please use the Current Password rule instead.
present
The field under validation must exist in the input data.
prohibited
The field under validation must be missing or empty. A field is «empty» if it meets one of the following criteria:
- The value is
null. - The value is an empty string.
- The value is an empty array or empty
Countableobject. - The value is an uploaded file with an empty path.
prohibited_if:anotherfield,value,…
The field under validation must be missing or empty if the anotherfield field is equal to any value. A field is «empty» if it meets one of the following criteria:
- The value is
null. - The value is an empty string.
- The value is an empty array or empty
Countableobject. - The value is an uploaded file with an empty path.
If complex conditional prohibition logic is required, you may utilize the Rule::prohibitedIf method. This method accepts a boolean or a closure. When given a closure, the closure should return true or false to indicate if the field under validation should be prohibited:
use IlluminateSupportFacadesValidator;
use IlluminateValidationRule;
Validator::make($request->all(), [
'role_id' => Rule::prohibitedIf($request->user()->is_admin),
]);
Validator::make($request->all(), [
'role_id' => Rule::prohibitedIf(fn () => $request->user()->is_admin),
]);
prohibited_unless:anotherfield,value,…
The field under validation must be missing or empty unless the anotherfield field is equal to any value. A field is «empty» if it meets one of the following criteria:
- The value is
null. - The value is an empty string.
- The value is an empty array or empty
Countableobject. - The value is an uploaded file with an empty path.
prohibits:anotherfield,…
If the field under validation is not missing or empty, all fields in anotherfield must be missing or empty. A field is «empty» if it meets one of the following criteria:
- The value is
null. - The value is an empty string.
- The value is an empty array or empty
Countableobject. - The value is an uploaded file with an empty path.
regex:pattern
The field under validation must match the given regular expression.
Internally, this rule uses the PHP preg_match function. The pattern specified should obey the same formatting required by preg_match and thus also include valid delimiters. For example: 'email' => 'regex:/^[email protected]+$/i'.
Warning
When using theregex/not_regexpatterns, it may be necessary to specify rules in an array instead of using|delimiters, especially if the regular expression contains a|character.
required
The field under validation must be present in the input data and not empty. A field is «empty» if it meets one of the following criteria:
- The value is
null. - The value is an empty string.
- The value is an empty array or empty
Countableobject. - The value is an uploaded file with no path.
required_if:anotherfield,value,…
The field under validation must be present and not empty if the anotherfield field is equal to any value.
If you would like to construct a more complex condition for the required_if rule, you may use the Rule::requiredIf method. This method accepts a boolean or a closure. When passed a closure, the closure should return true or false to indicate if the field under validation is required:
use IlluminateSupportFacadesValidator;
use IlluminateValidationRule;
Validator::make($request->all(), [
'role_id' => Rule::requiredIf($request->user()->is_admin),
]);
Validator::make($request->all(), [
'role_id' => Rule::requiredIf(fn () => $request->user()->is_admin),
]);
required_unless:anotherfield,value,…
The field under validation must be present and not empty unless the anotherfield field is equal to any value. This also means anotherfield must be present in the request data unless value is null. If value is null (required_unless:name,null), the field under validation will be required unless the comparison field is null or the comparison field is missing from the request data.
required_with:foo,bar,…
The field under validation must be present and not empty only if any of the other specified fields are present and not empty.
required_with_all:foo,bar,…
The field under validation must be present and not empty only if all of the other specified fields are present and not empty.
required_without:foo,bar,…
The field under validation must be present and not empty only when any of the other specified fields are empty or not present.
required_without_all:foo,bar,…
The field under validation must be present and not empty only when all of the other specified fields are empty or not present.
required_array_keys:foo,bar,…
The field under validation must be an array and must contain at least the specified keys.
same:field
The given field must match the field under validation.
size:value
The field under validation must have a size matching the given value. For string data, value corresponds to the number of characters. For numeric data, value corresponds to a given integer value (the attribute must also have the numeric or integer rule). For an array, size corresponds to the count of the array. For files, size corresponds to the file size in kilobytes. Let’s look at some examples:
// Validate that a string is exactly 12 characters long...
'title' => 'size:12';
// Validate that a provided integer equals 10...
'seats' => 'integer|size:10';
// Validate that an array has exactly 5 elements...
'tags' => 'array|size:5';
// Validate that an uploaded file is exactly 512 kilobytes...
'image' => 'file|size:512';
starts_with:foo,bar,…
The field under validation must start with one of the given values.
string
The field under validation must be a string. If you would like to allow the field to also be null, you should assign the nullable rule to the field.
timezone
The field under validation must be a valid timezone identifier according to the timezone_identifiers_list PHP function.
unique:table,column
The field under validation must not exist within the given database table.
Specifying A Custom Table / Column Name:
Instead of specifying the table name directly, you may specify the Eloquent model which should be used to determine the table name:
'email' => 'unique:AppModelsUser,email_address'
The column option may be used to specify the field’s corresponding database column. If the column option is not specified, the name of the field under validation will be used.
'email' => 'unique:users,email_address'
Specifying A Custom Database Connection
Occasionally, you may need to set a custom connection for database queries made by the Validator. To accomplish this, you may prepend the connection name to the table name:
'email' => 'unique:connection.users,email_address'
Forcing A Unique Rule To Ignore A Given ID:
Sometimes, you may wish to ignore a given ID during unique validation. For example, consider an «update profile» screen that includes the user’s name, email address, and location. You will probably want to verify that the email address is unique. However, if the user only changes the name field and not the email field, you do not want a validation error to be thrown because the user is already the owner of the email address in question.
To instruct the validator to ignore the user’s ID, we’ll use the Rule class to fluently define the rule. In this example, we’ll also specify the validation rules as an array instead of using the | character to delimit the rules:
use IlluminateSupportFacadesValidator;
use IlluminateValidationRule;
Validator::make($data, [
'email' => [
'required',
Rule::unique('users')->ignore($user->id),
],
]);
Warning
You should never pass any user controlled request input into theignoremethod. Instead, you should only pass a system generated unique ID such as an auto-incrementing ID or UUID from an Eloquent model instance. Otherwise, your application will be vulnerable to an SQL injection attack.
Instead of passing the model key’s value to the ignore method, you may also pass the entire model instance. Laravel will automatically extract the key from the model:
Rule::unique('users')->ignore($user)
If your table uses a primary key column name other than id, you may specify the name of the column when calling the ignore method:
Rule::unique('users')->ignore($user->id, 'user_id')
By default, the unique rule will check the uniqueness of the column matching the name of the attribute being validated. However, you may pass a different column name as the second argument to the unique method:
Rule::unique('users', 'email_address')->ignore($user->id),
Adding Additional Where Clauses:
You may specify additional query conditions by customizing the query using the where method. For example, let’s add a query condition that scopes the query to only search records that have an account_id column value of 1:
'email' => Rule::unique('users')->where(fn ($query) => $query->where('account_id', 1))
uppercase
The field under validation must be uppercase.
url
The field under validation must be a valid URL.
ulid
The field under validation must be a valid Universally Unique Lexicographically Sortable Identifier (ULID).
uuid
The field under validation must be a valid RFC 4122 (version 1, 3, 4, or 5) universally unique identifier (UUID).
Conditionally Adding Rules
Skipping Validation When Fields Have Certain Values
You may occasionally wish to not validate a given field if another field has a given value. You may accomplish this using the exclude_if validation rule. In this example, the appointment_date and doctor_name fields will not be validated if the has_appointment field has a value of false:
use IlluminateSupportFacadesValidator;
$validator = Validator::make($data, [
'has_appointment' => 'required|boolean',
'appointment_date' => 'exclude_if:has_appointment,false|required|date',
'doctor_name' => 'exclude_if:has_appointment,false|required|string',
]);
Alternatively, you may use the exclude_unless rule to not validate a given field unless another field has a given value:
$validator = Validator::make($data, [
'has_appointment' => 'required|boolean',
'appointment_date' => 'exclude_unless:has_appointment,true|required|date',
'doctor_name' => 'exclude_unless:has_appointment,true|required|string',
]);
Validating When Present
In some situations, you may wish to run validation checks against a field only if that field is present in the data being validated. To quickly accomplish this, add the sometimes rule to your rule list:
$v = Validator::make($data, [
'email' => 'sometimes|required|email',
]);
In the example above, the email field will only be validated if it is present in the $data array.
Note
If you are attempting to validate a field that should always be present but may be empty, check out this note on optional fields.
Complex Conditional Validation
Sometimes you may wish to add validation rules based on more complex conditional logic. For example, you may wish to require a given field only if another field has a greater value than 100. Or, you may need two fields to have a given value only when another field is present. Adding these validation rules doesn’t have to be a pain. First, create a Validator instance with your static rules that never change:
use IlluminateSupportFacadesValidator;
$validator = Validator::make($request->all(), [
'email' => 'required|email',
'games' => 'required|numeric',
]);
Let’s assume our web application is for game collectors. If a game collector registers with our application and they own more than 100 games, we want them to explain why they own so many games. For example, perhaps they run a game resale shop, or maybe they just enjoy collecting games. To conditionally add this requirement, we can use the sometimes method on the Validator instance.
$validator->sometimes('reason', 'required|max:500', function ($input) {
return $input->games >= 100;
});
The first argument passed to the sometimes method is the name of the field we are conditionally validating. The second argument is a list of the rules we want to add. If the closure passed as the third argument returns true, the rules will be added. This method makes it a breeze to build complex conditional validations. You may even add conditional validations for several fields at once:
$validator->sometimes(['reason', 'cost'], 'required', function ($input) {
return $input->games >= 100;
});
Note
The$inputparameter passed to your closure will be an instance ofIlluminateSupportFluentand may be used to access your input and files under validation.
Complex Conditional Array Validation
Sometimes you may want to validate a field based on another field in the same nested array whose index you do not know. In these situations, you may allow your closure to receive a second argument which will be the current individual item in the array being validated:
$input = [
'channels' => [
[
'type' => 'email',
'address' => '[email protected]',
],
[
'type' => 'url',
'address' => 'https://example.com',
],
],
];
$validator->sometimes('channels.*.address', 'email', function ($input, $item) {
return $item->type === 'email';
});
$validator->sometimes('channels.*.address', 'url', function ($input, $item) {
return $item->type !== 'email';
});
Like the $input parameter passed to the closure, the $item parameter is an instance of IlluminateSupportFluent when the attribute data is an array; otherwise, it is a string.
Validating Arrays
As discussed in the array validation rule documentation, the array rule accepts a list of allowed array keys. If any additional keys are present within the array, validation will fail:
use IlluminateSupportFacadesValidator;
$input = [
'user' => [
'name' => 'Taylor Otwell',
'username' => 'taylorotwell',
'admin' => true,
],
];
Validator::make($input, [
'user' => 'array:username,locale',
]);
In general, you should always specify the array keys that are allowed to be present within your array. Otherwise, the validator’s validate and validated methods will return all of the validated data, including the array and all of its keys, even if those keys were not validated by other nested array validation rules.
Validating Nested Array Input
Validating nested array based form input fields doesn’t have to be a pain. You may use «dot notation» to validate attributes within an array. For example, if the incoming HTTP request contains a photos[profile] field, you may validate it like so:
use IlluminateSupportFacadesValidator;
$validator = Validator::make($request->all(), [
'photos.profile' => 'required|image',
]);
You may also validate each element of an array. For example, to validate that each email in a given array input field is unique, you may do the following:
$validator = Validator::make($request->all(), [
'person.*.email' => 'email|unique:users',
'person.*.first_name' => 'required_with:person.*.last_name',
]);
Likewise, you may use the * character when specifying custom validation messages in your language files, making it a breeze to use a single validation message for array based fields:
'custom' => [
'person.*.email' => [
'unique' => 'Each person must have a unique email address',
]
],
Accessing Nested Array Data
Sometimes you may need to access the value for a given nested array element when assigning validation rules to the attribute. You may accomplish this using the Rule::forEach method. The forEach method accepts a closure that will be invoked for each iteration of the array attribute under validation and will receive the attribute’s value and explicit, fully-expanded attribute name. The closure should return an array of rules to assign to the array element:
use AppRulesHasPermission;
use IlluminateSupportFacadesValidator;
use IlluminateValidationRule;
$validator = Validator::make($request->all(), [
'companies.*.id' => Rule::forEach(function ($value, $attribute) {
return [
Rule::exists(Company::class, 'id'),
new HasPermission('manage-company', $value),
];
}),
]);
Error Message Indexes & Positions
When validating arrays, you may want to reference the index or position of a particular item that failed validation within the error message displayed by your application. To accomplish this, you may include the :index (starts from 0) and :position (starts from 1) placeholders within your custom validation message:
use IlluminateSupportFacadesValidator;
$input = [
'photos' => [
[
'name' => 'BeachVacation.jpg',
'description' => 'A photo of my beach vacation!',
],
[
'name' => 'GrandCanyon.jpg',
'description' => '',
],
],
];
Validator::validate($input, [
'photos.*.description' => 'required',
], [
'photos.*.description.required' => 'Please describe photo #:position.',
]);
Given the example above, validation will fail and the user will be presented with the following error of «Please describe photo #2.»
Validating Files
Laravel provides a variety of validation rules that may be used to validate uploaded files, such as mimes, image, min, and max. While you are free to specify these rules individually when validating files, Laravel also offers a fluent file validation rule builder that you may find convenient:
use IlluminateSupportFacadesValidator;
use IlluminateValidationRulesFile;
Validator::validate($input, [
'attachment' => [
'required',
File::types(['mp3', 'wav'])
->min(1024)
->max(12 * 1024),
],
]);
If your application accepts images uploaded by your users, you may use the File rule’s image constructor method to indicate that the uploaded file should be an image. In addition, the dimensions rule may be used to limit the dimensions of the image:
use IlluminateSupportFacadesValidator;
use IlluminateValidationRulesFile;
Validator::validate($input, [
'photo' => [
'required',
File::image()
->min(1024)
->max(12 * 1024)
->dimensions(Rule::dimensions()->maxWidth(1000)->maxHeight(500)),
],
]);
Note
More information regarding validating image dimensions may be found in the dimension rule documentation.
File Types
Even though you only need to specify the extensions when invoking the types method, this method actually validates the MIME type of the file by reading the file’s contents and guessing its MIME type. A full listing of MIME types and their corresponding extensions may be found at the following location:
https://svn.apache.org/repos/asf/httpd/httpd/trunk/docs/conf/mime.types
Validating Passwords
To ensure that passwords have an adequate level of complexity, you may use Laravel’s Password rule object:
use IlluminateSupportFacadesValidator;
use IlluminateValidationRulesPassword;
$validator = Validator::make($request->all(), [
'password' => ['required', 'confirmed', Password::min(8)],
]);
The Password rule object allows you to easily customize the password complexity requirements for your application, such as specifying that passwords require at least one letter, number, symbol, or characters with mixed casing:
// Require at least 8 characters...
Password::min(8)
// Require at least one letter...
Password::min(8)->letters()
// Require at least one uppercase and one lowercase letter...
Password::min(8)->mixedCase()
// Require at least one number...
Password::min(8)->numbers()
// Require at least one symbol...
Password::min(8)->symbols()
In addition, you may ensure that a password has not been compromised in a public password data breach leak using the uncompromised method:
Password::min(8)->uncompromised()
Internally, the Password rule object uses the k-Anonymity model to determine if a password has been leaked via the haveibeenpwned.com service without sacrificing the user’s privacy or security.
By default, if a password appears at least once in a data leak, it will be considered compromised. You can customize this threshold using the first argument of the uncompromised method:
// Ensure the password appears less than 3 times in the same data leak...
Password::min(8)->uncompromised(3);
Of course, you may chain all the methods in the examples above:
Password::min(8)
->letters()
->mixedCase()
->numbers()
->symbols()
->uncompromised()
Defining Default Password Rules
You may find it convenient to specify the default validation rules for passwords in a single location of your application. You can easily accomplish this using the Password::defaults method, which accepts a closure. The closure given to the defaults method should return the default configuration of the Password rule. Typically, the defaults rule should be called within the boot method of one of your application’s service providers:
use IlluminateValidationRulesPassword;
/**
* Bootstrap any application services.
*
* @return void
*/
public function boot()
{
Password::defaults(function () {
$rule = Password::min(8);
return $this->app->isProduction()
? $rule->mixedCase()->uncompromised()
: $rule;
});
}
Then, when you would like to apply the default rules to a particular password undergoing validation, you may invoke the defaults method with no arguments:
'password' => ['required', Password::defaults()],
Occasionally, you may want to attach additional validation rules to your default password validation rules. You may use the rules method to accomplish this:
use AppRulesZxcvbnRule;
Password::defaults(function () {
$rule = Password::min(8)->rules([new ZxcvbnRule]);
// ...
});
Custom Validation Rules
Using Rule Objects
Laravel provides a variety of helpful validation rules; however, you may wish to specify some of your own. One method of registering custom validation rules is using rule objects. To generate a new rule object, you may use the make:rule Artisan command. Let’s use this command to generate a rule that verifies a string is uppercase. Laravel will place the new rule in the app/Rules directory. If this directory does not exist, Laravel will create it when you execute the Artisan command to create your rule:
php artisan make:rule Uppercase --invokable
Once the rule has been created, we are ready to define its behavior. A rule object contains a single method: __invoke. This method receives the attribute name, its value, and a callback that should be invoked on failure with the validation error message:
<?php
namespace AppRules;
use IlluminateContractsValidationInvokableRule;
class Uppercase implements InvokableRule
{
/**
* Run the validation rule.
*
* @param string $attribute
* @param mixed $value
* @param Closure $fail
* @return void
*/
public function __invoke($attribute, $value, $fail)
{
if (strtoupper($value) !== $value) {
$fail('The :attribute must be uppercase.');
}
}
}
Once the rule has been defined, you may attach it to a validator by passing an instance of the rule object with your other validation rules:
use AppRulesUppercase;
$request->validate([
'name' => ['required', 'string', new Uppercase],
]);
Translating Validation Messages
Instead of providing a literal error message to the $fail closure, you may also provide a translation string key and instruct Laravel to translate the error message:
if (strtoupper($value) !== $value) {
$fail('validation.uppercase')->translate();
}
If necessary, you may provide placeholder replacements and the preferred language as the first and second arguments to the translate method:
$fail('validation.location')->translate([
'value' => $this->value,
], 'fr')
Accessing Additional Data
If your custom validation rule class needs to access all of the other data undergoing validation, your rule class may implement the IlluminateContractsValidationDataAwareRule interface. This interface requires your class to define a setData method. This method will automatically be invoked by Laravel (before validation proceeds) with all of the data under validation:
<?php
namespace AppRules;
use IlluminateContractsValidationDataAwareRule;
use IlluminateContractsValidationInvokableRule;
class Uppercase implements DataAwareRule, InvokableRule
{
/**
* All of the data under validation.
*
* @var array
*/
protected $data = [];
// ...
/**
* Set the data under validation.
*
* @param array $data
* @return $this
*/
public function setData($data)
{
$this->data = $data;
return $this;
}
}
Or, if your validation rule requires access to the validator instance performing the validation, you may implement the ValidatorAwareRule interface:
<?php
namespace AppRules;
use IlluminateContractsValidationInvokableRule;
use IlluminateContractsValidationValidatorAwareRule;
class Uppercase implements InvokableRule, ValidatorAwareRule
{
/**
* The validator instance.
*
* @var IlluminateValidationValidator
*/
protected $validator;
// ...
/**
* Set the current validator.
*
* @param IlluminateValidationValidator $validator
* @return $this
*/
public function setValidator($validator)
{
$this->validator = $validator;
return $this;
}
}
Using Closures
If you only need the functionality of a custom rule once throughout your application, you may use a closure instead of a rule object. The closure receives the attribute’s name, the attribute’s value, and a $fail callback that should be called if validation fails:
use IlluminateSupportFacadesValidator;
$validator = Validator::make($request->all(), [
'title' => [
'required',
'max:255',
function ($attribute, $value, $fail) {
if ($value === 'foo') {
$fail('The '.$attribute.' is invalid.');
}
},
],
]);
Implicit Rules
By default, when an attribute being validated is not present or contains an empty string, normal validation rules, including custom rules, are not run. For example, the unique rule will not be run against an empty string:
use IlluminateSupportFacadesValidator;
$rules = ['name' => 'unique:users,name'];
$input = ['name' => ''];
Validator::make($input, $rules)->passes(); // true
For a custom rule to run even when an attribute is empty, the rule must imply that the attribute is required. To quickly generate a new implicit rule object, you may use the make:rule Artisan command with the --implicit option:
php artisan make:rule Uppercase --invokable --implicit
Warning
An «implicit» rule only implies that the attribute is required. Whether it actually invalidates a missing or empty attribute is up to you.
Tag-хелперы валидации и стилизация ошибок
Последнее обновление: 08.04.2022
Для определения полей для вывода ошибок валидации применяются специальные хелперы. Рассмотрим их применение на примере следующей модели Person:
using System.ComponentModel.DataAnnotations;

namespace MvcApp.Models
{
    public class Person
    {
        [Required(ErrorMessage = "Не указано имя")]
        public string? Name { get; set; }


        [Required(ErrorMessage = "Не указан электронный адрес")]
        public string? Email { get; set; }

        [Required(ErrorMessage = "Не указан возраст")]
        [Range(1, 100)]
        public int Age { get; set; }
    }
}
ValidationMessageTagHelper
Для валидации на стороне клиента применяется класс ValidationMessageTagHelper. Данный tag-хелпер определяется с помощью применения
к элементу <span > атрибута asp-validation-for:
<span asp-validation-for="имя_свойства_модели"></span>
Атрибут asp-validation-for в качестве значения принимает название свойства модели, для которого будет выводиться сообщение об ошибке валидации.
Соответственно для каждого поля ввода мы можем предусмотреть подобный хелпер для вывода ошибок валидации. Например, форма для ввода значений для выше определенной модели Person:
@model MvcApp.Models.Person
@addTagHelper *, Microsoft.AspNetCore.Mvc.TagHelpers

<form method="post">
    <div>
        <p>
            <label asp-for="Name">Name</label><br />
            <input type="text" asp-for="Name" />
            <span asp-validation-for="Name"  />
        </p>
        <p>
            <label asp-for="Email">Email</label><br />
            <input type="text" asp-for="Email" />
            <span asp-validation-for="Email"  />
        </p>
        <p>
            <label asp-for="Age">Age</label><br />
            <input asp-for="Age" />
            <span asp-validation-for="Age" />
        </p>
        <p>
            <input type="submit" value="Send"  />
        </p>
    </div>
</form>

<script src="https://ajax.aspnetcdn.com/ajax/jQuery/jquery-3.5.1.min.js"></script>
<script src="https://ajax.aspnetcdn.com/ajax/jquery.validate/1.17.0/jquery.validate.min.js"></script>
<script src="https://ajax.aspnetcdn.com/ajax/jquery.validation.unobtrusive/3.2.10/jquery.validate.unobtrusive.min.js"></script>
Например, возьмем tag-хелпер, который применяется для вывода ошибок для свойства Name:
<span asp-validation-for="Name" />
Данный элемент span будет генерировать следующую разметку:
<span class="field-validation-valid" data-valmsg-for="Name" data-valmsg-replace="true"></span>
ValidationSummaryTagHelper
Другой tag-хелпера — ValidationSummaryTagHelper применяется для отображения сводки ошибок валидации. Он применяется к элементу <div>
в виде атрибута asp-validation-summary:
<div asp-validation-summary="ModelOnly"/>
В качестве значения атрибут asp-validation-summary принимает одно из значений перечисления ValidationSummary:
-
None: ошибки валидации не отображаются
-
ModelOnly: отображаются только ошибка валидации уровня модели, ошибки валидации для отдельных свойств не отображаются
-
All: отображаются все ошибки валидации
На выходе тег-хелпер будет генерировать следующий код:
<div class="validation-summary-valid" data-valmsg-summary="true">
	<ul>
		<li style="display:none"></li>
	</ul>
</div>
При возникновении ошибок в список <ul> добавляются все сообщения об ошибках.
Теперь применим ValidationSummaryTagHelper и для этого для модели Person определим следующее представление:
@model MvcApp.Models.Person
@addTagHelper *, Microsoft.AspNetCore.Mvc.TagHelpers

<form method="post">
    <div asp-validation-summary="All"></div>
        <p>
            <label asp-for="Name">Name</label><br />
            <input type="text" asp-for="Name" />
            <span asp-validation-for="Name"  />
        </p>
        <p>
            <label asp-for="Email">Email</label><br />
            <input type="text" asp-for="Email" />
            <span asp-validation-for="Email"  />
        </p>
        <p>
            <label asp-for="Age">Age</label><br />
            <input asp-for="Age" />
            <span asp-validation-for="Age" />
        </p>
        <p>
            <input type="submit" value="Send"  />
        </p>
</form>

<script src="https://ajax.aspnetcdn.com/ajax/jQuery/jquery-3.5.1.min.js"></script>
<script src="https://ajax.aspnetcdn.com/ajax/jquery.validate/1.17.0/jquery.validate.min.js"></script>
<script src="https://ajax.aspnetcdn.com/ajax/jquery.validation.unobtrusive/3.2.10/jquery.validate.unobtrusive.min.js"></script>
И в случае некорректного ввода в верху формы отобразятся ошибки валидации:
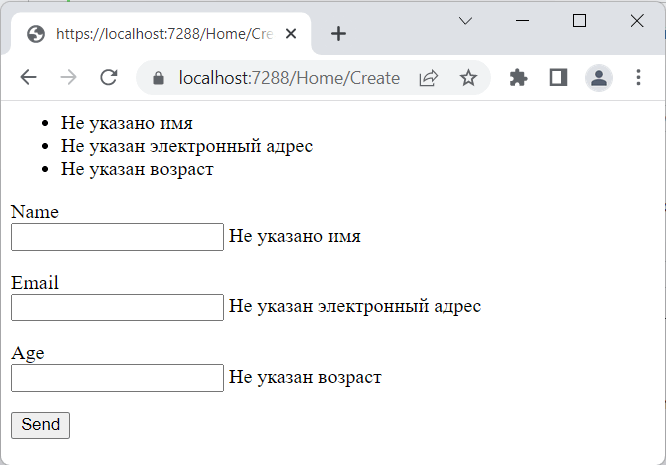
При подобном определении формы сообщения об ошибках отображаются как поверх формы ввода, так и ряд с соответствующими полями ввода. Может показаться, что в таком дополнительном
выводе ошибок свойств нет смысла — для этого ведь уже есть вывод ошибок возле каждого поля ввода. Тем не менее это может быть полезным, когда какая-то часть валидации производится на сервере.
Например, в контроллере в методе, который получает данную форму, добавим дополнительную проверку данных:
using Microsoft.AspNetCore.Mvc;
using MvcApp.Models;  // пространство имен класса Person

namespace MvcApp.Controllers
{
    public class HomeController : Controller
    {
        public IActionResult Create() => View();

        [HttpPost]
        public IActionResult Create(Person person)
        {
            if (person.Name == "admin")
                ModelState.AddModelError("Name", "admin - запрещенное имя.");
            if (ModelState.IsValid)
                return Content($"{person.Name} - {person.Age}");
            return View(person);
        }
    }
}
Здесь в post-методе Create, если свойству Name передана строка «admin», то для этого свойства добавляется дополнительная ошибка валидации. То есть с точки зрения атрибутов валидации
для свойства Name строка «admin» — корректное значение, а форма благополучно отправится методу контроллера. Но благодаря проверке на сервере подобное значение все равно не пройдет валидацию, :
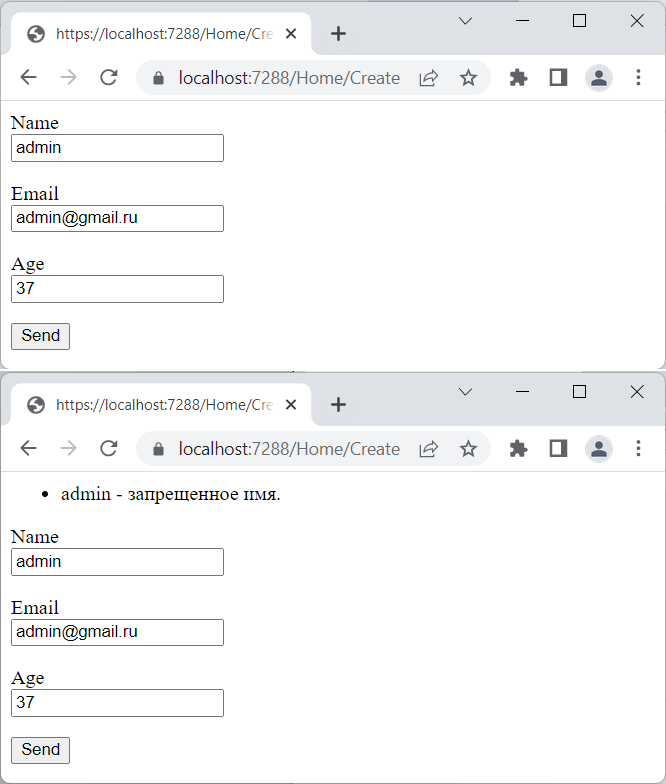
Ошибки уровня модели
Теперь изменим определение хелпера, чтобы он отображал только ошибки уровня модели:
@model MvcApp.Models.Person
@addTagHelper *, Microsoft.AspNetCore.Mvc.TagHelpers

<form method="post">
    <div asp-validation-summary="ModelOnly"></div>
        <p>
            <label asp-for="Name">Name</label><br />
            <input type="text" asp-for="Name" />
            <span asp-validation-for="Name"  />
        </p>
        <p>
            <label asp-for="Email">Email</label><br />
            <input type="text" asp-for="Email" />
            <span asp-validation-for="Email"  />
        </p>
        <p>
            <label asp-for="Age">Age</label><br />
            <input asp-for="Age" />
            <span asp-validation-for="Age" />
        </p>
        <p>
            <input type="submit" value="Send"  />
        </p>
</form>

<script src="https://ajax.aspnetcdn.com/ajax/jQuery/jquery-3.5.1.min.js"></script>
<script src="https://ajax.aspnetcdn.com/ajax/jquery.validate/1.17.0/jquery.validate.min.js"></script>
<script src="https://ajax.aspnetcdn.com/ajax/jquery.validation.unobtrusive/3.2.10/jquery.validate.unobtrusive.min.js"></script>
А в контроллере в методе, который получает данную форму, добавим дополнительную проверку данных:
using Microsoft.AspNetCore.Mvc;
using MvcApp.Models;  // пространство имен класса Person

namespace MvcApp.Controllers
{
    public class HomeController : Controller
    {
        public IActionResult Create() => View();

        [HttpPost]
        public IActionResult Create(Person person)
        {
            if (person.Name == person.Email)
                ModelState.AddModelError("", "Имя и электронный адрес не должны совпадать.");
            if (ModelState.IsValid)
                return Content($"{person.Name} - {person.Age}");
            return View(person);
        }
    }
}
Здесь в post-методе Create, если свойства Name и Email модели Person имеют одинаковые значение, то добавляется ошибка валидации:
ModelState.AddModelError("", "Имя и электронный адрес не должны совпадать.");
Пустая строка, передаваемая первому параметру метода, указывает, что данная ошибка относится ко всей модели в целом, а не к отдельному свойству. То есть даже
если пользователь ввел в форму корректные значения для отдельных свойств и форма была успешна отправлена, но при этом значения свойств Name и Email совпадают, то модель в итоге
не пройдет проверку и возвратиться пользователю.
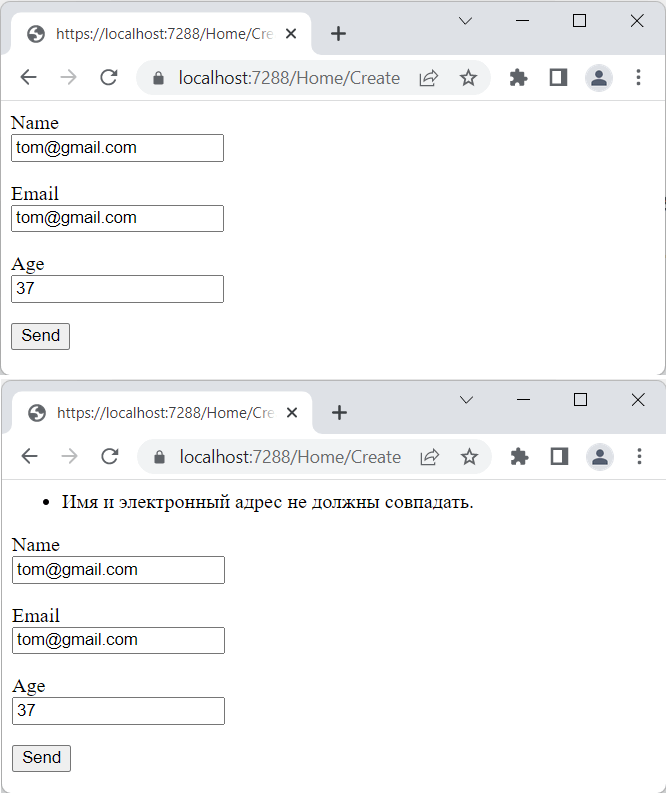
Стилизация сообщений об ошибках
Когда происходит валидация, то при отображении ошибок соответствующим полям присваиваются определенные классы css:
-
для блока ошибок, который генерируется хелпером ValidationSummaryTagHelper, при наличии ошибок устанавливается класс validation-summary-errors. Если
ошибок нет, то данный блок не отображается -
для элемента
<span>, который отображает ошибку для каждого отдельного поля и который генерируется хелпером ValidationTagHelper,
при наличии ошибок устанавливается класс field-validation-error. Если
ошибок нет, то данный элемент имеет класс field-validation-valid -
для поля ввода при наличии ошибок устанавливается класс input-validation-error. Если
ошибок нет, то устанавливается класс valid
Используя эти классы, мы можем настроить отображение сообщений. Например, изменим представление следующим образом:
@model MvcApp.Models.Person
@addTagHelper *, Microsoft.AspNetCore.Mvc.TagHelpers

<style>
.field-validation-error {
    color: #b94a48;
}

input.input-validation-error {
    border: 1px solid #b94a48;
}
input.valid {
    border: 1px solid #16a085;
}

.validation-summary-errors {
    color: #b94a48;
}
</style>
<form method="post">
    <div asp-validation-summary="ModelOnly"></div>
        <p>
            <label asp-for="Name">Name</label><br />
            <input type="text" asp-for="Name" />
            <span asp-validation-for="Name"  />
        </p>
        <p>
            <label asp-for="Email">Email</label><br />
            <input type="text" asp-for="Email" />
            <span asp-validation-for="Email"  />
        </p>
        <p>
            <label asp-for="Age">Age</label><br />
            <input asp-for="Age" />
            <span asp-validation-for="Age" />
        </p>
        <p>
            <input type="submit" value="Send"  />
        </p>
</form>

<script src="https://ajax.aspnetcdn.com/ajax/jQuery/jquery-3.5.1.min.js"></script>
<script src="https://ajax.aspnetcdn.com/ajax/jquery.validate/1.17.0/jquery.validate.min.js"></script>
<script src="https://ajax.aspnetcdn.com/ajax/jquery.validation.unobtrusive/3.2.10/jquery.validate.unobtrusive.min.js"></script>
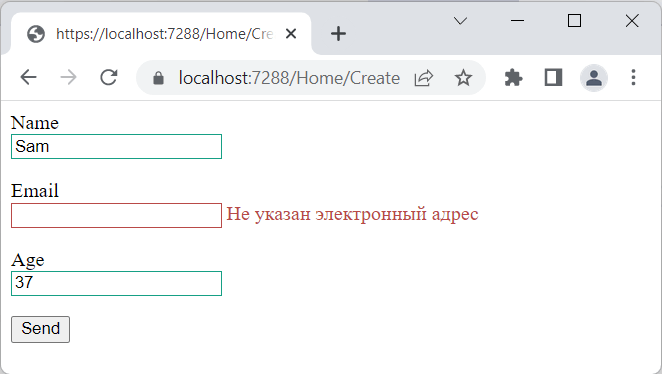
The Html.ValidationMessageFor() is a strongly typed extension method. It displays a validation message if an error exists for the specified field in the ModelStateDictionary object.
MvcHtmlString ValidateMessageFor(Expression<Func<dynamic,TProperty>> expression, string validationMessage, object htmlAttributes)
Visit MSDN to know all the overloads of ValidationMessageFor() method.
The following Student model class with the Required validation attribute on the StudentName.
public class Student
{
    public int StudentId { get; set; }
    [Required]
    public string StudentName { get; set; }
    public int Age { get; set; }
}
The following view uses the ValidationMessageFor() method for the StudentName.
@model Student

@Html.EditorFor(m => m.StudentName) <br />
@Html.ValidationMessageFor(m => m.StudentName, "", new { @class = "text-danger" })
In the above example, the first parameter in the ValidationMessageFor() method is a lambda expression to specify a property for which we want to show an error message.
The second parameter is for custom error message if any, and the third parameter is for HTML attributes such as CSS, style, etc.
The above code will generate the following HTML when you run it.
<input id="StudentName"
        name="StudentName"
        type="text"
        value="" />

<span class="field-validation-valid text-danger"
        data-valmsg-for="StudentName"
        data-valmsg-replace="true">
</span>
Now, when the user submits a form without entering a StudentName then ASP.NET MVC uses the data- attribute of HTML5 for the validation and the default validation message will be injected when validation error occurs, as shown below.
<span class="field-validation-error text-danger"
            data-valmsg-for="StudentName"
            data-valmsg-replace="true">The StudentName field is required.</span>
The error message will appear as the image shown below.

Custom Error Message
You can display custom error messages instead of the default error message as above. You can provide a custom error message either in the data annotation attribute or in the ValidationMessageFor() method.
Use the ErrorMessage parameter of the data annotation attribute to provide your own custom error message, as shown below.
public class Student
{
    public int StudentId { get; set; }
    [Required(ErrorMessage="Please enter student name.")]
    public string StudentName { get; set; }
    public int Age { get; set; }
}
You can also specify a message as a second parameter in the ValidationMessage() method, as shown below.
@model Student

@Html.Editor("StudentName") <br />
@Html.ValidationMessageFor(m => m.StudentName, "Please enter student name.", new { @class = "text-danger" })
It is recommended to use ValidationMessageFor() than ValidationMessage() because it is strongly typed and so performs fast and less error pron.
Want to check how much you know ASP.NET MVC?