-
Partition Wizard
-
Clone Disk
- [Quick Fixes] AMD-V Hardware Acceleration Is Not Available
By Ariel | Follow |
Last Updated August 04, 2021
When trying to install or launch a virtual machine, many users receive the “VT-x/AMD-V hardware acceleration is not available on your system” error message. What causes the error? How to fix it? Now, let’s explore the answers together with MiniTool.
Why AMD-V Is Not Available
What causes the “AMD-V is not available (verr_svm_no_svm).”error? After investigating extensive user reports and references, we find the main reason for the error is that your CPU doesn’t support VT-X/AMD-V. In addition, the Hyper-V technology could conflict with VT-x. If the VT-V/ADM-V is disabled in BIOS or certain system files get corrupted or missing, you may encounter the “AMD-V is not available” error.
How to Fix AMD-V Is Not Available
There are 4 applicable methods to fix the VT X AMD V hardware acceleration error. Let’s try them one by one.
Fix 1. Check If Your CPU Support VT-x/AMD-V
The first and most important thing you should do is to verify if your CPU supports VT-x/AMD-V. Although all the newest CPUs are equipped to use VT-x, some older CPUs don’t support VT-x/AMD-V.
To verify if your CPU supports virtualization quickly, you can utilize a dedicated tool called SecurAble that will automatically analyze the virtualization technology.
Step 1. Click here to download SecurAble.
Step 2. Open the executable file of this program and click on Yes at the UAC prompt. Then this tool will automatically check your CPU model.
Step 3. If your CPU supports the VT X AMD V hardware acceleration, you will see a green Yes in the Hardware Virtualization section.

Once confirmed, you can proceed with the following methods to get the “Virtualbox AMD-V is not available” issue resolved.
Fix 2. Disable Hyper-V
Microsoft Hyper-V is a piece of virtualization program that enables users to create one or more virtual machines. It performs almost the same tasks as VirtualBox, but it can be used by VirtualBox or VM due to stability reasons. To avoid conflict, you need to disable Hyper-V completely.
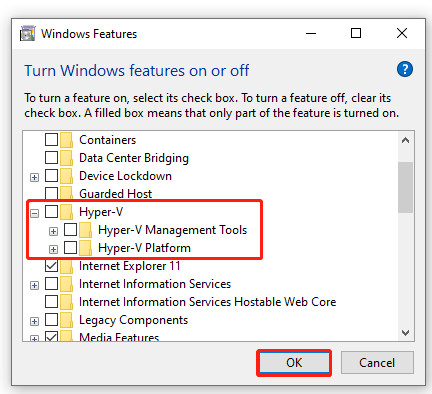
Step 1. Press Win + R keys to open the Run dialog box, and then type OptionalFeatures.exe in it and hit Enter.
Step 2. In the Windows Features window, scroll down the list to find the Hyper-V option. If it is checked, untick the checkbox of Hyper-V, including its sub-options.
Step 3. Click on OK to save changes.
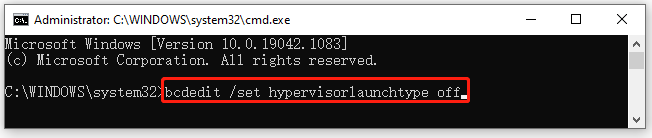
Step 4. Type cmd in the search box, and then right-click the Command Prompt app and select Run as administrator.
Step 5. In the elevated command prompt, type the following command and hit Enter.
bcdedit /set hypervisorlaunchtype off
Step 6. Open the Local Group Policy Editor window by running the gpedit.msc command, and then locate the following path via the left navigation bar:
Computer Configuration > Administrative Templates > System > Device Guard
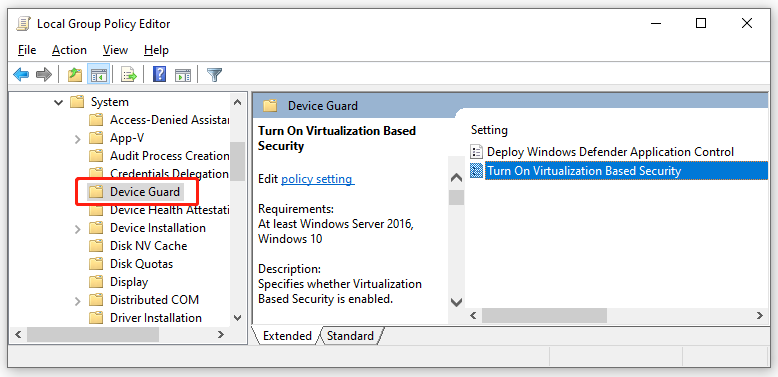
Step 7. Double click the Turn on Virtualization Based Security option and set it as Disabled, and click on OK to save changes.
Once done, you can see if the VT-x/AMD-V hardware acceleration is not available on your system error is fixed.
Fix 3. Enable VT-x/AMD-V in BIOS
Virtual Technology is an architecture that allows users to run multiple and isolated operating systems on a single server. Once the VT is disabled, you will encounter various problems like VirtualBox no 64 bit and Virtualbox AMD-V is not available. Now, follow the steps below to enable VT-x in BIOS.
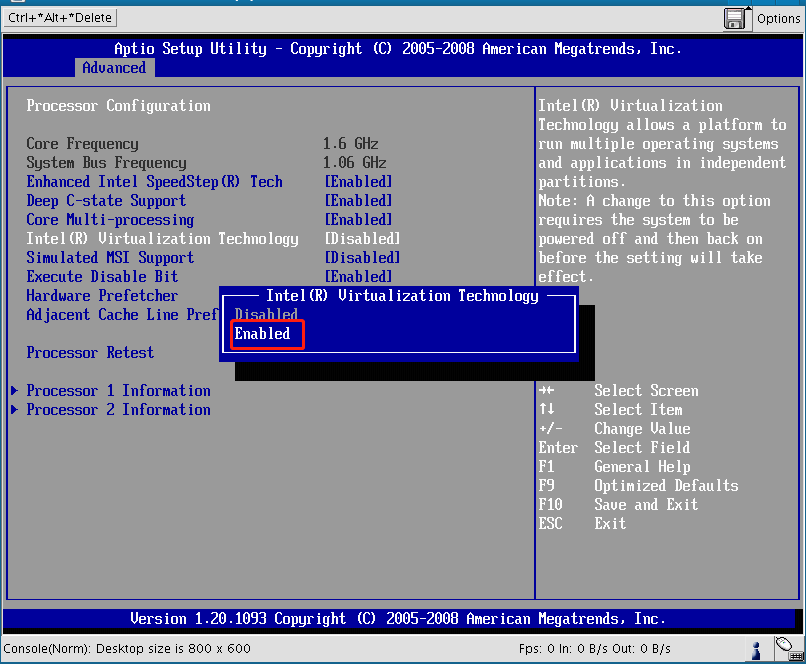
Step 1. Restart your computer and press the Delete or F2 key when the startup screen appears to enter BIOS.
Step 2. Navigate to the Advanced tab, and then select the Intel Virtualization Technology option and change it to Enabled using the arrow keys.
Tip: The Intel Virtualization Technology location may vary depending on a different motherboard. For instance, on an ASUS motherboard, the Intel Virtualization Technology option is located in Advanced > CPU Configuration.
Step 3. Press the F10 key to save changes and exit the BIOS. Then your computer will restart.
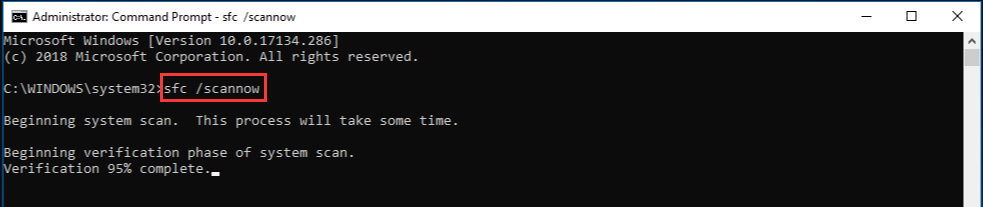
Fix 4. Run an SFC Scan
Some users encounter the “AMD-V is not available” error and get the DCP-WATCHDOG-VIOLATION blue screen after restarting. This could be caused by corrupted system files. If you are in this case, you can try running an SFC scan to repair them.
Open the elevated command prompt window again, and then type sfc /scannow command and hit Enter. After that, this tool will scan and repair the corrupted system files. This process may take you some time and make sure that it completes.
About The Author

Position: Columnist
Ariel is an enthusiastic IT columnist focusing on partition management, data recovery, and Windows issues. She has helped users fix various problems like PS4 corrupted disk, unexpected store exception error, the green screen of death error, etc. If you are searching for methods to optimize your storage device and restore lost data from different storage devices, then Ariel can provide reliable solutions for these issues.
Learn how to solve this exception when trying to launch a virtual machine for first time on computers with AMD processors.
With virtual machines you will face regular problems on new computers. For example, recently i switched from an Intel Core i7 to an AMD Ryzen 9 3950x. Everything worked exceptionally until i tried to boot some virtual machines using Virtual Box:r
Not in a hypervisor partition (HVP=0) (VERR_NEM_NOT_AVAILABLE).
AMD-V is disabled in the BIOS (or by the host OS) (VERR_SVM_DISABLED).

Result Code:
E_FAIL (0x80004005)
Component:
ConsoleWrap
Interface:
IConsole {872da645-4a9b-1727-bee2-5585105b9eed}
This problem usually appears because of the following reasons:
- Virtualization (AMD-V) is disabled from BIOS settings.
- If Microsoft Hyper-V is enabled, it automatically means that the built-in virtualization technology was turned off.
- BIOS version doesn’t support many CPU cores. If – As it turns out, the issue might get thrown by VM VirtualBox if the software is forced to create a virtual machine with more than 1 CPU core. In order to do this, it requires hardware virtualizations and will throw the error if the feature is disabled or unavailable.
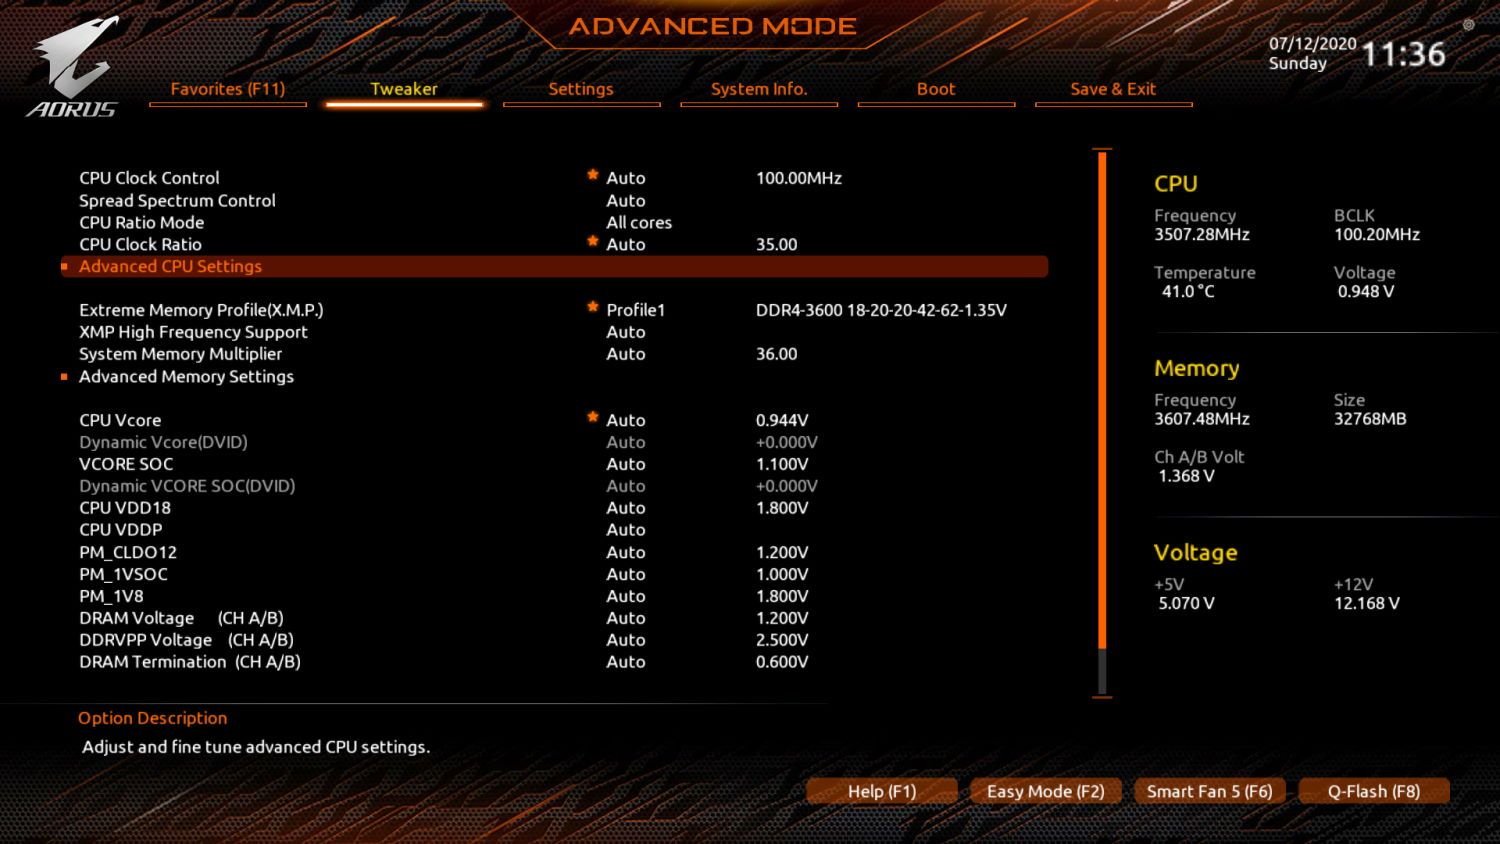
A. Enable Secure Virtual Machine Mode on the BIOS
Basically the VERR_SVM_DISABLE error code is telling you that your PC does support AMD-V, but it’s disabled on the BIOS. You may simply boot your computer and start the bios. In board that support AMD processors, you will find this option as Secure Virtual Machine Mode. For example, in our AORUS x570 board we may find this option on the advanced mode, under the Tweak tab, search for the Advanced CPU settings:
And then search for the Secure Virtual Machine Mode option and enable it:
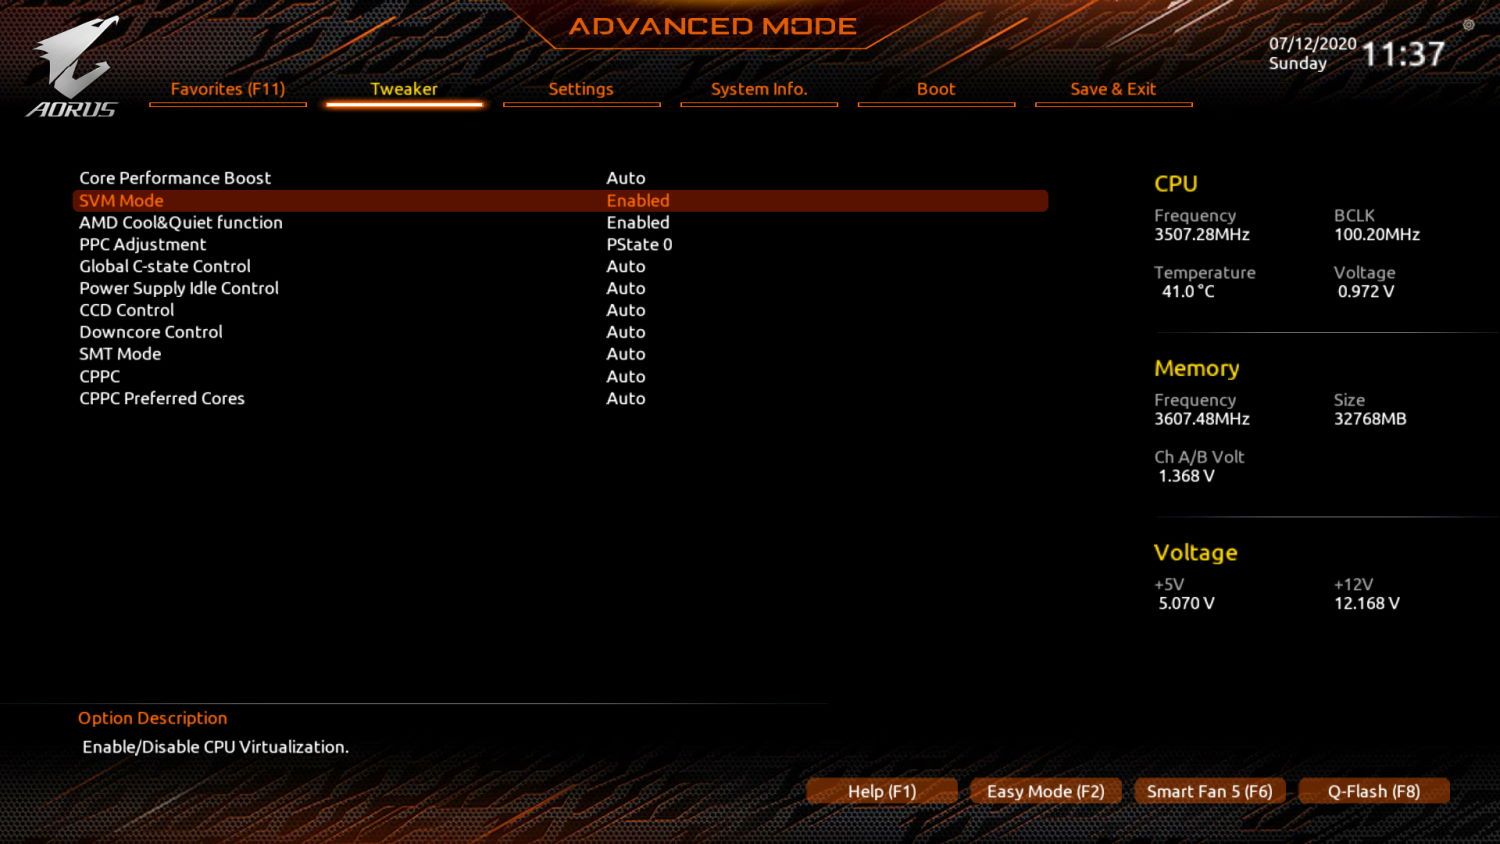
Save changes and reboot the computer, in most of the cases, the virtualization will work immediately, specially on brand new computers. If you try to start your virtual machine and it still fails, proceed with the next possible solution.
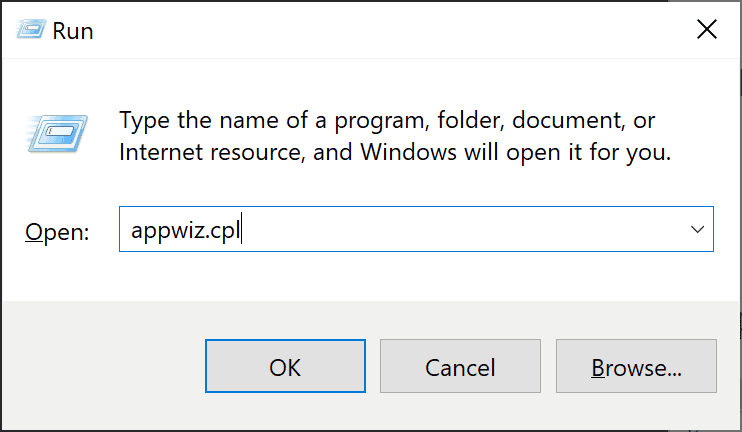
B. Disable Windows Hyper-V
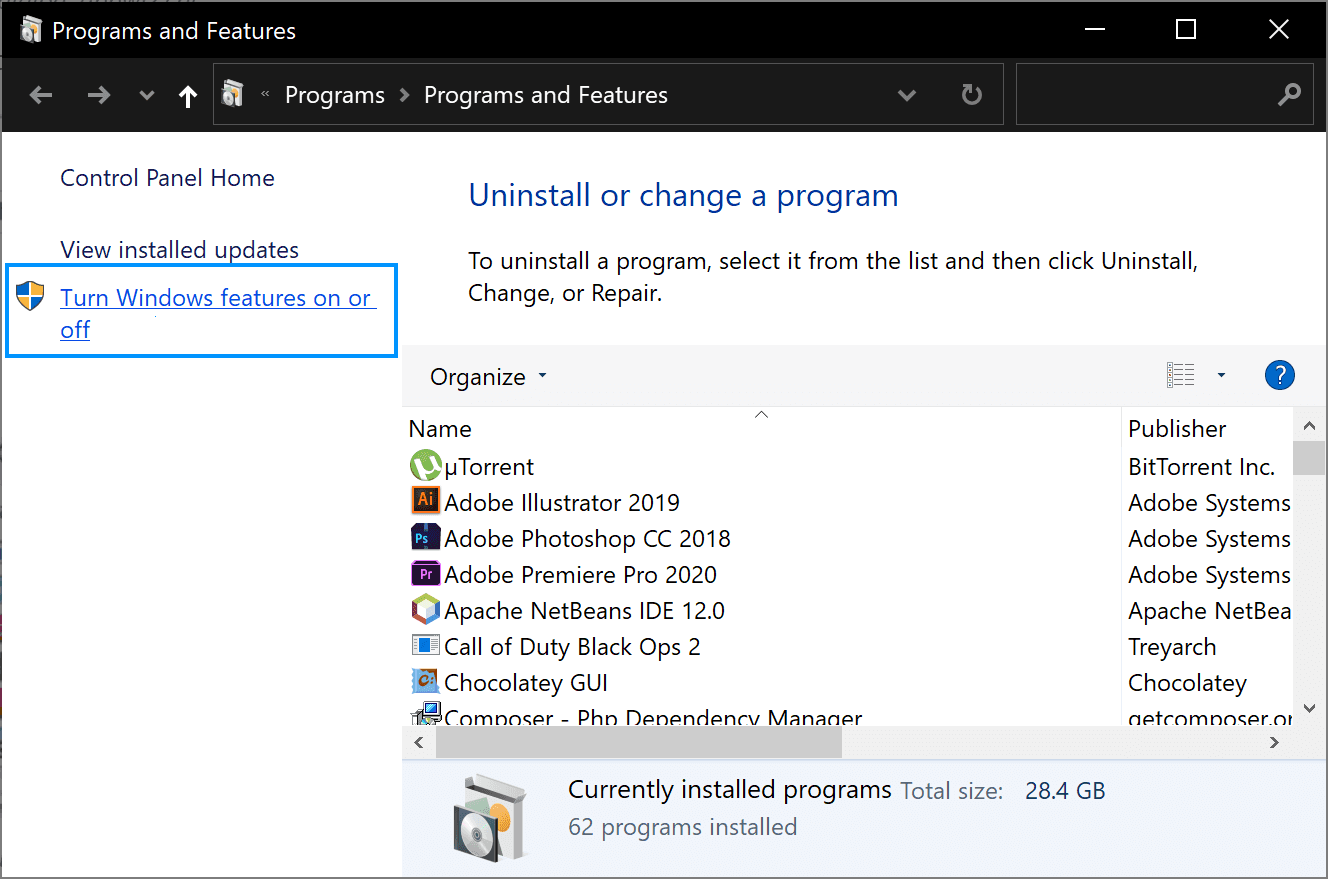
Many users found the solution of this problem by simply disabling the Microsoft Hyper V Feature of Windows 10. To do this, you will have to open the appwiz.cpl executable through the run dialog box (Windows key + R):
Then click on Turn Windows Features on or off on the left side of the control panel home:
Finally search for Hyper-V on the list:
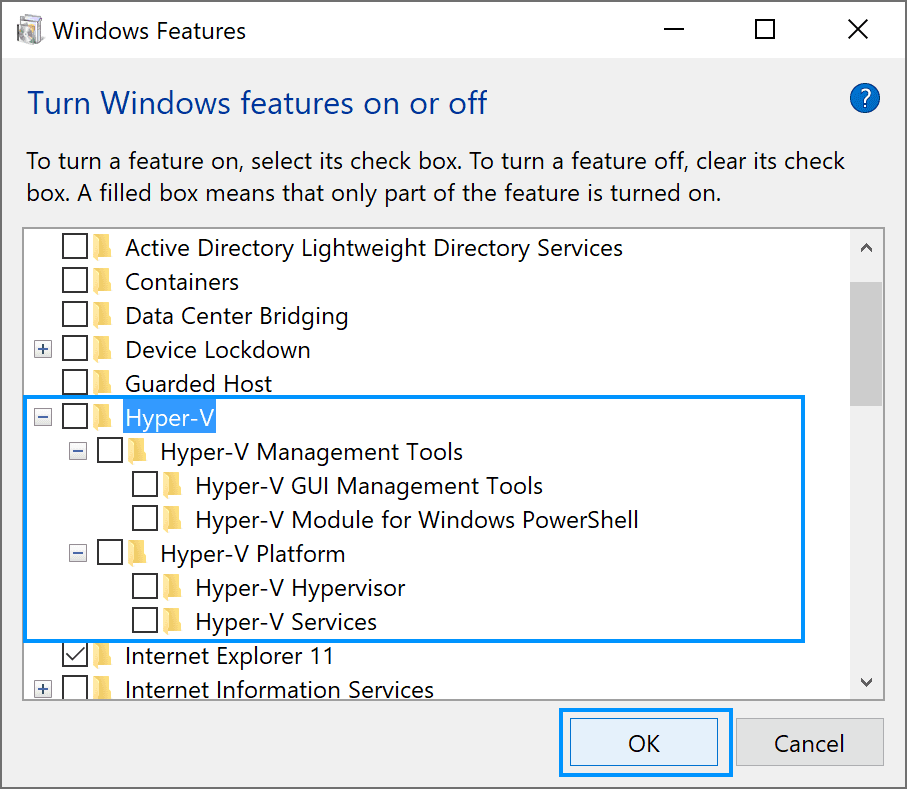
Click on OK and restart your computer, this should solve the problem when you try to start the machine again. If it doesn’t work, you can continue with the next option.
C. Change number of CPU cores to 1
If after both of the mentioned solutions, the virtualization still fails, is very likely that the AMD-V technology is not supported by the current configuration of your virtual machine. Many users report that, when the software assigns more than 1 CPU in the System settings, which forces the system to use hardware virtualization in order to start the virtual host, this exception appears. Therefore, you will have to limit the amount of processors. Go to the settings of the virtual machine:
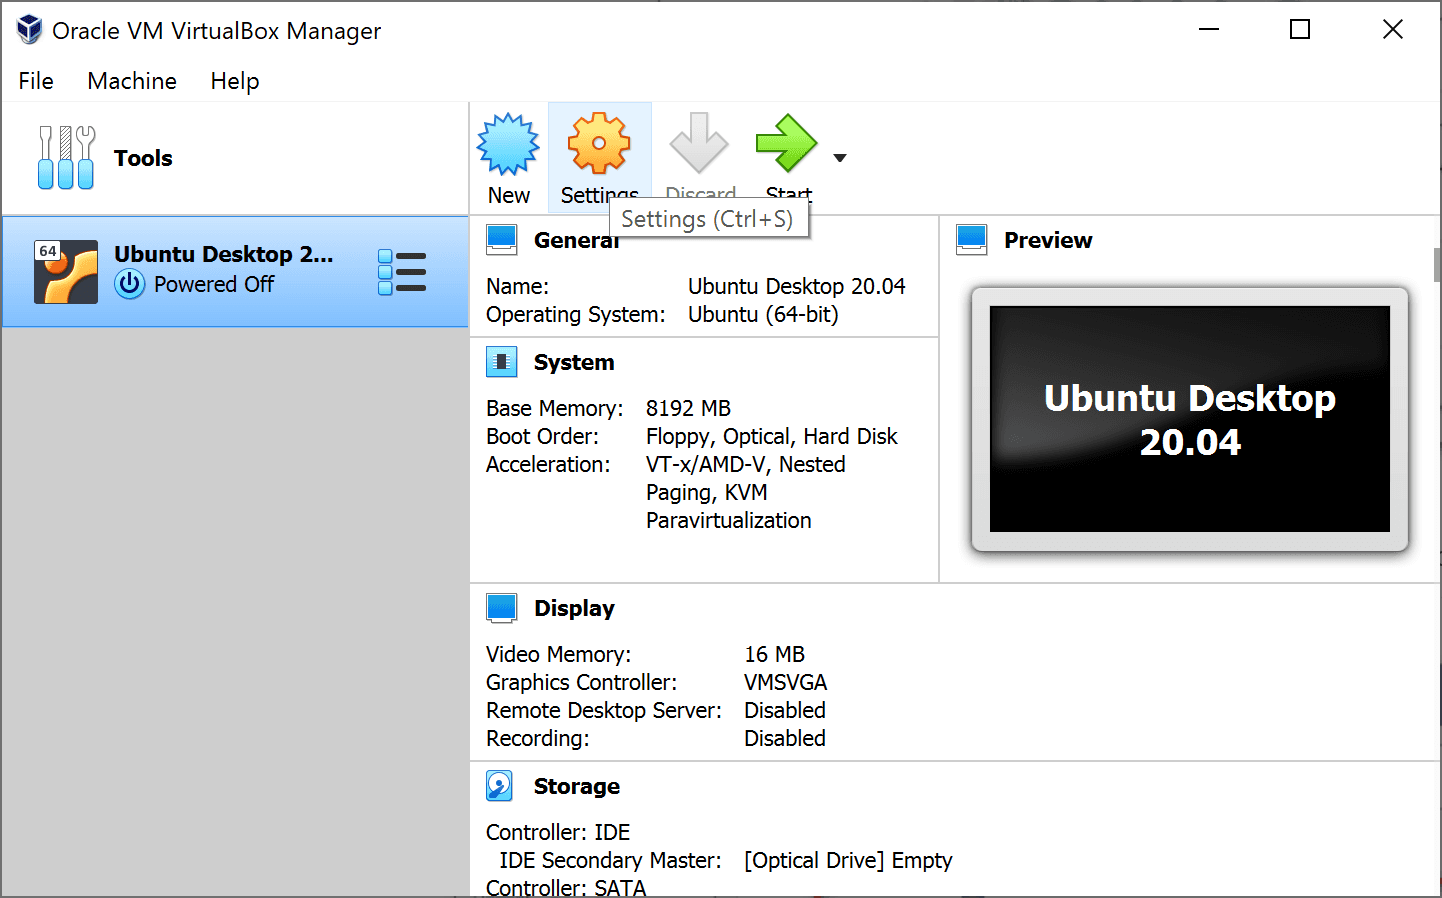
And decrease the number of processors to 1:
Close the settings and restart your virtual machine. It should boot up without the AMD-V is disabled in the BIOS.
Happy virtualization ❤️!
In this article, I will explain how to enable Nested VT-X/AMD-V in Virtualbox. Last night when I was trying to bring up a VM using vagrant in my Ubuntu system which is actually running on Oracle VirtualBox, I was facing Stderr: VBoxManage: error: VT-x is not available (VERR_VMX_NO_VMX) error. When I further checked, I found that an option called Enable Nested VT-X/AMD-V under System->Processor is greyed out and hence causing this error. So before solving this error I thought to write an article about this so that it will help you guys as well in case you are also facing the same error.
![How to Enable Nested VT-X/AMD-V in Virtualbox [Step by Step]](https://www.cyberithub.com/wp-content/uploads/2021/12/enanes.jpg)
Also Read: How to Display Nth Column of a File or an output using Windows Command Line
Step 1: Open CMD
In the first step, you need to open Windows Command line terminal by typing CMD on the bottom Search area. Once it shows up, right click on it and select Run as Administrator.
![]()
This will open the command line terminal in the administrator mode as shown below.
![How to Enable Nested VT-X/AMD-V in Virtualbox [Step by Step] 3](https://www.cyberithub.com/wp-content/uploads/2021/12/cmdwin-e1639634859435.jpg)
Step 2: Go to Installation Folder
In the next step, you need to go to VirtualBox folder using cd "Program FilesOracleVirtualBox" command as shown below. This folder contains all the VirtualBox executables components along with other important files in which we need to use VBoxManage. You can check about other components on Oracle VirtualBox Documentation.
C:>cd "Program FilesOracleVirtualBox"
Step 3: Enable Nested VT-x/AMD-v
To enable the Nested VT-x/AMD-v in VirtualBox, you need to run VBoxManage modifyvm <vm_name> --nested-hw-virt on syntax. Since here I am enabling it for one of my VM called Ubuntu so I will use VBoxManage modifyvm Ubuntu --nested-hw-virt on command for this as you can see below.
C:Program FilesOracleVirtualBox>VBoxManage modifyvm Ubuntu --nested-hw-virt on
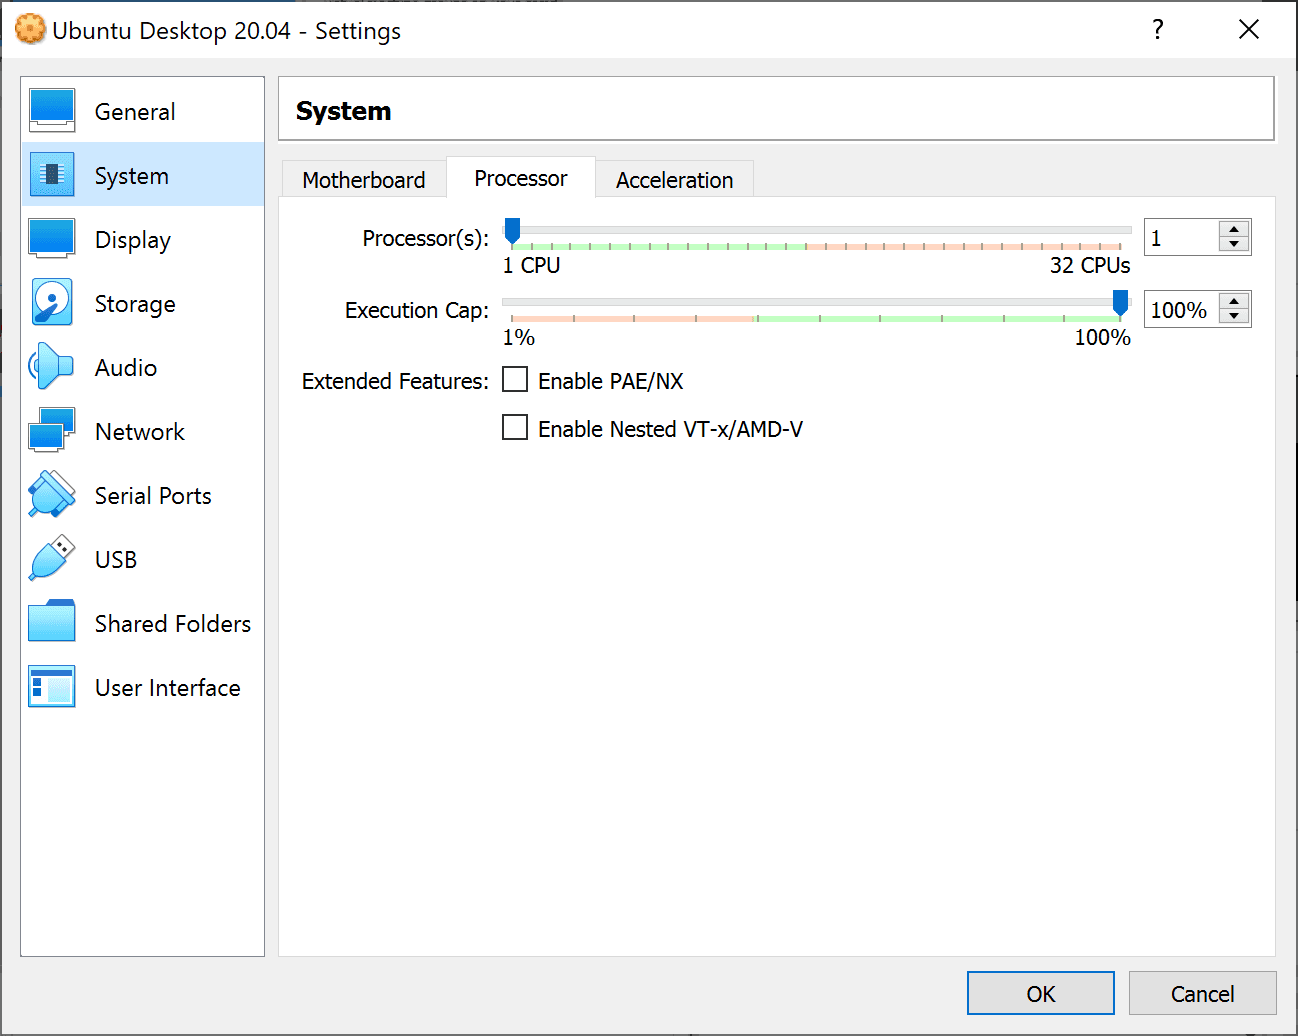
Step 4: Verify Processor Setting
Finally we have to verify the changes by going to the affected VM System settings in the VirtualBox and see if tick mark on Enable Nested VT-x/AMD-v appears as expected. If it does then it should look like below. That’s it !! You are now all set to proceed with your work.
NOTE:
Please note that when you are enabling Nested VT-x/AMD-v feature then always turn off Virtual Machine Platform feature from Windows Features if it is already enabled. Otherwise you will end up in getting Cannot enable nested VT-x/AMD-V without nested-paging and unrestricted guest execution! error. Check more about this on [Solved]: Cannot enable nested VT-x/AMD-V without nested paging.
![How to Enable Nested VT-X/AMD-V in Virtualbox [Step by Step] 4](https://www.cyberithub.com/wp-content/uploads/2021/12/pae-e1639627216403.jpg)