- Reply with quote
VBoxManage: error: Could not find a registered machine named…
Hello,
I need to setup external auth for VirtualBox running on Linux host(s) and when following this tutorial: virtualbox(dot)org/manual/ch07.html#vbox-auth , the command
- Code: Select all Expand viewCollapse view
VBoxManage setextradata "THE_OS" "VBoxAuthSimple/users/MY_USER" CHOOSED_PASSWORD
gave me this error
- Code: Select all Expand viewCollapse view
VBoxManage: error: Could not find a registered machine named "THE_OS"
VBoxManage: error: Details: code VBOX_E_OBJECT_NOT_FOUND (0x80bb0001), component VirtualBoxWrap, interface IVirtualBox, callee nsISupports
VBoxManage: error: Context: "FindMachine(Bstr(a->argv[0]).raw(), machine.asOutParam())" at line 934 of file VBoxManageMisc.cpp
when I hit the return key.
The VM name that I’m using is the correct one, I’ve got the same error when using the virtual machine UUID.
How to make it work?
Thanks in advance for help!
With regards,
Guillaume
- Guillaume Soucy
- Posts: 15
- Joined: 27. Dec 2021, 04:27
- Location: L’Orignal CA.
- Primary OS: Linux other
- VBox Version: OSE Debian
- Guest OSses: Windows (Multiples Versions)
-
- Website
- Reply with quote
Re: VBoxManage: error: Could not find a registered machine named…
![]() by scottgus1 » 2. Jan 2022, 16:48
by scottgus1 » 2. Jan 2022, 16:48
Glad you’re up and running!
Virtualbox uses files stored in the user’s home folder to configure itself. If the user account holding the files is not being used, then the home folder will point to a different folder, and the config files won’t be found.
- scottgus1
- Site Moderator
- Posts: 17670
- Joined: 30. Dec 2009, 20:14
- Primary OS: MS Windows 10
- VBox Version: PUEL
- Guest OSses: Windows, Linux
Return to VirtualBox on Linux Hosts
Who is online
Users browsing this forum: No registered users and 20 guests
In this article, I’m going to show you the complete guide to fix VirtualBox errors while installing Mac OS X. Most of the website that creating content regarding the installation of Mac OS X El Capitan or macOS Sierra on VirtualBox is not complete and have errors. The article might be correct and work on one device perfectly and without any problem. But there are lots of devices and different kinds of errors. A few months ago, we created an article on how to install Mac OS X El Capitan on VirtualBox and the visitors has got different kinds of problems.
One of our visitors “Holk” has read all the necessary comments and collected all the errors together and told the solutions. Here is his comment.
First THANXALOT to Mukhtar Jafari for all of his work! Great!
I needed more than 3 hours getting it to work. I was stuck in most of the errors mentioned above. Only with hints out of the comments I got it working. I`m merging it here so not anybody else will have this pain.
Creating the VM is easy, I´m not mentioning it here (just get vram to 128 mb!), problems were caused by the code (whatelse?!).
1) command prompt as admin
2) Mukhtar Jafari says: May 23, 2016 at 4:06 PM -> vboxmanage error
Aha, Add one more hyphen then try once again. Because when you copy and paste the code from Website
there will appear only one hyphen so use double hyphen *–* before cpuidset
3) LoThAr says: May 21, 2016 at 3:47 AM -> VBoxManage error: Could not find a registered machine named ‘”OS’
None of the solution posted worked for me, so, there is a way that cannot fail. Follow this steps:
In the DOS prompt type:
VBoxManage.exe list vms
You’ll see all your Virtual Machines (in case you have more than one). At the right of the Mac image is the GUID of the machine. Copy that GUID an replace it for the name of the VM in the command.
For example:
VBoxManage.exe list vms
“ZENTYAL2” {f5ee0212-7ca4-4710-b30e-b7e2ee881cb9}
“IE9 – Win7” {6730b42b-d555-4729-9948-711159678cac}
“Mac OS El Capitan” {9089dae0-6372-4c00-b415-b8963d54535f} “Missing Bluetooh Controller” error
You are getting the “Missing Bluetooh Controller” error because you are running the commands (Step# 5) while the Oracle VM software is open. Shut down the VM software completely and then run the commands. After the commands are ran, open up Oracle VM and start your VM session.
5) 3) Yhal Htet Aung says: May 19, 2016 at 12:53 PM -> “Missing Bluetooh Controller” error
Dude, I know what is the error. If you copy code from the website, try to change ” with your open inverted comma “. It is the error. After I changed the line with my open inverted comma for Search and Replace, then the problem solved. Make sure that you use your own open inverted comma in every single line. Try to check and replace it. Search and Replace doesn’t replace all the lines sometimes.
—————————————————————————-
These tips solved also the “considerRebuildOfPrelinkedKernel com.apple.kext.triggers triggered rebuild” error!
Conclusion: Wouldn´t it have been easier to add an ANSI-textfile with the right code to the downloads list?!
Nevertheless: Thanx to all of you!
Fix VirtualBox Errors While Installing Mac OS X
Now, I would like to shorten this whole passage into some steps. I hope you should get something from this article.
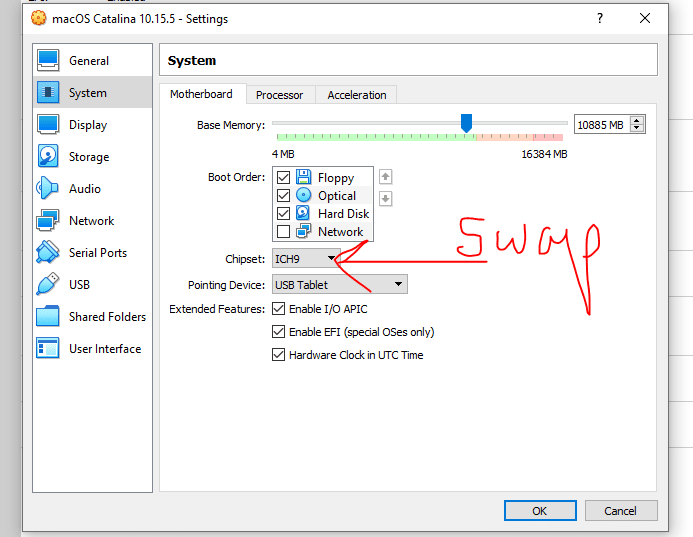
Step #1. While creating a new virtual machine, you should do the following tasks;
- Memory Size to 4 GB (Recommended)
- Disable Floppy disk
- Chipset to ICH9 or PIIX3 for some devices
- Processor minimum 2 recommended 4
- Video memory to 128 MB
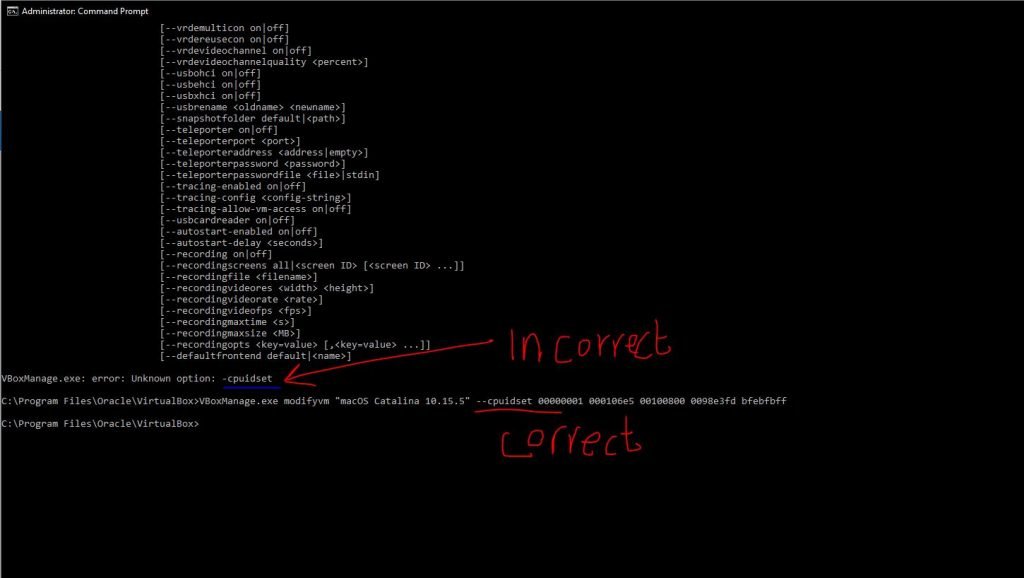
Step #2. Whenever you face this problem “VBoxManage.exe: error: Unknown option. -cpuidset
The VM hangs on boot” while adding the first code in the Command Prompt. It’s because of a double hyphen. Use Double hyphen “- – “ before cpuidset.
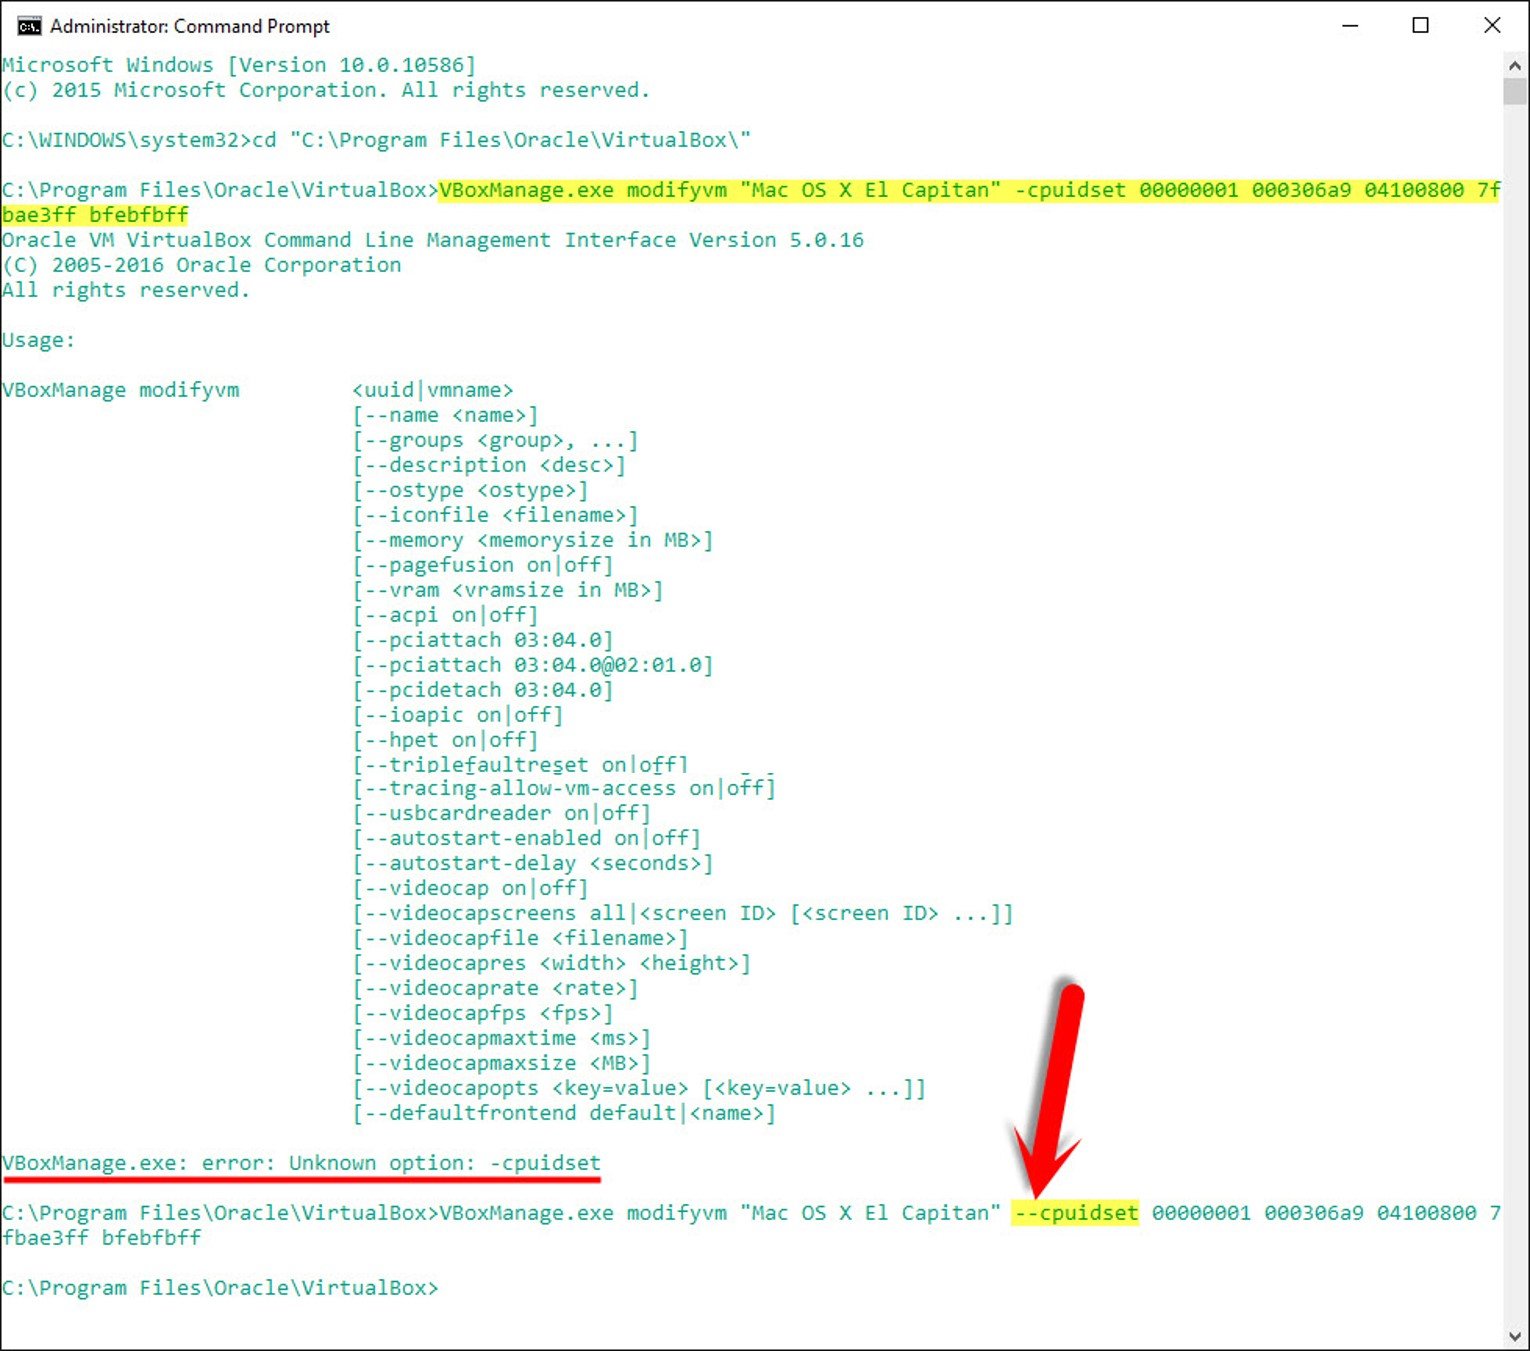
unknown option – cpuidset
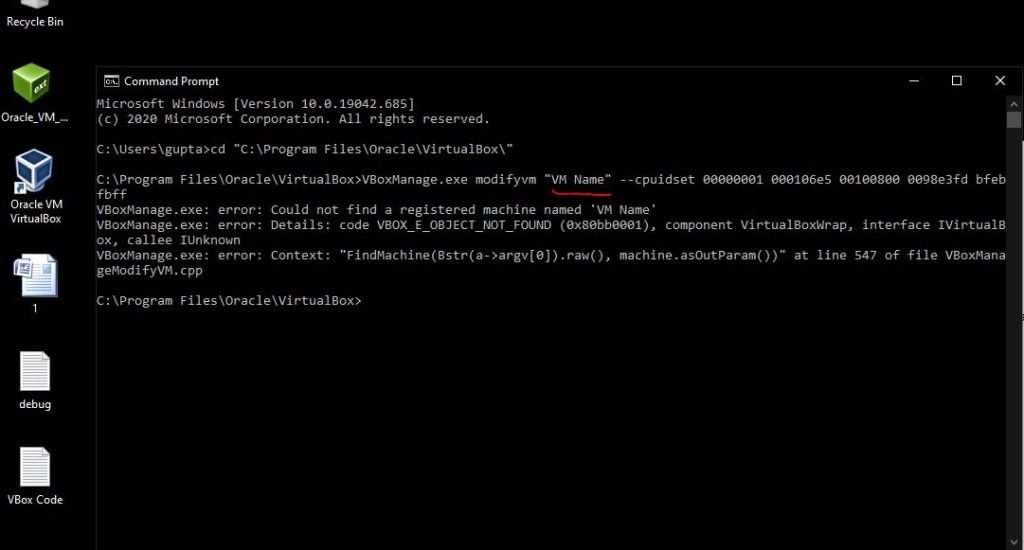
Step #3. When you see this error “VBoxManage error: Could not find a registered machine named ‘Your VM Name‘”, it’s because of your virtual machine name. You did not replace the VM name in the code. So you have replaced the VM name. And then insert the code. See the screenshot below.
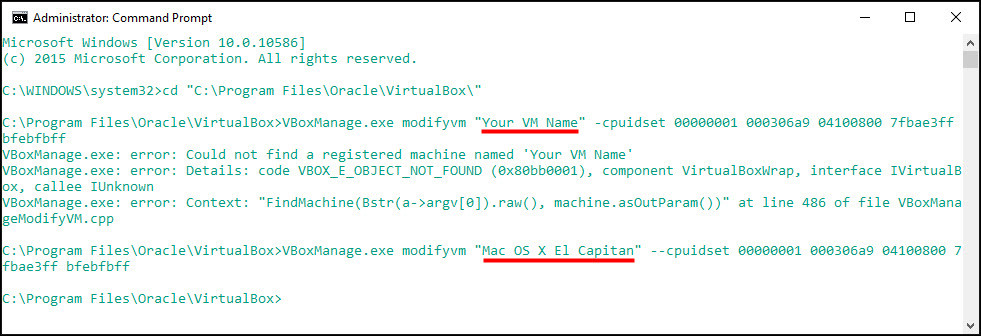
Could not find a registered machine name
Or do it in this way. Type this command “VBoxManage.exe list vms”. You’ll see all your Virtual Machines (in case you have more than one). At the right of the Mac, image is the GUID of the machine. Copy that GUID a replace it for the name of the VM in the command.
“Kali Linux” {6d21496a-248a-490e-9fb9-345e2fabda85}
” Windows10″ {1a73201f-ed39-4c73-bd7c-4dccc06efba8}
“Mac OS X El Capitan” {3fc75013-68e9-4561-a054-cd7853ffca2f}
“macOS Sierra” {d95c956f-ae86-47fb-a3f8-71cfa1973a38}
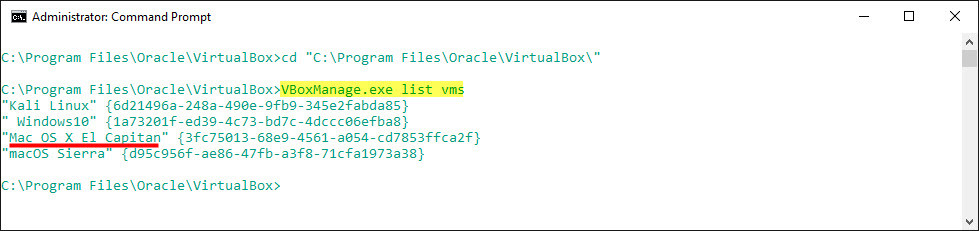
Could not find a registered machine name
Step #4. How to fix this “Missing Bluetooth Controller…” error. When you see this error. because you are running the commands (Step# 5) while the Oracle VM software is open. Shut down the VM software completely and then run the commands. After the commands executed, open up Oracle VM and start your VM session.
If this method didn’t work. Try this method. One of our visitor “Yhal Htet Aung” have found this error. If you copy the code from the website, try to change ” with your open inverted comma “. It is the error. After I changed the line with my open inverted comma for Search and Replaced, then the problem solved. Make sure that you use your own open inverted comma in every single line. Try to check and replace it. Search and Replace doesn’t replace all the lines sometimes
These tips also solved the “considerRebuildOfPrelinkedKernel com.apple.kext.triggers triggered rebuild” error!

Fix VirtualBox Errors While Installing Mac OS X
Conclusion
These tips were for you dear visitors, and I hope you found this article helpful. If you have any questions regarding this problem or know the better solution. Please feel free to share it with us. Thanks for being with us.
This informative article will demonstrate the comprehensive guide to fix VirtualBox mistakes while installing Mac OS X. Most sites producing content about the installment of Mac OS X El Capitan or macOS Sierra on VirtualBox aren’t complete and have errors. The guide may be right and operate on a single device perfectly and with no issue. However, there are plenty of devices and various types of errors. A couple of weeks ago, we made a post on the way best to set up Mac OS X El Capitan on VirtualBox, and the traffic has different sorts of issues.
Minimum System Requirements to install MacOS X on Virtualbox:
Minimum system requirements to install MacOS X on Virtualbox are: (It will help run macOS High Sierra or later versions without any problem.)
- Minimum 2 GB memory (Recommended 8GB or higher)
- Minimum 2 cores of processors (Recommended 4 cores or higher)
- Hard disk free space 40 GB (Recommended 100GB or higher)
- Your system should support Intel or AMD VT (Virtualization Technology)
- Intel/AMD VT (Virtualization Technology) Should be enabled from BIOS setup
For fast performance, try installing macOS X on SSD rather than HDD.
Required: Enable Virtualization Technology (aka Intel VT or AMD-V). See video below.
Some key points to remember before Installing Mac OS X:
1) Intel CPU works better than AMD
2) Turn OFF Antivirus programs (Windows Defender) and Windows Firewall before starting the install
3) Set Video RAM to between 64-128MB
4) Use no spaces in VM name (ex: “MACOSX” not “MAC OSX”). Also, no punctuation. Also, re-verify:
VM Type: Mac OS X and Version: Mac OS X 10.11 El Capitan (64-bit)
(These are in Virtualbox Settings->General)
5) Suggest use wired Internet, not WiFi, for initial download/updates, etc.
6) Run CMD window as Administrator when entering command-line commands.
7) May need to start Virtualbox as Administrator.
 Be patient during initial boot up. It runs disk checks and other repairs… and can reboot a couple of times.
9) Be sure your HD or SSD has >80GB of free space. All the updates after initial installation gobble space.
10) Black Screen? Try video RAM > 64MB and Chipset = PIIX3
11) Do not install Virtual Box Extensions “CD”
12) Before adding commands on CMD, make sure you have quit your Virtualbox.
Unkown option –cpuidset
If you get this error “VBoxManage.exe: error: Unknown option. –cpuidset. The VM hangs on boot” while adding the first code in the Command Prompt. It’s because of the double hyphen. Use Double hyphen “- – “before cpuidset.
VBoxManage error: Could not find a registered machine named Your VM Name
If you get this error “VBoxManage error: Could not find a registered machine named Your VM Name“, it is because you haven’t used the correct name of your virtual machine when adding the codes on CMD.
You need to make sure you use the same VM Name you used when creating the virtual disk.
Missing Bluetooth Controller
If you get this error, make sure you close the virtual machine before adding the CMD codes.
Guru Meditation error or Black Screen
This error is majorly seen because of two issues-
The critical error happens due to the guest operating system. It is trying to switch to the PAE mode, which is currently disabled by default in VirtualBox. PAE support can be enabled using the VM settings (System/Processor)”.
- Open VM VirtualBox
- File -> Settings -> System -> Processor
- Check Extended Features: Enable PAE/NX
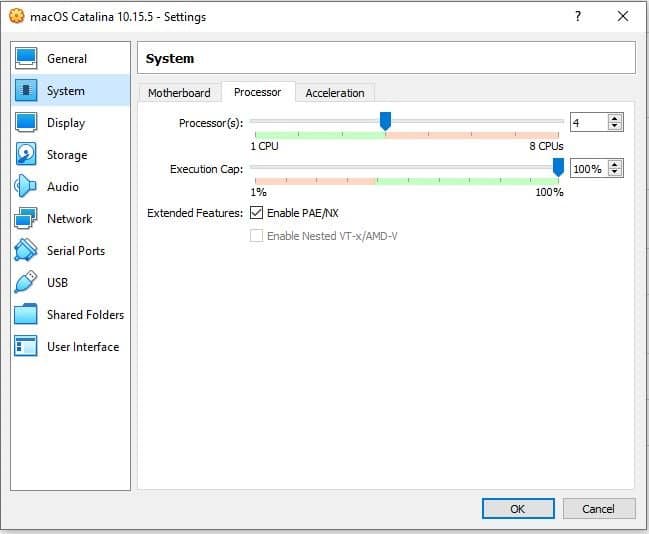
OR,
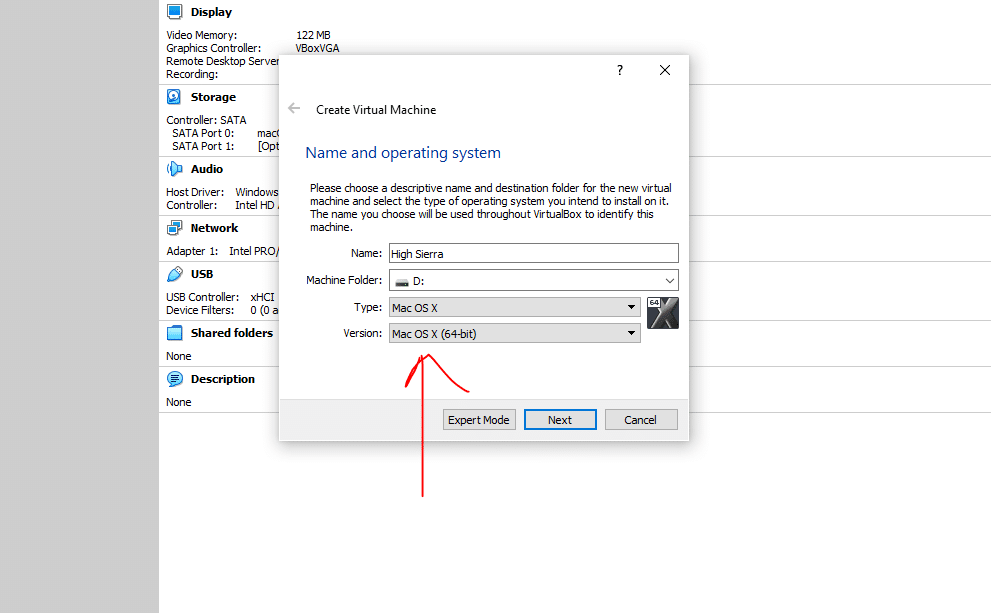
For people with the black screen problem or Guro Meditation error, change the operating system version from macOS 10.13 High Sierra (64-bit) or macOS 10.12 Sierra (64-bit) to just the Mac OS X (64-bit). If the error still exists, switch the Video Memory Size to 128 MB from Virtual machine settings. This is a significant issue with most of the users.
This version of Mac OS X is not supported on this platform Reason: Iloveapple
Make sure Virtualization Technology (VT) is enabled from BIOS.
error: VBoxManage setextradata “OSX” “VBoxInternal/Devices/smc/0/Config/DeviceKey” “ourhardworkbythesewordsguardedpleasedontsteal(c)AppleComputerInc” and you are stuck at appleKeyStore: operation failed (pid:30 sel:7 ret:e00002c2 ‘-536870206’)
Exit VirtualBox before adding codes to CMD
Yhal Htet Aung
Try to change the inverted commons throughout the virtual codes. Since you are copying the codes, you might be using the wrong inverted commas.
So, copy the codes in your notepad file, replace all the inverted commas via your keyboard and then try again.

Invalid Virtualbox Version
Make sure you add the right virtual codes. You can download the correct version codes here-
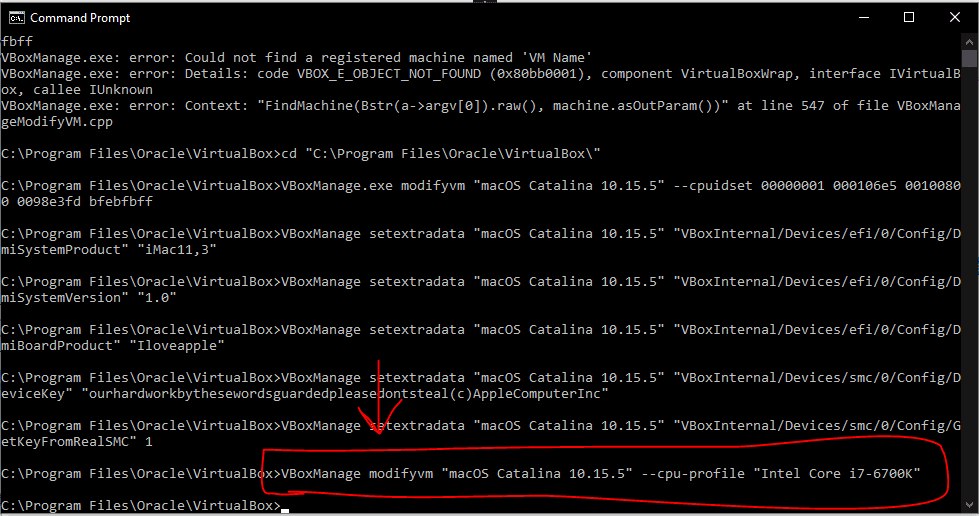
Stuck in an infinite loop on Black Screen
Try using this command as the last command on CMD-
VBoxManage modifyvm “VM_name” –cpu-profile “Intel Core i7-6700K”
Or,
Try Motherboards Chipset – both PIIX3 and ICH9 one by one
install.nsh is not recognized as an internal command
1st method:
If you get ‘install.nsh’ is not recognized as an internal or external command, operable program, or script file. You have not attached the Virtualbox Boot Image.
See, https://www.geekrar.com/fix-macos-catalina-install-nsh-isnt-recognized-as-an-internal-error/
2nd method:
If you then get messages along the lines of ‘macOS Install DataLocked FilesBoot Filesboot.efi’ missing or not recognized:
run setup.nsh
now run, fs0:SystemLibraryCoreServicesboot.efi
and all should now spring into life.
3rd method:
- At UEFI prompt: Type exit
- You’ll be brought into an EFI text-mode GUI.
- Select Boot Maintenance Manager and click.
- Select Boot From File and click
You should see two entries in a list (they are cryptic looking PCI bus paths).
The first PCI path in the list is probably the boot partition that doesn’t contain bootable firmware. The second PCI path is probably to the recovery partition, the one you need to boot from. If the 2nd partition isn’t the recovery partition, look under the paths in the list to see if one of them is it. If the recovery partition isn’t present and valid, these instructions won’t work.
Click the 2nd entry, you should see (and then click):
macOS Install Data
Then click:
Locked Files
Then (if present), click
Boot Files
And finally click:
boot.efi
The installation will continue, or you will boot into the OS or get the Recovery utility menu (where macOS can be reinstalled from or Disk Utilities run). The ambiguity of that last statement is I did that awhile before writing this comment, and I don’t recall what I booted into first, only that it worked and was not hard to figure out what to do at that point. If you have a recovery partition, to boot directly into the Recovery Mode, turn on the Mac and immediately press and hold (⌘)-R
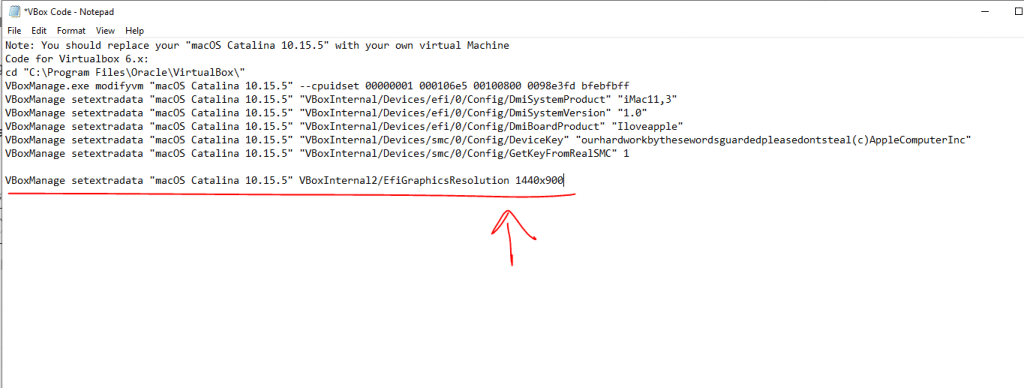
Set screen resolution
Use the following command-
cd “C:Program FilesOracleVirtualBox”
VBoxManage setextradata “VM Name” VBoxInternal2/EfiGraphicsResolution 1440×900
If you are still facing some issues, try using VMWare to install macOS on your Windows. When your current PC does not support Virtualbox and its configurations, try switching to VMWare. The process for it is relatively painless.
Share files and folders between Windows and MAC on Virtual Machines
You can go through this complete guide- How to share folders on VirtualBox & Vmware? (Windows-MAC) Step by Step Guide
I tried installing macOS Catalina on Virtual on Windows 10 on a low configration system. You can watch the video tutorial here-
-
#1
Здравствуйте. У меня проблема с отображением ВМ в GNS3. Собственно, в VirtualBox у меня есть три машины, которые отлично работают, а вот в GNSе уже проблемы. Основной функционал эмулятора работает, однако при попытке подключить ВМ вылезает следующая ошибка (на фото), при закрытии ошибки список ВМ пуст.
Пробовал с разными версиями VB и GNS, всё также. В нете советуют проверить включена ли виртуализация — проверил, всё включено. Также советуют от имени администратора запускать, тоже не помогает.
Последнее редактирование модератором: 10.11.2019
-
#2
Код:
VirtualBox has returned an error: VBoxManage.exe: error: Could not find a registered machine named ''
VBoxManage.exe: error: Details: code VBOX_E_OBJECT_NOT_FOUND (0x80bb0001), component VirtualBoxWrap, interface |VirtualBox, callee|Unknown
VBoxManage.exe: error: Context: "FindMachine (Bstr(a->argv[0].raw(),machine.asOutParam())" at line 748 of VBoxManageMisc.cpp
У машины пустое имя? Попробуйте переименовать. Для верности — используйте только латиницу, без пробелов.
Какой физический процессор в ПК? Это может быть из за аппаратной несовместимости.
-
#3
Запуск от имени администратора попробуйте
-
#4
Запуск от имени администратора попробуйте
Нет, у машин имеются имена, все разные и все полностью на латинице.
Процессор: Intel core i7-6500U 2,5GHz
Если это аппаратная, то получается это не лечится?
— -Подумал и добавил — —
Код:
VirtualBox has returned an error: VBoxManage.exe: error: Could not find a registered machine named ''
VBoxManage.exe: error: Details: code VBOX_E_OBJECT_NOT_FOUND (0x80bb0001), component VirtualBoxWrap, interface |VirtualBox, callee|Unknown
VBoxManage.exe: error: Context: "FindMachine (Bstr(a->argv[0].raw(),machine.asOutParam())" at line 748 of VBoxManageMisc.cpp
У машины пустое имя? Попробуйте переименовать. Для верности — используйте только латиницу, без пробелов.
Какой физический процессор в ПК? Это может быть из за аппаратной несовместимости.
Не помогает
-
#5
Здравствуйте. У меня проблема с отображением ВМ в GNS3. Собственно, в VirtualBox у меня есть три машины, которые отлично работают, а вот в GNSе уже проблемы. Основной функционал эмулятора работает, однако при попытке подключить ВМ вылезает следующая ошибка (на фото), при закрытии ошибки список ВМ пуст.
Пробовал с разными версиями VB и GNS, всё также. В нете советуют проверить включена ли виртуализация — проверил, всё включено. Также советуют от имени администратора запускать, тоже не помогает.
Попробуй в биосе компа-сервера выставить
Код:
F2--> Settings --> Configuration --> Intel Virtual Technology: [ENABLED]
-
#6
Попробуй в биосе компа-сервера выставить
Замечание: F2—> Settings —> Configuration —> Intel Virtual Technology: [ENABLED][/QUOTE]
Там с самого начала включена виртуализация
-
#7
И все таки убедитесь:
— что GNS3 запускается с правами администратора (Run As Administrator), и что в BIOS включена поддержка виртуализации (Intel VT-x/EPT, AMD-V).
— что установлена последняя версия VirtualBox.
Вариант — попробовать перезапустить сервис из командной строки (с правами админа):
Код:
SC START VBOXDRV
SC STOP VBOXDRV
SC START VBOXDRV
(если скажет, что уже запущен, то остановить и запустить заново)
Вероятнее всего, проблема связана с тем, что GNS3 не запущен с правами админа.
-
#8
Что будет если попытаться зарегистрировать ВМ ?
Код:
VBoxManage registervm your_virtual_machine.vbox
-
#9
И все таки убедитесь:
— что GNS3 запускается с правами администратора (Run As Administrator), и что в BIOS включена поддержка виртуализации (Intel VT-x/EPT, AMD-V).
— что установлена последняя версия VirtualBox.Вариант — попробовать перезапустить сервис из командной строки (с правами админа):
Код:
SC START VBOXDRV
SC STOP VBOXDRV
SC START VBOXDRV
(если скажет, что уже запущен, то остановить и запустить заново)
Вероятнее всего, проблема связана с тем, что GNS3 не запущен с правами админа.
я в этом сразу убедился, через командную строку не пробовал, попробую завтра, хотя не понимаю разницы
про версию vb: пробовал и с последней и более ранними, одна ерунда
— -Подумал и добавил — —
Что будет если попытаться зарегистрировать ВМ ?
Код:
VBoxManage registervm your_virtual_machine.vbox
Простите, где зарегистрировать?)

-
#11
Как называются виртуальные машины? Писали на github что был баг с импортом виртуальных машин в GNS3 содержащих в названии символы не ASCII.
https://github.com/GNS3/gns3-gui/issues/1422
Не знаю исправили или нет, вообще глюк интересный
— -Подумал и добавил — —
т.е правиьно ли я понял что при попытке добавить виртуалку virtualbox в GNS3 получаем ошибку выше
-
#12
ubuntu(web)
ubuntu(mail)
ubuntu(dns)
Если я правильно понимаю, то все символы входят в ASCII
— -Подумал и добавил — —
такое дело…тут похоже старые версии gns, причём очень старые, потому что я ставил последнюю версию и версию постарее 2.0.3, в обоих такой кнопки нет
— -Подумал и добавил — —
Ещё кстати, немного покопавшись в настройках, увидел вот такую неприятную надпись. Говорит, что внутренняя виртуализация в vb не поддерживается, а в чём проблема? В настройках vb ни слова про это не нашёл. Хотя может и не в этом вообще проблема…

-
#13
virtualbox вроде не поддерживает вложенную виртуализацию
с вмваре вроде должно работать
-
#14
Сам VB предупреждает, что эта внутренняя виртуализация не поддерживается, но он ведь не говорит, что не должно работать совсем, он говорит, что будет работать медленно. Я просто знаю людей, у которых работает, с теме же самыми версиями VB, GNS, Ubuntu. Да и в GNS не просто же есть раздел импорта ВМ из VB. Должно как-то работать, но как…
В VMware работает, проверил уже, просто хочу понять, как заставить работать и с VB.
-
#15
Вон чувак пишет что семь лет этой фишки ждали и ссылку на трэкер дает. Может быть еще из-за разрядности ОС.
-
#16
Да то, что VB не поддерживает её, это я уже понял. Ответа, как это решается так и нет.
У всех сейчас x64, вряд ли из-за разрядности
-
#17
Доброго времени суток.В моём случае данная проблема решилась запуском VirtualBox с правами администратора и созданием нужных машин в ней.GNS3 видит только машины,созданные в VB, запущенной с правами админа.
Обновленная статья Установка MacOS 10.13 High Sierra на VirtualBox
Так в последнее время сложилось, что мне переодически требуется под рукой MacOS. Не настолько часто, что бы бежать в магазин и покупать продукцию Apple, но все же достаточно часто, что бы испытывать неудобство. Понятно, что самым простым решением в таком случае будет установка какой-нибудь версии MacOS на виртуалку. Честно сказать, такой надобности я не испытывал лет пять. И когда мне такая виртуалка была нужна прошлый раз, я изрядно наплясался с бубном, пока получил приемлемый результат. Почему то я думал, что с тех пор что то изменилось, тем более, что в списке доступных ОС для VirtualBox MacOS присутствует. Но начав мучить гугл на эту тему, выяснил, что изменилось все весьма мало. Поддержка в боксе уже который год в стадии беты, Guest Additions (пакет расширений для гостевой системы, улучшающий ее работу) отсутствует как класс, а большинство образов которые я скачал, были изрядно кривые. Но все же более менее приемлемое решение я нашел – чем с вами и делюсь. Надеюсь кому то будет полезно.
Что понадобится
- Нормальный образ MacOS Sierra забираем тут
- Последнюю версию VirtualBox берем, как всегда, с официального сайта
Настраиваем VirtualBox для работы с MacOS
Запускаем VirtualBox и создаем новую виртуалку (что бы получить картинку как на скрине переключитесь в режим “Подробный режим”). Я поставил 4096 оперативки – если вы себе этого позволить не можете, оставьте 2 Гб. Меньше уже бессмысленно. На экране с настройками жесткого диска все оставляем по умолчанию.
Нажимаем создать, затем правой кнопкой по вновь созданной машине и “Настроить”. Далее выставляем все, как на скриншотах.


В настройках дисплея выделяем побольше видеопамяти и обязательно снимаем галочки с ускорения.
Далее надо немного изменить настройки доступных приводов. Когда виртуальный оптический привод висел на одном контроллере с жестким диском у меня установка не запустилась.
Удаляем: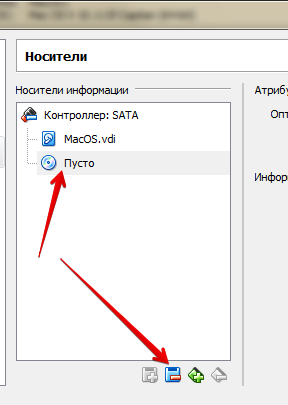
Затем добавляем новый контроллер SATA и к нему прикрепляем наш образ.
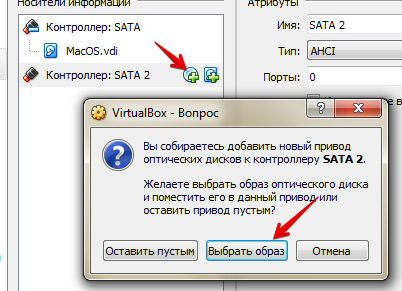
Остальное оставляем по умолчанию и сохраняем настройки.
Теперь с нашей виртуальной машиной надо еще немного поработать. Для этого закрываем VirtualBox, запускаем командную строку (Win+R, ввести
cmd
) и вводим следующее (“MacOS” замените на название вашей виртуальной машины):
|
cd «C:Program FilesOracleVirtualBox» VBoxManage.exe modifyvm «MacOS» —cpuidset 00000001 000106e5 00100800 0098e3fd bfebfbff VBoxManage setextradata «MacOS» «VBoxInternal/Devices/efi/0/Config/DmiSystemProduct» «iMac11,3» VBoxManage setextradata «MacOS» «VBoxInternal/Devices/efi/0/Config/DmiSystemVersion» «1.0» VBoxManage setextradata «MacOS» «VBoxInternal/Devices/efi/0/Config/DmiBoardProduct» «Iloveapple» VBoxManage setextradata «MacOS» «VBoxInternal/Devices/smc/0/Config/DeviceKey» «ourhardworkbythesewordsguardedpleasedontsteal(c)AppleComputerInc» VBoxManage setextradata «MacOS» «VBoxInternal/Devices/smc/0/Config/GetKeyFromRealSMC» 1 |
На этом собственно подготовительный этап заканчивается. Запускаем VirtualBox, стартуем виртуальную машину и процесс установки MacOS.
Установка MacOS на VirtualBox
Если все сделали верно, через некоторое время запустится графическая оболочка установщика. Описывать весь процесс установки нет смысла, он достаточно прост. Остановлюсь на не очевидных моментах.
На третьем или четвертом шаге вы получите сообщение “На “OS X BaseSystem” недостаточно свободного места для установки”.
Дело в том, что наш жесткий диск надо сначала подготовить для установки MacOS. Обратите внимание на панель меню вверху. Выберите “Утилиты” -> “Дисковая утилита”.
В открывшемся окне выберите наш диск и нажмите очистить:
Вводим имя раздела и запускаем на очистку:
После завершения, закрываем утилиту и выбираем появившийся диск под установку и продолжаем:
На что еще надо обратить внимание. Не вводите свой и не создавайте новый AppleID: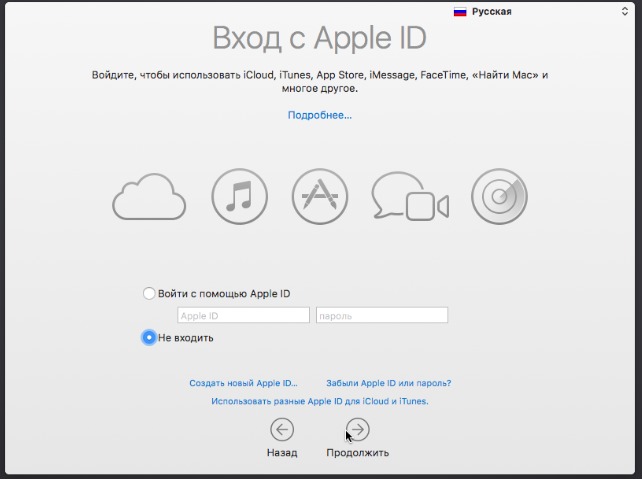
Снимите галочки с отправки диагностики в Apple:
Вот собственно и все. Имейте ввиду, что грузится MacOS на VirtaulBox достаточно значительное время. Поэтому не нервничайте, не перегружайте виртуалку, а просто дождитесь завершения загрузки. И еще или измените порядок загрузки системы (оптический диск поставьте после жесткого) или отмонтируйте образ, что бы каждый раз не запускалась установка MacOS.
Решаем проблему с разрешением экрана в MacOS на VirtualBox
Вот у нас все загрузилось, все вроде хорошо, если не считать того, что разрешение системы 1024×768. Жить с этим можно, но все же не комфортно. Рецепт который я нашел скажем прямо не панацея, если кто то знает лучше способ, просьба поделится. Выключаем нашу виртуалку, опять запускаем командную строку и делаем следующее:
|
cd “C:Program FilesOracleVirtualbox” VBoxManage setextradata “MacOS” VBoxInternal2/EfiGopMode 4 |
Это переведет экран в разрешение 1440×900, что более менее приемлемо. Вместо 4 в конце можно ставить следующие значения:
0
,
1
,
2
,
3
,
4
,
5
что соответствует разрешениям
640×480
,
800×600
,
1024×768
,
1280×1024
,
1440×900
,
1900×1200
![]()
Error finding machine! Could not find a registered machine named ‘centos’
I am pretty sure the name is correct. It it your program doesn’t support new version of VirtualBox?
this command: VBoxManage.exe startvm centos —type headless
work well, so I don’t think the problem is the name.
Version: VBoxVmService-5.2-Jujube.exe
![]()
I found where the problem is.
I have to do following steps manually:
Open «dcomcnfg.exe» , and find VboxVMService.
right-click -> proprieties -> log On -> This account -> (my login in information)
please do that automatically, thank you.
![]()
Same probleme and I was able to fix it by installing vboxvmservice 5.1 and after that installing the 5.2 version.
![]()
I have always had to edit the Log On tab in Services to get VM’s to start automatically.

![]()
Same Problem with version 6.0 (VirtualBox & VBoxVmService). It seems like a VMs that was added by a user is not visible to the system account.
I have to do following steps manually.
I have to open «dcomcnfg.exe» , and find VboxVMService.
right-click -> proprieties -> log On -> This account -> (my login in information)
I have always had to edit the Log On tab in Services to get VM’s to start automatically.
This is not a good solution (and does not work for me). What if you have to manage VMs from multiple users?
![]()
+1 On this. Same issue. See attached, using Virtual Box 6. The «log on» option isn’t an option. Like OP, running VBoxManage.exe directly successfully launches my image.

![]()
+1 On this. Same issue. See attached, using Virtual Box 6. The «log on» option isn’t an option. Like OP, running
VBoxManage.exedirectly successfully launches my image.
Same issue with VirtualBox 6.1 on VBoxVMService-6.1-Kiwi
Resolution suggested by #4 (comment) still works.
![]()
I found where the problem is.
I have to do following steps manually:
Open «dcomcnfg.exe» , and find VboxVMService.
right-click -> proprieties -> log On -> This account -> (my login in information)please do that automatically, thank you.
Fabulous! This solves my problem: my login user can’t see the correct running state of the virtual machine when using the VirtualBox management program.
It is recommended to add this usage rule to the instruction document Howto.txt