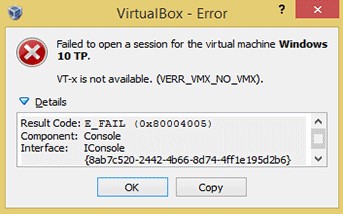
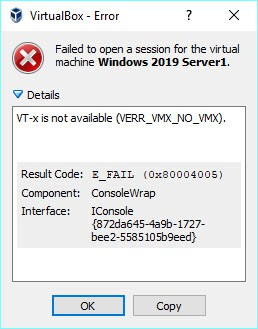
Ошибка vt-x is not available (verr_vmx_no_vmx) появляется, когда пользователь запускает виртуальные машины при помощи VirtualBox на Windows 10. Виновником данной ошибки могут быть несколько причин: не включена виртуализация в BIOS, включен Hyper-V, включена изоляция ядра, Avast может отключить виртуализацию.
1. Отключить Hyper-V
Эта самая распространенная ошибка, когда пользователь при включенном Hyper-V использует и VirtualBox или любую другую стороннюю программу как Docker. Дело в том, что, если включена встроенная виртуальная машина Hyper-V, то она отключает виртуализацю для VirtualBox.
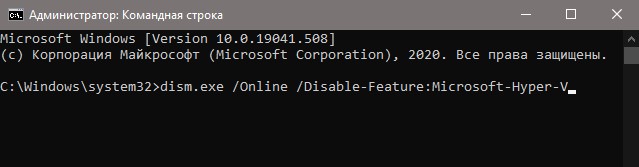
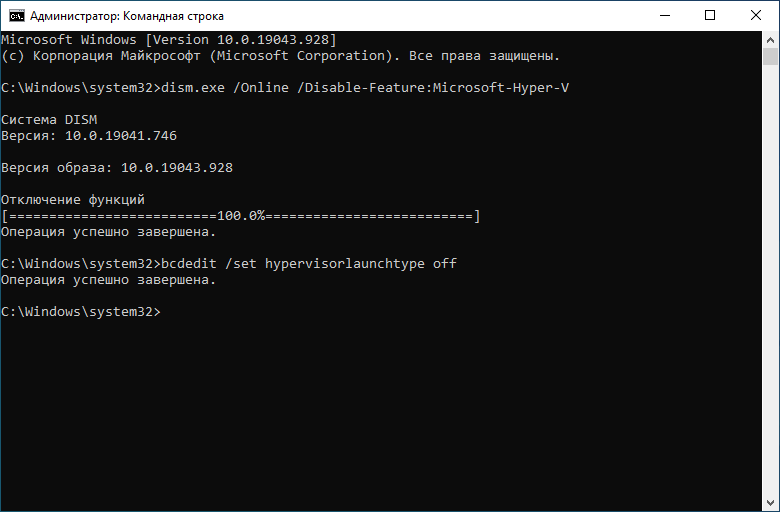
Запустите командную строку от имени администратора и введите ниже команды:
dism.exe /Online /Disable-Feature:Microsoft-Hyper-Vbcdedit /set hypervisorlaunchtype off
Перезагрузите ПК и посмотрите появляется ли ошибка vt-x is not available (verr_vmx_no_vmx) при запуске виртуальных машин.
2. Avast
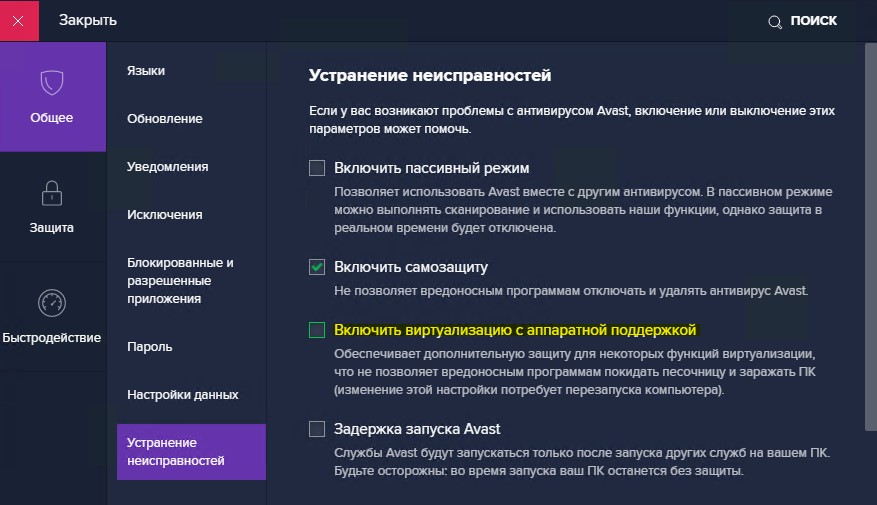
Если у вас стоит сторонний антивирус как Avast, то вам ну;но выключить в параметрах антивируса «Включить виртуализацию с аппаратной поддержкой«.
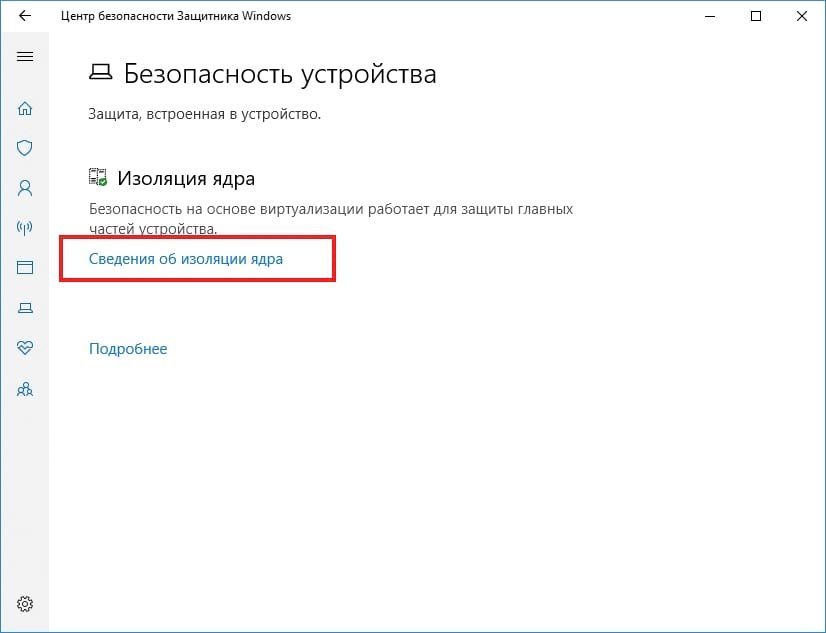
3. Изоляция ядра
Изоляция ядра это параметр безопасности встроенного антивируса в Windopws 10. Известно что включенная изоляция ядра конфликтует и создает много проблем связанных с виртулизацией.

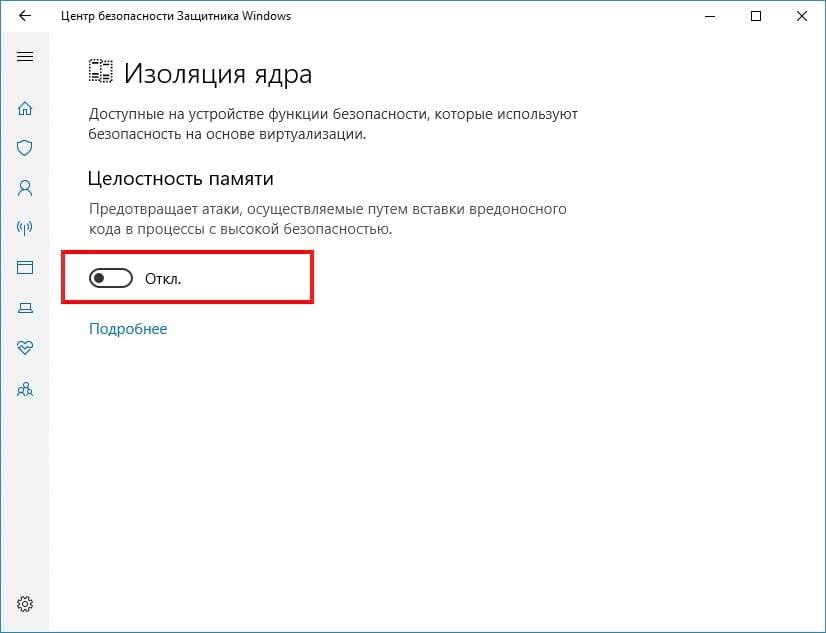
Откройте защитник Windows и перейдите «Безопасность устройства» > «Сведения об изоляции ядра» > и убедитесь, что параметр «Целостность памяти» выключена. Перезагрузите компьютер, чтобы применить изменения.
Если у вас целостность памяти было включена и вы не можете отключить, то обратитесь к этому руководству, последнему способу.

4. Виртуализация в BIOS
Если выше способы не помогли исправить ошибку vt-x is not available (verr vmx no vmx) при запуске виртуальных машин в Windows 10, то скорее всего виртуализация отключена в BIOS на уровне ядра процессора и её нужно включить.
Зайдите в BIOS или UEFI и включите параметр виртуализации. Так как BIOS у всех разный и параметр может называться по разному, то советую воспользоваться Google или Yandex картинками. К примеру, у вас материнская плата Asus, то просто напишите в поиске «Как включить виртуализацю в BIOS Asus«.

Смотрите еще:
- Невозможно запустить движок виртуализации BlueStacks в Windows 10
- Пропала кнопка центра уведомлений в Windows 10
- Некоторыми параметрами управляет ваша организация Windows 10
- Ошибка Game Security Violation Detected при запуске игр
- Как подписать PDF документ электронной подписью
[ Telegram | Поддержать ]
Please note that the Vagrant issue tracker is in priority reserved for bug reports and enhancements. For general usage questions, please use the Vagrant mailing list:
https://groups.google.com/forum/#!forum/vagrant-up. Thank you!
Tip: Before submitting your issue, don’t hesitate to remove the above introductory text, possible empty sections (e.g. References), and this tip.
Vagrant version
Vagrant 2.1.2
Host operating system
Centos7 cloud platform.
Guest operating system
Centos7
Vagrantfile
# -*- mode: ruby -*-
# vi: set ft=ruby :

# All Vagrant configuration is done below. The "2" in Vagrant.configure
# configures the configuration version (we support older styles for
# backwards compatibility). Please don't change it unless you know what
# you're doing.
Vagrant.configure("2") do |config|
  # The most common configuration options are documented and commented below.
  # For a complete reference, please see the online documentation at
  # https://docs.vagrantup.com.

  # Every Vagrant development environment requires a box. You can search for
  # boxes at https://vagrantcloud.com/search.
  config.vm.box = "hashicorp/precise64"

  # Disable automatic box update checking. If you disable this, then
  # boxes will only be checked for updates when the user runs
  # `vagrant box outdated`. This is not recommended.
  # config.vm.box_check_update = false

  # Create a forwarded port mapping which allows access to a specific port
  # within the machine from a port on the host machine. In the example below,
  # accessing "localhost:8080" will access port 80 on the guest machine.
  # NOTE: This will enable public access to the opened port
  # config.vm.network "forwarded_port", guest: 80, host: 8080

  # Create a forwarded port mapping which allows access to a specific port
  # within the machine from a port on the host machine and only allow access
  # via 127.0.0.1 to disable public access
  # config.vm.network "forwarded_port", guest: 80, host: 8080, host_ip: "127.0.0.1"

  # Create a private network, which allows host-only access to the machine
  # using a specific IP.
  # config.vm.network "private_network", ip: "192.168.33.10"

  # Create a public network, which generally matched to bridged network.
  # Bridged networks make the machine appear as another physical device on
  # your network.
  # config.vm.network "public_network"

  # Share an additional folder to the guest VM. The first argument is
  # the path on the host to the actual folder. The second argument is
  # the path on the guest to mount the folder. And the optional third
  # argument is a set of non-required options.
  # config.vm.synced_folder "../data", "/vagrant_data"

  # Provider-specific configuration so you can fine-tune various
  # backing providers for Vagrant. These expose provider-specific options.
  # Example for VirtualBox:
  #
  # config.vm.provider "virtualbox" do |vb|
  #   # Display the VirtualBox GUI when booting the machine
  #   vb.gui = true
  #
  #   # Customize the amount of memory on the VM:
  #   vb.memory = "1024"
  # end
  #
  # View the documentation for the provider you are using for more
  # information on available options.

  # Enable provisioning with a shell script. Additional provisioners such as
  # Puppet, Chef, Ansible, Salt, and Docker are also available. Please see the
  # documentation for more information about their specific syntax and use.
  # config.vm.provision "shell", inline: <<-SHELL
  #   apt-get update
  #   apt-get install -y apache2
  # SHELL
end
Please note, if you are using Homestead or a different Vagrantfile format, we
may be unable to assist with your issue. Try to reproduce the issue using a
vanilla Vagrantfile first.
Debug output
Provide a link to a GitHub Gist containing the complete debug output:
https://www.vagrantup.com/docs/other/debugging.html. The debug output should
be very long. Do NOT paste the debug output in the issue, just paste the
link to the Gist.
Expected behavior
Vagrant up should start this vm
Actual behavior
There was an error while executing VBoxManage, a CLI used by Vagrant
for controlling VirtualBox. The command and stderr is shown below.
Command: [«startvm», «b4293ed5-0a7a-4fb2-bd62-23d47fe87557», «—type», «headless»]
Stderr: VBoxManage: error: VT-x is not available (VERR_VMX_NO_VMX)
VBoxManage: error: Details: code NS_ERROR_FAILURE (0x80004005), component ConsoleWrap, interface IConsole
Steps to reproduce
References
Are there any other GitHub issues (open or closed) that should be linked here?
For example:
- NAT DNS Proxy Option? #1234
- …
- Reply with quote
[Solved] VT-x is not available (VERR_VMX_NO_VMX).
Hi,
Error what I always get when I try to open existing VMs:
VT-x is not available (VERR_VMX_NO_VMX).
Result Code: E_FAIL (0x80004005)
Component: ConsoleWrap
Interface: IConsole {872da645-4a9b-1727-bee2-5585105b9eed}
My Laptop:
OS Name:        Microsoft Windows 10 Pro
OS Version:     10.0.16299 N/A Build 16299
System Model:   2429MD1
System Type:    x64-based PC
Processor(s):   1 Processor(s) Installed.  [01]: Intel64 Family 6 Model 58 Stepping 9 GenuineIntel ~2601 Mhz
BIOS Version:   LENOVO G4ET62WW (2.04 ), 2012-09-13
I’ve installed VirtualBox since Nov-2016, there I’ve :
- created VM OEL — 32bit 5.11 and I worked on it till Jun-2017
- imported Oracle12c Upgrade_HOL (64-bit OEL) — I used it some times to do some tests — Oracle Database 12c (12.2.0.1.0) Upgrade and Migration hands-on Lab — on oracle com
- Bots VMs worked fine, second one was not shutdown, just saved.
Actually on same PC/OS(windows is regularly upgraded)/VMs /BIOS settings I just do uprgade Oracle VirtualBox to latest version (VirtualBox-5.2.8-121009-Win.exe) and then I am not able start them, and also if I try to create new VM, there is not possible to select 64-bit version.
I have check BIOS settings and Virtualization is enabled.
Could you please help me to fix it or explain why it happening? Or is it anything regarding windows upgrade? because this is only one component what is changed since time (except OVB upgrade). Or is there any related Windows Service related to this?
I’ve read one other post on this forum which is already locked (Error after upgrade:VT-x is not available. (VERR_VMX_NO_VMX)), but nothing solved my issue … like «—longmode off» , or
Recommendations like «Enable the Virtualization option in the local machine BIOS» are not relevant because it is already ENABLED from beginning and I used to 64bit VMs many times in OVB … if it has not been ENABLED, then I couldn’t be able to run/create my existing VMs in past.
Attached file showing logs, settings and errors and BIOS settings.
 vbox_vt-x_erros.zip
- Attached file showing logs, settings and errors and BIOS settings.
- (234.06 KiB) Downloaded 554 times
thanks
- Attachments
-

- Lenovo_T530_BIOS_VTsettings
- Lenovo_T530_BIOS_VTsettings.jpg (67.54 KiB) Viewed 74409 times
Last edited by mpack on 30. Apr 2018, 14:58, edited 2 times in total.
Reason: Fixed formatting.
- MaGic
- Posts: 3
- Joined: 28. Apr 2018, 09:35
- Reply with quote
Re: VT-x is not available (VERR_VMX_NO_VMX).
![]() by andyp73 » 28. Apr 2018, 16:47
by andyp73 » 28. Apr 2018, 16:47
We didn’t need all of the log files from your entire system — one log from a complete VM session showing the issue is fine. We are all volunteers here and don’t have the time (nor often the inclination) to wade through superfluous information.
That said, there is a common theme:
00:00:03.241559 VMSetError: VT-x is not available
There are more things than just enabling VT-x support in the BIOS. My guess is that your Windows 10 has recently upgraded to build 16299 in which Hyper-V is enabled by default. Hyper-V is one of a growing list of software tools / products that take exclusive use of VT-x and don’t play nicely. With this particular build of Windows 10 unchecking the Hyper-V option in Windows Features isn’t enough there is are a couple of commands you will also need to execute — you can find those by searching other posts in the forum.
If that doesn’t work, look at anti-virus, web filtering, etc. etc. etc.
-Andy.
My crystal ball is currently broken. If you want assistance you are going to have to give me all of the necessary information.
Please don’t ask me to do your homework for you, I have more than enough of my own things to do.
- andyp73
- Volunteer
- Posts: 1642
- Joined: 25. May 2010, 23:48
- Primary OS: Mac OS X other
- VBox Version: PUEL
- Guest OSses: Assorted Linux, Windows Server 2012, DOS, Windows 10, BIOS/UEFI emulation
- Reply with quote
Re: VT-x is not available (VERR_VMX_NO_VMX).
![]() by MaGic » 28. Apr 2018, 17:12
by MaGic » 28. Apr 2018, 17:12
Hi Andy,
thank you for your tip … I will check it.
I know … I just would avoid long conversation, when I start with short question and then I will provide some particular information if you or any other volunteer will ask ![]()
thaks,
Martin
- MaGic
- Posts: 3
- Joined: 28. Apr 2018, 09:35
- Reply with quote
Re: VT-x is not available (VERR_VMX_NO_VMX).
![]() by MaGic » 30. Apr 2018, 14:34
by MaGic » 30. Apr 2018, 14:34
Andy
you we totally right … perfect tip, problem was with Hyper-V ![]() TYVM
TYVM
Just info & sources if anybody looking for same issue:
VT-x is not available (VERR_VMX_NO_VMX)
- hyper-v disables vt-x for other hypervisors
VBox says there is not VT-X available … (mainboard and processor support vt-x and it is enabled)
- Because when hyper-V is installed on Windows 8 Pro, the hypervisor is running all the time underneath the host OS, and only one thing can control the VT hardware at a time for stability. The hypervisor blocks all other calls to the VT hardware..
SOLUTION:
Turning Hyper-V ON/OFF https://blogs.technet.microsoft.com/gmarchetti/2008/12/07/turning-hyper-v-on-and-off/
1) Open CMD as administrator
2) Turning hyper-v OFF with and a reboot:
bcdedit /set hypervisorlaunchtype off
3) To TURN it back ON (or auto start) and reboot:
bcdedit /set hypervisorlaunchtype
Martin
- MaGic
- Posts: 3
- Joined: 28. Apr 2018, 09:35
- Reply with quote
Re: VT-x is not available (VERR_VMX_NO_VMX).
![]() by mpack » 30. Apr 2018, 14:57
by mpack » 30. Apr 2018, 14:57
Thanks for the feedback, however that information is already in the faq, so there should be no need to repeat it.
- mpack
- Site Moderator
- Posts: 37957
- Joined: 4. Sep 2008, 17:09
- Primary OS: MS Windows 10
- VBox Version: PUEL
- Guest OSses: Mostly XP
- Reply with quote
Re: [Solved] VT-x is not available (VERR_VMX_NO_VMX).
![]() by carlosnewmusic » 9. Oct 2018, 12:34
by carlosnewmusic » 9. Oct 2018, 12:34
VT-x is not available (VERR_VMX_NO_VMX).
Result Code: E_FAIL (0x80004005)
Componente: ConsoleWrap
Interfaz: IConsole {872da645-4a9b-1727-bee2-5585105b9eed}
I have activated the virtualization in the bios, disabled the hyper-v and unistall but even so I get that message, even having the docker services turned off
Last edited by socratis on 9. Oct 2018, 15:42, edited 1 time in total.
Reason: Enclosed the information in [quote] tag for better readability
- carlosnewmusic
- Posts: 3
- Joined: 9. Oct 2018, 12:31
- Reply with quote
Re: [Solved] VT-x is not available (VERR_VMX_NO_VMX).
![]() by socratis » 9. Oct 2018, 15:42
by socratis » 9. Oct 2018, 15:42
Please go thoroughly through the FAQ: I have a 64bit host, but can’t install 64bit guests. Remember that these are just guidelines, you have to use your judgement…
Do NOT send me Personal Messages (PMs) for troubleshooting, they are simply deleted.
Do NOT reply with the «QUOTE» button, please use the «POST REPLY«, at the bottom of the form.
If you obfuscate any information requested, I will obfuscate my response. These are virtual UUIDs, not real ones.
- socratis
- Site Moderator
- Posts: 27689
- Joined: 22. Oct 2010, 11:03
- Location: Greece
- Primary OS: Mac OS X other
- VBox Version: PUEL
- Guest OSses: Win(*>98), Linux*, OSX>10.5
- Reply with quote
Re: [Solved] VT-x is not available (VERR_VMX_NO_VMX).
![]() by socratis » 10. Oct 2018, 11:25
by socratis » 10. Oct 2018, 11:25
Well, then, you got to go further than the guide! Remember what I said:
socratis wrote:these are just guidelines, you have to use your judgement…
Do *not* expect a solution pinpointing to your specific problem. We can’t figure out every potential/possible piece of software that might steal your VT-x out there…
Do NOT send me Personal Messages (PMs) for troubleshooting, they are simply deleted.
Do NOT reply with the «QUOTE» button, please use the «POST REPLY«, at the bottom of the form.
If you obfuscate any information requested, I will obfuscate my response. These are virtual UUIDs, not real ones.
- socratis
- Site Moderator
- Posts: 27689
- Joined: 22. Oct 2010, 11:03
- Location: Greece
- Primary OS: Mac OS X other
- VBox Version: PUEL
- Guest OSses: Win(*>98), Linux*, OSX>10.5
- Reply with quote
Re: [Solved] VT-x is not available (VERR_VMX_NO_VMX).
![]() by socratis » 10. Oct 2018, 11:48
by socratis » 10. Oct 2018, 11:48
Docker is a program that relies on VirtualBox but modifies its configuration files in unknown ways to us. It is not supported on these VirtualBox user forums, they have their own Docker support channels.
Do NOT send me Personal Messages (PMs) for troubleshooting, they are simply deleted.
Do NOT reply with the «QUOTE» button, please use the «POST REPLY«, at the bottom of the form.
If you obfuscate any information requested, I will obfuscate my response. These are virtual UUIDs, not real ones.
- socratis
- Site Moderator
- Posts: 27689
- Joined: 22. Oct 2010, 11:03
- Location: Greece
- Primary OS: Mac OS X other
- VBox Version: PUEL
- Guest OSses: Win(*>98), Linux*, OSX>10.5
- Reply with quote
Re: VT-x is not available (VERR_VMX_NO_VMX).
![]() by bvg » 31. Jan 2020, 07:58
by bvg » 31. Jan 2020, 07:58
MaGic wrote:SOLUTION:
Turning Hyper-V ON/OFF
1) Open CMD as administrator
2) Turning hyper-v OFF with and a reboot:
bcdedit /set hypervisorlaunchtype off3) To TURN it back ON (or auto start) and reboot:
bcdedit /set hypervisorlaunchtype
On the money $$$.
- bvg
- Posts: 1
- Joined: 31. Jan 2020, 07:54
Return to VirtualBox on Windows Hosts
Who is online
Users browsing this forum: Google [Bot] and 30 guests
-
MiniTool
-
MiniTool News Center
- Solved – VT-x Is Not Available (VERR_VMX_NO_VMX)
By Tina | Follow |
Last Updated February 08, 2023
![]()
What is the error vt-x is not available (verr_vmx_no_vmx)? What causes the error that vt-x is not available? How to fix the error that verr_vmx_no_vmx vt x is not available? This post from MiniTool will show you the solutions.
What Causes VT-x Is Not Available (VERR_VMX-NO-VMX)?
When you are trying to open any virtual machines using VirtualBox or other similar software, you may encounter the error that vt-x is not available (verr_vmx_no_vmx). In general, the error that vt-x is not available may be caused by various reasons. In the following part, we will list some.
- Vt-x is not enabled in the BIOS settings.
- The machine’s CPU does not support vt-x.
- Hyper-V virtualization is enabled in Windows.
- Core location is enabled.
So, in the following section, we will show you how to fix the error that vt-x is not available.
How to Fix VT-x Is Not Available (VERR_VMX_NO_VMX)?
In this section, we will walk you through how to solve the error that verr_vmx_no_vmx vt x is not available.
Way 1. Disable Hyper-V Virtualization
In order to fix the error that vt-x is not available (verr_vmx_no_vmx), you can choose to disable Hyper-V virtualization.
Now, here is the tutorial.
- Type Command Prompt in the search box of Windows and choose the best-matched one.
- Then right-click it to choose Run as administrator.
- In the pop-up window, type the command exe /Online /Disable-Feature:Microsoft-Hyper-V and hit Enter to continue.
When the process is finished, close the command line window and reboot your computer. Then open the virtual machine again to check whether the error that vt-x is not available (verr_vmx_no_vmx) is solved.
If this solution is not effective, try other solutions.
Way 2. Disable Core Isolation from Windows Defender
In order to fix the error that verr_vmx_no vmx vt x is not available, you can also choose to disable core isolation from Windows Defender.
Now, here is the tutorial.
- Press Windows key and I key together to open Settings.
- In the pop-up window, choose Update & Security to continue.
- Then choose Open Windows Security to continue.
- On the right panel, choose Device Security to continue.
- In the pop-up window, click Core isolation details.
- Then change toggle under Memory integrity to Off.

After that, reboot your computer and check the error that vt-x is not available is solved.
Way 3. Enable VT-X from BIOS Settings
If the Virtualization Technology is disabled from the BIOS settings, you can also get the error that vt-x is not available (verr_vmx_no_vmx). Thus, you can choose to enable vt-x from BIOS settings.
Now, here is the tutorial.
- Boot your computer. Once the Windows logo appears, press the setup continuously to enter BIOS.
- After entering the BIOS, navigate to the Security tab and scroll down to System Security.
- Then check whether Virtualization Technology or VTx/VTd is listed here and whether it is enabled.
- If no, change its status to enabled.
After all steps are finished, reboot your computer to check whether the error that vt-x is not available (verr_vmx_no_vmx) is solved.
Final Words
To sum up, this post has introduced 3 ways to fix the error that vt-x is not available. If you have encountered the same error, try these ways. If you have any better solution to fix the error that verr_vmx_no_vmx vt x is not available, you can share it in the comment zone.
About The Author

Position: Columnist
Tina is a technology enthusiast and joined MiniTool in 2018. As an editor of MiniTool, she is keeping on sharing computer tips and providing reliable solutions, especially specializing in Windows and files backup and restore. Besides, she is expanding her knowledge and skills in data recovery, disk space optimizations, etc.
On her spare time, Tina likes to watch movies, go shopping or chat with friends and enjoy her life.
Некорректные настройки VirtualBox, например, выделение слишком большого объема памяти виртуальной машине, нередко становятся причиной разных ошибок. Так, появление ошибки «VT-x is not available (verr_vmx_no_vmx)» может быть связан с рядом причин, стоящих того, чтобы рассмотреть их более подробно. Отключение виртуализации. Самопроизвольное отключение виртуализации, сбой в настройках BIOS является скорее исключением, чем правилом.
Причиной сбоя может стать некорректное завершение работы системы вследствие внезапного отключения электропитания, есть примеры, когда виртуализация отключалась антивирусами.
Так или иначе, эту причину необходимо исключить.
Зайдите в BIOS вашего компьютера и поищите там настройку «Intel Virtualization Technology» в разделе Advanced Mode -> CPU Configuration.
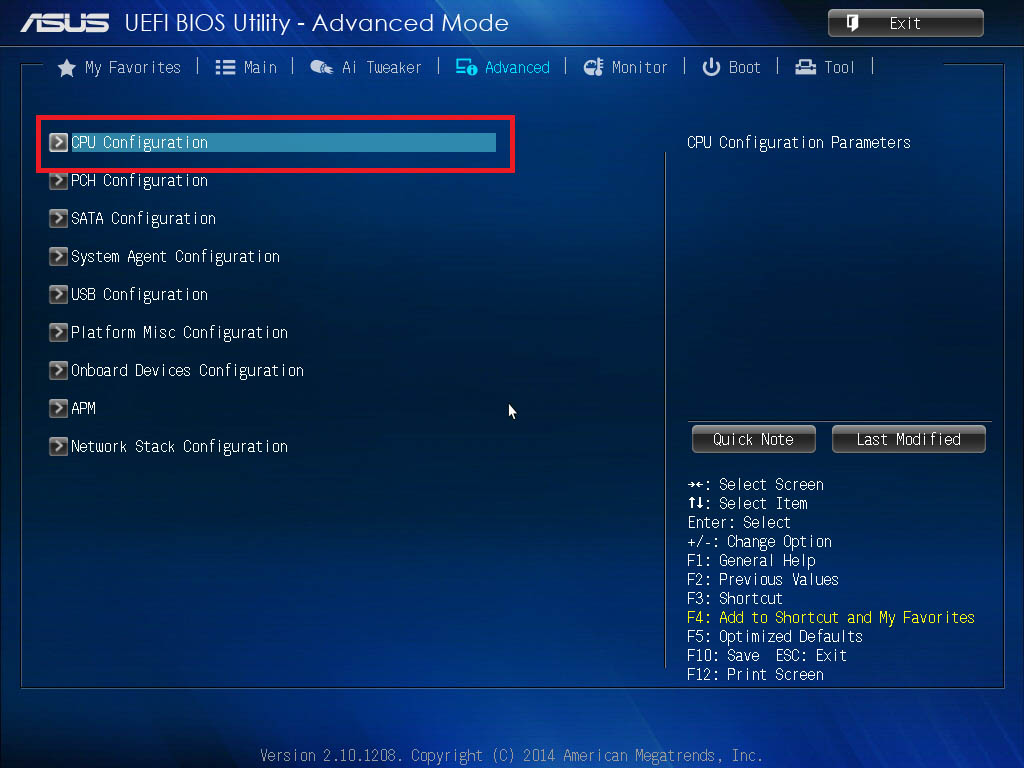
Она должна иметь значение «Enabled» (Включено).

Учитывая, что BIOSы бывают разными, лучше поискать инструкцию о включении виртуализации именно для вашей модели материнской платы.
Активность встроенного гипервизора Hyper-V
Причиной описанной выше ошибки может стать включенный в Windows встроенный гипервизор Hyper-V. Если вы его активируете, не запустите, а просто активируете, работа со сторонними гипервизорами уже станет невозможной.
С последними такой проблемы нет, например, вы можете параллельно запустить VirtualBox и VMware Workstation.
Поэтому Hyper-V следует отключить.
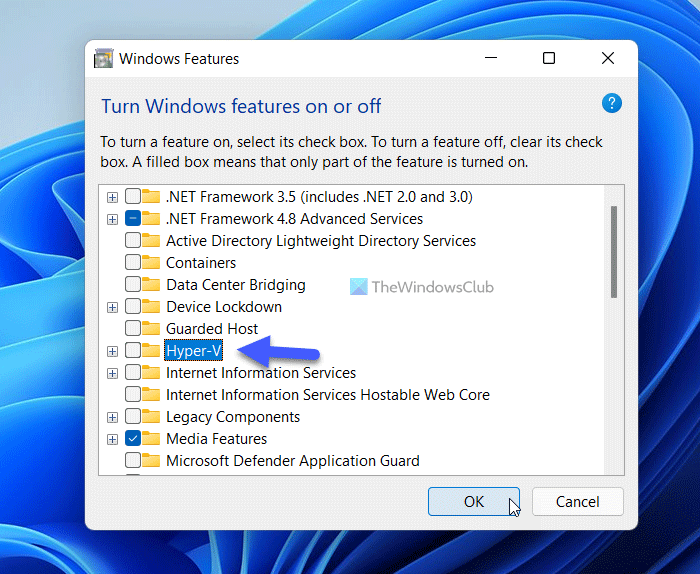
Откройте командой optionalfeatures оснастку «Включение и отключение компонентов Windows» и снимите галку с пункта Hyper-V.

Настройки вступят в силу после перезагрузки компьютера.
Штатный гипервизор может быть также деактивирован в запущенной от имени администратора командной строке последовательно выполненными командами:
dism.exe /Online /Disable-Feature:Microsoft-Hyper-V
bcdedit /set hypervisorlaunchtype off
Включенная проверка целостности памяти
Для обеспечения дополнительной безопасности в Windows 10 реализованы такие функции как «Изоляция ядра» и «Целостность памяти».
Они предотвращают внедрение и выполнение вредоносного или непроверенного кода в ядре Windows.
Но, поскольку функция «Целостности памяти» использует аппаратное обеспечение виртуализации, она, как и Hyper-V, оказывается несовместимой со сторонними гипервизорами.
Чтобы ее отключить, откройте настройки Защитника и перейдите в раздел Безопасность устройства.
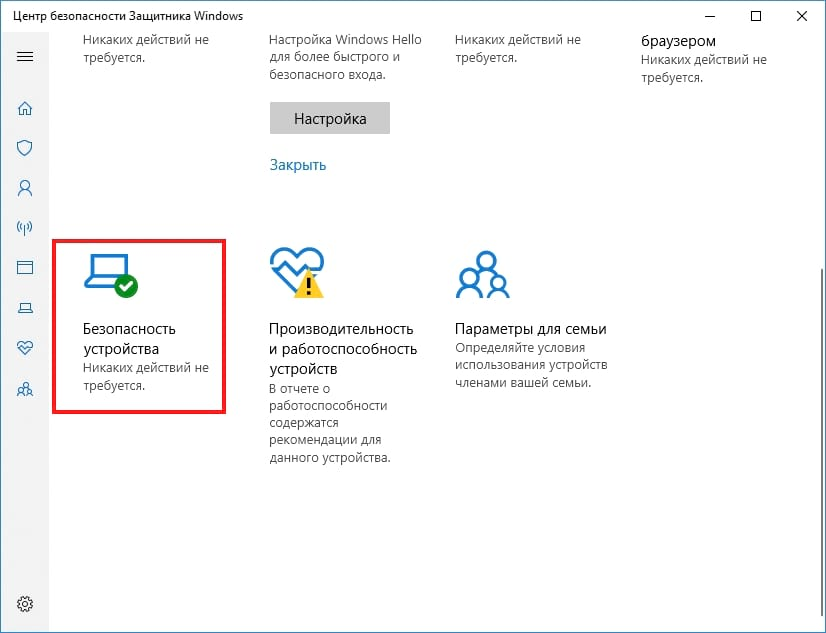
Затем в Сведения об изоляции ядра.
И отключите опцию «Целостность памяти».
После этого виртуальная машина VirtualBox должна запуститься без ошибок.
![]() Загрузка…
Загрузка…
Download PC Repair Tool to quickly find & fix Windows errors automatically
If you get VT-x is not available (VERR_VMX_NO_VMX) error while starting a virtual machine using VirtualBox, then the following solutions will help you resolve the issue. It is pretty common when you disable the virtualization or VT-x before using the VirtualBox virtual machine.
")
Failed to open a session for the virtual machine [virtual-machine-name]. VT-x is not available. (VERR_VMX_NO_VMX).
You can get this error when starting any virtual machine, including Windows and Linux. Either way, you need to follow the same steps.
To fix VT-x is not available (VERR_VMX_NO_VMX) error, follow these steps:
- Enable VT-x and VT-d
- Disable Hyper-V
- Turn off Hyper-V virtualization using Command Prompt
- Disable Memory integrity
To know more about these steps, continue reading.
1] Enable VT-x and VT-d
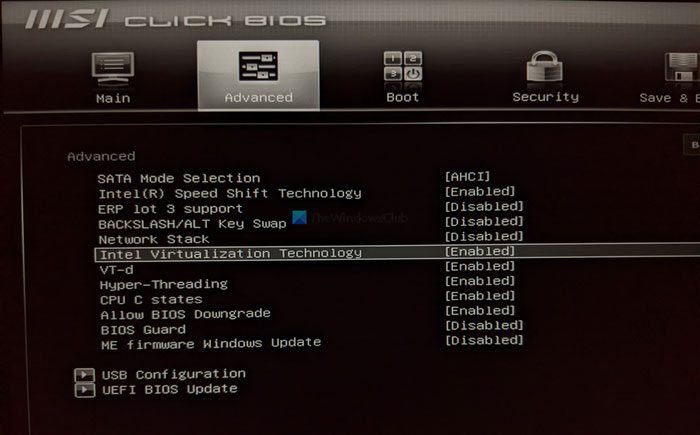
When using VirtualBox, VT-x and VT-d are two of the most essential things that need to be enabled on your computer. If your computer doesn’t have these supports, you cannot use VirtualBox and end up getting such an error as stated above. If you enabled it earlier, but it has been disabled mistakenly, you might get the same error. Therefore, it is recommended to turn on the VT-x and VT-d settings from the BIOS.
For that, you need to open the BIOS and find out two settings named Intel Virtualization Technology (also known as VT-x)and VT-d. Following that, you need to verify if they are enabled. If not, turn them on.
2] Disable Hyper-V
When you use VirtualBox, Hyper-V needs to be enabled. Otherwise, you may get such issues mentioned above. As Hyper-V is another virtualization functionality, two virtualization features won’t run simultaneously. Therefore, follow the following steps to disable Hyper-V on your PC:
- Search for windows features in the Taskbar search box.
- Click on the individual search result.
- Find out Hyper-V on the list.
- Remove the corresponding checkbox from the Hyper-V option.
- Click the OK button.
At last, you might need to restart your computer to get the change. Once done, you will be able to use the VirtualBox without any error.
3] Turn off Hyper-V virtualization using Command Prompt
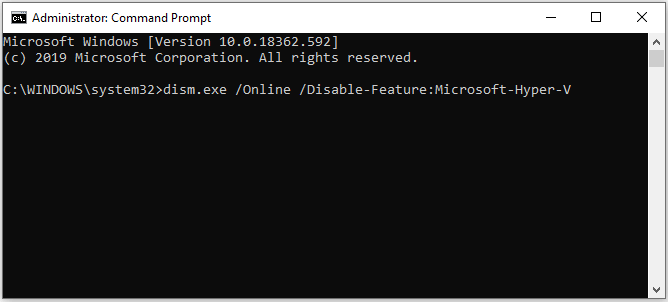
At times, disabling the Hyper-V might not be enough to fix the aforementioned issue. If the same thing happens with you, you need to turn off Hyper-V virtualization using Command Prompt. For that, do the following:
- Search for cmd in the Taskbar search box.
- Click on the Run as administrator option.
- Click the Yes button.
- Enter this command:
bcdedit /set hypervisorlaunchtype off - Enter this command:
dism.exe /Online /Disable-Feature:Microsoft-Hyper-V
After that, you should be able to use VirtualBox with the above-mentioned error message.
4] Disable Memory integrity
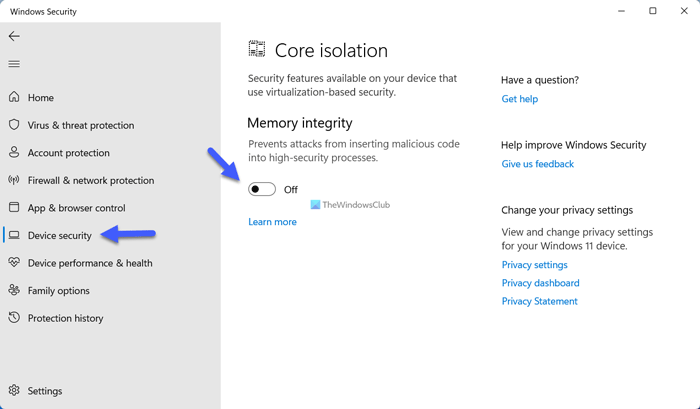
You can disable the Memory integrity feature in Windows Security to check if that resolves your issue or not. For that, do the following:
- Search for windows security in the Taskbar search box.
- Click on the individual search result.
- Switch to the Device security tab on the left side.
- Click on the Core isolation details option.
- Toggle the Memory integrity button to turn it off.
After that, restart your computer and check if the problem remains or not.
How do I fix VT-x not available?
To fix VT-x not available, you need to turn on Intel Virtualization Technology from the BIOS. For that, open your BIOS settings, and find out the Intel Virtualization technology option. Next, make sure that it is turned on. If not, toggle the option to turn it on.
Read: VT-x is disabled in the BIOS for all CPU modes (VERR_VMX_MSR_ALL_VMX_DISABLED)
How do I enable VT-x on a VM?
To enable VT-x on a VM or virtual machine, you need to enable the Intel Virtualization Technology. To do so, open the BIOS on your computer and find out the Intel Virtualization Technology option. Then, you need to select the Enabled option.

Sudip loves to engage with the latest technology & gadgets. Apart from writing about all things technology, he is a Photoshop junkie and a football enthusiast.
Если вы получаете сообщение об ошибке VT-x is not available (VERR_VMX_NO_VMX) при запуске виртуальной машины с помощью VirtualBox, следующие решения помогут вам решить проблему. Довольно часто вы отключаете виртуализацию или VT-x перед использованием виртуальной машины VirtualBox.
Не удалось открыть сеанс для виртуальной машины [virtual-machine-name]. VT-x недоступен. (VERR_VMX_NO_VMX).
Вы можете получить эту ошибку при запуске любой виртуальной машины, включая Windows и Linux. В любом случае вам необходимо выполнить те же действия.
Чтобы исправить ошибку VT-x is not available (VERR_VMX_NO_VMX), выполните следующие действия:
- Включить VT-x и VT-d
- Отключить Hyper-V
- Отключите виртуализацию Hyper-V с помощью командной строки
- Отключить целостность памяти
Чтобы узнать больше об этих шагах, продолжайте читать.
1]Включить VT-x и VT-d
При использовании VirtualBox VT-x и VT-d — две самые важные вещи, которые необходимо включить на вашем компьютере. Если ваш компьютер не поддерживает эти функции, вы не можете использовать VirtualBox и в конечном итоге получите указанную выше ошибку. Если вы включили его ранее, но отключили по ошибке, вы можете получить ту же ошибку. Поэтому рекомендуется включать настройки VT-x и VT-d из BIOS.
Для этого вам нужно открыть BIOS и найти две настройки: Intel Virtualization Technology (также известная как VT-x) и VT-d. После этого вам необходимо проверить, включены ли они. Если нет, включите их.
2]Отключить Hyper-V
Когда вы используете VirtualBox, необходимо включить Hyper-V. В противном случае вы можете столкнуться с проблемами, упомянутыми выше. Поскольку Hyper-V является еще одной функцией виртуализации, две функции виртуализации не могут работать одновременно. Поэтому выполните следующие действия, чтобы отключить Hyper-V на вашем ПК:
- Найдите функции Windows в поле поиска на панели задач.
- Щелкните индивидуальный результат поиска.
- Найдите Hyper-V в списке.
- Снимите соответствующий флажок с параметра Hyper-V.
- Щелкните кнопку ОК.
Наконец, вам может потребоваться перезагрузить компьютер, чтобы получить изменения. После этого вы сможете использовать VirtualBox без каких-либо ошибок.
3]Отключите виртуализацию Hyper-V с помощью командной строки.
Иногда отключения Hyper-V может быть недостаточно для решения вышеупомянутой проблемы. Если то же самое происходит с вами, вам необходимо отключить виртуализацию Hyper-V с помощью командной строки. Для этого сделайте следующее:
- Найдите cmd в поле поиска на панели задач.
- Нажмите на опцию Запуск от имени администратора.
- Щелкните кнопку Да.
- Введите эту команду: bcdedit / set hypervisorlaunchtype off
- Введите эту команду: DISM.exe / Online / Disable-Feature: Microsoft-Hyper-V
После этого вы сможете использовать VirtualBox с указанным выше сообщением об ошибке.
4]Отключить целостность памяти
Вы можете отключить функцию целостности памяти в Windows Security, чтобы проверить, решает ли это вашу проблему или нет. Для этого сделайте следующее:
- Найдите безопасность Windows в поле поиска на панели задач.
- Щелкните индивидуальный результат поиска.
- Перейдите на вкладку Безопасность устройства слева.
- Щелкните параметр Сведения об изоляции ядра.
- Переключите кнопку целостности памяти, чтобы выключить ее.
После этого перезагрузите компьютер и проверьте, сохраняется ли проблема.
Как исправить недоступность VT-x?
Чтобы исправить недоступность VT-x, вам необходимо включить технологию виртуализации Intel в BIOS. Для этого откройте настройки BIOS и найдите Технология виртуализации Intel вариант. Далее убедитесь, что он включен. Если нет, включите эту опцию.
Как включить VT-x на виртуальной машине?
Чтобы включить VT-x на виртуальной машине или виртуальной машине, вам необходимо включить технологию виртуализации Intel. Для этого откройте BIOS на своем компьютере и найдите Технология виртуализации Intel вариант. Затем вам нужно выбрать Включено вариант.