- Reply with quote
Appliance import failed Vbox 6.1.4 on uBuntu 20.04
I am setting up a new XPS-15 with uBuntu 20.04. On the old machine I upgraded Virtualbox to the 6.1 latest and exported three VMs. One XP Pro, two Windows 10 home, three Windows 10 Pro. Then moved the .ova files to the new machine and imported them. The first two worked fine. The Windows 10 Pro does not work. It fails and here is the last part of the import failure:
11: SATA controller, type AHCI
(disable with «—vsys 0 —unit 11 —ignore»)
12: Hard disk image: source image=Windows 10 Procur-disk001.vmdk, target path=Windows 10 Procur-disk001.vmdk, controller=11;channel=0
(change target path with «—vsys 0 —unit 12 —disk path»;
disable with «—vsys 0 —unit 12 —ignore»)
0%…10%…20%…30%…
Progress state: NS_ERROR_INVALID_ARG
VBoxManage: error: Appliance import failed
VBoxManage: error: Code NS_ERROR_INVALID_ARG (0x80070057) — Invalid argument value (extended info not available)
VBoxManage: error: Context: «RTEXITCODE handleImportAppliance(HandlerArg*)» at line 1118 of file VBoxManageAppliance.cpp
Please help me get this going. I have a meeting on Wednesday and will need this.
Marvin
- mbudd
- Posts: 16
- Joined: 11. Dec 2019, 13:10
- Reply with quote
Re: Appliance import failed Vbox 6.1.4 on uBuntu 20.04
![]() by scottgus1 » 13. Apr 2020, 23:24
by scottgus1 » 13. Apr 2020, 23:24
If the old machine is still available and was using Virtualbox too, then you only need to copy the guest folders, not go through the full export/import process. See Moving a VM
- scottgus1
- Site Moderator
- Posts: 17670
- Joined: 30. Dec 2009, 20:14
- Primary OS: MS Windows 10
- VBox Version: PUEL
- Guest OSses: Windows, Linux
- Reply with quote
Re: Appliance import failed Vbox 6.1.4 on uBuntu 20.04
![]() by mbudd » 14. Apr 2020, 15:39
by mbudd » 14. Apr 2020, 15:39
Thank you for responding! I have seen several reports of something like this error but no responses. You are truly appreciated.
However, following the article, since both machines are on version 6.1.4, I tried moving the mounted VM to a removable drive. The error was:
———-
The given path ‘/home/mbudd/VirtualBox VMs/Windows 10 Pro Clone/Windows 10 Pro Clone-disk1.vmdk’ is an existing file. Delete or rename this file..
Result Code:
VBOX_E_FILE_ERROR (0x80BB0004)
Component:
MediumWrap
Interface:
IMedium {ad47ad09-787b-44ab-b343-a082a3f2dfb1}
———
I did not take this suggestion seriously because that file is the source VMs actual storage. The destination folder was empty so nothing needed to be deleted there. Something else must be wrong.
I next assumed perhaps my VM was an older version so followed the instructions to clone the full VM. That finished. But moving that clone is no different than the original.
So I’m back where I started.
Thanks for trying!
Last edited by mbudd on 14. Apr 2020, 15:48, edited 1 time in total.
- mbudd
- Posts: 16
- Joined: 11. Dec 2019, 13:10
- Reply with quote
Re: Appliance import failed Vbox 6.1.4 on uBuntu 20.04
![]() by scottgus1 » 14. Apr 2020, 15:47
by scottgus1 » 14. Apr 2020, 15:47
You will need to completely undo and purge everything you attempted before with the import process, including checking if folders that were made still exist. The error message is clear, you have old files that are interfering with the tutorial’s process.
Try again.
- scottgus1
- Site Moderator
- Posts: 17670
- Joined: 30. Dec 2009, 20:14
- Primary OS: MS Windows 10
- VBox Version: PUEL
- Guest OSses: Windows, Linux
- Reply with quote
Re: Appliance import failed Vbox 6.1.4 on uBuntu 20.04
![]() by mbudd » 14. Apr 2020, 15:59
by mbudd » 14. Apr 2020, 15:59
I have deleted everything from the destination directory — /media/mbudd/Elements/VMs. When using that as the destination it starts clean. After the error copied above it has a directory «Windows 10 Pro Clone» — after trying to move the clone there. But the same error occurs. It wants me to delete the source storage. I will not follow that suggestion because that is the heart of the VM — right?
- mbudd
- Posts: 16
- Joined: 11. Dec 2019, 13:10
- Reply with quote
Re: Appliance import failed Vbox 6.1.4 on uBuntu 20.04
![]() by mbudd » 14. Apr 2020, 17:03
by mbudd » 14. Apr 2020, 17:03
Perhaps I don’t understand something basic. If I Move the VM on the old system to my USB drive, what do I do on the new system to cause VirtualBox to recognize it?
- mbudd
- Posts: 16
- Joined: 11. Dec 2019, 13:10
- Reply with quote
Re: Appliance import failed Vbox 6.1.4 on uBuntu 20.04
![]() by scottgus1 » 14. Apr 2020, 17:09
by scottgus1 » 14. Apr 2020, 17:09
First copy the guest folder from the USB drive to your new computer’s hard drive, because USB drives are slow (unless it’s > USB3, and even then it can be unplugged accidentally, which is bad for a running guest.
Then use the main Virtualbox window, Machine menu, Add, to browse to the guest’s .vbox file and register the guest.
- scottgus1
- Site Moderator
- Posts: 17670
- Joined: 30. Dec 2009, 20:14
- Primary OS: MS Windows 10
- VBox Version: PUEL
- Guest OSses: Windows, Linux
- Reply with quote
Re: Appliance import failed Vbox 6.1.4 on uBuntu 20.04
![]() by mbudd » 14. Apr 2020, 22:56
by mbudd » 14. Apr 2020, 22:56
Again — Thank you! We are getting farther. I never knew that option existed. I copied the folder to the USB drive, moved the USB drive to the new computer and copied the VM folder to alongside other working VMs on the new computer. The Machine Add seemed to work, although I had to adjust memory and display settings (did I miss something here??). When I started the VM I just got a white screen. Not even the boot screen with F12 to see boot options. Then I noticed an ! window on the left side and that was telling me a crash occurred and asked me if I wanted to send in a report. That report is here —
https://bugs.launchpad.net/ubuntu/+sour … ug/1872821
. I have no idea how it relates to the problem.
We seem to be making progress though, so I have hope someone knows the next step.
- mbudd
- Posts: 16
- Joined: 11. Dec 2019, 13:10
- Reply with quote
Re: Appliance import failed Vbox 6.1.4 on uBuntu 20.04
![]() by mbudd » 15. Apr 2020, 00:31
by mbudd » 15. Apr 2020, 00:31
It just started working. I have two monitors. As soon as I moved the display to the other (lower resolution) monitor I could see the windows display and after updating the additions it all works again!!!
Thank you! Is there a reward mechanism here?
- mbudd
- Posts: 16
- Joined: 11. Dec 2019, 13:10
- Reply with quote
Re: Appliance import failed Vbox 6.1.4 on uBuntu 20.04
![]() by scottgus1 » 15. Apr 2020, 18:06
by scottgus1 » 15. Apr 2020, 18:06
Nice! Glad you’re running!
- scottgus1
- Site Moderator
- Posts: 17670
- Joined: 30. Dec 2009, 20:14
- Primary OS: MS Windows 10
- VBox Version: PUEL
- Guest OSses: Windows, Linux
Return to Using VirtualBox
Who is online
Users browsing this forum: Majestic-12 [Bot] and 15 guests
Failed to import appliance in Virtualbox?
In VirtualBox, virtual machines are referred to as appliances.
Virtualbox supports disk image files such as VDI, VMDK, VHD, and HDD.
At Bobcares, we often get requests from our customers regarding VirtualBox as part of our Server Management Services.
Today, we’ll see how our Support Engineers resolve failed to import appliance in VirtualBox error.
How to import Appliance in VirtualBox
First, let us discuss how our Support Engineers import Appliance in VirtualBox for your customers.
We open the Virtualbox manager.
Click on File and select Import Appliance option. Now a window appears.
Now we browse for the file and select the .OVA file. Then click next.
Within a few seconds, the file will be read and we select the RAM and the CPU required.
Finally, click on import.

Once the process is complete we can use the Virtual Machine.
Common errors and how we fix VirtualBox failed to import appliance
Let us discuss the common reasons for the failure and how our Support Engineers resolve the error for our customers.
1. Image file corrupt
One of the common reasons that fail VM import is file corruption. This is a common error when the file is downloaded from the internet. This happens because of network issues during the download or the file is not downloaded completely.
To resolve the error we re-download the file and try to import the file. Here, we always ensure that there are no download restrictions in the server network.
2. Attach as a virtual hard disk
Recently one of our customers contacted us regarding the error. Let us discuss how our Support Engineers helped the customer resolve it.
In this case, the file downloaded properly. But he was still facing the same error. Here, we helped him create a new VM and attach the file as a virtual disk.
We open Virtualbox Manager and click on New.
Now we enter the Name, Type, and version of the operating system and click next.
Then we select the Allocated memory size and click next.
Select the option Use an existing virtual hard disk file. Now we browse and locate the file. Click on Create.
Thus it creates a new virtual machine with the attached file.
3. Administrative privileges for vboxmanage.exe
Another common reason for import appliance failure in Windows happens when the vboxmanage.exe file does not have the administrative privileges. This occurs when trying to attach the disk from the USB drive. This is because the USB drive requires admin rights. So our Support Engineers run the application as an administrator and import Appliance in VirtualBox.
4. Corrupted VirtualBox installation
The corrupted VirtualBox installation will also fail to import appliance. During corrupted VirtualBox, the only option is to re-install the whole VirtualBox. So our Support Engineers re-install the VirtualBox once again and import the appliance.
[Need help in fixing VirtualBox errors? We are available 24×7.]
Conclusion
In short, we have discussed how our Support Engineers import Appliance in VirtualBox. Also, we have discussed the common causes for the error faced during import and how we resolve it.
PREVENT YOUR SERVER FROM CRASHING!
Never again lose customers to poor server speed! Let us help you.
Our server experts will monitor & maintain your server 24/7 so that it remains lightning fast and secure.
GET STARTED
var google_conversion_label = «owonCMyG5nEQ0aD71QM»;
How to fix VirtualBox error when you try to import an ova file
If you download an ova file to import it to Virtualbox, maybe you will see the following message:
Failed to import appliance filename.ova.
Seeking within the archive failed (VERR_TAR_UNEXPECTED_EOS).
Result Code: VBOX_E_IPRT_ERROR (0x80BB0005)
Component: ApplianceWrap
Interface: IAppliance {8398f026-4add-4474-5bc3-2f9f2140b23e}
If you do it the same throught VBoxManage you will get:
# VBoxManage import filename.ova
Progress state: VBOX_E_IPRT_ERROR
VBoxManage: error: Appliance import failed
VBoxManage: error: Seeking within the archive failed (VERR_TAR_UNEXPECTED_EOS)
VBoxManage: error: Details: code VBOX_E_IPRT_ERROR (0x80bb0005), component ApplianceWrap, interface IAppliance
VBoxManage: error: Context: «RTEXITCODE handleImportAppliance(HandlerArg*)» at line 877 of file VBoxManageAppliance.cpp
To fix it, you must extract ova content and compress again as follows:
tar xvf filename.ova
tar cvf newfilename.ova filename.ovf filename.vmdk
Also, you can import the virtual machine with double click on .ovf file
Enjoy it!
Popular posts from this blog
from: can’t read /var/mail/ in Python scripts
If you add a Python file to your PATH, maybe you will see this error: from: can’t read /var/mail/$First_Library_Name This happend, because you need to be explicit with application you want to run your script. To fix it, just add in the first line of your script the following line: #! /usr/bin/python Enjoy it!
How to fix Android when developer options are not available for this user
I have an Android One with Oreo version and suddenly my Android rebooted and after that it started to behave strangely: 1) Notification section doesn’t work. I can’t see notifications from my apps and the arrow and the screw icon to settings access don’t work. 2) As I can’t access to the notification area, I can’t enable Use USB to Transfer Files to access to my phone memory. 3) I can’t access to developer mode (I before active it with a lot of taps over Build number). Clicking on developer options just shows developer options are not available to this user. 4) I can’t update or install the apps on google play. They freeze on Download pending… message 5) Home and Switch buttons don’t work. They light up and vibrate when I tap them but they do nothing. This issue is apparently related to a deconfiguration of user accounts. To fix it, you need re-setup the users. As you can’t access to the user manager (you are in guest mode
Exception: Could not find a default OpenFlow controller in Mininet
If you try to run a mininet script like this , maybe you will get this problem if you are under Ubuntu. Exception: Could not find a default OpenFlow controller This is trigger because your system don’t find a default controller . To enable it just add the first line and add the controller argument to net variable like the second line: from mininet.node import OVSController net = Mininet(topo=topo,host=CPULimitedHost, link=TCLink,controller = OVSController) Now, you will get the following error: c0 Cannot find required executable ovs-controller. Please make sure that it is installed and available in your $PATH: (/usr/local/sbin:/usr/local/bin:/usr/sbin:/usr/bin:/sbin:/bin:/snap/bin) ovs-controller is a legacy name. You need to be sure that you has it. sudo apt-get install openvswitch-testcontroller sudo cp /usr/bin/ovs-testcontroller /usr/bin/ovs-controller If you run it again, you should kill ovs-testcontroller first to avoid this: Exception: Please shut d

- Forum
- The Ubuntu Forum Community
- Ubuntu Specialised Support
- Virtualisation
- Appliance import failed Virtualbox 6.1.4 on ubuntu 20.04

-
Appliance import failed Virtualbox 6.1.4 on ubuntu 20.04
I am setting up a new XPS-15 with uBuntu 20.04. On the old machine I upgraded Virtualbox to the 6.1 latest and exported three VMs. One XP Pro, two Windows 10 home, three Windows 10 Pro. Then moved the .ova files to the new machine and imported them. The first two worked fine. The Windows 10 Pro does not work. It fails and here is the last part of the import failure:
Code:
vboxmanage import "/home/mbudd/Documents/VirtualboxBkup/Windows 10 Procur.ova"
0%...10%...20%...30%...40%...50%...60%...70%...80%...90%...100%
Interpreting /home/mbudd/Documents/VirtualboxBkup/Windows 10 Procur.ova...
OK.
Disks:
  vmdisk1	53687091200	-1	http://www.vmware.com/interfaces/specifications/vmdk.html#streamOptimized Windows 10 Procur-disk001.vmdk	-1	-1

Virtual system 0:
 0: Suggested OS type: "Windows10_64"
    (change with "--vsys 0 --ostype <type>"; use "list ostypes" to list all possible values)
 1: Suggested VM name "Windows 10 Pro"
    (change with "--vsys 0 --vmname <name>")
 2: Suggested VM group "/"
    (change with "--vsys 0 --group <group>")
 3: Suggested VM settings file name "/home/mbudd/VirtualBox VMs/Windows 10 Pro/Windows 10 Pro.vbox"
    (change with "--vsys 0 --settingsfile <filename>")
 4: Suggested VM base folder "/home/mbudd/VirtualBox VMs"
    (change with "--vsys 0 --basefolder <path>")
 5: Number of CPUs: 2
    (change with "--vsys 0 --cpus <n>")
 6: Guest memory: 4096 MB
    (change with "--vsys 0 --memory <MB>")
 7: Sound card (appliance expects "", can change on import)
    (disable with "--vsys 0 --unit 7 --ignore")
 8: USB controller
    (disable with "--vsys 0 --unit 8 --ignore")
 9: Network adapter: orig NAT, config 3, extra slot=0;type=NAT
10: CD-ROM
    (disable with "--vsys 0 --unit 10 --ignore")
11: SATA controller, type AHCI
(disable with "--vsys 0 --unit 11 --ignore")
12: Hard disk image: source image=Windows 10 Procur-disk001.vmdk, target path=Windows 10 Procur-disk001.vmdk, controller=11;channel=0
(change target path with "--vsys 0 --unit 12 --disk path";
disable with "--vsys 0 --unit 12 --ignore")
0%...10%...20%...30%...
Progress state: NS_ERROR_INVALID_ARG
VBoxManage: error: Appliance import failed
VBoxManage: error: Code NS_ERROR_INVALID_ARG (0x80070057) - Invalid argument value (extended info not available)
VBoxManage: error: Context: "RTEXITCODE handleImportAppliance(HandlerArg*)" at line 1118 of file VBoxManageAppliance.cpp
Please help me get this going. I have a meeting on Wednesday and will need this.
MarvinLast edited by DuckHook; April 14th, 2020 at 07:12 PM.
Reason: Added [CODE] tags.
-
Re: Appliance import failed Virtualbox 6.1.4 on ubuntu 20.04
Thread moved to Virtualisation as the more appropriate forum.
-
Re: Appliance import failed Virtualbox 6.1.4 on ubuntu 20.04
Follow up with this here — https://forums.virtualbox.org/viewto…473851#p473851. The solution to the error was not found. But copying the actual VM files to the new machine and then using Machine Add to incorporate them in the new laptop allowed me to circumvent the export/import fault.
Bookmarks
Bookmarks
Posting Permissions

A lot of users receive the “VBOX_E_FILE_ERROR (0x80BB0004)” error message when trying to attach a virtual disk or export a created appliance into VM. Don’t worry. This post of MiniTool summarizes 8 effective ways to fix it.
Possible Reasons for the VBOX_E_FILE_ERROR (0x80bb0004)
After investigating extensive user reports on forums, we found the VBOX_E_FILE_ERROR (0x80BB0004) error code usually appears in two situations. The first situation is when they were trying to attach a virtual disk to the virtual machine using VirtualBox. The other is when they failed to export a previously created appliance into VM.
According to user reports, the several common scenarios below will trigger the result code: VBOX_E_FILE_ERROR (0x80BB0004).
- The .vdi or .vmdk file gets corrupted or missing. A lot of users encounter the error when they failed to import a virtual appliance that was torrent files downloaded via a brave browser. This error could occur due to an incomplete download or a network issue.
- The path of the created appliance doesn’t exist in the current laptop. It often occurs when importing a virtual machine that contains multiple appliances into a new laptop. For instance, some users find that the original VM path was “drive I:” which doesn’t exist on the new laptop. In this case, you can fix it by changing its path to a C drive.
- The vbomxmanage.exe lacks administrator privileges. This situation is mostly reported to happen when trying to attach a virtual disk hosted on a USB flash drive.
- The .vdi or .vmdk file is saved on a drive that has bad sectors. If the vdi file contains bad sectors, the error can occur due to file corruption.
- The VM disk image format is incorrect. Some users find the “failed to import appliance VirtualBox” error can occur when the image became other formats like “.qcow” or “.vhd”. The error can disappear after converting it to VDI.
- The saved state file inside .vbox is invalid. Some users get the error 0x80BB0004 in the log file after VM refused to start. This can occur due to an invalid saved state file.
- The virtual machine configuration gets outdated or corrupted. It is also responsible for the VirtualBox failed to import appliance error. For that, you can create a new virtual machine.
- The VM VirtualBox installation is corrupted. Some users have managed to fix the error by uninstalling the whole VirtualBox client.
How to Fix the VBOX_E_FILE_ERROR (0x80bb0004)
Based on the above analysis, we summarize several effective ways to fix the VBOX_E_FILE_ERROR. Let’s try them one by one.
Solution 1. Re-download the .vmdk or .vdi File
If download the .vmdk or vdi file via a brave browser instead of a torrent client, then the file may get corrupted or incomplete. That’s why you receive the “result code: VBOX_E_FILE_ERROR (0x80BB0004)” error when importing a virtual appliance into VM. In this case, you need to re-download the file using a torrent client like QBitTorrent or download via HTTPS directly.
Solution 2. Change the Path of the Created Appliance to C Drive
A lot of users get the error 0x80BB0004 after exporting a virtual machine into a new laptop. This is because the drive path of the VM doesn’t exist in the laptop. In this case, you need to change the path of the VM to C drive. Also, you can create a new partition and assign a correct drive letter to it, and transfer the VM into the new partition. Once done, you can reboot the virtual machine from the drive and check if the error code disappears.
Solution 3. Run Vboxmanage.exe File as Administrator
If the VirtualBox failed to import appliance error stuck on an Access Denied error, it is possible that you are not running the vboxmanage.exe file with administrator privileges. This is because accessing a virtual disk hosted on a USB drive requires Admin rights. To avoid the error code, we recommend you run both VirtualBox and vboxmanage.exe as administrators.
Step 1. Right-click the VirtualBox shortcut on your desktop and select Properties.
Step 2. In the Properties window, navigate to the Compatibility tab and tick the checkbox next to Run this program as an administrator. Then click on OK to save the change.
Tip: Also, you can right-click the VirtualBox shortcut and select Run as administrator directly each time you launch the program.
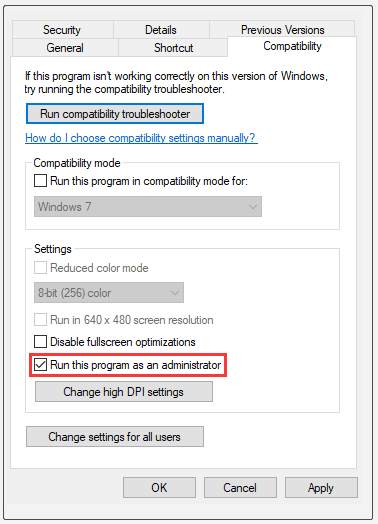
Step 3. Press Win + E keys to open the File Explorer, and then find the vboxmanage.exe file and run it as administrator by following the above 2 steps.
Solution 4. Check Bad Sectors on the Hard Drive
Another common reason for the “failed to import appliance VirtualBox” error is that the .vdi or .vmdk contains bad sectors. To fully check hard drive errors, we highly recommend you use the professional utility – MiniTool Partition Wizard. It is a reliable multifunctional partition manager that can help you convert MBR to GPT, recover lost data, migrate OS, etc.
Free Download
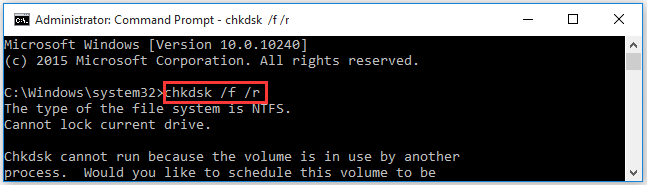
Step 1. In the main interface of this program, select the hard disk that contains the vdi/vmdk file and click on the Surface Test from the left pane.
Step 2. Click on the Start now button in the pop-up window. After that, this program will scan the whole disk immediately and show you the test result.

Step 3. Once any bad sectors are tested, you will the red blocks in the disk map. To mark the bad sectors as unusable, you can utilize the CHKDSK utility. Specifically, you can run Command Prompt as administrator, and then type chkdsk /f /r command and hit Enter in the elevated command prompt.
Once done, you can reboot your computer. Then re-download the .vdi file and use it to create a VM, and check if the error is fixed.
Solution 5. Convert the Virtual Disk Image into VDI
In some cases, users get the “result code: VBOX_E_FILE_ERROR (0x80BB0004)” accompanied with the “file not accessible or erroneous file contents” message. If you find the virtual disk image inside the VM is .vhd or .qcom instead of the .vdi format, then you may encounter the issue. To fix it, you need to convert the disk image into .vdi. For that:
Step 1. Navigate to the VirtualBox installation that is mostly located at C:Program FilesOracleVirtualBox, and then find the .vhd file inside the VirtualBox folder and write down its path.
Step 2. Type cmd in the search box, and then right-click the Command Prompt app and select Run as administrator.
Step 3. In the elevated command prompt, type the following command and hit Enter. Here make sure you change the correct path of the .vhd file. For example, the file path is C:Program FilesOracleVirtualBoxWindows 8.vhd.
VBoxManage.exe clonemedium disk «C:Program FilesOracleVirtualBoxWindows 8.vhd» —format vdi
Solution 6. Delete the Saved State Value in the .vbox File
Some users get the VBOX_E_FILE_ERROR (0x80BB0004) error after VM refused to start. In the log file, they find the “VM cannot start because the saved state file is invalid, VERR_FILE_NOT_FOUND” error message. If you are in this situation, you can try deleting the saved state file and restart VM. This method has been proven by some affected users to be helpful.
Step 1. Open the File Explorer and navigate to the C:UsersmeVirtualBox VMs Snapshots path.
Step 2. Open the Snapshots folder and find the .vbox file (its XML) inside it. Then right-click it and select Open with Notepad.
Step 3. Find the Variable LastStateChange and delete it. And also delete the stateFile= Snapshots value.
Tip: To find the Variable LastStateChange quickly, you can press Ctrl + F keys to open the Find box and copy LastStateChange in it.
Step 4. Press Ctrl + S keys to save changes and restart the VM.
Solution 7. Create a New Virtual Machine
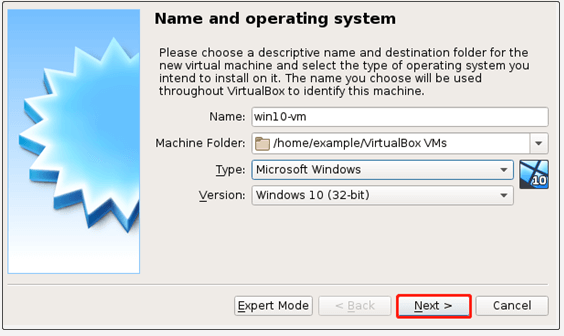
Some users managed to resolve the VirtualBox failed to import appliance error by creating a new virtual machine. Here is a full guide on how to do that:
Step 1. Launch your Oracle VM VirtualBox as administrator, and then select the New button from the top toolbar and select an OS that you want to create.
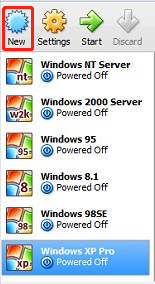
Step 2. In the pop-up window, name your virtual machine, and select the Machine Folder from File Explorer, and then select the Type and Version of the operating system. After that, click on Next to go on.
Step 3. Select the allocated memory size for the VM by using the blue toggle and click on Next to continue. Here the recommended memory size is 1024MB.

Step 4. Now, you need to select a virtual disk for the VM. Here we take the Use an existing virtual hard disk file option for example, and then click on the Folder icon and browse to the location of the .vdi file. Then click on Create to confirm it.
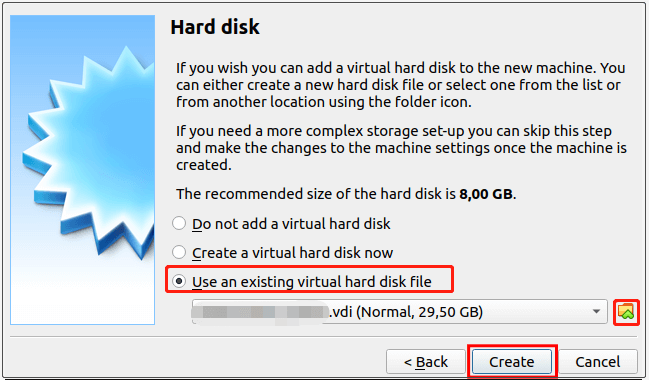
Step 5. Wait for the process to complete. Once done, you can repeat the steps that you provoke the error 0x80BB0004 and see if it has been solved.
Solution 8. Reinstall Oracle VirtualBox
If all the above methods can’t help you fix the error, then you may have to consider reinstalling Oracle VirtualBox Manager. To do so, follow the steps below:
Step 1. Press Win + R keys to open the Run dialog box, and then type appwiz.cpl in the box and hit Enter to open Programs and Features.
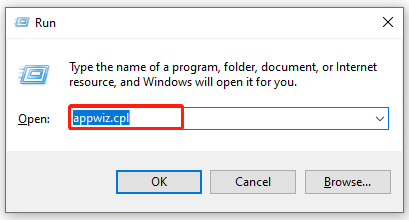
Step 2. Scroll down the list of installed programs to find Oracle VM VirtualBox, and then right-click it and select Uninstall. Click on Yes/Uninstall in the confirmation prompt and follow the on-screen to complete the uninstallation.
Step 3. Once installed, restart your computer and click here to re-download the VirtualBox manager.
Step 4. The VirtualBox packages vary from different operating systems. Make sure you select the correct one.
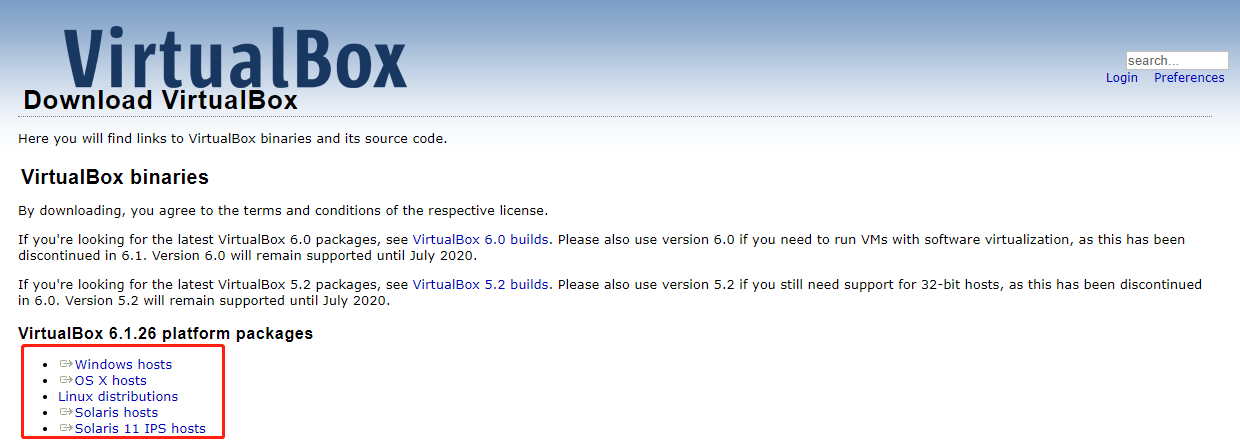
Step 5. Open the executable file in the installation folder and follow the on-screen instructions to reinstall the program on your computer.
Now, you can try attaching the virtual disk to the VM and check if the error code disappears.
Are you still troubled by the VBOX_E_FILE_ERROR (0x80BB0004)? You can get 8 applicable methods from this post now! Click to Tweet
Have a Try Now
How to fix VBOX_E_FILE_ERROR (0x80BB0004)? The top 8 solutions have been told to you. Now, it’s your turn to have a try. If you have any other ideas on this topic, you can leave them in the comment area below. For any difficulties in using MiniTool Partition Wizard, you can send us an email at [email protected].