- Reply with quote
Compacting Medium VDI
Hi,
I have a Windows guest Win 7 x64 in a VDI, it has gotten to a size that I would like to compact it as my linux host Ubuntu 16.04 LTS only has a small SSD.
I have removed any large files in the guest, defragged and ran sdelete. However when I try to compact the VDI I get the following error.0%…
Progress state: VBOX_E_FILE_ERROR
VBoxManage: error: Failed to compact medium
VBoxManage: error: Code VBOX_E_FILE_ERROR (0x80BB0004) — File not accessible or erroneous file contents (extended info not available)
VBoxManage: error: Context: «RTEXITCODE handleModifyMedium(HandlerArg*)» at line 692 of file VBoxManageDisk.cpp
The command I am running is vboxmanage modifymedium OD.VDI —compact
Please can anyone give me some advice.
- loopyludo
- Posts: 6
- Joined: 16. Sep 2016, 11:11
- Reply with quote
Re: Compacting Medium VDI
![]() by mpack » 16. Sep 2016, 13:29
by mpack » 16. Sep 2016, 13:29
That looks like a host error related to the file. Nothing to do with compaction per se.
I also don’t recognize the error wording. Please be aware that we do not support forked versions of VirtualBox here. Someone who forks the project has responsibility to do their own support.
- mpack
- Site Moderator
- Posts: 37957
- Joined: 4. Sep 2008, 17:09
- Primary OS: MS Windows 10
- VBox Version: PUEL
- Guest OSses: Mostly XP
- Reply with quote
Re: Compacting Medium VDI
![]() by loopyludo » 16. Sep 2016, 14:00
by loopyludo » 16. Sep 2016, 14:00
Hi mpack, many thanks for the reply, I am using the version of VirtualBox that I downloaded from the official site (Version 5.1.4 r110228 (Qt5.5.1)) I have since upgrade to the latest version (Version 5.1.6 r110634 (Qt5.5.1))
I am able to start the VM with no issues at all, I can also mount the VDI in Ubunu and access the file system. The disk image was previously a VHD which I converted to VDI using vboxmanage, I was getting the same error trying to compact the VHD I just assumed it was because it was a VHD and not VDI.
- loopyludo
- Posts: 6
- Joined: 16. Sep 2016, 11:11
- Reply with quote
Re: Compacting Medium VDI
![]() by Perryg » 16. Sep 2016, 14:34
by Perryg » 16. Sep 2016, 14:34
File not accessible
Means that the file can not be found.
vboxmanage modifymedium OD.VDI —compact
vboxmanage modifymedium <absolute path>OD.VDI —compact
Unless you are in the folder that has the *.VDI file you need to give the absolute path to and include the file and extension.
- Perryg
- Site Moderator
- Posts: 34373
- Joined: 6. Sep 2008, 22:55
- Primary OS: Linux other
- VBox Version: OSE self-compiled
- Guest OSses: *NIX
- Reply with quote
Re: Compacting Medium VDI
![]() by loopyludo » 16. Sep 2016, 14:44
by loopyludo » 16. Sep 2016, 14:44
Thanks Perry, yes I was in the directory I have also tried with the absolute path, in addition I have tried with the specific UUID of the image in question. I have just realised though that the storage format still say VHD.
UUID: 4bca9107-814e-4387-8802-353b1da81c0c
Parent UUID: base
State: created
Type: normal (base)
Location: /home/loopyludo/VHD/OD.VDI
Storage format: VHD
- loopyludo
- Posts: 6
- Joined: 16. Sep 2016, 11:11
- Reply with quote
Re: Compacting Medium VDI
![]() by mpack » 16. Sep 2016, 16:31
by mpack » 16. Sep 2016, 16:31
Well, that might explain the «erroneous contents», though I thought VirtualBox ignored the extension and worked out the format in other ways. You should rename the file so that the extension correctly identifies the format.
Before you can do that you would need to unregister it from the VM — and hopefully you have not used snapshots, as that would make the entire discussion moot.
- mpack
- Site Moderator
- Posts: 37957
- Joined: 4. Sep 2008, 17:09
- Primary OS: MS Windows 10
- VBox Version: PUEL
- Guest OSses: Mostly XP
- Reply with quote
Re: Compacting Medium VDI
![]() by loopyludo » 16. Sep 2016, 17:02
by loopyludo » 16. Sep 2016, 17:02
Thanks mpack, I have just tried that, I made sure that the image was no longer listed, renamed the file to .VHD and attempted to compact, unfortunately I am getting the same error. Why would vboxmanage allow me to perform other operations on the image without any issues.
loopyludo@OD-HP146012:~/VHD$ VBoxManage showmediuminfo /home/loopyludo/VHD/OD.VHD
UUID: 4bca9107-814e-4387-8802-353b1da81c0c
Parent UUID: base
State: created
Type: normal (base)
Location: /home/loopyludo/VHD/OD.VHD
Storage format: VHD
Format variant: dynamic default
Capacity: 122104 MBytes
Size on disk: 65754 MBytes
Thanks for your patience and efforts
- loopyludo
- Posts: 6
- Joined: 16. Sep 2016, 11:11
- Reply with quote
Re: Compacting Medium VDI
![]() by Martin » 17. Sep 2016, 08:24
by Martin » 17. Sep 2016, 08:24
VHD compaction is not supported. You need to convert it to VDI first (correctly ![]() ).
).
- Martin
- Volunteer
- Posts: 2549
- Joined: 30. May 2007, 18:05
- Primary OS: Fedora other
- VBox Version: PUEL
- Guest OSses: XP, Win7, Linux, OS/2
- Reply with quote
Re: Compacting Medium VDI
![]() by loopyludo » 19. Sep 2016, 10:08
by loopyludo » 19. Sep 2016, 10:08
Hi Martin,
Ok thanks, I thought it was, how should I convert to VDI correctly this time.
Last time I used vboxmanage clonemedium OD.VHD OD.VDI
- loopyludo
- Posts: 6
- Joined: 16. Sep 2016, 11:11
- Reply with quote
Re: Compacting Medium VDI
![]() by Martin » 19. Sep 2016, 10:30
by Martin » 19. Sep 2016, 10:30
You need to specify the target format with the «—format VDI» parameter for the clonemedium command.
VBoxManage clonemedium [disk|dvd|floppy] <uuid|inputfile> <uuid|outputfile>
[—format VDI|VMDK|VHD|RAW|<other>]
[—variant Standard,Fixed,Split2G,Stream,ESX]
[—existing]
- Martin
- Volunteer
- Posts: 2549
- Joined: 30. May 2007, 18:05
- Primary OS: Fedora other
- VBox Version: PUEL
- Guest OSses: XP, Win7, Linux, OS/2
- Reply with quote
Re: Compacting Medium VDI
![]() by mpack » 19. Sep 2016, 10:41
by mpack » 19. Sep 2016, 10:41
Just a tip: if you already ran sdelete (in the guest) then cloning to VDI will do the same as compact, so there’s no need for a further compaction step.
- mpack
- Site Moderator
- Posts: 37957
- Joined: 4. Sep 2008, 17:09
- Primary OS: MS Windows 10
- VBox Version: PUEL
- Guest OSses: Mostly XP
- Reply with quote
Re: Compacting Medium VDI
![]() by loopyludo » 19. Sep 2016, 12:29
by loopyludo » 19. Sep 2016, 12:29
Many thanks indeed for all your help, I could have sworn that I had used the —format option, I obviously didn’t as I have just done it again and this time I have a VDI that is a much smaller size, no need to compact.
- loopyludo
- Posts: 6
- Joined: 16. Sep 2016, 11:11
- Reply with quote
Re: Compacting Medium VDI
![]() by mpack » 19. Sep 2016, 18:37
by mpack » 19. Sep 2016, 18:37
Thanks for reporting back.
- mpack
- Site Moderator
- Posts: 37957
- Joined: 4. Sep 2008, 17:09
- Primary OS: MS Windows 10
- VBox Version: PUEL
- Guest OSses: Mostly XP
Return to VirtualBox on Linux Hosts
Who is online
Users browsing this forum: No registered users and 20 guests
Содержание
- Исправить: VBOX_E_FILE_ERROR (0x80bb0004)
- Содержание
- Что вызывает ошибку vbox_e_file_error (0x80bb0004)
- Способ 1. Повторная загрузка файла .vmdk или .vdi
- Метод 2: открытие vboxmanage.exe с правами администратора
- Метод 3: создание новой виртуальной машины
- Метод 4: запуск CHKDSK
- Метод 5: переустановите виртуальный ящик Oracle
- Новый раунд 64-битных исправлений ARM, объединенных в ядро Linux 4.19, включает поддержку подключаемого модуля GCC Stackleak
- Далее
- Nvidia SHIELD TV обновлен с поддержкой 120 Гц, SHIELD Experience 7.1
- Далее
- Скоро пропуск рекламы на YouTube больше не будет вариантом
- virtualbox.org
- Cannot copy/clone .vdi or export appliance VBOX_E_FILE_ERROR (0x80bb0004)
- Cannot copy/clone .vdi or export appliance VBOX_E_FILE_ERROR (0x80bb0004)
- Re: Cannot copy/clone .vdi or export appliance VBOX_E_FILE_ERROR (0x80bb0004)
- Re: Cannot copy/clone .vdi or export appliance VBOX_E_FILE_ERROR (0x80bb0004)
- Fix: VBOX_E_FILE_ERROR (0x80bb0004)
- What is causing the vbox_e_file_error (0x80bb0004) error
- Method 1: Re-downloading the .vmdk or .vdi file
- Method 2: Opening vboxmanage.exe with administrative privileges
- Method 3: Creating a new Virtual Machine
- Method 4: Running CHKDSK
- Method 5: Reinstall Oracle Virtual box
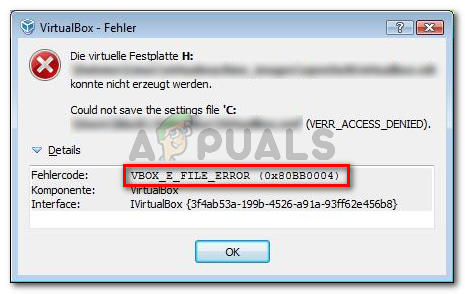
Исправить: VBOX_E_FILE_ERROR (0x80bb0004)

Видео: how to fix VBOX E FILE ERROR 0x80BB0004 and how to restore a deleted machine
Содержание
Несколько пользователей сообщают о получении vbox_e_file_error (0x80bb0004) ошибка при попытке подключить виртуальный диск к виртуальной машине с помощью VirtualBox. Другие пользователи сообщают, что для них проблема возникает, когда они пытаются экспортировать ранее созданное устройство в VM VirtualBox Manager.
Что вызывает ошибку vbox_e_file_error (0x80bb0004)
Мы исследовали эту конкретную проблему, изучив различных пользователей и метод, который они, как сообщается, использовали для устранения сообщения об ошибке. Исходя из того, что нам удалось собрать, существует несколько довольно распространенных сценариев, которые вызывают это конкретное сообщение об ошибке:
- Файл .vmdk или .vdi поврежден. — Эта конкретная ошибка часто возникает, когда пользователь пытается импортировать виртуальное устройство, загруженное через Интернет. Это может произойти из-за неполной загрузки или проблем с сетью.
- vbomxmanage.exe не имеет прав администратора — Другая распространенная причина, которая вызывает эту проблему, — это когда компонент, участвующий в процессе импорта или экспорта, не имеет прав администратора. Обычно это происходит, когда пользователь пытается подключить виртуальный диск, размещенный на USB-накопителе.
- Необходимо обновить конфигурацию машины. — Ошибка также может возникнуть из-за того, что некоторое ручное вмешательство повредило вашу текущую конфигурацию виртуальной машины. Некоторым пользователям в подобной ситуации удалось решить проблему, воссоздав виртуальную машину с нуля в VirtualBox.
- Файл .vdi или .vmdk содержит поврежденные сектора. — Несколько пользователей сообщили, что проблема была устранена после того, как они использовали утилиту CHKDSK для сканирования файла на наличие битых секторов. Это говорит о том, что ошибка также может возникать из-за повреждения файла.
- Поврежденная установка виртуальной машины VirtualBox — Поврежденная установка Windows VirtualBox также может вызвать это сообщение об ошибке. Некоторым пользователям удалось решить проблему, удалив весь клиент VM VirtualBox вместе со всеми связанными компонентами.
Если вы в настоящее время пытаетесь решить эту конкретную проблему, эта статья предоставит вам список проверенных шагов по устранению неполадок. Ниже приведен список методов, которые другие пользователи в аналогичной ситуации использовали для решения проблемы.
Для достижения наилучших результатов следуйте приведенным ниже потенциальным исправлениям по порядку, пока не найдете то, которое эффективно для вашей конкретной ситуации.
Способ 1. Повторная загрузка файла .vmdk или .vdi
Если вы получаете именно эту ошибку при попытке импортировать виртуальное устройство в Oracle VM VirtualBox Manager, вполне вероятно, что вы имеете дело с каким-то повреждением.
Большинство затронутых пользователей сообщили, что им удалось решить проблему после повторной загрузки виртуального устройства или после выполнения тщательной проверки CHKDSK.
Если ваша ситуация похожа на описанную выше, начните с повторной загрузки .vmdk файл (если вы получили его через Интернет). Вы можете иметь дело с прерванным или частично загруженным обновлением.
После завершения загрузки попробуйте снова импортировать виртуальное устройство в виртуальную машину VirtualBox Manager. Если vbox_e_file_error (0x80bb0004) ошибка возвращается, вы только что подтвердили, что ошибка не возникает из-за поврежденной загрузки.
Если вы все еще видите ошибку или не загрузили файл .vmdk из Интернета, перейдите к следующему способу ниже
Метод 2: открытие vboxmanage.exe с правами администратора
Если код ошибки заключен в ошибку «Доступ запрещен», очень вероятно, что вы столкнулись с проблемой, потому что не открываете vboxmanage исполняемый файл с правами администратора. Некоторые затронутые пользователи сообщили, что проблема была решена после того, как они открыли VirtualBox и vboxmanage.exe в качестве администратора.
Это довольно частое явление при попытке подключить виртуальный диск (размещенный на USB-накопителе) к виртуальной машине. Оказывается, для доступа в формате RAW к USB-устройству потребуются права администратора, что может привести к ошибке.
Итак, прежде чем пробовать что-либо еще, убедитесь, что вы используете права администратора при выполнении части управления, щелкнув правой кнопкой мыши vboxmanage.exe и выбирая Запустить от имени администратора.
Если этот метод не позволил решить проблему, перейдите к следующему способу ниже.
Метод 3: создание новой виртуальной машины
Несколько пользователей, столкнувшихся с VBOX_E_FILE_ERROR (0x80BB0004) ошибка при попытке импортировать файл OVA устройства в VirtualBox сообщила, что им удалось решить проблему, создав новую виртуальную машину с нуля.
Вот краткое руководство, как это сделать:
- Откройте Oracle VM VirtualBox и нажмите Новый для создания новой виртуальной машины.
- Назовите свою новую виртуальную машину, затем выберите Тип и Версия эмулируемой операционной системы.
- Выберите размер выделенной памяти с помощью переключателя и нажмите следующий снова.
- На следующем экране выберите Использовать существующий файл виртуального жесткого диска, щелкните значок папки и перейдите к расположению файла .vdi.
- После воссоздания новой виртуальной машины повторите шаги, которые ранее запускали vbox_e_file_error (0x80bb0004) ошибка и посмотрите, решена ли проблема.
Если вы по-прежнему видите то же сообщение об ошибке, перейдите к следующему способу ниже.
Метод 4: запуск CHKDSK
Несколько пользователей сообщили, что проблема была исправлена после того, как они запустили сканирование CHKDSK на своем компьютере. Видимо, CHKDSK утилита отлично способна находить и исправлять ошибки в .vdi файл.
Если ошибка возникает из-за наличия поврежденных секторов в файле .vdi, следующая процедура должна полностью устранить проблему. Вот что вам нужно сделать:
Примечание: Если вы столкнулись с этой проблемой в Linux, вы можете вместо этого использовать утилиту FSCK (проверка файловой системы).
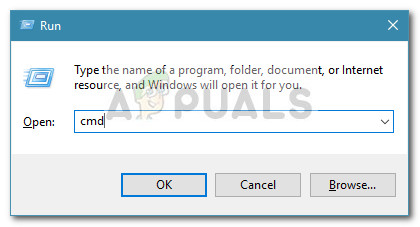
- Нажмите Клавиша Windows + R открыть Бегать диалоговое окно. Затем введите «cmd»И нажмите Ctrl + Shift + Enter , чтобы открыть окно командной строки с повышенными правами.
- Внутри командной строки с повышенными привилегиями просто выполните следующую команду и нажмите Войти , чтобы начать сканирование.
chkdsk X: / f / r / x
Примечание: Имейте в виду, что X — это просто буква-заполнитель для буквы тома диска, на котором находится файл .vmdk или .vmi. Замените его соответствующим образом, чтобы он выглядел так: chkdsk c: / f / r / x
Если вы по-прежнему получаете то же сообщение об ошибке, перейдите к последнему способу ниже.
Метод 5: переустановите виртуальный ящик Oracle
Некоторые пользователи сталкиваются с тем же vbox_e_file_error (0x80bb0004) ошибка сообщили, что проблема была исправлена только после переустановки всей установки Oracle Virtual box. Похоже, это предполагает, что поврежденная установка также может быть причиной этой конкретной ошибки.
Вот краткое руководство по переустановке Oracle VirtualBox:
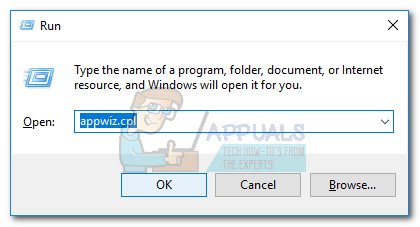
- Нажмите Клавиша Windows + R , чтобы открыть диалоговое окно «Выполнить». Затем введите «appwiz.cpl»И нажмите Войти открыться Программы и особенности.
- Внутри Программы и особенностипрокрутите список приложений и найдите Oracle VM VirtualBox. Как только вы увидите запись, щелкните ее правой кнопкой мыши и выберите Удалить.
- Нажмите да при запросе подтверждения удалить Oracle VM VirtualBox.
- После завершения процесса удаления перезагрузите компьютер.
- При следующем запуске перейдите по этой ссылке (Вот) и щелкните хосты Windows, чтобы загрузить последнюю версию VirtualBox для Windows.
- Откройте исполняемый файл установки и следуйте инструкциям на экране, чтобы переустановить программное обеспечение в вашей системе.
- Попробуйте снова подключить виртуальный диск к виртуальной машине и посмотрите, сохраняется ли ошибка.
Новый раунд 64-битных исправлений ARM, объединенных в ядро Linux 4.19, включает поддержку подключаемого модуля GCC Stackleak
Новый раунд изменений для 64-битной архитектуры ARM (ARM64 / AArch64) был только что загружен в окно слияния ядра Linux 4.19, и в него, как правило, были включены некоторые довольно хорошие вещи.64-би.
Далее
Nvidia SHIELD TV обновлен с поддержкой 120 Гц, SHIELD Experience 7.1
Хотя Nvidia HIELD TV не является самым популярным устройством на рынке, Nvidia по-прежнему поддерживает его в меру своих возможностей. Можно с уверенностью сказать, что это устройство является одним и.
Далее
Скоро пропуск рекламы на YouTube больше не будет вариантом
Обновить: Кристофер Лоутон из отдела по связям с общественностью YouTube подтвердил нам, что YouTube не отказывается от TrueView. И TrueView, и объявления без возможности пропуска будут показываться п.
Источник
virtualbox.org
End user forums for VirtualBox
- Board index‹General‹VirtualBox on Linux Hosts
- Change font size
- Print view
- FAQ
- Login
Cannot copy/clone .vdi or export appliance VBOX_E_FILE_ERROR (0x80bb0004)
Cannot copy/clone .vdi or export appliance VBOX_E_FILE_ERROR (0x80bb0004)
by massula » 2. Sep 2016, 23:45
I’m having a lot of trouble trying to copy a VM from an old computer.
The old host system:
Linux Mint 13 64bit
VirtualBox 4.3.8 PUEL
On this system I have a VM (Windows XP), with 15GB of hard disk, dinamically allocated, that I simply cannot copy or clone.
Every time that I try to make a copy, clone the complete VM ou clone only the .vdi file (sometimes converting it to another format), I get his error:
Could not create the clone medium ‘/media/. vdi’ (VERR_DEV_IO_ERROR).
VBOX_E_FILE_ERROR (0x80BB0004)
Component:
Appliance
Interface:
IAppliance
I also get the same error when I tried to compact the .vdi with vboxmanage modifyhd command.
Progress state: VBOX_E_FILE_ERROR
VBoxManage: error: Failed to compact hard disk
VBoxManage: error: Could not compact medium ‘/home/. vdi’ (VERR_DEV_IO_ERROR)
VBoxManage: error: Details: code VBOX_E_FILE_ERROR (0x80bb0004), component Medium, interface IMedium
VBoxManage: error: Context: «int handleModifyHardDisk(HandlerArg*)» at line 582 of file VBoxManageDisk.cpp
But I could increase the size of the .vdi, from 15GB to 16GB
I’ve tried copy from Nautilus, copy from terminal, copy with rsync, boot with another linux distros and copy with its tools, and nothing works.
Sometimes I get an 14 GB file (the original .vdi had 15 GB), but I’m unable to use this new corrupted .vdi.
I also performed a FSCK on the partition where this .vdi is stored and nothing appeared.
The interesting detail: this VM is still working perfectly!
I have a old copy of this machine, but is almost two years old, and I would like to use the updated one that I’m trying to copy.
Re: Cannot copy/clone .vdi or export appliance VBOX_E_FILE_ERROR (0x80bb0004)
by Perryg » 3. Sep 2016, 00:20
Re: Cannot copy/clone .vdi or export appliance VBOX_E_FILE_ERROR (0x80bb0004)
by massula » 3. Sep 2016, 03:06
I’ve forget to mention that I’ve also tried to compress the VM folder and the .vdi file.
But, now You talked about this, I noticed that I only tried to compress this VM to some kind of external storage, not to the host computer hd itself.
Источник
Fix: VBOX_E_FILE_ERROR (0x80bb0004)
Several users report getting the vbox_e_file_error (0x80bb0004) error when trying to attach a virtual disk to the virtual machine using VirtualBox. Other users report that for them the issue occurs when they try to export a previously created appliance into VM VirtualBox Manager.
 vbox_e_file_error (0x80bb0004) error
What is causing the vbox_e_file_error (0x80bb0004) error
We investigated this particular issue by looking at various users and the method that they reportedly used to resolve the error message. Based on what we were able to gather, there are several fairly common scenarios that will trigger this particular error message:
- The .vmdk or .vdi file is corrupt – This particular error is often reported to occur when the user tries to import a virtual appliance downloaded over the internet. This can occur due to an incomplete download or a network issue.
- vbomxmanage.exe doesn’t have administrative privileges – Another common reason that will trigger this issue is when a component involved in the importing or exporting process is missing admin rights. This is mostly reported to occur when the user tries to attach a virtual disk hosted on a USB drive.
- The machine configuration needs to be updated – The error might also occur because some manual intervention has corrupted your current virtual machine configuration. Some users in a similar situation have managed to get the issue resolved by recreating the virtual machine from scratch in VirtualBox.
- The .vdi or .vmdk file contains bad sectors – Several users have reported that the issue was fixed after they used the CHKDSK utility to scan the file for bad sectors. This suggests that the error can also occur due to file corruption.
- Corrupted VM VirtualBox installation – A corrupted Windows VirtualBox installation can also trigger this error message. Some users have managed to resolve the issue by uninstalling the whole VM VirtualBox client along with all associated components.
If you’re currently struggling to resolve this particular issue, this article will provide you with a list of verified troubleshooting steps. Below you have a list of methods that other users in a similar situation have used to get the issue resolved.
For the best results, follow the potential fixes below in order until you encounter one that is effective for your particular situation.
Method 1: Re-downloading the .vmdk or .vdi file
If you’re getting this particular error when trying to import a Virtual Appliance into the Oracle VM VirtualBox Manager, it’s very likely that you’re dealing with some kind of corruption.
Most affected users reported that they managed to resolve the issue after they re-downloaded the Virtual Appliance or after they performed a thorough CHKDSK.
If your situation is similar to the one described above, start by re-downloading the .vmdk file (if you got it over the internet). You might e dealing with an interrupted or partially downloaded update.
Once the download is complete, try to import the Virtual Appliance again into your VM VirtualBox Manager. If the vbox_e_file_error (0x80bb0004) error returns, you’ve just confirmed that the error is not occurring due to a corrupted download.
If you’re still seeing the error or you haven’t downloaded the .vmdk file from the Internet, move down to the next method below
Method 2: Opening vboxmanage.exe with administrative privileges
If the error code is wrapped up in an Access Denied error, it’s very likely that you are encountering the issue because you’re not opening the vboxmanage executable with administrative privileges. Some affected users have reported that the issue was resolved after they opened both VirtualBox and vboxmanage.exe as Administrator.
This is quite a common occurrence when trying to attach a virtual disk (hosted on a USB drive) to a virtual machine. As it turns out, RAW access to the USB device will require Admin rights, which is what might end up producing the error.
So, before trying anything else, make sure that you’re using Admin rights when doing the managing part by right-clicking on vboxmanage.exe and choosing Run as Administrator.
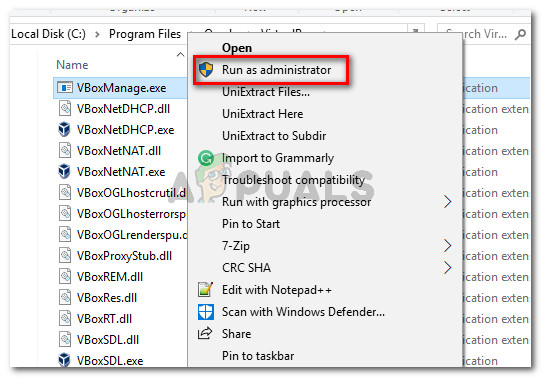 Running vboxmanage.exe as Admin
If this method didn’t allow you to resolve the issue, move down to the next method below.
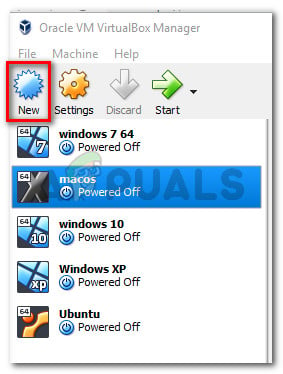
Method 3: Creating a new Virtual Machine
Several users that encountered the VBOX_E_FILE_ERROR (0x80BB0004) error when trying to import the Appliance OVA file into VirtualBox reported that they managed to resolve the issue by creating a new virtual machine from scratch.
Here’s a quick guide on how to do this:
- Open Oracle VM VirtualBox and press New to create a new virtual machine.
 Creating a new Virtual Machine
 - Name your new virtual machine, then select the Type and Version of the emulated operating system. Creating a new virtual machine
- Select the allocated memory size using the toggle and click Next once again. Allocating memory
- In the next screen, choose to Use an existing virtual hard disk file, click the folder icon and browse to the location of the .vdi file. Browsing to the location of the VDI file before creating the new machine
- Once the new virtual machine is recreated, repeat the steps that were previously triggering the vbox_e_file_error (0x80bb0004) error and see if the issue has been resolved.
 Creating a new Virtual Machine
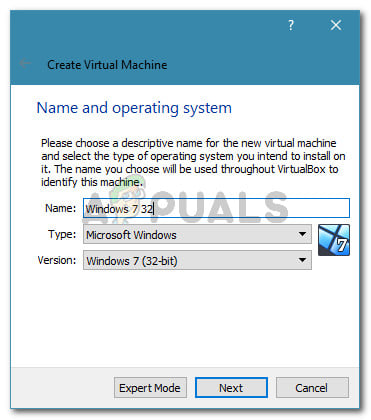 Creating a new virtual machine
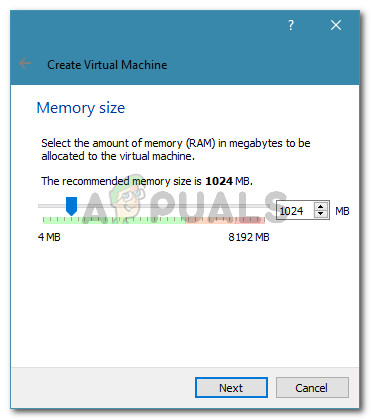 Allocating memory
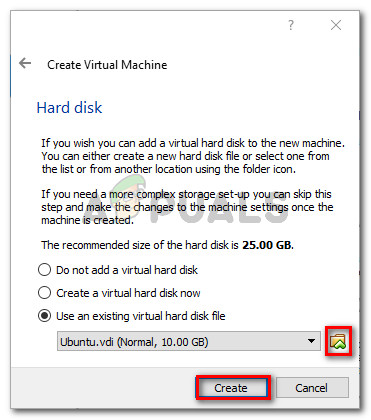 Browsing to the location of the VDI file before creating the new machine
If you’re still seeing the same error message, move down to the next method below.
Method 4: Running CHKDSK
Several users have reported that the issue was corrected after they ran a CHKDSK scan on their computer. Apparently, the CHKDSK utility is perfectly capable of finding and correcting errors in the .vdi file.
If the error is occurring due to some bad sectors in the .vdi file, the following procedure should resolve the issue entirely. Here’s what you need to do:
Note: If you’re encountering this issue on Linux, you can use the FSCK (File System Check) utility instead.
- Press Windows key + R to open up a Run dialog box. Then, type “cmd” and press Ctrl + Shift + Enter to open up an elevated Command Prompt window. Run dialog: cmd , then press Ctrl + Shift + Enter
- Inside the elevated Command Prompt, simply run the following command and press Enter to initiate a scan.
 Run dialog: cmd , then press Ctrl + Shift + Enter
Note: Keep in mind that X is merely a placeholder for the volume letter of the drive holding the .vmdk or .vmi file. Replace it accordingly so it looks like this: chkdsk c: /f /r /x
If you’re still encountering the same error message, move down to the final method below.
Method 5: Reinstall Oracle Virtual box
Some users encountering the same vbox_e_file_error (0x80bb0004) error have reported that the issue was only fixed after they reinstalled the whole Oracle Virtual box installation. This seems to suggest that a corrupted installation might also be responsible for this particular error.
Here’s a quick guide on reinstalling Oracle VirtualBox:
- Press Windows key + R to open up a Run dialog box. Then, type “appwiz.cpl” and press Enter to open up Programs and Features. Run dialog: appwiz.cpl
- Inside Programs and Features, scroll down through the list of applications and locate Oracle VM VirtualBox. Once you see the entry, right-click on it and choose Uninstall. Uninstalling Oracle VM VirtualBox
- Click Yes at the confirmation prompt to uninstall the Oracle VM VirtualBox. Confirming the installation of Oracle VM VirtualBox
- Once the uninstallation process is complete, restart your computer.
- At the next startup, visit this link (here) and click on Windows hosts to download the latest version of VirtualBox for windows.
- Open the installation executable and follow the on-screen prompts to reinstall the software to your system.
- Try to attach the Virtual Disk to the virtual machine again and see if the error is still occurring.
 Run dialog: appwiz.cpl
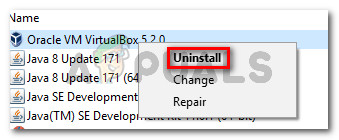 Uninstalling Oracle VM VirtualBox
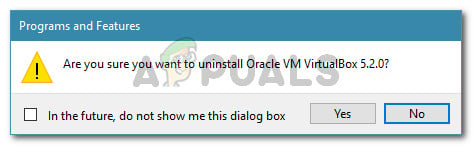 Confirming the installation of Oracle VM VirtualBox
Источник
If you’ve got a couple of VMs, then trimming them occasionally will help with storage management on the host. Disk files (like VDI and VMDK images) will grow over time if the VM was configured to expand the disk as needed – but they will never shrink on their own.
This was tested on a Windows 10 VM managed by VirtualBox, the starting file size was over 40GB, as it had been used for various roles and grown over time.

1 – Perform a disk clean-up.
There’s going to be a ton of Windows updates, temp files and other junk that keeps accumulating over time.
a) Open explorer and open properties on the primary drive
b) Click on “Disk Clean-up” under the general tab
c) Clean all files (don’t miss the “Clean up system files” section)

2 – Disable hibernate.
Use the native save or suspend functionality in the hypervisor rather than the Windows functionality, and save on the chunky hiberfil file.
a) Open a command prompt (run as Administrator)
b) Run the following command: powercfg /h off
![]()
3 – Reduce pagefile size or disable it.
By default Windows can assign some pretty large pagefiles. Tune these down to save several more GBs.
a) Click start, search for “System” and open it
b) Open “Advanced system settings” from the left hand pane

c) Open performance settings
d) Click on the “Advanced” tab
e) Click “Change” under virtual memory
Change this value to an appropriate amount, save and restart the system.
4 – Compress system files.
Use compact.exe to slim down your system files. This will eek out another few GB in savings, even when some system files are already in the compact state.
a) Open a command prompt (run as Administrator)
b) Optional – verify the current state by running: Compact.exe /CompactOS:query
c) Enable compact mode by running: Compact.exe /CompactOS:always
This may take 10-20 minutes to make the required changes, and it’ll update you once it’s finished.

5 – Overwrite free space with zeros
Although the space is empty, it’s still full of 1’s and 0’s. VirtualBox won’t see this as free space until we fill it with 0’s. If you’re not running a SSD, you may need to optimise/defragment this drive first.
Microsoft has a tool called SDelete – download this to the VM, extract it and do the following.
a) Open a command prompt (run as Administrator)
b) Navigate to where you extracted the zip file: cd c:usersusernamedownloadssdelete
c) Run the following command: sdelete.exe c: -z
d) Accept the licence terms if it prompts you
e) Once complete, shut down the VM

Once that’s done, we’re in good shape to compact the disk.
6 – Compact the disk image
Back in the host system, we can use VBoxManage.exe to compact the disk image.
a) Open a command prompt (run as Administrator)
b) Navigate to the VirtualBox program directory: cd "C:Program FilesOracleVirtualBox"
c) Run the following to get a list of all disk images registered with VirtualBox:
VBoxManage.exe list hdds

d) Compact the image using the following if it’s a .VDI format:
VBoxManage.exe modifymedium disk "C:usersusernameVirtualBox VMsvmnamedisk.vdi" --compact
If it’s a .vmdk format, then you’ll receive an error like:
Progress state: VBOX_E_NOT_SUPPORTED
VBoxManage.exe: error: Compact medium operation for this format is not implemented yet!
In this case, we have two options.
Option 1 – Convert the file to VDI and then back to VMDK
Option 2 – Use the VirtualBox UI to clone the VM
I’m going to use option 2 here as it uses less disk space for the process (option 1 requires a full copy, option 2 only uses the compacted space when cloning).

This results in a new copy of our VM, so we need to delete the original once this is complete.

The resulting file is approx 50% the size of the original image.