Как убрать ошибку сценария в Windows?
Ошибка сценария Windows явно указывает на сбои в работе скриптов, файлов или некоторых платформ для обработки кода. Возможно, на каком-либо этапе загрузки проявляются неправильные ссылки или намерено повреждены файлы. Иногда это случается вследствие вирусов, а иногда из-за некорректной работы самого кода.
Что такое Script Error или ошибка сценария?
Нужно понимать, что ошибка скрипта – это сбой в предустановленной инструкции сценария. Спровоцировать нарушение хода процедуры может что угодно: как неправильно прописанный код, так и ошибки в системе пользователя. Чаще всего появляются в браузере и в сообщении указывается ссылка на строку с проблемой. Команда в том месте не может быть выполнена. Проблема возникает из-за одного из языков сценариев, чаще всего JavaScript или VBScript. Также ошибка скрипта может появляться в некоторых программах и играх.
Причины ошибки сценария
Как уже упоминалось, причин может быть много:
- неправильная работа Internet Exporer или его некорректная настройка;
- проблема в коде сайта, обычно в JavaScript;
- конфликт между игровыми модами или повреждение файлов;
- отсутствие полномочий на доступ к необходимым файлам и др.
Разновидности ошибок сценариев
Действия, что нужно делать, если произошла ошибка сценария напрямую зависят от того, где и при каких условиях произошла ошибка. Мы постараемся разобраться со всеми ее вариациями:
- ошибка сценария в Internet Explorer;
- неисправность в Google Chrome, Opera и др. браузерах, связанная с JS;
- повреждение скрипта в Windows;
- игровая проблема.
Каждая категория имеет свои особенности устранения, поэтому в зависимости от рода ошибки, нужно искоренять заболевание системы.
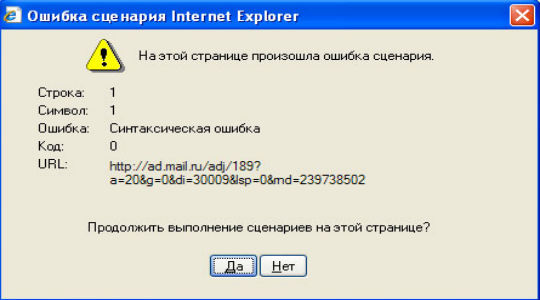
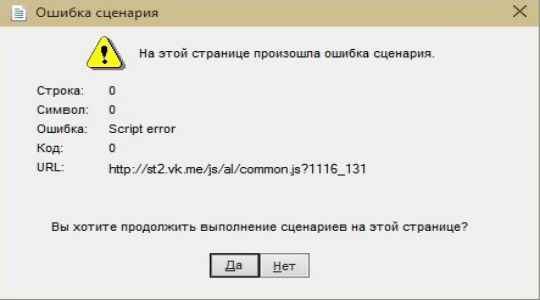
Ошибка сценария в Internet Explorer
На этой странице произошла ошибка сценария – одна из самых распространённых неисправностей, возникает обычно в браузере, особенно часто в IE, при этом версия не играет роли. Причиной проблемы становится либо сам ресурс, к которому вы пытаетесь получить доступ, либо неисправность со стороны клиента.
Предварительно следует переустановить/обновить браузер, вероятно, он имеет какие-то повреждения. Более простой вариант – это просто почистить кеш и куки, процедура выполняется через «Свойства браузера». Чтобы быстро удалить временные файлы, достаточно нажать комбинацию Ctrl + Shift + Del и запустить процедуру кнопкой «Удалить». Альтернативный вариант — через CCleaner.
Есть также несколько более эффективных способов исправления проблемы, которые имеет смысл описать более детально.
Способ 1: отключаем отображение сообщения об ошибке
Устранить ошибку сценария, если проблема со стороны веб-ресурса, не представляется возможным всем, кроме администраторов сайта. Однако можем просто выключить отображение этого окна отладки, оно не будет мелькать, а система продолжит работать стабильно.
Что нужно сделать при ошибке скрипта:
- Откройте Internet Explorer.
- Нажмите на кнопку меню и выберите «Свойства браузера».
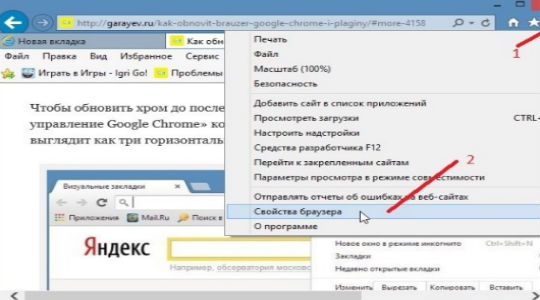
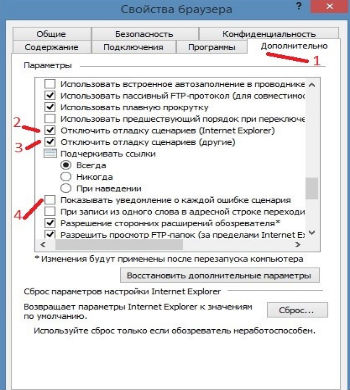
- Перейдите в раздел «Дополнительно».
- Установите флаги возле опций «Отключить отладку сценариев».
- Немного ниже снимите выделение с уведомления об ошибке.
Таким образом не получится исправить ошибку сценария, но можем просто убрать всплывающее окно. Причина возникновения ошибки, скорее всего, не в вашей системе, и решать неисправность следует по другую сторону, мастерами сайта. Хотя так бывает не всегда.
Способ 2: включаем активные скрипты
Блокировка активных сценариев, ActiveX и Java может влечь появление ошибки сценария. Несколько простых настроек должны исправить проблему:
- Нажмите на изображение шестеренки и перейдите в «Свойства браузера».
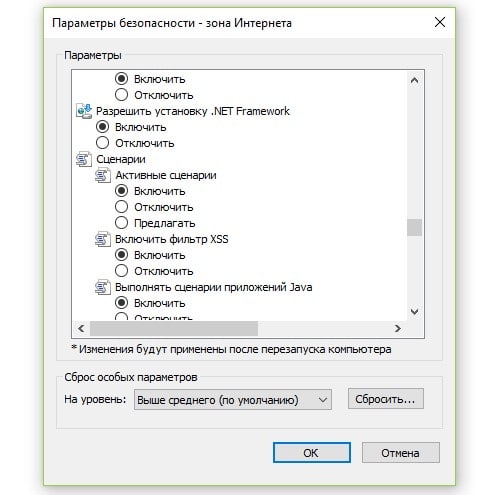
- Кликните по вкладке «Безопасность», а затем – по кнопке «Другой».
- Пролистайте список вниз и в блоке «Сценарии» активируйте «Активные сценарии».
- Немногим ниже по списку включите «Выполнять сценарии приложений Java», а затем — «Фильтрация ActiveX».
- Установите флаги в положения «Выполнять сценарии элементов ActiveX».
- Закройте окно и перезапустите браузер.
Способ 3: включить безопасный режим для проблемного сайта
Этот способ показан в видео и он получил много положительных отзывов. Стоит попробовать.
Если у вас показывается «Ошибка сценария: на этой странице произошла ошибка скрипта», сделайте следующее:
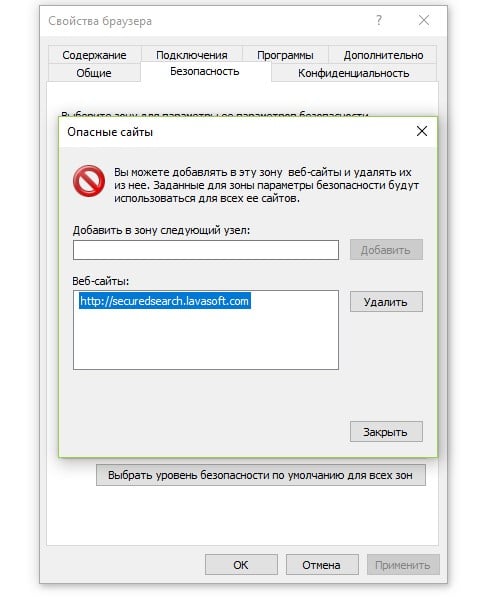
- В «Свойствах браузера» на вкладке «Безопасность» выберите «Опасные сайты».
- Нажмите на кнопку «Сайты» и добавьте ссылку на тот веб-ресурс, на котором появляется ошибка сценария.
Ошибка сценария в играх (Sims 4)
Script error может появляться не только в Sims 4, но и в других, но чаще всего именно здесь. Что касается этой игры, должно сработать следующее решение:
- Выселите семью из дома для полного сброса повседневных желаний.
- Удалите все предметы, провоцирующие ошибки, в основном это двери, но не только.
- Сохраните состояние домов и семей и перезапустите игру.
- Снова заселите семью в дом, на этот раз без ошибки.
Для Sims 4 и других игр достаточно высокий шанс на исправление ошибки имеет удаление модов. Это можно делать по одному, пока ошибка перестанет появляться.
Ошибка сценариев Windows 11, 10, 7
Подобного рода проблема, возникает из-за ошибки сценариев Windows сразу после запуска системы или через время. При этом все версии Windows в зоне риска, что увеличивает вероятность столкнуться с неисправностью. Благо, здесь тоже можно отключить уведомление и забыть о проблеме.
Как отключить ошибку сценариев в Windows:
- Введите в поиск Windows «Свойства браузера» и перейдите во вкладку «Дополнительно».
- Установите галочки в строки «Отключить отладку сценариев (Internet Explorer)» и «Отключить отладку сценариев (другие)».
- Нажмите на кнопку «Применить» и закройте окно.
Как убрать ошибку сценария при запуске:
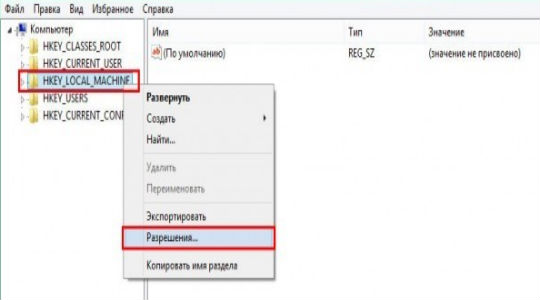
- Нажмите Win + R и введите regedit;
- ПКМ по разделу HKEY_LOCAL_MACHINE, выберите свойство «Разрешения…»;
- Выберите среди пользователей пункт «Все» и снизу установите флаг возле «Полный доступ»;
- Нажмите на кнопку «Дополнительно»;
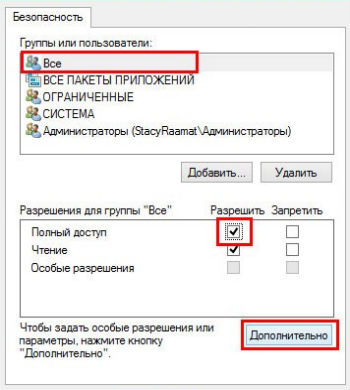
- Установите выделение на субъект «Все» и клик по «Изменить»;
- Снова задайте «Полный доступ» и перезагрузите ПК;
- Используйте сочетание Win + R и введите cmd, затем вставьте строку: Regsvr32 C:WindowsSystem32Msxml.dll.
- Если не сработает предыдущее, дополнительно попробуйте regsvr32 msxml3.dll затем regsvr32 dispex.dll.
Ошибка сценариев Windows после подобной манипуляции должна исчезнуть и более не тревожить пользователя. Даже с тем учетом, что уведомление может не оказывать никакого негативного воздействия на систему, оно все равно вызывает неудобства.
Если появляется ошибка сценария при запуске и далее загрузка системы не производится, необходимо запустить Windows из безопасного режима и откатиться, также следует проделать описанную ранее процедуру. На крайний случай необходимо воспользоваться средством восстановления с установочного дистрибутива.
Что еще можно попробовать?
К сожалению, вариантов ошибок сценариев настолько много, что все их обхватить в виде пошаговых инструкций довольно сложно, но мы не хотим оставить вас без решения. По этой причине перечисляем ниже частые коды ошибок и способы, которые должны сработать:
- Ошибка сценария со ссылкой logincdn.msauth.net решается по инструкции для IE. Также нужно понимать, что сбой относится к OneDrive, а он не работает с накопителями в файловых системах FAT32 (часто так отформатированы флешки). Поддерживает только NTFS или HFS+. Если все способы не помогут исправить сбой с кодом logincdn.msauth.net, попробуйте сделать сброс IE.
- Сбой подобного рода»dataset» есть null или не является объектом, со ссылкой на file:///c:/searcherbar/js/localization.js или многочисленные другие файлы. Это означает, что проблема в каком-то файле JavaScript. В данном случае проблема в вирусе searcherbar — он устанавливает различные параметры поиска и может добавлять рекламу. Стоит просканировать систему с помощью Malwarebytes AdwCleaner или любого другого софта. Вот лучшие бесплатные антивирусы для Windows. В целом проблему вызывает то, что планировщик заданий пытается запустить программу, которой нет или была удалена не полностью.
- Ошибка сценария в Datakam player чаще всего появляется при попытке воспроизведения ролика с видеорегистратора. Программу часто рекомендуют тем, у кого есть также GPS-карта. Однако сама программа работает криво, здесь лучшим советом будет переход на RegistratorViewer.
- Проблема в Microsoft Teams преимущественно появляется у пользователей Windows 7, так как программа более не поддерживает ее. На форуме Microsoft некоторые пишут, что включение отладки и серфинг по настройкам может помочь. Насколько это правда — сложно сказать.
- В Hamachi суть проблемы заключается в программе, обычно появляется при регистрации. Нужно выполнить регистрацию через браузер и просто войти в приложении и ошибки не будет.
Совет! Если вы не веб-программист, то это тот случай, когда не имеет значения код 0, строка 23 или строка 657 символ 9. Все перечисленное никак вам не поможет в решении проблемы.
Если у Вас остались вопросы по теме «Как убрать ошибку сценария в Windows?», то можете задать их в комментариях
Рейтинг статьи 4.6 / 5. Голосов: 18
Пока нет голосов! Будьте первым, кто оценит этот пост.
Источник
JUnit5, Mockito, TDD with Camunda BPMN2.0 spring-boot
“Oh no!! Updated code works. But … the existing working flow is now crashing. What happened?”
Probably, this could have been avoided, if your existing flow had a Test Case(s) and you had run the test case(s) prior to deployment. If it was an automated deployment then you would have the Test step some-where which would have failed.
The question — answered by this blog is how Camunda helps out with writing Test Cases for Camunda Workflows?
Software testing checks the software applications and products for bugs and errors to ensure it’s performance is efficient and reliable.
Software Testing is a continuous process to identify, evaluate and conform that the Business Requirement Specifications are met.
Camunda Workflow Engine embedded in springboot is no different when it comes to test cases. We may write tests for each camunda flow step(Unit Test) or for entire flow(Integration Test), rather we must write tests for both, to conform to the Business Requirements Specifications.
What is JUnit 5 ?
As per the JUnit user guide :
JUnit 5 is composed of several different modules from three different sub-projects.
JUnit 5 = JUnit Platform + JUnit Jupiter + JUnit Vintage
The JUnit Platform serves as a foundation for launching testing frameworks on the JVM. It also defines the TestEngine API for developing a testing framework that runs on the platform.
JUnit Jupiter is the combination of the new programming model and extension model for writing tests and extensions in JUnit 5. The Jupiter sub-project provides a TestEngine for running Jupiter based tests on the platform.
JUnit Vintage provides a TestEngine for running JUnit 3 and JUnit 4 based tests on the platform. It requires JUnit 4.12 or later to be present on the class/module path.
You can visit JUnit 5 user-guide to learn more.
What is Mockito?
As the name suggests, Mockito Framework is used to create Mocks, right from interfaces to final classes. It lets you write beautiful tests with a clean & simple API. Mockito tests are very readable and produce clean verification errors
You can visit Mockito Framework to learn more.
What is Camunda Mockito?
If you have worked on Camunda Workflow code and wrote some tests, then you definitely know there are so many things in Camunda that you need to mock and stub. Camunda Mockito simplifies this process mocking and testing.
camunda-bpm-mockito is a community extension for the Camunda BPM process engine that aims to simplify and automate mocking of process applications.
You can visit camunda-bpm-mockito github repository to learn more.
We will use JUnit 5 with Camunda Mockito to write the Unit and Integration Test. However, there is one more thing that we can do with Camunda Workflow i:e TDD — Test Driven Development
What is TDD?
It’s a debatable topic. However, as per the definition, “Test driven development” refers to a style of programming in which three activities are tightly interwoven: coding, testing (unit tests) and design.
Below are some set of rules we can remember when using TDD:
- write a “single” unit test describing an aspect of the program
- run the test, which should fail because the program lacks that feature
- write “just enough” code, the simplest possible, to make the test pass
- “refactor” the code until it conforms to the simplicity criteria
- repeat, “accumulating” unit tests over time
For example, let’s consider we are writing add functionality for a calculator program.
We know what add does, so we write a test to add two integers. To fix the compilation issues, write the function and the code which will pass the test.
You will thus end up in writing the code that is testable and traceable.
Just like any other aspect, there are pitfalls with TDD approach. It takes time to adjust and developer jumps back and forth with test cases and code. But, overall TDD approach leads to improved design qualities in the code. It helps to decrease bugs in the product over time.
With Camunda, we have a great opportunity to implement TDD. Each Step in Camunda Workflow can be treated as a Unit. For each unit, a test case can be written using the expected input and output for the step. At this point if you run the test, then it would fail which is expected in TDD. We can then add the minimal code for the test to pass.
Let’s combine all details in above section to implement Unit and Integration test cases in Camunda. You can find the code on GitHub
In order to use JUnit5, Mockito, CamundaMockito we would have to setup our POM(Project Object Model)file first. Below are the minimal dependencies for Camunda Engine 7.15.0 and Springboot 2.4.3.
Camunda Mockito javadocs describe various mocks that can be created using it. One such example that you would widely see in the test cases is use of class DelegateExecutionFake.
DelegateExecutionFake probably does not support all operations but, we can extend it if needed and implement the mocks.
It provides a Fake/Mocked delegateExecution to test simple delegates/listeners without mocking.
A Test from the project shows the use of Fake delegateExecution().
Here, we trigger the step OrderOnline JavaDelegate and then try to check the values of the variable set.
This could have been also done using Mockito, but CamundaMockito covers the boiler plate code for mocking.
Another example could be a fake VariableScope which is required when we receive response from an Activity invoked from within a BPMN workflow.
For more mocked classes, you can check out javadocs for camunda-mockito
We can regard this as Unit Test Cases and use TDD approach to design the test. Plus, these samples are developed using JUnit 5 Jupiter TestEngine.
Now, let’s talk about Integration Test. An entire flow test!!
I use Mockito to write the integration test for Camunda Flow. Consider our camunda noodles project where we cook noodles based on the ingredients we have. Camunda tells us the recipe and then expects us to tell if we were able to cook it or not.
To test this entire flow, we can create a mocked instance of ProcessScenario interface which extends Runnable. Then, when we want to invoke a Camunda flow, say “CookMasalaVeggiesNoodles”, we can simply do it by using Scenario.run() and using key to start the process.
Let us check one of the output variable value for the flow that we ran. We can use asssertThat() from BpmnAwareTests . The code looks something like below, where we take the process instance variables and check if the key, value is present in it.
The remaining part of the flow test would be verifying that bpmn flow steps were visited. This can be verified using verify() from Mockito. The code looks something like below, which also takes the process scenario instance and checks if the step with id say “LetsCook” is completed/started or not.
In addition to these, ProcessScenario can be extended using Mockito to mock events or other steps. In cases where we want the Event gateway say “IsItReady” to catch a message “IsReady” then we can use below code. Optionally, you can pass variables that might be needed for the event gateway for further processing.
But, in case we want the Event gateway to fail say timeout scenario, then we can write it something like below. We basically declare it empty i:e do nothing. Hence resulting in an immediate timeout situation instead of waiting for the event.
The Test Case using the above concepts for ProcessScenario is as below or you can check it in the Github repository too.
One can only appreciate how easy it is to test the entire flow by moving through different steps/flows and validating the complete processing using JUnit5, Mockito and CamundaMockito framework.
Conclusion
Looking at our above Unit Tests and Integration Test, we can conclude that Junit5, Mockito and Camunda Mockito would help us to:
- Mock Listener and Delegate behavior — since delegate and listener methods are void, they can either modify process variables or raise an error. Instead of messing up with mockito’s doAnswer() you can use these options.
- Mock Sub Processes — Sub process is able to wait for timer, set variable, wait for message, send message, throw exception or just do anything what you want.
- Automatic mocking of all expressions and delegates in a process without explicitly registering mocks
Hope you have find this an interesting story of testing cooking instant noodles developed using embedded camunda workflow engine.
Do leave your feedback or shower some claps. As always for any doubts or issues in setting up your local environment, we can connect via email or comments below.
Источник
![]()
Learn how you can test your error handling flows.
When verifying users on your platform, the verification checks performed by Adyen can return a range of error messages. In your test environment, all verification checks are passed by default when the required fields and documents are provided.
To test your error handling flow, you can force a scenario where one or more verification checks fail. This allows you to reproduce an unsuccessful verification flow, including the result and corresponding error codes.
Before you begin
Make sure that you have API credentials for the Legal Entity Management API and Configuration API.
Step 1: Make an API request
Using the Legal Entity Management API, you can include a x-requested-verification-code in the header of your API request.
You can use requested verification codes for the following endpoints:
- /legalEntities
- /documents
- /transferInstruments
Use a suberror code as your requested verification code. You can include one code at a time in your request header. Requested verification codes can only be used in your test environment.
In this example, you want to test the 1_3004 suberror code The name and residence country couldn't be verified for an individual legal entity. This triggers the following verification checks:
- Name and date of birth check
- Residency country check
In the header of your POST /legalEntities request, include x-requested-verification-code: 1_3004.
Force legal entity verification
curl https://kyc-test.adyen.com/lem/v2/legalEntities
-u "ws123456@Scope.BalancePlatform_YourBalancePlatform":"YourWsPassword"
-H "content-type: application/json"
-H "x-requested-verification-code: 1_3004"
-X POST
-d '{
    "type": "individual",
    "individual": {
        "phone": {
            "number": "+31612345678",
            "type": "mobile"
        },
        "birthData": {
            "dateOfBirth": "1977-01-01"
        },
        "name": {
            "firstName": "KYC",
            "lastName": "My Test scenario"
        },
        "nationality": "NL",
        "residentialAddress": {
            "city": "Amsterdam",
            "country": "NL",
            "postalCode": "1111AB",
            "street": "Main street"
        },
        "identificationData": {
            "type": "nationalIdNumber",
            "number": "12345678",
            "issuerState": "NL"
        }
    }
}
https://docs.adyen.com/issuing/test-verification-errors#force-legal-entity-verification
Step 2: Create account holder
For error tests for legal entities, you need to create an account holder for the legal entity of the organization, individual, or sole proprietorship. For error tests for documents or transfer instruments, you need to create an account holder for the legal entity who owns the resource.
Step 3: Get verification results
To get updates about the verification status and results, you can:
- Listen to the balancePlatform.accountHolder.updated webhook or
- Make a GET API request for the particular legal entity, document, or transfer instrument.
Make a GET /legalEntities/{id} request, specifying the id in the path.
Verification result-API response
{
   "verificationErrors":[
      {
         "code":"1_30",
         "message":"Individual details couldn't be verified",
         "remediatingActions":[
            {
               "code":"1_300",
               "message":"Update individual details"
            }
         ],
         "subErrors":[
            {
               "code":"1_3004",
               "message":"The name and residence country couldn't be verified",
               "remediatingActions":[
                  {
                     "code":"1_305",
                     "message":"Upload a different proof of residency"
                  },
                  {
                     "code":"1_300",
                     "message":"Update individual details"
                  }
               ],
               "type":"invalidInput"
            }
         ],
         "type":"invalidInput"
      }
   ]
}
https://docs.adyen.com/issuing/test-verification-errors#verification-result-api-response
Verification result-webhook
{
   "data":{
      "accountHolder":{
         "capabilities":{
            "sendToTransferInstrument":{
               "allowed":"false",
               "enabled":"true",
               "problems":[
                  {
                     "entity":{
                        "id":"LE00000000000000000000001",
                        "type":"LegalEntity"
                     },
                     "verificationErrors":[
                        {
                           "code":"1_30",
                           "message":"Individual details couldn't be verified.",
                           "remediatingActions":[
                              {
                                 "code":"1_300",
                                 "message":"Update individual details"
                              }
                           ],
                           "subErrors":[
                              {
                                 "code":"1_3004",
                                 "message":"The name and residence country couldn't be verified",
                                 "remediatingActions":[
                                    {
                                       "code":"1_305",
                                       "message":"Upload a different proof of residency"
                                    },
                                    {
                                       "code":"1_300",
                                       "message":"Update individual details"
                                    }
                                 ],
                                 "type":"invalidInput"
                              }
                           ]
                        }
                     ],
                     "requested":"true",
                     "verificationStatus":"invalid"
                  }
               ]
            },
            "description":"YOUR_DESCRIPTION",
            "reference":"YOUR_REFERENCE",
            "id":"AH00000000000000000000001",
            "legalEntityId":"LE00000000000000000000001",
            "status":"Active"
         },
         "balancePlatform":"YOUR_BALANCE_PLATFORM"
      },
      "environment":"test",
      "type":"balancePlatform.accountHolder.updated"
   }
}
https://docs.adyen.com/issuing/test-verification-errors#verification-result-webhook
The response returns the specified requested verification code and associated error codes.
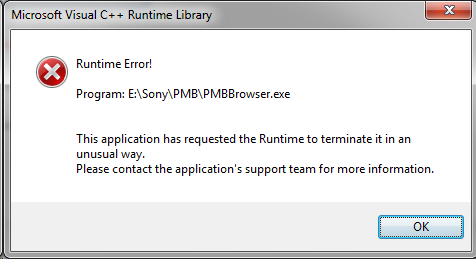
«Runtime error» появляется при запуске различных приложений, включая и видеоигр, либо в случайные моменты при работе ОС Windows. Ошибка не эксклюзивна для какой-то одной версии Windows — она возникает на всем, начиная от Windows XP и заканчивая последними сборками «десятки». В сегодняшней статье мы расскажем вам, что вызывает «Runtime error» и как от нее избавиться.
Содержание
- Причины появления «Runtime error»
- Решение ошибки «Runtime error»
- Решение №1 Ликвидация кириллицы
- Решение №2 Изменение языка программ, не поддерживающих Юникод
- Решение №3 Переустановка Visual Studio C++ и .NET Framework
- Решение №4 Удаление недавно установленных программ
- Решение №5 Восстановление системных файлов
Причины появления «Runtime error»
К сожалению, определить точную причину появления данной ошибки невозможно: пользователю необходимо перебирать доступные решения, пока одно из них не устранит проблему. Тем не менее давайте все же взглянем на список, так сказать, «подозреваемых». Вот что может вызывать появление ошибки «Runtime error»:
- отсутствующие либо поврежденные системные компоненты;
- конфликт запускаемого приложения со сторонней программой/службой;
- поврежденные файлы запускаемого приложения;
- присутствие кириллицы в расположении исполняемого файла приложения;
- «кривая» установка библиотек Visual Studio C++ и .NET Framework либо их отсутствие.
Решение ошибки «Runtime error»
Решение №1 Ликвидация кириллицы
Ошибка «Runtime error» может возникать при запуске тех программ и игр, в расположении которых присутствуют кириллические символы. Например, на данную ошибку можно наткнуться, если запускаемое приложение находится по пути C:Users[ИМЯ АККАУНТА НА РУССКОМ]Downloads[КОРНЕВАЯ ПАПКА ПРИЛОЖЕНИЯ]. Избавьтесь от русского языка по пути к приложению и попробуйте запустить его еще раз.
Решение №2 Изменение языка программ, не поддерживающих Юникод
Появление ошибки «Runtime error» возможно в том случае, если в параметрах региональных стандартов для приложений, не поддерживающих Юникод, задан русский, а не английский язык.
- Нажмите WIN+R и выполните значение «CONTROL»;
- кликните на пункт «Изменение форматов даты, времени и чисел» в разделе «Часы и регион»;
- перейдите во вкладку «Дополнительно» в появившемся окошке «Регион»;
- нажмите на кнопку «Изменить язык системы…»;
- в ниспадающем меню выберите «Английский (США)» и сохраните внесенные изменения;
- перезагрузите ПК.
Запустите проблемное приложение, чтобы проверить наличие ошибки.
Решение №3 Переустановка Visual Studio C++ и .NET Framework
Некорректно установленные (либо отсутствующие в системе) распространяемые библиотеки Microsoft Visual Studio C++ и .NET Framework могут вызвать появление «Runtime error». Чтобы переустановить эти библиотеки, вам нужно сделать следующее:
- вызовите перед собой Панель управления, как это было показано выше;
- кликните на «Удаление программы» в разделе «Программы»;
- найдите в списке программ все версии Visual Studio C++ и удалите их;
- перейдите на официальный сайт Майкрософт и загрузите необходимые установщики VS C++;
- проделайте тоже самое с различными версиями .NET Framework на своем ПК;
- вернитесь к окошку «Программы и компоненты» и кликните на пункт «Включение или отключение компонентов Windows»;
- убедитесь, что возле всех версий .NET Framework стоят галочки;
- закройте все открытые окна и перезагрузите ПК.
Решение №4 Удаление недавно установленных программ
Определенные программы могут входить в конфликты с приложениями на компьютере. Ошибка «Runtime error» начала появляться практически сразу после установки какой-то программы или игры? Удалите ее, перезагрузите ПК и попробуйте запустить нужное вам приложение еще раз. Возможно, на сей раз никакой ошибки не появится. Заняться удалением программ можно в «Программы и компоненты» (показано выше ↑).
Решение №5 Восстановление системных файлов
Поврежденные системные файлы — потенциальная причина за появлением ошибки «Runtime error». Благо, в Windows присутствует специальная утилита, задача которой — это восстановление системных файлов. Чтобы пустить эту утилиту в работу, вам нужно сделать на своем ПК следующее:
- кликните ПКМ на меню Пуск и выберите пункт «Командная строка (администратор)» (PowerShell тоже подойдет);
- пропишите в консоли команду «SFC /SCANNOW» и нажмите ENTER;
- дождитесь окончания сканирования и восстановления системных файлов;
- перезагрузите компьютер.
Ошибка «Runtime error» практически наверняка исчезнет с вашего ПК, особенно если SFC удалось найти и восстановить поврежденные системные файлы.
In any layered communication protocol, all the layers above physical layer will utilize some form of protocol data units to accomplish the protocol defined. Here for the simplicity, referring all the protocol data units as transactions.
Physical layer error injection requires a different thought process and will be covered in another blog. Following will focus on the higher layers transaction field error injection.
Transaction field error injection for higher layers of communication protocol will have to cover following.
Continue reading “Error injection in communication protocol – Transaction corruptions”
A bidirectional interface have data traffic in two directions. As we had discussed in “Error handling verification of serial communication designs” the error handling is defined to cover the imperfections in the physical line. In bidirectional interface two physical lines are used for connecting both the directions. Thus effects of imperfections in physical line in both the directions should to be verified.
Continue reading “Error injection in communication protocol – Handling direction”
Execution and closure of error injection verification is the last step. Ordering the execution of the verification plan with the following tips can help improve the effectiveness of execution.
If you have reached this step it means, you have followed the “Error injection scenario enumeration thought process”. The scenarios have been prioritized as per the “Definition of the sensible error handling verification plan”. The BFM selected meets the “Error injection capabilities of bus functional models”. The tests have been written following guidelines of “Structuring the error injection tests”.
It’s assumed that normal operation verification has achieved certain level of stability before starting the error injection verification.
Test execution closure
Error injection tests execution should start with the directed tests. Directed tests are simpler to bring up and debug. It’s generally a good idea to go with “width first” approach unless and until there are specific demands. Width first means exercise all the error injection types in directed mode before jumping in to exercising it in the constrained random mode. Width first allows catching many issues and gives enough time for designers to fix the issues. Constrained random will take longer duration of time to exercise and clean it up. Its goes deeper into each of the error injection types.
After the directed tests are clean it’s then advisable to jump into the constrained random tests exercising. The numbers of seeds have to be decided differently based on the error injection type. Finding bugs can drive the number of seeds selection initially but it can later settle down to minimum seeds to achieve the desired functional coverage.
Functional coverage closure
Basic functional coverage for error injection has to be driven by the error configuration. Error injection types have to cover for both the single and multiple error injections simultaneously. Corruption variations per field and sequence will have to be separately covered.
Cross coverage has to be defined for the following:
- Error types, which are applicable to multiple protocol data unit types. These have to be covered with the right type of cross coverage between the error injection type and protocol data unit type
- Error types, which are applicable to both transmit and receive side. So those have to be covered by crossing the direction with the error type
Be cautious with the cross creations. It’s easy to create the cross but difficult to cover. So keep the cross restricted to relevant error injections.
Error configuration error type coverage can be met by the directed error injection tests. Whereas the variations of the corruptions and cross coverage is best covered using the constrained random tests.
Summary
Ideal order for the error injection test execution is following:
- Independently for transmit and receive side
- Directed tests exercising single error for all the selected error injection types
- Constrained random tests exercising single error for all the selected error injection types independently for transmit and receive side
- Directed tests exercising selected multiple error combinations independently for transmit and receive side
- Constrained random tests exercising selected multiple error combinations independently for transmit and receive side
- Simultaneous error injection on both transmit and receive side
- Constrained random tests exercising single error for all the selected error injection types independently for transmit and receive side
- Constrained random tests exercising selected multiple error combinations independently for transmit and receive side
Error injection being a complex feature demands focus and cleanliness in all the areas. Also the error injection can easily contribute to about 30–40 % of the total tests. This is not a small number.
Tests written for the error injection should be well structured for two primary reasons. First in order to make tests easy to debug and second improve the reuse of the code across the tests. Considering the total contribution of the error injection tests good reuse can reduce the test development effort.
Some common characteristics of the tests, apply to error injection tests as well
- Tests contain Stimulus generation and Response checking
- Tests will be of two types: Directed tests, Constrained random tests
Error injection test stimulus and response checking
One key point, which is, often ignored, is data traffic being a part of every test. Make sure there is a data traffic flowing through before the error injection, after the error injection and after recovery sequence completion. This is very important because we are building the protocol for communication of data. So all the tests need to exercise data traffic with whatever else they are doing. Because whatever else they are doing is to aid the reliable and efficient data communication.
Error injection tests will be characterized by:
- Stimulus containing
- Type of the error injection being exercised
- Trigger for recovery
- Checks to be performed on DUT
- FSM state
- Interrupts and configuration status registers
- Recovery sequence
Error injection tests directed versus constrained random selection
Now the key thing is deciding which tests should be directed and which should be constrained random tests. The errors that have high probability of occurrence and have error recovery sequence implemented in the hardware are clear candidates for the constrained random verification. This is because you want to exercise them rigorously. The scenarios, which have low probability of occurrence and software based recovery sequences are fine to be exercised with the directed tests. Ideally everything should be constrained random if you have the luxury of schedule and resources.
Error injection test typical structure
Data traffic generation can use existing sequences, which have been developed for the normal operation verification. Make sure not to jump into error injection verification unless there is some stability in the normal operation verification is achieved.

Setup the error injection in either directed or constrained random manner. In the directed cases, the tests itself will create the error configuration with the specific error injection type to be exercised. It will program the same to BFM. In the constrained random tests the weights are programmed for the errors to be enabled.
After the error injection do the required checks. The checks will have to check if there is any error reporting associated. All the errors detected may not be reported but for the ones reported will have to be typically checked by reading the configuration registers. There may be requirements to check the states of some key finite state machines (FSM). In fact error injection tests may be contributing to the FSM functional coverage as well.
After the reporting and state checks, the recovery sequence will have to be checked. The recovery sequence trigger has to be clearly identified. The recovery trigger can be
- Corrupted protocol data unit itself
- Timeout in case of missing protocol data units
- Protocol data unit following the corrupted protocol data unit
- Other
Recovery mechanism could be built in to hardware or initiated by the higher-level application. Typically when it’s handled by the higher-level application it will be some form of reset. Whereas when it’s handled by hardware it will use sequence of the predefined protocol data units. Recovery sequence is checked by the BFM.
After recovery sequence check completion, any additional checks as to clearing of some the status registers or state-indicating readiness for normal operation may have to be checked.
After completion of recovery sequence do not forget adding data traffic before calling it an end of test.
Some optimizations while writing the tests are possible. Based on the commonality of the recovery mechanism it may be possible to combine multiple error injections in a single test file. In such tests, the type of error to be exercised could be passed through the command line. This will minimize the number of the tests to be maintained.
Error injection is a complex area in all its related dimensions. Supporting it in bus functional models(BFM) is also not an exception. Care has to exercised, if not it can easily create mess. Danger is it will affect the stability of the bus functional model in all areas.
Keep in mind, BFM’s default mode of operation will be normal operation. Verification will use normal operation mode for 70 % of time and 30 % time it will use it for error injection.
Error injection support implementation in BFMs, is like swimming against the current of river. Bus functional model architecture has these contradictory requirements to be fulfilled. On one hand, they have to model the normal operation and an on other error injection. Both have to be housed together in the same enclosure. Error injection is like living being with contagious disease and normal operation is like healthy living beings. Now if the error injection is not quarantined it will spread the disease to other parts of the BFM. Thus affecting the overall code stability of the BFM.
We certainly don’t want the code that is used for the 70 % of the time to be affected by the code that’s used for the 30 %.
In next few sections let’s look at some of the ways to cleanly structure the error injection implementation in BFM.
We have already seen the requirements for the error injection support from BFM in the “Error injection capabilities of bus functional models”.
Error injection support is made up of three major functional areas:
- Randomization of the error configuration
- Applying the error configuration to the protocol data unit
- Checking the response from the DUT on the line

1. Error configuration randomization
Error configuration contains information about the type of corruption and selection among the variations for the corruptions. Field corruption variations consist of different illegal values for a selected field. Sequence corruption variations consist of different possible protocol data units. Typically a error configuration per protocol data unit is desired.
First level of quarantining is avoiding merging of error configuration and the respective protocol data unit class. Eve when it may seems tempting to do so.
Every layer should have it’s own error configuration. It should not be mixed with the other layer. Some layer can have multiple error configurations, if it supports multiple distinct functionalities. A typical link layer for example would support three major functional areas, link initialization, link layer control and supporting data flow of upper layer. These are clearly three different areas and it’s okay to have three different error configurations to control the error injection in respective areas.
Properties representing type of corruption and selection among variations of corruptions, in the error configuration class will have to be random and constrained to correct values. In order for the constraints to be implemented correctly the respective layer configuration and state information is also required. The layer configuration is required to tune the the randomization as per the DUT configuration. The definition of the legal range is typically dependent on the configuration of the system. The definition of the legal sequence is typically dependent on the state. So the correct the corrupted value generation will be dependent on both of these. Error configuration should have access to the corresponding protocol layer’s configuration and state objects as well.
Apart from that sometimes layers may operate very closely. In such case the error injection in one the layer can have effects on another layer. This may appear like breaking the abstraction of layering but note that it’s protocol design. So in such cases the error injection information about related layers will have to be exchanged with each other.
The protocol data unit corrupted should hold the error configuration with which its corrupted. This will ease the debug process.
Error configuration should also have ability to generate the different errors based on the weights specified for different error types.
Error configuration randomization should be able to generate the one of the valid error types and select the one of the correct illegal variations for the injection, given the corresponding protocol data unit, layer’s configuration, layer’s state and optionally the weights for the different error types. Setting up these constraints is not a simple task. It takes few iterations to settle down. Key to getting right quickly is, in case of failures do not do point thinking, go after the root cause. In case of error injection all problems need due attention. Either at the point of problem or later they will claim their share of time and effort. So better give it early and close it right.
2. Error configuration application
Applying error configuration means executing the information present in it. If its field corruption, the corresponding field in the protocol data unit will be overwritten with its corresponding corrupted value generated in the error configuration. If it’s the sequence corruption the current protocol data unit will be replaced with the corrupted protocol data unit. At times this could be null. Which is meant for creating the missing protocol data units scenarios.
Now applying the error configuration may sound simple. Yes it is simple. Challenge is in selecting the right point for applying it in data flow path. It may sound very tempting to distribute it at various points in your data flow paths. This is strict no. Do not puncture the normal operation data flow path at multiple places. Minimize the point of corruptions. Best is single point of corruption. Pick a point in data flow where all the protocol data units of layer pass through and corrupt it at only this point. This helps to keep this part of the error injection logic quarantined to a specific point.
At times it may not be possible to restrict it to single point. Especially when the layer has multiple distinct major functionalities. Link layer for example. It will contain the initialization, layer control sequences and data flow from upper layer. All these three are distinct functionalities and may need a different point of error configuration application. In such cases one point per each functional area is appropriate. Bottom line is keep these points to as minimum and clean as possible.
3. Error response checking
The response from the DUT for the error injection needs to be checked at two interface:
- Recovery: For some errors are recovered in hardware driven recovery protocol. This is accomplished by initiating protocol defined recovery sequence on the line. This will be visible to BFM.
- Reporting: The error detected will have to be reported to application. Sometimes internal statistics counters maintained in the hardware will have to be updated. This typically accomplished with the interrupts and status registers. This will not be directly visible to BFM. This has to be checked by tests or test bench.
Recovery mechanism action will be visible to the BFM. So BFM will have to set up expectations to check if this recovery sequence has been triggered. For the error injection done from the transmit side of the BFM, the expectations for checking the recovery sequence will have to be passed to receive side. Its best to setup a tracker queues through which the transmitter can pass the information about the expectations on the response with the receive side. As indicated the corrupted protocol data units must contain the error configuration associated with it. This protocol data unit will have to be passed to receiver for checking error response.
On receive side whenever it finds the tracker entries that have the protocol data units with valid error configurations, checking should be implemented as separately as possible from normal operation checking. Checking logic is one of the parts of the logic where clean quarantining can be challenging. This is because of the reuse of checking logic between the normal operation and error response checking.
The expected response also being set up as a part of the error configuration itself is a good idea. This provides the flexibility for tests to tune the checking as per slight variations in the DUT implementation, when required.
Key to successful implementation of the error injection support is to keep it quarantined as much as possible from the normal operation data path. Allow as much flexibility in this logic as possible in both stimulus generation and especially in response checking to accommodate the unforeseen scenarios.
Which can be many !
This blog will discuss what are the expected capabilities from the bus functional models (BFM) for the error injection support.
Before we jump into details of support required in the bus functional models, in the post “Error injection scenario enumeration thought process” we understood that the error injection is primarily modeling the manifestations of imperfections of physical line. Now one may question, why not just model it like that? That is model a wire to do random corruptions of the data passing through it. Simple solution, why go add error injection capability in the bus functional models?
Answer may seem bit too obvious for veterans but for the benefit of newcomers bringing this point up. Good news is, yes you can. It will create the valid scenarios as well. But remember in the functional verification we want all the cases that real life usage can create but in the controlled environment. With the random data corruption if we want to specifically corrupt some field of a protocol data unit, it will become tedious to do so. Also it’s not just sufficient to corrupt we also need to check if it’s handled correctly by DUT.
This means, test will have to figure out when is this transaction going out by decoding data going out on the physical line, corrupt the right data and then pass the information about corruption to BFM, if its implementing any checks. It’s not impossible but it will demand more effort and process is error prone. To overcome this, control is desired at higher level of abstraction. This means test should be able to indicate at higher level to corrupt a specific field of specific protocol data unit. This type of interface is critical to close the error injection functional verification. That’s reason it’s modeled in the bus functional models instead of the physical lines.
Now that we are clear why we need the error injection capabilities in the bus functional model let’s explore what should we expect from it?
Functional requirements for error injection:
Bus functional model should be able to meet the test case requirements identified following thought process outlined in the blog “Error injection scenario enumeration thought process”. It should support :
- BFM Transmit side error injection
- BFM Receive side error injection
- For multi layer protocol, should allow error injection in every layer
- Allow single and multiple error injection based on requirement
- Allow back-to-back error injection based on requirement
- Error response checking for line side response should be built-in
- Allow simultaneous error injections in both directions
This blog will assume bus functional models implemented using object oriented programming interface. It’s assumed primarily due to ease of information abstraction. If the abstraction can be achieved through other mechanisms the concepts will still hold true.

BFM’s Error injection interface
Before we jump into the interface details, let’s understand what needs to be communicated to BFM’s for doing error injection.
Error injection requires specifying two types of information:
- Type of error injection
- Field or sequence error injection
- Selection of possible variations
- For field corruption the corrupted value of the field to be used for corruption
- For sequence corruption the protocol data unit replacements to be used for corrupting the sequence
Both of these information together is typically abstracted as error configuration.
Where should this error configuration information be specified?
In multi layer protocol every layer will have its protocol data unit. Each protocol data unit should support field and sequence corruptions. Typically this is protocol data unit is modeled using a class. This class will contain all the fields as the class properties.
There are two possibilities to specify the error configuration related to this protocol data unit:
1. Implement the error configuration in the same class as the protocol data unit
2. Implement the error configuration in a separate class
It’s recommended to choose the second approach of implementing the separate class for error configuration. For simpler protocols it may not make big difference but for the complex protocol it will yield good returns by it’s cleanliness of division.
How to program error configuration in BFM?
BFM should provide the APIs for programming this error configuration. As per the error configuration specification BFM should corrupt the selected protocol data unit.
This could be separate API or error configurations can be attached with the protocol data unit to be corrupted. In case of separate API it’s important to also specify the protocol data unit to be selected for the corruption.
How do we control the selection of the protocol data unit to be corrupted?
There are two popular approaches possible:
- BFM provides the protocol data unit through call back. Test attaches the error configuration to that specific protocol data unit and then BFM injects the specified error as per the error configuration
- BFM provides simple API as to corrupt the next protocol data unit. To detect if the next protocol data unit is the transaction of interest BFM provides the events
If the second approach is used the test code flow will look linear. Whereas due to callback usages in the first approach the code flow will not look linear. Linear code are simple to understand and maintain. Both the approaches will accomplish the objective.
In multi layer protocol it’s advisable to keep the error configuration for individual layers separate. This keeps the implementation clean and allows scope for incorporating the expansion of the protocol in future.
Directed vs Constrained random error injection
Error injection should allow exercising error injection in both of the following modes:
- Directed error injection
- Constrained random error injection
Directed error injection should allow creation of any error injection scenario. In order to be able to create very specific scenarios the test needs to understand what is happening inside the bus functional models. The state and various events about the internals of the BFM should be provided to the test through the events and callbacks. Through these events, callbacks or any other mechanism the test should be able to achieve the necessary synchronization and then exercise the error injection to create the specific scenario of interest. In this case test generate traffic and uses the error configuration to specify the error to be injected.
Constrained random error injection is kind of the hands free mode of the operations. In this case test would only generate the traffic and BFM would do constrained random error injection of enabled error injections. One of the effective control for error injection enabling in constrained random mode is through percentage specification. BFM should allow the specification of percentages for either any specific error or category of errors. This would allow user to mix different types of the errors with the different weights as per the requirement. Now it’s important to do the selected errors in constrained error injection. Typically the best to consider the innermost circle of the errors indicated in the “Definition of the sensible error handling verification plan” for constrained random error injection.
Debugging help
Error injection debugs can get really crazy. Logging is one of the key interfaces through which the BFM’s provide the debug information.
BFM should be able to clearly identify following through the logging interface:
- Whether the protocol data unit logged is corrupted or not
- If corrupted corrupted the details of the error configuration associated with the corruption
- In case of corruption it’s better to provide the information about the uncorrupted protocol data unit as well along with the corrupted protocol data unit. This eases the analysis in many debugs.
In the course of the error injection there is high probability that the DUT’s will misbehave. This would be caught by the checks implemented in the BFM. The checks should have meaningful message to guide the debug in right direction.
Flexibility in error response checking
Certain error injection scenarios can result in multiple possible responses from the DUT. These possibilities could manifest as different response or missing response or additional protocol data units from DUT.
Error configuration should allow user to override the expected responses. By default it can implement most likely response but it should provide the flexibility to specify a different response for checking.
Also BFM should have capabilities to downgrade certain checks. This is not to be used as a long term solution but for work around during the DUT development. In certain cases, it may be interesting to see how the DUT behaves further beyond a check failure for understanding the scenario better. Check downgrading will be useful in this case as well.
This blog will focus on the error injection scenario enumeration thought process for bi-directional communication interface designs.
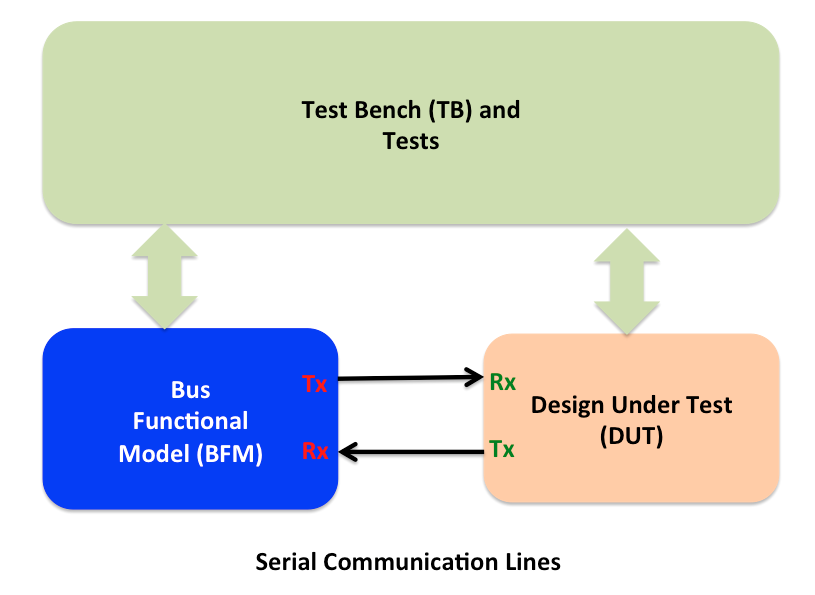
Simplest representation of the verification environment for bi-directional communication interface is shown below.

Although there are unidirectional interfaces as well but they pose lesser challenge in terms of the error injection verification. The reason being there is no hardware recovery mechanism possible with the unidirectional interfaces. So they are not covered in this post.
Error injection scenario enumeration process may seem very discrete. When there is no clear thought process identified, one may randomly start listing the scenarios. This makes it difficult to judge whether all the key scenarios have been thought through. This confusion can lead to either bloated or inadequate listing.
Bloated list is a risk to schedule and inadequate list is risk to functionality of chip. Worst is bloated list with irrrelevant cases.
So, what is thought process that leads to effective enumeration of error injection scenarios?
This blog will show it. It will showcase: What are some of major parameters to be taken into consideration? How to establish the overall scope of error injection verification to enable assessing and questioning the completeness of listing?
Following set theory based diagram is basis for building a three step process.

Step #1: Populate sets
For bi-directional communication interface, there are two sets of key parameters. First is direction and second is transaction.
The direction set has two elements: transmit and receive. Both elements of directions are applicable for error injection.
The transaction error injection set has two elements: field error injection and sequence error injection.
For field error injection element, list all the fields of the transaction that can be corrupted. For sequence error injection, list all the protocol violations possible which lead to sequence error injection.
Step #2: Transaction x Direction
First step is combination operations on two sets. First set containing direction and second set containing transactions. Here the word transaction means any generic protocol data units used by any layer.
All the combinations of these two sets should to be listed for unique error injection cases listing completeness.
Step#3: Additional variations
Once the unique error injection combinations are listed, each error injection case will have to be questioned with following questions
- Are multiple errors simultaneously possible with this error injection case?
- Are back-to-back errors possible with this error injection case?
- Are simultaneous errors on both directions possible for this error injection case ?
Any YES answer will add additional cases which are combinations of the errors cases listed in the step#2.
This completes the process of enumeration. Let’s look into details as to what do these questions mean in detail.
Single versus Multiple Errors
Question here is, whether transaction should be injected with the single error or multiple errors?
As discussed in the “Definition of the sensible error handling verification plan” decision is mainly driven by the specification requirements.
Certain specifications do provide provision for dealing with the multiple errors taking place at the same time in a given transaction. If the specification allows it, then it must also define the priority in which the errors should be dealt with. In such cases it’s good idea to exercise the multiple errors taking place at the same time.
If it’s not defined, it should be considered as lower priority activity. Without the proper priority definition the receiver handling of the multiple errors can become ambiguous.
Back to back errors
Question here is, whether to allow the back-to-back errors?
In some of the protocols, after the first error is detected further error detection mechanism is disabled until the first step of the expected error recovery sequence is completed successfully. In such cases the further errors injected back-to-back beyond first error are ignored. So it may not add much value to verification and unnecessarily it will increase the complexity of the error injection logic implementation in the BFM.
If the receiver remains active beyond first error and responds differently to back-to-back errors then it’s effective to allow the back-to-back error injection. Although care should be exercised to ensure the right scenarios are allowed minimizing the complexity of the error injection logic implementation.
Decision on multiple errors at the same time and back-to-back error injection has significant implications on the BFM error injection complexity. So it should be carefully thought out.
Implementation
Transaction corruptions scenarios have to be thought out from both transmit and receive side. Many times the receive side corruption results in DUT seeing same response. Such cases can be grouped and covered by the single test case in implementation.
If multiple errors at same time, back-to-back errors and error injection simultaneously on both directions are allowed they should be implemented as additional variations of test cases rather than writing a test for each.
After all the error scenarios are enumerated which would be quite a big list for sure, refer to “Definition of the sensible error handling verification plan” as to how to prioritize it for execution.
Please do comment if you would like to add to it.
It’s very easy to identify loads of the error injection scenarios. Key is to focus on the right scenarios. As we have seen in the “Error handling verification of serial communication designs” failure to select the right error scenarios can lead to wastage of the valuable engineering resource and time on this activity.
Remember this the activity has high probability of going off track. A good plan is like a map that will keep it on track.
Next question, how do you know which scenarios are the right scenarios?
Definition of right scenarios for the error handling verification requires one to ask the following four questions and answer them:
- Is this error scenario defined in the specification?
- Does the DUT support this error scenario?
- What is the impact of this error scenario on end application?
- What is the probability of this error scenario happening in real life usage?
- How to prioritize the execution?
Objective of these questions is to direct the thought process towards right scenarios by minimizing the noise and enabling right prioritization of the scenarios in the verification plan. Scenario with has more “Yes” answers are higher in relevance.
In next few paragraphs lets look at why each of these questions are important and how to use the answers of these questions to build right verification plan and how to use it for prioritization of execution.
1. Is the error scenario defined in the specification?
One can go wild and annotate exotic error injection scenarios. But if you are working on the standard specification, then first answer this question “Is the error scenario defined in the specification?” for every error injection scenario identified.
Our focus should be on meeting the intent of the specification first. Which means the error injection scenario identified is valid only if the error detection and action on error detection is specified in the specification.
If error is mentioned in the specification, check is any reporting or recovery action defined? Many cases specification may indicate the system state will become undefined when this error scenario takes place. These cases are not as important as the ones for which specifically reporting and recovery mechanism is defined. Design state becoming unknown cannot be verified meaningfully.
Scenarios, which lead to System state becoming undefined, are usually due to clear violation of specification in peer design implementation. One general rule of thumb to remember is error injection in communication protocols is meant for detecting, reporting and recovering errors due to imperfections in physical line. The physical line is unreliable. Protection for this unreliability is built through the error detection, reporting and optional recovery mechanisms. We do not have control over imperfect nature of physical line. Typically specifications do not intend to protect the flaws due to incorrect logic implementations. This is something expected to be done right.
Hence unless specifically requested the error scenarios for which the detection and action on detection is not defined in the specification should not be added in the verification plan.
On request by designers or architects, if such scenarios are added to verification plan it should be tagged as implementation specific error handling scenarios.
2. Does the DUT support this error scenario?
DUT may not implement all the features defined in the specification. In such cases although the error scenario defined in the specification, contains error detection, recovery and/or reporting but it may not be relevant to current DUT verification.
Make a list of the error scenarios for which answers to both of the above questions is YES. These are the scenarios applicable to current DUT.
Among these scenarios, prioritize the error scenarios that involve a complex detection and recovery mechanisms. One of the classic example of complex error scenarios is the one that involves retransmission based recovery logic. Retransmission logic can be fairly complicated. Typically it will also interact with the normal data transmission logic as well. So it’s better to exercise the complex logic and/or the logic that affects or touches multiple parts of the design early. This provides the designers ample time to fix issues found. Typically these fixes have higher potential to break other functionality, which is not directly touched. Such cases being verified early provide the time required for regressing effort involved. Goes without saying, prioritization becomes more effective by taking in to consideration the inputs from designers as well.
3. What is the impact of this error on end application?
Specification has defined it and DUT has implemented it. But the end application will never use the DUT in a mode where this specific error scenario is applicable. Such error scenarios can be deprioritized for the execution. Make list of the error scenarios that have answered YES to all three questions above.
Among these scenarios, prioritize based on impact of the error scenario for application. Some applications may have high tolerance for the error and for some other applications reliability, accessibility and serviceability (RAS) may be very critical. For example compare a desktop computer versus a server computer. For server computer RAS is of utmost importance. Based on the type of application, impact of each of the error scenario for targeted application should be evaluated for prioritization of the error injection cases for execution.
4. What is the probability of this error scenario happening in real life usage?
This is another angle that is useful in prioritizing the cases. Specification may have defined it, DUT has implemented it and it’s applicable for the end application usage but still some errors may have very low probability of occurrence in real life. Such cases can be scheduled for the later execution.
5. How to prioritize the execution?
Execution should move from cases of the inner most circle to outer most circles. Each inner circles forms the sub-set of its outermost circle and grows in its relevance. These circles form the scenarios identified by the different criteria identified above.

Some of the following concepts related to error handling verification are generic across the design type but the focus of this blog would be on the functional verification of error handling in protocol based serial communication designs.
Error handling verification is a complex, effort intensive and has potential to throw the schedule off the track. To add to problem the effort invested can turn out to be low returns on the investment.
If it’s not well thought out, error-handling verification can soon turn into a nightmare. Other feature verification also has chances of going wrong but error-handling verification has very high probability of going wrong. It’s a slippery slope, which leads to quicksand. Caution has to be exercised while planning.
Typical verification environment for serial interface based designs looks as following:
Error handling in hardware is verified through the
- Error injections on transmit (Tx) side of the bus functional model
- Error injection on receive (Rx) side of the bus functional model
- Behaving as if the error has been detected on receive side of the bus functional model
- Checking response from the DUT on receive (Rx) side bus functional model.
- Checking can also be done as part of the monitor which is separate component or built in to the Bus functional model itself
Error injection verification needs a good planning from multiple points of view. They are following:
- Error injection scenario enumeration thought process
- Definition of the sensible error handling verification plan
- Error injection capabilities of bus functional models
- Error injection implementation in bus function models
- Structuring the error injection tests
- Execution and Closure of the error injection verification
Error handling in serial communication interfaces is primarily about detecting the corruption in data due to noise in the transmission lines when the data is transmitted from the source to destination. Error detection and handling improves the reliability of the data on unreliable transmission lines.
Some of the errors detected are correctable at the hardware level. Typically such corrections are done through encoding schemes at physical layer level. Error correction here refers to cases where the receiver itself is able to correct it without having to consult the peer. Typically physical layer encoding based error correction can correct errors up to certain predefined number of bits.
This leads to some of the errors that are not correctable at receiver. They require recovery through the retransmission handled by the higher-level protocol layers above physical layer implemented in hardware.
Some of the errors are neither correctable or recoverable at hardware level. These types of errors are detected and reported to software. Software handles the necessary recovery. Reporting to software is handled through set of status registers and interrupts.
The last category of errors that lead to undefined state of the system requiring a physical hardware reset to recover out of it.
Error handling implementation
Error handling implementation in hardware primarily consists of all or some of the following:
- Error detection logic
- Error correction logic
- Error recovery logic
- Error reporting logic
Verification of the error handling in serial communication is one of the challenging area of functional verification.

Application interface refers to register and data read/write interface to higher-level software.
Physical line interface is external interface off the chip connecting to another chip.
Error detection logic detects the error. Detection can be based on static pre-defined information or dynamic state information. Undefined protocol data unit type detection is static predefined type of detection. Invalid response or missing response type is state based type of detection. Decoders and timeouts are primary components of error detection logic.
Error correction logic is mostly limited to physical layer encoding schemes. At higher-level layers there is not much of independent error correction involved.
Error reporting logic is typically made up of set of registers and interrupts. Depending on the complexity of error handling different level of granularity of reporting and interrupt generation mechanism is implemented. Group of status registers provides the report on different type of errors detected. For some of errors the transaction causing error is also stored as part of reporting. This helps software with the further diagnosis of the error. Group of mask registers control which errors lead to interrupts. When the total number of errors detected are more than 10 in number they are often grouped in smaller number of categories based on the action for handling them.
Error recovery logic is typically implemented as FSM. In most cases it involves some form of retransmission, re-initialization or resets of different severity based on the nature of the error. Re-transmission is simplest form of recovery where the set of protocol data units not acknowledged are retransmitted. Re-initialization helps re-evaluate any change in the conditions of the physical layer. Reset is more severe form recovery. It can range from just the link reset to entire chip reset.
VBScript Error Handlers
In Part-1 we have discussed about Recovery Scenario and now we know that Recovery Scenarios are useful to continue the script execution whenever an error/exception/unexpected event interrupts the script execution. But Recovery Scenarios will not handle VBScript Errors. It can only handle QTP Errors.
What is an error in VBScript?
When working with VBScript you get two types of errors.
- Syntax Errors
- Runtime Errors
Syntax Errors:
Syntax error is a grammatical mistake. In that case VBScript compiler doesn’t understand your statement and throws an error. It can be found in compilation stage before the script has begun to be executed. Ex: calling a sub with parenthesis “(“.
You can find the list of syntax errors in QTP Help File (Press F1 to get) –> VBScript Reference –> VBScript –> VBScript Language Reference –> Errors (VBScript) –> VBScript Syntax Errors
Run Time Errors:
Runtime Errors shows when VBScript attempts an action that the system cannot execute. Run-time errors occur in script execution time when variable expressions are being evaluated, and memory is being dynamic allocated. Ex: When calling a function which is not there/loaded, When assigning values to an array more than allocated size.
You can find the list of syntax errors in QTP Help File (Press F1 to get) –> VBScript Reference –> VBScript –> VBScript Language Reference –> Errors (VBScript) –> VBScript Runtime Errors
How to handle VBScript Errors?
You cannot skip from syntax errors. You must fix them in order to start execution. There is no specific recovery mechanism for VBScript runtime errors. But you can suppress them.
On Error Resume Next: This statement will simply suppress the errors and executes entire script. Suppressing the error means when error occur VBScript shows popup error message, pauses execution and waits for user action. When using this statement, the error popup will not be displayed on failure and goes to the next statement for execution.
On Error Go to 0: This statement is used to disable “On Error Resume Next”.
In VBScript there is no facility to call a statement/function on error. But you can use err object to perform condition based error handling. On Error Resume Next, Go to 0 and Err objects will work for VBScript as well as for QTP Objects.
Err Object: This object captures the information about runtime errors. Using this you can always get the last error details. To access error details you can use err.number or err.description statements. We can clear and raise the runtime errors using this object.
Condition Based Error Handling
You can use this when not using recovery scenarios.
'Clear the error
err.clear

'Execute a statement
Browser("Google").Page("Google").WebButton("SignIn").click

'Verify error. If error exist, err.number contains a value. Otherwise the value is empty.
if err.number<>"" then
    Reporter.Reportevent micpass,"Button Click", "Clicked on Sign In Button"
Else
    'Call a recovery function here if needed
    'Send error details to result
    Reporter.Reportevent micfail,"Button Click", "Clicked on Sign In Button Failed"&vbnewline&"Error Details: "&err.description
End If
'Clear the error
err.clear

'Execute a statement
Browser("Google").Page("Google").WebButton("SignIn").click

'Verify error. If error exist, err.number contains a value. Otherwise the value is empty.
if err.number<>"" then
    Reporter.Reportevent micpass,"Button Click", "Clicked on Sign In Button"
Else
    'Call a recovery function here if needed
    'Send error details to result
    Reporter.Reportevent micfail,"Button Click", "Clicked on Sign In Button Failed"&vbnewline&"Error Details: "&err.description

    'Clear the error from cache
    err.clear
End If
'Clear the error
err.clear

'Execute a statement
Browser("Google").Page("Google").WebButton("SignIn").click

'Verify error. If error exist, err.number contains a value. Otherwise the value is empty.
if err.number<>"" then
    'Call a recovery function here if needed
    'Send error details to result
    Reporter.Reportevent micfail,"Button Click", "Clicked on Sign In Button Failed"&vbnewline&"Error Details: "&err.description

Else
     Reporter.Reportevent micpass,"Button Click", "Clicked on Sign In Button"
End If
Why VBScript Errors cannot be handled by Recovery Scenario Manager?
QTP is having a large set of Objects, Methods, Properties, statements and Keywords that are not available in VBScript. But to access QTP objects/methods/properties/statements/keywords we must use the standards of VBScript. QTP Recovery Scenario Manager is developed to handle the issues that are occurred when working with QTP Test objects. So Recovery Scenario Manager works only with the errors that are related Test Objects and It cannot handle any other errors.
QTP activate Recovery Scenarios only on below errors. Whether it is Popup/Object State/TestRun Error/Application crash QTP gets any of the below error and activates the Recovery Scenario Mechanism.
- Object Not Found
- Item in list or menu is not unique
- Item in list or menu not found
- More than one object responds to the physical description
- Object is disabled
- Object not found
- Object not visible
When to use Recovery Scenario Manager and VBScript Error Handlers?
Recovery Scenario Manager useful to handle the test object related errors and VBScript error handlers useful to handle VBScript runtime errors. We must use both in order to complete the execution.
< Error Handling and Recovery Scenarios in QTP — Part-3 will be updated soon>
Ошибка сценария Windows явно указывает на сбои в работе скриптов, файлов или некоторых платформ для обработки кода. Возможно, на каком-либо этапе загрузки проявляются неправильные ссылки или намерено повреждены файлы. Иногда это случается вследствие вирусов, а иногда из-за некорректной работы самого кода.
Что такое Script Error или ошибка сценария?
Нужно понимать, что ошибка скрипта – это сбой в предустановленной инструкции сценария. Спровоцировать нарушение хода процедуры может что угодно: как неправильно прописанный код, так и ошибки в системе пользователя. Чаще всего появляются в браузере и в сообщении указывается ссылка на строку с проблемой. Команда в том месте не может быть выполнена. Проблема возникает из-за одного из языков сценариев, чаще всего JavaScript или VBScript. Также ошибка скрипта может появляться в некоторых программах и играх.
Причины ошибки сценария
Как уже упоминалось, причин может быть много:
- неправильная работа Internet Exporer или его некорректная настройка;
- проблема в коде сайта, обычно в JavaScript;
- конфликт между игровыми модами или повреждение файлов;
- отсутствие полномочий на доступ к необходимым файлам и др.
Разновидности ошибок сценариев
Действия, что нужно делать, если произошла ошибка сценария напрямую зависят от того, где и при каких условиях произошла ошибка. Мы постараемся разобраться со всеми ее вариациями:
- ошибка сценария в Internet Explorer;
- неисправность в Google Chrome, Opera и др. браузерах, связанная с JS;
- повреждение скрипта в Windows;
- игровая проблема.
Каждая категория имеет свои особенности устранения, поэтому в зависимости от рода ошибки, нужно искоренять заболевание системы.
Ошибка сценария в Internet Explorer
На этой странице произошла ошибка сценария – одна из самых распространённых неисправностей, возникает обычно в браузере, особенно часто в IE, при этом версия не играет роли. Причиной проблемы становится либо сам ресурс, к которому вы пытаетесь получить доступ, либо неисправность со стороны клиента.
Предварительно следует переустановить/обновить браузер, вероятно, он имеет какие-то повреждения. Более простой вариант – это просто почистить кеш и куки, процедура выполняется через «Свойства браузера». Чтобы быстро удалить временные файлы, достаточно нажать комбинацию Ctrl + Shift + Del и запустить процедуру кнопкой «Удалить». Альтернативный вариант — через CCleaner.
Читайте также: CCleaner — программа очистки компьютера от мусора
Есть также несколько более эффективных способов исправления проблемы, которые имеет смысл описать более детально.
Способ 1: отключаем отображение сообщения об ошибке
Устранить ошибку сценария, если проблема со стороны веб-ресурса, не представляется возможным всем, кроме администраторов сайта. Однако можем просто выключить отображение этого окна отладки, оно не будет мелькать, а система продолжит работать стабильно.
Что нужно сделать при ошибке скрипта:
- Откройте Internet Explorer.
- Нажмите на кнопку меню и выберите «Свойства браузера».
- Перейдите в раздел «Дополнительно».
- Установите флаги возле опций «Отключить отладку сценариев».
- Немного ниже снимите выделение с уведомления об ошибке.
Таким образом не получится исправить ошибку сценария, но можем просто убрать всплывающее окно. Причина возникновения ошибки, скорее всего, не в вашей системе, и решать неисправность следует по другую сторону, мастерами сайта. Хотя так бывает не всегда.
Способ 2: включаем активные скрипты
Блокировка активных сценариев, ActiveX и Java может влечь появление ошибки сценария. Несколько простых настроек должны исправить проблему:
- Нажмите на изображение шестеренки и перейдите в «Свойства браузера».
- Кликните по вкладке «Безопасность», а затем – по кнопке «Другой».
- Пролистайте список вниз и в блоке «Сценарии» активируйте «Активные сценарии».
- Немногим ниже по списку включите «Выполнять сценарии приложений Java», а затем — «Фильтрация ActiveX».
- Установите флаги в положения «Выполнять сценарии элементов ActiveX».
- Закройте окно и перезапустите браузер.
Способ 3: включить безопасный режим для проблемного сайта
Этот способ показан в видео и он получил много положительных отзывов. Стоит попробовать.
Если у вас показывается «Ошибка сценария: на этой странице произошла ошибка скрипта», сделайте следующее:
- В «Свойствах браузера» на вкладке «Безопасность» выберите «Опасные сайты».
- Нажмите на кнопку «Сайты» и добавьте ссылку на тот веб-ресурс, на котором появляется ошибка сценария.
Ошибка сценария в играх (Sims 4)
Script error может появляться не только в Sims 4, но и в других, но чаще всего именно здесь. Что касается этой игры, должно сработать следующее решение:
- Выселите семью из дома для полного сброса повседневных желаний.
- Удалите все предметы, провоцирующие ошибки, в основном это двери, но не только.
- Сохраните состояние домов и семей и перезапустите игру.
- Снова заселите семью в дом, на этот раз без ошибки.
Для Sims 4 и других игр достаточно высокий шанс на исправление ошибки имеет удаление модов. Это можно делать по одному, пока ошибка перестанет появляться.
Ошибка сценариев Windows 11, 10, 7
Подобного рода проблема, возникает из-за ошибки сценариев Windows сразу после запуска системы или через время. При этом все версии Windows в зоне риска, что увеличивает вероятность столкнуться с неисправностью. Благо, здесь тоже можно отключить уведомление и забыть о проблеме.
Как отключить ошибку сценариев в Windows:
- Введите в поиск Windows «Свойства браузера» и перейдите во вкладку «Дополнительно».
- Установите галочки в строки «Отключить отладку сценариев (Internet Explorer)» и «Отключить отладку сценариев (другие)».
- Нажмите на кнопку «Применить» и закройте окно.
Как убрать ошибку сценария при запуске:
- Нажмите Win + R и введите regedit;
- ПКМ по разделу HKEY_LOCAL_MACHINE, выберите свойство «Разрешения…»;
- Выберите среди пользователей пункт «Все» и снизу установите флаг возле «Полный доступ»;
- Нажмите на кнопку «Дополнительно»;
- Установите выделение на субъект «Все» и клик по «Изменить»;
- Снова задайте «Полный доступ» и перезагрузите ПК;
- Используйте сочетание Win + R и введите cmd, затем вставьте строку: Regsvr32 C:WindowsSystem32Msxml.dll.
- Если не сработает предыдущее, дополнительно попробуйте regsvr32 msxml3.dll затем regsvr32 dispex.dll.
Ошибка сценариев Windows после подобной манипуляции должна исчезнуть и более не тревожить пользователя. Даже с тем учетом, что уведомление может не оказывать никакого негативного воздействия на систему, оно все равно вызывает неудобства.
Если появляется ошибка сценария при запуске и далее загрузка системы не производится, необходимо запустить Windows из безопасного режима и откатиться, также следует проделать описанную ранее процедуру. На крайний случай необходимо воспользоваться средством восстановления с установочного дистрибутива.
Что еще можно попробовать?
К сожалению, вариантов ошибок сценариев настолько много, что все их обхватить в виде пошаговых инструкций довольно сложно, но мы не хотим оставить вас без решения. По этой причине перечисляем ниже частые коды ошибок и способы, которые должны сработать:
- Ошибка сценария со ссылкой logincdn.msauth.net решается по инструкции для IE. Также нужно понимать, что сбой относится к OneDrive, а он не работает с накопителями в файловых системах FAT32 (часто так отформатированы флешки). Поддерживает только NTFS или HFS+. Если все способы не помогут исправить сбой с кодом logincdn.msauth.net, попробуйте сделать сброс IE.
- Сбой подобного рода»dataset» есть null или не является объектом, со ссылкой на file:///c:/searcherbar/js/localization.js или многочисленные другие файлы. Это означает, что проблема в каком-то файле JavaScript. В данном случае проблема в вирусе searcherbar — он устанавливает различные параметры поиска и может добавлять рекламу. Стоит просканировать систему с помощью Malwarebytes AdwCleaner или любого другого софта. Вот лучшие бесплатные антивирусы для Windows. В целом проблему вызывает то, что планировщик заданий пытается запустить программу, которой нет или была удалена не полностью.
- Ошибка сценария в Datakam player чаще всего появляется при попытке воспроизведения ролика с видеорегистратора. Программу часто рекомендуют тем, у кого есть также GPS-карта. Однако сама программа работает криво, здесь лучшим советом будет переход на RegistratorViewer.
- Проблема в Microsoft Teams преимущественно появляется у пользователей Windows 7, так как программа более не поддерживает ее. На форуме Microsoft некоторые пишут, что включение отладки и серфинг по настройкам может помочь. Насколько это правда — сложно сказать.
- В Hamachi суть проблемы заключается в программе, обычно появляется при регистрации. Нужно выполнить регистрацию через браузер и просто войти в приложении и ошибки не будет.
Совет! Если вы не веб-программист, то это тот случай, когда не имеет значения код 0, строка 23 или строка 657 символ 9. Все перечисленное никак вам не поможет в решении проблемы.
Если у Вас остались вопросы по теме «Как убрать ошибку сценария в Windows?», то можете задать их в комментариях