I have «ubuntu-20.04.1-live-server» It ends with me ↓
Code: Select all
_|      _|  _|_|_|_|    _|_|_|  _|_|_|_|_|    _|_|
 _|      _|  _|        _|            _|      _|    _|
 _|      _|  _|_|_|      _|_|        _|      _|_|_|_|
   _|  _|    _|              _|      _|      _|    _|
     _|      _|_|_|_|  _|_|_|        _|      _|    _|

                                  Vesta Control Panel


The following software will be installed on your system:
   - Apache Web Server
   - Bind DNS Server
   - MySQL Database Server
   - PostgreSQL Database Server
   - Softaculous Plugin


Would you like to continue [y/n]: y
Please enter admin email address: 4ddd33@o2.pl
Please enter FQDN hostname [tom]: localhost
Installation backup directory: /root/vst_install_backups/1606297140


Installation will take about 15 minutes ...

Reading package lists... Done
Building dependency tree
Reading state information... Done
Calculating upgrade... Done
0 upgraded, 0 newly installed, 0 to remove and 0 not upgraded.
--2020-11-25 09:39:05--  http://nginx.org/keys/nginx_signing.key
Resolving nginx.org (nginx.org)... 52.58.199.22, 3.125.197.172, 2a05:d014:edb:5702::6, ...
Connecting to nginx.org (nginx.org)|52.58.199.22|:80... connected.
HTTP request sent, awaiting response... 200 OK
Length: 1561 (1.5K) [application/octet-stream]
Saving to: ‘/tmp/nginx_signing.key’

/tmp/nginx_signing.key                               100%[=====================================================================================================================>]   1.52K  --.-KB/s    in 0s

2020-11-25 09:39:05 (109 MB/s) - ‘/tmp/nginx_signing.key’ saved [1561/1561]

OK
--2020-11-25 09:39:06--  http://c.vestacp.com/deb_signing.key
Resolving c.vestacp.com (c.vestacp.com)... 104.236.66.100
Connecting to c.vestacp.com (c.vestacp.com)|104.236.66.100|:80... connected.
HTTP request sent, awaiting response... 200 OK
Length: 1719 (1.7K) [text/plain]
Saving to: ‘deb_signing.key’

deb_signing.key                                      100%[=====================================================================================================================>]   1.68K  --.-KB/s    in 0s

2020-11-25 09:39:06 (111 MB/s) - ‘deb_signing.key’ saved [1719/1719]

OK
Hit:1 http://nginx.org/packages/mainline/ubuntu focal InRelease
Hit:2 http://pl.archive.ubuntu.com/ubuntu focal InRelease
Hit:3 http://pl.archive.ubuntu.com/ubuntu focal-updates InRelease
Ign:4 http://apt.vestacp.com/focal focal InRelease
Hit:5 http://pl.archive.ubuntu.com/ubuntu focal-backports InRelease
Err:6 http://apt.vestacp.com/focal focal Release
  404  Not Found [IP: 104.236.66.100 80]
Hit:7 http://pl.archive.ubuntu.com/ubuntu focal-security InRelease
Reading package lists... Done
E: The repository 'http://apt.vestacp.com/focal focal Release' does not have a Release file.
N: Updating from such a repository can't be done securely, and is therefore disabled by default.
N: See apt-secure(8) manpage for repository creation and user configuration details.
Reading package lists... Done
Building dependency tree
Reading state information... Done
E: Unable to locate package rssh
E: Unable to locate package vesta
E: Unable to locate package vesta-ioncube
E: Unable to locate package vesta-nginx
E: Unable to locate package vesta-php
E: Unable to locate package vesta-softaculous
Error: apt-get install failed
and
Code: Select all
sudo apt update
Hit:1 http://pl.archive.ubuntu.com/ubuntu focal InRelease
Hit:2 http://pl.archive.ubuntu.com/ubuntu focal-updates InRelease
Hit:3 http://nginx.org/packages/mainline/ubuntu focal InRelease
Hit:4 http://pl.archive.ubuntu.com/ubuntu focal-backports InRelease
Hit:5 http://pl.archive.ubuntu.com/ubuntu focal-security InRelease
Ign:6 http://apt.vestacp.com/focal focal InRelease
Err:7 http://apt.vestacp.com/focal focal Release
  404  Not Found [IP: 104.236.66.100 80]
Reading package lists... Done
E: The repository 'http://apt.vestacp.com/focal focal Release' does not have a Release file.
N: Updating from such a repository can't be done securely, and is therefore disabled by default.
N: See apt-secure(8) manpage for repository creation and user configuration details.
Where is the problem?
Operating System (OS/VERSION):
ubuntu 16.04 clean install (server)
VestaCP Version:
latest?
Installed Software (what you got with the installer):
none, clean installation
Steps to Reproduce:
curl -O http://vestacp.com/pub/vst-install.sh
bash vst-install.sh --nginx yes --phpfpm yes --apache no --named yes --remi yes --vsftpd no --proftpd no --iptables yes --fail2ban yes --quota no --exim yes --dovecot yes --spamassassin yes --clamav yes --softaculous yes --mysql yes --postgresql no
Result:
Installation backup directory: /root/vst_install_backups/1533850309


Installation will take about 15 minutes ...

Reading package lists... Done
Building dependency tree
Reading state information... Done
Calculating upgrade... Done
0 upgraded, 0 newly installed, 0 to remove and 0 not upgraded.
--2018-08-09 21:31:54--  http://nginx.org/keys/nginx_signing.key
Resolving nginx.org (nginx.org)... 95.211.80.227, 62.210.92.35, 2001:1af8:4060:a004:21::e3, ...
Connecting to nginx.org (nginx.org)|95.211.80.227|:80... connected.
HTTP request sent, awaiting response... 200 OK
Length: 1561 (1.5K) [text/plain]
Saving to: ‘/tmp/nginx_signing.key’

/tmp/nginx_signing.key                100%[======================================================================>]   1.52K  --.-KB/s    in 0s

2018-08-09 21:31:54 (97.4 MB/s) - ‘/tmp/nginx_signing.key’ saved [1561/1561]

OK
--2018-08-09 21:31:54--  http://c.vestacp.com/deb_signing.key
Resolving c.vestacp.com (c.vestacp.com)... 104.236.66.100
Connecting to c.vestacp.com (c.vestacp.com)|104.236.66.100|:80... connected.
HTTP request sent, awaiting response... 200 OK
Length: 1719 (1.7K) [text/plain]
Saving to: ‘deb_signing.key’

deb_signing.key                       100%[======================================================================>]   1.68K  --.-KB/s    in 0s

2018-08-09 21:31:55 (93.0 MB/s) - ‘deb_signing.key’ saved [1719/1719]

OK
Hit:1 http://archive.ubuntu.com/ubuntu bionic InRelease
Hit:2 http://archive.ubuntu.com/ubuntu bionic-security InRelease
Hit:3 http://archive.ubuntu.com/ubuntu bionic-updates InRelease
Get:4 http://nginx.org/packages/mainline/ubuntu bionic InRelease [2,112 B]
Get:5 http://nginx.org/packages/mainline/ubuntu bionic/nginx amd64 Packages [10.0 kB]
Get:6 http://apt.vestacp.com/bionic bionic InRelease [2,187 B]
Get:7 http://apt.vestacp.com/bionic bionic/vesta amd64 Packages [1,004 B]
Fetched 15.3 kB in 11s (1,441 B/s)
Reading package lists... Done
Reading package lists... Done
Building dependency tree
Reading state information... Done
Package mc is not available, but is referred to by another package.
This may mean that the package is missing, has been obsoleted, or
is only available from another source

Package rssh is not available, but is referred to by another package.
This may mean that the package is missing, has been obsoleted, or
is only available from another source

E: Unable to locate package expect
E: Unable to locate package fail2ban
E: Unable to locate package idn
E: Package 'mc' has no installation candidate
E: Unable to locate package ntpdate
E: Unable to locate package php-fpm
E: Unable to locate package phpmyadmin
E: Unable to locate package roundcube-core
E: Unable to locate package roundcube-mysql
E: Unable to locate package roundcube-plugins
E: Package 'rssh' has no installation candidate
E: Unable to locate package webalizer
Error: apt-get install failed
Содержание
- Vesta Control Panel — Forum
- Ubuntu 18.04 по каким-то причинам установка VestaCP завершается ошибкой Topic is solved
- Vesta Control Panel — Forum
- Ubuntu 16.10 Error: apt-get install failed
- Vesta Control Panel — Forum
- Проблемы при установке Vesta на Debian 9
- Error: apt-get install failed #1681
- Comments
- Operating System (OS/VERSION):
- VestaCP Version:
- Installed Software (what you got with the installer):
- Steps to Reproduce:
- Vesta Control Panel — Forum
- Error While fresh install
Vesta Control Panel — Forum
Ubuntu 18.04 по каким-то причинам установка VestaCP завершается ошибкой Topic is solved
Ubuntu 18.04 по каким-то причинам установка VestaCP завершается ошибкой
Post by DreamerKlim » Fri Aug 03, 2018 9:57 am
Re: Ubuntu 18.04 по каким-то причинам установка VestaCP завершается ошибкой
Post by imperio » Fri Aug 03, 2018 10:45 am
Re: Ubuntu 18.04 по каким-то причинам установка VestaCP завершается ошибкой
Post by DreamerKlim » Fri Aug 03, 2018 11:29 am
Re: Ubuntu 18.04 по каким-то причинам установка VestaCP завершается ошибкой
Post by imperio » Fri Aug 03, 2018 4:06 pm
Re: Ubuntu 18.04 по каким-то причинам установка VestaCP завершается ошибкой
Post by Vladimir Chanaev » Tue Aug 21, 2018 8:15 am
В моём случае отказывался стартовать IP Tables.
DO droplet
Ubuntu 18.04
Vesta latest
Может тоже поможете. Спасибо!
Re: Ubuntu 18.04 по каким-то причинам установка VestaCP завершается ошибкой
Post by imperio » Tue Aug 21, 2018 3:49 pm
В моём случае отказывался стартовать IP Tables.
DO droplet
Ubuntu 18.04
Vesta latest
Может тоже поможете. Спасибо!
Re: Ubuntu 18.04 по каким-то причинам установка VestaCP завершается ошибкой
Post by Vladimir Chanaev » Thu Aug 23, 2018 3:43 am
В моём случае отказывался стартовать IP Tables.
DO droplet
Ubuntu 18.04
Vesta latest
Источник
Vesta Control Panel — Forum
Ubuntu 16.10 Error: apt-get install failed
Ubuntu 16.10 Error: apt-get install failed
Post by Konstantinus » Fri Dec 30, 2016 8:51 am
Добрый день!
Ставлю на чистую систему 16.10: bash vst-install.sh —nginx yes —phpfpm yes —apache no —vsftpd no —proftpd yes —exim no —dovecot no —spamassassin no —clamav no —named no —iptables yes —fail2ban yes —mysql yes —postgresql no —remi yes —quota no —hostname library.mk.ua —email admin@konstantinus.com
P.S. С теми же параметрами на 16.04.1 установилась без проблем.
Получаю в ответ:
Package php5-common is not available, but is referred to by another package.
This may mean that the package is missing, has been obsoleted, or
is only available from another source
Package php5-mysql is not available, but is referred to by another package.
This may mean that the package is missing, has been obsoleted, or
is only available from another source
Package php5 is not available, but is referred to by another package.
This may mean that the package is missing, has been obsoleted, or
is only available from another source
Package php5-curl is not available, but is referred to by another package.
This may mean that the package is missing, has been obsoleted, or
is only available from another source
Package php5-fpm is not available, but is referred to by another package.
This may mean that the package is missing, has been obsoleted, or
is only available from another source
Package php5-cgi is not available, but is referred to by another package.
This may mean that the package is missing, has been obsoleted, or
is only available from another source
E: Package ‘php5’ has no installation candidate
E: Package ‘php5-common’ has no installation candidate
E: Package ‘php5-cgi’ has no installation candidate
E: Package ‘php5-mysql’ has no installation candidate
E: Package ‘php5-curl’ has no installation candidate
E: Package ‘php5-fpm’ has no installation candidate
E: Unable to locate package phpMyAdmin
Error: apt-get install failed
Re: Ubuntu 16.10 Error: apt-get install failed
Post by dpeca » Fri Dec 30, 2016 4:50 pm
I noticed it too.
16.10 comes with php7.0 packages, and does not contains php5 packages.
In vst-install-ubuntu.sh replace (everywhere) php5 to php7.0 and phpMyAdmin to phpmyadmin
and then run again vst-install-ubuntu.sh
Re: Ubuntu 16.10 Error: apt-get install failed
Post by Konstantinus » Fri Dec 30, 2016 10:06 pm
Источник
Vesta Control Panel — Forum
Проблемы при установке Vesta на Debian 9
Проблемы при установке Vesta на Debian 9
Post by miroslav » Thu Jan 18, 2018 4:38 am
Имеем debian 9 (чистая, новая система)
RAID 1, из установленного ПО только webmin
При стандартной установке возвращает ошибку, и более не устанавливается: E: Не удалось найти пакет vesta
Following software will be installed on your system:
— Nginx Web Server
— Apache Web Server (as backend)
— Bind DNS Server
— Exim mail server + Antivirus Antispam
— Dovecot POP3/IMAP Server
— MySQL Database Server
— Vsftpd FTP Server
— Softaculous Plugin
— Iptables Firewall + Fail2Ban
Would you like to continue [y/n]: y
Installation will take about 15 minutes .
Чтение списков пакетов… Готово
Построение дерева зависимостей
Чтение информации о состоянии… Готово
Расчёт обновлений… Готово
Следующие пакеты устанавливались автоматически и больше не требуются:
bcrelay gcc gcc-6 libasan3 libatomic1 libbison-dev libc-dev-bin libc6-dev
libcc1-0 libcilkrts5 libgcc-6-dev libgmp-dev libgmpxx4ldbl libgomp1 libitm1
libmpx2 libquadmath0 libsigsegv2 libubsan0 linux-libc-dev m4 manpages-dev
Для их удаления используйте «apt autoremove».
обновлено 0, установлено 0 новых пакетов, для удаления отмечено 0 пакетов, и 0 пак етов не обновлено.
—2018-01-17 22:43:12— http://nginx.org/keys/nginx_signing.key
Распознаётся nginx.org (nginx.org)… 206.251.255.63, 95.211.80.227, 2606:7100:1:69: :3f, .
Подключение к nginx.org (nginx.org)|206.251.255.63|:80. соединение установлено.
HTTP-запрос отправлен. Ожидание ответа… 200 OK
Длина: 1561 (1,5K) [text/plain]
Сохранение в: «/tmp/nginx_signing.key»
/tmp/nginx_signing.k 100%[====================>] 1,52K —.-KB/s in 0s
Источник
Error: apt-get install failed #1681
Operating System (OS/VERSION):
ubuntu 16.04 clean install (server)
VestaCP Version:
Installed Software (what you got with the installer):
none, clean installation
Steps to Reproduce:
The text was updated successfully, but these errors were encountered:
Are you running Ubuntu under Windows10?
Of course, NO!
In your first message you mark as you use ubuntu 16, but your repos say you try use ubuntu 18, your ubuntu isnt fully supported yet
Ok my bad, main site say is supported, I try check it
You use default repost, is a clean install ?
@Skamasle , sorry, ubuntu 18 of course. Yeah, clean install from ubuntu-18.04.1-live-server-amd64.iso
16.04
Can’t reproduce on our test servers. Please, try again, and let me know if problem still exists
try an apt-get update, maybe it will fix the issue
try an apt-get upgrade, maybe it will fix the issue
also try to add the multiverse repos, might help.
last thing, try to install the standard server package if you didn’t (this is for 16.04 coudn’t find the 18.04, might work):
apt-get install manpages dnsutils bsdmainutils psmisc python3-gdbm ufw dosfstools ed telnet powermgmt-base ntfs-3g ubuntu-release-upgrader-core iputils-tracepath python3-update-manager groff-base python3-distupgrade bind9-host mtr-tiny bash-completion mlocate tcpdump geoip-database install-info irqbalance language-selector-common friendly-recovery command-not-found info hdparm man-db lshw update-manager-core apt-transport-https accountsservice command-not-found-data python3-commandnotfound time ltrace parted popularity-contest strace ftp ubuntu-standard lsof
I can reproduce this, by default you have only main repos in ubuntu 18.04, ensure you have main restricted universe multiverse thats the problem
Your repo need look like this:
Now update and install, you will not get errors.
Источник
Vesta Control Panel — Forum
Error While fresh install
Error While fresh install
Post by xorro » Thu Sep 12, 2019 5:16 pm
Re: Error While fresh install
Post by xorro » Thu Sep 12, 2019 7:03 pm
Re: Error While fresh install
Post by liamgibbins » Thu Sep 12, 2019 7:20 pm
Exactly the same as I am getting with CentOS 7 64bit
wish I never decided to reinstall my server now..
Re: Error While fresh install
Post by xorro » Thu Sep 12, 2019 7:52 pm
Some how i was able to install vestacp on Ubuntu 18.04 with several errors.
The other issue which i have been facing on my old centos 7 and current fresh installed ubuntu server is when ever i try to activate ssl support via let’s encrypt i get this error «Error: Let’s Encrypt validation status 400» no matter what i do this error is not going away even with CLI i get this error on ubuntu
Re: Error While fresh install
Post by liamgibbins » Thu Sep 12, 2019 7:56 pm
I tried to roll back the changes form the last update and tried to install on CentOS 7 64bit with vesta-0.938-23 and still get the same errors.
Going to run webmin until its sorted out, also reported the issue on github so hopefully they pick it up & fix it quickly. 🙂
Re: Error While fresh install
Post by xorro » Thu Sep 12, 2019 8:04 pm
Finally i think it’s time to move instead spending more time on this. Going to try ISPConfig.
Re: Error While fresh install
Post by liamgibbins » Fri Sep 13, 2019 10:57 am
There is a fix up on github, awesome speed..
Or a copy paste here..
kammi321 commented:
I fixed this issue by first executing the following commands prior to Installation:
Источник
Think I saw a note that this only works with debian 10, and debian 11 is not supported/experimental currently. I have a fresh install that failed once, then I started again and it seemed to almost finish right but errored. I have logs of the whole install, but thought if I shared the errors here maybe it would help future development.
1st run errors:
E: Failed to fetch http://mirror.myhostdatacenter.com/debian/pool/main/m/mc/mc-data_4.8.26-1.1_all.deb Undetermined Error [IP: 107.107.77.77 77]
E: Unable to fetch some archives, maybe run apt-get update or try with —fix-missing?
Error: apt-get install failed
=-=-=-=-
So.. I did some ip checks and they show up, so I did the restart apache2.. then I tried to run the install script again.. I think it did better the second time.. but it got janky and now I think the server can’t get out to the internet / curl, apt-get and such fails now..
=-=-=-===-
here are some errors from the second run:
ERROR 2002 (HY000): Can’t connect to local MySQL server through socket ‘/run/mysqld/mysqld.sock’ (2).
unable to connect to mysql server.
error encountered creating user:
ERROR 2002 (HY000): Can’t connect to local MySQL server through socket ‘/run/mysqld/mysqld.sock’ (2)
dbconfig-common: phpmyadmin configure: noninteractive fail.
dbconfig-common: phpmyadmin configure: ignoring errors from here forwards
populating database via sql… done.
ERROR 2002 (HY000): Can’t connect to local MySQL server through socket ‘/run/mysqld/mysqld.sock’ (2).
unable to connect to mysql server.
error encountered creating user:
ERROR 2002 (HY000): Can’t connect to local MySQL server through socket ‘/run/mysqld/mysqld.sock’ (2)
dbconfig-common: roundcube configure: noninteractive fail.
update-rc.d: error: unable to read /etc/init.d/mysql
2022-01-10 23:43:48 URL:http://c.myvestacp.com/debian/11/pma/pma.sh [6790/6790] -> «/root/phpmyadmin/pma.sh» [1]
2022-01-10 23:43:48 URL:http://c.myvestacp.com/debian/11/pma/create_tables.sql [11911/11911] -> «/root/phpmyadmin/create_tables.sql» [1]
ALTER ROLE
update-rc.d: error: unable to read /etc/init.d/bind9
at the end I got:
=== Blocking executable files inside zip/rar/tar archives in ClamAV
2022-01-10 23:44:27 URL:http://c.myvestacp.com/tools/clamav/foxhole_all.cdb [10477/10477] -> «/var/lib/clamav/foxhole_all.cdb» [1]
Synchronizing state of spamassassin.service with SysV service script with /lib/systemd/systemd-sysv-install.
Executing: /lib/systemd/systemd-sysv-install enable spamassassin
Created symlink /etc/systemd/system/multi-user.target.wants/spamassassin.service → /lib/systemd/system/spamassassin.service.
Error: invalid interface format :: enp2s0
Usage: v-change-sys-ip-nat IP NAT_IP [RESTART]
Enabling module remoteip.
To activate the new configuration, you need to run:
systemctl restart apache2
grep: /usr/local/vesta/data/ips/*: No such file or directory
grep: /usr/local/vesta/data/ips/*: No such file or directory
Error: no IP is available
Error: can’t create myactualwebsitename.click domain
=-=-=-=-=-==-=-=
This is what I can now:
sudo bash vst-install-debian.sh —apache yes —nginx yes —p[27m[7mh[27m[7mpfpm no —vsftpd no —proftpd yes —named yes —mysql yes —postgresql yes —ex[27m[7mi[27m[7mm yes —dovecot yes —clamav yes —spamassassin yes —iptables yes —fail2ban y[27m[7me[27m[7ms —quota no —force no —interactive yes —port 8083 —lang en [27m[A[A[A
[C[C[C[C[C[C[C[C[C[C[C[C[C[C[C[C[C[C[C sudo bash vst-install-debian.sh —apache yes —nginx yes —phpfpm no —vsftpd no —proftpd yes —named yes —mysql yes —postgresql yes —exim yes —dovecot yes —clamav yes —spamassassin yes —iptables yes —fail2ban yes —quota no —force no —interactive yes —port 8083 —lang en
[?2004l
Updating apt, please wait…
Error: No access to Vesta repository
=-=-=-==-=-=-
I can post the full logs on a pass protected page or something if the main dev would find it useful.
should I just reinstall deb 11 and do something different or should I just wipe it and switch to debian 10 ?
any ideas? help appreciated.
Steve
Wondering how to Install Vesta control panel in Ubuntu? We can help you.
VestaCP offers a simple web-based interface for its users. With VestaCP, we can install more than 439 apps with one click installer.
As part of our Server Management Services, we assist our customers with several Ubuntu queries.
Today, let us see how to install the Vesta control panel in Ubuntu 18.04.
Vesta control panel in Ubuntu
A free, open-source, and powerful website control panel that comes with website, email, database, and DNS functionalities, VestaCP is lightweight, resource-friendly, and easy to install compared to other control panels.
VestaCP offers us:
- A very neat Web interface open-source and written in PHP. So compatibility is a guarantee.
- Vesta core is written in bash. Hence, we can execute 381 commands on Core.
- Its license is GNU GPL3. Its source code can be studied and modified
- A powerful CLI ready to give us control of what happens on the server.
- Commercial plugins.
In order to begin, our Support Techs suggest having a server running Ubuntu 18.04.0 and a root password set up on our server.
Install Vesta control panel in Ubuntu
Initially, we update the system completely to have everything ready.
$ apt update -y
$ apt upgrade -y
Next, we change the hostname of the server since it can be an issue later.
nano /etc/hostnameThen we change the entry from “localhost” to the name of the domain.
Now, we change the hosts’ file to reflect the changes we made:
nano /etc/hostsNext to the line after “localhost” we add the IP address, hit the tab key then add the domain name.
VestaCP has a pretty competent installer that we have to download using curl.
$ curl -O http://vestacp.com/pub/vst-install.shOnce we download it, we can run it with the following command:
$ bash vst-install.shThis will start the wizard.
The first thing it will ask is our Email and the FQDN of the server.
Then, it will start the whole installation, which will take a while.
When the installation is complete we will be met with a congratulatory message and that you may log in at the address listed above with the username and password provided.
-
Test VestaCP on Ubuntu 18.04
Now in order to access the tool, open any web browser and go to https://your-server:8083 where we will see the login screen.
Since it is using a self-signed certificate, we will get an SSL warning. Click to proceed anyway. The exact steps may vary by the web browser.
For Chrome, click Advanced and then click Proceed. Once we’re at the login screen, enter the two credentials displayed in the server console after installation. These credentials will also be emailed to us using the email we entered at the beginning of the install.
-
Configure VestaCP
Within the administration console, there are a few changes that we need to make, to get VestaCP to work properly.
We must change the nameserver entries to match the nameservers we created through the domain registrar’s website.
- Hover the mouse over the admin user and click on edit.
- Change the Default parameters into the nameservers we created earlier, then save the changes.
- Now move over to the DNS tab, click on “edit”.
- Here we must change the “Template” to “child-ns” and the SOA to the first nameserver and save changes. Go back to the DNS tab.
- Hover once again over your domain but this time click on “List Records”.
- Scroll all the way down and make sure NS records reflect the nameservers; if not do change them now.
- On the right side of the top bar is “Packages”, click on that and edit all the tabs.
- Scroll down to the Name Server options and make the necessary changes.
- Now go to the domain tab and edit your domain.
- Check the box labeled “SSL support”, then check the box labeled “Lets Encrypt Support”; then click save, this will generate an SSL certificate.
Note that we may have to wait for up to 72 hours for the DNS records to fully propagate from the domain registrar. Once done, move on to the next step.
Now we will create the SSL certificate for the control panel itself, to do this we need to go back to the SSH terminal and key in the code below.
source /etc/profile PATH=$PATH:/usr/local/vesta/bin && export PATH
v-add-letsencrypt-domain ‘admin’ domainname ” ‘yes’
v-update-host-certificate admin domainname
Now we can access the admin page from our domain name, just be sure to append the port number to it.
We should see no errors by the browser as the SSL certificate has been installed.
Few common errors
Moving ahead, let us have a look at a few errors we may come across during these processes.
-
Error: apt-get upgrade failed
While installing VestaCP on Ubuntu, after inputting the install command we may encounter:
Error: apt-get upgrade failed
In order to solve this, we run the command:
# apt-get -f installThen reinstall the Vesta control panel.
-
Connection to IMAP Server Failed
After installing the Vesta control panel, we may receive the following error while accessing the mail account using Roundcube:
Connection to IMAP Server Failed
Authentication is working fine.
In order to solve this:
- Check whether “inbox=yes” in /etc/dovecot/conf.d/15-mailboxes.conf
- If it is not, run the command:
# sed -i “s#namespace inbox {#namespace inbox {n inbox = yes#” /etc/dovecot/conf.d/15-mailboxes.conf - Then restart dovecot
[Stuck with any error? We’d be happy to assist]
Conclusion
In short, VestaCP is a control panel for Linux with many features that facilitate the administration of a server. Today, we saw how our Support Techs install Vesta control panel in Ubuntu in a very simple way.
PREVENT YOUR SERVER FROM CRASHING!
Never again lose customers to poor server speed! Let us help you.
Our server experts will monitor & maintain your server 24/7 so that it remains lightning fast and secure.
GET STARTED
var google_conversion_label = «owonCMyG5nEQ0aD71QM»;
baisar57
-

- Новичок форума
- Сообщения: 4
- Записан

Здравствуйте друзья,
Не могу установить Vesta на Debian Jessie.
При установке возникает ошибка
После команды
sudo bash vst-install.sh —force
это ошибка
«
There are problems and -y was used without —force-yes
Error: apt-get install failed
«
.
Гуглил, ниче не могу найти.
Помогите плис
Русские дебианщики против цифрового слабоумия !
baisar57
-
- Новичок форума
- Сообщения: 4
- Записан
Спс за ответ.
Я не профи в Linux.
Но я установил Vesta на Debian 8 Jessie. Но это был другой сервер(Debian 8 Jessie).
А мне нужен именно этот сервер. И нужно установить.
Но в этот раз че то не идет. Т.е. установка идет — но через 5-6 сек прерывается сообщением.
—
There are problems and -y was used without —force-yes
Error: apt-get install failed
Но как это решить то?
—
В дебиан устанавливается. Мне раньше хостеры устанавливали 1 раз.
Цитата: baisar57 от 04 апреля 2017, 22:19:13В дебиан устанавливается. Мне раньше хостеры устанавливали 1 раз.
так и никто не говорит, что нельзя шуруп молотком забить. уважаемый ferum уже вам подсказал, откройте скрипт установки (это vst-install.sh, если что) любым текстовым редактором, посмотрите какие пакеты он ставит. разумеется, раз софтина для убунты — версии пакетов будут отличаться от тех, что в дебиане.
baisar57
-
- Новичок форума
- Сообщения: 4
- Записан
Спс за ваши ответы.
Но это не называется забить шуруп молотком.
Vesta официально поддерживается в Debian. Это написано на сайте Vesta https://vestacp.com/.
Все же спс за советы
http://vestacp.com/pub/vst-install.sh — выполняет обнаружение поддерживаемой версии и загружает в дальнейшем нужный скприт, который в случае с debian находится по адресу: http://vestacp.com/pub/vst-install-debian.sh
Cообщение объединено 05 апреля 2017, 09:29:16
Далее, судя по тому что он ругается на ключ -y, находим строки:
# Install apt packages
apt-get -y install $software
check_result $? "apt-get install failed"
меняем -y на —force-yes
и заново запускаем скрипт.
baisar57
-
- Новичок форума
- Сообщения: 4
- Записан
Endru
Спасибо тебе большое.
Я сейчас переустановил Debian8. И собираюсь настраивать сначала.
Скорее всего установлю Vesta без проблем.
Дам знать что будет.
Cообщение объединено 05 апреля 2017, 10:06:19
Спс за советы ребята.
Я решил. Vesta прекрасно работает теперь.
После переустановки Debian8 — установилось без проблем.

HestiaCP — это панель управления с открытым исходным кодом, которая предоставляет простые в использовании веб-интерфейсы и интерфейсы командной строки, позволяющие администраторам веб-серверов легко и без необходимости вручную редактировать файлы конфигурации управлять доменными именами, веб-пространством, учетными записями почты и зонами DNS.
Проект является ответвлением существующей панели управления Vesta и в настоящее время находится в активной разработке. У проекта много участников в репозитории GitHub. Программное обеспечение публикуется под лицензией GPLv3.
Установка HestiaCP
Обновление системы до последней версии:
sudo apt update
sudo apt upgrade

Переход под пользователя root:
sudo su
Добавления ключа репозитория для HestiaCP, чтобы иметь возможность загружать все необходимые пакеты во время установки:
wget -qO - https://gpg.hestiacp.com/deb_signing.key | apt-key add -
Загрузка установочного скрипта HestiaCP
wget https://raw.githubusercontent.com/hestiacp/hestiacp/release/install/hst-install.sh

Запустите скрипт установки и следуйте инструкциям:
bash hst-install.sh
У меня при установке возникла ошибка:
Updating currently installed packages, please wait... E: Репозиторий «https://apt.hestiacp.com focal Release» не содержит файла Release.

The installer is now downloading and installing all required packages.

NOTE: This process may take 10 to 15 minutes to complete, please wait...

Error: apt-get install failed
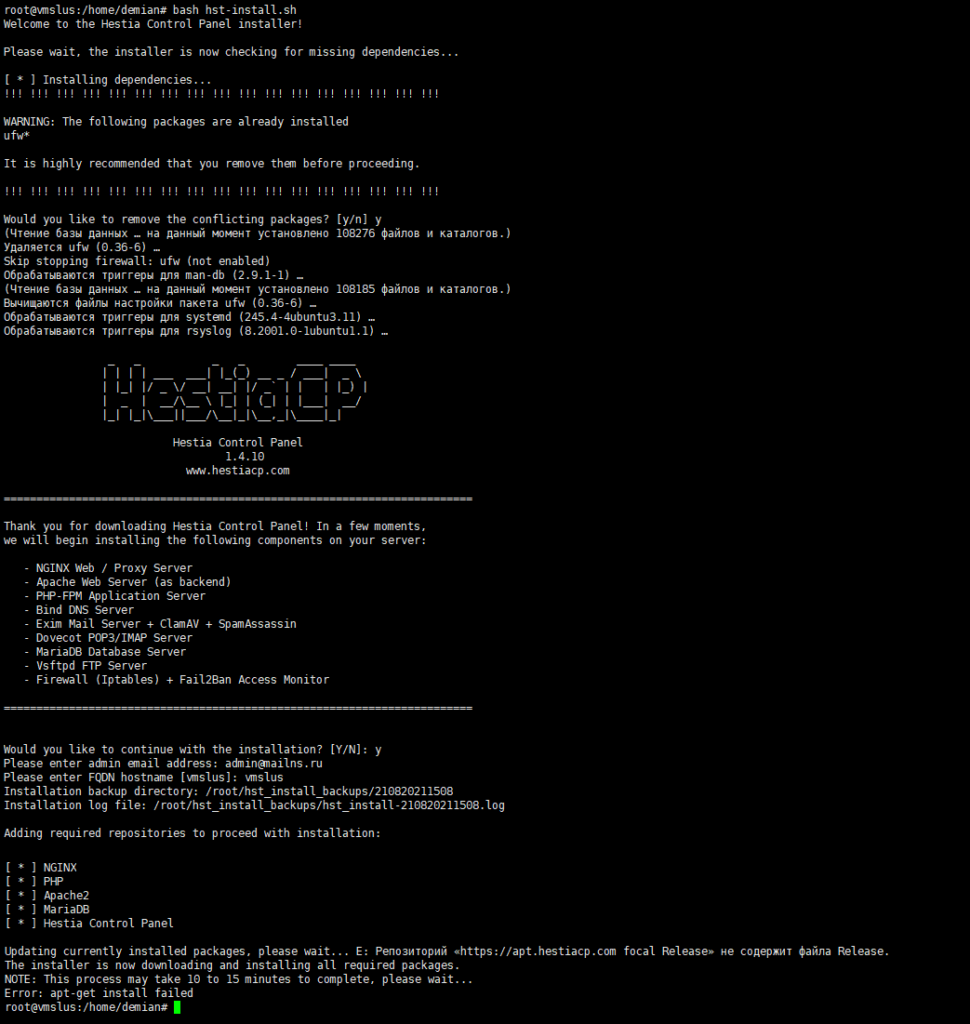
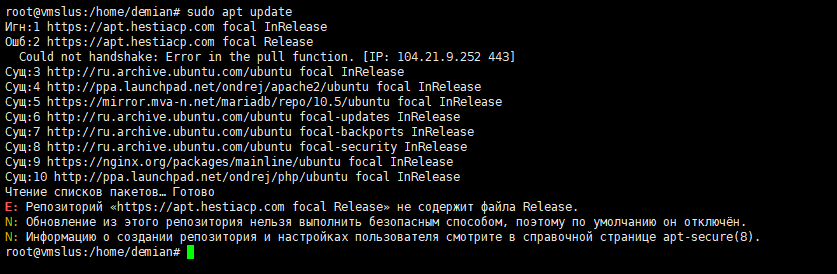
Так же при выполнении команды по обновлению репозиториев ubuntu, есть ошибка репозитория «https://apt.hestiacp.com focal Release»:
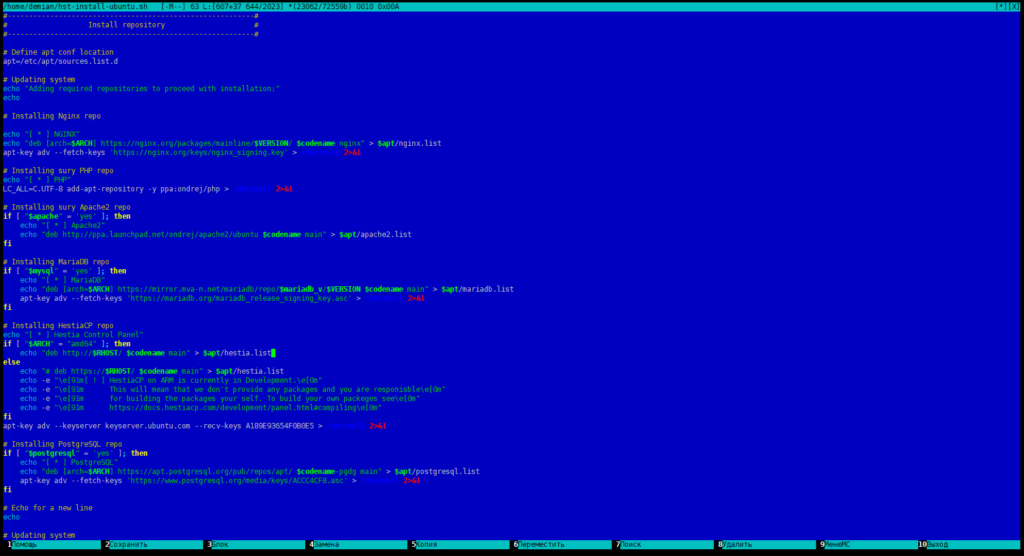
При запуске скрипта установки определяется операционная система и загружается скрипт инсталляции для текущей операционной системы в данном случае:
hst-install-ubuntu.sh
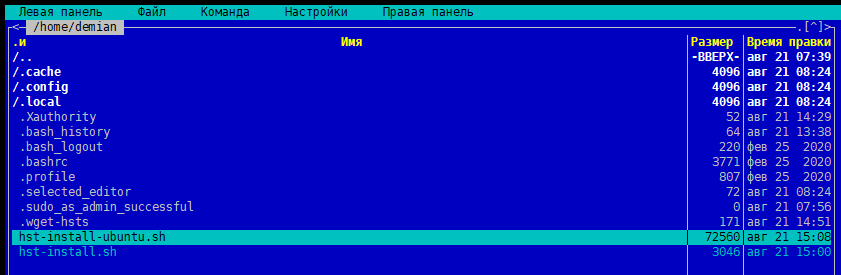
В данном скрипте есть секция установки репозиториев. В 644 строке скрипта (в данном случае), которая устанавливает HestiaCP repo (hestia.list) заменил «https» протокол на «http»:
echo "deb http://$RHOST/ $codename main" > $apt/hestia.list
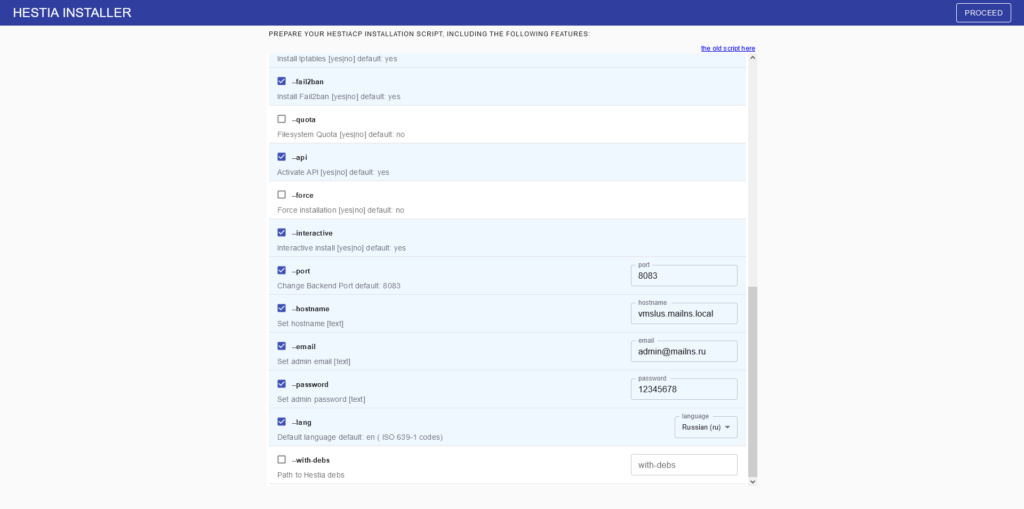
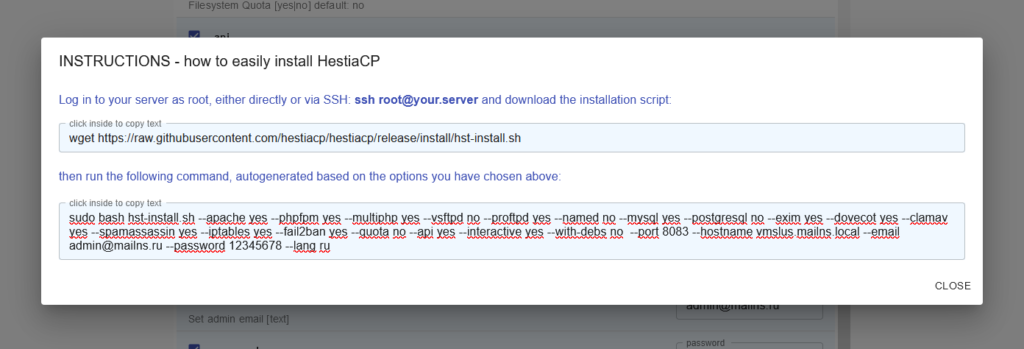
Для установки HestiaCP с дополнительными параметрами можно использовать генератор команд он доступен по ссылке https://gabizz.github.io/hestiacp-scriptline-generator/.
В генерированной команде установки заменил «hst-install.sh» на hst-install-ubuntu.sh, если запустить «hst-install.sh» то скрипт «hst-install-ubuntu.sh» загрузиться по новой.
sudo bash hst-install-ubuntu.sh --apache yes --phpfpm yes --multiphp yes --vsftpd no --proftpd yes --named no --mysql yes --postgresql no --exim yes --dovecot yes --clamav yes --spamassassin yes --iptables yes --fail2ban yes --quota no --api yes --interactive yes --with-debs no --port 8083 --hostname vmslus.mailns.local --email admin@mailns.ru --password 12345678 --lang ru
Установка HestiaCP выполняется автоматически и может занять до 15 минут в зависимости от конфигурации вашей системы.
После завершения установки появится следующее сообщение.
[ ! ] IMPORTANT: System will reboot

Press any key to continue!
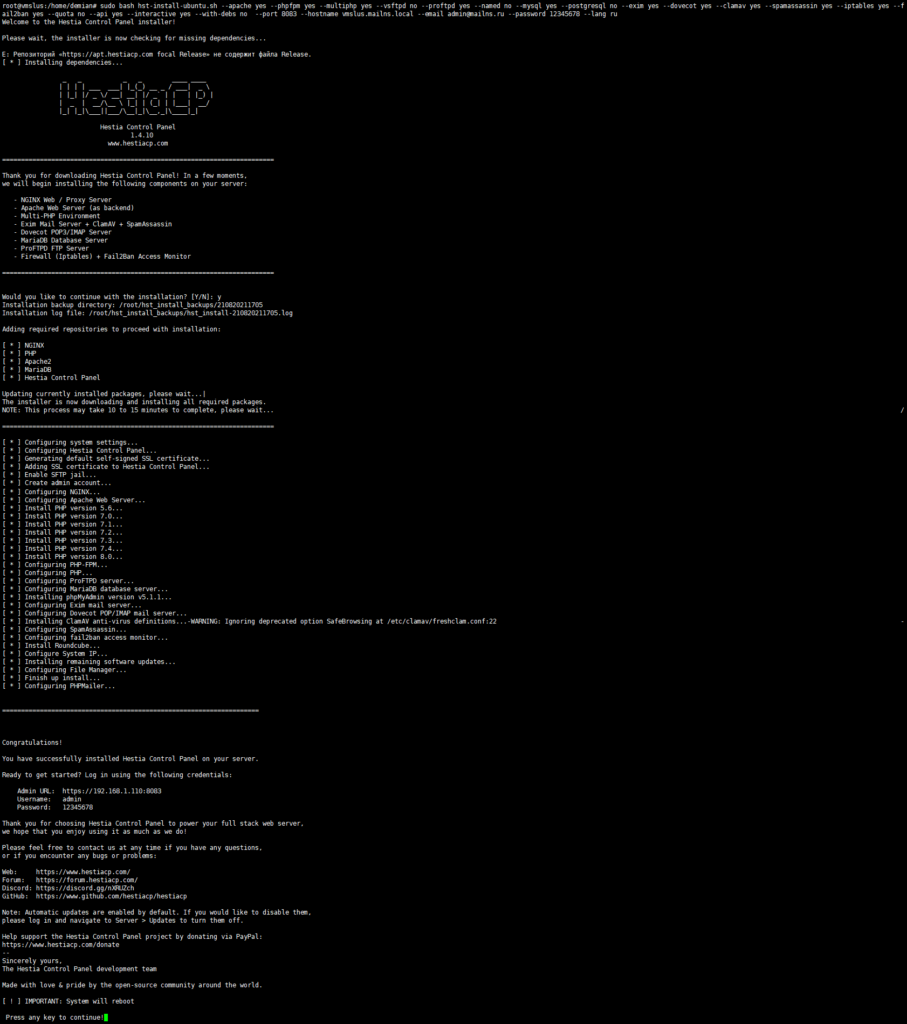
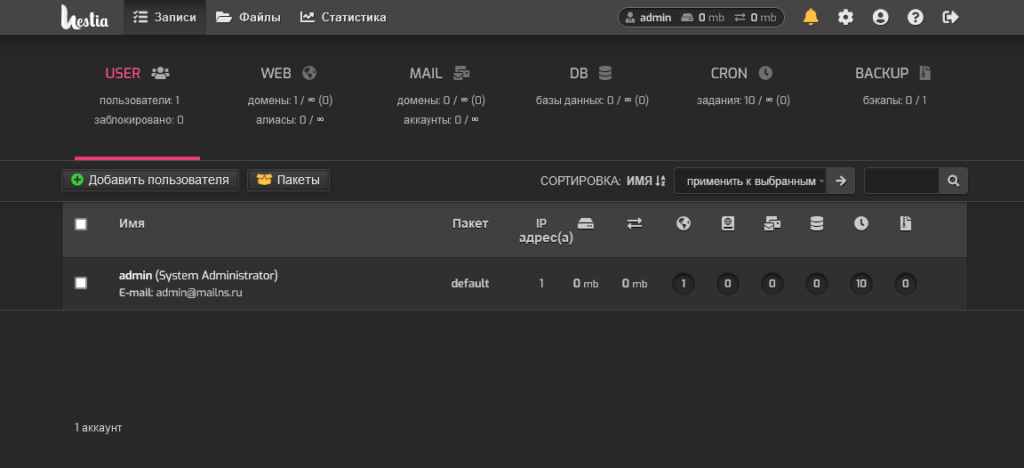
Доступ к веб-интерфейсу Hestia CP
Откройте веб-браузер на своем компьютере и введите адрес домена или IP адрес HestiaCP (например: https://hestiacp.example.com:8083). В моем случае https://192.168.1.110:8083.
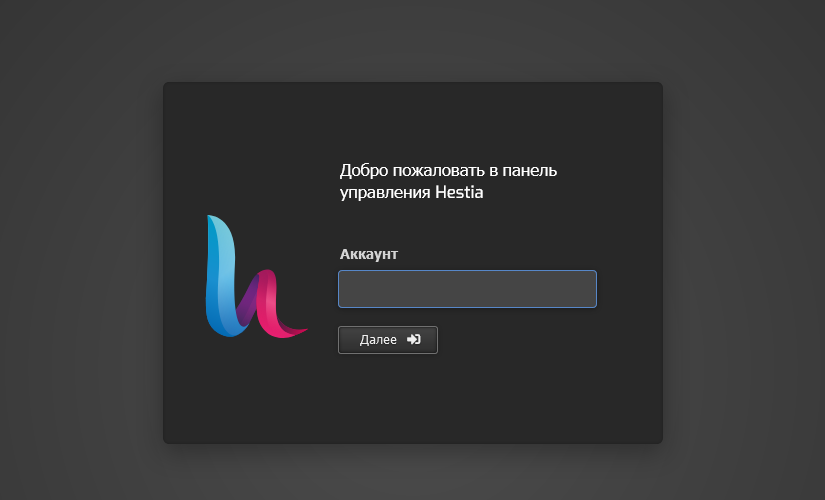
Введите имя администратора и пароль, отображаемые во время установки. Нажмите Войти, чтобы подключиться к панели управления.