Содержание
- Diskpart Has Encountered an Error: The Media Is Write Protected
- About this error
- Causes of “DiskPart has encountered an error the media is write protected”
- Solutions to “Diskpart has encountered an error the media is write protected»
- в–Њ 1. Change the value of Write-protect key in Registry
- в–Њ 2. Type attributes disk clear readonly command first
- в–Њ 3. Repair the corrupted file system
- в–Њ 4. Change Read-only mode
- в–Њ 5. Format the write protected media for reuse
- Wrapping things up
- 6 Fixes to DiskPart Virtual Disk Service Error
- Overview
- Fix #1: The volume size is too big
- Fix #2: The object is not found
- Fix #3: Clean is not allowed on the disk containing the current boot, system, pagefile, crashdump or hibernation volume
- Fix #4: The media is write protected
- Fix #5: Disk Management connecting to virtual disk service
- Fix #6: The specified disk is not convertible. CDROMs and DVDs are examples of disks that are not convertible
- Conclusion
When you meet the Diskpart clean error: Diskpart has encountered an error the media is write protected during cleaning your disk using Diskpart, here you can find the reason and the corresponding solution.

By Emily  / Last Updated March 4, 2022
About this error
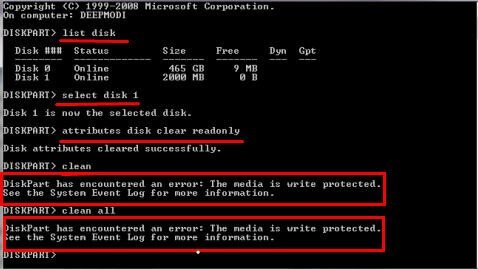
When you use Diskpart clean or clean all command on USB drive, you may receive the following error message.
Diskpart has encountered an error the media is write protected
See the system event log for more information
Besides, this error message will occur when you use the command above on SD card, HDD, SSD, SanDisk drive and more.
Causes of “DiskPart has encountered an error the media is write protected”
On the market, there is some mass storage device providing a write-protection function to protect files and folders. However, sometimes, you still cannot access files and folders. Besides, some drive does not have a write-protection switch and still can be set to read-only mode. In the following, I’ll list some possible causes.
в–¶Your storage media is damaged by virus or malware.
в–¶You accidentally set the read-only switch to ON side and the media becomes un-writable.
в–¶You set the disk is to read-only in Property or Registry.
в–¶Your drive has physical damages, such as bad sectors.
Solutions to “Diskpart has encountered an error the media is write protected»
To fix this error and ensure the security of your data, you’d better to backup files first and then try the following solutions one by one. Some of the following operations will lead to data loss.
в–Њ 1. Change the value of Write-protect key in Registry
Step 1. Type regedit in the Run window.
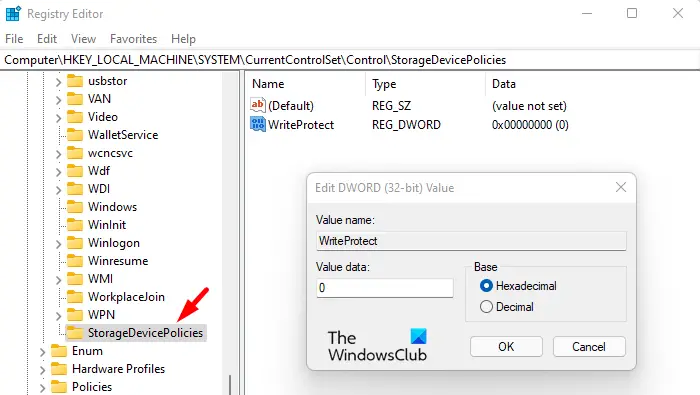
Step 2. Navigate to the following sub-key and find the WriteProtect key on the right panel.
HKEY_LOCAL_MACHINESYSTEMCurrentControlSetControlStorageDevicePolicies
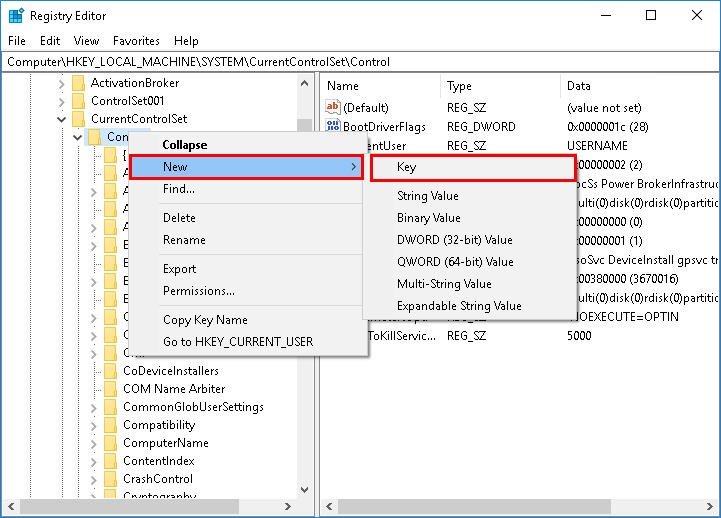
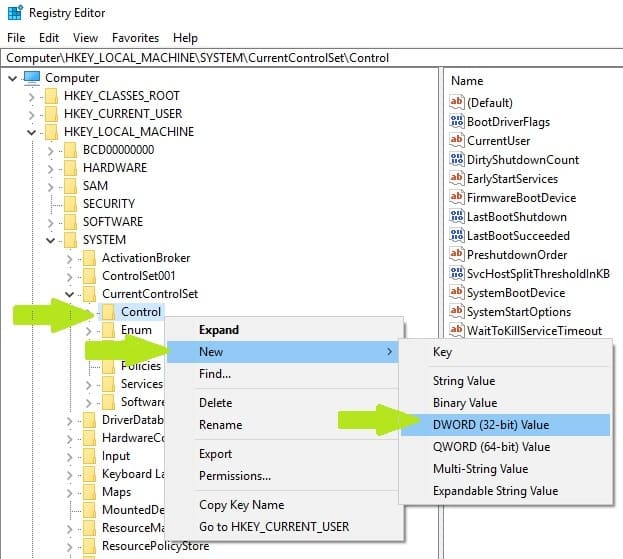
Step 3. If there is no StorageDevicePolicies key, you need to create one. Right-click on Control, select New andKey option in order and then name it as StorageDevicePolicies.
Step 4. Right-clickStorageDevicePolicies, select New andDWORD (32-bit) Value and then name it as WriteProtect.
Step 5. Right-click the newly created WriteProtect key and change the Value to . And then click OKto exit this window.
Step 6. Check if you can access your storage device and data.
в–Њ 2. Type attributes disk clear readonly command first
When you use Diskpart clean command but receive Diskpart has encountered an error the media is write protected on USB/SD card/HDD/SSD, you can type attributes disk clear readonly command prior to typing clean or clean all command.
Step 1. Type cmd in the search box, right-click it and select Run as administrator.
Step 2. Type diskpart in the pop-up window and press Enter.
Step 3. Type the commands below in order and hit Enter to run it.
в–¶list disk
в–¶select disk n (n refers to the number of device you want to clean)
в–¶attributes disk clear readonly
в–¶clean
![]()
Step 4. Exit this window and check if it works.
в–Њ 3. Repair the corrupted file system
If your drive has corrupted file system, you can use Diskpart to clear all write-protection file attributions from the disk and reformat it again.
Step 1.Open cmd and type diskpart in the window.
Step 2. Type the commands below and press Enter.
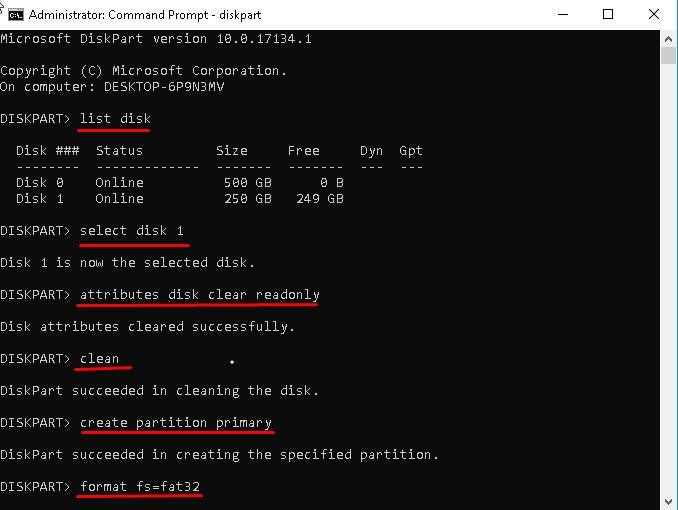
в–¶list disk
в–¶select disk m (m refers to the drive containing corrupted file system)
в–¶attributes disk clear readonly
в–¶clean
в–¶create partition primary
в–¶format fs=fat32 (or format fs=ntfs)
Step 3. Exit this window and then see if you can access your device and data.
в–Њ 4. Change Read-only mode
If the device is in read-only mode, you need to check it first, and then change the Current Read-only State from Yes to No.
Step 1. Open cmd window and type diskpart in the command prompt.
Step 2. Type the following commands and hit Enter.
в–¶list disk
в–¶select disk r ( r refers to the disk you want to clean)
в–¶attribute disk
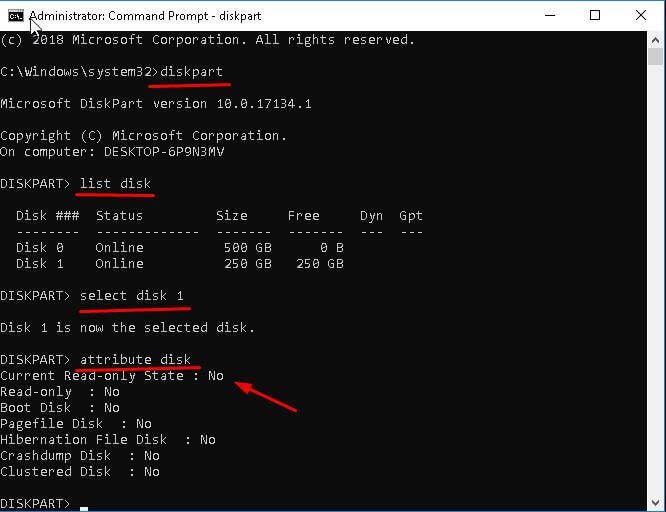
This command tells you if your device is in read-only mode. If yes, see Step 3. If not, try to format the media for reuse.
Step 3. Type attributes disk clear readonly command in the command prompt and hit Enter.
Notes:вњЋ. 1. If your disk is locked by an active process, you still need to reboot the computer. 2. If your device is USB drive, you still need to check the write-protect switch.
Step 4. Try the clean command again and see if this error occurs again.
в–Њ 5. Format the write protected media for reuse
Formatting partition is the last resort to write-protected issues. It will lead to data loss if you do not have a file backup. To fix the Diskpart clean error: Diskpart has encountered an error the media is write-protected, you can use the free partition manager: AOMEI Partition Assistant Standard. It can format USB drive/SD card/ HDD/SSD, which is write-protected due to corrupted file system. And all the steps are very easy to learn, even for a beginner. You just need to follow the steps below and move your finger.
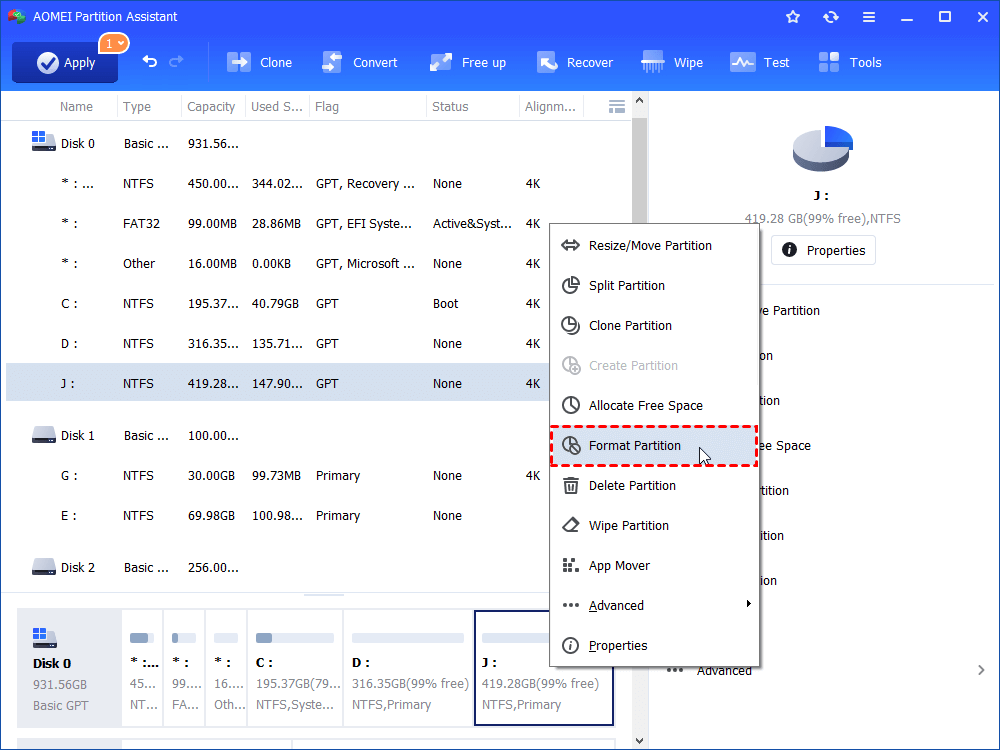
Step 1. Download the write-protected removal tool – free AOMEI Partition Assistant and run it. Right-click the write-protected media in the main page, and then select Format Partition.
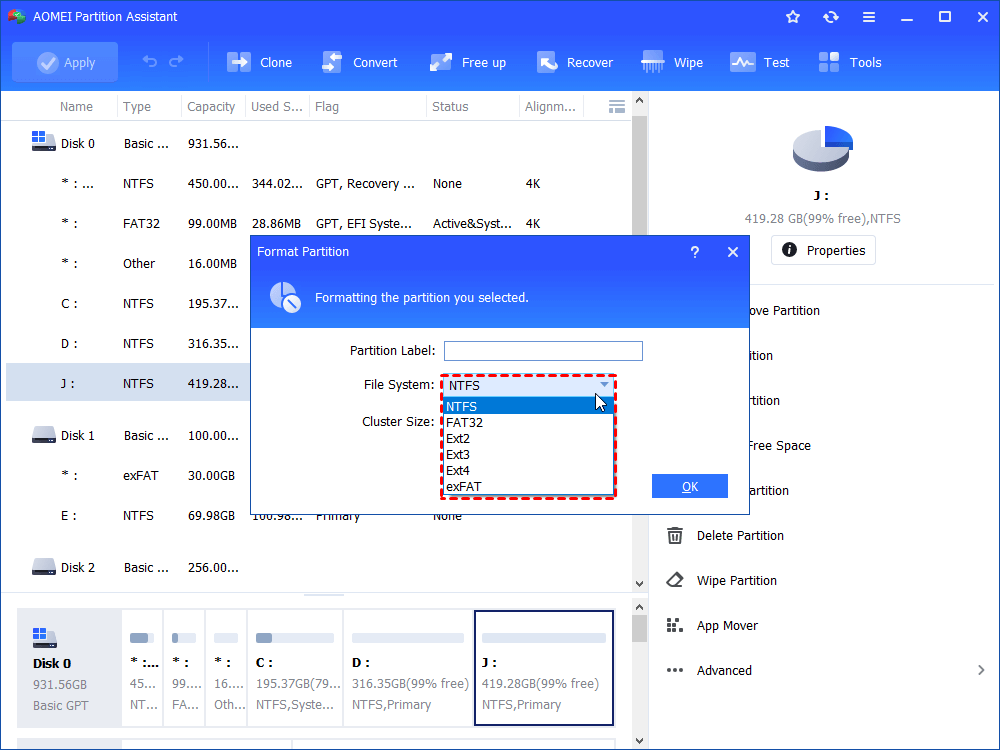
Step 2. Select NTFS or FAT32 file system from the drop-down menu and click OK to exit.
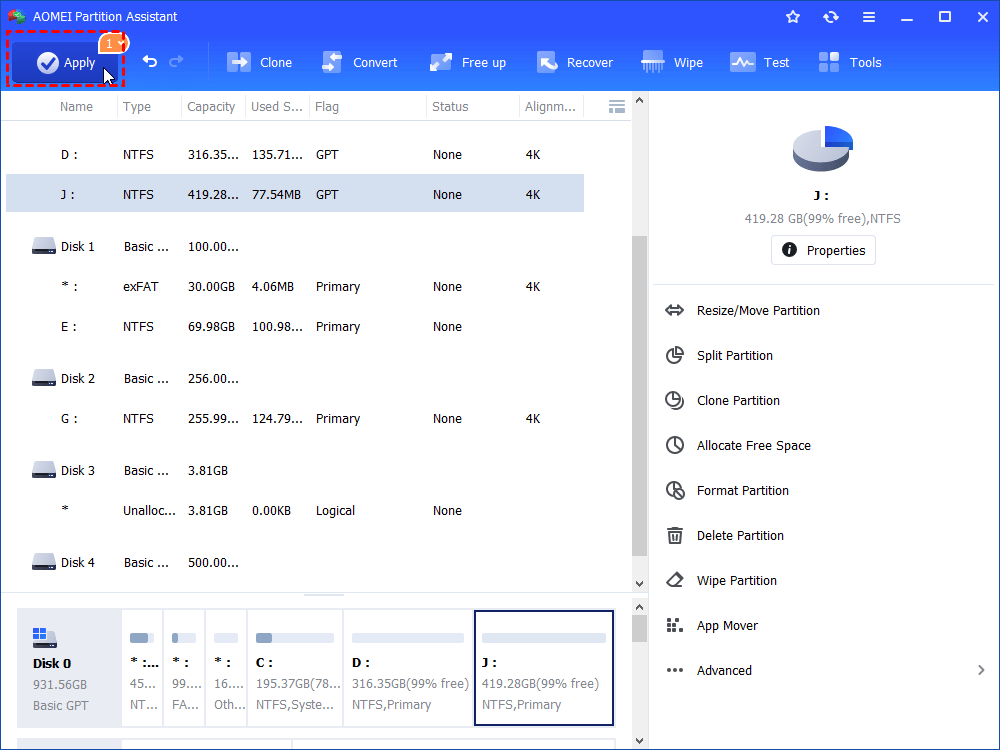
Step 3. Click Apply and then Proceed to start the pending operation.
Besides above operation, AOMEI Partition Assistant can help you do more things and fix some problems. You can use it to move partition to end of the disk, clone Windows to USB drive, etc. Also, you can use it to fix virtual disk service error the volume size is too big, extend volume greyed out, Diskpart has encountered an error access is denied, etc.
AOMEI Partition Assistant, the free version of partition manager, can satisfy all your basic needs. But if you want to fix the problem free version cannot or just get more features, you can upgrade toAOMEI Partition Assistant Professional or AOMEI Partition Assistant Server according. The advanced versions allows you to convert MBR to GPT without deleting partitions, allocate free space, convert dynamic disk to basic one without losing data, and more.
Wrapping things up
To fix Diskpart has encountered an error the media is write-protected, you can try to change the value of the Writeprotect key in Registry, type attributes disk clear readonly first and then clean, repair corrupted file system of the media, change the read-only mode from Yes to No.
If none of the above methods works for you, you can try the last one – formatting partition with AOMEI Partition Assistant. With it, all things become easy. You do not need to learn the complicated commands, which will lead to data loss if one of the processes goes wrong. In this software, all steps are fixed and there is little risk to make a mistake.
Источник
6 Fixes to DiskPart Virtual Disk Service Error
Position: How Tos — Disk Utilities — 6 Fixes to DiskPart Virtual Disk Service Error
Summary
DiskGenius — Free disk manager to format partition, wipe disk, convert GPT/MBR, check bad sectors, etc.
Table of Contents:
Overview
What is virtual disk service? According to Microsoft, virtual disk service (VDS) refers to a set of application programming interfaces (APIs) that provide a single interface for managing disks. It offers an end-to-end solution to manage storage hardware and disks as well as create partition on these storage devices. Virtual disk service has two sets of providers to manage storage hardware: the built-in VDS software providers allow you to manage disk space and partition at the OS level, while the hardware providers make it possible to manage hardware RAID arrays. The VDS APIs allow programs to mange disks and partition, thus, you can develop your own software which uses VDS API or make use of programs like Disk Management or diskpart command-line to carry out actions such as create volume, format volume, format volume, assign drive letter, convert basic disk to dynamic disk, etc.
Although we benefit a lot from VDS, sometimes we have to face some issues when using it. Virtual disk service error discussed in this article happens during executing diskpart commands, and it usually appears with a variety of error messages. Once error occurs, the task to be performed cannot be completed. This error can happen when you run diskpart.exe command line to manage your disk and volumes for instance, format disk to FAT32, clean a disk, convert disk between GPT and MBR, etc. In this tutorial, we’ll list some typical errors and provide solutions to help you fix it.
Fix #1: The volume size is too big
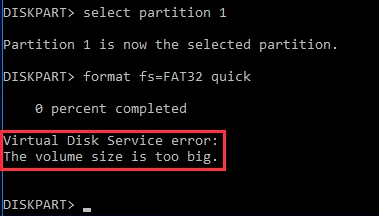
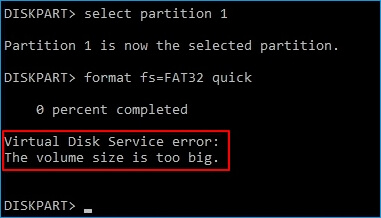
When you try to format a local or removable hard drive via diskpart commands you may receive error message «Virtual Disk Service error: The volume size is too big». This error tends to appear when you format a large partition or USB drive to FAT32 file system with diskpart utility. If you try to format the disk or partition in Windows File Explorer, you will be left NTFS and exFAT file system to choose. Here is one of the real-world cases of this problem:
«Hello all, I’ve been trying to format my external hard drive (320GB) to FAT32 so that I can use it under both Windows and Mac. However, there is not FAT32 option when formatting in Windows. Then, I tried to use diskpart to do the job. First, I ran ‘clean all’ to clear the disk and then create a primary partition. Finally, I type ‘format fs=fat32’. It appears the formatting works, but it ended up with error message which says the volume size is too big. My computer is sunning 64-bit version of Windows 10. Is there any other free tool out there that can complete the format? Thanks a lot!»
What is causing the issue?
Windows File Explorer cannot format partition which is larger than 32GB to FAT32 file system, even though it is able to access and use a large FAT32 partition without issue. In this case, users will try to format drive to FAT32 in diskpart, which often ends up with error. This limitation set by Windows is kind of reasonable and understandable, as FAT32 is not the proper choice to manage large disk space. A very large drive formatted in FAT32 might be unstable and tends to encounter issues such as partition corruption. Anyway, if you indeed want to format partition to FAT32, there is an easy solution to complete the task.
Here we recommend to use DiskGenius to format the drive for you. DiskGenius is free disk partition software which enables users to bypass 32G limitation on Windows. The free edition is effective to complete formatting task, and it is capable of formatting partition to NTFS, FAT32, exFAT, EXT4, EXT3 and EXT2. The following section is the formatting process.
Step 1. Install and launch DiskGenius from your Windows computer and you can view the partition you want to format.
Step 2. Right-click on the partition you want to format to FAT32 and select «Format Current Partition» option as below:
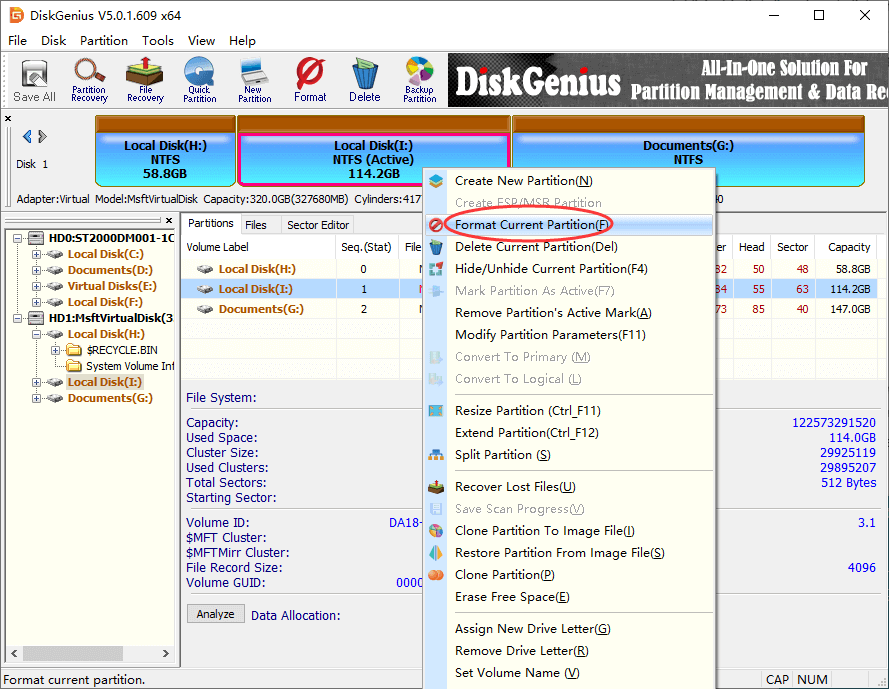
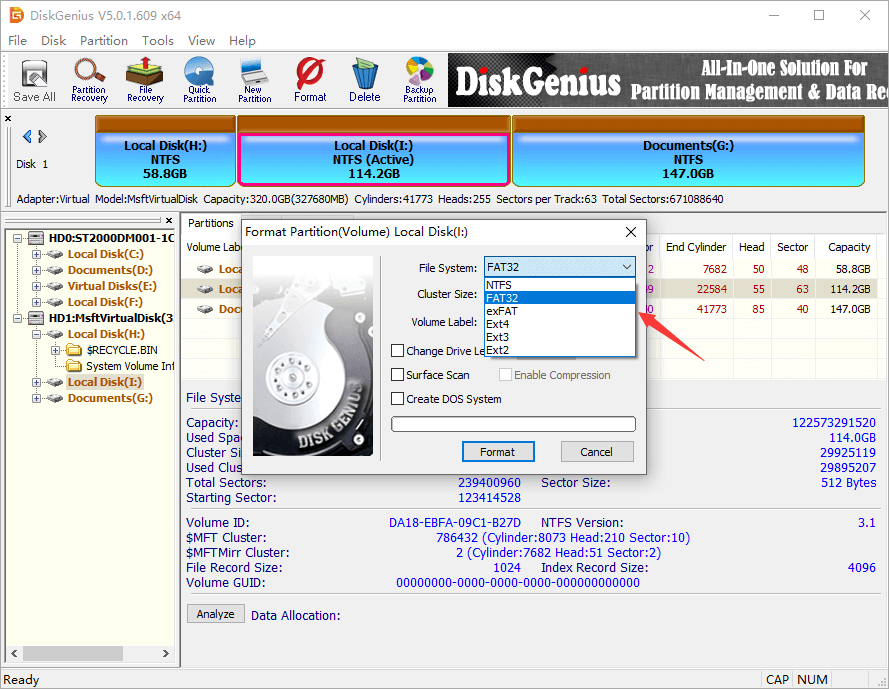
Step 3. Select file system from drop-down list and click Format button. Then click Yes button to continue.
DiskGenius performs quick formatting by default, and you can select «Surface Scan» if you want to have a check if the drive contains errors. Once the formatting completes, the NTFS partition will be converted to FAT32 regardless the partition size.
Fix #2: The object is not found
«I was trying to create a new partition on my laptop using diskpart in Command Prompt, as there is not a recovery volume on the computer and I cannot restore Windows. Thus, I attempted to create a partition on my own. I learned steps of creating partition from the Internet. Here are commands I’ve tried: list disk, select disk 0, clean, create partition primary. Then the error ‘Virtual Disk Service Error: the object is not found’«
Did you meet similar problem? Sometimes diskpart just fails to work as expected for some reason. If you fails to create partition via diskpart commands, you can use free third-party software to complete the task.
DiskGenius allows to create new partition from either unallocated disk space or existing partition, so that you can easily create partition via simple steps.
Step 1. Install and launch DiskGenius Free Edition on your computer and locate the disk where you want to create partition.
Step 2. Select unallocated space on the disk and click New Partition button from toolbar. Then the Create New Partition window shows up.

Step 3. Click OK button after setting partition parameters like partition type, file system type, partition size, etc.
Step 4. Click Save All button and format the newly created partition. After that, you can store data to the partition.
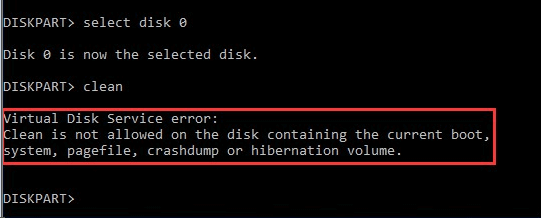
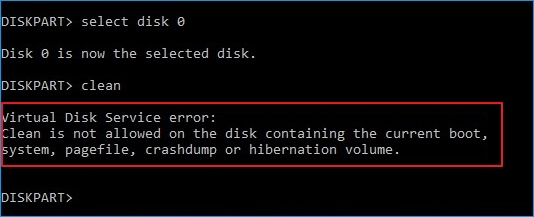
Fix #3: Clean is not allowed on the disk containing the current boot, system, pagefile, crashdump or hibernation volume
If you use diskpart clean command to clean system disk, you will receive the error «Virtual Disk Service error: Clean is not allowed on the disk containing the current boot, system, pagefile, crashdump or hibernation volume. » Operating system does not allow to clean the disk when system is running, which means you can clean the disk where Windows is installed when operating system is not running.
If you have a Windows installation disc, you can insert it to computer to let computer boot from the disc. Then select Repair your computer> Troubleshoot > Advanced Options > Command Prompt. After that you can retype diskpart commands to clean system disk.
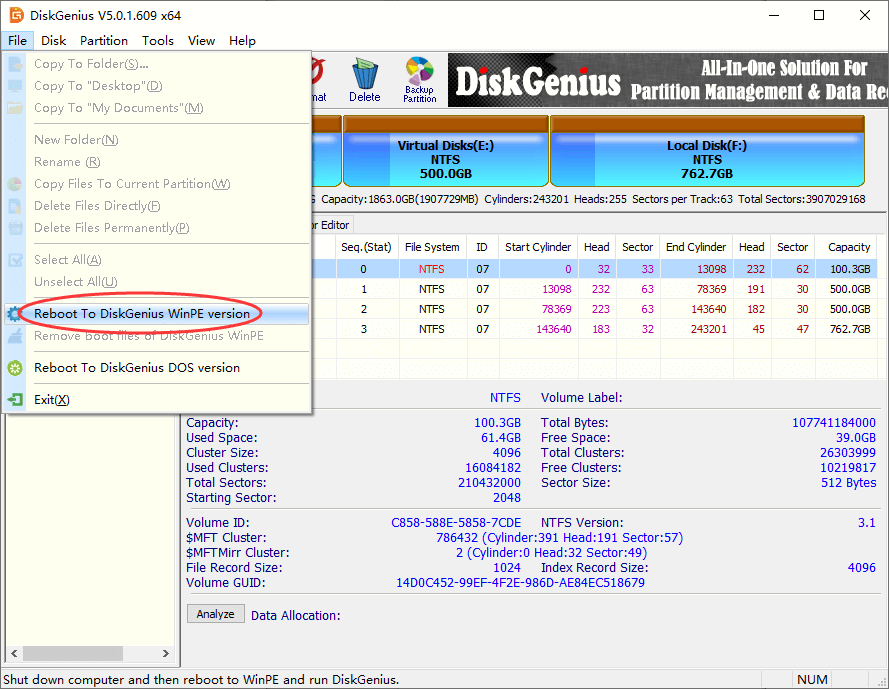
However, if you do not obtain a Windows installation disc or your computer does not have a CD-ROM device, you can follow steps here to clean hard drive.
Step 1. Launch DiskGenius from your computer and click «Reboot to DiskGenius WinPE Version» from File menu, as picture below.
DiskGenius will prepare to boot to its WinPE version, and you need to wait for a while with patience. Once it is done, you will be asked whether to boot computer immediate. Click OK to continue.
DiskGenius also supports creating Win-PE based bootable USB disk. If you have a USB flash drive, you can have a try.
Step 2. When computer boots to DiskGenius WinPE edition, you can select the system disk, click Disk and choose Delete All Partitions.
This function will delete all partitions and data on the hard drive you’ve selected, and you will suffer data loss if there is a bakcup in advance. If you delete partition or files by mistake, you can perform data recovery or partition recovery to get lost data back with DiskGenius. If you want to permanently remove data, you need to wipe hard drive using Erase Sector function which can be found from Tools menu.
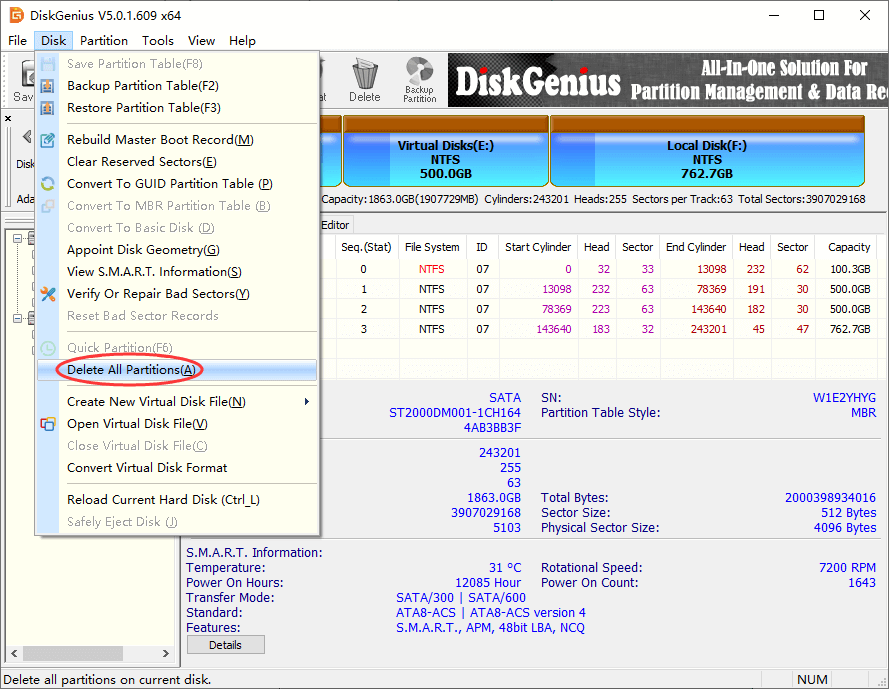
Note: if system partition is cleaned, computer won’t be able to boot normally, and you need to reinstall Windows.
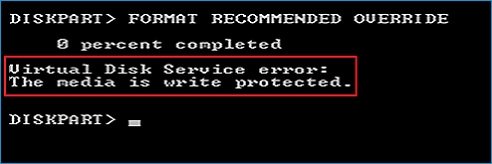
«I have a 16GB Sandisk USB flash drive 2.0. I bought this USB disk about 3 three years ago and it works well all the time. Today I used it to create a bootable drive with Windows iso tool, which failed due to write-protect error. I’ve tried formatted it in File Explorer and Disk Management, but nothing working. Finally, I tried format fs=fat32 quick in Command Prompt, but still get error ‘Virtual disk service error: the media is write protected’ Does that mean the drive is dead? Do you have any solution to remove the protection.»
Solution 1: Disable write protection in Registry
Step 1. In Windows 10, type regedit in searching box and press Enter key. This will open the Registry Editor.
Step 2. Expand keys on the left pane: HKEY_LOCAL_MACHINESYSTEMCurrentControlSetControlStorageDevicePolicies.
If there is not StorageDevicePolicies on your computer, you need to create one. Right-click on «Control» and select «New» and «Key». Then name it as StorageDevicePolicies
Step 3. Double-click on the WriteProtect value in the right-hand pane. You can now change the Value data from 1 to 0. Then click OK to save the change.
Step 4. Close the Registry Editor and restart computer. Then check if the write protection is removed.
Solution 2: Check and repair bad sectors for the drive
It is necessary to run bad sector checking once a disk cannot be formatted by system, as this indicates the drive cannot be written properly. If a disk cannot be read or written via normal method, it is likely to contain bad sectors. Since it is easy to check bad sectors for hard drive or USB disk with DiskGenius Free, you can have a try when virtual disk service reports the drive cannot be formatted due to write issue.
Step 1. Connect the disk in question to your computer and launch DiskGenius. Select the disk in the application, and choose Disk -> Verify Or Repair Bad Sectors, as below.
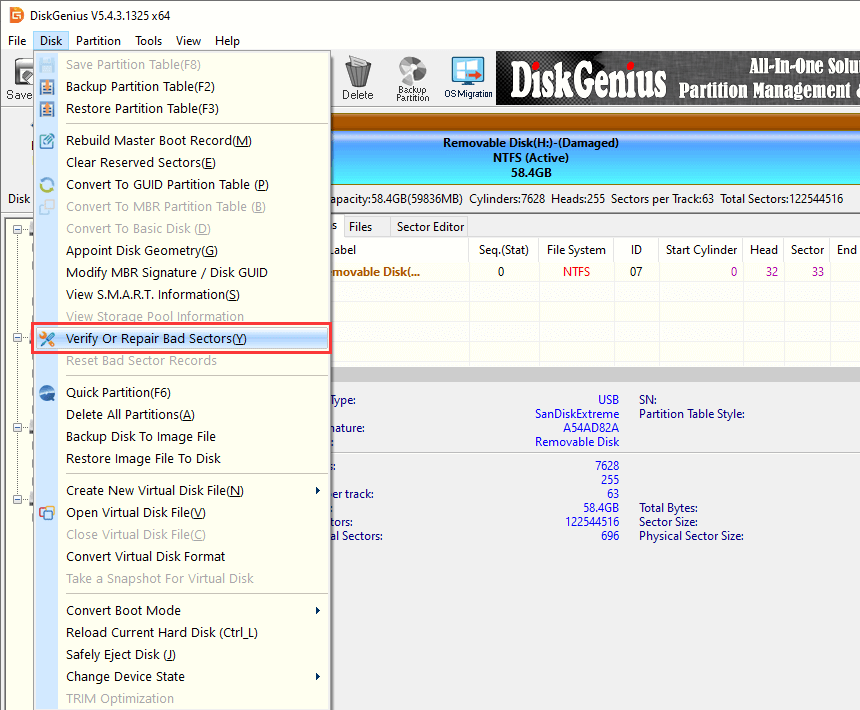
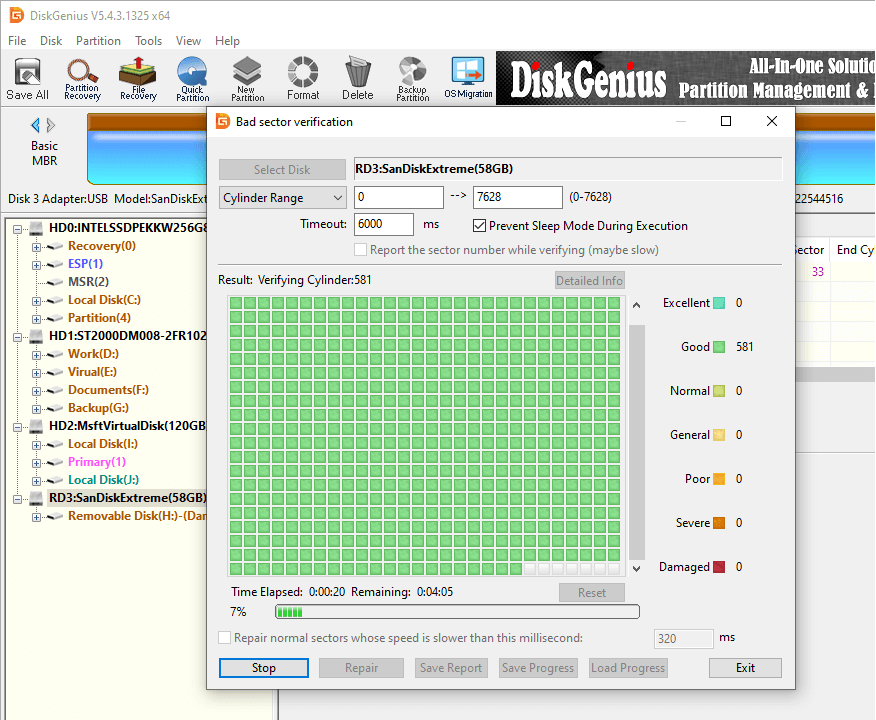
Step 2. Click Start Verify button from the pop-up window and DiskGenius starts to scan the disk to check if it contains any bad sectors.
DiskGenius marks sectors conditions with colored blocks and bad sectors are tagged with red block (Damaged). If the disk has bad sectors, you can try repairing them after the scanning completed. Note: You should make sure all files on the disk have been backed up before repairing bad sectors.
Fix #5: Disk Management connecting to virtual disk service
Windows Disk Manager Windows does not work as expected and says it is unable to connect to Virtual Disk Service, or «Disk Management could not start Virtual Disk Service (VDS) on (Your Computer Name). This can happen if the remote computer does not support VDS, or if a connection cannot be established because it was blocked by Windows Firewall. For additional information about diagnosing and correcting this problem, see Troubleshooting Disk Management in Disk Management Help.»
The VDS is not supported or cannot be started on this computer.
Solution: Run SFC and DISM
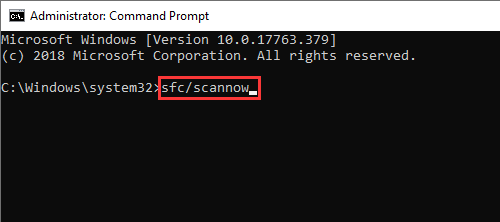
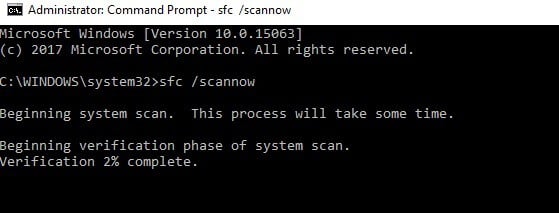
Step 1. Run Command Prompt as administrator. Type SFC /scannow and hit Enter key. The command starts to scan system files, and the scanning process may take some time.
Step 3. Type following commands and press Enter key after each command.
Dism /Online /Cleanup-Image /CheckHealth
Dism /Online /Cleanup-Image /ScanHealth
Dism /Online /Cleanup-Image /RestoreHealth
Step 2. Restart computer after all these commands are executed.
Fix #6: The specified disk is not convertible. CDROMs and DVDs are examples of disks that are not convertible
You are likely to get the «Virtual disk Service error: The specified disk is not convertible. CDROMs and DVDs are examples of disks that are not convertible» error when DiskPart command cannot change the select disk to GPT or MBR format.
In general, two possible reasons behind this error: the disk you want to convert to GPT or MBR is not full of unallocated space, i.e. there is one or more partitions on it; the select disk contains Windows OS.
Solution: Convert disk to GPT/MBR format with DiskGenius Free Edition
The converting between GPT and MBR made by DiskGenius does NOT remove any files on the hard drive. Follow these steps to change disk to GPT.
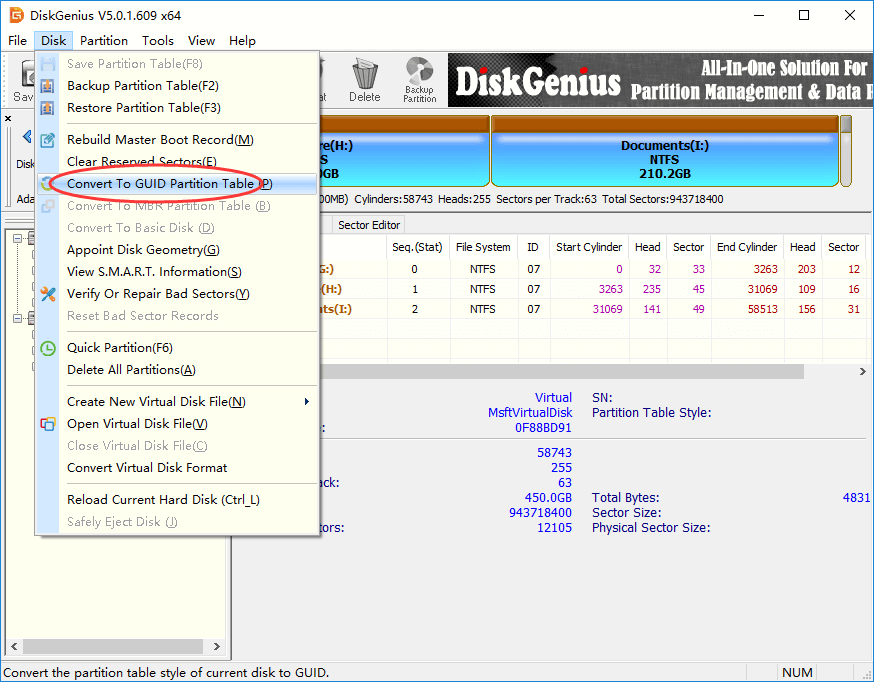
Step 1. Launch DiskGenius Free edition on your computer and choose the hard drive you want to change its partition table style. Then click «Disk» -> «Convert To GUID Partition Table».
Tip: If you want to convert GPT to MBR, then choose «Convert to MBR Partition Table».
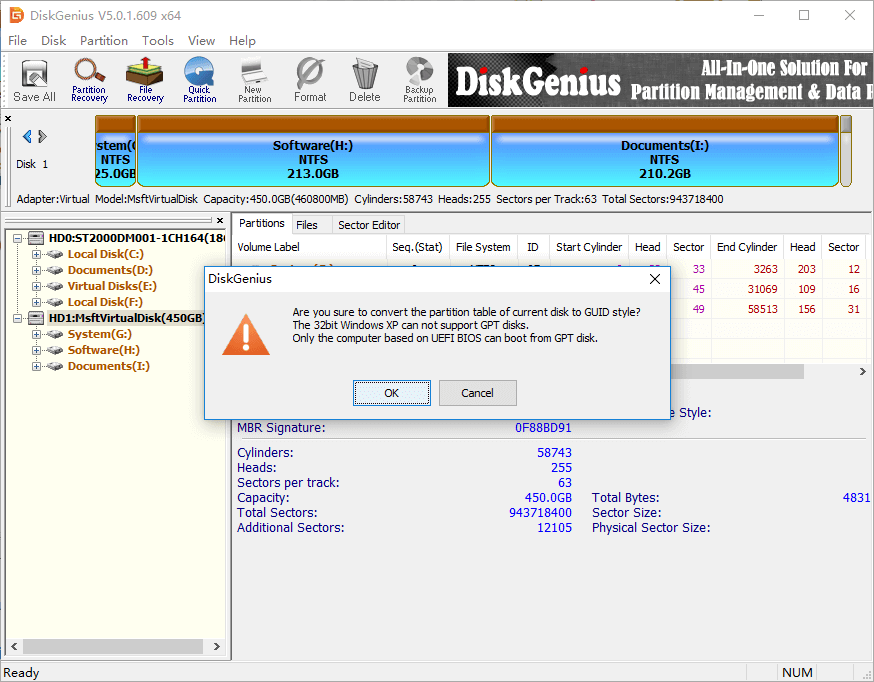
Step 2. Click «OK» to continue the conversion.
Step 3. Click «Save All» button to save changes to partition table.
Conclusion
To wrap things up, we talked about what is virtual disk service error and provided solutions to fix all kinds of diskpart virtual disk service errors. If you are blocked by the error, try DiskGenius and you will be amazed at how easily to manage disk and partitions, If you have any questions when using the disk partition software, welcome to contact our support team.
DiskGenius — Top disk partition and data recovery software to organize your data and safeguard digital life.
Источник
What Is DiskPart Virtual Disk Service Error
According to Microsoft, Virtual Disk Service is a Microsoft Windows service that performs query and configuration operations at the request of end users, scripts, and applications. It enables users to manage disk hard drives, volumes, etc., by running the DiskPart command prompt.
Sometimes, you will receive a DiskPart virtual disk service error while running DiskPart command to manage your disk partition, including format disk to FAT32, clean a disk, delete partitions, convert MBR disk to GPT disk or vice versa, etc.
Accordingly, the fixes toward different errors on DiskPart may differ. On this page, we list the typical Virtual Disk Service errors along with the solutions.
Common DiskPart Virtual Disk Service Errors and Solutions
Check the exact error that you are having and refer to the right solution to get rid of it from your computer immediately.
8 Common DiskPart Virtual Disk Service Errors and Fixes:
You Must-Have Tool
The best way to deal with Diskpart Virtual Disk Service errors is to try a powerful third-party disk management tool. EaseUS partition tool, which wins the praise of numerous users, is a wonderful choice. It perfectly resolves each error on your computer within a few simple clicks.
Download it, and let’s see how it works to help.
Error 1: Clean is not allowed on the disk containing the current boot, system, pagefile, crashdump or hibernation volume
Applies to:
Virtual Disk Service error:
Clean is not allowed on the disk containing the current boot, system, pagefile, crashdump or hibernation volume.
This error usually comes when you run DiskPart clean command on a system disk. If you tend to clean up the old system disk or a running system disk to reinstall the Windows OS, you’ll need to create a bootable disk using EaseUS Partition Master.
The Delete All feature in EaseUS Partition Master works the same as the clean command, which deletes all partitions that you may apply for help.
Tutorial: Two Options to Fix Virtual Disk Error — Clean is not allowed
- #1. Clean Up OS Disk — Delete All Partitions with OS
- #2. Clean Up Data Disk — Delete All Partitions
#1. Clean Up OS Disk — Delete all partitions with OS:
Step 1. Correctly connect a USB drive, flash drive, or a CD/DVD disc to your computer. Then, launch EaseUS Partition Master, go to the «Bootable Media» and click «Create bootable media», click «Next».

Step 2. You can choose the USB or CD/DVD when the drive is available. Once made the option, click «Proceed».
If you do not have a storage device at hand, you can also save the ISO file to a local drive, and later burn it to a storage media.

Step 3. Connect the WinPE bootable disk to the computer. Restart your computer and press F2/Del at the same time to enter BIOS. Set to boot the PC from «Removable Devices» (bootable USB disk) or «CD-ROM Drive» (bootable CD/DVD) beyond Hard Drive. Press «F10» to save and exit.
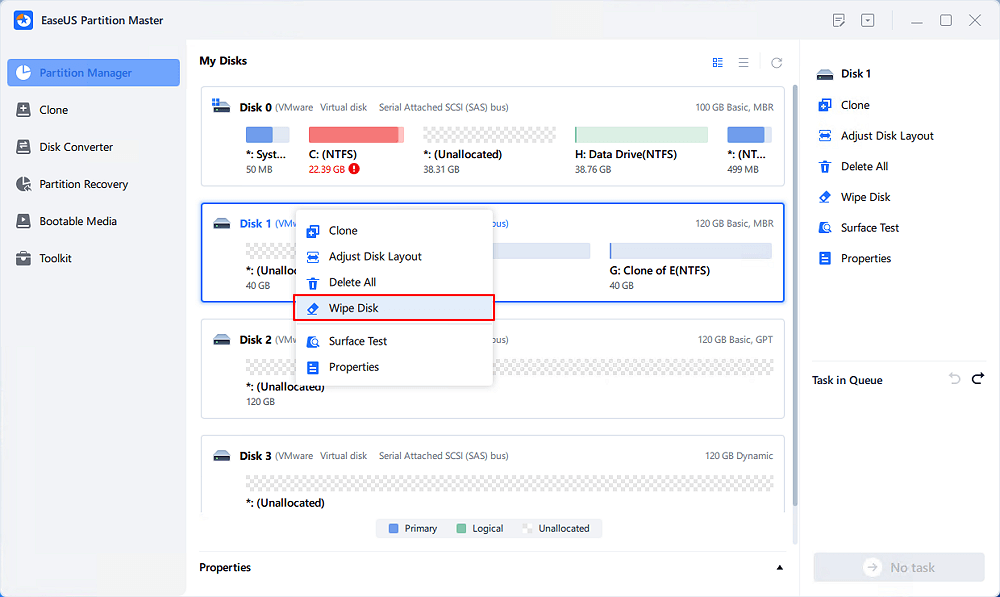
Step 4. Install and launch EaseUS Partition Master. Select the HDD or SSD which you want to wipe. And right-click to choose «Wipe Disk».
Step 5. Set the number of times to wipe data. You can set to 10 at most. Then, click «OK».
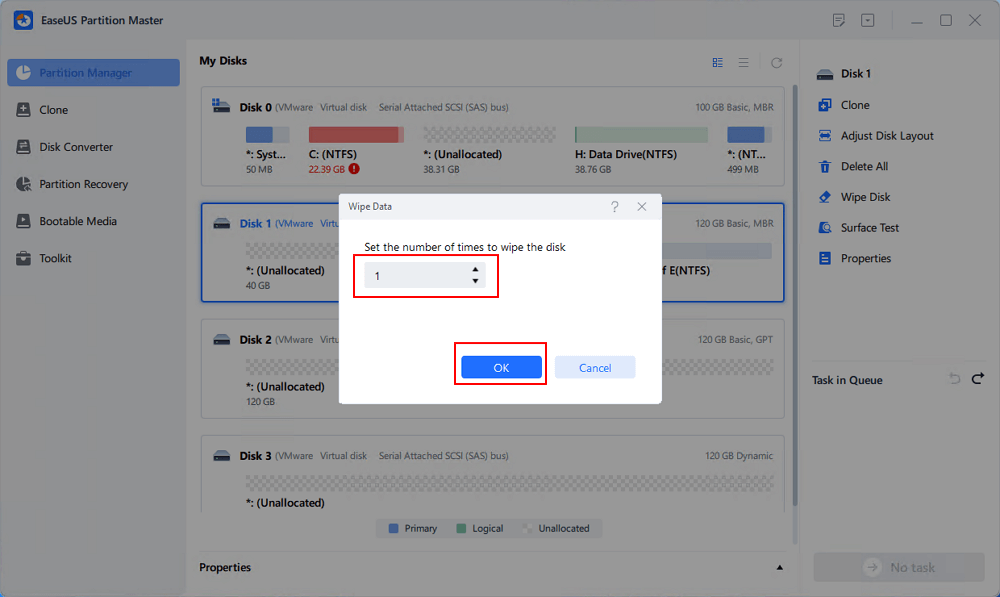
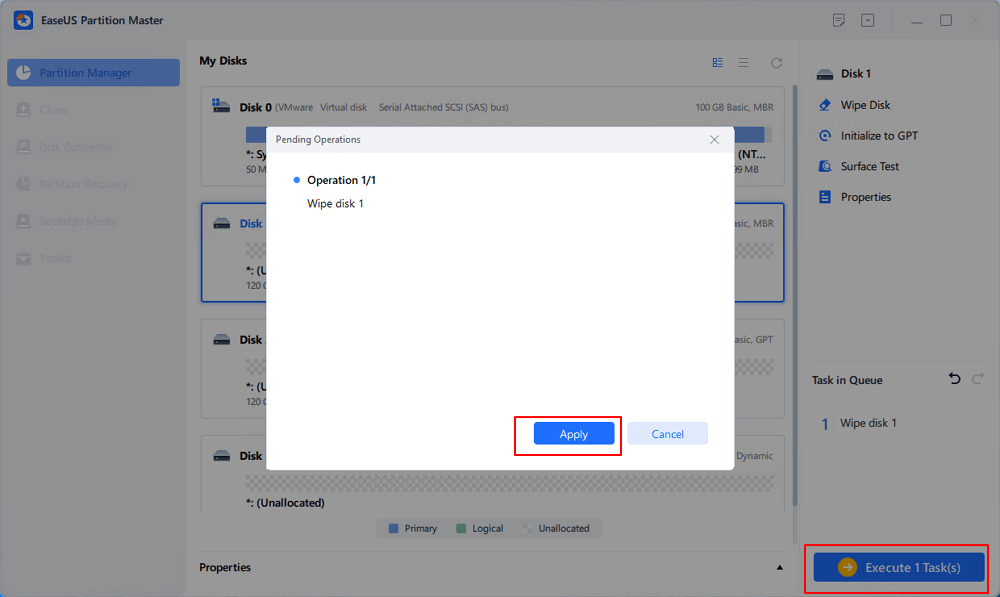
Step 6. Click «Execute 1 Task(s)» and then click «Apply» to start wiping data.
#2. Clean up and delete all existing partitions on the data disk:
Launch EaseUS Partition Master > Right-click on the target disk and select «Delete All» > Click «OK» and «Execute Operation».
Error 2: The specified disk is not convertible. CDROMs and DVDs are examples of disks that are not convertible
Applies to:
Virtual Disk Service error:
The specified disk is not convertible. CDROMs and DVDs are examples of disks that are not convertible.
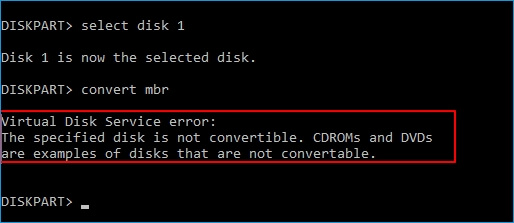
When you type list disk > select disk * > convert GPT or convert MBR but received an error message, telling that you are having a virtual disk service error on the current disk, the reason is that you have partitions existing on the drive.
So how to fix this error? You have two ways out:
Two Fixes for Virtual Disk Service Error — Specified Disk Is Not Convertible
- #1. Convert Disk to MBR/GPT without Losing Data
- #2. Clean Disk and Convert Disk to MBR/GPT
#1. Directly Convert Disk to MBR or GPT using EaseUS Partition Master
EaseUS Partition Master is an excellent DiskPart alternative tool that enables you to convert a disk to MBR or GPT without deleting partitions. No data loss issue will occur.
Follow the steps below to fix the virtual disk service error — the specified disk is not a convertible error on your own:
— Convert MBR to GPT:
Step 1. Download and launch EaseUS Partition Master on your computer.
Step 2. Go to Disk Converter, select «Convert MBR to GPT» and click «Next» to continue.

Step 3. Select the target MBR disk that you tend to convert to GPT, and click «Convert» to start the conversion.

— Convert GPT to MBR:
Right-click target GPT disk on EaseUS Partition Master > Select «Convert to MBR» > Click «OK» > «Execute Operation».
#2. Clean and Convert Disk to MBR/GPT using DiskPart Command
It requires deleting partitions before converting drive to GPT or MBR using the DiskPart conversion command. Therefore, if you have important data saved on the target disk, back up data to an external hard drive first.
Here are the steps:
Step 1. Open DiskPart by typing cmd in the Search bar, right-click Command Prompt and select «Run as Administrator».
Then type diskpart and hit Enter.
Step 2. Type the following commands and hit Enter each time:
- list disk
- select disk * (replace * with the target disk number)
- clean
- convert gpt or convert mbr
- exit
Error 3: Delete is not allowed on the current boot, system, pagefile, crashdump or hibernation volume
Applies to:
Virtual Disk Service error:
Delete is not allowed on the current boot, system, pagefile, crashdump, or hibernation volume.
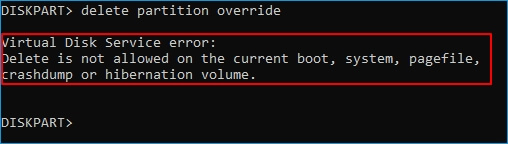
Note that this error often occurs when you set command in DiskPart to order Windows to delete the boot partition or system partition on its own. If you input the wrong volume number, retry to delete partitions again with the right volume number.
If your goal is to delete the OS partition or boot partition, try the below tutorial.
Fix: Delete Boot/System Volume via EaseUS Partition Master Bootable Disk
EaseUS Partition Master offers a safe way to help you delete the OS partition or the boot drive from its bootable disk.
- 1) You need first create an EaseUS Partition Master WinPE bootable disk.
- 2) Next, boot PC from EaseUS Partition software from the bootable disk.
- 3) Enter EaseUS Partition Master main window, right-click on the system or boot partition and choose «Delete» and click «OK».
- 4). Last, click «Execute Operation» to start deleting the boot, system, pagefile, crashdump, or hibernation volume.
Error 4: There is no media in the device
Applies to:
Virtual Disk Service error:
There is no media in the device.

When you run DiskPart to perform some operations on your target disk but receive virtual disk service error: there is no media in the device, it means that DiskPart could not find specified media. In other words, it could not load nor access the device.
2 Fixes for Virtual Disk Service Error — There Is No Media in The Device
#1. Change USB port to reconnect an external storage device or reinstall an HDD/SSD disk
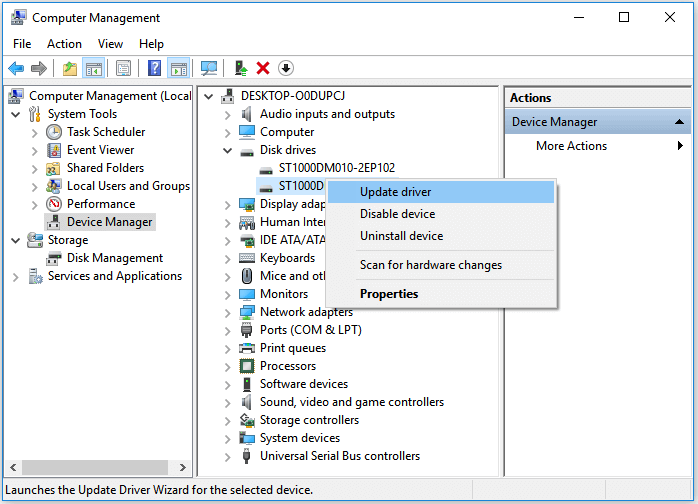
#2. Update No Media Device Drive Driver:
Step 1. Right-click «This PC» and choose «Manage» > «Device Manager».
Step 2. Expand «Disk Drives», then right-click your problematic device that shows no media and select «Update Driver».
Step 3. In the new window, choose «Search automatically for updated driver software».
You may also refer to: There Is No Media in The (Specified) Device for further fixes.
Error 5: The volume size is too big
Applies to:
Virtual Disk Service error:
The volume size is too big.
This error often occurs when you tend to format a large partition or a USB/external hard drive to the FAT32 file system using DiskPart utility. Due to the limit of the FAT32 file system, Windows doesn’t allow you to format a device larger than 32GB into FAT32. To fix this error, you have two options, as listed below.
2 Methods to Fix Virtual Disk Service Error — The Volume Size Is Too Big
- #1. Format Large Device to FAT32
- #2. Format Large Device to Other File System
#1. Using Third-Party Formatting Tool to Format Large Device to FAT32
If you tend to use a large device as a FAT32 removable drive, professional formatting tool — EaseUS Partition Master is your best shot. It breaks the limit of FAT32, enabling users to set large storage devices (more than 32GB) to FAT32 via its Format feature:
- Right-click the external drive or USB you intend to format and choose «Format».
- Set the Partition label, File system (NTFS/FAT32/EXT2/EXT3/EXT4/exFAT), and Cluster size, then click «OK».
- Click «Yes» to continue.
- Click the «Execute 1 Task(s)» button and click «Apply» to format the hard drive partition.
#2. Format Device to Other File Systems
The other fix that you can try is to change the file system, formatting your hard drive or external USB to other Windows supported format — NTFS (for internal HDD/SSD partition) or exFAT (for external hard drive):
Step 1. Right-click «This PC» and choose «Manage». Then go to «Disk Management».
Step 2. Right-click the target hard drive partition and choose «Format».
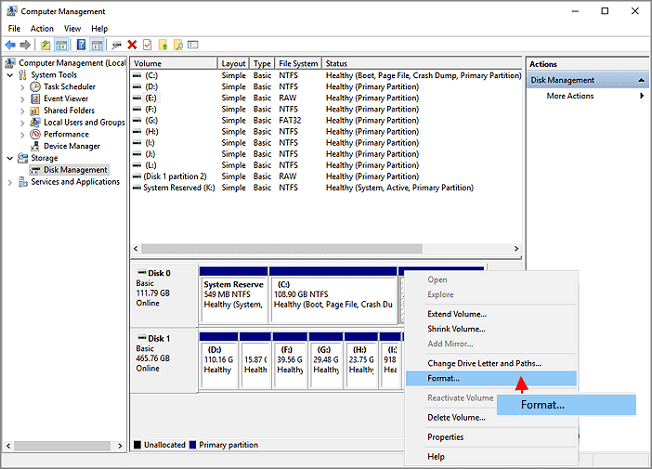
Step 3. Set the volume label, file system, and click «OK» to start formatting the drive.
Error 6: There is not enough usable space for this operation
Applies to:
Virtual Disk Service error:
There is not enough usable space for this operation.
This error often occurs when there is no unused free space or not enough unallocated space available on a hard disk for some specific operations, such as to extend a partition or to create a primary partition using DiskPart utility.
Two Fixes:
- 1]. Shrink Partition to leave unallocated space
- 2]. Extend Partition with or without unallocated space
Error 7: The service failed to initialize
Applies to:
Virtual Disk Service error:
The service failed to initialize.
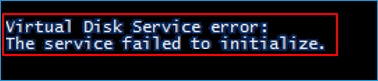
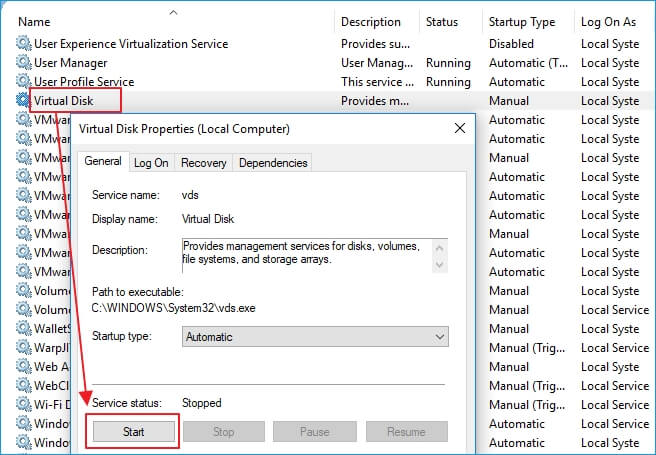
Normally, the Virtual Disk Service starts automatically on Windows PC. However, it may not start sometimes or failed to initialize.
Two Fixes:
1]. Open DiskPart utility > Type net start vds and hit Enter.
2]. Manually restart Virtual Disk Service: Type services in the Search box and hit Enter > Right-click or double-click «Virtual Disk» service > Select «Start».
This will change the Virtual Disk service startup type from Manual to Automatic, then restart Windows.
Error 8: The media is write protected.
Applies to:
Virtual Disk Service error:
The media is write protected.
This error often occurs when a storage device is encrypted or locked due to some manual operation or device error. And the fixes toward this issue are multiple.
Full Fixes:
5 Ways to Remove Write Protection from USB, SD, internal/external hard drive in Windows 10/8/7.
Bonus Tip:
After fixing the diskpart error, you can now use this disk utility tool to manage your disks for free. And here is a guide to show you how to do so.
![]()
What Is Diskpart and How to Use Diskpart on Windows
After fixing the Diskpart Virtual Disk Service error, you may now apply the Diskpart to manage your disk partitions with relative command lines. This page offers you the complete guide to master and use Diskpart to partitioning hard drives on your own.
Conclusion
These are multiple solutions that can fix the typical Virtual Disk Service errors that you might encounter while manage disk partitions using Diskpart.
As we addressed, the methods to fix each error are different. You need to confirm the exact problem you are having in DiskPart to decide which method to apply. We collected the most possible ways to help you out and hope they are helpful!
If the problem that you are having is not included on this page, use the Search option at the top right corner on our homepage: https://www.easeus.com for help.
Download PC Repair Tool to quickly find & fix Windows errors automatically
Some users reported getting an error message saying “Diskpart has encountered an error, The media is write protected” after using the clean or clean all commands in DiskPart. Additionally, this problem may also appear when mounting SD cards, HDDs, SSDs, SanDisk drives, among others. In case you’re dealing with the same issue on your computer, this post might help you fix it.

What causes Diskpart to encounter a Media write protection error?
There are a few mass storage devices that provide file and folder protection through write protection. Unfortunately, sometimes the files and folders cannot be accessed. Furthermore, some drives lack a write-protection switch but can still be set to read-only. Below are some possible reasons for this.
- You might have bad sectors on your drive.
- Malware or viruses have infected your storage media.
- Disks are set to read-only in the Registry or in Property.
- The media can no longer be writeable if the read-only mode is accidentally activated.
- The read-only mode is accidentally activated and the media becomes un-writable.
It is recommended that you first backup your files and then try the suggestions below to fix this error effectively.
1] Modify the Registry Editor
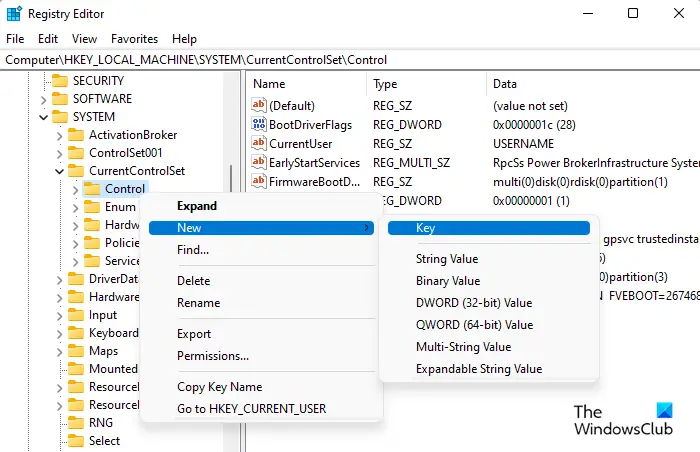
Try changing the WriteProtect key’s value in the Registry to see if that solves the issue. You can do this using the below steps:
- The first step is to open the Registry Editor. In order to do this, press the Windows key + R to open Run. Type regedit into the textbox, then click OK. When UAC appears on the screen, click on the Yes button.
- Once you are in the Registry Editor, go to the following location:
HKEY_LOCAL_MACHINESYSTEMCurrentControlSetControlStorageDevicePolicies
Note: Alternatively, you can just copy and paste the below path line in the address bar of the Registry Editor and press Enter. Your computer will automatically take you there.
- If you do not see the StorageDevicePolicies key in the following location, you need to create it.
- To do so, right-click on Control and then select New > Key.
- Then name it StorageDevicePolicies.
- You now need to create a new 32-bit DWORD value named WriteProtect.
- For this, right-click on StorageDevicePolicies, choose New > DWORD (32-bit) Value, and then name it WriteProtect.
- Click twice on the newly created WriteProtect key, and then when the popup menu appears, change the Value data to 0.
- Lastly, click OK to save the changes.
Now close the Registry Editor window and check if you are able to access the storage device and data.
2] Remove Read Only Attribute
If the Diskpart clean command fails to run correctly due to the media being write-protected on USB, SD Cards, HDDs, or SSDs, clear the read-only attributes and see if it helps. Here is how to do this:
- Run Command Prompt as an Administrator. To do so, open the Run window. Once it opens, type cmd in the search bar and press the key combination Ctrl+Shift+Enter.
- In the Command Prompt window, type diskpart and press Enter.
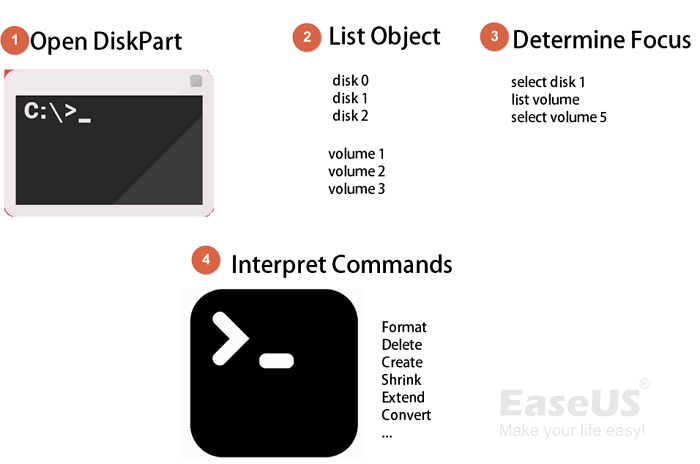
- Then, run the commands in the order listed below:
![]()
list disk
select disk n
attributes disk clear readonly
clean
Note: In the above command, n represents the number of devices to be cleaned
- After you perform the above steps, now close the window, and check if it works.
3] Repair the corrupted system file
A corrupted file system can also result in this issue. If you encounter such a problem, you can use Diskpart to remove all write-protection files and reformat the disk.
- Open Command Prompt as an administrator.
- On the next page, type diskpart and press Enter.
- Now run the commands below one after another:
list disk
select disk m
attributes disk clear readonly
clean
create partition primary
format fs=fat32
Note: In the above command line, m refers to the drive containing the corrupted file system
When you have completed the above steps, close this window and check if your device and data are accessible.
Related:
- Diskpart has encountered an error, The parameter is incorrect
- DiskPart has encountered an error: Access is denied
- DiskPart has encountered an error: Data error Cyclic redundancy check
- DiskPart error, The device does not recognize the command
- Virtual Disk Service error, There is no media in the device
How can I clean Diskpart?
Using the clean command in Diskpart will erase the entire disk and its partitions. When you have cleaned your entire disk, you can use the Diskpart utility to create new partitions. In this article, we discussed the whole process.

Digvijay is a Windows enthusiast who likes to write about the Windows OS and software in specific, and technology in general. When he is not working, he would either surf the web or dives into learning tech skills.
- Remove From My Forums
-
Question
-
Hi
i want ur help plz >
i have sony vaio usb flash disk 16GB ..
i have play with diskpart trying to re partition ,
but i do not know what happen ,, now the flash is with size 189 mb .
i try to clean it from diskpart but i can’t i have this mesage «diskpart has encountered an error the media is write protected «
i try many sol in the web but no one helped me >>
i have try to remov readonly but i can’t
help plz
thanks

-
Moved by
Tuesday, July 12, 2011 7:04 AM
(From:Server Core)
-
Moved by

Answers
-
Hi,
Can you run the following command in an elevated CMD prompt line?
C:diskpart
DISKPART> list disk
DISKPART> select disk 1
Note: Please adjust the disk number accordingly.
Disk 1 is now the selected disk.
DISKPART> clean
DISKPART> create partition primary
DISKPART> format fs=fat32 quick
If the issue continues, you may need to contact Sony to see whether there are some hardware issue with the USB disk. Thanks for your understanding.
Best Regards,
Vincent Hu
-
Marked as answer by
Vincent Hu
Tuesday, August 9, 2011 7:14 AM
-
Marked as answer by
Solve the error in no time to regain access to your drive
by Madalina Dinita
Madalina has been a Windows fan ever since she got her hands on her first Windows XP computer. She is interested in all things technology, especially emerging technologies… read more
Updated on December 30, 2022
Reviewed by
Alex Serban

After moving away from the corporate work-style, Alex has found rewards in a lifestyle of constant analysis, team coordination and pestering his colleagues. Holding an MCSA Windows Server… read more
- The ERROR_WRITE_PROTECT error code, also known as error 19 (0x13) usually occurs when you try to write data on internal or external storage devices. Follow the complete step by step guide below to fix this problem.
- The message can also come as The media is write protected» which won’t let you make any edits.
- The most common cause is the disk finds some kind of issue and won’t let you modify anything on it.
XINSTALL BY CLICKING THE DOWNLOAD FILE
This software will repair common computer errors, protect you from file loss, malware, hardware failure and optimize your PC for maximum performance. Fix PC issues and remove viruses now in 3 easy steps:
- Download Restoro PC Repair Tool that comes with Patented Technologies (patent available here).
- Click Start Scan to find Windows issues that could be causing PC problems.
- Click Repair All to fix issues affecting your computer’s security and performance
- Restoro has been downloaded by 0 readers this month.
If you’re getting the ERROR_WRITE_PROTECT error code with The media is write protected description, follow the troubleshooting steps listed in this article to fix it.
The ‘ERROR_WRITE_PROTECT’ error message, also known as error 19 (0x13) usually occurs when users try to write data on internal or external storage devices.
This error prevents users from actually writing any files to their PC hard drive, external drive, USB flash drive, etc.
There are various elements triggering this issue, including corrupted files and folders, broken EXE, DLL or SYS files, malware infection, outdated software versions, and more.
In this article, we’re going to show you how to fix the ‘ERROR_WRITE_PROTECT’ error code both on internal drives, as well as on external drives.
- Fix The media is write protected error on internal hard drives
- 1. Run a full system scan
- 2. Repair your registry using CCleaner
- 3. Use Microsoft’s System File Checker to check for system file corruption
- 4. Update your OS
- 5. Check your disk for errors
- 6. Clean your temporary files and folders
- 7. Use system recovery options
- 8. Fix The media is write protected error on external hard drives/ USB flash drives
- Solution 1 — Tweak the StorageDevicePolicies key
- Solution 2 — Remove write protect using Command Prompt
- Solution 3 — Install the HP USB Disk Storage Format Tool
1. Run a full system scan
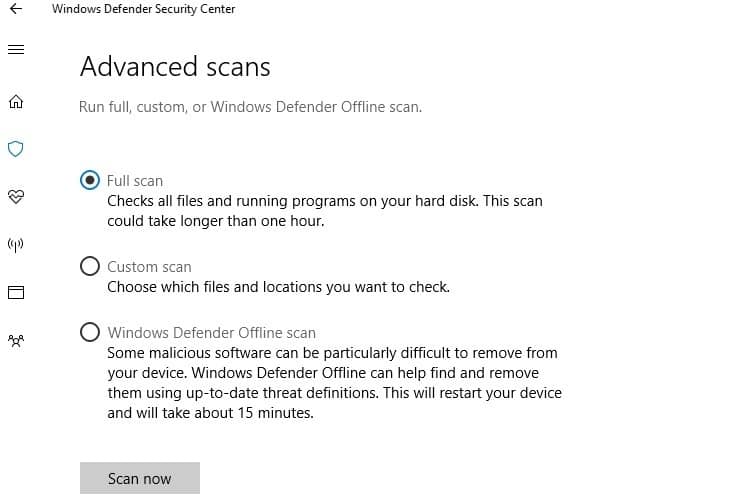
Malware may cause various issues on your computer, including errors. Perform a full system scan in order to detect any malware running on your computer. You can use Windows’ built-in antivirus, Windows Defender, or third-party antivirus solutions.
2. Repair your registry using CCleaner
The simplest way to repair your registry is to use a dedicated tool, such as CCleaner. Don’t forget to first back up your registry in case anything goes wrong.
3. Use Microsoft’s System File Checker to check for system file corruption
1. Go to Start > type cmd > right-click Command Prompt > select Run as Administrator
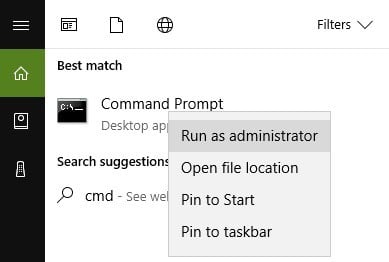
2. Now type the sfc /scannow command
3. Wait for the scanning process to complete and then restart your computer. All corrupted files will be replaced on reboot.
4. Update your OS
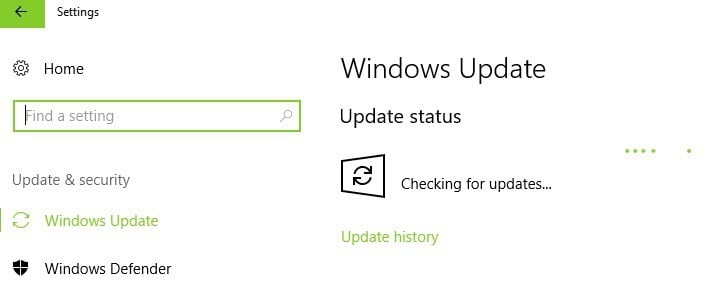
Make sure that you’re running the latest Windows OS updates on your machine. As a quick reminder, Microsoft constantly rolls out Windows updates in order to improve the system’s stability and fix various issues.
Go to Windows Update, check for updates and install the available updates. To access the Windows Update section, you can simply type update in the search box. This method works on all Windows versions.
5. Check your disk for errors
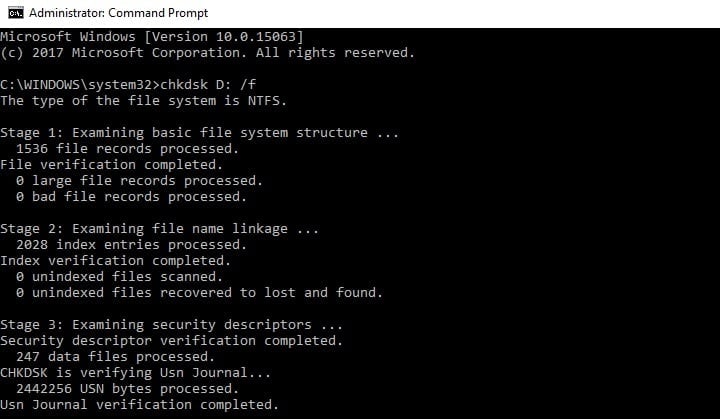
On Windows 10, you can run a disk check using Command Prompt.
Start Command Prompt as administrator and type the chkdsk C: /f command followed by Enter. Replace C with the letter of your hard drive partition.
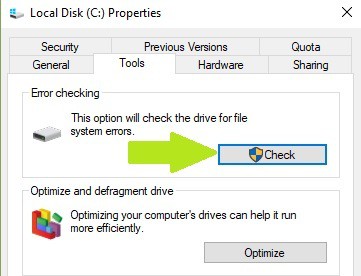
On Windows 7, go to hard drives > right-click the drive that you want to check > select Properties > Tool. Under the ‘Error checking’ section, click Check.
6. Clean your temporary files and folders
The simplest and quickest manner to delete your temporary files and folders is to use Disk Cleanup. As you use your computer or browse the Internet, your PC accumulates various unnecessary files.
These so-called junk files may affect your computer’s processing speed, causing apps to respond slowly and may also trigger various error codes, including the ERROR_WRITE_PROTECT error code.
Clean your temporary files and then try to write data on the problematic storage device again.
Here’s how to use Disk Cleanup on Windows 10:
Some PC issues are hard to tackle, especially when it comes to corrupted repositories or missing Windows files. If you are having troubles fixing an error, your system may be partially broken.
We recommend installing Restoro, a tool that will scan your machine and identify what the fault is.
Click here to download and start repairing.
1. Go to Start > type Disk Cleanup > launch the tool
2. Select the disk that you want to clean > the tool will then tell you how much space you can free up
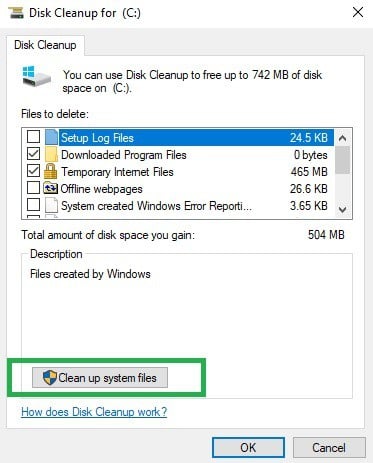
3. Select the Clean up system files button.
4. For Windows 7 go to Start, type Disk Cleanup, and click on it Disk Cleanup.
- In Disk Cleanup’s description section, select Clean up system files and select the drive that you want to clean up > click OK.
- On the Disk Cleanup tab, select the checkboxes for the file types that you want to delete > click OK > select Delete files.
7. Use system recovery options
The System Restore option allows you to restore the previous well-performing system configuration without losing any files, except for a few customizable features and settings.
If System Restore is enabled, follow the instructions listed below:
- Go to Search > type system properties > open System Properties.
- Go to System Protection > click on System Restore.
- Click Next > choose the preferred restore point in the new window.
- Once you’ve selected your preferred restore point, click Next > click Finish.
- Your PC will restart and the restoring process will start.
After the procedure has been completed, try to write data on the problematic storage device again to see if the problem still persists.
Windows 10 offers a series of advanced recovery option that allows users to clean install the OS. If you’re a Windows 10 user, you can also use ‘Reset this PC’ recovery option.
- Go to Settings > Update & Security > click on Recovery under the left pane.
- Click on Get Started under Reset this PC > choose to Keep your files.
- Follow the on-screen instructions to complete the reset.
8. Fix The media is write protected error on external hard drives/ USB flash drives
Solution 1 — Tweak the StorageDevicePolicies key
1. Go to Start > type regedit > hit Enter
2. Go to HKEY_LOCAL_MACHINESYSTEMCurrentcontrolsetControlStorageDevicePolicies
If you can’t find StorageDevicePolicies, here’s how to create it:
- Go to HKEY_LOCAL_MACHINESYSTEMCurrentcontrolsetcontrol > right click Control
- Select New > Key > rename the new key into StorageDevicePolicies
- Right click the StorageDevicePolicies folder > select new DWORD(32-bit) Value/ DWORD(64-bit) depending on your OS
- Rename the dword folder into WriteProtect > double click WriteProtect > change the value data into 0 (zero) > close the registry
4. If the StorageDevicePolicies key is available, select it > you’ll see a WriteProtect DWORD key in the right-hand pane.
5. Double click WriteProtect > replace the Value Data 1 with a 0 (zero)
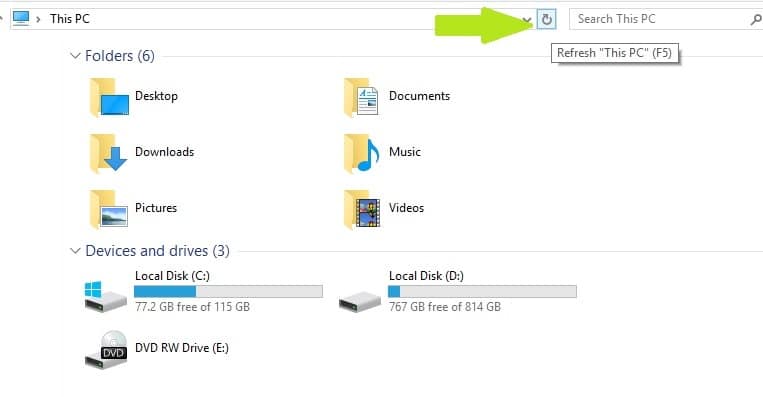
6. Go to My Computer (Windows 7) or This PC (Windows 10) and refresh it a few times. You can also reboot your computer.
7. Eject your flash drive > plug it back in and format it using exfat instead of fat32. After this action, ‘The Media is write protected’ message should be history.
Solution 2 — Remove write protect using Command Prompt
1. Go to Start > type cmd > right-click the first result > launch Command Prompt as Admin
2.Type the following commands, hitting Enter after each one:
DISKPART
LIST VOLUME
SELECT VOLUME X — X is the volume number you want to remove the write protect from.
ATTRIBUTES DISK CLEAR READONLY
3. A prompt should appear informing you that the write protect has been removed.
4. Close Command Prompt > test your flash drive.
Solution 3 — Install the HP USB Disk Storage Format Tool
Users also confirmed that the HP USB Disk Storage Format Tool successfully removed write protection off their USB flash drives. This tool was created to format USB drives and computers that run older Windows versions. As a matter of fact, the UI is strikingly similar Windows XP’s format option.
The formatting tool works with newer Windows versions, but the results may vary. If you are going to run the HP USB Disk Storage Format Tool on your Windows 10 PC, you should do it as an Admin in Safe Mode in order to avoid errors. Sometimes, the tool may look like it has frozen. Rest assured, it’s still working in the background, but it needs more to complete the task.
There you go, we hope that the solutions listed above helped you fix ‘The media is write protected‘ error code. If you’ve come across other workarounds to fix this problem, you can help the Windows community by listing the troubleshooting steps in the comments below.
![]()