Learn how to solve this exception when trying to launch a virtual machine for first time on computers with AMD processors.
With virtual machines you will face regular problems on new computers. For example, recently i switched from an Intel Core i7 to an AMD Ryzen 9 3950x. Everything worked exceptionally until i tried to boot some virtual machines using Virtual Box:r
Not in a hypervisor partition (HVP=0) (VERR_NEM_NOT_AVAILABLE).
AMD-V is disabled in the BIOS (or by the host OS) (VERR_SVM_DISABLED).

Result Code:
E_FAIL (0x80004005)
Component:
ConsoleWrap
Interface:
IConsole {872da645-4a9b-1727-bee2-5585105b9eed}
This problem usually appears because of the following reasons:
- Virtualization (AMD-V) is disabled from BIOS settings.
- If Microsoft Hyper-V is enabled, it automatically means that the built-in virtualization technology was turned off.
- BIOS version doesn’t support many CPU cores. If – As it turns out, the issue might get thrown by VM VirtualBox if the software is forced to create a virtual machine with more than 1 CPU core. In order to do this, it requires hardware virtualizations and will throw the error if the feature is disabled or unavailable.
A. Enable Secure Virtual Machine Mode on the BIOS
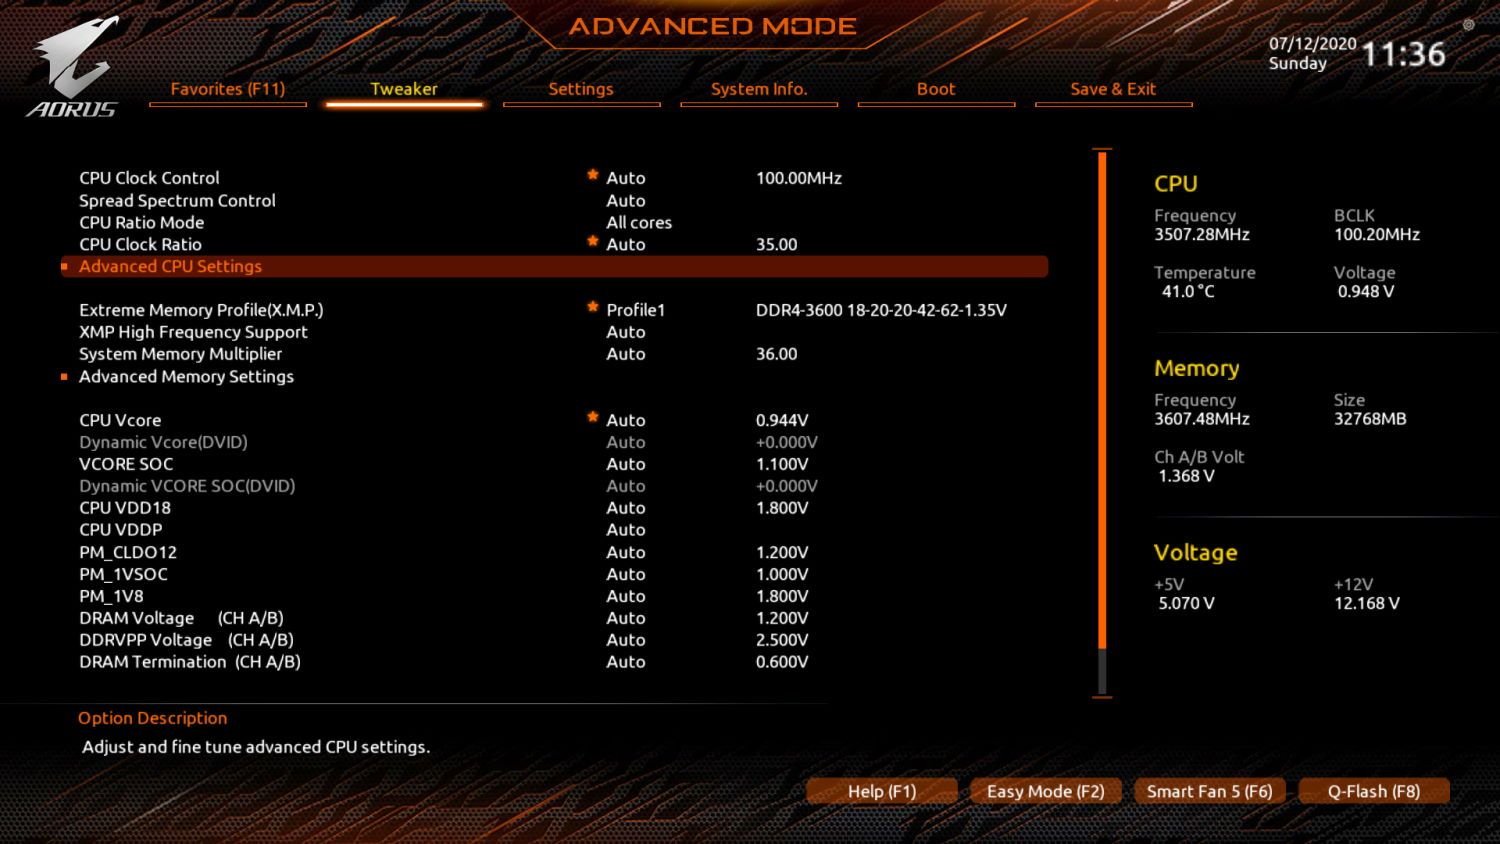
Basically the VERR_SVM_DISABLE error code is telling you that your PC does support AMD-V, but it’s disabled on the BIOS. You may simply boot your computer and start the bios. In board that support AMD processors, you will find this option as Secure Virtual Machine Mode. For example, in our AORUS x570 board we may find this option on the advanced mode, under the Tweak tab, search for the Advanced CPU settings:
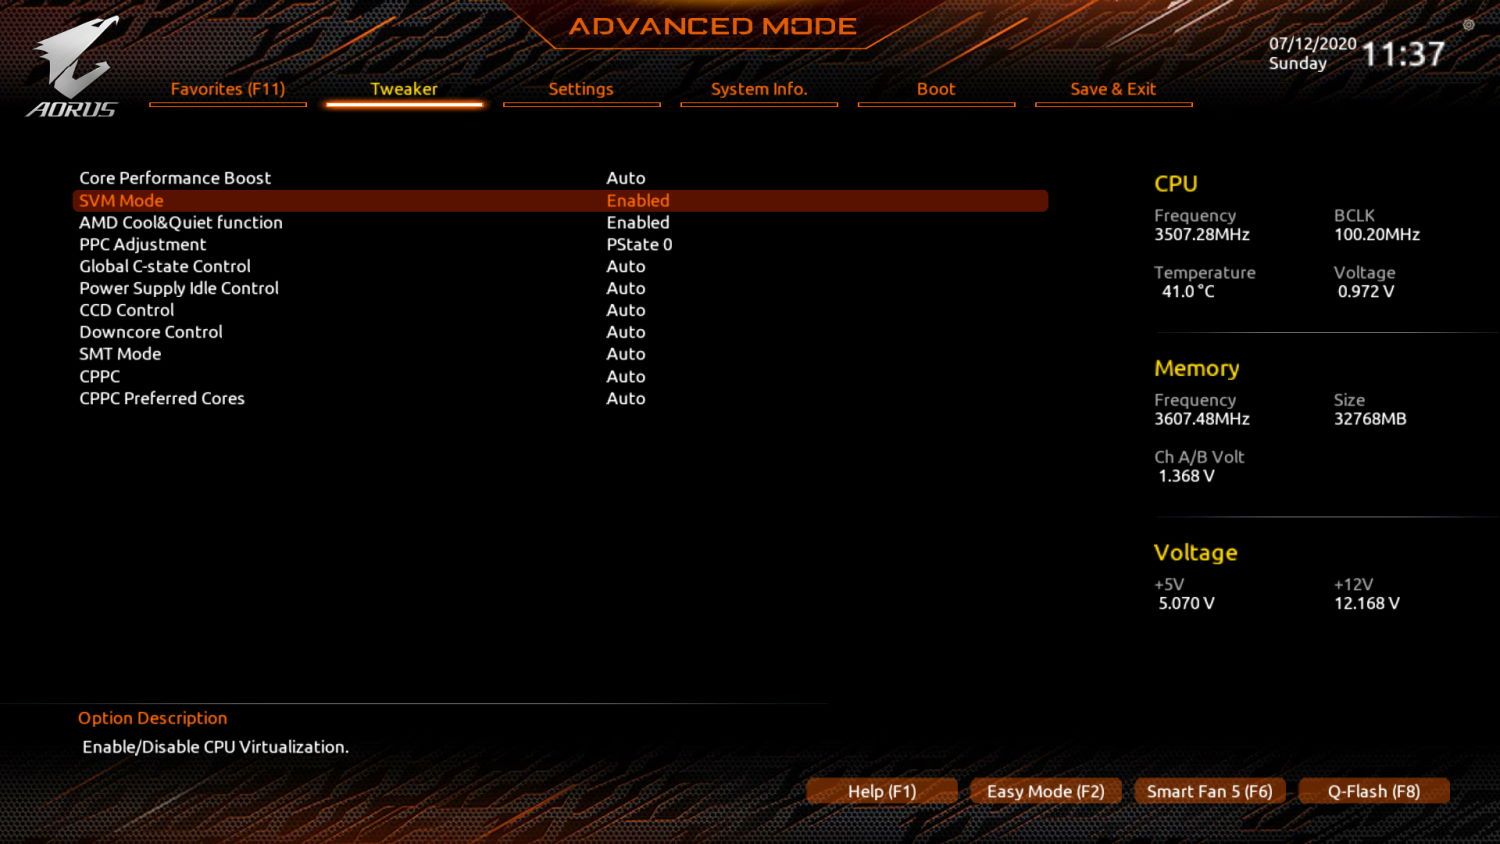
And then search for the Secure Virtual Machine Mode option and enable it:
Save changes and reboot the computer, in most of the cases, the virtualization will work immediately, specially on brand new computers. If you try to start your virtual machine and it still fails, proceed with the next possible solution.
B. Disable Windows Hyper-V
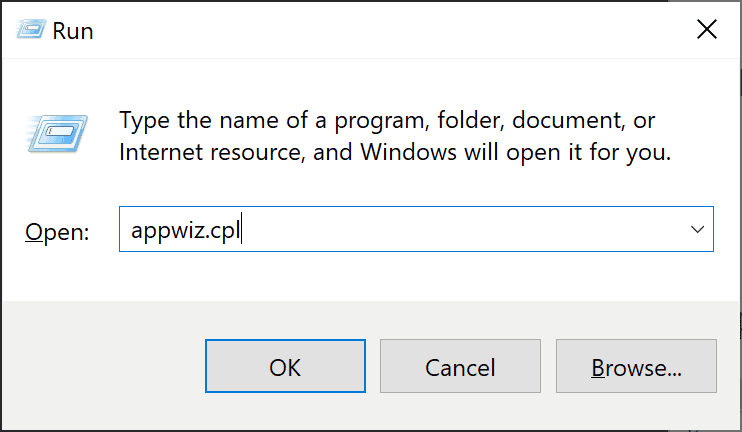
Many users found the solution of this problem by simply disabling the Microsoft Hyper V Feature of Windows 10. To do this, you will have to open the appwiz.cpl executable through the run dialog box (Windows key + R):
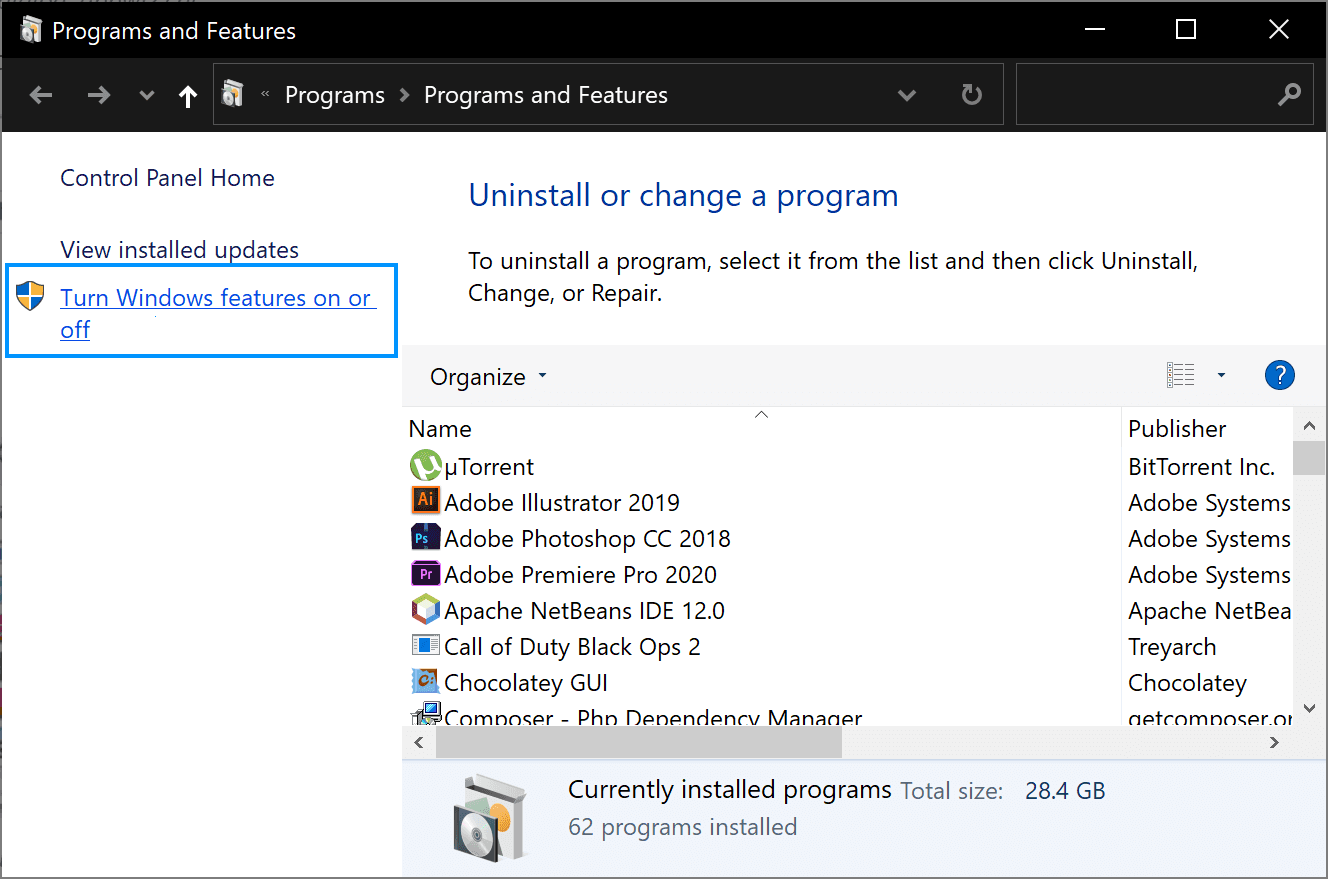
Then click on Turn Windows Features on or off on the left side of the control panel home:
Finally search for Hyper-V on the list:
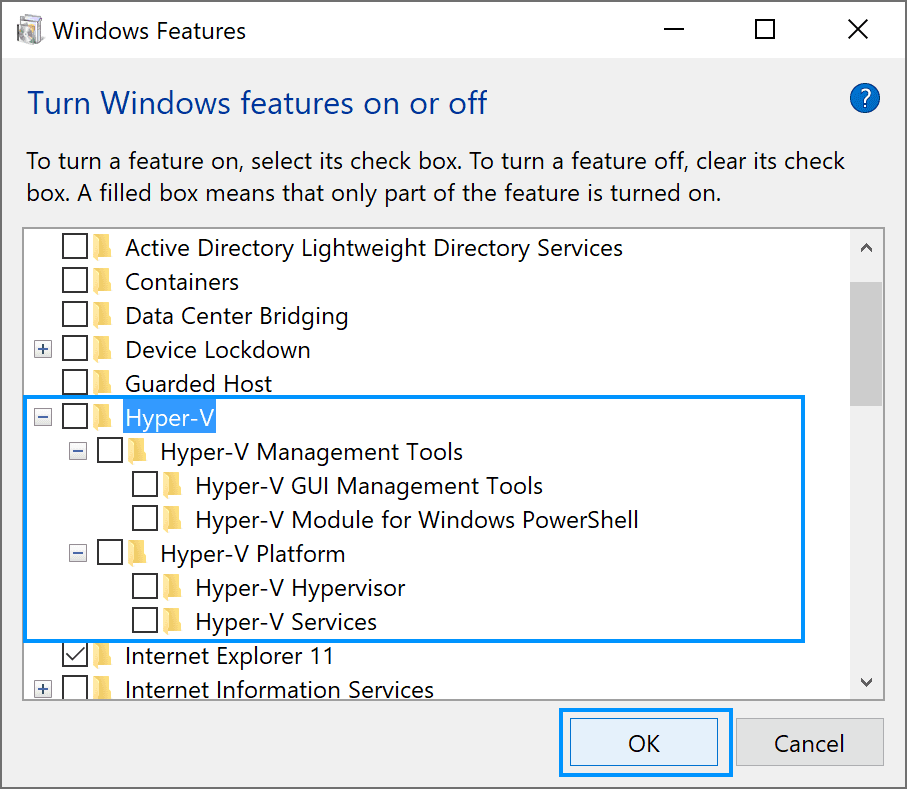
Click on OK and restart your computer, this should solve the problem when you try to start the machine again. If it doesn’t work, you can continue with the next option.
C. Change number of CPU cores to 1
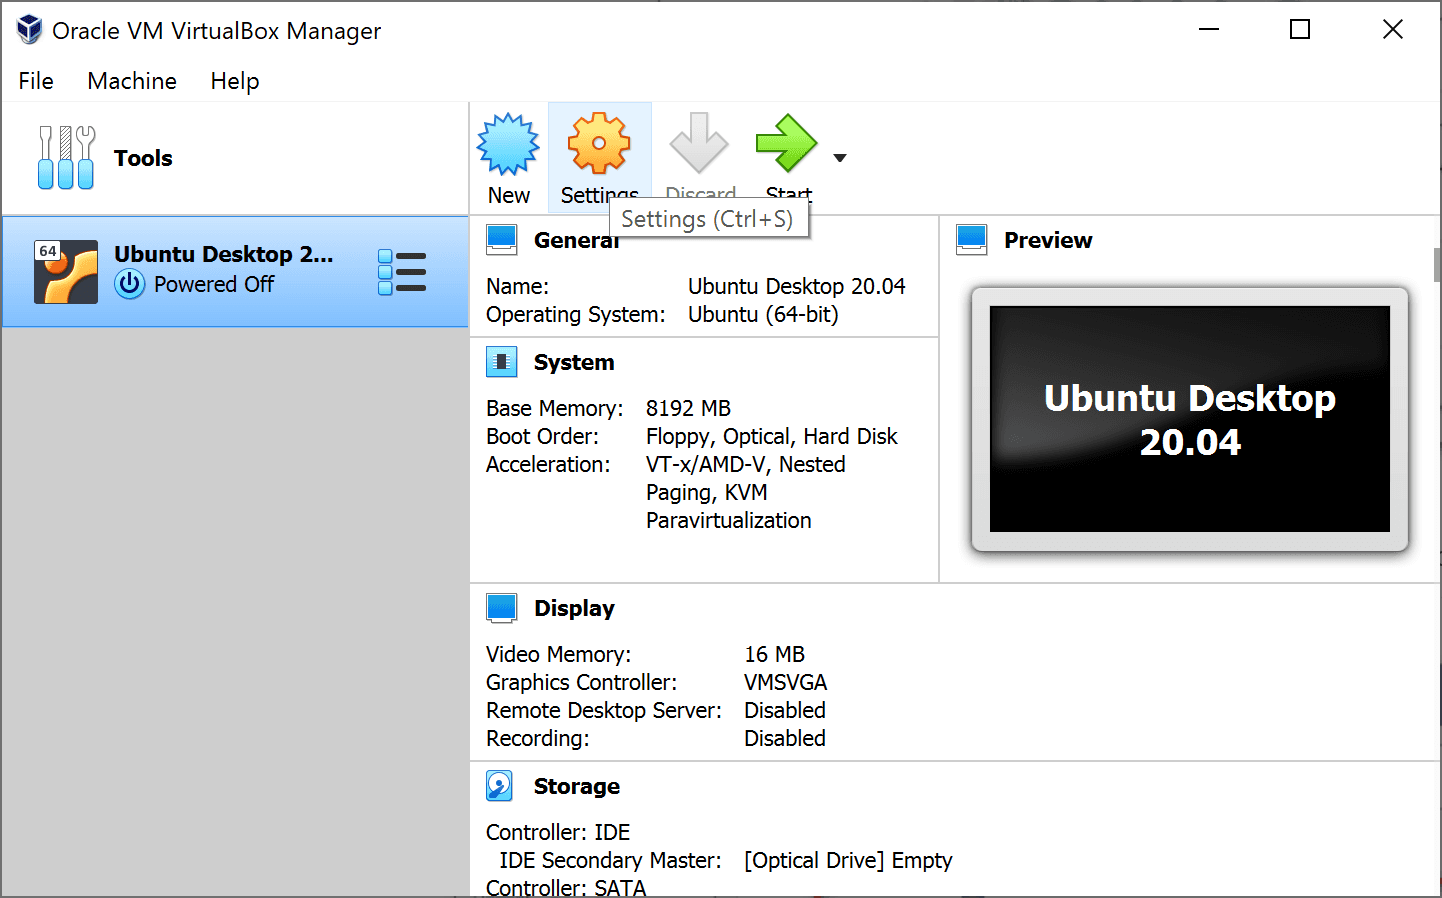
If after both of the mentioned solutions, the virtualization still fails, is very likely that the AMD-V technology is not supported by the current configuration of your virtual machine. Many users report that, when the software assigns more than 1 CPU in the System settings, which forces the system to use hardware virtualization in order to start the virtual host, this exception appears. Therefore, you will have to limit the amount of processors. Go to the settings of the virtual machine:
And decrease the number of processors to 1:
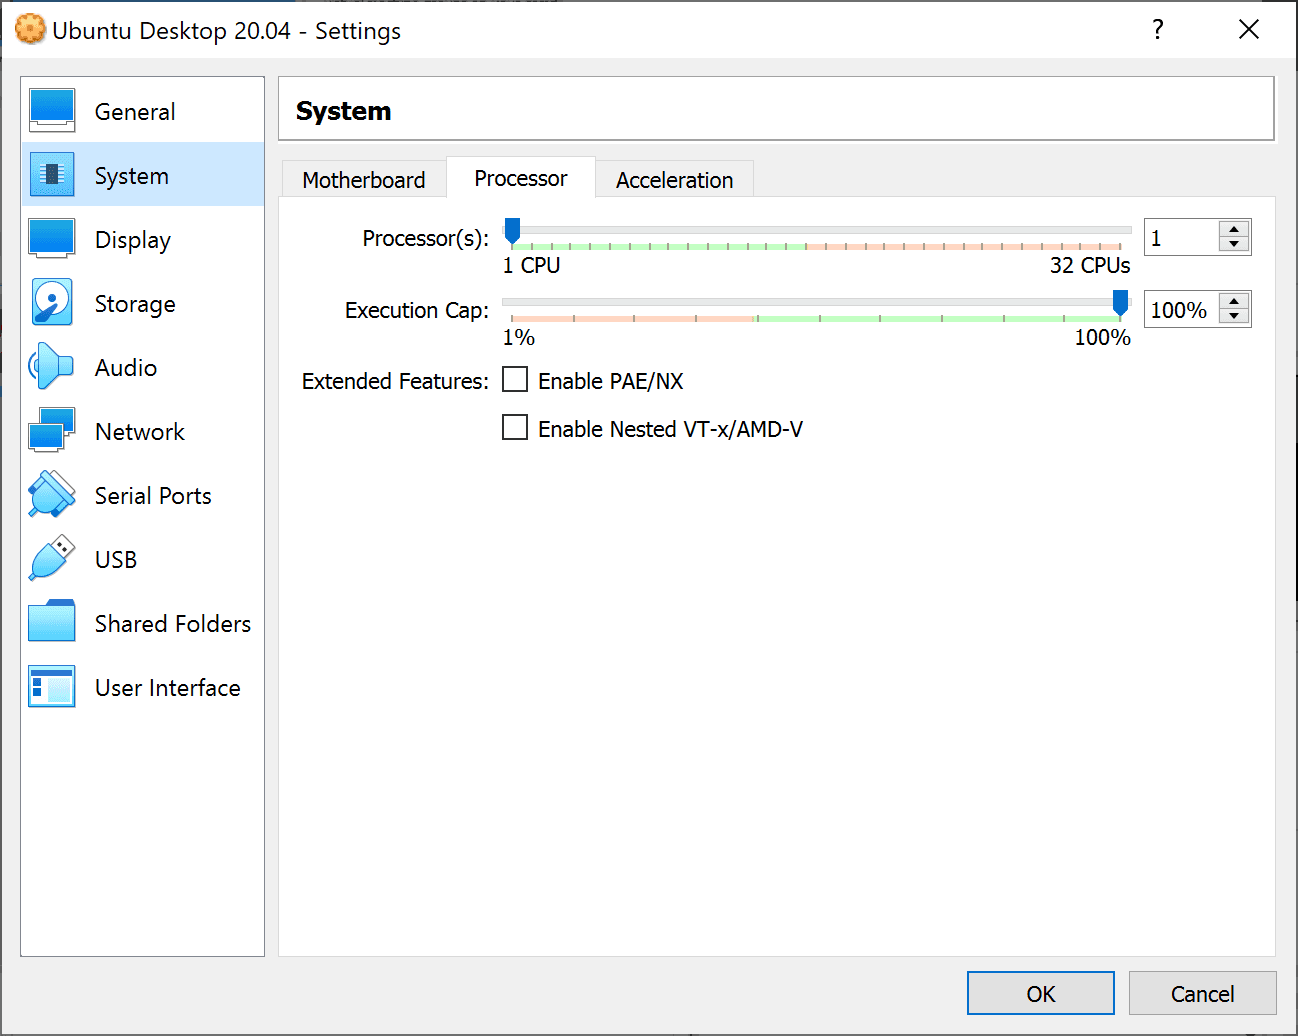
Close the settings and restart your virtual machine. It should boot up without the AMD-V is disabled in the BIOS.
Happy virtualization ❤️!
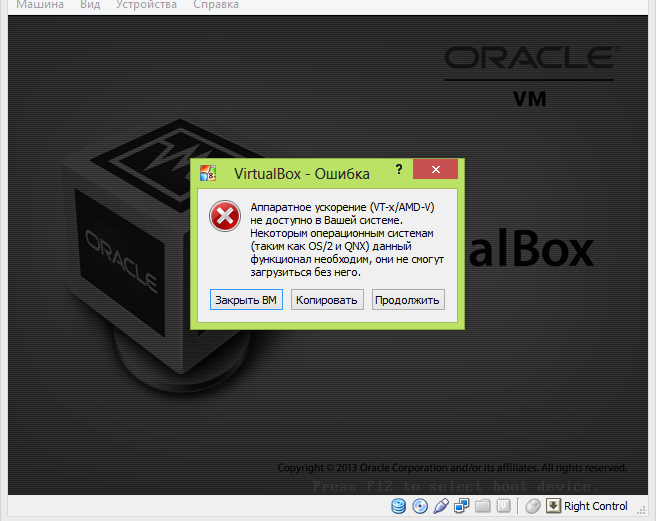
VirtualBox – замечательный программный инструмент, позволяющий устанавливать и запускать операционные системы и приложения в изолированной безопасной среде, а также выполнять различные тестирования их функций. Но может случится так, что в один момент при запуске виртуальной машины вы получите ошибку «Аппаратное ускорение (VT-x AMD-V) недоступно в вашей системе» и установленная на VirtualBox система не сможет запуститься.
В таких случаях пользователи нередко начинают искать причины неполадки в самом VirtualBox, изменять его настройки, переустанавливать и тому подобное, но корень проблемы обычно скрывается глубже. Если вы зайдете в настройки виртуальной машины в разделе «Система», то увидите, что вкладка «Ускорение» неактивна. Указанная ошибка редко возникает вдруг, «ни с того ни с сего», обычно ей предшествуют критические сбои, изменения системных настроек или аппаратные неполадки.
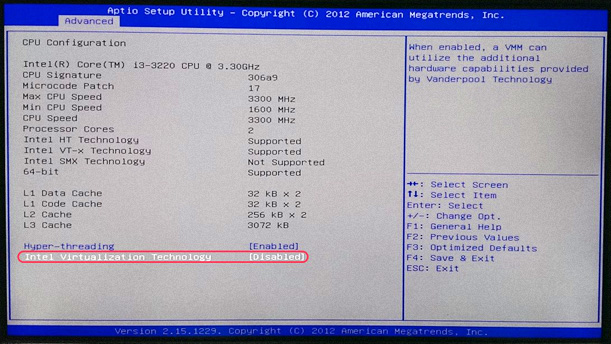
Наиболее часто встречающаяся причина ошибки «Аппаратное ускорение (VT-x AMD-V) недоступно в вашей системе» заключается в сбое настроек BIOS. Обязательно проверьте эту настройку, если она будет отключена, виртуализация в системе работать не будет. Обычно эта опция находится в разделе Advanced или Advanced → CPU Configuration. Называться она может Secure Virtual Machine Mode, Intel Virtualization Technology, Virtualization Extensions или AMD-V. Значение ее должно выставлено Enabled.
Отдельно стоит сказать о ноутбуках, владельцем которых пришлось столкнуться с аппаратными неполадками в системе энергообеспечения. Ошибка аппаратного ускорения в VirtualBox наблюдалась после извлечения аккумулятора (переход на работу только от сети), после повреждения питающего кабеля и т.п. Любопытно, но ошибка может наблюдаться и при активной опции виртуализации в BIOS. В таких случаях все обычно решается правильной перезагрузкой, то есть выполненной через интерфейс или командную строку.
Также обратите внимание на следующий момент. Если на ноутбуке используется гибернация, в BIOS после выключения лэптопа вы можете не попасть, вместо этого у вас начнется загружаться система. Причина — изменение параметров электропитания, а именно, действия кнопок питания. Используйте перезагрузку или измените действие таким образом, чтобы при нажатии «Завершении работы» компьютер действительно выключался.
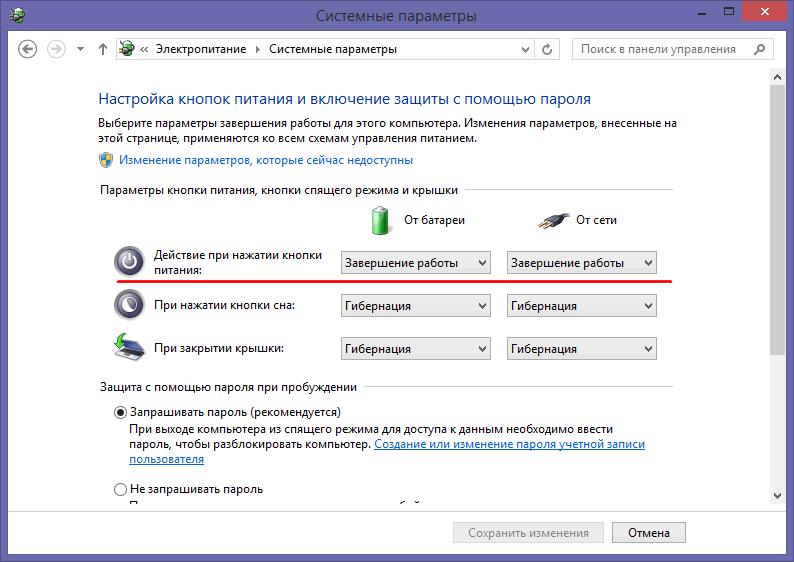
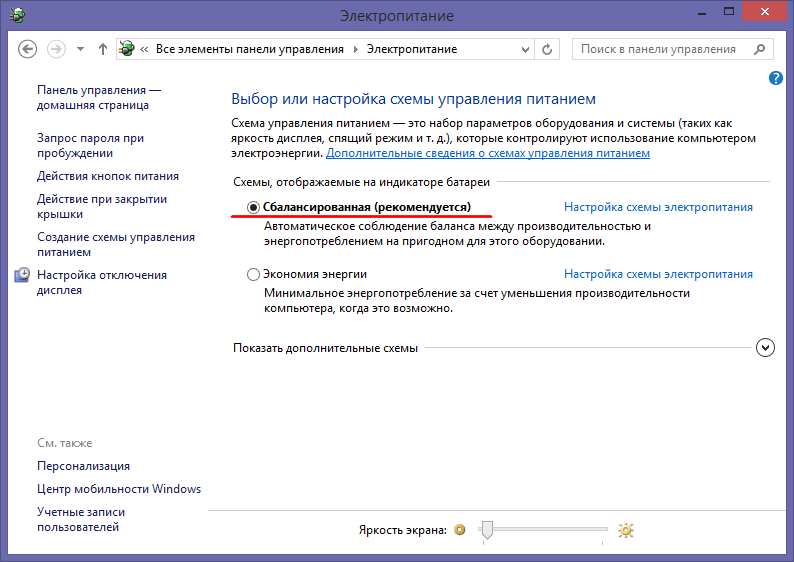
Схему управления питанием при этом лучше выбрать «Сбалансированная».
Некоторые пользователи сообщают о восстановлении работы VirtualBox после отключения в BIOS опции Execute Disable Bit. Используйте этот способ в крайнем случае, если ничего другое не помогает. Функция Execute Disable Bit обеспечивает дополнительную защиту ПК от вирусов, поэтому отключать ее не рекомендуется. В разных версиях BIOS она может называться по-разному: XD Technology, NX Technology, NX BIOS Control, Intel XD Bit, No-Execute Memory Protect. Располагается она в разделе Advanced.
Но есть и другая причина, по которой VirtualBox может не видеть аппаратного ускорения. Такое бывает, если на ПК активен системный компонент Hyper-V. Откройте окно управления компонентами Windows, отыщите пункт Hyper-V и, если напротив него установлены галочки, снимите их, примените новые настройки и перезагрузите компьютер.

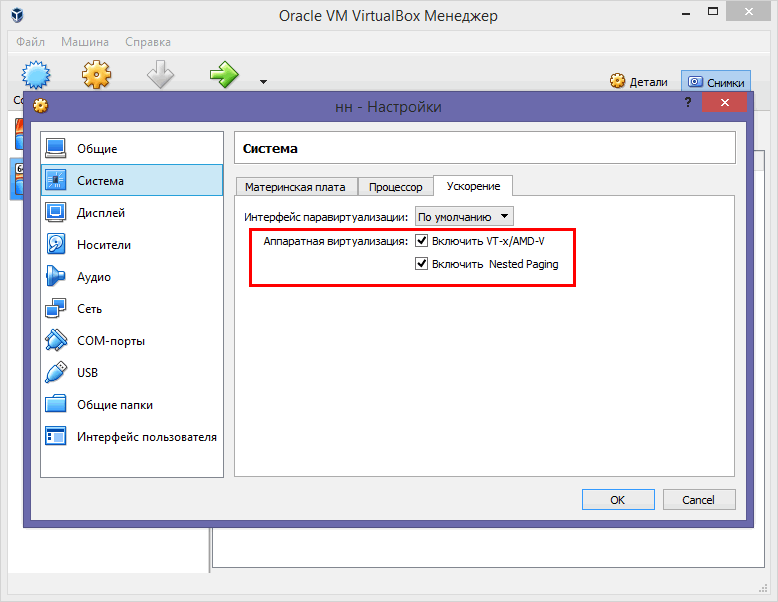
После этого созданные в VirtualBox машины должны начать запускаться. Ну и напоследок не помешает проверить настройки аппаратной виртуализации в самом виртуалбоксе. Галочки VT-x AMD-V и Nested Paging на вкладке «Ускорение» должны быть установлены.
![]() Загрузка…
Загрузка…
![]()
При работе с программным продуктом виртуализации VirtualBox, нередко возникают проблемы и неполадок, связанные с установкой на виртуальную машину той или иной операционной системы. Причины возникновения ошибок в работе могут быть разные и с одной из них, где говорится о том, что «аппаратное ускорение (VT-x AMD-V) недоступно в вашей системе», мы будем разбираться в данной статье.
В данном случае, такая проблема возникла при установке операционной системы windows 8, хотя когда производилась установка ОС windows 7, такой ошибки не возникало. Как же нам решить данную проблему? Узнаем ниже.
Итак, в первую очередь мы должны убедиться в том, что процессор поддерживает функцию VT-x/AMD-V, для это прочитайте статью Как проверить поддерживает ли ваш процессор аппаратную виртуализацию Intel VT-x/VT-d и AMD-V. А для её включения, необходимо перейти в BIOS материнской платы. Для это перезагружаем компьютер и переходим в BIOS нашей системы.

Для того, что бы перейти в BIOS, нам нужно при включение компьютера нажимать клавишу Delete на клавиатуре. (Если не заходит с помощью клавиши delete попробуйте F1, F2) При включении компьютера на начальном экране обычно видно какая клавиша ведет в BIOS.

В результате мы попадаем в BIOS нашего компьютера. Далее выбираем вкладку «Advanced». Там мы видим вкладку «CPU Configuration» выбираем её и нажимаем «Enter»

Попадаем в меню конфигураций, где видим вкладку «Secure Virtual Machine Mode», напротив стоит значение «Disabled», что означает отключено, нам просто надо её включить, для этого нажимаем на вкладку и выбираем значение «Enabled».

Как мы видим на рисунке значение поменялось, теперь нам надо сохранить внесённые изменения.

Для сохранения внесённых изменений переходим на вкладку «Exit», далее выбираем вкладку «Exit & Save Changes». В открывшемся окошке где нам предлагают сохранить внесенные изменения, нажимаем «OK» и ждем пока компьютер перезагрузится.

Далее открываем программу VirtualBox, заходим в «настройки» той системы которую хотели установить, в моём случае это Windows 8.1.Нажимаем на вкладку «система», далее «ускорение», ставим галочки напротив указанных на картинке пунктов и нажимаем «OK».

Всё! Ошибка больше не выскакивает, можно начинать установку. И в заключении хочу порекомендовать единственный в своем роде телеграмм канал наших добрых знакомых, где они выкладывают программы для windows абсолютно бесплатно.

Оставляйте своё мнение о данной статье, ну и конечно же задавайте свои вопросы если у вас что то вдруг пошло не так.
Спасибо за внимание!
Статьи рекомендуемые к прочтению:
-
Ошибка в программе VirtualBox. Аппаратное ускорение (VT-x AMD-V) недоступно в вашей системе. Что делать?
(107797)
-
Виртуальная машина Hyper-V
(20969)
-
Как подключить общую папку в VirtualBox
(24705)
-
Как перенести установленную в компьютере Windows 7 на виртуальную машину VirtualBox
(30722)
-
Увеличить размер диска VirtualBox
(41801)
-
Загружаем виртуальную машину с флешки программой Virtual Machine USB Boot
(16316)
-
Ошибка VirtualBox — This operating system user the Physical Address Extension feature to support systems with more than 4GB of RAM.
(15111)
Добавить комментарий
Several users are getting the ‘VT-x/AMD-V hardware acceleration is not available on your system’ error when trying to install or launch a virtual machine in Oracle VM Virtualbox. The issue is not specific to a certain Windows version as it’s reported to occur with every recent Windows release.

We investigated this particular issue by looking at various user reports and the repair strategies that they used to get the issue resolved. Based on what we gathered, there are several common scenarios that will trigger this particular error message:
- Your CPU doesn’t support VT-x/AMD-V – Some older CPUs are not equipped to support Intel’s VT-x or AMD-V. If your computer dosen’t supports any virtualization technology, you will be unable to circumvent or resolve the error message.
- VT-x/AMD-V was disabled by Hyper-V – Hyper-V is Microsoft’s proprietary virtualization technology. The most recent Windows versions will enable Hyper-V automatically and disable VT-x/AMD-V in order to avoid any conflicts. However, Hyper-V does not work well with virtual machines.
- VT-x/AMD-V is disabled within BIOS – Another reason why you might see this error message is that the virtualization technology that your CPU uses is disabled from BIOS. In this case, accessing the BIOS settings and enabling VT-x/AMD-V will resolve the error message and allow you to run virtual machines.
If you’re currently struggling to resolve the ‘VT-x/AMD-V hardware acceleration is not available on your system’ error, this article will provide you with a collection of verified troubleshooting steps. Down below, you’ll find several popular methods that other users in a similar situation have used to resolve the error message.
In order to spare yourself from trying out unnecessary fixes, follow the methods below in the order that they are presented. You should eventually find a method that resolves (or at least provides an answer for) your problem.
Before continuing, try performing an SFC scan.
Method 1: Verifying if your CPU supports virtualization
Before trying out anything else, it’s important that you take the time to investigate whether your computer is equipped to use VT-X or AMD-V. All the newer CPUs will support virtualization nowadays (including the ones in the low-range). However, if you’re working with an older CPU, you should start by verifying if your CPU support virtualization.
There are a couple of ways to verify whether your CPU is equipped to use virtualization – you either use a dedicated program that will tell you if virtualization is supported on your CPU or do things manually. Follow whichever guide is closer to your preferred approach.
How to verify if your CPU supports Virtualization automatically
One of the easiest ways to find out if your computer supports virtualization is to use a dedicated tool called SecurAble. Among other things, this tool will analyze the presence of operational model process features including virtualization. Here’s a quick guide on using SecurAble:
- Visit this link (here) and click on Download now to download the latest version of Securable.

Downloading SecurAble - Open the SecurAble executable and click Yes at the UAC (User Account Control) prompt.
- If your computer is equipped to support hardware virtualization, you will see a green Yes above Hardware Virtualization.

Verifying if virtualization is supported


If the answer is Yes, it means that your computer’s CPU is equipped to support virtualization and one of the next methods below will allow you to resolve the error message. If you determined that hardware virtualization is not supported, follow the other methods below will not resolve the error message.
How to verify if your CPU supports Virtualization manually
If you prefer to do things manually, you can verify whether your CPU supports VT-x (on Intel) or AMD-V (on AMD) by investigating the specifications of your CPU manually. To do this, follow one of the two guides below (according to your CPU manufacturer):
Intel
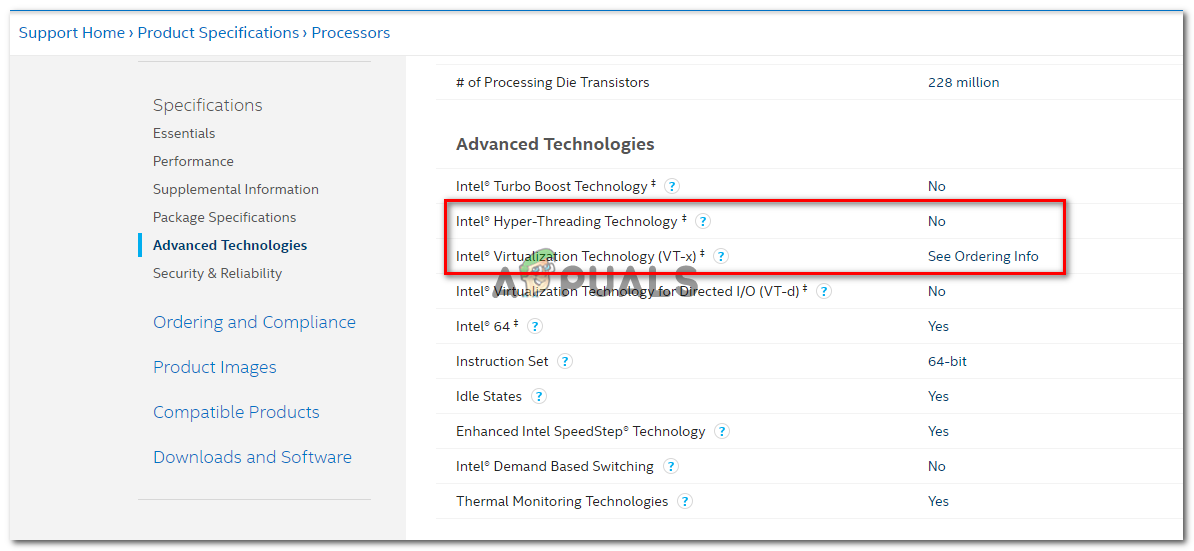
With Intel processors, you can see whether Virtualization is supported by looking at the Processor Documentation which can be found on ARK.INTEL.COM. Once you get there, use the search function to search for your specific CPU model.
Then, scroll down to the Advanced Technologies tab and see the status of Intel® Virtualization Technology for Directed I/O (VT-d) and Intel® Virtualization Technology (VT-x). If any of them is labeled as No, then virtualization technology is not supported by your processor model.
AMD
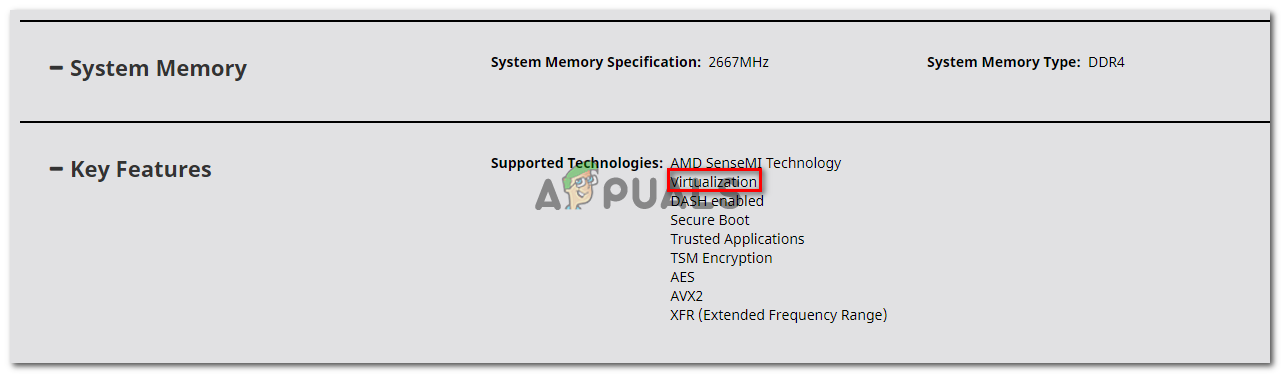
If you have an AMD processor, you can verify if it supports virtualization by looking at the specifications on AMD’s website. Use the search function to find your specific model or choose it from the list. Once you arrive at the webpage dedicated to your CPU model, expand the Key Features drop-down menu and see if Virtualization is among the Supported Technologies.
If you found that virtualization is supported, proceed with the next methods below in order to get the issue resolved.
Method 2: Disabling Hyper V
Hyper-V (formerly known as Windows Server Virtualization) is Microsoft’s proprietary virtualization technology. Hyper-V is perfectly capable of creating virtual machines on x86 and x64 system running Windows, but it’s not used by VirtualBox or VMware for stability reasons.
However, the most recent Windows versions are programmed to prioritize Hyper-V over VT-X or AMD-V. And since Hyper-V will conflict with similar virtualization technology, VT-x or AMD-V will be disabled by default whenever Hyper-V is enabled.
As you can imagine, this will create errors with Virtualbox, VMware or similar software, since most of them are not designed to work with Hyper-V.
Fortunately, disabling Hyper-V will resolve the ‘VT-x/AMD-V hardware acceleration is not available on your system’ error if the issue. There are multiple methods that you can follow to disable Hyper-V and allow VT-x or AMD-V to take over. Feel free to follow whichever one you feel more comfortable with.
Disabling Hyper-V via Command prompt
The easiest way to disable Hyper-V is by typing a command inside an elevated Command Prompt window. Here’s what you need to do:
- Press Windows key + R to open up a Run dialog box. Then, type “cmd” and press Ctrl + Shift + Enter to open up an elevated Command Prompt. When prompted by the UAC (User Account Control), click Yes to grant administrative privileges.

Opening Command Prompt via Run dialog box - In the elevated Command Prompt, type/paste the following command and press Enter to disable the Hyper-V function:
dism.exe /Online /Disable-Feature:Microsoft-Hyper-V
As soon as you’ve finished running this command, Hyper-V will be disabled and the virtualization technology provided by your processor will be reinforced.

Disabling Hyper-V via GUI
Another method that will enable you to disable Hyper-V technology is to use the Control Panel interface. This method is slower but should be preferred if you’re not comfortable with running commands via the terminal. Follow the steps down below to disable Hyper-V via the Programs and Features screen:
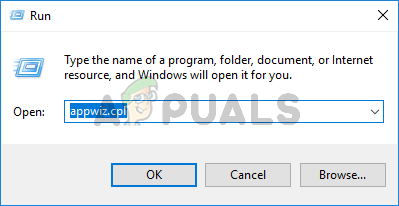
- Press Windows key + R to open up a Run dialog box. Then, type “appwiz.cpl” and press Enter to open up the Programs and Features screen.
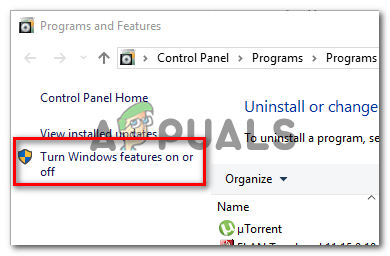
Type appwiz.cpl and Press Enter to Open The List of Installed Programs on Windows - Inside the Programs and Features screen, click on Turn Windows features on or off from the left-hand pane.

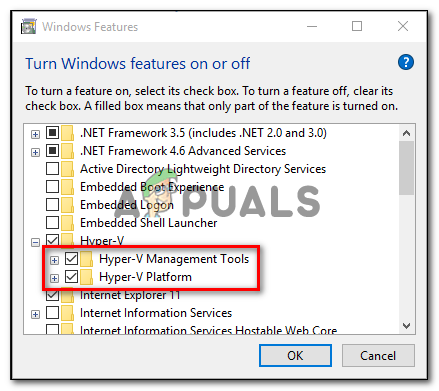
Accessing the Windows features menu - From the Windows Features menu, expand the Hyper-V folder and make sure to uncheck Hyper-V Management Tools and Hyper-V Platform before clicking OK.

Disabling Hyper-V via the Windows Features screen - Restart your computer and see if the error has been resolved at the next startup.
If you’re still encountering the ‘VT-x/AMD-V hardware acceleration is not available on your system’ error, move down to the next method below for steps on ensuring that virtualization is enabled from BIOS/UEFI.
Method 3: Enabling virtualization withing BIOS/UEFI
Another reason why you might get the ‘VT-x/AMD-V hardware acceleration is not available on your system’ error is due to virtualization being disabled from your BIOS settings. Although virtualization is enabled by default on most computer configurations, this is quite a common occurrence. For a lot of affected users, a BIOS update is what ended up disabling the virtualization technology in BIOS.
Fortunately, you can write this wrong quite easily by accessing your BIOS/UEFI settings and re-enabling the virtualization technology from there.
Note: Motherboard released prior to the release of Windows 8 are likely to use BIOS, while most modern PC builds are using UEFI.
On a BIOS-powered computer, you’ll need to press the Setup key during the initial startup screen. The Setup key is usually one of the F keys (F2, F4, F6, F8) or the Del key. If you can’t identify the setup key specific to your motherboard, do an online search on the ‘motherboard model + setup key‘.
On a UEFI-based computer, boot into the Advanced Startup options menu. From there, you can access the UEFI firmware settings.

Once you gain entry into your BIOS/UEFI settings, start looking for an option labeled Intel VT-x, AMD-V, Intel Virtualization Technology, Vanderpool, etc. You can typically find the option under Processor, Security, Chipset, Advanced, Advanced Chipset Control, Advanced CPU configuration, etc.
When you manage to find the option, make sure you enable it.

Note: The settings you’ll find inside your BIOS/UEFI will be different depending on your motherboard and CPU manufacturer. If you can’t find the option yourself, search online for specific steps on enabling hardware virtualization on your configuration.
Once you manage to enable virtualization, save the changes and restart your computer. At the next startup, the ‘VT-x/AMD-V hardware acceleration is not available on your system’ error should no longer occur when you try to install or run a virtual machine.
-
Partition Wizard
-
Clone Disk
- [Quick Fixes] AMD-V Hardware Acceleration Is Not Available
By Ariel | Follow |
Last Updated August 04, 2021
When trying to install or launch a virtual machine, many users receive the “VT-x/AMD-V hardware acceleration is not available on your system” error message. What causes the error? How to fix it? Now, let’s explore the answers together with MiniTool.
Why AMD-V Is Not Available
What causes the “AMD-V is not available (verr_svm_no_svm).”error? After investigating extensive user reports and references, we find the main reason for the error is that your CPU doesn’t support VT-X/AMD-V. In addition, the Hyper-V technology could conflict with VT-x. If the VT-V/ADM-V is disabled in BIOS or certain system files get corrupted or missing, you may encounter the “AMD-V is not available” error.
How to Fix AMD-V Is Not Available
There are 4 applicable methods to fix the VT X AMD V hardware acceleration error. Let’s try them one by one.
Fix 1. Check If Your CPU Support VT-x/AMD-V
The first and most important thing you should do is to verify if your CPU supports VT-x/AMD-V. Although all the newest CPUs are equipped to use VT-x, some older CPUs don’t support VT-x/AMD-V.
To verify if your CPU supports virtualization quickly, you can utilize a dedicated tool called SecurAble that will automatically analyze the virtualization technology.
Step 1. Click here to download SecurAble.
Step 2. Open the executable file of this program and click on Yes at the UAC prompt. Then this tool will automatically check your CPU model.
Step 3. If your CPU supports the VT X AMD V hardware acceleration, you will see a green Yes in the Hardware Virtualization section.

Once confirmed, you can proceed with the following methods to get the “Virtualbox AMD-V is not available” issue resolved.
Fix 2. Disable Hyper-V
Microsoft Hyper-V is a piece of virtualization program that enables users to create one or more virtual machines. It performs almost the same tasks as VirtualBox, but it can be used by VirtualBox or VM due to stability reasons. To avoid conflict, you need to disable Hyper-V completely.
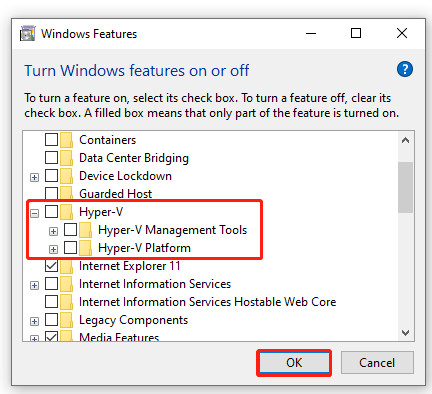
Step 1. Press Win + R keys to open the Run dialog box, and then type OptionalFeatures.exe in it and hit Enter.
Step 2. In the Windows Features window, scroll down the list to find the Hyper-V option. If it is checked, untick the checkbox of Hyper-V, including its sub-options.
Step 3. Click on OK to save changes.
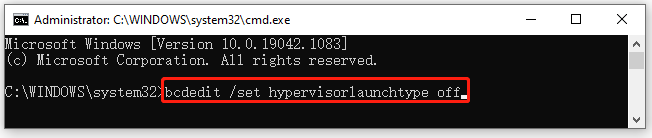
Step 4. Type cmd in the search box, and then right-click the Command Prompt app and select Run as administrator.
Step 5. In the elevated command prompt, type the following command and hit Enter.
bcdedit /set hypervisorlaunchtype off
Step 6. Open the Local Group Policy Editor window by running the gpedit.msc command, and then locate the following path via the left navigation bar:
Computer Configuration > Administrative Templates > System > Device Guard
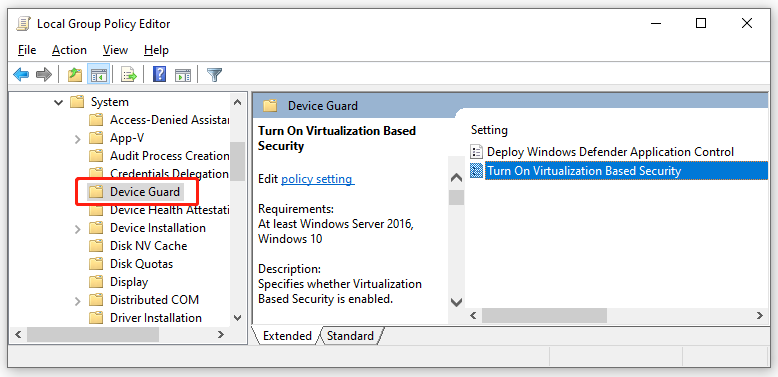
Step 7. Double click the Turn on Virtualization Based Security option and set it as Disabled, and click on OK to save changes.
Once done, you can see if the VT-x/AMD-V hardware acceleration is not available on your system error is fixed.
Fix 3. Enable VT-x/AMD-V in BIOS
Virtual Technology is an architecture that allows users to run multiple and isolated operating systems on a single server. Once the VT is disabled, you will encounter various problems like VirtualBox no 64 bit and Virtualbox AMD-V is not available. Now, follow the steps below to enable VT-x in BIOS.
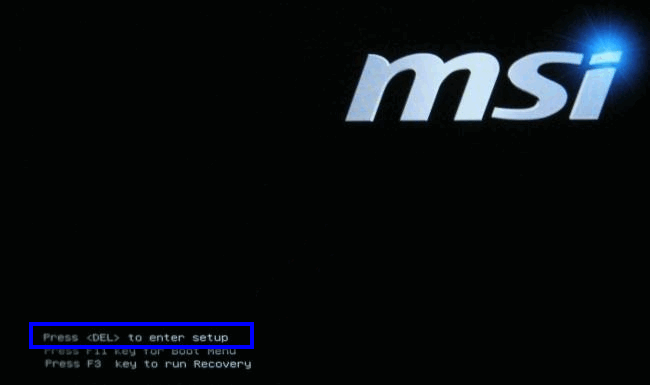
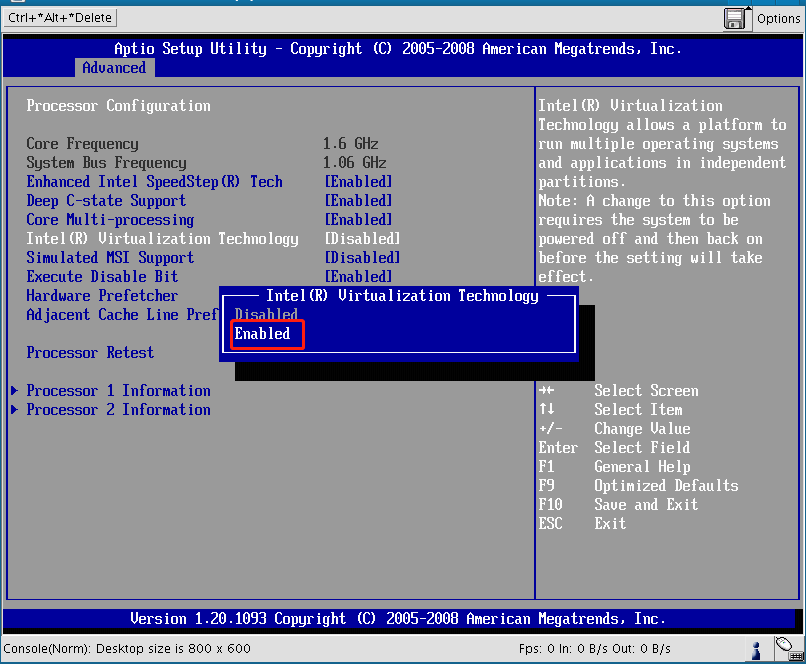
Step 1. Restart your computer and press the Delete or F2 key when the startup screen appears to enter BIOS.
Step 2. Navigate to the Advanced tab, and then select the Intel Virtualization Technology option and change it to Enabled using the arrow keys.
Tip: The Intel Virtualization Technology location may vary depending on a different motherboard. For instance, on an ASUS motherboard, the Intel Virtualization Technology option is located in Advanced > CPU Configuration.
Step 3. Press the F10 key to save changes and exit the BIOS. Then your computer will restart.
Fix 4. Run an SFC Scan
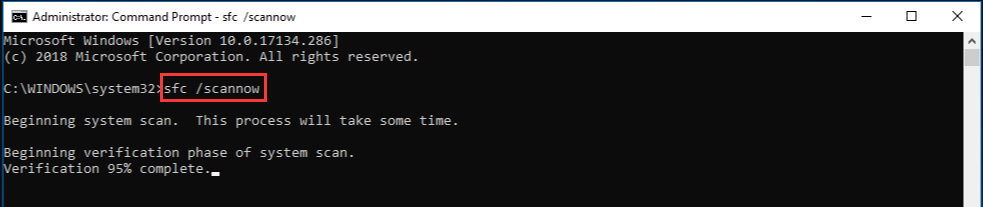
Some users encounter the “AMD-V is not available” error and get the DCP-WATCHDOG-VIOLATION blue screen after restarting. This could be caused by corrupted system files. If you are in this case, you can try running an SFC scan to repair them.
Open the elevated command prompt window again, and then type sfc /scannow command and hit Enter. After that, this tool will scan and repair the corrupted system files. This process may take you some time and make sure that it completes.
About The Author

Position: Columnist
Ariel is an enthusiastic IT columnist focusing on partition management, data recovery, and Windows issues. She has helped users fix various problems like PS4 corrupted disk, unexpected store exception error, the green screen of death error, etc. If you are searching for methods to optimize your storage device and restore lost data from different storage devices, then Ariel can provide reliable solutions for these issues.