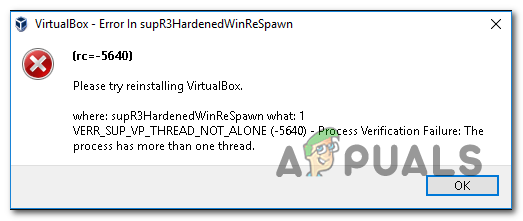
Проблема «Ошибка в supR3HardenedWinReSpawn» возникает при установке Oracle Virtualbox — обычно через пару секунд после попытки запустить их виртуальную машину. Как только эта проблема начинает возникать, каждая новая созданная виртуальная машина будет отображать одно и то же сообщение об ошибке (что делает Virtualbox полностью непригодным для использования).
VirtualBox «Ошибка в supR3HardenedWinReSpawn»
Примечание. Эта проблема отличается от ошибки E_FAIL (0x80004005) при каждом запуске виртуальной машины.
Одной из наиболее распространенных причин, вызывающих такой тип поведения, является отсутствие драйвера (VBoxDrv.inf). Возможно, из-за некоторых проблем с разрешением установка этого важного драйвера не завершится во время первоначальной установки. В этом случае вы можете решить проблему, установив VBoxDrv.inf вручную.
Другая потенциальная причина, которая может вызвать эту конкретную ошибку, — несоответствие реестра, которое указывает на неправильный каталог драйвера. Если этот сценарий применим, вы можете быстро устранить проблему, выполнив проверку реестра и изменив строку ImagePath в случае, если каталог неверен.
Если вы столкнулись с проблемой в самый первый раз, когда пытались запустить виртуальную машину, вероятно, вы видите ошибку из-за того, что виртуальной машине VirtualBox не хватает оперативной памяти для работы. В этом случае вы можете быстро решить проблему, зайдя в настройки виртуальной машины и настроив выделенное ОЗУ.
Существует множество проблем, связанных с использованием опции паравиртуализации по умолчанию. Возможно, это не поддерживается ОС, которую вы пытаетесь эмулировать. Чтобы устранить проблему в этом случае, вам нужно получить доступ к настройкам виртуальной машины и изменить паравиртуализацию с По умолчанию на KVM.
Если вы используете более старую конфигурацию ПК, возможно, аппаратная виртуализация отключена по умолчанию. Если ваша машина не может заменить эту технологию, при каждом запуске виртуальной машины может возникать ошибка. Чтобы решить эту проблему, просто перейдите к настройкам UEFI / BIOS и убедитесь, что виртуализация разрешена.
Есть много проблем, связанных с VirtualBox версии 5.2.6. Если вы все еще используете его, скорее всего, вы страдаете от того же сбоя, который вызвал проблему у тысяч пользователей. В данном случае самый простой способ решения проблемы — удалить текущую версию Virtualbox и установить последнюю доступную стабильную сборку.
1. Установите VBoxDRV.inf
Как выясняется, одной из наиболее распространенных причин, вызывающих VirtualBox «Ошибка в supR3HardenedWinReSpawn», является отсутствующий драйвер (VBoxDRV.inf). Существует вероятность того, что из-за некоторых проблем с разрешениями основное приложение VirtualBox может быть установлено без этого ключевого драйвера.
Если этот сценарий применим, вы не сможете запустить любую машину Virtualbox (созданную с нуля или импортированную из более старой установки). Несколько затронутых пользователей, которые также боролись с этой проблемой, подтвердили, что смогли решить эту проблему, вручную перейдя к расположению драйвера VBoxDRV.inf, выполнив установку, а затем принудительно запустив недавно установленную службу с помощью команды повышенных прав. Незамедлительный.
Вот краткое руководство по установке и запуску службы VBoxDrv для исправления проблемы «Ошибка в supR3HardenedWinReSpawn»:
- Откройте проводник и перейдите в следующую папку: C: Program Files Oracle VirtualBox drivers vboxdrv
Примечание. Можно либо перейти к местоположению вручную, либо вставить его непосредственно в панель навигации и нажать клавишу «Ввод», чтобы мгновенно туда попасть.
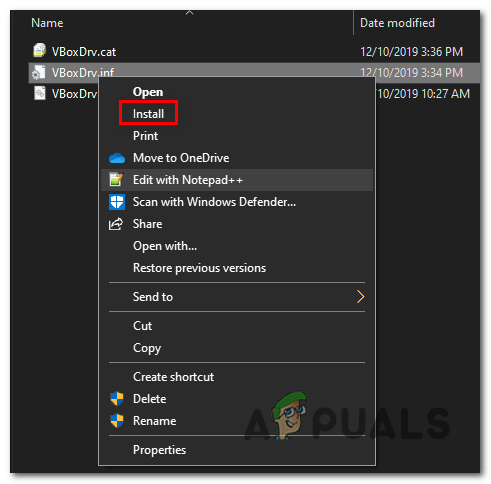
- Как только вы доберетесь до нужного места, щелкните правой кнопкой мыши на VBoxDrv.inf и выберите Install из контекстного меню.
Установка VBoxDrv вручную
- В ответ на запрос UAC (Контроль учетных записей) нажмите кнопку «Да», а затем дождитесь успешной установки драйвера.
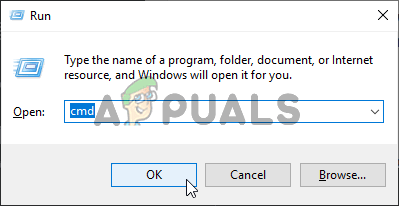
Примечание. Вы не получите сообщение об успешном завершении, но ваш экран будет мигать после установки драйвера. - Нажмите клавишу Windows + R, чтобы открыть диалоговое окно «Выполнить». Затем введите «cmd» и нажмите Ctrl + Shift + Enter, чтобы открыть окно с повышенными привилегиями CMD. Когда вас попросит UAC (Контроль учетных записей), нажмите Да, чтобы предоставить административные привилегии.
Запуск командной строки
- Когда вы находитесь в командной строке с повышенными привилегиями, введите следующую команду и нажмите Enter, чтобы принудительно запустить только что установленную службу: sc start vboxdrv
- После успешной обработки команды закройте командную строку с повышенными правами и перезагрузите компьютер. При следующей последовательности запуска повторите действие, которое ранее вызывало ошибку, и проверьте, устранена ли проблема.
Если вы все еще сталкиваетесь с той же проблемой «Ошибка в supR3HardenedWinReSpawn», перейдите к следующему потенциальному исправлению ниже.
2. Исправить проблему с каталогом
Другой потенциальной причиной, которая может вызвать эту конкретную проблему, является проблема с каталогом, вызванная несогласованностью реестра, поддерживаемой драйвером VirtualBox. Если этот сценарий применим, вы сможете быстро решить проблему, выполнив быструю проверку реестра, чтобы убедиться, что путь к драйверу ведет к VBoxDrv.sys.
В случае, если путь отличается, небольшая модификация должна гарантировать, что вы сможете запускать свои виртуальные машины без повторного появления ошибки «Ошибка в supR3HardenedWinReSpawn».
Вот краткое руководство по расследованию и устранению проблемы с каталогом, связанной с драйвером VBoxDrv.sys:
- Нажмите клавишу Windows + R, чтобы открыть диалоговое окно «Выполнить». Внутри текстового поля введите regedit и нажмите Enter, чтобы открыть редактор реестра. Когда вас попросит Контроль учетных записей (UAC), нажмите Да, чтобы предоставить доступ администратора.
Запуск редактора реестра
- Когда вы окажетесь в редакторе реестра, используйте левый раздел, чтобы перейти к следующему местоположению: HKEY_LOCAL_MACHINE system currentcontrolset services vboxdrv
Примечание. Можно либо перейти к местоположению вручную, либо вставить его непосредственно в панель навигации вверху и нажать клавишу «Ввод», чтобы мгновенно туда попасть.
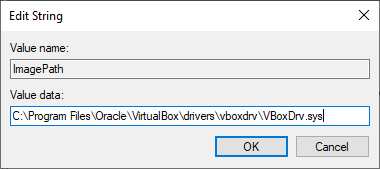
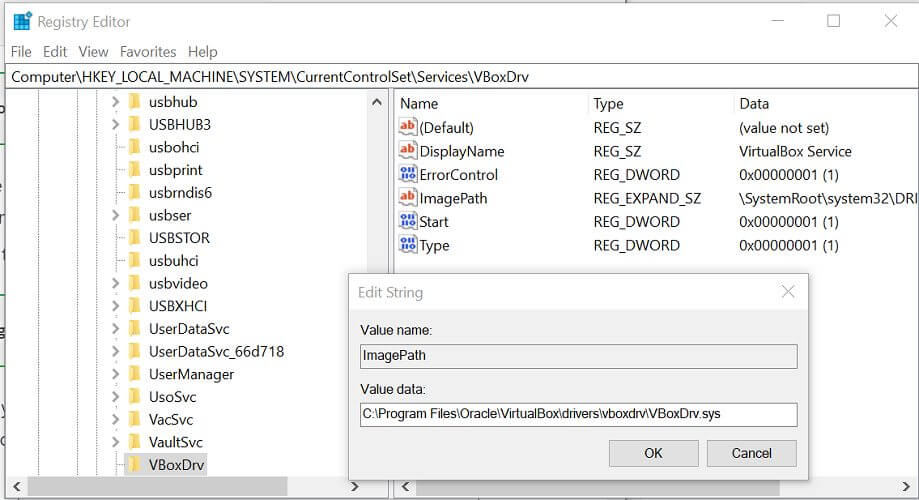
- После того, как вы достигнете правильного местоположения, перейдите в правую часть и дважды щелкните ImagePath.
- Когда вы туда попадете, проверьте, что путь точно такой, как показано ниже: C: Program Files Oracle VirtualBox drivers vboxdrv VBoxDrv.sys
Примечание. Если местоположение совпадает, это означает, что у вас нет проблемы с каталогом, и вы можете смело переходить к следующему потенциальному исправлению ниже.
- Но если расположение отличается, измените значение на следующее: C: Program Files Oracle VirtualBox drivers vboxdrv VBoxDrv.sys
- Как только вы убедитесь, что строка ImagePatch отображает правильное местоположение, нажмите «ОК» и закройте редактор реестра, чтобы сохранить изменения.
Правильное расположение VBoxDrv
- Теперь, чтобы убедиться, что драйвер действительно используется, перейдите в каталог драйверов ниже и запустите драйвер, щелкнув правой кнопкой мыши на VBoxDrv.sys и выбрав Установить.
Установка VBoxDrv вручную
Примечание: не обращайте внимания на этот шаг, если вы уже сделали это в методе 1.
- Затем нажмите клавиши Windows + R, чтобы открыть диалоговое окно «Выполнить». Затем введите «cmd» в текстовом поле и нажмите Ctrl + Shift + Enter, чтобы открыть окно CMD с повышенными правами и доступом администратора.
Запуск командной строки
Примечание. Если вы видите запрос «Контроль учетных записей», нажмите «Да», чтобы предоставить доступ администратора.
- Внутри административного CMD введите следующую команду, чтобы убедиться, что служба VBoxDrv запущена: sc start vboxdrv
- Перезагрузите компьютер и посмотрите, решена ли проблема, если попытаться запустить компьютер Virtualbox еще раз.
Если проблема «Ошибка в supR3HardenedWinReSpawn» по-прежнему сохраняется, перейдите к следующему потенциальному исправлению ниже.
3. Увеличьте выделенный объем оперативной памяти
Как выясняется, эта конкретная проблема также может возникать из-за недостатка оперативной памяти, выделенной для виртуальной машины, которая была ранее создана. Проблема в том, что Virtualbox не очень хорошо объясняет, что именно делает виртуальную машину непригодной для использования.
Более того, есть несколько разных пользовательских отчетов, в которых утверждается, что динамическая настройка выделенного ОЗУ не поможет. Чтобы устранить проблему, если этот сценарий применим, вам необходимо полностью удалить текущую конфигурацию виртуальной машины, прежде чем создавать ее с тем же образом, но с увеличенным выделенным ОЗУ.
Вот краткое руководство по всему этому:
- Начните с открытия установки Oracle VM VirtualBox Manager и удаления текущей установки виртуальной машины. Для этого просто щелкните правой кнопкой мыши установку VM (правая часть) и выберите «Удалить» из появившегося контекстного меню.
Удаление установки виртуальной машины
- Когда вас спросят, хотите ли вы удалить или удалить все файлы, выберите «Только удаление», чтобы не допустить потери данных.
Удаление установки виртуальной машины
- Затем создайте новую конфигурацию с тем же изображением. Но когда вы доберетесь до места, где вам нужно выбрать базовую память, убедитесь, что она выше, чем ваша предыдущая установка виртуальной машины.
Создание новой машины с более выделенным ОЗУ
- Завершите начальную настройку машины и убедитесь, что вы можете запустить машину, не столкнувшись с той же проблемой «Ошибка в supR3HardenedWinReSpawn».
Если та же проблема возвращается, перейдите к следующему потенциальному решению ниже.
4. Настройте интерфейс паравиртуализации
Другим потенциальным виновником, который может способствовать появлению проблемы «Ошибка в supR3HardenedWinReSpawn», является технология ParaVirtualization, которая не поддерживается ОС, которую пытаются эмулировать. Чаще всего это происходит, если пользователь оставляет эту опцию по умолчанию.
Несколько затронутых пользователей, которые также пытались решить эту проблему, подтвердили, что проблема была полностью решена, и они наконец смогли запустить свою виртуальную машину Vmware после того, как они изменили ParaVirtualization с Default на KVM.
Вот краткое руководство по внесению того же изменения в конфигурацию вашей виртуальной машины:
- Откройте Oracle VM VirtualBox Manager и щелкните правой кнопкой мыши на виртуальной машине, которая вызывает проблемы. Далее в появившемся контекстном меню выберите «Настройки».
- Когда вы окажетесь в меню «Настройки» виртуальной машины, выберите вкладку «Система» в левом меню.
- Выбрав вкладку «Система», перейдите в правую часть и перейдите на вкладку «Ускорение».
- Когда вы попадете в правильное меню, разверните раскрывающееся меню, связанное с интерфейсом паравиртуализации, и измените его с По умолчанию на KVM.
- Нажмите кнопку «ОК», чтобы сохранить изменения, затем снова запустите виртуальную машину, чтобы проверить, решена ли проблема.
Изменение технологии Para-виртуализации по умолчанию
Если проблема «Ошибка в supR3HardenedWinReSpawn» сохраняется, перейдите к следующему потенциальному исправлению ниже.
5. Включить виртуализацию в BIOS / UEFI
Как оказалось, еще одна потенциальная причина, которая вызовет эту проблему, — отключение виртуализации в настройках BIOS или UEFI. В то время как аппаратная виртуализация включена по умолчанию на подавляющем большинстве конфигураций компьютеров, вполне возможно, что более старые установки ПК необходимо настроить вручную.
Если этот сценарий применим, вы сможете довольно легко решить проблему, получив доступ к настройкам BIOS или UEFI и повторно включив запатентованную технологию виртуализации.
Вот краткое руководство о том, как это сделать (используете ли вы BIOS или UEFI):
- Если вы используете компьютер с BIOS, запустите компьютер и несколько раз нажмите клавишу настройки во время начального экрана запуска. В большинстве конфигураций клавиша Setup обычно является клавишей F (F2, F4, F6, F8) или клавишей Del.
Нажмите [key] Чтобы войти в setupNote: Если вы столкнулись с проблемой на компьютере на основе UEFI, следуйте инструкциям (здесь), чтобы загрузить непосредственно в меню параметров расширенного запуска. Оттуда вы можете получить доступ к настройкам прошивки UEFI.
Доступ к настройкам прошивки UEFI
- Зайдя в меню настроек BIOS или UEFI, начните просматривать меню, чтобы найти вариант, эквивалентный вашей технологии виртуализации (Intel VT-x, Intel Virtualization Technology, AMD-V, Vanderpool и т. Д.). Когда вам удастся найти опция убедитесь, что включить его.
Включение технологии виртуализации Intel
Примечание. Обычно этот параметр можно найти в разделе «Процессор», «Безопасность», «Набор микросхем», «Расширенный», «Расширенный контроль набора микросхем», «Расширенная конфигурация ЦП» и т. Д. Имейте в виду, что параметры могут отличаться в зависимости от вашей материнской платы и производителя вашего ЦП. Если вы не можете найти эту опцию самостоятельно, поищите в Интернете конкретные инструкции.
- После включения технологии виртуализации сохраните изменения BIOS / UEFI и перезагрузите компьютер.
- После завершения следующей последовательности запуска попытайтесь запустить виртуальную машину еще раз и посмотрите, сохраняется ли то же сообщение об ошибке.
Если вы по-прежнему видите начальное сообщение «Ошибка в supR3HardenedWinReSpawn», перейдите к последнему методу ниже.
6. Установите более новую версию Virtualbox
Если вы выполнили все приведенные выше инструкции безрезультатно, скорее всего, вы столкнулись с этой проблемой из-за несоответствия Virtualbox, которое было решено с помощью более новых версий. В большинстве случаев эта конкретная проблема сообщается с VirtualBox версии 5.2.6.
В случае, если этот сценарий применим, вы можете быстро устранить проблему, удалив текущую версию VirtualBox, а затем установив последнюю версию со официальной страницы загрузки Virtualbox.
Вот краткое руководство о том, как это сделать:
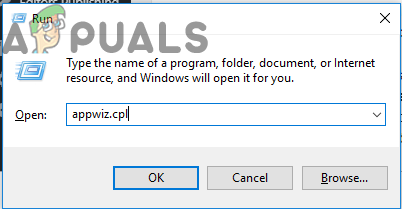
- Откройте диалоговое окно «Выполнить», нажав клавишу Windows + R. Внутри текстового поля введите «appwiz.cpl» и нажмите клавишу «Ввод», чтобы открыть меню «Приложения и функции».
Введите «appwiz.cpl» в строке «Выполнить»
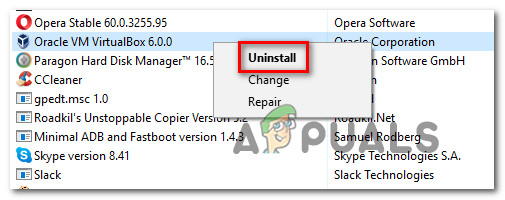
- Как только вы окажетесь в меню «Приложения и компоненты», прокрутите список установленных приложений и найдите установку VirtualBox. Как только вы увидите его, щелкните его правой кнопкой мыши и выберите «Удалить» из появившегося контекстного меню.
Удаление VirtualBox
- В окне удаления следуйте инструкциям на экране для завершения процесса, а затем перезагрузите компьютер.
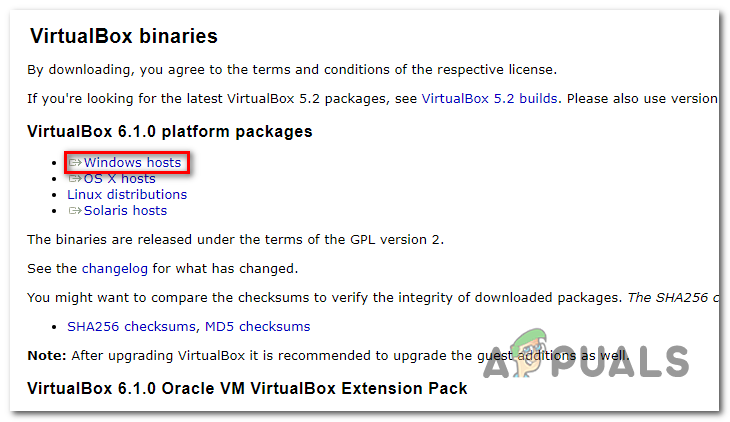
- После следующей последовательности запуска перейдите по этой ссылке (Вот) и загрузите последнюю версию VirtualBox, нажав на хосты Windows.
Скачал последнюю версию VirtualBox
- После установки новой версии перенастройте виртуальную машину и посмотрите, сможете ли вы запустить ее, не обнаружив сообщение об ошибке «Ошибка в supR3HardenedWinReSpawn».
The ‘Error in supR3HardenedWinReSpawn’ issue is encountered with Oracle Virtualbox Installations – typically a couple of seconds after attempts to start their virtual machine. Once this problem starts occurring, every new virtual machine that is created will show the same error message (making Virtualbox completely unusable).
Note: This issue is different from the E_FAIL (0x80004005) error at every virtual machine startup.
One of the most common causes that will cause this type of behaviour is a missing driver (VBoxDrv.inf). It’s possible that due to some permission issues, the installation of this crucial driver doesn’t complete during the initial installation. In this case, you can fix the problem by installing the VBoxDrv.inf manually.
Another potential cause that might spawn this particular error is a Registry inconsistency that points to the wrong driver directory. If this scenario is applicable, you can fix the issue swiftly by doing a registry check and adjusting the ImagePath string in case the directory is wrong.
If you started encountering the issue the very first time you tried to launch the VM, it’s likely that you’re seeing the error due to the fact that the VirtualBox VM doesn’t have enough RAM to work with. In this case, you can fix the issue swiftly by accessing the VM Settings and adjusting the allocated RAM.
There are a plethora of problems associated with the usage of the Default Paravirtualization option. It’s possible that it’s not supported by the OS you are trying to emulate. To fix the issue in this case, you will need to access your virtual machine settings and change the Paravirtualization from Default to KVM.
If you’re using an older PC configuration, it’s possible that hardware virtualization is disabled by default. In case your machine is unable to substitute this technology, an error might get thrown at every virtual machine startup. To fix the problem, simply access your UEFI / BIOS settings and ensure that Virtualization is allowed.
There are a lot of issues associated with VirtualBox version 5.2.6. If you’re still using it, chances are you’re suffering from the same glitch that caused the problem from thousands of users. The easiest way of fixing the issue, in this case, is to uninstall the current Virtualbox version and then install the latest stable build available.
1. Install the VBoxDRV.inf
As it turns out, one of the most common causes that will cause the VirtualBox ‘Error in supR3HardenedWinReSpawn’ is a missing driver (VBoxDRV.inf). There is a chance that due to some permissions issue, the main VirtualBox application can install without this key driver.
If this scenario is applicable, you will be unable to run any Virtualbox machine (created from scratch or imported from an older installation). Several affected users that were also struggling with this problem have confirmed that they were able to fix the problem by manually browsing to the location of the VBoxDRV.inf driver, doing the installation and then forcing the newly installed service to be started via an elevated Command Prompt.
Here’s a quick guide on installing and starting the VBoxDrv service in order to fix the ‘Error in supR3HardenedWinReSpawn’ issue:
- Open File Explorer and navigate to the following location:
C:Program FilesOracleVirtualBoxdriversvboxdrv
Note: You can either browse to the location manually or you can paste the location directly into the navigation bar and press Enter to get there instantly.
- Once you get to the correct location, right-click on VBoxDrv.inf and choose Install from the context menu.

Installing the VBoxDrv manually - When prompted by the UAC (User Account Control), click Yes, then wait until the driver is installed successfully.
Note: You won’t get a success message, but your screen will flicker after the driver gets installed. - Press Windows key + R to open up a Run dialog box. Next, type ‘cmd’ and press Ctrl + Shift + Enter to open up an elevated CMD prompt. When you’re prompted by the UAC (User Account Control), click Yes to grant administrative privileges.

Running Command Prompt - Once you’re inside the elevated Command prompt, type the following command and press Enter to force start the service that you just installed:
sc start vboxdrv
- After the command is successfully processed, close the elevated Command Prompt and restart your computer. At the next startup sequence, repeat the action that was previously causing the error and see if the problem is now fixed.
In case you’re still encountering the same ‘Error in supR3HardenedWinReSpawn’ issue, move down to the next potential fix below.
2. Fix the directory problem
Another potential cause that might cause this particular problem is a directory problem facilitated by a Registry inconsistency facilitated by the VirtualBox driver. If this scenario is applicable, you should be able to fix the problem swiftly by doing a quick registry check to see if the driver path leads to the VBoxDrv.sys.
In case the path is different, a small modification should ensure that you are able to start your virtual machines without encountering the ‘Error in supR3HardenedWinReSpawn’ issue again.
Here’s a quick guide on investigating and fixing the directory problem related to the VBoxDrv.sys driver:
- Press Windows key + R to open up a Run dialog box. Inside the text box, type ‘regedit’ and press Enter to open up Registry Editor. When you’re prompted by the User Account Control (UAC), click Yes to grant admin access.
Running the Registry Editor - Once you’re inside the Registry Editor, use the left-hand section to navigate to the following location:
HKEY_LOCAL_MACHINEsystemcurrentcontrolsetservicesvboxdrv
Note: You can either browse to the location manually or you can paste the location directly into the navigation bar at the top and press Enter to get there instantly.
- After you arrive at the correct location, move over to the right-hand section and double-click on ImagePath.
- Once you get there, check if the path is exactly the one below:
C:Program FilesOracleVirtualBoxdriversvboxdrvVBoxDrv.sys
Note: If the location is a match, it means that you don’t have a directory problem and you can safely move to the next potential fix below.
- But in case the location is different, change the value to the following location:
C:Program FilesOracleVirtualBoxdriversvboxdrvVBoxDrv.sys
- As soon as you’re certain that the ImagePatch string displays the correct location, hit Ok and close Registry Editor to save the changes.

Correct location of VBoxDrv - Now to ensure that the driver is actually used, navigate to the driver directory below and run the driver by right-clicking on the VBoxDrv.sys and choosing Install.
Installing the VBoxDrv manually Note: Disregard this step if you’ve already done it at Method 1.
- Next, press Windows key + R to open up a Run dialog box. Then, type ‘cmd’ inside the text box and press Ctrl + Shift + Enter to open up an elevated CMD prompt with admin access.
Running Command Prompt Note: If you see the User Account Control prompt, click Yes to grant admin access.
- Inside the admin CMD, type the following command to ensure that the VBoxDrv service is running:
sc start vboxdrv
- Restart your computer and see if the problem is resolved by attempting to run a Virtualbox machine once again.

If the same ‘Error in supR3HardenedWinReSpawn’ problem is still happening, move down to the next potential fix below.
3. Increase the allocated amount of RAM
As it turns out, this particular problem can also occur due to insufficient RAM allocated to the Virtual machine that was previously created. The problem is, Virtualbox doesn’t do a good job of making it clear what exactly is the problem that’s making the virtual machine unusable.
Even more, there are several different user reports claiming that dynamically adjusting the allocated RAM will not do the trick. To fix the issue if this scenario is applicable, you will need to remove the current virtual machine configuration altogether before creating one with the same image, but with increased allocated RAM.
Here’s a quick guide through the whole thing:
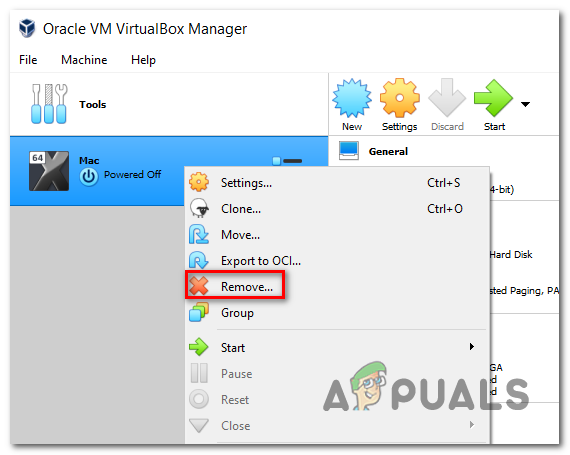
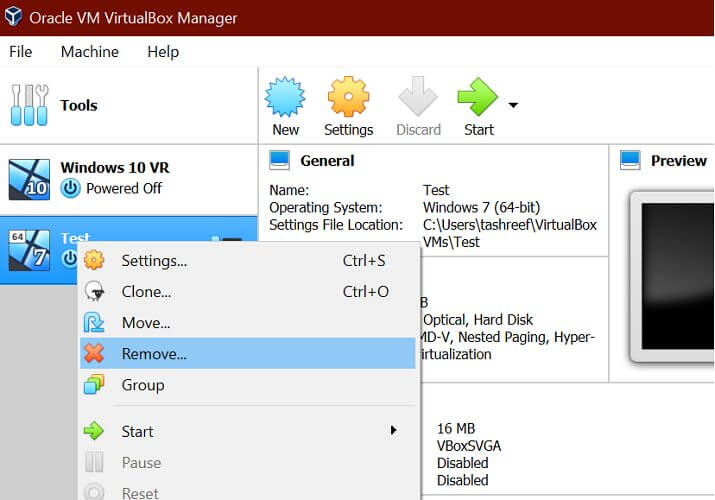
- Start by opening your Oracle VM VirtualBox Manager installation and removing the current virtual machine installation. To do this, simply right-click on the VM installation (right-hand section) and choose Remove from the newly appeared context menu.

Removing the VM installation - When asked whether you want to remove or delete all the files, choose to Remove Only so you don’t facilitate any data loss.

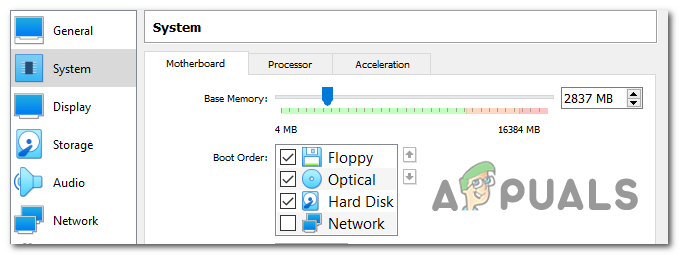
Removing the VM installation - Next, create a new configuration with the same image. But when you get to the part where you need to pick the Base Memory, make sure that it’s higher than your previous VM installation.

Creating a new VM machine with more allocated RAM - Complete the initial machine configuration and see I you are able to start the machine without encountering the same ‘Error in supR3HardenedWinReSpawn’ problem.

If the same issue returns, move down to the next potential fix below.
4. Adjust the Paravirtualization Interface
Another potential culprit that might facilitate the apparition of the ‘Error in supR3HardenedWinReSpawn’ issue is a ParaVirtualization technology that is not supported by the OS that is attempted to be emulated. Most frequently, this happens if the user leaves this option to the Default.
Several affected users that were also struggling to resolve this problem have confirmed that the issue was entirely resolved and they were finally able to run their Vmware virtual machine after they changed the ParaVirtualization from Default to KVM.
Here’s a quick guide on making the same change on your virtual machine configuration:
- Open Oracle VM VirtualBox Manager and right-click on the virtual machine that is giving you issues. Next, from the newly appeared context menu, choose Settings.
- Once you are inside the Settings menu of the virtual machine, select the System tab from the left-hand side menu.
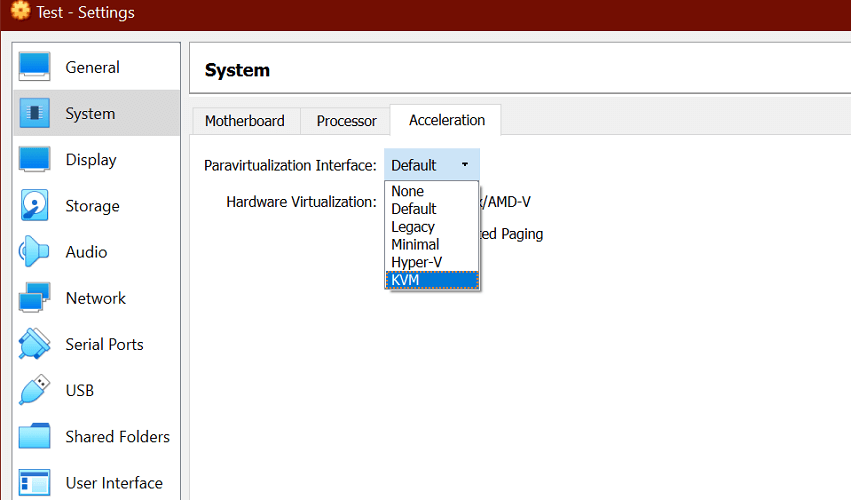
- With the System tab selected, move over to the right-hand section and access the Acceleration tab.
- When you get to the correct menu, expand the drop-down menu associated with Paravirtualization Interface and change it from Default to KVM.
- Click Ok to save the changes, then start the virtual machine again to see if the problem is now resolved.
If the same ‘Error in supR3HardenedWinReSpawn’ problem is persisting, move down to the next potential fix below.
5. Enable Virtualization in BIOS / UEFI
As it turns out, another potential reason that will cause this problem is virtualization being disabled from your BIOS or UEFI settings. While hardware virtualization is enabled by default on the vast majority of computer configurations, it’s possible that older PC rigs need to be adjusted manually.
If this scenario is applicable, you should be able to fix the issue quite easily by accessing your BIOS or UEFI settings and re-enabling the proprietary virtualization technology.
Here’s a quick guide on how to do this (whether you’re using BIOS or UEFI):
- If you’re using a BIOS-powered computer, start your computer and press the Setup key repeatedly during the initial startup screen. With most configurations, the Setup key is usually one of the F keys (F2, F4, F6, F8) or the Del key.

Press [key] to enter setup Note: If you’re encountering the issue on a UEFI-based computer, follow the instructions (here) to boot directly into the Advanced Startup options menu. From there, you can access the UEFI firmware settings.
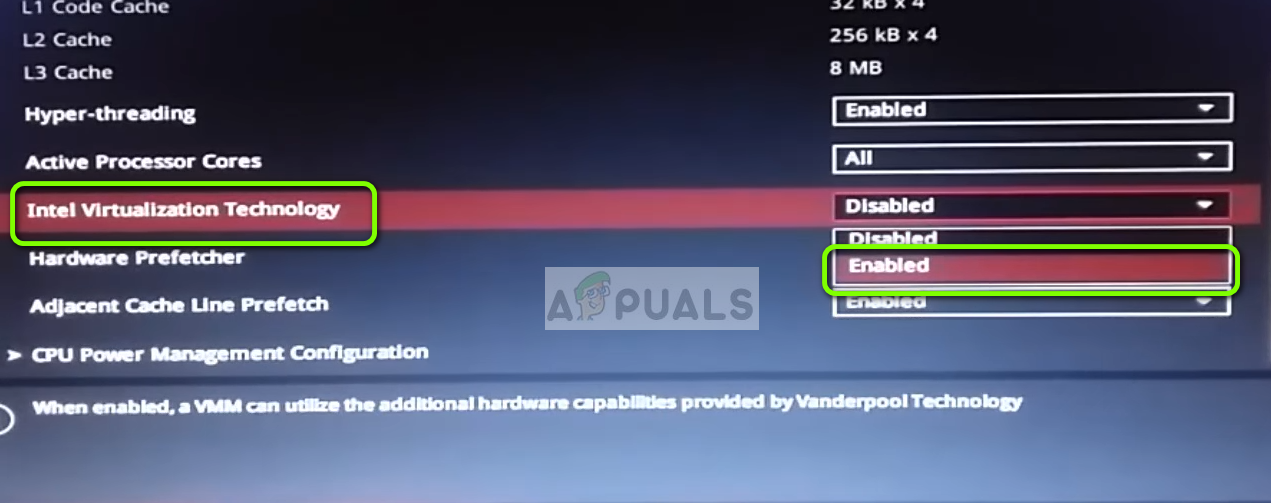
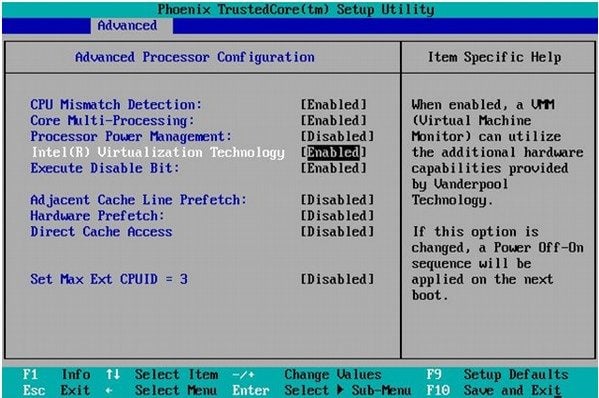
Accessing the UEFI firmware settings - Once you’re inside you BIOS or UEFI setting menu, start browsing the menus to find the option equivalent to your virtualization technology (Intel VT-x, Intel Virtualization Technology, AMD-V, Vanderpool, etc.) When you manage to find the option make sure to Enable it.

Enabling Intel Virtualization Technology Note: Typically, you can find this option under Processor, Security, Chipset, Advanced, Advanced Chipset Control, Advanced CPU configuration, etc. Keep in mind that the settings might be different depending on your motherboard and your CPU manufacturer. If you can’t find the option by yourself, search online for specific instructions.
- Once the virtualization technology is enabled, save the BIOS / UEFI changes and restart your computer.
- After the next startup sequence is complete, attempt to run the virtual machine once again and see if the same error message is still persisting.


In case you’re still seeing the ‘Error in supR3HardenedWinReSpawn’ initial message, move down to the final method below.
6. Install a newer version of Virtualbox
If you followed all the instructions above to no avail, chances are you’re encountering this problem due to a Virtualbox inconsitency that was resolved with newer versions. In most cases, this particular issue is reported with VirtualBox version 5.2.6.
In case this scenario is applicable, you can fix the issue swiftly by uninstalling your current VirtualBox version and then installing the latest version from the official Virtualbox download page.
Here’s a quick guide on how to do this:
- Open up a Run dialog box by pressing Windows key + R. Inside the text box, type ‘appwiz.cpl’ and press Enter to open up the Apps and Features menu.

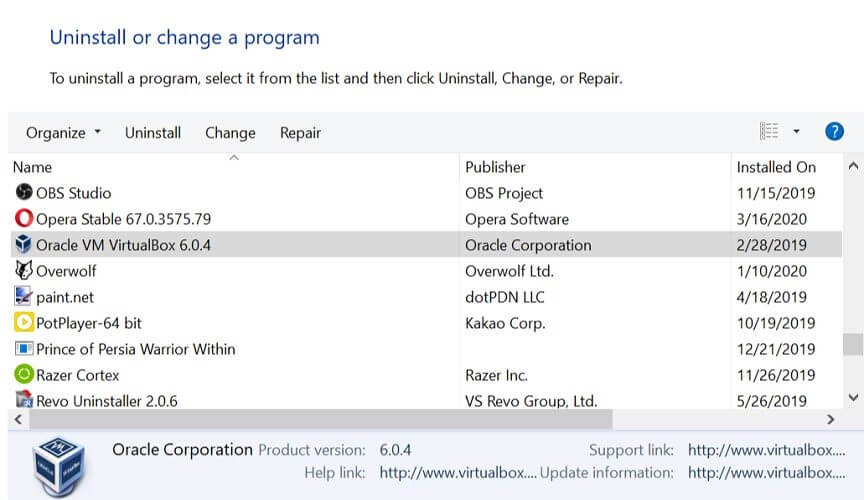
Typing in “appwiz.cpl” in the Run prompt - Once you’re inside the Apps and Features menu, scroll down through the list of installed applications and locate your VirtualBox installation. Once you see it, right-click on it and choose Uninstall from the newly appeared context menu.

Uninstalling VirtualBox - Inside the uninstallation window, follow the on-screen prompts to complete the process then restart your computer.
- After the next startup sequence, access this link (here) and download the latest version of VirtualBox by clicking on Windows hosts.

Downloaded the latest version of VirtualBox - After the new version is installed, reconfigure the virtual machine and see if you are able to launch it without encountering the ‘Error in supR3HardenedWinReSpawn’ error message.
by Tashreef Shareef
Tashreef Shareef is a software developer turned tech writer. He discovered his interest in technology after reading a tech magazine accidentally. Now he writes about everything tech from… read more
Updated on March 4, 2021
- VirtualBox is an excellent VM tool that anyone can use.
- The article below will be covering the supr3hardenedwinrespawn VirtualBox error.
- To learn more about this amazing tool, check out our VirtualBox Errors Hub.
- For more guides on this topic, visit our Virtualization page.

XINSTALL BY CLICKING THE DOWNLOAD FILE
This software will keep your drivers up and running, thus keeping you safe from common computer errors and hardware failure. Check all your drivers now in 3 easy steps:
- Download DriverFix (verified download file).
- Click Start Scan to find all problematic drivers.
- Click Update Drivers to get new versions and avoid system malfunctionings.
- DriverFix has been downloaded by 0 readers this month.
After installing Oracle VirtualBox, you may encounter the error in supr3hardenedwinrespawn issue. This issue occurs when the user runs the virtual machine for the first time after installing the program.
The cause of this error is attributed to the missing the VBoxDrv.inf file that may have failed to install during installation due to permission issues.
If you are also troubled by this error, here are a couple of troubleshooting tips to help you resolve the error in supr3hardenedwinrespawn VirtualBox issue in Windows.
How can I fix the supr3hardenedwinrespawn error?
1. Install the VBoxDrV.inf file

- Open File Explorer and navigate to the following location:
C:Program FilesOracleVirtualBoxdriversvboxdrv
- You can copy-paste the above path in File Explorer as well.
- In the VBoxDrv folder, right-click on VBoxDrv.inf and run Install.
- The UAC will ask you to confirm the action. Click Yes to proceed with the installation.
- Next, press the Windows key.
- Type cmd, right-click on Command Prompt and select Run as Administrator.
- In the Command Prompt, type the following command and hit enter to execute:
- sc start vboxdrv
- Once the command is successfully executed, close the Command Prompt window.
- Try running the Virtual Machine again and check for any improvements.
Reinstalling the missing file seems to have fixed the issue for many users. This driver may not have installed due to permission issues thus creating issues with the virtual machine.
Unable to access Wi-Fi on VirtualBox? Try these methods
2. Check for directory issues
- Press Windows Key + R to open Run.
- Type regedit and click OK to open Registry Editor.
- In Registry Editor, navigate to the following location:
HKEY_LOCAL_MACHINEsystemcurrentcontrolsetservicesvboxdrv
- From the right pane, right-click on Imagepath and select Modify.
- In the Value data field, check if the path looks like this:
C:Program FilesOracleVirtualBoxdriversvboxdrvVBoxDrv.sys
- If it has a different path, change the path to make it look like this:
C:Program FilesOracleVirtualBoxdriversvboxdrvVBoxDrv.sys
- Click OK to save the changes.
- Close the Registry Editor window.
- Open File Explorer again and navigate to the following location:
C:Program FilesOracleVirtualBoxdriversvboxdrv
- Right-click on VBoxDrv.ing and select Install.
- Press Windows Key + R to open Run.
- Type Cmd and press the Ctrl + Shift + Enter keys simultaneously to open elevated Command Prompt.
- In the Command Prompt enter the following command and hit enter:
- sc start vboxdrv
- Close the Command Prompt and check for any improvements.
Some PC issues are hard to tackle, especially when it comes to corrupted repositories or missing Windows files. If you are having troubles fixing an error, your system may be partially broken.
We recommend installing Restoro, a tool that will scan your machine and identify what the fault is.
Click here to download and start repairing.
Restart the Oracle VirtualBox program and check if the error in supr3hardenedwinrespawn is resolved.
3. Allocate more RAM to your virtual machine
- Launch Oracle VM VirtualBox Manager.
- right-click on your current virtual machine installation and select Remove.
- In the new dialog box, click the Remove Only button.
- Next, proceed to create a new configuration with the same image.
- However, when you reach the Base Memory part, make sure you allocate more RAM than the previous VM installation.
- Once the configuration is created, proceed to start the virtual machine and check for any improvements.
The error in supr3hardenedwinrespawn can occur due to insufficient RAM allocation for the virtual machine. Try allocating more memory to your new configuration and check for any improvements.
4. Enable virtualization in BIOS
- Restart your computer and press the F2/F4/F6/F8 or the Del key repeatedly to enter the initial startup screen. Different manufacturers have different setup keys.
- Now locate the Advanced tab. If you don’t have an Advanced tab, look for the Advanced Chipset Control or CPU configuration tab.
- If you are using the Intel processor, make sure Intel Virtualization Technology is enabled.
- In case you are using AMD processor, enable AMD-V and so on.
- After the virtualization technology is enabled, save the BIOS change and restart your system.
- After the system restarts, launch Oracle VirtualBox and check if the error in supr3hardenedwinrespawn is resolved.
5. Change Paravirtualization interface settings
- Launch Oracle VM VirtualBox Manager.
- Right-click on the virtual machines with the error and select Settings.
- Open the System tab from the left pane.
- From the right pane, access the Acceleration tab.
- Expand the Paravirtualiaztion interface menu and select the KVM option.
- Click OK to save the changes.
- Run the virtual machine and check for any improvements.
6. Reinstall VirtualBox
- Try installing the latest version of Oracle VirtualBox to resolve the error.
- Press Windows Key + R.
- Type control and click OK to open the Control Panel.
- Go to Programs > Programs and Features.
- Select VirtualBox from the list of installed applications.
- Click on Uninstall. Click Yes to confirm the action.
- Once uninstalled, go to the VirtualBox download page.
- Download and install the latest version of the software.
- Reconfigure the machine and check for any improvements.
The VirtualBox error in supr3hardenedwinrespawn can occur due to multiple reasons thus making it difficult to diagnose the problem.
However, we have listed all the possible solutions to help you resolve the issue and get your VMs back online.
![]()
Newsletter
Many VirtualBox users (including me), have encountered the following issue, when starting a virtual machine after restarting the computer: «VirtualBox – Error in supR3HardenedWiReSpawn» and after clicking OK, it appears another error says «Failed to open a session for the virtual machine exit code 1 (0x1) – E_FAIL (0x80004005)», which refers to the ‘VBoxHardening.log’ for details about the error. But, in ‘VBoxHardening.log’ file, there is not a clear explanation about the problem, except that many DLL files «lacks WinVerifyTrust».
Problem description: On a Windows 10 PC, after installing the latest version of VirtualBox and after restarting the computer, the following errors appears when starting a VM machine:
«VirtualBox – Error in supR3HardenedWiReSpawn
Error relaunching VirtualBox VM process: 5
supR3HardenedWinReSpawn what: 5 VERR_INVALID_NAME (-104) -Invalid (malformed) file/path name.»

…and after hitting OK (on the above message), you receive the following error:
«Failed to open a session for the virtual machine %VM_Machine_Name%.
The virtual machine ‘%VM_Machine_Name%’ has terminated unexpectedly during startup with exit code 1 (0x1). More details may be available in ‘C:UsersAdminVirtualBox VMs%VM_Machine_Name%LogsVBoxHardening.log’.
Result Code: E_FAIL (0x80004005)
Component: MachineWrap
Interface: IMachine {85632c68-b5bb-4316-a900-5eb28d3413df}»
.")
This tutorial contains instructions to solve the following VirtualBox errors:
- VirtualBox Error in supR3HardenedWiReSpawn. Error relaunching VirtualBox VM process: 5…supR3HardenedWinReSpawn what: 5 VERR_INVALID_NAME
- Failed to open a session for the virtual machine…Virtual Machine terminated with exit code 1 (0x1)»
- The ‘VBoxHardening.log’ file reports that several .dll files [lacks WinVerifyTrust].
How to FIX: Error relaunching VirtualBox VM process 5 [lacks WinVerifyTrust]
Important: Before proceeding to the steps below, apply the following actions and see if you can start the VM (after applying each of them):
1. Disable the AV Real Time Protection, or uninstall your Antivirus program and then try to start the VM. *
* Note: If you own an HP Pro or an HP Elite PC, with preinstalled software from HP, proceed and uninstall the following programs:
- HP Client Security
- HP Sure Click
- HP Sure Sense
2. Make sure that Hyper-V is Disabled. To do that, navigate to Control Panel > Programs and Features > Turn Windows features on or off and Uncheck the Hyper-V feature.
3. Navigate to «C:Program FilesOracleVirtualBoxdriversvboxdrv», right click at VBoxDrv.inf and click Install.

4. Uninstall and Re-Install the VirtuaBox, by following the procedure below:
a. Navigate to Control Panel > Programs and Features and Uninstall VirtualBox
b. Reboot your computer.
c. Download the latest version of VirtualBox.
d. Right click on the downloaded file and click Run As Administrator.
e. Reboot your computer.
f. Try to start the VM and if you receive the same error, follow the steps below:
Step 1. Change the Start type of VBoxDrv Service (VBoxDrv.inf) to 2 (Auto Load)*
* Note: The idea to change the ‘Start’ value of VBoxDrv service to 2, came after reading the Hardening Fix (workaround) For Error After Install and Restart in VirtualBox forums, where it is suggested to change the ‘Start’ value to 3. But that change didn’t work and things got worse.
1. Open Registry Editor.
2. Navigate to this key at left pane:
-
HKEY_LOCAL_MACHINESYSTEMCurrentControlSetServicesVBoxDrv.
3. At the right pane, double click at Start REG_DWORD value.

4. Change the Value data from 1 to 2 and click OK. *
* Possible Values for the Startup type of ‘VBoxDrv’ service (Stored in ‘Start’ REG_DWORD value).
Value Startup type Explanation
0 Boot Service is Loaded at Boot.
1 System: Service is loaded during the KERNEL initialization (on Boot).
2 Automatic: Service is loaded Automatic by the Service Control Manager.
3 Manual: Service is loaded Manually (on Demand).
4 Disabled: Service is Disabled.

5. Close the Registry Editor and restart the PC.
6. Try to start the VM. If the VM, couldn’t start again, with error «Call to WHvSetupPartition failed: ERROR_SUCCESS (Last=0xc000000d/87», continue to step 2.
Step 2. Disable Hyper-V at Boot.
In Windows 10 PRO or Enterprise, the HYPER-V is started by default at bootup, so proceed and disable it.
1. Open Command Prompt as Administrator.
2. Type the following command and press Enter:
- bcdedit /set hypervisorlaunchtype off

3. Reboot your PC.
4. After reboot, start the VM.
That’s it! Let me know if this guide has helped you by leaving your comment about your experience. Please like and share this guide to help others.
If this article was useful for you, please consider supporting us by making a donation. Even $1 can a make a huge difference for us in our effort to continue to help others while keeping this site free:

If you want to stay constantly protected from malware threats, existing and future ones, we recommend that you install Malwarebytes Anti-Malware PRO by clicking below (we
do earn a commision from sales generated from this link, but at no additional cost to you. We have experience with this software and we recommend it because it is helpful and useful):