Color Themes
Color themes let you modify the colors in Visual Studio Code’s user interface to suit your preferences and work environment.
Selecting the Color Theme
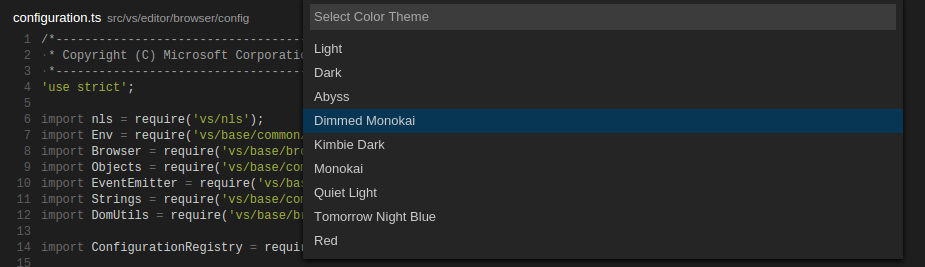
- In VS Code, open the Color Theme picker with File > Preferences > Theme > Color Theme. (Code > Preferences > Theme > Color Theme on macOS).
- You can also use the keyboard shortcut ⌘K ⌘T (Windows, Linux Ctrl+K Ctrl+T) to display the picker.
- Use the cursor keys to preview the colors of the theme.
- Select the theme you want and press Enter.

The active color theme is stored in your user settings (keyboard shortcut ⌘, (Windows, Linux Ctrl+,)).
  // Specifies the color theme used in the workbench.
  "workbench.colorTheme": "Default Dark+"
Tip: By default, the theme is stored in your user settings and applies globally to all workspaces. You can also configure a workspace specific theme. To do so, set a theme in the Workspace settings.
Color Themes from the Marketplace
There are several out-of-the-box color themes in VS Code for you to try.
Many more themes have been uploaded to the VS Code Extension Marketplace by the community. If you find one you want to use, install it and restart VS Code and the new theme will be available.
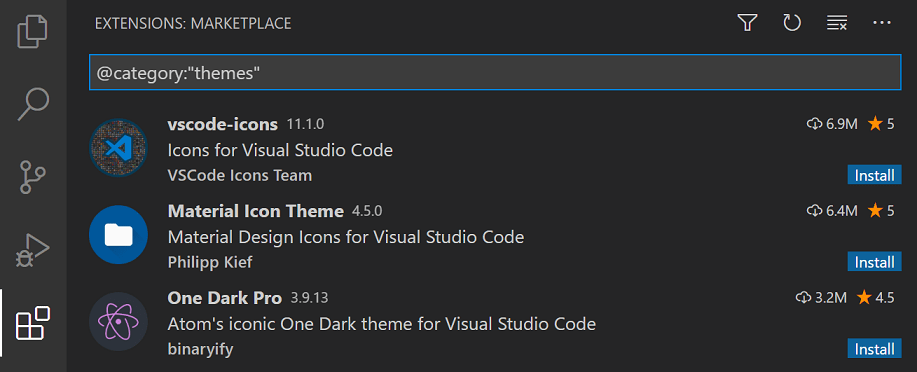
You can search for themes in the Extensions view (⇧⌘X (Windows, Linux Ctrl+Shift+X)) search box using the @category:"themes" filter.
Auto switch based on OS color scheme
Windows and macOS support light and dark color schemes. There is a setting, window.autoDetectColorScheme, that instructs VS Code to listen to changes to the OS’s color scheme and switch to a matching theme accordingly.
To customize the themes that are used when a color scheme changes, you can set the preferred light, dark, and high contrast themes with the settings:
workbench.preferredLightColorTheme— defaults to «Default Light+»workbench.preferredDarkColorTheme— defaults to «Default Dark+»workbench.preferredHighContrastColorTheme— defaults to «Default High Contrast»workbench.preferredHighContrastLightColorTheme— defaults to «Default High Contrast Light»
Customizing a Color Theme
Workbench colors
You can customize your active color theme with the workbench.colorCustomizations and editor.tokenColorCustomizations user settings.
To set the colors of VS Code UI elements such as list & trees (File Explorer, suggestions widget), diff editor, Activity Bar, notifications, scroll bar, split view, buttons, and more, use workbench.colorCustomizations.
You can use IntelliSense while setting workbench.colorCustomizations values or, for a list of all customizable colors, see the Theme Color Reference.
To customize a specific theme only, use the following syntax:
"workbench.colorCustomizations": {
    "[Monokai]": {
        "sideBar.background": "#347890"
    }
}
If a customization applies to more than one themes, you can name multiple themes or use * as wildcard at the beginning and the end of the name:
"workbench.colorCustomizations": {
    "[Abyss][Red]": {
        "activityBar.background": "#ff0000"
    },
    "[Monokai*]": {
        "activityBar.background": "#ff0000"
    }
}
Editor syntax highlighting
To tune the editor’s syntax highlighting colors, use editor.tokenColorCustomizations in your user settings settings.json file:
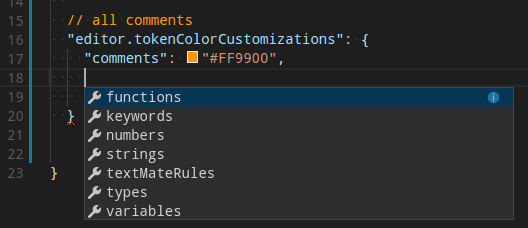
A pre-configured set of syntax tokens (‘comments’, ‘strings’, …) is available for the most common constructs. If you want more, you can do so by directly specifying TextMate theme color rules:
Note: Directly configuring TextMate rules is an advanced skill as you need to understand on how TextMate grammars work. Go to the Color Theme guide for more information.
Again, to customize specific themes, you can do this in one of the following ways:
"editor.tokenColorCustomizations": {
    "[Monokai]": {
        "comments": "#229977"
    },
    "[*Dark*]": {
        "variables": "#229977"
    },
    "[Abyss][Red]": {
        "keywords": "#f00"
    }
}
Editor semantic highlighting
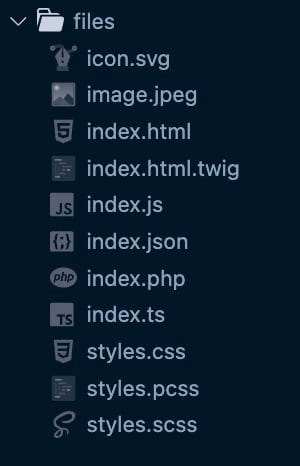
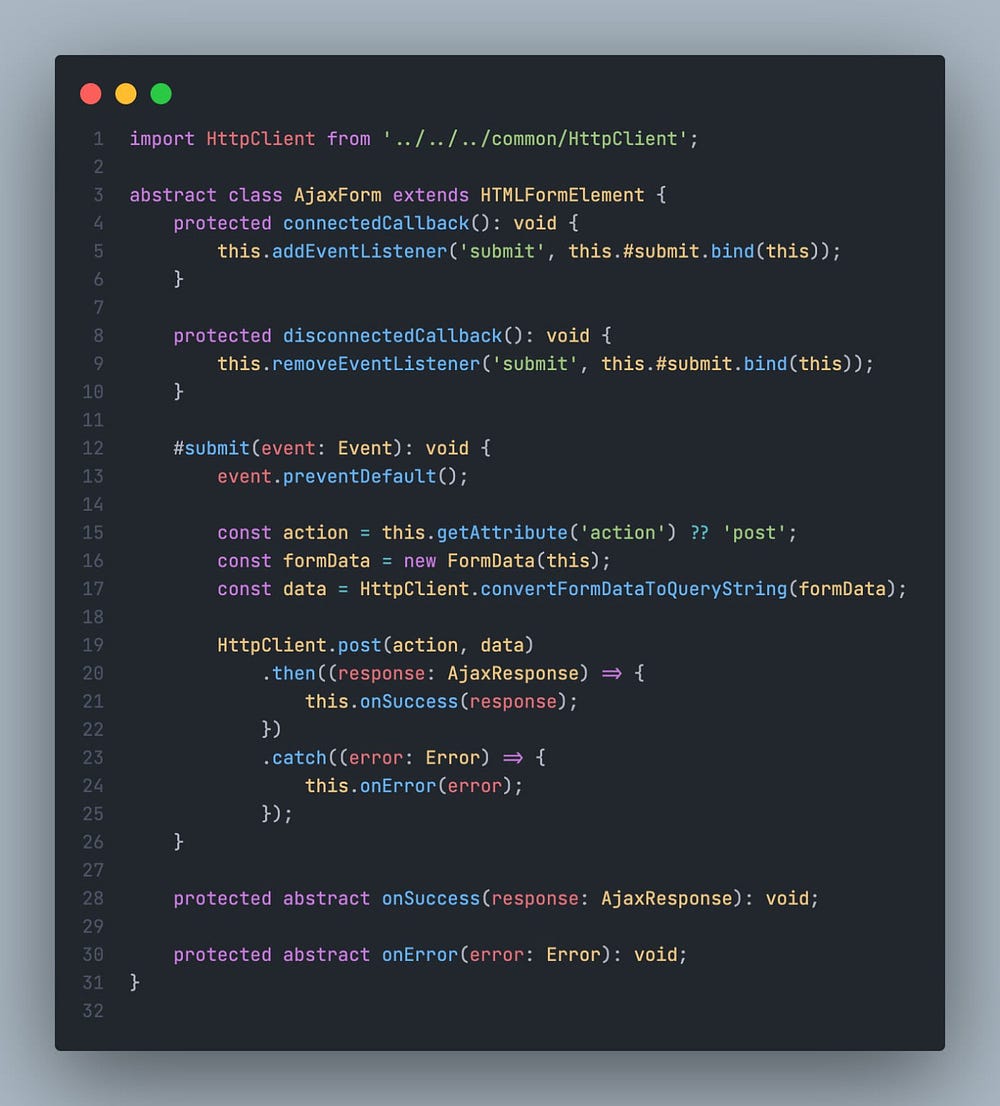
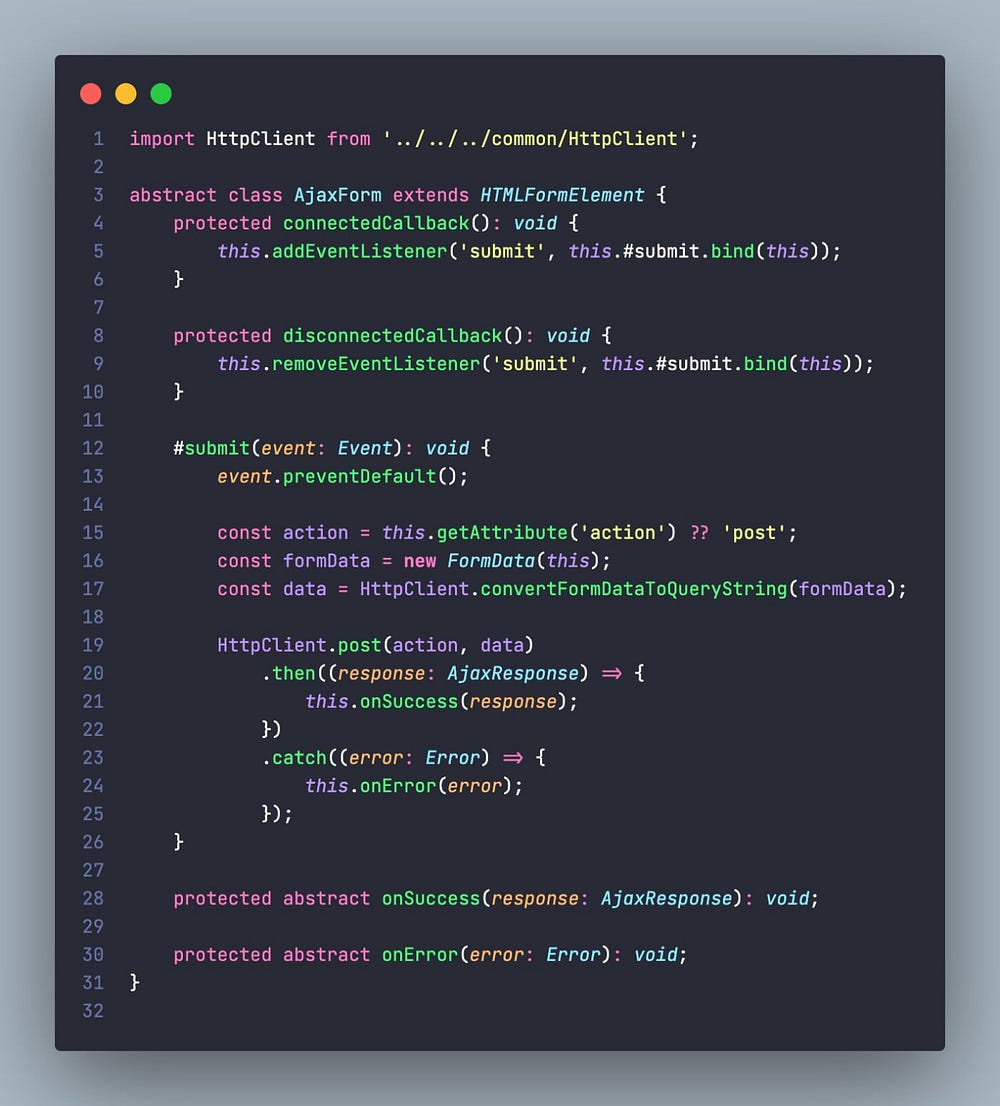
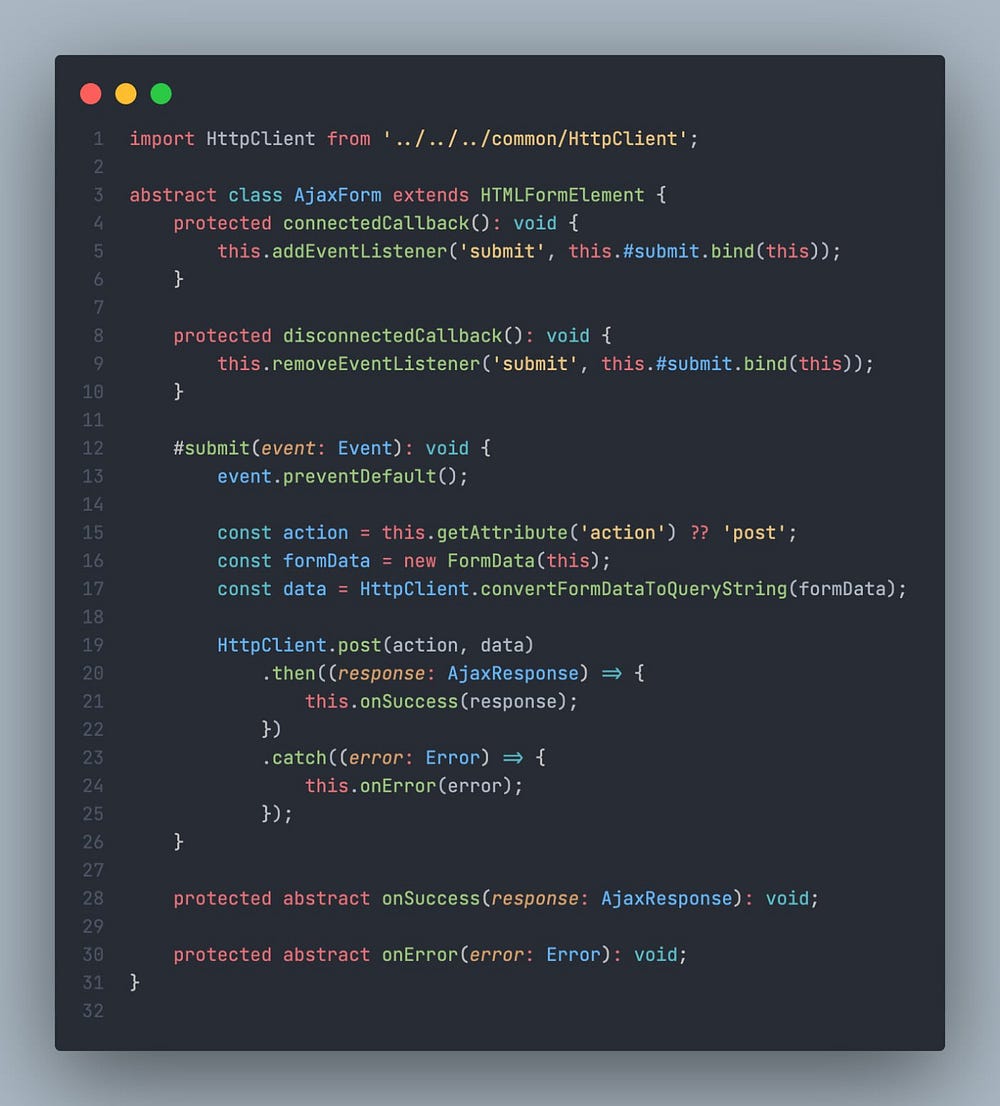
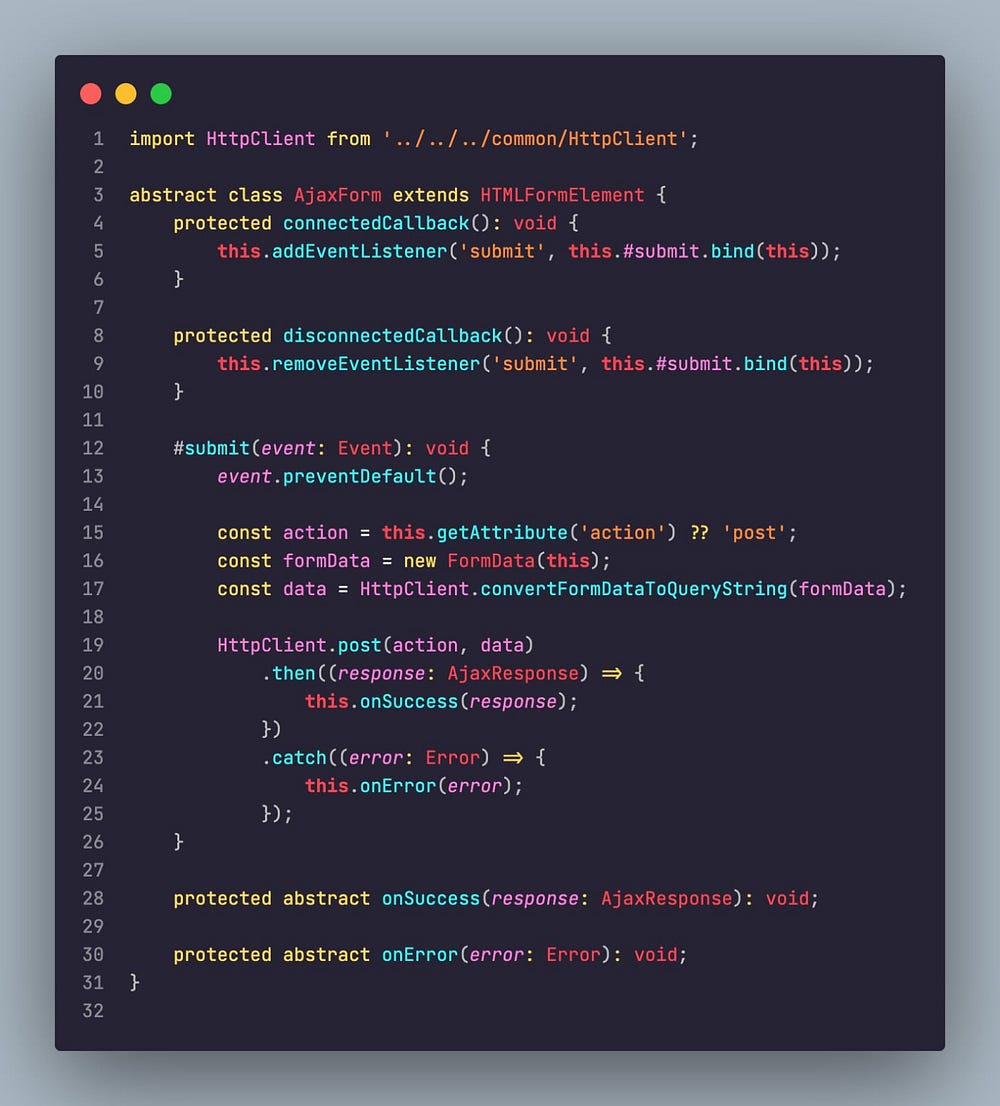
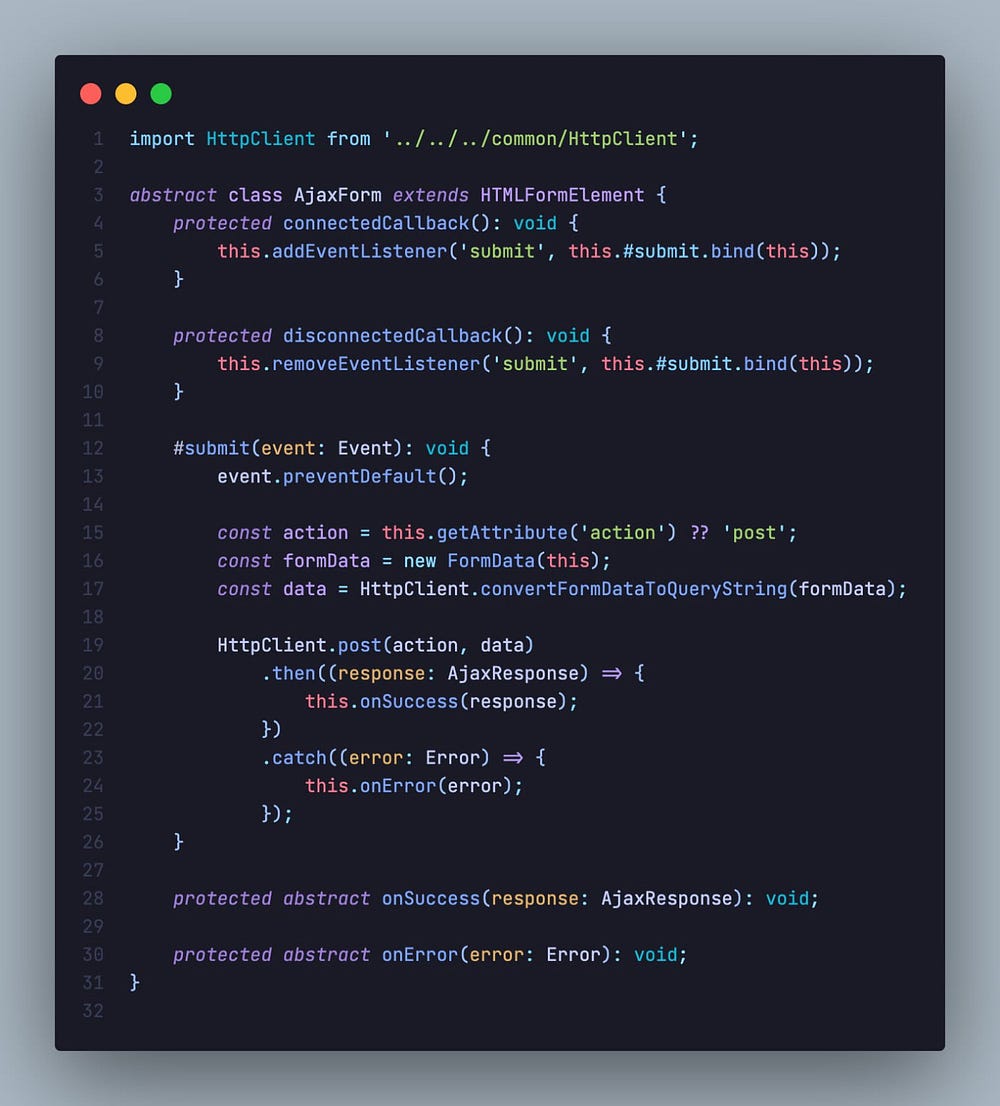
Some languages (currently: TypeScript, JavaScript, Java) provide semantic tokens. Semantic tokens are based on the language service’s symbol understanding and are more accurate than the syntax tokens coming from the TextMate grammars that are driven by regular expressions. The semantic highlighting that is computed from the semantic tokens goes on top of syntax highlighting and can correct and enrich the highlighting as seen in the following example:
The «Tomorrow Night Blue» color theme without semantic highlighting:

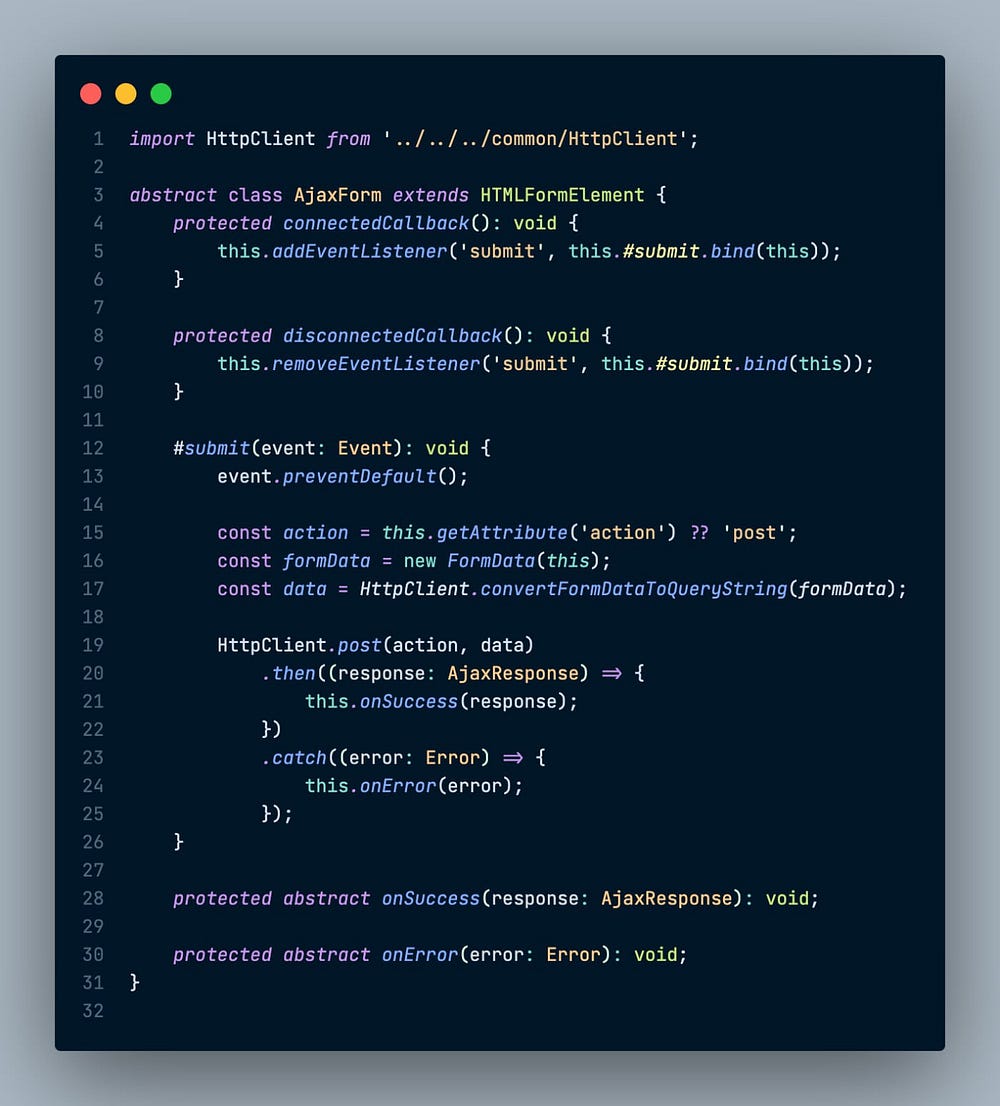
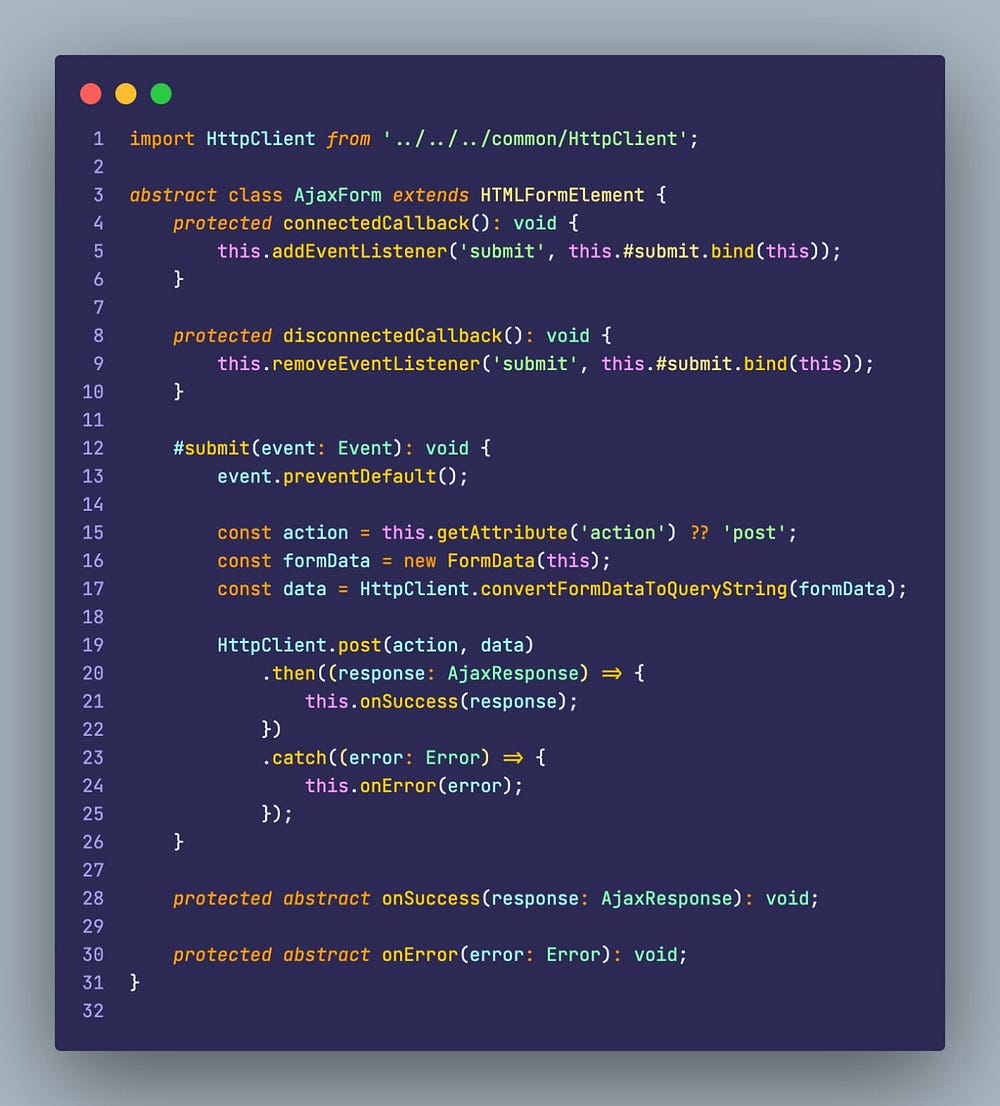
The «Tomorrow Night Blue» color theme with semantic highlighting:

Notice the color differences based on language service symbol understanding:
- line 10:
languageModesis colored as a parameter. - line 11:
RangeandPositionare colored as classes anddocumentas a parameter. - line 13:
getFoldingRangesis colored as a function.
The settings editor.semanticHighlighting.enabled serves as the main control on whether semantic highlighting is applied. It can have values true, false, and configuredByTheme.
trueandfalseturn semantic highlighting on or off for all themes.configuredByThemeis the default and lets each theme control whether semantic highlighting is enabled or not. All the themes that ship with VS Code (for example, the «Dark+» default) have semantic highlighting enabled by default.
Users can override the theme setting by:
"editor.semanticTokenColorCustomizations": {
    "[Rouge]": {
        "enabled": true
    }
}
When semantic highlighting is enabled and available for a language, it is up to the theme to configure whether and how semantic tokens are colored. Some semantic tokens are standardized and map to well-established TextMate scopes. If the theme has a coloring rule for these TextMate scopes, the semantic token will be rendered with that color, without the need for any additional coloring rules.
Additional styling rules can be configured by the user in editor.semanticTokenColorCustomizations":
"editor.semanticTokenColorCustomizations": {
    "[Rouge]": {
        "enabled": true,
        "rules": {
            "*.declaration": { "bold": true }
        }
    }
}
To see what semantic tokens are computed and how they are styled, users can use the scope inspector (Developer: Inspect Editor Tokens and Scopes), which displays information for the text at the current cursor position.
If semantic tokens are available for the language at the given position and enabled by theme, the inspect tool shows a section semantic token type. The section shows the semantic token information (type and any number of modifiers) as well as the styling rules that apply.
More information on semantic tokens and styling rule syntax can be found in the Semantic Highlighting Guide.
Creating your own Color Theme
Creating and publishing a theme extension is easy. Customize your colors in your user settings then generate a theme definition file with the Developer: Generate Color Theme From Current Settings command.
VS Code’s Yeoman extension generator will help you generate the rest of the extension.
See the Create a new Color Theme topic in our Extension API section to learn more.
Remove default Color Themes
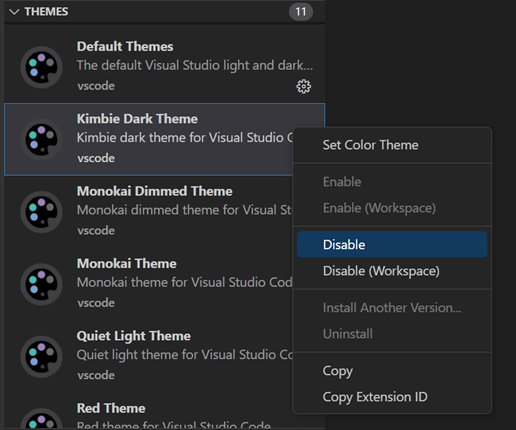
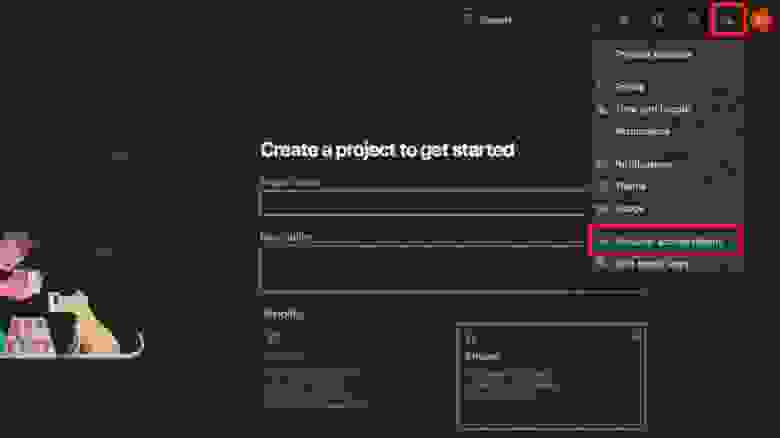
If you’d like to remove some of the default themes shipped with VS Code from the Color Theme picker, you can disable them from the Extensions view (⇧⌘X (Windows, Linux Ctrl+Shift+X)). Click the Filter Extensions button from the top of the Extensions view, select the Built-in option, and you’ll see a THEMES section listing the default themes.
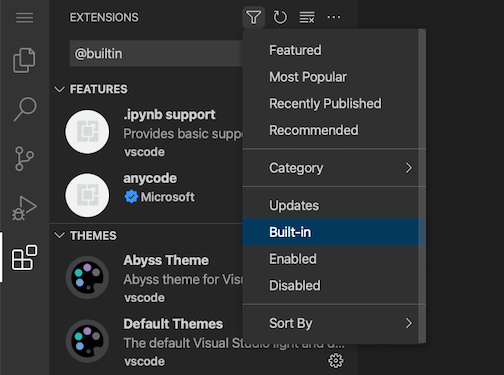
You can disable a built-in theme extension as you would any other VS Code extension with the Disable command on the gear context menu.
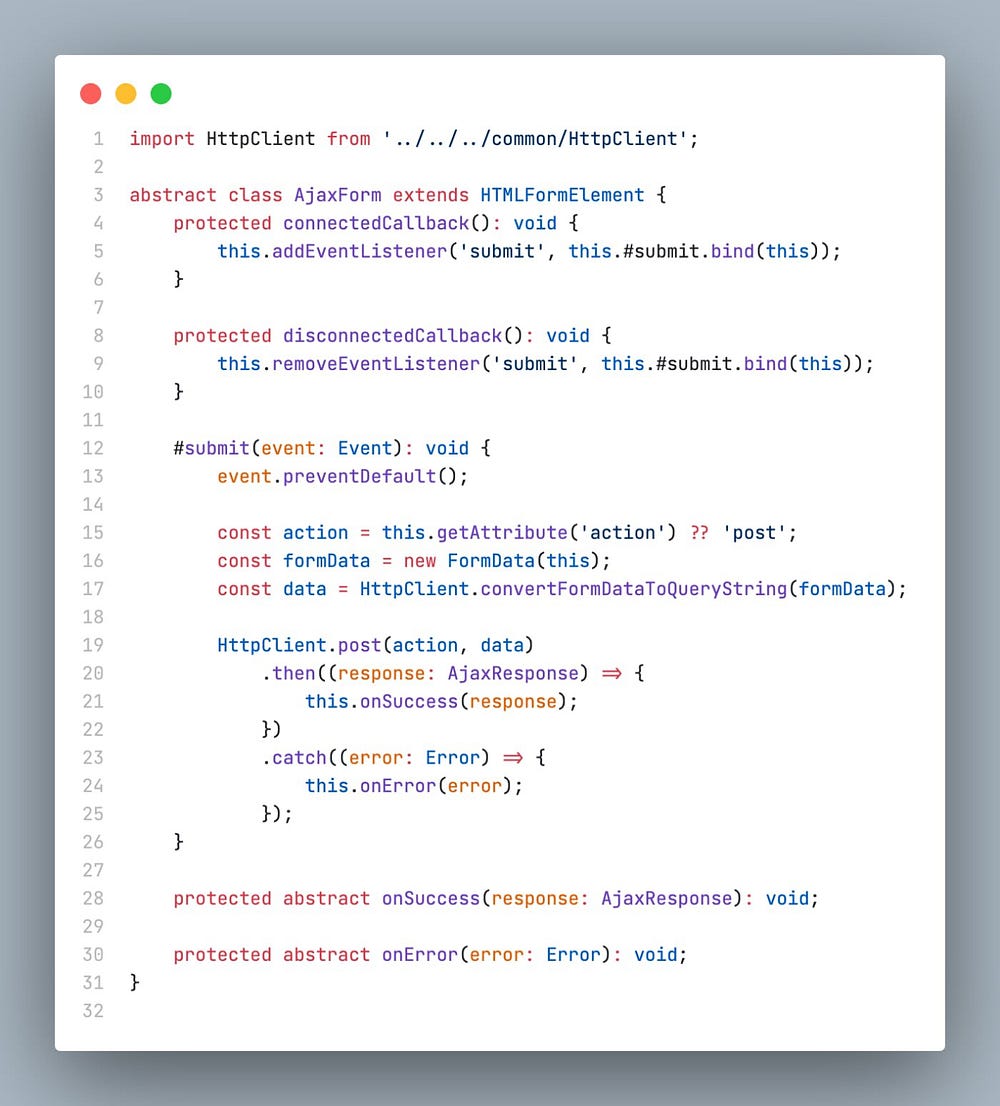
File Icon Themes
File icon themes can be contributed by extensions and selected by users as their favorite set of file icons. File icons are shown in the File Explorer and tabbed headings.
Selecting the File Icon Theme
- In VS Code, open the File Icon Theme picker with File > Preferences > Theme > File Icon Theme. (Code > Preferences > Theme > File Icon Theme on macOS).
- You can also use the Preferences: File Icon Theme command from the Command Palette (⇧⌘P (Windows, Linux Ctrl+Shift+P)).
- Use the cursor keys to preview the icons of the theme.
- Select the theme you want and hit Enter.
![]()
By default, the Seti file icon set is used and those are the icons you see in the File Explorer. Once a file icon theme is selected, the selected theme will be remembered and appear again whenever VS Code is restarted. You can disable file icons by selecting None.
VS code ships with two file icon themes; Minimal and Seti. To install more file icon themes, select the Install Additional File Icon Themes item in the file icon theme picker and you’ll see a query for file icon themes (tag:icon-theme) in the Extensions view.
You can also browse the VS Code Marketplace site directly to find available themes.
The active File Icon theme is persisted in your user settings (keyboard shortcut ⌘, (Windows, Linux Ctrl+,)).
  // Specifies the file icon theme used in the workbench.
  "workbench.iconTheme": "vs-seti"
Creating your own File Icon Theme
You can create your own File Icon Theme from icons (preferably SVG), see the File Icon Theme topic in our Extension API section for details.
Next steps
Themes are just one way to customize VS Code. If you’d like to learn more about VS Code customization and extensibility, try these topics:
- Settings — Learn how to configure VS Code to your preferences through user and workspace settings.
- Snippets — Add additional snippets to your favorite language.
- Extension API — Learn about other ways to extend VS Code.
- Color Theme — Color Theme extension API.
- File Icon Theme — File Icon Theme extension API.
2/2/2023
Color Themes
Color themes let you modify the colors in Visual Studio Code’s user interface to suit your preferences and work environment.
Selecting the Color Theme
- In VS Code, open the Color Theme picker with File > Preferences > Theme > Color Theme. (Code > Preferences > Theme > Color Theme on macOS).
- You can also use the keyboard shortcut ⌘K ⌘T (Windows, Linux Ctrl+K Ctrl+T) to display the picker.
- Use the cursor keys to preview the colors of the theme.
- Select the theme you want and press Enter.
The active color theme is stored in your user settings (keyboard shortcut ⌘, (Windows, Linux Ctrl+,)).
  // Specifies the color theme used in the workbench.
  "workbench.colorTheme": "Default Dark+"
Tip: By default, the theme is stored in your user settings and applies globally to all workspaces. You can also configure a workspace specific theme. To do so, set a theme in the Workspace settings.
Color Themes from the Marketplace
There are several out-of-the-box color themes in VS Code for you to try.
Many more themes have been uploaded to the VS Code Extension Marketplace by the community. If you find one you want to use, install it and restart VS Code and the new theme will be available.
You can search for themes in the Extensions view (⇧⌘X (Windows, Linux Ctrl+Shift+X)) search box using the @category:"themes" filter.
Auto switch based on OS color scheme
Windows and macOS support light and dark color schemes. There is a setting, window.autoDetectColorScheme, that instructs VS Code to listen to changes to the OS’s color scheme and switch to a matching theme accordingly.
To customize the themes that are used when a color scheme changes, you can set the preferred light, dark, and high contrast themes with the settings:
workbench.preferredLightColorTheme— defaults to «Default Light+»workbench.preferredDarkColorTheme— defaults to «Default Dark+»workbench.preferredHighContrastColorTheme— defaults to «Default High Contrast»workbench.preferredHighContrastLightColorTheme— defaults to «Default High Contrast Light»
Customizing a Color Theme
Workbench colors
You can customize your active color theme with the workbench.colorCustomizations and editor.tokenColorCustomizations user settings.
To set the colors of VS Code UI elements such as list & trees (File Explorer, suggestions widget), diff editor, Activity Bar, notifications, scroll bar, split view, buttons, and more, use workbench.colorCustomizations.
You can use IntelliSense while setting workbench.colorCustomizations values or, for a list of all customizable colors, see the Theme Color Reference.
To customize a specific theme only, use the following syntax:
"workbench.colorCustomizations": {
    "[Monokai]": {
        "sideBar.background": "#347890"
    }
}
If a customization applies to more than one themes, you can name multiple themes or use * as wildcard at the beginning and the end of the name:
"workbench.colorCustomizations": {
    "[Abyss][Red]": {
        "activityBar.background": "#ff0000"
    },
    "[Monokai*]": {
        "activityBar.background": "#ff0000"
    }
}
Editor syntax highlighting
To tune the editor’s syntax highlighting colors, use editor.tokenColorCustomizations in your user settings settings.json file:
A pre-configured set of syntax tokens (‘comments’, ‘strings’, …) is available for the most common constructs. If you want more, you can do so by directly specifying TextMate theme color rules:
Note: Directly configuring TextMate rules is an advanced skill as you need to understand on how TextMate grammars work. Go to the Color Theme guide for more information.
Again, to customize specific themes, you can do this in one of the following ways:
"editor.tokenColorCustomizations": {
    "[Monokai]": {
        "comments": "#229977"
    },
    "[*Dark*]": {
        "variables": "#229977"
    },
    "[Abyss][Red]": {
        "keywords": "#f00"
    }
}
Editor semantic highlighting
Some languages (currently: TypeScript, JavaScript, Java) provide semantic tokens. Semantic tokens are based on the language service’s symbol understanding and are more accurate than the syntax tokens coming from the TextMate grammars that are driven by regular expressions. The semantic highlighting that is computed from the semantic tokens goes on top of syntax highlighting and can correct and enrich the highlighting as seen in the following example:
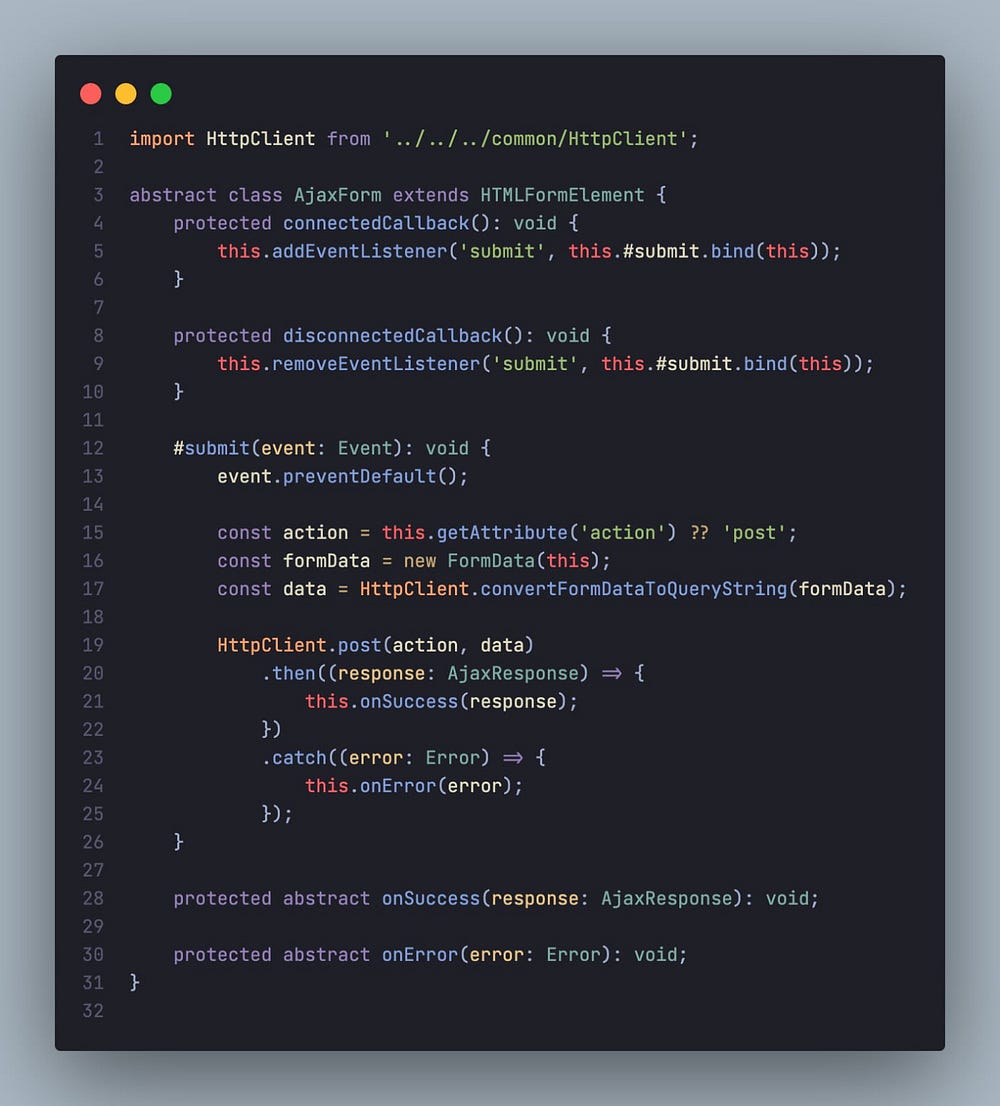
The «Tomorrow Night Blue» color theme without semantic highlighting:
The «Tomorrow Night Blue» color theme with semantic highlighting:
Notice the color differences based on language service symbol understanding:
- line 10:
languageModesis colored as a parameter. - line 11:
RangeandPositionare colored as classes anddocumentas a parameter. - line 13:
getFoldingRangesis colored as a function.
The settings editor.semanticHighlighting.enabled serves as the main control on whether semantic highlighting is applied. It can have values true, false, and configuredByTheme.
trueandfalseturn semantic highlighting on or off for all themes.configuredByThemeis the default and lets each theme control whether semantic highlighting is enabled or not. All the themes that ship with VS Code (for example, the «Dark+» default) have semantic highlighting enabled by default.
Users can override the theme setting by:
"editor.semanticTokenColorCustomizations": {
    "[Rouge]": {
        "enabled": true
    }
}
When semantic highlighting is enabled and available for a language, it is up to the theme to configure whether and how semantic tokens are colored. Some semantic tokens are standardized and map to well-established TextMate scopes. If the theme has a coloring rule for these TextMate scopes, the semantic token will be rendered with that color, without the need for any additional coloring rules.
Additional styling rules can be configured by the user in editor.semanticTokenColorCustomizations":
"editor.semanticTokenColorCustomizations": {
    "[Rouge]": {
        "enabled": true,
        "rules": {
            "*.declaration": { "bold": true }
        }
    }
}
To see what semantic tokens are computed and how they are styled, users can use the scope inspector (Developer: Inspect Editor Tokens and Scopes), which displays information for the text at the current cursor position.
If semantic tokens are available for the language at the given position and enabled by theme, the inspect tool shows a section semantic token type. The section shows the semantic token information (type and any number of modifiers) as well as the styling rules that apply.
More information on semantic tokens and styling rule syntax can be found in the Semantic Highlighting Guide.
Creating your own Color Theme
Creating and publishing a theme extension is easy. Customize your colors in your user settings then generate a theme definition file with the Developer: Generate Color Theme From Current Settings command.
VS Code’s Yeoman extension generator will help you generate the rest of the extension.
See the Create a new Color Theme topic in our Extension API section to learn more.
Remove default Color Themes
If you’d like to remove some of the default themes shipped with VS Code from the Color Theme picker, you can disable them from the Extensions view (⇧⌘X (Windows, Linux Ctrl+Shift+X)). Click the Filter Extensions button from the top of the Extensions view, select the Built-in option, and you’ll see a THEMES section listing the default themes.
You can disable a built-in theme extension as you would any other VS Code extension with the Disable command on the gear context menu.
File Icon Themes
File icon themes can be contributed by extensions and selected by users as their favorite set of file icons. File icons are shown in the File Explorer and tabbed headings.
Selecting the File Icon Theme
- In VS Code, open the File Icon Theme picker with File > Preferences > Theme > File Icon Theme. (Code > Preferences > Theme > File Icon Theme on macOS).
- You can also use the Preferences: File Icon Theme command from the Command Palette (⇧⌘P (Windows, Linux Ctrl+Shift+P)).
- Use the cursor keys to preview the icons of the theme.
- Select the theme you want and hit Enter.
![]()
By default, the Seti file icon set is used and those are the icons you see in the File Explorer. Once a file icon theme is selected, the selected theme will be remembered and appear again whenever VS Code is restarted. You can disable file icons by selecting None.
VS code ships with two file icon themes; Minimal and Seti. To install more file icon themes, select the Install Additional File Icon Themes item in the file icon theme picker and you’ll see a query for file icon themes (tag:icon-theme) in the Extensions view.
You can also browse the VS Code Marketplace site directly to find available themes.
The active File Icon theme is persisted in your user settings (keyboard shortcut ⌘, (Windows, Linux Ctrl+,)).
  // Specifies the file icon theme used in the workbench.
  "workbench.iconTheme": "vs-seti"
Creating your own File Icon Theme
You can create your own File Icon Theme from icons (preferably SVG), see the File Icon Theme topic in our Extension API section for details.
Next steps
Themes are just one way to customize VS Code. If you’d like to learn more about VS Code customization and extensibility, try these topics:
- Settings — Learn how to configure VS Code to your preferences through user and workspace settings.
- Snippets — Add additional snippets to your favorite language.
- Extension API — Learn about other ways to extend VS Code.
- Color Theme — Color Theme extension API.
- File Icon Theme — File Icon Theme extension API.
2/2/2023
Color Themes
Color themes let you modify the colors in Visual Studio Code’s user interface to suit your preferences and work environment.
Selecting the Color Theme
- In VS Code, open the Color Theme picker with File > Preferences > Theme > Color Theme. (Code > Preferences > Theme > Color Theme on macOS).
- You can also use the keyboard shortcut ⌘K ⌘T (Windows, Linux Ctrl+K Ctrl+T) to display the picker.
- Use the cursor keys to preview the colors of the theme.
- Select the theme you want and press Enter.
The active color theme is stored in your user settings (keyboard shortcut ⌘, (Windows, Linux Ctrl+,)).
  // Specifies the color theme used in the workbench.
  "workbench.colorTheme": "Default Dark+"
Tip: By default, the theme is stored in your user settings and applies globally to all workspaces. You can also configure a workspace specific theme. To do so, set a theme in the Workspace settings.
Color Themes from the Marketplace
There are several out-of-the-box color themes in VS Code for you to try.
Many more themes have been uploaded to the VS Code Extension Marketplace by the community. If you find one you want to use, install it and restart VS Code and the new theme will be available.
You can search for themes in the Extensions view (⇧⌘X (Windows, Linux Ctrl+Shift+X)) search box using the @category:"themes" filter.
Auto switch based on OS color scheme
Windows and macOS support light and dark color schemes. There is a setting, window.autoDetectColorScheme, that instructs VS Code to listen to changes to the OS’s color scheme and switch to a matching theme accordingly.
To customize the themes that are used when a color scheme changes, you can set the preferred light, dark, and high contrast themes with the settings:
workbench.preferredLightColorTheme— defaults to «Default Light+»workbench.preferredDarkColorTheme— defaults to «Default Dark+»workbench.preferredHighContrastColorTheme— defaults to «Default High Contrast»workbench.preferredHighContrastLightColorTheme— defaults to «Default High Contrast Light»
Customizing a Color Theme
Workbench colors
You can customize your active color theme with the workbench.colorCustomizations and editor.tokenColorCustomizations user settings.
To set the colors of VS Code UI elements such as list & trees (File Explorer, suggestions widget), diff editor, Activity Bar, notifications, scroll bar, split view, buttons, and more, use workbench.colorCustomizations.
You can use IntelliSense while setting workbench.colorCustomizations values or, for a list of all customizable colors, see the Theme Color Reference.
To customize a specific theme only, use the following syntax:
"workbench.colorCustomizations": {
    "[Monokai]": {
        "sideBar.background": "#347890"
    }
}
If a customization applies to more than one themes, you can name multiple themes or use * as wildcard at the beginning and the end of the name:
"workbench.colorCustomizations": {
    "[Abyss][Red]": {
        "activityBar.background": "#ff0000"
    },
    "[Monokai*]": {
        "activityBar.background": "#ff0000"
    }
}
Editor syntax highlighting
To tune the editor’s syntax highlighting colors, use editor.tokenColorCustomizations in your user settings settings.json file:
A pre-configured set of syntax tokens (‘comments’, ‘strings’, …) is available for the most common constructs. If you want more, you can do so by directly specifying TextMate theme color rules:
Note: Directly configuring TextMate rules is an advanced skill as you need to understand on how TextMate grammars work. Go to the Color Theme guide for more information.
Again, to customize specific themes, you can do this in one of the following ways:
"editor.tokenColorCustomizations": {
    "[Monokai]": {
        "comments": "#229977"
    },
    "[*Dark*]": {
        "variables": "#229977"
    },
    "[Abyss][Red]": {
        "keywords": "#f00"
    }
}
Editor semantic highlighting
Some languages (currently: TypeScript, JavaScript, Java) provide semantic tokens. Semantic tokens are based on the language service’s symbol understanding and are more accurate than the syntax tokens coming from the TextMate grammars that are driven by regular expressions. The semantic highlighting that is computed from the semantic tokens goes on top of syntax highlighting and can correct and enrich the highlighting as seen in the following example:
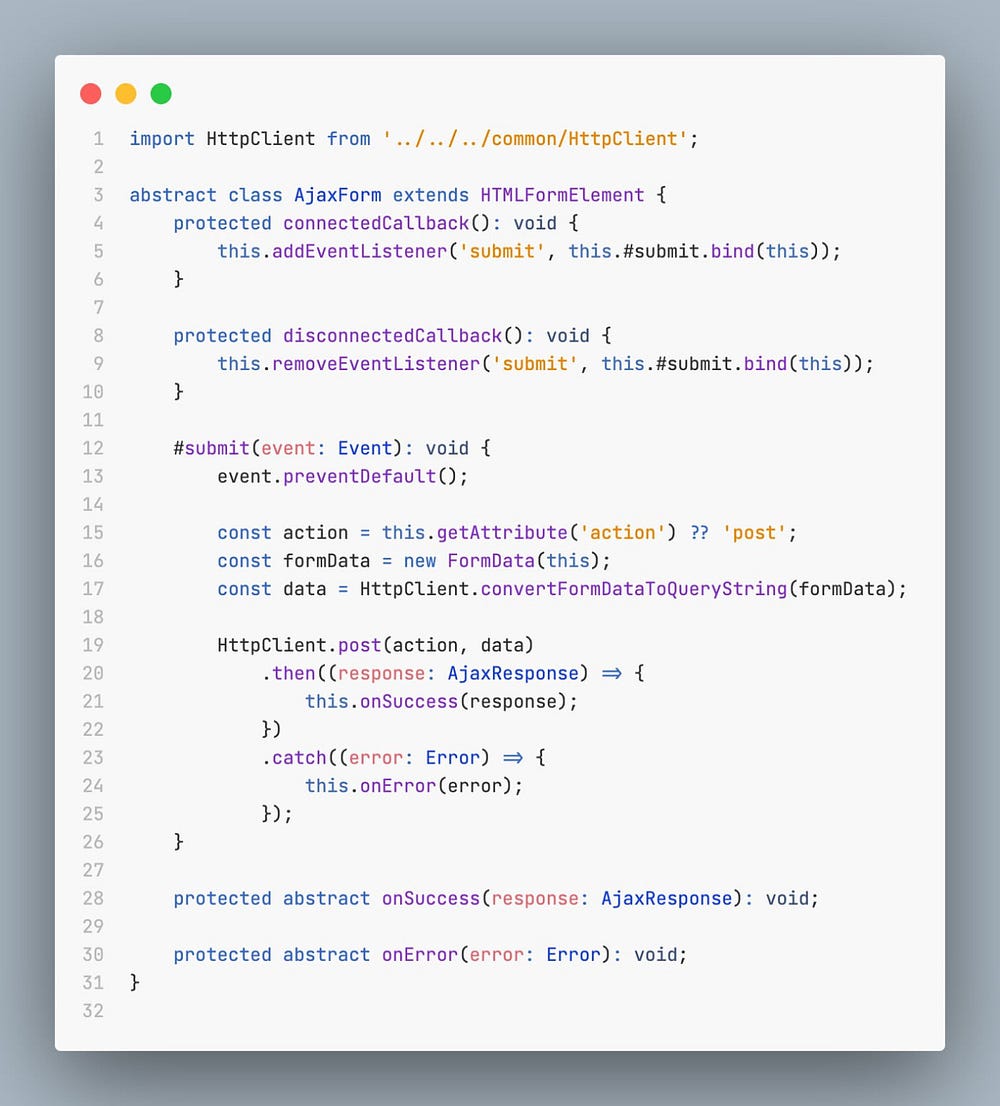
The «Tomorrow Night Blue» color theme without semantic highlighting:
The «Tomorrow Night Blue» color theme with semantic highlighting:
Notice the color differences based on language service symbol understanding:
- line 10:
languageModesis colored as a parameter. - line 11:
RangeandPositionare colored as classes anddocumentas a parameter. - line 13:
getFoldingRangesis colored as a function.
The settings editor.semanticHighlighting.enabled serves as the main control on whether semantic highlighting is applied. It can have values true, false, and configuredByTheme.
trueandfalseturn semantic highlighting on or off for all themes.configuredByThemeis the default and lets each theme control whether semantic highlighting is enabled or not. All the themes that ship with VS Code (for example, the «Dark+» default) have semantic highlighting enabled by default.
Users can override the theme setting by:
"editor.semanticTokenColorCustomizations": {
    "[Rouge]": {
        "enabled": true
    }
}
When semantic highlighting is enabled and available for a language, it is up to the theme to configure whether and how semantic tokens are colored. Some semantic tokens are standardized and map to well-established TextMate scopes. If the theme has a coloring rule for these TextMate scopes, the semantic token will be rendered with that color, without the need for any additional coloring rules.
Additional styling rules can be configured by the user in editor.semanticTokenColorCustomizations":
"editor.semanticTokenColorCustomizations": {
    "[Rouge]": {
        "enabled": true,
        "rules": {
            "*.declaration": { "bold": true }
        }
    }
}
To see what semantic tokens are computed and how they are styled, users can use the scope inspector (Developer: Inspect Editor Tokens and Scopes), which displays information for the text at the current cursor position.
If semantic tokens are available for the language at the given position and enabled by theme, the inspect tool shows a section semantic token type. The section shows the semantic token information (type and any number of modifiers) as well as the styling rules that apply.
More information on semantic tokens and styling rule syntax can be found in the Semantic Highlighting Guide.
Creating your own Color Theme
Creating and publishing a theme extension is easy. Customize your colors in your user settings then generate a theme definition file with the Developer: Generate Color Theme From Current Settings command.
VS Code’s Yeoman extension generator will help you generate the rest of the extension.
See the Create a new Color Theme topic in our Extension API section to learn more.
Remove default Color Themes
If you’d like to remove some of the default themes shipped with VS Code from the Color Theme picker, you can disable them from the Extensions view (⇧⌘X (Windows, Linux Ctrl+Shift+X)). Click the Filter Extensions button from the top of the Extensions view, select the Built-in option, and you’ll see a THEMES section listing the default themes.
You can disable a built-in theme extension as you would any other VS Code extension with the Disable command on the gear context menu.
File Icon Themes
File icon themes can be contributed by extensions and selected by users as their favorite set of file icons. File icons are shown in the File Explorer and tabbed headings.
Selecting the File Icon Theme
- In VS Code, open the File Icon Theme picker with File > Preferences > Theme > File Icon Theme. (Code > Preferences > Theme > File Icon Theme on macOS).
- You can also use the Preferences: File Icon Theme command from the Command Palette (⇧⌘P (Windows, Linux Ctrl+Shift+P)).
- Use the cursor keys to preview the icons of the theme.
- Select the theme you want and hit Enter.
![]()
By default, the Seti file icon set is used and those are the icons you see in the File Explorer. Once a file icon theme is selected, the selected theme will be remembered and appear again whenever VS Code is restarted. You can disable file icons by selecting None.
VS code ships with two file icon themes; Minimal and Seti. To install more file icon themes, select the Install Additional File Icon Themes item in the file icon theme picker and you’ll see a query for file icon themes (tag:icon-theme) in the Extensions view.
You can also browse the VS Code Marketplace site directly to find available themes.
The active File Icon theme is persisted in your user settings (keyboard shortcut ⌘, (Windows, Linux Ctrl+,)).
  // Specifies the file icon theme used in the workbench.
  "workbench.iconTheme": "vs-seti"
Creating your own File Icon Theme
You can create your own File Icon Theme from icons (preferably SVG), see the File Icon Theme topic in our Extension API section for details.
Next steps
Themes are just one way to customize VS Code. If you’d like to learn more about VS Code customization and extensibility, try these topics:
- Settings — Learn how to configure VS Code to your preferences through user and workspace settings.
- Snippets — Add additional snippets to your favorite language.
- Extension API — Learn about other ways to extend VS Code.
- Color Theme — Color Theme extension API.
- File Icon Theme — File Icon Theme extension API.
2/2/2023
| Order | Area | TOCTitle | ContentId | PageTitle | DateApproved | MetaDescription |
|---|---|---|---|---|---|---|
|
5 |
getstarted |
Themes |
CAC88BC7-90A5-4384-8A05-2187117C0F72 |
Visual Studio Code Themes |
2/2/2023 |
Changing the color theme in Visual Studio Code. You can use color themes provided by VS Code, the community or create your own new themes. |
Color Themes
Color themes let you modify the colors in Visual Studio Code’s user interface to suit your preferences and work environment.

Selecting the Color Theme
- In VS Code, open the Color Theme picker with File > Preferences > Theme > Color Theme. (Code > Preferences > Theme > Color Theme on macOS).
- You can also use the keyboard shortcut
kb(workbench.action.selectTheme)to display the picker. - Use the cursor keys to preview the colors of the theme.
- Select the theme you want and press
kbstyle(Enter).

The active color theme is stored in your user settings (keyboard shortcut kb(workbench.action.openSettings)).
  // Specifies the color theme used in the workbench.
  "workbench.colorTheme": "Default Dark+"
Tip: By default, the theme is stored in your user settings and applies globally to all workspaces. You can also configure a workspace specific theme. To do so, set a theme in the Workspace settings.
Color Themes from the Marketplace
There are several out-of-the-box color themes in VS Code for you to try.
Many more themes have been uploaded to the VS Code Extension Marketplace by the community. If you find one you want to use, install it and restart VS Code and the new theme will be available.
You can search for themes in the Extensions view (kb(workbench.view.extensions)) search box using the @category:"themes" filter.

Auto switch based on OS color scheme
Windows and macOS support light and dark color schemes. There is a setting, window.autoDetectColorScheme, that instructs VS Code to listen to changes to the OS’s color scheme and switch to a matching theme accordingly.
To customize the themes that are used when a color scheme changes, you can set the preferred light, dark, and high contrast themes with the settings:
workbench.preferredLightColorTheme— defaults to «Default Light+»workbench.preferredDarkColorTheme— defaults to «Default Dark+»workbench.preferredHighContrastColorTheme— defaults to «Default High Contrast»workbench.preferredHighContrastLightColorTheme— defaults to «Default High Contrast Light»
Customizing a Color Theme
Workbench colors
You can customize your active color theme with the workbench.colorCustomizations and editor.tokenColorCustomizations user settings.
To set the colors of VS Code UI elements such as list & trees (File Explorer, suggestions widget), diff editor, Activity Bar, notifications, scroll bar, split view, buttons, and more, use workbench.colorCustomizations.

You can use IntelliSense while setting workbench.colorCustomizations values or, for a list of all customizable colors, see the Theme Color Reference.
To customize a specific theme only, use the following syntax:
"workbench.colorCustomizations": {
    "[Monokai]": {
        "sideBar.background": "#347890"
    }
}
If a customization applies to more than one themes, you can name multiple themes or use * as wildcard at the beginning and the end of the name:
"workbench.colorCustomizations": {
    "[Abyss][Red]": {
        "activityBar.background": "#ff0000"
    },
    "[Monokai*]": {
        "activityBar.background": "#ff0000"
    }
}
Editor syntax highlighting
To tune the editor’s syntax highlighting colors, use editor.tokenColorCustomizations in your user settings settings.json file:

A pre-configured set of syntax tokens (‘comments’, ‘strings’, …) is available for the most common constructs. If you want more, you can do so by directly specifying TextMate theme color rules:

Note: Directly configuring TextMate rules is an advanced skill as you need to understand on how TextMate grammars work. Go to the Color Theme guide for more information.
Again, to customize specific themes, you can do this in one of the following ways:
"editor.tokenColorCustomizations": {
    "[Monokai]": {
        "comments": "#229977"
    },
    "[*Dark*]": {
        "variables": "#229977"
    },
    "[Abyss][Red]": {
        "keywords": "#f00"
    }
}
Editor semantic highlighting
Some languages (currently: TypeScript, JavaScript, Java) provide semantic tokens. Semantic tokens are based on the language service’s symbol understanding and are more accurate than the syntax tokens coming from the TextMate grammars that are driven by regular expressions. The semantic highlighting that is computed from the semantic tokens goes on top of syntax highlighting and can correct and enrich the highlighting as seen in the following example:
The «Tomorrow Night Blue» color theme without semantic highlighting:

The «Tomorrow Night Blue» color theme with semantic highlighting:

Notice the color differences based on language service symbol understanding:
- line 10:
languageModesis colored as a parameter. - line 11:
RangeandPositionare colored as classes anddocumentas a parameter. - line 13:
getFoldingRangesis colored as a function.
The settings editor.semanticHighlighting.enabled serves as the main control on whether semantic highlighting is applied. It can have values true, false, and configuredByTheme.
trueandfalseturn semantic highlighting on or off for all themes.configuredByThemeis the default and lets each theme control whether semantic highlighting is enabled or not. All the themes that ship with VS Code (for example, the «Dark+» default) have semantic highlighting enabled by default.
Users can override the theme setting by:
"editor.semanticTokenColorCustomizations": {
    "[Rouge]": {
        "enabled": true
    }
}
When semantic highlighting is enabled and available for a language, it is up to the theme to configure whether and how semantic tokens are colored. Some semantic tokens are standardized and map to well-established TextMate scopes. If the theme has a coloring rule for these TextMate scopes, the semantic token will be rendered with that color, without the need for any additional coloring rules.
Additional styling rules can be configured by the user in editor.semanticTokenColorCustomizations":
"editor.semanticTokenColorCustomizations": {
    "[Rouge]": {
        "enabled": true,
        "rules": {
            "*.declaration": { "bold": true }
        }
    }
}
To see what semantic tokens are computed and how they are styled, users can use the scope inspector (Developer: Inspect Editor Tokens and Scopes), which displays information for the text at the current cursor position.

If semantic tokens are available for the language at the given position and enabled by theme, the inspect tool shows a section semantic token type. The section shows the semantic token information (type and any number of modifiers) as well as the styling rules that apply.
More information on semantic tokens and styling rule syntax can be found in the Semantic Highlighting Guide.
Creating your own Color Theme
Creating and publishing a theme extension is easy. Customize your colors in your user settings then generate a theme definition file with the Developer: Generate Color Theme From Current Settings command.
VS Code’s Yeoman extension generator will help you generate the rest of the extension.
See the Create a new Color Theme topic in our Extension API section to learn more.
Remove default Color Themes
If you’d like to remove some of the default themes shipped with VS Code from the Color Theme picker, you can disable them from the Extensions view (kb(workbench.view.extensions)). Click the Filter Extensions button from the top of the Extensions view, select the Built-in option, and you’ll see a THEMES section listing the default themes.

You can disable a built-in theme extension as you would any other VS Code extension with the Disable command on the gear context menu.

File Icon Themes
File icon themes can be contributed by extensions and selected by users as their favorite set of file icons. File icons are shown in the File Explorer and tabbed headings.
Selecting the File Icon Theme
- In VS Code, open the File Icon Theme picker with File > Preferences > Theme > File Icon Theme. (Code > Preferences > Theme > File Icon Theme on macOS).
- You can also use the Preferences: File Icon Theme command from the Command Palette (
kb(workbench.action.showCommands)). - Use the cursor keys to preview the icons of the theme.
- Select the theme you want and hit
kbstyle(Enter).
![]()
By default, the Seti file icon set is used and those are the icons you see in the File Explorer. Once a file icon theme is selected, the selected theme will be remembered and appear again whenever VS Code is restarted. You can disable file icons by selecting None.
VS code ships with two file icon themes; Minimal and Seti. To install more file icon themes, select the Install Additional File Icon Themes item in the file icon theme picker and you’ll see a query for file icon themes (tag:icon-theme) in the Extensions view.
You can also browse the VS Code Marketplace site directly to find available themes.
The active File Icon theme is persisted in your user settings (keyboard shortcut kb(workbench.action.openSettings)).
  // Specifies the file icon theme used in the workbench.
  "workbench.iconTheme": "vs-seti"
Creating your own File Icon Theme
You can create your own File Icon Theme from icons (preferably SVG), see the File Icon Theme topic in our Extension API section for details.
Next steps
Themes are just one way to customize VS Code. If you’d like to learn more about VS Code customization and extensibility, try these topics:
- Settings — Learn how to configure VS Code to your preferences through user and workspace settings.
- Snippets — Add additional snippets to your favorite language.
- Extension API — Learn about other ways to extend VS Code.
- Color Theme — Color Theme extension API.
- File Icon Theme — File Icon Theme extension API.
В Visual Studio Code (VSCode) темы оформления можно настроить несколькими способами. Самый простой — это установить уже готовый вариант. Поскольку выбор, действительно, очень большой, то можно подобрать наиболее привлекательный вариант. Второй способ — это воспользоваться он-лайн редактором тем, где можно самостоятельно настроить все цвета. И третий вариант — это используя уже готовую тему, внести необходимые коррективы в локальные настройки.
Прежде, чем рассмотреть все эти варианты, я отмечу, что VSCode может хранить настройки не только глобально для всего редактора, но и локально: для выбранной папки или для рабочей области. Однажды я установил какое-то расширение, которое поменяло цвет оформления на болотно-грязный, и потом полдня потратил на то, как его отключить. Оказалось, что цвет прописался в конфигурации папки. 
Готовые темы для Visual Studio Code
Здесь всё очень просто: все темы устанавливаются с официального сайта: Marketplace. На странице темы есть ссылка Install , нажав на которую, откроется сам VSCode, где и выбирается установка.
Для переключения установленных тем используются горячие клавиши Ctrl+K+T (нажать Ctrl, потом не отпуская, «K» и «T»). Дальше курсором выбираем любой вариант.

В Marketplace не очень удобно сделан предпросмотр тем, поэтому можно выбрать тему с других сайтов, например:
- orta.io/vscode-themes — здесь большие скриншоты всех тем на одной странице.
- vscodethemes.com — здесь темы уже сгруппированы на светлые и тёмные, а также доступен предпросмотр для HTML/JS/CSS-кода.
Если тема не понравилась, то её можно удалить во включенных расширениях. Готовые темы удобны тем, что это самый быстрый и простой способ установки — буквально в пару кликов.
Создание своей темы для VSCode
При желании можно создать и свою тему. Для этого нужно воспользоваться он-лайн редактором TmTheme Editor. Вначале лучше выбрать из галереи какой-то подходящий вариант, после его отредактировать. После того, как настройки выполнены, нужно скачать файл (кнопка Download). Это будет файл с расширением .tmTheme.
После этого нужно создать расширение для этой темы. Идём в каталог c:UsersЮЗЕР.vscodeextensions, где VSCode хранит все установленные расширения. Делаем там каталог «my.themу», в который размещаем файл package.json такого содержания:
{
    "name": "My theme",
    "version": "1.0.0",
    "engines": {
        "vscode": ">=0.9.0-pre.1"
    },
    "publisher": "MAX",
    "contributes": {
        "themes": [
            {
                "label": "MyTheme",
                "uiTheme": "vs",
                "path": "./themes/my.tmTheme"
            }
        ]
    }
}
Название, версию можно поменять на свою. Параметр path указывает на tmTheme-файл. Его мы скачали с TmTheme Editor — нужно его переименовать в my.tmTheme. Делаем подкаталог themes и кидаем в него этот файл.
Параметр uiTheme указывает на базовый UI — в данном примере «vs» означает светлую тему. Если вы используется темную, то нужно указать «vs-dark».
После этого в Visual Studio Code переключаемся на вкладку расширений и включаем его.

Если вы решите изменить какой-то цвет в TmTheme Editor, то скачиваете новый файл и заменяете им my.tmTheme. Чтобы изменения вступили в силу, можно выключить расширение и опять его включить.
Свои настройки оформления Visual Studio Code
Лично я предпочитаю светлые темы оформления, хотя тёмные выглядят красивей, поскольку цвет на темном фоне лучше различим. Для меня проблема в том, что приходится постоянно переключаться с редактора на сайт в браузере и мельтешение «тёмное-светлое» довольно сильно раздражает. Поэтому, чтобы не насиловать глаза, я использую светлое оформление.
У готовых светлых тем существенный недостаток — низкий контраст цветов на белом фоне. Из-за этого подобрать нормальный цвет не такое простое занятие. Например многие используют светло-серый цвет текста: выгладит красиво, но для зрения получается слишком малый контраст. Другие, наоборот, ставят насыщенные цвета: синий, красный — для нас они несут ещё и смысловой оттенок, поэтому их нужно подбирать с умом. В общем, если вы такой же капризный как я, то самым лучшим способом будет собственная настройка оформления VSCode. И делается это, на самом деле, достаточно просто.
Общий принцип
Все настройки хранятся как обычно в settings.json. Visual Studio Code разделяет оформление самого редактора от цветовой схемы подсветки кода. Сам редактор настраивается в очень широких пределах — изменить можно буквально каждый элемент дизайна.
В settings.json нужно сделать секцию workbench.colorCustomizations, в которой указываются изменяемые параметры. Это «глобальное оформление», которое перекроет оформление любой темы.
Перед тем, как вы начнёте вносить изменения, я бы посоветовал выбрать наиболее подходящую тему и уже после этого вносить свои изменения.
Оформление самого редактора
Я использую стандартную тему оформления Visual Studio Light и секция workbench.colorCustomizations у меня такая:
...
    "workbench.colorCustomizations": {
        "foreground": "#000000",
        "editor.lineHighlightBackground": "#F0F05D70"
    },
...
Параметр foreground задаёт базовый черный цвет текста. Второй параметр задает полупрозрачный желтый цвет для подсветки текущей линии. Параметров очень много: все они описаны в официальной документации Theme Color.
После сохранения settings.json изменения сразу же вступают в силу.
«Подводные камни»
Некоторые расширения могут перекрывать ваши настройки. Я столкнулся с тем, что например расширение Git (сейчас это стандартное расширение, доступное в общих настройках), изменяет цвет списка файлов. То есть я указываю цвет #000000, но он принудительно меняет их на малоконтрастный серый. В данном случае Git нашёл существующий репозиторий и решил, что изменения не заcommit’чены. Настройки оформления для Git’а другие (они есть в документации). Поэтому, если какой-то параметр вдруг не работает, то возможно его перебивает какое-то расширение.
Если расширение не нужно, то его можно просто отключить (enable).
Подсветка кода в VSCode
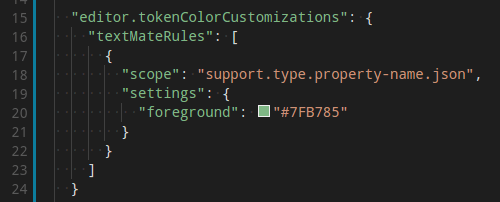
Теперь самое интересное. Для изменения подсветки кода, используется секция editor.tokenColorCustomizations. В ней указывается тема оформления, для которой нужно внести изменения. То есть настройки применятся только, если будет выбрана эта тема.
Покажу на примере:
...
"editor.tokenColorCustomizations": {
        "[Visual Studio Light]": {
            "textMateRules": [
                {
                    "scope": "entity.name.function.php",
                    "settings": {
                        "foreground": "#000000",
                        "fontStyle": "italic underline"
                    }
                },
                {
                    "scope": "variable.other.php",
                    "settings": {
                        "foreground": "#0000BB",
                    }
                },
            ],
        },
    },
...
Здесь выбрана тема «Visual Studio Light». Секция textMateRules как раз и содержит оформление для каждого элемента, который задаётся в параметре scope. Само же оформление задается в параметре settings.
Если оформление для разных элементов одно и тоже, то в scope можно их перечислить через запятую, например так (здесь два элемента):
{
    "scope": "comment.block.documentation.phpdoc.php, comment.line.double-slash.php",
    "settings": {
        "foreground": "#7c7c7c",
    }
},
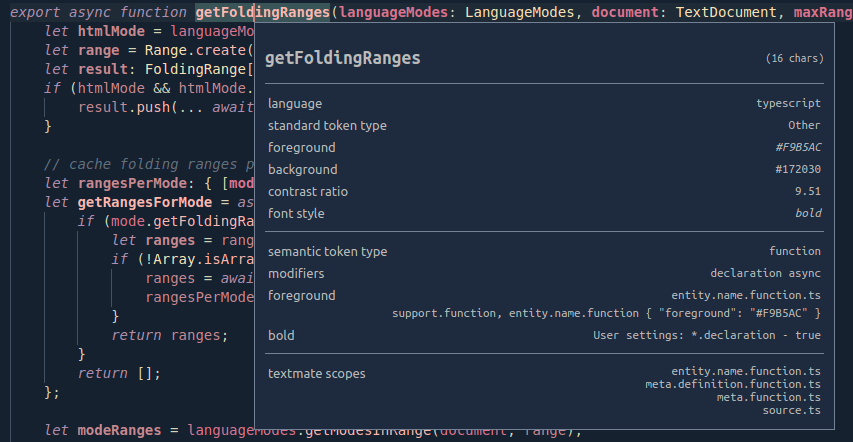
Предусмотренных элементов очень много, более того, они ещё и имеют привязку к языку, поэтому Visual Studio Code предлагает готовый инструмент Inspect TM Scopes, который показывает всю необходимую информацию.
Для начала загрузите любой файл, например PHP (как в моих примерах). После этого нажмите F1 (открется панель команд) и в неё наберите Developer: Inspect TM Scopes и после нажмите Enter.

После этого можно поставить курсор на любой элемент и откроется окно с описанием этого элемента.

Здесь указывается текущее оформление. Строчка:
entity.name.function.php { "foreground": "#000000" }
показывает какой именно элемент сейчас работает. А ниже приведена иерархия элементов:
entity.name.function.php
meta.function-call.php
source.php
meta.embedded.block.php
text.html.php
Верхние элементы имеют более высокий приоритет. В данном примере сработал entity.name.function.php, но в коде могут встречаться и другие, например source.php.
Если нужно изменить элемент, достаточно скопировать его из этой информации и вставить в settings.json. После сохранения файла, изменения будут сразу же видны в коде.
Подсказка. Удобно разделить окна редактора VSCode, чтобы в одном был исходный php-код, а в другом
settings.json.
Таким вот нехитрым способом можно настроить Visual Studio Code под любые «капризы».

Visual Studio Code — замечательный редактор, поддерживающий множество расширений для настройки под нужды пользователя. Сейчас для него доступно более 8 000 тем, которые помогают настроить цвета интерфейса, иконки, используемые для отображения типов файлов, и многое другое.
Шрифт и лигатуры
Правильно подобранный шрифт может стать удивительно эффективным средством повышения производительности и снижения утомляемости глаз. Существует множество шрифтов, созданных специально для разработчиков.
Обычно это моноширинные шрифты, все символы которых занимают одинаковое пространство по горизонтали.
Другим распространенным дополнением является добавление лигатур, специфичных для конкретного кода. Лигатуры — это символы, состоящие из двух и более соединенных символов. Вот две причины использовать лигатуры для кода.
- Наш мозг воспринимает многосимвольную последовательность, например
===, как три отдельных символа. Это заставляет глаза сканировать все три символа, что требует затрат энергии на их обработку. - Некоторые комбинации символов позволяют корректировать пробельные символы, что также делает лигатуры более заметными для глаз при сканировании и обработке.
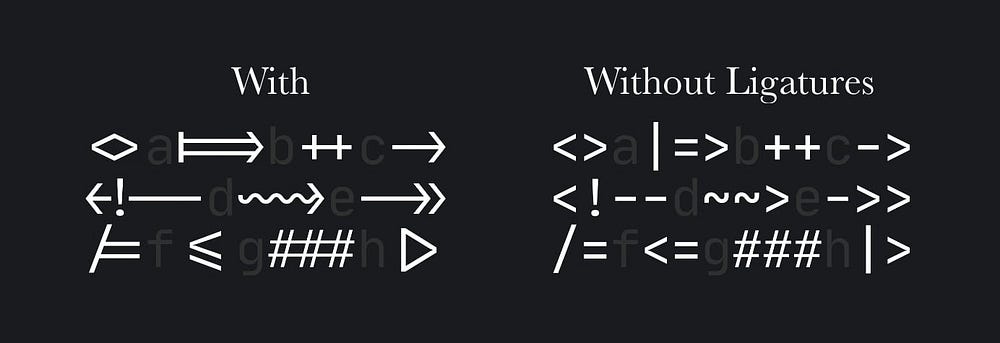
Остановимся на двух популярных шрифтах для разработчиков:
- JetBrains Mono.
- Fira Code.
Оба шрифта замечательны сами по себе и оба бесплатны для использования. Попробуйте скачать и потестить в течение какого-то времени оба шрифта, чтобы понять, какой из них подходит именно вам.
Алгоритм по использованию предпочитаемого шрифта в VS Code
- Скачайте шрифт по указанным выше ссылкам на свой компьютер и установите их локально. Рекомендую установить шрифты TTF из загруженного .zip-файла.
- Откройте файл VS Code
settings.jsonчерез командную палитру (⇧⌘P). Введите settings (настройки) и затем Preferences: Open User Settings (JSON) — Предпочтения: открыть настройки пользователя (JSON). - Добавьте следующие две строки кода в файл
settings.json, чтобы выбрать предпочитаемый шрифт и включить лигатуры. Это позволит использовать несколько моноширинных шрифтов.
{
	"editor.fontFamily": "JetBrains Mono, Fira Code, Menlo, Monaco, 'Courier New', monospace",
	"editor.fontLigatures": true
}
Темы иконок
Visual Studio Code показывает иконку перед каждым элементом в проводнике папок. Каждая иконка указывает определенный тип элемента. Таким образом, вы можете быстро увидеть различия между папкой, файлом Javascript и HTML.
Иконки можно настраивать. Маркетплейс предлагает на выбор множество отличных пакетов. Рассмотрим несколько популярных вариантов.
1. Material Icon Theme (14,5 млн установок)
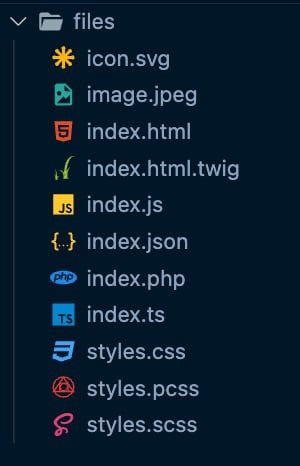
Material Icon Theme — наиболее часто скачиваемое расширение на VSCode Marketplace. Оно имеет красивый набор четких иконок и заслуживает всяческих похвал.
2. Monokai Pro (1,7 млн установок)
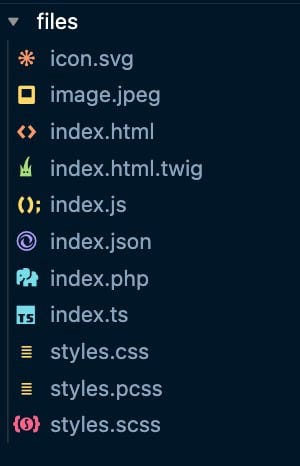
Monokai Pro — это и цветовая тема, и тема иконок, переключающиеся независимо друг от друга. Обе выглядят эффектно и позволяют сосредоточиться на коде.
3. vscode-icons (12,1 млн установок)
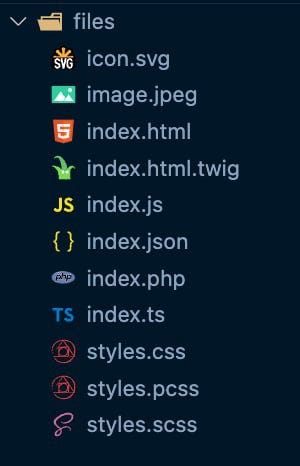
vscode-icons — это удивительный набор иконок, который сразу же внесет ясность в вашу боковую панель. Я использовал его с самого первого выпуска VS Code до недавнего времени. Если вы затрудняетесь с выбором набора иконок, рекомендую загрузить vscode-icons. Каждая его иконка проста и понятна, к тому же хорошо сочетается с любой цветовой темой.
4. Пакет City Lights Icon (96 тыс. установок)
Пакет City Lights Icon включает в себя две темы иконок для цветного и монохромного вариантов. Монохромный вариант удивительно чистый и, на мой взгляд, очень хорошо сочетается с темой Night Owl.
Цветовые темы
Цветовые темы — это, безусловно, самое радикальное визуальное изменение, которое вы можете внести в свой редактор. Их выбор очень индивидуален. Тем не менее я хочу привести здесь несколько отличных вариантов, которые завоевали наибольшую популярность в сообществе VS Code.
1. One Dark Pro (6,2 млн установок)
One Dark Pro — точная копия темы One Dark от Atom. Это самая популярная темная тема на VS Code Marketplace. Она вызывает ностальгию у многих разработчиков, которые использовали Atom в прошлом.
Популярность One Dark Pro вполне заслужена: цвета красивые и не отвлекают от кода.
2. Github Theme (5,4 млн установок)
GitHub выпустил набор собственных цветовых тем. Доступны темная и светлая тема, каждая из которых имеет режим по умолчанию, высокую контрастность и режим для дальтоников.
Если вы являетесь давним пользователем GitHub и приверженцем его цветовой темы, то вам определенно стоит попробовать этот набор.
3. Dracula Official (4,4 млн установок)
Dracula Official — популярная тема для различных редакторов, оболочек и других инструментов. Идея заключается в том, чтобы создать единую цветовую тему для всех рабочих процессов. Это красивая темная цветовая тема, вдохновленная ночной романтикой (отсюда и название).
Узнать больше об этой теме можно на сайте разработчика Dracula Official.
4. Night Owl (1,6 млн установок)
Night Owl — это впечатляющая темная тема, созданная специально для тех, кто пишет код до поздней ночи. Как утверждает автор: “При выборе цветовой схемы учитывались возможности, доступные людям с дальтонизмом и в условиях недостаточной освещенности. Решения также были основаны на контрастности, значимой для понимания прочитанного и оптимальной яркости”.
5. One Monokai (1,5 млн установок)
Тема One Monokai представляет собой нечто среднее между One Dark Theme и Monokai.
6. Shades of Purple (1,3 млн установок)
Shades of Purple — завораживающая тема со смелыми оттенками фиолетового. В этой теме код практически “выпрыгивает” с экрана.
7. SynthWave ’84 (1 млн установок)
Эта креативная тема создана под влиянием электронной музыки и обложек синтвейв-групп, таких как Timecop 1983 FM-84 и The Midnight. Она очень яркая, так что код будет буквально пылать на вашем экране. Если вы любите стиль 80-х, эта тема может прийтись вам по вкусу!
8. Tokyo Night (650 тыс. установок)
Эта тема для Visual Studio Code воспевает огни ночного Токио. Она очень чистая и выглядит великолепно.
9. Kanagawa (100 тыс. установок)
Kanagawa — своеобразный VSCode-порт в цветовую схему KANAGAWA.nvim. Это темная тема, вдохновленная колористикой знаменитой картины Кацусики Хокусая.
10. Bracket Lights Pro (65 тыс. установок)
Тема Bracket Lights Pro привлекает внимание красивой цветовой палитрой. Она придает VS Code светлую тему, характерную для редактора кода Brackets.
Заключение
Visual Studio Code обладает множеством вариантов настройки. Такое разнообразие предложений позволяет сделать редактор эстетически приятным для каждого разработчика.
Читайте также:
- Расширения VS Code, в 3 раза повышающие скорость работы
- 5 секретов продуктивной работы в VS Code
- ReSvelte — инструмент разработчика Svelte и визуализатор дерева компонентов (расширение VS Code)
Читайте нас в Telegram, VK и Дзен
Перевод статьи Wesley Smits: How To Make Visual Studio Code Look Amazing
Если зайти в магазин дополнений Visual Studio Code, то можно заметить огромное количество совершенно разных тем и оформлений. Во всем этом обилии наверняка найдётся что-то подходящее. Но если ничего не нашлось или просто хочется реализовать свою идею, то всегда можно сделать собственную тему. Готовый проект можно не только установить локально, но и опубликовать в магазине дополнений Visual Studio Code.
В этой статье пройдемся по полному циклу создания собственной темы для VS Code, познакомимся с полезными инструментами, которые упростят работу, и опубликуем готовую тему в Visual Studio Code.

Одним вечером мне стало интересно, как работают темы в Visual Studio Code. Меня полностью устраивала моя тема, и я в принципе очень редко их меняю. В основном такое случается при переустановке ОС. Но просто появилась мысль, что если люди как-то публикуют свои работы на маркетплейсе, то наверняка Microsoft подготовила документацию по этому вопросу.
Поискав я обнаружил, что команда VS Code и правда подготовила документацию, но она разбита на несколько страниц в разных разделах и нет какой-то цельной статьи-руководства с пошаговым объяснением. Потом нашел несколько статей от сторонних авторов, но они тоже не были полными. Поэтому решил собрать всё то, что нашел, в один материал. Саму тему я тоже сделал и опубликовал в магазине расширений. Скачиваний у неё не очень много, но я поделился ей со знакомыми, получил обратную связь и готовлюсь в ближайшее время исправить недочеты.
Что из себя представляет тема VS Code и как создать новую
Тема Visual Studio Code в общем виде — набор данных в формате JSON, в котором описан цвет каждой кнопки, каждого окна и каждого состояния. Звучит банально просто, но так оно и есть на самом деле. Единственная сложность в том, что элементов и состояний очень много и с первого раза такое обилие может запутать. Тогда сразу же приступим к созданию новой темы.
Во-первых, надо убедиться, что на машине установлены Git и Node.js. Они понадобятся для установки других инструментов и взаимодействия с ними, поэтому без них не выйдет. Проверить можно с помощью следующих команд:
git --version
node --version
Если все в порядке, то переходим к следующему шагу и устанавливаем генератор расширений Yeoman. Для этого в терминале вводим следующую команду:
npm install -g yo generator-codeДалее в корне компьютера создаём отдельную директорию и в ней выполняем команду yo code. Откроется генератор, поприветствует и спросит, что от него требуется сделать. Так как мы делаем тему, то с помощью стрелок на клавиатуре выбираем пункт New Color Theme и дальше проходимся по шагам.
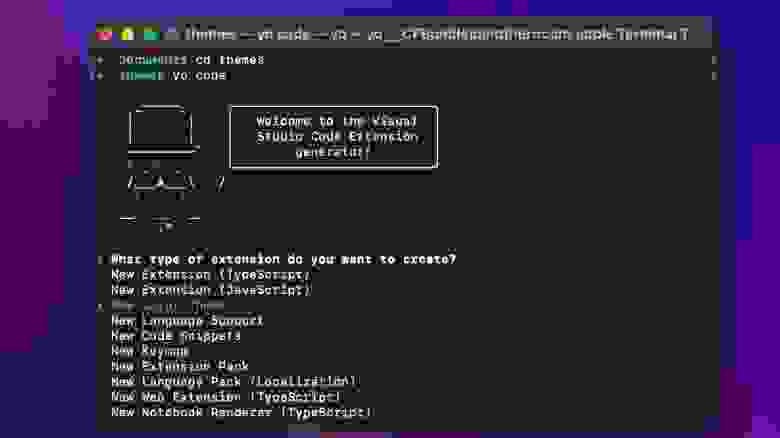
Для совершенно новой темы они будут выглядеть так:
-
New Color Theme;
-
No, start fresh;
-
Вводим название темы;
-
Вводим идентификатор, можно нажать Enter и использовать предложенный вариант;
-
Указываем краткое описание проекта;
-
Вводим имя, которое пользователи будут видеть в магазине расширений;
-
Выбираем базовый шаблон из четырёх доступных.
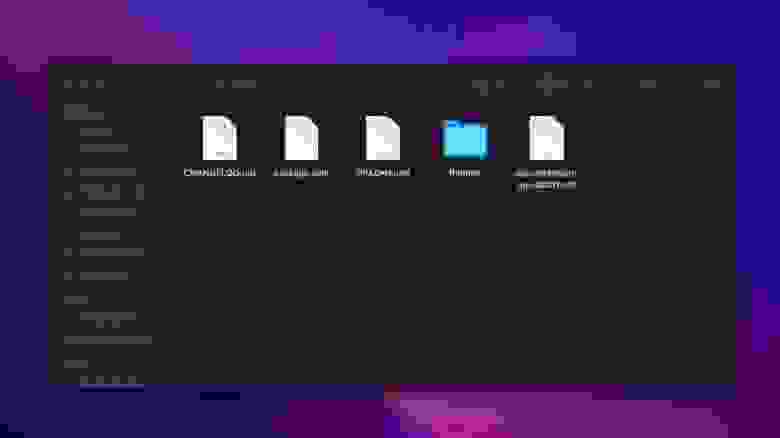
После этого система спросит, надо ли инициализировать git-репозиторий. Соглашаемся на это, и в директории появится новая поддиректория со всем необходимым для создания темы. Разберём её содержимое:
-
CHANGELOG.md— привычный файл с историей изменений, которая потом будет видна пользователям в магазине расширений; -
package.json— конфигурационный файл, который поможет автоматически собрать тему для публикации; -
README.md— классический файл с описанием проекта и всех его тонкостей, его содержимое также будет видно пользователям на главной странице дополнения в магазине; -
vsc-extension-quickstart.md— от этого файла можно сразу же избавиться, а можно сначала прочитать, а потом избавляться. В нём указаны ссылки на полезные страницы официальной документации и перечисленные основные горячие клавиши; -
themes →
[название темы]-color-theme.json— главный файл, содержащий все данные самой темы; -
Из скрытых файлов ещё будут
.gitattributes,.gitignoreи.vscodeignore.
Как работать с цветами
Из официального руководства по работе с цветами следует, что для использования доступны форматы #RGB, #RGBA, #RRGGBB и #RRGGBBAA, где R — красный, G — зеленый, B — синий, A — альфа-канал прозрачности. Если не задать альфа-канал, то он по умолчанию будет непрозрачным.
Перед началом работы должна быть какая-то задумка, а в идеале — цветовая палитра. Если сложно придумать гармоничное сочетание цветов, то можно обратиться за помощью к сервису Coolors. В библиотеке есть большое количество уже готовых палитр, но можно составить и свою. Мне особенно понравилась функция генерации палитры из изображения, ей я и воспользовался. Можно найти картинку с приятными цветами и по ней составить гармоничную палитру.
После того, как составили цветовую схему и продумали общую идею, можно открыть файл [название темы]-color-theme.json. В нём должны содержаться записи о цветах всех кнопок, окон и элементов управления. Но в случае с новой темой в файле есть только данные о подсветке синтаксиса. Все остальные поля надо будет вписать вручную. Ознакомиться с ними можно в документации от команды Visual Studio Code. Страница довольно подробно рассказывает обо всех элементах интерфейса, разделяет их на смысловые группы, даёт описания и иногда — скриншоты. Мне не хватило предложенного описания и иногда приходилось задавать яркий цвет элементу, к примеру красный, а после запускать отладку и искать его, чтобы понять, что это такое.
Есть несколько сервисов, которые помогут быстрее и проще создавать шаблоны для тем или целые темы. В этом случае можно практически отказаться от ручного заполнения JSON-файла или свести это к минимуму:
-
VS Code Theme Color Generator — минималистичный генератор тем для VS Code от автора YouTube-канала Coder Coder. Инструмент доступен в виде веб-приложения, в котором можно указать основные цвета и получить на выходе JSON-файл, который можно скопировать и вставить в свой проект. На сайте реализован удобный выбор цветов;

-
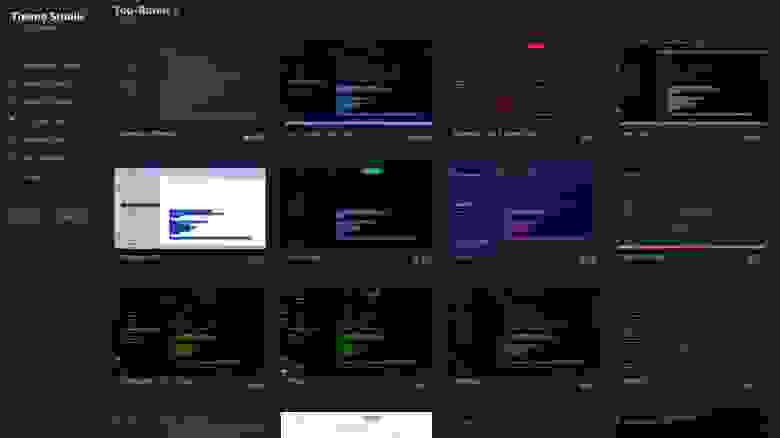
Theme Studio — более профессиональный редактор тем, позволяющий детально редактировать практически каждый элемент интерфейса VS Code. В Theme Studio предусмотрен мониторинг изменений в реальном времени. Важно отметить, что сервис не всегда вовремя сохраняет изменения. Поэтому лучше периодически сохраняться вручную, чтобы не потерять несколько часов труда.
Подготовка к публикации
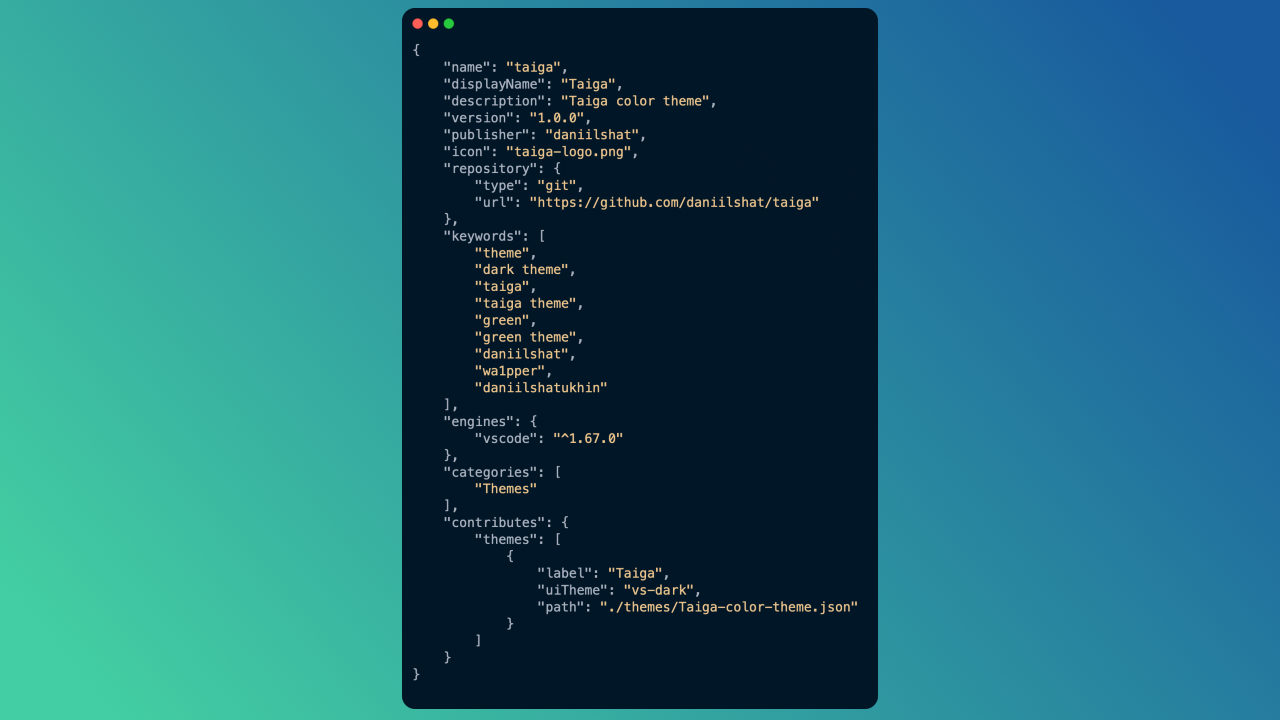
Теперь, когда тема написана и готова, её необходимо подготовить к публикации в Visual Studio Marketplace. Во-первых, все данные должны находится в удалённом git-репозитории. Можно использовать любой удобный сервис, но для полностью корректной работы рекомендуется использовать GitHub. Во-вторых, следует дополнить конфигурационный файл package.json, который необходим для публикации. В нём обычно указывают название, автора, описание, версию, теги и ключевые слова. Также важно, чтобы в репозитории была активная лицензия, иначе менеджер дополнений может отработать некорректно. Для этого подойдёт лицензия MIT, но можно подобрать любую подходящую.
Пример конфигурационного файла:
После финальной доработки содержимого репозитория необходимо перейти на сайт Microsoft Azure для разработчиков. После этого нажимаем на кнопку Start free. Если уже есть аккаунт, то входим в него, если нет — создаём новый.
Теперь необходимо создать персональный ключ доступа. Для этого нажимаем на иконку в правом верхнем углу и в выпадающем меню выбираем Personal access tokens.
Откроется страница со всеми актуальными ключами, нажимаем на New Token. В открывшемся меню заполняем поля формы:
-
Name — любое удобное имя ключа;
-
Organization — выбираем All accessible organizations;
-
Expiration — задаём любой подходящий срок действия;
-
Scopes — выбираем Full Access.

В открывшемся меню копируем ключ, никому не показываем и сохраняем в секретном месте.
Теперь необходимо создать издателя, который будет выпускать тему в маркетплейсе. К одному аккаунту может быть привязано несколько издателей, поэтому можно удобно разделять свою деятельность или работать в команде. Для создания нового издателя переходим на страницу магазина расширений и заполняем поля формы. Обязательно необходимо указать имя издателя и идентификатор, остальные данные можно оставить пустыми или заполнить позже.
Публикация
Публиковать тему будем с помощью VS Code Extension Manager. Для начала установим его командой npm install -g vsce. После установки надо авторизоваться под своим идентификатором издателя. Для этого вводим команду vsce login [publisher id], заменяем publisher id на свой. Система попросит вставить ключ для авторизации. Вставляем тот ключ, который недавно сгенерировали, и нажимаем Enter.
После авторизации вызываем команду vsce package для сборки темы и генерации необходимых файлов. Важно учесть, что команду следует вызывать в директории с проектом темы. После того, как команда отработает, вызываем vsce publish для публикации. Теперь, если перейти на страницу управления опубликованными расширениями, то там можно будет увидеть свою тему. На время модерации она будет видна только разработчику. Модерация обычно занимает 5-10 минут, и после этого тема попадает в общий доступ. Найти её можно как в веб-версии маркетплейса, так и в самом редакторе Visual Studio Code.
Обновление темы
Вероятно, что тема будет дорабатываться, меняться и становиться лучше. В таком случае проект надо будет актуализировать не только локально, но и в магазине расширений. Для этого надо убедиться, что все изменения синхронизированы с удалённым GitHub-репозиторием. После этого необходимо в терминале перейти в папку с проектом и снова пройти авторизацию в vsce.
Для обновления предусмотрены две команды:
-
vsce publish minor— маленькие обновления и незначительные исправления; -
vsce publish major— глобальные и крупные обновления.
После выполнения одной из команд обновление уйдёт на модерацию, пробудет там 5-10 минут и станет доступно пользователям.
Статистика
В личном кабинете разработчика Visual Studio Marketplace можно отслеживать статистику опубликованной темы. Доступны вкладки со статистикой по скачиваниям, оценками, обзорами и историей версий. Можно просмотреть данные за 90, 60 или 30 дней. Также важно учесть, что в Visual Studio нет алгоритмов продвижения тем и расширений. Поэтому если планируете снискать популярность, то тему придётся продвигать самостоятельно.
Я опубликовал свою тему и поделился ссылкой максимум с 10 людьми, 3-4 точно установили её и дали обратную связь. Без дополнительного продвижения за 6 месяцев теме удалось собрать 38 установок. Вероятно, что тему находили по ключевым словам и тегам, которые я указал в конфигурационном файле. Поэтому к их подбору стоит отнестись серьёзнее.
Что в итоге
В этой статье мы узнали о том, как работают темы в редакторе Visual Studio Code и познакомились с инструментами для создания тем. Кроме того, полностью прошли весь путь от идеи до публикации собственной темы в магазине Visual Studio Marketplace. Сам процесс несложный и не требует каких-то специальных навыков, а задачу могут упростить автоматизированные сервисы, превращающие создание собственной темы в творчество.
Как сменить, загрузить новую тему для Visual Studio Code
29.03.2021
Марат
3199
0
vs_code |
темы vs code или «Как сменить, загрузить новую тему для Visual Studio Code«.Заменим и загрузим новую старую темы для «Как сменить, загрузить новую тему для Visual Studio Code«
Все о темах для «Visual Studio Code«
- Как сменить тему на «Visual Studio Code«?
- Горячие клавиши сменить тему на «Visual Studio Code«?
- Как поставить светлую/темную тему «Visual Studio Code«?
- Загрузить сторонние темы «Visual Studio Code«?
Как сменить тему на «Visual Studio Code«?
Когда люди пишут инструкции — они такие скучные и непонятные, в которых еще нужно и разбираться! У нас все просто!
Открываем программу VS Code.
Идем — файл — параметры — цветовая тема:
Нажмите, чтобы открыть в новом окне.

В новом окне выбираем тему… список тем слева, просто кликайте оп названию темы — она установится автоматически… справа строка прокрутки.
Если тем не хватило, то можно перейти по ссылке внизу ссылки.
Нажмите, чтобы открыть в новом окне.

Горячие клавиши сменить тему на «Visual Studio Code«?
Для быстрого доступа к новым темам и смены тем в «Visual Studio Code» есть горячие клавиши…
Не буду повторять тот путь, что уже выше проделывали…
Смотрим скрин:
Нажмите, чтобы открыть в новом окне.

Быстрая смена тем на «Visual Studio Code«
Быстрая смена тем на «Visual Studio Code» происходит по нажатию клавиш «ctrl + K ctrl + T»
ctrl + K ctrl + T
Как нажимать!?
Зажали клавишу ctrl(не отпускаем…) — далее K и далее T
Как поставить светлую тему «Visual Studio Code«?
Как мы уже выше выяснили, быстрый доступ к темам… нажимаем:
ctrl + K ctrl + T
В окне, смотрим, есть строчка — «светлые темы», либо просто выбираем светлую тему, либо слева есть несколько светлых тем для Visual Studio Code«.
Нажмите, чтобы открыть в новом окне.

Как поставить темную тему «Visual Studio Code«?
Если вам нужно поставить темную тему в «Visual Studio Code«, то проделываем аналогичные действия..:
ctrl + K ctrl + T
И далее выбираем темную тему
Нажмите, чтобы открыть в новом окне.

Загрузить сторонние темы «Visual Studio Code«?
Если вам вдруг…. не хватило перечисленных тем, то можно загрузить сторонние темы.
Два варианта:
Вариант 1.
Сочетание клавиш:
ctrl + K ctrl + T
Установить дополнительные цветовые темы.
Вариант 1.
Слева открываем строку поиска нажав по кнопке «extensions»(ctrl + shift + X)
В строке вводим:
category:themes
Выбор сторонне темы «Visual Studio Code«?
И в двух случаях попадаем в одно и то же место:
Я пытался я прокрутить до самого низа…, когда кончится список сторонних тем … но у меня не получилось — может у вас получится!?
Нажмите, чтобы открыть в новом окне.

Можете не благодарить, лучше помогите!
COMMENTS+
BBcode
Changing the Color Theme
Color themes let you modify VS Code’s background, text and language syntax colorization to suit your preferences and work environment. VS Code supports light, dark and high contrast themes.
Selecting the Color Theme
There are several out-of-the-box color themes in VS Code for you to try out.
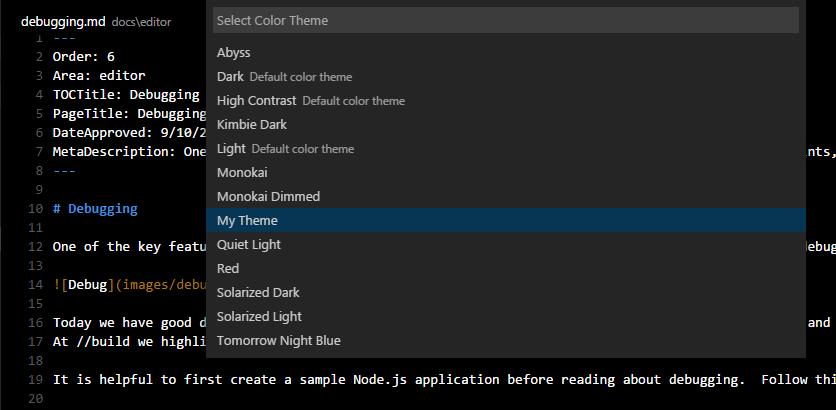
- Open the Color Theme picker with
File | Preferences | Color Theme. - Use the cursor keys to preview the colors of the theme.
- Select the theme you want and hit
kbstyle(Enter).
Adding Themes from the Extension Gallery
Many themes have been uploaded to the VS Code Extension Gallery by the community. If you find one you want to use, simply install it and restart VS Code and the new theme will be available.
Tip: To search for themes, type ‘theme’ in the
Extension: Install Extensiondropdown to filter on extensions with ‘theme’ in their name.

You can also browse the VS Code Marketplace to find available themes.
Adding a new Theme
You can also add new TextMate theme files (.tmTheme) to your VS Code installation using the yo code extension generator.
ColorSublime has hundreds of existing TextMate themes to choose from. Pick a theme you like and copy the Download link to use in the Yeoman generator e.g. http://colorsublime.com/theme/download/42472. The ‘code’ generator will prompt you for the URL or file location of the .tmTheme file, the theme name as well as other information for the theme.

Copy the generated theme folder to a new folder under your .vscode/extensions folder and restart VS Code.
Open the Color Theme picker theme with File | Preferences | Color Theme and you can see your theme in the dropdown. Arrow up and down to see a live preview of your theme.
Publishing a Theme to the Extension Gallery
If you’d like to share your new theme with the community, you can publish it to the Extension Gallery. Use the vsce publishing tool to package your theme and publish it to the VS Code gallery.
Tip: To make it easy for users to find your theme, include the word «theme» in the extension description and set the
CategorytoThemein yourpackage.json.
We also have recommendations on how to make your extension look great on the VS Code Marketplace, see Marketplace Presentation Tips.
Next Steps
Themes are just one way to customize VS Code. If you’d like to learn more about VS Code extensibility, try these topics:
- Colorizers and Bracket Matchers — Learn how to import TextMate colorizers
- Snippets — Add additional snippets to your favorite language
- Extending Visual Studio Code — Learn about other ways to extend VS Code
Common Questions
Nothing yet