| title | description | ms.date | ms.topic | f1_keywords | dev_langs | helpviewer_keywords | ms.assetid | author | ms.author | manager | ms.technology | ms.workload | |||||||||||||||||||||
|---|---|---|---|---|---|---|---|---|---|---|---|---|---|---|---|---|---|---|---|---|---|---|---|---|---|---|---|---|---|---|---|---|---|
|
Manage exceptions with the debugger | Microsoft Docs |
Learn how to specify which exceptions the debugger breaks on, at which point you want the debugger to break, and how breaks are handled. |
01/23/2023 |
how-to |
|
|
|
43a77fa8-37d0-4c98-a334-0134dbca4ece |
mikejo5000 |
mikejo |
jmartens |
vs-ide-debug |
multiple |
Manage exceptions with the debugger in Visual Studio
[!INCLUDE Visual Studio]
An exception is an indication of an error state that occurs while a program is being executed. You can tell the debugger which exceptions or sets of exceptions to break on, and at which point you want the debugger to break (that is, pause in the debugger). When the debugger breaks, it shows you where the exception was thrown. You can also add or delete exceptions. With a solution open in Visual Studio, use Debug > Windows > Exception Settings to open the Exception Settings window.
Provide handlers that respond to the most important exceptions. If you need to know how to add handlers for exceptions, see Fix bugs by writing better C# code. Also, learn how to configure the debugger to always break execution for some exceptions.
When an exception occurs, the debugger writes an exception message to the Output window. It may break execution in the following cases when:
- An exception is thrown that isn’t handled.
- The debugger is configured to break execution before any handler is invoked.
- You have set Just My Code, and the debugger is configured to break on any exception that isn’t handled in user code.
[!NOTE]
ASP.NET has a top-level exception handler that shows error pages in a browser. It doesn’t break execution unless Just My Code is turned on. For an example, see Tell the debugger to continue on user-unhandled exceptions below.
[!NOTE]
In a Visual Basic application, the debugger manages all errors as exceptions, even if you use On Error-style error handlers.
Tell the debugger to break when an exception is thrown
The debugger can break execution at the point where an exception is thrown, so you may examine the exception before a handler is invoked.
In the Exception Settings window (Debug > Windows > Exception Settings), expand the node for a category of exceptions, such as Common Language Runtime Exceptions. Then select the check box for a specific exception within that category, such as System.AccessViolationException. You can also select an entire category of exceptions.
::: moniker range=»<=vs-2019″

::: moniker-end
::: moniker range=»>=vs-2022″

::: moniker-end
[!TIP]
You can find specific exceptions by using the Search window in the Exception Settings toolbar, or use search to filter for specific namespaces (such as System.IO).
If you select an exception in the Exception Settings window, debugger execution will break wherever the exception is thrown, no matter whether it’s handled. Now the exception is called a first chance exception. For example, here are a couple of scenarios:
-
In the following C# console application, the Main method throws an AccessViolationException inside a
try/catchblock.static void Main(string[] args) { try { throw new AccessViolationException(); Console.WriteLine("here"); } catch (Exception e) { Console.WriteLine("caught exception"); } Console.WriteLine("goodbye"); }
If you have AccessViolationException checked in Exception Settings, execution will break on the
throwline when you run this code in the debugger. You can then continue execution. The console should display both lines:but it doesn’t display the
hereline. -
A C# console application references a class library with a class that has two methods. One method throws an exception and handles it, while a second method throws the same exception but doesn’t handle it.
public class Class1
{
    public void ThrowHandledException()
    {
        try
        {
            throw new AccessViolationException();
        }
        catch (AccessViolationException ave)
        {
            Console.WriteLine("caught exception" + ave.Message);
        }
    }

    public void ThrowUnhandledException()
    {
        throw new AccessViolationException();
    }
}
Here’s the Main() method of the console application:
static void Main(string[] args)
{
    Class1 class1 = new Class1();
    class1.ThrowHandledException();
    class1.ThrowUnhandledException();
}
If you have AccessViolationException checked in Exception Settings, execution will break on the
throwline in both ThrowHandledException() and ThrowUnhandledException() when you run this code in the debugger.
To restore the exception settings to the defaults, choose the Restore the list to the default settings button:
::: moniker range=»<=vs-2019″

::: moniker-end
::: moniker range=»>=vs-2022″

::: moniker-end
Tell the debugger to continue on user-unhandled exceptions
If you are debugging .NET or JavaScript code with Just My Code, you can tell the debugger to prevent breaking on exceptions that aren’t handled in user code but are handled elsewhere.
-
In the Exception Settings window, open the shortcut menu by right-clicking a column label, and then select Show Columns > Additional Actions. (If you’ve turned off Just My Code, you won’t see this command.) A third column named Additional Actions appears.
::: moniker range=»<=vs-2019″

::: moniker-end
::: moniker range=»>=vs-2022″
::: moniker-end
For an exception that shows Continue when unhandled in user code in this column, the debugger continues if that exception isn’t handled in user code but is handled externally.
-
To change this setting for a particular exception, select the exception, right-click to show the shortcut menu, and select Continue When Unhandled in User Code. You may also change the setting for an entire category of exceptions, such as the entire Common Language Runtime exceptions).
::: moniker range=»<=vs-2019″
::: moniker-end
::: moniker range=»>=vs-2022″
::: moniker-end


For example, ASP.NET web applications handle exceptions by converting them to an HTTP 500 status code (Exception handling in ASP.NET Web API), which may not help you determine the source of the exception. In the example below, the user code makes a call to String.Format() that throws a xref:System.FormatException. Execution breaks as follows:

Add and delete exceptions
You can add and delete exceptions. To delete an exception type from a category, select the exception, and choose the Delete the selected exception from the list button (the minus sign) on the Exception Settings toolbar. Or you may right-click the exception and select Delete from the shortcut menu. Deleting an exception has the same effect as having the exception unchecked, which is that the debugger won’t break when it’s thrown.
To add an exception:
-
In the Exception Settings window, select one of the exception categories (for example, Common Language Runtime).
-
Choose the Add an exception to the selected category button (the plus sign).
::: moniker range=»<=vs-2019″
::: moniker-end
::: moniker range=»>=vs-2022″
::: moniker-end
-
Type the name of the exception (for example, System.UriTemplateMatchException).
::: moniker range=»<=vs-2019″
::: moniker-end
::: moniker range=»>=vs-2022″
::: moniker-end
The exception is added to the list (in alphabetical order) and automatically checked.


To add an exception to the GPU Memory Access Exceptions, JavaScript Runtime Exceptions, or Win32 Exceptions categories, include the error code and the description.
[!TIP]
Check your spelling! The Exception Settings window doesn’t check for the existence of an added exception. So if you type Sytem.UriTemplateMatchException, you’ll get an entry for that exception (and not for System.UriTemplateMatchException).
Exception settings are persisted in the solution’s .suo file, so they apply to a particular solution. You can’t reuse specific exception settings across solutions. Now only added exceptions are persisted; deleted exceptions aren’t. You may add an exception, close and reopen the solution, and the exception will still be there. But if you delete an exception and close/reopen the solution, the exception will reappear.
The Exception Settings window supports generic exception types in C# but not in Visual Basic. To break on exceptions like MyNamespace.GenericException<T>, you must add the exception as MyNamespace.GenericException`1. That is, if you’ve created an exception like this code:
public class GenericException<T> : Exception
{
    public GenericException() : base("This is a generic exception.")
    {
    }
}
You can add the exception to Exception Settings using the previous procedure:
::: moniker range=»<=vs-2019″

::: moniker-end
::: moniker range=»>=vs-2022″

::: moniker-end
Add conditions to an exception
Use the Exception Settings window to set conditions on exceptions. Currently supported conditions include the module name(s) to include or exclude for the exception. By setting module names as conditions, you can choose to break for the exception only on certain code modules. You may also choose to avoid breaking on particular modules.
[!NOTE]
Adding conditions to an exception is supported starting in [!includevs_dev15].
To add conditional exceptions:
-
Choose the Edit conditions button in the Exception Settings window, or right-click the exception and choose Edit Conditions.
-
To add extra required conditions to the exception, select Add Condition for each new condition. Additional condition lines appear.
-
For each condition line, type the name of the module, and change the comparison operator list to Equals or Not Equals. You may specify wildcards (*) in the name to specify more than one module.
-
If you need to delete a condition, choose the X at the end of the condition line.


See also
- Continue execution after an exception
- How to: Examine system code after an exception
- How to: Use native run-time checks
- First look at the debugger
Отладка кода в Visual Studio происходит довольно просто, если сравнивать этот процесс с другими IDE. Плюс отладчик Visual Studio обладает довольно широкими возможностями и позволяет отлаживать различные технологии, а если имеющихся средств не хватает, то можно воспользоваться дополнениями.
Отладка кода — это один из самых важных процессов. Без отладки в свет не выходит ни одно нормальное приложение. Потому что, независимо от опыта разработчика, код не всегда работает так, как нужно. А иногда и вообще работает совершенно не так. Вот тут как раз и приходит на помощь отладчик, который позволит разобраться, что не так, и найти изъяны. Можно, конечно, много часов провести за самостоятельным выявлением багов, но отладчиком все-таки быстрее и проще.
В то же время отладка кода — это не волшебная палочка, которая быстренько найдет и исправит все недочеты вашего кода. Отладка — это процесс, при котором код пошагово выполняется в некой программе, например, в Visual Studio. В процессе выполнения идет поиск точек, где вы могли допустить ошибку. А вы в это время можете анализировать свой код и вносить необходимые правки для устранения «косяков».
Работа с отладчиком, даже с таким простым, как Visual Studio, требует определенных знаний и понимания, что там внутри происходит. Умение работать с отладчиком вам в любом случае пригодится, если вы хотите связать свою жизнь с разработкой ПО. В этой статье мы ознакомим вас с процессом отладки при помощи Visual Studio.
Отладка кода в Visual Studio
Перед стартом отладки вашего кода не лишним было бы для себя выяснить, существует ли какая-то проблема с вашим кодом? Для чего вам нужна отладка? Если есть какие-то проблемы в работе вашего ПО и вы хотите найти их, используя отладчик Visual Studio, нужно понять, в чем суть проблемы. Возможно, есть проблемы, которые отладчик не определит, например:
- орфографические ошибки или опечатки,
- неправильно подключенные API,
- неправильное размещение последних корректировок в код,
- и др.
В принципе, все ошибки возможно будет увидеть уже в процессе работы отладчика. При его работе активно мониторится все, что происходит с вашим ПО. А то, что вы можете в любой точке остановить отладку, дает вам возможность более детально рассмотреть состояние вашего приложения и в нужный момент перейти в построчное изучение кода.
Прежде чем запускать отладчик Visual Studio, не лишним будет проверить код редактором кода и визуально оценить. Нужно искать «красные» и «зеленые»линии. «Красные» линии — это ошибки. «Зеленые» — предупреждения. Это могут быть:
- ошибка компиляции;
- ошибка преобразования типа;
- код не поддерживает синтаксис;
- и др.
«Красные» волнистые линии нужно исправить — это поможет в дальнейшем уменьшить количество ошибок, найденных Visual Studio. А зеленые, если не получается исправить, то по крайней мере нужно тщательно изучить.
Как запустить отладчик Visual Studio
Чтобы запустить отладчик Visual Studio, нужно:
- Запустить саму программу Visual Studio.
- Открыть код приложения, который необходимо отладить.
- Потом при помощи нажатия клавиши «F5» запустить режим отладки. Также это можно сделать через меню, если нажать «Отладка», а потом «Начать отладку».
Начнется процесс отладки. При возникновении ошибок отладчик Visual Studio покажет вам строку их проявления и предоставит вам информацию о том, что произошло. Для более точного изучения кода вы можете расставить точки останова. Это те точки в коде, где отладчик Visual Studio остановит свою работу, а у вас появится возможность детальнее изучить:
последовательность исполнения кода;
работу памяти;
значение переменных и др.
Чтобы создать точку останова в отладчике, нужно кликнуть слева от интересующей вас строки кода или при помощи клавиши «F9».
Бывает такое, что сразу выявить ошибки не получается при помощи отладчика, но приложение все равно не работает корректно. Тогда вам тоже смогут помочь точки останова. Нужно выставить их перед выполнением проблемного кода, а потом запустить отладчик Visual Studio в построчном выполнении программы для детализированного анализа, и тогда баг проявится.
Какая информация выводится отладчиком Visual Studio
Итак, вы выставили несколько точек останова и запустили процесс отладки. На каждой точке останова Visual Studio будет останавливаться. В эти моменты вам будет доступна определенная информация. Чтобы ее просмотреть, нужно кликнуть кнопку «Debug» на панели инструментов и найти «Windows». Получите бонус от Пин ап казино 100% от первого депозита с вейджером отыгрыша x35 на 72 часа! Только на официальном сайте Pin Up лучшие игровые автоматы, рулетка и живые диллеры.
Там вам будет доступна следующая информация:
- Breakpoints. Тут собраны сведения о ваших точках останова.
- Output. Здесь выводятся служебные сообщения от самой Visual Studio.
- Watch. Здесь расположены переменные, за которыми вы наблюдаете в коде; внести их можно только вручную.
- Autos. Здесь находится список переменных, с которыми прямо сейчас проводится работа.
- Locals. Здесь выводятся все локальные переменные.
- Immediate. Здесь выводятся переменные, которые вы требуете.
- Call Stack. Здесь расположен список вызываемых функций.
- Threads. Тут выводится информация об уже стартовавших потоках вашего приложения.
- Modules. Отображаются все загруженные модули.
- Processes. Отображаются процессы модулей.
- Memory. Отображается память рассматриваемых модулей.
- Disassembly. Тут можно увидеть, как отображается ваш код на языке более высокого уровня.
- Registers. Выводится регистр значения.
В заключение
Отладка в Visual Studio дает возможность довольно быстро решить проблемы с вашим кодом. Да, без определенных знаний и понимания запустить и понять отладчик Visual Studio будет нелегко, но с опытом все станет понятнее. В разработке без отладки кода — путь в никуда, потому что стабильность работы приложения — это залог его качества. И если на самом старте разработки игнорировать этот процесс, то нет смысла идти дальше.
Далеко не всегда удается писать код абсолютно без ошибок. Если ошибки компиляции нам помогает отловить компилятор, то с ошибками логики дело обстоит немного сложнее. Как узнать, почему какая-то переменная не изменяется или почему результат выполнения какого-то кода не такой, как вы ожидали? Все это сложно, если в вас нет мощного средства отладки программы, а в Visual Studio средства отладки достаточно мощные, чтобы найти любые ошибки.
Данный документ показывает примеры отладки программ на примере среды разработки Microsoft Visual C# Express Edition. Это базовая поставка среды разработки, которая доступна бесплатно. Уже в ней заложены мощные средства отладки приложений, так что в платных версиях вы сможете найти все то же самое.
Давайте создадим новое приложение, на примере которого и будем рассматривать отладку. Нам все равно, какого типа оно будет — консольное или с визуальным интерфейсом. Я решил выбрать WinForms приложение. На поверхность формы я поместил кнопку и по событию Click для кнопки написал следующий код:
 private void button1_Click(object sender, EventArgs e)
 {
   int x = 10;
   int y = 15;
   x = Double(x);
   x = x / (y - 15);
   MessageBox.Show(x.ToString());
 }
В этом коде в третьей строке происходит вызов метода Double. Это не какой-то стандартный метод, его нужно написать в коде формы:
 int Double(int x)
 {
   return x * 2;
 }
Полный исходный код формы будет выглядеть следующим образом:
using System;
using System.Collections.Generic;
using System.ComponentModel;
using System.Data;
using System.Drawing;
using System.Linq;
using System.Text;
using System.Windows.Forms;

namespace WindowsFormsApplication1
{
    public partial class Form1 : Form
    {
        // конструктор
        public Form1()
        {
            InitializeComponent();
        }

        // обработчик события Click для кнопки
        private void button1_Click(object sender, EventArgs e)
        {
            int x = 10;
            int y = 15;
            x = Double(x);
            x = x / (y - 15);
            MessageBox.Show(x.ToString());
        }

        // наш метод Double
        int Double(int x)
        {
            return x * 2;
        }
    }
}
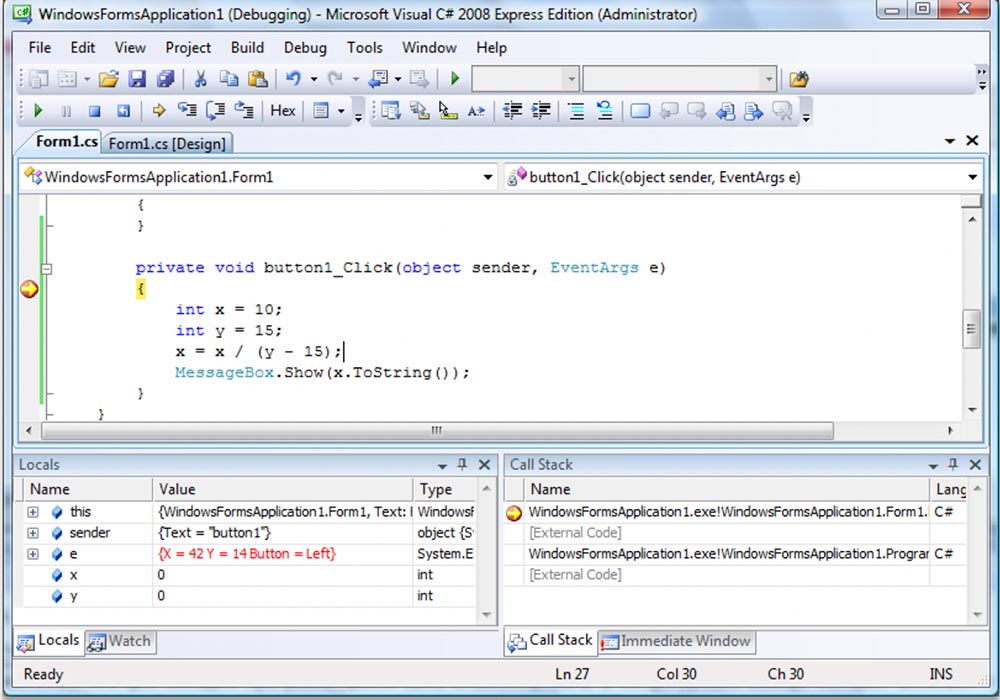
Если запустить программу из среды разработки и нажать на кнопку, то выполнение программы переключится на среду разработки и вы увидите сообщение об ошибке:
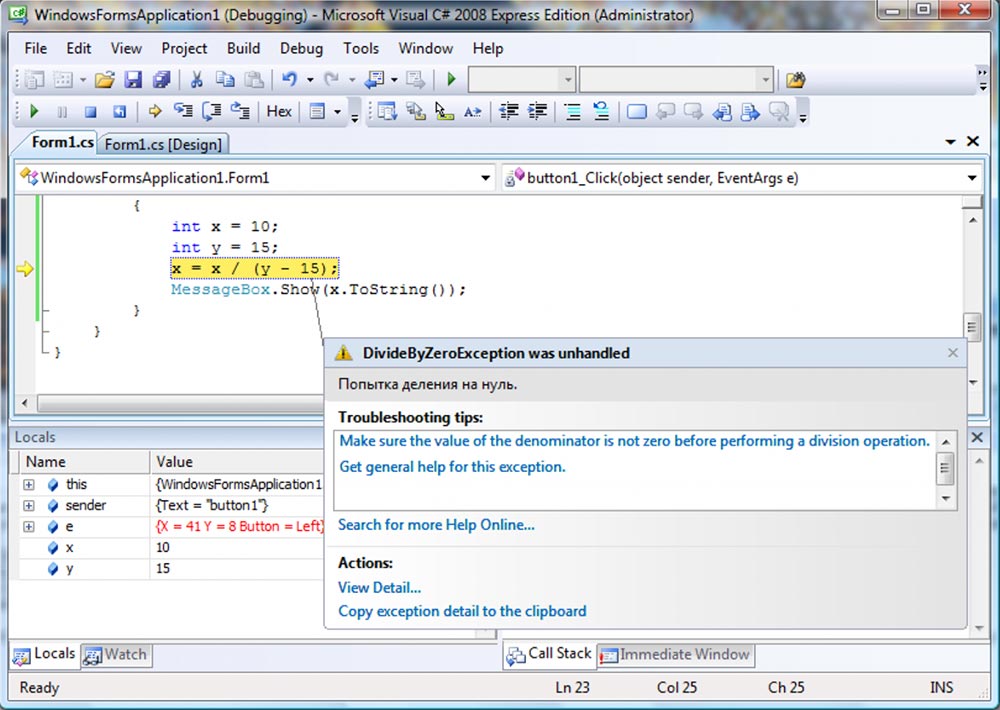
Произошла ошибка, и среда разработки взяла управление на себя, чтобы вы смогли просмотреть информацию об ошибке и попробовали определить ее источник. В редакторе кода желтым цветом выделена строка кода, в которой и произошла ошибка. От этой строки идет стрелка к всплывающему окну, в котором исключительная ситуация описана более подробно.
Название ошибки можно увидеть в заголовке всплывающего окна. Чуть ниже под заголовком находится описание ошибки. Нам повезло, потому что оно написано на русском и сразу понятно, что произошло деление на ноль:
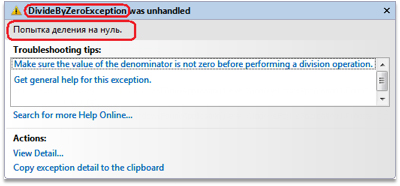
В списке Troubleshooting tips этого окна можно увидеть возможные подсказки, которые могут помочь вам найти возможное решение. В данном случае проблема проста и с ней можно разобраться без дополнительных советов, потому что в строке произошло деление на ноль и наша задача добавить перед выполнением кода проверку, которая предотвратит деление на 0. В данном случае, нужно проверить, чтобы переменная y не была равна 15:
 int x = 10;
 int y = 15;

 if (y == 15)
   MessageBox.Show("Переменная y не должна быть равна 15 ");

 x = x / (y - 15);
 MessageBox.Show(x.ToString());
Но определение ошибки далеко не всегда так легко определимо. Бывают случаи, когда нужно пройти программу пошагово, строчка за строчкой, в поисках уязвимого места, которое привело к проблеме. Давайте попробуем пройти программу пошагово. Проходить всю программу шаг за шагом проблематично, потому что очень многое происходить за кулисами, в том числе и обработка событий, а большой проект проходить шаг за шагом вообще подобно самоубийству. Поэтому чаще всего заранее определяется блок кода, который нужно проанализировать. В нашем случае этим блоком кода будет обработчик события Click для кнопки.
Конфигурация компиляции
Для того, чтобы отладка программы была доступна, программа должна быть еще запущена в режиме отладки и из среды разработки. Простое нажатие клавиши F5 как раз запускает программу в отладочном режиме. Чтобы запустить программу без возможности отладки, нужно нажать Ctrl+F5. Соответствующие пункты меню можно найти в меню Debug:
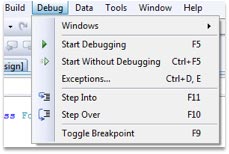
- Debug | Start Debugging запустить в режиме отладки
- Debug | Start Without Debugging запустить в режиме выполнения и без возможности отладки
Тут нужно заметить, что для отладки программа должна быть скомпилирована в конфигурации Debug, которая включает в исполняемый файл дополнительную информацию, необходимую при отладке программы. Конфигурацию можно выбрать на панели инструментов чуть правее кнопки запуска программы. На следующем снимке соответствующий выпадающий список окрашен красным цветом:

В версии Microsoft Visual C# Express Edition данный выпадающий список недоступен, а отладочная информация попадает в исполняемый файл. В версии Visual Studio Standard и более полных вариантах данный выпадающий список будет содержать конфигурации Debug и Release. Вы должны будете выбрать первый пункт. Вы можете создавать и свои конфигурации, но это уже тема отдельного разговора.
Точки останова
Итак, нам нужно отладить метод и мы сделаем это с самого начала. Для этого нужно поставить точку прерывания в нужном нам месте. Точка прерывания — это точка в коде программы, при достижении которой выполнение программы будет прервано и управление будет передано среде разработки.
Вы можете создавать точки останова в любом месте программы, но только там, где есть код и программа может прервать выполнение. Для создания точки перейдите на нужную строку и:
- — нажмите F9
- — выберите меню Debug | Toggle Breakpoint
- — дважды щелкните на полоске серого цвета, слева от строки текста в окне редактора кода
Напротив строки на полоске серого цвета слева от текста появиться красный кружок, символизирующий, что здесь стоит точка останова. Если еще раз попытаться поставить точку останова на этой же строке, то точка останова будет снята.
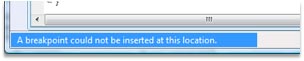
Если точку на текущей строке установить нельзя, то в строке состояния среды разработки появиться соответствующее сообщение:
Так как мы отлаживаем метод с самого начала, то поставьте курсор на строку с именем метода и нажмите F9. Теперь можно запускать программу. Кстати, запустить программу можно было и раньше, потому что точку останова можно ставить в любой момент, даже во время выполнения программы.
Запустите программу и нажмите на кнопку. После нажатия кнопки должен сработать метод button1_Click (у вас он может называться по-другому), на который я поставил обработчик события. Так как мы поставили точку останова, среда разработки перехватит на себя выполнение и выделит оператор, который можно выполнить следующим шагом желтым цветом (назовем эту точку курсором пошагового выполнения программы):
Обратите внимание, что выделена строка с символом открывающейся фигурной скобки. Это потому, что выполнение метода начинается именно с фигурной скобки, а не с имени, где мы поставили точку останова. Да, точка останова иногда может смещатся, но если вы поставите ее на конкретный оператор, который может быть выполнен, то точка останется там и никуда не поедет.
Внизу окна среды разработки появилось две панели:
- Locals — где в виде списка представлены все переменные, доступные в текущем методе. В этом списке переменные представлены в виде трех колонок:
- Name — название переменной
- Value — значение переменной
- Type — тип
- Call stack — стек вызовов. В этом окне перечислены методы, которые уже были вызваны ранее.
Пошаговое выполнение
Итак, наш курсор пошагового выполнения остановился на какой-то точке и теперь хотим начать тестирование кода. Посмотрим на панель, где появилась новая панелька отладки, там же мы и найдем необходимые команды (в скобках указаны горячие клавиши):

На этой панели можно найти следующие интересные кнопочки:
- Continue (F5) — продолжить выполнение программы.
- Stop debugging (Shift+F5) — остановить отладку. При этом остановится и выполнение программы. Даже больше — ваполнение программы прервется на той точке, на которой сейчас и находиться, т.е. оно не будет завершено корректно и ничего не сохранится, если вы в программе что-то делали.
- Restart (Ctrl+Shift+F5) — перезапустить программу. Выполнение программы будет прервано и запустится заново.
- Show Next Statement (Alt + Num *) — показать следующий оператор, т.е переместить курсор редактора кода в курсор пошагового выполнения. Курсор переместиться в начала оператора, который должен быть выполнен следующим. В редакторе кода он выделен желтым цветом.
- Step Into (F11) — выполнить очередной оператор. Если это метод, то перейти в начало этого метода, чтобы начать отладку. Например, если вы находитесь на строке: x = Double(x) то, курсор пошагового выполнения перейдет на начало метода Double и вы сможете отладить этот метод;
- Step Over (F10) — выполнить очередной оператор. Если это метод, то он будет полностью выполнен, т.е. курсор выполнения не будет входить внутрь метода.
- Step out (Shift + F11) — выйти из метода. Если вы отлаживаете метод и нажмете эту кнопку, то метод выполнится до конца и курсор пошагового выполнения выйдет из метода и остановится на следующей строке после вызова данного метода. Например, если вы отлаживаете метод Double, нашего примера и нажмете эту кнопку, то метод выполнится до конца, а выполнение остановится на строке «x = x / (y — 15);» метода button1_Click.
Попробуйте сейчас пошагово выполнить код метода, нажимая клавишу F10. Потому запустите снова приложение и попробуйте пошагово выполнить его, нажимая клавишу F11. Я могу много рассказывать и описывать тестирование, но пока вы сами не попробуете, вы не поймете смысл и мощь пошагового выполнения. Когда произойдет ошибка, попробуйте прервать работу отладки и приложения, нажав Shift+F5.
Просмотр значений
Выполните пошагово код так, чтобы курсор выполнения остановился на следующей строке:
x = x / (y - 15);
Нам нужно узнать, почему происходит ошибка. Так как ошибка в делении, то нужно просмотреть, на что происходит деление. В данном случае это скобка. Наведите мышкой на открывающуюся или закрывающуюся скобку и вы увидите всплывающую подсказку, в которой находится результат вычисления значения в скобках:
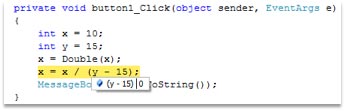
Результат находится после вертикальной черты и он равен нулю. Вы можете наводить мышкой на любую переменную, и отладчик покажет вам ее значение в виде всплывающей подсказки.
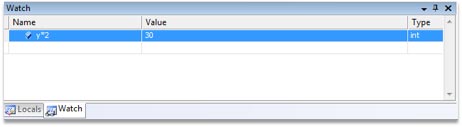
Посмотрите на панель Locals. По идее внизу у вас должны быть еще одна закладка Watch. Переключитесь на нее. Здесь находится список, в который вы можете вносить свои переменные и выражения, за значениями которых вы хотите наблюдать. Выделите первую пустую строку в списке (всегда одна пустая строка присутствует в списке) и в поле Name введите y*2 и нажмите Enter. В поле Value появится значение выражения. После каждого шага выполнения значение переменной будет пересчитано и отображено. Таким образом, вам не нужно после каждого шага наводить на переменную, чтобы узнать ее значение. Оно видно в окне Watch:
На закладке Locals видны переменные, которые актуальны для данного метода. Сюда включаются переменные, объявленные внутри метода и параметры метода, а так же переменная this.
Параметры представлены в виде дерева для объектных типов данных. Раскрывая дерево объекта this вы можете увидеть значения всех свойств и даже объектов на текущей форме, ведь this всегда указывает на текущий объект, которым является форма:
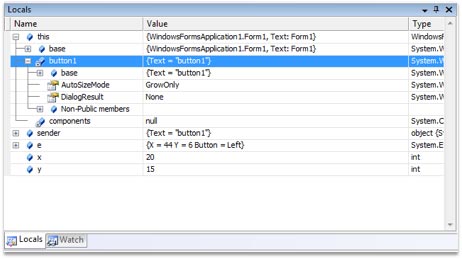
Заключение
Отладка — это мощное средство поиска любого вида ошибок. Я надеюсь, что этот документ поможет вам разобраться с этим процессом. Да, документ нельзя назвать основательным, но я постарался включить в него все основные нюансы, которые вам могут пригодиться в реальной работе.
Внимание!!! Если ты копируешь эту статью себе на сайт, то оставляй ссылку непосредственно на эту страницу. Спасибо за понимание
- Remove From My Forums

Microsoft Visual C++ Debug Error — when exception thrown
-
Question
-
My Visual Studio 2008 is defying the laws as I know them. The debugger is exiting an application, between a try and catch block, and popping up a dialog that says, «Microsoft Visual C++ Debug Library — Debug Error! This application
has requested the Runtime to terminate it in an unusual way. Please contact the application’s support team for more information.This occurs right as a _com_error is thrown. The exception is thrown within a try, which is immediatly followed by a catch(_com_error & e) block. The catch never gets hit. Instead this dialog pops up. If I click rety, I am taken to some internal exit
code and the call stack does not contain any of my code. I double checked the thread IDs and they match at a breakpoint on the throw and where the debugger takes me when I hit retry. So, it is the same thread.I have no idea what is causing this.
What causes an error dialog to pop up with a this message as opposed to an unhandled exception?
Answers
-
I think I may have found the source of my problems. It seems the original author of the code I am working on had no regard for releasing COM interfaces, releasing COM itself, or freeing any resources at all before letting an exception make its way across
boundries. I’ll know for sure after a whole lot of editing.-
Marked as answer by
Thursday, April 21, 2011 3:52 PM
-
Marked as answer by
One of the key features of Visual Studio Code is its great debugging support. VS Code’s built-in debugger helps accelerate your edit, compile, and debug loop.
Debugger extensions
VS Code has built-in debugging support for the Node.js runtime and can debug JavaScript, TypeScript, or any other language that gets transpiled to JavaScript.
For debugging other languages and runtimes (including PHP, Ruby, Go, C#, Python, C++, PowerShell and many others), look for Debuggers extensions in the VS Code Marketplace or select Install Additional Debuggers in the top-level Run menu.
Below are several popular extensions which include debugging support:
Tip: The extensions shown above are dynamically queried. Select an extension tile above to read the description and reviews to decide which extension is best for you.
Start debugging
The following documentation is based on the built-in Node.js debugger, but most of the concepts and features are applicable to other debuggers as well.
It is helpful to first create a sample Node.js application before reading about debugging. You can follow the Node.js walkthrough to install Node.js and create a simple «Hello World» JavaScript application (app.js). Once you have a simple application set up, this page will take you through VS Code debugging features.
Run and Debug view
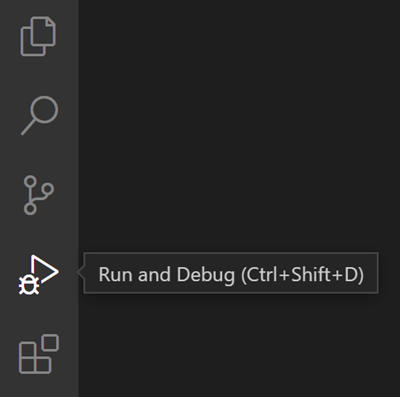
To bring up the Run and Debug view, select the Run and Debug icon in the Activity Bar on the side of VS Code. You can also use the keyboard shortcut ⇧⌘D (Windows, Linux Ctrl+Shift+D).
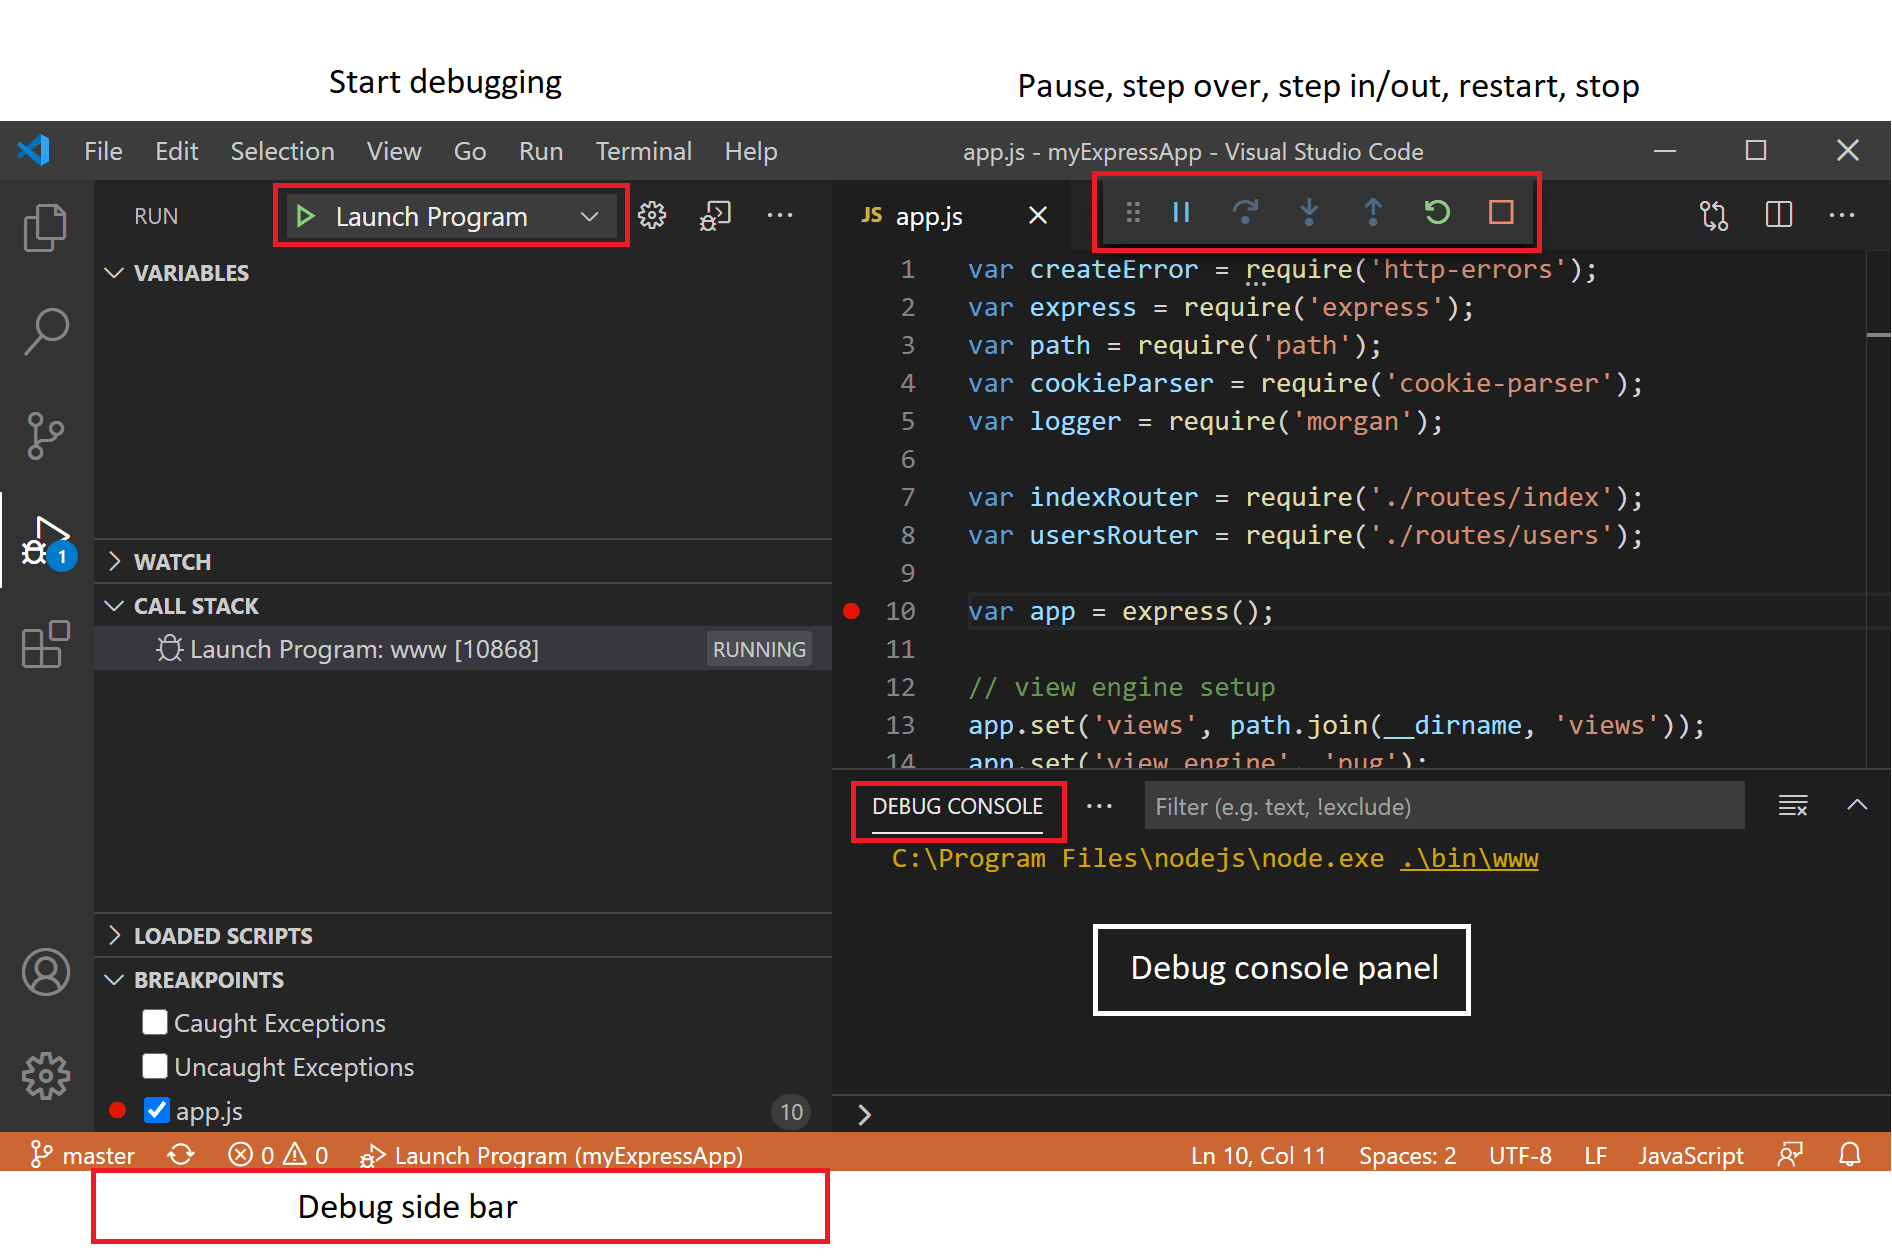
The Run and Debug view displays all information related to running and debugging and has a top bar with debugging commands and configuration settings.
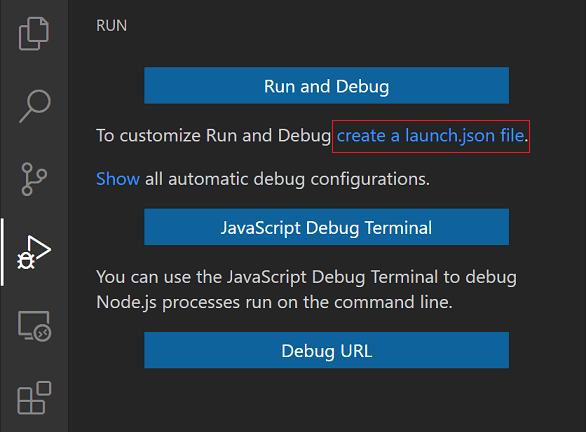
If running and debugging is not yet configured (no launch.json has been created), VS Code shows the Run start view.
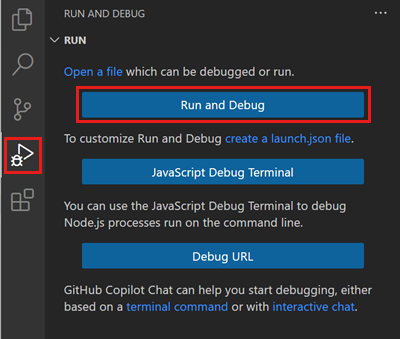
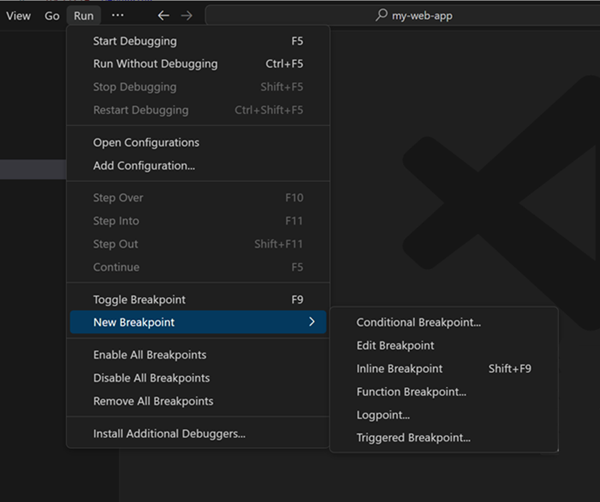
The top-level Run menu has the most common run and debug commands:
Launch configurations
To run or debug a simple app in VS Code, select Run and Debug on the Debug start view or press F5 and VS Code will try to run your currently active file.
However, for most debugging scenarios, creating a launch configuration file is beneficial because it allows you to configure and save debugging setup details. VS Code keeps debugging configuration information in a launch.json file located in a .vscode folder in your workspace (project root folder) or in your user settings or workspace settings.
To create a launch.json file, click the create a launch.json file link in the Run start view.
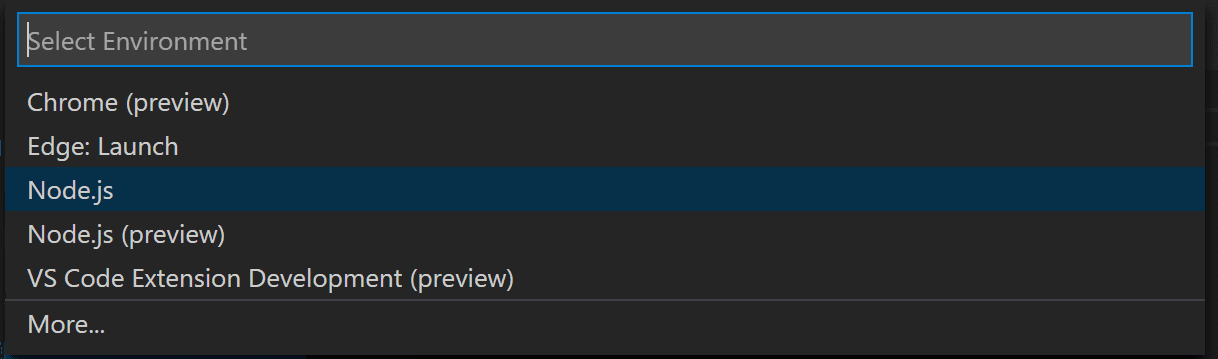
VS Code will try to automatically detect your debug environment, but if this fails, you will have to choose it manually:
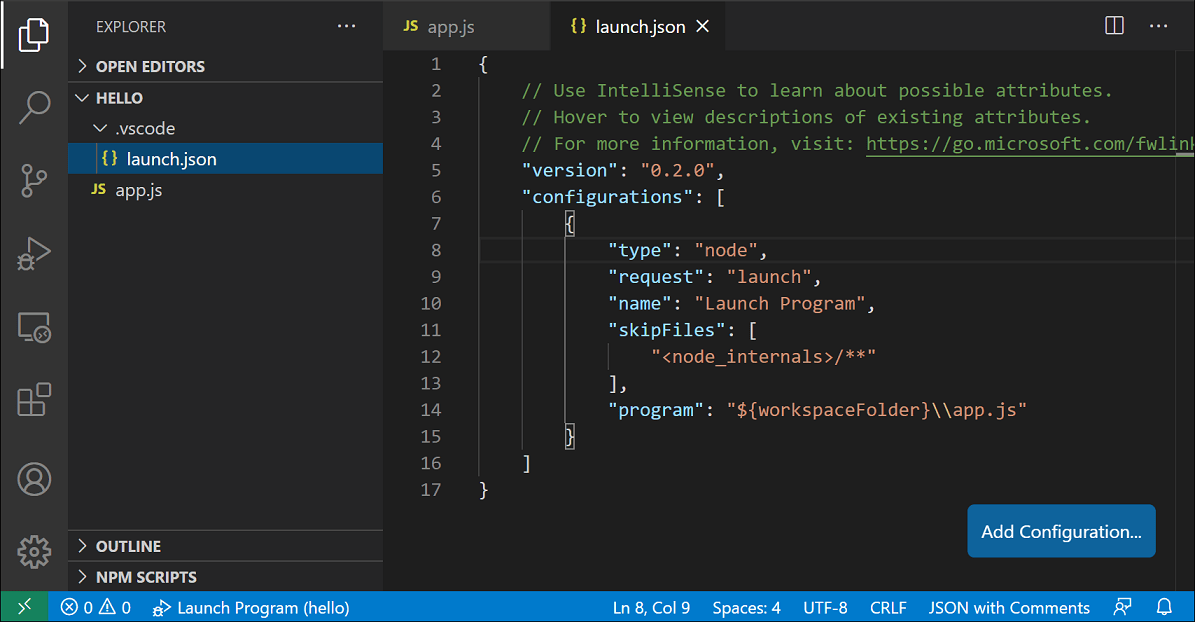
Here is the launch configuration generated for Node.js debugging:
{
  "version": "0.2.0",
  "configurations": [
    {
      "type": "node",
      "request": "launch",
      "name": "Launch Program",
      "skipFiles": ["<node_internals>/**"],
      "program": "${workspaceFolder}\app.js"
    }
  ]
}
If you go back to the File Explorer view (⇧⌘E (Windows, Linux Ctrl+Shift+E)), you’ll see that VS Code has created a .vscode folder and added the launch.json file to your workspace.
Note: You can debug a simple application even if you don’t have a folder open in VS Code, but it is not possible to manage launch configurations and set up advanced debugging. The VS Code Status Bar is purple if you do not have a folder open.
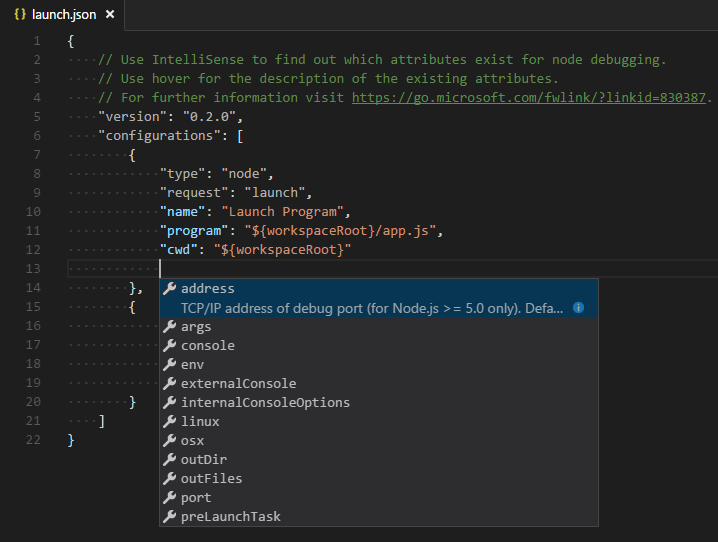
Note that the attributes available in launch configurations vary from debugger to debugger. You can use IntelliSense suggestions (⌃Space (Windows, Linux Ctrl+Space)) to find out which attributes exist for a specific debugger. Hover help is also available for all attributes.
Do not assume that an attribute that is available for one debugger automatically works for other debuggers too. If you see green squiggles in your launch configuration, hover over them to learn what the problem is and try to fix them before launching a debug session.
Review all automatically generated values and make sure that they make sense for your project and debugging environment.
Launch versus attach configurations
In VS Code, there are two core debugging modes, Launch and Attach, which handle two different workflows and segments of developers. Depending on your workflow, it can be confusing to know what type of configuration is appropriate for your project.
If you come from a browser Developer Tools background, you might not be used to «launching from your tool,» since your browser instance is already open. When you open DevTools, you are simply attaching DevTools to your open browser tab. On the other hand, if you come from a server or desktop background, it’s quite normal to have your editor launch your process for you, and your editor automatically attaches its debugger to the newly launched process.
The best way to explain the difference between launch and attach is to think of a launch configuration as a recipe for how to start your app in debug mode before VS Code attaches to it, while an attach configuration is a recipe for how to connect VS Code’s debugger to an app or process that’s already running.
VS Code debuggers typically support launching a program in debug mode or attaching to an already running program in debug mode. Depending on the request (attach or launch), different attributes are required, and VS Code’s launch.json validation and suggestions should help with that.
Add a new configuration
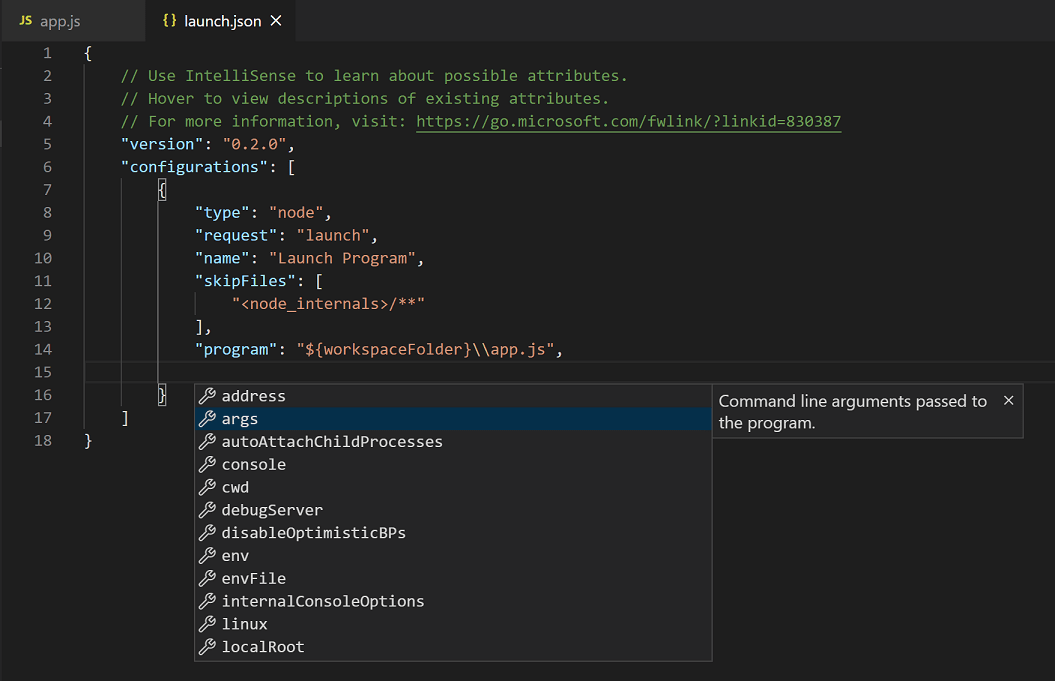
To add a new configuration to an existing launch.json, use one of the following techniques:
- Use IntelliSense if your cursor is located inside the configurations array.
- Press the Add Configuration button to invoke snippet IntelliSense at the start of the array.
- Choose Add Configuration option in the Run menu.
VS Code also supports compound launch configurations for starting multiple configurations at the same time; for more details, please read this section.
In order to start a debug session, first select the configuration named Launch Program using the Configuration dropdown in the Run and Debug view. Once you have your launch configuration set, start your debug session with F5.
Alternatively, you can run your configuration through the Command Palette (⇧⌘P (Windows, Linux Ctrl+Shift+P)) by filtering on Debug: Select and Start Debugging or typing 'debug ' and selecting the configuration you want to debug.
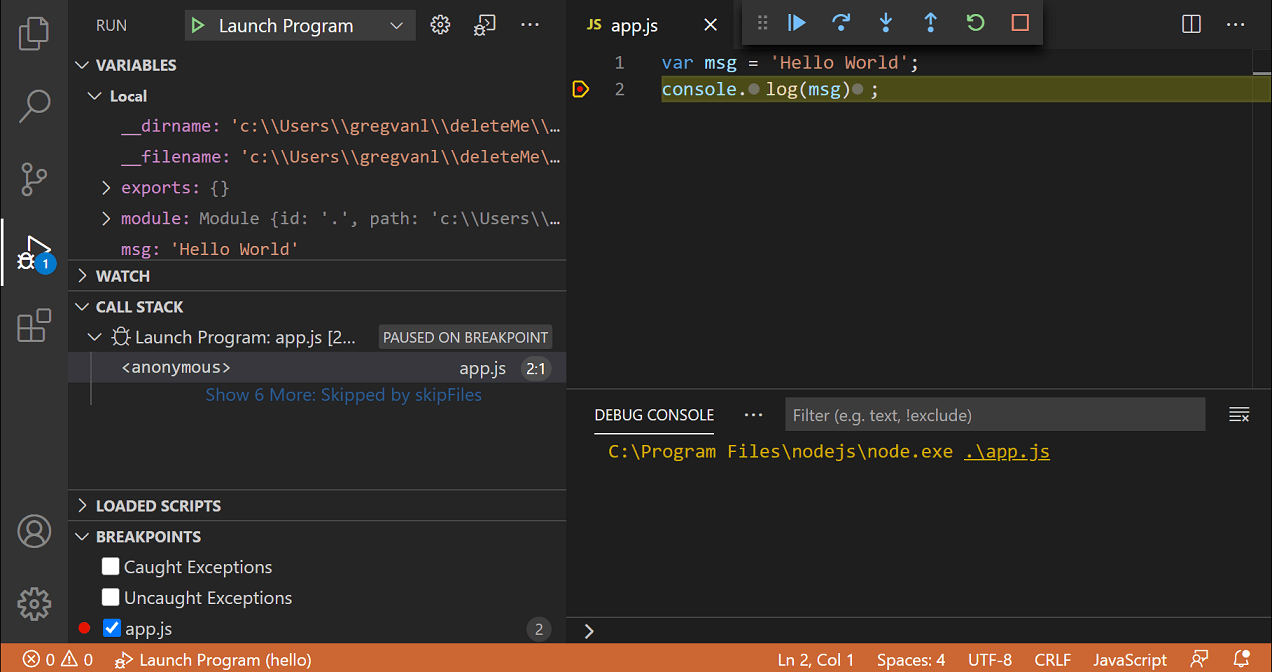
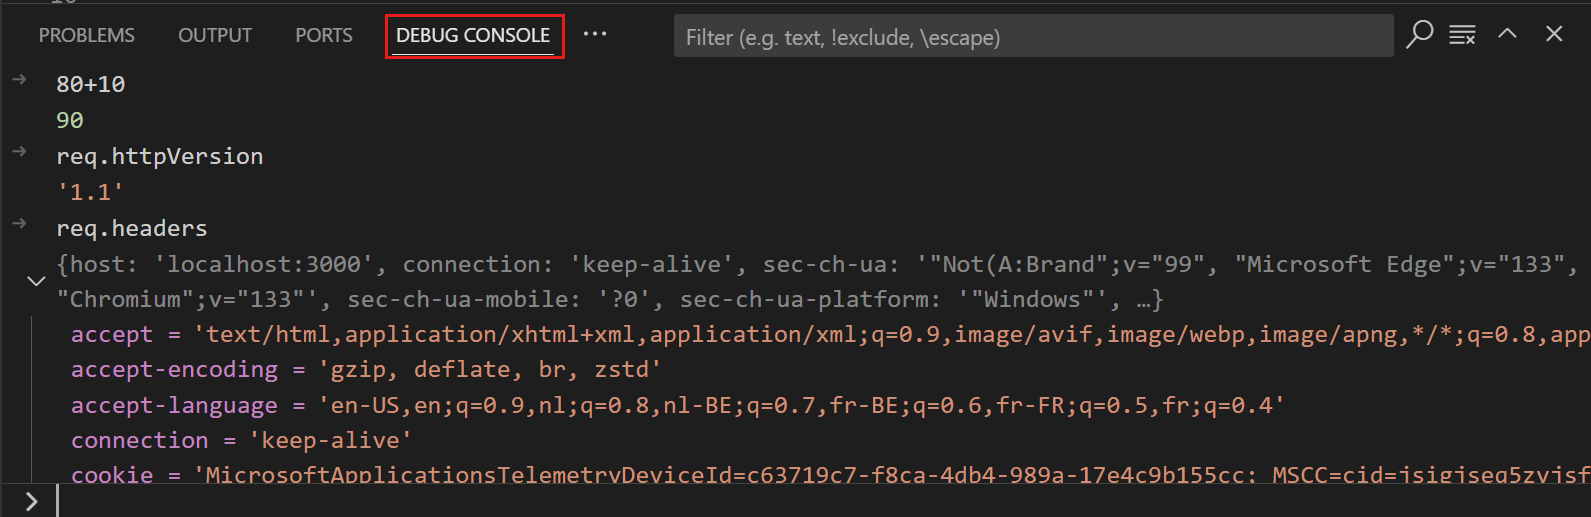
As soon as a debugging session starts, the DEBUG CONSOLE panel is displayed and shows debugging output, and the Status Bar changes color (orange for default color themes):
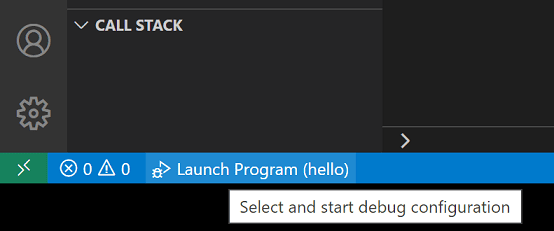
In addition, the debug status appears in the Status Bar showing the active debug configuration. By selecting the debug status, a user can change the active launch configuration and start debugging without needing to open the Run and Debug view.
Debug actions
Once a debug session starts, the Debug toolbar will appear on the top of the editor.

| Action | Explanation |
|---|---|
| Continue / Pause F5 |
Continue: Resume normal program/script execution (up to the next breakpoint). Pause: Inspect code executing at the current line and debug line-by-line. |
| Step Over F10 |
Execute the next method as a single command without inspecting or following its component steps. |
| Step Into F11 |
Enter the next method to follow its execution line-by-line. |
| Step Out ⇧F11 (Windows, Linux Shift+F11) |
When inside a method or subroutine, return to the earlier execution context by completing remaining lines of the current method as though it were a single command. |
| Restart ⇧⌘F5 (Windows, Linux Ctrl+Shift+F5) |
Terminate the current program execution and start debugging again using the current run configuration. |
| Stop ⇧F5 (Windows, Linux Shift+F5) |
Terminate the current program execution. |
Tip: Use the setting
debug.toolBarLocationto control the location of the debug toolbar. It can be the defaultfloating,dockedto the Run and Debug view, orhidden. Afloatingdebug toolbar can be dragged horizontally and also down to the editor area.
Run mode
In addition to debugging a program, VS Code supports running the program. The Debug: Run (Start Without Debugging) action is triggered with ⌃F5 (Windows, Linux Ctrl+F5) and uses the currently selected launch configuration. Many of the launch configuration attributes are supported in ‘Run’ mode. VS Code maintains a debug session while the program is running, and pressing the Stop button terminates the program.
Tip: The Run action is always available, but not all debugger extensions support ‘Run’. In this case, ‘Run’ will be the same as ‘Debug’.
Breakpoints
Breakpoints can be toggled by clicking on the editor margin or using F9 on the current line. Finer breakpoint control (enable/disable/reapply) can be done in the Run and Debug view’s BREAKPOINTS section.
- Breakpoints in the editor margin are normally shown as red filled circles.
- Disabled breakpoints have a filled gray circle.
- When a debugging session starts, breakpoints that cannot be registered with the debugger change to a gray hollow circle. The same might happen if the source is edited while a debug session without live-edit support is running.
If the debugger supports breaking on different kinds of errors or exceptions, those will also be available in the BREAKPOINTS view.
The Reapply All Breakpoints command sets all breakpoints again to their original location. This is helpful if your debug environment is «lazy» and «misplaces» breakpoints in source code that has not yet been executed.

Optionally, breakpoints can be shown in the editor’s overview ruler by enabling the setting debug.showBreakpointsInOverviewRuler:

Logpoints
A Logpoint is a variant of a breakpoint that does not «break» into the debugger but instead logs a message to the console. Logpoints are especially useful for injecting logging while debugging production servers that cannot be paused or stopped.
A Logpoint is represented by a «diamond» shaped icon. Log messages are plain text but can include expressions to be evaluated within curly braces (‘{}’).
Just like regular breakpoints, Logpoints can be enabled or disabled and can also be controlled by a condition and/or hit count.
Note: Logpoints are supported by VS Code’s built-in Node.js debugger, but can be implemented by other debug extensions. The Python and Java extensions, for example, support Logpoints.
Data inspection
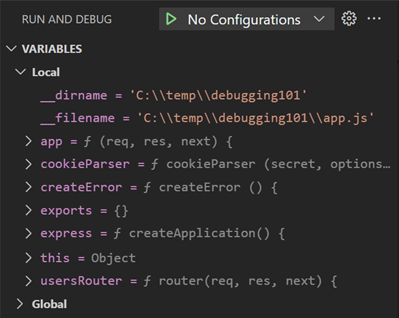
Variables can be inspected in the VARIABLES section of the Run and Debug view or by hovering over their source in the editor. Variable values and expression evaluation are relative to the selected stack frame in the CALL STACK section.
Variable values can be modified with the Set Value action from the variable’s context menu. Additionally, you can use the Copy Value action to copy the variable’s value, or Copy as Expression action to copy an expression to access the variable.
Variables and expressions can also be evaluated and watched in the Run and Debug view’s WATCH section.

Variable names and values can be filtered by typing while the focus is on the VARIABLES section.

Launch.json attributes
There are many launch.json attributes to help support different debuggers and debugging scenarios. As mentioned above, you can use IntelliSense (⌃Space (Windows, Linux Ctrl+Space)) to see the list of available attributes once you have specified a value for the type attribute.
The following attributes are mandatory for every launch configuration:
type— the type of debugger to use for this launch configuration. Every installed debug extension introduces a type:nodefor the built-in Node debugger, for example, orphpandgofor the PHP and Go extensions.request— the request type of this launch configuration. Currently,launchandattachare supported.name— the reader-friendly name to appear in the Debug launch configuration dropdown.
Here are some optional attributes available to all launch configurations:
presentation— using theorder,group, andhiddenattributes in thepresentationobject, you can sort, group, and hide configurations and compounds in the Debug configuration dropdown and in the Debug quick pick.preLaunchTask— to launch a task before the start of a debug session, set this attribute to the label of a task specified in tasks.json (in the workspace’s.vscodefolder). Or, this can be set to${defaultBuildTask}to use your default build task.postDebugTask— to launch a task at the very end of a debug session, set this attribute to the name of a task specified in tasks.json (in the workspace’s.vscodefolder).internalConsoleOptions— this attribute controls the visibility of the Debug Console panel during a debugging session.debugServer— for debug extension authors only: this attribute allows you to connect to a specified port instead of launching the debug adapter.serverReadyAction— if you want to open a URL in a web browser whenever the program under debugging outputs a specific message to the debug console or integrated terminal. For details see section Automatically open a URI when debugging a server program below.
Many debuggers support some of the following attributes:
program— executable or file to run when launching the debuggerargs— arguments passed to the program to debugenv— environment variables (the valuenullcan be used to «undefine» a variable)envFile— path to dotenv file with environment variablescwd— current working directory for finding dependencies and other filesport— port when attaching to a running processstopOnEntry— break immediately when the program launchesconsole— what kind of console to use, for example,internalConsole,integratedTerminal, orexternalTerminal
Variable substitution
VS Code makes commonly used paths and other values available as variables and supports variable substitution inside strings in launch.json. This means that you do not have to use absolute paths in debug configurations. For example, ${workspaceFolder} gives the root path of a workspace folder, ${file} the file open in the active editor, and ${env:Name} the environment variable ‘Name’. You can see a full list of predefined variables in the Variables Reference or by invoking IntelliSense inside the launch.json string attributes.
{
  "type": "node",
  "request": "launch",
  "name": "Launch Program",
  "program": "${workspaceFolder}/app.js",
  "cwd": "${workspaceFolder}",
  "args": ["${env:USERNAME}"]
}
Platform-specific properties
Launch.json supports defining values (for example, arguments to be passed to the program) that depend on the operating system where the debugger is running. To do so, put a platform-specific literal into the launch.json file and specify the corresponding properties inside that literal.
Below is an example that passes "args" to the program differently on Windows:
{
  "version": "0.2.0",
  "configurations": [
    {
      "type": "node",
      "request": "launch",
      "name": "Launch Program",
      "program": "${workspaceFolder}/node_modules/gulp/bin/gulpfile.js",
      "args": ["myFolder/path/app.js"],
      "windows": {
        "args": ["myFolder\path\app.js"]
      }
    }
  ]
}
Valid operating properties are "windows" for Windows, "linux" for Linux, and "osx" for macOS. Properties defined in an operating system specific scope override properties defined in the global scope.
Please note that the type property cannot be placed inside a platform-specific section, because type indirectly determines the platform in remote debugging scenarios, and that would result in a cyclic dependency.
In the example below, debugging the program always stops on entry except on macOS:
{
  "version": "0.2.0",
  "configurations": [
    {
      "type": "node",
      "request": "launch",
      "name": "Launch Program",
      "program": "${workspaceFolder}/node_modules/gulp/bin/gulpfile.js",
      "stopOnEntry": true,
      "osx": {
        "stopOnEntry": false
      }
    }
  ]
}
Global launch configuration
VS Code supports adding a "launch" object inside your User settings. This "launch" configuration will then be shared across your workspaces. For example:
"launch": {
    "version": "0.2.0",
    "configurations": [{
        "type": "node",
        "request": "launch",
        "name": "Launch Program",
        "program": "${file}"
    }]
}
Advanced breakpoint topics
Conditional breakpoints
A powerful VS Code debugging feature is the ability to set conditions based on expressions, hit counts, or a combination of both.
- Expression condition: The breakpoint will be hit whenever the expression evaluates to
true. - Hit count: The ‘hit count’ controls how many times a breakpoint needs to be hit before it will ‘break’ execution. Whether a ‘hit count’ is respected and the exact syntax of the expression vary among debugger extensions.
You can add a condition and/or hit count when creating a source breakpoint (with the Add Conditional Breakpoint action) or when modifying an existing one (with the Edit Condition action). In both cases, an inline text box with a dropdown menu opens where you can enter expressions:
Condition and hit count editing support is also supported for function and exception breakpoints.
You can initiate condition editing from the context menu or the new inline Edit Condition action.
An example of condition editing in the BREAKPOINTS view:

If a debugger does not support conditional breakpoints, the Add Conditional Breakpoint and Edit Condition actions will be missing.
Inline breakpoints
Inline breakpoints will only be hit when the execution reaches the column associated with the inline breakpoint. This is particularly useful when debugging minified code which contains multiple statements in a single line.
An inline breakpoint can be set using ⇧F9 (Windows, Linux Shift+F9) or through the context menu during a debug session. Inline breakpoints are shown inline in the editor.
Inline breakpoints can also have conditions. Editing multiple breakpoints on a line is possible through the context menu in the editor’s left margin.
Function breakpoints
Instead of placing breakpoints directly in source code, a debugger can support creating breakpoints by specifying a function name. This is useful in situations where source is not available but a function name is known.
A function breakpoint is created by pressing the + button in the BREAKPOINTS section header and entering the function name. Function breakpoints are shown with a red triangle in the BREAKPOINTS section.
Data breakpoints
If a debugger supports data breakpoints, they can be set from the context menu in the VARIABLES view. The Break on Value Change/Read/Access commands will add a data breakpoint that is hit when the value of the underlying variable changes/is read/is accessed. Data breakpoints are shown with a red hexagon in the BREAKPOINTS section.
Debug Console REPL
Expressions can be evaluated with the Debug Console REPL (Read-Eval-Print Loop) feature. To open the Debug Console, use the Debug Console action at the top of the Debug pane or use the View: Debug Console command (⇧⌘Y (Windows, Linux Ctrl+Shift+Y)). Expressions are evaluated after you press Enter and the Debug Console REPL shows suggestions as you type. If you need to enter multiple lines, use Shift+Enter between the lines and then send all lines for evaluation with Enter.
Debug Console input uses the mode of the active editor, which means that the Debug Console input supports syntax coloring, indentation, auto closing of quotes, and other language features.
Note: You must be in a running debug session to use the Debug Console REPL.
Redirect input/output to/from the debug target
Redirecting input/output is debugger/runtime specific, so VS Code does not have a built-in solution that works for all debuggers.
Here are two approaches you might want to consider:
-
Launch the program to debug («debug target») manually in a terminal or command prompt and redirect input/output as needed. Make sure to pass the appropriate command line options to the debug target so that a debugger can attach to it. Create and run an «attach» debug configuration that attaches to the debug target.
-
If the debugger extension you are using can run the debug target in VS Code’s Integrated Terminal (or an external terminal), you can try to pass the shell redirect syntax (for example, «<» or «>») as arguments.
Here’s an example launch.json configuration:
{
  "name": "launch program that reads a file from stdin",
  "type": "node",
  "request": "launch",
  "program": "program.js",
  "console": "integratedTerminal",
  "args": ["<", "in.txt"]
}
This approach requires that the «<» syntax is passed through the debugger extension and ends up unmodified in the Integrated Terminal.
Multi-target debugging
For complex scenarios involving more than one process (for example, a client and a server), VS Code supports multi-target debugging.
Using multi-target debugging is simple: after you’ve started a first debug session, you can just launch another session. As soon as a second session is up and running, the VS Code UI switches to multi-target mode:
Compound launch configurations
An alternative way to start multiple debug sessions is by using a compound launch configuration. A compound launch configuration lists the names of two or more launch configurations that should be launched in parallel. Optionally a preLaunchTask can be specified that is run before the individual debug sessions are started. The boolean flag stopAll controls whether manually terminating one session will stop all of the compound sessions.
{
  "version": "0.2.0",
  "configurations": [
    {
      "type": "node",
      "request": "launch",
      "name": "Server",
      "program": "${workspaceFolder}/server.js"
    },
    {
      "type": "node",
      "request": "launch",
      "name": "Client",
      "program": "${workspaceFolder}/client.js"
    }
  ],
  "compounds": [
    {
      "name": "Server/Client",
      "configurations": ["Server", "Client"],
      "preLaunchTask": "${defaultBuildTask}",
      "stopAll": true
    }
  ]
}
Compound launch configurations are displayed in the launch configuration dropdown menu.
Remote debugging
VS Code does not itself support remote debugging: this is a feature of the debug extension you are using, and you should consult the extension’s page in the Marketplace for support and details.
There is, however, one exception: the Node.js debugger included in VS Code supports remote debugging. See the Node.js Debugging topic to learn how to configure this.
Automatically open a URI when debugging a server program
Developing a web program typically requires opening a specific URL in a web browser in order to hit the server code in the debugger. VS Code has a built-in feature «serverReadyAction» to automate this task.
Here is an example of a simple Node.js Express application:
var express = require('express');
var app = express();

app.get('/', function(req, res) {
  res.send('Hello World!');
});

app.listen(3000, function() {
  console.log('Example app listening on port 3000!');
});
This application first installs a «Hello World» handler for the «/» URL and then starts to listen for HTTP connections on port 3000. The port is announced in the Debug Console, and typically, the developer would now type http://localhost:3000 into their browser application.
The serverReadyAction feature makes it possible to add a structured property serverReadyAction to any launch config and select an «action» to be performed:
{
  "type": "node",
  "request": "launch",
  "name": "Launch Program",
  "program": "${workspaceFolder}/app.js",

  "serverReadyAction": {
    "pattern": "listening on port ([0-9]+)",
    "uriFormat": "http://localhost:%s",
    "action": "openExternally"
  }
}
Here the pattern property describes the regular expression for matching the program’s output string that announces the port. The pattern for the port number is put into parenthesis so that it is available as a regular expression capture group. In this example, we are extracting only the port number, but it is also possible to extract a full URI.
The uriFormat property describes how the port number is turned into a URI. The first %s is substituted by the first capture group of the matching pattern.
The resulting URI is then opened outside of VS Code («externally») with the standard application configured for the URI’s scheme.
Trigger Debugging via Edge or Chrome
Alternatively, the action can be set to debugWithEdge or debugWithChrome. In this mode, a webRoot property can be added that is passed to the Chrome or Edge debug session.
To simplify things a bit, most properties are optional and we use the following fallback values:
- pattern:
"listening on.* (https?://\S+|[0-9]+)"which matches the commonly used messages «listening on port 3000» or «Now listening on: https://localhost:5001». - uriFormat:
"http://localhost:%s" - webRoot:
"${workspaceFolder}"
Triggering an Arbitrary Launch Config
In some cases, you may need to configure additional options for the browser debug session—or use a different debugger entirely. You can do this by setting action to startDebugging with a name property set to the name of the launch configuration to start when the pattern is matched.
The named launch configuration must be in the same file or folder as the one with the serverReadyAction.
Here the serverReadyAction feature in action:

Next steps
To learn about VS Code’s Node.js debugging support, take a look at:
- Node.js — Describes the Node.js debugger, which is included in VS Code.
- TypeScript — The Node.js debugger also supports TypeScript debugging.
To see tutorials on the basics of Node.js debugging, check out these videos:
- Intro Video — Debugging — Showcases the basics of debugging.
- Getting started with Node.js debugging — Shows how to attach a debugger to a running Node.js process.
To learn about debugging support for other programming languages via VS Code extensions:
- C++
- Python
- Java
To learn about VS Code’s task running support, go to:
- Tasks — Describes how to run tasks with Gulp, Grunt, and Jake and how to show errors and warnings.
To write your own debugger extension, visit:
- Debugger Extension — Uses a mock sample to illustrate the steps required to create a VS Code debug extension.
Common questions
What are the supported debugging scenarios?
Debugging of Node.js-based applications is supported on Linux, macOS, and Windows out of the box with VS Code. Many other scenarios are supported by VS Code extensions available in the Marketplace.
I do not see any launch configurations in the Run and Debug view dropdown. What is wrong?
The most common problem is that you did not set up launch.json or there is a syntax error in that file. Alternatively, you might need to open a folder, since no-folder debugging does not support launch configurations.
2/2/2023