Содержание
- How to: Ignore errors in tasks
- Use the ContinueOnError attribute
- To ignore an error in a task
- Example
- Подавление нарушений анализа кода
- Подавление нарушений с помощью файла EditorConfig
- Подавление нарушений в исходном коде
- Подавление нарушений с помощью глобального файла подавления
- Подавление нарушений с помощью параметров проекта
- Подавление нарушений с помощью набора правил
- Подавление в источнике и атрибут SuppressMessage
- SuppressMessage — атрибут
- Подавление использованияMessage
- Подавление выборочных нарушений в теле метода
- Подавления глобального уровня
- Глобальный файл подавления
- Область подавления модулей
- Созданный код
How to: Ignore errors in tasks
Sometimes you want a build to be tolerant of faults in certain tasks. If those non-critical tasks fail, you want the build to continue because it can still produce the required output. For example, if a project uses a SendMail task to send an e-mail message after each component is built, you might consider it acceptable for the build to proceed to completion even when the mail servers are unavailable and the status messages cannot be sent. Or, for example, if intermediate files are usually deleted during the build, you might consider it acceptable for the build to proceed to completion even when those files cannot be deleted.
Use the ContinueOnError attribute
The ContinueOnError attribute of the Task element controls whether a build stops or continues when a task failure occurs. This attribute also controls whether errors are treated as errors or warnings when the build continues.
The ContinueOnError attribute can contain one of the following values:
WarnAndContinue or true. When a task fails, subsequent tasks in the Target element and the build continue to execute, and all errors from the task are treated as warnings.
ErrorAndContinue. When a task fails, subsequent tasks in the Target element and the build continue to execute, and all errors from the task are treated as errors.
ErrorAndStop or false (default). When a task fails, the remaining tasks in the Target element and the build aren’t executed, and the entire Target element and the build is considered to have failed.
Versions of the .NET Framework before 4.5 supported only the true and false values.
The default value of ContinueOnError is ErrorAndStop . If you set the attribute to ErrorAndStop , you make the behavior explicit to anyone who reads the project file.
To ignore an error in a task
Use the ContinueOnError attribute of the task. For example:
Example
The following code example illustrates that the Build target still runs and the build is considered a success, even if the Delete task fails.
Источник
Подавление нарушений анализа кода
Область применения: Visual Studio Visual Studio для Mac Visual Studio Code
Часто полезно указать, что предупреждение неприменимо. Подавление нарушений анализа кода означает, что участники команды проверили код, и предупреждение может быть подавлено. В следующих разделах описаны различные способы подавления нарушений анализа кода с помощью интегрированной среды разработки Visual Studio.
Подавление нарушений с помощью файла EditorConfig
В файле EditorConfig задайте уровень серьезности none , например dotnet_diagnostic.CA1822.severity = none . Сведения о добавлении файла EditorConfig см. в разделе «Добавление файла EditorConfig» в проект.
Подавление нарушений в исходном коде
Вы можете подавлять нарушения в коде с помощью директивы препроцессора, предупреждения #pragma (C#) или директивы Disable (Visual Basic), чтобы отключить предупреждение только для определенной строки кода. Кроме того, можно использовать атрибут SuppressMessage.
Из редактора кода
Поместите курсор в строку кода с нарушением и нажмите клавиши CTRL+Period (.), чтобы открыть меню быстрых действий . Выберите «Отключить CAXXXXXX», а затем в источнике или в источнике (атрибуте).
При выборе в источнике вы увидите предварительную версию директивы препроцессора, которая будет добавлена в код.

Если выбран параметр Source (attribute), вы увидите предварительный просмотр атрибута SuppressMessage , который будет добавлен в код.

Из списка ошибок
Выберите правила, которые нужно отключить, а затем щелкните правой кнопкой мыши и выберите «Отключить>в источнике«.
При отключении в источнике откроется диалоговое окно «Предварительный просмотр изменений» и отображается предварительный просмотр предупреждения C# #pragma или Visual Basic #Disable директивы предупреждения, добавляемой в исходный код.
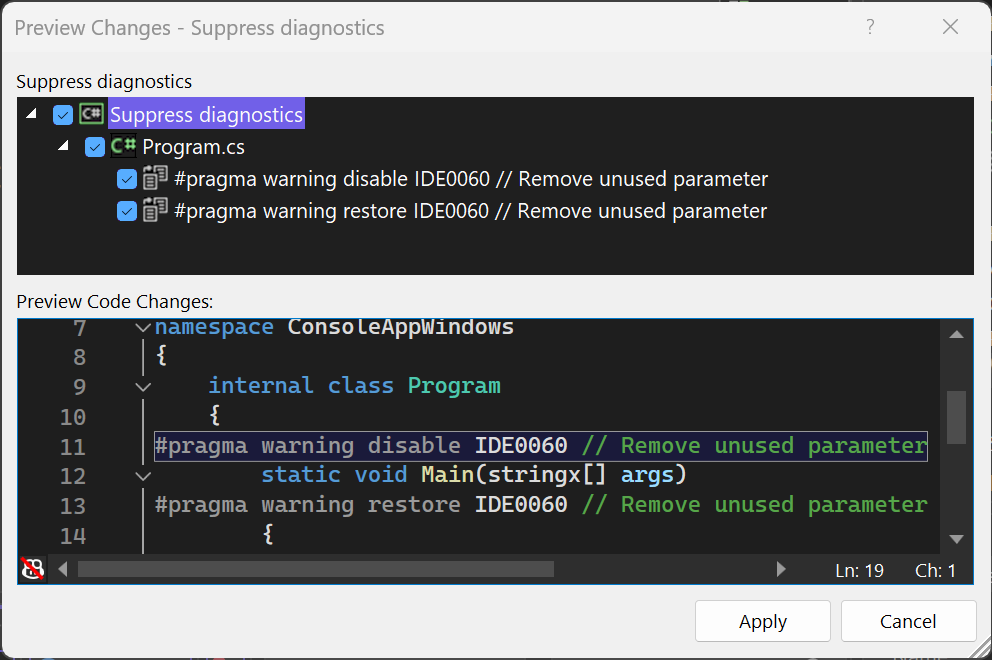
В диалоговом окне предварительных изменений нажмите кнопку «Применить«.
Если в Обозреватель решений не отображается параметр меню «Отключить«, то нарушение, скорее всего, будет происходить из сборки, а не динамического анализа. В списке ошибок отображаются данные диагностики или нарушения правил как из анализа динамического кода, так и при сборке. Так как диагностика сборки может быть устаревшей, например, если вы отредактировали код для исправления нарушения, но не перестроили, эти данные диагностики нельзя отключить из списка ошибок. Диагностика из динамического анализа или IntelliSense всегда актуальна с текущими источниками и может быть подавлена из списка ошибок. Чтобы исключить диагностику сборки из выбранного фрагмента, переключите фильтр источника списка ошибок из сборки + IntelliSense на только IntelliSense. Затем выберите диагностику, которую нужно отключить и продолжить, как описано выше.

Подавление нарушений с помощью глобального файла подавления
В списке ошибок выберите правила, которые нужно отключить, а затем щелкните правой кнопкой мыши и выберите » Отключить>» в файле подавления. Откроется диалоговое окно «Предварительный просмотр изменений» и отображается предварительный просмотр атрибута, добавленного SuppressMessageAttribute в файл глобальных подавлений.

В редакторе кода поместите курсор в строку кода с нарушением и нажмите быстрые действия и рефакторинг (или нажмите клавиши CTRL+Period (.)) , чтобы открыть меню быстрых действий . Выберите «Отключить CAXXXXX», а затем в файле подавления. Вы увидите предварительный просмотр глобального файла подавления , который будет создан или изменен.
В меню «Анализ» выберите » Анализ>сборки и подавления активных проблем » в строке меню, чтобы отключить все текущие нарушения. Подавление всех текущих нарушений иногда называется «базированием».
Подавление нарушений с помощью параметров проекта
В Обозреватель решений откройте свойства проекта (щелкните проект правой кнопкой мыши и выберите «Свойства» (или нажмите клавиши ALT+ВВОД) и перейдите на вкладку Code Analysis для настройки параметров. Например, можно отключить анализ динамического кода или отключить анализаторы .NET.
Подавление нарушений с помощью набора правил
В редакторе набора правил снимите флажок рядом с его именем или установите для действиязначение None.
Подавление в источнике и атрибут SuppressMessage
Подавление в источнике (ISS) использует SuppressMessageAttribute атрибут для подавления предупреждения. Атрибут можно поместить рядом с сегментом кода, создающим предупреждение. Вы можете добавить атрибут в SuppressMessageAttribute исходный файл, введя его или используя контекстное меню в предупреждении в списке ошибок , чтобы добавить его автоматически.
Этот SuppressMessageAttribute атрибут является условным атрибутом, включенным в метаданные IL сборки управляемого кода. Этот атрибут включается только в том случае, если символ компиляции CODE_ANALYSIS определен во время компиляции.
В C++/CLI используйте макросы CA_SUPPRESS_MESSAGE или CA_GLOBAL_SUPPRESS_MESSAGE в файле заголовка для добавления атрибута.
Для предотвращения случайной отправки метаданных подавления в исходном коде не следует использовать в сборках выпуска.
Если вы переносите проект в Visual Studio 2019 г., вы можете внезапно столкнуться с большим количеством предупреждений анализа кода. Если вы не готовы исправить предупреждения, вы можете отключить их, выбрав » Анализ>сборки» и «Отключить активные проблемы«.
SuppressMessage — атрибут
При выборе команды «Отключить » в контексте или контекстном меню предупреждения анализа кода в списке ошибок атрибут добавляется либо в код, SuppressMessageAttribute либо в глобальный файл подавления проекта.
Атрибут SuppressMessageAttribute имеет следующий формат:
К свойствам атрибута относятся:
Категория — категория, в которой определено правило. Дополнительные сведения о категориях правил анализа кода см. в предупреждениях управляемого кода.
CheckId — идентификатор правила. Поддержка включает как короткое, так и длинное имя идентификатора правила. Короткое имя — CAXXXX; длинное имя — CAXXXX:FriendlyTypeName.
Обоснование — текст, используемый для документирования причины подавления сообщения.
MessageId — уникальный идентификатор проблемы для каждого сообщения.
Область — целевой объект, на котором подавляется предупреждение. Если целевой объект не указан, он задается в качестве целевого объекта атрибута. Поддерживаемые области:
module — Эта область подавляет предупреждения для сборки. Это глобальное подавление, которое применяется ко всему проекту.
resource — (только устаревшая версия FxCop ) Эта область подавляет предупреждения в диагностических сведениях, записанных в файлы ресурсов, которые являются частью модуля (сборки). Эта область не считывается и не учитывается в компиляторах C#/VB для диагностики анализатора Roslyn, которая анализирует только исходные файлы.
type — Эта область подавляет предупреждения для типа.
member — Эта область подавляет предупреждения для элемента.
namespace — Эта область подавляет предупреждения для самого пространства имен. Он не подавляет предупреждения о типах в пространстве имен.
namespaceanddescendants — (Требуется компилятор версии 3.x или более поздней и Visual Studio 2019) Эта область подавляет предупреждения в пространстве имен и всех его потомках. Значение namespaceanddescendants игнорируется устаревшим анализом.
Целевой объект — идентификатор, используемый для указания целевого объекта, на котором подавляется предупреждение. Он должен содержать полное имя компонента.
При отображении предупреждений в Visual Studio можно просмотреть примеры SuppressMessage , добавив подавление в глобальный файл подавления. Атрибут подавления и его обязательные свойства отображаются в окне предварительного просмотра.
Подавление использованияMessage
Code Analysis предупреждения подавляются на уровне, к которому SuppressMessageAttribute применяется атрибут. Например, атрибут может применяться на уровне сборки, модуля, типа, члена или параметра. Назначение этого атрибута заключается в тесной привязке сведений подавления к коду, в котором происходит нарушение.
Общая форма подавления включает категорию правила и идентификатор правила, который содержит необязательное удобочитаемое пользователем представление имени правила. Пример:
Если существуют строгие причины для минимизации метаданных подавления в источнике, имя правила можно опустить. Категория правила и его идентификатор правила вместе образуют достаточно уникальный идентификатор правила. Пример:
В целях поддержки не рекомендуется пропускать имя правила.
Подавление выборочных нарушений в теле метода
Атрибуты подавления могут применяться к методу, но не могут быть внедрены в тело метода. Все нарушения определенного правила подавляются при добавлении атрибута SuppressMessageAttribute в метод.
В некоторых случаях может потребоваться отключить определенный экземпляр нарушения. Рассмотрим пример, в котором будущий код не будет автоматически исключен из правила анализа кода. Некоторые правила анализа кода позволяют подавлять определенный экземпляр нарушения с помощью MessageId свойства атрибута SuppressMessageAttribute . Как правило, устаревшие правила нарушения определенного символа (локальной переменной или параметра) учитывают MessageId свойство. CA1500:VariableNamesShouldNotMatchFieldNames является примером такого правила. Однако устаревшие правила нарушений исполняемого кода (не символа) не учитывают MessageId свойство. Кроме того, .NET Compiler Platform анализаторы (Roslyn) не уважают MessageId свойство.
Чтобы отключить определенное нарушение символа правила, укажите имя символа для MessageId свойства атрибута SuppressMessageAttribute . В следующем примере показан код с двумя нарушениями CA1500:VariableNamesShouldNotMatchFieldNames — один для переменной name и один для переменной age . Только нарушение символа age подавляется.
Подавления глобального уровня
Средство анализа управляемого кода проверяет атрибуты SuppressMessage , применяемые на уровне сборки, модуля, типа, члена или параметра. Он также вызывает нарушения ресурсов и пространств имен. Эти нарушения должны применяться на глобальном уровне и быть ограничены и нацелены на них. Например, следующее сообщение подавляет нарушение пространства имен:
[module: SuppressMessage(«Microsoft.Design», «CA1020:AvoidNamespacesWithFewTypes», Scope = «namespace», Target = «MyNamespace»)]
При подавлении предупреждения с namespace областью оно подавляет предупреждение для самого пространства имен. Предупреждение о типах в пространстве имен не подавляется.
Любое подавление может быть выражено путем указания явной области. Эти подавления должны жить на глобальном уровне. Невозможно указать подавление на уровне члена, изменив тип.
Подавления глобального уровня — единственный способ подавления сообщений, ссылающихся на код, созданный компилятором, который не сопоставляется с явно предоставленным источником пользователя. Например, следующий код подавляет нарушение в конструкторе, созданном компилятором:
[module: SuppressMessage(«Microsoft.Design», «CA1055:AbstractTypesDoNotHavePublicConstructors», Scope=»member», Target=»Microsoft.Tools.FxCop.Type..ctor()»)]
Target всегда содержит полное имя элемента.
Глобальный файл подавления
Глобальный файл подавления поддерживает подавления, которые являются либо подавлениями глобального уровня, либо подавлениями, которые не указывают целевой объект. Например, подавления нарушений на уровне сборки хранятся в этом файле. Кроме того, некоторые ASP.NET подавления хранятся в этом файле, так как параметры уровня проекта недоступны для кода за формой. Создается глобальный файл подавления и добавляется в проект при первом выборе параметра «В Project файл подавления» команды «Отключить» в окне «Список ошибок«.
Область подавления модулей
Вы можете отключить нарушения качества кода для всей сборки с помощью области модуля .
Например, следующий атрибут в файле проекта GlobalSuppressions подавляет нарушение ConfigureAwait для проекта ASP.NET Core:
[assembly: System.Diagnostics.CodeAnalysis.SuppressMessage(«Reliability», «CA2007:Consider calling ConfigureAwait on the awaited task», Justification = «ASP.NET Core doesn’t use thread context to store request context.», Scope = «module»)]
Созданный код
Компиляторы управляемого кода и некоторые сторонние средства создают код для быстрого разработки кода. Созданный компилятором код, который отображается в исходных файлах, помечается атрибутом GeneratedCodeAttribute .
Для анализа исходного кода можно подавлять сообщения в созданном коде .editorconfig в файле. Дополнительные сведения см. в разделе «Исключение созданного кода».
Для анализа устаревшего кода можно указать, следует ли подавлять предупреждения и ошибки анализа кода для созданного кода. Сведения о подавлении таких предупреждений и ошибок см. в разделе «Практическое руководство. Подавление предупреждений для созданного кода».
Анализ кода игнорируется GeneratedCodeAttribute , если он применяется ко всей сборке или одному параметру.
Источник
| title | description | ms.custom | ms.date | ms.technology | ms.topic | author | ms.author | manager | ms.workload |
|---|---|---|---|---|---|---|---|---|---|
|
Suppress warnings for projects and NuGet packages |
Learn how you can use Visual Studio to declutter a build log by filtering out one or more kinds of compiler warnings. |
SEO-VS-2020 |
06/10/2022 |
vs-ide-compile |
how-to |
ghogen |
ghogen |
jmartens |
multiple |
How to: Suppress compiler warnings
[!INCLUDE Visual Studio]
You can declutter a build log by filtering out one or more kinds of compiler warnings. For example, you might want to review only some of the output that’s generated when you set the build log verbosity to Normal, Detailed, or Diagnostic. For more information about verbosity, see How to: View, save, and configure build log files.
Suppress specific warnings for Visual C# or F#
Use the Build properties to suppress specific warnings for C# and F# projects.
:::moniker range=»>=vs-2022″
-
In Solution Explorer, choose the project in which you want to suppress warnings.
-
Right-click on the project node, and choose Properties on the context menu. Or, select the project node and press Alt+Enter.
-
Choose Build, and go to the Errors and warnings subsection.
-
In the Suppress warnings or Suppress specific warnings box, specify the error codes of the warnings that you want to suppress, separated by semicolons. For a list and descriptions of warning codes, see C# Compiler Messages.
-
Rebuild the solution.
:::moniker-end
:::moniker range=»<=vs-2019″ -
In Solution Explorer, choose the project in which you want to suppress warnings.
-
Right-click on the project node, and choose Properties on the context menu. Or, select the project node and press Alt+Enter.
-
Choose the Build page or section, and if you’re in the current UI, open the Errors and warnings subsection.
-
In the Suppress warnings or Suppress specific warnings box, specify the error codes of the warnings that you want to suppress, separated by semicolons. For a list and descriptions of warning codes, see C# Compiler Messages.
-
Rebuild the solution.
:::moniker-end
[!NOTE]
Some warnings can’t be suppressed. For a list of those, see NoWarn compiler option.
Suppress specific warnings for C++
Use the Configuration Properties property page to suppress specific warnings for C++ projects.
-
In Solution Explorer, choose the project or source file in which you want to suppress warnings.
-
On the menu bar, choose View > Property Pages.
-
Choose the Configuration Properties category, choose the C/C++ category, and then choose the Advanced page.
-
Perform one of the following steps:
-
In the Disable Specific Warnings box, specify the error codes of the warnings that you want to suppress, separated by a semicolon.
-
In the Disable Specific Warnings box, choose Edit to display more options.
-
-
Choose the OK button, and then rebuild the solution.
Suppress warnings for Visual Basic
You can hide specific compiler warnings for Visual Basic by editing the .vbproj file for the project. To suppress warnings by category, you can use the Compile property page. For more information, see Configure warnings in Visual Basic.
To suppress specific warnings for Visual Basic
This example shows you how to edit the .vbproj file to suppress specific compiler warnings.
-
In Solution Explorer, choose the project in which you want to suppress warnings.
-
On the menu bar, choose Project > Unload Project.
-
In Solution Explorer, open the right-click or shortcut menu for the project, and then choose Edit <ProjectName>.vbproj.
The XML project file opens in the code editor.
-
Locate the
<NoWarn>element for the build configuration you’re building with, and add one or more warning numbers as the value of the<NoWarn>element. If you specify multiple warning numbers, separate them with a comma.The following example shows the
<NoWarn>element for the Debug build configuration on an x86 platform, with two compiler warnings suppressed:<PropertyGroup Condition=" '$(Configuration)|$(Platform)' == 'Debug|x86' "> <PlatformTarget>x86</PlatformTarget> <DebugSymbols>true</DebugSymbols> <DebugType>full</DebugType> <Optimize>false</Optimize> <OutputPath>binDebug</OutputPath> <DefineDebug>true</DefineDebug> <DefineTrace>true</DefineTrace> <ErrorReport>prompt</ErrorReport> <NoWarn>40059,42024</NoWarn> <WarningLevel>1</WarningLevel> </PropertyGroup>
[!NOTE]
.NET Core projects do not contain build configuration property groups by default. To suppress warnings in a .NET Core project, add the build configuration section to the file manually. For example:<Project Sdk="Microsoft.NET.Sdk"> <PropertyGroup> <OutputType>Exe</OutputType> <TargetFramework>netcoreapp2.0</TargetFramework> <RootNamespace>VBDotNetCore_1</RootNamespace> </PropertyGroup> <PropertyGroup Condition=" '$(Configuration)|$(Platform)' == 'Debug|AnyCPU' "> <NoWarn>42016,41999,42017</NoWarn> </PropertyGroup> </Project>
-
Save the changes to the .vbproj file.
-
On the menu bar, choose Project > Reload Project.
-
On the menu bar, choose Build > Rebuild Solution.
The Output window no longer shows the warnings that you specified.
For more information, see the /nowarn compiler option for the Visual Basic command-line compiler.
Suppress warnings for NuGet packages
In some cases, you may want to suppress NuGet compiler warnings for a single NuGet package, instead of for an entire project. The warning serves a purpose, so you don’t want to suppress it at the project level. For example, one of the NuGet warnings tells you that the package may not be fully compatible with your project. If you suppress it at the project level and later add an additional NuGet package, you would never know if it was producing the compatibility warning.
To suppress a specific warning for a single NuGet package
-
In Solution Explorer, select the NuGet package you want to suppress compiler warnings for.
:::moniker range=»vs-2019″

:::moniker-end
:::moniker range=»>=vs-2022″
:::moniker-end -
From the right-click or context menu, select Properties.
-
In the Suppress warnings box of the package’s properties, enter the warning number you want to suppress for this package. If you want to suppress more than one warning, use a comma to separate the warning numbers.
:::moniker range=»vs-2019″
:::moniker-end
:::moniker range=»>=vs-2022″
:::moniker-endThe warning disappears from Solution Explorer and the Error List. In the project file, the NoWarn property is set.
 <PackageReference Include="NuGet.Build.Tasks.Pack" Version="6.2.0">
   <PrivateAssets>all</PrivateAssets>
   <IncludeAssets>runtime; build; native; contentfiles; analyzers; buildtransitive</IncludeAssets>
   <NoWarn>NU5104</NoWarn>
 </PackageReference>


See also
- Walkthrough: Build an application
- How to: View, save, and configure build log files
- Compile and build
- Remove From My Forums
-
Question
-
Hello:
I have some C# .net code using Puppeteer, most of the time, it works well. But sometimes, I see some errors, like the following:
PuppeteerSharp.PuppeteerException
HResult=0x80131500
Message=Protocol error (Runtime.callFunctionOn): Session closed. Most likely the Page has been closed.Close reason: Target.detachedFromTarget
As I just want to ignore this kind of error, so I write some code like this:try { do something in C# } catch (PuppeteerException ex) { Console.Write(ex.Message); }My code worked before when I used VS 2019 Version 16.1; 16.2; but now, I am using VS 2019 Version 16.3.2
The above code simply not working in Debug mode, the program always stops at the catch statement.
I want to setup the exception setting to continue in this case, but failed.
I searched around, most of the articles about this issue seem just tell me how to break on this case, which is rather
narrow-minded, I just want to continue as this kind of error is not important.
Please advice on how to change the Exception Settings in Visual Studio 2019 Version 16.3.2 to continue when the exception is handled by user. Not to break at all!
Thanks,
Answers
-
Hello:
I seemed to find one solution, as the exception happened again, I un-check break on this type of exception, so my program can continue. VS 2019 version 16.3.2 seems to remember what I did with the exception settings, so until now, it didn’t break again
at the same point.But I still think VS 2019 the newest version needs better documents on how to handle this kind of situation, not let the developers to guess what could happen.
-
Proposed as answer by
Monday, October 7, 2019 2:35 AM
-
Marked as answer by
zydjohn
Tuesday, October 8, 2019 9:49 PM
-
Proposed as answer by
VS 2005+
The compiler used by Visual Studio can produce errors when code cannot be built and warnings when it completes compilation successfully but there are areas of concern. To avoid warnings being missed or ignored, there is an option to treat them as errors.
Why Treat Warnings as Errors?
The compiler can produce warnings that do not cause a build to fail but that may point to problems that require resolution to avoid your programs from behaving unexpectedly. A simple example of C# code that generates a warning is as follows:
while (someBoolean = true)
{
    someBoolean = false;
}
At first glance this code seems to provide a while loop that executes whilst the someBoolean variable is set to true. As the variable’s value becomes false in the first iteration, you may expect that the loop will execute at most once. However, this is actually an infinite loop because the programmer has accidentally used the assignment operator (=) instead of the equality operator (==). In the first line the someBoolean value is set to true, not compared with it. As such, the condition will evaluate to true and the loop will continue forever.
The compiler is able to spot the potential problem and shows the warning, «Assignment in conditional expression is always constant; did you mean to use == instead of = ?». Unfortunately it can be easy to miss this warning and release the program with a bug. One option to ensure that this type of mistake cannot be made is to treat all warnings within a project as errors. With this option active, any warning is upgraded to an error and causes the build to fail.
Enabling Warnings as Errors
The compiler is not a true part of Visual Studio. It is a separate program that can be used from the command line and can be instructed to treat warnings as errors using a command line switch. However, when you are using Visual Studio, or one of the free versions such as Visual C# Express edition, the integrated development environment (IDE) includes a graphical interface to enable the option.
To find the option, view the properties for a project by choosing the Properties option from the Project menu, or by right-clicking your project in the Project Explorer and choosing Properties from the context-sensitive menu that appears. You must click a project, not the solution, as the option is configured for each project individually. Once you have selected the menu option the project’s property page should appear. This is arranged in a tabbed layout. To find the «Treat warnings as errors» option, select the «Build» tab.

Choose the «All» option to treat all warnings as errors. You can test the option by adding the following method to any class within your code and also adding a call to this method. All calls to obsolete methods cause a warning to be generated. With the warning acting as an error you will find that the code will not compile.
[Obsolete]
public void ObsoleteMethod() { }
Treating Specific Warnings as Errors
In addition to the «None» and «All» options, you can elect to treat only specific warnings as errors. This is useful when you wish to permit most warnings but where selected warnings are not acceptable. To use this option, select the «Specific warnings:» radio button and provide a comma-separated list of warning numbers in the textbox. You may have noticed in the Output window that the warning generated when compiling included the warning number. The message will be similar to the following:
warning CS0612: ‘ConsoleApplication1.Program.ObsoleteMethod()’ is obsolete
To specify that only this type of warning should be treated as an error, add «612» to the textbox in the project properties.
Allowing Specific Warnings
Some developers prefer to treat all warnings as errors except for one or two specific warning types. Using the IDE, this would require that almost the entire list of warning numbers would need to be included in the «Specific warnings:» textbox for each project. This would be awkward to configure.
It is possible to exclude specific warnings by editing the project file directly using a text editor such as notepad. C# project files can be found in the project’s folder and have the extension, «csproj». Before editing the file, switch on the option to treat all warnings as errors and then save your project. Open the project file in Notepad or your preferred editor and you will find a series of «PropertyGroup» XML tags. To ignore specific errors, add a new PropertyGroup tag and include within it another tag named «WarningsNotAsErrors». You can then list the warning numbers that should remain as warnings.
<PropertyGroup><WarningsNotAsErrors>612</WarningsNotAsErrors></PropertyGroup>
NB: It is advisable to backup the file before editing it.
25 June 2009
Linting highlights syntactical and stylistic problems in your Python source code, which often helps you identify and correct subtle programming errors or unconventional coding practices that can lead to errors. For example, linting detects use of an uninitialized or undefined variable, calls to undefined functions, missing parentheses, and even more subtle issues such as attempting to redefine built-in types or functions. Linting is thus distinct from Formatting because linting analyzes how the code runs and detects errors whereas formatting only restructures how code appears.
Note: Stylistic and syntactical code detection is enabled by the Language Server. To enable third-party linters for additional problem detection, you can enable them by using the Python: Select Linter command and selecting the appropriate linter.
Enable linting
To enable linters, open the Command Palette (⇧⌘P (Windows, Linux Ctrl+Shift+P)) and select the Python: Select Linter command. The Select Linter command adds "python.linting.<linter>Enabled": true to your settings, where <linter> is the name of the chosen linter. See Specific linters for details.
Enabling a linter prompts you to install the required packages in your selected environment for the chosen linter.

Note: If you’re using a global environment and VS Code is not running elevated, linter installation may fail. In that case, either run VS Code elevated, or manually run the Python package manager to install the linter at an elevated command prompt for the same environment: for example
sudo pip3 install pylint(macOS/Linux) orpip install pylint(Windows, at an elevated prompt).
Disable linting
You can easily toggle between enabling and disabling your linter. To switch, open the Command Palette (⇧⌘P (Windows, Linux Ctrl+Shift+P)) and select the Python: Enable/Disable Linting command.
This will populate a dropdown with the current linting state and options to Enable or Disable Python linting.

Run linting
To perform linting, open the Command Palette (⇧⌘P (Windows, Linux Ctrl+Shift+P)), filter on «linting», and select Python: Run Linting. Linting will run automatically when you save a file.
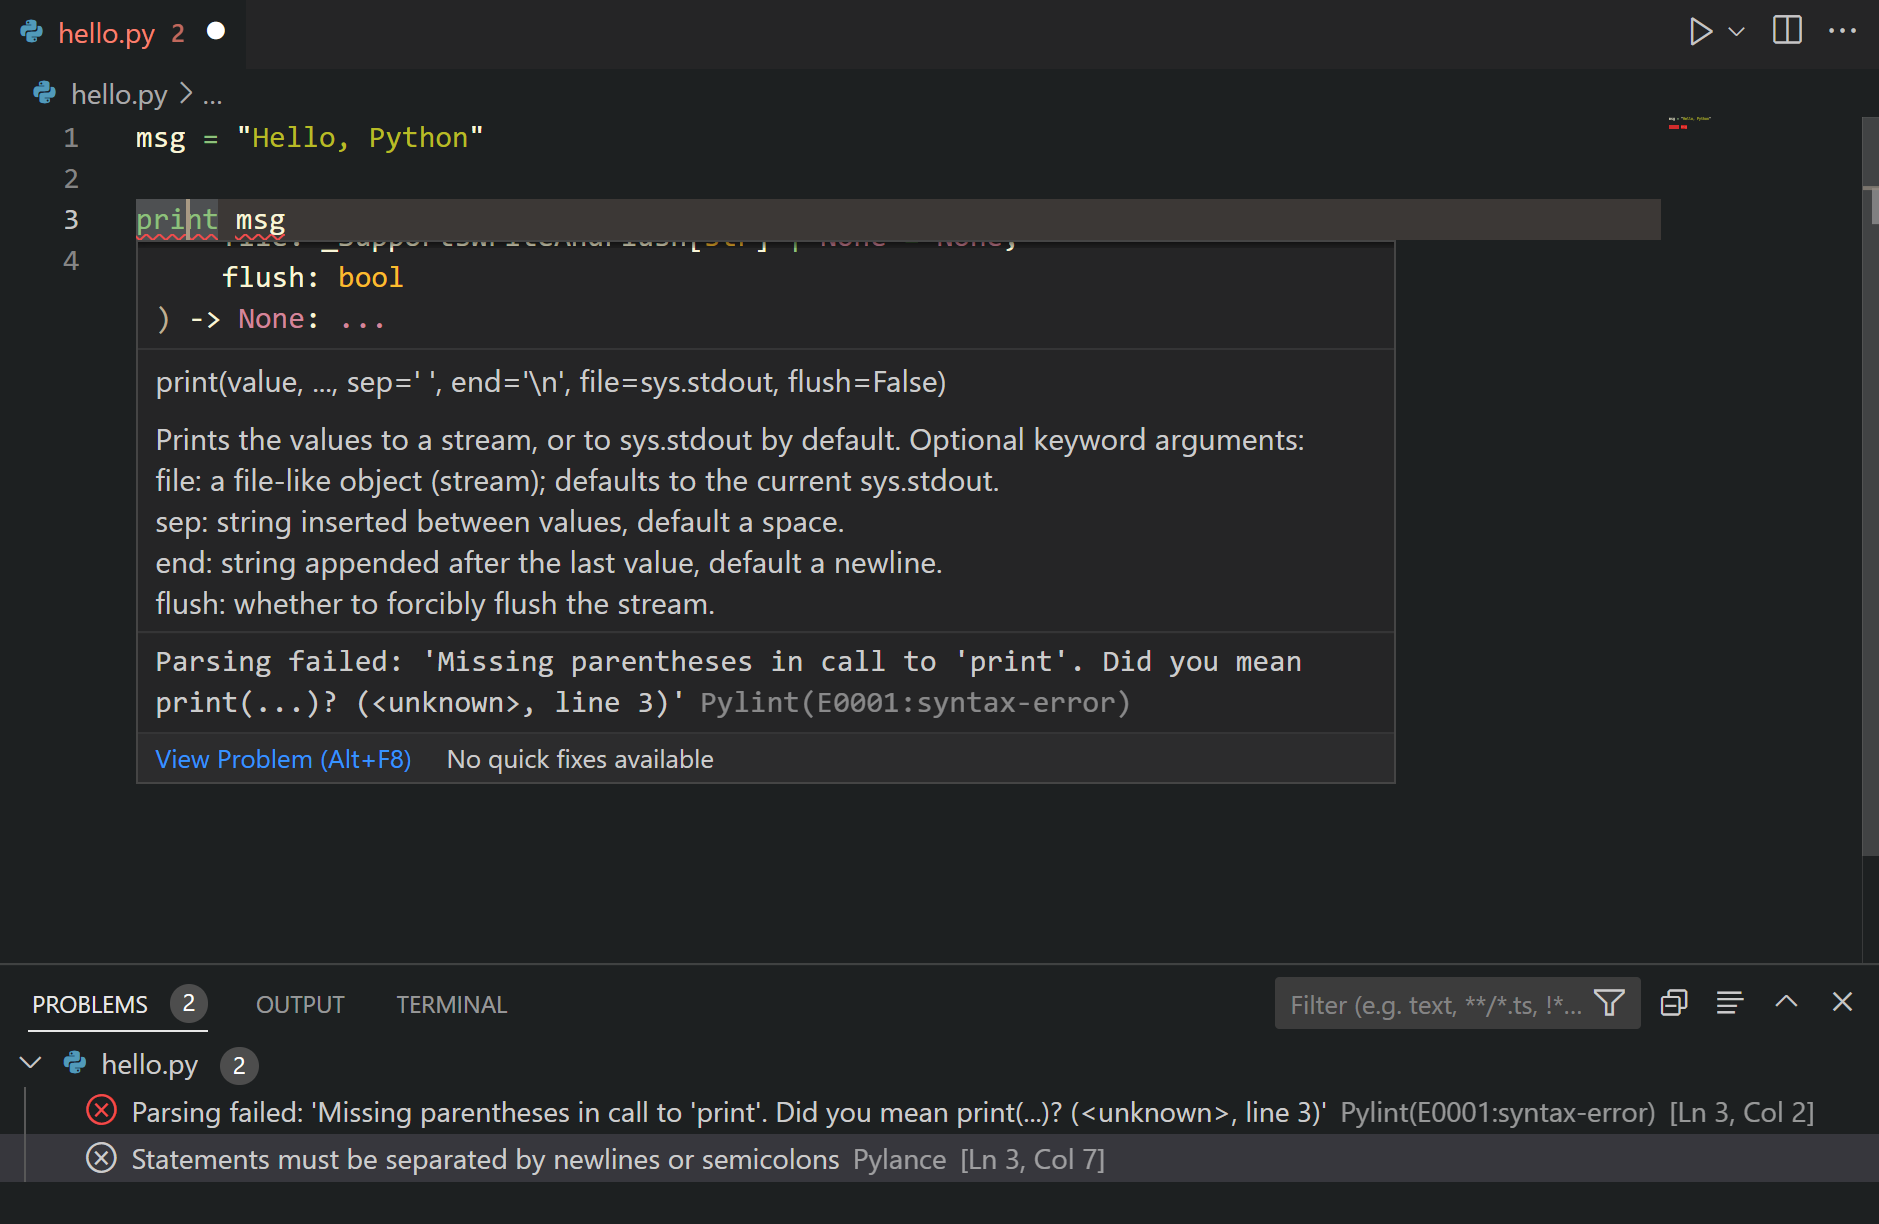
Issues are shown in the Problems panel and as wavy underlines in the code editor. Hovering over an underlined issue displays the details:
General linting settings
You can add any of the linting settings to your user settings.json file (opened with the File > Preferences > Settings command ⌘, (Windows, Linux Ctrl+,)). Refer to User and Workspace settings to find out more about working with settings in VS Code.
To change the linting behavior across all enabled linters, modify the following settings:
| Feature | Setting (python.linting.) |
Default value |
|---|---|---|
| Linting in general | enabled | true |
| Linting on file save | lintOnSave | true |
| Maximum number of linting messages | maxNumberOfProblems | 100 |
| Exclude file and folder patterns | ignorePatterns | [".vscode/*.py", "**/site-packages/**/*.py"] |
When enabling lintOnSave, you might also want to enable the generic files.autoSave option (see Save / Auto Save). The combination provides frequent linting feedback in your code as you type.
Specific linters
The following table provides a summary of available Python linters and their basic settings. For descriptions of individual settings, see the Linter settings reference.
| Linter | Package name for pip install command |
True/false enable setting (python.linting.) |
Arguments setting (python.linting.) |
Custom path setting (python.linting.) |
|---|---|---|---|---|
| Pylint | pylint | pylintEnabled | pylintArgs | pylintPath |
| Flake8 | flake8 | flake8Enabled | flake8Args | flake8Path |
| mypy | mypy | mypyEnabled | mypyArgs | mypyPath |
| pycodestyle (pep8) | pycodestyle | pycodestyleEnabled | pycodestyleArgs | pycodestylePath |
| prospector | prospector | prospectorEnabled | prospectorArgs | prospectorPath |
| pylama | pylama | pylamaEnabled | pylamaArgs | pylamaPath |
| bandit | bandit | banditEnabled | banditArgs | banditPath |
Note: If you don’t find your preferred linter in the table above, you can add support via an extension. The Python Extension Template makes it easy to integrate new Python tools into VS Code.
To select a different linter, use the Python: Select Linter command. You can also edit your settings manually to enable multiple linters. Note, that using the Select Linter command overwrites those edits.
Custom arguments are specified in the appropriate arguments setting for each linter. Each top-level element of an argument string that’s separated by a space on the command line must be a separate item in the args list. For example:
"python.linting.pylintArgs": ["--reports", "12", "--disable", "I0011"],
"python.linting.flake8Args": ["--ignore=E24,W504", "--verbose"]
"python.linting.pydocstyleArgs": ["--ignore=D400", "--ignore=D4"]
If a top-level element is a single value (delineated by quotation marks or braces), it still appears as a single item in the list even if the value itself contains spaces.
A custom path is generally unnecessary as the Python extension resolves the path to the linter based on the Python interpreter being used (see Environments). To use a different version of a linter, specify its path in the appropriate custom path setting. For example, if your selected interpreter is a virtual environment but you want to use a linter that’s installed in a global environment, then set the appropriate path setting to point to the global environment’s linter.
Note: The following sections provide additional details for the individual linters linked in the Specific linters table above. In general, custom rules must be specified in a separate file as required by the linter you’re using.
Pylint
Pylint messages fall into the categories in the following table with the indicated mapping to VS Code categories. You can change the setting to change the mapping.
| Pylint category | Description | VS Code category mapping | Applicable setting (python.linting.) |
|---|---|---|---|
| Convention (C) | Programming standard violation | Information (underline) | pylintCategorySeverity.convention |
| Refactor (R) | Bad code smell | Hint (light bulbs) | pylintCategorySeverity.refactor |
| Warning (W) | Python-specific problems | Warning | pylintCategorySeverity.warning |
| Error (E) | Likely code bugs | Error (underline) | pylintCategorySeverity.error |
| Fatal (F) | An error prevented further Pylint processing | Error | pylintCategorySeverity.fatal |
Command-line arguments and configuration files
You can easily generate an options file using different methods. See Pylint command-line arguments for general switches.
If you’re using command-line arguments:
Command-line arguments can be used to load Pylint plugins, such as the plugin for Django:
"python.linting.pylintArgs": ["--load-plugins", "pylint_django"]
If you’re using a pylintrc file:
Options can also be specified in a pylintrc or .pylintrc options file in the workspace folder, as described on Pylint command line arguments.
To control which Pylint messages are shown, add the following contents to an options file:
[MESSAGES CONTROL]

# Enable the message, report, category or checker with the given id(s). You can
# either give multiple identifier separated by comma (,) or put this option
# multiple time.
#enable=

# Disable the message, report, category or checker with the given id(s). You
# can either give multiple identifier separated by comma (,) or put this option
# multiple time (only on the command line, not in the configuration file where
# it should appear only once).
#disable=
If you’re using Pylint:
You can create an options file using Pylint itself, by running the command below.
# Using an *nix shell or cmd on Windows
pylint --generate-rcfile > .pylintrc
If you are running Pylint in PowerShell, you have to explicitly specify a UTF-8 output encoding. This file contains sections for all the Pylint options, along with documentation in the comments.
pylint --generate-rcfile | Out-File -Encoding utf8 .pylintrc
pydocstyle
Command-line arguments and configuration files
See pydocstyle Command Line Interface for general options. For example, to ignore error D400 (first line should end with a period), add the following line to your settings.json file:
"python.linting.pydocstyleArgs": ["--ignore=D400"]
A code prefix also instructs pydocstyle to ignore specific categories of errors. For example, to ignore all Docstring Content issues (D4XXX errors), add the following line to settings.json:
"python.linting.pydocstyleArgs": ["--ignore=D4"]
More details can be found in the pydocstyle documentation.
Options can also be read from a [pydocstyle] section of any of the following configuration files:
setup.cfgtox.ini.pydocstyle.pydocstyle.ini.pydocstylerc.pydocstylerc.ini
For more information, see Configuration Files.
Message category mapping
The Python extension maps all pydocstyle errors to the Convention (C) category.
pycodestyle (pep8)
Command-line arguments and configuration files
See pycodestyle example usage and output for general switches. For example, to ignore error E303 (too many blank lines), add the following line to your settings.json file:
"python.linting.pycodestyleArgs": ["--ignore=E303"]
pycodestyle options are read from the [pycodestyle] section of a tox.ini or setup.cfg file located in any parent folder of the path(s) being processed. For details, see pycodestyle configuration.
Message category mapping
The Python extension maps pycodestyle message categories to VS Code categories through the following settings. If desired, change the setting to change the mapping.
| pycodestyle category | Applicable setting (python.linting.) |
VS Code category mapping |
|---|---|---|
| W | pycodestyleCategorySeverity.W | Warning |
| E | pycodestyleCategorySeverity.E | Error |
Prospector
Command-line arguments and configuration files
See Prospector Command Line Usage for general options. For example, to set a strictness level of «very high,» add the following line to your settings.json file:
"python.linting.prospectorArgs": ["-s", "veryhigh"]
It’s common with Prospector to use profiles to configure how Prospector runs. By default, Prospector loads the profile from a .prospector.yaml file in the current folder.
Because Prospector calls other tools, such as Pylint, any configuration files for those tools override tool-specific settings in .prospector.yaml. For example, suppose you specify the following, in .prospector.yaml:
pylint:
  disable:
    - too-many-arguments
If you also have a .pylintrc file that enables the too-many-arguments warning, you continue to see the warning from Pylint within VS Code.
Message category mapping
The Python extension maps all Prospector errors and warnings to the Error (E) category.
Flake8
Command-line arguments and configuration files
See Invoking Flake8 for general switches. For example, to ignore error E303 (too many blank lines), use the following setting:
"python.linting.flake8Args": ["--ignore=E303"]
By default, Flake8 ignores E121, E123, E126, E226, E24, and E704.
Flake8 user options are read from the C:Users<username>.flake8 (Windows) or ~/.config/flake8 (macOS/Linux) file.
At the project level, options are read from the [flake8] section of a tox.ini, setup.cfg, or .flake8 file.
For details, see Flake8 configuration.
Message category mapping
The Python extension maps flake8 message categories to VS Code categories through the following settings. If desired, change the setting to change the mapping.
| Flake8 category | Applicable setting (python.linting.) |
VS Code category mapping |
|---|---|---|
| F | flake8CategorySeverity.F | Error |
| E | flake8CategorySeverity.E | Error |
| W | flake8CategorySeverity.W | Warning |
mypy
Message category mapping
The Python extension maps mypy message categories to VS Code categories through the following settings. If desired, change the setting to change the mapping.
| mypy category | Applicable setting (python.linting.) |
VS Code category mapping |
|---|---|---|
| error | mypyCategorySeverity.error | Error |
| note | mypyCategorySeverity.note | Information |
Troubleshooting linting
| Error message | Cause | Solution |
|---|---|---|
| … unable to import <module_name> | The Python extension is using the wrong version of Pylint. | Ensure that selected interpreter is a valid Python installation where Pylint is installed. Alternately, set the python.linting.pylintPath to an appropriate version of Pylint for the Python interpreter being used. |
| Linting with <linter> failed … | The path to the Python interpreter is incorrect. | Make sure you selected a valid interpreter path by running the Python: Select Interpreter command (see Environments). |
| The linter has not been installed in the current Python environment. | Open a command prompt, navigate to the location where your selecter interpreter is, and run pip install for the linter. |
|
| The path to the linter is incorrect. | Ensure that the appropriate python.linting.<linter>Path setting for the linter is correct. |
|
| Custom arguments are defined incorrectly. | Check the appropriate python.linting.<linter>Args settings, and that the value of the setting is a list of the argument elements that are separated by spaces. For example, "python.linting.pylintPath": "pylint --load-plugins pylint_django" is incorrect. The correct syntax is "python.linting.pylintArgs": ["--load-plugins", "pylint_django"]. |
Next steps
- Debugging — Learn to debug Python both locally and remotely.
- Testing — Configure test environments and discover, run, and debug tests.
- Basic Editing — Learn about the powerful VS Code editor.
- Code Navigation — Move quickly through your source code.
- Python Extension Template — Create an extension to integrate your favorite linter into VS Code.
4/30/2022
Code Focused
Hide Compiler Warnings in Your Spare Time
Learn how to keep new code-style warnings from filling up your formerly pristine Visual Studio Error List panel.

As Microsoft .NET Framework languages have grown in functionality, they’ve started tossing out compiler warnings like your development life depended on it. Messages about unused variables can sometimes help locate esoteric bugs. But new code-style warnings, such as whether your variables begin with capital letters, can easily fill up the formerly pristine Visual Studio Error List panel.
Of course, it’s always best to address the more meaningful warnings as quickly as possible. But if there are situations where you need to keep the questionable code as it is, and you don’t want to see the annoying warning message hanging around, Visual Studio offers a few different ways to suppress these messages, on scales from a single source line up to your entire project.
Consider, as an example, an asynchronous method that lacks an embedded await statement:
private async Task DoSomeWork()
{
  // ----- This method lacks an await statement, and therefore
  //       generates C# compiler warning CS1998.
}
Such C# code will add warning CS1998 to your Visual Studio experience, as shown in Figure 1.

Figure 1. Missing Await Statement Warning
The Code column in the Error List panel identifies the specific warning identity. If you want to hide a particular warning code across your entire project, open the overall properties through the Project | Properties menu command, and when the properties appear, select the Build page. The Suppress Warnings box on that page accepts a semicolon-delimited list of codes. Entering CS1998 in that field (see Figure 2) prevents the compiler from reporting that warning project-wide.

Figure 2. Project-Level Warning Suppression
If your warning-suppression needs are a bit more targeted, use the C# language #pragma statement to hide messages within a code file or block of source. The «warning disable» version of the statement, when paired with a comma-delimited list of codes, disables those codes for the remainder of that file’s processing:
#pragma warning disable CS1998
Leave off the list of codes to disable all warnings. If you want to reactivate the warnings later in the file, use the «warning restore» version of the statement instead. When used together, the two variations of the #pragma statement let you limit warning hiding to specific code lines:
#pragma warning disable CS1998 // Warning suppressed from here
private async Task DoSomeWork()
#pragma warning restore CS1998 // Warning recognized from here
{
}
If typing these statements is more than your fingers are willing to do, right-click on the warning message in the Error List panel and choose the Suppress | In Source command from the shortcut menu that appears. This action will surround the warning-laden line with the relevant #pragma statements.
Yet another way to disable warnings involves the SuppressMessage attribute, found in the System.Diagnostics.CodeAnalysis namespace. When applied to a method or other relevant code element, the attribute deactivates the indicated warning in a more object-centric manner:
// ----- Assumes: using System.Diagnostics.CodeAnalysis;
[SuppressMessage("Compiler", "CS1998")]
private async Task DoSomeWork()
{
}
I determined the first argument passed into the SuppressMessage attribute, «Compiler,» by turning on the Category column in the Error List panel and copying the text that appears for that warning. There are other options included with the attribute that let you narrow down the focus to specific code features. Microsoft recommends that you use SuppressMessage sparingly. Whereas #pragma does its work early in the compilation process and then says goodbye, the suppression attribute adds content to your final assembly, leading to attribute bloat or worse.
The MSDN documentation (such as this for C#) lists many of the error and warning codes you might encounter, allowing you to be proactive in your warning-suppression activities. But because one major goal of programming is to fix problems instead of hiding them, it’s probably best to act on individual messages as they pop up in the Error List panel. Let this be a warning to you.
About the Author
Tim Patrick has spent more than thirty years as a software architect and developer. His two most recent books on .NET development — Start-to-Finish Visual C# 2015, and Start-to-Finish Visual Basic 2015 — are available from http://owanipress.com. He blogs regularly at http://wellreadman.com.