Very important: Make sure to check the Super cool! But i don’t use eslint section! Wich provide a global solution! By setting up tasks! And explained in details!
Note: If you feel the document is blottered! Make sure to skim and get to the titles that catch you! Even though every section may matter! (TLDS (TOO LONG DO SKIM)).
Javascript and Eslint
To add upon @Ajay Raghav answer!
This section show how to run the task on question! And the output of the execution!
For javascript, Vscode Eslint extension provide such a feature! Which if you are using Eslint (and not jshint) then you are having it already installed!
Usage as described on @Ajay Raghav answer! Are explained on the Eslint extension page!
https://marketplace.visualstudio.com/items?itemName=dbaeumer.vscode-eslint
eslint.lintTask.enable: whether the extension contributes a lint task to lint a whole workspace folder.
eslint.lintTask.options: Command line options applied when running the task for linting the whole workspace (https://eslint.org/docs/user-guide/command-line-interface). An example to point to a custom .eslintrc.json file and a custom .eslintignore is:
{
  "eslint.lintTask.options": "-c C:/mydirectory/.eslintrc.json --ignore-path C:/mydirectory/.eslintignore ."
}
Using the extension with VS Code’s task running
From the doc:
The extension is linting an individual file only on typing. If you want to lint the whole workspace set
eslint.lintTask.enabletotrueand the extension will also contribute theeslint: lint whole foldertask. There is no need anymore to define a custom task intasks.json.
If you are not familiar with task! Here how you use the above!
- Go to Command pallet (CTRL + P + SHIFT)
> tasks run- Hit
Tasks: run Task - You’ll find
eslint: lint whole folder - Hit and that’s it


If eslint have no configuration setup! You’ll get the following error!

If as such, Run eslint --init
And follow the interactive terminal!
Note if you don’t have eslint command avaialble globally!
Intall it globally by running npm i -g eslint!
Result of the run
First the task run on the terminal!


You can see a detailed report! You can use the click link on terminal feature (CTRL + CLICK)! To directly open the file in question!

You can see too that the problems will automatically be listed in the problems tab! Which is cool!
Super cool! But i don’t use eslint
Typescript and TSLINT
If you are a typescript user and you use TSLINT!
Then we need to go to the global way! And that’s by creating a task!
Just like eslint did! (problemMatcher: $tsc) [you’ll get to know what that is just a bit bellow].
(Make sure to check TSLINT is deprecated title)!
I use a complete other language (c#, java, c++, php, python …)
Yup yup! We need a global way! And the global way is through creating a task!
Creating a task (The global way)
(Support all languages (to be configured for each))
We need to create a task!
The vscode documentation explains it pretty awesomely and in details!
https://code.visualstudio.com/docs/editor/tasks
Check the documentation!
Now in short! I would resume what a task is in:
A vscode tool and feature! That allow us to setup tasks based on tools and scripts and run them within vscode! Analyse there output within vscode! And activating and profiting from other vscode features! That includes Click link navigation on terminal! And problems listing on problem tab! Auto fixing and suggestions! Integration with the debugging tool! …etc! It depends on the task type!

A task get set through a setting file (task.json)! For a workspace or the whole user! (Some tasks types need to be set for only a workspace! They depends on the variables of a workspace)!
Also the task feature contains a lot of options and features! And is a big piece! For more just check the documentation!
Back to our problem!
We want linting of a whole project! And errors detection!
We need to have the errors listed on the problems tab! And preferably too with fixes suggestions!
All this gonna be done through a task.
Setting up the task! And core elements
Through vscode task features and integration! We need to configure it to allow good output! And integration with the problems tab!
The config will go as such:
{
  // See https://go.microsoft.com/fwlink/?LinkId=733558
  // for the documentation about the tasks.json format
  "version": "2.0.0",
  "tasks": [
    {
      "type": "npm",
      "script": "lint",
      "problemMatcher": ["$eslint-stylish"]
    }
  ]
}
(Here eslint through npm run lint)
The most important thing here to see! Is the type which determine the category and the task handling and launch setup! The script which define what get executed! And lastly and importantly problemMatcher!
For the whole tasks setting up! And options you can check the doc!
Here another example for typescript:
{
  // See https://go.microsoft.com/fwlink/?LinkId=733558
  // for the documentation about the tasks.json format
  "version": "2.0.0",
  "tasks": [
    {
      "type": "typescript",
      "tsconfig": "tsconfig.json",
      "problemMatcher": ["$tsc"],
      "group": {
        "kind": "build",
        "isDefault": true
      }
    }
  ]
}
TSLINT is deprecated
Yo ! You just shown how, a line above! Yea there is something important!
We can see typescript problems through tsc compile process! Or Through TSLINT! TSLINT will support code style rules and so on! BUT mmmm TSLINT is deprecated! And ESLINT is taking on! And in simple words use Eslint! And so we can use Eslint for Typescript! And that can be more rich!
Check the link bellow from the official link:
https://code.visualstudio.com/api/advanced-topics/tslint-eslint-migration
And humor face: Don’t be affraid to do this

Already did!
Should i migrate Tslint to eslint
Another reason would be: TSLint is a linter that can only be used for TypeScript, while ESLint supports both JavaScript and TypeScript.
Reason for the choice and deprecation is:
In the TypeScript 2019 Roadmap, the TypeScript core team explains that ESLint has a more performant architecture than TSLint and that they will only be focusing on ESLint when providing editor linting integration for TypeScript.
Check it here and how to setup .eslintrc.js without the migration tool!
or https://www.npmjs.com/package/@typescript-eslint/eslint-plugin
Which in short would be like:
module.exports = {
  "parser": "@typescript-eslint/parser", // set eslint parser
   "parserOptions": {
       "ecmaVersion": 12, // latest ecma script features
       "sourceType": "module" // Allows for the use of imports
   },
   "plugins": [
       "@typescript-eslint"
   ],
  extends: [
    "plugin:@typescript-eslint/recommended" // Uses the recommended rules from the @typescript-eslint/eslint-plugin
  ],
  rules: {
    // Place to specify ESLint rules. Can be used to overwrite rules specified from the extended configs
    // e.g. "@typescript-eslint/explicit-function-return-type": "off",
  }
};
And sure : npm install --save-dev eslint @typescript-eslint/parser @typescript-eslint/eslint-plugin
Make sure to use
eslint --ext .js,.tswhen executing eslint! Since by default eslint will only search for .js files.
Make sure to use the code styles versions that support typescript like this one for airbnb:
https://www.npmjs.com/package/eslint-config-airbnb-typescript
(The next section is the most important)!
Processing task output with problem matchers
https://code.visualstudio.com/docs/editor/tasks#_processing-task-output-with-problem-matchers
VS Code can process the output from a task with a problem matcher. Problem matchers scan the task output text for known warning or error strings, and report these inline in the editor and in the Problems panel. VS Code ships with several problem matchers ‘in-the-box’:
- TypeScript:
$tscassumes that file names in the output are relative to the opened folder. - TypeScript Watch:
$tsc-watchmatches problems reported from the tsc compiler when executed in watch mode. - JSHint:
$jshintassumes that file names are reported as an absolute path. - JSHint Stylish:
$jshint-stylishassumes that file names are reported as an absolute path. - ESLint Compact:
$eslint-compactassumes that file names in the output are relative to the opened folder. - ESLint Stylish:
$eslint-stylishassumes that file names in the output are relative to the opened folder. - Go:
$gomatches problems reported from the go compiler. Assumes that file names are relative to the opened folder. - CSharp and VB Compiler:
$mscompileassumes that file names are reported as an absolute path. - Lessc compiler:
$lesscassumes that file names are reported as absolute path. - Node Sass compiler:
$node-sassassumes that file names are reported as an absolute path.
OK but you said JAVA, C/C++, PHP, Python …
=> We need to write our own problemMatcher
C/C++ (GCC)
The c/c++ support in vscode is added through the official ms extension ms-vscode.cpptools
https://marketplace.visualstudio.com/items?itemName=ms-vscode.cpptools
The extension provide $gcc problemMatcher!
A task will go as:
{
  "version": "2.0.0",
  "tasks": [
    {
      "type": "shell",
      "label": "g++ build all",
      "command": "/usr/bin/g++",
      "args": ["${workspaceFolder}/src/*.cpp", "-o", "${workspaceFolder}/build"],
      "options": {
        "cwd": "/usr/bin"
      },
      "problemMatcher": ["$gcc"],
      "group": {
        "kind": "build",
        "isDefault": true
      }
    }
  ]
}
Note that i just made the compilation to go for files in src (one level)
One can use cmake to build!
May like to check :
https://code.visualstudio.com/docs/cpp/config-linux#_build-helloworldcpp
Defining a problem matcher
You can check the doc section bellow:
https://code.visualstudio.com/docs/editor/tasks#_defining-a-problem-matcher
An example for gcc was given for c/c++!
A compilation outcome will be like:
helloWorld.c:5:3: warning: implicit declaration of function ‘prinft’
We set a matcher by the following
{
  // The problem is owned by the cpp language service.
  "owner": "cpp",
  // The file name for reported problems is relative to the opened folder.
  "fileLocation": ["relative", "${workspaceFolder}"],
  // The actual pattern to match problems in the output.
  "pattern": {
    // The regular expression. Example to match: helloWorld.c:5:3: warning: implicit declaration of function ‘printf’ [-Wimplicit-function-declaration]
    "regexp": "^(.*):(\d+):(\d+):\s+(warning|error):\s+(.*)$",
    // The first match group matches the file name which is relative.
    "file": 1,
    // The second match group matches the line on which the problem occurred.
    "line": 2,
    // The third match group matches the column at which the problem occurred.
    "column": 3,
    // The fourth match group matches the problem's severity. Can be ignored. Then all problems are captured as errors.
    "severity": 4,
    // The fifth match group matches the message.
    "message": 5
  }
}
Directly in the task config that can go as:
{
  "version": "2.0.0",
  "tasks": [
    {
      "label": "build",
      "command": "g++",
      "args": ["${workspaceFolder}/src/*.cpp", "-o", "${workspaceFolder}/build"],
      "problemMatcher": {
        "owner": "cpp",
        "fileLocation": ["relative", "${workspaceFolder}"],
        "pattern": {
          "regexp": "^(.*):(\d+):(\d+):\s+(warning|error):\s+(.*)$",
          "file": 1,
          "line": 2,
          "column": 3,
          "severity": 4,
          "message": 5
        }
      }
    }
  ]
}
You can see how staight forward the setting is!
You can check the doc link above for more details!
Defining multiple line problem matcher
https://code.visualstudio.com/docs/editor/tasks#_defining-a-multiline-problem-matcher
Some tools spread problems found in a source file over several lines, especially if stylish reporters are used. An example is ESLint; in stylish mode it produces output like this:
test.js
  1:0   error  Missing "use strict" statement                 strict
✖ 1 problems (1 errors, 0 warnings)
I’ll not go about the details check the doc! it explains it well (check the loop property too!
{
  "owner": "javascript",
  "fileLocation": ["relative", "${workspaceFolder}"],
  "pattern": [
    {
      "regexp": "^([^\s].*)$",
      "file": 1
    },
    {
      "regexp": "^\s+(\d+):(\d+)\s+(error|warning|info)\s+(.*)\s\s+(.*)$",
      "line": 1,
      "column": 2,
      "severity": 3,
      "message": 4,
      "code": 5,
      "loop": true
    }
  ]
}
Modifying an existing problem matcher
https://code.visualstudio.com/docs/editor/tasks#_modifying-an-existing-problem-matcher
Simply check the doc!
JAVA
oK now we know, how to make problems matchers! We didn’t do java yet! So let’s do that for it! (Wait i just googled and here someone that did it)
{
    // compiles all files in the folder of the currently opened file
    "taskName": "javac all",
    "args": ["$env:CLASSPATH += ';${fileDirname}'; javac ${fileDirname}\*.java -Xlint"],
    "showOutput": "silent",
    "problemMatcher": {
        "owner": "java",
        "fileLocation": "absolute",
        "pattern": {
            "regexp": "^(.*):([0-9]+): (error|warning): (.*)$",
            "file": 1,
            "line": 2,
            "severity": 3,
            "message": 4
        }
    }
}
PHP
Here a php task too that use code sniff!
src (googling again): https://github.com/bmewburn/vscode-intelephense/issues/1102
{
  "version": "2.0.0",
  "tasks": [
    {
      "label": "PHP: CodeSniff Workspace",
      "type": "shell",
      "command": "${config:phpcs.executablePath}",
      "args": [
        "--standard=${config:phpcs.standard}",
        "--extensions=module,inc,install,php,theme,test,js,css",
        "--report=csv",
        "--basepath=${workspaceFolder}",
        "web/modules/custom"
      ],
      "options": {
        "cwd": "${workspaceFolder}"
      },
      "problemMatcher": {
        "owner": "php",
        "fileLocation": [
          "relative",
          "${workspaceFolder}"
        ],
        "pattern": {
          "regexp": "^"(.*?)",(\d+),(\d+),(error|warning),"(.*)",.*$",
          "file": 1,
          "line": 2,
          "column": 3,
          "severity": 4,
          "message": 5
        }
      }
    }
  ]
}
Problem matcher and auto fixing
Ok so how the problem matcher make the auto fixing suggestions? The answer is it doesn’t! It can be clear! Or you may said at the first time you get to see the problem matcher, hey it may have a relation!
It isn’t! The languages support or linters extensions are what provide such a feature! And that through using vscode Action api!
Check
https://code.visualstudio.com/api/references/vscode-api#CodeAction
https://code.visualstudio.com/api/references/vscode-api#CodeActionKind
https://code.visualstudio.com/api/references/vscode-api#CodeActionProvider%3CT%3E
So simply: The problemMatcher set how the output of a task run is parsed and outputed on the problems tab!
And the languages support extension implement the auto fixes! Or linters! (Extensions) [I can make a play ground extension if i want]!
To note too that the yellow bulbe in the problems tab! Works and allow auto fixing! Because the problem matcher provide the line for the problem! That get mapped with the output of the extension fixing suggestions range! That get precised on the CodeActionProvider!
| title | description | ms.date | ms.topic | f1_keywords | dev_langs | helpviewer_keywords | ms.assetid | author | ms.author | manager | ms.technology | ms.workload | |||||||||||||||||||||
|---|---|---|---|---|---|---|---|---|---|---|---|---|---|---|---|---|---|---|---|---|---|---|---|---|---|---|---|---|---|---|---|---|---|
|
Manage exceptions with the debugger | Microsoft Docs |
Learn how to specify which exceptions the debugger breaks on, at which point you want the debugger to break, and how breaks are handled. |
01/23/2023 |
how-to |
|
|
|
43a77fa8-37d0-4c98-a334-0134dbca4ece |
mikejo5000 |
mikejo |
jmartens |
vs-ide-debug |
multiple |
Manage exceptions with the debugger in Visual Studio
[!INCLUDE Visual Studio]
An exception is an indication of an error state that occurs while a program is being executed. You can tell the debugger which exceptions or sets of exceptions to break on, and at which point you want the debugger to break (that is, pause in the debugger). When the debugger breaks, it shows you where the exception was thrown. You can also add or delete exceptions. With a solution open in Visual Studio, use Debug > Windows > Exception Settings to open the Exception Settings window.
Provide handlers that respond to the most important exceptions. If you need to know how to add handlers for exceptions, see Fix bugs by writing better C# code. Also, learn how to configure the debugger to always break execution for some exceptions.
When an exception occurs, the debugger writes an exception message to the Output window. It may break execution in the following cases when:
- An exception is thrown that isn’t handled.
- The debugger is configured to break execution before any handler is invoked.
- You have set Just My Code, and the debugger is configured to break on any exception that isn’t handled in user code.
[!NOTE]
ASP.NET has a top-level exception handler that shows error pages in a browser. It doesn’t break execution unless Just My Code is turned on. For an example, see Tell the debugger to continue on user-unhandled exceptions below.
[!NOTE]
In a Visual Basic application, the debugger manages all errors as exceptions, even if you use On Error-style error handlers.
Tell the debugger to break when an exception is thrown
The debugger can break execution at the point where an exception is thrown, so you may examine the exception before a handler is invoked.
In the Exception Settings window (Debug > Windows > Exception Settings), expand the node for a category of exceptions, such as Common Language Runtime Exceptions. Then select the check box for a specific exception within that category, such as System.AccessViolationException. You can also select an entire category of exceptions.
::: moniker range=»<=vs-2019″

::: moniker-end
::: moniker range=»>=vs-2022″

::: moniker-end
[!TIP]
You can find specific exceptions by using the Search window in the Exception Settings toolbar, or use search to filter for specific namespaces (such as System.IO).
If you select an exception in the Exception Settings window, debugger execution will break wherever the exception is thrown, no matter whether it’s handled. Now the exception is called a first chance exception. For example, here are a couple of scenarios:
-
In the following C# console application, the Main method throws an AccessViolationException inside a
try/catchblock.static void Main(string[] args) { try { throw new AccessViolationException(); Console.WriteLine("here"); } catch (Exception e) { Console.WriteLine("caught exception"); } Console.WriteLine("goodbye"); }
If you have AccessViolationException checked in Exception Settings, execution will break on the
throwline when you run this code in the debugger. You can then continue execution. The console should display both lines:but it doesn’t display the
hereline. -
A C# console application references a class library with a class that has two methods. One method throws an exception and handles it, while a second method throws the same exception but doesn’t handle it.
public class Class1
{
    public void ThrowHandledException()
    {
        try
        {
            throw new AccessViolationException();
        }
        catch (AccessViolationException ave)
        {
            Console.WriteLine("caught exception" + ave.Message);
        }
    }

    public void ThrowUnhandledException()
    {
        throw new AccessViolationException();
    }
}
Here’s the Main() method of the console application:
static void Main(string[] args)
{
    Class1 class1 = new Class1();
    class1.ThrowHandledException();
    class1.ThrowUnhandledException();
}
If you have AccessViolationException checked in Exception Settings, execution will break on the
throwline in both ThrowHandledException() and ThrowUnhandledException() when you run this code in the debugger.
To restore the exception settings to the defaults, choose the Restore the list to the default settings button:
::: moniker range=»<=vs-2019″

::: moniker-end
::: moniker range=»>=vs-2022″

::: moniker-end
Tell the debugger to continue on user-unhandled exceptions
If you are debugging .NET or JavaScript code with Just My Code, you can tell the debugger to prevent breaking on exceptions that aren’t handled in user code but are handled elsewhere.
-
In the Exception Settings window, open the shortcut menu by right-clicking a column label, and then select Show Columns > Additional Actions. (If you’ve turned off Just My Code, you won’t see this command.) A third column named Additional Actions appears.
::: moniker range=»<=vs-2019″

::: moniker-end
::: moniker range=»>=vs-2022″
::: moniker-end
For an exception that shows Continue when unhandled in user code in this column, the debugger continues if that exception isn’t handled in user code but is handled externally.
-
To change this setting for a particular exception, select the exception, right-click to show the shortcut menu, and select Continue When Unhandled in User Code. You may also change the setting for an entire category of exceptions, such as the entire Common Language Runtime exceptions).
::: moniker range=»<=vs-2019″
::: moniker-end
::: moniker range=»>=vs-2022″
::: moniker-end


For example, ASP.NET web applications handle exceptions by converting them to an HTTP 500 status code (Exception handling in ASP.NET Web API), which may not help you determine the source of the exception. In the example below, the user code makes a call to String.Format() that throws a xref:System.FormatException. Execution breaks as follows:

Add and delete exceptions
You can add and delete exceptions. To delete an exception type from a category, select the exception, and choose the Delete the selected exception from the list button (the minus sign) on the Exception Settings toolbar. Or you may right-click the exception and select Delete from the shortcut menu. Deleting an exception has the same effect as having the exception unchecked, which is that the debugger won’t break when it’s thrown.
To add an exception:
-
In the Exception Settings window, select one of the exception categories (for example, Common Language Runtime).
-
Choose the Add an exception to the selected category button (the plus sign).
::: moniker range=»<=vs-2019″
::: moniker-end
::: moniker range=»>=vs-2022″
::: moniker-end
-
Type the name of the exception (for example, System.UriTemplateMatchException).
::: moniker range=»<=vs-2019″
::: moniker-end
::: moniker range=»>=vs-2022″
::: moniker-end
The exception is added to the list (in alphabetical order) and automatically checked.


To add an exception to the GPU Memory Access Exceptions, JavaScript Runtime Exceptions, or Win32 Exceptions categories, include the error code and the description.
[!TIP]
Check your spelling! The Exception Settings window doesn’t check for the existence of an added exception. So if you type Sytem.UriTemplateMatchException, you’ll get an entry for that exception (and not for System.UriTemplateMatchException).
Exception settings are persisted in the solution’s .suo file, so they apply to a particular solution. You can’t reuse specific exception settings across solutions. Now only added exceptions are persisted; deleted exceptions aren’t. You may add an exception, close and reopen the solution, and the exception will still be there. But if you delete an exception and close/reopen the solution, the exception will reappear.
The Exception Settings window supports generic exception types in C# but not in Visual Basic. To break on exceptions like MyNamespace.GenericException<T>, you must add the exception as MyNamespace.GenericException`1. That is, if you’ve created an exception like this code:
public class GenericException<T> : Exception
{
    public GenericException() : base("This is a generic exception.")
    {
    }
}
You can add the exception to Exception Settings using the previous procedure:
::: moniker range=»<=vs-2019″

::: moniker-end
::: moniker range=»>=vs-2022″

::: moniker-end
Add conditions to an exception
Use the Exception Settings window to set conditions on exceptions. Currently supported conditions include the module name(s) to include or exclude for the exception. By setting module names as conditions, you can choose to break for the exception only on certain code modules. You may also choose to avoid breaking on particular modules.
[!NOTE]
Adding conditions to an exception is supported starting in [!includevs_dev15].
To add conditional exceptions:
-
Choose the Edit conditions button in the Exception Settings window, or right-click the exception and choose Edit Conditions.
-
To add extra required conditions to the exception, select Add Condition for each new condition. Additional condition lines appear.
-
For each condition line, type the name of the module, and change the comparison operator list to Equals or Not Equals. You may specify wildcards (*) in the name to specify more than one module.
-
If you need to delete a condition, choose the X at the end of the condition line.


See also
- Continue execution after an exception
- How to: Examine system code after an exception
- How to: Use native run-time checks
- First look at the debugger
Отладка кода в Visual Studio происходит довольно просто, если сравнивать этот процесс с другими IDE. Плюс отладчик Visual Studio обладает довольно широкими возможностями и позволяет отлаживать различные технологии, а если имеющихся средств не хватает, то можно воспользоваться дополнениями.
Отладка кода — это один из самых важных процессов. Без отладки в свет не выходит ни одно нормальное приложение. Потому что, независимо от опыта разработчика, код не всегда работает так, как нужно. А иногда и вообще работает совершенно не так. Вот тут как раз и приходит на помощь отладчик, который позволит разобраться, что не так, и найти изъяны. Можно, конечно, много часов провести за самостоятельным выявлением багов, но отладчиком все-таки быстрее и проще.
В то же время отладка кода — это не волшебная палочка, которая быстренько найдет и исправит все недочеты вашего кода. Отладка — это процесс, при котором код пошагово выполняется в некой программе, например, в Visual Studio. В процессе выполнения идет поиск точек, где вы могли допустить ошибку. А вы в это время можете анализировать свой код и вносить необходимые правки для устранения «косяков».
Работа с отладчиком, даже с таким простым, как Visual Studio, требует определенных знаний и понимания, что там внутри происходит. Умение работать с отладчиком вам в любом случае пригодится, если вы хотите связать свою жизнь с разработкой ПО. В этой статье мы ознакомим вас с процессом отладки при помощи Visual Studio.
Отладка кода в Visual Studio
Перед стартом отладки вашего кода не лишним было бы для себя выяснить, существует ли какая-то проблема с вашим кодом? Для чего вам нужна отладка? Если есть какие-то проблемы в работе вашего ПО и вы хотите найти их, используя отладчик Visual Studio, нужно понять, в чем суть проблемы. Возможно, есть проблемы, которые отладчик не определит, например:
- орфографические ошибки или опечатки,
- неправильно подключенные API,
- неправильное размещение последних корректировок в код,
- и др.
В принципе, все ошибки возможно будет увидеть уже в процессе работы отладчика. При его работе активно мониторится все, что происходит с вашим ПО. А то, что вы можете в любой точке остановить отладку, дает вам возможность более детально рассмотреть состояние вашего приложения и в нужный момент перейти в построчное изучение кода.
Прежде чем запускать отладчик Visual Studio, не лишним будет проверить код редактором кода и визуально оценить. Нужно искать «красные» и «зеленые»линии. «Красные» линии — это ошибки. «Зеленые» — предупреждения. Это могут быть:
- ошибка компиляции;
- ошибка преобразования типа;
- код не поддерживает синтаксис;
- и др.
«Красные» волнистые линии нужно исправить — это поможет в дальнейшем уменьшить количество ошибок, найденных Visual Studio. А зеленые, если не получается исправить, то по крайней мере нужно тщательно изучить.
Как запустить отладчик Visual Studio
Чтобы запустить отладчик Visual Studio, нужно:
- Запустить саму программу Visual Studio.
- Открыть код приложения, который необходимо отладить.
- Потом при помощи нажатия клавиши «F5» запустить режим отладки. Также это можно сделать через меню, если нажать «Отладка», а потом «Начать отладку».
Начнется процесс отладки. При возникновении ошибок отладчик Visual Studio покажет вам строку их проявления и предоставит вам информацию о том, что произошло. Для более точного изучения кода вы можете расставить точки останова. Это те точки в коде, где отладчик Visual Studio остановит свою работу, а у вас появится возможность детальнее изучить:
последовательность исполнения кода;
работу памяти;
значение переменных и др.
Чтобы создать точку останова в отладчике, нужно кликнуть слева от интересующей вас строки кода или при помощи клавиши «F9».
Бывает такое, что сразу выявить ошибки не получается при помощи отладчика, но приложение все равно не работает корректно. Тогда вам тоже смогут помочь точки останова. Нужно выставить их перед выполнением проблемного кода, а потом запустить отладчик Visual Studio в построчном выполнении программы для детализированного анализа, и тогда баг проявится.
Какая информация выводится отладчиком Visual Studio
Итак, вы выставили несколько точек останова и запустили процесс отладки. На каждой точке останова Visual Studio будет останавливаться. В эти моменты вам будет доступна определенная информация. Чтобы ее просмотреть, нужно кликнуть кнопку «Debug» на панели инструментов и найти «Windows». Получите бонус от Пин ап казино 100% от первого депозита с вейджером отыгрыша x35 на 72 часа! Только на официальном сайте Pin Up лучшие игровые автоматы, рулетка и живые диллеры.
Там вам будет доступна следующая информация:
- Breakpoints. Тут собраны сведения о ваших точках останова.
- Output. Здесь выводятся служебные сообщения от самой Visual Studio.
- Watch. Здесь расположены переменные, за которыми вы наблюдаете в коде; внести их можно только вручную.
- Autos. Здесь находится список переменных, с которыми прямо сейчас проводится работа.
- Locals. Здесь выводятся все локальные переменные.
- Immediate. Здесь выводятся переменные, которые вы требуете.
- Call Stack. Здесь расположен список вызываемых функций.
- Threads. Тут выводится информация об уже стартовавших потоках вашего приложения.
- Modules. Отображаются все загруженные модули.
- Processes. Отображаются процессы модулей.
- Memory. Отображается память рассматриваемых модулей.
- Disassembly. Тут можно увидеть, как отображается ваш код на языке более высокого уровня.
- Registers. Выводится регистр значения.
В заключение
Отладка в Visual Studio дает возможность довольно быстро решить проблемы с вашим кодом. Да, без определенных знаний и понимания запустить и понять отладчик Visual Studio будет нелегко, но с опытом все станет понятнее. В разработке без отладки кода — путь в никуда, потому что стабильность работы приложения — это залог его качества. И если на самом старте разработки игнорировать этот процесс, то нет смысла идти дальше.
I’ve been using Visual Studio (2017) for quite a long time now, to program mostly in C#, for Unity games. Recently though, I noticed that it was not displaying any errors in the code anymore, or at least most of them. I initially started making some small tests, for example removing variables that were being used multiple times in the scripts. Visual Studio was not showing any errors, while when going back to Unity, it was showing all the correct errors in the console (as always). Instead, if I tried to remove a parenthese, it was, after a bit, showing errors all over the place. Again, it was really strange.
After one day, I was still testing, and I noticed that if I first opened Visual Studio, and then in «recent» I clicked on the the .sln file, that opened all the scripts for one Unity project, it was immediately showing all the right errors, like it had always done and how (I think) it should always do. I started looking for some differences between what I was seeing there, and what I was seeing when opening the .cs files (in the way that wasn’t working):
- At the top, I wasn’t seeing «Debug» and «Any CPU» how I was when it was working:


-
Another thing was that, between the «Project» and the «Debug» buttons (at the top, that open the drop-down lists), I didn’t have the «Compile» button.
-
Also, under the the «Debug» drop-down many options like «start debug» were not available / disabled.
-
At the top left, under the left-most script name, I have «External files» instead of «Assembly-CSharp»
-
At the right of where there should be «Debug» and «Any CPU», I have «Connect» instead of «Start» (Or something similar, my system’s language is not english, these are translations)
Another (maybe less relevant) thing that has changed from before, when it was working:
- I have installed Visual Studio 2019, and uninstalled after a few minutes (I’ve always preferred Visual Studio 2017!).
Programming without seeing the errors realtime takes much more time, so I’d really like to fix this problem, if it is possible to do so. Is there anything that I have to activate? Did I accidentally press a combination of keys?
Thanks in advance! 
I’ve been using Visual Studio (2017) for quite a long time now, to program mostly in C#, for Unity games. Recently though, I noticed that it was not displaying any errors in the code anymore, or at least most of them. I initially started making some small tests, for example removing variables that were being used multiple times in the scripts. Visual Studio was not showing any errors, while when going back to Unity, it was showing all the correct errors in the console (as always). Instead, if I tried to remove a parenthese, it was, after a bit, showing errors all over the place. Again, it was really strange.
After one day, I was still testing, and I noticed that if I first opened Visual Studio, and then in «recent» I clicked on the the .sln file, that opened all the scripts for one Unity project, it was immediately showing all the right errors, like it had always done and how (I think) it should always do. I started looking for some differences between what I was seeing there, and what I was seeing when opening the .cs files (in the way that wasn’t working):
- At the top, I wasn’t seeing «Debug» and «Any CPU» how I was when it was working:
-
Another thing was that, between the «Project» and the «Debug» buttons (at the top, that open the drop-down lists), I didn’t have the «Compile» button.
-
Also, under the the «Debug» drop-down many options like «start debug» were not available / disabled.
-
At the top left, under the left-most script name, I have «External files» instead of «Assembly-CSharp»
-
At the right of where there should be «Debug» and «Any CPU», I have «Connect» instead of «Start» (Or something similar, my system’s language is not english, these are translations)
Another (maybe less relevant) thing that has changed from before, when it was working:
- I have installed Visual Studio 2019, and uninstalled after a few minutes (I’ve always preferred Visual Studio 2017!).
Programming without seeing the errors realtime takes much more time, so I’d really like to fix this problem, if it is possible to do so. Is there anything that I have to activate? Did I accidentally press a combination of keys?
Thanks in advance!
Далеко не всегда удается писать код абсолютно без ошибок. Если ошибки компиляции нам помогает отловить компилятор, то с ошибками логики дело обстоит немного сложнее. Как узнать, почему какая-то переменная не изменяется или почему результат выполнения какого-то кода не такой, как вы ожидали? Все это сложно, если в вас нет мощного средства отладки программы, а в Visual Studio средства отладки достаточно мощные, чтобы найти любые ошибки.
Данный документ показывает примеры отладки программ на примере среды разработки Microsoft Visual C# Express Edition. Это базовая поставка среды разработки, которая доступна бесплатно. Уже в ней заложены мощные средства отладки приложений, так что в платных версиях вы сможете найти все то же самое.
Давайте создадим новое приложение, на примере которого и будем рассматривать отладку. Нам все равно, какого типа оно будет — консольное или с визуальным интерфейсом. Я решил выбрать WinForms приложение. На поверхность формы я поместил кнопку и по событию Click для кнопки написал следующий код:
 private void button1_Click(object sender, EventArgs e)
 {
   int x = 10;
   int y = 15;
   x = Double(x);
   x = x / (y - 15);
   MessageBox.Show(x.ToString());
 }
В этом коде в третьей строке происходит вызов метода Double. Это не какой-то стандартный метод, его нужно написать в коде формы:
 int Double(int x)
 {
   return x * 2;
 }
Полный исходный код формы будет выглядеть следующим образом:
using System;
using System.Collections.Generic;
using System.ComponentModel;
using System.Data;
using System.Drawing;
using System.Linq;
using System.Text;
using System.Windows.Forms;

namespace WindowsFormsApplication1
{
    public partial class Form1 : Form
    {
        // конструктор
        public Form1()
        {
            InitializeComponent();
        }

        // обработчик события Click для кнопки
        private void button1_Click(object sender, EventArgs e)
        {
            int x = 10;
            int y = 15;
            x = Double(x);
            x = x / (y - 15);
            MessageBox.Show(x.ToString());
        }

        // наш метод Double
        int Double(int x)
        {
            return x * 2;
        }
    }
}
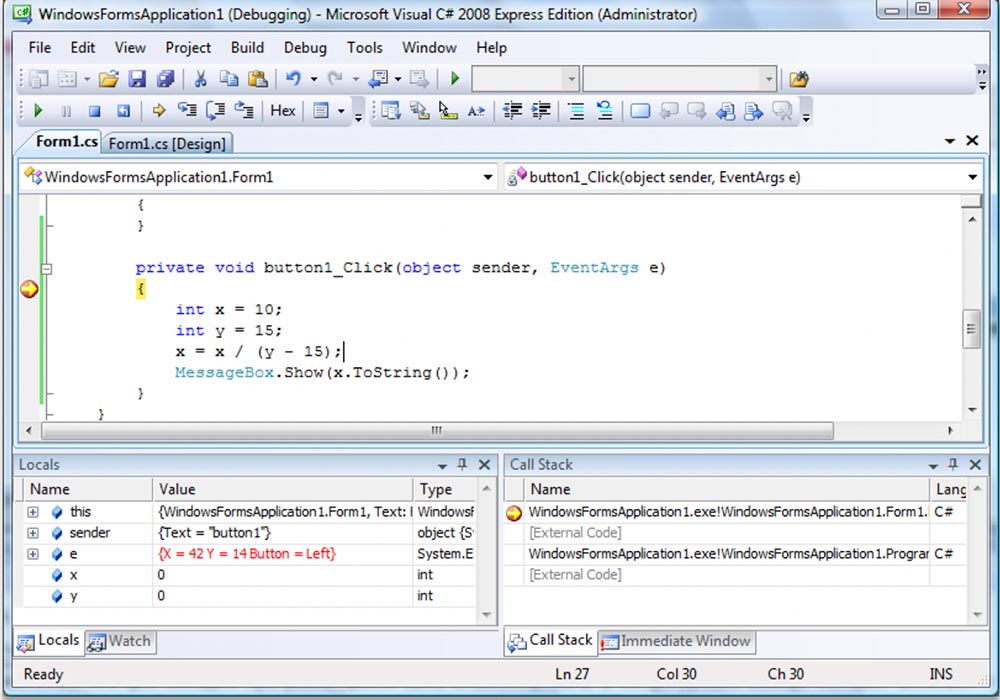
Если запустить программу из среды разработки и нажать на кнопку, то выполнение программы переключится на среду разработки и вы увидите сообщение об ошибке:
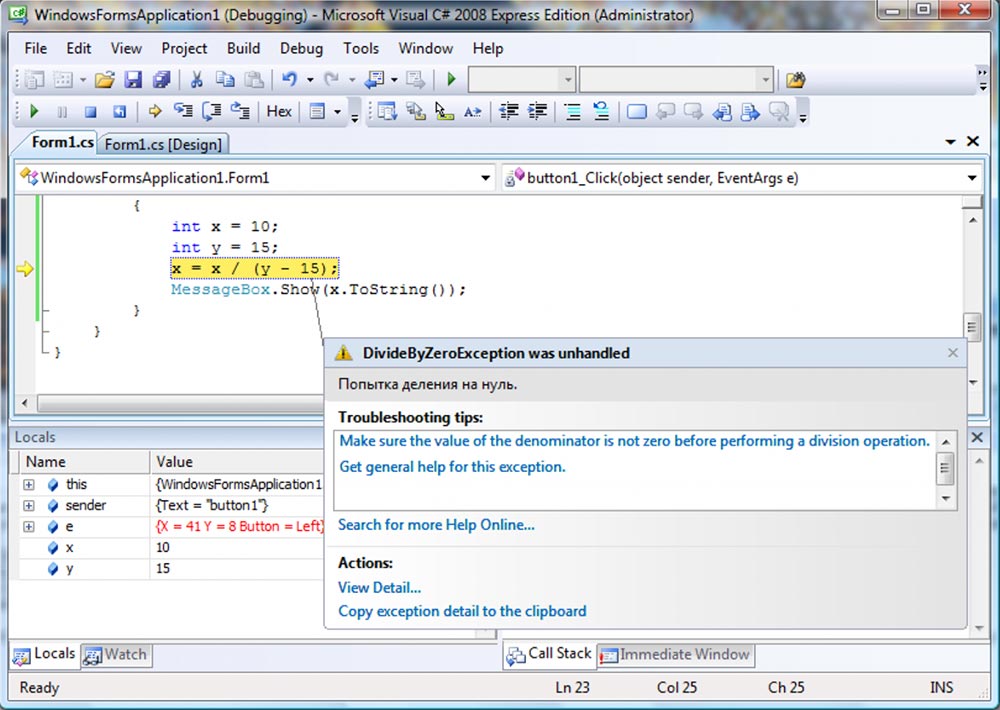
Произошла ошибка, и среда разработки взяла управление на себя, чтобы вы смогли просмотреть информацию об ошибке и попробовали определить ее источник. В редакторе кода желтым цветом выделена строка кода, в которой и произошла ошибка. От этой строки идет стрелка к всплывающему окну, в котором исключительная ситуация описана более подробно.
Название ошибки можно увидеть в заголовке всплывающего окна. Чуть ниже под заголовком находится описание ошибки. Нам повезло, потому что оно написано на русском и сразу понятно, что произошло деление на ноль:
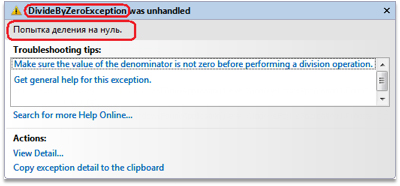
В списке Troubleshooting tips этого окна можно увидеть возможные подсказки, которые могут помочь вам найти возможное решение. В данном случае проблема проста и с ней можно разобраться без дополнительных советов, потому что в строке произошло деление на ноль и наша задача добавить перед выполнением кода проверку, которая предотвратит деление на 0. В данном случае, нужно проверить, чтобы переменная y не была равна 15:
 int x = 10;
 int y = 15;

 if (y == 15)
   MessageBox.Show("Переменная y не должна быть равна 15 ");

 x = x / (y - 15);
 MessageBox.Show(x.ToString());
Но определение ошибки далеко не всегда так легко определимо. Бывают случаи, когда нужно пройти программу пошагово, строчка за строчкой, в поисках уязвимого места, которое привело к проблеме. Давайте попробуем пройти программу пошагово. Проходить всю программу шаг за шагом проблематично, потому что очень многое происходить за кулисами, в том числе и обработка событий, а большой проект проходить шаг за шагом вообще подобно самоубийству. Поэтому чаще всего заранее определяется блок кода, который нужно проанализировать. В нашем случае этим блоком кода будет обработчик события Click для кнопки.
Конфигурация компиляции
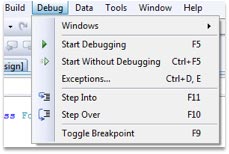
Для того, чтобы отладка программы была доступна, программа должна быть еще запущена в режиме отладки и из среды разработки. Простое нажатие клавиши F5 как раз запускает программу в отладочном режиме. Чтобы запустить программу без возможности отладки, нужно нажать Ctrl+F5. Соответствующие пункты меню можно найти в меню Debug:
- Debug | Start Debugging запустить в режиме отладки
- Debug | Start Without Debugging запустить в режиме выполнения и без возможности отладки
Тут нужно заметить, что для отладки программа должна быть скомпилирована в конфигурации Debug, которая включает в исполняемый файл дополнительную информацию, необходимую при отладке программы. Конфигурацию можно выбрать на панели инструментов чуть правее кнопки запуска программы. На следующем снимке соответствующий выпадающий список окрашен красным цветом:

В версии Microsoft Visual C# Express Edition данный выпадающий список недоступен, а отладочная информация попадает в исполняемый файл. В версии Visual Studio Standard и более полных вариантах данный выпадающий список будет содержать конфигурации Debug и Release. Вы должны будете выбрать первый пункт. Вы можете создавать и свои конфигурации, но это уже тема отдельного разговора.
Точки останова
Итак, нам нужно отладить метод и мы сделаем это с самого начала. Для этого нужно поставить точку прерывания в нужном нам месте. Точка прерывания — это точка в коде программы, при достижении которой выполнение программы будет прервано и управление будет передано среде разработки.
Вы можете создавать точки останова в любом месте программы, но только там, где есть код и программа может прервать выполнение. Для создания точки перейдите на нужную строку и:
- — нажмите F9
- — выберите меню Debug | Toggle Breakpoint
- — дважды щелкните на полоске серого цвета, слева от строки текста в окне редактора кода
Напротив строки на полоске серого цвета слева от текста появиться красный кружок, символизирующий, что здесь стоит точка останова. Если еще раз попытаться поставить точку останова на этой же строке, то точка останова будет снята.
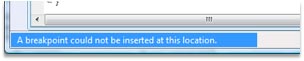
Если точку на текущей строке установить нельзя, то в строке состояния среды разработки появиться соответствующее сообщение:
Так как мы отлаживаем метод с самого начала, то поставьте курсор на строку с именем метода и нажмите F9. Теперь можно запускать программу. Кстати, запустить программу можно было и раньше, потому что точку останова можно ставить в любой момент, даже во время выполнения программы.
Запустите программу и нажмите на кнопку. После нажатия кнопки должен сработать метод button1_Click (у вас он может называться по-другому), на который я поставил обработчик события. Так как мы поставили точку останова, среда разработки перехватит на себя выполнение и выделит оператор, который можно выполнить следующим шагом желтым цветом (назовем эту точку курсором пошагового выполнения программы):
Обратите внимание, что выделена строка с символом открывающейся фигурной скобки. Это потому, что выполнение метода начинается именно с фигурной скобки, а не с имени, где мы поставили точку останова. Да, точка останова иногда может смещатся, но если вы поставите ее на конкретный оператор, который может быть выполнен, то точка останется там и никуда не поедет.
Внизу окна среды разработки появилось две панели:
- Locals — где в виде списка представлены все переменные, доступные в текущем методе. В этом списке переменные представлены в виде трех колонок:
- Name — название переменной
- Value — значение переменной
- Type — тип
- Call stack — стек вызовов. В этом окне перечислены методы, которые уже были вызваны ранее.
Пошаговое выполнение
Итак, наш курсор пошагового выполнения остановился на какой-то точке и теперь хотим начать тестирование кода. Посмотрим на панель, где появилась новая панелька отладки, там же мы и найдем необходимые команды (в скобках указаны горячие клавиши):

На этой панели можно найти следующие интересные кнопочки:
- Continue (F5) — продолжить выполнение программы.
- Stop debugging (Shift+F5) — остановить отладку. При этом остановится и выполнение программы. Даже больше — ваполнение программы прервется на той точке, на которой сейчас и находиться, т.е. оно не будет завершено корректно и ничего не сохранится, если вы в программе что-то делали.
- Restart (Ctrl+Shift+F5) — перезапустить программу. Выполнение программы будет прервано и запустится заново.
- Show Next Statement (Alt + Num *) — показать следующий оператор, т.е переместить курсор редактора кода в курсор пошагового выполнения. Курсор переместиться в начала оператора, который должен быть выполнен следующим. В редакторе кода он выделен желтым цветом.
- Step Into (F11) — выполнить очередной оператор. Если это метод, то перейти в начало этого метода, чтобы начать отладку. Например, если вы находитесь на строке: x = Double(x) то, курсор пошагового выполнения перейдет на начало метода Double и вы сможете отладить этот метод;
- Step Over (F10) — выполнить очередной оператор. Если это метод, то он будет полностью выполнен, т.е. курсор выполнения не будет входить внутрь метода.
- Step out (Shift + F11) — выйти из метода. Если вы отлаживаете метод и нажмете эту кнопку, то метод выполнится до конца и курсор пошагового выполнения выйдет из метода и остановится на следующей строке после вызова данного метода. Например, если вы отлаживаете метод Double, нашего примера и нажмете эту кнопку, то метод выполнится до конца, а выполнение остановится на строке «x = x / (y — 15);» метода button1_Click.
Попробуйте сейчас пошагово выполнить код метода, нажимая клавишу F10. Потому запустите снова приложение и попробуйте пошагово выполнить его, нажимая клавишу F11. Я могу много рассказывать и описывать тестирование, но пока вы сами не попробуете, вы не поймете смысл и мощь пошагового выполнения. Когда произойдет ошибка, попробуйте прервать работу отладки и приложения, нажав Shift+F5.
Просмотр значений
Выполните пошагово код так, чтобы курсор выполнения остановился на следующей строке:
x = x / (y - 15);
Нам нужно узнать, почему происходит ошибка. Так как ошибка в делении, то нужно просмотреть, на что происходит деление. В данном случае это скобка. Наведите мышкой на открывающуюся или закрывающуюся скобку и вы увидите всплывающую подсказку, в которой находится результат вычисления значения в скобках:
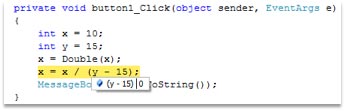
Результат находится после вертикальной черты и он равен нулю. Вы можете наводить мышкой на любую переменную, и отладчик покажет вам ее значение в виде всплывающей подсказки.
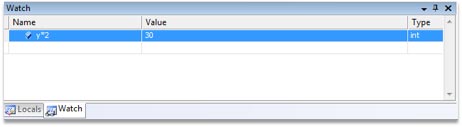
Посмотрите на панель Locals. По идее внизу у вас должны быть еще одна закладка Watch. Переключитесь на нее. Здесь находится список, в который вы можете вносить свои переменные и выражения, за значениями которых вы хотите наблюдать. Выделите первую пустую строку в списке (всегда одна пустая строка присутствует в списке) и в поле Name введите y*2 и нажмите Enter. В поле Value появится значение выражения. После каждого шага выполнения значение переменной будет пересчитано и отображено. Таким образом, вам не нужно после каждого шага наводить на переменную, чтобы узнать ее значение. Оно видно в окне Watch:
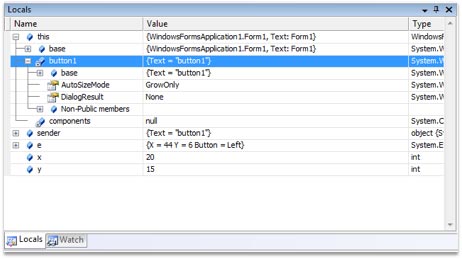
На закладке Locals видны переменные, которые актуальны для данного метода. Сюда включаются переменные, объявленные внутри метода и параметры метода, а так же переменная this.
Параметры представлены в виде дерева для объектных типов данных. Раскрывая дерево объекта this вы можете увидеть значения всех свойств и даже объектов на текущей форме, ведь this всегда указывает на текущий объект, которым является форма:
Заключение
Отладка — это мощное средство поиска любого вида ошибок. Я надеюсь, что этот документ поможет вам разобраться с этим процессом. Да, документ нельзя назвать основательным, но я постарался включить в него все основные нюансы, которые вам могут пригодиться в реальной работе.
Внимание!!! Если ты копируешь эту статью себе на сайт, то оставляй ссылку непосредственно на эту страницу. Спасибо за понимание