Содержание
- Vix error code 21002
- Vix error code 21002
- Vix error code 21002
- Описание ошибки
- Устранение ошибки импорта invalid target disk adapter type: pvscsi
- Vix error code 21002
- Как исправить ошибку с сертификатом
- Vix error code 21002
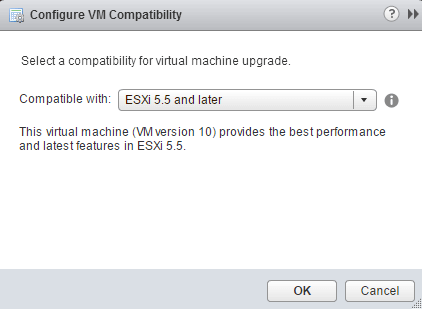
- Что из себя представляет версия виртуальной машины
- Как обновить VM Version Hardware через VMware vSphere Client
- Как обновить VM Version Hardware через VMware Web Client на работающей машине
- Как обновить VM Version Hardware через VMware Web Client на выключенной виртуальной машине
- Как обновить VM Version Hardware до 9 версии или до 10 через PowerCLI
Vix error code 21002

Добрый день! Уважаемые читатели и гости одного из крупнейших блогов по системному администрированию Pyatilistnik.org. В прошлый раз мы с вами разобрали, что такое software reporter tool и как ее использует Google Chrome на вашем компьютере. Сегодня же я хочу вновь поговорить, о гипервизоре ESXI и ситуации, когда я попытался установить виртуальные драйвера Vmware Tools, то получил ошибку «The last operation failed for the entity with the following error message. Error updating Vmware Tools vix error code = 21002«.
Вот так вот выглядит ошибка при попытке смонтировать VMware Tools на одной из виртуальных машин.
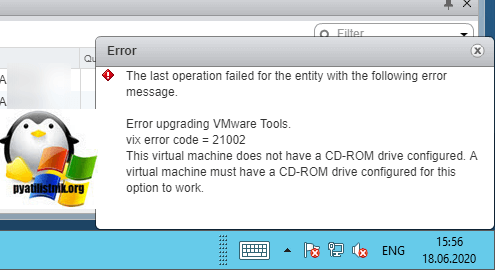
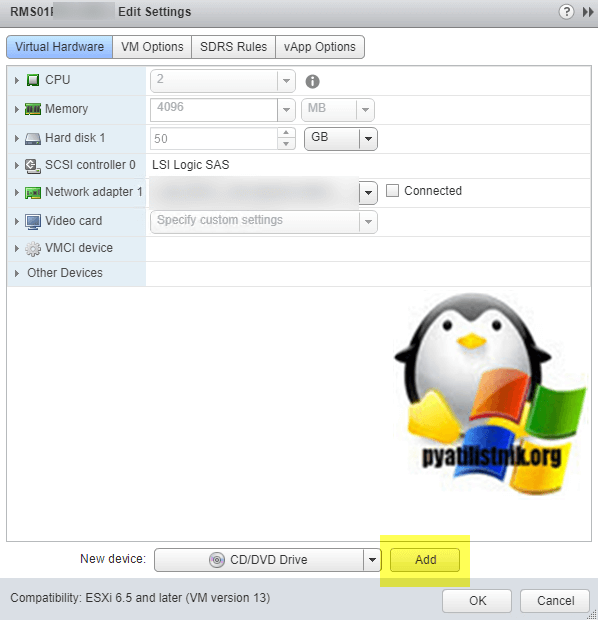
Как оказалось, тут все было очень просто и тривиально. Когда я произвел конвертирование своей физической рабочей станции P2V через VMware Converter, то забыл, что у меня среди оборудования не числился CD-ROM, а раз его нет, то и смонтировать ISO образ с VMware Tools не получиться. Для устранения данной оплошности идем в свойства виртуальной машины. Нажмите «Select» и из всплывающего списка выберите пункт «CD/DVD Drive»

Обязательно нажимаем кнопку «Add» для добавления оборудования и сохраняем настройки.
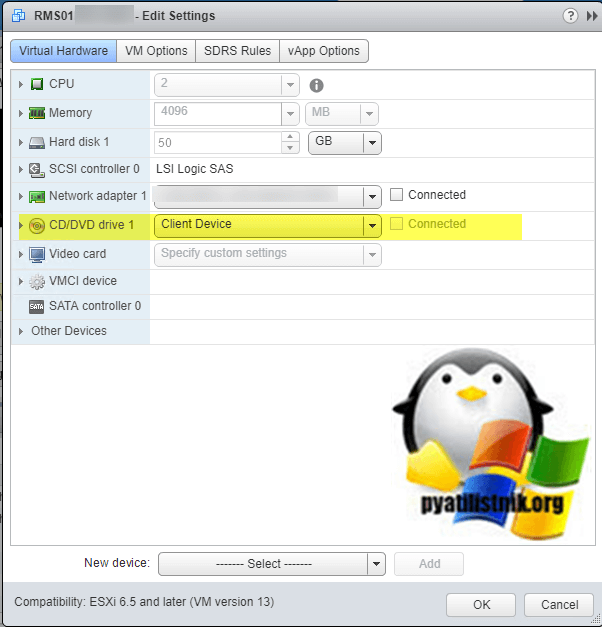
В итоге у вас появится строка CD/DVD drive 1 и при следующей попытке смонтировать VMware Tools вы не получите ошибу «Устранение ошибки Error updating Vmware Tools vix error code = 21002».
Добавить кстати CR-ROM можно и через PowerCLI, для этого выполните команду:
Источник
Vix error code 21002

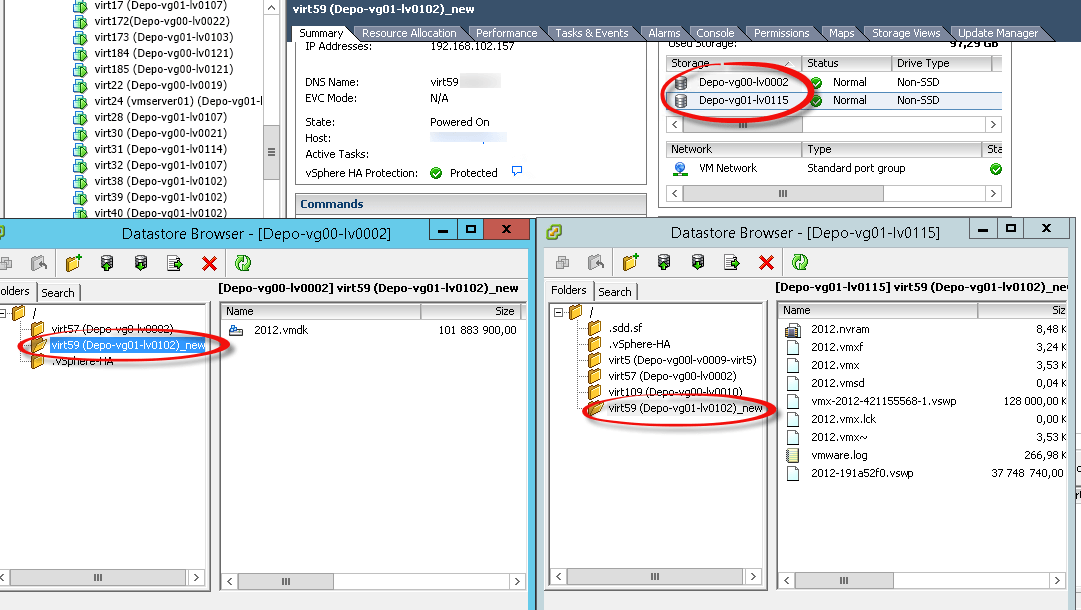
Всем привет, сегодня хочу поделиться вот такой проблемой, с которой я столкнулся совсем недавно, а именно пропала виртуальная машина vmware. Пропала в прямом смысле слова, вот симптомы, в списке доступных vm она виделась в inventory, но вот самой папки на датасторе не было, просто исчезла, и куда пропала не ясно. Представим себе спокойный вечер администратора, время уже 19 или поболее, все спокойно, все шуршит как нужно, админ собирается домой, но тут приходит смс, о том что лег один виртуальный сервер. Зайдя на vCenter виртуалка была выключена вот с такой ошибкой «Cannot power on virt. File *.vmdk was not foud». Что запуск не возможен с отсутствием диска vmdk. Давайте попробуем разобраться и понять, что случилось и как это исправить.
Вот скриншот, логов полученных в vCenter сервере.
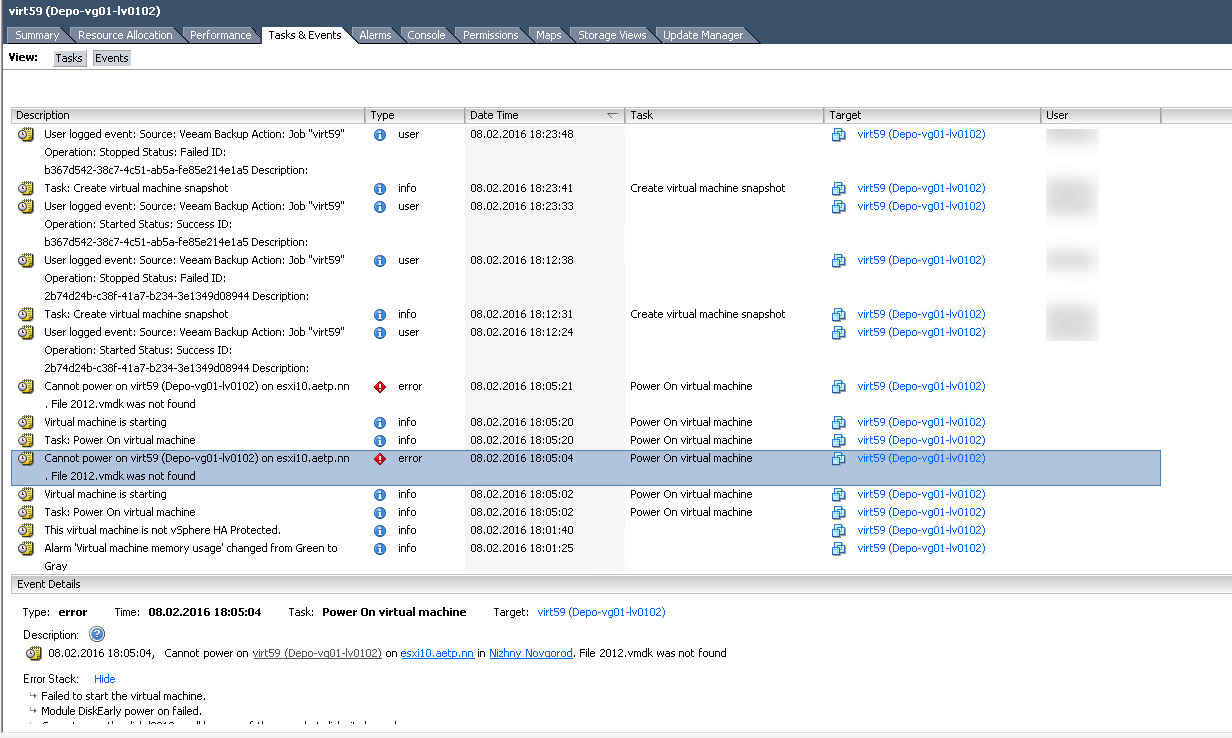

Зайдя в свойства выключенной виртуалки, я обнаружил, что диск весит 0 мегабайт, и как я писал выше этой папки с его дисками и конфигурацией просто не было. Не мудрено почему она не запускалась 🙂

Также нашел вот такой косяк, как оказалось файл виртуального диска лежит на одном луне, а вот конфиг на другом, возможно это тоже повлияло на снятие снапшота и его краш, но это не объясняет пропажу файлов.
Пока искал логи запустил восстановление из бэкапа, продолжаем смотреть логи, находим событие An error occurred while taking a snapshot: msg.snapshot.error-CHECKPOINT
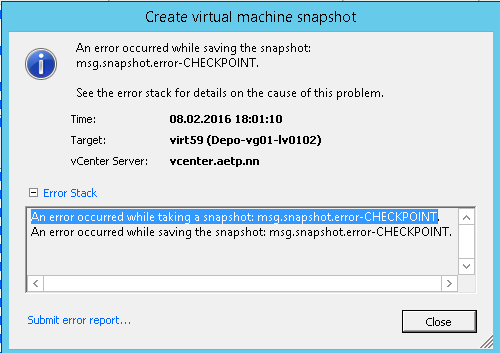
В данной ошибке видно, что сервер резервного копирования виртуальных машин Veeam, не смог сделать снапшот, и логично, файлов виртуалки то нету. Смотрим дальше события по данной vm. Находим, что реально была попытка снятия снапшота, для бэкапирования.
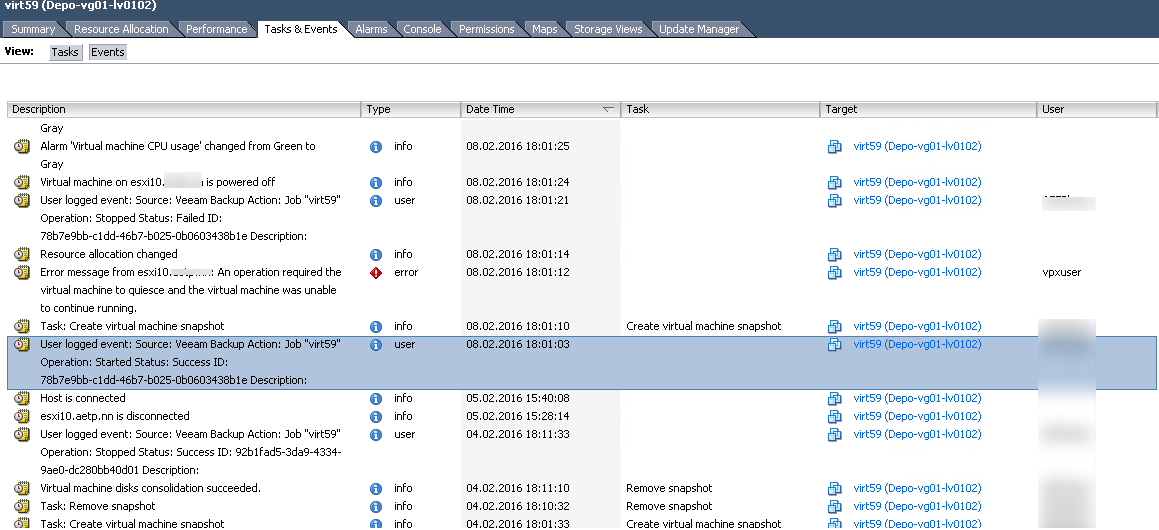
на самом veeam backup & replication лог выглядел вот так, видно, что была попытка сделать snapshot, но положить его было не куда, директории то нет.
Источник
Vix error code 21002

Добрый день! Уважаемые читатели и гости одного из крупнейших IT блогов в России Pyatilistnik.org, где вам доступным языком расскажут, о разных ситуациях в жизни системного администратора. В прошлый раз мы с вами разобрали замечательную утилиту Remote Desktop Connection Manager от компании Microsoft. В сегодняшней публикации, я бы хотел вернуться к своему любимому гипервизору от компании VMware. В данной публикации мы рассмотрим ситуацию, когда при импорте виртуальной машины у вас выскакивает ошибка «invalid target disk adapter type: pvscsi«, рассмотрим ее причину.
Описание ошибки
Во время массовой удаленной работы, многие компании разрешили на время карантина использовать свои продукты. Раз так я давно хотел развернуть и протестировать балансировщик Kemp LoadMaster. Я загрузил виртуальную машины, она шла в виде OVF шаблона. При попытке его импортировать на мой тестовый VMware Workstation 14 я и получил ошибку в мастере импорта виртуальной машины.
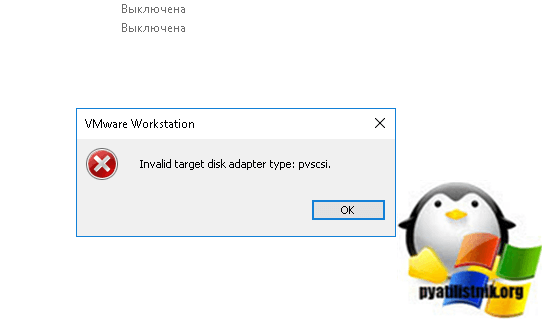
Причиной этой проблемы является то, что ни программные продукты Fusion/Workstation 14 и ниже, не поддерживают тип адаптера хранения PVSCSI, который использует последняя версия PhotonOS OVA/OVF. Но есть, обходной путь, вам нужно отредактировать OVA/OVF шаблон, чтобы использовать адаптер LSI Logic вместо PVSCSI, либо вы можете обновиться до Fusion/Workstation 15 и выше.
Устранение ошибки импорта invalid target disk adapter type: pvscsi
Когда у вас есть OVF архив, вы можете приступать к его редактированию. Берем обычный текстовый редактор, в моем случае, это Notepad++ и открываем им файл OVF, который из себя представляет конфигурационный файл. Найдите в нем строку вот с таким значением:
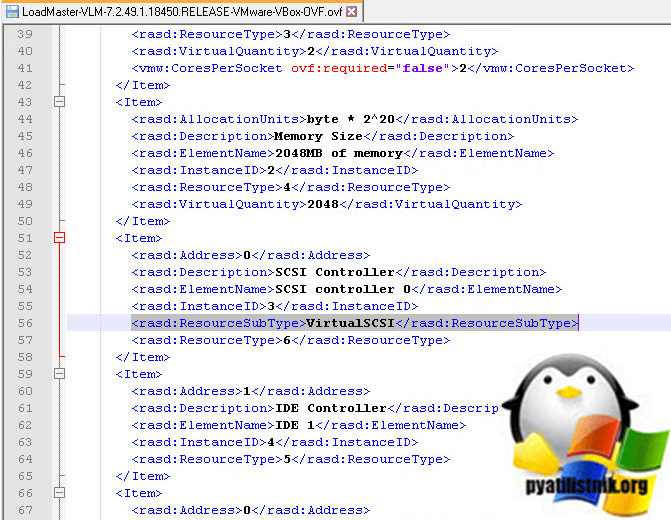
Поменяйте значение » VirtualSCSI » на » lsilogic » и сохраните конфигурационный файл.
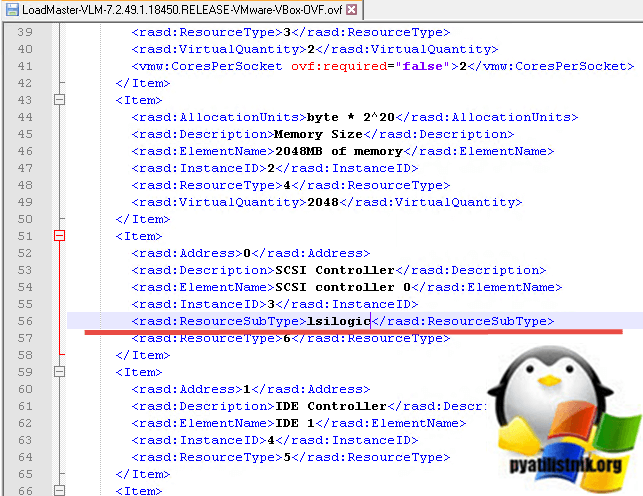
Далее, удалите файл манифеста OVF с именем «имя.mf», если он появился, так как содержимое файла было обновлено и хэш суммы так же. Теперь вы можете импортировать измененный OVF.
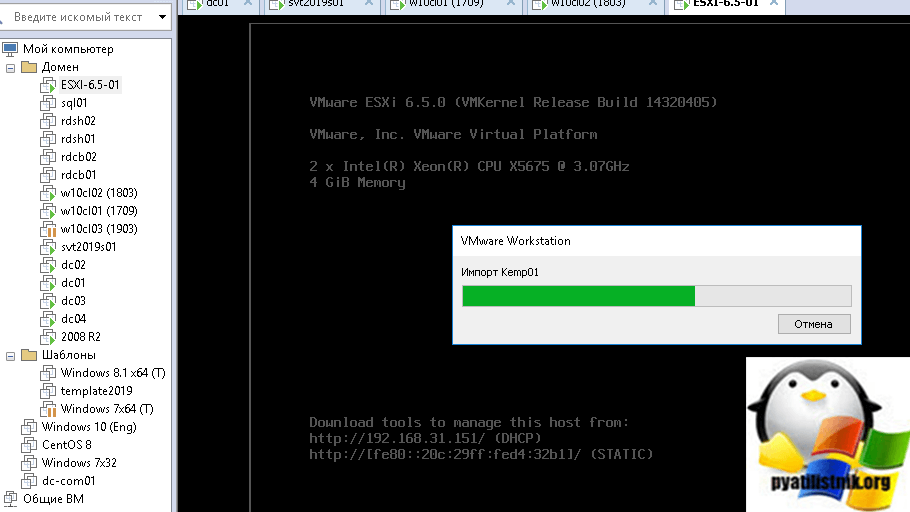
Как видите виртуальная машина теперь успешно импортировалась и запустилась.
Источник
Vix error code 21002
Добрый день! Сегодня хотел переустановить одному разработчику операционную систему, на его виртуальной машине, которая располагается на гипервизоре Vmware ESXI 6.5. Так как от Windows Server 2012 R2, мы давно отказались и шаблона уже не было, пришлось заливать обновленный ISO на датастор vCenter 6.5. В момент попытки загрузить установочный образ, я получил ошибку от vCenter: The operation failed for an audetermined reason. Давайте покажу как она решается.
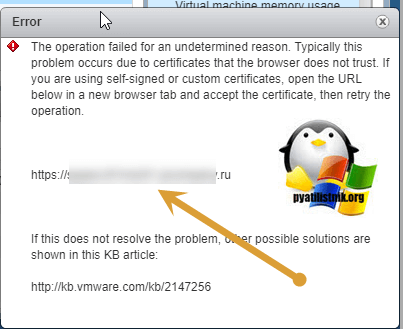
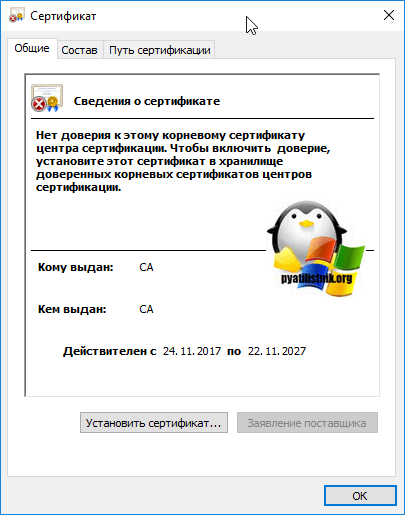
Обратите внимание, что тут ваш локальный компьютер ругается на сертификат, который установлен на определенном ESXI хосте, который фигурирует в ошибке. Проблема в то, что ваша система, на которой вы подключились к vCenter, не доверяет этому сертификату.
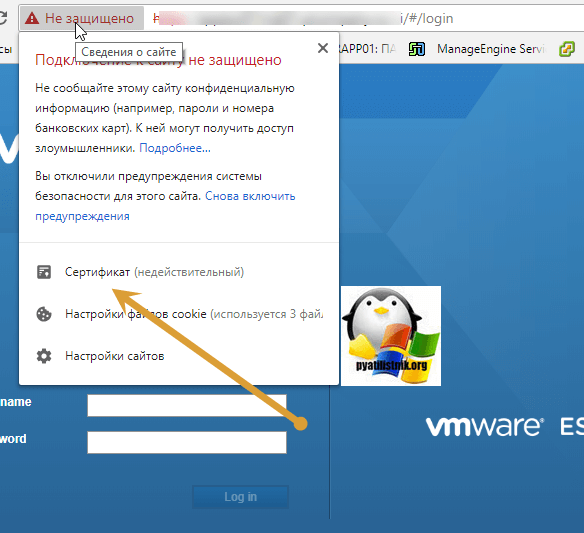
Как исправить ошибку с сертификатом
Подключитесь в веб-интерфейс вашего хоста Vmware ESXI 6.5 и щелкаете по его сертификату.
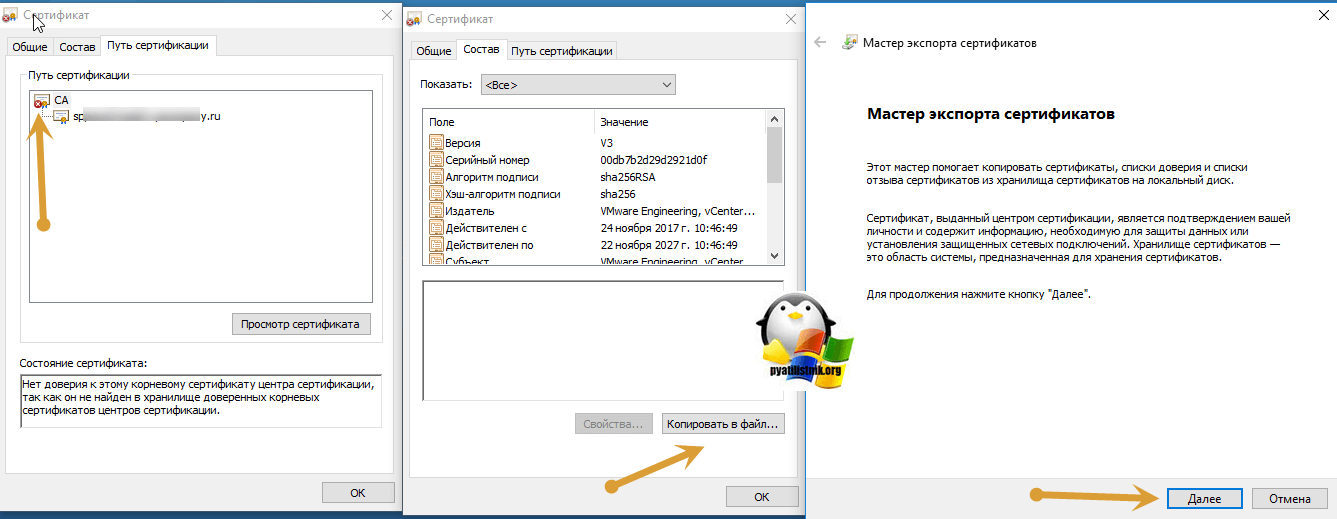
В открывшемся сертификате, видно. что мой компьютер не доверяет центру сертификации, выдавшем этот сертификат. Выбираем его, на вкладке «Путь сертификации» и нажмите кнопку «Просмотр сертификата»
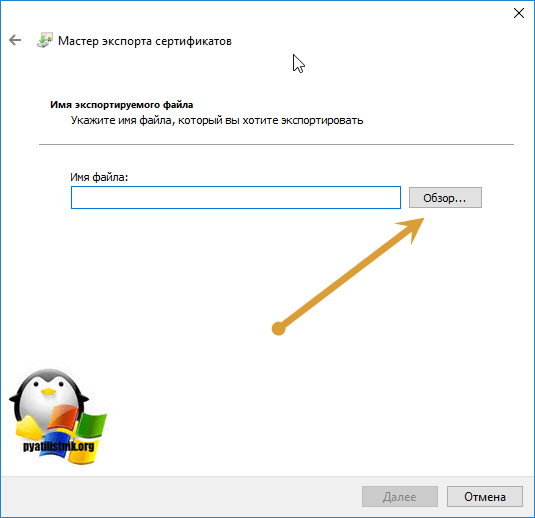
Переходим на вкладку «Состав», нажимаем кнопку «Копировать в файл», для выгрузки открытого ключа, который мы установим к себе. Далее откроется «Мастер экспорта сертификата».
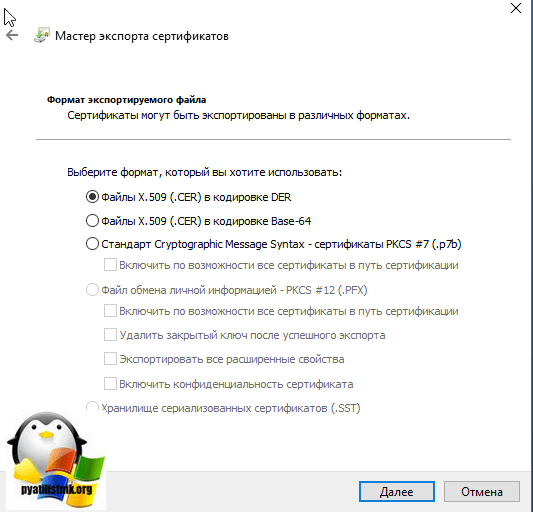
Оставляем формат X.509 (.CER) и нажимаем далее.
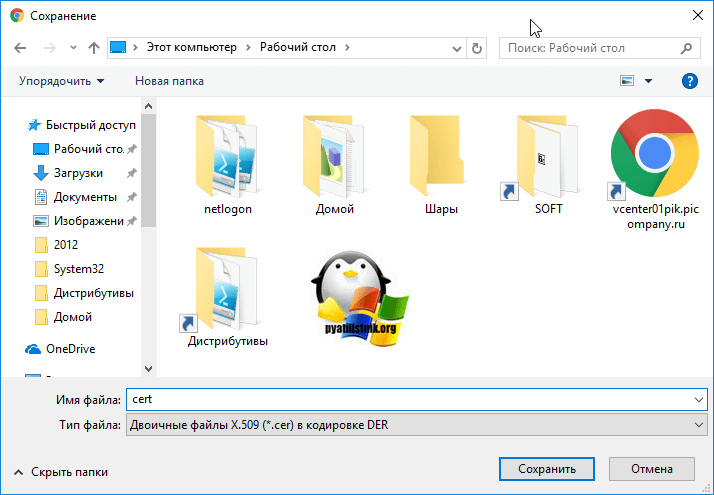
Через кнопку «Обзор» зададим место сохранения сертификата.
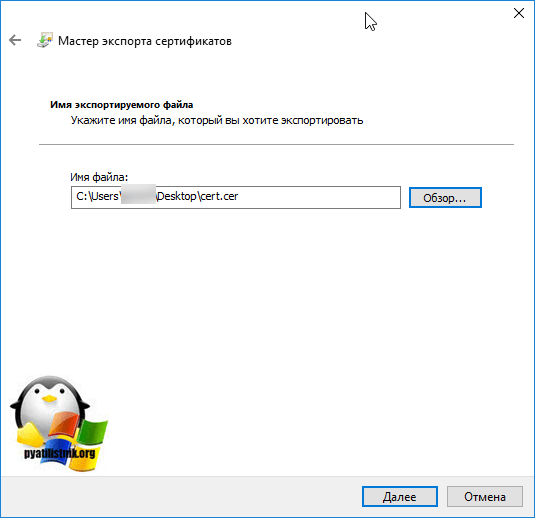
Я сохраню свой открытый ключ в формате cer на рабочем столе
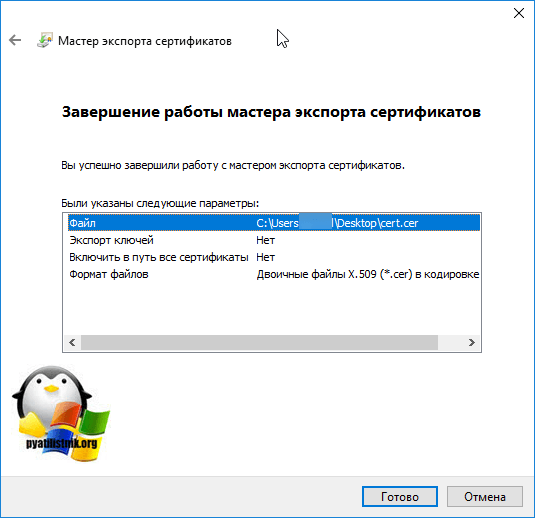
Продолжаем экспорт сертификата.
Все открытый ключ сохранен у меня на рабочем столе.
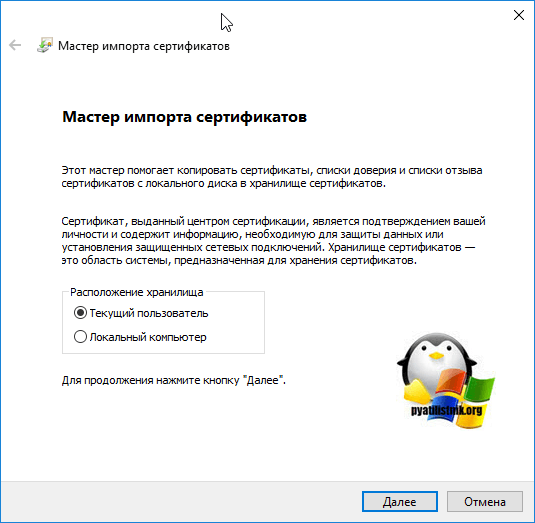
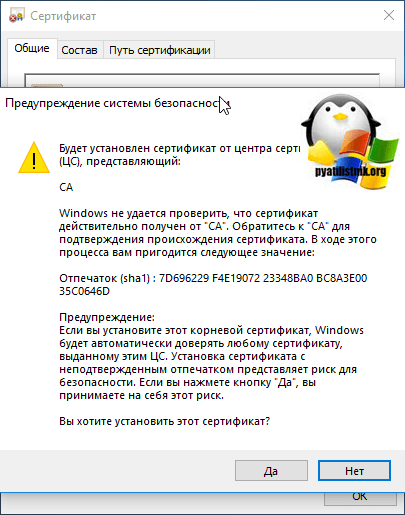
Открываем выгруженный сертификат, он будет у вас с красным крестиком, означающим, что вы ему не доверяете. Для того, чтобы он стал валидный, вам необходимо установить его в надежные корневые центры сертификации. Нажимаем кнопку «Установить сертификат»
Далее будет два выбора, сделать это для текущего пользователя, либо же для компьютера. Если выберите второй вариант, то если вы не один пользователь компьютера, то у них, уже не потребует установка данного сертификата и ошибку: «The operation failed for an audetermined reason. Typically this problem occurs due to certificates that the browser does not trust» они не увидят.
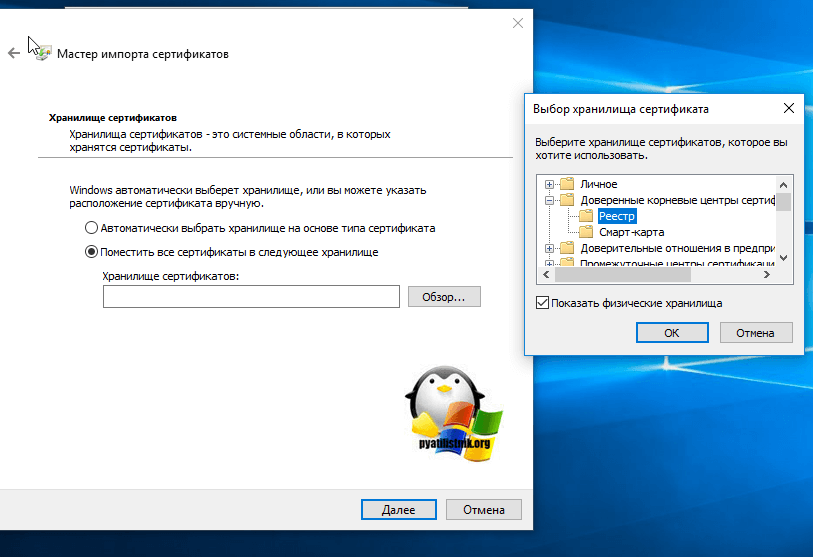
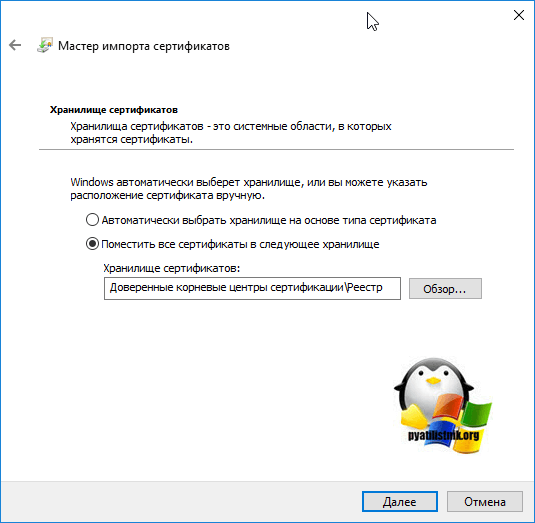
Далее выставляем «Поместить все сертификаты в следующее хранилище» и нажимаем кнопку «Обзор». В дополнительном окне, выберите «Доверенные корневые центры сертификации — Реестр»
Завершаем работу мастера по импорту сертификата в доверенные узлы.
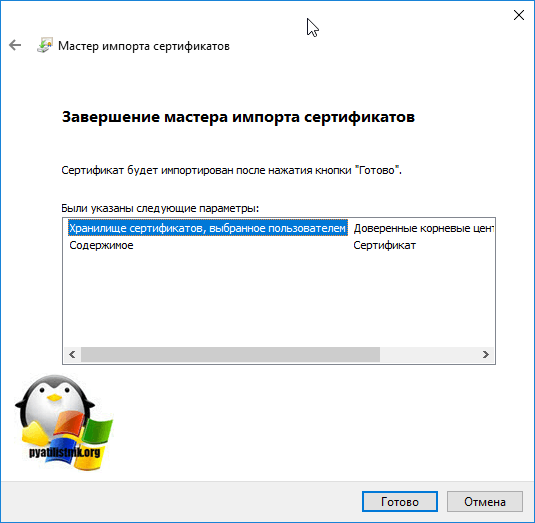
У вас появится окно с предупреждением, в котором вас уведомят, о том, действительно ли вы хотите добавить данный сертификат, нажимаем «Да»
Импорт успешно выполнен.
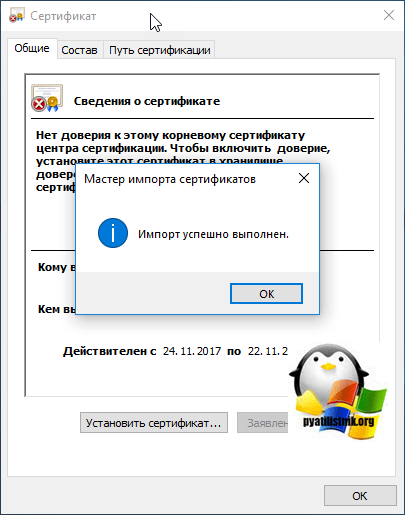
Теперь, когда вы откроете импортированный открытый ключ, то обнаружите, что больше нет проблем с его доверием.
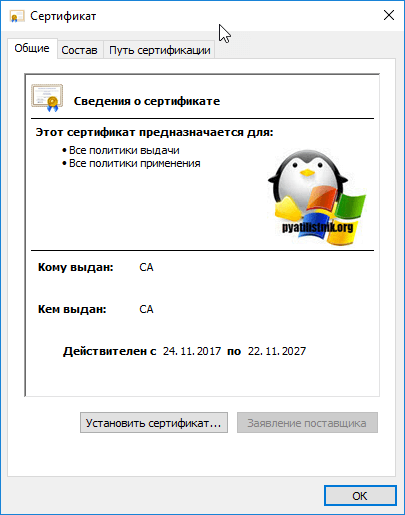
Теперь, снова попробуйте загрузить ISO Образ на нужный вам датастор в vCenter 6.5, как видите, все загружается и ошибка «The operation failed for an audetermined reason. Typically this problem occurs due to certificates that the browser does not trust. If you are using self-signed or custom certificates, open the URL below in a new browser tab and accept the certificate, then retry the operation» больше не появляется, миссия выполнена.
Источник
Vix error code 21002

Всем привет! Рад, что вы снова заглянули, на один из лучших блогов, посвященных Vmware ESXI pyatilistnik.org. Сегодня расскажу, как обновить версию виртуальной машины ESXI 5.5 или, как обновить VM Version ESXI 5.5. Давайте ниже рассмотрим, что такое VM Version и для чего она вообще нужна. Уверен, что за вашу практику ни раз столкнетесь с такой задачей и должны уметь ее решать.
Что из себя представляет версия виртуальной машины
VM Version или как ее еще называют версия виртуального аппаратного обеспечения, как можно понять из названия, это то железо и те фишки железа которые поддерживает текущая версия виртуальной машины (БИОС, доступные PCI слоты, максимальное количество процессоров и размер памяти. ). Есть даже слухи, что с новыми версиями VM Version, виртуальные машины работаю быстрее. Существует несколько методов обновления версии виртуальной машины ESXI, рассмотрим их все.
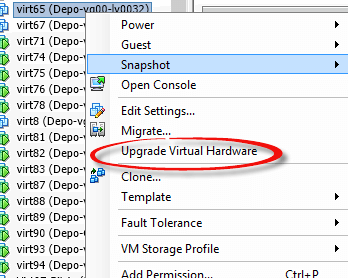
Как обновить VM Version Hardware через VMware vSphere Client
Сразу хочу отметить, что виртуальная машина должна быть выключена, чтобы вы могли произвести обновления. Итак видим, что текущая версия виртуальной машины 8 и она выключена. Напоминаю, что такое вы увидите, через клиента VMware vSphere Client

Как обновить версию виртуальной машины ESXI 5.5-Как обновить VM Version ESXI 5.5-01
Щелкаем правой кнопкой по нужной машине и выбираем из меню пункт «Update Virtual Hardware»
Как обновить версию виртуальной машины ESXI 5.5-Как обновить VM Version ESXI 5.5-02
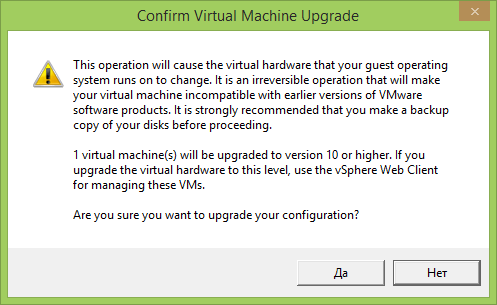
Вас спросят действительно ли вы хотите это сделать, жмем Yes.
Как обновить версию виртуальной машины ESXI 5.5-Как обновить VM Version ESXI 5.5-03
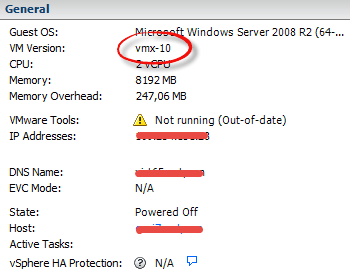
Видим, что теперь версия виртуальной машины 10.
Как обновить VM Version Hardware через VMware Web Client на работающей машине
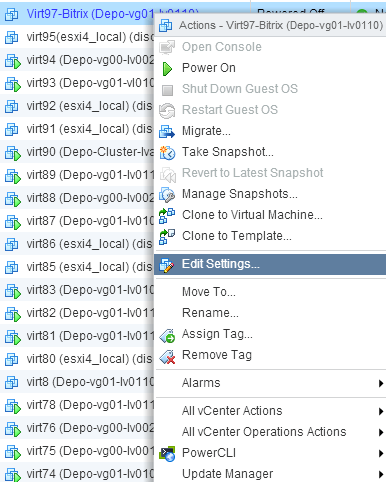
Щелкаем правым кликом по нужной виртуальной машине и выбираем пункт «Edit Settings»
Как обновить версию виртуальной машины ESXI 5.5-Как обновить VM Version ESXI 5.5-05
Идем в пункт Update и ставим галку «Shedule VM Compatibility Upgrade»
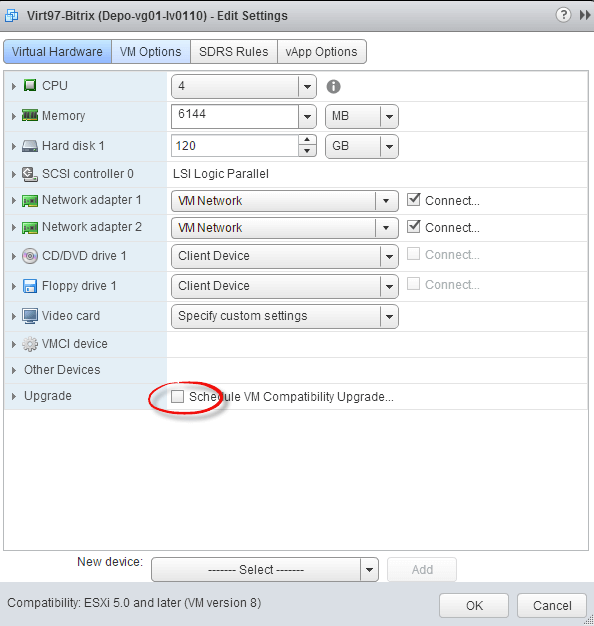
Как обновить версию виртуальной машины ESXI 5.5-Как обновить VM Version ESXI 5.5-06
Видим, что текущая версия 8 и она будет обновлена до 10. Обновления произойдет при следующей перезагрузке, обратите внимание что вам говорят, что будет лучшая производительность и последние плюшки.
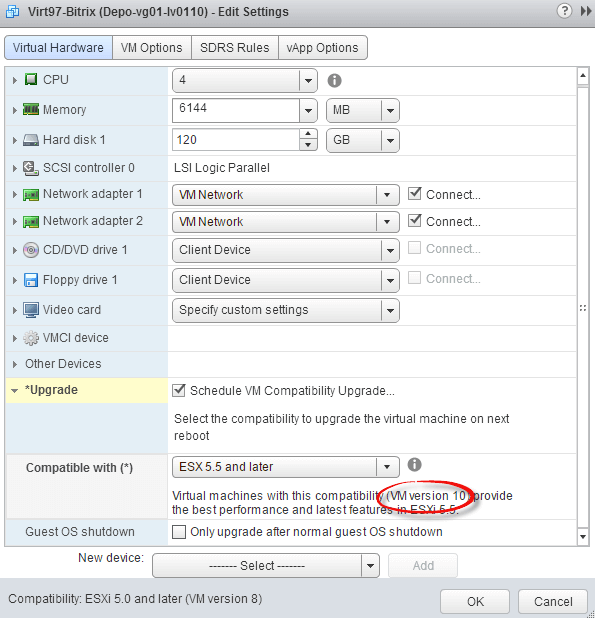
Как обновить версию виртуальной машины ESXI 5.5-Как обновить VM Version ESXI 5.5-07
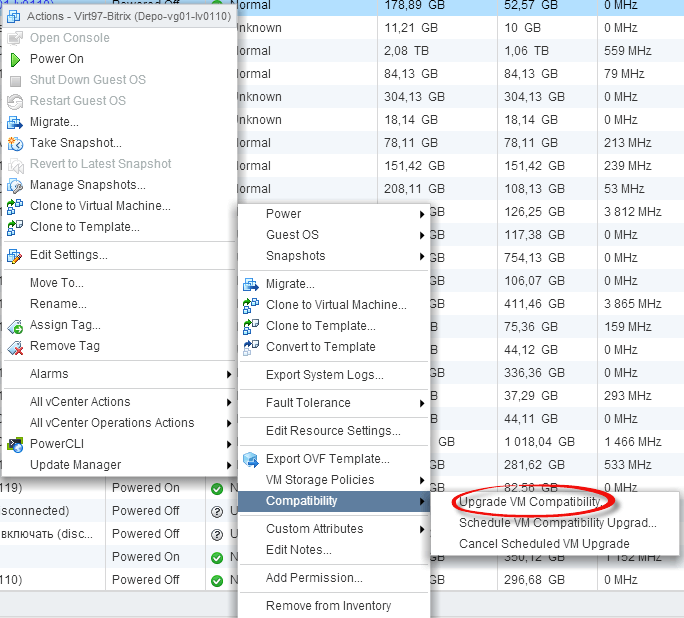
Как обновить VM Version Hardware через VMware Web Client на выключенной виртуальной машине
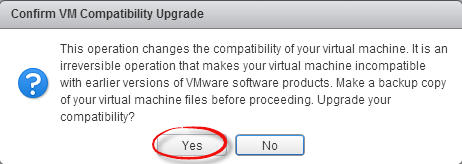
Данные действия, вы сможете выполнить на своем vCenter сервере. Щелкаем правым кликом по виртуалке и выбираем пункт меню Compatibility-Upgrade VM Compatibility. Обратите внимание, что тут же можно отменить расписание обновления.
Как обновить версию виртуальной машины ESXI 5.5-Как обновить VM Version ESXI 5.5-08
Как обновить версию виртуальной машины ESXI 5.5-Как обновить VM Version ESXI 5.5-09
и видим, что поставится 10 версия оборудования
Как обновить версию виртуальной машины ESXI 5.5-Как обновить VM Version ESXI 5.5-10
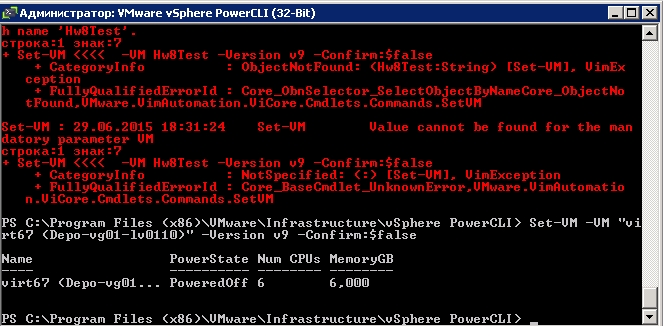
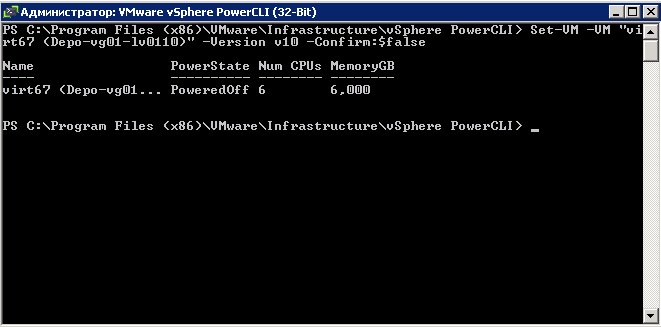
Как обновить VM Version Hardware до 9 версии или до 10 через PowerCLI
Существует и такой метод, Воспользуемся командной строкой Vmware PowerCLI, которая предоставляет для этого специальные командлеты. Виртуалка должна быть выключена. Во первых соединяемся с хостом, через команду:
И обновляем виртуальную машину virt67 до 9 версии

Как обновить версию виртуальной машины ESXI 5.5-Как обновить VM Version ESXI 5.5-11
Видим, что все ок.
Как обновить версию виртуальной машины ESXI 5.5-Как обновить VM Version ESXI 5.5-12
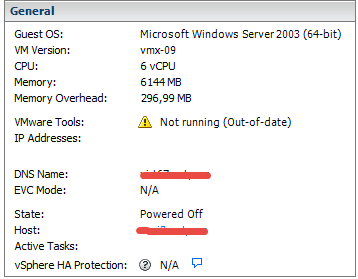
Видим, что версия стала 9. Командная оболочка Vmware PowerCLI, отличается от графических собратьев, тем, что позволяет все это дело автоматизировать и делать обработку пачками виртуальных машин.
Как обновить версию виртуальной машины ESXI 5.5-Как обновить VM Version ESXI 5.5-13
Обновим, теперь этим же методом до 10 версии
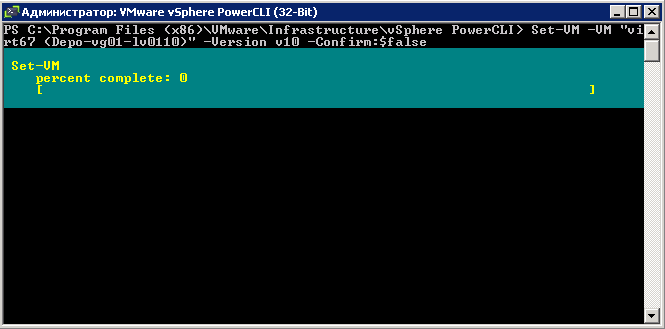
Как обновить версию виртуальной машины ESXI 5.5-Как обновить VM Version ESXI 5.5-14
Все отработало, как нужно.
Как обновить версию виртуальной машины ESXI 5.5-Как обновить VM Version ESXI 5.5-15
Видим, что теперь версия VM Version стала 10.
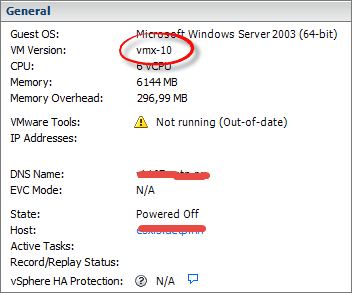
Как обновить версию виртуальной машины ESXI 5.5-Как обновить VM Version ESXI 5.5-16
Источник
Posted by ernestntshetlho 2018-07-26T13:16:52Z
Hi guys, I need your assistance
I have HP ProLiant DL180 Gen9 Server with Esxi Installed, However I want to install OS preferably windows. So am asking for the procedure to install OS. I have the server and my laptop. I can connect to it via network.
check
Best Answer
Easy, connect to ESXi with the web or Vsphere client and create a new VM. Launch it and install your O/S. More detail needed, then you should go to VMware and watch some how-to videos. Fairly easy.
Was this post helpful?
thumb_up
thumb_down
View Best Answer in replies below
44 Replies
-
Easy, connect to ESXi with the web or Vsphere client and create a new VM. Launch it and install your O/S. More detail needed, then you should go to VMware and watch some how-to videos. Fairly easy.
Was this post helpful?
thumb_up
thumb_down
-

can3gxw
This person is a verified professional.
Verify your account
to enable IT peers to see that you are a professional.tabasco
Or do you mean that ESXi is already installed (bare metal) and you want to install Windows instead then ESXi on top of Windows? You will just need to insert your install disk into the server, boot it into the Windows install and away you go. Then install ESXi on top of Windows.
You need to clarify exactly what it is you want to accomplish.
Was this post helpful?
thumb_up
thumb_down
-
@can3gxw Let me put this way
ESXI is already installed in the SERVER, I want to install windows without getting rid of ESXI.
I have my laptop and Server only
So in terms of booting do I need a monitor or I can do it through the network.
Was this post helpful?
thumb_up
thumb_down
-
Denis may you say it step by step
Yes I have Vsphere client, I can access the server through Vsphere or web
Was this post helpful?
thumb_up
thumb_down
-
can3gxw
This person is a verified professional.
Verify your account
to enable IT peers to see that you are a professional.tabasco
If all you are trying to do is create a new Windows VM, Denis Kelley told you and even gave a «how to» video. It’s easy.
Was this post helpful?
thumb_up
thumb_down
-
Is youtube banned in your country so you can’t see the youtube video posted?
1 of 2 found this helpful
thumb_up
thumb_down
-
It sounds like you’re looking to dual-boot between ESXi and Windows on that server. Is this the case?
If so, and you have at least two disks installed, dedicate one drive to each operating system and choose via the BIOS or during boot which drive to boot from.
Was this post helpful?
thumb_up
thumb_down
-
Jeff, I want to install the OS on a VM. after final installation, my colleagues can access the server to store their data. Am struggle with all the procedure. Now I got this error
«This virtual machine does not have a CD-ROM drive configured. A virtual machine must have a CD-ROM drive configured for this option to work. vix error code = 21002»
Was this post helpful?
thumb_up
thumb_down
-
Edit the settings for that VM. Add a CD-ROM drive. Take the defaults. To mount the VMware Tools ISO (or any other) you need a virtual CD-ROM drive as part of the VM’s configuration.
Was this post helpful?
thumb_up
thumb_down
-
Thanks , am done with that part
Am now struggling with Installation of VMware tools but I think I will manage with it.
I will be back if something else occurs
Was this post helpful?
thumb_up
thumb_down
-
What does this mean and what Am I supposed to do
» Mounts the tools CD installer as a CD-ROM for the guest»
Was this post helpful?
thumb_up
thumb_down
-
That means ESXi is connecting the VMware Tools ISO to the virtual CD-ROM so that VMware Tools can be installed. If the installation doesn’t start automatically, run Setup from the virtual CD-ROM via Windows Explorer. Just double-click (if it doesn’t start on its own).
Was this post helpful?
thumb_up
thumb_down
-
Take the default installation of VMware Tools and reboot the VM.
Was this post helpful?
thumb_up
thumb_down
-
Sure
am on it
Was this post helpful?
thumb_up
thumb_down
-
Was this post helpful?
thumb_up
thumb_down
-
Yup in the VM, not the host or whatever else you are trying.
Was this post helpful?
thumb_up
thumb_down
-
Install VMware Tools in the Windows VM. Where were you trying to install it?
Was this post helpful?
thumb_up
thumb_down
-
VMware Tools provides video, mouse, network and other drivers to the virtual machine. That’s its purpose. Every VM will be running VMware Tools (some VMs come with VMware Tools pre-installed).
Was this post helpful?
thumb_up
thumb_down
-
I get this when trying to launch remote console with VM right clicking.
For the CD-Rom drive, should I install it first before trying to open the remote console?
Was this post helpful?
thumb_up
thumb_down
-
Guys please be patient with me, I have never installed an OS in a server. So this CD-ROM thing is just a driver, I don’t necessarily need an installation disk since I have the ISO file in my laptop?
Was this post helpful?
thumb_up
thumb_down
-
So, before you can launch the VMRC (Remote Console) you have to install it. Once installed, it adds a kind of virtual device to your browser(s) so that it opens properly. The easiest way to install it is to go to the Summary page for a VM and click the little virtual screen/preview window. You should be prompted, I think, to open or install the VMRC. Install it. In some version (6.0?) of vSphere, there’s an Install VMRC option just under that little window. I think it’s gone in 6.5+.
You can also search for the latest VMRC installable at the VMware Website, download and install it. You’ll need to log in, of course.
1 found this helpful
thumb_up
thumb_down
-
Oh, the VMRC has nothing to do with the virtual CD-ROM drive in the VM’s configuration, to answer your question. It’s just another piece in the vSphere environment that you need to add/install/configure. But only once.
1 found this helpful
thumb_up
thumb_down
-
Let me try, I will be back if it doesn’t go well
Thanks
Was this post helpful?
thumb_up
thumb_down
-
Installation is taking forever or I don’t know if its really working
Was this post helpful?
thumb_up
thumb_down
-
OS not found
Can someone please take me step by step now because this is the steps I did:
1. Install VM2. Install CD_ROM driver and connect it. (browser the datafile and select my .iso file)
3. Installed the VMware tools but they are failing to install as I get that above screenshot and nothing seem to change)
4. Click the small windows screen to install OS but I get this screen of OS not found
Assist me guys
I have watched youtube on how to install VMware tools its so easy but I don’t know why am struggling when doing the same process
Was this post helpful?
thumb_up
thumb_down
-
You can’t install VMware Tools until you have an operating system installed. VMware Tools is a collection of virtual devices and device drivers for a particular operating system.
Install an OS. Then install VMware Tools.
To install a os in your already created VM (very high level, and there are multiple ways to do this):
- Upload your ISO file to a folder you create (maybe ISO) on a datastore seen by your server.
- Shut down the VM.
- Edit settings.
- On the Virtual Hardware tab, in the dropdown for CD/DVD Drive 1, select «Datastore ISO File» and browsed to the ISO you uploaded in step 1.
- Select Save and reboot the VM. It should boot into the Setup program on the ISO.
- Install your OS.
- Install VMware Tools. (You will see Tools installing if you are viewing the console. If install doesn’t start by itself, navigate to the virtual CD-ROM drive and kick it off.
- Reboot.
- Get OS updates, a few at a time, not all at once.
Was this post helpful?
thumb_up
thumb_down
-
Oh, and don’t use the Windows vSphere Client with ESXi 6.5 or above. Don’t get used to it. It’s going far, far away. Use the host’s built-in HTML5 Client (from a browser on the LAN, navigate to: https:/ Opens a new window/yourhostaddress/ui Opens a new window
Was this post helpful?
thumb_up
thumb_down
-
Hello Jeff
I don’t get the last comment. I should use webclient or Vsphere client not above ESXI 6.5?
Was this post helpful?
thumb_up
thumb_down
-
Toss out the vSphere Client (the Windows client). It’s deprecated. Learn to use the newer tools: The Web Client for vSphere (vCenter required) and the HTML client built into each host at https://hostaddress/ui Opens a new window and into vCenter Server at https://vcenteraddress/ui Opens a new window.
Since you’re starting new, you don’t have the baggage of us old timers who love the Windows Client and are grumbling every minute we aren’t using it.
Was this post helpful?
thumb_up
thumb_down
-
Installation through the web client is seem to be fine on the start but just after adding admin password, immediately after signing in. A CMD screen pops up with C://Users/Administrator.. and it will be blinking showing that I should type something. I cancelled it but again nothing happened. With V sphere client I get that error which after coming across it. I googled it only to find that I need to restart the virtual machine but it seem not to be solved my problem
Was this post helpful?
thumb_up
thumb_down
-
Bro I don’t get you
Was this post helpful?
thumb_up
thumb_down
-
You’re making progress! The screen with the Windows 2012 R2 logo looks good. You got the OS installed. That’s a console window. You should continue using that console window. You don’t need to switch to the vSphere Client (which is NO LONGER SUPPORTED for ESXi 6.5).
Connect to the VM’s console from the https://hostname/ui Opens a new window interface.
Now install VMware Tools. If you don’t see it installing, it probably isn’t. Use Windows Explorer to kick it off. Reboot when it’s done. Voila!
Was this post helpful?
thumb_up
thumb_down
-
Jeff I upgraded my Vsphere client and now am good.
The server cool, it got the ip address and i installed the VM Tools after OS installation.Can you take me through some basic stuff
I want my colleagues to have access to the server such that they can store their data in it.
And the workgroup and domain, which one should I use? I have a domain
Was this post helpful?
thumb_up
thumb_down
-
If you’re on a domain and your users authenticate via domain login, add the server to the domain. Don’t forget Window Updates too. That will take hours, but once you have it done on this VM, you can use a clone of this VM, properly sysprepped, to create any more that you need, saving HOURS of drudgery.
Assuming the server’s name is in DNS (make sure that it is), your users can save files to a share you create for that purpose.
Do your Windows updates before you let users loose on the thing, as it will be rebooting many times. Also, plan a backup strategy for the VM, as you don’t want your users to lose their data should something happen.
If you’re going to use the VM as a file server, it’s probably best to attach a large 2nd hard disk to it and put your shares there. Don’t put expanding shares on the operating system disk, it leads to unpleasant surprises. As to how large, not so large that it takes up your whole datastore. Use thin provisioning so that it’s only as big as it needs to be on the datastore, but looks to the operating system like it’s full sized.
Was this post helpful?
thumb_up
thumb_down
-
Glad you got the thing working. Now create more VMs!
Was this post helpful?
thumb_up
thumb_down
-
But that «encryption oracle remediation » is not available when navigating there
what can I do? Install updates first or what?
Was this post helpful?
thumb_up
thumb_down
-
Jeff, with Remote access, I followed some instruction I saw online but I failed as the option «Encryption Oracle Remediation was not available»
I then tried the other alternative by following a certain video on YouTube where by I was navigating to Registry Editor—H_Key Local machine-software—Microsoft—windows—
Its not working. Am doing all these in a client machine
I hope you know what am talking about for sure
Help me
Was this post helpful?
thumb_up
thumb_down
-
I have no idea what you are talking about. Sorry.
If it’s Oracle-specific, I’m not the one to ask. (I’m a Microsoft guy.) You can start another thread aimed at this particular problem. BE DESCRIPTIVE! What are you trying to accomplish and what video were you following?
Was this post helpful?
thumb_up
thumb_down
-
Was this post helpful?
thumb_up
thumb_down
-
My comments are still under review
But what am saying is: I want to access my server remotely but am getting an error
Was this post helpful?
thumb_up
thumb_down
-
The problem could be with my laptop because its WIN 10 SINGLE ED
when am using desktop, its working fine..
Was this post helpful?
thumb_up
thumb_down
-
Bro I found the problem
My Windows Home Edition does not support Remote Desktop
Was this post helpful?
thumb_up
thumb_down
-
Jeez. What would it hurt for Microsoft to have put in RDP?!
Was this post helpful?
thumb_up
thumb_down


 Installation is taking forever or I don’t know if its really working
 OS not found
 Installation through the web client is seem to be fine on the start but just after adding admin password, immediately after signing in. A CMD screen pops up with C://Users/Administrator.. and it will be blinking showing that I should type something. I cancelled it but again nothing happened.
  With V sphere client I get that error which after coming across it. I googled it only to find that I need to restart the virtual machine but it seem not to be solved my problem
Read these next…
Can’t communicate with scanner
Hardware
Hello everyone,I have a client that uses Kodak ScanMate i940 scanners at their desks. They recently got a new computer that we prepped and put on their domain. This new computer is recognizing the scanner but it is unusable with the error «can’t communica…
Different MAC address, same computer name — multiple DHCP leases
Windows
I’m noticing a lot more now that our Wifi DHCP scopes are filled by the same computer name, but with different mac addresses. I know there’s a feature in Windows 10 called Random hardware addresses, but that setting is off. Is there anything else that cou…
Snap! — No-Password Logins, Solar Powered Water Filter, Glitch in the Matrix?
Spiceworks Originals
Your daily dose of tech news, in brief.
Welcome to the Snap!
Flashback: February 9, 1996: Introduction of the Bandai Pippin (Read more HERE.)
Bonus Flashback: February 9, 1990: Galileo Probe does a Venus Flyby (Read more HERE.)
You nee…
Roku TV being used as Wallboard Issues
Hardware
Helping someone out at their shop. They have 4 large Roku screens and 2 laptops with dual HDMI ports for video. They are viewing static website business dashboards and PowerPoint. At first all 4 screens connected to wireless, worked for a while but with a…
Charging for SSO
Security
We have SSO set up with around 5 or 6 solution providers via our M365. Not one of them charges for this, they just sent us the documentation.I identified another online service in use by one of our departments which would benefit from using SSO for staff …


Let’s say I have my own hosting platform based on vSphere, where I run most of my customers, as a service provider, on a decent cluster with multiple nodes and shared storage and all that jazz.
Let’s further say that I have customers that have local Hyper-V environments running on single boxes here and there, because those customers have chosen, because Reasons, that they want local hardware. The VMs themselves as well as Hyper-V in my test scenario are all running Windows Server 2012 R2.
But what if that hardware breaks? What if there’s a disaster of some sort that makes their server inoperable and their offices uninhabitable? No fun, we have to wait for the hardware to be repaired/replaced, and then do restores. What if we could instead do the restores to a virtual machine in our environment? After all, we do use Veeam Backup and Replication (which is a nice product by the way), and we might already let them store backup copies in our datacenter.
Well, no such luck, because Veeam can’t restore a Hyper-V VM onto vSphere, nor vice versa. Which kind of makes sense, V2V is a hard problem that Veeam doesn’t seem to want to tackle.
We might consider setting up a Windows Server with Hyper-V or two in our datacenter to deal with these potential use cases, but that’s hardware that would just sit unused most of the time. So, that probably won’t happen here.
But all isn’t neccessarilly lost! What if you could use Veeam to Restore VM Files rather than restore the VM itself? That would basically tell Veeam to dump out the constituent files making up a Hyper-V VM, in this case the configuration file (XML) and the VHDX files, and then use some kind of tool to import the Hyper-V VM into VMware from that intermediate restored format? Let’s see.
The first that comes to mind is VMware vCenter Converter. I have that installed on my vCenter box already for other reasons. It looked quite promising, after all, it advertises itself as being able to convert Hyper-V VM:s, but if you look at it a little closer, it seems like it can only do conversions from actual Hyper-V boxes, not from a set of VM files.
This discouraged me a little, and I looked around for other tools. I found (but didn’t try) Starwind V2V Converter, which I probably would have ended up going with, if it weren’t for the fact that it’s a hassle to basically create a new VM and then attach disks to it. There had to be a better way.
That’s when I thought about VMware vCenter Converter again. It has to talk to a Hyper-V server. It has to be registered there, but it also has to be powered off! Aha!
So… what if I would in fact set up a Windows server with the Hyper-V role? I would not have any intention of actually running any VMs on it, just use it to register VMs being restored off Veeam Backup and Replication, for the purposes of VMWare vCenter Converter then doing a V2V of it onto our real production cluster?
I set out to try it. I decided to use my Veeam Backup server (running Windows Server 2012 R2) as the Hyper-V box. It’s already a physical disk with a ton of Storage Spaces JBOD, and I wouldn’t have to send the data over the network for the initial staging of the VM.
So, I decided to start out by simply adding the Hyper-V role to the box.
It asked me about virtual switches, I just skipped that, since I don’t intend to power on any VMs on the box.
It asked me about setting up Live Migration, I skipped that as well, since we’re not doing that.
It asked me about default storage locations. I decided to leave it at the default for now, and see about adding some scratch storage for receiving the restore. For a simple test just doing it on the C-drive where there was ample space was good enough.
After rebooting, I went back into the Veeam Backup & Replication console, and went to Backup Infrastructure and added a new Microsoft Hyper-V Server – the backup server itself. It had to install a few components and took a few minutes.
After that, I made Veeam Backup & Replication restore the entire VM to the backup server where I just installed the Hyper-V role. After the restore was complete, I looked over at the Hyper-V manager on the backup server. Indeed, the VM was there but powered off. I did not attempt to power it on.
Instead, I went over to my vCenter server, where I have vCenter Converter installed. I might just as well have had it on the backup box, but this is where I already had the software. I pressed “Convert Machine”, selected “Hyper-V Server” as a source type, and pointed the software at my backup server.
Here’s where I ran into a hiccup related to Windows Firewall. The diagnostic logs (within two layers of ZIP files) of vCenter Converter showed that it was attempting to connect on port 9089, like so:
2016-02-23T14:09:29.947+01:00 warning vmware-converter-worker[03124] [Originator@6876 sub=Default] Failed to connect socket; <io_obj p:0x0169b440, h:1700, <TCP ‘0.0.0.0:0’>, <TCP ‘192.0.2.123:9089’>>, e: system:10060(A connection attempt failed because the connected party did not properly respond after a period of time, or established connection failed because connected host has failed to respond)
As far as I can tell this is what happens: If that port shows “Connection refused” then it would offer to install the proper agent on the remote system. If it just timed out (which is what Windows Firewall will do when somebody connects to a port that doesn’t respond, due to Stealth Mode) then it assumes there are network issues and does not offer to deploy the agent.
Advice I found online said to disable the Windows Firewall, but that’s not how I roll. Instead, I created a firewall exception for TCP port 9089 from the vCenter server to my backup server, and then disabled stealth mode in Windows Firewall. There’s no supported or GUI way to do this, you’ll have to dive into the registry.
Following the instructions from this Server Fault answer, I created the registry key HKLMSoftwarePoliciesMicrosoftWindowsFirewallDomainProfile, and a DWORD value under it named DisableStealthMode set to “1”. After that, I restarted the Windows Firewall service. (That, or just save yourself the hassle and install the converter on your Hyper-V host.)
After that I was able to proceed to actually deploy the agent in VMware vCenter Converter. Yet another pain in the net…
I chose to manually uninstall the files later, as I anticipate to perform more conversions in the future, but then:
The version of the selected Microsoft Hyper-V Server is not supported. Select an earlier version of Microsoft Hyper-V Server or another supported source type.
More pain. Looking at the release notes, it turned out that I have an older version of VMware vCenter Converter installed – version 6.0 doesn’t seem to support Windows Server 2012 R2 according to the release notes. Fortunately, version 6.1 does seem to support it. So, I proceeded to upgrade it. I also tested re-enabling Stealth mode on the backup server’s Windows firewall to see if the same bug was still present with a recent version. Looks like this bug is still present as of version 6.1.1 build 3533064, which is the most recent as of posting. Oh, VMware, why don’t you test your crap with Windows Firewall enabled? Disabling Windows Firewall may be a common practice, but it’s hardly best practice.
Anyway, now I repeated my steps, and again, I entered the hostname and the credentials, and entered my credentials. And YES! I see my powered off VM I want to get into vSphere.
So, I choose it, and press next, and here comes more pain.
Permission to perform this operation was denied.
Back into the diagnostic logs. This time, I find the appropriate log within three layers of nested ZIP files. Somebody at VMware must have a real fetish for Russian matryoshka dolls, all that nested unzipping… Fortunately, the cause seemed quite simple this time:
2016-02-23T15:08:20.277+01:00 warning vmware-converter-agent[06692] [Originator@6876 sub=Default] UAC is enabled! using non elevated administrator ‘contosopv2b-admin’
So, I restart VMware vCenter Converter Standalone again, and this time, elevated as an administrators. Convert machine, powered off, servername, user name password, deploy agent, select VM, next, and again. Permission denied.
This time, I guess the problem is probably Remote UAC being enabled, since it’s trying to get admin over the network. Yet more registry hacks chipping away at security… incidentally Veeam needs the same to work, so I figure I’d try that, according to the solution I found over at Xyfon solutions.
Onto the backup Server, inside the registry key HKEY_LOCAL_MACHINESOFTWAREMicrosoftWindowsCurrentVersionPoliciesSystem, I create a DWORD named LocalAccountTokenFilterPolicy with a Value of 1.
Then I try the same steps again. Nope. Permission still denied. At this point, I get suitably annoyed at VMware’s barely functional client-server software as well as the vagaries of UAC, and decide to just install vCenter Converter Standalone over at the Hyper-V box instead, just to make the netpain stop. If that works, I decide I can just roll back the firewall rule and disabling stealth mode.
Copy installer, paste installer. Wait. Double-click installer. Yes to UAC. Wait while mesmerized by 1990s style installer splash screen. Next, next, agree, next, next, next, next, install. Run standalone client now? Yes. Finish.
Then, I try it again. Convert machine, powered off, Hyper-V server, localhost, username, password, next. Permission denied. Argh. Oh, wait, the installer didn’t launch the converter elevated.
Elevate, repeat steps, still broken. Argh. Curse at the screen for a while, and then realise that I’m stupid. It’s not going to matter if I run the converter itself elevated, because it doesn’t try to use my network creds in a pass-through mode. So, as another stupid simple way, I try using the built-in Administrator account, which because of compatibility reasons (such as stupid applications like this one) does not have UAC enabled.
After that, I’m able to proceed. Seriously, am I really supposed to be crippling the entire security model of Windows just to convert a VM? Anyway, I roll back my registry hacks and firewall rules from above and retry, making sure they’re not neccessary as long as using the built-in Administrator.
After that, I just breeze through the wizard. I make sure the network card is connected to an isolated network, choose some appropriate storage in vSphere, and submit the job, and it seems to be running. Success seems within grasp! Estimated time remaining: 1 hours and 3 minutes. I decide to do some actual work, such as preparing for an after-hours P2V of a dying Windows Server 2003 SBS. (The irony is, we’re already in the process of moving him to a Windows Server 2012 R2 environment, but the server’s so flaky we can’t even get the file share data out of there reliably without his disks timing out… but that’s another article.)
34 minutes later, the VM conversion has finished. I look over in the vSphere Web Client and confirm that the VM is actually on an isolated network. I power on the VM, open the console, and grab figurative popcorn. “Getting devices ready”… hmm… seems there’s some kind of driver injection going on… and then, with no further ado, I get to the login screen. I check the vSphere Client to see if VMware tools is installed – nope. Not surprised not really disappointed, it would have been really cool if vCenter Converter brought them in, but that would just be asking too much.
I log onto the machine with the local admin account. First thing, I look at the network card. It’s there, but set to DHCP. Static IP settings are missing. Not surprising, since it’s a new network card. That’s all right, I just type in some new settings. I type in the same settings as the old VM had, expecting problems with hidden devices. And yes – that’s the case. “Already assigned to another adapter”. I click past it and proceed.
At this point, I’m happy enough to call the restore a success. It boots, and everything important (disks and network) seems to work, as well as the size of the VM (cores, RAM, disk layout etc) being appropriately set as by magic. Very convenient considering. I just kick off an install of VMware tools, making sure that wouldn’t cause any problems, and that’s when I reach some minor netpain:
Call “VirtualMachine.MountToolsInstaller” for object “server01.contoso.com” on vCenter Server “VCENTER” failed.
vix error code = 21002
This virtual machine does not have a CD-ROM drive configured. A virtual machine must have a CD-ROM drive configured for this option to work.
I just hot-add an optical drive into the VM, without rebooting. (Sometimes I love vSphere), and try again. VMware Tools installs like a champ, and I get to reboot to finalize the install. Nice!
Finally, I get to log in to the backup server, open up the Hyper-V manager, and delete the intermediate VM that was registered in Hyper-V. It has served its purpose. Also, can’t remember deleting the VHDX files, which keep the actual data, because deleting the VM does not also delete the virtual hard disks.
So… once this is all set up, this is my workflow for spinning up a Hyper-V VM backed up by Veeam on our vSphere setup:
- Perform a Veeam restore of the Hyper-V VM onto the Hyper-V role on the backup server itself. Use suitable scratch space on the local server.
- Run VMware vCenter Converter, to convert an offline VM from Hyper-V server. Source server localhost, make sure to use the built-in local administrator account (not any old admin account) due to UAC shenanigans.
- Target your vCenter server, and restore onto suitable storage in the cluster.
- Boot up the VM, add a CD-ROM drive, install VMware tools, reboot.
- Set up proper IP addressing, reboot again.
- Test, and bring into production.
- Nuke the intermediate Hyper-V VM on the backup server. Make sure to also delete the associated VHDX files.
Entirely doable, although it involves two copies of the entire VM data, it’s not exactly efficient. But it’s good enough for now. 🙂
I’m wondering if anyone knows how to determine if there is an actual CD ROM drive device attached to a VM. This is different from an attached CD ROM Media file (ISO, etc.).
I was recently doing a round of VM Tools and Hardware upgrades. There were a few that failed to upgrade tools. Some failed because a previous uninstall attempt had failed (https://kb.vmware.com/s/article/1001354 — if anyone knows a reliable way to detect this, please let me know as well — that’s my next project. I tried scanning for the registry keys, but that didn’t return anything, and I’m fairly confident there are more VMs in the environment in this state). However, one VM failed with the error:
Call "VitualMachine.MountToolsInstaller" for object "VMName" on vCenter Server "vcenter" failed.
vix error code = 21002
This virtual machine does not have a CD-ROM drive configured. A virtual machine must have a CD-ROM drive configured for this option to work.
So due to these errors, as well as some other issues encountered, I decided to come up with a script that will detect potential issues in upgrading tools and hardware. Right now, I’m trying to detect when the CD-ROM device does not exist.
For the machine in question, I tried Get-VM VM | Get-CDDrive, and as expected, it returned null. So I scanned the cluster, and found a bunch more in this condition. But it didn’t seem to be correct. I tried Get-VM | ? { ([array]$_.CDDrives).Count -eq 0 } and this returned fewer, so it seemed believable. However, I ran this against the list of VMs that were recently upgraded, and 13 reported not having a CD Rom drive via that method — and only 1 of these 13 had this issue, so that doesn’t seem to be the right method to determine what I’m looking for. It seems like the CDDrives property does not map to a device, but an ISO, or some other host/remote device — even though when I look at some of the VMs, these are all empty. So it could be possible this is the method, and these VMs somehow had the CD Drive disabled after the fact, but I don’t know why that would be.
Any ideas of a fail-proof way to detect if there is a CD Rom Drive?
-
#1
Доброго времени суток! Обновил vsphere 5.5 до версии 6.5. В связи с этим на всех виртуальных машинах повылезали алярмы:
Код:
Vmware tools is outdated on this virtual machineКогда жамкаю на обновить получаю такое
The required VMware Tools ISO image does not exist or is inaccessible.
vix error code = 21001
Unable to install VMware Tools. An error occurred while trying to access image file «/usr/lib/vmware/isoimages/windows.iso» needed to install VMware Tools: 2 (No such file or directory). Please refer the product documentation or KB article 2129825 for details about how to get VMware Tools package for this guest operating system.
Какой iso образ требуется? ISO с vSphere 6.5 или c vCenter?
— -Подумал и добавил — —
или еще какой то? Можно ли без ISO обновить?
Последнее редактирование модератором: 08.10.2020
-
#2
Код:
isolation.tools.autoInstall.disable = TRUEпоставьте в FALSE

Последнее редактирование модератором: 08.11.2018
-
#3
Доброго времени суток! Обновил vsphere 5.5 до версии 6.5. В связи с этим на всех виртуальных машинах повылезали алярмы:
Код:
Vmware tools is outdated on this virtual machineКогда жамкаю на обновить получаю такое
Какой iso образ требуется? ISO с vSphere 6.5 или c vCenter?
— -Подумал и добавил — —
или еще какой то? Можно ли без ISO обновить?:gowork:
у меня такая же проблема, но я не могу найти где этот ключ добавлять.. А если у меня свыше ста виртуальных машин — мне что в каждой этот ключ добавлять ??
Последнее редактирование модератором: 08.10.2020
-
#4
проблема возникла только с одной виртуальной машиной и на одном ESXi? Если Выполнить миграцию виртуальной машины на другой ESXi, то проблема сохраняется?
-
#5
у меня только на некоторых ESXi в HA-кластере почему-то не работает, а на некоторых работает..
Последнее редактирование модератором: 08.10.2020
-
#6
у меня только на некоторых ESXi в HA-кластере почему-то не работает, а на некоторых работает..:upset:
Попробуйте подключиться к ESXi (где обнаружена проблема) по SSH и выполнить команду
Код:
ls -la /usr/lib/vmware/isoimages/Далее по статье
-
#7
у меня там совсем плохо. вывод пустой
-
#8
в смысле пусто? С проблемного ESXi дайте вывод с корня
-
#9
Я нашел в логах вот это
2019-04-24T07:04:45.493Z DEBUG lun — naa.200049454505080f
2019-04-24T07:04:45.493Z DEBUG Trying /vmfs/devices/disks/naa.200049454505080f
2019-04-24T07:04:45.525Z cpu27:3428934)Partition: 861: MBR table with partition type ‘0xee’ detected on naa.200049454505080f. However, it does not have a valid GPT table. Is this a valid MBR disk?
2019-04-24T07:04:45.525Z cpu27:3428934)WARNING: Partition: 1270: Partition 9 is active, failure to update partition table for naa.200049454505080f
2019-04-24T07:04:45.558Z cpu27:3428934)Partition: 861: MBR table with partition type ‘0xee’ detected on naa.200049454505080f. However, it does not have a valid GPT table. Is this a valid MBR disk?
2019-04-24T07:04:45.558Z cpu27:3428934)WARNING: Partition: 1270: Partition 9 is active, failure to update partition table for naa.200049454505080f
2019-04-24T07:04:45.929Z ERROR Exception: The primary GPT table is corrupt, but the backup appears OK, so that will be used. Fix primary table ? diskPath (/dev/disks/naa.200049454505080f) diskSize (15261696) AlternateLBA (1) LastUsableLBA (15261662)
2019-04-24T07:04:45.929Z INFO Discovered lun — naa.200049454505080f (console /vmfs/devices/disks/naa.200049454505080f) — JetFlash Mass Storage Dev (7452 MiB, vmkusb)
2019-04-24T07:04:45.930Z DEBUG lun — naa.60060160f1503500f28e04860afee411
2019-04-24T07:04:45.930Z DEBUG Trying /vmfs/devices/disks/naa.60060160f1503500f28e04860afee411
2019-04-24T07:04:46.012Z DEBUG Found overlap in fsTable: ‘vmfs3’ .. overriding ‘<class ‘weasel.fsset.vmfs3FileSystem’>’ with ‘<class ‘weasel.fsset.vmfs3FileSystem’>’.
2019-04-24T07:04:46.013Z DEBUG Executing: partedUtil getptbl /vmfs/devices/disks/naa.60060160f1503500f28e04860afee411
Вывод ls -la
Код:
 ls -la
total 745
drwxr-xr-x    1 root     root           512 Apr 23 13:29 .
drwxr-xr-x    1 root     root           512 Apr 23 13:29 ..
-rw-------    1 root     root            90 Apr 24 08:25 .ash_history
-r--r--r--    1 root     root            20 Apr 18  2018 .mtoolsrc
lrwxrwxrwx    1 root     root            49 Aug  2  2018 altbootbank -> /vmfs/vo                 lumes/918fd6ea-b4565fa8-8059-f94e7437a97c
drwxr-xr-x    1 root     root           512 Aug  2  2018 bin
lrwxrwxrwx    1 root     root            49 Aug  2  2018 bootbank -> /vmfs/volum                 es/51d7dbe1-addd68f1-4fb4-eb6e2e62a538
-r--r--r--    1 root     root        505734 Apr 18  2018 bootpart.gz
drwxr-xr-x   16 root     root           512 Apr 24 08:25 dev
drwxr-xr-x    1 root     root           512 Mar 30 16:40 etc
drwxr-xr-x    1 root     root           512 Aug  2  2018 lib
drwxr-xr-x    1 root     root           512 Aug  2  2018 lib64
-r--r--r--    1 root     root         18571 Aug  2  2018 local.tgz
drwxr-xr-x    1 root     root           512 Apr 23 13:29 locker
drwxr-xr-x    1 root     root           512 Aug  2  2018 mbr
drwxr-xr-x    1 root     root           512 Aug  2  2018 opt
drwxr-xr-x    1 root     root        131072 Apr 24 08:25 proc
lrwxrwxrwx    1 root     root            23 Aug  2  2018 productLocker -> /locke                 r/packages/6.5.0/
lrwxrwxrwx    1 root     root             4 Apr 18  2018 sbin -> /bin
lrwxrwxrwx    1 root     root            12 Aug  2  2018 scratch -> /tmp/scratch
lrwxrwxrwx    1 root     root            49 Aug  2  2018 store -> /vmfs/volumes/                 56433ca7-649f769d-31e8-0027b5a0005f
drwxr-xr-x    1 root     root           512 Aug  2  2018 tardisks
drwxr-xr-x    1 root     root           512 Aug  2  2018 tardisks.noauto
drwxrwxrwt    1 root     root           512 Apr 24 08:01 tmp
drwxr-xr-x    1 root     root           512 Aug  2  2018 usr
drwxr-xr-x    1 root     root           512 Aug  2  2018 var
drwxr-xr-x    1 root     root           512 Aug  2  2018 vmfs
drwxr-xr-x    1 root     root           512 Aug  2  2018 vmimages
lrwxrwxrwx    1 root     root            18 Apr 18  2018 vmupgrade -> /locker/vm                 upgrade/
-
#10
Даже картинка есть
-

photo606.png
77,1 КБ
· Просмотры: 3
-
#11
Похоже flash диски помирают у вас. Попробуйте перейти в
Код:
/usr/lib/vmware/isoimages/и создать там файл — похеру какой

-
#12
лучше зайти сразу в
Код:
/vmfs/volumes/56433ca7-649f769d-31e8-0027b5a0005fи там создать попытаться, но думаю ничего не получится
Последнее редактирование: 08.10.2020
-
#13
Вобщем такие дела
Код:
 cd /vmfs/volumes/56433ca7-649f769d-31e8-0027b5a0005f
-sh: cd: [B]can't cd to /vmfs/volumes/56433ca7-649f769d-31e8-0027b5a0005f[/B]
-
#14
че делать то в итоге?:wtf:
-
#15
ошибка, которая у вас возникает связана с недоступностью USB диска. На данном разделе хранятся ISO образы VMware tools. Из-за этого не получается выполнить обновление VMware tools. Так как в логах были зафиксированы ошибки, которые указывают на повреждение данных, то рекомендуется выполнить проверку USB диска. Возможно потребуется замена USB диска и переустановка ESXi. Как то так. Работки подвалило.
Последнее редактирование модератором: 08.10.2020
Hello,
I’m working on non-consumable IAP’s and when I try to validate a receipt, I always get this status code 21002, which means my receipt-data property was malformed or missing. But I’ve been doing exactly how I saw on apple’s documentation. What am I missing?
Code Block guard let receiptFileURL = Bundle.main.appStoreReceiptURL, FileManager.default.fileExists(atPath: receiptFileURL.path) else { return } let receiptData = try? Data(contentsOf: receiptFileURL, options: .alwaysMapped) guard receiptData != nil else { UserDefaults.standard.set(false, forKey: "isSubscribed") return } var recieptString = receiptData?.base64EncodedString() ?? "" let jsonDict : [String : Any] = ["receipt-data" : recieptString, "password" : Constants.ConstantValues.autoRenewableReceitPassword.rawValue, "exclude-old-transactions" : false] let httpBody = try? JSONSerialization.data(withJSONObject: jsonDict, options: []) let storeURL = URL(string: Constants.ConstantValues.verifyReceiptSandboxURL.rawValue)! var storeRequest = URLRequest(url: storeURL) storeRequest.httpMethod = "POST" storeRequest.httpBody = httpBody storeRequest.setValue("Application/json", forHTTPHeaderField: "Content-Type") let task = URLSession.shared.dataTask(with: storeRequest) { [weak self] (data, response, error) in if let data = data, let jsonData = try? JSONSerialization.jsonObject(with: data, options: .allowFragments) { /* Status code is always 21002 */ } } } task.resume()
Replies
There are different ways to handle this. One suggestion is to obtain the complete base64 encoded appStoreReceipt (in your case — recieptString) and manually validate the contents using the Terminal app — curl command line tool. Here’s how to do so.
curl -d ‘{ «exclude-old-transactions»: true «password»:»yyyy» «receipt-data»: «xxxx»}’ https://sandbox.itunes.apple.com/verifyReceipt
curl -d ‘{ «exclude-old-transactions»: true «password»:»yyyy» «receipt-data»: «xxxx»}’ https://buy.itunes.apple.com/verifyReceipt
Where exclude-old-transactions is used to limit the contents of the latest_receipt_info to only the most recent entry and
«password» is the request key to indicate the shared-secret that is required when the content is an auto-renewing subscription.
yyyy — is the shared-secret and
xxxx — is the base64 encoded content of the appStoreReceipt.
When manually validating the receipt make sure that the double quote characters are not the curly type. The use of the curly quotes will themselves result in status 21002 for a valid appStoreReceipt.
rich kubota — rkubota@apple.com
developer technical support CoreOS/Hardware/MFI
I have the same issue while implementing IAP in dev environment. I guest it’s related to In-app purchases do not work on the simulator things.
Before doing receipt validation and encounter the problem bakedPotato mentioned, I got problem loading products, and have worked around.
Then I tested the receipt and always 21002. I tried sample receipts from internet (and my old pre-iOS 13 receipt data) with same curl script and succeeded. Then I decoded the base64 with online decoder and compared pre-iOS 13 receipts with new one. It seems the new one has different information from old one, for examples, it misses something like «ProductionSandbox0», «#Apple Worldwide Developer Relations»…, but it has «Xcode0», «StoreKit1» that are not in the pre-iOS 13 one.
Sample pre-iOS 13 receipts
New receipt:
Code Block MIAGCSqGSIb3DQEHAqCAMIACAQExDzANBglghkgBZQMEAgEFADCABgkqhkiG9w0BBwGggCSABIIBOzGCATcwDwIBAAIBAQQHDAVYY29kZTALAgEBAgEBBAMCAQAwFwIBAgIBAQQPDA1jb20uYnVraS5idWtpMAwCAQMCAQEEBAwCNzkwEAIBBAIBAQQIse//TgcAAAAwHAIBBQIBAQQUjIZ+RiRb9aC7bpQ3J2LCtkv3vhMwCgIBCAIBAQQCFgAwIgIBDAIBAQQaFhgyMDIxLTAzLTA4VDE3OjQ4OjM0KzA4MDAwbAIBEQIBAQRkMWIwDAICBqUCAQEEAwIBATAjAgIGpgIBAQQaDBhjb20uYnVraS5idWtpLmNvaW5zLjMwMDAwDAICBqcCAQEEAwwBMDAfAgIGqAIBAQQWFhQyMDIxLTAzLTA4VDE3OjQ4OjM0WjAiAgEVAgEBBBoWGDQwMDEtMDEtMDFUMDg6MDA6MDArMDgwMAAAAAAAAKCCA3gwggN0MIICXKADAgECAgEBMA0GCSqGSIb3DQEBCwUAMF8xETAPBgNVBAMMCFN0b3JlS2l0MREwDwYDVQQKDAhTdG9yZUtpdDERMA8GA1UECwwIU3RvcmVLaXQxCzAJBgNVBAYTAlVTMRcwFQYJKoZIhvcNAQkBFghTdG9yZUtpdDAeFw0yMDA0MDExNzUyMzVaFw00MDAzMjcxNzUyMzVaMF8xETAPBgNVBAMMCFN0b3JlS2l0MREwDwYDVQQKDAhTdG9yZUtpdDERMA8GA1UECwwIU3RvcmVLaXQxCzAJBgNVBAYTAlVTMRcwFQYJKoZIhvcNAQkBFghTdG9yZUtpdDCCASIwDQYJKoZIhvcNAQEBBQADggEPADCCAQoCggEBANt/kDwscw/blyZLk7sK+KEhPshh2STIXh91PtqT2zEakYC5v+UMyzy7DkRiJvoEKbZJ52/gG+YNaM0lbsN2CPVKC656dDzEqQuzz2IP+7S899uEXijrRw3x7Yus9Z+wCTijbnvLJlAKGuGJ0XJ2CzlMy09uwLNft5W6uahdSnSr729BpX4Jjbo9Pc1wV9jt79Xad8iTBBzvCYh4Zc6B8o1y5wcabiYS9zKxDbs4kGsGxPwN5ZVQzZHIuiX0WMmM4XHbSkXzLRmWA1aBpkTudXdbU894rF26Pl9QK1wpjN3C1yoX3yK01+R4qK+obafB2mgtZszPKQtQLOPC++ZfEsECAwEAAaM7MDkwDwYDVR0TAQH/BAUwAwEB/zAOBgNVHQ8BAf8EBAMCAoQwFgYDVR0lAQH/BAwwCgYIKwYBBQUHAwMwDQYJKoZIhvcNAQELBQADggEBALIA4Dzx6OlivcDWHUCeV7k4kHd2UtKoS3BuuGeZ+7OKVZ/vHSi4XyrRc581Rze7RtN2EPLwaezNYplx+WCKhEg4xL2LZyW5q2wzZa3Ywpp4SA/pzMEnDcbPZDxtgFkzjMo2BioRG41Jzgj/ZsBHKEvrWsErCVYspaoJA3syMdzohXhIzsDFEhFqDwyuLwXKb3pkfyAsdeZMsRLT/eMfXg19uFjXoHzkf2Orl5orwyrY0LLh1VoNORtvZyipEoPWh3htmb1eswrgmM726sOObWnrt0CBPYc9cFHRxF2Npdx/alga3mB2N1Ls/6wZXQwVL4oP9YnI1ysdHuwrkQWnPU8xggGPMIIBiwIBATBkMF8xETAPBgNVBAMMCFN0b3JlS2l0MREwDwYDVQQKDAhTdG9yZUtpdDERMA8GA1UECwwIU3RvcmVLaXQxCzAJBgNVBAYTAlVTMRcwFQYJKoZIhvcNAQkBFghTdG9yZUtpdAIBATANBglghkgBZQMEAgEFADANBgkqhkiG9w0BAQsFAASCAQAlfjPYZ/c32kRxPfA05Dx+vfq2Ri6t/FecNic3T135VWnP6ameGee377IW+wzx8vlzBYN3hzDd9Byx+S/UXmayXwApQnm0yLeGnrmHd+wPt+isBY6gFBAoUE3fvhVga7jjxzB7o+2Pm7LI+eLYjTIuODLXmD/54fmF1l31Us/3+vc4scvW0d63vsRbt5bJHIMqOG/JNvtetQmvl8xZa7wehOCPKi1W6aKEMWJalce7fD2Ps2EYqS1OWawj0IseqSfuCTLz5OMq+TFSEYn8bjmTBgygihP6AK2sRBealAxeNBtH+Jy9F8pP1ubbfkKWMSuOz1iAvQCbp0LQPxQdFE9LAAAAAAAA
I will try ad-hoc later and I guess it will get right there.