![]()
-
- Share
Yes, this is only for VMware Workstation, maybe Fusion, but not ESXi.
-

1

Link to comment
Share on other sites

-
- Share
Just now, Naki said:
Yes, this is only for VMware Workstation, maybe Fusion, but not ESXi.
ok thanks, so for me the last version is 3.0.0?
i don’t know where is my problem…
somebody have mojave on esxi 6.7 U3 works ?
Link to comment
Share on other sites

-
- Share
Link to comment
Share on other sites
- 2 weeks later…
-
- Share
On 11/1/2019 at 12:58 PM, edem2302 said:
ok thanks, so for me the last version is 3.0.0?
i don’t know where is my problem…
somebody have mojave on esxi 6.7 U3 works ?
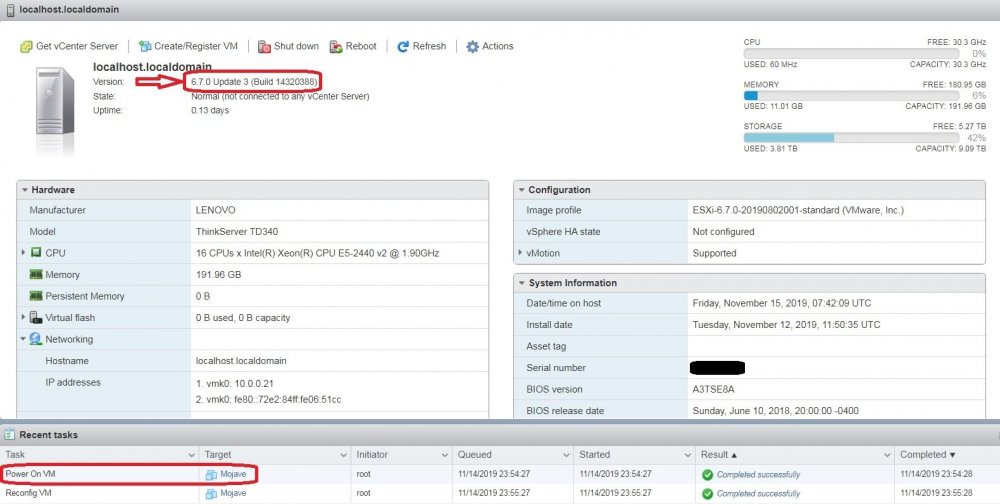
I was able to start up and run my Mojave VM under ESXi 6.7 U3 — no issues. I did need to reinstall the Unlocker 3.0 after the ESXi upgrade (from 6.7 U2). Unlocker 3.0 seemed to work fine before for me so I stayed with 3.0…never used 3.01 or 3.02. When installing macOS, make sure you erase the hard drive partition (using Apple’s Disk Utility) and set the new partition to be of type APFS. I believe, I used to be able to use HFS+ in High Sierra, but for Mojave it is absolutely necessary to use APFS as the file system.

Edited November 15, 2019 by Cybernut
-
1
Link to comment
Share on other sites
-
- Share
On 11/15/2019 at 9:07 AM, Cybernut said:
I was able to start up and run my Mojave VM under ESXi 6.7 U3 — no issues. I did need to reinstall the Unlocker 3.0 after the ESXi upgrade (from 6.7 U2). Unlocker 3.0 seemed to work fine before for me so I stayed with 3.0…never used 3.01 or 3.02. When installing macOS, make sure you erase the hard drive partition (using Apple’s Disk Utility) and set the new partition to be of type APFS. I believe, I used to be able to use HFS+ in High Sierra, but for Mojave it is absolutely necessary to use APFS as the file system.
Ok thanks for the reply !
i can’t use apple disk utility because i can’t go after the apple logo…
i have try different iso (make with my macbook) the iso seems good but can’t boot…
i have a boot loop.
Link to comment
Share on other sites
-
- Share
7 hours ago, edem2302 said:
Ok thanks for the reply !
i can’t use apple disk utility because i can’t go after the apple logo…
i have try different iso (make with my macbook) the iso seems good but can’t boot…
i have a boot loop.
I recommend uninstalling and re-installing Unlocker 3.0 for ESXi. If you still get boot loop after that, then that means the problem is with your Mojave iso.
Link to comment
Share on other sites
-
- Share
Hello!
I have successfully installed Mojave using unlocker. (ESXi6.7U3)
However, even if Tools are installed, all sounds become noise.
Is there a solution for this problem?
Thanks.
Link to comment
Share on other sites
-
- Share
On 11/20/2019 at 6:27 AM, Cybernut said:
I recommend uninstalling and re-installing Unlocker 3.0 for ESXi. If you still get boot loop after that, then that means the problem is with your Mojave iso.
yes, i have try uninstall and re-installing 4 or 5 times, same result.
maybe it’s my mojave you’re right…
i’ll try…but i don’t see where i made a mistake…
thanks for your help
Link to comment
Share on other sites
-
- Share
I have run into a problem using Unlocker and Catalina (10.15.1 19B88). I have tried this from a generated iso, using various tools in the macAdmin community (namely vfuse, AutoDMG, and installinstallmacos.py).
I am using an Intel Nuc (NUC Kit NUC6i7KYK) with the following details below:

As my main goal here is to test our DEP & MDM workflows on a non apple based esxi machine, I need to use a keyboard input. However, this appears to generate a problem. When setting the device to Apple macOS 10.14 as the VMs guest, the machine boots successfully, but keyboard input does not work correctly.
For instance, here:

I am presented with an authentication window, but, every key I press automatically initiates the cancel button, in the example above, I am hitting command which somehow sets «cancel».
The only thing I can think of here is unlocker and changes in 10.15.. As the behavior doesn’t happen with Mojave and below, and didn’t happen with Catalina betas either.
Alternatively, is anyone else having isues with running Catalina 10.15 (non-beta software) on ESXi 6.7u3 with Unlocker and having issues with keyboard inputs?
Link to comment
Share on other sites

-
- Share
Dear Donk,
Thank you so much for the Unlocker releases. They’re always of major help. The issue I see right now is the following:
All recent unlockers modified to work with VMware Workstation 15.5.x:
https://github.com/DrDonk/unlocker
https://github.com/paolo-projects/unlocker
https://github.com/BDisp/unlocker
have the following issue:
You cannot install any macOS in new machines.
The Installation ISO works fine in VMware Workstation 15.10, but it doesn’t work in VMWare Workstation 15.5.x
Upon installation of macOS 10.11x, 10.12.x, 10.13.x, 10.14.x the error displayed at the state of starting the installation upon formatting the hardddrive with DiskUtilities is: «CORRUPTED INSTALLATION DISK»
macOS Catalina 10.15.x ISOs will install only by turning board-id.reflectHost = «TRUE». If board-id.reflectHost = «FALSE» then the installation will not proceed. it will be just stuck at continue with no error message.
As I mentioned the installation media I used works fine in 15.10 and preinstalled machines with whichever version of macOS will run just fine, however it is impossible to install new ones.
I believe Unlocked is missing something. Can you please check this out?
Thank you so much!
Link to comment
Share on other sites
-
- Share
On 12/1/2019 at 2:46 AM, BWEL said:
Dear Donk,
Thank you so much for the Unlocker releases. They’re always of major help. The issue I see right now is the following:
All recent unlockers modified to work with VMware Workstation 15.5.x:
https://github.com/DrDonk/unlocker
https://github.com/paolo-projects/unlocker
https://github.com/BDisp/unlocker
have the following issue:
You cannot install any macOS in new machines.
The Installation ISO works fine in VMware Workstation 15.10, but it doesn’t work in VMWare Workstation 15.5.x
Upon installation of macOS 10.11x, 10.12.x, 10.13.x, 10.14.x the error displayed at the state of starting the installation upon formatting the hardddrive with DiskUtilities is: «CORRUPTED INSTALLATION DISK»
macOS Catalina 10.15.x ISOs will install only by turning board-id.reflectHost = «TRUE». If board-id.reflectHost = «FALSE» then the installation will not proceed. it will be just stuck at continue with no error message.
As I mentioned the installation media I used works fine in 15.10 and preinstalled machines with whichever version of macOS will run just fine, however it is impossible to install new ones.
I believe Unlocked is missing something. Can you please check this out?
Thank you so much!
Can you please post off-topic items in other threads (or create new threads if needed)? This thread is for Unlocker for ESXi, not Workstation. I do not care about issues with Workstation. And looks like you did post in other relevant threads (https://www.insanelymac.com/forum/topic/340416-unlocker-vmware-workstation-155/?do=findComment&comment=2699256) so please don’t spam.
Edited December 3, 2019 by Cybernut
Link to comment
Share on other sites
- 2 weeks later…

-
- Share
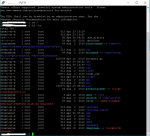
on startup

Link to comment
Share on other sites
-
- Share
1 hour ago, Cristina89 said:
on startup
I could be wrong but looks like your unlocker was not installed properly.
Did you follow the instruction to verify that the install of unlocker was successful?
If not, uninstall and reinstall unlocker and then verify it was successful.
Edited December 15, 2019 by Cybernut
Link to comment
Share on other sites
-
- Share
no error

Link to comment
Share on other sites
-
- Share
11 hours ago, Cristina89 said:
no error
Yes, no error — but to be sure there is a test (to check if install was successful).
Look in the readme.txt file — in section 4, on how to run the test.
If your test results match with readme’s results, then I am sorry, I don’t know what the problem is — but the error looks more unlocker-related than macOS-related.
Link to comment
Share on other sites
-
- Share
Test OK

Link to comment
Share on other sites
-
- Share
23 hours ago, Cristina89 said:
Test OK
Then I suspect something is wrong with your macOS installer.
I hope you build your installer iso. I never download installer iso from Internet — always a good chance of malware, etc. hidden.
I had no problems installing High Sierra (10.13.6), Mojave (1014.6) and the latest Catalina (10.15.2) using Unlocker 3.0
Link to comment
Share on other sites
-
- Share
Just an fyi. It is possible to install and run the latest Catalina (10.15.2) released on December 10, 2019, on ESXi 7.6 U3 using Unlocker 3.0.
I had some trouble installing the previous version of Catalina (10.15.1) and had given up.
But with the new Catalina I tried again and though I got the same error again (basically I was stopped during the installer loading — it never finishes loading), I tried one more time, but during VM configuration this time instead of changing my CDROM device to an IDE, I left it as a SATA device and installer loaded without problems. I proceeded with the rest of the installation, and everything worked as expected. I have not had the chance to experiment with that setting using the previous Catalina (10.15.1) once more…hopefully that will work with 10.15.1 too.
When creating the VM, I chose VM type of ESXi 7.6 U2 (since U3 type is not available). And chose macOS 10.14 (since 10.15 is not available).
Anyway, here’s the screenshots:


Edited December 17, 2019 by Cybernut
Link to comment
Share on other sites
-
- Share
error without operating system, macOS OK

Link to comment
Share on other sites
- 4 weeks later…

-
- Share
We’re a small org. We were on 6.0 and I used Unlocker 2.x to install Mojave. It was successful.
A colleague of mine upgraded to 6.5.
Now Mojave guest throws an error saying the host is not suitable or compatible when I try to power it on.
I ended up here and I wanted to try Unlocker 3.0.
I know the instructions say that I need to uninstall any existing scripts but in the process of upgrade we lost the version of script and we downloaded before. So I used 2.08, ran uninstall rebooted.
Then I downloaded 3.0 and installed it.
Script executes just fine and says it’s successful prompting me to reboot.
However when I try the script to check it returns with smcpresent = false.
We thought we had secure boot enabled but when we ran the python script from VMware, it says that Secure boot is not enabled on the host.
I’m not sure what’s causing this issue while it’s working for many people.
Any insights greatly appreciated.
Thanks.
Link to comment
Share on other sites
- 2 weeks later…
-
- Share
What’s the difference between version 3 and version 2.1?
Link to comment
Share on other sites
- 2 months later…
-
- Share
I am trying to install the unlocker 3.0. I downloaded it from: https://github.com/benevo/esxi-unlocker. The installation script referes to an unlocker.tgz which is not present in the release file.
When I rename esxi-unlocker-3.0.0.tar.gz unlocker.tgz and try to use it with the esxi-install.sh script it does seem to go through and I see the unlocker.tgz being copied to /bootbank/ and see the entry being added to /bootbank/boot.cfg but when I reboot nothing happens. If I manually execute the script etc/rc.local.d/unlocker.py then the path is indeed apply and I can run MacOS VM but if I reboot my host machine, the changes are lost and I need to re-execute the unlocker.py script again.
What am I missing, where should I download the unlocker.tgz from?
Thank you!
Link to comment
Share on other sites
- 2 weeks later…
-
- Share
Long shot I’ve got a pci to pci-e converter attached to a usb controller that passes through to windows fine but when passing to the macOS Vm I don’t get any console. Any ideas what the issue is related to?
Link to comment
Share on other sites
-
- Share
Anyone else tried ESXi 7. I did and the patch ran but the system (host) booted but I could not log into it (couldn’t find some file)
I wish to use my existing 6.5 VMs of Mojave and Catalina, which are working find but on a clean USB install of ESXi 7 the machines won’t power on without something.
I don’t need to create them, I just want/need to start them on ESXi 7
Anybody can think of a short term fix?
Link to comment
Share on other sites
-
- Share
Is an ‘upgrade’ from ESXi 6.7 (unlocker 3.0 installed) to ESXi 7.0 likely to keep currently working Mojave and Catalina VMs functioning?
Since the machines are already created the question would really be if they will continue to Power On?
I tried a fresh v7 install that did not go too well. So, now I’m exploring an in place upgrade
Any thoughts?
Link to comment
Share on other sites
-
#1
Доброго времени суток! Обновил vsphere 5.5 до версии 6.5. В связи с этим на всех виртуальных машинах повылезали алярмы:
Код:
Vmware tools is outdated on this virtual machineКогда жамкаю на обновить получаю такое
The required VMware Tools ISO image does not exist or is inaccessible.
vix error code = 21001
Unable to install VMware Tools. An error occurred while trying to access image file «/usr/lib/vmware/isoimages/windows.iso» needed to install VMware Tools: 2 (No such file or directory). Please refer the product documentation or KB article 2129825 for details about how to get VMware Tools package for this guest operating system.
Какой iso образ требуется? ISO с vSphere 6.5 или c vCenter?
— -Подумал и добавил — —
или еще какой то? Можно ли без ISO обновить?
Последнее редактирование модератором: 08.10.2020
-
#2
Код:
isolation.tools.autoInstall.disable = TRUEпоставьте в FALSE

Последнее редактирование модератором: 08.11.2018
-
#3
Доброго времени суток! Обновил vsphere 5.5 до версии 6.5. В связи с этим на всех виртуальных машинах повылезали алярмы:
Код:
Vmware tools is outdated on this virtual machineКогда жамкаю на обновить получаю такое
Какой iso образ требуется? ISO с vSphere 6.5 или c vCenter?
— -Подумал и добавил — —
или еще какой то? Можно ли без ISO обновить?:gowork:
у меня такая же проблема, но я не могу найти где этот ключ добавлять.. А если у меня свыше ста виртуальных машин — мне что в каждой этот ключ добавлять ??
Последнее редактирование модератором: 08.10.2020
-
#4
проблема возникла только с одной виртуальной машиной и на одном ESXi? Если Выполнить миграцию виртуальной машины на другой ESXi, то проблема сохраняется?
-
#5
у меня только на некоторых ESXi в HA-кластере почему-то не работает, а на некоторых работает..
Последнее редактирование модератором: 08.10.2020
-
#6
у меня только на некоторых ESXi в HA-кластере почему-то не работает, а на некоторых работает..:upset:
Попробуйте подключиться к ESXi (где обнаружена проблема) по SSH и выполнить команду
Код:
ls -la /usr/lib/vmware/isoimages/Далее по статье
-
#7
у меня там совсем плохо. вывод пустой
-
#8
в смысле пусто? С проблемного ESXi дайте вывод с корня
-
#9
Я нашел в логах вот это
2019-04-24T07:04:45.493Z DEBUG lun — naa.200049454505080f
2019-04-24T07:04:45.493Z DEBUG Trying /vmfs/devices/disks/naa.200049454505080f
2019-04-24T07:04:45.525Z cpu27:3428934)Partition: 861: MBR table with partition type ‘0xee’ detected on naa.200049454505080f. However, it does not have a valid GPT table. Is this a valid MBR disk?
2019-04-24T07:04:45.525Z cpu27:3428934)WARNING: Partition: 1270: Partition 9 is active, failure to update partition table for naa.200049454505080f
2019-04-24T07:04:45.558Z cpu27:3428934)Partition: 861: MBR table with partition type ‘0xee’ detected on naa.200049454505080f. However, it does not have a valid GPT table. Is this a valid MBR disk?
2019-04-24T07:04:45.558Z cpu27:3428934)WARNING: Partition: 1270: Partition 9 is active, failure to update partition table for naa.200049454505080f
2019-04-24T07:04:45.929Z ERROR Exception: The primary GPT table is corrupt, but the backup appears OK, so that will be used. Fix primary table ? diskPath (/dev/disks/naa.200049454505080f) diskSize (15261696) AlternateLBA (1) LastUsableLBA (15261662)
2019-04-24T07:04:45.929Z INFO Discovered lun — naa.200049454505080f (console /vmfs/devices/disks/naa.200049454505080f) — JetFlash Mass Storage Dev (7452 MiB, vmkusb)
2019-04-24T07:04:45.930Z DEBUG lun — naa.60060160f1503500f28e04860afee411
2019-04-24T07:04:45.930Z DEBUG Trying /vmfs/devices/disks/naa.60060160f1503500f28e04860afee411
2019-04-24T07:04:46.012Z DEBUG Found overlap in fsTable: ‘vmfs3’ .. overriding ‘<class ‘weasel.fsset.vmfs3FileSystem’>’ with ‘<class ‘weasel.fsset.vmfs3FileSystem’>’.
2019-04-24T07:04:46.013Z DEBUG Executing: partedUtil getptbl /vmfs/devices/disks/naa.60060160f1503500f28e04860afee411
Вывод ls -la
Код:
 ls -la
total 745
drwxr-xr-x    1 root     root           512 Apr 23 13:29 .
drwxr-xr-x    1 root     root           512 Apr 23 13:29 ..
-rw-------    1 root     root            90 Apr 24 08:25 .ash_history
-r--r--r--    1 root     root            20 Apr 18  2018 .mtoolsrc
lrwxrwxrwx    1 root     root            49 Aug  2  2018 altbootbank -> /vmfs/vo                 lumes/918fd6ea-b4565fa8-8059-f94e7437a97c
drwxr-xr-x    1 root     root           512 Aug  2  2018 bin
lrwxrwxrwx    1 root     root            49 Aug  2  2018 bootbank -> /vmfs/volum                 es/51d7dbe1-addd68f1-4fb4-eb6e2e62a538
-r--r--r--    1 root     root        505734 Apr 18  2018 bootpart.gz
drwxr-xr-x   16 root     root           512 Apr 24 08:25 dev
drwxr-xr-x    1 root     root           512 Mar 30 16:40 etc
drwxr-xr-x    1 root     root           512 Aug  2  2018 lib
drwxr-xr-x    1 root     root           512 Aug  2  2018 lib64
-r--r--r--    1 root     root         18571 Aug  2  2018 local.tgz
drwxr-xr-x    1 root     root           512 Apr 23 13:29 locker
drwxr-xr-x    1 root     root           512 Aug  2  2018 mbr
drwxr-xr-x    1 root     root           512 Aug  2  2018 opt
drwxr-xr-x    1 root     root        131072 Apr 24 08:25 proc
lrwxrwxrwx    1 root     root            23 Aug  2  2018 productLocker -> /locke                 r/packages/6.5.0/
lrwxrwxrwx    1 root     root             4 Apr 18  2018 sbin -> /bin
lrwxrwxrwx    1 root     root            12 Aug  2  2018 scratch -> /tmp/scratch
lrwxrwxrwx    1 root     root            49 Aug  2  2018 store -> /vmfs/volumes/                 56433ca7-649f769d-31e8-0027b5a0005f
drwxr-xr-x    1 root     root           512 Aug  2  2018 tardisks
drwxr-xr-x    1 root     root           512 Aug  2  2018 tardisks.noauto
drwxrwxrwt    1 root     root           512 Apr 24 08:01 tmp
drwxr-xr-x    1 root     root           512 Aug  2  2018 usr
drwxr-xr-x    1 root     root           512 Aug  2  2018 var
drwxr-xr-x    1 root     root           512 Aug  2  2018 vmfs
drwxr-xr-x    1 root     root           512 Aug  2  2018 vmimages
lrwxrwxrwx    1 root     root            18 Apr 18  2018 vmupgrade -> /locker/vm                 upgrade/
-
#10
Даже картинка есть
-

photo606.png
77,1 КБ
· Просмотры: 3
-
#11
Похоже flash диски помирают у вас. Попробуйте перейти в
Код:
/usr/lib/vmware/isoimages/и создать там файл — похеру какой

-
#12
лучше зайти сразу в
Код:
/vmfs/volumes/56433ca7-649f769d-31e8-0027b5a0005fи там создать попытаться, но думаю ничего не получится
Последнее редактирование: 08.10.2020
-
#13
Вобщем такие дела
Код:
 cd /vmfs/volumes/56433ca7-649f769d-31e8-0027b5a0005f
-sh: cd: [B]can't cd to /vmfs/volumes/56433ca7-649f769d-31e8-0027b5a0005f[/B]
-
#14
че делать то в итоге?:wtf:
-
#15
ошибка, которая у вас возникает связана с недоступностью USB диска. На данном разделе хранятся ISO образы VMware tools. Из-за этого не получается выполнить обновление VMware tools. Так как в логах были зафиксированы ошибки, которые указывают на повреждение данных, то рекомендуется выполнить проверку USB диска. Возможно потребуется замена USB диска и переустановка ESXi. Как то так. Работки подвалило.
Последнее редактирование модератором: 08.10.2020
** UPDATE 12/03/2020**
THIS WORKS WITH BIG SUR TOO!
This now installs natively on ESXi 6.7 Update 3 Patch 02 — 202004002
I followed my same procedure below after downloading Catalina and Big Sur.
Note: I am running as root using sudo su —
** I increased the image sise to 13GB as Some Catalina versions were greater than 8GB and Big Sur is 12.9GB
hdiutil create -o /tmp/catalina -size 13000m -layout SPUD -fs HFS+J
hdiutil attach /tmp/catalina.dmg -noverify -mountpoint /Volumes/install_build
/Applications/Install macOS Catalina.app/Contents/Resources/createinstallmedia —volume /Volumes/install_build
hdiutil convert /tmp/catalina.dmg -format UDTO -o ~/Downloads/catalina
mv ~/Downloads/catalina.cdr ~/Downloads/catalina.iso
rm -f /tmp/catalina.dmg.
Next, I copy the ISO to a external system (my desktop) an a network drive where I will install from.
In VMware (I am using vCenter)
Create a new VM
Name it, I use macos-catalina
Pick a folder, Pick a Server/resource Pool and Pick Storage
For Compatibility, click the dropdown and select ESXi 6.7 Update 2 and later
For Select OS, click the Gueast OS Family drop down and select Other
For Guest OS Version, click the dropdown and select Apple macOS 10.14 (64-bit)
I add 4 vCPU and 4GB memory as a base.
Under the datastore, I choose Disk Provisioning Thin Provision
For Video Cars, I choose Auto-detect settings
Finish and save the VM
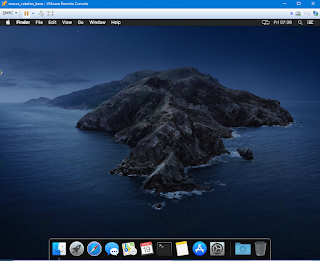
To install, I open a remote console on the VM
Start the VM
Select VMRC — > Removable Devices -> CD/DVD Drive1 -> Connect to Disk Image File (ISO)
Navigate to ISO file and attach.
In the OS boot menu, select SATA CD/DVROM, then boot to the installer
From the install menu, select Disk Util
Select the VMware Virtual Disk
Select Erase
Give the disk a name
Once erased, exit the disk util
Start the macOS installer and complete the install steps. This takes about 45 minutes total.
Once installed, disconnect the ISO from the console client.
Reboot one last time to make sure it still boots OK.
** UPDATE 04/15/2020**
Seems you need to start at Mojave to be able to download the full Catalina package from the App Store. I started from Mojave so I never ran into the issues found in the comments. Check the comments for what Adam had to say…
** UPDATE 10/17/2019**
After applying the first update, the VM was rendered un-bootable again. That is the same crash that is originally experienced. SEE Boot Work Around at the bottom.
This exercise was to get a running MacOS Catalina VM instance running on VMware. I first wrote this for Catalina Beta but afte rthe official release, a couple things changed. So now it is how to install Catalina on ESXi 6.7.
I am using a 2013 Mac Pro with VMWare 6.7 U2 installed. I have High Sierra and Mojave VMs running on the host. Running VMs on VMware is something I’ve done for a few years.
A lot has changed in Catalina. Admittedly, I am not a MacOS expert. I’m not particularly good a Mac user either. So, I can’t speak to the changes only that it is not currently (Oct 1, 2019) frienld to install on VMware ESXi. Catalina runs fine once you get a working VM though.
The MacOS Part
As of this writing (10/10/2019), You cannot upgrade and existing VM running High Sierra or Mojave. At least, I could not successfully upgrade and boot to Catalina.
If at first You Don’t Succeed…
Note: You need to start at Mojave to upgrade to download the fill Catalina package.
I started with trying to upgrade a Mojave VM to Catalina. I just downloaded Catalina from the Apple Store (Search: macos catalina).
I followed the prompts and downloaded the Catalina installation image. I ran though the installation process which seemed to go pretty well. That is until it booted from the upgraded image. Then, it crashed. You can’t see the crash, you just has an frozen Apple logo.
To see what is happening, reboot the VM and hold down the Windows Key + v for Verbose mode and see the boot attempt and the kernel panic. Changing VMware setting had no affect. After a couple hours, I gave up.
Try Something Else… And It Worked!
My next tack was to boot from a Catalina ISO. First, I had to create one. I’d done this before on Mojave so it wasn’t all unfamiliar. The steps are below. I am not sure where they came from.
First, I had to boot back to Mojave. I had found by rebooting the VM to the Boot Manager settings (you can set this in the VM settings or press escape before the OS loads in a VM console) and Selecting the EFI VMware Virtual SATA Hard Drive (0,0) option (not Mac OS X), that boots to my original Mojave image.
To start from scratch on a Mojave instance, download Catalina from the app store (Search: macos catalina). Just don’t run the installer. You need the app image to create the ISO.
Once Mojave loaded, to build the ISO file, I start by making the virtual disk:
hdiutil create -o /tmp/catalina -size 13000m -layout SPUD -fs HFS+J
Then, I mount it to I can copy the installer to it
hdiutil attach /tmp/catalina.dmg -noverify -mountpoint /Volumes/install_build
Now I copy the installer to the mounted image
sudo /Applications/Install macOS Catalina.app/Contents/Resources/createinstallmedia —volume /Volumes/install_build
The image is automatically mounted and is on your desktop. Select it and un-mount the image.
Now convert the image to an ISO file. You can put the file anywhere but I used ~/Downloads for simplicity
hdiutil convert /tmp/catalina.dmg -format UDTO -o ~/Downloads/catalina
Now rename the file from catalina.cdr to catalina.iso
mv ~/Downloads/catalina.cdr ~/Downloads/catalina.iso
You can delete /tmp/catalina.dmg.
Copy the ISO to your PC or where ever you want to attach it to the VM via a console session. I use WinSCP to copy to my PC.
The VMware Part
I created a blank VM with the following settings:
These are important. Just follow my lead here.
Guest OS: Other
Guest OS Version: Apple macOS 10.14 64-bit
2 vCPU
4GB Memory
100GB Disk space
 |
| VMware settings |
Once the VM is saved, edit the settings and change to
Guest OS: Windows
Guest OS Version: Windows 10 64-bit
 |
| Changed to Windows 10 |
Next…
Open a Remote Console (VMRC)
Power on the VM
Click VMRC —> Removeable Devices —> CD/DVD —> Connect to Disk Image File
Navigate to the catalina.iso file you saved where ever, Click Open
 |
| Attach ISO |
Now ALT+CTRL+Insert in the VM to reboot it. It will boot from the ISO automatically. If not select the SATA CDROM frm the EFI menu. Note, sometimes it took several reboots for it to successfully boot from the ISO. usually, just one.


Once the installer image loads, use the disk tool to erase the VMware virtual disk (100GB in my case)

Use the default erase options (Note: Your keyboard doesn’t work so just accept «Untitled»)


Quit the disk utility
Next, choose to install MacOS

Follow the install steps and install Catalina

Once the install finishes, it will reboot to the OS. Make sure you detach the ISO so you don’t boot to the installer again.
Reset the VM
The VM should boot to the image and continue installing Catalina. When it finishes (10 or so minutes) it will reboot.

After the reboot, it will freeze on the blank Apple logo or unsuccessfully load MacOS X. Don’t fret.. We’re OK.

Power off the VM
Edit the VM setting and change the OS values.
Guest OS: Other (Apple Mac OS X)
Guest OS Version: Apple macOS 10.14 64-bit

Power on the VM and it will boot to and load Catalina.
Once you go through the setup steps and Catalina is ready to go.


Good luck on your adventure!
Boot Work Around
Added 10/17/2019
After applying the update, the VM was no longer booting. Same cast at boot with the Apple Logo and no progress.
the work around is to change the boot order in EFI boot settings to boot to SATA Hard Drive 0.0
You need to enter EFI boot configuration for the VM. You can hit escape a the VMware logo or go to the VM settings and set to boor to EFI next boot. Boot/reboot to get the EFI menu

Enter Setup

Configure Boot Options

Change Boot Order

Press Enter then change the boot order in the pop up window using + and — keys. Press Escape when done editing.
Move EFI Virtual SATA Hard Drive (0.0) to the Top
You can see I change the overall boot order to:
Hard Drive
CDROM
Mac OS X

Press Enter to Commit changes and exit
Exit boot manager and reset the VM.
Now the VM will always boot to the Hard Drive.
I am avoiding applying updates.