If you are using VMware vCenter converter standalone tool version 6.2.x for P2V / V2V to migrate the obsolete windows Server 2000 to 2008 SP1 / SP2, 2008 R2 or later then may face very common errors : Unable to complete converter agent installation error code 1603 or similar errors as shown below:
vCenter Converter Standalone Tool common error list and solution is here.
vCenter Tool – Common Issues
1. The VMware vCenter Converter Standalone Agent service failed to start due to the following error: The service did not respond to the start or control request in a timely fashion. Unable to complete converter agent installation error code 1603.
2. Error 1053: “The service did not respond in a timely fashion” when attempting to start, stop or pause a service
3. A timeout was reached (30000 milliseconds) while waiting for the VMware vCenter Converter Standalone Agent service to connect.
4. A service does not start, and events 7000 and 7011 are logged in the Windows event log.
5. Event ID 7009 can be get in Windows event viewer with content “A timeout was reached (30000 milliseconds) while waiting for the VMware vCenter Converter Standalone Worker service to connect”.
6. Error 7000: The failed to start due to the following error: The service did not respond to the start or control request in a timely fashion.
7. This issue occurs because Service Control Manager generates an event if a service does not respond within the defined timeout period (the default timeout period is 30000 milliseconds).
8. A VMware product fails to install with the error 1603 (1009167)
9. vCenter Converter 6.2 failed to install on Windows Server 2008 R2 or later (64993)
10. VMware vcenter converter standalone server service not starting 1053
11. Error 1603: A fatal error occurred during installation
12. When install vCenter Converter standalone 6.x, the installation finished with pop window “Could not start service“.
13. vCenter Converter Agent, vCenter Converter Server or vCenter Converter Worker service cannot turn to “Running” in Windows Service Manager.
14. VMware vcenter converter standalone agent service failed to start
15. The VMware vCenter Converter Standalone Agent service failed to start due to the following error.
I know you have frustrated from above VMware vCenter converter tool 6.2.x errors but don’t worry i have the Best Solution here for all above vCenter converter tool errors list.
Best Solution of Above Error List
The Service Control Manager will generate an event if a service does not respond within the defined timeout period (the default timeout period is 30000 milliseconds). To resolve the error: Unable to complete converter agent installation error code 1603, just use the Registry Editor to change the default timeout value for all services to follow the following steps:
Increase the service timeout period
To perform this procedure, you must have membership in Administrators, or user must be member of Administrator group.
Warning: Incorrectly editing the registry may severely damage your system. Before making changes to the registry, you should back up any valued data.
To change the service timeout period:
Step 1: Click the Start button, then click Run, type regedit, and click OK.
Step 2: In the Registry Editor, click the registry subkey HKEY_LOCAL_MACHINESYSTEMCurrentControlSetControl
Step 3: Select Control Folder, look at right-hand the ServicesPipeTimeout entry, right-click that entry and then select Modify.
Note: If the ServicesPipeTimeout entry does not exist, you must create it by selecting New on the Edit menu, followed by the DWORD Value 32 bit, then typing ServicesPipeTimeout, and clicking Enter.
Step 4: Modify the ServicePipeTimeout value,
Click Decimal, enter the new timeout value = 180000 OR 300000 ( In Milliseconds ) and then click OK.
Note : If 180,000 milliseconds is not sufficient then you can increase it as per your requirement.

Step 5: Restart the computer to save the registry changes.
This above method 100% works in most of the cases but if doesn’t work then follow the below Alternative solutions.
Read Also: Cross Hypervisor Migration To-from Nutanix AHV
Alternative Solutions
If above BEST SOLUTION doesn’t work for you then you need to cross-check following things:
Check Compatibility Matrix
VMware Converter Standalone 6.2.x supported Guest OS Compatibility list:
- Windows Vista SP2 (32-bit and 64-bit)
- Windows Server 2008 SP2 (32-bit and 64-bit)
- Windows 7 (32-bit and 64-bit)
- Windows Server 2008 R2 (64-bit)
- Windows 8 (32-bit and 64-bit)
- Windows Server 2012 (64-bit)
- Windows 8.1 (32-bit and 64-bit)
- Windows Server 2012 R2 (64-bit)
- Windows 10 (32-bit and 64-bit)
- Windows Server 2016 (64-bit)
- CentOS 6.x (32-bit and 64-bit)
- CentOS 7.0, 7.1, 7.2, 7.3, 7.4, 7.5 (64-bit)
- Red Hat Enterprise Linux 4.x (32-bit and 64-bit)
- Red Hat Enterprise Linux 5.x (32-bit and 64-bit)
- Red Hat Enterprise Linux 6.x (32-bit and 64-bit)
- Red Hat Enterprise Linux 7.0, 7.1, 7.2, 7.3, 7.4, 7.5 (64-bit)
- SUSE Linux Enterprise Server 10.x (32-bit and 64-bit)
- SUSE Linux Enterprise Server 11.x (32-bit and 64-bit)
- Ubuntu 12.04 LTS (32-bit and 64-bit)
- Ubuntu 14.04 LTS (32-bit and 64-bit)
- Ubuntu 16.04 LTS (32-bit and 64-bit)
Read also: Change VMware ESXi Hypervisor Hostname in Nutanix Hyper HCI Cluster
Check VMware vCenter Tool Platform
you can install VMware Converter Standalone tool version 6.2.x on the following Windows OS platforms:
- Windows Vista SP2 (32-bit and 64-bit)
- Windows Server 2008 SP2 (32-bit and 64-bit)
- Windows 7 (32-bit and 64-bit)
- Windows Server 2008 R2 (64-bit)
- Windows 8 (32-bit and 64-bit)
- Windows Server 2012 (64-bit)
- Windows 8.1 (32-bit and 64-bit)
- Windows Server 2012 R2 (64-bit)
- Windows 10 (32-bit and 64-bit)
- Windows Server 2016 (64-bit)
Read also: Nutanix In-Place Hypervisor Conversion | ESXi – AHV
Check vCenter Tool Firewall Port List
Required network ports must be open on external firewall between source machine and vCenter Converter standalone tool during the conversion of powered on source machines running Windows / Linux.
Network Ports required during Windows P2V
| Communication Paths | Communication Ports | Notes |
|---|---|---|
| Converter Standalone server to powered on source machine | TCP – 445, 139, 9089UDP – 137, 138 | If the source computer uses NetBIOS, port 445 is not required. If NetBIOS is not being used, ports 137, 138, and 139 are not required. When in doubt, make sure that none of the ports are blocked.Note:Unless you have installed Converter Standalone server or agent on the source computer, the account used for authentication to the source computer must have a password, the source computer must have network file sharing enabled, and it cannot be using Simple File Sharing. |
| Converter Standalone server to vCenter Server | TCP – 443 | Required only if the conversion destination is vCenter Server. |
| Converter Standalone client to vCenter Server | TCP – 443 | Required only if the Converter Standalone server and client components are on different machines. |
| Converter Standalone server to the destination ESXi | TCP – 902 | Converter server always requires access to ESXi at port 902. |
| Powered on source machine to ESXi | TCP – 443, 902 | If the conversion destination is vCenter Server, only port 902 is required.If the proxy mode feature is on, port 902 is not required. |
Read also: Nutanix Infra Default Credentials
Network Ports Required During Linux P2V
| Communication Paths | TCP Ports | Notes |
|---|---|---|
| Converter Standalone server to powered on source machine | 22 | Used to establish an SSH connection between the Converter Standalone server and the source machine. |
| Converter Standalone client to Converter Standalone server | 443 | Required only if the Converter Standalone server and client components are on different machines. |
| Converter Standalone server to vCenter Server | 443 | Required only if the conversion destination is a vCenter Server. |
| Converter Standalone server to ESXi | 443, 902 | If the conversion destination is a vCenter Server, only port 902 is required. |
| Converter Standalone server to helper virtual machine | 443 | |
| Helper virtual machine to powered on source machine | 22 | Used to establish an SSH connection between the helper virtual machine and the source machine. By default, the IP address of the helper virtual machine is assigned by DHCP. If no DHCP server is available on the destination network, you must manually assign the helper virtual machine an IP address. |
Read also: Nutanix Move Migration Guide ?
Network Ports Required During V2V
| Communication Paths | Communication Ports | Notes |
|---|---|---|
| Converter Standalone server to Fileshare path | TCP – 445, 139UPD – 137, 138 | Required only for standalone virtual machine sources or destinations. If the computer hosting the source or destination path uses NetBIOS, port 445 is not required. If NetBIOS is not being used, ports 137, 138, and 139 are not required. When in doubt, make sure that none of the ports are blocked. |
| Converter Standalone client to Converter Standalone server | TCP – 443 | Required only if the Converter Standalone server and client components are on different machines. |
| Converter Standalone server to vCenter Server | TCP – 443 | Required only if the conversion destination is a vCenter Server. |
| Converter Standalone server to ESXi | TCP – 443, 902 | If the conversion destination is a vCenter Server, only port 902 is required. |
Read also: VMware Esxi 6.5 U1 High CPU Consumption issue
VMware Prerequisites for Converting a Powered On Windows Machine
VMware Prerequisites for P2V / V2V migration for Windows OS, Before you continue with the conversion, you must prepare the source Windows machine.
1. Make sure that the Converter Standalone server machine has network access to the Windows source machine.
2. Turn off firewall applications and Defender Antivirus running on the source machine.
3. Disable simple file sharing on the source Windows
machine.
4. Stop or disable anti-virus software running on the source
machine.
5. Turn off User Account Control (UAC) or use local administrator account on the source machine.
6. If you are logged in as a member of the local Administrators group, you must disable the User Account Control: You must reboot for the changes to take effect.
7. Remove any Pen drive or removal disk from Physical machine.
8. You must have the Windows / Linux – local administrator / root account credential.
9. Check Windows update should not pending to install in Windows OS
10 ( Optional ). Check HDD / SSD Disk bad sector before migration if you have any doubt on disk performance or data corruption event.
Note: The Security
Options folder is located in Computer Configuration/Windows
Settings/Security Settings/Local Policies.
Ensure that Windows Firewall Does Not Block File and
Printer Sharing
If Converter Standalone fails to connect to a remote Windows machine and issues a bad username/ password error message, ensure that file and printer sharing is not blocked by Windows Firewall.
Procedure
1 Select Start > Settings > Control Panel > Administrative Tools > Local Security Policy.
2 In the Security Settings list on the left, select Local Policies > Security Options.
3 In the policies list on the right, select Network access: Sharing and Security model for local accounts.
4 Verify that Classic – local users authenticate as themselves is selected.
More info visit VMware vCenter converter tool 6.2.x document.
Conclusion
Hopefully you have got the solution of Unable to complete converter agent installation error code 1603, Error 1053: “The service did not respond in a timely fashion” when attempting to start, stop or pause a service, The service did not respond to the start or control request in a timely fashion, installation finished with pop window “Could not start service”, vmware vcenter converter standalone agent service failed to start, vmware vcenter converter standalone server service not starting 1053 etc. issues.
Thanks to being with HyperHCI Tech Blog to stay tuned with latest and trending technology.!
Содержание
- VMware vCenter Converter Standalone error 1603 ‘Unable to complete vCenter Converter Agent installation’ while trying to p2v + fix
- VMware Converter: P2V конвертация физического сервера в виртуальную машину
- Конвертация физического сервера в виртуальную машину VMware (P2V)
- VMware Converter: Конвертируем сервер в виртуальную машину с синхронизацией изменений
- vCenter 6 Upgrade: 1603 Error
- VMware SSO-Server Error 1603
VMware vCenter Converter Standalone error 1603 ‘Unable to complete vCenter Converter Agent installation’ while trying to p2v + fix
When doing a p2v I always use the standalone version of the Converter software. It proved to be more stable than the vCenter Converter plugin.
While trying to p2v a server onto our vSphere platform I was presented with the following error by the VMware vCenter Converter Standalone client: “Unable to complete vCenter Converter agent installation on . Error code: 1603.”

While checking the event log of the server in question, I noticed a perfect error description (Error 1714). There was an older version of the converter agent installed on the server and it refused to be uninstalled:

I checked the uninstall string and tried a manual uninstall, but of course that failed too.


The installation MSI wasn’t available on the server anymore.

This is a problem many of us will have faced. Quite annoying. In this case, however, the software is still available for download on the VMware website (Thank you VMware for keeping some of the older versions available).
So I downloaded VMware vCenter Converter 3.0.3 Enterprise Edition. I didn’t want to install the software, so I extracted the VMware Agent.msi from the installer by executing VMware-converter-3.0.3-89816.exe. This will extract the MSI installer to a subdir of %TEMP%. From there I used UniExtract to extract the files from the MSI.

In the subdir ‘VMware Converterprogram filesVMwareVMware Converter’ that will be created by UniExtract, I found the file I needed; VMware Agent.msi. I copied it to another folder and stopped the installation of VMware vCenter Converter 3.0.3 Enterprise Edition. I had to manually delete the extraction folder.
I copied the VMware Agent.msi to the server I wanted to P2V, pointed the VMware Agent uninstaller on the server to the MSI I just copied and was able to complete the uninstall of the ‘old’ Converter agent.
From here, the installation of the ‘new’ vCenter Converter Standalone agent went smoothly. The P2V ran without any problems. So I was able to put another old hardware server out of commission. Hurray for virtualization!
Источник
VMware Converter: P2V конвертация физического сервера в виртуальную машину
vCenter Converter Standalone это бесплатная утилита от VWware, которая позволяет выполнить преобразование (перенос) физического сервера (компьютера) в виртуальную машину (P2V, Physical-to—Virtua) или перенести ВМ из одной системы виртуализации в другую (V2V, Virtual-to—Virtual). С помощью vCenter Converter вы можете перенести в виртуальную среду как обычный компьютер, так и сервер с Windows или Linux. В этой статье мы рассмотрим, как выполнить миграцию физического сервера в виртуальную среду VMware с помощью vCenter Converter.
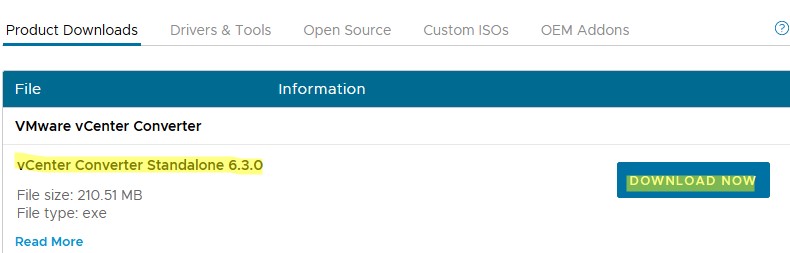
И наконец 11 октября 2022 года новая версия vCenter Converter 6.3 стала доступна для загрузки. Эта версия поддерживает новые Windows Server 2019/2022 и Windows 11. При этом старые версии ниже Windows Server 2012, RHEL/CentOS 6 и Ubuntu 14 более не поддерживаются.
Вы можете бесплатно скачать последнюю версию Converter здесь (потребуется регистрация): https://www.vmware.com/products/converter.html
Рассмотрим, как в онлайн режиме, почти без простоя мигрировать физический сервер с Windows Server в виртуальную машину VMware.
Конвертация физического сервера в виртуальную машину VMware (P2V)
- Скачайте и установите vCenter Converter на любой Windows компьютер;
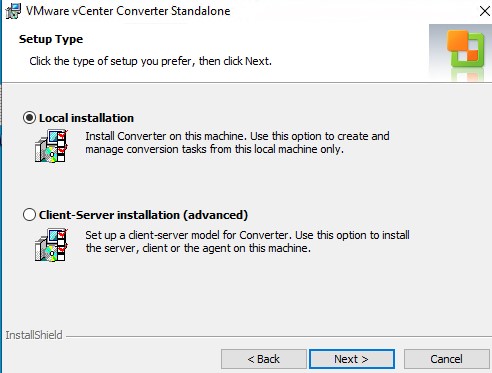
- Доступны два режима установки:
Local installation – устанавливает все необходимые компоненты для управления задачами конвертации на локальном компьютере (мы используем именно этот режим) Client-Server installation — позволяет отдельно установить сервер, клиент или агент на компьютере;
- Создайте новое задание конвертации: File->New->Convert machine;
Мне пришлось сначала с помощью PowerShell удалить программу на хосте Windows:
Get-Package -Name «VMware vCenter Converter*» | Uninstall-Package
И затем вручную установить агент из дистрибутива vCenter Converter (Custom Setup -> Converter agent).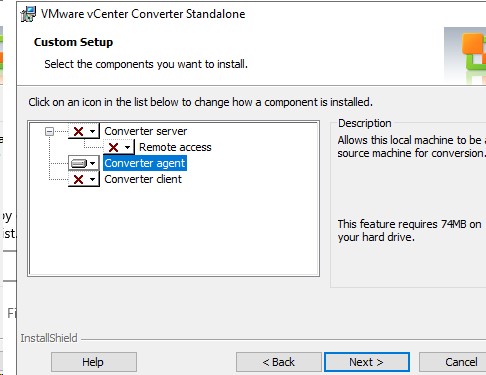
VMware Converter: Конвертируем сервер в виртуальную машину с синхронизацией изменений
VMware Converter поддерживает возможность синхронизации изменений между исходной системой и виртуальной машиной-копией, расположенной на ESXi хосте. Эта функция позволяет в несколько этапов с минимальным простоем виртуализировать физический сервер с большим объёмом данных на физических дисках.
Мы планируем сконвертировать наш физический сервер в виртуальную машину в два этапа. На первом этапе Converter копирует данные из компьютера-источника в целевую ВМ, в то время пока сама машина источник работает и данные на ней могут меняться пользователями. На втором (финальном) этапе выполняется синхронизация изменений, произошедших с момента первоначального копирования данных.
Функция синхронизации изменений позволяет уменьшить простой приложения во время P2V/V2V конвертации, так как конечное приложение нужно отключать только на время передачи изменений.
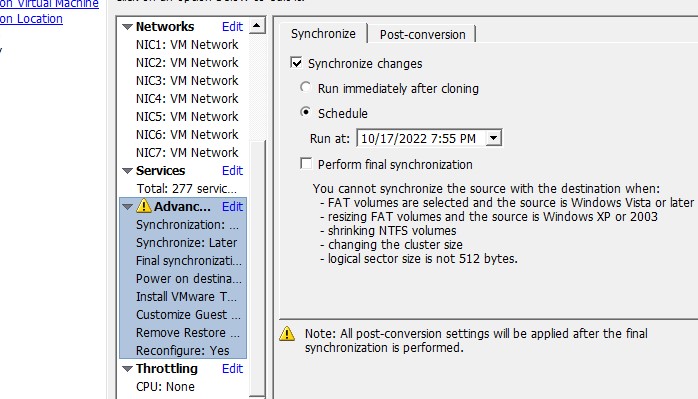
- На вкладке Synchronize включите опцию Synchronize change. Выберите, когда выполнить следующую синхронизацию. Обязательно(!!) снимает галку Perform final synchronization;
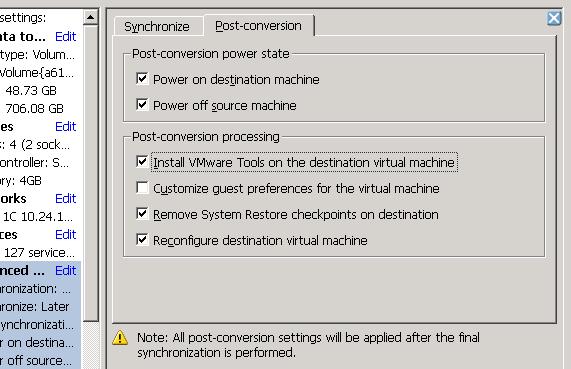
- На вкладке Post-Conversion выберите действия, которые нужно будет выполнить после финальной синхронизации. Мы хотим автоматически включить созданную ВМ (Power on destination machine), отключить исходный сервер (Power off source machine), установить VMTools и т.д.
- Осталось запустить первоначальную фазу конвертации P2V и дождаться ее окончания.
В процессе выполнения синхронизации изменений сервер vSphere создает на целевой машине отдельные снапшоты (снимки), позволяющие в случае чего откатиться к любому этапу синхронизации (логика работы VMware Converter будет при этом нарушена).
Источник
vCenter 6 Upgrade: 1603 Error
I completed our lab vCenter upgrades during this last post. A few weeks after that effort, VMware release vCenter 6.0u1b. Since there was still time to evaluate this release, I went ahead and tried to upgrade from 6.0u1 to 6.0u1b.
One vCenter went off without a problem, another vCenter was not so lucky.
During the installation, the second vCenter encoured a ‘1603’ error during installation. Most of the community posts and KB articles pointed to SQL permissions, which doesn’t make much sense because the vCenter 6.0u1 was working fine with SQL in my case. After opening a case with VMware, the TSE focused on this section of the vminst.log
2016-01-15 13:28:01.007-06:00| vcsInstUtil-3343021| I: RunFirstLastUpdateboot: Told to run “C:Windowssystem32cmd.exe /S /C “”E:Program FilesVMwarevCenter Serverbinrun-updateboot-scripts.bat”””
2016-01-15 13:28:01.007-06:00| vcsInstUtil-3343021| I: Entering function: LaunchProcAndMonitorStatus
2016-01-15 13:28:01.007-06:00| vcsInstUtil-3343021| I: LaunchProcAndMonitorStatus: Launching “C:Windowssystem32cmd.exe /S /C “”E:Program FilesVMwarevCenter Serverbinrun-updateboot-scripts.bat””” in “C:Windowssystem32”
2016-01-15 13:28:01.007-06:00| vcsInstUtil-3343021| I: LaunchProcAndMonitorStatus: Launched process with pid 11312 tid 9572
2016-01-15 13:28:01.007-06:00| vcsInstUtil-3343021| I: Entering function: MonitorStatusFile
2016-01-15 13:28:01.007-06:00| vcsInstUtil-3343021| I: MonitorStatusFile: Started execution of process
2016-01-15 13:30:15.548-06:00| vcsInstUtil-3343021| I: MonitorStatusFile: Other process terminated with 1, exiting
2016-01-15 13:30:15.548-06:00| vcsInstUtil-3343021| E: MonitorStatusFile: Process exited with a non-zero exit code; no status monitoring so assuming failure
2016-01-15 13:30:15.548-06:00| vcsInstUtil-3343021| I: MonitorStatusFile: called parse callback 0 times
2016-01-15 13:30:15.548-06:00| vcsInstUtil-3343021| I: MonitorStatusFile: No need to wait for process to complete
2016-01-15 13:30:15.548-06:00| vcsInstUtil-3343021| I: MonitorStatusFile: Process’s job tree still hasn’t terminated, waiting
2016-01-15 13:30:15.548-06:00| vcsInstUtil-3343021| I: MonitorStatusFile: Wait on process’s job tree has completed: 0
2016-01-15 13:30:15.548-06:00| vcsInstUtil-3343021| I: Leaving function: MonitorStatusFile
2016-01-15 13:30:15.548-06:00| vcsInstUtil-3343021| E: LaunchProcAndMonitorStatus: Failure detected while monitoring status file
2016-01-15 13:30:15.548-06:00| vcsInstUtil-3343021| E: LaunchProcAndMonitorStatus: Job still alive, terminating
2016-01-15 13:30:15.548-06:00| vcsInstUtil-3343021| I: Leaving function: LaunchProcAndMonitorStatus
2016-01-15 13:30:15.548-06:00| vcsInstUtil-3343021| E: RunFirstLastUpdateboot: Failed to run boot script: “C:Windowssystem32cmd.exe /S /C “”E:Program FilesVMwarevCenter Serverbinrun-updateboot-scripts.bat”””
2016-01-15 13:30:15.548-06:00| vcsInstUtil-3343021| I: Leaving function: VM_RunUpdateBoot
2016-01-15 13:30:15.658-06:00| vcsInstUtil-3343021| I: Entering function: VM_RunUpdateBoot
2016-01-15 13:30:15.667-06:00| vcsInstUtil-3343021| I: RunFirstLastUpdateboot: DEBUG: silentMode 0
2016-01-15 13:30:15.668-06:00| vcsInstUtil-3343021| I: RunFirstLastUpdateboot: Told to run “C:Windowssystem32cmd.exe /S /C “”E:Program FilesVMwarevCenter Serverbinrun-updatebootrb-scripts.bat”””
2016-01-15 13:30:15.668-06:00| vcsInstUtil-3343021| I: Entering function: LaunchProcAndMonitorStatus
2016-01-15 13:30:15.669-06:00| vcsInstUtil-3343021| I: LaunchProcAndMonitorStatus: Launching “C:Windowssystem32cmd.exe /S /C “”E:Program FilesVMwarevCenter Serverbinrun-updatebootrb-scripts.bat””” in “C:Windowssystem32”
2016-01-15 13:30:15.671-06:00| vcsInstUtil-3343021| I: LaunchProcAndMonitorStatus: Launched process with pid 2748 tid 2824
2016-01-15 13:30:15.671-06:00| vcsInstUtil-3343021| I: Entering function: MonitorStatusFile
2016-01-15 13:30:15.671-06:00| vcsInstUtil-3343021| I: MonitorStatusFile: Started execution of process
2016-01-15 13:34:40.731-06:00| vcsInstUtil-3343021| I: MonitorStatusFile: Other process terminated with 0, exiting
2016-01-15 13:34:40.731-06:00| vcsInstUtil-3343021| I: MonitorStatusFile: Process exited with a ‘0’ exit code; no status monitoring so assuming success
2016-01-15 13:34:40.731-06:00| vcsInstUtil-3343021| I: MonitorStatusFile: called parse callback 0 times
2016-01-15 13:34:40.731-06:00| vcsInstUtil-3343021| I: MonitorStatusFile: No need to wait for process to complete
2016-01-15 13:34:40.731-06:00| vcsInstUtil-3343021| I: MonitorStatusFile: Process’s job tree still hasn’t terminated, waiting
2016-01-15 13:34:40.731-06:00| vcsInstUtil-3343021| I: MonitorStatusFile: Wait on process’s job tree has completed: 0
2016-01-15 13:34:40.731-06:00| vcsInstUtil-3343021| I: Leaving function: MonitorStatusFile
2016-01-15 13:34:40.731-06:00| vcsInstUtil-3343021| E: LaunchProcAndMonitorStatus: Job still alive, terminating
2016-01-15 13:34:40.731-06:00| vcsInstUtil-3343021| I: Leaving function: LaunchProcAndMonitorStatus
2016-01-15 13:34:40.731-06:00| vcsInstUtil-3343021| I: RunFirstLastUpdateboot: Successfully ran boot script: “C:Windowssystem32cmd.exe /S /C “”E:Program FilesVMwarevCenter Serverbinrun-updatebootrb-scripts.bat”””
2016-01-15 13:34:40.731-06:00| vcsInstUtil-3343021| I: Leaving function: VM_RunUpdateBoot
2016-01-15 13:34:40.871-06:00| vcsInstUtil-3343021| E: wWinMain: MSI result of install of “R:vCenter-ServerPackagesvcsservicemanager.msi” may have failed: 1603 (0x00000643)
2016-01-15 13:34:40.871-06:00| vcsInstUtil-3343021| E: LaunchPkgMgr: Operation on vcsservicemanager.msi appears to have failed: 1603 (0x00000643)
2016-01-15 13:34:40.871-06:00| vcsInstUtil-3343021| I: PitCA_MessageBox: Displaying message: “Installation of component VCSServiceManager failed with error code ‘1603’. Check the logs for more details.”
2016-01-15 13:37:45.576-06:00| vcsInstUtil-3343021| I: LaunchPkgMgr: Telling child to revert transaction
2016-01-15 13:37:45.576-06:00| vcsInstUtil-3343021| I: InstallStatus_SetStage: install stage: install-packages / revert-transaction
2016-01-15 13:38:50.160-06:00| vcsInstUtil-3343021| I: EndTransaction: Chain transaction 1 rollback result 0
The VMware TSE found an internal KB referening a 1603 issue when the administrator@vsphere.local is NOT a member of the SSO group DCAdmins.I added the administrator@vsphere.local account to DCAdmins as follows:
- Log into the Web Client as the Administrator@vpshere.local account.
- Click Administration.
- Click Users and Groups under Single Sign-On.
- Select the Groups tab select DC Admins.
- In the bottom pane under Group Members click the button to add a member.
- Add the Administrator@vsphere.local account.
I then completed the installation successfully and removed the account from DCAdmins.
Источник
VMware SSO-Server Error 1603
Все новые темы
| Автор | ||||
|---|---|---|---|---|
| Rescuer Участник форума Зарегистрирован: 12.08.2004 |
|
|||
| Вернуться к началу |
|
|||
| Зарегистрируйтесь и реклама исчезнет!
|
||||
| ADMINDM guru 
Зарегистрирован: 04.11.2007
|
|
|||
| Вернуться к началу |
|
|||
| Rescuer Участник форума Зарегистрирован: 12.08.2004 |
|
|||
| Вернуться к началу |
|
|||
| Rescuer Участник форума Зарегистрирован: 12.08.2004 Источник Adblock |


When doing a p2v I always use the standalone version of the Converter software. It proved to be more stable than the vCenter Converter plugin.
While trying to p2v a server onto our vSphere platform I was presented with the following error by the VMware vCenter Converter Standalone client: “Unable to complete vCenter Converter agent installation on <SERVERNAME>. Error code: 1603.”

While checking the event log of the server in question, I noticed a perfect error description (Error 1714). There was an older version of the converter agent installed on the server and it refused to be uninstalled:

I checked the uninstall string and tried a manual uninstall, but of course that failed too.


The installation MSI wasn’t available on the server anymore.

This is a problem many of us will have faced. Quite annoying. In this case, however, the software is still available for download on the VMware website (Thank you VMware for keeping some of the older versions available).
So I downloaded VMware vCenter Converter 3.0.3 Enterprise Edition. I didn’t want to install the software, so I extracted the VMware Agent.msi from the installer by executing VMware-converter-3.0.3-89816.exe. This will extract the MSI installer to a subdir of %TEMP%. From there I used UniExtract to extract the files from the MSI.

In the subdir ‘VMware Converterprogram filesVMwareVMware Converter’ that will be created by UniExtract, I found the file I needed; VMware Agent.msi. I copied it to another folder and stopped the installation of VMware vCenter Converter 3.0.3 Enterprise Edition. I had to manually delete the extraction folder.
I copied the VMware Agent.msi to the server I wanted to P2V, pointed the VMware Agent uninstaller on the server to the MSI I just copied and was able to complete the uninstall of the ‘old’ Converter agent.
From here, the installation of the ‘new’ vCenter Converter Standalone agent went smoothly. The P2V ran without any problems. So I was able to put another old hardware server out of commission. Hurray for virtualization!

Итак, как видно из названия, рассмотрим проблемы с vCenter Converter при конвертировании физических Windows серверов. Очень часто сталкиваюсь с проблемами виртуализации серверов 2008 и 2008 R2, на 2012 не сталкивался и пока везло и вопросы с виртуализацией 2003-го динозавра тоже не появлялись. Как правило симптомы и их причины достаточно одинаковы от случая к случаю и в комьюнити широко известны, да и блоги не молчат. Итак, вот список часто встречающихся проблем, по крайней мере мне.
При установки vCenter Converter Agent на виртуализируемую Windows машину возникает длительное ожидание процесса установки а в конце победоносно прилетает ошибка — ERROR 1053 “ The service did not respond to the start or control request in a timely fashion ”. Данная проблема известна VMware как ни странно это из-за отсутствия доступа в интернет с машины, на которой устанавливается служба конвертера, это кстати относится как к машине, на которой разворачивается консоль vCenter Converter, так и виртуализируемой машину, на которуя в процессе ставиться vCenter Converter Agent. Смотрим цитату из Release Notes. Собственно, в ней же и решение. Запустив regedit в CMD и создать параметр реестра (DWORD) по пути HKEY_LOCAL_MACHINESystemCurrentControlSetControl с именем ServicesPipeTimeout и деситичным (decemical) значением не ниже 300000 (5 minutes), после этого перезагрузить машину для применения изменений. После этих манипуляций проблема решается.
Проблема, появляющаяся так же, как и предыдущая при инсталляции агента конвертации на виртуализируемую Windows машину. «Error 1603: A fatal error occurred during installation» преследует нас по причине слишком долгого ожидания старта службы vCenter Converter Agent после ее установки. Решение то же самое, что и для предыдущей проблемы.
При конфигурировании задачи конвертации (Job), в самом начале, после того как мы заполнили данные логин и пароля source машины и нажали Next, нам вываливается “Permission to perform this operation was denied”, и даже после того как мы запустим конфертер от имени администратора, данная проблема не уходит. Досконально в чем причина сказать не могу, но есть решение, которое мне помогло. Итак, логинимся на конвертируемый Windows сервер, заходим в Local Security Policy (открывая в cmd secpol.msc), идем в Local Policies > Security Options, пункт «User Access Control: Run all Administrators in Admin Approval Mode» переводим в Disable, перезагружаем машину. И после этого у Вас должно все получиться.
Когда мы уже запустили наш Job по конвертации Windows машины и радостные пошли пить кофе, на 1% прогресса появляется «A file I/O error occurred while accesssing» и задача останавливается. Странная проблема, в комьюнити грешат на некорректную насройку DNS на конвертируемой машине, в следствии чего машина по имени не могла достучаться до ESXi, но в моем случае с DNS было все в порядке. Мне помог запуск Job через включение галочки PROXY при настройке подключения в vCenter, этот же метод помог и нескольким другим людям.
На всякий случай приложу список необходимых портов для работы vCenter Converter:
Windows P2V
| Communication Paths | Communication Ports | Notes |
| Converter Standalone server to powered on source machine | TCP — 445, 139, 9089 UDP — 137, 138 | If the source computer uses NetBIOS, port 445 is not required. If NetBIOS is not being used, ports 137, 138, and 139 are not required. When in doubt, make sure that none of the ports are blocked. Note: Unless you have installed Converter Standalone server or agent on the source computer, the account used for authentication to the source computer must have a password, the source computer must have network file sharing enabled, and it cannot be using Simple File Sharing. |
| Converter Standalone server to vCenter Server | TCP — 443 | Required only if the conversion destination is vCenter Server. |
| Converter Standalone client to vCenter Server | TCP — 443 | Required only if the Converter Standalone server and client components are on different machines. |
| Converter Standalone server to the destination ESXi | TCP — 902 | Converter server always requires access to ESXi at port 902. |
| Powered on source machine to ESXi | TCP — 443, 902 | If the conversion destination is vCenter Server, only port 902 is required. If the proxy mode feature is on, port 902 is not required. |
Linux P2V
| Communication Paths | TCP Ports | Notes |
| Converter Standalone server to powered on source machine | 22 | Used to establish an SSH connection between the Converter Standalone server and the source machine. |
| Converter Standalone client to Converter Standalone server | 443 | Required only if the Converter Standalone server and client components are on different machines. |
| Converter Standalone server to vCenter Server | 443 | Required only if the conversion destination is a vCenter Server. |
| Converter Standalone server to ESXi | 443, 902 | If the conversion destination is a vCenter Server, only port 902 is required. |
| Converter Standalone server to helper virtual machine | 443 | |
| Helper virtual machine to powered on source machine | 22 | Used to establish an SSH connection between the helper virtual machine and the source machine. By default, the IP address of the helper virtual machine is assigned by DHCP. If no DHCP server is available on the destination network, you must manually assign the helper virtual machine an IP address. |

I was deploying a vCenter 6.x with a separate Platform Service Controller and a database, installation was not successful due to the “Installation of component VCSServiceManager failed with error code ‘1603’. Check the logs for more details” error message.
In the middle of the installation it gave me an error message saying “An error occurred while starting the service ‘invsvc’” and rolled back the installation at the end.
Also, the same error appeared in couple of vCenter 6.0 Upgrades and this small change to the ODBC connection fixed the issue and led me to a successful vCenter 6.0 Upgrade.
In the installation this error message appeared at the very beginning.

At the end gave me the below error message
Installation of component VCSServiceManager failed with error code ‘1603’. Check the logs for more details.

I was so frustrated and started to find a solution in the internet. There were few blog posts and couple of VMware KB articles similar to the error message and I did all the workarounds and non of them worked. Few of them asked to install the .Net framework 3.5, set the database permissions to sysadmin and dbowner etc. I tried all of them and I was not able find a solution to my problem.
I checked the installation error log (vminst) and found the below errors in the log.


I tested the ODBC connection to the Database server and it was successful and I was able to connect to the database without an issue.
In my domain environment forward and reverse lookup zones were working fine and I added the database instance with the “servername/sqlinstance” format. I changed the SQL server instance to “<IP_address/sqlinstance>” format as shown in the below screen capture and re-run the installation, I was surprised and it was successful without an issue at this time.

It was a simple change but had to spend my entire morning half to find the solution. So I thought to write this blog post and hope someone will find this as useful.
Error code ‘1603’ appeared in vCenter 6.0 Upgrades….
In some cases it was successful after using “<IP_ADDRESS>” for the server in the ODBC connection.

This was encountered and tested in couple of vCenter 6.0 upgrades.
If you found this post as useful please rate the post and share it!
Click to rate this post!
[Total: 3 Average: 5]

Aruna Lakmal
Associate Technical Specialist, Sri Lanka. Technology junky, enthusiast, a VMware vExpert and a blogger with more than 8 years of Experience in Virtualization and Cloud Native technologies.
Get Updates Directly To Your Inbox!
vCenter Converter Standalone это бесплатная утилита от VWware, которая позволяет выполнить преобразование (перенос) физического сервера (компьютера) в виртуальную машину (P2V, Physical-to—Virtua) или перенести ВМ из одной системы виртуализации в другую (V2V, Virtual-to—Virtual). С помощью vCenter Converter вы можете перенести в виртуальную среду как обычный компьютер, так и сервер с Windows или Linux. В этой статье мы рассмотрим, как выполнить миграцию физического сервера в виртуальную среду VMware с помощью vCenter Converter.
До недавнего времени последним релизом была версия VMware Converter Standalone 6.2, выпущенный еще в 2018. В феврале 2022 VMware убрала эту версию Converter из списка доступных загрузок на своем сайте (в предыдущих версиях обнаружены существенные уязвимости) и пообещала выпустить новую версию немного позднее. При этом никакой альтернативы для выполнения P2V конвертаций предложено не было.
И наконец 11 октября 2022 года новая версия vCenter Converter 6.3 стала доступна для загрузки. Эта версия поддерживает новые Windows Server 2019/2022 и Windows 11. При этом старые версии ниже Windows Server 2012, RHEL/CentOS 6 и Ubuntu 14 более не поддерживаются.
Вы можете бесплатно скачать последнюю версию Converter здесь (потребуется регистрация): https://www.vmware.com/products/converter.html
Рассмотрим, как в онлайн режиме, почти без простоя мигрировать физический сервер с Windows Server в виртуальную машину VMware.
Содержание:
- Конвертация физического сервера в виртуальную машину VMware (P2V)
- VMware Converter: Конвертируем сервер в виртуальную машину с синхронизацией изменений
Конвертация физического сервера в виртуальную машину VMware (P2V)
- Скачайте и установите vCenter Converter на любой Windows компьютер;
- Доступны два режима установки:
Local installation – устанавливает все необходимые компоненты для управления задачами конвертации на локальном компьютере (мы используем именно этот режим) Client-Server installation — позволяет отдельно установить сервер, клиент или агент на компьютере;
- Создайте новое задание конвертации: File-> New-> Convert machine;
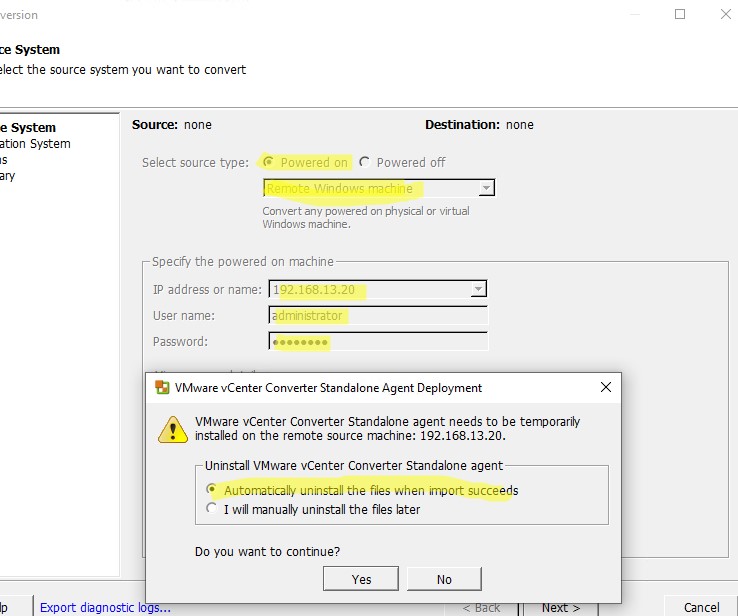
- Выберете, что вы хотите удаленно конвертировать компьютер с Windows (Powered on -> Remote Windows machine). Укажите FQDN или IP адрес удаленного компьютера, имя пользователя с правами администратора и пароль для подключения;
Также VMware Converter позволяет удаленно сконвертировать виртуальную машину, которая находится на Hyper-V Server, VMware Workstation, Player или VMware vSphere.

- Если вы выполняете конвертацию удаленного компьютера, на котором включен файервол, вам нужно открыть ряд портов. В Windows нужно открыть следующие порты TCP: 139,445,9089 и UDP:137,138. Можно открыть порты в Windows Defender Firewall через GPO или с таких команд PowerShell:
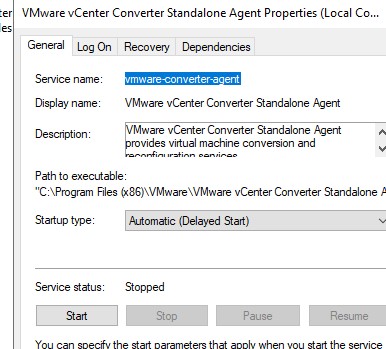
New-NetFirewallRule -DisplayName "Allow9089VMConver" -Direction Inbound -Protocol TCP -LocalPort 9089 -Action Allow | Enable-NetFirewallRule - vCenter Converter подключится к удаленном компьютеру и попытается установить свой агент — службу VMware vCenter Converter Standalone Agent (
vmware-converter-agent
);

В моем случае при удаленной установке агента в Windows появилась ошибка:
Error 1603: A fatal error occurred during installation.
Unable to complete Converter agent installation on '192.168.13.20'. Error code: 1,603.
Мне пришлось сначала с помощью PowerShell удалить программу на хосте Windows:
Get-Package -Name "VMware vCenter Converter*" | Uninstall-Package
И затем вручную установить агент из дистрибутива vCenter Converter (Custom Setup -> Converter agent).
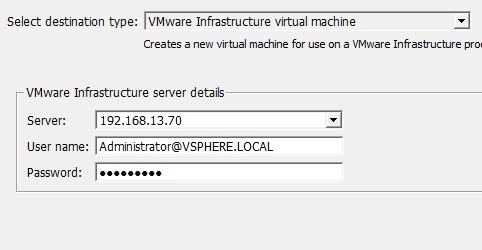
- Затем вам нужно указать имя хоста ESXi (или сервера VMwarevCenter) , на котором будет создаваться виртуальная машина, и учетные данные для доступа к нему;

- Затем выберите датасентер, кластер, хост ESXi и имя VMFS хранилище, где вы хотите разместить новую виртуальную машину. Выберите версию оборудования виртуальной машины (virtual hardware);

- Затем нужно выбрать диски целевой системы, которые нужно скопировать, настройки памяти и vCPU и т.д. Нас больше всего интересует настройки в секции Advanced;


VMware Converter: Конвертируем сервер в виртуальную машину с синхронизацией изменений
VMware Converter поддерживает возможность синхронизации изменений между исходной системой и виртуальной машиной-копией, расположенной на ESXi хосте. Эта функция позволяет в несколько этапов с минимальным простоем виртуализировать физический сервер с большим объёмом данных на физических дисках.
Мы планируем сконвертировать наш физический сервер в виртуальную машину в два этапа. На первом этапе Converter копирует данные из компьютера-источника в целевую ВМ, в то время пока сама машина источник работает и данные на ней могут меняться пользователями. На втором (финальном) этапе выполняется синхронизация изменений, произошедших с момента первоначального копирования данных.
Функция синхронизации изменений позволяет уменьшить простой приложения во время P2V/V2V конвертации, так как конечное приложение нужно отключать только на время передачи изменений.
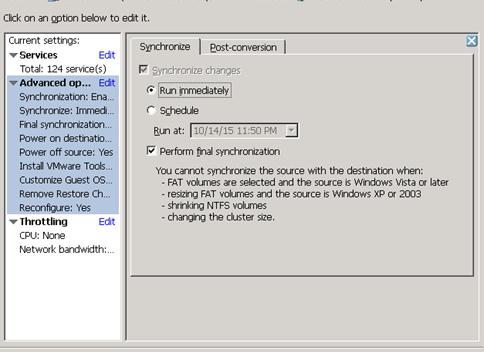
- На вкладке Synchronize включите опцию Synchronize change. Выберите, когда выполнить следующую синхронизацию. Обязательно(!!) снимает галку Perform final synchronization;

- На вкладке Post-Conversion выберите действия, которые нужно будет выполнить после финальной синхронизации. Мы хотим автоматически включить созданную ВМ (Power on destination machine), отключить исходный сервер (Power off source machine), установить VMTools и т.д.

- Осталось запустить первоначальную фазу конвертации P2V и дождаться ее окончания.
Примечание. В нашем случае, для физического файлового сервера с 700 Гб данных конвертация заняла порядка 15 часов.
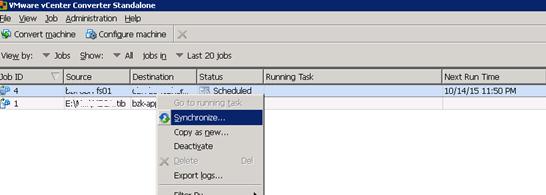
- После окончания первоначальной конвертации можете вручную выполнить финальную синхронизацию. Для этого выберете задание в консоли VMware Converter и в контекстном меню щелкните Synchronize.

Примечание. VMware Converter устанавливает на исходной системе специальный “bitmap driver” (служба bmdrvr), который отслеживает изменения, произошедшие в системе с момента последней синхронизации.
- В открывшемся окне мастера укажем, что синхронизацию нужно запустить немедленно, а по окончании ее выполнить финальную синхронизацию. Чтобы пользователи не могли изменять файлы на сервере в момент финальной синхронизации, рекомендуем временно остановить основной сервис в ВМ (например, файловые сервер или сервер приложений;

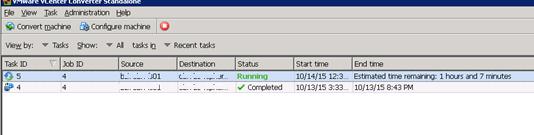
- Финальная синхронизация заняла около часа, в течении которых изменения на исходной машине были реплицированы на ВМ. После чего старый сервер автоматически отключился, а новая виртуальную машина запустилась;

- Осталось выполнить окончательную настройку виртуальной машину (удалить скрытые сетевые карты, удалить старые драйвера устройств, задать параметры сети и IP адреса новым сетевым интерфейсам и т.д.) – и виртуальная машина готова к работе.
В процессе выполнения синхронизации изменений сервер vSphere создает на целевой машине отдельные снапшоты (снимки), позволяющие в случае чего откатиться к любому этапу синхронизации (логика работы VMware Converter будет при этом нарушена).
Recently ran across this one:
2016-06-22 10:23:19.878-07:00| vcsInstUtil-3634789| I: MonitorStatusFile: Other process terminated with 0, exiting
2016-06-22 10:23:19.878-07:00| vcsInstUtil-3634789| I: MonitorStatusFile: Process exited with a '0' exit code; no status monitoring so assuming success
2016-06-22 10:23:19.878-07:00| vcsInstUtil-3634789| I: MonitorStatusFile: called parse callback 0 times
2016-06-22 10:23:19.878-07:00| vcsInstUtil-3634789| I: MonitorStatusFile: No need to wait for process to complete
2016-06-22 10:23:19.878-07:00| vcsInstUtil-3634789| I: MonitorStatusFile: Process's job tree still hasn't terminated, waiting
2016-06-22 10:23:19.878-07:00| vcsInstUtil-3634789| I: MonitorStatusFile: Wait on process's job tree has completed: 0
2016-06-22 10:23:19.878-07:00| vcsInstUtil-3634789| I: Leaving function: MonitorStatusFile
2016-06-22 10:23:19.878-07:00| vcsInstUtil-3634789| E: LaunchProcAndMonitorStatus: Job still alive, terminating
2016-06-22 10:23:19.878-07:00| vcsInstUtil-3634789| I: Leaving function: LaunchProcAndMonitorStatus
2016-06-22 10:23:19.878-07:00| vcsInstUtil-3634789| I: RunFirstLastUpdateboot: Successfully ran boot script: "C:Windowssystem32cmd.exe /S /C ""D:VMwarevCenter Serverbinrun-updatebootrb-scripts.bat"""
2016-06-22 10:23:19.878-07:00| vcsInstUtil-3634789| I: Leaving function: VM_RunUpdateBoot
2016-06-22 10:23:20.065-07:00| vcsInstUtil-3634789| E: wWinMain: MSI result of install of "D:TempVMware-VIMSetup-all-6.0.0-3634788vCenter-ServerPackagesvcsservicemanager.msi" may have failed: 1603 (0x00000643)
2016-06-22 10:23:20.065-07:00| vcsInstUtil-3634789| E: LaunchPkgMgr: Operation on vcsservicemanager.msi appears to have failed: 1603 (0x00000643)
2016-06-22 10:23:20.065-07:00| vcsInstUtil-3634789| I: PitCA_MessageBox: Displaying message: "Installation of component VCSServiceManager failed with error code '1603'. Check the logs for more details."
The upgrade would get to the VCSServiceManager step, fail and back out. It then left our existing vCenter 6.0u1 installation unable to start.
I did all the standard things you’ll find on VMwares Support site (and recommended by the support rep I got a hold of):
| 2119768 | Error code 1603 when upgrading to vCenter Server 6.0 |
| 2127519 | Installing the VMware vCenter Server 6.0 fails with the vminst.log error: MSI result of install of “C:vCenter-ServerPackagesvcsservicemanager.msi” may have failed : 1603 |
| 2137365 | Upgrade of vCenter from 5.x to 6.0 fails with “Installation of component VCSServiceManager failed with error code ‘1603’. Check the logs for more details.” |
| 2113068 | Upgrading or installing VMware vCenter Server 6.0 fails with the vminst.log error: Error in accessing registry entry for DSN |
| 2119169 | Installing VMware vCenter Server 6.0 using a Microsoft SQL database fails with the error: An error occurred while starting service ‘invsvc’ |
None helped.
While waiting for my VMware Support rep to dig through the log files, on a hunch, I made the following changes:
- Checkmarked ‘IPv6’ in the network stack for the servers network card
- Re-ran the vCenter installer separately by right clicking it and ‘Running As Administrator’ (VMware-VIMSetup-all-6.0.0-3634788vCenter-ServerVMware-vCenter-Server.exe)
The installation then succeeded and we have a functioning vCenter again.
Two fun facts:
- The UAC is disabled on our server
- IPv6 was (and still is) disabled via the registry using these utilities even though I’ve now re-checked IPv6 in the network cards network stack
Our server is in a fairly unique configuration I suspect but hopefully this will help someone else.
I completed our lab vCenter upgrades during this last post. A few weeks after that effort, VMware release vCenter 6.0u1b. Since there was still time to evaluate this release, I went ahead and tried to upgrade from 6.0u1 to 6.0u1b.
One vCenter went off without a problem, another vCenter was not so lucky.
During the installation, the second vCenter encoured a ‘1603’ error during installation. Most of the community posts and KB articles pointed to SQL permissions, which doesn’t make much sense because the vCenter 6.0u1 was working fine with SQL in my case. After opening a case with VMware, the TSE focused on this section of the vminst.log
2016-01-15 13:28:01.007-06:00| vcsInstUtil-3343021| I: RunFirstLastUpdateboot: Told to run “C:Windowssystem32cmd.exe /S /C “”E:Program FilesVMwarevCenter Serverbinrun-updateboot-scripts.bat”””
2016-01-15 13:28:01.007-06:00| vcsInstUtil-3343021| I: Entering function: LaunchProcAndMonitorStatus
2016-01-15 13:28:01.007-06:00| vcsInstUtil-3343021| I: LaunchProcAndMonitorStatus: Launching “C:Windowssystem32cmd.exe /S /C “”E:Program FilesVMwarevCenter Serverbinrun-updateboot-scripts.bat””” in “C:Windowssystem32”
2016-01-15 13:28:01.007-06:00| vcsInstUtil-3343021| I: LaunchProcAndMonitorStatus: Launched process with pid 11312 tid 9572
2016-01-15 13:28:01.007-06:00| vcsInstUtil-3343021| I: Entering function: MonitorStatusFile
2016-01-15 13:28:01.007-06:00| vcsInstUtil-3343021| I: MonitorStatusFile: Started execution of process
2016-01-15 13:30:15.548-06:00| vcsInstUtil-3343021| I: MonitorStatusFile: Other process terminated with 1, exiting
2016-01-15 13:30:15.548-06:00| vcsInstUtil-3343021| E: MonitorStatusFile: Process exited with a non-zero exit code; no status monitoring so assuming failure
2016-01-15 13:30:15.548-06:00| vcsInstUtil-3343021| I: MonitorStatusFile: called parse callback 0 times
2016-01-15 13:30:15.548-06:00| vcsInstUtil-3343021| I: MonitorStatusFile: No need to wait for process to complete
2016-01-15 13:30:15.548-06:00| vcsInstUtil-3343021| I: MonitorStatusFile: Process’s job tree still hasn’t terminated, waiting
2016-01-15 13:30:15.548-06:00| vcsInstUtil-3343021| I: MonitorStatusFile: Wait on process’s job tree has completed: 0
2016-01-15 13:30:15.548-06:00| vcsInstUtil-3343021| I: Leaving function: MonitorStatusFile
2016-01-15 13:30:15.548-06:00| vcsInstUtil-3343021| E: LaunchProcAndMonitorStatus: Failure detected while monitoring status file
2016-01-15 13:30:15.548-06:00| vcsInstUtil-3343021| E: LaunchProcAndMonitorStatus: Job still alive, terminating
2016-01-15 13:30:15.548-06:00| vcsInstUtil-3343021| I: Leaving function: LaunchProcAndMonitorStatus
2016-01-15 13:30:15.548-06:00| vcsInstUtil-3343021| E: RunFirstLastUpdateboot: Failed to run boot script: “C:Windowssystem32cmd.exe /S /C “”E:Program FilesVMwarevCenter Serverbinrun-updateboot-scripts.bat”””
2016-01-15 13:30:15.548-06:00| vcsInstUtil-3343021| I: Leaving function: VM_RunUpdateBoot
2016-01-15 13:30:15.658-06:00| vcsInstUtil-3343021| I: Entering function: VM_RunUpdateBoot
2016-01-15 13:30:15.667-06:00| vcsInstUtil-3343021| I: RunFirstLastUpdateboot: DEBUG: silentMode 0
2016-01-15 13:30:15.668-06:00| vcsInstUtil-3343021| I: RunFirstLastUpdateboot: Told to run “C:Windowssystem32cmd.exe /S /C “”E:Program FilesVMwarevCenter Serverbinrun-updatebootrb-scripts.bat”””
2016-01-15 13:30:15.668-06:00| vcsInstUtil-3343021| I: Entering function: LaunchProcAndMonitorStatus
2016-01-15 13:30:15.669-06:00| vcsInstUtil-3343021| I: LaunchProcAndMonitorStatus: Launching “C:Windowssystem32cmd.exe /S /C “”E:Program FilesVMwarevCenter Serverbinrun-updatebootrb-scripts.bat””” in “C:Windowssystem32”
2016-01-15 13:30:15.671-06:00| vcsInstUtil-3343021| I: LaunchProcAndMonitorStatus: Launched process with pid 2748 tid 2824
2016-01-15 13:30:15.671-06:00| vcsInstUtil-3343021| I: Entering function: MonitorStatusFile
2016-01-15 13:30:15.671-06:00| vcsInstUtil-3343021| I: MonitorStatusFile: Started execution of process
2016-01-15 13:34:40.731-06:00| vcsInstUtil-3343021| I: MonitorStatusFile: Other process terminated with 0, exiting
2016-01-15 13:34:40.731-06:00| vcsInstUtil-3343021| I: MonitorStatusFile: Process exited with a ‘0’ exit code; no status monitoring so assuming success
2016-01-15 13:34:40.731-06:00| vcsInstUtil-3343021| I: MonitorStatusFile: called parse callback 0 times
2016-01-15 13:34:40.731-06:00| vcsInstUtil-3343021| I: MonitorStatusFile: No need to wait for process to complete
2016-01-15 13:34:40.731-06:00| vcsInstUtil-3343021| I: MonitorStatusFile: Process’s job tree still hasn’t terminated, waiting
2016-01-15 13:34:40.731-06:00| vcsInstUtil-3343021| I: MonitorStatusFile: Wait on process’s job tree has completed: 0
2016-01-15 13:34:40.731-06:00| vcsInstUtil-3343021| I: Leaving function: MonitorStatusFile
2016-01-15 13:34:40.731-06:00| vcsInstUtil-3343021| E: LaunchProcAndMonitorStatus: Job still alive, terminating
2016-01-15 13:34:40.731-06:00| vcsInstUtil-3343021| I: Leaving function: LaunchProcAndMonitorStatus
2016-01-15 13:34:40.731-06:00| vcsInstUtil-3343021| I: RunFirstLastUpdateboot: Successfully ran boot script: “C:Windowssystem32cmd.exe /S /C “”E:Program FilesVMwarevCenter Serverbinrun-updatebootrb-scripts.bat”””
2016-01-15 13:34:40.731-06:00| vcsInstUtil-3343021| I: Leaving function: VM_RunUpdateBoot
2016-01-15 13:34:40.871-06:00| vcsInstUtil-3343021| E: wWinMain: MSI result of install of “R:vCenter-ServerPackagesvcsservicemanager.msi” may have failed: 1603 (0x00000643)
2016-01-15 13:34:40.871-06:00| vcsInstUtil-3343021| E: LaunchPkgMgr: Operation on vcsservicemanager.msi appears to have failed: 1603 (0x00000643)
2016-01-15 13:34:40.871-06:00| vcsInstUtil-3343021| I: PitCA_MessageBox: Displaying message: “Installation of component VCSServiceManager failed with error code ‘1603’. Check the logs for more details.”
2016-01-15 13:37:45.576-06:00| vcsInstUtil-3343021| I: LaunchPkgMgr: Telling child to revert transaction
2016-01-15 13:37:45.576-06:00| vcsInstUtil-3343021| I: InstallStatus_SetStage: install stage: install-packages / revert-transaction
2016-01-15 13:38:50.160-06:00| vcsInstUtil-3343021| I: EndTransaction: Chain transaction 1 rollback result 0
The VMware TSE found an internal KB referening a 1603 issue when the administrator@vsphere.local is NOT a member of the SSO group DCAdmins.I added the administrator@vsphere.local account to DCAdmins as follows:
- Log into the Web Client as the Administrator@vpshere.local account.
- Click Administration.
- Click Users and Groups under Single Sign-On.
- Select the Groups tab select DC Admins.
- In the bottom pane under Group Members click the button to add a member.
- Add the Administrator@vsphere.local account.
I then completed the installation successfully and removed the account from DCAdmins.
The internal KB also has some steps to move the administrators group in the vsphere.local LDAP. I am not going to post these here since I didn’t need them