Содержание
- Error unable to create the customization deployment file
- Error unable to create the customization deployment file
- Error unable to create the customization deployment file
- SharePoint user unable to deploy custom solutions
- Server level permissions
- Database level permissions
- Read Next
- vcloudnine.de
- … virtualization on cloud 9
- Windows guest customization fails after cloning a VM
Error unable to create the customization deployment file

- Mark as New
- Bookmark
- Subscribe
- Mute
- Subscribe to RSS Feed
- Permalink
- Report Inappropriate Content
We have problems with converting the machine (Powered ON, Remote windows machine) to a virtual environment vmware.
Source machine (Powered ON, Remote windows machine): Windows 10 1607 Enterprise Russian
Converter: Vmware vCenter Converter Standalone 6.1.1 build-3533064 (OS Windows Server 2008 R2 Standard SP1 English)
Vcenter: VMware vCenter Server Version 6.0.0 Build 3634793
ESXi host: VMware ESXi 6.0.0 build 3620759
The process of cloning and copying disks is normal.
But when start customization we have error:
Error: Unable to create the customization deployment file.
And task FAILED:
FAILED: Unable to proceed since the Sysprep parameters provided are not correct.
In converter-agent logs we see:
2017-03-28T10:10:24.262+09:00 info vmware-converter-agent[03688] [Originator@6876 sub=task-17] sysprepDeployRoot:
2017-03-28T10:10:24.262+09:00 info vmware-converter-agent[03688] [Originator@6876 sub=task-17] sysprepOptions:
2017-03-28T10:10:24.262+09:00 warning vmware-converter-agent[03688] [Originator@6876 sub=Default] Unable to get GetShortPathName for ‘C:WINDOWSTEMPvmware-tempvmware-РЎР˜РЎРўР•РњРђdeploypkgwwphoojetoutvinqdeployPkg.cab’, error ‘Системе не удается найти указанный путь. —> ‘[3]
2017-03-28T10:10:24.262+09:00 error vmware-converter-agent[03688] [Originator@6876 sub=task-17] Error while creating Customization deploy File: ERR: FileIO=0
2017-03-28T10:10:34.737+09:00 info vmware-converter-agent[05576] [Originator@6876 sub=ThreadPool] Thread delisted
Apparently the problem is the presence of Russian characters (encoding) in the path, for GetShortPathName.
Источник
Error unable to create the customization deployment file
I have a Template Winodws 2008 R2 Std and Ent. I use to deploy vms with the template using the customization wizard. Suddenly since 2 days I cant provision vm with the customiation wizard. Earlier there seems to be no issue with the customization but when I power on the vm I see errors, attached is the screen shot for your reference.
After the error 2 the vm keeps restarting endless times.
I’m not sure what is the cause. Please help me with the issue. Let me know if you need any additional information.
Thanks in advance.

- Mark as New
- Bookmark
- Subscribe
- Mute
- Subscribe to RSS Feed
- Permalink
- Report Inappropriate Content
Have you tried re-entering the Microsoft Windows product key? And maybe the administrator password in the customization profile.
If that doesn’t work, try using a new customization profile.
Let us know how things work out!
- Mark as New
- Bookmark
- Subscribe
- Mute
- Subscribe to RSS Feed
- Permalink
- Report Inappropriate Content
I use temporary customization while provisioning the vm and uncheck the button for the windows license key and re-entered the password again. Vm provison is done successfully but there is another issue where I cant update / install the vm tools.
there is a error saying: — The Required VMware tools ISO Image does not exist or is inaccessible.
thanks for the help.
- Mark as New
- Bookmark
- Subscribe
- Mute
- Subscribe to RSS Feed
- Permalink
- Report Inappropriate Content
Great that your customization is working now!
I have seen that error before and I had to place the VMware Tools binaries on the ESXi host.
Have you been able to enroll VMware Tools before on this particular host?
I believe there is a ESXi installation ISO with and without VMware Tools binaries built in.
Let me know what you are using.
Try to find the following folder on your ESXi host ( /vmfs/volumes/localdisk/packages/version/vmtools). Maybe something is wrong with the folder name or data inside.
- Mark as New
- Bookmark
- Subscribe
- Mute
- Subscribe to RSS Feed
- Permalink
- Report Inappropriate Content
Host is installed with VMware ESXi 5.5.0, 1331820 Datastores are mounted (EMC Storage SYM5766) to this ESX Host and I cant see any local drive attached to the host. all the vms on this host have vm tools running except the vms which I provisioned today. I’m unable to go to the location you mentioned ( /vmfs/volumes/localdisk/packages/version/vmtools) b’cz of the unavailability of the drive. .
Now I’m unable to recall how to find where the ESXi is installed.
- Mark as New
- Bookmark
- Subscribe
- Mute
- Subscribe to RSS Feed
- Permalink
- Report Inappropriate Content
Try to find and browse the local disk/device where your ESXi is installed using the shell. There must be a device under vmfs/volumes! 😃
Sent from my mobile phone
- Mark as New
- Bookmark
- Subscribe
- Mute
- Subscribe to RSS Feed
- Permalink
- Report Inappropriate Content
Sorry I was Out of the Office and unable to update the discussion. I have 2 templates in my organization for vm deployment.
Template 1 windows 2008 R2 Std / Ent
2 Windows 2008 R2 Ent (Application Specific)
I figured out that, Customization is working for Windows 2008 R2 Std / Ent, while I apply the same customization to the application specific Windows 2008 R2 Ent it is getting failed. I was wondering what went wrong because earlier I use to provision vms with same customization for both the templates.
Now to provision vm with the Windows 2008 R2 Ent (Application Specific template ) I’m not using the customzation wizard and it is good. After provisioning the vm I have to login and need to change the hostname and few other settings which is annoying (for every vm provisioning whenever there is a request).
Источник
Error unable to create the customization deployment file

- Mark as New
- Bookmark
- Subscribe
- Mute
- Subscribe to RSS Feed
- Permalink
- Report Inappropriate Content
The KB that was out on this was a little misleading and seemed out of date for 5.1 so I wanted to share my experiences this morning in attempts to save others that are facing this issue a little time. Apologies if this seems redundant and unnecessary since there is a KB already, this is more of a spoon feeding approach.
Unable to start vApp «vApp Name». Unable to create deployment package. Failed to execute process [ /opt/vmware/vcloud-director/deploymentPackageCreator/deploymentPackageCreator ]. Standard Output: Standard Error: DeployPkgError exception: error creating archive.
When attempting to run deploymentPackageCreator in /opt/vmware/vcloud-director/deploymentPackageCreator/ manually I kept getting errors stating:
error while loading shared libraries: libCreatePkg.so: cannot open shared object file: No such file or directory.
I used the first command in the KB to export the library that deploymentPackageCreator was complaining about but used the 5.1 name of the vcloud-director directory.
export LD_LIBRARY_PATH=$LD_LIBRARY_PATH:/opt/vmware/ v cloud-director/deploymentPackageCreator
I verified this by going back and attempting to run deploymentPackageCreator again, and this time I received a much more positive result of deploymentPackageCreator asking for proper usage to run the command.
sourcedirpath=Fully qualified path to the directory containing the files to be packaged in the deployment package.
packagepath=Fully qualified path to the deployment package file.
startupcommand=Startup command for the deployment package
includesubdirsflag=1/0 (flag specifying whether to include sub directories under sourcedirpath)
Again I followed the KB information which tells you to run a series of commands, which didn’t work. However they point you to another series of commands that need to be tweaked for 5.1 usage.
/opt/vmware/ v cloud-director/deploymentPackageCreator/deploymentPackageCreator /opt/vmware/ v cloud-director/guestcustomization/unix /opt/vmware/ v cloud-director/guestcustomization/unix_deployment_package.tar.gz «/bin/sh /tmp/.vmware/linux/deploy/customize-guest.sh start» 0
Finally the KB has you run a command to unset the library.
I ran the last two steps in reverse order, but I don’t think it matters much.
Источник
Building custom solutions for SharePoint is something that no SharePoint site can not have.
Developing custom features, web parts, event receivers and many other tools has become so important when the out-of-the-box SharePoint features become limited against the site requirements.
This post illustrates a widely faced issue when trying to add a new user to the farm and this user tries to deploy any custom solution to a SharePoint 2010 site using Visual Studio 2010.
When this user tries to deploy the project, an error shows up with message: » Error occurred in deployment step ‘Recycle IIS Application Pool’: The local SharePoint server is not available. Check that the server is running and connected to the SharePoint farm. «
To fix this error, you need to give some permissions to the failed user on both the server and the database level. Follow these steps to fix this issue.
Server level permissions
- Add the user to the Administrators group. If the user is not an administrator, then add him.
- Add the user to the SharePoint farm administrators group. To do this, go to central administration, and under the «Security» section click «Manage the farm administrators group». On the «Farm Administrators» group page, click «New» and add the user.
- Add the user to site collection administrators. To do this, browse to the SharePoint site that you need to deploy the solution on. Click «Site Actions» then click on «Site Settings». Under «Users and permissions» section, click «Site Collection Administrators». On the «Site Collection Administrators» page, put the new user in the users look up box, click «Check Names» and then click «OK».
- Add the user to the same farm administrator groups. Add the user to the following groups: IIS_IUSRS, WSS_ADMIN_WPG, WSS_RESTRICTED_WPG_V4 and WSS_WPG.
Database level permissions
- The new user should be given dbowner permission on the SharePoint configuration database.
- The new user should be given dbowner permission on the SharePoint administrator database.
After you finish applying the above configurations, do an «iisreset» from the command prompt and try to redeploy the project from Visual Studio 2010.
Read Next
The following articles are related to sharepoint user unable to deploy custom solutions.
Источник
vcloudnine.de
… virtualization on cloud 9

Windows guest customization fails after cloning a VM
8 years years old. You should keep this in mind. IT is a short living business. This information might be outdated.
Last week I got a call from a customer. The customer has tried to deploy new Citrix XenApp servers, and because the VMware template was a bit outdated, he tried to clone a provisioned and running Citrix XenApp VM. During this, the customer applied a guest customization specification to customize the guest OS (IP address, hostname etc). Until this point everything was fine. But after the clone process, the guest customization started, but never finished.

Patrick Terlisten/ www.vcloudnine.de/ Creative Commons CC0
Using the VMware template, deployment and customization were successful. So the main problem was, that the customer was unable to use a provisioned and running Windows guest to deploy new Windows guests. I checked to logs and found this error messages in the setupact.log (you can find this log under C:windowssystem32syspreppanther):
I checked the rearm count with slmgr.vbs /dlv and saw, that the remaining count was 1.
Cloning and customizing a Windows VM with a rearm count of 1 leads to the observed behaviour. After the cloning and the start of the customization, the rearm count is 0. Microsoft describes this behaviour in KB929828.
This error may occur if the Windows Software Licensing Rearm program has run more than three times in a single Windows image.
RESOLUTION
To resolve this issue, you must rebuild the Windows image.
vExpert Maish Saidel-Keesing wrote about this in his blog in 2011. He explained it very well, make sure that you read his three blog posts!
In my case, rebuilding the template wasn’t an option. Therefore I had to reset the rearm count. I searched a while and found a solution that has worked for me. I’m quite sure that Microsoft doesn’t allow this, therefore I will not describe this procedure in detail. You will find it easily in the web…
The main task is to remove the WPA registry key. This key is protected under normal operation, so you have to do this using WinRE (Windows ecovery Environment) or WinPE (Windows Preinstallation Environment). After the removal of the WPA registry key, reboot the VM, add a new key using slmgr.vbs /ipk and active the Windows installation. You can check the rearm counter using slmgr.vbs /dlv and you will notice that the rearm counter is resetted.
Always keep in mind that you can’t use sysprep with a Windows installations an infinite number of times.
Источник
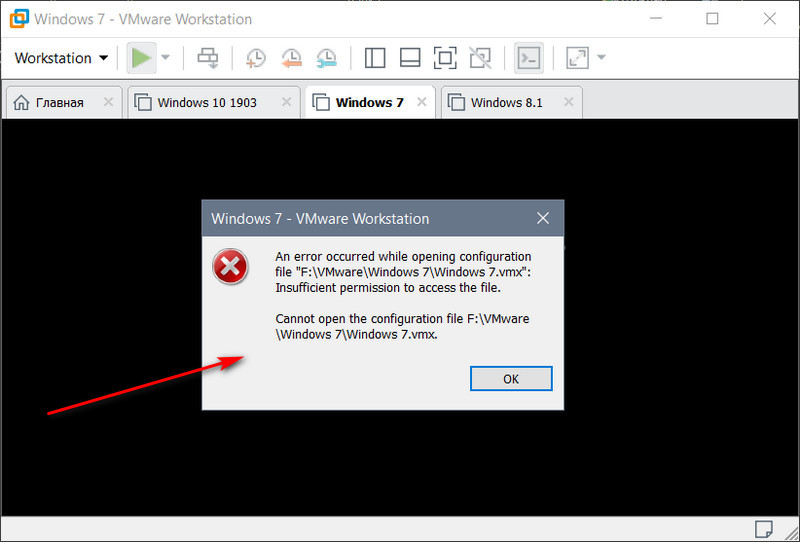
Несмотря на то, что VMware Workstation является лучшим гипервизором для Windows, в частности, в плане стабильности работы, у него могут возникать определённые сложности. Это может быть, например, ошибка запуска виртуальной машины «Cannot open the configuration file» — ошибка, означающая, что VMware не может открыть файл конфигурации машины, поскольку тот либо повреждён, либо отсутствует. Что делать в такой ситуации? Как восстановить работоспособность виртуальной машины?
Файл конфигурации виртуальной машины
Итак, при запуске машины получаем ошибку открытия файла конфигурации. Следовательно, этот файл повреждён или отсутствует. В некоторых случаях ошибка может быть обусловлена недостаточным наличием прав для открытия файла.
Можно попробовать запустить VMware Workstation с правами администратора, открыть машину, выключить гостевую ОС и попробовать снова запустить машину в программе без прав администратора. Если это не поможет, придётся виртуальную машину пересоздать. Но на базе её существующего виртуального диска.
Файл конфигурации машин VMware – это файл формата «.wmx», где хранятся параметры эмуляции оборудования и прочие настройки, которые мы указываем при создании машин и потом меняем их. Файл конфигурации хранится в папке виртуальной машины, его путь прямо указан в окошке сведений.
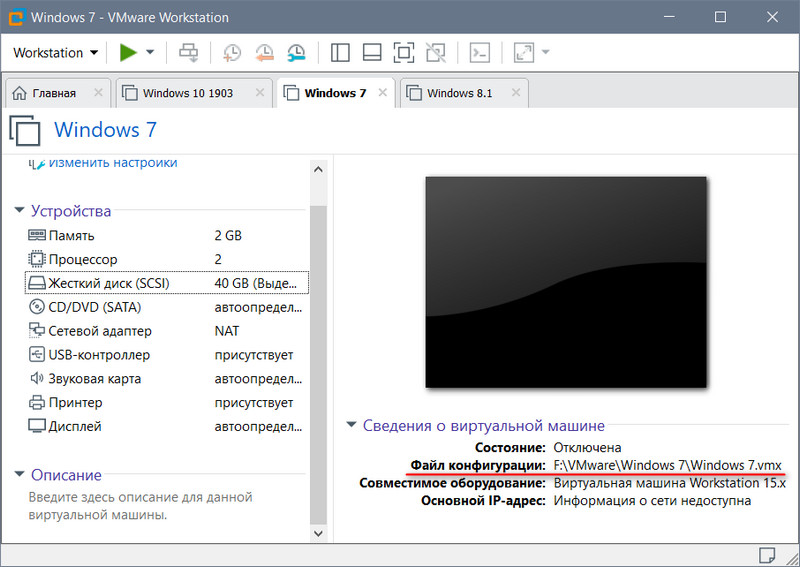
Повреждение или удаление файла конфигурации влечёт за собой невозможность работы виртуальной машины. Однако этот файл никак не влияет на содержимое виртуального диска. В последнем сохранено состояние гостевой ОС, и после пересоздания машины мы продолжим работу с этой гостевой ОС. Разве что будут утеряны какие-то данные последнего сеанса работы гостевой ОС, если у машины было приостановленное, а не выключенное состояние. Ну и также будут удалены снапшоты, если они использовались.
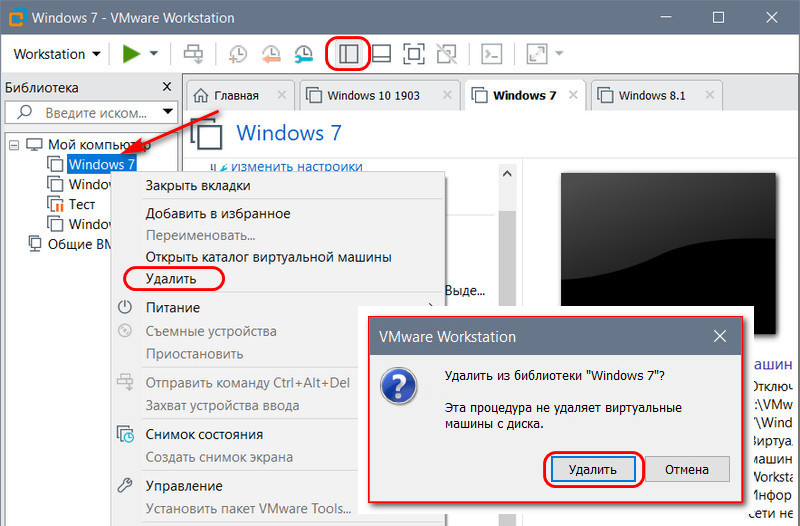
Удаление виртуальной машины
Идём в проводнике по пути хранения данных машины VMware Workstation. Удаляем все её файлы, кроме виртуальных дисков – файлов «.wmdk» (или «.vhd», если используется этот формат).
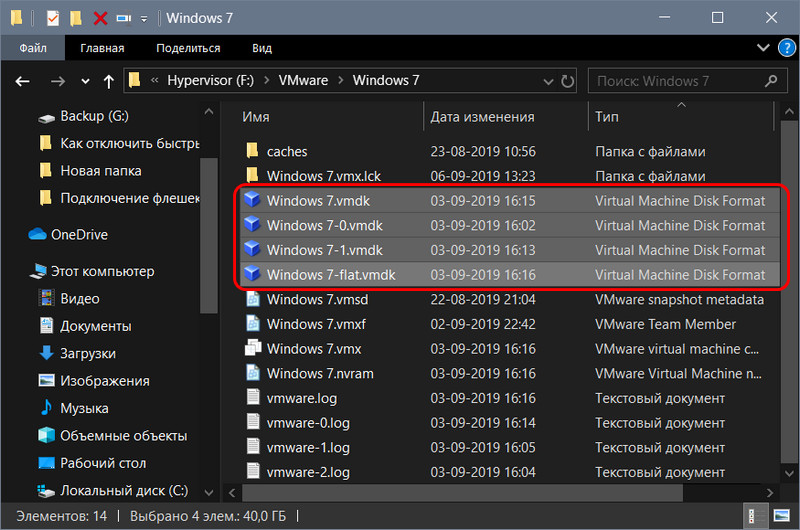
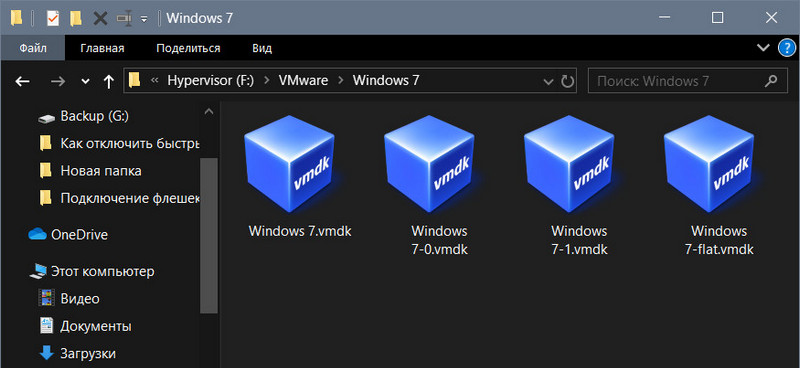
В папке машины должны остаться только файлы виртуальных дисков.
Теперь в программе VMware Workstation открываем панель библиотеки и удаляем машину с помощью контекстного меню.
Пересоздание виртуальной машины
Пересоздадим машину. Запускаем создание новой.
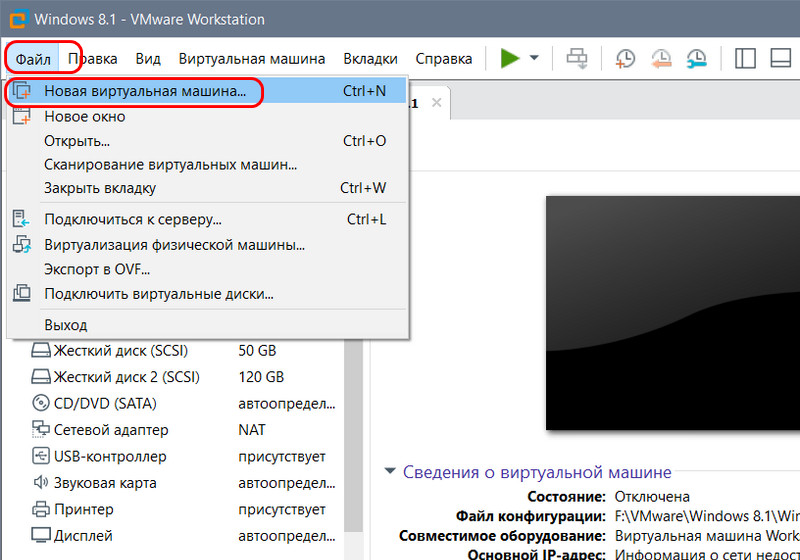
Указываем выборочный тип конфигурации.

Жмём «Далее».

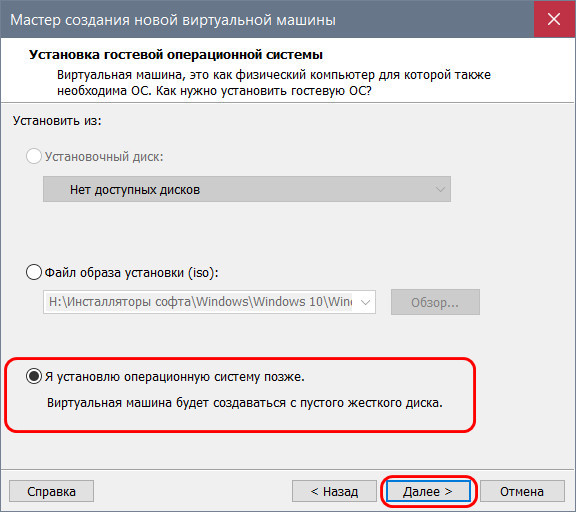
Указываем, что мы позже установим гостевую ОС.
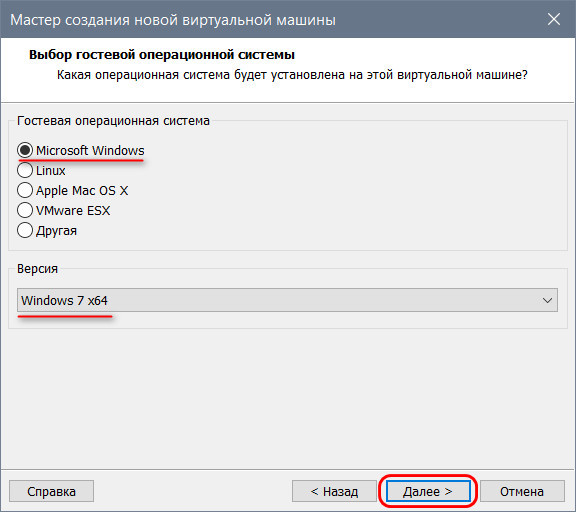
Указываем установленную на оставшемся виртуальном диске гостевую ОС, её версию и разрядность.
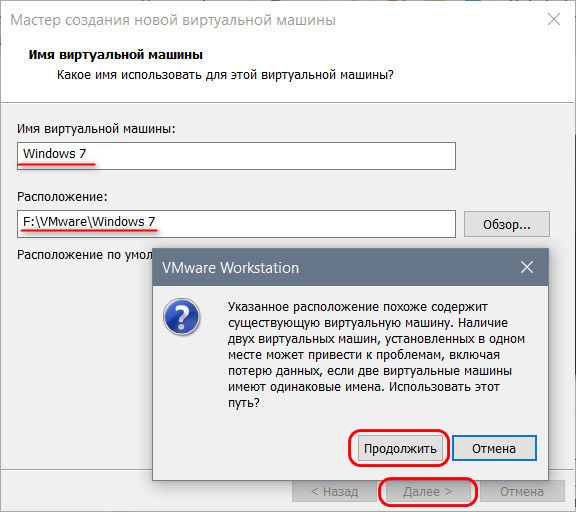
Имя и расположение машины указываем такие, как были. На сообщение VMware, что, мол, в указанном месте уже есть виртуальная машина жмём «Продолжить».
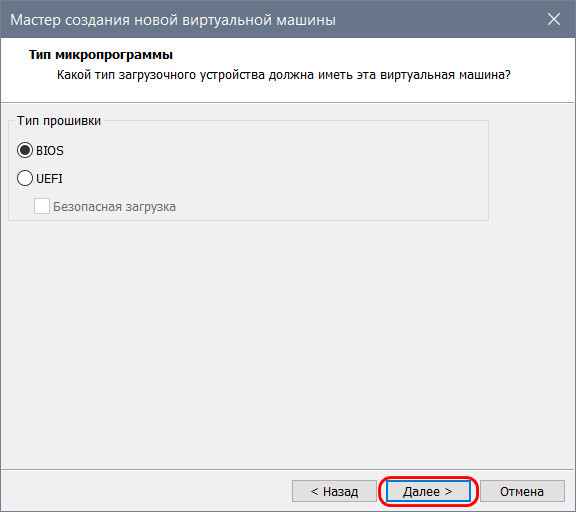
Указываем тип BIOS, какой был у удалённой машины.
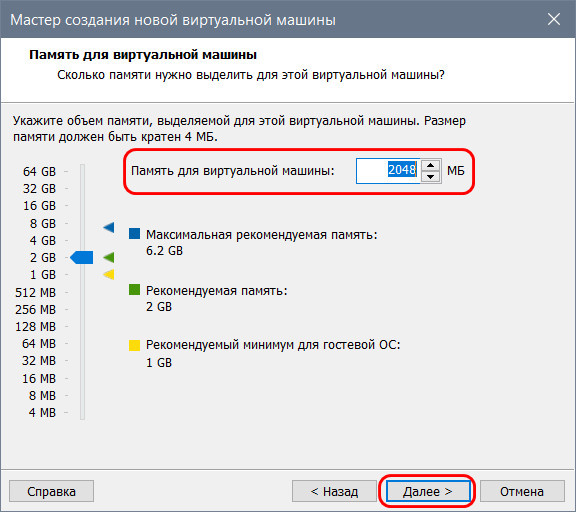
Указываем ядра процессора, выделяемую оперативную память.

Тип сети.

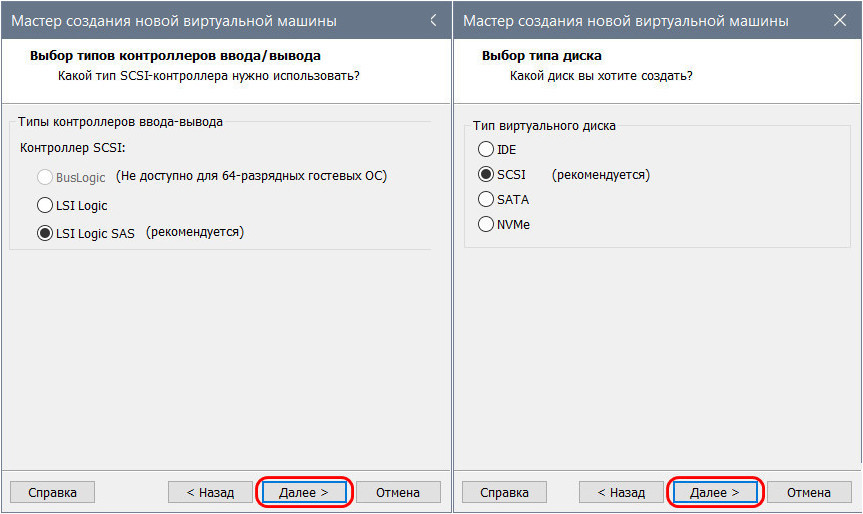
Контроллеры и тип диска.
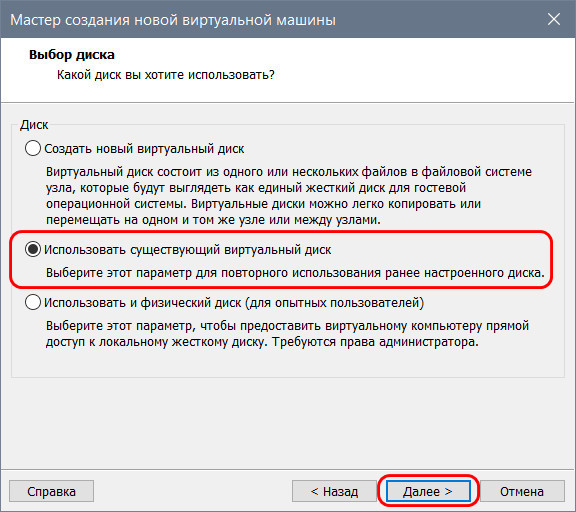
На этапе выбора диска выбираем использование существующего виртуального диска.
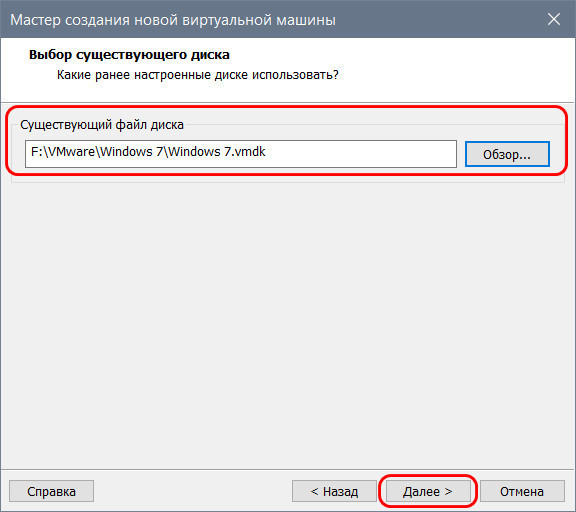
Жмём кнопку обзора и указываем путь к оставленному виртуальному диску. Указываем основной файл «.vmdk» (или «.vhd»).
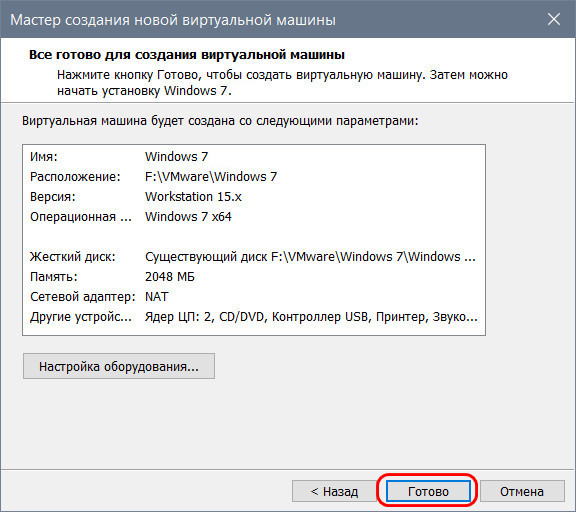
Готово.
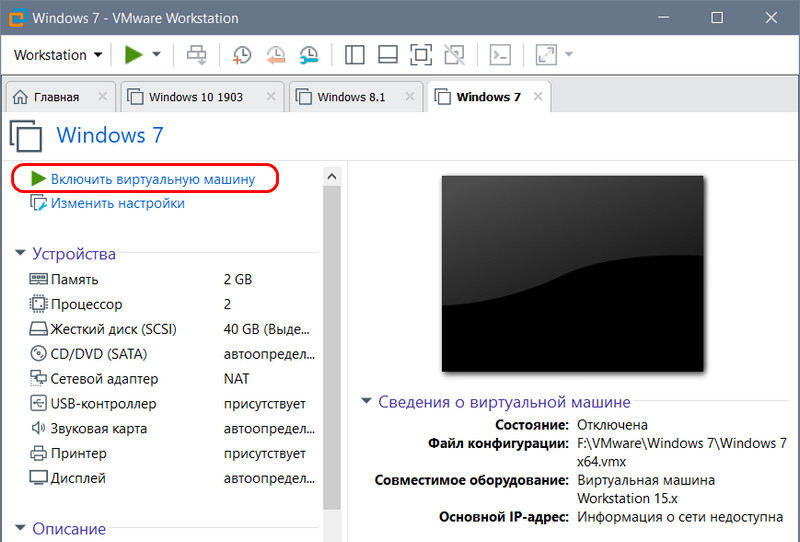
Всё – теперь виртуальная машина с новым файлом конфигурации, и она должна запуститься без проблем.
![]() Загрузка…
Загрузка…
I’ve been having issues deploying from a template in vSphere. When I deploy from a sysprep’d Windows template, the hosts’ virtual NIC is not reattaching after the initial reboot and I’m unable to make any further changes that rely on connectivity. The actual host deploys perfectly well, and changes to things such as the hostname, and even the IP address, are made — but the network remains in a disconnected state until I manually reattach it. Whilst I’m aware that the NIC should be initially unattached, there are some discepancies between this and the other cases I’ve found whilst Googling that make me wonder if there’s not some other issues going on.
The host is a Windows Server 2012 R2 image. Single VMXNET3 NIC configured. Built normally, vmtools installed, and then sysprep’d using OOBE/Generalize. The VM was then converted to a template. To date, these are the things that I’ve attempted:
-
Deploying new VM from the template, no customization options: Machine clones and deploys fine. No loss of network connectivity;
-
Deploying new VM from the template, customization profile applied within vSphere (new SID, custom hostname, static IP, licence key applied, admin password specified): Customization occurs correctly (or appears to), but NIC is disabled;
-
Tried adding ‘ethernet0.startConnected = «TRUE»‘ to the template file: No dice;
-
Deployed template using Ansible, with customization options specified in the YAML file: Deploys fine, but no network;
-
Deployed template using Ansible, with static IP config but no other changes/customization: Deploys fine, but no network;
-
Created a new machine, but removed all network devices prior to making it a template. Deploys fine, but no network.
-
Updated ESXi host to 6.5 (from v6.0): No changes.
Honestly, I’m really frustrated with it now. I understand that the NIC starting disconnected is as-intended, but something is clearly going wrong that is causing it to stay disco’d after the initial reboot. I lack the troubleshooting skills to understand where things are going wrong at this point and would really appreciate some pointers on where I can look to try and troubleshoot/resolve this.
This posting is ~8 years years old. You should keep this in mind. IT is a short living business. This information might be outdated.
Last week I got a call from a customer. The customer has tried to deploy new Citrix XenApp servers, and because the VMware template was a bit outdated, he tried to clone a provisioned and running Citrix XenApp VM. During this, the customer applied a guest customization specification to customize the guest OS (IP address, hostname etc). Until this point everything was fine. But after the clone process, the guest customization started, but never finished.

Patrick Terlisten/ www.vcloudnine.de/ Creative Commons CC0
Using the VMware template, deployment and customization were successful. So the main problem was, that the customer was unable to use a provisioned and running Windows guest to deploy new Windows guests. I checked to logs and found this error messages in the setupact.log (you can find this log under C:windowssystem32syspreppanther):
Error [0x0f0082] SYSPRP LaunchDll:Failure occurred while executing 'C:WindowsSystem32slc.dll,SLReArmWindows', returned error code -1073425657
Error [0x0f0070] SYSPRP RunExternalDlls:An error occurred while running registry sysprep DLLs, halting sysprep execution. dwRet = -1073425657
Error [0x0f00a8] SYSPRP WinMain:Hit failure while processing sysprep generalize internal providers; hr = 0xc004d307
I checked the rearm count with slmgr.vbs /dlv and saw, that the remaining count was 1.
Remaining Windows rearm count : 1
Cloning and customizing a Windows VM with a rearm count of 1 leads to the observed behaviour. After the cloning and the start of the customization, the rearm count is 0. Microsoft describes this behaviour in KB929828.
CAUSE
This error may occur if the Windows Software Licensing Rearm program has run more than three times in a single Windows image.
RESOLUTION
To resolve this issue, you must rebuild the Windows image.
vExpert Maish Saidel-Keesing wrote about this in his blog in 2011. He explained it very well, make sure that you read his three blog posts!
- Windows 7/2008 Deployment – KMS and MAK Keys pt. 1
- Windows 7/2008 Deployment – KMS and MAK Keys pt. 2
- Windows 7/2008 Deployment – KMS and MAK Keys pt. 3
In my case, rebuilding the template wasn’t an option. Therefore I had to reset the rearm count. I searched a while and found a solution that has worked for me. I’m quite sure that Microsoft doesn’t allow this, therefore I will not describe this procedure in detail. You will find it easily in the web…
The main task is to remove the WPA registry key. This key is protected under normal operation, so you have to do this using WinRE (Windows ecovery Environment) or WinPE (Windows Preinstallation Environment). After the removal of the WPA registry key, reboot the VM, add a new key using slmgr.vbs /ipk and active the Windows installation. You can check the rearm counter using slmgr.vbs /dlv and you will notice that the rearm counter is resetted.
Always keep in mind that you can’t use sysprep with a Windows installations an infinite number of times.
- Author
- Recent Posts

vcloudnine.de is the personal blog of Patrick Terlisten. Patrick has a strong focus on virtualization & cloud solutions, but also storage, networking, and IT infrastructure in general. He is a fan of Lean Management and agile methods, and practices continuous improvement whereever it is possible.
Feel free to follow him on Twitter and/ or leave a comment.
В этой теме рассматриваются проблемы, возникающие при работе с
VMware Workstation

Внимание!
Новые версии VMware Workstation предназначены для установки только на 64-битные системы!
Для установки на 32-битные системы используйте версии ниже 11!
Код:
«C:Program Files (x86)VMwareVMware Workstationvmrun.exe» -T ws stop «E:HARDDISKSUbuntu ServerUbuntu Server.vmx» Stop a VM soft
Упс, сорри, попутал задачу, не заметил, что хост под убунтой. Собственно, в манах примерно так описывается
Несмотря на то, что я дал файлам vmdk; wmx — полные права, может им нужно еще сменить владельца на vmware?
я выполнил только chmod 777, c vmware настройками еще не разбирался, не знаю ее группу и пользователя для нее.
chown -R user:group /var/lib/vmware/vms
Хост:
Core2Quad Q6600
8Gb DDR2
Win 8.1 x64 (UAC выключен полностью, работа в полном режиме администратора, брандмауэр отключен, антивирусов нет)
VMWare 11.1.0
Гость:
Совместимость оборудования: VMWare 11
1 виртуальный процессор с 2-мя ядрами
512мб оперативы
WinXP x86 sp3 rus оригинал.
vmtools
Unable to proceed without a log file vmware что делать
Ошибка при установке операционной системы на виртуальную машину.
VMware Workstation установлена на Windows8 хочу теперь установить Windows XP на виртуальную машину.
Ошибка при компиляции проекта из Builder 2010 в XE3 — Unable to Open file ‘ALIASREC.OBJ’
Новые проекты создаются и компилируются без проблем, а вот при загрузке любого, самого простого.
При попытке открыть файл, в пути которого есть символы на кириллице, возникает ошибка: Unable to open file
Добавил на форму OpenDialog, Memo. При попытке открыть файл в пути которого есть символы на.
при входе в виртуальную машину так пишет: Unable to open file «C:WindowsWmVirtual MachinesWindows XP ProfessionalWindows XP Professional.vmdk»: Insufficient permission to access file. ТАК ПИШЕТ. у кого так было? как войти в неё?
Добавлено через 31 секунду
Persk, персик пожалуйста помоги мне
Добавлено через 1 минуту
Андрей1224, Андрюша у меня на экране квадратик и там так написано где в настройках по нажимать чтоб зайти в машину. люди очень нужно помогите Тани(((
солнце я тормоз в этом деле ((( у тебя есть агент можешь мне написать вот моё мыло . я запускаю как обычно ,но вот такое окно сегодня выдает написали что надо для чтения поставить но как и где я незнаю..
Добавлено через 2 минуты
Hikari, есть варианты.
правой кнопкой по файлу виртуальной машины — свойства.
magirus, там параметры тока ,я пыталась меня и на больше и на меньшее не получается .
Добавлено через 5 минут
magirus, ПОЛУЧИЛОСЬ ДОГНАЛА ,ДЛЯ ЧТЕНИЯ НАСТРОИЛА НО ВСЕ РОВНО НЕ ВХОДИТ ..ЧТО ЕЩЁ НАДО ЭТОЙ МАШИНЕ?
TANYA13_13, в директории Виртуальных машин, например:
C:UsersСергейDocumentsVirtual MachinesUnified Networking Lab (2)
Щелкнуть ПКМ, снять галочку
закройте виртуальную машину. зайдите по пути — C:WindowsWmVirtual MachinesWindows XP Professional найдите файл Windows XP Professional.vmdk
щелкните по нему правой кнопкой мыши — выберите свойства.
Добавлено через 47 секунд
возможно то же нужно проделать со всеми файлами в папке.
magirus, Отмечу, что надо снимать с папки, а не только с файла ВМ попробуйте переместить или скопировать папку с виртуальной машиной из папки Windows в другое место.
TANYA13_13, покажите путь где у вас храняться ВМ, скажите имеете ли вы полный доступ на ПК ?
Добавлено через 10 минут
Епт, ты хоть не ставишь галку на атрибут «Только для чтения» ?
Ее снимать нужно
magirus, смотри зайти почти получилось теперь пишет внутренняя ошибка
MAGIRUS, теперь вот так пишет : An error occurred while opening configuration file «C:WmVirtual MachinesWindows XP ProfessionalWindows XP Professional.vmx»: Insufficient permission to access the file.
Cannot open the configuration file C:WmVirtual MachinesWindows XP ProfessionalWindows XP Professional.vmx.
Добавлено через 2 минуты
magirus, как теперь память увеличить правильно я поняла ?
Добавлено через 8 минут
Konev, я знаю что не нужно я её не снимаю..я почти зашла теперь я так поняла что места там мало увеличиваю но пишет внутрення ошибка..можешь зайти и настроить правильно. ну я совсем начинающая незнаю как сделать правильно..помоги прошу
Несмотря на то, что VMware Workstation является лучшим гипервизором для Windows, в частности, в плане стабильности работы, у него могут возникать определённые сложности. Это может быть, например, ошибка запуска виртуальной машины «Cannot open the configuration file» — ошибка, означающая, что VMware не может открыть файл конфигурации машины, поскольку тот либо повреждён, либо отсутствует. Что делать в такой ситуации? Как восстановить работоспособность виртуальной машины?
Файл конфигурации виртуальной машины
Итак, при запуске машины получаем ошибку открытия файла конфигурации. Следовательно, этот файл повреждён или отсутствует. В некоторых случаях ошибка может быть обусловлена недостаточным наличием прав для открытия файла.
Можно попробовать запустить VMware Workstation с правами администратора, открыть машину, выключить гостевую ОС и попробовать снова запустить машину в программе без прав администратора. Если это не поможет, придётся виртуальную машину пересоздать. Но на базе её существующего виртуального диска.
Файл конфигурации машин VMware – это файл формата «.wmx» , где хранятся параметры эмуляции оборудования и прочие настройки, которые мы указываем при создании машин и потом меняем их. Файл конфигурации хранится в папке виртуальной машины, его путь прямо указан в окошке сведений.
Повреждение или удаление файла конфигурации влечёт за собой невозможность работы виртуальной машины. Однако этот файл никак не влияет на содержимое виртуального диска. В последнем сохранено состояние гостевой ОС, и после пересоздания машины мы продолжим работу с этой гостевой ОС. Разве что будут утеряны какие-то данные последнего сеанса работы гостевой ОС, если у машины было приостановленное, а не выключенное состояние. Ну и также будут удалены снапшоты, если они использовались.
Удаление виртуальной машины
Идём в проводнике по пути хранения данных машины VMware Workstation. Удаляем все её файлы, кроме виртуальных дисков – файлов «.wmdk» (или «.vhd», если используется этот формат) .
В папке машины должны остаться только файлы виртуальных дисков.
Теперь в программе VMware Workstation открываем панель библиотеки и удаляем машину с помощью контекстного меню.
Пересоздание виртуальной машины
Пересоздадим машину. Запускаем создание новой.
Указываем выборочный тип конфигурации.
Указываем, что мы позже установим гостевую ОС.
Указываем установленную на оставшемся виртуальном диске гостевую ОС, её версию и разрядность.
Указываем тип BIOS , какой был у удалённой машины.
Указываем ядра процессора, выделяемую оперативную память.
Контроллеры и тип диска.
На этапе выбора диска выбираем использование существующего виртуального диска.
Жмём кнопку обзора и указываем путь к оставленному виртуальному диску. Указываем основной файл «.vmdk» (или «.vhd») .
Всё – теперь виртуальная машина с новым файлом конфигурации, и она должна запуститься без проблем.

Иногда какой-нибудь хост ESXi может заблокировать виртуальную машину и «забыть» разблокировать. Причины бывают разные, но исправлять всё равно нам.
После неудачного резервного копирования виртуальная машина попросила выполнить консолидацию дисков.

Virtual machine disks consolidation is needed


И получаю ошибку.
Unable to access file since it is locked
Не работает примус. Нужно попасть в консоль гипервизора. Для удобства запускаю SSH.

Авторизируюсь по SSH на гипервизоре с «больной» виртуалкой.

По опыту уже знаю что могло послужить причиной запроса консолидации, блокировки виртуальной машины и описываемой ошибки. Банальная нехватка места в директории /tmp. Уже были статьи про такую проблему, но в каждом конкретном случае результат переполнения /tmp вызывал разные ошибки. Примеры устранения проблемы есть здесь:
Действительно, диск переполнен.

Прежде чем разбираться с заблокированной виртуалкой следует почистить /tmp.
Всё место занял файл ams-bbUsg.txt. Это известная проблема. Ошибка в пакете HPE Agentless Management (AMS) версии 11.4.0:
Сначала освободим место.
Место появилось. Но причина не устранена. Пробую обновить пакет AMS.

Причину проблемы устранили, правда, нужно будет запланировать перезагрузку гипервизора.
Теперь разберёмся с заблокированной виртуалкой. Нам нужно определить, который гипервизор эту виртуальную машину заблокировал и перезапустить на нём службы. Если виртуальная машина находится на локальном диске и доступ к ней имеет только один хост, то просто выполняем:
Если же хостов может быть несколько, то переходим в каталог с файлами виртуальной машины и смотрим vmware.log:

Нам нужно найти название заблокированного файла.
Заблокирован файл fs-office-000001.vmdk. Определим flat или delta файл.

Получили путь к файлу delta.
Утилита vmfsfilelockinfo поможет определить хост. Утилиту можно запускать, зная файл VMDK flat, delta, esparse для VMFS или .UUID. lck для vSAN.

Получаем MAC адрес хоста, который заблокировал виртуальную машину. По MAC адресу определяем хост. Можно вывести ARP таблицу и получить IP и MAC адреса всех соседних серверов ESXi:
Я же просто пробегаюсь глазами по всем хостам в vCenter:

На найденном хосте выполняем:
Блокировка с виртуальной машины снимается, теперь консолидация выполнится успешно.
Многие администраторы VMware ESXi сталкивались с такой проблемой, как «фиолетовый экран смерти». Самое неприятное в этой проблеме, что у вас возникает недоверие к своей собственной инфраструктуре. В голове постоянно крутятся мысли о том, что такая же проблема может повториться и на другом сервере.
Что такое PSOD?
PSOD расшифровывается, как Purple Screen of Diagnostics, часто называемый Purple Screen of Death от более известного Blue Screen of Death, встречающегося в Microsoft Windows.
Это диагностический экран, отображаемый VMware ESXi, когда ядро обнаруживает фатальную ошибку, при которой оно либо не может безопасно восстановиться, либо не может продолжать работу.
Данный экран отображается в консоли сервера. Чтобы увидеть его, вам нужно будет либо находиться в центре обработки данных и подключить монитор, либо подключиться удаленно с помощью внеполосного управления сервером (iLO, iDRAC, IMM и т.д. в зависимости от вашего вендора).

Почему появляется PSOD?
Наиболее частые причины PSOD:
1. Аппаратные сбои, в основном связанные с RAM или CPU. Обычно они выдают ошибку «MCE» или «NMI».
2. Программные ошибки
· неверное взаимодействие между компонентами ESXi SW (см. KB2105711)
· из ресурсов: память, динамическая область памяти, буфер (см. KB2034111, KB2150280)
· бесконечный цикл + переполнение стека (см. KB2105522 )
· неверные или неподдерживаемые параметры конфигурации (см. KB2012125, KB2127997)
3. Некорректно функционирующие драйвера; ошибки в драйверах, которые пытаются получить доступ к некорректному индексу или несуществующему методу (см. KB2146526, KB2148123)
Какое влияние оказывает PSOD?
Кроме того, все другие службы, предоставляемые хостом, будут прекращены, поэтому, если ваш хост является частью кластера VSAN, PSOD также повлияет на vSAN.
Что делать?
Одна из самых важных вещей, которые нужно сделать при появлении фиолетового экрана — это сделать снимок экрана. Если вы подключаетесь к консоли удаленно (IMM, iLO, iDRAC, …), будет легко сделать снимок экрана, если нет такой возможности, хотя сфотографируйте экран на телефон. На этом экране много полезной информации о причине сбоя.

2. Обратитесь в службу поддержки VMware.
Прежде чем приступить к дальнейшему исследованию и устранению неполадок, рекомендуется обратиться в службу поддержки VMware, если у вас есть контракт на поддержку. Параллельно с вашим расследованием они смогут помочь вам в проведении корневого анализа причин (RCA).
3. Перезагрузите затронутый хост ESXi.
Чтобы восстановить сервер, вам необходимо перезагрузить его. Я бы также посоветовал оставить его в режиме обслуживания, пока вы не выполните полный анализ RCA, пока не будет определена и исправлена ошибка. Если вы не можете позволить себе держать его в режиме обслуживания, по крайней мере, точно настройте свои правила DRS, чтобы на нем работали только второстепенные виртуальные машины, чтобы в случае возникновения другого PSOD влияние было минимальным.
4. Получите coredump
В зависимости от вашей конфигурации у вас может быть дамп ядра в одной из следующих форм:
b. В виде файла .dump в одном из хранилищ данных хоста
c. В виде файла .dump на vCenter — через службу netdump

5. Расшифруйте ошибку.
Наиболее распространенные случаи описаны в отдельных статьях базы знаний VMware. Поэтому используйте эту таблицу в качестве индекса для ошибок PSOD:
Ошибка VMWare: Unable to access a file since it is locked
 05.02.2020
 itpro
itpro VMWare, Виртуализация
 Комментариев пока нет
Очень часто при удалении снапшотов или консолидации дисков виртуальных машин на хостах VMWare ESXi, я сталкиваюсь с ошибкой “Unable to access a file since it is locked”. Это довольна частая проблема связана с ошибками в системе резервного копирования ВМ (я встречал проблему в Veeam, HP Data Protector, Veritas). Блокировка виртуального диска снапшота виртуальной машины не позволит вам выполнить консолидацию (Virtual machine disks consolidation is needed), Storage vMotion на другой дисковый массив, выполнить резервное копирование или удалить текущий снапшот. Иногда виртуальную машины с блокировками нельзя даже элементарно включить.
Ошибка с доступом к заблокированному файлу виртуального диска или снапшот в VMWare может выглядеть так:

Так же вы можете увидеть такую ошибку:
Чаще всего ошибка “Unable to access file since it is locked” появляется:
- Когда некоторые файлы включенной виртуальной машины содержат метки блокировки другими хостаим ESXi;
- При добавлении виртуальных дисков в appliance резервного копирования во время неудачных сессий создания бэкапа;
Чтобы найти источник блокировки и снять ее, сначала нужно определить заблокированные файлы.
- С помощью SSH клиента подключитесь к хосту ESXi, на котором зарегистрирована проблемная ВМ;
В строке RO Owner указан MAC адрес сетевой карты хоста ESXi, который заблокировал данный файл снапшота (MAC адрес выделен на скриншоте). Также обратите внимание на значение Mode:
- mode 1 – блокировка на чтение/запись (например, у включенной ВМ);
- mode 2 – обычно означает, что диск заблокирован приложением резервного копирования.
Чтобы по известному MAC адресу найти ESXi сервер, можно воспользоваться следующими командами в PowerCLI (преобразуйте полученный ранее MAC адрес в формат с двоеточиями):
Import-Module VMware.VimAutomation.Core -ErrorAction SilentlyContinue
connect-viserver vcenter1
Get-VMHost | Get-VMHostNetworkAdapter | Where-Object | Format-List -Property *
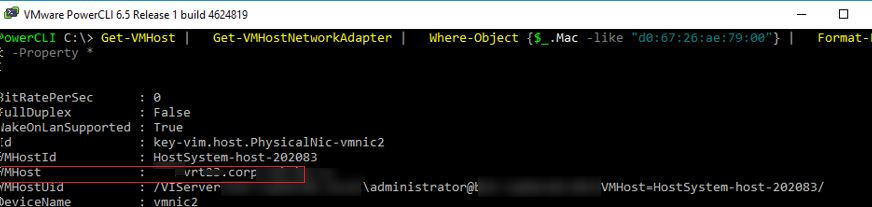
Имя ESXi хоста будет указано в поле VMHost.
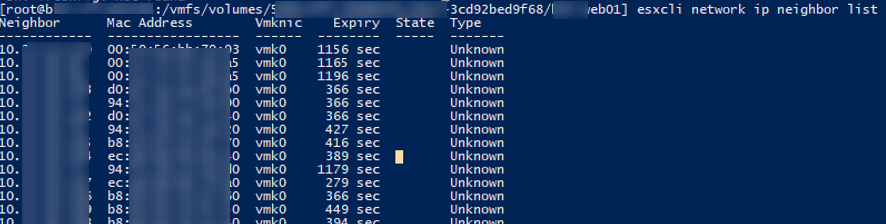
Также вы можете вывести ARP таблицу прямо с хоста ESXi и получить IP и MAC адреса всех соседних серверов ESXi в сети VMkernel:
esxcli network ip neighbor list
Чтобы снять блокировку с файла ВМ просто перезагрузите найденный ESXi хост (предварительно смигрируйте с него все ВМ с помощью VMotion). Если вы не можете перезагрузить хост, перезапустите службу Management Agent (hostd) в Maintenance Mode из SSH консоли хоста:
После этого попробуйте выполнить консолидацию или удалить снашот ВМ.
Чтобы исправить проблему, откройте параметры ВМ, на которой установлен прокси Veeam. Удалите из оборудования ВМ диск ВМ, файлы которой заблокированы.
Убедитесь, что вы выбрали опцию “Remove from virtual machine”, а не “Remove from virtual machine and delete files from disk”. Иначе вы можете случайно удалить ваш vmdk диск.