Содержание
- AMD-V and VMware player
- #1 Chris Cosgrove
- BC AdBot (Login to Remove)
- #2 Genericuser42069
- #3 jonuk76
- #4 Chris Cosgrove
- #5 Genericuser42069
- #6 jonuk76
- #7 Chris Cosgrove
- #8 Chris Cosgrove
- #9 jonuk76
- #10 gphill4
- #11 jonuk76
- #12 Chris Cosgrove
- #13 gphill4
- #14 Chris Cosgrove
- Vmware error while powering on this host supports amd v but amd v is disabled
- Исправлено: AMD-V отключен в BIOS (VERR_SVM_DISABLED) —
- Что вызывает отключение AMD-V в ошибке BIOS?
- Способ 1. Включение AMD-V из настроек BIOS
- Способ 2: отключение Windows Hyper-V
- Способ 3: изменение количества ядер процессора на 1
- Способ 4. Изменение версии на Windows 7 или Windows 2003 (если применимо)
AMD-V and VMware player
#1 Chris Cosgrove
My desktop has an AMD Ryzen 5-3600 CPU running on an MSI B450-A Pro Max mobo and using Win 10 v20H2. The BIOS is American Megatrends v M.B0 dated 3 — Dec — 2020. And VMware Workstation Player v16.1 is installed.
Whenever I try to run an old version of Windows I get this error message —
ERROR while powering on. This host supports AMD-V but AMD-V is disabled
AMD-V might be disabled if it has been disabled in the BIOS/firmware settings or the host has not been power-cycled since changing this setting.
(1) Verify that the BIOS/firmware settings enable AMD-V
(2) Power-cycle the host if this BIOS/firmware setting has been changed.
(3) Power-cycle the host if you have not done so since installing VMplayer
(4) Update the host BIOS/firmware to the latest version
This host does not support ‘AMD RVI’ hardware assisted MMU virtualisation.
VMware Player does not support the user level monitor on this host.
Module ‘Monitor mode’ power on failed. Failed to start the virtual machine.
I have updated the BIOS to the latest version, the only later one is a ‘Beta’ which I am not interested in and I have power-cycled the computer since the update and VMware throws this error every time I try to run it
I have had a good look around the BIOS and I cannot find anything looking like a switch for AMD-V, nor indeed any mention of it. It does show virtualisation as being enabled.
I haven’t used VMplayer since I re-built this computer last summer but it ran without problems on my previous hardware.
Where do I find this switch ?
BC AdBot (Login to Remove)

- BleepingComputer.com
- Register to remove ads

#2 Genericuser42069
This might be a very useless comment by me but here are 2 solutions that are easy to do, 1. Reinstall, 2. Download amibcp and search for this «amd-v» because it could be hidden, you can download amibcp here https://novoselovvlad.ru/2019/10/24/%D1%83%D1%82%D0%B8%D0%BB%D0%B8%D1%82%D1%8B-ami-mmtool-%D0%B8-bcp/ , bcp v3 is for amibios, bcp v4 is for aptio 4, and bcp 5 is for aptio 5, you problably have aptio 5 so use v5.
If that doesnt work i have another solution but its pretty hard if you dont have a removable bios chip like me, before you do this backup the mobo bios as you may need it, here are the steps if you want to use this method but its pretty hard (the flashing part), 1. Search for all msi b450 mobos, 2. Download bioses till you find one with amd V option (via looking at the bios in amibcp), 3. When you find one get your bios programmer ready and make sure it has a bios clip (assuming you have one) i use ch341a, 4. download asprogrammer on another computer (so if you temp brick your board you can still reflash it) 5. Insert the bios programmer into one of your usb slots, 6. Search for the bios chip on your mobo, 7. Once you have found it take a close look at it to find the model number and maker, 8. In asprogrammer open the IC dropdown menu and click spi then find your bios chip maker and model, 9. Once you have found it attach the clip to the front if your chip is a 25xxx series or at the back it its a 24xxx series, 10. Attach the clip to the bios chip (may take ahwhile if its a low quality clip), 11. Flash the chip with your bios that has the amd v option, 12. Check if your mobo turns on or of its bricked, if it turns on then success.
Sorry if im trash at making a step by step guide xD
I have flashed my p5qs and p5q pros with p5q pro turbo bios using this method but the motive is to gain performance, i bought my programmer as i thought that maybe the boards that i bought had bad bioses and had to be reflashed cuz i was buying broken boards.
#3 jonuk76
Which old version of Windows are you running as a guest? I’ve been entirely unsuccessful getting Windows 98SE to run in any VM on my Ryzen 1700X (VBox, VMWare, Linux and Windows host OS — doesn’t matter). It just creates an endless stream of errors during installation and has to be abandoned. I can use it on my Intel PC’s without a problem though, so I think there’s an incompatibility at the CPU level. I can use WinXP, Win 7, Win 10, Linux and various other guests without issue though.
One thing I’d check is go into your BIOS (advanced mode) and see if you can find CPU features (on my old MSI board it was in the Overclocking menu). Look for a CPU feature called «SVM» (AMD Secure Virtual Machine) and check that it is enabled.
#4 Chris Cosgrove
This is a new install of VMware but I did update the BiOS after that install, so perhaps worth doing an uninstall/re-install. And a power-cycle. Amibcp may be an answer but I think I will try JonUK’s suggestion before going down that hole. Up until two days ago I think I had v15.5 and it was this problem that led me to updating to 16.1. At the moment I have no idea if the BIOS chip is demountable or not, easy enough to check.
As it happens the OS I was trying to use is 98SE, so that may well be the problem but since I have installers for XP and 7 that is easily fixed. It certainly ran on Win 7 because that is what i used it on last. It is a very effective if dated application to convert images into a cross stitch design but the system requirements are for 98SE through XP !
Worst comes to the worst, I will just have to steal an hour or so on my wife’s laptop, it’s Intel powered.
#5 Genericuser42069
#6 jonuk76
Hi Chris, yes there are some bugs in Ryzens virtualisation apparently. It seems to mainly affect old 16/32 bit OS like Windows 9x worst. I thought it might be fixed in newer gen Ryzens but there are still reports to the contrary — https://www.vogons.org/viewtopic.php?t=68205
Did you have a look for the CPU SVM feature in the BIOS? Its often disabled by default and I believe current versions of VMWare will not work properly unless its enabled. This being disabled will cause it to throw an error as soon as you try to start a VM. I am able to run Win 2K and XP perfectly on my Ryzen system.
#7 Chris Cosgrove
This is turning into something of a saga. I might be interested in a 2nd hand workstation but my wife would not be amused and, since my workspace is a bit like a fighter aircraft’s cockpit I don’t think I have the room for a second desktop. A laptop running win 7 I might get away with.
Actually i tried one of the other suggestions, use an Intel computer. Out came my Vaio, also running 10 20H2, and installed 16.1 and got exactly the same error message except it was the Intel version. Since I had the v15.3 installer in my collection I gave that a try and got the same result. If I get the time tomorrow I will go and look for the SVM switch on my desktop.
And it’s not that I am hen-pecked or anything like that but this is all because my wife wants an image turning into a pattern. You know how it goes — ‘Yes dear, certainly dear, whatever you say dear !’
#8 Chris Cosgrove
For the time being I am giving up on this. I have been over the BIOS again and found an entry for SVM which says ‘Yes’ so I assume that means it is enalbled so I don’t see wht the problem is. also, trying it on an Intel powered VAIO, I got the message that it required Intel V-tx. I also tried VirtualBox and got the same results.
At the moment I just don’t have the time to mess with this, I’ll look around and see if anybody has an older computer running either 7 or XP. But thanks for all the suggestions.
#9 jonuk76
Beats me then. SVM is the usually what AMD’s VT-X equivalent is referred to in the BIOS. This is where it was enabled on my old MSI board (helpfully buried in the Overclocking menu. I believe it’s the same on the B450 Tomahawk Max) —
I don’t know how old the VAIO system is (I’m aware VAIO isn’t sold in the UK anymore, but don’t know when they stopped) but not all Core 2 era systems have it, it depends on the actual processor. I think more recent systems with CPU’s with Core i3/i5 etc branding should have VT-X. Again it’s possibly disabled in BIOS by default for some reason.
#10 gphill4
If the Memory Integrity option is enabled in Windows Defender under Core Isolation, VMware and VBox cannot be used and may give errors like you’re seeing. See the Virtual Machines Problems section under this link about Core Isolation and Memory Integrity.
#11 jonuk76
Interesting to know — thanks for the info! It’s disabled on my own PC (plus I don’t have a TPM chip installed)
#12 Chris Cosgrove
It looks like it is unfortunate for me that my desktop is essentially a new-build — August 2020 — and when I type ‘Memory integrity’ into search I get the message «The page you are trying to access has no supported features and is not available»
It looks to me like I am going to have to find another way to skin this particular cat ! Maybe i am going to have to find a newer package.
#13 gphill4
It says the same when I type it into mine, but then when I go to Windows Security, Device Security, Core Isolation Details, it bring up an option to turn Memory Integrity on. I don’t have it on because I run VMware Workstation Player with a Linux Guest for distributed computing, but it’s there for me to choose. This is not a new build, it’s my main desktop with an i7 3770 running Win 10 Home.
#14 Chris Cosgrove
I have solved this problem, at least to my wife’s satisfaction. I found a shareware application to the job. The application is less flexible and capable than the one I have had for quite a long time but it has done the job. Chickening out, I know !
I have been surprised at how difficult/impossible it is to get a VM to run on this computer. Possibly it is because I am running Win 10 Home and I am wondering if an upgrade to Pro would allow me to change the settings gphil4 suggested. The downside to that is that it would probably mean re-building my C: drive which is even more work than I am willing to contemplate at the moment.
Thanks for all the advice and suggestions, this question of a VM is something I may come back to again.
Источник
Vmware error while powering on this host supports amd v but amd v is disabled
I want to pick your mind today by exposing a case that´s driving me nuts, and still can´t fix it. Here is the deal : I am running VM Workstation 10.0.3 build-1895310 on Windows 8.1, 64-bit (Build 9600) 6.3.9600 ( both of them with all vendor-mandatory updates applied ) on a laptop with 6 GB RAM ( 4 GB free at the time of testing ). I want my VMs to perform faster since this laptop reports that it support the AMD-V extensions. Here´s the report of a utility named speccy on the CPU :
Name AMD A6-5200
Code Name Kabini
Package Socket FT3 (BGA769)
Specification AMD A6-5200 APU with Radeon HD Graphics
Extended Family 16
Extended Model 0
Instructions MMX (+), SSE, SSE2, SSE3, SSSE3, SSE4.1, SSE4.2, SSE4A, AMD 64, NX, VMX, AES, AVX
Virtualization Supported, Enabled
Hyperthreading Not supported
Bus Speed 99.8 MHz
Stock Core Speed 2000 MHz
Stock Bus Speed 100 MHz
Average Temperature 49 °C
Whenever I set the Virtualization engine preferred mode in VM > settings > Processors to «intel-VTx or AMD-V», after trying to start a Windows XP 32 bit VM, i get the following error message and the reversion to binary translationmode :
Preferred mode unavailable. Using binary translation instead.
This host supports AMD-V, but AMD-V is disabled.
AMD-V might be disabled if it has been disabled in the BIOS/firmware settings or the host has not been power-cycled since changing this setting.
(1) Verify that the BIOS/firmware settings enable AMD-V.
(2) Power-cycle the host if this BIOS/firmware setting has been changed.
(3) Power-cycle the host if you have not done so since installing VMware Workstation.
(4) Update the host’s BIOS/firmware to the latest version.
I have done ALL that this error message is suggesting and looked everywhere on other forums, but I still can´t figure out why is this happenning.
It´s been suiggested somewhere that other virtualization platforms may interfere with VM Wkst «grabbing and using» these extension, so I made shure there are no other of a kind.
I am attaching a screenshoot of the VMware error.
Any insights on this will be highly appreciated !
Источник
Исправлено: AMD-V отключен в BIOS (VERR_SVM_DISABLED) —
Несколько пользователей сообщают о получении AMD-V отключена в BIOS (или ОС хоста) (VERR_SVM_DISABLED) ошибка сообщение при попытке запустить виртуальную машину с помощью VM VirtualBox. Хотя эта конкретная проблема чаще всего сообщается в Windows 7, Windows 8 и Windows 10, существует несколько сообщений о ее возникновении в дистрибутивах Linux.
 AMD-V отключен в BIOS (VER_SVM_DISABLED)
Замечания: Если вы получаете VT-X недоступен — VERR_VMX_NO_VMX ошибка, следуйте этому руководству по устранению неполадок (Вот) вместо
Что вызывает отключение AMD-V в ошибке BIOS?
Мы исследовали проблему, просмотрев различные пользовательские отчеты. Из того, что мы смогли собрать, есть несколько сценариев, которые приведут к появлению этой конкретной проблемы. Вот список распространенных виновников, которые удалось выявить нескольким другим пострадавшим пользователям:
- AMD-V отключен в настройках BIOS — По сути, VERR_SVM_DISABLE Код ошибки говорит вам, что ваш компьютер поддерживает AMD-V, но настройки BIOS хоста в настоящее время отключают его.
- Microsoft Hyper-V мешает технологии AMD-V — Если Hyper-V включен, это автоматически означает, что встроенная технология виртуализации была отключена. В этом случае вам необходимо отключить его, чтобы разрешить использование AMD-V.
- Версия BIOS не поддерживает столько ядер процессора — Как оказалось, эта проблема может быть выброшена VM VirtualBox, если программное обеспечение вынуждено создавать виртуальную машину с более чем одним ядром ЦП. Для этого требуется виртуализация оборудования и будет выдано сообщение об ошибке, если функция отключена или недоступна.
- VM VirtualBox Bug — Существует несколько сообщений об этой ошибке на компьютерах, поддерживающих технологию аппаратной виртуализации. В этом случае проблему обычно можно решить, изменив некоторые параметры, относящиеся к виртуальной машине.
Если вы в настоящее время пытаетесь устранить это конкретное сообщение об ошибке, эта статья предоставит вам несколько руководств по устранению неполадок. Ниже представлен набор методов, которые другие пользователи в аналогичной ситуации успешно использовали для решения проблемы.
Имейте в виду, что приведенные ниже возможные исправления упорядочены по эффективности и серьезности, поэтому следуйте им, пока не наткнетесь на метод, эффективный для решения проблемы.
Способ 1. Включение AMD-V из настроек BIOS
AMD-V является переименованным товарным знаком для Sрежим виртуальной машины ecure (SVM). Причина номер один, почему AMD-V отключена в BIOS (или ОС хоста) (VERR_SVM_DISABLED) ошибка происходит потому, что технология AMD-V отключена в настройках BIOS.
Даже если на большинстве компьютеров этот параметр включен по умолчанию, вмешательство третьей стороны или изменение вручную могут означать, что он отключен на вашем компьютере.
К счастью, вы можете снова включить AMD-V, открыв настройки BIOS и повторно включив режим защищенной виртуальной машины в настройках CPU.
Но имейте в виду, что шаги входа в BIOS будут отличаться в зависимости от производителя вашей материнской платы. Чтобы получить доступ к вашему BIOS, вам нужно будет нажать кнопку «Настройка» во время начальной процедуры запуска. Как правило, ключ настройки является одним из Клавиши F (F2, F4, F8, F10, F12) или Ключ Del (для машин Del). Если вы не можете обнаружить ключ установки самостоятельно, во время начальной процедуры запуска следите за любыми упоминаниями о нем или ищите конкретные шаги в соответствии с производителем вашей материнской платы.
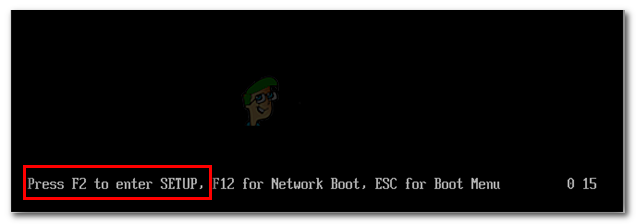 Нажмите кнопку BIOS во время процедуры запуска
После успешного входа в BIOS найдите запись с именем «Режим защищенной виртуальной машины» и убедитесь, что она включена. На самой популярной версии BIOS ее можно найти в Дополнительно> Конфигурация процессора. Как только вы доберетесь туда, убедитесь, что Безопасный режим виртуальной машины является Включено, затем сохраните конфигурацию и выйдите из BIOS.
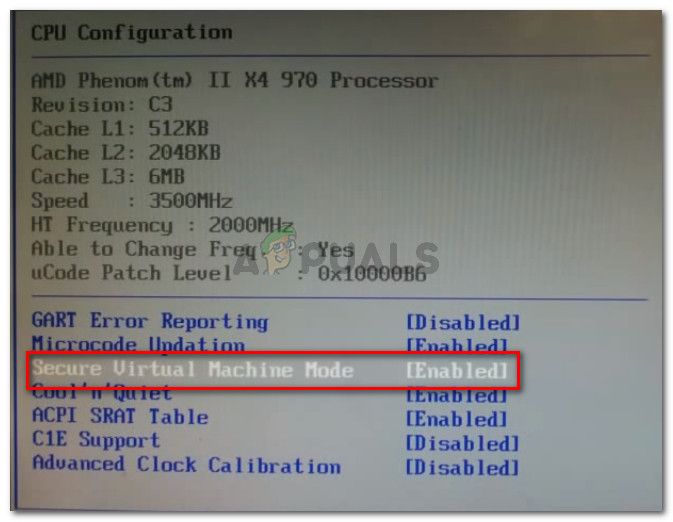 Убедитесь, что режим защищенной виртуальной машины включен
Замечания: Точное местоположение этой записи может отличаться в зависимости от модели вашей материнской платы. Если Безопасный режим виртуальной машины не для вас, ищите конкретные шаги в соответствии с вашим производителем. На материнской плате Acer вы можете снова включить AMD-V, установив AMD IOMMU в Включено (вы можете найти его внутри Технология виртуализации AMD I / O меню).
Имейте в виду, что для того, чтобы изменение вступило в силу, перезагрузка компьютера не достаточно. Вам нужно выполнить холодную загрузку. Это означает, что вам необходимо полностью выключить компьютер, а затем дать ему загрузиться с нуля.
После завершения следующего запуска откройте виртуальную машину, которая показывала вам сообщение внутри VM VirtualBox, и посмотрите, решена ли проблема. Если вы все еще видите AMD-V отключена в BIOS (или ОС хоста) (VERR_SVM_DISABLED) ошибка, перейти к следующему способу ниже.
Способ 2: отключение Windows Hyper-V
Несколько пользователей сталкиваются с AMD-V отключена в BIOS (или ОС хоста) (VERR_SVM_DISABLED) ошибка удалось решить проблему, отключив Функция Microsoft Hyper-V от Добавить / удалить функции Windows экран.
Microsoft Hyper-V — это собственная технология виртуализации Microsoft, которая автоматически включается в большинстве последних версий Windows. Это создает проблему, потому что всякий раз, когда Hyper-V включен, встроенная аппаратная технология отключается (в данном случае (AMD-V)). Поскольку для виртуальной машины VM VirtualBox требуется AMD-V или VT-X, вы получите сообщение об ошибке вместо фактической виртуальной машины.
К счастью, вы можете легко устранить эту проблему, выполнив ряд простых инструкций, которые помогут вам отключить технологию Microsoft Hyper-V. Вот что вам нужно сделать:
- Нажмите Windows ключ + R открыть Бежать диалоговое окно. Затем введите «appwiz.cplИ нажмите Войти открыть Программы и особенности. Диалог запуска: appwiz.cpl
- внутри Программы и особенности, используйте правое меню, чтобы нажать на Включить или отключить функции Windows. В разделе «Программы и компоненты» нажмите «Включить или отключить компоненты Windows».
- На экране «Функции Windows» найдите запись Hyper-V и убедитесь, что связанный с ней флажок отключен. Затем нажмите Хорошо сохранить изменения. Снимите флажок, связанный с Hyper-V
- Перезагрузите компьютер и проверьте, устранена ли ошибка при следующем запуске.
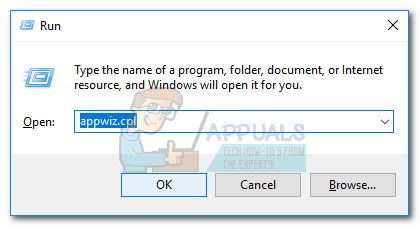 Диалог запуска: appwiz.cpl
 В разделе «Программы и компоненты» нажмите «Включить или отключить компоненты Windows».
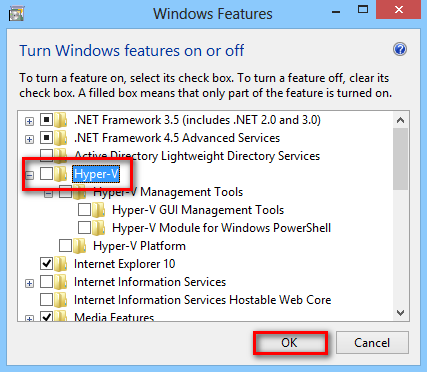 Снимите флажок, связанный с Hyper-V
Если вы все еще сталкиваетесь с AMD-V отключен в BIOS (или ОС хоста) (VERR_SVM_DISABLED) при включении вашей виртуальной машины переходите к следующему способу ниже.
Способ 3: изменение количества ядер процессора на 1
Если вы использовали описанные выше методы, чтобы убедиться, что ваша машина отвечает всем требованиям для виртуализации оборудования, и проблема все еще возникает, вполне вероятно, что идентификатор технологии AMD-V не поддерживается вашей текущей конфигурацией.
К счастью, вы можете исправить ошибку, выполнив несколько очень простых инструкций. Но сначала давайте рассмотрим причину проблемы. Даже если вы не настроили параметры виртуальной машины, отображающие ошибку, настройки по умолчанию могут создать проблему.
Что происходит, программное обеспечение назначает более 1 ЦП в настройках системы, что вынуждает систему использовать аппаратную виртуализацию для запуска виртуального хоста. Однако, если ваша машина не поддерживает его (у вас есть четырехъядерный процессор AMD или что-то подобное), процедура не будет завершена успешно, и вы увидите AMD-V отключена в BIOS (или ОС хоста) (VERR_SVM_DISABLED) ошибка сообщение вместо
К счастью, вы можете исправить эту проблему, изменив число назначенных процессоров на 1. Это, скорее всего, решит проблему раз и навсегда. Вот что вам нужно сделать:
- открыто Oracle VM VirtualBox, щелкните правой кнопкой мыши на машине, которая отображает ошибку, а затем нажмите на настройки. Щелкните правой кнопкой мыши на зараженном компьютере и выберите «Настройки».
- в настройки вашей виртуальной машины, перейдите на вкладку Система (используя левое подменю) и получите доступ к процессор Вкладка. Затем перетащите ползунок, связанный с процессором (-ами), на 1 процессор и щелкните Хорошо сохранить.
Процессор и установите ползунок Процессор в 1 CPU «width =» 672 «height =» 473 «> Перейдите в Система> Процессор и установите ползунок Processor в 1 CPU - Закройте меню настроек и перезапустите вашу виртуальную машину. Это должно загрузиться без AMD-V отключена в BIOS (или ОС хоста) (VERR_SVM_DISABLED) ошибка.
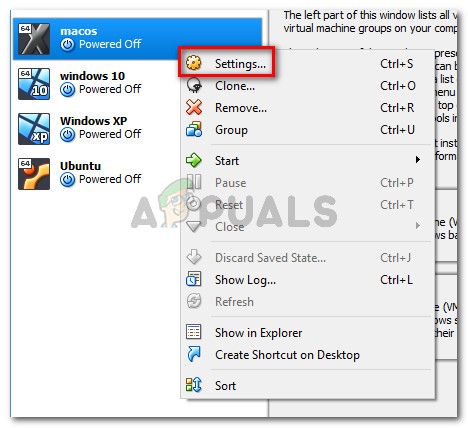 Щелкните правой кнопкой мыши на зараженном компьютере и выберите «Настройки».
Способ 4. Изменение версии на Windows 7 или Windows 2003 (если применимо)
Несколько пользователей Ubuntu (Linux), которые, используя VM VirtualBox для запуска Windows XP или Windows 10, также получали AMD-V отключена в BIOS (или ОС хоста) (VERR_SVM_DISABLED) ошибка. Чтобы решить проблему, нужно изменить настройки гостевой ОС, чтобы указанная версия была установлена на Windows 2003 или же Windows 7.
Несмотря на то, что нет объяснения, почему это исправление является успешным, похоже, что оно помогло многим пользователям восстановить нормальную функциональность своих виртуальных машин. Вот краткое руководство по изменению указанной версии вашей виртуальной машины:
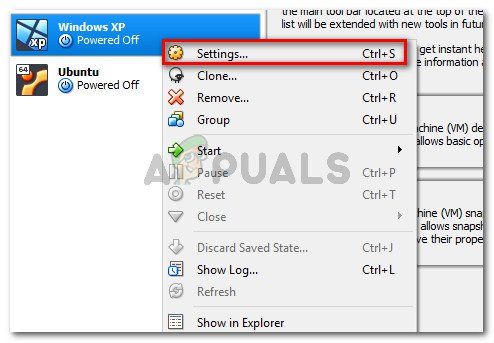
- Откройте VM VirtualBox, щелкните правой кнопкой мыши на компьютере, на котором отображается ошибка, и выберите настройки. Щелкните правой кнопкой мыши на зараженном компьютере и выберите «Настройки».
- В меню «Настройки» перейдите в подменю «Общие» и нажмите вкладку «Основные». Затем измените версию с помощью раскрывающегося меню либо Windows 2003 или же Windows 7 и ударил Хорошо сохранить изменения. Изменение версии образа на Windows 7 или Windows 2003
- Запустите виртуальную машину еще раз и посмотрите, успешна ли процедура загрузки без AMD-V отключена в BIOS (или ОС хоста) (VERR_SVM_DISABLED) ошибка
 Щелкните правой кнопкой мыши на зараженном компьютере и выберите «Настройки».
 Изменение версии образа на Windows 7 или Windows 2003
Источник
I recently learned that VMware offers a license for its ESXi bare-metal hypervisor for free. The process to install it on consumer-grade hardware can be a little tricky, as I learned by re-purposing the gaming PC I built last December into a home virtualization server. But it can be done – let me show you how.
For reference, here are the specs for the machine that I built:
- Motherboard: MSI B450 Tomahawk
- CPU: AMD Ryzen 5 2400G (Quad-core, 8 threads)
- RAM: CORSAIR Vengeance LED 16GB (2 x 8GB)
Step 1 – Make a Bootable USB with the ESXi ISO
Download the ISO file from VMware. You will need to create an account, but the download and license key for a single physical machine are free.
To make the bootable USB, I first tried running the dd command through Terminal on my Mac, to little avail. I’ve always had good luck with the Rufus tool on Windows, so I switched OS’s and gave it another go – this time, with success! My machine was able to recognize the USB stick as a bootable device.
I was able to load into the ESXi installer and begin the installation. However, I quickly encountered this issue:

No Network Adapters: No network adapters were detected. Either no network adapters are physically connected to the system, or a suitable driver could not be located. A third party driver may be required. Ensure that there is at least one network adapter physically connected to the system before attempting installation. If the problem persists, consult the VMware Knowledge Base.
I first checked the network connection – ahh, the switch was unplugged. But that shouldn’t interfere with the detection of the network adapter, should it? I rebooted, and alas, the error reappeared.
Some Googling revealed that this is quite a common issue with consumer-grade hardware – the ESXi ISO comes pre-packaged with a limited set of network adapter drivers, most of them belonging to server-class machines. (You can browse VMware’s hardware compatibility guide here). Which brings us to our next step…
Step 1 (Revised) – Get the Right NIC Driver Added to the ISO
… and then make your USB stick bootable.
I found this lovely article at the VMware Front Experience blog, in which the author breaks down the steps to determine your current NIC ID and how to modify the ESXi ISO with the proper driver for your hardware.

lspci brought up the information for all my machine’s PCI devices, including my Ethernet controller: Realtek Semiconductor Co., Ltd. RTL8111/8168/8411.
I wasn’t finding the PCI ID information in my machine’s printout that I had expected from the V-Front blog’s instructions. Thankfully, a quick Google of the alphanumeric string RTL8111/8168/8411 brought me to this device identification page, which confirmed that my controller ID was 10ec:8168.
This was lucky – the V-Front author had already written a Powershell script that could compile a custom ESXi ISO with the proper drivers for just such a NIC.
Step 2 – Download & Run an Unknown Script from the Internet
Although ill-advised to download and run a Powershell script that one finds posted on a blog, I made the decision to try it out (after inspecting the script, of course, and finding nothing that to my amateur eyes appeared suspicious. If a home lab isn’t for experimenting, then what is it truly for?)
But, of course, Microsoft wasn’t thrilled by my wanton ways and tried to put on the brakes.

You cannot run this script on the current system. For more information about running scripts and setting execution policy, see about_Execution_Policies at https://go.microsoft.com/fwlink/?LinkID=135170
Well, this seemed like a good opportunity to learn about Windows’ Execution Policies for running scripts. I decided to issue the following command before attempting the Powershell script again:
Set-ExecutionPolicy -ExecutionPolicy Unrestricted -Scope Process
Voila! Or so I thought, before the FATAL ERROR in aggressive red text caught my eye:

FATAL ERROR: VMware.VimAutomation.Core is not available as a module or snapin! It looks like there is no compatible version of PowerCLI installed!
According to VMware, PowerCLI is “a command-line and scripting tool built on Windows PowerShell,” offering “more than 600 cmdlets for managing VMware products and features.” The tool is free to download.
I had to do a bit more troubleshooting with the script (it was having difficulty loading the drivers automatically, so I downloaded the offline package for the driver I needed and pointed the script to the file location), but eventually, the script completed its run. I found the custom ESXi ISO fresh in my Downloads folder and made a new bootable USB.
Step 3 – Installation & Making VMs
This time around, the ESXi installation was a breeze. In no time at all, I had the server up and running, ready to host some VMs.
It took a bit of time for me to figure out how to create said VMs – ESXi is managed remotely over an HTTP connection (or through the desktop vSphere console), and it was not clear how I should point my new VM to an ISO to install the OS.
VMs can be configured to use the host machine’s optical drive, but my machine does not have one. I attached a bootable Ubuntu USB to the host, but could not get the host to detect it. I could tell the VM to use an ISO instead of using the optical drive, but was prompted to select an ISO stored locally on the host – and the host, of course, had no ISO files.
I finally discovered the option to upload an ISO to the host from the remote management computer. I wasn’t thrilled at the idea of downloading and then having to schlep a large file over the network, but the upload was surprisingly quick.
With my ISO loaded in the VM, I was ready to power on and install the OS.
I was ready… but my machine was not.

Failed to power on virtual machine Athena. This host supports AMD-V, but AMD-V is disabled. AMD-V might be disabled if it has been disabled in the BIOS/firmware settings or the host has not been power-cycled since changing this setting. (1) Verify that the BIOS/firmware settings enable AMD-V. (2) Power-cycle the host if this BIOS/firmware setting has been changed. (3) Power-cycle the host if you have not done so since installing VMware ESX. (4) Update the host's BIOS/firmware to the latest version. Click here for more details.
Step 4 – Enable Virtualization in the BIOS
I restarted my machine to scour the BIOS for the virtualization settings. I was looking for something like “AMD-V” or “virtualization” under the CPU settings, but could not find an option that seemed appropriate. After many minutes of fruitless searching, I turned to my old pal Google for advice and came across the video below.
If you start at the 1:20 mark, you’ll see a walkthrough of the MSI BIOS and where to find the virtualization settings – under the OC tab, under “CPU Features,” the feature we want to enable is called “SVM Mode.”
So, there we have it! Once the virtualization settings were enabled, I was able to power up my new VM and go through the OS installation without further issue.
Have you set up a virtualization server with ESXi? Did you encounter a different set of challenges? Tell me about your experience in the comments below!
VMWare Workstation 15 Player Error while powering on
-
Thread starter
sarah.3
-
Start date
Dec 29, 2019
-
#1
Hi,
I’ve read so much posts about this issue, but nothing helps.
I tried to start a VM (this file works with my old PC), but with my new PC i got this problem :
Error while powering on: This host supports AMD-V, but AMD-V is disabled.
I got the lates Bios, SMT Control to «Auto», latest VM Workstation, Latest Windows-Updates,
latest drivers from MSI.
Any Idea’s ?
Regards Sarah
-
121.8 KB
Views: 74 -
22 KB
Views: 171


Svet
Well-known member
-
#2
you need to enable SVM Mode
not SMT
-
#3
I found it … my Mistake, both modes sounds so equal
and they are in different sections, so that i didn’t realize that I’ve choosed the wrong one.
You are my hero … 
Thank you so much …
regards Sarah
Svet
Well-known member