Handling Transient APD Conditions
A storage device is considered to be in the all paths down (APD) state when it becomes unavailable to your ESXi host for an unspecified time period.
The reasons for an APD state can be, for example, a failed switch or a disconnected storage cable.
In contrast with the permanent device loss (PDL) state, the host treats the APD state as transient and expects the device to be available again.
The host continues to retry issued commands in an attempt to reestablish connectivity with the device. If the host’s commands fail the retries for a prolonged period, the host might be at risk of having performance problems. Potentially, the host and its virtual machines might become unresponsive.
To avoid these problems, your host uses a default APD handling feature. When a device enters the APD state, the host turns on a timer. With the timer on, the host continues to retry non-virtual machine commands for a limited time period only.
By default, the APD timeout is set to 140 seconds. This value is typically longer than most devices require to recover from a connection loss. If the device becomes available within this time, the host and its virtual machine continue to run without experiencing any problems.
Even though the device and datastores are unavailable, virtual machines remain responsive. You can power off the virtual machines or migrate them to a different datastore or host.
If later the device paths become operational, the host can resume I/O to the device and end the special APD treatment.
Deactivate Storage APD Handling
The storage all paths down (APD) handling on your ESXi host is activated by default. When this functionality is activated and a storage device enters the APD state, the host continues to retry nonvirtual machine I/O commands only for a limited time period. After the time period expires, the host stops its retry attempts and terminates any nonvirtual machine I/O. You can deactivate the APD handling feature on your host.
Procedure
- In the vSphere Client , navigate to the ESXi host.
- Click the Configure tab.
- Under System , click Advanced System Settings .
- In the Advanced System Settings table, select the Misc.APDHandlingEnable parameter and click the Edit icon.
- Change the value to 0.
Results
Change Timeout Limits for Storage APD
The timeout parameter controls how many seconds the ESXi host must retry the I/O commands to a storage device in an all paths down (APD) state. You can change the default timeout value.
By default, the timeout parameter on your host is set to 140 seconds. You can increase the value of the timeout if, for example, storage devices connected to your ESXi host take longer than 140 seconds to recover from a connection loss.
Procedure
- In the vSphere Client , navigate to the ESXi host.
- Click the Configure tab.
- Under System , click Advanced System Settings .
- In the Advanced System Settings table, select the Misc.APDTimeout parameter and click the Edit icon.
- Change the default value.
Verify the Connection Status of a Storage Device on ESXi Host
Use the esxcli command to verify the connection status of a particular storage device.
Prerequisites
Install ESXCLI. See Getting Started with ESXCLI . For troubleshooting, run esxcli commands in the ESXi Shell .
Источник
Vmware storage dead or error
You are using an outdated browser. Please upgrade your browser to improve your experience.
—> share-line
—> —> —> —> plus
A storage device is considered to be in the all paths down (APD) state when it becomes unavailable to your ESXi host for an unspecified time period.
The reasons for an APD state can be, for example, a failed switch or a disconnected storage cable.
In contrast with the permanent device loss (PDL) state, the host treats the APD state as transient and expects the device to be available again.
The host continues to retry issued commands in an attempt to reestablish connectivity with the device. If the host’s commands fail the retries for a prolonged period, the host might be at risk of having performance problems. Potentially, the host and its virtual machines might become unresponsive.
To avoid these problems, your host uses a default APD handling feature. When a device enters the APD state, the host turns on a timer. With the timer on, the host continues to retry non-virtual machine commands for a limited time period only.
By default, the APD timeout is set to 140 seconds. This value is typically longer than most devices require to recover from a connection loss. If the device becomes available within this time, the host and its virtual machine continue to run without experiencing any problems.
Even though the device and datastores are unavailable, virtual machines remain responsive. You can power off the virtual machines or migrate them to a different datastore or host.
If later the device paths become operational, the host can resume I/O to the device and end the special APD treatment.
Источник
Raj2796’s Blog
March 14, 2012
Vmware vSphere 5 dead LUN and pathing issues and resultant SCSI errors
Recently we had a hardware issues with a san, somehow it appears to have presented multiple fake LUN’s to vmware before crashing and leaving vmware with a large amount of dead LUN’s it could not connect to. Cue a rescan all … and everthing started crashing !
Our primary cluster of 6 servers started to abend, half the ESX servers decided to vmotion of every vm and shutdown, the other 3 ESX servers were left running 6 servers worth of vm’s, DRS decided to keep moving vm’s of the highest utilised ESX server resulting in another esx server becoming highest utilised which then decided to migrate all vm’s of and so on in a never-ending loop
As a result the ESX servers were:
- unresponsive
- showing powered of machines as being on
- unable to vmotion vm’s of
- intermittently lost connection to VC
- lost vm’s that were vmotioned i.e. the vms became orphaned
Here’s what i did to fix the issue.
1 – get NAA ID of the lun to be removed
See error messages on server
Or see properties of Datastore in vc (assuming vc isn’t crashed)
Or from command line :
#esxcli storage vmfs extent list
Alternatively you could use #esxclu storage filesystem list however that wouldn’t work in this case since there were no filesystems on the failed luns
Volume Name VMFS UUID Extent Number Device Name Partition
———– ———————————– ————- ———————————— ———
datastore1 4de4cb24-4cff750f-85f5-0019b9f1ecf6 0 naa.6001c230d8abfe000ff76c198ddbc13e 3
Storage2 4c5fbff6-f4069088-af4f-0019b9f1ecf4 0 naa.6001c230d8abfe000ff76c2e7384fc9a 1
Storage4 4c5fc023-ea0d4203-8517-0019b9f1ecf4 0 naa.6001c230d8abfe000ff76c51486715db 1
LUN01 4e414917-a8d75514-6bae-0019b9f1ecf4 0 naa.60a98000572d54724a34655733506751 1
Look at the 3 rd column, it’s the naa id of the luns, the 4 th one is for a volume that’s labelled LUN01 – dodgy since they would have a recognisable label such as FASSHOME1 or FASSWEB6 etc if they were production servers, or even test servers
- 2 – remove bad luns
If vc is working – in our case it wasn’t – goto configuration / device / look at the identifier’s and match the naa – e.g. random screenshot below to show where to look ( screenshot removed since it shows too much work information)
Right click the naa under identifier and select detach – confirm
Now rescan the fc hba
In our case vc wasn’t an option since the hosts were unresponsive and vc couldn’t communicate, also the luns were allready detached since they were never used, so :
list permanently detached devices:
# esxcli storage core device detached list
look at output at state off luns e.g.
Device UID State
next permanently remove the device configuration information from the system:
# esxcli storage core device detached remove -d
# esxcli storage core device detached remove -d naa.50060160c46036df50060160c46036df
OR
To detach a device/LUN, run this command:
# esxcli storage core device set –state=off -d
To verify that the device is offline, run this command:
# esxcli storage core device list -d
The output, which shows that the status of the disk is off, is similar to:
naa.60a98000572d54724a34655733506751
Display Name: NETAPP Fibre Channel Disk (naa.60a98000572d54724a34655733506751)
Has Settable Display Name: true
Size: 1048593
Device Type: Direct-Access
Multipath Plugin: NMP
Devfs Path: /vmfs/devices/disks/naa.60a98000572d54724a34655733506751
Vendor: NETAPP
Model: LUN
Revision: 7330
SCSI Level: 4
Is Pseudo: false
Status: off
Is RDM Capable: true
Is Local: false
Is Removable: false
Is SSD: false
Is Offline: false
Is Perennially Reserved: false
Thin Provisioning Status: yes
Attached Filters:
VAAI Status: unknown
Other UIDs: vml.020000000060a98000572d54724a346557335067514c554e202020
Running the partedUtil getptbl command on the device shows that the device is not found.
# partedUtil getptbl /vmfs/devices/disks/naa.60a98000572d54724a34655733506751
Error: Could not stat device /vmfs/devices/disks/naa.60a98000572d54724a34655733506751- No such file or directory.
Unable to get device /vmfs/devices/disks/naa.60a98000572d54724a34655733506751
AFTER DETACHING RESCAN LUNS
In our case we’re vmotioning the servers of then powering down/up the servers since they have issues and we want to force all references to be updated from a fresh network discovery which is the safest option
You can rescan through VC under normal operations – the scan all can cause errors however and its better to selectively scan adapaters to avoid stressing the system
Alternately theres the command line command which needs to be run on all affect servers:
# esxcli storage core adapter rescan [ -A vmhba# | –all ]
Othere usefull info
- Where existing datastores have issues and need unmounting and vc not working
# esxcli storage filesystem list
(see above for example output)
Unmount the datastore by running the command:
# esxcli storage filesystem unmount [-u | -l | -p
For example, use one of these commands to unmount the LUN01 datastore:
# esxcli storage filesystem unmount -l LUN01
# esxcli storage filesystem unmount -u 4e414917-a8d75514-6bae-0019b9f1ecf4
# esxcli storage filesystem unmount -p /vmfs/volumes/4e414917-a8d75514-6bae-0019b9f1ecf4
verify its unmounted by again running # esxcli storage filesystem list and confirming its removed from list
The above are the actions I found useful in my environment – to read the original Vmware TID i gained the majority of the information from go here
Источник
Adblock
detector
A storage device is considered to be in the permanent device loss (PDL) state when it becomes permanently unavailable to your ESXi host.
Typically, the PDL condition occurs when a device is unintentionally removed, or its unique ID changes, or when the device experiences an unrecoverable hardware error.
When the storage array determines that the device is permanently unavailable, it sends SCSI sense codes to the ESXi host. After receiving the sense codes, your host recognizes the device as failed and registers the state of the device as PDL. For the device to be considered permanently lost, the sense codes must be received on all its paths.
After registering the PDL state of the device, the host stops attempts to reestablish connectivity or to send commands to the device.
The
vSphere Client displays the following information for the device:
- The operational state of the device changes to Lost Communication.
- All paths are shown as Dead.
- Datastores on the device are not available.
If no open connections to the device exist, or after the last connection closes, the host removes the PDL device and all paths to the device. You can deactivate the automatic removal of paths by setting the advanced host parameter Disk.AutoremoveOnPDL to 0.
If the device returns from the PDL condition, the host can discover it, but treats it as a new device. Data consistency for virtual machines on the recovered device is not guaranteed.
Note: When a device fails without sending appropriate SCSI sense codes or an iSCSI login rejection, the host cannot detect PDL conditions. In this case, the host continues to treat the device connectivity problems as APD even when the device fails permanently.
Permanent Device Loss and SCSI Sense Codes
The following VMkernel log example of a SCSI sense code indicates that the device is in the PDL state.
H:0x0 D:0x2 P:0x0 Valid sense data: 0x5 0x25 0x0 or Logical Unit Not Supported
Permanent Device Loss and iSCSI
On iSCSI arrays with a single LUN per target, PDL is detected through iSCSI login failure. An iSCSI storage array rejects your host’s attempts to start an iSCSI session with a reason Target Unavailable. As with the sense codes, this response must be received on all paths for the device to be considered permanently lost.
Permanent Device Loss and Virtual Machines
After registering the PDL state of the device, the host closes all I/O from virtual machines. vSphere HA can detect PDL and restart failed virtual machines.
Recently we had a hardware issues with a san, somehow it appears to have presented multiple fake LUN’s to vmware before crashing and leaving vmware with a large amount of dead LUN’s it could not connect to. Cue a rescan all … and everthing started crashing !
Our primary cluster of 6 servers started to abend, half the ESX servers decided to vmotion of every vm and shutdown, the other 3 ESX servers were left running 6 servers worth of vm’s, DRS decided to keep moving vm’s of the highest utilised ESX server resulting in another esx server becoming highest utilised which then decided to migrate all vm’s of and so on in a never-ending loop
As a result the ESX servers were:
- unresponsive
- showing powered of machines as being on
- unable to vmotion vm’s of
- intermittently lost connection to VC
- lost vm’s that were vmotioned i.e. the vms became orphaned
Here’s what i did to fix the issue.
1 – get NAA ID of the lun to be removed
See error messages on server
Or see properties of Datastore in vc (assuming vc isn’t crashed)
Or from command line :
#esxcli storage vmfs extent list
Alternatively you could use #esxclu storage filesystem list however that wouldn’t work in this case since there were no filesystems on the failed luns
e.g. output
Volume Name VMFS UUID Extent Number Device Name Partition
———– ———————————– ————- ———————————— ———
datastore1 4de4cb24-4cff750f-85f5-0019b9f1ecf6 0 naa.6001c230d8abfe000ff76c198ddbc13e 3
Storage2 4c5fbff6-f4069088-af4f-0019b9f1ecf4 0 naa.6001c230d8abfe000ff76c2e7384fc9a 1
Storage4 4c5fc023-ea0d4203-8517-0019b9f1ecf4 0 naa.6001c230d8abfe000ff76c51486715db 1
LUN01 4e414917-a8d75514-6bae-0019b9f1ecf4 0 naa.60a98000572d54724a34655733506751 1
Look at the 3rd column, it’s the naa id of the luns, the 4th one is for a volume that’s labelled LUN01 – dodgy since they would have a recognisable label such as FASSHOME1 or FASSWEB6 etc if they were production servers, or even test servers
- 2 – remove bad luns
If vc is working – in our case it wasn’t – goto configuration / device / look at the identifier’s and match the naa – e.g. random screenshot below to show where to look ( screenshot removed since it shows too much work information)
Right click the naa under identifier and select detach – confirm
Now rescan the fc hba
In our case vc wasn’t an option since the hosts were unresponsive and vc couldn’t communicate, also the luns were allready detached since they were never used, so :
list permanently detached devices:
# esxcli storage core device detached list
look at output at state off luns e.g.
Device UID State
———————————— —–
naa.50060160c46036df50060160c46036df off
naa.6006016094602800c8e3e1c5d3c8e011 off
next permanently remove the device configuration information from the system:
# esxcli storage core device detached remove -d <NAA ID>
e.g.
# esxcli storage core device detached remove -d naa.50060160c46036df50060160c46036df
OR
To detach a device/LUN, run this command:
# esxcli storage core device set –state=off -d <NAA ID>
To verify that the device is offline, run this command:
# esxcli storage core device list -d <NAA ID>
The output, which shows that the status of the disk is off, is similar to:
naa.60a98000572d54724a34655733506751
Display Name: NETAPP Fibre Channel Disk (naa.60a98000572d54724a34655733506751)
Has Settable Display Name: true
Size: 1048593
Device Type: Direct-Access
Multipath Plugin: NMP
Devfs Path: /vmfs/devices/disks/naa.60a98000572d54724a34655733506751
Vendor: NETAPP
Model: LUN
Revision: 7330
SCSI Level: 4
Is Pseudo: false
Status: off
Is RDM Capable: true
Is Local: false
Is Removable: false
Is SSD: false
Is Offline: false
Is Perennially Reserved: false
Thin Provisioning Status: yes
Attached Filters:
VAAI Status: unknown
Other UIDs: vml.020000000060a98000572d54724a346557335067514c554e202020
Running the partedUtil getptbl command on the device shows that the device is not found.
For example:
# partedUtil getptbl /vmfs/devices/disks/naa.60a98000572d54724a34655733506751
Error: Could not stat device /vmfs/devices/disks/naa.60a98000572d54724a34655733506751- No such file or directory.
Unable to get device /vmfs/devices/disks/naa.60a98000572d54724a34655733506751
AFTER DETACHING RESCAN LUNS
In our case we’re vmotioning the servers of then powering down/up the servers since they have issues and we want to force all references to be updated from a fresh network discovery which is the safest option
You can rescan through VC under normal operations – the scan all can cause errors however and its better to selectively scan adapaters to avoid stressing the system
Alternately theres the command line command which needs to be run on all affect servers:
# esxcli storage core adapter rescan [ -A vmhba# | –all ]
Othere usefull info
- Where existing datastores have issues and need unmounting and vc not working
# esxcli storage filesystem list
(see above for example output)
Unmount the datastore by running the command:
# esxcli storage filesystem unmount [-u <UUID> | -l <label> | -p <path> ]
For example, use one of these commands to unmount the LUN01 datastore:
# esxcli storage filesystem unmount -l LUN01
# esxcli storage filesystem unmount -u 4e414917-a8d75514-6bae-0019b9f1ecf4
# esxcli storage filesystem unmount -p /vmfs/volumes/4e414917-a8d75514-6bae-0019b9f1ecf4
verify its unmounted by again running # esxcli storage filesystem list and confirming its removed from list
The above are the actions I found useful in my environment – to read the original Vmware TID i gained the majority of the information from go here

I have been running a VMware vSAN based home lab environment for the past year or so now. It has performed and worked flawlessly since instantiating the 2-node vSAN cluster a little over a year ago. The cluster is completely NVMe based storage which makes for an extremely performant environment relatively cheaply. I am constantly surprised at how cheap NVMe storage has gotten, even since a year ago when I purchased the additional drives needed for my cluster. However, I finally experienced a hardware failure in my VMware vSAN home lab environment. Over the past weekend at the time of this writing, a cache drive in one of my ESXi nodes bit the dust. I performed the normal troubleshooting with the NVMe stick, powering off, and reseating as well as a few other tricks. However, the drive simply shows to be dead and not recognized. I have a new drive ordered and on the way as we speak. I was pleasantly surprised at how well the vSAN cluster handled the error and continued to serve out my VMs. My VMware vSAN home lab hardware failure and resiliency of the solution increased served to bolster my already confident trust in vSAN as a platform for enterprise production workloads. I want to walk through the series of events that led up to discovering the hardware failure in vSAN and how the system handled the degradation in the drives. Let’s look at VMware vSAN Home Lab Hardware Failure and Resiliency.
VMware vSAN Drive Errors
I started receiving errors in the data protection solution covering the home lab environment that there were unusable disks in the vSAN cluster and less than the number of fault domains required. This all indicated that something bad had happened in the environment. So, off to checking vSphere client to see what had happened.
In the vSphere client, I saw the error for VM snapshot creation – “There are currently 1 usable disks for the operation. This operation requires 1 more usable disks. Remaining 1 disks not usuable because: 0 – Insufficient space for data/cache reservation. 0“.
In looking at the Configure > vSAN > Disk Management section, I see the cache disk is showing up as Dead or Error.
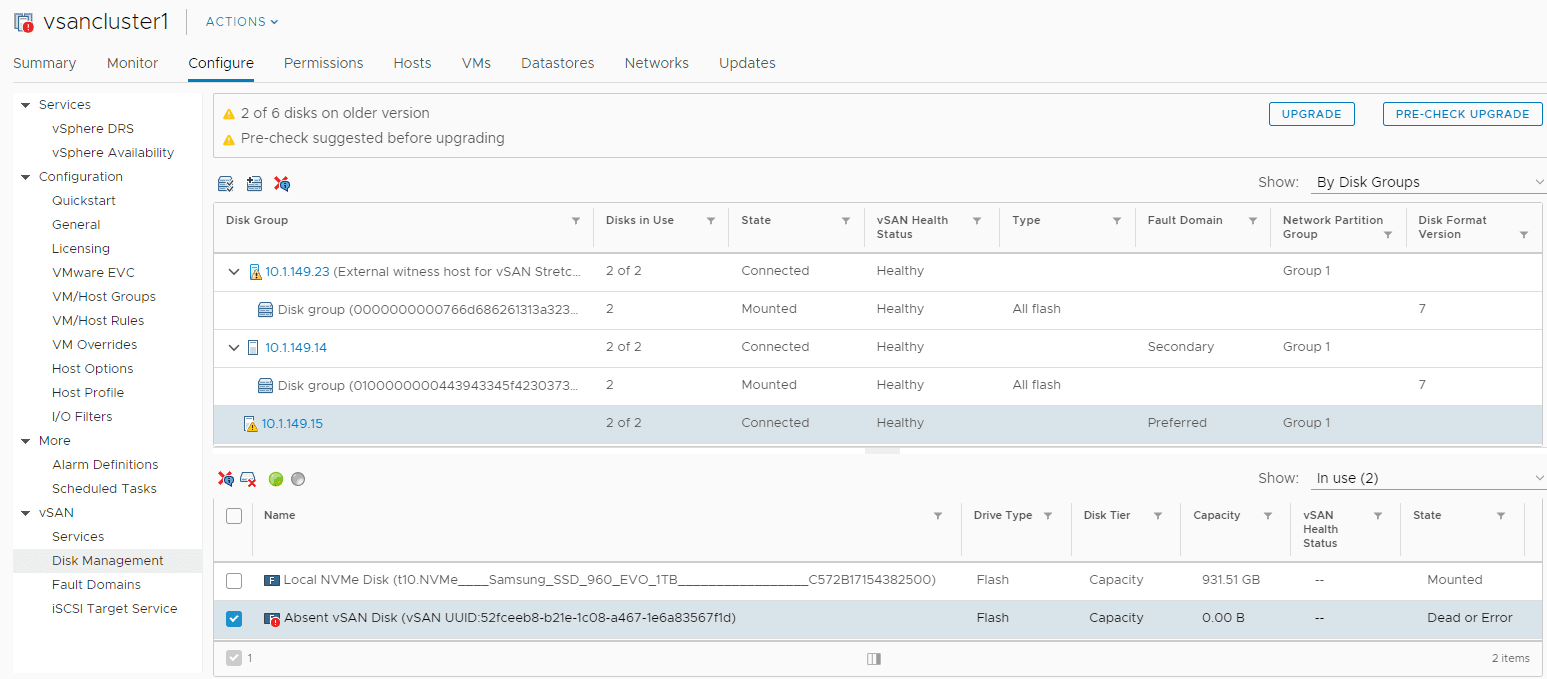
At this point, I did all of the typical troubleshooting such as placing the server in maintenance mode, rebooting, and checking out the disk. After a reboot, I actually did see the disk come up briefly. Upon attempting to start a VM on the host however, the disk quickly went back into an error state.
Next, a shutdown of the host. I reseated the NVMe stick just to cover the bases. After rebooting, the drive was still showing up as dead.
A quick aside here. At this point, I still have all my VMs running on a single host that still has availability to the vSAN datastore and no issues with VM availability. Ironically for me, I was doing some black Friday shopping for another NVMe drive to create a standalone datastore on my second host for nested vSAN environment testing and a few other use cases. The Samsung 970 drives are super cheap. The timing was right so I decided to snag not only a datstore drive, but another cache disk for use to replace the failed NVMe drive.
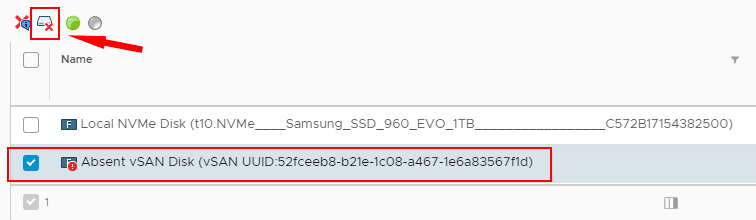
Removing the failed NVMe cache disk
The procedure is well documented from the KB Remove Disk Groups or Devices from vSAN.
Procedure
- Navigate to the vSAN cluster.
- Click the Configure tab.
- Under vSAN, click Disk Management.
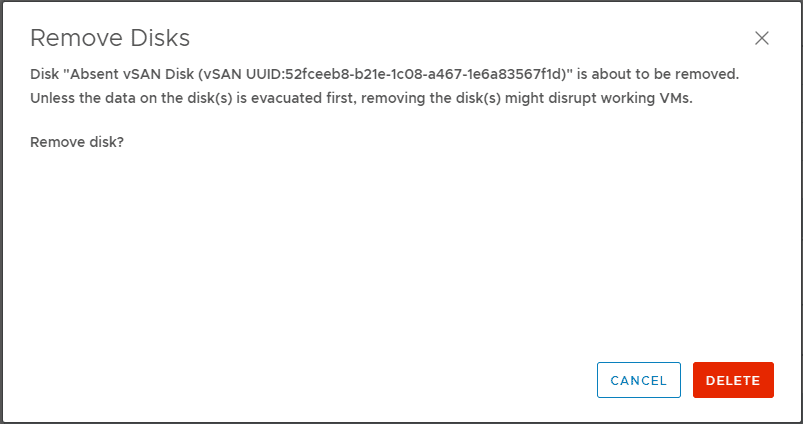
- Remove a disk group or selected devices.
- Click Yes or Delete to confirm.
The data is evacuated from the selected devices or a disk group and is no longer available to vSAN.
A few points of observation with VMware vSAN and a cache disk failure.
- The capacity drive on the failed host’s disk group continued to function and offer capacity to vSAN without the cache drive. I saw this as even with the cache disk dead, vSAN was still showing the full capacity.
- Removing the cache drive will remove your disk group from the server. You might think that you can leave the disk group intact when replacing/removing a cache drive. However, it is expected behavior that removing a cache drive will remove the disk group from the server. This is taken directly from the VMware KB Remove Disk Groups or Devices from vSAN. As mentioned in the KB: “Removing one flash cache device or all capacity devices from a disk group removes the entire disk group.”
- Another point to note – Evacuating data from devices or disk groups might result in the temporary noncompliance of virtual machine storage policies. You can see this below. If you look under the Monitor > vSAN > Virtual Objects dashboard, you will see the VMs that are impacted.
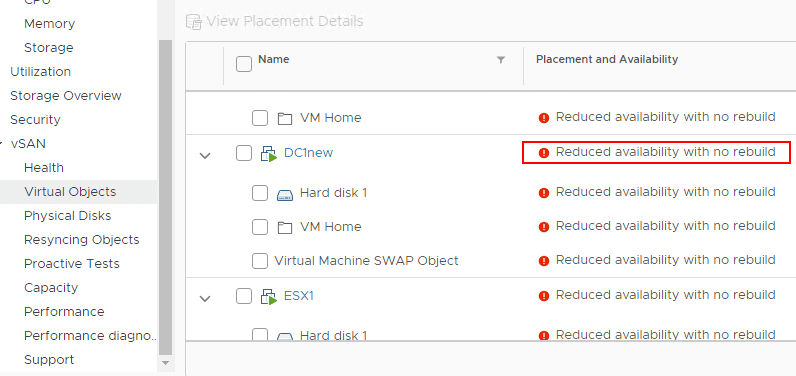
For my lab environment, I am sitting in a state of reduced availability with no rebuild, however, VMs are running fine and so far have not had any disruption. A new Samsung 970 should arrive today. Will be documenting how the process to replace the drive and reprovision the disk group in the next post 🙂
Takeaways
My first VMware vSAN Home Lab Hardware Failure and Resiliency test so far is going well. VMware vSAN has withstood the hardware failure very well and virtual machines are running without issue. For me, it is a testament to the fact that software-defined infrastructure is resilient and certainly able to run production workloads in a way that leads to confidence in the solution. Stay tuned for more information on my lab failure and the changing out of the cache drive with a new cache drive arriving soon. Until then, my vSAN environment is chugging away, albeit with reduced availability.
We will check for the possible solutions on the alert of Degraded Storage Path Redundancy On The VMware ESXi Host.
We know that there are different multi-pathing options are available when interacting with a storage device, there might be a situation where one or more than one of these paths might not be available for the ESXi Host.
At no point in time, even if the VMware connectivity to the back-end device is lost, other available paths can still be leveraged and communication with them should still continue, and there would not be any impact to the VMs. However, there could still be a dip observed in the VM’s overall performance.
Error Message
An alert can be seen in the vSphere console similar to below:
"Degraded Storage Path Redundancy"The Task and Events tab of the ESXi host on the vSphere Client reports the error similar to:
Path redundancy to storage device naa.6009800043346534645a433967325764 degraded. Path vmhba3:C0:T1:L1 is down. Affected datastores: vSANDatastore.
or
Lost access to volume 5c784594-db4be3e2-5618-0017a4770014 (vSANDatastore) due to connectivity issues. A recovery attempt is in progress and the outcome will be reported shortly.
The above error message indicates that of the different multi-pathing options in place to interact with the device “naa.6009800043346534645a433967325764”, only one path “vmhba3:C0:T1:L1” is down, and this path is no longer usable.
To Breaking down the specifics of this path – vmhba3:C0:T1:L1, you can see several interaction points (or potential failure points):
vmhba3 – HBA (Host Bus Adapter)
C0 – Channel 0
T1 – Target 1 (Storage Processor or Storage Controller Port)
L1 – LUN 1 (Logical Unit Number or Disk Unit)
Solutions
- Make a rescan for the storage. ( Right click on the host -> Storage -> Rescan Storage).
- Check if the affected LUNs are visible to the host or not. ( Configure -> Storage Devices).
- As per VMware, “Majority of the time, this issue occurs due to some form of miscommunication taking place between the device driver and firmware versions of the PCI devices being used to interact with the storage devices.” Hence Check with your Storage Team for any issues from their side.
- Check HBA and NIC driver version and firmware version compatibility here.
That’s all for now which can checked to fixed the issue of Degraded Storage Path Redundancy with the ESXi host.
Also Read
- All About VMware vSAN HCL Database Update – TechyGuy
- VMware vSAN Features By Version Matrix – TechyGuy
- All You Need To Know About VMware vSAN | vSAN 6.7 – TechyGuy
- How to force shutdown VMware Virtual Machine – Techy Guy
- Features which will not be available after upgrade to windows 11 TechyGuy
- Possible Solution For Host Memory Usage Alarm VMware (techyguy.in)
VMware: vSAN Disk Group Cache Drive Dead or Error (VSAN Absent Disk)
Summary:
A cache disk failed in my host taking along with it the disk group. This is expected behavior, but for some reason, the disk group also disappeared from GUI so I couldn’t decommission the disk group to basically replace the cached drive. So, had to do it through powercli/esxcli. Wish I took a screenshot, cause it was kind of annoying.
PowerCLI Example:
Once you’ve deleted the offending disk group, you can now create a new disk group utilizing the replaced cache disk and former capacity disks.
Popular posts from this blog
RacADM, Powershell, and Kerberos KeyTabs
Summary: I was looking to automate configuration of iDRAC’s (Dell Remote Admin Console) synonymous w/ iLOM and many other acronyms. I also wanted to enable domain authentication in a somewhat secure manner. By using a kerberos keytag, I’m able to in the very least obfuscate the username and password into a file for upload into the iDRAC. What follows is a journey into a ridiculous realm. PreReqs: RACADM ktpass Powershell 3.0 (2.0 probably works too, but I was using 3.0 @ the time) Your root CA’s cert This is so it AD Authentication can be setup Solution: It’s not a complete solution, but hopefully it’ll help you get started in your own endeavors. Below assumes the iDRAC has been configured and is available on the network in default config. To generate a kerbero’s keytab , you simply need the name and password of a service account (this is simply a Active Directory user account) in your domain. ktpass /pass ReallySecurePas5word /ptype K
MacOS: AnyConnect VPN client was unable to successfully verify the IP forwarding table modifications.

The VPN client was unable to successfully verify the IP forwarding table modification. A VPN connection will not be established. Summary: I started running into issue utilizing Cisco AnyConnect on my Mac basically complaining about not able to overwrite IP forwarding tables. This was on 4.6.x. Since my VPN endpoints were not providing me w/ an updated client and w/ no access to Cisco Anyconnect downloads, my only option was to try openconnect. It was totally worth it, here is why and how to set it up. PreReqs: Homebrew Installing OpenConnect: Launch MacOS Terminal brew install openconnect Getting VPN IP’s/DNS Endpoints from AnyConnect: The information is typically located in your profile xml files located here: /opt/cisco/anyconnect/profile/somethingsomething.xml In the xml file, you are looking for «<HostAddress>typicallyaDNSName.com</HostAddress>» entry. These are your VPN endpoints that you would need to pass to openconnect. Using
PowerCLI: The SSL connection could not be established, see inner exception.
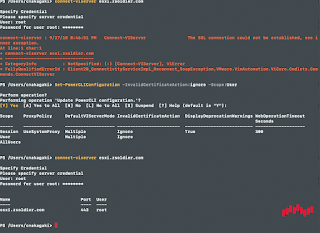
Summary: Unable to connect to ESXi/vCenter server with Connect-VIserver cmdlet, get the following error: «The SSL connection could not be established, see inner exception.» Be sure to «Set-PowerCLIConfiguration -InvalidCertificateAction:Ignore» if you plan to connect to an ESXi/vCenter that does not have trusted certificate. Interestingly, something must’ve changed recently because the PowerCLI module actually would output a more descriptive message about setting your PowerCLIConfiguration. This appears to be the case w/ Powershell Core 6.1. I’m actually unsure when this behavior started happening and whether is module or powershell related. Regardless, figured I’d post this since I was initially confused myself when running some things on another system.