Color Themes
Color themes let you modify the colors in Visual Studio Code’s user interface to suit your preferences and work environment.
Selecting the Color Theme
- In VS Code, open the Color Theme picker with File > Preferences > Theme > Color Theme. (Code > Preferences > Theme > Color Theme on macOS).
- You can also use the keyboard shortcut ⌘K ⌘T (Windows, Linux Ctrl+K Ctrl+T) to display the picker.
- Use the cursor keys to preview the colors of the theme.
- Select the theme you want and press Enter.

The active color theme is stored in your user settings (keyboard shortcut ⌘, (Windows, Linux Ctrl+,)).
  // Specifies the color theme used in the workbench.
  "workbench.colorTheme": "Default Dark+"
Tip: By default, the theme is stored in your user settings and applies globally to all workspaces. You can also configure a workspace specific theme. To do so, set a theme in the Workspace settings.
Color Themes from the Marketplace
There are several out-of-the-box color themes in VS Code for you to try.
Many more themes have been uploaded to the VS Code Extension Marketplace by the community. If you find one you want to use, install it and restart VS Code and the new theme will be available.
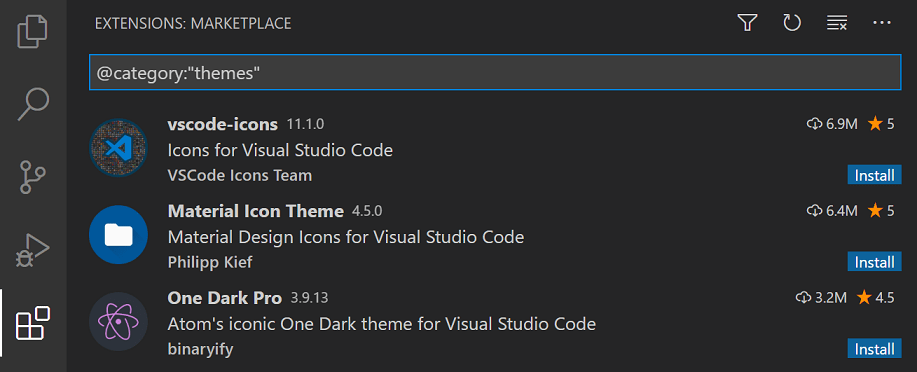
You can search for themes in the Extensions view (⇧⌘X (Windows, Linux Ctrl+Shift+X)) search box using the @category:"themes" filter.
Auto switch based on OS color scheme
Windows and macOS support light and dark color schemes. There is a setting, window.autoDetectColorScheme, that instructs VS Code to listen to changes to the OS’s color scheme and switch to a matching theme accordingly.
To customize the themes that are used when a color scheme changes, you can set the preferred light, dark, and high contrast themes with the settings:
workbench.preferredLightColorTheme— defaults to «Default Light+»workbench.preferredDarkColorTheme— defaults to «Default Dark+»workbench.preferredHighContrastColorTheme— defaults to «Default High Contrast»workbench.preferredHighContrastLightColorTheme— defaults to «Default High Contrast Light»
Customizing a Color Theme
Workbench colors
You can customize your active color theme with the workbench.colorCustomizations and editor.tokenColorCustomizations user settings.
To set the colors of VS Code UI elements such as list & trees (File Explorer, suggestions widget), diff editor, Activity Bar, notifications, scroll bar, split view, buttons, and more, use workbench.colorCustomizations.
You can use IntelliSense while setting workbench.colorCustomizations values or, for a list of all customizable colors, see the Theme Color Reference.
To customize a specific theme only, use the following syntax:
"workbench.colorCustomizations": {
    "[Monokai]": {
        "sideBar.background": "#347890"
    }
}
If a customization applies to more than one themes, you can name multiple themes or use * as wildcard at the beginning and the end of the name:
"workbench.colorCustomizations": {
    "[Abyss][Red]": {
        "activityBar.background": "#ff0000"
    },
    "[Monokai*]": {
        "activityBar.background": "#ff0000"
    }
}
Editor syntax highlighting
To tune the editor’s syntax highlighting colors, use editor.tokenColorCustomizations in your user settings settings.json file:
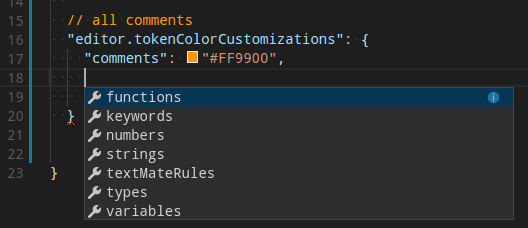
A pre-configured set of syntax tokens (‘comments’, ‘strings’, …) is available for the most common constructs. If you want more, you can do so by directly specifying TextMate theme color rules:
Note: Directly configuring TextMate rules is an advanced skill as you need to understand on how TextMate grammars work. Go to the Color Theme guide for more information.
Again, to customize specific themes, you can do this in one of the following ways:
"editor.tokenColorCustomizations": {
    "[Monokai]": {
        "comments": "#229977"
    },
    "[*Dark*]": {
        "variables": "#229977"
    },
    "[Abyss][Red]": {
        "keywords": "#f00"
    }
}
Editor semantic highlighting
Some languages (currently: TypeScript, JavaScript, Java) provide semantic tokens. Semantic tokens are based on the language service’s symbol understanding and are more accurate than the syntax tokens coming from the TextMate grammars that are driven by regular expressions. The semantic highlighting that is computed from the semantic tokens goes on top of syntax highlighting and can correct and enrich the highlighting as seen in the following example:
The «Tomorrow Night Blue» color theme without semantic highlighting:

The «Tomorrow Night Blue» color theme with semantic highlighting:

Notice the color differences based on language service symbol understanding:
- line 10:
languageModesis colored as a parameter. - line 11:
RangeandPositionare colored as classes anddocumentas a parameter. - line 13:
getFoldingRangesis colored as a function.
The settings editor.semanticHighlighting.enabled serves as the main control on whether semantic highlighting is applied. It can have values true, false, and configuredByTheme.
trueandfalseturn semantic highlighting on or off for all themes.configuredByThemeis the default and lets each theme control whether semantic highlighting is enabled or not. All the themes that ship with VS Code (for example, the «Dark+» default) have semantic highlighting enabled by default.
Users can override the theme setting by:
"editor.semanticTokenColorCustomizations": {
    "[Rouge]": {
        "enabled": true
    }
}
When semantic highlighting is enabled and available for a language, it is up to the theme to configure whether and how semantic tokens are colored. Some semantic tokens are standardized and map to well-established TextMate scopes. If the theme has a coloring rule for these TextMate scopes, the semantic token will be rendered with that color, without the need for any additional coloring rules.
Additional styling rules can be configured by the user in editor.semanticTokenColorCustomizations":
"editor.semanticTokenColorCustomizations": {
    "[Rouge]": {
        "enabled": true,
        "rules": {
            "*.declaration": { "bold": true }
        }
    }
}
To see what semantic tokens are computed and how they are styled, users can use the scope inspector (Developer: Inspect Editor Tokens and Scopes), which displays information for the text at the current cursor position.
If semantic tokens are available for the language at the given position and enabled by theme, the inspect tool shows a section semantic token type. The section shows the semantic token information (type and any number of modifiers) as well as the styling rules that apply.
More information on semantic tokens and styling rule syntax can be found in the Semantic Highlighting Guide.
Creating your own Color Theme
Creating and publishing a theme extension is easy. Customize your colors in your user settings then generate a theme definition file with the Developer: Generate Color Theme From Current Settings command.
VS Code’s Yeoman extension generator will help you generate the rest of the extension.
See the Create a new Color Theme topic in our Extension API section to learn more.
Remove default Color Themes
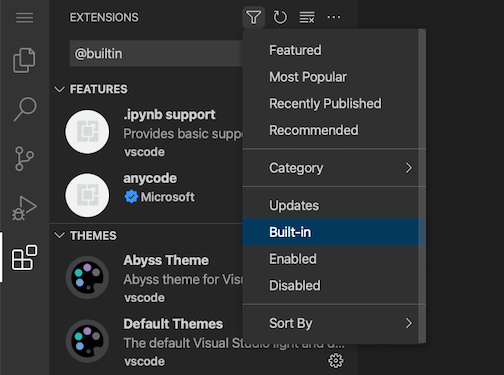
If you’d like to remove some of the default themes shipped with VS Code from the Color Theme picker, you can disable them from the Extensions view (⇧⌘X (Windows, Linux Ctrl+Shift+X)). Click the Filter Extensions button from the top of the Extensions view, select the Built-in option, and you’ll see a THEMES section listing the default themes.
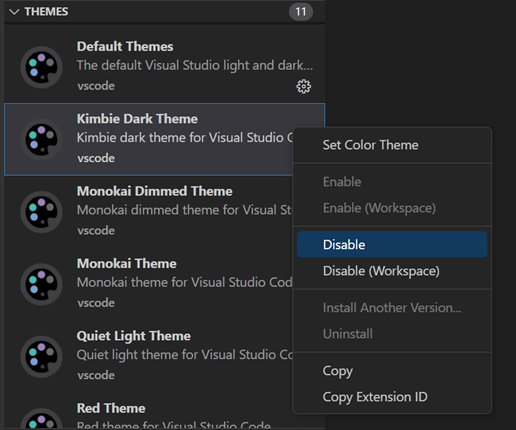
You can disable a built-in theme extension as you would any other VS Code extension with the Disable command on the gear context menu.
File Icon Themes
File icon themes can be contributed by extensions and selected by users as their favorite set of file icons. File icons are shown in the File Explorer and tabbed headings.
Selecting the File Icon Theme
- In VS Code, open the File Icon Theme picker with File > Preferences > Theme > File Icon Theme. (Code > Preferences > Theme > File Icon Theme on macOS).
- You can also use the Preferences: File Icon Theme command from the Command Palette (⇧⌘P (Windows, Linux Ctrl+Shift+P)).
- Use the cursor keys to preview the icons of the theme.
- Select the theme you want and hit Enter.
![]()
By default, the Seti file icon set is used and those are the icons you see in the File Explorer. Once a file icon theme is selected, the selected theme will be remembered and appear again whenever VS Code is restarted. You can disable file icons by selecting None.
VS code ships with two file icon themes; Minimal and Seti. To install more file icon themes, select the Install Additional File Icon Themes item in the file icon theme picker and you’ll see a query for file icon themes (tag:icon-theme) in the Extensions view.
You can also browse the VS Code Marketplace site directly to find available themes.
The active File Icon theme is persisted in your user settings (keyboard shortcut ⌘, (Windows, Linux Ctrl+,)).
  // Specifies the file icon theme used in the workbench.
  "workbench.iconTheme": "vs-seti"
Creating your own File Icon Theme
You can create your own File Icon Theme from icons (preferably SVG), see the File Icon Theme topic in our Extension API section for details.
Next steps
Themes are just one way to customize VS Code. If you’d like to learn more about VS Code customization and extensibility, try these topics:
- Settings — Learn how to configure VS Code to your preferences through user and workspace settings.
- Snippets — Add additional snippets to your favorite language.
- Extension API — Learn about other ways to extend VS Code.
- Color Theme — Color Theme extension API.
- File Icon Theme — File Icon Theme extension API.
2/2/2023
Color Themes
Color themes let you modify the colors in Visual Studio Code’s user interface to suit your preferences and work environment.
Selecting the Color Theme
- In VS Code, open the Color Theme picker with File > Preferences > Theme > Color Theme. (Code > Preferences > Theme > Color Theme on macOS).
- You can also use the keyboard shortcut ⌘K ⌘T (Windows, Linux Ctrl+K Ctrl+T) to display the picker.
- Use the cursor keys to preview the colors of the theme.
- Select the theme you want and press Enter.
The active color theme is stored in your user settings (keyboard shortcut ⌘, (Windows, Linux Ctrl+,)).
  // Specifies the color theme used in the workbench.
  "workbench.colorTheme": "Default Dark+"
Tip: By default, the theme is stored in your user settings and applies globally to all workspaces. You can also configure a workspace specific theme. To do so, set a theme in the Workspace settings.
Color Themes from the Marketplace
There are several out-of-the-box color themes in VS Code for you to try.
Many more themes have been uploaded to the VS Code Extension Marketplace by the community. If you find one you want to use, install it and restart VS Code and the new theme will be available.
You can search for themes in the Extensions view (⇧⌘X (Windows, Linux Ctrl+Shift+X)) search box using the @category:"themes" filter.
Auto switch based on OS color scheme
Windows and macOS support light and dark color schemes. There is a setting, window.autoDetectColorScheme, that instructs VS Code to listen to changes to the OS’s color scheme and switch to a matching theme accordingly.
To customize the themes that are used when a color scheme changes, you can set the preferred light, dark, and high contrast themes with the settings:
workbench.preferredLightColorTheme— defaults to «Default Light+»workbench.preferredDarkColorTheme— defaults to «Default Dark+»workbench.preferredHighContrastColorTheme— defaults to «Default High Contrast»workbench.preferredHighContrastLightColorTheme— defaults to «Default High Contrast Light»
Customizing a Color Theme
Workbench colors
You can customize your active color theme with the workbench.colorCustomizations and editor.tokenColorCustomizations user settings.
To set the colors of VS Code UI elements such as list & trees (File Explorer, suggestions widget), diff editor, Activity Bar, notifications, scroll bar, split view, buttons, and more, use workbench.colorCustomizations.
You can use IntelliSense while setting workbench.colorCustomizations values or, for a list of all customizable colors, see the Theme Color Reference.
To customize a specific theme only, use the following syntax:
"workbench.colorCustomizations": {
    "[Monokai]": {
        "sideBar.background": "#347890"
    }
}
If a customization applies to more than one themes, you can name multiple themes or use * as wildcard at the beginning and the end of the name:
"workbench.colorCustomizations": {
    "[Abyss][Red]": {
        "activityBar.background": "#ff0000"
    },
    "[Monokai*]": {
        "activityBar.background": "#ff0000"
    }
}
Editor syntax highlighting
To tune the editor’s syntax highlighting colors, use editor.tokenColorCustomizations in your user settings settings.json file:
A pre-configured set of syntax tokens (‘comments’, ‘strings’, …) is available for the most common constructs. If you want more, you can do so by directly specifying TextMate theme color rules:
Note: Directly configuring TextMate rules is an advanced skill as you need to understand on how TextMate grammars work. Go to the Color Theme guide for more information.
Again, to customize specific themes, you can do this in one of the following ways:
"editor.tokenColorCustomizations": {
    "[Monokai]": {
        "comments": "#229977"
    },
    "[*Dark*]": {
        "variables": "#229977"
    },
    "[Abyss][Red]": {
        "keywords": "#f00"
    }
}
Editor semantic highlighting
Some languages (currently: TypeScript, JavaScript, Java) provide semantic tokens. Semantic tokens are based on the language service’s symbol understanding and are more accurate than the syntax tokens coming from the TextMate grammars that are driven by regular expressions. The semantic highlighting that is computed from the semantic tokens goes on top of syntax highlighting and can correct and enrich the highlighting as seen in the following example:
The «Tomorrow Night Blue» color theme without semantic highlighting:
The «Tomorrow Night Blue» color theme with semantic highlighting:
Notice the color differences based on language service symbol understanding:
- line 10:
languageModesis colored as a parameter. - line 11:
RangeandPositionare colored as classes anddocumentas a parameter. - line 13:
getFoldingRangesis colored as a function.
The settings editor.semanticHighlighting.enabled serves as the main control on whether semantic highlighting is applied. It can have values true, false, and configuredByTheme.
trueandfalseturn semantic highlighting on or off for all themes.configuredByThemeis the default and lets each theme control whether semantic highlighting is enabled or not. All the themes that ship with VS Code (for example, the «Dark+» default) have semantic highlighting enabled by default.
Users can override the theme setting by:
"editor.semanticTokenColorCustomizations": {
    "[Rouge]": {
        "enabled": true
    }
}
When semantic highlighting is enabled and available for a language, it is up to the theme to configure whether and how semantic tokens are colored. Some semantic tokens are standardized and map to well-established TextMate scopes. If the theme has a coloring rule for these TextMate scopes, the semantic token will be rendered with that color, without the need for any additional coloring rules.
Additional styling rules can be configured by the user in editor.semanticTokenColorCustomizations":
"editor.semanticTokenColorCustomizations": {
    "[Rouge]": {
        "enabled": true,
        "rules": {
            "*.declaration": { "bold": true }
        }
    }
}
To see what semantic tokens are computed and how they are styled, users can use the scope inspector (Developer: Inspect Editor Tokens and Scopes), which displays information for the text at the current cursor position.
If semantic tokens are available for the language at the given position and enabled by theme, the inspect tool shows a section semantic token type. The section shows the semantic token information (type and any number of modifiers) as well as the styling rules that apply.
More information on semantic tokens and styling rule syntax can be found in the Semantic Highlighting Guide.
Creating your own Color Theme
Creating and publishing a theme extension is easy. Customize your colors in your user settings then generate a theme definition file with the Developer: Generate Color Theme From Current Settings command.
VS Code’s Yeoman extension generator will help you generate the rest of the extension.
See the Create a new Color Theme topic in our Extension API section to learn more.
Remove default Color Themes
If you’d like to remove some of the default themes shipped with VS Code from the Color Theme picker, you can disable them from the Extensions view (⇧⌘X (Windows, Linux Ctrl+Shift+X)). Click the Filter Extensions button from the top of the Extensions view, select the Built-in option, and you’ll see a THEMES section listing the default themes.
You can disable a built-in theme extension as you would any other VS Code extension with the Disable command on the gear context menu.
File Icon Themes
File icon themes can be contributed by extensions and selected by users as their favorite set of file icons. File icons are shown in the File Explorer and tabbed headings.
Selecting the File Icon Theme
- In VS Code, open the File Icon Theme picker with File > Preferences > Theme > File Icon Theme. (Code > Preferences > Theme > File Icon Theme on macOS).
- You can also use the Preferences: File Icon Theme command from the Command Palette (⇧⌘P (Windows, Linux Ctrl+Shift+P)).
- Use the cursor keys to preview the icons of the theme.
- Select the theme you want and hit Enter.
![]()
By default, the Seti file icon set is used and those are the icons you see in the File Explorer. Once a file icon theme is selected, the selected theme will be remembered and appear again whenever VS Code is restarted. You can disable file icons by selecting None.
VS code ships with two file icon themes; Minimal and Seti. To install more file icon themes, select the Install Additional File Icon Themes item in the file icon theme picker and you’ll see a query for file icon themes (tag:icon-theme) in the Extensions view.
You can also browse the VS Code Marketplace site directly to find available themes.
The active File Icon theme is persisted in your user settings (keyboard shortcut ⌘, (Windows, Linux Ctrl+,)).
  // Specifies the file icon theme used in the workbench.
  "workbench.iconTheme": "vs-seti"
Creating your own File Icon Theme
You can create your own File Icon Theme from icons (preferably SVG), see the File Icon Theme topic in our Extension API section for details.
Next steps
Themes are just one way to customize VS Code. If you’d like to learn more about VS Code customization and extensibility, try these topics:
- Settings — Learn how to configure VS Code to your preferences through user and workspace settings.
- Snippets — Add additional snippets to your favorite language.
- Extension API — Learn about other ways to extend VS Code.
- Color Theme — Color Theme extension API.
- File Icon Theme — File Icon Theme extension API.
2/2/2023
| Order | Area | TOCTitle | ContentId | PageTitle | DateApproved | MetaDescription |
|---|---|---|---|---|---|---|
|
5 |
getstarted |
Themes |
CAC88BC7-90A5-4384-8A05-2187117C0F72 |
Visual Studio Code Themes |
2/2/2023 |
Changing the color theme in Visual Studio Code. You can use color themes provided by VS Code, the community or create your own new themes. |
Color Themes
Color themes let you modify the colors in Visual Studio Code’s user interface to suit your preferences and work environment.

Selecting the Color Theme
- In VS Code, open the Color Theme picker with File > Preferences > Theme > Color Theme. (Code > Preferences > Theme > Color Theme on macOS).
- You can also use the keyboard shortcut
kb(workbench.action.selectTheme)to display the picker. - Use the cursor keys to preview the colors of the theme.
- Select the theme you want and press
kbstyle(Enter).

The active color theme is stored in your user settings (keyboard shortcut kb(workbench.action.openSettings)).
  // Specifies the color theme used in the workbench.
  "workbench.colorTheme": "Default Dark+"
Tip: By default, the theme is stored in your user settings and applies globally to all workspaces. You can also configure a workspace specific theme. To do so, set a theme in the Workspace settings.
Color Themes from the Marketplace
There are several out-of-the-box color themes in VS Code for you to try.
Many more themes have been uploaded to the VS Code Extension Marketplace by the community. If you find one you want to use, install it and restart VS Code and the new theme will be available.
You can search for themes in the Extensions view (kb(workbench.view.extensions)) search box using the @category:"themes" filter.

Auto switch based on OS color scheme
Windows and macOS support light and dark color schemes. There is a setting, window.autoDetectColorScheme, that instructs VS Code to listen to changes to the OS’s color scheme and switch to a matching theme accordingly.
To customize the themes that are used when a color scheme changes, you can set the preferred light, dark, and high contrast themes with the settings:
workbench.preferredLightColorTheme— defaults to «Default Light+»workbench.preferredDarkColorTheme— defaults to «Default Dark+»workbench.preferredHighContrastColorTheme— defaults to «Default High Contrast»workbench.preferredHighContrastLightColorTheme— defaults to «Default High Contrast Light»
Customizing a Color Theme
Workbench colors
You can customize your active color theme with the workbench.colorCustomizations and editor.tokenColorCustomizations user settings.
To set the colors of VS Code UI elements such as list & trees (File Explorer, suggestions widget), diff editor, Activity Bar, notifications, scroll bar, split view, buttons, and more, use workbench.colorCustomizations.

You can use IntelliSense while setting workbench.colorCustomizations values or, for a list of all customizable colors, see the Theme Color Reference.
To customize a specific theme only, use the following syntax:
"workbench.colorCustomizations": {
    "[Monokai]": {
        "sideBar.background": "#347890"
    }
}
If a customization applies to more than one themes, you can name multiple themes or use * as wildcard at the beginning and the end of the name:
"workbench.colorCustomizations": {
    "[Abyss][Red]": {
        "activityBar.background": "#ff0000"
    },
    "[Monokai*]": {
        "activityBar.background": "#ff0000"
    }
}
Editor syntax highlighting
To tune the editor’s syntax highlighting colors, use editor.tokenColorCustomizations in your user settings settings.json file:

A pre-configured set of syntax tokens (‘comments’, ‘strings’, …) is available for the most common constructs. If you want more, you can do so by directly specifying TextMate theme color rules:

Note: Directly configuring TextMate rules is an advanced skill as you need to understand on how TextMate grammars work. Go to the Color Theme guide for more information.
Again, to customize specific themes, you can do this in one of the following ways:
"editor.tokenColorCustomizations": {
    "[Monokai]": {
        "comments": "#229977"
    },
    "[*Dark*]": {
        "variables": "#229977"
    },
    "[Abyss][Red]": {
        "keywords": "#f00"
    }
}
Editor semantic highlighting
Some languages (currently: TypeScript, JavaScript, Java) provide semantic tokens. Semantic tokens are based on the language service’s symbol understanding and are more accurate than the syntax tokens coming from the TextMate grammars that are driven by regular expressions. The semantic highlighting that is computed from the semantic tokens goes on top of syntax highlighting and can correct and enrich the highlighting as seen in the following example:
The «Tomorrow Night Blue» color theme without semantic highlighting:

The «Tomorrow Night Blue» color theme with semantic highlighting:

Notice the color differences based on language service symbol understanding:
- line 10:
languageModesis colored as a parameter. - line 11:
RangeandPositionare colored as classes anddocumentas a parameter. - line 13:
getFoldingRangesis colored as a function.
The settings editor.semanticHighlighting.enabled serves as the main control on whether semantic highlighting is applied. It can have values true, false, and configuredByTheme.
trueandfalseturn semantic highlighting on or off for all themes.configuredByThemeis the default and lets each theme control whether semantic highlighting is enabled or not. All the themes that ship with VS Code (for example, the «Dark+» default) have semantic highlighting enabled by default.
Users can override the theme setting by:
"editor.semanticTokenColorCustomizations": {
    "[Rouge]": {
        "enabled": true
    }
}
When semantic highlighting is enabled and available for a language, it is up to the theme to configure whether and how semantic tokens are colored. Some semantic tokens are standardized and map to well-established TextMate scopes. If the theme has a coloring rule for these TextMate scopes, the semantic token will be rendered with that color, without the need for any additional coloring rules.
Additional styling rules can be configured by the user in editor.semanticTokenColorCustomizations":
"editor.semanticTokenColorCustomizations": {
    "[Rouge]": {
        "enabled": true,
        "rules": {
            "*.declaration": { "bold": true }
        }
    }
}
To see what semantic tokens are computed and how they are styled, users can use the scope inspector (Developer: Inspect Editor Tokens and Scopes), which displays information for the text at the current cursor position.

If semantic tokens are available for the language at the given position and enabled by theme, the inspect tool shows a section semantic token type. The section shows the semantic token information (type and any number of modifiers) as well as the styling rules that apply.
More information on semantic tokens and styling rule syntax can be found in the Semantic Highlighting Guide.
Creating your own Color Theme
Creating and publishing a theme extension is easy. Customize your colors in your user settings then generate a theme definition file with the Developer: Generate Color Theme From Current Settings command.
VS Code’s Yeoman extension generator will help you generate the rest of the extension.
See the Create a new Color Theme topic in our Extension API section to learn more.
Remove default Color Themes
If you’d like to remove some of the default themes shipped with VS Code from the Color Theme picker, you can disable them from the Extensions view (kb(workbench.view.extensions)). Click the Filter Extensions button from the top of the Extensions view, select the Built-in option, and you’ll see a THEMES section listing the default themes.

You can disable a built-in theme extension as you would any other VS Code extension with the Disable command on the gear context menu.

File Icon Themes
File icon themes can be contributed by extensions and selected by users as their favorite set of file icons. File icons are shown in the File Explorer and tabbed headings.
Selecting the File Icon Theme
- In VS Code, open the File Icon Theme picker with File > Preferences > Theme > File Icon Theme. (Code > Preferences > Theme > File Icon Theme on macOS).
- You can also use the Preferences: File Icon Theme command from the Command Palette (
kb(workbench.action.showCommands)). - Use the cursor keys to preview the icons of the theme.
- Select the theme you want and hit
kbstyle(Enter).
![]()
By default, the Seti file icon set is used and those are the icons you see in the File Explorer. Once a file icon theme is selected, the selected theme will be remembered and appear again whenever VS Code is restarted. You can disable file icons by selecting None.
VS code ships with two file icon themes; Minimal and Seti. To install more file icon themes, select the Install Additional File Icon Themes item in the file icon theme picker and you’ll see a query for file icon themes (tag:icon-theme) in the Extensions view.
You can also browse the VS Code Marketplace site directly to find available themes.
The active File Icon theme is persisted in your user settings (keyboard shortcut kb(workbench.action.openSettings)).
  // Specifies the file icon theme used in the workbench.
  "workbench.iconTheme": "vs-seti"
Creating your own File Icon Theme
You can create your own File Icon Theme from icons (preferably SVG), see the File Icon Theme topic in our Extension API section for details.
Next steps
Themes are just one way to customize VS Code. If you’d like to learn more about VS Code customization and extensibility, try these topics:
- Settings — Learn how to configure VS Code to your preferences through user and workspace settings.
- Snippets — Add additional snippets to your favorite language.
- Extension API — Learn about other ways to extend VS Code.
- Color Theme — Color Theme extension API.
- File Icon Theme — File Icon Theme extension API.
Решить, вроде бы, банальный для редактора кода вопрос из заголовка, в VS Code оказалось непросто. В Sublime Text для этого достаточно распаковать файл темы, найти нужное значение и поменять цвет. Но мне нужен был официально бесплатный для коммерческого использования редактор и из тех, что я пробовал, VS Code показался самым нормальным (еще потыкал Brackets и Atom). Но, как это обычно бывает, чем дольше чем-то пользуешься, тем больше косяков находишь. Особенно у Майкрософт, да. Тут они решили не искать простых путей (по крайней мере, для пользователя). Хотите поменять один цвет? Вам придется либо создавать тему с нуля, либо собирать по крупицам рецепт ниже. Может этот пост сэкономит кому-то время и нервы.
Будем менять цвета подсветки на примере темы Solarized Dark и CSS.
- Открываем настройки.
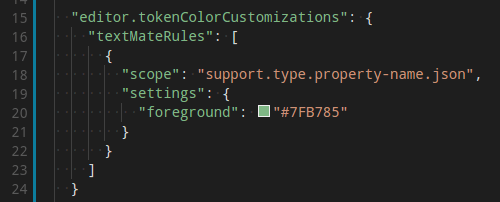
- В пользовательские настройки добавляем следующую конструкцию:
“editor.tokenColorCustomizations”: {
    “[Solarized Dark]”: {
        “textMateRules”: [
            {
                “scope”: “entity.other.attribute-name.class.css”,
                “settings”: {
                “foreground”: “#e9a449”
                }
            },
        ],
    },
},
Как изменить другую тему, другие параметры и другие языки
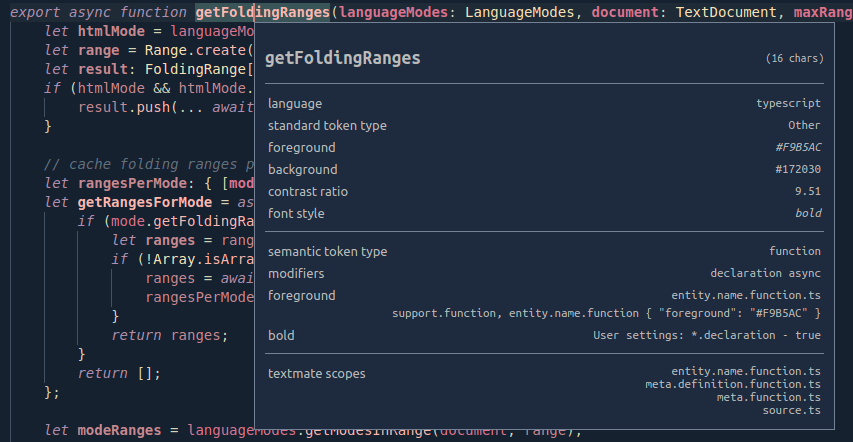
Название темы в квадратных скобках просто заменяете на вашу. Вам нужно узнать значение scope для того элемента, который вы хотите изменить. Для этого откройте файл с кодом. Вызовите командную строку (Ctrl+Shift+P). Наберите “Developer: Inspect Editor Tokens and Scopes” и нажмите Enter. При клике на элемент, появится всплывающее окно:

Оно сразу предлагает строку с называнием параметра (тот самый scope) и текущим цветом — entity.other.attribute-name { “foreground”: “#93A1A1” }. Но, это не то, что нам нужно! По-крайней мере в данном случае, этот параметр изменит цвет всех селекторов (и классов, и id). Но я хочу задать для каждого свой цвет. Поэтому нам нужен первый параметр из списка ниже. То есть entity.other.attribute-name.class.css. У идентификатора будет похожая картина, только scope будет entity.other.attribute-name.id.css.
А вот после применения настроек scope также поменяется на нужный:

Я оставил в коде запятые на случай, если вы захотите добавить других цветов и другие параметры на уровни выше.

Spread the love, Share this Article!
Subscribe to Our YouTube Channel!
How to Change Color of Text and Syntax in VS Code Editor
Are you a new web developer and just started using Visual Studio Code? If you don’t know how to change the color of Text and Syntax in VS Code Editor, then this article is exactly for you.
In this post, you will learn how to change the color of text and syntax in VS Code Editor 2023. Visual Studio Code by Microsoft is one of the most popular tools and software among web developers and software engineers.
Visual Studio Sode Syntax Highlighting Colors
Moreover, Most new developers are not satisfied with the default theme and color scheme of VS Code editor. They want to change the visual studio code syntax highlighting colors according to their own color choice.
The article will explain the step-by-step process for code newbies to change the color of text and syntax in VS Code. You just need to paste the given source code and change the color of any tag to syntax in the visual studio code syntax highlighting colors.
How do I change the Color of Syntax in Visual Studio?
To change the text and syntax colors in visual studio code follow the steps given below:
- Open VS Code editor to change the syntax colors.
- Go to Settings, which is in the bottom left corner of the VS Code window.
- In the search field type JSON, and click on the ‘Edit in settings.json’ option.
- Copy and paste the given source code in the settings.json, code editor tab.
- Press ‘Ctrl+shift+P’ from the keyboard to open VS Code command palette.
- Search: ‘Inspect Editor Tokens and Scopes’
- Take the cursor on the text or tag, if you want to change the colors.
- To change the syntax colors, follow the steps in the below video tutorials.
I have explained all the steps in the video tutorials for your understanding. You can watch the below video if your visual studio code syntax highlighting not working.
How to Change Text Color in Visual Studio Code?
Recommended for You!
- 10 Easy HTML CSS Projects for Beginners with Source Codes
- How to Run PHP Code in VSCode Terminal Console
- How to Receive Email from HTML Form using PHP
Step – 1
Open your VS Code editor and go to the settings option. The settings option is located in the bottom left corner of the Visual Studio code editor window as shown in the image below.

Step – 2
In the search field type JSON, and click on the ‘Edit in settings.json’ option. It will open a new tab where you can copy and paste the given JSON source code.

Step – 3
Source Code – How to change text color in Visual Studio code?
Now, it’s time to copy and paste the given source code into the settings.json, code editor tab. Just paste the given JSON source code in the settings.json tab window and modify this code according to the instruction given in the above video tutorial.
"editor.tokenColorCustomizations": {
        "textMateRules": [
            {
                "scope": [
                 "support.function.session.php",
                 ],
                 "settings": {
                 "foreground": "#569CD6",
                 }
            },
        ]
    }
The below image shows, where to paste the above JSON code to modify the text and syntax of VS Code editor.

Step – 4
Modification of JSON Code to Change the Syntax Colors in VS Code
- Press ‘Ctrl+shift+P’ from the keyboard to open VS Code command palette and Search: ‘Inspect Editor Tokens and Scopes‘. As shown in the image below:

- After that, take the mouse cursor on the text or tag, you want to change the colors. And copy the line before the ‘textmate scopes’ and paste it into the Scope section of the JSON source code as shown in the image below.

- After that, paste this line into the Scope section of the JSON source code as shown in the image below.

To change the colors of multiple syntaxes repeat the above steps again.
Support Me!!!
Related Tutorials About VS Code Fonts
How to Change Font Size in Visual Studio Code
Hit The Subscribe Button to Get Daily New video!
Spread the love, Share this Article!
-
Design/Dev -
CSS -
JavaScript -
PHP -
VS Code -
Learn more
Recommended For You!
6 Responses
-
Hi,
Could you show how to change color for multiple items?
Say for instance I want to have different colors for both commands, parameters etc.?
I tried adding your syntax multiple times but It’s generating errors in settings.json.-
Hi, Follow the steps in the video tutorial. It will work properly!
-
Yes, This tutorial will work for you. You can add color code multiple times!
-
Yes, Please watch the video tutorial!
https://www.youtube.com/watch?v=suaqd0te9Pw
-
-
hi,
yes you can do that just copy the scop block to the end of the function.. after that add a comma and paste it again change the name of scop and the color and that’s it.
for example on the HTML page:
“editor.tokenColorCustomizations”: {
“textMateRules”: [
{
“scope”: [
“entity.other.attribute-name.html”,
],
“settings”: {
“foreground”: “#085eaf”,
},
},
{
“scope”: [
“entity.name.tag.html”,
],
“settings”: {
“foreground”: “#08af40”,
},
}
],
},-
Thank you! for the explanation!
-
Leave a Reply
В Visual Studio Code (VSCode) темы оформления можно настроить несколькими способами. Самый простой — это установить уже готовый вариант. Поскольку выбор, действительно, очень большой, то можно подобрать наиболее привлекательный вариант. Второй способ — это воспользоваться он-лайн редактором тем, где можно самостоятельно настроить все цвета. И третий вариант — это используя уже готовую тему, внести необходимые коррективы в локальные настройки.
Прежде, чем рассмотреть все эти варианты, я отмечу, что VSCode может хранить настройки не только глобально для всего редактора, но и локально: для выбранной папки или для рабочей области. Однажды я установил какое-то расширение, которое поменяло цвет оформления на болотно-грязный, и потом полдня потратил на то, как его отключить. Оказалось, что цвет прописался в конфигурации папки. 
Готовые темы для Visual Studio Code
Здесь всё очень просто: все темы устанавливаются с официального сайта: Marketplace. На странице темы есть ссылка Install , нажав на которую, откроется сам VSCode, где и выбирается установка.
Для переключения установленных тем используются горячие клавиши Ctrl+K+T (нажать Ctrl, потом не отпуская, «K» и «T»). Дальше курсором выбираем любой вариант.

В Marketplace не очень удобно сделан предпросмотр тем, поэтому можно выбрать тему с других сайтов, например:
- orta.io/vscode-themes — здесь большие скриншоты всех тем на одной странице.
- vscodethemes.com — здесь темы уже сгруппированы на светлые и тёмные, а также доступен предпросмотр для HTML/JS/CSS-кода.
Если тема не понравилась, то её можно удалить во включенных расширениях. Готовые темы удобны тем, что это самый быстрый и простой способ установки — буквально в пару кликов.
Создание своей темы для VSCode
При желании можно создать и свою тему. Для этого нужно воспользоваться он-лайн редактором TmTheme Editor. Вначале лучше выбрать из галереи какой-то подходящий вариант, после его отредактировать. После того, как настройки выполнены, нужно скачать файл (кнопка Download). Это будет файл с расширением .tmTheme.
После этого нужно создать расширение для этой темы. Идём в каталог c:UsersЮЗЕР.vscodeextensions, где VSCode хранит все установленные расширения. Делаем там каталог «my.themу», в который размещаем файл package.json такого содержания:
{
    "name": "My theme",
    "version": "1.0.0",
    "engines": {
        "vscode": ">=0.9.0-pre.1"
    },
    "publisher": "MAX",
    "contributes": {
        "themes": [
            {
                "label": "MyTheme",
                "uiTheme": "vs",
                "path": "./themes/my.tmTheme"
            }
        ]
    }
}
Название, версию можно поменять на свою. Параметр path указывает на tmTheme-файл. Его мы скачали с TmTheme Editor — нужно его переименовать в my.tmTheme. Делаем подкаталог themes и кидаем в него этот файл.
Параметр uiTheme указывает на базовый UI — в данном примере «vs» означает светлую тему. Если вы используется темную, то нужно указать «vs-dark».
После этого в Visual Studio Code переключаемся на вкладку расширений и включаем его.

Если вы решите изменить какой-то цвет в TmTheme Editor, то скачиваете новый файл и заменяете им my.tmTheme. Чтобы изменения вступили в силу, можно выключить расширение и опять его включить.
Свои настройки оформления Visual Studio Code
Лично я предпочитаю светлые темы оформления, хотя тёмные выглядят красивей, поскольку цвет на темном фоне лучше различим. Для меня проблема в том, что приходится постоянно переключаться с редактора на сайт в браузере и мельтешение «тёмное-светлое» довольно сильно раздражает. Поэтому, чтобы не насиловать глаза, я использую светлое оформление.
У готовых светлых тем существенный недостаток — низкий контраст цветов на белом фоне. Из-за этого подобрать нормальный цвет не такое простое занятие. Например многие используют светло-серый цвет текста: выгладит красиво, но для зрения получается слишком малый контраст. Другие, наоборот, ставят насыщенные цвета: синий, красный — для нас они несут ещё и смысловой оттенок, поэтому их нужно подбирать с умом. В общем, если вы такой же капризный как я, то самым лучшим способом будет собственная настройка оформления VSCode. И делается это, на самом деле, достаточно просто.
Общий принцип
Все настройки хранятся как обычно в settings.json. Visual Studio Code разделяет оформление самого редактора от цветовой схемы подсветки кода. Сам редактор настраивается в очень широких пределах — изменить можно буквально каждый элемент дизайна.
В settings.json нужно сделать секцию workbench.colorCustomizations, в которой указываются изменяемые параметры. Это «глобальное оформление», которое перекроет оформление любой темы.
Перед тем, как вы начнёте вносить изменения, я бы посоветовал выбрать наиболее подходящую тему и уже после этого вносить свои изменения.
Оформление самого редактора
Я использую стандартную тему оформления Visual Studio Light и секция workbench.colorCustomizations у меня такая:
...
    "workbench.colorCustomizations": {
        "foreground": "#000000",
        "editor.lineHighlightBackground": "#F0F05D70"
    },
...
Параметр foreground задаёт базовый черный цвет текста. Второй параметр задает полупрозрачный желтый цвет для подсветки текущей линии. Параметров очень много: все они описаны в официальной документации Theme Color.
После сохранения settings.json изменения сразу же вступают в силу.
«Подводные камни»
Некоторые расширения могут перекрывать ваши настройки. Я столкнулся с тем, что например расширение Git (сейчас это стандартное расширение, доступное в общих настройках), изменяет цвет списка файлов. То есть я указываю цвет #000000, но он принудительно меняет их на малоконтрастный серый. В данном случае Git нашёл существующий репозиторий и решил, что изменения не заcommit’чены. Настройки оформления для Git’а другие (они есть в документации). Поэтому, если какой-то параметр вдруг не работает, то возможно его перебивает какое-то расширение.
Если расширение не нужно, то его можно просто отключить (enable).
Подсветка кода в VSCode
Теперь самое интересное. Для изменения подсветки кода, используется секция editor.tokenColorCustomizations. В ней указывается тема оформления, для которой нужно внести изменения. То есть настройки применятся только, если будет выбрана эта тема.
Покажу на примере:
...
"editor.tokenColorCustomizations": {
        "[Visual Studio Light]": {
            "textMateRules": [
                {
                    "scope": "entity.name.function.php",
                    "settings": {
                        "foreground": "#000000",
                        "fontStyle": "italic underline"
                    }
                },
                {
                    "scope": "variable.other.php",
                    "settings": {
                        "foreground": "#0000BB",
                    }
                },
            ],
        },
    },
...
Здесь выбрана тема «Visual Studio Light». Секция textMateRules как раз и содержит оформление для каждого элемента, который задаётся в параметре scope. Само же оформление задается в параметре settings.
Если оформление для разных элементов одно и тоже, то в scope можно их перечислить через запятую, например так (здесь два элемента):
{
    "scope": "comment.block.documentation.phpdoc.php, comment.line.double-slash.php",
    "settings": {
        "foreground": "#7c7c7c",
    }
},
Предусмотренных элементов очень много, более того, они ещё и имеют привязку к языку, поэтому Visual Studio Code предлагает готовый инструмент Inspect TM Scopes, который показывает всю необходимую информацию.
Для начала загрузите любой файл, например PHP (как в моих примерах). После этого нажмите F1 (открется панель команд) и в неё наберите Developer: Inspect TM Scopes и после нажмите Enter.

После этого можно поставить курсор на любой элемент и откроется окно с описанием этого элемента.

Здесь указывается текущее оформление. Строчка:
entity.name.function.php { "foreground": "#000000" }
показывает какой именно элемент сейчас работает. А ниже приведена иерархия элементов:
entity.name.function.php
meta.function-call.php
source.php
meta.embedded.block.php
text.html.php
Верхние элементы имеют более высокий приоритет. В данном примере сработал entity.name.function.php, но в коде могут встречаться и другие, например source.php.
Если нужно изменить элемент, достаточно скопировать его из этой информации и вставить в settings.json. После сохранения файла, изменения будут сразу же видны в коде.
Подсказка. Удобно разделить окна редактора VSCode, чтобы в одном был исходный php-код, а в другом
settings.json.
Таким вот нехитрым способом можно настроить Visual Studio Code под любые «капризы».
![]()
Visual Studio Code Docs Ru
Цветовые темы
Цветные темы позволяют изменять цвет фона, текста и языка синтаксиса VS Code в соответствии с вашими предпочтениями и рабочей средой. VS Code поддерживает светлые, темные и высококонтрастные темы.
Выбор цветовой темы
Текущая цветовая тема сконфигурирована в настройках.
// Указывает цветовую тему, используемую в рабочей среде.
«workbench.colorTheme»: «Default Dark+»
Однако нет необходимости редактировать настройки напрямую. С помощью Color Theme Picker проще просмотреть и выбрать тему.
- Откройте панель выбора цветов в меню Файл > Настройки > Цветная тема. (Код > Настройки > Цветная тема на Mac)
- Используйте клавиши курсора, чтобы просмотреть цвета темы.
- Выберите нужную тему и нажмите Enter.
Совет: По умолчанию тема настраивается в пользовательских настройках и применяется ко всем рабочим пространствам. Но вы также можете настроить тему для конкретной рабочей области. Для этого задайте тему в настройках рабочей области.
Цветовые темы из Marketplace
В VS Code есть несколько готовых цветовых тем, которые вы можете попробовать.
Сообщество добавило еще много тем, которые были добавлены сообществом VS Code Расширения Marketplace. Если вы найдете тот, который хотите использовать, установите его и перезапустите VS Code, и новая тема будет доступна.
Совет: Чтобы найти темы, введите ‘theme’ в поле поиска в расширениях (Ctrl + Shift + X).

Вы также можете напрямую просмотреть сайт VS Code Marketplace, чтобы найти доступные темы.
Кастомизация цветовых тем
Примечание: поддерживается в VS Code версии 1.12 или выше.
Вы также можете настроить свою активную цветовую тему с помощью пользовательской настройки workbench.colorCustomizations. Вы можете установить цвета элементов интерфейса VS Code, таких как список и деревья (проводник файлов, виджет предложений), редактор diff, панель активности, уведомления, полоса прокрутки, разделенный вид, кнопки и многое другое.

Вы можете использовать автодополнение при настройке значений workbench.colorCustomizations или, для списка всех настраиваемых цветов, см. Справочная информация по цвету.
Использование существующих тем TextMate
Вы можете добавить существующие цветовые темы TextMate (.tmTheme) в VS Code. Например, на сайте цвета Sublime есть сотни доступных тем TextMate. См. Добавление новой темы в раздел Расширение автозапуска.
Темы иконок
Темы значков файлов могут быть добавлены расширениями и выбраны пользователями как их любимый набор значков файлов. Значки файлов отображаются в Проводнике файлов и заголовках с вкладками.
Выбор темы значков файлов
Текущая тема значков файлов сохраняется в ваших пользовательских настройках.
// Указывает тему значка, используемую в рабочем месте.
«workbench.iconTheme»: null
Нет необходимости редактировать файл settings.json напрямую. Для просмотра и выбора темы лучше использовать элемент Значок темы.
- Откройте выбор значка темы с помощью Файл > Настройки > Значок значка файла. (Код > Настройки > Тема значка файла на Mac)
- Используйте клавиши курсора для предварительного просмотра значков темы.
- Выберите нужную тему и нажмите Enter.
По умолчанию не установлен набор значков файлов, поэтому в Проводнике нет значков. После выбора темы значка выбранная тема будет запомнена и снова установлена, когда VS Code будет запущен в следующий раз.
VS Code поставляется с двумя темами значков: Minimal и Seti. Чтобы установить другие темы значков, выберите пункт Найти больше в Marketplace … в подборке тем для значков.
Вы также можете напрямую просмотреть сайт VS Code Marketplace, чтобы найти доступные темы.
Создание собственной темы значков файлов
Вы можете создать свою собственную тему значков файлов из значков (предпочтительно SVG), см. Раздел Добавление новой темы значка в разделе Создание расширений.
Следующие шаги
Темы — это всего лишь один способ настроить VS Code. Если вы хотите узнать больше о настройке и расширении VS Code, попробуйте следующие темы:
- Настройки — Узнайте, как настроить VS Code в соответствии с вашими предпочтениями с помощью настроек пользователя и рабочей области.
- Сниппеты — добавьте дополнительные сниппеты в ваш любимый язык.
- Расширение Visual Studio Code — Узнайте о других способах расширения VS Code.
- Темы, сниппеты и оформление — вы можете создавать темы, сниппеты и языковые настройки для использования в VS Code.