
Spread the love, Share this Article!
Subscribe to Our YouTube Channel!
How to Change Color of Text and Syntax in VS Code Editor
Are you a new web developer and just started using Visual Studio Code? If you don’t know how to change the color of Text and Syntax in VS Code Editor, then this article is exactly for you.
In this post, you will learn how to change the color of text and syntax in VS Code Editor 2023. Visual Studio Code by Microsoft is one of the most popular tools and software among web developers and software engineers.
Visual Studio Sode Syntax Highlighting Colors
Moreover, Most new developers are not satisfied with the default theme and color scheme of VS Code editor. They want to change the visual studio code syntax highlighting colors according to their own color choice.
The article will explain the step-by-step process for code newbies to change the color of text and syntax in VS Code. You just need to paste the given source code and change the color of any tag to syntax in the visual studio code syntax highlighting colors.
How do I change the Color of Syntax in Visual Studio?
To change the text and syntax colors in visual studio code follow the steps given below:
- Open VS Code editor to change the syntax colors.
- Go to Settings, which is in the bottom left corner of the VS Code window.
- In the search field type JSON, and click on the ‘Edit in settings.json’ option.
- Copy and paste the given source code in the settings.json, code editor tab.
- Press ‘Ctrl+shift+P’ from the keyboard to open VS Code command palette.
- Search: ‘Inspect Editor Tokens and Scopes’
- Take the cursor on the text or tag, if you want to change the colors.
- To change the syntax colors, follow the steps in the below video tutorials.
I have explained all the steps in the video tutorials for your understanding. You can watch the below video if your visual studio code syntax highlighting not working.
How to Change Text Color in Visual Studio Code?
Recommended for You!
- 10 Easy HTML CSS Projects for Beginners with Source Codes
- How to Run PHP Code in VSCode Terminal Console
- How to Receive Email from HTML Form using PHP
Step – 1
Open your VS Code editor and go to the settings option. The settings option is located in the bottom left corner of the Visual Studio code editor window as shown in the image below.

Step – 2
In the search field type JSON, and click on the ‘Edit in settings.json’ option. It will open a new tab where you can copy and paste the given JSON source code.

Step – 3
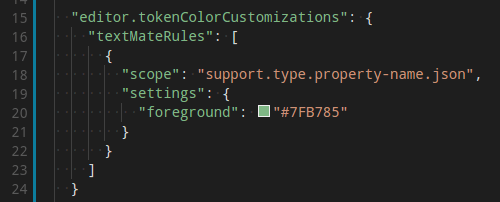
Source Code – How to change text color in Visual Studio code?
Now, it’s time to copy and paste the given source code into the settings.json, code editor tab. Just paste the given JSON source code in the settings.json tab window and modify this code according to the instruction given in the above video tutorial.
"editor.tokenColorCustomizations": {
        "textMateRules": [
            {
                "scope": [
                 "support.function.session.php",
                 ],
                 "settings": {
                 "foreground": "#569CD6",
                 }
            },
        ]
    }
The below image shows, where to paste the above JSON code to modify the text and syntax of VS Code editor.

Step – 4
Modification of JSON Code to Change the Syntax Colors in VS Code
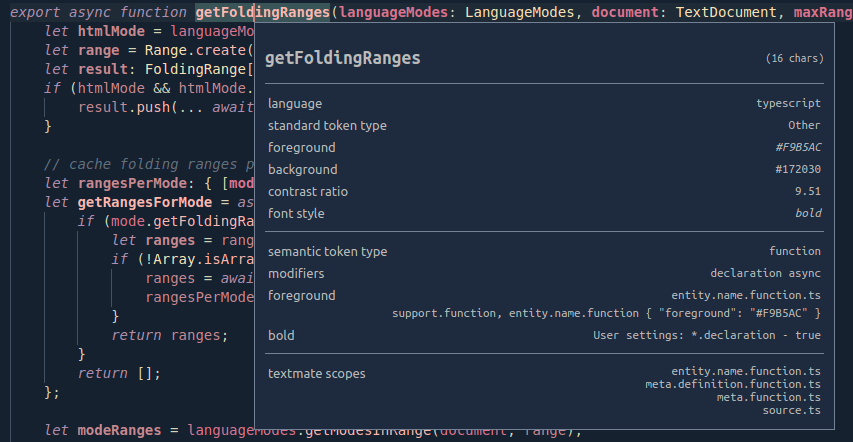
- Press ‘Ctrl+shift+P’ from the keyboard to open VS Code command palette and Search: ‘Inspect Editor Tokens and Scopes‘. As shown in the image below:

- After that, take the mouse cursor on the text or tag, you want to change the colors. And copy the line before the ‘textmate scopes’ and paste it into the Scope section of the JSON source code as shown in the image below.

- After that, paste this line into the Scope section of the JSON source code as shown in the image below.

To change the colors of multiple syntaxes repeat the above steps again.
Support Me!!!
Related Tutorials About VS Code Fonts
How to Change Font Size in Visual Studio Code
Hit The Subscribe Button to Get Daily New video!
Spread the love, Share this Article!
-
Design/Dev -
CSS -
JavaScript -
PHP -
VS Code -
Learn more
Recommended For You!
6 Responses
-
Hi,
Could you show how to change color for multiple items?
Say for instance I want to have different colors for both commands, parameters etc.?
I tried adding your syntax multiple times but It’s generating errors in settings.json.-
Hi, Follow the steps in the video tutorial. It will work properly!
-
Yes, This tutorial will work for you. You can add color code multiple times!
-
Yes, Please watch the video tutorial!
https://www.youtube.com/watch?v=suaqd0te9Pw
-
-
hi,
yes you can do that just copy the scop block to the end of the function.. after that add a comma and paste it again change the name of scop and the color and that’s it.
for example on the HTML page:
“editor.tokenColorCustomizations”: {
“textMateRules”: [
{
“scope”: [
“entity.other.attribute-name.html”,
],
“settings”: {
“foreground”: “#085eaf”,
},
},
{
“scope”: [
“entity.name.tag.html”,
],
“settings”: {
“foreground”: “#08af40”,
},
}
],
},-
Thank you! for the explanation!
-
Leave a Reply
Syntax highlighting determines the color and style of source code displayed in the Visual Studio Code editor. It is responsible for colorizing keywords like if or for in JavaScript differently than strings and comments and variable names.
There are two components to syntax highlighting:
- Tokenization: Breaking text into a list of tokens
- Theming: Using themes or user settings to map the tokens to specific colors and styles
Before diving into the details, a good start is to play with the scope inspector tool and explore what tokens are present in a source file and what theme rules they match to. To see both semantic and syntax token, use a built-in theme (for example, Dark+) on a TypeScript file.
Tokenization
The tokenization of text is about breaking the text into segments and to classify each segment with a token type.
VS Code’s tokenization engine is powered by TextMate grammars. TextMate grammars are a structured collection of regular expressions and are written as a plist (XML) or JSON files. VS Code extensions can contribute grammars through the grammars contribution point.
The TextMate tokenization engine runs in the same process as the renderer and tokens are updated as the user types. Tokens are used for syntax highlighting, but also to classify the source code into areas of comments, strings, regex.
Starting with release 1.43, VS Code also allows extensions to provide tokenization through a Semantic Token Provider. Semantic providers are typically implemented by language servers that have a deeper understanding of the source file and can resolve symbols in the context of the project. For example, a constant variable name can be rendered using constant highlighting throughout the project, not just at the place of its declaration.
Highlighting based on semantic tokens is considered an addition to the TextMate-based syntax highlighting. Semantic highlighting goes on top of the syntax highlighting. And as language servers can take a while to load and analyze a project, semantic token highlighting may appear after a short delay.
This article focuses on the TextMate-based tokenization. Semantic tokenization and theming are explained in the Semantic Highlighting guide.
TextMate grammars
VS Code uses TextMate grammars as the syntax tokenization engine. Invented for the TextMate editor, they have been adopted by many other editors and IDEs due to large number of language bundles created and maintained by the Open Source community.
TextMate grammars rely on Oniguruma regular expressions and are typically written as a plist or JSON. You can find a good introduction to TextMate grammars here, and you can take a look at existing TextMate grammars to learn more about how they work.
TextMate tokens and scopes
Tokens are one or more characters that are part of the same program element. Example tokens include operators such as + and *, variable names such as myVar, or strings such as "my string".
Each token is associated with a scope that defines the context of the token. A scope is a dot separated list of identifiers that specify the context of the current token. The + operation in JavaScript, for example, has the scope keyword.operator.arithmetic.js.
Themes map scopes to colors and styles to provide syntax highlighting. TextMate provides list of common scopes that many themes target. In order to have your grammar as broadly supported as possible, try to build on existing scopes rather than defining new ones.
Scopes nest so that each token is also associated with a list of parent scopes. The example below uses the scope inspector to show the scope hierarchy for the + operator in a simple JavaScript function. The most specific scope is listed at the top, with more general parent scopes listed below:

Parent scope information is also used for theming. When a theme targets a scope, all tokens with that parent scope will be colorized unless the theme also provides a more specific colorization for their individual scopes.
Contributing a basic grammar
VS Code supports json TextMate grammars. These are contributed through the grammars contribution point.
Each grammar contribution specifies: the identifier of the language the grammar applies to, the top-level scope name for the tokens of the grammar, and the relative path to a grammar file. The example below shows a grammar contribution for a fictional abc language:
{
  "contributes": {
    "languages": [
      {
        "id": "abc",
        "extensions": [".abc"]
      }
    ],
    "grammars": [
      {
        "language": "abc",
        "scopeName": "source.abc",
        "path": "./syntaxes/abc.tmGrammar.json"
      }
    ]
  }
}
The grammar file itself consists of a top-level rule. This is typically split into a patterns section that lists the top-level elements of the program and a repository that defines each of the elements. Other rules in the grammar can reference elements from the repository using { "include": "#id" }.
The example abc grammar marks the letters a, b, and c as keywords, and nestings of parens as expressions.
{
  "scopeName": "source.abc",
  "patterns": [{ "include": "#expression" }],
  "repository": {
    "expression": {
      "patterns": [{ "include": "#letter" }, { "include": "#paren-expression" }]
    },
    "letter": {
      "match": "a|b|c",
      "name": "keyword.letter"
    },
    "paren-expression": {
      "begin": "\(",
      "end": "\)",
      "beginCaptures": {
        "0": { "name": "punctuation.paren.open" }
      },
      "endCaptures": {
        "0": { "name": "punctuation.paren.close" }
      },
      "name": "expression.group",
      "patterns": [{ "include": "#expression" }]
    }
  }
}
The grammar engine will try to successively apply the expression rule to all text in the document. For a simple program such as:
a
(
    b
)
x
(
    (
        c
        xyz
    )
)
(
a
The example grammar produces the following scopes (listed left-to-right from most specific to least specific scope):
a               keyword.letter, source.abc
(               punctuation.paren.open, expression.group, source.abc
    b           keyword.letter, expression.group, source.abc
)               punctuation.paren.close, expression.group, source.abc
x               source.abc
(               punctuation.paren.open, expression.group, source.abc
    (           punctuation.paren.open, expression.group, expression.group, source.abc
        c       keyword.letter, expression.group, expression.group, source.abc
        xyz     expression.group, expression.group, source.abc
    )           punctuation.paren.close, expression.group, expression.group, source.abc
)               punctuation.paren.close, expression.group, source.abc
(               punctuation.paren.open, expression.group, source.abc
a               keyword.letter, expression.group, source.abc
Note that text that is not matched by one of the rules, such as the string xyz, is included in the current scope. The last parenthesis at the end of the file is part of the expression.group even if the end rule is not matched, as end-of-document was found before the end rule was.
Embedded languages
If your grammar includes embedded languages within the parent language, such as CSS style blocks in HTML, you can use the embeddedLanguages contribution point to tell VS Code to treat the embedded language as distinct from the parent language. This ensures that bracket matching, commenting, and other basic language features work as expected in the embedded language.
The embeddedLanguages contribution point maps a scope in the embedded language to a top-level language scope. In the example below, any tokens in the meta.embedded.block.javascript scope will be treated as JavaScript content:
{
  "contributes": {
    "grammars": [
      {
        "path": "./syntaxes/abc.tmLanguage.json",
        "scopeName": "source.abc",
        "embeddedLanguages": {
          "meta.embedded.block.javascript": "javascript"
        }
      }
    ]
  }
}
Now if you try to comment code or trigger snippets inside a set of tokens marked meta.embedded.block.javascript, they will get the correct // JavaScript style comment and the correct JavaScript snippets.
Developing a new grammar extension
To quickly create a new grammar extension, use VS Code’s Yeoman templates to run yo code and select the New Language option:

Yeoman will walk you through some basic questions to scaffold the new extension. The important questions for creating a new grammar are:
Language id— A unique identifier for your language.Language name— A human readable name for your language.Scope names— Root TextMate scope name for your grammar.

The generator assumes that you want to define both a new language and a new grammar for that language. If you are creating a grammar for an existing language, just fill these in with your target language’s information and be sure to delete the languages contribution point in the generated package.json.
After answering all the questions, Yeoman will create a new extension with the structure:

Remember, if you are contributing a grammar to a language that VS Code already knows about, be sure to delete the languages contribution point in the generated package.json.
Converting an existing TextMate grammar
yo code can also help convert an existing TextMate grammar to a VS Code extension. Again, start by running yo code and selecting Language extension. When asked for an existing grammar file, give it the full path to either a .tmLanguage or .json TextMate grammar file:

Using YAML to write a grammar
As a grammar grows more complex, it can become difficult to understand and maintain it as json. If you find yourself writing complex regular expressions or needing to add comments to explain aspects of the grammar, consider using yaml to define your grammar instead.
Yaml grammars have the exact same structure as a json based grammar but allow you to use yaml’s more concise syntax, along with features such as multi-line strings and comments.

VS Code can only load json grammars, so yaml based grammars must be converted to json. The js-yaml package and command-line tool makes this easy.
# Install js-yaml as a development only dependency in your extension
$ npm install js-yaml --save-dev

# Use the command-line tool to convert the yaml grammar to json
$ npx js-yaml syntaxes/abc.tmLanguage.yaml > syntaxes/abc.tmLanguage.json
Injection grammars
Injection grammars let you extend an existing grammar. An injection grammar is a regular TextMate grammar that is injected into a specific scope within an existing grammar. Example applications of injection grammars:
- Highlighting keywords such as
TODOin comments. - Add more specific scope information to an existing grammar.
- Adding highlighting for a new language to Markdown fenced code blocks.
Creating a basic injection grammar
Injection grammars are contributed though the package.json just like regular grammars. However, instead of specifying a language, an injection grammar uses injectTo to specify a list of target language scopes to inject the grammar into.
For this example, we’ll create a simple injection grammar that highlights TODO as a keyword in JavaScript comments. To apply our injection grammar in JavaScript files, we use the source.js target language scope in injectTo:
{
  "contributes": {
    "grammars": [
      {
        "path": "./syntaxes/injection.json",
        "scopeName": "todo-comment.injection",
        "injectTo": ["source.js"]
      }
    ]
  }
}
The grammar itself is a standard TextMate grammar except for the top level injectionSelector entry. The injectionSelector is a scope selector that specifies which scopes the injected grammar should be applied in. For our example, we want to highlight the word TODO in all // comments. Using the scope inspector, we find that JavaScript’s double slash comments have the scope comment.line.double-slash, so our injection selector is L:comment.line.double-slash:
{
  "scopeName": "todo-comment.injection",
  "injectionSelector": "L:comment.line.double-slash",
  "patterns": [
    {
      "include": "#todo-keyword"
    }
  ],
  "repository": {
    "todo-keyword": {
      "match": "TODO",
      "name": "keyword.todo"
    }
  }
}
The L: in the injection selector means that the injection is added to the left of existing grammar rules. This basically means that our injected grammar’s rules will be applied before any existing grammar rules.
Embedded languages
Injection grammars can also contribute embedded languages to their parent grammar. Just like with a normal grammar, an injection grammar can use embeddedLanguages to map scopes from the embedded language to a top-level language scope.
An extension that highlights SQL queries in JavaScript strings, for example, may use embeddedLanguages to make sure all token inside the string marked meta.embedded.inline.sql are treated as SQL for basic language features such as bracket matching and snippet selection.
{
  "contributes": {
    "grammars": [
      {
        "path": "./syntaxes/injection.json",
        "scopeName": "sql-string.injection",
        "injectTo": ["source.js"],
        "embeddedLanguages": {
          "meta.embedded.inline.sql": "sql"
        }
      }
    ]
  }
}
Token types and embedded languages
There is one additional complication for injection languages embedded languages: by default, VS Code treats all tokens within a string as string contents and all tokens with a comment as token content. Since features such as bracket matching and auto closing pairs are disabled inside of strings and comments, if the embedded language appears inside a string or comment, these features will also be disabled in the embedded language.
To override this behavior, you can use a meta.embedded.* scope to reset VS Code’s marking of tokens as string or comment content. It is a good idea to always wrap embedded language in a meta.embedded.* scope to make sure VS Code treats the embedded language properly.
If you can’t add a meta.embedded.* scope to your grammar, you can alternatively use tokenTypes in the grammar’s contribution point to map specific scopes to content mode. The tokenTypes section below ensures that any content in the my.sql.template.string scope is treated as source code:
{
  "contributes": {
    "grammars": [
      {
        "path": "./syntaxes/injection.json",
        "scopeName": "sql-string.injection",
        "injectTo": ["source.js"],
        "embeddedLanguages": {
          "my.sql.template.string": "sql"
        },
        "tokenTypes": {
          "my.sql.template.string": "other"
        }
      }
    ]
  }
}
Theming
Theming is about assigning colors and styles to tokens. Theming rules are specified in color themes, but users can customize the theming rules in the user settings.
TextMate theme rules are defined in tokenColors and have the same syntax as regular TextMate themes. Each rule defines a TextMate scope selector and a resulting color and style.
When evaluating the color and style of a token, the current token’s scope is matched against the rule’s selector to find the most specific rule for each style property (foreground, bold, italic, underline)
The Color Theme guide describes how to create a color theme. Theming for semantic tokens is explained in the Semantic Highlighting guide.
Scope inspector
VS Code’s built-in scope inspector tool helps debug grammars and semantic tokens. It displays the scopes for the token and the semantic tokens at the current position in a file, along with metadata about which theme rules apply to that token.
Trigger the scope inspector from the Command Palette with the Developer: Inspect Editor Tokens and Scopes command or create a keybinding for it:
{
  "key": "cmd+alt+shift+i",
  "command": "editor.action.inspectTMScopes"
}

The scope inspector displays the following information:
- The current token.
- Metadata about the token and information about its computed appearance. If you are working with embedded languages, the important entries here
languageandtoken type. - The semantic token section is shown when a semantic token provider is available for the current language and when the current theme supports semantic highlighting. It shows the current semantic token type and modifiers along with the theme rules that match the semantic token type and modifiers.
- The TextMate section shows the scope list for the current TextMate token, with the most specific scope at the top. It also shows the most specific theme rules that match the scopes. This only shows the theme rules that are responsible for the token’s current style, it does not show overridden rules. If semantic tokens are present, the theme rules are only shown when they differ from the rule matching the semantic token.
2/2/2023
Color Themes
Color themes let you modify the colors in Visual Studio Code’s user interface to suit your preferences and work environment.
Selecting the Color Theme
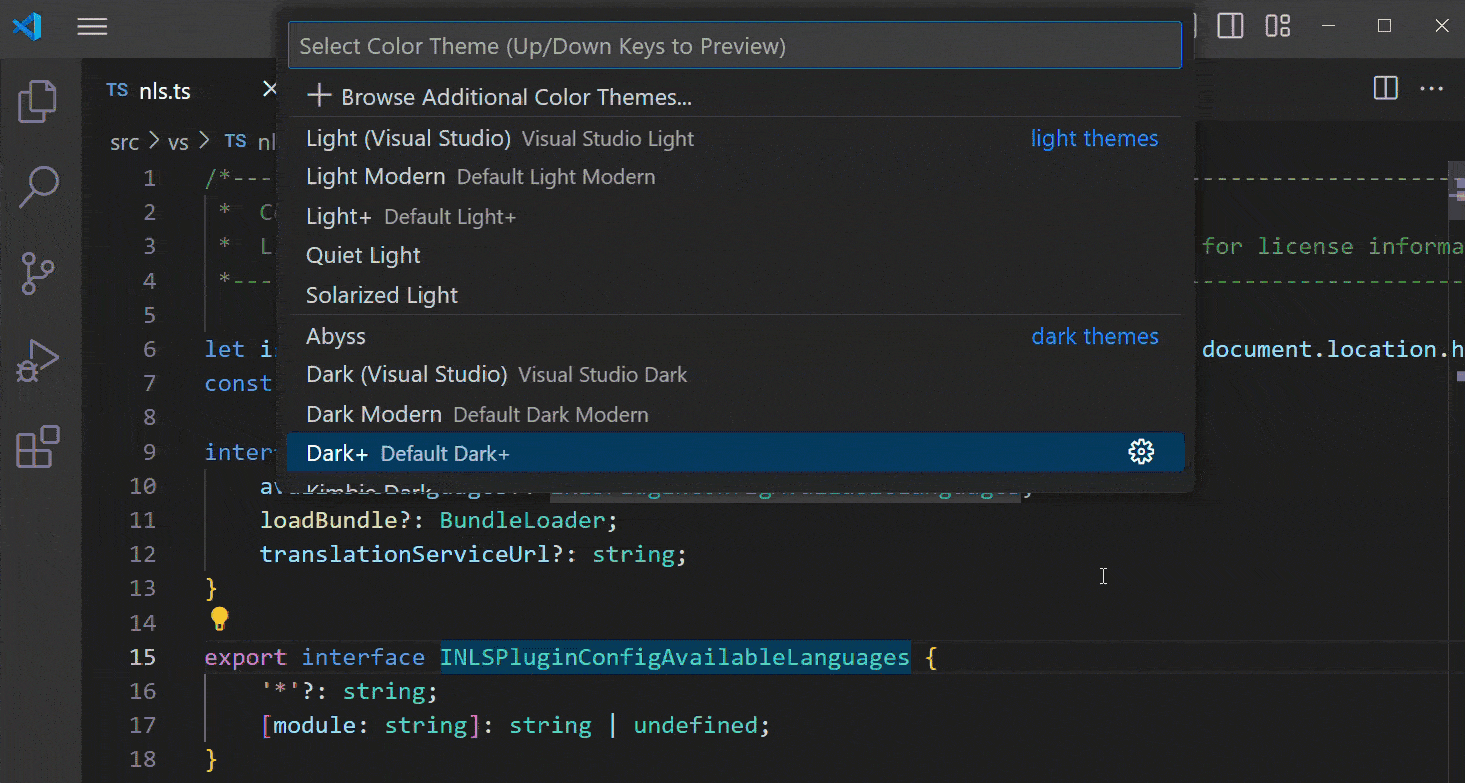
- In VS Code, open the Color Theme picker with File > Preferences > Theme > Color Theme. (Code > Preferences > Theme > Color Theme on macOS).
- You can also use the keyboard shortcut ⌘K ⌘T (Windows, Linux Ctrl+K Ctrl+T) to display the picker.
- Use the cursor keys to preview the colors of the theme.
- Select the theme you want and press Enter.

The active color theme is stored in your user settings (keyboard shortcut ⌘, (Windows, Linux Ctrl+,)).
  // Specifies the color theme used in the workbench.
  "workbench.colorTheme": "Default Dark+"
Tip: By default, the theme is stored in your user settings and applies globally to all workspaces. You can also configure a workspace specific theme. To do so, set a theme in the Workspace settings.
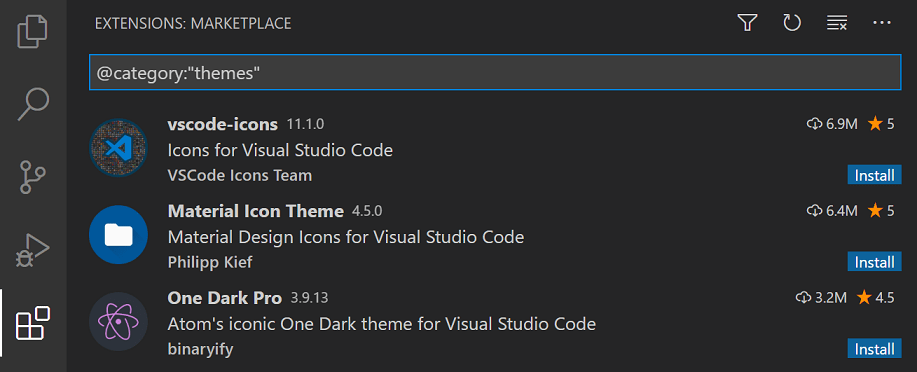
Color Themes from the Marketplace
There are several out-of-the-box color themes in VS Code for you to try.
Many more themes have been uploaded to the VS Code Extension Marketplace by the community. If you find one you want to use, install it and restart VS Code and the new theme will be available.
You can search for themes in the Extensions view (⇧⌘X (Windows, Linux Ctrl+Shift+X)) search box using the @category:"themes" filter.
Auto switch based on OS color scheme
Windows and macOS support light and dark color schemes. There is a setting, window.autoDetectColorScheme, that instructs VS Code to listen to changes to the OS’s color scheme and switch to a matching theme accordingly.
To customize the themes that are used when a color scheme changes, you can set the preferred light, dark, and high contrast themes with the settings:
workbench.preferredLightColorTheme— defaults to «Default Light+»workbench.preferredDarkColorTheme— defaults to «Default Dark+»workbench.preferredHighContrastColorTheme— defaults to «Default High Contrast»workbench.preferredHighContrastLightColorTheme— defaults to «Default High Contrast Light»
Customizing a Color Theme
Workbench colors
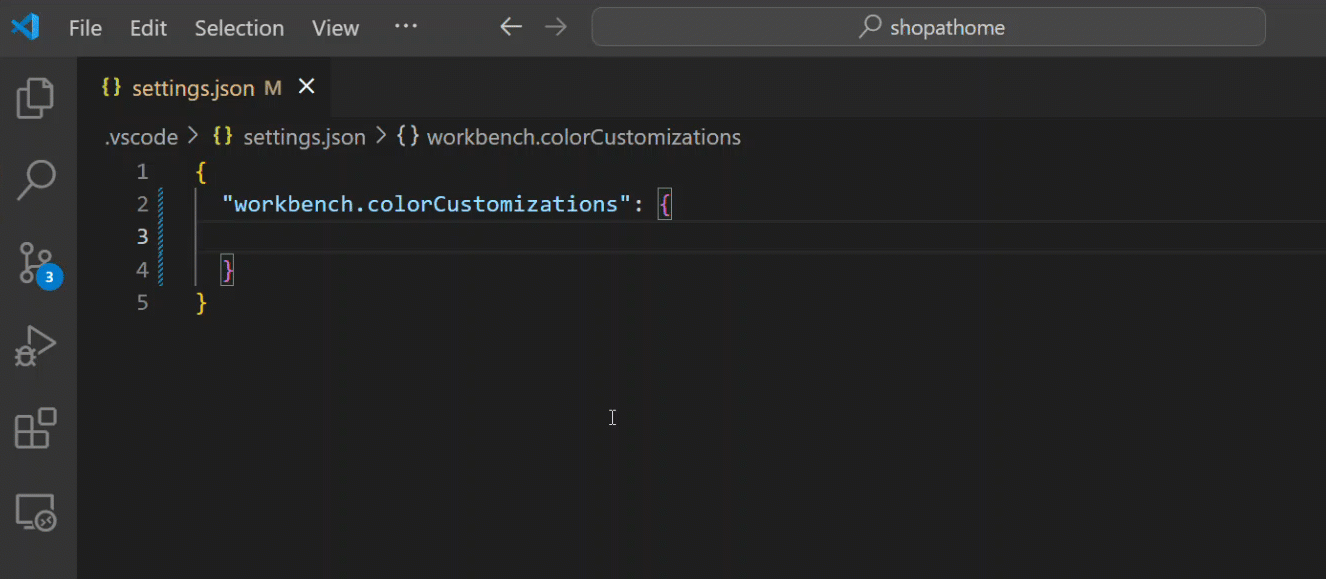
You can customize your active color theme with the workbench.colorCustomizations and editor.tokenColorCustomizations user settings.
To set the colors of VS Code UI elements such as list & trees (File Explorer, suggestions widget), diff editor, Activity Bar, notifications, scroll bar, split view, buttons, and more, use workbench.colorCustomizations.
You can use IntelliSense while setting workbench.colorCustomizations values or, for a list of all customizable colors, see the Theme Color Reference.
To customize a specific theme only, use the following syntax:
"workbench.colorCustomizations": {
    "[Monokai]": {
        "sideBar.background": "#347890"
    }
}
If a customization applies to more than one themes, you can name multiple themes or use * as wildcard at the beginning and the end of the name:
"workbench.colorCustomizations": {
    "[Abyss][Red]": {
        "activityBar.background": "#ff0000"
    },
    "[Monokai*]": {
        "activityBar.background": "#ff0000"
    }
}
Editor syntax highlighting
To tune the editor’s syntax highlighting colors, use editor.tokenColorCustomizations in your user settings settings.json file:
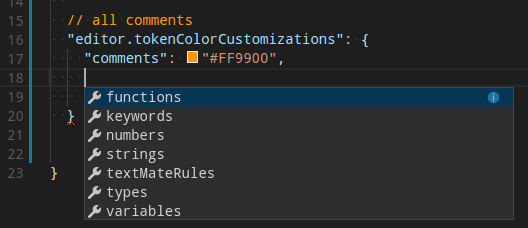
A pre-configured set of syntax tokens (‘comments’, ‘strings’, …) is available for the most common constructs. If you want more, you can do so by directly specifying TextMate theme color rules:
Note: Directly configuring TextMate rules is an advanced skill as you need to understand on how TextMate grammars work. Go to the Color Theme guide for more information.
Again, to customize specific themes, you can do this in one of the following ways:
"editor.tokenColorCustomizations": {
    "[Monokai]": {
        "comments": "#229977"
    },
    "[*Dark*]": {
        "variables": "#229977"
    },
    "[Abyss][Red]": {
        "keywords": "#f00"
    }
}
Editor semantic highlighting
Some languages (currently: TypeScript, JavaScript, Java) provide semantic tokens. Semantic tokens are based on the language service’s symbol understanding and are more accurate than the syntax tokens coming from the TextMate grammars that are driven by regular expressions. The semantic highlighting that is computed from the semantic tokens goes on top of syntax highlighting and can correct and enrich the highlighting as seen in the following example:
The «Tomorrow Night Blue» color theme without semantic highlighting:

The «Tomorrow Night Blue» color theme with semantic highlighting:

Notice the color differences based on language service symbol understanding:
- line 10:
languageModesis colored as a parameter. - line 11:
RangeandPositionare colored as classes anddocumentas a parameter. - line 13:
getFoldingRangesis colored as a function.
The settings editor.semanticHighlighting.enabled serves as the main control on whether semantic highlighting is applied. It can have values true, false, and configuredByTheme.
trueandfalseturn semantic highlighting on or off for all themes.configuredByThemeis the default and lets each theme control whether semantic highlighting is enabled or not. All the themes that ship with VS Code (for example, the «Dark+» default) have semantic highlighting enabled by default.
Users can override the theme setting by:
"editor.semanticTokenColorCustomizations": {
    "[Rouge]": {
        "enabled": true
    }
}
When semantic highlighting is enabled and available for a language, it is up to the theme to configure whether and how semantic tokens are colored. Some semantic tokens are standardized and map to well-established TextMate scopes. If the theme has a coloring rule for these TextMate scopes, the semantic token will be rendered with that color, without the need for any additional coloring rules.
Additional styling rules can be configured by the user in editor.semanticTokenColorCustomizations":
"editor.semanticTokenColorCustomizations": {
    "[Rouge]": {
        "enabled": true,
        "rules": {
            "*.declaration": { "bold": true }
        }
    }
}
To see what semantic tokens are computed and how they are styled, users can use the scope inspector (Developer: Inspect Editor Tokens and Scopes), which displays information for the text at the current cursor position.
If semantic tokens are available for the language at the given position and enabled by theme, the inspect tool shows a section semantic token type. The section shows the semantic token information (type and any number of modifiers) as well as the styling rules that apply.
More information on semantic tokens and styling rule syntax can be found in the Semantic Highlighting Guide.
Creating your own Color Theme
Creating and publishing a theme extension is easy. Customize your colors in your user settings then generate a theme definition file with the Developer: Generate Color Theme From Current Settings command.
VS Code’s Yeoman extension generator will help you generate the rest of the extension.
See the Create a new Color Theme topic in our Extension API section to learn more.
Remove default Color Themes
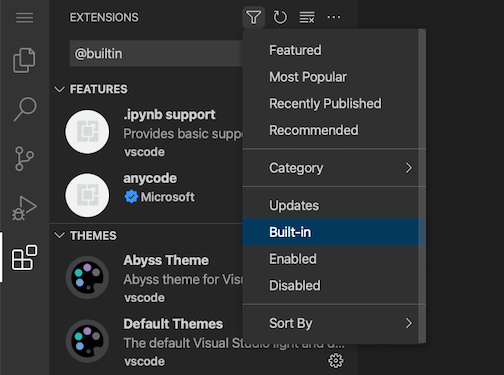
If you’d like to remove some of the default themes shipped with VS Code from the Color Theme picker, you can disable them from the Extensions view (⇧⌘X (Windows, Linux Ctrl+Shift+X)). Click the Filter Extensions button from the top of the Extensions view, select the Built-in option, and you’ll see a THEMES section listing the default themes.
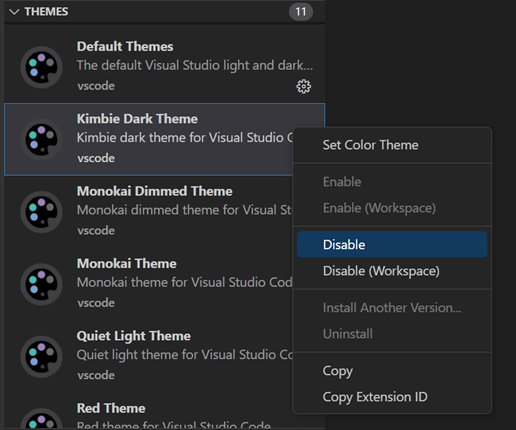
You can disable a built-in theme extension as you would any other VS Code extension with the Disable command on the gear context menu.
File Icon Themes
File icon themes can be contributed by extensions and selected by users as their favorite set of file icons. File icons are shown in the File Explorer and tabbed headings.
Selecting the File Icon Theme
- In VS Code, open the File Icon Theme picker with File > Preferences > Theme > File Icon Theme. (Code > Preferences > Theme > File Icon Theme on macOS).
- You can also use the Preferences: File Icon Theme command from the Command Palette (⇧⌘P (Windows, Linux Ctrl+Shift+P)).
- Use the cursor keys to preview the icons of the theme.
- Select the theme you want and hit Enter.
![]()
By default, the Seti file icon set is used and those are the icons you see in the File Explorer. Once a file icon theme is selected, the selected theme will be remembered and appear again whenever VS Code is restarted. You can disable file icons by selecting None.
VS code ships with two file icon themes; Minimal and Seti. To install more file icon themes, select the Install Additional File Icon Themes item in the file icon theme picker and you’ll see a query for file icon themes (tag:icon-theme) in the Extensions view.
You can also browse the VS Code Marketplace site directly to find available themes.
The active File Icon theme is persisted in your user settings (keyboard shortcut ⌘, (Windows, Linux Ctrl+,)).
  // Specifies the file icon theme used in the workbench.
  "workbench.iconTheme": "vs-seti"
Creating your own File Icon Theme
You can create your own File Icon Theme from icons (preferably SVG), see the File Icon Theme topic in our Extension API section for details.
Next steps
Themes are just one way to customize VS Code. If you’d like to learn more about VS Code customization and extensibility, try these topics:
- Settings — Learn how to configure VS Code to your preferences through user and workspace settings.
- Snippets — Add additional snippets to your favorite language.
- Extension API — Learn about other ways to extend VS Code.
- Color Theme — Color Theme extension API.
- File Icon Theme — File Icon Theme extension API.
2/2/2023
Color Themes
Color themes let you modify the colors in Visual Studio Code’s user interface to suit your preferences and work environment.
Selecting the Color Theme
- In VS Code, open the Color Theme picker with File > Preferences > Theme > Color Theme. (Code > Preferences > Theme > Color Theme on macOS).
- You can also use the keyboard shortcut ⌘K ⌘T (Windows, Linux Ctrl+K Ctrl+T) to display the picker.
- Use the cursor keys to preview the colors of the theme.
- Select the theme you want and press Enter.
The active color theme is stored in your user settings (keyboard shortcut ⌘, (Windows, Linux Ctrl+,)).
  // Specifies the color theme used in the workbench.
  "workbench.colorTheme": "Default Dark+"
Tip: By default, the theme is stored in your user settings and applies globally to all workspaces. You can also configure a workspace specific theme. To do so, set a theme in the Workspace settings.
Color Themes from the Marketplace
There are several out-of-the-box color themes in VS Code for you to try.
Many more themes have been uploaded to the VS Code Extension Marketplace by the community. If you find one you want to use, install it and restart VS Code and the new theme will be available.
You can search for themes in the Extensions view (⇧⌘X (Windows, Linux Ctrl+Shift+X)) search box using the @category:"themes" filter.
Auto switch based on OS color scheme
Windows and macOS support light and dark color schemes. There is a setting, window.autoDetectColorScheme, that instructs VS Code to listen to changes to the OS’s color scheme and switch to a matching theme accordingly.
To customize the themes that are used when a color scheme changes, you can set the preferred light, dark, and high contrast themes with the settings:
workbench.preferredLightColorTheme— defaults to «Default Light+»workbench.preferredDarkColorTheme— defaults to «Default Dark+»workbench.preferredHighContrastColorTheme— defaults to «Default High Contrast»workbench.preferredHighContrastLightColorTheme— defaults to «Default High Contrast Light»
Customizing a Color Theme
Workbench colors
You can customize your active color theme with the workbench.colorCustomizations and editor.tokenColorCustomizations user settings.
To set the colors of VS Code UI elements such as list & trees (File Explorer, suggestions widget), diff editor, Activity Bar, notifications, scroll bar, split view, buttons, and more, use workbench.colorCustomizations.
You can use IntelliSense while setting workbench.colorCustomizations values or, for a list of all customizable colors, see the Theme Color Reference.
To customize a specific theme only, use the following syntax:
"workbench.colorCustomizations": {
    "[Monokai]": {
        "sideBar.background": "#347890"
    }
}
If a customization applies to more than one themes, you can name multiple themes or use * as wildcard at the beginning and the end of the name:
"workbench.colorCustomizations": {
    "[Abyss][Red]": {
        "activityBar.background": "#ff0000"
    },
    "[Monokai*]": {
        "activityBar.background": "#ff0000"
    }
}
Editor syntax highlighting
To tune the editor’s syntax highlighting colors, use editor.tokenColorCustomizations in your user settings settings.json file:
A pre-configured set of syntax tokens (‘comments’, ‘strings’, …) is available for the most common constructs. If you want more, you can do so by directly specifying TextMate theme color rules:
Note: Directly configuring TextMate rules is an advanced skill as you need to understand on how TextMate grammars work. Go to the Color Theme guide for more information.
Again, to customize specific themes, you can do this in one of the following ways:
"editor.tokenColorCustomizations": {
    "[Monokai]": {
        "comments": "#229977"
    },
    "[*Dark*]": {
        "variables": "#229977"
    },
    "[Abyss][Red]": {
        "keywords": "#f00"
    }
}
Editor semantic highlighting
Some languages (currently: TypeScript, JavaScript, Java) provide semantic tokens. Semantic tokens are based on the language service’s symbol understanding and are more accurate than the syntax tokens coming from the TextMate grammars that are driven by regular expressions. The semantic highlighting that is computed from the semantic tokens goes on top of syntax highlighting and can correct and enrich the highlighting as seen in the following example:
The «Tomorrow Night Blue» color theme without semantic highlighting:
The «Tomorrow Night Blue» color theme with semantic highlighting:
Notice the color differences based on language service symbol understanding:
- line 10:
languageModesis colored as a parameter. - line 11:
RangeandPositionare colored as classes anddocumentas a parameter. - line 13:
getFoldingRangesis colored as a function.
The settings editor.semanticHighlighting.enabled serves as the main control on whether semantic highlighting is applied. It can have values true, false, and configuredByTheme.
trueandfalseturn semantic highlighting on or off for all themes.configuredByThemeis the default and lets each theme control whether semantic highlighting is enabled or not. All the themes that ship with VS Code (for example, the «Dark+» default) have semantic highlighting enabled by default.
Users can override the theme setting by:
"editor.semanticTokenColorCustomizations": {
    "[Rouge]": {
        "enabled": true
    }
}
When semantic highlighting is enabled and available for a language, it is up to the theme to configure whether and how semantic tokens are colored. Some semantic tokens are standardized and map to well-established TextMate scopes. If the theme has a coloring rule for these TextMate scopes, the semantic token will be rendered with that color, without the need for any additional coloring rules.
Additional styling rules can be configured by the user in editor.semanticTokenColorCustomizations":
"editor.semanticTokenColorCustomizations": {
    "[Rouge]": {
        "enabled": true,
        "rules": {
            "*.declaration": { "bold": true }
        }
    }
}
To see what semantic tokens are computed and how they are styled, users can use the scope inspector (Developer: Inspect Editor Tokens and Scopes), which displays information for the text at the current cursor position.
If semantic tokens are available for the language at the given position and enabled by theme, the inspect tool shows a section semantic token type. The section shows the semantic token information (type and any number of modifiers) as well as the styling rules that apply.
More information on semantic tokens and styling rule syntax can be found in the Semantic Highlighting Guide.
Creating your own Color Theme
Creating and publishing a theme extension is easy. Customize your colors in your user settings then generate a theme definition file with the Developer: Generate Color Theme From Current Settings command.
VS Code’s Yeoman extension generator will help you generate the rest of the extension.
See the Create a new Color Theme topic in our Extension API section to learn more.
Remove default Color Themes
If you’d like to remove some of the default themes shipped with VS Code from the Color Theme picker, you can disable them from the Extensions view (⇧⌘X (Windows, Linux Ctrl+Shift+X)). Click the Filter Extensions button from the top of the Extensions view, select the Built-in option, and you’ll see a THEMES section listing the default themes.
You can disable a built-in theme extension as you would any other VS Code extension with the Disable command on the gear context menu.
File Icon Themes
File icon themes can be contributed by extensions and selected by users as their favorite set of file icons. File icons are shown in the File Explorer and tabbed headings.
Selecting the File Icon Theme
- In VS Code, open the File Icon Theme picker with File > Preferences > Theme > File Icon Theme. (Code > Preferences > Theme > File Icon Theme on macOS).
- You can also use the Preferences: File Icon Theme command from the Command Palette (⇧⌘P (Windows, Linux Ctrl+Shift+P)).
- Use the cursor keys to preview the icons of the theme.
- Select the theme you want and hit Enter.
![]()
By default, the Seti file icon set is used and those are the icons you see in the File Explorer. Once a file icon theme is selected, the selected theme will be remembered and appear again whenever VS Code is restarted. You can disable file icons by selecting None.
VS code ships with two file icon themes; Minimal and Seti. To install more file icon themes, select the Install Additional File Icon Themes item in the file icon theme picker and you’ll see a query for file icon themes (tag:icon-theme) in the Extensions view.
You can also browse the VS Code Marketplace site directly to find available themes.
The active File Icon theme is persisted in your user settings (keyboard shortcut ⌘, (Windows, Linux Ctrl+,)).
  // Specifies the file icon theme used in the workbench.
  "workbench.iconTheme": "vs-seti"
Creating your own File Icon Theme
You can create your own File Icon Theme from icons (preferably SVG), see the File Icon Theme topic in our Extension API section for details.
Next steps
Themes are just one way to customize VS Code. If you’d like to learn more about VS Code customization and extensibility, try these topics:
- Settings — Learn how to configure VS Code to your preferences through user and workspace settings.
- Snippets — Add additional snippets to your favorite language.
- Extension API — Learn about other ways to extend VS Code.
- Color Theme — Color Theme extension API.
- File Icon Theme — File Icon Theme extension API.
2/2/2023
| Order | Area | TOCTitle | ContentId | PageTitle | DateApproved | MetaDescription |
|---|---|---|---|---|---|---|
|
5 |
getstarted |
Themes |
CAC88BC7-90A5-4384-8A05-2187117C0F72 |
Visual Studio Code Themes |
2/2/2023 |
Changing the color theme in Visual Studio Code. You can use color themes provided by VS Code, the community or create your own new themes. |
Color Themes
Color themes let you modify the colors in Visual Studio Code’s user interface to suit your preferences and work environment.

Selecting the Color Theme
- In VS Code, open the Color Theme picker with File > Preferences > Theme > Color Theme. (Code > Preferences > Theme > Color Theme on macOS).
- You can also use the keyboard shortcut
kb(workbench.action.selectTheme)to display the picker. - Use the cursor keys to preview the colors of the theme.
- Select the theme you want and press
kbstyle(Enter).

The active color theme is stored in your user settings (keyboard shortcut kb(workbench.action.openSettings)).
  // Specifies the color theme used in the workbench.
  "workbench.colorTheme": "Default Dark+"
Tip: By default, the theme is stored in your user settings and applies globally to all workspaces. You can also configure a workspace specific theme. To do so, set a theme in the Workspace settings.
Color Themes from the Marketplace
There are several out-of-the-box color themes in VS Code for you to try.
Many more themes have been uploaded to the VS Code Extension Marketplace by the community. If you find one you want to use, install it and restart VS Code and the new theme will be available.
You can search for themes in the Extensions view (kb(workbench.view.extensions)) search box using the @category:"themes" filter.

Auto switch based on OS color scheme
Windows and macOS support light and dark color schemes. There is a setting, window.autoDetectColorScheme, that instructs VS Code to listen to changes to the OS’s color scheme and switch to a matching theme accordingly.
To customize the themes that are used when a color scheme changes, you can set the preferred light, dark, and high contrast themes with the settings:
workbench.preferredLightColorTheme— defaults to «Default Light+»workbench.preferredDarkColorTheme— defaults to «Default Dark+»workbench.preferredHighContrastColorTheme— defaults to «Default High Contrast»workbench.preferredHighContrastLightColorTheme— defaults to «Default High Contrast Light»
Customizing a Color Theme
Workbench colors
You can customize your active color theme with the workbench.colorCustomizations and editor.tokenColorCustomizations user settings.
To set the colors of VS Code UI elements such as list & trees (File Explorer, suggestions widget), diff editor, Activity Bar, notifications, scroll bar, split view, buttons, and more, use workbench.colorCustomizations.

You can use IntelliSense while setting workbench.colorCustomizations values or, for a list of all customizable colors, see the Theme Color Reference.
To customize a specific theme only, use the following syntax:
"workbench.colorCustomizations": {
    "[Monokai]": {
        "sideBar.background": "#347890"
    }
}
If a customization applies to more than one themes, you can name multiple themes or use * as wildcard at the beginning and the end of the name:
"workbench.colorCustomizations": {
    "[Abyss][Red]": {
        "activityBar.background": "#ff0000"
    },
    "[Monokai*]": {
        "activityBar.background": "#ff0000"
    }
}
Editor syntax highlighting
To tune the editor’s syntax highlighting colors, use editor.tokenColorCustomizations in your user settings settings.json file:

A pre-configured set of syntax tokens (‘comments’, ‘strings’, …) is available for the most common constructs. If you want more, you can do so by directly specifying TextMate theme color rules:

Note: Directly configuring TextMate rules is an advanced skill as you need to understand on how TextMate grammars work. Go to the Color Theme guide for more information.
Again, to customize specific themes, you can do this in one of the following ways:
"editor.tokenColorCustomizations": {
    "[Monokai]": {
        "comments": "#229977"
    },
    "[*Dark*]": {
        "variables": "#229977"
    },
    "[Abyss][Red]": {
        "keywords": "#f00"
    }
}
Editor semantic highlighting
Some languages (currently: TypeScript, JavaScript, Java) provide semantic tokens. Semantic tokens are based on the language service’s symbol understanding and are more accurate than the syntax tokens coming from the TextMate grammars that are driven by regular expressions. The semantic highlighting that is computed from the semantic tokens goes on top of syntax highlighting and can correct and enrich the highlighting as seen in the following example:
The «Tomorrow Night Blue» color theme without semantic highlighting:

The «Tomorrow Night Blue» color theme with semantic highlighting:

Notice the color differences based on language service symbol understanding:
- line 10:
languageModesis colored as a parameter. - line 11:
RangeandPositionare colored as classes anddocumentas a parameter. - line 13:
getFoldingRangesis colored as a function.
The settings editor.semanticHighlighting.enabled serves as the main control on whether semantic highlighting is applied. It can have values true, false, and configuredByTheme.
trueandfalseturn semantic highlighting on or off for all themes.configuredByThemeis the default and lets each theme control whether semantic highlighting is enabled or not. All the themes that ship with VS Code (for example, the «Dark+» default) have semantic highlighting enabled by default.
Users can override the theme setting by:
"editor.semanticTokenColorCustomizations": {
    "[Rouge]": {
        "enabled": true
    }
}
When semantic highlighting is enabled and available for a language, it is up to the theme to configure whether and how semantic tokens are colored. Some semantic tokens are standardized and map to well-established TextMate scopes. If the theme has a coloring rule for these TextMate scopes, the semantic token will be rendered with that color, without the need for any additional coloring rules.
Additional styling rules can be configured by the user in editor.semanticTokenColorCustomizations":
"editor.semanticTokenColorCustomizations": {
    "[Rouge]": {
        "enabled": true,
        "rules": {
            "*.declaration": { "bold": true }
        }
    }
}
To see what semantic tokens are computed and how they are styled, users can use the scope inspector (Developer: Inspect Editor Tokens and Scopes), which displays information for the text at the current cursor position.

If semantic tokens are available for the language at the given position and enabled by theme, the inspect tool shows a section semantic token type. The section shows the semantic token information (type and any number of modifiers) as well as the styling rules that apply.
More information on semantic tokens and styling rule syntax can be found in the Semantic Highlighting Guide.
Creating your own Color Theme
Creating and publishing a theme extension is easy. Customize your colors in your user settings then generate a theme definition file with the Developer: Generate Color Theme From Current Settings command.
VS Code’s Yeoman extension generator will help you generate the rest of the extension.
See the Create a new Color Theme topic in our Extension API section to learn more.
Remove default Color Themes
If you’d like to remove some of the default themes shipped with VS Code from the Color Theme picker, you can disable them from the Extensions view (kb(workbench.view.extensions)). Click the Filter Extensions button from the top of the Extensions view, select the Built-in option, and you’ll see a THEMES section listing the default themes.

You can disable a built-in theme extension as you would any other VS Code extension with the Disable command on the gear context menu.

File Icon Themes
File icon themes can be contributed by extensions and selected by users as their favorite set of file icons. File icons are shown in the File Explorer and tabbed headings.
Selecting the File Icon Theme
- In VS Code, open the File Icon Theme picker with File > Preferences > Theme > File Icon Theme. (Code > Preferences > Theme > File Icon Theme on macOS).
- You can also use the Preferences: File Icon Theme command from the Command Palette (
kb(workbench.action.showCommands)). - Use the cursor keys to preview the icons of the theme.
- Select the theme you want and hit
kbstyle(Enter).
![]()
By default, the Seti file icon set is used and those are the icons you see in the File Explorer. Once a file icon theme is selected, the selected theme will be remembered and appear again whenever VS Code is restarted. You can disable file icons by selecting None.
VS code ships with two file icon themes; Minimal and Seti. To install more file icon themes, select the Install Additional File Icon Themes item in the file icon theme picker and you’ll see a query for file icon themes (tag:icon-theme) in the Extensions view.
You can also browse the VS Code Marketplace site directly to find available themes.
The active File Icon theme is persisted in your user settings (keyboard shortcut kb(workbench.action.openSettings)).
  // Specifies the file icon theme used in the workbench.
  "workbench.iconTheme": "vs-seti"
Creating your own File Icon Theme
You can create your own File Icon Theme from icons (preferably SVG), see the File Icon Theme topic in our Extension API section for details.
Next steps
Themes are just one way to customize VS Code. If you’d like to learn more about VS Code customization and extensibility, try these topics:
- Settings — Learn how to configure VS Code to your preferences through user and workspace settings.
- Snippets — Add additional snippets to your favorite language.
- Extension API — Learn about other ways to extend VS Code.
- Color Theme — Color Theme extension API.
- File Icon Theme — File Icon Theme extension API.