by Milan Stanojevic
Milan has been enthusiastic about technology ever since his childhood days, and this led him to take interest in all PC-related technologies. He’s a PC enthusiast and he… read more
Updated on October 11, 2021
- Google Chrome is one of the most popular web browsers on the market but unfortunately, some users report getting a Profile error message when trying to create their own profile.
- If you want to completely fix this and create your Chrome profile, make sure to read our article and follow our recommendations.
- There are several possible causes for this problem, you’ll see below suggestions for each of them.

XINSTALL BY CLICKING THE DOWNLOAD FILE
This software will keep your drivers up and running, thus keeping you safe from common computer errors and hardware failure. Check all your drivers now in 3 easy steps:
- Download DriverFix (verified download file).
- Click Start Scan to find all problematic drivers.
- Click Update Drivers to get new versions and avoid system malfunctionings.
- DriverFix has been downloaded by 0 readers this month.
Google Chrome is one of the most popular web browsers on the market. It offers a wide range of features and also allows you to create your own profile.
By having your own profile, you can save your history, passwords, and extensions and sync Chrome across multiple devices.
While this is a great feature, some users report Profile error occurred messages in Chrome, and today we’re going to show you how to fix it.
How can I fix the Profile error occurred message in Chrome?
1. End all Chrome processes
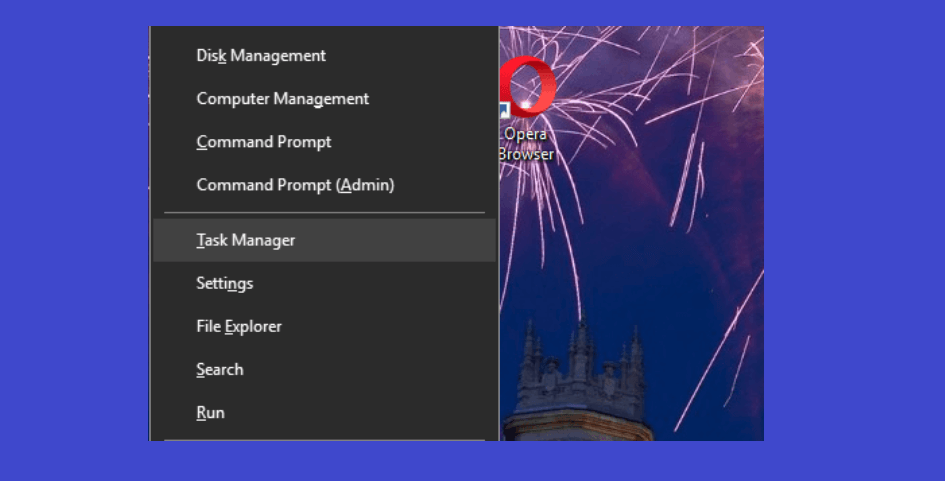
- Open Task Manager. You can do that quickly by pressing Ctrl + Shift + Esc.
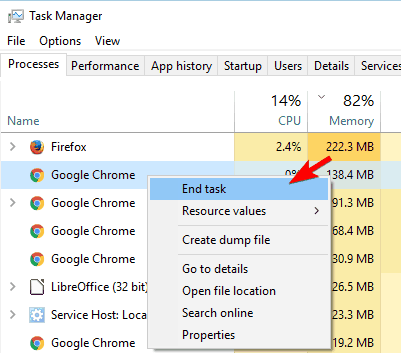
- When Task Manager opens, navigate to the Processes tab.
- Locate a Google Chrome process, right-click it and choose End Task.

- Repeat the step from above to close all Google Chrome processes.
- After doing that, close Task Manager and start Google Chrome again.
A few users report that closing all Chrome processes fixed the problem for them, so be sure to try this solution.
2. Restart your PC
Sometimes, the simplest solutions are the most effective. According to users, you can fix the Profile error occurred message by restarting your PC. After it does, Chrome should be able to start without any issues or errors.
Sometimes. minor glitches can occur but you can usually fix them with a single restart. Keep in mind that this isn’t a universal solution, so it might not work for every user.
3. Disable the antivirus software
Antivirus is one of the most important applications that you have on your PC. Unfortunately, some antivirus tools can interfere with your Google Chrome profile and cause the Profile error occurred message to appear. To fix this issue, disable your antivirus software.
If you are using Windows Defender, you can manually disable it from the Windows Security Settings. This won’t uninstall the Antivirus but temporarily pause all its actions.
To disable Windows Defender:
1. Type Windows Security in the Start search bar and open the panel.
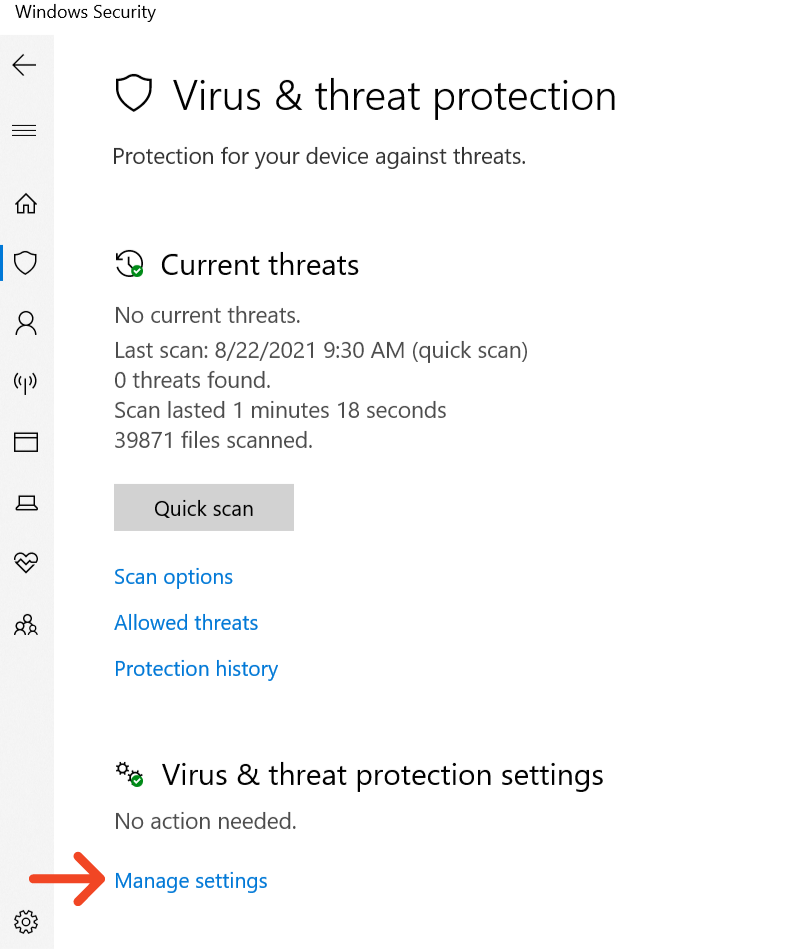
2. Click on the Virus and Threat Protection icon.

3. Select Manage Settings.
4. Click the button under Real-time protection to turn it off.
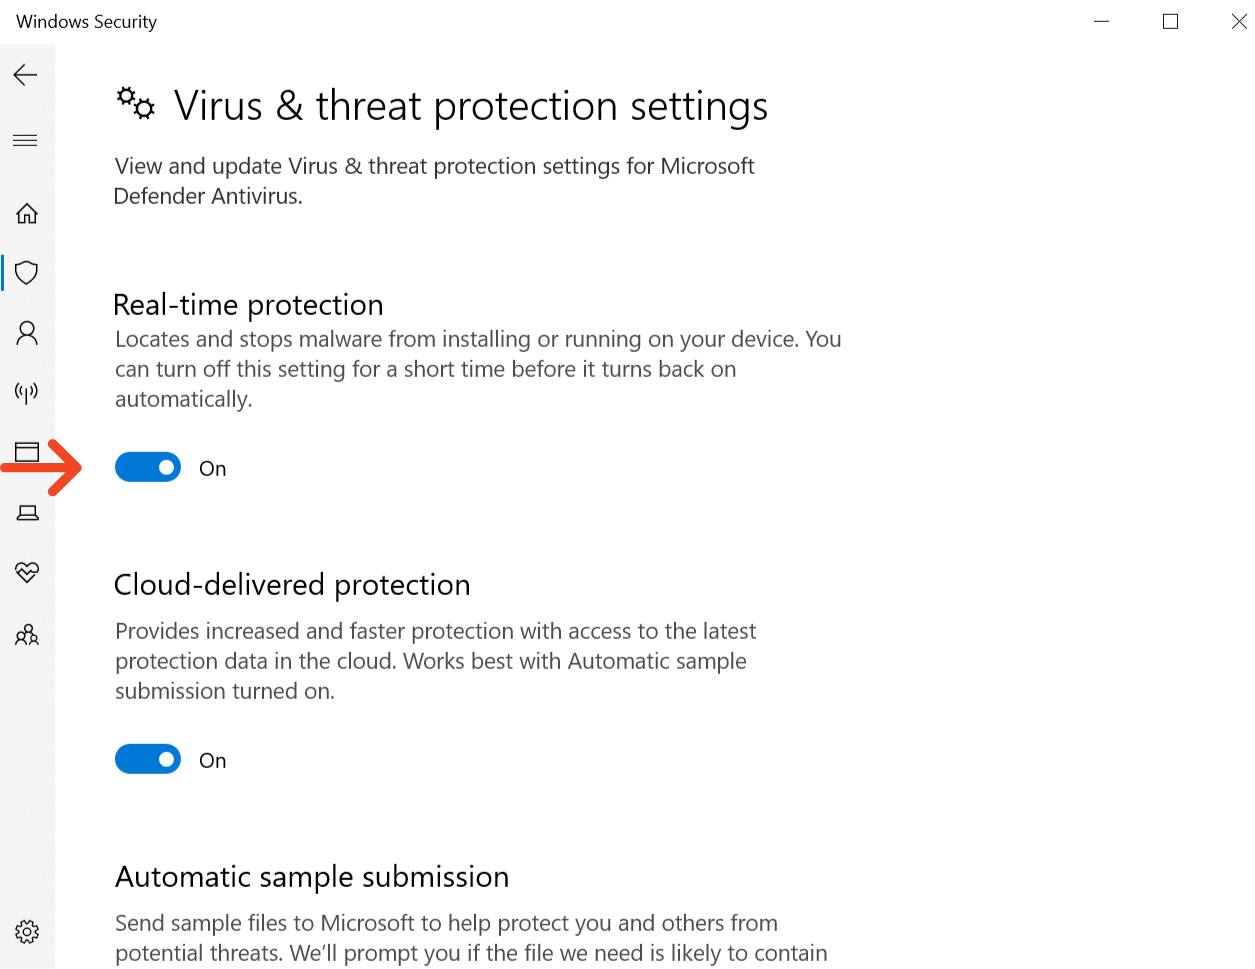
A dialog box will ask if you want to make these changes, select Yes.
Now your Antivirus is disabled. To turn it back on, just click the Real-time protection button again. At this point, your Chrome Profile error should be remediated, unless it is caused by something else.
If that doesn’t help, you might want to remove your antivirus software and check if that solves the problem. If you decide to remove your antivirus, be sure to use a dedicated removal tool to remove it completely.
Such program will remove any unwanted software from your device, including the bundled programs.
If you want to completely uninstall applications, including stray files, and get rid of annoying toolbars and plug-ins then uninstaller software is the best choice.
⇒ Get Iobit Uninstaller
4. Remove the AVG Toolbar
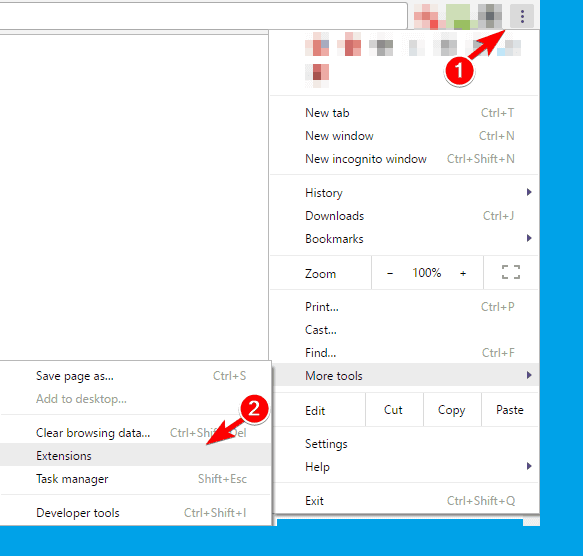
- Open Chrome and click the Menu button up top and choose More tools > Extensions.
- Locate AVG Toolbar in the list of extensions and click the trash can icon to remove it.


AVG Antivirus can cause problems with Chrome to appear. This antivirus tends to install AVG Toolbar into your browser so it can better protect you from online threats. This is a completely optional feature and even without it, AVG will provide you with almost the same protection.
As for the Profile error occurred message, users report that it occurs if you don’t completely remove the AVG Toolbar from your PC. According to users, they fixed the issue by removing avgtpx64.sys from Windows/system32/drivers directory. After doing that, the problem should be resolved.
Some PC issues are hard to tackle, especially when it comes to corrupted repositories or missing Windows files. If you are having troubles fixing an error, your system may be partially broken.
We recommend installing Restoro, a tool that will scan your machine and identify what the fault is.
Click here to download and start repairing.
If you feel uncomfortable removing files from the Windows folder, you can fix this problem by using the AVG Removal Tool. Many antivirus companies, including AVG, offer dedicated tools that remove any leftover files and registry entries from your PC.
If you still have problems with AVG, simply download this tool from AVG’s website and run it on your PC. The tool will completely remove all files associated with AVG. After doing that, the problem with Google Chrome should be fixed.
5. Delete Web Data file
- Close Google Chrome completely.
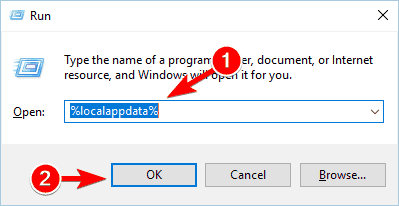
- Press Windows Key + R and enter %localappdata%. Press Enter or click OK.
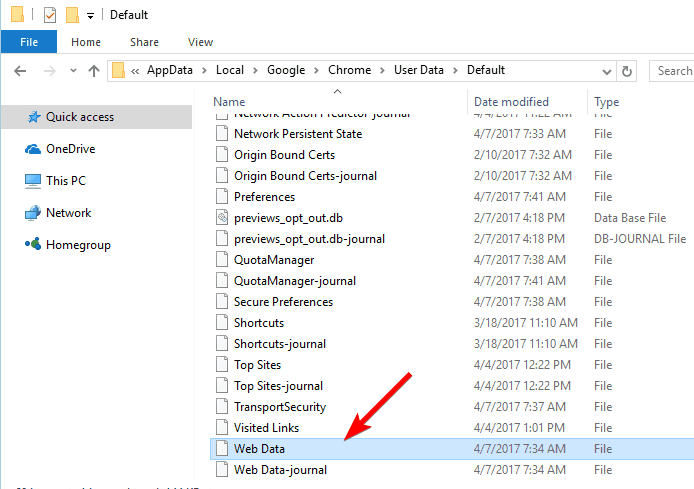
- When the Local folder opens, navigate to the GoogleChromeUser DataDefault folder.
- Locate the Web Data file and delete it.

- Optional: Delete Web Data-Journal file.
- Optional: Delete the Local State file.
After deleting the files, start Google Chrome again and check to see if the issue is resolved.
6. Delete your Google Chrome profile
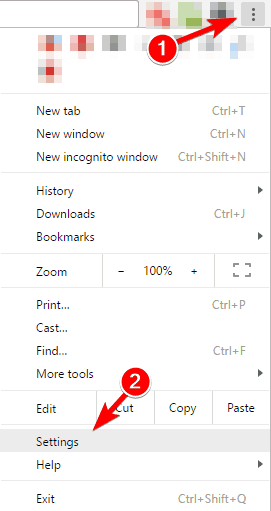
- Open Google Chrome and click the Menu button and choose Settings.
- Scroll down to the People section.
- Select your profile and click the Remove button.

- A confirmation message will appear. Click the Remove button to confirm.
- After doing that, restart Chrome. Now, create your Chrome profile again and check if that solves the problem.

All your information is stored in the cloud, so even if you remove your Google profile you won’t lose any important information.
After creating a new profile, all your data such as browsing history, extensions, and passwords will be restored. A few users suggest deleting all additional Google profiles except your own, so be sure to try that as well by following the instructions from above.
7. Rename the default folder
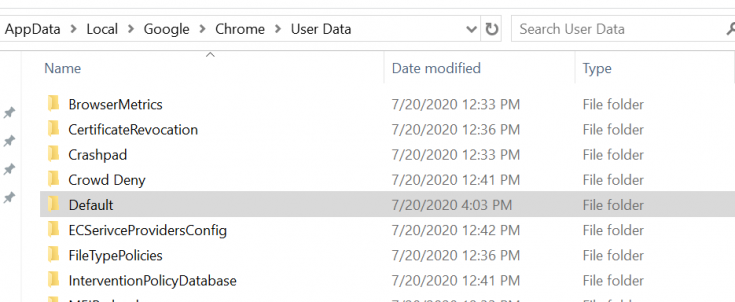
- Make sure Chrome is completely closed.
- Navigate to the
C:Usersyour_usernameAppDataLocalGoogleChromeUser Datafolder. For more information on how to navigate to that directory, check Solution 4. - In the User Data folder, you should see the Default folder.
- Right-click the folder and choose Rename from the menu.
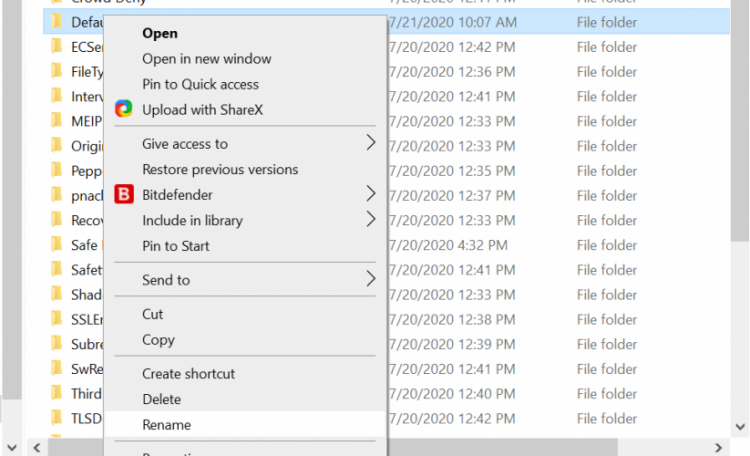
- Rename the folder to Default.backup or use any other name.
- Start Chrome again and check if the problem is resolved.
This is a simple solution and several users reported that it works for them, so feel free to try it out.
A few users also suggested creating a new Default folder and moving the following items from the old Default folder to a new one:
- Preferences file
- Bookmarks file
- Extensions folder
- Local Storage folder
- History
To find which of these components is corrupted, simply start Chrome after copying one list entry to the new Defaults folder. If you see an error message, it means that the component that was copied last is causing the problem.
8. Avoid using certain software
If you need to remove junk files, CCleaner is probably one of the best tools. This application can also remove cache and browsing history for all your browsers in a single click, which makes it rather useful.
Despite its usefulness, it seems that CCleaner can cause certain problems with Google Chrome.
According to users, the Profile error occurred message can be caused by CCleaner. To fix the problem, refrain from using CCleaner to clean Chrome’s history and cache. In addition, try using a different cleaning tool or simply uncheck the option to clean Chrome’s history.
If that doesn’t work, you might want to update CCleaner to the latest version and check if that solves the issue.
9. Update Java
According to users, you can fix the Profile error occurred message with ease simply by updating Java to the latest version. If you have Java installed, you should see a notification in the bottom right corner saying that an update is available.
Click the notification and follow the instructions on the screen to update it. Alternatively, you can visit Java’s website and download the latest version. If you don’t have Java installed this solution won’t apply to you.
10. Check if you’re using the latest version of Chrome
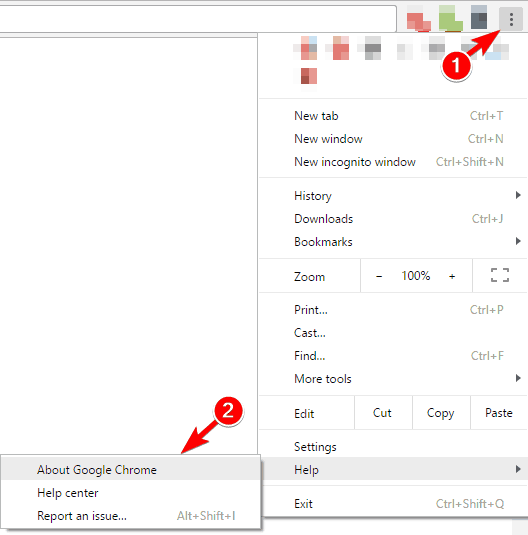
- Click the Menu button in the top right corner and choose Help > About Google Chrome.
- A new tab will now appear showing you the current version of Chrome. The application will automatically check for updates and download them.
- Be sure to check if you’re using the stable version of Google Chrome. If about tab says Chrome Beta or Chrome Canary, be sure to download and install the latest stable version instead.
11. Reinstall Google Chrome
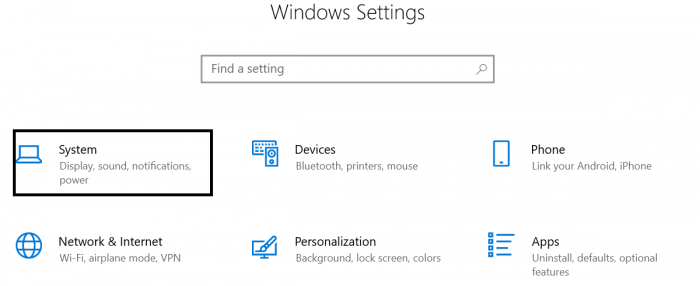
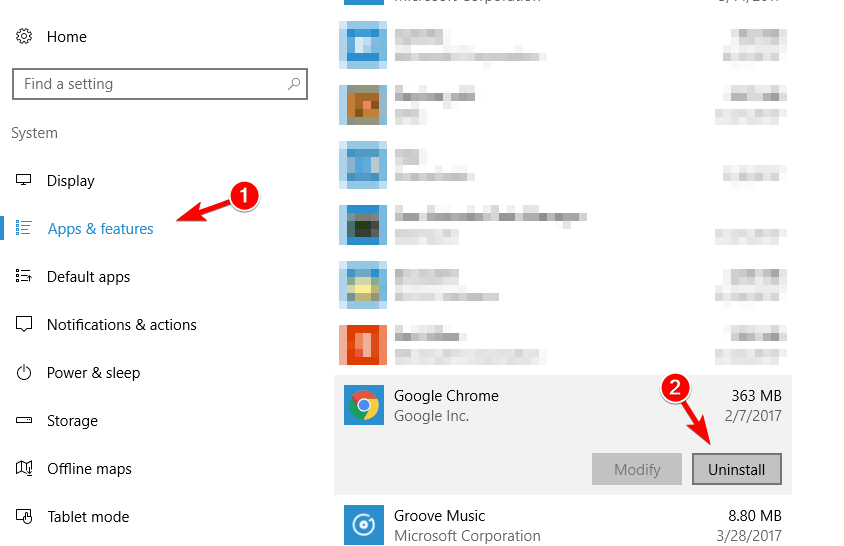
- Press Windows Key + I to open the Settings app.
- Go to System section.
- Click on Apps & features in the left pane. List of installed applications will appear in the right pane. Locate Google Chrome on the list, select it and click on Uninstall button.

- Follow the instructions on the screen to remove Chrome.
Alternatively, you can use Programs and Features to remove Chrome. To do that, follow these steps:
- Press Windows Key + S and enter programs. Choose Programs and Features from the menu.

- When Programs and Features window opens, locate Google Chrome on the list of installed applications and double-click it.

- Follow the instructions on the screen to remove Google Chrome.


After removing Chrome, you just need to install the latest version.
A few users reported that they removed the Google folder from C:Usersyour_usernameAppDataLocal directory, so you might want to do that as well.
If you want to completely remove Chrome, along with its all associated files and registry entries, be sure to use an uninstaller tool such as Revo Uninstaller or similar.
Keep in mind that removing all these files isn’t mandatory, but if a regular reinstall doesn’t fix the problem, be sure to remove all files associated with Google Chrome and then try again.
12. Create a new Windows account

- Open the Settings app and go to the Accounts section.
- Choose Family & other people from the left pane. Now click on Add someone else to this PC in Other people section.
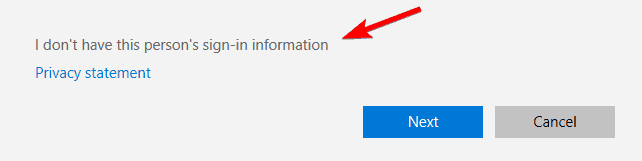
- Now click I don’t have this person’s sign-in information.

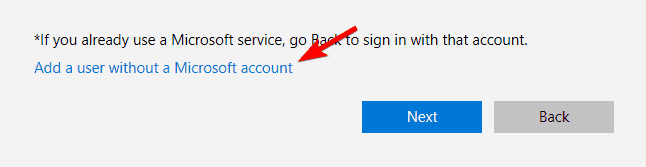
- Click Add a user without a Microsoft account.

- Enter a desired user name for the new account and click Next.

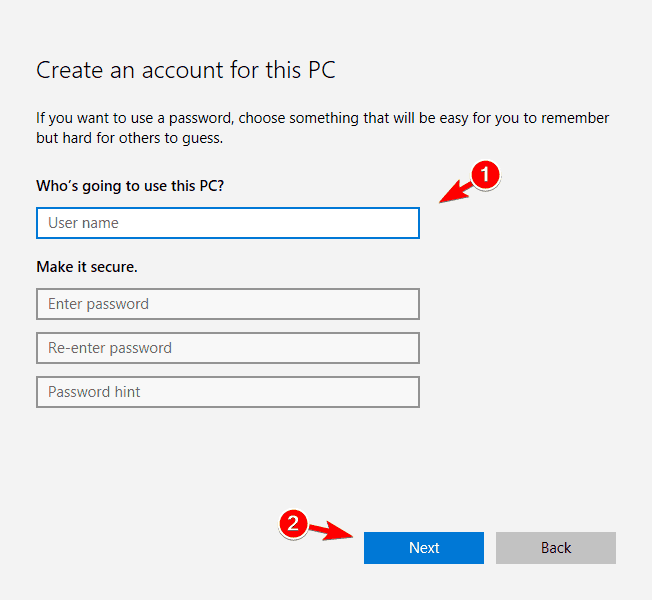
After creating a new user account, switch to it and try running Chrome with it. If the problem doesn’t appear on a new account, you might have to transfer your personal files to it and use it as your main account. This isn’t the best solution since it requires you to move your files, but if all other solutions don’t work, you might want to try this one.
We hope that you’ll find at least one of these solutions useful and that it will help you create your Chrome profile.
If you have some comments, suggestions, or maybe know some other solutions, reach us in the comments below, we would love to hear your opinion.
![]()
Newsletter
Using instance profiles
Use an instance profile to pass an IAM role to an EC2 instance. For more information, see IAM roles for Amazon EC2 in the Amazon EC2 User Guide for Linux Instances.
Managing instance profiles (console)
If you use the AWS Management Console to create a role for Amazon EC2, the console automatically creates an instance profile and gives it the same name as the role. When you then use the Amazon EC2 console to launch an instance with an IAM role, you can select a role to associate with the instance. In the console, the list that’s displayed is actually a list of instance profile names. The console does not create an instance profile for a role that is not associated with Amazon EC2.
You can use the AWS Management Console to delete IAM roles and instance profiles for Amazon EC2 if the role and the instance profile have the same name. To learn more about deleting instance profiles, see Deleting roles or instance profiles.
Managing instance profiles (AWS CLI or AWS API)
If you manage your roles from the AWS CLI or the AWS API, you create roles and instance profiles as separate actions. Because roles and instance profiles can have different names, you must know the names of your instance profiles as well as the names of roles they contain. That way you can choose the correct instance profile when you launch an EC2 instance.
You can attach tags to your IAM resources, including instance profiles, to identify, organize, and control access to them. You can tag instance profiles only when you use the AWS CLI or AWS API.
An instance profile can contain only one IAM role, although a role can be included in multiple instance profiles. This limit of one role per instance profile cannot be increased. You can remove the existing role and then add a different role to an instance profile. You must then wait for the change to appear across all of AWS because of eventual consistency . To force the change, you must disassociate the instance profile and then associate the instance profile, or you can stop your instance and then restart it.
Managing instance profiles (AWS CLI)
You can use the following AWS CLI commands to work with instance profiles in an AWS account.
Источник
Troubleshoot common issues
This article describes how to troubleshoot common Profile Management issues.
Slow logons
If your users encounter slow logons, follow these steps to troubleshoot:
Check the profile load time in the Logon Duration panel of Citrix Director. If it’s substantially longer than expected, the slow logon is caused by loading user profiles.
Check the profile processing time in the Citrix Profile Management log file.
In the Profile Management log file at C:WindowsSystem32Log FilesUser Profile Manager , locate the entry starting with DispatchLogonLogoff . The following example shows that the logon processing time is 10.22 seconds.
DispatchLogonLogoff: ———- Finished logon processing successfully in [s]: .
Make sure that you’ve applied the recommended Profile Management policies.
Follow the recommendations for improving logon performance in Improve user logon performance.
Contact Citrix Technical Support.
If slow logons persist, contact Citrix Technical Support for further assistance. For more information, see Contact Citrix Technical Support.
Check that profiles are being streamed
If you have enabled streamed user profiles and want to verify that this feature is being applied to a user’s profile, do the following:
Check the following type of entry in the Profile Management log file:
pre codeblock 2010-03-16;16:16:35.369;INFORMATION;;;;1140;ReadPolicy: Configuration value read from policy: PSEnabled=
The last item must be set to PSEnabled= if the feature is enabled.
Check the following entry for the user in the Profile Management log file:
pre codeblock 2010-03-16;20:17:30.401;INFORMATION; ; ;2;2364;ProcessLogon: User logging on with Streamed Profile support enabled.
If streamed user profiles aren’t being applied, the item reads ProcessLogon: User logging on with Streamed Profile support disabled.
Determine which policies are in force
Use the UPMSettings.ini file to determine the Profile Management policies that are being applied. This file is present in the root folder of each Citrix user profile in the user store. Examining this file might be more convenient than using the Resultant Set of Policy (RSoP). Doing so especially if you use a mixture of GPOs and .ini file settings to determine policies.
Use the UPMFRSettings.ini file to determine which profile folders aren’t processed because they are on an exclusion list. The UPMFRSettings.ini file is also present in the root folder.
Exclude corrupt profile data
If a user profile is corrupt and you’re confident the problem lies with a particular file or folder, exclude it from the synchronization process. The way is to add the file or folder to the exclusion list.
Clean connections to registry entries
In some scenarios (not just those involving Profile Management), connections to registry profile data are preserved after users log off. This preservation can result in slow logoffs or incomplete termination of user sessions. The User Profile Hive Cleanup ( UPHClean ) tool from Microsoft can help resolve these scenarios.
Delete local profiles
Microsoft Delprof.exe and Sepago Delprof2 are tools that help you delete user profiles.
Delete locked, cached profiles
If you use VMware software to create virtual desktops, but users’ cached profiles are locked and cannot be deleted, see Profile Management and VMware for troubleshooting information.
Identify where profiles are stored
Diagnosing profile issues can involve locating where the files in a user’s profiles are stored. The following procedure provides a quick way to identify where profiles are stored.
- In Event Viewer, click Application in the left pane.
- Under Source in the right pane, locate the Citrix Profile Management event of interest and double-click it.
- The path to the user store associated with the event is displayed as a link on the General tab.
- Follow the link to browse the user store if you want to explore the files.
Check servers
To determine whether a server is processing a user’s logons and logoffs correctly, check the file called PmCompatibility.ini in the user’s profile in the user store. The file is present in the profile’s root folder. The last entry in the file is the name of the server from which the user last logged off. For example, if the server runs Profile Management 5.0, the entry would be:
Roll back
To roll back to earlier versions of Profile Management, run del /s from the command line on the file server that hosts the user store. The command deletes the PmCompatibility.ini file from each profile. For example, if the local path to the user store is D:UpmProfiles, run:
After the command has completed, users can log on to computers running the earlier version and receive their profile from the user store.
Profile Management running on VMware creates multiple profiles
Replicated VMware folders are created in user profiles. The replicates have incremented folder names (000, 001, 002, and so on). For more information about this issue and how to resolve it, see Knowledge Center article CTX122501.
Long logon times With Novell eDirectory
When users log on to an environment having Citrix products and Novell eDirectory, long logon times might be experienced and errors written to the event log. Sessions might become unresponsive for up to 30 seconds at the Applying your personal settings stage. For more information about this issue and how to resolve it, see Knowledge Center article CTX118595.
Excluded folders in user store
Excluded folders appear in the user store. This issue is expected and no corrective action is required. Folders on an exclusion list are created in the user store but their contents are not synchronized.
Missing information in log file
Activating debug mode does not automatically enable full logging. In log settings, verify that you’ve selected all check boxes for the events you want to log.
Tip: You might have to scroll down to enable the last check boxes on the list.
GPO settings inoperative
You change a GPO setting but it isn’t operative on the computer running the Citrix Profile Management Service. The issue occurs because GP does not refresh immediately but instead is based on events or intervals specified in your deployment. To refresh GP immediately, run gpupdate /force on the computer.
For your changes to take effect, run the gpupdate /force command from the command prompt as documented at https://docs.microsoft.com/en-us/windows-server/administration/windows-commands/gpupdate.
Users receive new or temporary profiles
By default, users are given a temporary profile when a problem occurred. For example, the user store is unavailable. Alternatively, you can configure Profile Management to display an error message and then log users off. This approach can help with troubleshooting.
For instructions on configuring this feature, see Force user logoffs.
In some circumstances, when they log on, users receive a new profile instead of their cached profile. For more information about this issue and a workaround for it, see Knowledge Center article CTX118226.
Users might also receive a temporary profile if a local profile is present after the copy in the user store is removed. This situation can arise if the user store is cleared but local profiles are not deleted at logoff.
Profile Management treats such partial removal of profiles as a network, share, or permissions error, and provides the user with a temporary profile. For this reason, partial removal isn’t recommended. To work around this issue, log on to the affected computer and delete the profile manually.
If your deployment includes personal vDisks, users might receive temporary profiles if the default processing of these disks hasn’t been correctly adjusted. For more information, see Migrate user profiles.
Profile data lost when virtual desktop sessions become unresponsive
In a Citrix virtual desktops deployment, disconnecting from a Remote Desktop Protocol (RDP) session can cause a virtual desktop to become unresponsive or to restart. The behavior impacts Profile Management because it causes profile data to be lost when the session ends. The issue is fixed in Citrix Virtual Delivery Agent Version 3.1.3242 and later.
Users cannot log on (Event ID: 1000, Source: Userenv)
Users are unable to log on to a Citrix environment and receive the following error message: “Windows did not load your roaming profile and is attempting to log you on with your local profile… Contact your network administrator.” This error appears in Windows Application Event Logs (Event ID: 1000, Source: Userenv).
For more information about this issue and other workarounds for it, see Knowledge Center article CTX105618.
Printing
In Citrix virtual desktops environments, a user can select a default printer but sometimes the selection isn’t retained between logons. This issue has been observed when a Citrix virtual desktop’s policy is used to set printers on pooled virtual desktops based on a Citrix Provisioning Services Personal vDisk in standard image mode.
This issue does not originate with Profile Management. Though the Profile Management log file shows that the registry entry for the printer is copied at logoff (which is expected), NTUSER.dat for the user doesn’t contain the entry (which isn’t expected). The issue in fact originates with the way Citrix virtual desktops uses the DefaultPmFlags registry setting. For more information, see Knowledge Center article CTX119066.
Sometimes, unexpected printers are added to profiles. After users remove them, the printers reappear at the next logon. See the Profile Management support forum for more information.
Problems with application settings on multiple platforms
You might experience problems where application settings don’t roam correctly across multiple platforms. Typically these problems result from:
- Settings that aren’t applicable from one system to another. For example, hardware-specific settings that are not on every system.
- Applications that are installed differently on different systems. Examples:
- An application that is installed on a C: drive on one system but on a D: drive on another.
- An application that is installed in C:Program Files on one system but in C:Program Files (x86) on another.
- An Excel add-in installed on one system but not on another.
- Applications that don’t store setting information in the profile. For example, information stored in the local machine’s settings or outside the user profile.
- Language-specific configuration settings stored in the registry. Profile Management automatically translates language-specific folder names in Version 1 profiles but not in the registry.
In most instances, better standardization of the systems that cause these issues can minimize the issues. However, often the issues result from inherent incompatibilities (with multiple platforms) of the OS or the respective application. If the problematic settings aren’t critical, excluding them from the profile might resolve the issue.
Profiles owned by unknown accounts
On rare occasions, a profile can appear to belong to an unknown account. On the Advanced tab of the System Properties dialog box for a computer, Account Unknown is displayed when you click Settings in User Profiles. This issue comes along with an event log entry, “Profile notification of event Create for component failed, error code is. ” In the registry, the application ID points to the SHACCT Profile Notification Handler, a Microsoft component.
To confirm that this issue occurs in your environment, log on as a user whose data Profile Management doesn’t process, and check for these symptoms.
It isn’t an issue with Profile Management but might be the result of Active Directory interacting badly with virtual machine snapshots. The operation of Citrix user profiles is unaffected. Users can log on and off, and their profile changes are preserved.
Источник
Invalid IAM Instance Profile name #15341
Comments
aleybovich commented Jun 20, 2017
I have created an instance role and profile as following:
Now, I add an EC2 instance:
And I get the floowing error:
Now, if I go check the role code-deploy-ec2-instance-profile in teh console, I see that it’s Instrance Profile ARN is empty (but if i create an EC2 role via the AWS console it shows a valid ARN).
Any ideas if it’s a bug or am I doing something wrong?
The text was updated successfully, but these errors were encountered:
aleybovich commented Jun 20, 2017 •
By the way, I am able to successfully change an existing EC2 instance’s IAM Role to search-api-instance-profile manually via AWS console (as in https://aws.amazon.com/blogs/security/easily-replace-or-attach-an-iam-role-to-an-existing-ec2-instance-by-using-the-ec2-console/), so it’s a valid instance profile. Must be a bug in terraform
aleybovich commented Jun 20, 2017
It started working, I must have missed smth originally. Closing as not an issue
jsravn commented Jul 4, 2017
This happened to me as well. There seems to be some race condition for newly created profiles. When I wait a short period and rerun the terraform it succeeds.
jsravn commented Jul 4, 2017
@aleybovich I think you should reopen this.
captainpete commented Jul 18, 2017
seeing same issue, @jsravn thanks for work-around
ramkarthik-sys commented Jul 24, 2017
@aleybovich — I’m facing the same issue. You have to reopen the case as suggested by @jsravn
spanktar commented Aug 2, 2017
@aleybovich +1 to reopen as I just hit this as well.
aleybovich commented Aug 3, 2017
I’m no longer able to reproduce after I took down my whole envo and rebuilt. You guys need to reopen with your steps to reproduce
spanktar commented Aug 10, 2017
This is an intermittent error, where something that relies on IAM later in the cycle (usually immediately) cannot find the IAM resource. This is probably Amazon internal delay in actually making the resource available everywhere although the resource has been successfully created to Terraform. In my case, a simple re-run of Terraform got me past this. I hit it every now and then and now recognize it so I know what to do.
Suggested remedies: resources that require IAM resources specifically check that they are available before creation? Terraform will have marked them as created, but they may not be ready yet, so maybe a double-check is in order? This only seems to happen with Instance Profiles.
stutefish commented Aug 16, 2017
I get the same behavior — rerun terra and it goes away.
realflash commented Sep 9, 2017 •
edmundcraske commented Oct 18, 2017
Just seen this as well.
gvirtuoso commented Nov 15, 2017
I get the same behavior, but with Ansible. so I waited for a couple minutes.. run again. and OK! No more issues. as @spanktar said. I think that is an AWS internal delay!
labkey-ians commented Nov 16, 2017
Seeing this too.
six0h commented Nov 20, 2017
Also ran into this.
milankubin commented Nov 30, 2017 •
seeing this as well..This also seems to happen apparently on change, not just on create!
Second run all ok!
macropin commented Dec 6, 2017
Seeing this as well. Looks like a race.
spanktar commented Dec 15, 2017
kristinepetrosyan commented Dec 20, 2017
Seeing this again with
Terraform v0.11.1
- provider.aws v1.6.0
milankubin commented Dec 20, 2017 •
@six0h Are you getting the same error with ansible ? (InvalidParameterValue)
According to AWS there is a hardcoded 2min delay for creating instance profiles, yet if you look at my example Terraform is reporting
LucaFilipozzi commented Dec 22, 2017
Also encountering this bug.
tsalisbury-zz commented Jan 4, 2018
rodrigodiez commented Jan 4, 2018
danilogomesrosa commented Jan 4, 2018
I’ve been facing it about two hours and it still does not work.
spanktar commented Jan 4, 2018
Here’s a horrifying hack I used somewhere else to deal with bad timing issues. Maybe this would help in this scenario as well, adjust resource types to suit your needs:
enm10k commented Jan 14, 2018
I have the same issue.
In my case, IAM role created by terraform have no instance profile arn and it was the cause of error.
Martinsos commented Jan 26, 2018 •
Just to confirm the suspicion, I am not using terraform but am instead using javascript sdk in nodejs to first create the Instance Profile and then to associate it with the instance, and I get the same problem -> if I try to do association with instance immediately after, it will say Instance Profile does not yet exist. However, if I do it somewhat later, it will work.
Is seems like instance profile is visible in IAM, but is not yet visible in EC2.
Conclusion: this is delay on the AWS side as few people suggested.
Unfortunately I have not found a way to query AWS to find out when instance profile is visible through EC2, so I just repeatedly try to do the association until it does not succeed.
bflad commented Jan 27, 2018
Hi folks, as suggested above and noted in the AWS IAM documentation, you are running against the eventual consistency nature of the IAM service.
In v1.7.1 of the AWS provider (specifically PR hashicorp/terraform-provider-aws#3055), we now appropriately retry for up to a minute on this particular condition of associating or re-associating IAM instance profiles with EC2 instances, which should cover the most common scenarios. We will adjust that retry period if necessary based on feedback.
Please see the Terraform documentation on provider versioning or reach out if you need any assistance upgrading your AWS provider.
Источник
Synopsis
Trying to apply a Host profile created from another Host in a cluster today I got an error message which resulted in only some of the host profile actually being applied.
A specifed parameter was not correct. changedValue.key

I thought that the error message looked familiar, but couldn’t quite remember at the time, so I left what I was doing to take a look at again later. On my way home this evening I had a bit of a brainwave – the ESX host I had taken the original profile from was a slightly different update level (2) as opposed to the update level of the newer host I was applying the profile to. I also remembered where I had seen the text “changedValue.key” in the error message before – changing Advanced Settings on a Host using PowerCLI! This gave me a good idea as to where to look for the issue I was having with this Host Profile – the Advanced Settings in the Host Profile.
I knew it was probably to do with a value that was different between hosts because of their differing update levels, but to gather more information I decided to hit the log files to find out more… Opening up /var/log/vmware/hostd.log on the Host and navigating down to the time I tried to apply the Host Profile I found this (interesting bit in the screenshot below, full log text in the section after that):

[2012-02-20 19:50:07.849 F66966D0 info 'TaskManager'] Task Created : haTask-ha-host-vim.option.OptionManager.updateValues-896
[2012-02-20 19:50:07.853 F66966D0 verbose 'VersionOptionProvider'] Attempt to set readonly option
[2012-02-20 19:50:07.853 F66966D0 info 'App'] AdapterServer caught exception: vmodl.fault.InvalidArgument
[2012-02-20 19:50:07.853 F66966D0 info 'TaskManager'] Task Completed : haTask-ha-host-vim.option.OptionManager.updateValues-896 Status error
[2012-02-20 19:50:07.853 F66966D0 info 'Vmomi'] Activation [N5Vmomi10ActivationE:0x5cf27a98] : Invoke done [updateValues] on [vim.option.OptionManager:ha-adv-options]
[2012-02-20 19:50:07.853 F66966D0 verbose 'Vmomi'] Arg changedValue:
(vim.option.OptionValue) [
   (vim.option.OptionValue) {
      dynamicType = <unset>,
      key = "Misc.HostAgentUpdateLevel",
      value = "2",
   },
   (vim.option.OptionValue) {
      dynamicType = <unset>,
      key = "Misc.HostAgentUpdateLevel",
      value = "2",
   }
]
[2012-02-20 19:50:07.853 F66966D0 info 'Vmomi'] Throw vmodl.fault.InvalidArgument
[2012-02-20 19:50:07.853 F66966D0 info 'Vmomi'] Result:
(vmodl.fault.InvalidArgument) {
   dynamicType = <unset>,
   faultCause = (vmodl.MethodFault) null,
   invalidProperty = "changedValue.key",
   msg = "",
}
[root@hostnamehere vmware]#
The cause:
So we can see that the Host Profile did a “change value” (changedValue) on the key “Misc.HostAgentUpdateLevel” and this is where our error was thrown with an “invalidProperty” (changedValue.key). If we google the message “vmodl.fault.InvalidArgument” we’ll arrive at the VMware SDK Reference Guide which states that “An InvalidArgument exception is thrown if the set of arguments passed to the function is not specified correctly.” In this case we’ll soon see that this is happening because the value that is trying to be changed is actually a read-only value for the Host – as it should be, as it just references the update level of the host – this wouldn’t normally be something you want to change.
The issue here was of course that original host off which the profile was based is update 2, whereas the new host having the profile applied is update 4. The two settings differ, therefore Host Profiles tries to change this value on the new Host. The setting is really read-only, therefore Host Profiles fails to apply the value and throws this error message at us, which also results in the rest of our host profile (annoyingly) not being applied. Ideally if Host Profiles found a read-only value that shouldn’t be changed, it would not change this value.
Solution:
So the simple solution is to either:
- Take a Host Profile from a Host with the settings you need which is on the same update level as the Hosts you will be applying this profile to.
- Modify this Host Profile (edit) and remove the Advanced Setting for “Misc.HostAgentUpdateLevel“.
In my case, I was testing the host profile on a clean ESX Host before using it for other Hosts – that meant I also only had one new ESX host of this particular update level and therefore couldn’t use the first option (take the profile from an existing host). So I therefore just went to Home -> Host Profiles and edited this Host Profile to get rid of the unnecessary key called “Misc.HostAgentUpdateLevel” like so:

After removing the entries referring to this read-only key, I simply re-applied the profile and this time around all the settings went on as expected and there was no more error message. So to sum it all up, check that you aren’t first of all taking a Host Profile from a reference host of a different update level as your target hosts (and if you have to you can then resort to manually editing your profile as I did). If you get cryptic errors applying your Host Profiles, check your Host log files for more info and clues as to where the issue may lie.