The topic of error handling in web applications is very important. From a client perspective it is essential to know on how was the request proceeded and in case of any error is crucial to provide to the client a valid reason, especially if the error was due to the client’s actions. There are different situations, when notifying callers about concrete reasons is important – think about server-side validations, business logic errors that come due to bad requests or simple not found situations.
The mechanism of error handling in Webflux is different, from what we know from Spring MVC. Core building blocks of reactive apps – Mono and Flux brings a special way to deal with error situations, and while old exception-based error handling still may work for some cases, it violates Spring Webflux nature. In this post I will do an overview of how to process errors in Webflux when it comes to business errors and absent data. I will not cover technical errors in this article, as they are handled by Spring framework.
When Do We Need to Handle Errors in Webflux
Before we will move to the subject of error handling, let define what we want to achieve. Assume, that we build application using a conventional architecture with a vertical separation by layers and a horizontal separation by domains. That means, that our app consists of three main layers: repositories (one that handle data access), services (one that do custom business logic) and handlers (to work with HTTP requests/responses; understand them as controllers in Spring MVC). Take a look on the graph below and you can note that potentially errors may occur on any layer:
Although, I need to clarify here, that from a technical perspective errors are not same. On the repository level (and let abstract here also clients, that deal with external APIs and all data-access components) usually occur what is called technical errors. For instance, something can be wrong with a database, so the repository component will throw an error. This error is a subclass of RuntimeException and if we use Spring is handled by framework, so we don’t need to do something here. It will result to 500 error code.
An another case is what we called business errors. This is a violation of custom business rules of your app. While it may be considered as not as a good idea to have such errors, they are unavoidable, because, as it was mentioned before, we have to provide a meaningful response to clients in case of such violations. If you will return to the graph, you will note, that such errors usually occur on the service level, therefore we have to deal with them.
Now, let see how to handle errors and provide error responses in Spring Webflux APIs.
Start From Business Logic
In my previous post, I demonstrated how to build two-factor authentication for Spring Webflux REST API. That example follows the aforesaid architecture and is organized from repositories, services and handlers. As it was already mentioned, business errors take place inside a service. Prior to reactive Webflux, we often used exception-based error handling. It means that you provide a custom runtime exception (a subclass of ResponseStatusException) which is mapped with specific http status.
However, Webflux approach is different. Main building blocks are Mono and Flux components, that are chained throughout an app’s flow (note, from here I refer to both Mono and Flux as Mono). Throwing an exception on any level will break an async nature. Also, Spring reactive repositories, such as ReactiveMongoRepository don’t use exceptions to indicate an error situation. Mono container provides a functionality to propagate error condition and empty condition:
Mono.empty()= this static method creates aMonocontainer that completes without emitting any itemMono.error()= this static method creates aMonocontainer that terminates with an error immediately after being subscribed to
With this knowledge, we can now design a hypothetical login/signup flow to be able to handle situations, when 1) an entity is absent and 2) error occurred. If an error occurs on the repository level, Spring handles it by returning Mono with error state. When the requested data is not found – empty Mono. We also can add some validation for business rules inside the service. Take a look on the refactored code of signup flow from this post:
Now, we have a business logic. The next phase is to map results as HTTP responses on the handler level.
Display http Responses in Handlers
This level can correspond to the old good controllers in Spring MVC. The purpose of handlers is to work with HTTP requests and responses and by this to connect a business logic with the outer world. In the most simple implementation, the handler for signup process looks like this:
This code does essential things:
- Accepts a body payload from the HTTP request
- Call a business logic component
- Returns a result as HTTP response
However, it does not takes an advantage of custom error handling, that we talked about in the previous section. We need to handle a situation, when user already exists. For that, let refactor this code block:
Note, that compare to the previous post, I use here bodyValue() instead of body(). This is because body method actually accepts producers, while data object here is entity (SignupResponse). For that I use bodyValue() with passed value data. Read more on this here.
In this code we can specify to the client, what was a reason of the error. If user does exist already in database, we will provide 409 error code to the caller, so she/he have to use an another email address for signup procedure. That is what is about business errors. For technical errors our API displays 500 error code.
We can validate, that when we create a new user, everything works ok and the expected result is 200 success code:
On the other hand, if you will try to signup with the same email address, API should response with 400 error code, like it is shown on the screenshot below:
Moreover, we don’t need success field for SignupResponse entity anymore, as unsuccessful signup is handled with error codes. There is an another situation, I want to mention is this post – the problem of empty responses. This is what we would observe on a login example.
Special Case: Response on Empty Result
Why this is a special case? Well, technically, empty response is not an error, neither business error or technical error. There are different opinions among developers how to handle it properly. I think, that even it is not an exception in a traditional sense, we still need to expose 404 error code to the client, to demonstrate an absence of the requested information.
Let have a look on the login flow. For login flow is common a situation, opposite to the signup flow. For signup flow we have to ensure, that user does not exist yet, however for login we have to know that user does already exist. In the case of the absence we need to return an error response.
Take a look on the login handler initial implementation:
From the service component’s perspective we could expect three scenarios:
- User exists and login is successful = return
LoginResponse - User exists but login was denied = return an error
- User does not exist = return an empty user
We have already seen how to work with errors in handlers. The empty response situation is managed using switchIfEmpty method. Take a look on the refactored implementation:
Note, that unlike onErrorResume method, switchIfEmpty accepts as an argument an alternative Mono, rather than function. Now, let check that everything works as expected. The login for existed user entity and valid credentials should return a valid response:
When submitted credentials are wrong (password does not match), but user does exist (case no.2), we will obtain a Bad request error code:
Finally, if repository is unable to find a user entity, handler will answer with Not found:
Please note, that this post is focused on the handler level. For what happens inside service, I recommend you to check the previous post and also to look on the complete source code in this github repository. If you have any questions – don’t hesitate to ask them in comments or contact me.
References
- Dan Newton Doing stuff with Spring WebFlux (2018) Lanky Dan Blog access here
- Filip Marszelewski Migrating a microservice to Spring WebFlux (2019) Allegro Tech Blog access here
- Yuri Mednikov Handling Exceptions in Java With Try-Catch Block and Vavr Try (2019) DZone access here
Spring Framework
code style
Business logic
Database
Repository (version control)
app
microservice
Web Service
POST (HTTP)
Flow (web browser)
Overview:
In this article, I would like to show you Spring WebFlux Error Handling using @ControllerAdvice.
Developing Microservices is fun and easy with Spring Boot. But anything could go wrong in when multiple Microservices talk to each other. In case of some unhandled exceptions like 500 – Internal Server Error, Spring Boot might respond as shown here.
{
    "timestamp": "2020-11-02T02:33:08.501+00:00",
    "path": "/movie/action",
    "status": 500,
    "error": "Internal Server Error",
    "message": "",
    "requestId": "a9b4c6d4-4"
}
Usually error messages like this will not be handled properly and would be propagated to all the downstream services which might impact user experience. In some cases, applications might want to use application specific error code to convey appropriate messages to the calling service.
Let’s see how we could achieve that using Spring WebFlux.
Sample Application:
Let’s consider a simple application in which we have couple of APIs to get student information.
- GET – /student/all
- This will return all student information. Occasionally this throws some weird exceptions.
- GET /student/[id]
- This will return specific student based on the given id.
Project Set up:
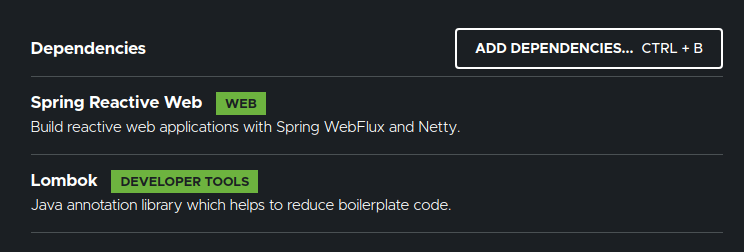
Create a Spring application with the following dependencies.
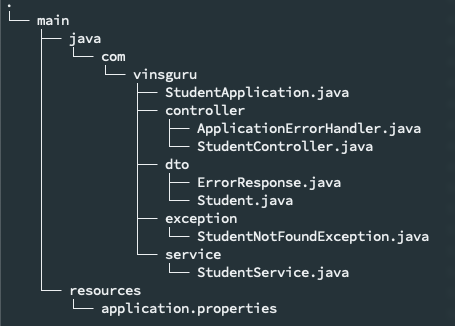
Overall the project structure will be as shown here.
DTO:
First I create a simple DTO for student. We are interested only these 3 attributes of student for now.
@Data
@ToString
@NoArgsConstructor
@AllArgsConstructor
public class Student {

    private int id;
    private String firstName;
    private String lastName;

}
Then I create another class to respond in case of error. errorCode could be some app specific error code and some appropriate error message.
@Data
@ToString
@NoArgsConstructor
@AllArgsConstructor
public class ErrorResponse {

    private int errorCode;
    private String message;

}
I also create another exception class as shown here for the service layer to throw an exception when student is not found for the given id.
public class StudentNotFoundException extends RuntimeException {

    private final int studentId;
    private static final String MESSAGE = "Student not found";

    public StudentNotFoundException(int id) {
        super(MESSAGE);
        this.studentId = id;
    }

    public int getStudentId() {
        return studentId;
    }

}
Student Service:
Then I create a service layer with these 2 methods.
@Service
public class StudentService {

    private static final Map<Integer, Student> DB = Map.of(
            1, new Student(1, "fn1", "ln1"),
            2, new Student(2, "fn2", "ln2"),
            3, new Student(3, "fn3", "ln3"),
            4, new Student(4, "fn4", "ln4"),
            5, new Student(5, "fn5", "ln5")
    );

    public Flux<Student> getAllStudents() throws Exception {
        return Flux.fromIterable(DB.values())
                   .doFirst(this::throwRandomError);
    }

    public Mono<Student> findStudentById(int id) {
        return Mono.just(id)
                   .filter(DB::containsKey)
                   .map(DB::get)
                   .switchIfEmpty(Mono.error(() -> new StudentNotFoundException(id)));
    }

    private void throwRandomError(){
        var random = ThreadLocalRandom.current().nextInt(0, 10);
        if(random > 5)
            throw new RuntimeException("some random error");
    }

}- getAllStudents: will throw some exception at random.
- findStudentById: method will throw exception when the student is not found. It throws StudentNotFoundException.
REST API:
Let’s create a simple StudentController to expose those 2 APIs.
- /student/all endpoint will fetch all the students
- /student/{id} endpoint will fetch specific student
@RestController
@RequestMapping("student")
public class StudentController {

    @Autowired
    private StudentService studentService;

    @GetMapping("all")
    public Flux<Student> getAll() throws Exception {
        return this.studentService.getAllStudents();
    }

    @GetMapping("{id}")
    public Mono<Student> getById(@PathVariable("id") int id){
        return this.studentService.findStudentById(id);
    }

}
Now if we run the application and try to access the below URL a few times – will throw RunTimeException.
http://localhost:8080/student/allThe response could be something like this.
{
   "timestamp":"2022-02-01T02:39:47.489+00:00",
   "path":"/student/all",
   "status":500,
   "error":"Internal Server Error",
   "requestId":"cfa1db44-3"
}
Let’s see how we could handle and respond better.
@ControllerAdvice:
Spring provides @ControllerAdvice for handling exceptions in Spring Boot Microservices. The annotated class will act like an Interceptor in case of any exceptions.
- We can have multiple exception handlers to handle each exception.
- In our case we throw RunTimeException and StudentNotFoundException – so we have 2 exception handlers. We can also handle all by using a simple Exception.class if we want.
@ControllerAdvice
public class ApplicationErrorHandler {

    @ExceptionHandler(RuntimeException.class)
    public ResponseEntity<ErrorResponse> handleRuntimeException(RuntimeException e){
        var errorResponse = this.buildErrorResponse(100, "Unable to fetch students");
        return ResponseEntity.status(HttpStatus.INTERNAL_SERVER_ERROR)
                .body(errorResponse);
    }

    @ExceptionHandler(StudentNotFoundException.class)
    public ResponseEntity<ErrorResponse> handleStudentNotFoundException(StudentNotFoundException e){
        var errorResponse = this.buildErrorResponse(101, String.format("Student id %s is not found", e.getStudentId()));
        return ResponseEntity.status(HttpStatus.NOT_FOUND)
                .body(errorResponse);
    }

    private ErrorResponse buildErrorResponse(int code, String message){
        return new ErrorResponse(code, message);
    }

}
Spring WebFlux Error Handling – Demo:
If I send below request, I get the appropriate response instead of directly propagating 500 Internal Server Error.
http://localhost:8080/student/35This error provides more meaningful error message. So the calling service use this error code might take appropriate action.
{
   "errorCode":101,
   "message":"Student id 35 is not found"
}
Similarly, I invoke below endpoint (after few times), then I below response.
http://localhost:8080/student/all{
"errorCode":100,
"message":"Unable to fetch students"
}Summary:
We were able to demonstrate Spring WebFlux Error Handling using @ControllerAdvice. This is a simple example. There are various other design patterns as well to make the system more resilient which could be more useful for a large application.
Resilient Microservice Design Patterns:
- Microservice Pattern – Timeout Pattern
- Microservice Pattern – Retry Pattern
- Microservice Pattern – Circuit Breaker Pattern
- Microservices Design Patterns – Bulkhead Pattern
- Microservice Pattern – Rate Limiter Pattern
The source code is here.
Happy learning 🙂
The original web framework included in the Spring Framework, Spring Web MVC, was
purpose-built for the Servlet API and Servlet containers. The reactive-stack web framework,
Spring WebFlux, was added later in version 5.0. It is fully non-blocking, supports
Reactive Streams back pressure, and runs on such servers as
Netty, Undertow, and Servlet containers.
Both web frameworks mirror the names of their source modules
(spring-webmvc and
spring-webflux) and co-exist side by side in the
Spring Framework. Each module is optional. Applications can use one or the other module or,
in some cases, both — for example, Spring MVC controllers with the reactive WebClient.
1.1. Overview
Why was Spring WebFlux created?
Part of the answer is the need for a non-blocking web stack to handle concurrency with a
small number of threads and scale with fewer hardware resources. Servlet non-blocking I/O
leads away from the rest of the Servlet API, where contracts are synchronous
(Filter, Servlet) or blocking (getParameter, getPart). This was the motivation
for a new common API to serve as a foundation across any non-blocking runtime. That is
important because of servers (such as Netty) that are well-established in the async,
non-blocking space.
The other part of the answer is functional programming. Much as the addition of annotations
in Java 5 created opportunities (such as annotated REST controllers or unit tests), the
addition of lambda expressions in Java 8 created opportunities for functional APIs in Java.
This is a boon for non-blocking applications and continuation-style APIs (as popularized
by CompletableFuture and ReactiveX) that allow declarative
composition of asynchronous logic. At the programming-model level, Java 8 enabled Spring
WebFlux to offer functional web endpoints alongside annotated controllers.
1.1.1. Define “Reactive”
We touched on “non-blocking” and “functional” but what does reactive mean?
The term, “reactive,” refers to programming models that are built around reacting to change — network components reacting to I/O events, UI controllers reacting to mouse events, and others.
In that sense, non-blocking is reactive, because, instead of being blocked, we are now in the mode
of reacting to notifications as operations complete or data becomes available.
There is also another important mechanism that we on the Spring team associate with “reactive”
and that is non-blocking back pressure. In synchronous, imperative code, blocking calls
serve as a natural form of back pressure that forces the caller to wait. In non-blocking
code, it becomes important to control the rate of events so that a fast producer does not
overwhelm its destination.
Reactive Streams is a
small spec
(also adopted in Java 9)
that defines the interaction between asynchronous components with back pressure.
For example a data repository (acting as
Publisher)
can produce data that an HTTP server (acting as
Subscriber)
can then write to the response. The main purpose of Reactive Streams is to let the
subscriber control how quickly or how slowly the publisher produces data.
|
Common question: what if a publisher cannot slow down? The purpose of Reactive Streams is only to establish the mechanism and a boundary. If a publisher cannot slow down, it has to decide whether to buffer, drop, or fail. |
1.1.2. Reactive API
Reactive Streams plays an important role for interoperability. It is of interest to libraries
and infrastructure components but less useful as an application API, because it is too
low-level. Applications need a higher-level and richer, functional API to
compose async logic — similar to the Java 8 Stream API but not only for collections.
This is the role that reactive libraries play.
Reactor is the reactive library of choice for
Spring WebFlux. It provides the
Mono and
Flux API types
to work on data sequences of 0..1 (Mono) and 0..N (Flux) through a rich set of operators aligned with the
ReactiveX vocabulary of operators.
Reactor is a Reactive Streams library and, therefore, all of its operators support non-blocking back pressure.
Reactor has a strong focus on server-side Java. It is developed in close collaboration
with Spring.
WebFlux requires Reactor as a core dependency but it is interoperable with other reactive
libraries via Reactive Streams. As a general rule, a WebFlux API accepts a plain Publisher
as input, adapts it to a Reactor type internally, uses that, and returns either a
Flux or a Mono as output. So, you can pass any Publisher as input and you can apply
operations on the output, but you need to adapt the output for use with another reactive library.
Whenever feasible (for example, annotated controllers), WebFlux adapts transparently to the use
of RxJava or another reactive library. See Reactive Libraries for more details.
|
In addition to Reactive APIs, WebFlux can also be used with Coroutines APIs in Kotlin which provides a more imperative style of programming. The following Kotlin code samples will be provided with Coroutines APIs. |
1.1.3. Programming Models
The spring-web module contains the reactive foundation that underlies Spring WebFlux,
including HTTP abstractions, Reactive Streams adapters for supported
servers, codecs, and a core WebHandler API comparable to
the Servlet API but with non-blocking contracts.
On that foundation, Spring WebFlux provides a choice of two programming models:
-
Annotated Controllers: Consistent with Spring MVC and based on the same annotations
from thespring-webmodule. Both Spring MVC and WebFlux controllers support reactive
(Reactor and RxJava) return types, and, as a result, it is not easy to tell them apart. One notable
difference is that WebFlux also supports reactive@RequestBodyarguments. -
Functional Endpoints: Lambda-based, lightweight, and functional programming model. You can think of
this as a small library or a set of utilities that an application can use to route and
handle requests. The big difference with annotated controllers is that the application
is in charge of request handling from start to finish versus declaring intent through
annotations and being called back.
1.1.4. Applicability
Spring MVC or WebFlux?
A natural question to ask but one that sets up an unsound dichotomy. Actually, both
work together to expand the range of available options. The two are designed for
continuity and consistency with each other, they are available side by side, and feedback
from each side benefits both sides. The following diagram shows how the two relate, what they
have in common, and what each supports uniquely:

We suggest that you consider the following specific points:
-
If you have a Spring MVC application that works fine, there is no need to change.
Imperative programming is the easiest way to write, understand, and debug code.
You have maximum choice of libraries, since, historically, most are blocking. -
If you are already shopping for a non-blocking web stack, Spring WebFlux offers the same
execution model benefits as others in this space and also provides a choice of servers
(Netty, Tomcat, Jetty, Undertow, and Servlet containers), a choice of programming models
(annotated controllers and functional web endpoints), and a choice of reactive libraries
(Reactor, RxJava, or other). -
If you are interested in a lightweight, functional web framework for use with Java 8 lambdas
or Kotlin, you can use the Spring WebFlux functional web endpoints. That can also be a good choice
for smaller applications or microservices with less complex requirements that can benefit
from greater transparency and control. -
In a microservice architecture, you can have a mix of applications with either Spring MVC
or Spring WebFlux controllers or with Spring WebFlux functional endpoints. Having support
for the same annotation-based programming model in both frameworks makes it easier to
re-use knowledge while also selecting the right tool for the right job. -
A simple way to evaluate an application is to check its dependencies. If you have blocking
persistence APIs (JPA, JDBC) or networking APIs to use, Spring MVC is the best choice
for common architectures at least. It is technically feasible with both Reactor and
RxJava to perform blocking calls on a separate thread but you would not be making the
most of a non-blocking web stack. -
If you have a Spring MVC application with calls to remote services, try the reactive
WebClient.
You can return reactive types (Reactor, RxJava, or other)
directly from Spring MVC controller methods. The greater the latency per call or the
interdependency among calls, the more dramatic the benefits. Spring MVC controllers
can call other reactive components too. -
If you have a large team, keep in mind the steep learning curve in the shift to non-blocking,
functional, and declarative programming. A practical way to start without a full switch
is to use the reactiveWebClient. Beyond that, start small and measure the benefits.
We expect that, for a wide range of applications, the shift is unnecessary. If you are
unsure what benefits to look for, start by learning about how non-blocking I/O works
(for example, concurrency on single-threaded Node.js) and its effects.
1.1.5. Servers
Spring WebFlux is supported on Tomcat, Jetty, Servlet containers, as well as on
non-Servlet runtimes such as Netty and Undertow. All servers are adapted to a low-level,
common API so that higher-level
programming models can be supported across servers.
Spring WebFlux does not have built-in support to start or stop a server. However, it is
easy to assemble an application from Spring configuration and
WebFlux infrastructure and run it with a few
lines of code.
Spring Boot has a WebFlux starter that automates these steps. By default, the starter uses
Netty, but it is easy to switch to Tomcat, Jetty, or Undertow by changing your
Maven or Gradle dependencies. Spring Boot defaults to Netty, because it is more widely
used in the asynchronous, non-blocking space and lets a client and a server share resources.
Tomcat and Jetty can be used with both Spring MVC and WebFlux. Keep in mind, however, that
the way they are used is very different. Spring MVC relies on Servlet blocking I/O and
lets applications use the Servlet API directly if they need to. Spring WebFlux
relies on Servlet non-blocking I/O and uses the Servlet API behind a low-level
adapter. It is not exposed for direct use.
For Undertow, Spring WebFlux uses Undertow APIs directly without the Servlet API.
1.1.6. Performance
Performance has many characteristics and meanings. Reactive and non-blocking generally
do not make applications run faster. They can, in some cases, (for example, if using the
WebClient to run remote calls in parallel). On the whole, it requires more work to do
things the non-blocking way and that can slightly increase the required processing time.
The key expected benefit of reactive and non-blocking is the ability to scale with a small,
fixed number of threads and less memory. That makes applications more resilient under load,
because they scale in a more predictable way. In order to observe those benefits, however, you
need to have some latency (including a mix of slow and unpredictable network I/O).
That is where the reactive stack begins to show its strengths, and the differences can be
dramatic.
1.1.7. Concurrency Model
Both Spring MVC and Spring WebFlux support annotated controllers, but there is a key
difference in the concurrency model and the default assumptions for blocking and threads.
In Spring MVC (and servlet applications in general), it is assumed that applications can
block the current thread, (for example, for remote calls). For this reason, servlet containers
use a large thread pool to absorb potential blocking during request handling.
In Spring WebFlux (and non-blocking servers in general), it is assumed that applications
do not block. Therefore, non-blocking servers use a small, fixed-size thread pool
(event loop workers) to handle requests.
|
“To scale” and “small number of threads” may sound contradictory but to never block the current thread (and rely on callbacks instead) means that you do not need extra threads, as there are no blocking calls to absorb. |
Invoking a Blocking API
What if you do need to use a blocking library? Both Reactor and RxJava provide the
publishOn operator to continue processing on a different thread. That means there is an
easy escape hatch. Keep in mind, however, that blocking APIs are not a good fit for
this concurrency model.
Mutable State
In Reactor and RxJava, you declare logic through operators. At runtime, a reactive
pipeline is formed where data is processed sequentially, in distinct stages. A key benefit
of this is that it frees applications from having to protect mutable state because
application code within that pipeline is never invoked concurrently.
Threading Model
What threads should you expect to see on a server running with Spring WebFlux?
-
On a “vanilla” Spring WebFlux server (for example, no data access nor other optional
dependencies), you can expect one thread for the server and several others for request
processing (typically as many as the number of CPU cores). Servlet containers, however,
may start with more threads (for example, 10 on Tomcat), in support of both servlet (blocking) I/O
and servlet 3.1 (non-blocking) I/O usage. -
The reactive
WebClientoperates in event loop style. So you can see a small, fixed
number of processing threads related to that (for example,reactor-http-nio-with the Reactor
Netty connector). However, if Reactor Netty is used for both client and server, the two
share event loop resources by default. -
Reactor and RxJava provide thread pool abstractions, called schedulers, to use with the
publishOnoperator that is used to switch processing to a different thread pool.
The schedulers have names that suggest a specific concurrency strategy — for example, “parallel”
(for CPU-bound work with a limited number of threads) or “elastic” (for I/O-bound work with
a large number of threads). If you see such threads, it means some code is using a
specific thread poolSchedulerstrategy. -
Data access libraries and other third party dependencies can also create and use threads
of their own.
Configuring
The Spring Framework does not provide support for starting and stopping
servers. To configure the threading model for a server,
you need to use server-specific configuration APIs, or, if you use Spring Boot,
check the Spring Boot configuration options for each server. You can
configure the WebClient directly.
For all other libraries, see their respective documentation.
1.2. Reactive Core
The spring-web module contains the following foundational support for reactive web
applications:
-
For server request processing there are two levels of support.
-
HttpHandler: Basic contract for HTTP request handling with
non-blocking I/O and Reactive Streams back pressure, along with adapters for Reactor Netty,
Undertow, Tomcat, Jetty, and any Servlet container. -
WebHandlerAPI: Slightly higher level, general-purpose web API for
request handling, on top of which concrete programming models such as annotated
controllers and functional endpoints are built.
-
-
For the client side, there is a basic
ClientHttpConnectorcontract to perform HTTP
requests with non-blocking I/O and Reactive Streams back pressure, along with adapters for
Reactor Netty, reactive
Jetty HttpClient
and Apache HttpComponents.
The higher level WebClient used in applications
builds on this basic contract. -
For client and server, codecs for serialization and
deserialization of HTTP request and response content.
1.2.1. HttpHandler
HttpHandler
is a simple contract with a single method to handle a request and a response. It is
intentionally minimal, and its main and only purpose is to be a minimal abstraction
over different HTTP server APIs.
The following table describes the supported server APIs:
| Server name | Server API used | Reactive Streams support |
|---|---|---|
|
Netty |
Netty API |
Reactor Netty |
|
Undertow |
Undertow API |
spring-web: Undertow to Reactive Streams bridge |
|
Tomcat |
Servlet non-blocking I/O; Tomcat API to read and write ByteBuffers vs byte[] |
spring-web: Servlet non-blocking I/O to Reactive Streams bridge |
|
Jetty |
Servlet non-blocking I/O; Jetty API to write ByteBuffers vs byte[] |
spring-web: Servlet non-blocking I/O to Reactive Streams bridge |
|
Servlet container |
Servlet non-blocking I/O |
spring-web: Servlet non-blocking I/O to Reactive Streams bridge |
The following table describes server dependencies (also see
supported versions):
| Server name | Group id | Artifact name |
|---|---|---|
|
Reactor Netty |
io.projectreactor.netty |
reactor-netty |
|
Undertow |
io.undertow |
undertow-core |
|
Tomcat |
org.apache.tomcat.embed |
tomcat-embed-core |
|
Jetty |
org.eclipse.jetty |
jetty-server, jetty-servlet |
The code snippets below show using the HttpHandler adapters with each server API:
Reactor Netty
Java
HttpHandler handler = ...
ReactorHttpHandlerAdapter adapter = new ReactorHttpHandlerAdapter(handler);
HttpServer.create().host(host).port(port).handle(adapter).bindNow();
Kotlin
val handler: HttpHandler = ...
val adapter = ReactorHttpHandlerAdapter(handler)
HttpServer.create().host(host).port(port).handle(adapter).bindNow()
Undertow
Java
HttpHandler handler = ...
UndertowHttpHandlerAdapter adapter = new UndertowHttpHandlerAdapter(handler);
Undertow server = Undertow.builder().addHttpListener(port, host).setHandler(adapter).build();
server.start();
Kotlin
val handler: HttpHandler = ...
val adapter = UndertowHttpHandlerAdapter(handler)
val server = Undertow.builder().addHttpListener(port, host).setHandler(adapter).build()
server.start()
Tomcat
Java
HttpHandler handler = ...
Servlet servlet = new TomcatHttpHandlerAdapter(handler);

Tomcat server = new Tomcat();
File base = new File(System.getProperty("java.io.tmpdir"));
Context rootContext = server.addContext("", base.getAbsolutePath());
Tomcat.addServlet(rootContext, "main", servlet);
rootContext.addServletMappingDecoded("/", "main");
server.setHost(host);
server.setPort(port);
server.start();
Kotlin
val handler: HttpHandler = ...
val servlet = TomcatHttpHandlerAdapter(handler)

val server = Tomcat()
val base = File(System.getProperty("java.io.tmpdir"))
val rootContext = server.addContext("", base.absolutePath)
Tomcat.addServlet(rootContext, "main", servlet)
rootContext.addServletMappingDecoded("/", "main")
server.host = host
server.setPort(port)
server.start()
Jetty
Java
HttpHandler handler = ...
Servlet servlet = new JettyHttpHandlerAdapter(handler);

Server server = new Server();
ServletContextHandler contextHandler = new ServletContextHandler(server, "");
contextHandler.addServlet(new ServletHolder(servlet), "/");
contextHandler.start();

ServerConnector connector = new ServerConnector(server);
connector.setHost(host);
connector.setPort(port);
server.addConnector(connector);
server.start();
Kotlin
val handler: HttpHandler = ...
val servlet = JettyHttpHandlerAdapter(handler)

val server = Server()
val contextHandler = ServletContextHandler(server, "")
contextHandler.addServlet(ServletHolder(servlet), "/")
contextHandler.start();

val connector = ServerConnector(server)
connector.host = host
connector.port = port
server.addConnector(connector)
server.start()
Servlet Container
To deploy as a WAR to any Servlet container, you can extend and include
AbstractReactiveWebInitializer
in the WAR. That class wraps an HttpHandler with ServletHttpHandlerAdapter and registers
that as a Servlet.
1.2.2. WebHandler API
The org.springframework.web.server package builds on the HttpHandler contract
to provide a general-purpose web API for processing requests through a chain of multiple
WebExceptionHandler, multiple
WebFilter, and a single
WebHandler component. The chain can
be put together with WebHttpHandlerBuilder by simply pointing to a Spring
ApplicationContext where components are
auto-detected, and/or by registering components
with the builder.
While HttpHandler has a simple goal to abstract the use of different HTTP servers, the
WebHandler API aims to provide a broader set of features commonly used in web applications
such as:
-
User session with attributes.
-
Request attributes.
-
Resolved
LocaleorPrincipalfor the request. -
Access to parsed and cached form data.
-
Abstractions for multipart data.
-
and more..
Special bean types
The table below lists the components that WebHttpHandlerBuilder can auto-detect in a
Spring ApplicationContext, or that can be registered directly with it:
| Bean name | Bean type | Count | Description |
|---|---|---|---|
|
<any> |
|
0..N |
Provide handling for exceptions from the chain of |
|
<any> |
|
0..N |
Apply interception style logic to before and after the rest of the filter chain and |
|
|
|
1 |
The handler for the request. |
|
|
|
0..1 |
The manager for |
|
|
|
0..1 |
For access to |
|
|
|
0..1 |
The resolver for |
|
|
|
0..1 |
For processing forwarded type headers, either by extracting and removing them or by removing them only. |
Form Data
ServerWebExchange exposes the following method for accessing form data:
Java
Mono<MultiValueMap<String, String>> getFormData();
Kotlin
suspend fun getFormData(): MultiValueMap<String, String>The DefaultServerWebExchange uses the configured HttpMessageReader to parse form data
(application/x-www-form-urlencoded) into a MultiValueMap. By default,
FormHttpMessageReader is configured for use by the ServerCodecConfigurer bean
(see the Web Handler API).
Multipart Data
ServerWebExchange exposes the following method for accessing multipart data:
Java
Mono<MultiValueMap<String, Part>> getMultipartData();
Kotlin
suspend fun getMultipartData(): MultiValueMap<String, Part>The DefaultServerWebExchange uses the configured
HttpMessageReader<MultiValueMap<String, Part>> to parse multipart/form-data content
into a MultiValueMap.
By default, this is the DefaultPartHttpMessageReader, which does not have any third-party
dependencies.
Alternatively, the SynchronossPartHttpMessageReader can be used, which is based on the
Synchronoss NIO Multipart library.
Both are configured through the ServerCodecConfigurer bean
(see the Web Handler API).
To parse multipart data in streaming fashion, you can use the Flux<PartEvent> returned from the
PartEventHttpMessageReader instead of using @RequestPart, as that implies Map-like access
to individual parts by name and, hence, requires parsing multipart data in full.
By contrast, you can use @RequestBody to decode the content to Flux<PartEvent> without
collecting to a MultiValueMap.
As a request goes through proxies (such as load balancers), the host, port, and
scheme may change. That makes it a challenge, from a client perspective, to create links that point to the correct
host, port, and scheme.
RFC 7239 defines the Forwarded HTTP header
that proxies can use to provide information about the original request. There are other
non-standard headers, too, including X-Forwarded-Host, X-Forwarded-Port,
X-Forwarded-Proto, X-Forwarded-Ssl, and X-Forwarded-Prefix.
ForwardedHeaderTransformer is a component that modifies the host, port, and scheme of
the request, based on forwarded headers, and then removes those headers. If you declare
it as a bean with the name forwardedHeaderTransformer, it will be
detected and used.
There are security considerations for forwarded headers, since an application cannot know
if the headers were added by a proxy, as intended, or by a malicious client. This is why
a proxy at the boundary of trust should be configured to remove untrusted forwarded traffic coming
from the outside. You can also configure the ForwardedHeaderTransformer with
removeOnly=true, in which case it removes but does not use the headers.
In 5.1 ForwardedHeaderFilter was deprecated and superseded byForwardedHeaderTransformer so forwarded headers can be processed earlier, before theexchange is created. If the filter is configured anyway, it is taken out of the list of filters, and ForwardedHeaderTransformer is used instead.
|
1.2.3. Filters
In the WebHandler API, you can use a WebFilter to apply interception-style
logic before and after the rest of the processing chain of filters and the target
WebHandler. When using the WebFlux Config, registering a WebFilter is as simple
as declaring it as a Spring bean and (optionally) expressing precedence by using @Order on
the bean declaration or by implementing Ordered.
CORS
Spring WebFlux provides fine-grained support for CORS configuration through annotations on
controllers. However, when you use it with Spring Security, we advise relying on the built-in
CorsFilter, which must be ordered ahead of Spring Security’s chain of filters.
See the section on CORS and the CORS WebFilter for more details.
1.2.4. Exceptions
In the WebHandler API, you can use a WebExceptionHandler to handle
exceptions from the chain of WebFilter instances and the target WebHandler. When using the
WebFlux Config, registering a WebExceptionHandler is as simple as declaring it as a
Spring bean and (optionally) expressing precedence by using @Order on the bean declaration or
by implementing Ordered.
The following table describes the available WebExceptionHandler implementations:
| Exception Handler | Description |
|---|---|
|
|
Provides handling for exceptions of type |
|
|
Extension of This handler is declared in the WebFlux Config. |
1.2.5. Codecs
The spring-web and spring-core modules provide support for serializing and
deserializing byte content to and from higher level objects through non-blocking I/O with
Reactive Streams back pressure. The following describes this support:
-
Encoderand
Decoderare low level contracts to
encode and decode content independent of HTTP. -
HttpMessageReaderand
HttpMessageWriterare contracts
to encode and decode HTTP message content. -
An
Encodercan be wrapped withEncoderHttpMessageWriterto adapt it for use in a web
application, while aDecodercan be wrapped withDecoderHttpMessageReader. -
DataBufferabstracts different
byte buffer representations (e.g. NettyByteBuf,java.nio.ByteBuffer, etc.) and is
what all codecs work on. See Data Buffers and Codecs in the
«Spring Core» section for more on this topic.
The spring-core module provides byte[], ByteBuffer, DataBuffer, Resource, and
String encoder and decoder implementations. The spring-web module provides Jackson
JSON, Jackson Smile, JAXB2, Protocol Buffers and other encoders and decoders along with
web-only HTTP message reader and writer implementations for form data, multipart content,
server-sent events, and others.
ClientCodecConfigurer and ServerCodecConfigurer are typically used to configure and
customize the codecs to use in an application. See the section on configuring
HTTP message codecs.
Jackson JSON
JSON and binary JSON (Smile) are
both supported when the Jackson library is present.
The Jackson2Decoder works as follows:
-
Jackson’s asynchronous, non-blocking parser is used to aggregate a stream of byte chunks
intoTokenBuffer‘s each representing a JSON object. -
Each
TokenBufferis passed to Jackson’sObjectMapperto create a higher level object. -
When decoding to a single-value publisher (e.g.
Mono), there is oneTokenBuffer. -
When decoding to a multi-value publisher (e.g.
Flux), eachTokenBufferis passed to
theObjectMapperas soon as enough bytes are received for a fully formed object. The
input content can be a JSON array, or any
line-delimited JSON format such as NDJSON,
JSON Lines, or JSON Text Sequences.
The Jackson2Encoder works as follows:
-
For a single value publisher (e.g.
Mono), simply serialize it through the
ObjectMapper. -
For a multi-value publisher with
application/json, by default collect the values with
Flux#collectToList()and then serialize the resulting collection. -
For a multi-value publisher with a streaming media type such as
application/x-ndjsonorapplication/stream+x-jackson-smile, encode, write, and
flush each value individually using a
line-delimited JSON format. Other
streaming media types may be registered with the encoder. -
For SSE the
Jackson2Encoderis invoked per event and the output is flushed to ensure
delivery without delay.
|
By default both |
Form Data
FormHttpMessageReader and FormHttpMessageWriter support decoding and encoding
application/x-www-form-urlencoded content.
On the server side where form content often needs to be accessed from multiple places,
ServerWebExchange provides a dedicated getFormData() method that parses the content
through FormHttpMessageReader and then caches the result for repeated access.
See Form Data in the WebHandler API section.
Once getFormData() is used, the original raw content can no longer be read from the
request body. For this reason, applications are expected to go through ServerWebExchange
consistently for access to the cached form data versus reading from the raw request body.
Multipart
MultipartHttpMessageReader and MultipartHttpMessageWriter support decoding and
encoding «multipart/form-data» content. In turn MultipartHttpMessageReader delegates to
another HttpMessageReader for the actual parsing to a Flux<Part> and then simply
collects the parts into a MultiValueMap.
By default, the DefaultPartHttpMessageReader is used, but this can be changed through the
ServerCodecConfigurer.
For more information about the DefaultPartHttpMessageReader, refer to the
javadoc of DefaultPartHttpMessageReader.
On the server side where multipart form content may need to be accessed from multiple
places, ServerWebExchange provides a dedicated getMultipartData() method that parses
the content through MultipartHttpMessageReader and then caches the result for repeated access.
See Multipart Data in the WebHandler API section.
Once getMultipartData() is used, the original raw content can no longer be read from the
request body. For this reason applications have to consistently use getMultipartData()
for repeated, map-like access to parts, or otherwise rely on the
SynchronossPartHttpMessageReader for a one-time access to Flux<Part>.
Limits
Decoder and HttpMessageReader implementations that buffer some or all of the input
stream can be configured with a limit on the maximum number of bytes to buffer in memory.
In some cases buffering occurs because input is aggregated and represented as a single
object — for example, a controller method with @RequestBody byte[],
x-www-form-urlencoded data, and so on. Buffering can also occur with streaming, when
splitting the input stream — for example, delimited text, a stream of JSON objects, and
so on. For those streaming cases, the limit applies to the number of bytes associated
with one object in the stream.
To configure buffer sizes, you can check if a given Decoder or HttpMessageReader
exposes a maxInMemorySize property and if so the Javadoc will have details about default
values. On the server side, ServerCodecConfigurer provides a single place from where to
set all codecs, see HTTP message codecs. On the client side, the limit for
all codecs can be changed in
WebClient.Builder.
For Multipart parsing the maxInMemorySize property limits
the size of non-file parts. For file parts, it determines the threshold at which the part
is written to disk. For file parts written to disk, there is an additional
maxDiskUsagePerPart property to limit the amount of disk space per part. There is also
a maxParts property to limit the overall number of parts in a multipart request.
To configure all three in WebFlux, you’ll need to supply a pre-configured instance of
MultipartHttpMessageReader to ServerCodecConfigurer.
Streaming
When streaming to the HTTP response (for example, text/event-stream,
application/x-ndjson), it is important to send data periodically, in order to
reliably detect a disconnected client sooner rather than later. Such a send could be a
comment-only, empty SSE event or any other «no-op» data that would effectively serve as
a heartbeat.
DataBuffer
DataBuffer is the representation for a byte buffer in WebFlux. The Spring Core part of
this reference has more on that in the section on
Data Buffers and Codecs. The key point to understand is that on some
servers like Netty, byte buffers are pooled and reference counted, and must be released
when consumed to avoid memory leaks.
WebFlux applications generally do not need to be concerned with such issues, unless they
consume or produce data buffers directly, as opposed to relying on codecs to convert to
and from higher level objects, or unless they choose to create custom codecs. For such
cases please review the information in Data Buffers and Codecs,
especially the section on Using DataBuffer.
1.2.6. Logging
DEBUG level logging in Spring WebFlux is designed to be compact, minimal, and
human-friendly. It focuses on high value bits of information that are useful over and
over again vs others that are useful only when debugging a specific issue.
TRACE level logging generally follows the same principles as DEBUG (and for example also
should not be a firehose) but can be used for debugging any issue. In addition, some log
messages may show a different level of detail at TRACE vs DEBUG.
Good logging comes from the experience of using the logs. If you spot anything that does
not meet the stated goals, please let us know.
Log Id
In WebFlux, a single request can be run over multiple threads and the thread ID
is not useful for correlating log messages that belong to a specific request. This is why
WebFlux log messages are prefixed with a request-specific ID by default.
On the server side, the log ID is stored in the ServerWebExchange attribute
(LOG_ID_ATTRIBUTE),
while a fully formatted prefix based on that ID is available from
ServerWebExchange#getLogPrefix(). On the WebClient side, the log ID is stored in the
ClientRequest attribute
(LOG_ID_ATTRIBUTE)
,while a fully formatted prefix is available from ClientRequest#logPrefix().
Sensitive Data
DEBUG and TRACE logging can log sensitive information. This is why form parameters and
headers are masked by default and you must explicitly enable their logging in full.
The following example shows how to do so for server-side requests:
Java
@Configuration
@EnableWebFlux
class MyConfig implements WebFluxConfigurer {

    @Override
    public void configureHttpMessageCodecs(ServerCodecConfigurer configurer) {
        configurer.defaultCodecs().enableLoggingRequestDetails(true);
    }
}
Kotlin
@Configuration
@EnableWebFlux
class MyConfig : WebFluxConfigurer {

    override fun configureHttpMessageCodecs(configurer: ServerCodecConfigurer) {
        configurer.defaultCodecs().enableLoggingRequestDetails(true)
    }
}
The following example shows how to do so for client-side requests:
Java
Consumer<ClientCodecConfigurer> consumer = configurer ->
        configurer.defaultCodecs().enableLoggingRequestDetails(true);

WebClient webClient = WebClient.builder()
        .exchangeStrategies(strategies -> strategies.codecs(consumer))
        .build();
Kotlin
val consumer: (ClientCodecConfigurer) -> Unit  = { configurer -> configurer.defaultCodecs().enableLoggingRequestDetails(true) }

val webClient = WebClient.builder()
        .exchangeStrategies({ strategies -> strategies.codecs(consumer) })
        .build()
Appenders
Logging libraries such as SLF4J and Log4J 2 provide asynchronous loggers that avoid
blocking. While those have their own drawbacks such as potentially dropping messages
that could not be queued for logging, they are the best available options currently
for use in a reactive, non-blocking application.
Custom codecs
Applications can register custom codecs for supporting additional media types,
or specific behaviors that are not supported by the default codecs.
Some configuration options expressed by developers are enforced on default codecs.
Custom codecs might want to get a chance to align with those preferences,
like enforcing buffering limits
or logging sensitive data.
The following example shows how to do so for client-side requests:
Java
WebClient webClient = WebClient.builder()
        .codecs(configurer -> {
                CustomDecoder decoder = new CustomDecoder();
                configurer.customCodecs().registerWithDefaultConfig(decoder);
        })
        .build();
Kotlin
val webClient = WebClient.builder()
        .codecs({ configurer ->
                val decoder = CustomDecoder()
                configurer.customCodecs().registerWithDefaultConfig(decoder)
         })
        .build()
1.3. DispatcherHandler
Spring WebFlux, similarly to Spring MVC, is designed around the front controller pattern,
where a central WebHandler, the DispatcherHandler, provides a shared algorithm for
request processing, while actual work is performed by configurable, delegate components.
This model is flexible and supports diverse workflows.
DispatcherHandler discovers the delegate components it needs from Spring configuration.
It is also designed to be a Spring bean itself and implements ApplicationContextAware
for access to the context in which it runs. If DispatcherHandler is declared with a bean
name of webHandler, it is, in turn, discovered by
WebHttpHandlerBuilder,
which puts together a request-processing chain, as described in WebHandler API.
Spring configuration in a WebFlux application typically contains:
-
DispatcherHandlerwith the bean namewebHandler -
WebFilterandWebExceptionHandlerbeans -
DispatcherHandlerspecial beans -
Others
The configuration is given to WebHttpHandlerBuilder to build the processing chain,
as the following example shows:
Java
ApplicationContext context = ...
HttpHandler handler = WebHttpHandlerBuilder.applicationContext(context).build();
Kotlin
val context: ApplicationContext = ...
val handler = WebHttpHandlerBuilder.applicationContext(context).build()
The resulting HttpHandler is ready for use with a server adapter.
1.3.1. Special Bean Types
The DispatcherHandler delegates to special beans to process requests and render the
appropriate responses. By “special beans,” we mean Spring-managed Object instances that
implement WebFlux framework contracts. Those usually come with built-in contracts, but
you can customize their properties, extend them, or replace them.
The following table lists the special beans detected by the DispatcherHandler. Note that
there are also some other beans detected at a lower level (see
Special bean types in the Web Handler API).
| Bean type | Explanation |
|---|---|
|
|
Map a request to a handler. The mapping is based on some criteria, the details of The main |
|
|
Help the |
|
|
Process the result from the handler invocation and finalize the response. |
1.3.2. WebFlux Config
Applications can declare the infrastructure beans (listed under
Web Handler API and
DispatcherHandler) that are required to process requests.
However, in most cases, the WebFlux Config is the best starting point. It declares the
required beans and provides a higher-level configuration callback API to customize it.
|
Spring Boot relies on the WebFlux config to configure Spring WebFlux and also provides many extra convenient options. |
1.3.3. Processing
DispatcherHandler processes requests as follows:
-
Each
HandlerMappingis asked to find a matching handler, and the first match is used. -
If a handler is found, it is run through an appropriate
HandlerAdapter, which
exposes the return value from the execution asHandlerResult. -
The
HandlerResultis given to an appropriateHandlerResultHandlerto complete
processing by writing to the response directly or by using a view to render.
1.3.4. Result Handling
The return value from the invocation of a handler, through a HandlerAdapter, is wrapped
as a HandlerResult, along with some additional context, and passed to the first
HandlerResultHandler that claims support for it. The following table shows the available
HandlerResultHandler implementations, all of which are declared in the WebFlux Config:
| Result Handler Type | Return Values | Default Order |
|---|---|---|
|
|
|
0 |
|
|
|
0 |
|
|
Handle return values from |
100 |
|
|
See also View Resolution. |
|
1.3.5. Exceptions
HandlerAdapter implementations can handle internally exceptions from invoking a request
handler, such as a controller method. However, an exception may be deferred if the request
handler returns an asynchronous value.
A HandlerAdapter may expose its exception handling mechanism as a
DispatchExceptionHandler set on the HandlerResult it returns. When that’s set,
DispatcherHandler will also apply it to the handling of the result.
A HandlerAdapter may also choose to implement DispatchExceptionHandler. In that case
DispatcherHandler will apply it to exceptions that arise before a handler is mapped,
e.g. during handler mapping, or earlier, e.g. in a WebFilter.
See also Exceptions in the “Annotated Controller” section or
Exceptions in the WebHandler API section.
1.3.6. View Resolution
View resolution enables rendering to a browser with an HTML template and a model without
tying you to a specific view technology. In Spring WebFlux, view resolution is
supported through a dedicated HandlerResultHandler that uses
ViewResolver instances to map a String (representing a logical view name) to a View
instance. The View is then used to render the response.
Handling
The HandlerResult passed into ViewResolutionResultHandler contains the return value
from the handler and the model that contains attributes added during request
handling. The return value is processed as one of the following:
-
String,CharSequence: A logical view name to be resolved to aViewthrough
the list of configuredViewResolverimplementations. -
void: Select a default view name based on the request path, minus the leading and
trailing slash, and resolve it to aView. The same also happens when a view name
was not provided (for example, model attribute was returned) or an async return value
(for example,Monocompleted empty). -
Rendering: API for
view resolution scenarios. Explore the options in your IDE with code completion. -
Model,Map: Extra model attributes to be added to the model for the request. -
Any other: Any other return value (except for simple types, as determined by
BeanUtils#isSimpleProperty)
is treated as a model attribute to be added to the model. The attribute name is derived
from the class name by using conventions,
unless a handler method@ModelAttributeannotation is present.
The model can contain asynchronous, reactive types (for example, from Reactor or RxJava). Prior
to rendering, AbstractView resolves such model attributes into concrete values
and updates the model. Single-value reactive types are resolved to a single
value or no value (if empty), while multi-value reactive types (for example, Flux<T>) are
collected and resolved to List<T>.
To configure view resolution is as simple as adding a ViewResolutionResultHandler bean
to your Spring configuration. WebFlux Config provides a
dedicated configuration API for view resolution.
See View Technologies for more on the view technologies integrated with Spring WebFlux.
Redirecting
The special redirect: prefix in a view name lets you perform a redirect. The
UrlBasedViewResolver (and sub-classes) recognize this as an instruction that a
redirect is needed. The rest of the view name is the redirect URL.
The net effect is the same as if the controller had returned a RedirectView or
Rendering.redirectTo("abc").build(), but now the controller itself can
operate in terms of logical view names. A view name such as
redirect:/some/resource is relative to the current application, while a view name such as
redirect:https://example.com/arbitrary/path redirects to an absolute URL.
Content Negotiation
ViewResolutionResultHandler supports content negotiation. It compares the request
media types with the media types supported by each selected View. The first View
that supports the requested media type(s) is used.
In order to support media types such as JSON and XML, Spring WebFlux provides
HttpMessageWriterView, which is a special View that renders through an
HttpMessageWriter. Typically, you would configure these as default
views through the WebFlux Configuration. Default views are
always selected and used if they match the requested media type.
1.4. Annotated Controllers
Spring WebFlux provides an annotation-based programming model, where @Controller and
@RestController components use annotations to express request mappings, request input,
handle exceptions, and more. Annotated controllers have flexible method signatures and
do not have to extend base classes nor implement specific interfaces.
The following listing shows a basic example:
Java
@RestController
public class HelloController {

    @GetMapping("/hello")
    public String handle() {
        return "Hello WebFlux";
    }
}
Kotlin
@RestController
class HelloController {

    @GetMapping("/hello")
    fun handle() = "Hello WebFlux"
}
In the preceding example, the method returns a String to be written to the response body.
1.4.1. @Controller
You can define controller beans by using a standard Spring bean definition.
The @Controller stereotype allows for auto-detection and is aligned with Spring general support
for detecting @Component classes in the classpath and auto-registering bean definitions
for them. It also acts as a stereotype for the annotated class, indicating its role as
a web component.
To enable auto-detection of such @Controller beans, you can add component scanning to
your Java configuration, as the following example shows:
Java
@Configuration
@ComponentScan("org.example.web") (1)
public class WebConfig {

    // ...
}
| 1 | Scan the org.example.web package. |
Kotlin
@Configuration
@ComponentScan("org.example.web") (1)
class WebConfig {

    // ...
}
| 1 | Scan the org.example.web package. |
@RestController is a composed annotation that is
itself meta-annotated with @Controller and @ResponseBody, indicating a controller whose
every method inherits the type-level @ResponseBody annotation and, therefore, writes
directly to the response body versus view resolution and rendering with an HTML template.
AOP Proxies
In some cases, you may need to decorate a controller with an AOP proxy at runtime.
One example is if you choose to have @Transactional annotations directly on the
controller. When this is the case, for controllers specifically, we recommend
using class-based proxying. This is automatically the case with such annotations
directly on the controller.
If the controller implements an interface, and needs AOP proxying, you may need to
explicitly configure class-based proxying. For example, with @EnableTransactionManagement
you can change to @EnableTransactionManagement(proxyTargetClass = true), and with
<tx:annotation-driven/> you can change to <tx:annotation-driven proxy-target-class="true"/>.
|
Keep in mind that as of 6.0, with interface proxying, Spring WebFlux no longer detects controllers based solely on a type-level @RequestMapping annotation on the interface.Please, enable class based proxying, or otherwise the interface must also have an @Controller annotation.
|
1.4.2. Request Mapping
The @RequestMapping annotation is used to map requests to controllers methods. It has
various attributes to match by URL, HTTP method, request parameters, headers, and media
types. You can use it at the class level to express shared mappings or at the method level
to narrow down to a specific endpoint mapping.
There are also HTTP method specific shortcut variants of @RequestMapping:
-
@GetMapping -
@PostMapping -
@PutMapping -
@DeleteMapping -
@PatchMapping
The preceding annotations are Custom Annotations that are provided
because, arguably, most controller methods should be mapped to a specific HTTP method versus
using @RequestMapping, which, by default, matches to all HTTP methods. At the same time, a
@RequestMapping is still needed at the class level to express shared mappings.
The following example uses type and method level mappings:
Java
@RestController
@RequestMapping("/persons")
class PersonController {

    @GetMapping("/{id}")
    public Person getPerson(@PathVariable Long id) {
        // ...
    }

    @PostMapping
    @ResponseStatus(HttpStatus.CREATED)
    public void add(@RequestBody Person person) {
        // ...
    }
}
Kotlin
@RestController
@RequestMapping("/persons")
class PersonController {

    @GetMapping("/{id}")
    fun getPerson(@PathVariable id: Long): Person {
        // ...
    }

    @PostMapping
    @ResponseStatus(HttpStatus.CREATED)
    fun add(@RequestBody person: Person) {
        // ...
    }
}
URI Patterns
You can map requests by using glob patterns and wildcards:
| Pattern | Description | Example |
|---|---|---|
|
|
Matches one character |
|
|
|
Matches zero or more characters within a path segment |
|
|
|
Matches zero or more path segments until the end of the path |
|
|
|
Matches a path segment and captures it as a variable named «name» |
|
|
|
Matches the regexp |
|
|
|
Matches zero or more path segments until the end of the path and captures it as a variable named «path» |
|
Captured URI variables can be accessed with @PathVariable, as the following example shows:
Java
@GetMapping("/owners/{ownerId}/pets/{petId}")
public Pet findPet(@PathVariable Long ownerId, @PathVariable Long petId) {
    // ...
}
Kotlin
@GetMapping("/owners/{ownerId}/pets/{petId}")
fun findPet(@PathVariable ownerId: Long, @PathVariable petId: Long): Pet {
    // ...
}
You can declare URI variables at the class and method levels, as the following example shows:
Java
@Controller
@RequestMapping("/owners/{ownerId}") (1)
public class OwnerController {

    @GetMapping("/pets/{petId}") (2)
    public Pet findPet(@PathVariable Long ownerId, @PathVariable Long petId) {
        // ...
    }
}
| 1 | Class-level URI mapping. |
| 2 | Method-level URI mapping. |
Kotlin
@Controller
@RequestMapping("/owners/{ownerId}") (1)
class OwnerController {

    @GetMapping("/pets/{petId}") (2)
    fun findPet(@PathVariable ownerId: Long, @PathVariable petId: Long): Pet {
        // ...
    }
}
| 1 | Class-level URI mapping. |
| 2 | Method-level URI mapping. |
URI variables are automatically converted to the appropriate type or a TypeMismatchException
is raised. Simple types (int, long, Date, and so on) are supported by default and you can
register support for any other data type.
See Type Conversion and DataBinder.
URI variables can be named explicitly (for example, @PathVariable("customId")), but you can
leave that detail out if the names are the same and you compile your code with the -parameters
compiler flag.
The syntax {*varName} declares a URI variable that matches zero or more remaining path
segments. For example /resources/{*path} matches all files under /resources/, and the
"path" variable captures the complete path under /resources.
The syntax {varName:regex} declares a URI variable with a regular expression that has the
syntax: {varName:regex}. For example, given a URL of /spring-web-3.0.5.jar, the following method
extracts the name, version, and file extension:
Java
@GetMapping("/{name:[a-z-]+}-{version:\d\.\d\.\d}{ext:\.[a-z]+}")
public void handle(@PathVariable String version, @PathVariable String ext) {
    // ...
}
Kotlin
@GetMapping("/{name:[a-z-]+}-{version:\d\.\d\.\d}{ext:\.[a-z]+}")
fun handle(@PathVariable version: String, @PathVariable ext: String) {
    // ...
}
URI path patterns can also have embedded ${…} placeholders that are resolved on startup
through PropertySourcesPlaceholderConfigurer against local, system, environment, and
other property sources. You can use this to, for example, parameterize a base URL based on
some external configuration.
Spring WebFlux uses PathPattern and the PathPatternParser for URI path matching support.Both classes are located in spring-web and are expressly designed for use with HTTP URLpaths in web applications where a large number of URI path patterns are matched at runtime. |
Spring WebFlux does not support suffix pattern matching — unlike Spring MVC, where a
mapping such as /person also matches to /person.*. For URL-based content
negotiation, if needed, we recommend using a query parameter, which is simpler, more
explicit, and less vulnerable to URL path based exploits.
Pattern Comparison
When multiple patterns match a URL, they must be compared to find the best match. This is done
with PathPattern.SPECIFICITY_COMPARATOR, which looks for patterns that are more specific.
For every pattern, a score is computed, based on the number of URI variables and wildcards,
where a URI variable scores lower than a wildcard. A pattern with a lower total score
wins. If two patterns have the same score, the longer is chosen.
Catch-all patterns (for example, **, {*varName}) are excluded from the scoring and are always
sorted last instead. If two patterns are both catch-all, the longer is chosen.
Consumable Media Types
You can narrow the request mapping based on the Content-Type of the request,
as the following example shows:
Java
@PostMapping(path = "/pets", consumes = "application/json")
public void addPet(@RequestBody Pet pet) {
    // ...
}
Kotlin
@PostMapping("/pets", consumes = ["application/json"])
fun addPet(@RequestBody pet: Pet) {
    // ...
}
The consumes attribute also supports negation expressions — for example, !text/plain means any
content type other than text/plain.
You can declare a shared consumes attribute at the class level. Unlike most other request
mapping attributes, however, when used at the class level, a method-level consumes attribute
overrides rather than extends the class-level declaration.
MediaType provides constants for commonly used media types — for example,APPLICATION_JSON_VALUE and APPLICATION_XML_VALUE.
|
Producible Media Types
You can narrow the request mapping based on the Accept request header and the list of
content types that a controller method produces, as the following example shows:
Java
@GetMapping(path = "/pets/{petId}", produces = "application/json")
@ResponseBody
public Pet getPet(@PathVariable String petId) {
    // ...
}
Kotlin
@GetMapping("/pets/{petId}", produces = ["application/json"])
@ResponseBody
fun getPet(@PathVariable String petId): Pet {
    // ...
}
The media type can specify a character set. Negated expressions are supported — for example,
!text/plain means any content type other than text/plain.
You can declare a shared produces attribute at the class level. Unlike most other request
mapping attributes, however, when used at the class level, a method-level produces attribute
overrides rather than extend the class level declaration.
MediaType provides constants for commonly used media types — e.g.APPLICATION_JSON_VALUE, APPLICATION_XML_VALUE.
|
Parameters and Headers
You can narrow request mappings based on query parameter conditions. You can test for the
presence of a query parameter (myParam), for its absence (!myParam), or for a
specific value (myParam=myValue). The following examples tests for a parameter with a value:
Java
@GetMapping(path = "/pets/{petId}", params = "myParam=myValue") (1)
public void findPet(@PathVariable String petId) {
    // ...
}
| 1 | Check that myParam equals myValue. |
Kotlin
@GetMapping("/pets/{petId}", params = ["myParam=myValue"]) (1)
fun findPet(@PathVariable petId: String) {
    // ...
}
| 1 | Check that myParam equals myValue. |
You can also use the same with request header conditions, as the following example shows:
Java
@GetMapping(path = "/pets", headers = "myHeader=myValue") (1)
public void findPet(@PathVariable String petId) {
    // ...
}
| 1 | Check that myHeader equals myValue. |
Kotlin
@GetMapping("/pets", headers = ["myHeader=myValue"]) (1)
fun findPet(@PathVariable petId: String) {
    // ...
}
| 1 | Check that myHeader equals myValue. |
HTTP HEAD, OPTIONS
@GetMapping and @RequestMapping(method=HttpMethod.GET) support HTTP HEAD
transparently for request mapping purposes. Controller methods need not change.
A response wrapper, applied in the HttpHandler server adapter, ensures a Content-Length
header is set to the number of bytes written without actually writing to the response.
By default, HTTP OPTIONS is handled by setting the Allow response header to the list of HTTP
methods listed in all @RequestMapping methods with matching URL patterns.
For a @RequestMapping without HTTP method declarations, the Allow header is set to
GET,HEAD,POST,PUT,PATCH,DELETE,OPTIONS. Controller methods should always declare the
supported HTTP methods (for example, by using the HTTP method specific variants — @GetMapping, @PostMapping, and others).
You can explicitly map a @RequestMapping method to HTTP HEAD and HTTP OPTIONS, but that
is not necessary in the common case.
Custom Annotations
Spring WebFlux supports the use of composed annotations
for request mapping. Those are annotations that are themselves meta-annotated with
@RequestMapping and composed to redeclare a subset (or all) of the @RequestMapping
attributes with a narrower, more specific purpose.
@GetMapping, @PostMapping, @PutMapping, @DeleteMapping, and @PatchMapping are
examples of composed annotations. They are provided, because, arguably, most
controller methods should be mapped to a specific HTTP method versus using @RequestMapping,
which, by default, matches to all HTTP methods. If you need an example of composed
annotations, look at how those are declared.
Spring WebFlux also supports custom request mapping attributes with custom request matching
logic. This is a more advanced option that requires sub-classing
RequestMappingHandlerMapping and overriding the getCustomMethodCondition method, where
you can check the custom attribute and return your own RequestCondition.
Explicit Registrations
You can programmatically register Handler methods, which can be used for dynamic
registrations or for advanced cases, such as different instances of the same handler
under different URLs. The following example shows how to do so:
Java
@Configuration
public class MyConfig {

    @Autowired
    public void setHandlerMapping(RequestMappingHandlerMapping mapping, UserHandler handler) (1)
            throws NoSuchMethodException {

        RequestMappingInfo info = RequestMappingInfo
                .paths("/user/{id}").methods(RequestMethod.GET).build(); (2)

        Method method = UserHandler.class.getMethod("getUser", Long.class); (3)

        mapping.registerMapping(info, handler, method); (4)
    }

}
| 1 | Inject target handlers and the handler mapping for controllers. |
| 2 | Prepare the request mapping metadata. |
| 3 | Get the handler method. |
| 4 | Add the registration. |
Kotlin
@Configuration
class MyConfig {

    @Autowired
    fun setHandlerMapping(mapping: RequestMappingHandlerMapping, handler: UserHandler) { (1)

        val info = RequestMappingInfo.paths("/user/{id}").methods(RequestMethod.GET).build() (2)

        val method = UserHandler::class.java.getMethod("getUser", Long::class.java) (3)

        mapping.registerMapping(info, handler, method) (4)
    }
}
| 1 | Inject target handlers and the handler mapping for controllers. |
| 2 | Prepare the request mapping metadata. |
| 3 | Get the handler method. |
| 4 | Add the registration. |
1.4.3. Handler Methods
@RequestMapping handler methods have a flexible signature and can choose from a range of
supported controller method arguments and return values.
Method Arguments
The following table shows the supported controller method arguments.
Reactive types (Reactor, RxJava, or other) are
supported on arguments that require blocking I/O (for example, reading the request body) to
be resolved. This is marked in the Description column. Reactive types are not expected
on arguments that do not require blocking.
JDK 1.8’s java.util.Optional is supported as a method argument in combination with
annotations that have a required attribute (for example, @RequestParam, @RequestHeader,
and others) and is equivalent to required=false.
| Controller method argument | Description |
|---|---|
|
|
Access to the full |
|
|
Access to the HTTP request or response. |
|
|
Access to the session. This does not force the start of a new session unless attributes |
|
|
The currently authenticated user — possibly a specific |
|
|
The HTTP method of the request. |
|
|
The current request locale, determined by the most specific |
|
|
The time zone associated with the current request, as determined by a |
|
|
For access to URI template variables. See URI Patterns. |
|
|
For access to name-value pairs in URI path segments. See Matrix Variables. |
|
|
For access to query parameters. Parameter values are converted to the declared method argument Note that use of |
|
|
For access to request headers. Header values are converted to the declared method argument |
|
|
For access to cookies. Cookie values are converted to the declared method argument type. |
|
|
For access to the HTTP request body. Body content is converted to the declared method |
|
|
For access to request headers and body. The body is converted with |
|
|
For access to a part in a |
|
|
For access to the model that is used in HTML controllers and is exposed to templates as |
|
|
For access to an existing attribute in the model (instantiated if not present) with Note that use of |
|
|
For access to errors from validation and data binding for a command object, i.e. a |
|
|
For marking form processing complete, which triggers cleanup of session attributes |
|
|
For preparing a URL relative to the current request’s host, port, scheme, and |
|
|
For access to any session attribute — in contrast to model attributes stored in the session |
|
|
For access to request attributes. See |
|
Any other argument |
If a method argument is not matched to any of the above, it is, by default, resolved as |
Return Values
The following table shows the supported controller method return values. Note that reactive
types from libraries such as Reactor, RxJava, or other are
generally supported for all return values.
| Controller method return value | Description |
|---|---|
|
|
The return value is encoded through |
|
|
The return value specifies the full response, including HTTP headers, and the body is encoded |
|
|
For returning a response with headers and no body. |
|
|
To render an RFC 7807 error response with details in the body, |
|
|
To render an RFC 7807 error response with details in the body, |
|
|
A view name to be resolved with |
|
|
A |
|
|
Attributes to be added to the implicit model, with the view name implicitly determined |
|
|
An attribute to be added to the model, with the view name implicitly determined based Note that |
|
|
An API for model and view rendering scenarios. |
|
|
A method with a If none of the above is true, a |
|
|
Emit server-sent events. The |
|
Other return values |
If a return value remains unresolved in any other way, it is treated as a model |
Type Conversion
Some annotated controller method arguments that represent String-based request input (for example,
@RequestParam, @RequestHeader, @PathVariable, @MatrixVariable, and @CookieValue)
can require type conversion if the argument is declared as something other than String.
For such cases, type conversion is automatically applied based on the configured converters.
By default, simple types (such as int, long, Date, and others) are supported. Type conversion
can be customized through a WebDataBinder (see DataBinder) or by registering
Formatters with the FormattingConversionService (see Spring Field Formatting).
A practical issue in type conversion is the treatment of an empty String source value.
Such a value is treated as missing if it becomes null as a result of type conversion.
This can be the case for Long, UUID, and other target types. If you want to allow null
to be injected, either use the required flag on the argument annotation, or declare the
argument as @Nullable.
Matrix Variables
RFC 3986 discusses name-value pairs in
path segments. In Spring WebFlux, we refer to those as “matrix variables” based on an
“old post” by Tim Berners-Lee, but they
can be also be referred to as URI path parameters.
Matrix variables can appear in any path segment, with each variable separated by a semicolon and
multiple values separated by commas — for example, "/cars;color=red,green;year=2012". Multiple
values can also be specified through repeated variable names — for example,
"color=red;color=green;color=blue".
Unlike Spring MVC, in WebFlux, the presence or absence of matrix variables in a URL does
not affect request mappings. In other words, you are not required to use a URI variable
to mask variable content. That said, if you want to access matrix variables from a
controller method, you need to add a URI variable to the path segment where matrix
variables are expected. The following example shows how to do so:
Java
// GET /pets/42;q=11;r=22

@GetMapping("/pets/{petId}")
public void findPet(@PathVariable String petId, @MatrixVariable int q) {

    // petId == 42
    // q == 11
}
Kotlin
// GET /pets/42;q=11;r=22

@GetMapping("/pets/{petId}")
fun findPet(@PathVariable petId: String, @MatrixVariable q: Int) {

    // petId == 42
    // q == 11
}
Given that all path segments can contain matrix variables, you may sometimes need to
disambiguate which path variable the matrix variable is expected to be in,
as the following example shows:
Java
// GET /owners/42;q=11/pets/21;q=22

@GetMapping("/owners/{ownerId}/pets/{petId}")
public void findPet(
        @MatrixVariable(name="q", pathVar="ownerId") int q1,
        @MatrixVariable(name="q", pathVar="petId") int q2) {

    // q1 == 11
    // q2 == 22
}
Kotlin
@GetMapping("/owners/{ownerId}/pets/{petId}")
fun findPet(
        @MatrixVariable(name = "q", pathVar = "ownerId") q1: Int,
        @MatrixVariable(name = "q", pathVar = "petId") q2: Int) {

    // q1 == 11
    // q2 == 22
}
You can define a matrix variable may be defined as optional and specify a default value
as the following example shows:
Java
// GET /pets/42

@GetMapping("/pets/{petId}")
public void findPet(@MatrixVariable(required=false, defaultValue="1") int q) {

    // q == 1
}
Kotlin
// GET /pets/42

@GetMapping("/pets/{petId}")
fun findPet(@MatrixVariable(required = false, defaultValue = "1") q: Int) {

    // q == 1
}
To get all matrix variables, use a MultiValueMap, as the following example shows:
Java
// GET /owners/42;q=11;r=12/pets/21;q=22;s=23

@GetMapping("/owners/{ownerId}/pets/{petId}")
public void findPet(
        @MatrixVariable MultiValueMap<String, String> matrixVars,
        @MatrixVariable(pathVar="petId") MultiValueMap<String, String> petMatrixVars) {

    // matrixVars: ["q" : [11,22], "r" : 12, "s" : 23]
    // petMatrixVars: ["q" : 22, "s" : 23]
}
Kotlin
// GET /owners/42;q=11;r=12/pets/21;q=22;s=23

@GetMapping("/owners/{ownerId}/pets/{petId}")
fun findPet(
        @MatrixVariable matrixVars: MultiValueMap<String, String>,
        @MatrixVariable(pathVar="petId") petMatrixVars: MultiValueMap<String, String>) {

    // matrixVars: ["q" : [11,22], "r" : 12, "s" : 23]
    // petMatrixVars: ["q" : 22, "s" : 23]
}
@RequestParam
You can use the @RequestParam annotation to bind query parameters to a method argument in a
controller. The following code snippet shows the usage:
Java
@Controller
@RequestMapping("/pets")
public class EditPetForm {

    // ...

    @GetMapping
    public String setupForm(@RequestParam("petId") int petId, Model model) { (1)
        Pet pet = this.clinic.loadPet(petId);
        model.addAttribute("pet", pet);
        return "petForm";
    }

    // ...
}
Kotlin
import org.springframework.ui.set

@Controller
@RequestMapping("/pets")
class EditPetForm {

    // ...

    @GetMapping
    fun setupForm(@RequestParam("petId") petId: Int, model: Model): String { (1)
        val pet = clinic.loadPet(petId)
        model["pet"] = pet
        return "petForm"
    }

    // ...
}
|
The Servlet API “request parameter” concept conflates query parameters, form data, and multiparts into one. However, in WebFlux, each is accessed individually through ServerWebExchange. While @RequestParam binds to query parameters only, you can usedata binding to apply query parameters, form data, and multiparts to a command object. |
Method parameters that use the @RequestParam annotation are required by default, but
you can specify that a method parameter is optional by setting the required flag of a @RequestParam
to false or by declaring the argument with a java.util.Optional
wrapper.
Type conversion is applied automatically if the target method parameter type is not
String. See Type Conversion.
When a @RequestParam annotation is declared on a Map<String, String> or
MultiValueMap<String, String> argument, the map is populated with all query parameters.
Note that use of @RequestParam is optional — for example, to set its attributes. By
default, any argument that is a simple value type (as determined by
BeanUtils#isSimpleProperty)
and is not resolved by any other argument resolver is treated as if it were annotated
with @RequestParam.
You can use the @RequestHeader annotation to bind a request header to a method argument in a
controller.
The following example shows a request with headers:
Host                    localhost:8080
Accept                  text/html,application/xhtml+xml,application/xml;q=0.9
Accept-Language         fr,en-gb;q=0.7,en;q=0.3
Accept-Encoding         gzip,deflate
Accept-Charset          ISO-8859-1,utf-8;q=0.7,*;q=0.7
Keep-Alive              300
The following example gets the value of the Accept-Encoding and Keep-Alive headers:
Java
@GetMapping("/demo")
public void handle(
        @RequestHeader("Accept-Encoding") String encoding, (1)
        @RequestHeader("Keep-Alive") long keepAlive) { (2)
    //...
}
| 1 | Get the value of the Accept-Encoding header. |
| 2 | Get the value of the Keep-Alive header. |
Kotlin
@GetMapping("/demo")
fun handle(
        @RequestHeader("Accept-Encoding") encoding: String, (1)
        @RequestHeader("Keep-Alive") keepAlive: Long) { (2)
    //...
}
| 1 | Get the value of the Accept-Encoding header. |
| 2 | Get the value of the Keep-Alive header. |
Type conversion is applied automatically if the target method parameter type is not
String. See Type Conversion.
When a @RequestHeader annotation is used on a Map<String, String>,
MultiValueMap<String, String>, or HttpHeaders argument, the map is populated
with all header values.
|
Built-in support is available for converting a comma-separated string into an array or collection of strings or other types known to the type conversion system. For example, a method parameter annotated with @RequestHeader("Accept") may be of typeString but also of String[] or List<String>.
|
@CookieValue
You can use the @CookieValue annotation to bind the value of an HTTP cookie to a method argument
in a controller.
The following example shows a request with a cookie:
JSESSIONID=415A4AC178C59DACE0B2C9CA727CDD84
The following code sample demonstrates how to get the cookie value:
Java
@GetMapping("/demo")
public void handle(@CookieValue("JSESSIONID") String cookie) { (1)
    //...
}
Kotlin
@GetMapping("/demo")
fun handle(@CookieValue("JSESSIONID") cookie: String) { (1)
    //...
}
Type conversion is applied automatically if the target method parameter type is not
String. See Type Conversion.
@ModelAttribute
You can use the @ModelAttribute annotation on a method argument to access an attribute from the
model or have it instantiated if not present. The model attribute is also overlaid with
the values of query parameters and form fields whose names match to field names. This is
referred to as data binding, and it saves you from having to deal with parsing and
converting individual query parameters and form fields. The following example binds an instance of Pet:
Java
@PostMapping("/owners/{ownerId}/pets/{petId}/edit")
public String processSubmit(@ModelAttribute Pet pet) { } (1)
| 1 | Bind an instance of Pet. |
Kotlin
@PostMapping("/owners/{ownerId}/pets/{petId}/edit")
fun processSubmit(@ModelAttribute pet: Pet): String { } (1)
| 1 | Bind an instance of Pet. |
The Pet instance in the preceding example is resolved as follows:
-
From the model if already added through
Model. -
From the HTTP session through
@SessionAttributes. -
From the invocation of a default constructor.
-
From the invocation of a “primary constructor” with arguments that match query
parameters or form fields. Argument names are determined through JavaBeans
@ConstructorPropertiesor through runtime-retained parameter names in the bytecode.
After the model attribute instance is obtained, data binding is applied. The
WebExchangeDataBinder class matches names of query parameters and form fields to field
names on the target Object. Matching fields are populated after type conversion is applied
where necessary. For more on data binding (and validation), see
Validation. For more on customizing data binding, see
DataBinder.
Data binding can result in errors. By default, a WebExchangeBindException is raised, but,
to check for such errors in the controller method, you can add a BindingResult argument
immediately next to the @ModelAttribute, as the following example shows:
Java
@PostMapping("/owners/{ownerId}/pets/{petId}/edit")
public String processSubmit(@ModelAttribute("pet") Pet pet, BindingResult result) { (1)
    if (result.hasErrors()) {
        return "petForm";
    }
    // ...
}
| 1 | Adding a BindingResult. |
Kotlin
@PostMapping("/owners/{ownerId}/pets/{petId}/edit")
fun processSubmit(@ModelAttribute("pet") pet: Pet, result: BindingResult): String { (1)
    if (result.hasErrors()) {
        return "petForm"
    }
    // ...
}
| 1 | Adding a BindingResult. |
You can automatically apply validation after data binding by adding the
jakarta.validation.Valid annotation or Spring’s @Validated annotation (see also
Bean Validation and
Spring validation). The following example uses the @Valid annotation:
Java
@PostMapping("/owners/{ownerId}/pets/{petId}/edit")
public String processSubmit(@Valid @ModelAttribute("pet") Pet pet, BindingResult result) { (1)
    if (result.hasErrors()) {
        return "petForm";
    }
    // ...
}
| 1 | Using @Valid on a model attribute argument. |
Kotlin
@PostMapping("/owners/{ownerId}/pets/{petId}/edit")
fun processSubmit(@Valid @ModelAttribute("pet") pet: Pet, result: BindingResult): String { (1)
    if (result.hasErrors()) {
        return "petForm"
    }
    // ...
}
| 1 | Using @Valid on a model attribute argument. |
Spring WebFlux, unlike Spring MVC, supports reactive types in the model — for example,
Mono<Account> or io.reactivex.Single<Account>. You can declare a @ModelAttribute argument
with or without a reactive type wrapper, and it will be resolved accordingly,
to the actual value if necessary. However, note that, to use a BindingResult
argument, you must declare the @ModelAttribute argument before it without a reactive
type wrapper, as shown earlier. Alternatively, you can handle any errors through the
reactive type, as the following example shows:
Java
@PostMapping("/owners/{ownerId}/pets/{petId}/edit")
public Mono<String> processSubmit(@Valid @ModelAttribute("pet") Mono<Pet> petMono) {
    return petMono
        .flatMap(pet -> {
            // ...
        })
        .onErrorResume(ex -> {
            // ...
        });
}
Kotlin
@PostMapping("/owners/{ownerId}/pets/{petId}/edit")
fun processSubmit(@Valid @ModelAttribute("pet") petMono: Mono<Pet>): Mono<String> {
    return petMono
            .flatMap { pet ->
                // ...
            }
            .onErrorResume{ ex ->
                // ...
            }
}
Note that use of @ModelAttribute is optional — for example, to set its attributes.
By default, any argument that is not a simple value type( as determined by
BeanUtils#isSimpleProperty)
and is not resolved by any other argument resolver is treated as if it were annotated
with @ModelAttribute.
@SessionAttributes
@SessionAttributes is used to store model attributes in the WebSession between
requests. It is a type-level annotation that declares session attributes used by a
specific controller. This typically lists the names of model attributes or types of
model attributes that should be transparently stored in the session for subsequent
requests to access.
Consider the following example:
Java
@Controller
@SessionAttributes("pet") (1)
public class EditPetForm {
    // ...
}
| 1 | Using the @SessionAttributes annotation. |
Kotlin
@Controller
@SessionAttributes("pet") (1)
class EditPetForm {
    // ...
}
| 1 | Using the @SessionAttributes annotation. |
On the first request, when a model attribute with the name, pet, is added to the model,
it is automatically promoted to and saved in the WebSession. It remains there until
another controller method uses a SessionStatus method argument to clear the storage,
as the following example shows:
Java
@Controller
@SessionAttributes("pet") (1)
public class EditPetForm {

    // ...

    @PostMapping("/pets/{id}")
    public String handle(Pet pet, BindingResult errors, SessionStatus status) { (2)
        if (errors.hasErrors()) {
            // ...
        }
            status.setComplete();
            // ...
        }
    }
}
| 1 | Using the @SessionAttributes annotation. |
| 2 | Using a SessionStatus variable. |
Kotlin
@Controller
@SessionAttributes("pet") (1)
class EditPetForm {

    // ...

    @PostMapping("/pets/{id}")
    fun handle(pet: Pet, errors: BindingResult, status: SessionStatus): String { (2)
        if (errors.hasErrors()) {
            // ...
        }
        status.setComplete()
        // ...
    }
}
| 1 | Using the @SessionAttributes annotation. |
| 2 | Using a SessionStatus variable. |
@SessionAttribute
If you need access to pre-existing session attributes that are managed globally
(that is, outside the controller — for example, by a filter) and may or may not be present,
you can use the @SessionAttribute annotation on a method parameter, as the following example shows:
Java
@GetMapping("/")
public String handle(@SessionAttribute User user) { (1)
    // ...
}
| 1 | Using @SessionAttribute. |
Kotlin
@GetMapping("/")
fun handle(@SessionAttribute user: User): String { (1)
    // ...
}
| 1 | Using @SessionAttribute. |
For use cases that require adding or removing session attributes, consider injecting
WebSession into the controller method.
For temporary storage of model attributes in the session as part of a controller
workflow, consider using SessionAttributes, as described in
@SessionAttributes.
@RequestAttribute
Similarly to @SessionAttribute, you can use the @RequestAttribute annotation to
access pre-existing request attributes created earlier (for example, by a WebFilter),
as the following example shows:
Java
@GetMapping("/")
public String handle(@RequestAttribute Client client) { (1)
    // ...
}
| 1 | Using @RequestAttribute. |
Kotlin
@GetMapping("/")
fun handle(@RequestAttribute client: Client): String { (1)
    // ...
}
| 1 | Using @RequestAttribute. |
Multipart Content
As explained in Multipart Data, ServerWebExchange provides access to multipart
content. The best way to handle a file upload form (for example, from a browser) in a controller
is through data binding to a command object,
as the following example shows:
Java
class MyForm {

    private String name;

    private MultipartFile file;

    // ...

}

@Controller
public class FileUploadController {

    @PostMapping("/form")
    public String handleFormUpload(MyForm form, BindingResult errors) {
        // ...
    }

}
Kotlin
class MyForm(
        val name: String,
        val file: MultipartFile)

@Controller
class FileUploadController {

    @PostMapping("/form")
    fun handleFormUpload(form: MyForm, errors: BindingResult): String {
        // ...
    }

}
You can also submit multipart requests from non-browser clients in a RESTful service
scenario. The following example uses a file along with JSON:
POST /someUrl
Content-Type: multipart/mixed

--edt7Tfrdusa7r3lNQc79vXuhIIMlatb7PQg7Vp
Content-Disposition: form-data; name="meta-data"
Content-Type: application/json; charset=UTF-8
Content-Transfer-Encoding: 8bit

{
    "name": "value"
}
--edt7Tfrdusa7r3lNQc79vXuhIIMlatb7PQg7Vp
Content-Disposition: form-data; name="file-data"; filename="file.properties"
Content-Type: text/xml
Content-Transfer-Encoding: 8bit
... File Data ...
You can access individual parts with @RequestPart, as the following example shows:
Java
@PostMapping("/")
public String handle(@RequestPart("meta-data") Part metadata, (1)
        @RequestPart("file-data") FilePart file) { (2)
    // ...
}
| 1 | Using @RequestPart to get the metadata. |
| 2 | Using @RequestPart to get the file. |
Kotlin
@PostMapping("/")
fun handle(@RequestPart("meta-data") Part metadata, (1)
        @RequestPart("file-data") FilePart file): String { (2)
    // ...
}
| 1 | Using @RequestPart to get the metadata. |
| 2 | Using @RequestPart to get the file. |
To deserialize the raw part content (for example, to JSON — similar to @RequestBody),
you can declare a concrete target Object, instead of Part, as the following example shows:
Java
@PostMapping("/")
public String handle(@RequestPart("meta-data") MetaData metadata) { (1)
    // ...
}
| 1 | Using @RequestPart to get the metadata. |
Kotlin
@PostMapping("/")
fun handle(@RequestPart("meta-data") metadata: MetaData): String { (1)
    // ...
}
| 1 | Using @RequestPart to get the metadata. |
You can use @RequestPart in combination with jakarta.validation.Valid or Spring’s
@Validated annotation, which causes Standard Bean Validation to be applied. Validation
errors lead to a WebExchangeBindException that results in a 400 (BAD_REQUEST) response.
The exception contains a BindingResult with the error details and can also be handled
in the controller method by declaring the argument with an async wrapper and then using
error related operators:
Java
@PostMapping("/")
public String handle(@Valid @RequestPart("meta-data") Mono<MetaData> metadata) {
    // use one of the onError* operators...
}
Kotlin
@PostMapping("/")
fun handle(@Valid @RequestPart("meta-data") metadata: MetaData): String {
    // ...
}
To access all multipart data as a MultiValueMap, you can use @RequestBody,
as the following example shows:
Java
@PostMapping("/")
public String handle(@RequestBody Mono<MultiValueMap<String, Part>> parts) { (1)
    // ...
}
Kotlin
@PostMapping("/")
fun handle(@RequestBody parts: MultiValueMap<String, Part>): String { (1)
    // ...
}
PartEvent
To access multipart data sequentially, in a streaming fashion, you can use @RequestBody with
Flux<PartEvent> (or Flow<PartEvent> in Kotlin).
Each part in a multipart HTTP message will produce at
least one PartEvent containing both headers and a buffer with the contents of the part.
-
Form fields will produce a single
FormPartEvent, containing the value of the field. -
File uploads will produce one or more
FilePartEventobjects, containing the filename used
when uploading. If the file is large enough to be split across multiple buffers, the first
FilePartEventwill be followed by subsequent events.
For example:
Java
@PostMapping("/")
public void handle(@RequestBody Flux<PartEvent> allPartsEvents) { (1)
    allPartsEvents.windowUntil(PartEvent::isLast) (2)
            .concatMap(p -> p.switchOnFirst((signal, partEvents) -> { (3)
                if (signal.hasValue()) {
                    PartEvent event = signal.get();
                    if (event instanceof FormPartEvent formEvent) { (4)
                        String value = formEvent.value();
                        // handle form field
                    }
                    else if (event instanceof FilePartEvent fileEvent) { (5)
                        String filename = fileEvent.filename();
                        Flux<DataBuffer> contents = partEvents.map(PartEvent::content); (6)
                        // handle file upload
                    }
                    else {
                        return Mono.error(new RuntimeException("Unexpected event: " + event));
                    }
                }
                else {
                    return partEvents; // either complete or error signal
                }
            }));
}
| 1 | Using @RequestBody. |
| 2 | The final PartEvent for a particular part will have isLast() set to true, and can befollowed by additional events belonging to subsequent parts. This makes the isLast property suitable as a predicate for the Flux::windowUntil operator, tosplit events from all parts into windows that each belong to a single part. |
| 3 | The Flux::switchOnFirst operator allows you to see whether you are handling a form field orfile upload. |
| 4 | Handling the form field. |
| 5 | Handling the file upload. |
| 6 | The body contents must be completely consumed, relayed, or released to avoid memory leaks. |
Kotlin
    @PostMapping("/")
    fun handle(@RequestBody allPartsEvents: Flux<PartEvent>) = { (1)
      allPartsEvents.windowUntil(PartEvent::isLast) (2)
          .concatMap {
              it.switchOnFirst { signal, partEvents -> (3)
                  if (signal.hasValue()) {
                      val event = signal.get()
                      if (event is FormPartEvent) { (4)
                          val value: String = event.value();
                          // handle form field
                      } else if (event is FilePartEvent) { (5)
                          val filename: String = event.filename();
                          val contents: Flux<DataBuffer> = partEvents.map(PartEvent::content); (6)
                          // handle file upload
                      } else {
                          return Mono.error(RuntimeException("Unexpected event: " + event));
                      }
                  } else {
                      return partEvents; // either complete or error signal
                  }
              }
          }
}
| 1 | Using @RequestBody. |
| 2 | The final PartEvent for a particular part will have isLast() set to true, and can befollowed by additional events belonging to subsequent parts. This makes the isLast property suitable as a predicate for the Flux::windowUntil operator, tosplit events from all parts into windows that each belong to a single part. |
| 3 | The Flux::switchOnFirst operator allows you to see whether you are handling a form field orfile upload. |
| 4 | Handling the form field. |
| 5 | Handling the file upload. |
| 6 | The body contents must be completely consumed, relayed, or released to avoid memory leaks. |
Received part events can also be relayed to another service by using the WebClient.
See Multipart Data.
@RequestBody
You can use the @RequestBody annotation to have the request body read and deserialized into an
Object through an HttpMessageReader.
The following example uses a @RequestBody argument:
Java
@PostMapping("/accounts")
public void handle(@RequestBody Account account) {
    // ...
}
Kotlin
@PostMapping("/accounts")
fun handle(@RequestBody account: Account) {
    // ...
}
Unlike Spring MVC, in WebFlux, the @RequestBody method argument supports reactive types
and fully non-blocking reading and (client-to-server) streaming.
Java
@PostMapping("/accounts")
public void handle(@RequestBody Mono<Account> account) {
    // ...
}
Kotlin
@PostMapping("/accounts")
fun handle(@RequestBody accounts: Flow<Account>) {
    // ...
}
You can use the HTTP message codecs option of the WebFlux Config to
configure or customize message readers.
You can use @RequestBody in combination with jakarta.validation.Valid or Spring’s
@Validated annotation, which causes Standard Bean Validation to be applied. Validation
errors cause a WebExchangeBindException, which results in a 400 (BAD_REQUEST) response.
The exception contains a BindingResult with error details and can be handled in the
controller method by declaring the argument with an async wrapper and then using error
related operators:
Java
@PostMapping("/accounts")
public void handle(@Valid @RequestBody Mono<Account> account) {
    // use one of the onError* operators...
}
Kotlin
@PostMapping("/accounts")
fun handle(@Valid @RequestBody account: Mono<Account>) {
    // ...
}
HttpEntity
HttpEntity is more or less identical to using @RequestBody but is based on a
container object that exposes request headers and the body. The following example uses an
HttpEntity:
Java
@PostMapping("/accounts")
public void handle(HttpEntity<Account> entity) {
    // ...
}
Kotlin
@PostMapping("/accounts")
fun handle(entity: HttpEntity<Account>) {
    // ...
}
@ResponseBody
You can use the @ResponseBody annotation on a method to have the return serialized
to the response body through an HttpMessageWriter. The following
example shows how to do so:
Java
@GetMapping("/accounts/{id}")
@ResponseBody
public Account handle() {
    // ...
}
Kotlin
@GetMapping("/accounts/{id}")
@ResponseBody
fun handle(): Account {
    // ...
}
@ResponseBody is also supported at the class level, in which case it is inherited by
all controller methods. This is the effect of @RestController, which is nothing more
than a meta-annotation marked with @Controller and @ResponseBody.
@ResponseBody supports reactive types, which means you can return Reactor or RxJava
types and have the asynchronous values they produce rendered to the response.
For additional details, see Streaming and
JSON rendering.
You can combine @ResponseBody methods with JSON serialization views.
See Jackson JSON for details.
You can use the HTTP message codecs option of the WebFlux Config to
configure or customize message writing.
ResponseEntity
ResponseEntity is like @ResponseBody but with status and headers. For example:
Java
@GetMapping("/something")
public ResponseEntity<String> handle() {
    String body = ... ;
    String etag = ... ;
    return ResponseEntity.ok().eTag(etag).body(body);
}
Kotlin
@GetMapping("/something")
fun handle(): ResponseEntity<String> {
    val body: String = ...
    val etag: String = ...
    return ResponseEntity.ok().eTag(etag).build(body)
}
WebFlux supports using a single value reactive type to
produce the ResponseEntity asynchronously, and/or single and multi-value reactive types
for the body. This allows a variety of async responses with ResponseEntity as follows:
-
ResponseEntity<Mono<T>>orResponseEntity<Flux<T>>make the response status and
headers known immediately while the body is provided asynchronously at a later point.
UseMonoif the body consists of 0..1 values orFluxif it can produce multiple values. -
Mono<ResponseEntity<T>>provides all three — response status, headers, and body,
asynchronously at a later point. This allows the response status and headers to vary
depending on the outcome of asynchronous request handling. -
Mono<ResponseEntity<Mono<T>>>orMono<ResponseEntity<Flux<T>>>are yet another
possible, albeit less common alternative. They provide the response status and headers
asynchronously first and then the response body, also asynchronously, second.
Jackson JSON
Spring offers support for the Jackson JSON library.
JSON Views
Spring WebFlux provides built-in support for
Jackson’s Serialization Views,
which allows rendering only a subset of all fields in an Object. To use it with
@ResponseBody or ResponseEntity controller methods, you can use Jackson’s
@JsonView annotation to activate a serialization view class, as the following example shows:
Java
@RestController
public class UserController {

    @GetMapping("/user")
    @JsonView(User.WithoutPasswordView.class)
    public User getUser() {
        return new User("eric", "7!jd#h23");
    }
}

public class User {

    public interface WithoutPasswordView {};
    public interface WithPasswordView extends WithoutPasswordView {};

    private String username;
    private String password;

    public User() {
    }

    public User(String username, String password) {
        this.username = username;
        this.password = password;
    }

    @JsonView(WithoutPasswordView.class)
    public String getUsername() {
        return this.username;
    }

    @JsonView(WithPasswordView.class)
    public String getPassword() {
        return this.password;
    }
}
Kotlin
@RestController
class UserController {

    @GetMapping("/user")
    @JsonView(User.WithoutPasswordView::class)
    fun getUser(): User {
        return User("eric", "7!jd#h23")
    }
}

class User(
        @JsonView(WithoutPasswordView::class) val username: String,
        @JsonView(WithPasswordView::class) val password: String
) {
    interface WithoutPasswordView
    interface WithPasswordView : WithoutPasswordView
}
@JsonView allows an array of view classes but you can only specify only one percontroller method. Use a composite interface if you need to activate multiple views. |
1.4.4. Model
You can use the @ModelAttribute annotation:
-
On a method argument in
@RequestMappingmethods
to create or access an Object from the model and to bind it to the request through a
WebDataBinder. -
As a method-level annotation in
@Controlleror@ControllerAdviceclasses, helping
to initialize the model prior to any@RequestMappingmethod invocation. -
On a
@RequestMappingmethod to mark its return value as a model attribute.
This section discusses @ModelAttribute methods, or the second item from the preceding list.
A controller can have any number of @ModelAttribute methods. All such methods are
invoked before @RequestMapping methods in the same controller. A @ModelAttribute
method can also be shared across controllers through @ControllerAdvice. See the section on
Controller Advice for more details.
@ModelAttribute methods have flexible method signatures. They support many of the same
arguments as @RequestMapping methods (except for @ModelAttribute itself and anything
related to the request body).
The following example uses a @ModelAttribute method:
Java
@ModelAttribute
public void populateModel(@RequestParam String number, Model model) {
    model.addAttribute(accountRepository.findAccount(number));
    // add more ...
}
Kotlin
@ModelAttribute
fun populateModel(@RequestParam number: String, model: Model) {
    model.addAttribute(accountRepository.findAccount(number))
    // add more ...
}
The following example adds one attribute only:
Java
@ModelAttribute
public Account addAccount(@RequestParam String number) {
    return accountRepository.findAccount(number);
}
Kotlin
@ModelAttribute
fun addAccount(@RequestParam number: String): Account {
    return accountRepository.findAccount(number);
}
|
When a name is not explicitly specified, a default name is chosen based on the type, as explained in the javadoc for Conventions.You can always assign an explicit name by using the overloaded addAttribute method orthrough the name attribute on @ModelAttribute (for a return value).
|
Spring WebFlux, unlike Spring MVC, explicitly supports reactive types in the model
(for example, Mono<Account> or io.reactivex.Single<Account>). Such asynchronous model
attributes can be transparently resolved (and the model updated) to their actual values
at the time of @RequestMapping invocation, provided a @ModelAttribute argument is
declared without a wrapper, as the following example shows:
Java
@ModelAttribute
public void addAccount(@RequestParam String number) {
    Mono<Account> accountMono = accountRepository.findAccount(number);
    model.addAttribute("account", accountMono);
}

@PostMapping("/accounts")
public String handle(@ModelAttribute Account account, BindingResult errors) {
    // ...
}
Kotlin
import org.springframework.ui.set

@ModelAttribute
fun addAccount(@RequestParam number: String) {
    val accountMono: Mono<Account> = accountRepository.findAccount(number)
    model["account"] = accountMono
}

@PostMapping("/accounts")
fun handle(@ModelAttribute account: Account, errors: BindingResult): String {
    // ...
}
In addition, any model attributes that have a reactive type wrapper are resolved to their
actual values (and the model updated) just prior to view rendering.
You can also use @ModelAttribute as a method-level annotation on @RequestMapping
methods, in which case the return value of the @RequestMapping method is interpreted as a
model attribute. This is typically not required, as it is the default behavior in HTML
controllers, unless the return value is a String that would otherwise be interpreted
as a view name. @ModelAttribute can also help to customize the model attribute name,
as the following example shows:
Java
@GetMapping("/accounts/{id}")
@ModelAttribute("myAccount")
public Account handle() {
    // ...
    return account;
}
Kotlin
@GetMapping("/accounts/{id}")
@ModelAttribute("myAccount")
fun handle(): Account {
    // ...
    return account
}
1.4.5. DataBinder
@Controller or @ControllerAdvice classes can have @InitBinder methods, to
initialize instances of WebDataBinder. Those, in turn, are used to:
-
Bind request parameters (that is, form data or query) to a model object.
-
Convert
String-based request values (such as request parameters, path variables,
headers, cookies, and others) to the target type of controller method arguments. -
Format model object values as
Stringvalues when rendering HTML forms.
@InitBinder methods can register controller-specific java.beans.PropertyEditor or
Spring Converter and Formatter components. In addition, you can use the
WebFlux Java configuration to register Converter and
Formatter types in a globally shared FormattingConversionService.
@InitBinder methods support many of the same arguments that @RequestMapping methods
do, except for @ModelAttribute (command object) arguments. Typically, they are declared
with a WebDataBinder argument, for registrations, and a void return value.
The following example uses the @InitBinder annotation:
Java
@Controller
public class FormController {

    @InitBinder (1)
    public void initBinder(WebDataBinder binder) {
        SimpleDateFormat dateFormat = new SimpleDateFormat("yyyy-MM-dd");
        dateFormat.setLenient(false);
        binder.registerCustomEditor(Date.class, new CustomDateEditor(dateFormat, false));
    }

    // ...
}
| 1 | Using the @InitBinder annotation. |
Kotlin
@Controller
class FormController {

    @InitBinder (1)
    fun initBinder(binder: WebDataBinder) {
        val dateFormat = SimpleDateFormat("yyyy-MM-dd")
        dateFormat.isLenient = false
        binder.registerCustomEditor(Date::class.java, CustomDateEditor(dateFormat, false))
    }

    // ...
}
| 1 | Using the @InitBinder annotation. |
Alternatively, when using a Formatter-based setup through a shared
FormattingConversionService, you could re-use the same approach and register
controller-specific Formatter instances, as the following example shows:
Java
@Controller
public class FormController {

    @InitBinder
    protected void initBinder(WebDataBinder binder) {
        binder.addCustomFormatter(new DateFormatter("yyyy-MM-dd")); (1)
    }

    // ...
}
| 1 | Adding a custom formatter (a DateFormatter, in this case). |
Kotlin
@Controller
class FormController {

    @InitBinder
    fun initBinder(binder: WebDataBinder) {
        binder.addCustomFormatter(DateFormatter("yyyy-MM-dd")) (1)
    }

    // ...
}
| 1 | Adding a custom formatter (a DateFormatter, in this case). |
Model Design
In the context of web applications, data binding involves the binding of HTTP request
parameters (that is, form data or query parameters) to properties in a model object and
its nested objects.
Only public properties following the
JavaBeans naming conventions
are exposed for data binding — for example, public String getFirstName() and
public void setFirstName(String) methods for a firstName property.
|
The model object, and its nested object graph, is also sometimes referred to as a command object, form-backing object, or POJO (Plain Old Java Object). |
By default, Spring permits binding to all public properties in the model object graph.
This means you need to carefully consider what public properties the model has, since a
client could target any public property path, even some that are not expected to be
targeted for a given use case.
For example, given an HTTP form data endpoint, a malicious client could supply values for
properties that exist in the model object graph but are not part of the HTML form
presented in the browser. This could lead to data being set on the model object and any
of its nested objects, that is not expected to be updated.
The recommended approach is to use a dedicated model object that exposes only
properties that are relevant for the form submission. For example, on a form for changing
a user’s email address, the model object should declare a minimum set of properties such
as in the following ChangeEmailForm.
public class ChangeEmailForm {

    private String oldEmailAddress;
    private String newEmailAddress;

    public void setOldEmailAddress(String oldEmailAddress) {
        this.oldEmailAddress = oldEmailAddress;
    }

    public String getOldEmailAddress() {
        return this.oldEmailAddress;
    }

    public void setNewEmailAddress(String newEmailAddress) {
        this.newEmailAddress = newEmailAddress;
    }

    public String getNewEmailAddress() {
        return this.newEmailAddress;
    }

}
If you cannot or do not want to use a dedicated model object for each data
binding use case, you must limit the properties that are allowed for data binding.
Ideally, you can achieve this by registering allowed field patterns via the
setAllowedFields() method on WebDataBinder.
For example, to register allowed field patterns in your application, you can implement an
@InitBinder method in a @Controller or @ControllerAdvice component as shown below:
@Controller
public class ChangeEmailController {

    @InitBinder
    void initBinder(WebDataBinder binder) {
        binder.setAllowedFields("oldEmailAddress", "newEmailAddress");
    }

    // @RequestMapping methods, etc.

}
In addition to registering allowed patterns, it is also possible to register disallowed
field patterns via the setDisallowedFields() method in DataBinder and its subclasses.
Please note, however, that an «allow list» is safer than a «deny list». Consequently,
setAllowedFields() should be favored over setDisallowedFields().
Note that matching against allowed field patterns is case-sensitive; whereas, matching
against disallowed field patterns is case-insensitive. In addition, a field matching a
disallowed pattern will not be accepted even if it also happens to match a pattern in the
allowed list.
|
It is extremely important to properly configure allowed and disallowed field patterns Furthermore, it is strongly recommended that you do not use types from your domain |
1.4.6. Exceptions
@Controller and @ControllerAdvice classes can have
@ExceptionHandler methods to handle exceptions from controller methods. The following
example includes such a handler method:
Java
@Controller
public class SimpleController {

    // ...

    @ExceptionHandler (1)
    public ResponseEntity<String> handle(IOException ex) {
        // ...
    }
}
| 1 | Declaring an @ExceptionHandler. |
Kotlin
@Controller
class SimpleController {

    // ...

    @ExceptionHandler (1)
    fun handle(ex: IOException): ResponseEntity<String> {
        // ...
    }
}
| 1 | Declaring an @ExceptionHandler. |
The exception can match against a top-level exception being propagated (that is, a direct
IOException being thrown) or against the immediate cause within a top-level wrapper
exception (for example, an IOException wrapped inside an IllegalStateException).
For matching exception types, preferably declare the target exception as a method argument,
as shown in the preceding example. Alternatively, the annotation declaration can narrow the
exception types to match. We generally recommend being as specific as possible in the
argument signature and to declare your primary root exception mappings on a
@ControllerAdvice prioritized with a corresponding order.
See the MVC section for details.
An @ExceptionHandler method in WebFlux supports the same method arguments andreturn values as a @RequestMapping method, with the exception of request body-and @ModelAttribute-related method arguments.
|
Support for @ExceptionHandler methods in Spring WebFlux is provided by the
HandlerAdapter for @RequestMapping methods. See DispatcherHandler
for more detail.
Method Arguments
@ExceptionHandler methods support the same method arguments
as @RequestMapping methods, except the request body might have been consumed already.
Return Values
@ExceptionHandler methods support the same return values
as @RequestMapping methods.
1.4.7. Controller Advice
Typically, the @ExceptionHandler, @InitBinder, and @ModelAttribute methods apply
within the @Controller class (or class hierarchy) in which they are declared. If you
want such methods to apply more globally (across controllers), you can declare them in a
class annotated with @ControllerAdvice or @RestControllerAdvice.
@ControllerAdvice is annotated with @Component, which means that such classes can be
registered as Spring beans through component scanning. @RestControllerAdvice is a composed annotation that is annotated
with both @ControllerAdvice and @ResponseBody, which essentially means
@ExceptionHandler methods are rendered to the response body through message conversion
(versus view resolution or template rendering).
On startup, the infrastructure classes for @RequestMapping and @ExceptionHandler
methods detect Spring beans annotated with @ControllerAdvice and then apply their
methods at runtime. Global @ExceptionHandler methods (from a @ControllerAdvice) are
applied after local ones (from the @Controller). By contrast, global @ModelAttribute
and @InitBinder methods are applied before local ones.
By default, @ControllerAdvice methods apply to every request (that is, all controllers),
but you can narrow that down to a subset of controllers by using attributes on the
annotation, as the following example shows:
Java
// Target all Controllers annotated with @RestController
@ControllerAdvice(annotations = RestController.class)
public class ExampleAdvice1 {}

// Target all Controllers within specific packages
@ControllerAdvice("org.example.controllers")
public class ExampleAdvice2 {}

// Target all Controllers assignable to specific classes
@ControllerAdvice(assignableTypes = {ControllerInterface.class, AbstractController.class})
public class ExampleAdvice3 {}
Kotlin
// Target all Controllers annotated with @RestController
@ControllerAdvice(annotations = [RestController::class])
public class ExampleAdvice1 {}

// Target all Controllers within specific packages
@ControllerAdvice("org.example.controllers")
public class ExampleAdvice2 {}

// Target all Controllers assignable to specific classes
@ControllerAdvice(assignableTypes = [ControllerInterface::class, AbstractController::class])
public class ExampleAdvice3 {}
The selectors in the preceding example are evaluated at runtime and may negatively impact
performance if used extensively. See the
@ControllerAdvice
javadoc for more details.
1.5. Functional Endpoints
Spring WebFlux includes WebFlux.fn, a lightweight functional programming model in which functions
are used to route and handle requests and contracts are designed for immutability.
It is an alternative to the annotation-based programming model but otherwise runs on
the same Reactive Core foundation.
1.5.1. Overview
In WebFlux.fn, an HTTP request is handled with a HandlerFunction: a function that takes
ServerRequest and returns a delayed ServerResponse (i.e. Mono<ServerResponse>).
Both the request and the response object have immutable contracts that offer JDK 8-friendly
access to the HTTP request and response.
HandlerFunction is the equivalent of the body of a @RequestMapping method in the
annotation-based programming model.
Incoming requests are routed to a handler function with a RouterFunction: a function that
takes ServerRequest and returns a delayed HandlerFunction (i.e. Mono<HandlerFunction>).
When the router function matches, a handler function is returned; otherwise an empty Mono.
RouterFunction is the equivalent of a @RequestMapping annotation, but with the major
difference that router functions provide not just data, but also behavior.
RouterFunctions.route() provides a router builder that facilitates the creation of routers,
as the following example shows:
Java
import static org.springframework.http.MediaType.APPLICATION_JSON;
import static org.springframework.web.reactive.function.server.RequestPredicates.*;
import static org.springframework.web.reactive.function.server.RouterFunctions.route;

PersonRepository repository = ...
PersonHandler handler = new PersonHandler(repository);

RouterFunction<ServerResponse> route = route() (1)
    .GET("/person/{id}", accept(APPLICATION_JSON), handler::getPerson)
    .GET("/person", accept(APPLICATION_JSON), handler::listPeople)
    .POST("/person", handler::createPerson)
    .build();


public class PersonHandler {

    // ...

    public Mono<ServerResponse> listPeople(ServerRequest request) {
        // ...
    }

    public Mono<ServerResponse> createPerson(ServerRequest request) {
        // ...
    }

    public Mono<ServerResponse> getPerson(ServerRequest request) {
        // ...
    }
}
| 1 | Create router using route(). |
Kotlin
val repository: PersonRepository = ...
val handler = PersonHandler(repository)

val route = coRouter { (1)
    accept(APPLICATION_JSON).nest {
        GET("/person/{id}", handler::getPerson)
        GET("/person", handler::listPeople)
    }
    POST("/person", handler::createPerson)
}


class PersonHandler(private val repository: PersonRepository) {

    // ...

    suspend fun listPeople(request: ServerRequest): ServerResponse {
        // ...
    }

    suspend fun createPerson(request: ServerRequest): ServerResponse {
        // ...
    }

    suspend fun getPerson(request: ServerRequest): ServerResponse {
        // ...
    }
}
| 1 | Create router using Coroutines router DSL; a Reactive alternative is also available via router { }. |
One way to run a RouterFunction is to turn it into an HttpHandler and install it
through one of the built-in server adapters:
-
RouterFunctions.toHttpHandler(RouterFunction) -
RouterFunctions.toHttpHandler(RouterFunction, HandlerStrategies)
Most applications can run through the WebFlux Java configuration, see Running a Server.
1.5.2. HandlerFunction
ServerRequest and ServerResponse are immutable interfaces that offer JDK 8-friendly
access to the HTTP request and response.
Both request and response provide Reactive Streams back pressure
against the body streams.
The request body is represented with a Reactor Flux or Mono.
The response body is represented with any Reactive Streams Publisher, including Flux and Mono.
For more on that, see Reactive Libraries.
ServerRequest
ServerRequest provides access to the HTTP method, URI, headers, and query parameters,
while access to the body is provided through the body methods.
The following example extracts the request body to a Mono<String>:
Java
Mono<String> string = request.bodyToMono(String.class);
Kotlin
val string = request.awaitBody<String>()
The following example extracts the body to a Flux<Person> (or a Flow<Person> in Kotlin),
where Person objects are decoded from some serialized form, such as JSON or XML:
Java
Flux<Person> people = request.bodyToFlux(Person.class);
Kotlin
val people = request.bodyToFlow<Person>()
The preceding examples are shortcuts that use the more general ServerRequest.body(BodyExtractor),
which accepts the BodyExtractor functional strategy interface. The utility class
BodyExtractors provides access to a number of instances. For example, the preceding examples can
also be written as follows:
Java
Mono<String> string = request.body(BodyExtractors.toMono(String.class));
Flux<Person> people = request.body(BodyExtractors.toFlux(Person.class));
Kotlin
    val string = request.body(BodyExtractors.toMono(String::class.java)).awaitSingle()
    val people = request.body(BodyExtractors.toFlux(Person::class.java)).asFlow()
The following example shows how to access form data:
Java
Mono<MultiValueMap<String, String>> map = request.formData();
Kotlin
val map = request.awaitFormData()
The following example shows how to access multipart data as a map:
Java
Mono<MultiValueMap<String, Part>> map = request.multipartData();
Kotlin
val map = request.awaitMultipartData()
The following example shows how to access multipart data, one at a time, in streaming fashion:
Java
Flux<PartEvent> allPartEvents = request.bodyToFlux(PartEvent.class);
allPartsEvents.windowUntil(PartEvent::isLast)
      .concatMap(p -> p.switchOnFirst((signal, partEvents) -> {
          if (signal.hasValue()) {
              PartEvent event = signal.get();
              if (event instanceof FormPartEvent formEvent) {
                  String value = formEvent.value();
                  // handle form field
              }
              else if (event instanceof FilePartEvent fileEvent) {
                  String filename = fileEvent.filename();
                  Flux<DataBuffer> contents = partEvents.map(PartEvent::content);
                  // handle file upload
              }
              else {
                  return Mono.error(new RuntimeException("Unexpected event: " + event));
              }
          }
          else {
              return partEvents; // either complete or error signal
          }
      }));
Kotlin
val parts = request.bodyToFlux<PartEvent>()
allPartsEvents.windowUntil(PartEvent::isLast)
    .concatMap {
        it.switchOnFirst { signal, partEvents ->
            if (signal.hasValue()) {
                val event = signal.get()
                if (event is FormPartEvent) {
                    val value: String = event.value();
                    // handle form field
                } else if (event is FilePartEvent) {
                    val filename: String = event.filename();
                    val contents: Flux<DataBuffer> = partEvents.map(PartEvent::content);
                    // handle file upload
                } else {
                    return Mono.error(RuntimeException("Unexpected event: " + event));
                }
            } else {
                return partEvents; // either complete or error signal
            }
        }
    }
}
Note that the body contents of the PartEvent objects must be completely consumed, relayed, or released to avoid memory leaks.
ServerResponse
ServerResponse provides access to the HTTP response and, since it is immutable, you can use
a build method to create it. You can use the builder to set the response status, to add response
headers, or to provide a body. The following example creates a 200 (OK) response with JSON
content:
Java
Mono<Person> person = ...
ServerResponse.ok().contentType(MediaType.APPLICATION_JSON).body(person, Person.class);
Kotlin
val person: Person = ...
ServerResponse.ok().contentType(MediaType.APPLICATION_JSON).bodyValue(person)
The following example shows how to build a 201 (CREATED) response with a Location header and no body:
Java
URI location = ...
ServerResponse.created(location).build();
Kotlin
val location: URI = ...
ServerResponse.created(location).build()
Depending on the codec used, it is possible to pass hint parameters to customize how the
body is serialized or deserialized. For example, to specify a Jackson JSON view:
Java
ServerResponse.ok().hint(Jackson2CodecSupport.JSON_VIEW_HINT, MyJacksonView.class).body(...);
Kotlin
ServerResponse.ok().hint(Jackson2CodecSupport.JSON_VIEW_HINT, MyJacksonView::class.java).body(...)
Handler Classes
We can write a handler function as a lambda, as the following example shows:
Java
HandlerFunction<ServerResponse> helloWorld =
  request -> ServerResponse.ok().bodyValue("Hello World");
Kotlin
val helloWorld = HandlerFunction<ServerResponse> { ServerResponse.ok().bodyValue("Hello World") }
That is convenient, but in an application we need multiple functions, and multiple inline
lambda’s can get messy.
Therefore, it is useful to group related handler functions together into a handler class, which
has a similar role as @Controller in an annotation-based application.
For example, the following class exposes a reactive Person repository:
Java
import static org.springframework.http.MediaType.APPLICATION_JSON;
import static org.springframework.web.reactive.function.server.ServerResponse.ok;

public class PersonHandler {

    private final PersonRepository repository;

    public PersonHandler(PersonRepository repository) {
        this.repository = repository;
    }

    public Mono<ServerResponse> listPeople(ServerRequest request) { (1)
        Flux<Person> people = repository.allPeople();
        return ok().contentType(APPLICATION_JSON).body(people, Person.class);
    }

    public Mono<ServerResponse> createPerson(ServerRequest request) { (2)
        Mono<Person> person = request.bodyToMono(Person.class);
        return ok().build(repository.savePerson(person));
    }

    public Mono<ServerResponse> getPerson(ServerRequest request) { (3)
        int personId = Integer.valueOf(request.pathVariable("id"));
        return repository.getPerson(personId)
            .flatMap(person -> ok().contentType(APPLICATION_JSON).bodyValue(person))
            .switchIfEmpty(ServerResponse.notFound().build());
    }
}
| 1 | listPeople is a handler function that returns all Person objects found in the repository asJSON. |
| 2 | createPerson is a handler function that stores a new Person contained in the request body.Note that PersonRepository.savePerson(Person) returns Mono<Void>: an empty Mono that emitsa completion signal when the person has been read from the request and stored. So we use the build(Publisher<Void>) method to send a response when that completion signal is received (that is,when the Person has been saved). |
| 3 | getPerson is a handler function that returns a single person, identified by the id pathvariable. We retrieve that Person from the repository and create a JSON response, if it isfound. If it is not found, we use switchIfEmpty(Mono<T>) to return a 404 Not Found response. |
Kotlin
class PersonHandler(private val repository: PersonRepository) {

    suspend fun listPeople(request: ServerRequest): ServerResponse { (1)
        val people: Flow<Person> = repository.allPeople()
        return ok().contentType(APPLICATION_JSON).bodyAndAwait(people);
    }

    suspend fun createPerson(request: ServerRequest): ServerResponse { (2)
        val person = request.awaitBody<Person>()
        repository.savePerson(person)
        return ok().buildAndAwait()
    }

    suspend fun getPerson(request: ServerRequest): ServerResponse { (3)
        val personId = request.pathVariable("id").toInt()
        return repository.getPerson(personId)?.let { ok().contentType(APPLICATION_JSON).bodyValueAndAwait(it) }
                ?: ServerResponse.notFound().buildAndAwait()

    }
}
| 1 | listPeople is a handler function that returns all Person objects found in the repository asJSON. |
| 2 | createPerson is a handler function that stores a new Person contained in the request body.Note that PersonRepository.savePerson(Person) is a suspending function with no return type. |
| 3 | getPerson is a handler function that returns a single person, identified by the id pathvariable. We retrieve that Person from the repository and create a JSON response, if it isfound. If it is not found, we return a 404 Not Found response. |
Validation
A functional endpoint can use Spring’s validation facilities to
apply validation to the request body. For example, given a custom Spring
Validator implementation for a Person:
Java
public class PersonHandler {

    private final Validator validator = new PersonValidator(); (1)

    // ...

    public Mono<ServerResponse> createPerson(ServerRequest request) {
        Mono<Person> person = request.bodyToMono(Person.class).doOnNext(this::validate); (2)
        return ok().build(repository.savePerson(person));
    }

    private void validate(Person person) {
        Errors errors = new BeanPropertyBindingResult(person, "person");
        validator.validate(person, errors);
        if (errors.hasErrors()) {
            throw new ServerWebInputException(errors.toString()); (3)
        }
    }
}
| 1 | Create Validator instance. |
| 2 | Apply validation. |
| 3 | Raise exception for a 400 response. |
Kotlin
class PersonHandler(private val repository: PersonRepository) {

    private val validator = PersonValidator() (1)

    // ...

    suspend fun createPerson(request: ServerRequest): ServerResponse {
        val person = request.awaitBody<Person>()
        validate(person) (2)
        repository.savePerson(person)
        return ok().buildAndAwait()
    }

    private fun validate(person: Person) {
        val errors: Errors = BeanPropertyBindingResult(person, "person");
        validator.validate(person, errors);
        if (errors.hasErrors()) {
            throw ServerWebInputException(errors.toString()) (3)
        }
    }
}
| 1 | Create Validator instance. |
| 2 | Apply validation. |
| 3 | Raise exception for a 400 response. |
Handlers can also use the standard bean validation API (JSR-303) by creating and injecting
a global Validator instance based on LocalValidatorFactoryBean.
See Spring Validation.
1.5.3. RouterFunction
Router functions are used to route the requests to the corresponding HandlerFunction.
Typically, you do not write router functions yourself, but rather use a method on the
RouterFunctions utility class to create one.
RouterFunctions.route() (no parameters) provides you with a fluent builder for creating a router
function, whereas RouterFunctions.route(RequestPredicate, HandlerFunction) offers a direct way
to create a router.
Generally, it is recommended to use the route() builder, as it provides
convenient short-cuts for typical mapping scenarios without requiring hard-to-discover
static imports.
For instance, the router function builder offers the method GET(String, HandlerFunction) to create a mapping for GET requests; and POST(String, HandlerFunction) for POSTs.
Besides HTTP method-based mapping, the route builder offers a way to introduce additional
predicates when mapping to requests.
For each HTTP method there is an overloaded variant that takes a RequestPredicate as a
parameter, though which additional constraints can be expressed.
Predicates
You can write your own RequestPredicate, but the RequestPredicates utility class
offers commonly used implementations, based on the request path, HTTP method, content-type,
and so on.
The following example uses a request predicate to create a constraint based on the Accept
header:
Java
RouterFunction<ServerResponse> route = RouterFunctions.route()
    .GET("/hello-world", accept(MediaType.TEXT_PLAIN),
        request -> ServerResponse.ok().bodyValue("Hello World")).build();
Kotlin
val route = coRouter {
    GET("/hello-world", accept(TEXT_PLAIN)) {
        ServerResponse.ok().bodyValueAndAwait("Hello World")
    }
}
You can compose multiple request predicates together by using:
-
RequestPredicate.and(RequestPredicate)— both must match. -
RequestPredicate.or(RequestPredicate)— either can match.
Many of the predicates from RequestPredicates are composed.
For example, RequestPredicates.GET(String) is composed from RequestPredicates.method(HttpMethod)
and RequestPredicates.path(String).
The example shown above also uses two request predicates, as the builder uses
RequestPredicates.GET internally, and composes that with the accept predicate.
Routes
Router functions are evaluated in order: if the first route does not match, the
second is evaluated, and so on.
Therefore, it makes sense to declare more specific routes before general ones.
This is also important when registering router functions as Spring beans, as will
be described later.
Note that this behavior is different from the annotation-based programming model, where the
«most specific» controller method is picked automatically.
When using the router function builder, all defined routes are composed into one
RouterFunction that is returned from build().
There are also other ways to compose multiple router functions together:
-
add(RouterFunction)on theRouterFunctions.route()builder -
RouterFunction.and(RouterFunction) -
RouterFunction.andRoute(RequestPredicate, HandlerFunction)— shortcut for
RouterFunction.and()with nestedRouterFunctions.route().
The following example shows the composition of four routes:
Java
import static org.springframework.http.MediaType.APPLICATION_JSON;
import static org.springframework.web.reactive.function.server.RequestPredicates.*;

PersonRepository repository = ...
PersonHandler handler = new PersonHandler(repository);

RouterFunction<ServerResponse> otherRoute = ...

RouterFunction<ServerResponse> route = route()
    .GET("/person/{id}", accept(APPLICATION_JSON), handler::getPerson) (1)
    .GET("/person", accept(APPLICATION_JSON), handler::listPeople) (2)
    .POST("/person", handler::createPerson) (3)
    .add(otherRoute) (4)
    .build();
| 1 | GET /person/{id} with an Accept header that matches JSON is routed toPersonHandler.getPerson |
| 2 | GET /person with an Accept header that matches JSON is routed toPersonHandler.listPeople |
| 3 | POST /person with no additional predicates is mapped toPersonHandler.createPerson, and |
| 4 | otherRoute is a router function that is created elsewhere, and added to the route built. |
Kotlin
import org.springframework.http.MediaType.APPLICATION_JSON

val repository: PersonRepository = ...
val handler = PersonHandler(repository);

val otherRoute: RouterFunction<ServerResponse> = coRouter {  }

val route = coRouter {
    GET("/person/{id}", accept(APPLICATION_JSON), handler::getPerson) (1)
    GET("/person", accept(APPLICATION_JSON), handler::listPeople) (2)
    POST("/person", handler::createPerson) (3)
}.and(otherRoute) (4)
| 1 | GET /person/{id} with an Accept header that matches JSON is routed toPersonHandler.getPerson |
| 2 | GET /person with an Accept header that matches JSON is routed toPersonHandler.listPeople |
| 3 | POST /person with no additional predicates is mapped toPersonHandler.createPerson, and |
| 4 | otherRoute is a router function that is created elsewhere, and added to the route built. |
Nested Routes
It is common for a group of router functions to have a shared predicate, for instance a
shared path. In the example above, the shared predicate would be a path predicate that
matches /person, used by three of the routes. When using annotations, you would remove
this duplication by using a type-level @RequestMapping annotation that maps to
/person. In WebFlux.fn, path predicates can be shared through the path method on the
router function builder. For instance, the last few lines of the example above can be
improved in the following way by using nested routes:
Java
RouterFunction<ServerResponse> route = route()
    .path("/person", builder -> builder (1)
        .GET("/{id}", accept(APPLICATION_JSON), handler::getPerson)
        .GET(accept(APPLICATION_JSON), handler::listPeople)
        .POST(handler::createPerson))
    .build();
| 1 | Note that second parameter of path is a consumer that takes the router builder. |
Kotlin
val route = coRouter { (1)
    "/person".nest {
        GET("/{id}", accept(APPLICATION_JSON), handler::getPerson)
        GET(accept(APPLICATION_JSON), handler::listPeople)
        POST(handler::createPerson)
    }
}
| 1 | Create router using Coroutines router DSL; a Reactive alternative is also available via router { }. |
Though path-based nesting is the most common, you can nest on any kind of predicate by using
the nest method on the builder.
The above still contains some duplication in the form of the shared Accept-header predicate.
We can further improve by using the nest method together with accept:
Java
RouterFunction<ServerResponse> route = route()
    .path("/person", b1 -> b1
        .nest(accept(APPLICATION_JSON), b2 -> b2
            .GET("/{id}", handler::getPerson)
            .GET(handler::listPeople))
        .POST(handler::createPerson))
    .build();
Kotlin
val route = coRouter {
    "/person".nest {
        accept(APPLICATION_JSON).nest {
            GET("/{id}", handler::getPerson)
            GET(handler::listPeople)
            POST(handler::createPerson)
        }
    }
}
1.5.4. Running a Server
How do you run a router function in an HTTP server? A simple option is to convert a router
function to an HttpHandler by using one of the following:
-
RouterFunctions.toHttpHandler(RouterFunction) -
RouterFunctions.toHttpHandler(RouterFunction, HandlerStrategies)
You can then use the returned HttpHandler with a number of server adapters by following
HttpHandler for server-specific instructions.
A more typical option, also used by Spring Boot, is to run with a
DispatcherHandler-based setup through the
WebFlux Config, which uses Spring configuration to declare the
components required to process requests. The WebFlux Java configuration declares the following
infrastructure components to support functional endpoints:
-
RouterFunctionMapping: Detects one or moreRouterFunction<?>beans in the Spring
configuration, orders them, combines them through
RouterFunction.andOther, and routes requests to the resulting composedRouterFunction. -
HandlerFunctionAdapter: Simple adapter that letsDispatcherHandlerinvoke
aHandlerFunctionthat was mapped to a request. -
ServerResponseResultHandler: Handles the result from the invocation of a
HandlerFunctionby invoking thewriteTomethod of theServerResponse.
The preceding components let functional endpoints fit within the DispatcherHandler request
processing lifecycle and also (potentially) run side by side with annotated controllers, if
any are declared. It is also how functional endpoints are enabled by the Spring Boot WebFlux
starter.
The following example shows a WebFlux Java configuration (see
DispatcherHandler for how to run it):
Java
@Configuration
@EnableWebFlux
public class WebConfig implements WebFluxConfigurer {

    @Bean
    public RouterFunction<?> routerFunctionA() {
        // ...
    }

    @Bean
    public RouterFunction<?> routerFunctionB() {
        // ...
    }

    // ...

    @Override
    public void configureHttpMessageCodecs(ServerCodecConfigurer configurer) {
        // configure message conversion...
    }

    @Override
    public void addCorsMappings(CorsRegistry registry) {
        // configure CORS...
    }

    @Override
    public void configureViewResolvers(ViewResolverRegistry registry) {
        // configure view resolution for HTML rendering...
    }
}
Kotlin
@Configuration
@EnableWebFlux
class WebConfig : WebFluxConfigurer {

    @Bean
    fun routerFunctionA(): RouterFunction<*> {
        // ...
    }

    @Bean
    fun routerFunctionB(): RouterFunction<*> {
        // ...
    }

    // ...

    override fun configureHttpMessageCodecs(configurer: ServerCodecConfigurer) {
        // configure message conversion...
    }

    override fun addCorsMappings(registry: CorsRegistry) {
        // configure CORS...
    }

    override fun configureViewResolvers(registry: ViewResolverRegistry) {
        // configure view resolution for HTML rendering...
    }
}
1.5.5. Filtering Handler Functions
You can filter handler functions by using the before, after, or filter methods on the routing
function builder.
With annotations, you can achieve similar functionality by using @ControllerAdvice, a ServletFilter, or both.
The filter will apply to all routes that are built by the builder.
This means that filters defined in nested routes do not apply to «top-level» routes.
For instance, consider the following example:
Java
RouterFunction<ServerResponse> route = route()
    .path("/person", b1 -> b1
        .nest(accept(APPLICATION_JSON), b2 -> b2
            .GET("/{id}", handler::getPerson)
            .GET(handler::listPeople)
            .before(request -> ServerRequest.from(request) (1)
                .header("X-RequestHeader", "Value")
                .build()))
        .POST(handler::createPerson))
    .after((request, response) -> logResponse(response)) (2)
    .build();
| 1 | The before filter that adds a custom request header is only applied to the two GET routes. |
| 2 | The after filter that logs the response is applied to all routes, including the nested ones. |
Kotlin
val route = router {
    "/person".nest {
        GET("/{id}", handler::getPerson)
        GET("", handler::listPeople)
        before { (1)
            ServerRequest.from(it)
                    .header("X-RequestHeader", "Value").build()
        }
        POST(handler::createPerson)
        after { _, response -> (2)
            logResponse(response)
        }
    }
}
| 1 | The before filter that adds a custom request header is only applied to the two GET routes. |
| 2 | The after filter that logs the response is applied to all routes, including the nested ones. |
The filter method on the router builder takes a HandlerFilterFunction: a
function that takes a ServerRequest and HandlerFunction and returns a ServerResponse.
The handler function parameter represents the next element in the chain.
This is typically the handler that is routed to, but it can also be another
filter if multiple are applied.
Now we can add a simple security filter to our route, assuming that we have a SecurityManager that
can determine whether a particular path is allowed.
The following example shows how to do so:
Java
SecurityManager securityManager = ...

RouterFunction<ServerResponse> route = route()
    .path("/person", b1 -> b1
        .nest(accept(APPLICATION_JSON), b2 -> b2
            .GET("/{id}", handler::getPerson)
            .GET(handler::listPeople))
        .POST(handler::createPerson))
    .filter((request, next) -> {
        if (securityManager.allowAccessTo(request.path())) {
            return next.handle(request);
        }
        else {
            return ServerResponse.status(UNAUTHORIZED).build();
        }
    })
    .build();
Kotlin
val securityManager: SecurityManager = ...

val route = router {
        ("/person" and accept(APPLICATION_JSON)).nest {
            GET("/{id}", handler::getPerson)
            GET("", handler::listPeople)
            POST(handler::createPerson)
            filter { request, next ->
                if (securityManager.allowAccessTo(request.path())) {
                    next(request)
                }
                else {
                    status(UNAUTHORIZED).build();
                }
            }
        }
    }
The preceding example demonstrates that invoking the next.handle(ServerRequest) is optional.
We only let the handler function be run when access is allowed.
Besides using the filter method on the router function builder, it is possible to apply a
filter to an existing router function via RouterFunction.filter(HandlerFilterFunction).
CORS support for functional endpoints is provided through a dedicatedCorsWebFilter.
|
1.6. URI Links
This section describes various options available in the Spring Framework to prepare URIs.
1.6.1. UriComponents
Spring MVC and Spring WebFlux
UriComponentsBuilder helps to build URI’s from URI templates with variables, as the following example shows:
Java
UriComponents uriComponents = UriComponentsBuilder
        .fromUriString("https://example.com/hotels/{hotel}") (1)
        .queryParam("q", "{q}") (2)
        .encode() (3)
        .build(); (4)

URI uri = uriComponents.expand("Westin", "123").toUri(); (5)
| 1 | Static factory method with a URI template. |
| 2 | Add or replace URI components. |
| 3 | Request to have the URI template and URI variables encoded. |
| 4 | Build a UriComponents. |
| 5 | Expand variables and obtain the URI. |
Kotlin
val uriComponents = UriComponentsBuilder
        .fromUriString("https://example.com/hotels/{hotel}") (1)
        .queryParam("q", "{q}") (2)
        .encode() (3)
        .build() (4)

val uri = uriComponents.expand("Westin", "123").toUri() (5)
| 1 | Static factory method with a URI template. |
| 2 | Add or replace URI components. |
| 3 | Request to have the URI template and URI variables encoded. |
| 4 | Build a UriComponents. |
| 5 | Expand variables and obtain the URI. |
The preceding example can be consolidated into one chain and shortened with buildAndExpand,
as the following example shows:
Java
URI uri = UriComponentsBuilder
        .fromUriString("https://example.com/hotels/{hotel}")
        .queryParam("q", "{q}")
        .encode()
        .buildAndExpand("Westin", "123")
        .toUri();
Kotlin
val uri = UriComponentsBuilder
        .fromUriString("https://example.com/hotels/{hotel}")
        .queryParam("q", "{q}")
        .encode()
        .buildAndExpand("Westin", "123")
        .toUri()
You can shorten it further by going directly to a URI (which implies encoding),
as the following example shows:
Java
URI uri = UriComponentsBuilder
        .fromUriString("https://example.com/hotels/{hotel}")
        .queryParam("q", "{q}")
        .build("Westin", "123");
Kotlin
val uri = UriComponentsBuilder
        .fromUriString("https://example.com/hotels/{hotel}")
        .queryParam("q", "{q}")
        .build("Westin", "123")
You can shorten it further still with a full URI template, as the following example shows:
Java
URI uri = UriComponentsBuilder
        .fromUriString("https://example.com/hotels/{hotel}?q={q}")
        .build("Westin", "123");
Kotlin
val uri = UriComponentsBuilder
        .fromUriString("https://example.com/hotels/{hotel}?q={q}")
        .build("Westin", "123")
1.6.2. UriBuilder
Spring MVC and Spring WebFlux
UriComponentsBuilder implements UriBuilder. You can create a
UriBuilder, in turn, with a UriBuilderFactory. Together, UriBuilderFactory and
UriBuilder provide a pluggable mechanism to build URIs from URI templates, based on
shared configuration, such as a base URL, encoding preferences, and other details.
You can configure RestTemplate and WebClient with a UriBuilderFactory
to customize the preparation of URIs. DefaultUriBuilderFactory is a default
implementation of UriBuilderFactory that uses UriComponentsBuilder internally and
exposes shared configuration options.
The following example shows how to configure a RestTemplate:
Java
// import org.springframework.web.util.DefaultUriBuilderFactory.EncodingMode;

String baseUrl = "https://example.org";
DefaultUriBuilderFactory factory = new DefaultUriBuilderFactory(baseUrl);
factory.setEncodingMode(EncodingMode.TEMPLATE_AND_VALUES);

RestTemplate restTemplate = new RestTemplate();
restTemplate.setUriTemplateHandler(factory);
Kotlin
// import org.springframework.web.util.DefaultUriBuilderFactory.EncodingMode

val baseUrl = "https://example.org"
val factory = DefaultUriBuilderFactory(baseUrl)
factory.encodingMode = EncodingMode.TEMPLATE_AND_VALUES

val restTemplate = RestTemplate()
restTemplate.uriTemplateHandler = factory
The following example configures a WebClient:
Java
// import org.springframework.web.util.DefaultUriBuilderFactory.EncodingMode;

String baseUrl = "https://example.org";
DefaultUriBuilderFactory factory = new DefaultUriBuilderFactory(baseUrl);
factory.setEncodingMode(EncodingMode.TEMPLATE_AND_VALUES);

WebClient client = WebClient.builder().uriBuilderFactory(factory).build();
Kotlin
// import org.springframework.web.util.DefaultUriBuilderFactory.EncodingMode

val baseUrl = "https://example.org"
val factory = DefaultUriBuilderFactory(baseUrl)
factory.encodingMode = EncodingMode.TEMPLATE_AND_VALUES

val client = WebClient.builder().uriBuilderFactory(factory).build()
In addition, you can also use DefaultUriBuilderFactory directly. It is similar to using
UriComponentsBuilder but, instead of static factory methods, it is an actual instance
that holds configuration and preferences, as the following example shows:
Java
String baseUrl = "https://example.com";
DefaultUriBuilderFactory uriBuilderFactory = new DefaultUriBuilderFactory(baseUrl);

URI uri = uriBuilderFactory.uriString("/hotels/{hotel}")
        .queryParam("q", "{q}")
        .build("Westin", "123");
Kotlin
val baseUrl = "https://example.com"
val uriBuilderFactory = DefaultUriBuilderFactory(baseUrl)

val uri = uriBuilderFactory.uriString("/hotels/{hotel}")
        .queryParam("q", "{q}")
        .build("Westin", "123")
1.6.3. URI Encoding
Spring MVC and Spring WebFlux
UriComponentsBuilder exposes encoding options at two levels:
-
UriComponentsBuilder#encode():
Pre-encodes the URI template first and then strictly encodes URI variables when expanded. -
UriComponents#encode():
Encodes URI components after URI variables are expanded.
Both options replace non-ASCII and illegal characters with escaped octets. However, the first option
also replaces characters with reserved meaning that appear in URI variables.
|
Consider «;», which is legal in a path but has reserved meaning. The first option replaces «;» with «%3B» in URI variables but not in the URI template. By contrast, the second option never replaces «;», since it is a legal character in a path. |
For most cases, the first option is likely to give the expected result, because it treats URI
variables as opaque data to be fully encoded, while the second option is useful if URI
variables do intentionally contain reserved characters. The second option is also useful
when not expanding URI variables at all since that will also encode anything that
incidentally looks like a URI variable.
The following example uses the first option:
Java
URI uri = UriComponentsBuilder.fromPath("/hotel list/{city}")
        .queryParam("q", "{q}")
        .encode()
        .buildAndExpand("New York", "foo+bar")
        .toUri();

// Result is "/hotel%20list/New%20York?q=foo%2Bbar"
Kotlin
val uri = UriComponentsBuilder.fromPath("/hotel list/{city}")
        .queryParam("q", "{q}")
        .encode()
        .buildAndExpand("New York", "foo+bar")
        .toUri()

// Result is "/hotel%20list/New%20York?q=foo%2Bbar"
You can shorten the preceding example by going directly to the URI (which implies encoding),
as the following example shows:
Java
URI uri = UriComponentsBuilder.fromPath("/hotel list/{city}")
        .queryParam("q", "{q}")
        .build("New York", "foo+bar");
Kotlin
val uri = UriComponentsBuilder.fromPath("/hotel list/{city}")
        .queryParam("q", "{q}")
        .build("New York", "foo+bar")
You can shorten it further still with a full URI template, as the following example shows:
Java
URI uri = UriComponentsBuilder.fromUriString("/hotel list/{city}?q={q}")
        .build("New York", "foo+bar");
Kotlin
val uri = UriComponentsBuilder.fromUriString("/hotel list/{city}?q={q}")
        .build("New York", "foo+bar")
The WebClient and the RestTemplate expand and encode URI templates internally through
the UriBuilderFactory strategy. Both can be configured with a custom strategy,
as the following example shows:
Java
String baseUrl = "https://example.com";
DefaultUriBuilderFactory factory = new DefaultUriBuilderFactory(baseUrl)
factory.setEncodingMode(EncodingMode.TEMPLATE_AND_VALUES);

// Customize the RestTemplate..
RestTemplate restTemplate = new RestTemplate();
restTemplate.setUriTemplateHandler(factory);

// Customize the WebClient..
WebClient client = WebClient.builder().uriBuilderFactory(factory).build();
Kotlin
val baseUrl = "https://example.com"
val factory = DefaultUriBuilderFactory(baseUrl).apply {
    encodingMode = EncodingMode.TEMPLATE_AND_VALUES
}

// Customize the RestTemplate..
val restTemplate = RestTemplate().apply {
    uriTemplateHandler = factory
}

// Customize the WebClient..
val client = WebClient.builder().uriBuilderFactory(factory).build()
The DefaultUriBuilderFactory implementation uses UriComponentsBuilder internally to
expand and encode URI templates. As a factory, it provides a single place to configure
the approach to encoding, based on one of the below encoding modes:
-
TEMPLATE_AND_VALUES: UsesUriComponentsBuilder#encode(), corresponding to
the first option in the earlier list, to pre-encode the URI template and strictly encode URI variables when
expanded. -
VALUES_ONLY: Does not encode the URI template and, instead, applies strict encoding
to URI variables throughUriUtils#encodeUriVariablesprior to expanding them into the
template. -
URI_COMPONENT: UsesUriComponents#encode(), corresponding to the second option in the earlier list, to
encode URI component value after URI variables are expanded. -
NONE: No encoding is applied.
The RestTemplate is set to EncodingMode.URI_COMPONENT for historic
reasons and for backwards compatibility. The WebClient relies on the default value
in DefaultUriBuilderFactory, which was changed from EncodingMode.URI_COMPONENT in
5.0.x to EncodingMode.TEMPLATE_AND_VALUES in 5.1.
1.7. CORS
Spring WebFlux lets you handle CORS (Cross-Origin Resource Sharing). This section
describes how to do so.
1.7.1. Introduction
For security reasons, browsers prohibit AJAX calls to resources outside the current origin.
For example, you could have your bank account in one tab and evil.com in another. Scripts
from evil.com should not be able to make AJAX requests to your bank API with your
credentials — for example, withdrawing money from your account!
Cross-Origin Resource Sharing (CORS) is a W3C specification
implemented by most browsers that lets you specify
what kind of cross-domain requests are authorized, rather than using less secure and less
powerful workarounds based on IFRAME or JSONP.
1.7.2. Processing
The CORS specification distinguishes between preflight, simple, and actual requests.
To learn how CORS works, you can read
this article, among
many others, or see the specification for more details.
Spring WebFlux HandlerMapping implementations provide built-in support for CORS. After successfully
mapping a request to a handler, a HandlerMapping checks the CORS configuration for the
given request and handler and takes further actions. Preflight requests are handled
directly, while simple and actual CORS requests are intercepted, validated, and have the
required CORS response headers set.
In order to enable cross-origin requests (that is, the Origin header is present and
differs from the host of the request), you need to have some explicitly declared CORS
configuration. If no matching CORS configuration is found, preflight requests are
rejected. No CORS headers are added to the responses of simple and actual CORS requests
and, consequently, browsers reject them.
Each HandlerMapping can be
configured
individually with URL pattern-based CorsConfiguration mappings. In most cases, applications
use the WebFlux Java configuration to declare such mappings, which results in a single,
global map passed to all HandlerMapping implementations.
You can combine global CORS configuration at the HandlerMapping level with more
fine-grained, handler-level CORS configuration. For example, annotated controllers can use
class- or method-level @CrossOrigin annotations (other handlers can implement
CorsConfigurationSource).
The rules for combining global and local configuration are generally additive — for example,
all global and all local origins. For those attributes where only a single value can be
accepted, such as allowCredentials and maxAge, the local overrides the global value. See
CorsConfiguration#combine(CorsConfiguration)
for more details.
|
To learn more from the source or to make advanced customizations, see:
|
1.7.3. @CrossOrigin
The @CrossOrigin
annotation enables cross-origin requests on annotated controller methods, as the
following example shows:
Java
@RestController
@RequestMapping("/account")
public class AccountController {

    @CrossOrigin
    @GetMapping("/{id}")
    public Mono<Account> retrieve(@PathVariable Long id) {
        // ...
    }

    @DeleteMapping("/{id}")
    public Mono<Void> remove(@PathVariable Long id) {
        // ...
    }
}
Kotlin
@RestController
@RequestMapping("/account")
class AccountController {

    @CrossOrigin
    @GetMapping("/{id}")
    suspend fun retrieve(@PathVariable id: Long): Account {
        // ...
    }

    @DeleteMapping("/{id}")
    suspend fun remove(@PathVariable id: Long) {
        // ...
    }
}
By default, @CrossOrigin allows:
-
All origins.
-
All headers.
-
All HTTP methods to which the controller method is mapped.
allowCredentials is not enabled by default, since that establishes a trust level
that exposes sensitive user-specific information (such as cookies and CSRF tokens) and
should be used only where appropriate. When it is enabled either allowOrigins must be
set to one or more specific domain (but not the special value "*") or alternatively
the allowOriginPatterns property may be used to match to a dynamic set of origins.
maxAge is set to 30 minutes.
@CrossOrigin is supported at the class level, too, and inherited by all methods.
The following example specifies a certain domain and sets maxAge to an hour:
Java
@CrossOrigin(origins = "https://domain2.com", maxAge = 3600)
@RestController
@RequestMapping("/account")
public class AccountController {

    @GetMapping("/{id}")
    public Mono<Account> retrieve(@PathVariable Long id) {
        // ...
    }

    @DeleteMapping("/{id}")
    public Mono<Void> remove(@PathVariable Long id) {
        // ...
    }
}
Kotlin
@CrossOrigin("https://domain2.com", maxAge = 3600)
@RestController
@RequestMapping("/account")
class AccountController {

    @GetMapping("/{id}")
    suspend fun retrieve(@PathVariable id: Long): Account {
        // ...
    }

    @DeleteMapping("/{id}")
    suspend fun remove(@PathVariable id: Long) {
        // ...
    }
}
You can use @CrossOrigin at both the class and the method level,
as the following example shows:
Java
@CrossOrigin(maxAge = 3600) (1)
@RestController
@RequestMapping("/account")
public class AccountController {

    @CrossOrigin("https://domain2.com") (2)
    @GetMapping("/{id}")
    public Mono<Account> retrieve(@PathVariable Long id) {
        // ...
    }

    @DeleteMapping("/{id}")
    public Mono<Void> remove(@PathVariable Long id) {
        // ...
    }
}
| 1 | Using @CrossOrigin at the class level. |
| 2 | Using @CrossOrigin at the method level. |
Kotlin
@CrossOrigin(maxAge = 3600) (1)
@RestController
@RequestMapping("/account")
class AccountController {

    @CrossOrigin("https://domain2.com") (2)
    @GetMapping("/{id}")
    suspend fun retrieve(@PathVariable id: Long): Account {
        // ...
    }

    @DeleteMapping("/{id}")
    suspend fun remove(@PathVariable id: Long) {
        // ...
    }
}
| 1 | Using @CrossOrigin at the class level. |
| 2 | Using @CrossOrigin at the method level. |
1.7.4. Global Configuration
In addition to fine-grained, controller method-level configuration, you probably want to
define some global CORS configuration, too. You can set URL-based CorsConfiguration
mappings individually on any HandlerMapping. Most applications, however, use the
WebFlux Java configuration to do that.
By default global configuration enables the following:
-
All origins.
-
All headers.
-
GET,HEAD, andPOSTmethods.
allowedCredentials is not enabled by default, since that establishes a trust level
that exposes sensitive user-specific information( such as cookies and CSRF tokens) and
should be used only where appropriate. When it is enabled either allowOrigins must be
set to one or more specific domain (but not the special value "*") or alternatively
the allowOriginPatterns property may be used to match to a dynamic set of origins.
maxAge is set to 30 minutes.
To enable CORS in the WebFlux Java configuration, you can use the CorsRegistry callback,
as the following example shows:
Java
@Configuration
@EnableWebFlux
public class WebConfig implements WebFluxConfigurer {

    @Override
    public void addCorsMappings(CorsRegistry registry) {

        registry.addMapping("/api/**")
            .allowedOrigins("https://domain2.com")
            .allowedMethods("PUT", "DELETE")
            .allowedHeaders("header1", "header2", "header3")
            .exposedHeaders("header1", "header2")
            .allowCredentials(true).maxAge(3600);

        // Add more mappings...
    }
}
Kotlin
@Configuration
@EnableWebFlux
class WebConfig : WebFluxConfigurer {

    override fun addCorsMappings(registry: CorsRegistry) {

        registry.addMapping("/api/**")
                .allowedOrigins("https://domain2.com")
                .allowedMethods("PUT", "DELETE")
                .allowedHeaders("header1", "header2", "header3")
                .exposedHeaders("header1", "header2")
                .allowCredentials(true).maxAge(3600)

        // Add more mappings...
    }
}
1.7.5. CORS WebFilter
You can apply CORS support through the built-in
CorsWebFilter, which is a
good fit with functional endpoints.
If you try to use the CorsFilter with Spring Security, keep in mind that SpringSecurity has built-in support for CORS. |
To configure the filter, you can declare a CorsWebFilter bean and pass a
CorsConfigurationSource to its constructor, as the following example shows:
Java
@Bean
CorsWebFilter corsFilter() {

    CorsConfiguration config = new CorsConfiguration();

    // Possibly...
    // config.applyPermitDefaultValues()

    config.setAllowCredentials(true);
    config.addAllowedOrigin("https://domain1.com");
    config.addAllowedHeader("*");
    config.addAllowedMethod("*");

    UrlBasedCorsConfigurationSource source = new UrlBasedCorsConfigurationSource();
    source.registerCorsConfiguration("/**", config);

    return new CorsWebFilter(source);
}
Kotlin
@Bean
fun corsFilter(): CorsWebFilter {

    val config = CorsConfiguration()

    // Possibly...
    // config.applyPermitDefaultValues()

    config.allowCredentials = true
    config.addAllowedOrigin("https://domain1.com")
    config.addAllowedHeader("*")
    config.addAllowedMethod("*")

    val source = UrlBasedCorsConfigurationSource().apply {
        registerCorsConfiguration("/**", config)
    }
    return CorsWebFilter(source)
}
1.8. Error Responses
A common requirement for REST services is to include details in the body of error
responses. The Spring Framework supports the «Problem Details for HTTP APIs»
specification, RFC 7807.
The following are the main abstractions for this support:
-
ProblemDetail— representation for an RFC 7807 problem detail; a simple container
for both standard fields defined in the spec, and for non-standard ones. -
ErrorResponse— contract to expose HTTP error response details including HTTP
status, response headers, and a body in the format of RFC 7807; this allows exceptions to
encapsulate and expose the details of how they map to an HTTP response. All Spring WebFlux
exceptions implement this. -
ErrorResponseException— basicErrorResponseimplementation that others
can use as a convenient base class. -
ResponseEntityExceptionHandler— convenient base class for an
@ControllerAdvice that handles all Spring WebFlux exceptions,
and anyErrorResponseException, and renders an error response with a body.
1.8.1. Render
You can return ProblemDetail or ErrorResponse from any @ExceptionHandler or from
any @RequestMapping method to render an RFC 7807 response. This is processed as follows:
-
The
statusproperty ofProblemDetaildetermines the HTTP status. -
The
instanceproperty ofProblemDetailis set from the current URL path, if not
already set. -
For content negotiation, the Jackson
HttpMessageConverterprefers
«application/problem+json» over «application/json» when rendering aProblemDetail,
and also falls back on it if no compatible media type is found.
To enable RFC 7807 responses for Spring WebFlux exceptions and for any
ErrorResponseException, extend ResponseEntityExceptionHandler and declare it as an
@ControllerAdvice in Spring configuration. The handler
has an @ExceptionHandler method that handles any ErrorResponse exception, which
includes all built-in web exceptions. You can add more exception handling methods, and
use a protected method to map any exception to a ProblemDetail.
1.8.2. Non-Standard Fields
You can extend an RFC 7807 response with non-standard fields in one of two ways.
One, insert into the «properties» Map of ProblemDetail. When using the Jackson
library, the Spring Framework registers ProblemDetailJacksonMixin that ensures this
«properties» Map is unwrapped and rendered as top level JSON properties in the
response, and likewise any unknown property during deserialization is inserted into
this Map.
You can also extend ProblemDetail to add dedicated non-standard properties.
The copy constructor in ProblemDetail allows a subclass to make it easy to be created
from an existing ProblemDetail. This could be done centrally, e.g. from an
@ControllerAdvice such as ResponseEntityExceptionHandler that re-creates the
ProblemDetail of an exception into a subclass with the additional non-standard fields.
1.8.3. Internationalization
It is a common requirement to internationalize error response details, and good practice
to customize the problem details for Spring WebFlux exceptions. This is supported as follows:
-
Each
ErrorResponseexposes a message code and arguments to resolve the «detail» field
through a MessageSource.
The actual message code value is parameterized with placeholders, e.g.
"HTTP method {0} not supported"to be expanded from the arguments. -
Each
ErrorResponsealso exposes a message code to resolve the «title» field. -
ResponseEntityExceptionHandleruses the message code and arguments to resolve the
«detail» and the «title» fields.
By default, the message code for the «detail» field is «problemDetail.» + the fully
qualified exception class name. Some exceptions may expose additional message codes in
which case a suffix is added to the default message code. The table below lists message
arguments and codes for Spring WebFlux exceptions:
| Exception | Message Code | Message Code Arguments |
|---|---|---|
|
|
(default) |
|
|
|
(default) + «.parseError» |
|
|
|
(default) |
|
|
|
(default) |
|
|
|
(default) |
|
|
|
(default) |
|
|
|
(default) + «.parseError» |
|
|
|
(default) |
|
|
|
(default) |
|
By default, the message code for the «title» field is «problemDetail.title.» + the fully
qualified exception class name.
1.8.4. Client Handling
A client application can catch WebClientResponseException, when using the WebClient,
or RestClientResponseException when using the RestTemplate, and use their
getResponseBodyAs methods to decode the error response body to any target type such as
ProblemDetail, or a subclass of ProblemDetail.
1.10. HTTP Caching
HTTP caching can significantly improve the performance of a web application. HTTP caching
revolves around the Cache-Control response header and subsequent conditional request
headers, such as Last-Modified and ETag. Cache-Control advises private (for example, browser)
and public (for example, proxy) caches how to cache and re-use responses. An ETag header is used
to make a conditional request that may result in a 304 (NOT_MODIFIED) without a body,
if the content has not changed. ETag can be seen as a more sophisticated successor to
the Last-Modified header.
This section describes the HTTP caching related options available in Spring WebFlux.
1.10.1. CacheControl
CacheControl provides support for
configuring settings related to the Cache-Control header and is accepted as an argument
in a number of places:
-
Controllers
-
Static Resources
While RFC 7234 describes all possible
directives for the Cache-Control response header, the CacheControl type takes a
use case-oriented approach that focuses on the common scenarios, as the following example shows:
Java
// Cache for an hour - "Cache-Control: max-age=3600"
CacheControl ccCacheOneHour = CacheControl.maxAge(1, TimeUnit.HOURS);

// Prevent caching - "Cache-Control: no-store"
CacheControl ccNoStore = CacheControl.noStore();

// Cache for ten days in public and private caches,
// public caches should not transform the response
// "Cache-Control: max-age=864000, public, no-transform"
CacheControl ccCustom = CacheControl.maxAge(10, TimeUnit.DAYS).noTransform().cachePublic();
Kotlin
// Cache for an hour - "Cache-Control: max-age=3600"
val ccCacheOneHour = CacheControl.maxAge(1, TimeUnit.HOURS)

// Prevent caching - "Cache-Control: no-store"
val ccNoStore = CacheControl.noStore()

// Cache for ten days in public and private caches,
// public caches should not transform the response
// "Cache-Control: max-age=864000, public, no-transform"
val ccCustom = CacheControl.maxAge(10, TimeUnit.DAYS).noTransform().cachePublic()
1.10.2. Controllers
Controllers can add explicit support for HTTP caching. We recommend doing so, since the
lastModified or ETag value for a resource needs to be calculated before it can be compared
against conditional request headers. A controller can add an ETag and Cache-Control
settings to a ResponseEntity, as the following example shows:
Java
@GetMapping("/book/{id}")
public ResponseEntity<Book> showBook(@PathVariable Long id) {

    Book book = findBook(id);
    String version = book.getVersion();

    return ResponseEntity
            .ok()
            .cacheControl(CacheControl.maxAge(30, TimeUnit.DAYS))
            .eTag(version) // lastModified is also available
            .body(book);
}
Kotlin
@GetMapping("/book/{id}")
fun showBook(@PathVariable id: Long): ResponseEntity<Book> {

    val book = findBook(id)
    val version = book.getVersion()

    return ResponseEntity
            .ok()
            .cacheControl(CacheControl.maxAge(30, TimeUnit.DAYS))
            .eTag(version) // lastModified is also available
            .body(book)
}
The preceding example sends a 304 (NOT_MODIFIED) response with an empty body if the comparison
to the conditional request headers indicates the content has not changed. Otherwise, the
ETag and Cache-Control headers are added to the response.
You can also make the check against conditional request headers in the controller,
as the following example shows:
Java
@RequestMapping
public String myHandleMethod(ServerWebExchange exchange, Model model) {

    long eTag = ... (1)

    if (exchange.checkNotModified(eTag)) {
        return null; (2)
    }

    model.addAttribute(...); (3)
    return "myViewName";
}
| 1 | Application-specific calculation. |
| 2 | Response has been set to 304 (NOT_MODIFIED). No further processing. |
| 3 | Continue with request processing. |
Kotlin
@RequestMapping
fun myHandleMethod(exchange: ServerWebExchange, model: Model): String? {

    val eTag: Long = ... (1)

    if (exchange.checkNotModified(eTag)) {
        return null(2)
    }

    model.addAttribute(...) (3)
    return "myViewName"
}
| 1 | Application-specific calculation. |
| 2 | Response has been set to 304 (NOT_MODIFIED). No further processing. |
| 3 | Continue with request processing. |
There are three variants for checking conditional requests against eTag values, lastModified
values, or both. For conditional GET and HEAD requests, you can set the response to
304 (NOT_MODIFIED). For conditional POST, PUT, and DELETE, you can instead set the response
to 412 (PRECONDITION_FAILED) to prevent concurrent modification.
1.10.3. Static Resources
You should serve static resources with a Cache-Control and conditional response headers
for optimal performance. See the section on configuring Static Resources.
1.11. View Technologies
The use of view technologies in Spring WebFlux is pluggable. Whether you decide to
use Thymeleaf, FreeMarker, or some other view technology is primarily a matter of a
configuration change. This chapter covers the view technologies integrated with Spring
WebFlux. We assume you are already familiar with View Resolution.
1.11.1. Thymeleaf
Thymeleaf is a modern server-side Java template engine that emphasizes natural HTML
templates that can be previewed in a browser by double-clicking, which is very
helpful for independent work on UI templates (for example, by a designer) without the need for a
running server. Thymeleaf offers an extensive set of features, and it is actively developed
and maintained. For a more complete introduction, see the
Thymeleaf project home page.
The Thymeleaf integration with Spring WebFlux is managed by the Thymeleaf project. The
configuration involves a few bean declarations, such as
SpringResourceTemplateResolver, SpringWebFluxTemplateEngine, and
ThymeleafReactiveViewResolver. For more details, see
Thymeleaf+Spring and the WebFlux integration
announcement.
1.11.2. FreeMarker
Apache FreeMarker is a template engine for generating any
kind of text output from HTML to email and others. The Spring Framework has built-in
integration for using Spring WebFlux with FreeMarker templates.
View Configuration
The following example shows how to configure FreeMarker as a view technology:
Java
@Configuration
@EnableWebFlux
public class WebConfig implements WebFluxConfigurer {

    @Override
    public void configureViewResolvers(ViewResolverRegistry registry) {
        registry.freeMarker();
    }

    // Configure FreeMarker...

    @Bean
    public FreeMarkerConfigurer freeMarkerConfigurer() {
        FreeMarkerConfigurer configurer = new FreeMarkerConfigurer();
        configurer.setTemplateLoaderPath("classpath:/templates/freemarker");
        return configurer;
    }
}
Kotlin
@Configuration
@EnableWebFlux
class WebConfig : WebFluxConfigurer {

    override fun configureViewResolvers(registry: ViewResolverRegistry) {
        registry.freeMarker()
    }

    // Configure FreeMarker...

    @Bean
    fun freeMarkerConfigurer() = FreeMarkerConfigurer().apply {
        setTemplateLoaderPath("classpath:/templates/freemarker")
    }
}
Your templates need to be stored in the directory specified by the FreeMarkerConfigurer,
shown in the preceding example. Given the preceding configuration, if your controller
returns the view name, welcome, the resolver looks for the
classpath:/templates/freemarker/welcome.ftl template.
FreeMarker Configuration
You can pass FreeMarker ‘Settings’ and ‘SharedVariables’ directly to the FreeMarker
Configuration object (which is managed by Spring) by setting the appropriate bean
properties on the FreeMarkerConfigurer bean. The freemarkerSettings property requires
a java.util.Properties object, and the freemarkerVariables property requires a
java.util.Map. The following example shows how to use a FreeMarkerConfigurer:
Java
@Configuration
@EnableWebFlux
public class WebConfig implements WebFluxConfigurer {

    // ...

    @Bean
    public FreeMarkerConfigurer freeMarkerConfigurer() {
        Map<String, Object> variables = new HashMap<>();
        variables.put("xml_escape", new XmlEscape());

        FreeMarkerConfigurer configurer = new FreeMarkerConfigurer();
        configurer.setTemplateLoaderPath("classpath:/templates");
        configurer.setFreemarkerVariables(variables);
        return configurer;
    }
}
Kotlin
@Configuration
@EnableWebFlux
class WebConfig : WebFluxConfigurer {

    // ...

    @Bean
    fun freeMarkerConfigurer() = FreeMarkerConfigurer().apply {
        setTemplateLoaderPath("classpath:/templates")
        setFreemarkerVariables(mapOf("xml_escape" to XmlEscape()))
    }
}
See the FreeMarker documentation for details of settings and variables as they apply to
the Configuration object.
Form Handling
Spring provides a tag library for use in JSPs that contains, among others, a
<spring:bind/> element. This element primarily lets forms display values from
form-backing objects and show the results of failed validations from a Validator in the
web or business tier. Spring also has support for the same functionality in FreeMarker,
with additional convenience macros for generating form input elements themselves.
The Bind Macros
A standard set of macros are maintained within the spring-webflux.jar file for
FreeMarker, so they are always available to a suitably configured application.
Some of the macros defined in the Spring templating libraries are considered internal
(private), but no such scoping exists in the macro definitions, making all macros visible
to calling code and user templates. The following sections concentrate only on the macros
you need to directly call from within your templates. If you wish to view the macro code
directly, the file is called spring.ftl and is in the
org.springframework.web.reactive.result.view.freemarker package.
For additional details on binding support, see Simple
Binding for Spring MVC.
1.11.3. Script Views
The Spring Framework has a built-in integration for using Spring WebFlux with any
templating library that can run on top of the
JSR-223 Java scripting engine.
The following table shows the templating libraries that we have tested on different script engines:
| Scripting Library | Scripting Engine |
|---|---|
|
Handlebars |
Nashorn |
|
Mustache |
Nashorn |
|
React |
Nashorn |
|
EJS |
Nashorn |
|
ERB |
JRuby |
|
String templates |
Jython |
|
Kotlin Script templating |
Kotlin |
The basic rule for integrating any other script engine is that it must implement theScriptEngine and Invocable interfaces.
|
Requirements
You need to have the script engine on your classpath, the details of which vary by script engine:
-
The Nashorn JavaScript engine is provided with
Java 8+. Using the latest update release available is highly recommended. -
JRuby should be added as a dependency for Ruby support.
-
Jython should be added as a dependency for Python support.
-
org.jetbrains.kotlin:kotlin-script-utildependency and aMETA-INF/services/javax.script.ScriptEngineFactory
file containing aorg.jetbrains.kotlin.script.jsr223.KotlinJsr223JvmLocalScriptEngineFactory
line should be added for Kotlin script support. See
this example for more detail.
You need to have the script templating library. One way to do that for JavaScript is
through WebJars.
Script Templates
You can declare a ScriptTemplateConfigurer bean to specify the script engine to use,
the script files to load, what function to call to render templates, and so on.
The following example uses Mustache templates and the Nashorn JavaScript engine:
Java
@Configuration
@EnableWebFlux
public class WebConfig implements WebFluxConfigurer {

    @Override
    public void configureViewResolvers(ViewResolverRegistry registry) {
        registry.scriptTemplate();
    }

    @Bean
    public ScriptTemplateConfigurer configurer() {
        ScriptTemplateConfigurer configurer = new ScriptTemplateConfigurer();
        configurer.setEngineName("nashorn");
        configurer.setScripts("mustache.js");
        configurer.setRenderObject("Mustache");
        configurer.setRenderFunction("render");
        return configurer;
    }
}
Kotlin
@Configuration
@EnableWebFlux
class WebConfig : WebFluxConfigurer {

    override fun configureViewResolvers(registry: ViewResolverRegistry) {
        registry.scriptTemplate()
    }

    @Bean
    fun configurer() = ScriptTemplateConfigurer().apply {
        engineName = "nashorn"
        setScripts("mustache.js")
        renderObject = "Mustache"
        renderFunction = "render"
    }
}
The render function is called with the following parameters:
-
String template: The template content -
Map model: The view model -
RenderingContext renderingContext: The
RenderingContext
that gives access to the application context, the locale, the template loader, and the
URL (since 5.0)
Mustache.render() is natively compatible with this signature, so you can call it directly.
If your templating technology requires some customization, you can provide a script that
implements a custom render function. For example, Handlerbars
needs to compile templates before using them and requires a
polyfill in order to emulate some
browser facilities not available in the server-side script engine.
The following example shows how to set a custom render function:
Java
@Configuration
@EnableWebFlux
public class WebConfig implements WebFluxConfigurer {

    @Override
    public void configureViewResolvers(ViewResolverRegistry registry) {
        registry.scriptTemplate();
    }

    @Bean
    public ScriptTemplateConfigurer configurer() {
        ScriptTemplateConfigurer configurer = new ScriptTemplateConfigurer();
        configurer.setEngineName("nashorn");
        configurer.setScripts("polyfill.js", "handlebars.js", "render.js");
        configurer.setRenderFunction("render");
        configurer.setSharedEngine(false);
        return configurer;
    }
}
Kotlin
@Configuration
@EnableWebFlux
class WebConfig : WebFluxConfigurer {

    override fun configureViewResolvers(registry: ViewResolverRegistry) {
        registry.scriptTemplate()
    }

    @Bean
    fun configurer() = ScriptTemplateConfigurer().apply {
        engineName = "nashorn"
        setScripts("polyfill.js", "handlebars.js", "render.js")
        renderFunction = "render"
        isSharedEngine = false
    }
}
Setting the sharedEngine property to false is required when using non-thread-safescript engines with templating libraries not designed for concurrency, such as Handlebars or React running on Nashorn. In that case, Java SE 8 update 60 is required, due to this bug, but it is generally recommended to use a recent Java SE patch release in any case. |
polyfill.js defines only the window object needed by Handlebars to run properly,
as the following snippet shows:
This basic render.js implementation compiles the template before using it. A production
ready implementation should also store and reused cached templates or pre-compiled templates.
This can be done on the script side, as well as any customization you need (managing
template engine configuration for example).
The following example shows how compile a template:
function render(template, model) {
    var compiledTemplate = Handlebars.compile(template);
    return compiledTemplate(model);
}
Check out the Spring Framework unit tests,
Java, and
resources,
for more configuration examples.
1.11.4. JSON and XML
For Content Negotiation purposes, it is useful to be able to alternate
between rendering a model with an HTML template or as other formats (such as JSON or XML),
depending on the content type requested by the client. To support doing so, Spring WebFlux
provides the HttpMessageWriterView, which you can use to plug in any of the available
Codecs from spring-web, such as Jackson2JsonEncoder, Jackson2SmileEncoder,
or Jaxb2XmlEncoder.
Unlike other view technologies, HttpMessageWriterView does not require a ViewResolver
but is instead configured as a default view. You can
configure one or more such default views, wrapping different HttpMessageWriter instances
or Encoder instances. The one that matches the requested content type is used at runtime.
In most cases, a model contains multiple attributes. To determine which one to serialize,
you can configure HttpMessageWriterView with the name of the model attribute to use for
rendering. If the model contains only one attribute, that one is used.
1.12. WebFlux Config
The WebFlux Java configuration declares the components that are required to process
requests with annotated controllers or functional endpoints, and it offers an API to
customize the configuration. That means you do not need to understand the underlying
beans created by the Java configuration. However, if you want to understand them,
you can see them in WebFluxConfigurationSupport or read more about what they are
in Special Bean Types.
For more advanced customizations, not available in the configuration API, you can
gain full control over the configuration through the
Advanced Configuration Mode.
1.12.1. Enabling WebFlux Config
You can use the @EnableWebFlux annotation in your Java config, as the following example shows:
Java
@Configuration
@EnableWebFlux
public class WebConfig {
}
Kotlin
@Configuration
@EnableWebFlux
class WebConfig
The preceding example registers a number of Spring WebFlux
infrastructure beans and adapts to dependencies
available on the classpath — for JSON, XML, and others.
1.12.2. WebFlux config API
In your Java configuration, you can implement the WebFluxConfigurer interface,
as the following example shows:
Java
@Configuration
@EnableWebFlux
public class WebConfig implements WebFluxConfigurer {
// Implement configuration methods...
}
Kotlin
@Configuration
@EnableWebFlux
class WebConfig : WebFluxConfigurer {
// Implement configuration methods...
}
1.12.3. Conversion, formatting
By default, formatters for various number and date types are installed, along with support
for customization via @NumberFormat and @DateTimeFormat on fields.
To register custom formatters and converters in Java config, use the following:
Java
@Configuration
@EnableWebFlux
public class WebConfig implements WebFluxConfigurer {
@Override
public void addFormatters(FormatterRegistry registry) {
// ...
}
}
Kotlin
@Configuration
@EnableWebFlux
class WebConfig : WebFluxConfigurer {
override fun addFormatters(registry: FormatterRegistry) {
// ...
}
}
By default Spring WebFlux considers the request Locale when parsing and formatting date
values. This works for forms where dates are represented as Strings with «input» form
fields. For «date» and «time» form fields, however, browsers use a fixed format defined
in the HTML spec. For such cases date and time formatting can be customized as follows:
Java
@Configuration
@EnableWebFlux
public class WebConfig implements WebFluxConfigurer {
@Override
public void addFormatters(FormatterRegistry registry) {
DateTimeFormatterRegistrar registrar = new DateTimeFormatterRegistrar();
registrar.setUseIsoFormat(true);
registrar.registerFormatters(registry);
}
}
Kotlin
@Configuration
@EnableWebFlux
class WebConfig : WebFluxConfigurer {
override fun addFormatters(registry: FormatterRegistry) {
val registrar = DateTimeFormatterRegistrar()
registrar.setUseIsoFormat(true)
registrar.registerFormatters(registry)
}
}
See FormatterRegistrar SPIand the FormattingConversionServiceFactoryBean for more information on when touse FormatterRegistrar implementations.
|
1.12.4. Validation
By default, if Bean Validation is present
on the classpath (for example, the Hibernate Validator), the LocalValidatorFactoryBean
is registered as a global validator for use with @Valid and
@Validated on @Controller method arguments.
In your Java configuration, you can customize the global Validator instance,
as the following example shows:
Java
@Configuration
@EnableWebFlux
public class WebConfig implements WebFluxConfigurer {
@Override
public Validator getValidator() {
// ...
}
}
Kotlin
@Configuration
@EnableWebFlux
class WebConfig : WebFluxConfigurer {
override fun getValidator(): Validator {
// ...
}
}
Note that you can also register Validator implementations locally,
as the following example shows:
Java
@Controller
public class MyController {
@InitBinder
protected void initBinder(WebDataBinder binder) {
binder.addValidators(new FooValidator());
}
}
Kotlin
@Controller
class MyController {
@InitBinder
protected fun initBinder(binder: WebDataBinder) {
binder.addValidators(FooValidator())
}
}
If you need to have a LocalValidatorFactoryBean injected somewhere, create a bean andmark it with @Primary in order to avoid conflict with the one declared in the MVC config.
|
1.12.5. Content Type Resolvers
You can configure how Spring WebFlux determines the requested media types for
@Controller instances from the request. By default, only the Accept header is checked,
but you can also enable a query parameter-based strategy.
The following example shows how to customize the requested content type resolution:
Java
@Configuration
@EnableWebFlux
public class WebConfig implements WebFluxConfigurer {
@Override
public void configureContentTypeResolver(RequestedContentTypeResolverBuilder builder) {
// ...
}
}
Kotlin
@Configuration
@EnableWebFlux
class WebConfig : WebFluxConfigurer {
override fun configureContentTypeResolver(builder: RequestedContentTypeResolverBuilder) {
// ...
}
}
1.12.6. HTTP message codecs
The following example shows how to customize how the request and response body are read and written:
Java
@Configuration
@EnableWebFlux
public class WebConfig implements WebFluxConfigurer {
@Override
public void configureHttpMessageCodecs(ServerCodecConfigurer configurer) {
configurer.defaultCodecs().maxInMemorySize(512 * 1024);
}
}
Kotlin
@Configuration
@EnableWebFlux
class WebConfig : WebFluxConfigurer {
override fun configureHttpMessageCodecs(configurer: ServerCodecConfigurer) {
// ...
}
}
ServerCodecConfigurer provides a set of default readers and writers. You can use it to add
more readers and writers, customize the default ones, or replace the default ones completely.
For Jackson JSON and XML, consider using
Jackson2ObjectMapperBuilder,
which customizes Jackson’s default properties with the following ones:
-
DeserializationFeature.FAIL_ON_UNKNOWN_PROPERTIESis disabled. -
MapperFeature.DEFAULT_VIEW_INCLUSIONis disabled.
It also automatically registers the following well-known modules if they are detected on the classpath:
-
jackson-datatype-joda: Support for Joda-Time types. -
jackson-datatype-jsr310: Support for Java 8 Date and Time API types. -
jackson-datatype-jdk8: Support for other Java 8 types, such asOptional. -
jackson-module-kotlin: Support for Kotlin classes and data classes.
1.12.7. View Resolvers
The following example shows how to configure view resolution:
Java
@Configuration
@EnableWebFlux
public class WebConfig implements WebFluxConfigurer {
@Override
public void configureViewResolvers(ViewResolverRegistry registry) {
// ...
}
}
Kotlin
@Configuration
@EnableWebFlux
class WebConfig : WebFluxConfigurer {
override fun configureViewResolvers(registry: ViewResolverRegistry) {
// ...
}
}
The ViewResolverRegistry has shortcuts for view technologies with which the Spring Framework
integrates. The following example uses FreeMarker (which also requires configuring the
underlying FreeMarker view technology):
Java
@Configuration
@EnableWebFlux
public class WebConfig implements WebFluxConfigurer {
@Override
public void configureViewResolvers(ViewResolverRegistry registry) {
registry.freeMarker();
}
// Configure Freemarker...
@Bean
public FreeMarkerConfigurer freeMarkerConfigurer() {
FreeMarkerConfigurer configurer = new FreeMarkerConfigurer();
configurer.setTemplateLoaderPath("classpath:/templates");
return configurer;
}
}
Kotlin
@Configuration
@EnableWebFlux
class WebConfig : WebFluxConfigurer {
override fun configureViewResolvers(registry: ViewResolverRegistry) {
registry.freeMarker()
}
// Configure Freemarker...
@Bean
fun freeMarkerConfigurer() = FreeMarkerConfigurer().apply {
setTemplateLoaderPath("classpath:/templates")
}
}
You can also plug in any ViewResolver implementation, as the following example shows:
Java
@Configuration
@EnableWebFlux
public class WebConfig implements WebFluxConfigurer {
@Override
public void configureViewResolvers(ViewResolverRegistry registry) {
ViewResolver resolver = ... ;
registry.viewResolver(resolver);
}
}
Kotlin
@Configuration
@EnableWebFlux
class WebConfig : WebFluxConfigurer {
override fun configureViewResolvers(registry: ViewResolverRegistry) {
val resolver: ViewResolver = ...
registry.viewResolver(resolver
}
}
To support Content Negotiation and rendering other formats
through view resolution (besides HTML), you can configure one or more default views based
on the HttpMessageWriterView implementation, which accepts any of the available
Codecs from spring-web. The following example shows how to do so:
Java
@Configuration
@EnableWebFlux
public class WebConfig implements WebFluxConfigurer {
@Override
public void configureViewResolvers(ViewResolverRegistry registry) {
registry.freeMarker();
Jackson2JsonEncoder encoder = new Jackson2JsonEncoder();
registry.defaultViews(new HttpMessageWriterView(encoder));
}
// ...
}
Kotlin
@Configuration
@EnableWebFlux
class WebConfig : WebFluxConfigurer {
override fun configureViewResolvers(registry: ViewResolverRegistry) {
registry.freeMarker()
val encoder = Jackson2JsonEncoder()
registry.defaultViews(HttpMessageWriterView(encoder))
}
// ...
}
See View Technologies for more on the view technologies that are integrated with Spring WebFlux.
1.12.8. Static Resources
This option provides a convenient way to serve static resources from a list of
Resource-based locations.
In the next example, given a request that starts with /resources, the relative path is
used to find and serve static resources relative to /static on the classpath. Resources
are served with a one-year future expiration to ensure maximum use of the browser cache
and a reduction in HTTP requests made by the browser. The Last-Modified header is also
evaluated and, if present, a 304 status code is returned. The following listing shows
the example:
Java
@Configuration
@EnableWebFlux
public class WebConfig implements WebFluxConfigurer {
@Override
public void addResourceHandlers(ResourceHandlerRegistry registry) {
registry.addResourceHandler("/resources/**")
.addResourceLocations("/public", "classpath:/static/")
.setCacheControl(CacheControl.maxAge(365, TimeUnit.DAYS));
}
}
Kotlin
@Configuration
@EnableWebFlux
class WebConfig : WebFluxConfigurer {
override fun addResourceHandlers(registry: ResourceHandlerRegistry) {
registry.addResourceHandler("/resources/**")
.addResourceLocations("/public", "classpath:/static/")
.setCacheControl(CacheControl.maxAge(365, TimeUnit.DAYS))
}
}
See also HTTP caching support for static resources.
The resource handler also supports a chain of
ResourceResolver implementations and
ResourceTransformer implementations,
which can be used to create a toolchain for working with optimized resources.
You can use the VersionResourceResolver for versioned resource URLs based on an MD5 hash
computed from the content, a fixed application version, or other information. A
ContentVersionStrategy (MD5 hash) is a good choice with some notable exceptions (such as
JavaScript resources used with a module loader).
The following example shows how to use VersionResourceResolver in your Java configuration:
Java
@Configuration
@EnableWebFlux
public class WebConfig implements WebFluxConfigurer {
@Override
public void addResourceHandlers(ResourceHandlerRegistry registry) {
registry.addResourceHandler("/resources/**")
.addResourceLocations("/public/")
.resourceChain(true)
.addResolver(new VersionResourceResolver().addContentVersionStrategy("/**"));
}
}
Kotlin
@Configuration
@EnableWebFlux
class WebConfig : WebFluxConfigurer {
override fun addResourceHandlers(registry: ResourceHandlerRegistry) {
registry.addResourceHandler("/resources/**")
.addResourceLocations("/public/")
.resourceChain(true)
.addResolver(VersionResourceResolver().addContentVersionStrategy("/**"))
}
}
You can use ResourceUrlProvider to rewrite URLs and apply the full chain of resolvers and
transformers (for example, to insert versions). The WebFlux configuration provides a ResourceUrlProvider
so that it can be injected into others.
Unlike Spring MVC, at present, in WebFlux, there is no way to transparently rewrite static
resource URLs, since there are no view technologies that can make use of a non-blocking chain
of resolvers and transformers. When serving only local resources, the workaround is to use
ResourceUrlProvider directly (for example, through a custom element) and block.
Note that, when using both EncodedResourceResolver (for example, Gzip, Brotli encoded) and
VersionedResourceResolver, they must be registered in that order, to ensure content-based
versions are always computed reliably based on the unencoded file.
For WebJars, versioned URLs like
/webjars/jquery/1.2.0/jquery.min.js are the recommended and most efficient way to use them.
The related resource location is configured out of the box with Spring Boot (or can be configured
manually via ResourceHandlerRegistry) and does not require to add the
org.webjars:webjars-locator-core dependency.
Version-less URLs like /webjars/jquery/jquery.min.js are supported through the
WebJarsResourceResolver which is automatically registered when the
org.webjars:webjars-locator-core library is present on the classpath, at the cost of a
classpath scanning that could slow down application startup. The resolver can re-write URLs to
include the version of the jar and can also match against incoming URLs without versions — for example, from /webjars/jquery/jquery.min.js to /webjars/jquery/1.2.0/jquery.min.js.
The Java configuration based on ResourceHandlerRegistry provides further optionsfor fine-grained control, e.g. last-modified behavior and optimized resource resolution. |
1.12.9. Path Matching
You can customize options related to path matching. For details on the individual options, see the
PathMatchConfigurer javadoc.
The following example shows how to use PathMatchConfigurer:
Java
@Configuration
@EnableWebFlux
public class WebConfig implements WebFluxConfigurer {
@Override
public void configurePathMatch(PathMatchConfigurer configurer) {
configurer
.setUseCaseSensitiveMatch(true)
.addPathPrefix("/api", HandlerTypePredicate.forAnnotation(RestController.class));
}
}
Kotlin
@Configuration
@EnableWebFlux
class WebConfig : WebFluxConfigurer {
@Override
fun configurePathMatch(configurer: PathMatchConfigurer) {
configurer
.setUseCaseSensitiveMatch(true)
.addPathPrefix("/api", HandlerTypePredicate.forAnnotation(RestController::class.java))
}
}
|
Spring WebFlux relies on a parsed representation of the request path called Spring WebFlux also does not support suffix pattern matching, unlike in Spring MVC, where we |
1.12.10. WebSocketService
The WebFlux Java config declares of a WebSocketHandlerAdapter bean which provides
support for the invocation of WebSocket handlers. That means all that remains to do in
order to handle a WebSocket handshake request is to map a WebSocketHandler to a URL
via SimpleUrlHandlerMapping.
In some cases it may be necessary to create the WebSocketHandlerAdapter bean with a
provided WebSocketService service which allows configuring WebSocket server properties.
For example:
Java
@Configuration
@EnableWebFlux
public class WebConfig implements WebFluxConfigurer {
@Override
public WebSocketService getWebSocketService() {
TomcatRequestUpgradeStrategy strategy = new TomcatRequestUpgradeStrategy();
strategy.setMaxSessionIdleTimeout(0L);
return new HandshakeWebSocketService(strategy);
}
}
Kotlin
@Configuration
@EnableWebFlux
class WebConfig : WebFluxConfigurer {
@Override
fun webSocketService(): WebSocketService {
val strategy = TomcatRequestUpgradeStrategy().apply {
setMaxSessionIdleTimeout(0L)
}
return HandshakeWebSocketService(strategy)
}
}
1.12.11. Advanced Configuration Mode
@EnableWebFlux imports DelegatingWebFluxConfiguration that:
-
Provides default Spring configuration for WebFlux applications
-
detects and delegates to
WebFluxConfigurerimplementations to customize that configuration.
For advanced mode, you can remove @EnableWebFlux and extend directly from
DelegatingWebFluxConfiguration instead of implementing WebFluxConfigurer,
as the following example shows:
Java
@Configuration
public class WebConfig extends DelegatingWebFluxConfiguration {
// ...
}
Kotlin
@Configuration
class WebConfig : DelegatingWebFluxConfiguration {
// ...
}
You can keep existing methods in WebConfig, but you can now also override bean declarations
from the base class and still have any number of other WebMvcConfigurer implementations on
the classpath.
1.13. HTTP/2
HTTP/2 is supported with Reactor Netty, Tomcat, Jetty, and Undertow. However, there are
considerations related to server configuration. For more details, see the
HTTP/2 wiki page.
I’ve been doing some research using spring-webflux and I like to understand what should be the right way to handle errors using Router Functions.
I’ve created an small project to test a couple of scenarios, and I like to get feedback about it, and see what other people is doing.
So far what I doing is.
Giving the following routing function:
@Component
public class HelloRouter {
@Bean
RouterFunction<?> helloRouterFunction() {
HelloHandler handler = new HelloHandler();
ErrorHandler error = new ErrorHandler();
return nest(path("/hello"),
nest(accept(APPLICATION_JSON),
route(GET("/"), handler::defaultHello)
.andRoute(POST("/"), handler::postHello)
.andRoute(GET("/{name}"), handler::getHello)
)).andOther(route(RequestPredicates.all(), error::notFound));
}
}
I’ve do this on my handler
class HelloHandler {
private ErrorHandler error;
private static final String DEFAULT_VALUE = "world";
HelloHandler() {
error = new ErrorHandler();
}
private Mono<ServerResponse> getResponse(String value) {
if (value.equals("")) {
return Mono.error(new InvalidParametersException("bad parameters"));
}
return ServerResponse.ok().body(Mono.just(new HelloResponse(value)), HelloResponse.class);
}
Mono<ServerResponse> defaultHello(ServerRequest request) {
return getResponse(DEFAULT_VALUE);
}
Mono<ServerResponse> getHello(ServerRequest request) {
return getResponse(request.pathVariable("name"));
}
Mono<ServerResponse> postHello(ServerRequest request) {
return request.bodyToMono(HelloRequest.class).flatMap(helloRequest -> getResponse(helloRequest.getName()))
.onErrorResume(error::badRequest);
}
}
Them my error handler do:
class ErrorHandler {
private static Logger logger = LoggerFactory.getLogger(ErrorHandler.class);
private static BiFunction<HttpStatus,String,Mono<ServerResponse>> response =
(status,value)-> ServerResponse.status(status).body(Mono.just(new ErrorResponse(value)),
ErrorResponse.class);
Mono<ServerResponse> notFound(ServerRequest request){
return response.apply(HttpStatus.NOT_FOUND, "not found");
}
Mono<ServerResponse> badRequest(Throwable error){
logger.error("error raised", error);
return response.apply(HttpStatus.BAD_REQUEST, error.getMessage());
}
}
Here is the full sample repo:
https://github.com/LearningByExample/reactive-ms-example

Reading Time: 3 minutes
Error handling is one of the ways we ensure we are gracefully handling our failures. While working with streams of data, the Reactive Library Reactor provides us with multiple ways of dealing with situations where we need to handle our errors. In this blog, I wish to discuss a few of them with you.
In streams, errors are terminal events. This means that from the point we encounter an error, our stream is not processed by the designated operator. On the contrary, it gets propagated to the subscription, looking for a path defined to follow in case of an error. If not defined, by default we get an UnsupportedOperatorException.
Error Handling
Now we could do multiple things when we encounter an error while working a stream.
1. We may want to substitute a default value in case of an Exception.
Say we’re processing a stream of integers and we return 100 divided by whatever value we have in the stream. In case we encounter a Zero, we want to return the maximum possible value. In such cases, we have a function like orErrorReturn( ).

Note: See that it didn’t process after getting an Exception. Basically, this means that while processing the stream, whenever you get an error, and you’ve used a onErrorReturn, the processing will stop, control moves to error handling you’ve provided, replaces the erroneous value with the provided value and stops the stream.
2. You may want to provide a fallback publisher in case you encounter an error. Let’s just say you wanted to hit an unreliable service which may produce some error. You may use a onErrorResume( ) which will return another stream on elements from the point you encountered that error.

Note: Using the instanceOf method, you may be able to verify if its an Exception of some expected type and hence you could handle it accordingly.
3. Sometimes we need to provide custom exceptions in order to be more clear about things. So instead of a DivideByZero we may want DenominatorInvalidException. Such is the use case of onErrorMap( ). What you may also notice is we tried to handle the business exception in the subscribe block in the second expression. Subscribe can also expect a throwable parameter and handle stuff. It’s an equivalent of doOnError( ).

4. We may want the error to propagate and just want to log stuff up so that we know where it failed. This is where doOnError( ) can help us. It’ll catch, perform side-effect operation and rethrow the exception.

So this is how we can functionally handle our exceptions in Reactive Streams. Hope you enjoyed this blog.
References:
Project Reactor


Ayush Prashar is a software consultant having more than 1 year of experience. He is familiar with programming languages such as Java, Scala, C, C++ and he is currently working on reactive technologies like Lagom, Akka, Spark, and Kafka. His hobbies include playing table tennis, basketball, watching TV series and football.
Let’s face it: sometimes you don’t always get the response that you’re expecting. And when you’re using the Spring WebFlux WebClient interface to make a request, you need to handle those error conditions.
Fortunately, you can do that fairly easily.
In this guide, I’ll show you how I like to handle errors returned by WebClient requests.
Of course, you’re always free to just go straight to the code if that’s how you roll.
Otherwise, read on.
[Please note: the code here has been refactored. Be sure to check out the article on handling empty responses with WebClient once you’re done reading this guide.]
The Business Requirements
Your boss Smithers barges into your office, irate as usual.
«What’s with all these exception stacktraces I’m seeing in the logs?!?» he asks. «I need you to handle these exception conditions more gracefully! We don’t need mile-long stacktraces!»
He pauses for a few moments.
«That’s all!» he says as he storms back out of your office.
You Have a Starting Point
In the previous guide, I showed you how to log the responses you get with WebClient requests. You’re going to build on that here.
But first, it’s time to create a new exception class.
Why? Because you want an exception class that includes both a message and a status code.
You could use WebClientRequestException for that purpose, but that’s married to the WebClient code. You need something more service-y. That way if you ever decide to use something other than WebClient to make these requests, you don’t have to change the exception class that gets sent back to the caller.
Now with that in mind, create this exception class:
public class ServiceException extends RuntimeException {
private static final long serialVersionUID = -7661881974219233311L;
private int statusCode;
public ServiceException (String message, int statusCode) {
super(message);
this.statusCode = statusCode;
}
public int getStatusCode() {
return statusCode;
}
}The new class extends RuntimeException because of the way that WebClient handles exceptions. Indeed, even WebClientResponseException is an unchecked exception. So just roll with it.
Beyond that, the exception stores the message just like every other exception. It also stores the response status code. That status code will be in the 400’s or 500’s because those are the error codes.
Fiddling With the Filter
Now update the filter class. Specifically change the method that handles logging errors as follows:
private static Mono<ClientResponse> logBody(ClientResponse response) {
if (response.statusCode() != null && (response.statusCode().is4xxClientError() || response.statusCode().is5xxServerError())) {
return response.bodyToMono(String.class)
.flatMap(body -> {
LOG.debug("Body is {}", body);
return Mono.error(new ServiceException(body, response.rawStatusCode()));
});
} else {
return Mono.just(response);
}
}The big change there is the second return statement. It’s now returning Mono.error() instead of Mono.just().
That’s still a publisher (remember: Mono is a publisher) . Not only that, but it still publishes ClientResponse.
However, the difference is that this time the publisher will terminate with the given exception once it’s got a subscriber.
That «given exception,» by the way is the new ServiceException() you see inside Mono.error().
The ServiceException constructor accepts two parameters: the first parameter is the response body returned by the downstream service. The second parameter is the HTTP status code.
Seasoning the Service
Now you need to update UserService. Change the fetchUser() method:
public SalesOwner fetchUser(String bearerToken) {
try {
SalesOwner salesOwner = userClient.get()
.uri("/user/me")
.header(HttpHeaders.AUTHORIZATION, bearerToken)
.retrieve()
.bodyToMono(SalesOwner.class)
.block();
LOG.debug("User is " + salesOwner);
return salesOwner;
} catch (WebClientResponseException we) {
throw new ServiceException (we.getMessage(), we.getRawStatusCode());
}
}The first thing to notice is that the whole method is now in a try/catch block. That’s cool because you want to start handling these errors gracefully.
Note, however, that the method catches WebClientResponseException and not ServiceException. What gives?
The point of that catch block is to catch anything not caught by the filter. It’s the last stand. It’s the Alamo.
And when it does catch that exception, it creates a new ServiceException and throws it back.
That’s it. Now you’ve got something that will handle your error situations.
So Come on, Man, Check This Out
Time to see if this works. Create some initialization code that looks like this:
@Component
public class ApplicationListenerInitialize implements ApplicationListener<ApplicationReadyEvent> {
@Autowired
private UserService userService;
public void onApplicationEvent(ApplicationReadyEvent event) {
try {
SalesOwner owner = userService.fetchUser("Bearer eyJhbGciOiJIUzU....");
ObjectMapper objectMapper = new ObjectMapper();
objectMapper.setSerializationInclusion(JsonInclude.Include.NON_NULL);
objectMapper.setSerializationInclusion(JsonInclude.Include.NON_EMPTY);
System.err.println(objectMapper.writerWithDefaultPrettyPrinter().writeValueAsString(owner));
} catch (ServiceException se) {
System.err.println("Error: " + se.getStatusCode() + " " + se.getMessage());
} catch (Exception e) {
e.printStackTrace();
}
}
}Pay attention to the first catch block. It catches ServiceException. That’s where you can make some graceful moves with the error condition.
Here, it’s just printing out the error and moving on.
Now to fully test this out I once again recoded the downstream service to intentionally throw a 400 (Bad Request) error with the message «You did something wrong.»
And if you want to do exactly what I’ve done above, just grab yourself a bearer token by using Postman to login to the user service.
Now with that preamble out of the way. Start your Spring Boot application and wait for everything to load. Then pay attention to the red lettering that appears in your console log. It should look like this:
Error: 400 You did something wrong.Bingo. That’s exactly what you’re looking for.
Wrapping It Up
Well that’s one way to skin this cat. There are plenty of others.
Feel free to take the code you see above and modify it to suit your own business requirements. Also: include it in a controller class and return the appropriate status code back to the calling client.
As always, feel free to grab the code on GitHub.
Have fun!
Photo by alleksana from Pexels
Обработка ошибок в Spring WebFlux
1. обзор
В этом руководствеwe’ll look at various strategies available for handling errors in a Spring WebFlux project проходит через практический пример.
Мы также укажем, где может быть выгоднее использовать одну стратегию перед другой, и дадим ссылку на полный исходный код в конце.
2. Настройка примера
Настройка Maven такая же, как у нашегоprevious article, который дает введение в Spring Webflux.
В нашем примере в результатеwe’ll usea RESTful endpoint that takes a username as a query parameter and returns “Hello username”.
Во-первых, давайте создадим функцию маршрутизатора, которая направляет запрос/hello методу с именемhandleRequest в переданном обработчике:
@Bean
public RouterFunction routeRequest(Handler handler) {
return RouterFunctions.route(RequestPredicates.GET("/hello")
.and(RequestPredicates.accept(MediaType.TEXT_PLAIN)),
handler::handleRequest);
}Затем мы определим методhandleRequest(), который вызывает методsayHello() и находит способ включения / возврата его результата в телоServerResponse:
public Mono handleRequest(ServerRequest request) {
return
//...
sayHello(request)
//...
}Наконец, методsayHello() — это простой служебный метод, который объединяет «Hello»String и имя пользователя:
private Mono sayHello(ServerRequest request) {
//...
return Mono.just("Hello, " + request.queryParam("name").get());
//...
}Пока имя пользователя присутствует как часть нашего запроса, например если конечная точка вызывается как“/hello?username=Tonni “, то эта конечная точка всегда будет работать правильно.
Однакоif we call the same endpoint without specifying a username e.g. “/hello”, it will throw an exception.
Ниже мы рассмотрим, где и как мы можем реорганизовать наш код для обработки этого исключения в WebFlux.
3. Обработка ошибок на функциональном уровне
В APIMono иFlux встроены два ключевых оператора для обработки ошибок на функциональном уровне.
Давайте кратко рассмотрим их и их использование.
3.1. Обработка ошибок с помощьюonErrorReturn
We can use onErrorReturn() to return a static default value всякий раз, когда возникает ошибка:
public Mono handleRequest(ServerRequest request) {
return sayHello(request)
.onErrorReturn("Hello Stranger")
.flatMap(s -> ServerResponse.ok()
.contentType(MediaType.TEXT_PLAIN)
.syncBody(s));
}Здесь мы возвращаем статическое «Hello Stranger» всякий раз, когда ошибочная функция конкатенацииsayHello() выдает исключение.
3.2. Обработка ошибок с помощьюonErrorResume
onErrorResume можно использовать для обработки ошибок тремя способами:
-
Вычислить динамическое запасное значение
-
Выполнить альтернативный путь с помощью резервного метода
-
Поймать, обернуть и повторно выдать ошибку, например, в качестве особого бизнес-исключения
Давайте посмотрим, как мы можем вычислить значение:
public Mono handleRequest(ServerRequest request) {
return sayHello(request)
.flatMap(s -> ServerResponse.ok()
.contentType(MediaType.TEXT_PLAIN)
.syncBody(s))
.onErrorResume(e -> Mono.just("Error " + e.getMessage())
.flatMap(s -> ServerResponse.ok()
.contentType(MediaType.TEXT_PLAIN)
.syncBody(s)));
}Здесь мы возвращаем строку, состоящую из динамически полученного сообщения об ошибке, добавляемого к строке «Error» всякий раз, когдаsayHello() вызывает исключение.
Теперь давайтеcall a fallback method when an error occurs:
public Mono handleRequest(ServerRequest request) {
return sayHello(request)
.flatMap(s -> ServerResponse.ok()
.contentType(MediaType.TEXT_PLAIN)
.syncBody(s))
.onErrorResume(e -> sayHelloFallback()
.flatMap(s ->; ServerResponse.ok()
.contentType(MediaType.TEXT_PLAIN)
.syncBody(s)));
}Здесь мы вызываем альтернативный методsayHelloFallback() всякий раз, когдаsayHello() вызывает исключение.
Последний вариант использованияonErrorResume() — этоcatch, wrap, and re-throw an error, например. какNameRequiredException:
public Mono handleRequest(ServerRequest request) {
return ServerResponse.ok()
.body(sayHello(request)
.onErrorResume(e -> Mono.error(new NameRequiredException(
HttpStatus.BAD_REQUEST,
"username is required", e))), String.class);
}Здесь мы генерируем настраиваемое исключение с сообщением: «username is required» всякий раз, когдаsayHello() вызывает исключение.
4. Обработка ошибок на глобальном уровне
До сих пор все представленные примеры касались обработки ошибок на функциональном уровне.
We can, however, opt to handle our WebFlux errors at a global level. Для этого нам нужно сделать всего два шага:
-
Настройте глобальные атрибуты ответа на ошибку
-
Реализуйте глобальный обработчик ошибок
Исключение, которое выдает наш обработчик, будет автоматически переведено в состояние HTTP и тело ошибки JSON. Чтобы настроить их, мы можем простоextend the DefaultErrorAttributes class и переопределить его методgetErrorAttributes():
public class GlobalErrorAttributes extends DefaultErrorAttributes{
@Override
public Map getErrorAttributes(ServerRequest request,
boolean includeStackTrace) {
Map map = super.getErrorAttributes(
request, includeStackTrace);
map.put("status", HttpStatus.BAD_REQUEST);
map.put("message", "username is required");
return map;
}
}Здесь мы хотим, чтобы статус:BAD_REQUEST и сообщение: «username is required» возвращались как часть атрибутов ошибки при возникновении исключения.
Теперь давайтеimplement the Global Error Handler. Для этого Spring предоставляет удобный классAbstractErrorWebExceptionHandler, который мы можем расширить и реализовать при обработке глобальных ошибок:
@Component
@Order(-2)
public class GlobalErrorWebExceptionHandler extends
AbstractErrorWebExceptionHandler {
// constructors
@Override
protected RouterFunction getRoutingFunction(
ErrorAttributes errorAttributes) {
return RouterFunctions.route(
RequestPredicates.all(), this::renderErrorResponse);
}
private Mono renderErrorResponse(
ServerRequest request) {
Map errorPropertiesMap = getErrorAttributes(request, false);
return ServerResponse.status(HttpStatus.BAD_REQUEST)
.contentType(MediaType.APPLICATION_JSON_UTF8)
.body(BodyInserters.fromObject(errorPropertiesMap));
}
}В этом примере мы устанавливаем порядок нашего глобального обработчика ошибок на -2. Это доgive it a higher priority than the DefaultErrorWebExceptionHandler, который зарегистрирован в@Order(-1).
ОбъектerrorAttributes будет точной копией того, который мы передаем в конструктор Web Exception Handler. В идеале это должен быть наш настраиваемый класс атрибутов ошибок.
Затем мы четко заявляем, что хотим направлять все запросы обработки ошибок методуrenderErrorResponse().
Наконец, мы получаем атрибуты ошибки и вставляем их в тело ответа сервера.
Затем создается ответ JSON с подробными сведениями об ошибке, статусе HTTP и сообщении об исключении для машинных клиентов. Для клиентов браузера он имеет обработчик ошибок «whitelabel», который отображает те же данные в формате HTML. Это, конечно, можно настроить.
5. Заключение
В этой статье мы рассмотрели различные стратегии, доступные для обработки ошибок в проекте Spring WebFlux, и указали, где может быть выгодно использовать одну стратегию над другой.
Как и было обещано, доступен полный исходный код, прилагаемый к статьеover on GitHub.
Содержание
- Spring WebFlux Error Handling
- Overview:
- Spring WebFlux Error Handling:
- Sample Application:
- Project Set up:
- DTO:
- Student Service:
- REST API:
- @ControllerAdvice:
- Spring WebFlux Error Handling – Demo:
- Summary:
- Error Handling in Spring Webflux
- Look at error handling in Spring Webflux.
- When Do We Need to Handle Errors in Webflux
- Start From Business Logic
- Web on Reactive Stack
- 1. Spring WebFlux
- 1.1. Overview
- 1.1.1. Define “Reactive”
- 1.1.2. Reactive API
- 1.1.3. Programming Models
- 1.1.4. Applicability
- 1.1.5. Servers
- 1.1.6. Performance
- 1.1.7. Concurrency Model
- 1.2. Reactive Core
- 1.2.1. HttpHandler
Spring WebFlux Error Handling
Overview:
In this article, I would like to show you Spring WebFlux Error Handling using @ControllerAdvice.
Spring WebFlux Error Handling:
Developing Microservices is fun and easy with Spring Boot. But anything could go wrong in when multiple Microservices talk to each other. In case of some unhandled exceptions like 500 – Internal Server Error, Spring Boot might respond as shown here.
Usually error messages like this will not be handled properly and would be propagated to all the downstream services which might impact user experience. In some cases, applications might want to use application specific error code to convey appropriate messages to the calling service.
Let’s see how we could achieve that using Spring WebFlux.
Sample Application:
Let’s consider a simple application in which we have couple of APIs to get student information.
- GET – /student/all
- This will return all student information. Occasionally this throws some weird exceptions.
- GET /student/[id]
- This will return specific student based on the given id.
Project Set up:
Create a Spring application with the following dependencies.
Overall the project structure will be as shown here.
DTO:
First I create a simple DTO for student. We are interested only these 3 attributes of student for now.
Then I create another class to respond in case of error. errorCode could be some app specific error code and some appropriate error message.
I also create another exception class as shown here for the service layer to throw an exception when student is not found for the given id.
Student Service:
Then I create a service layer with these 2 methods.
- getAllStudents: will throw some exception at random.
- findStudentById: method will throw exception when the student is not found. It throws StudentNotFoundException.
REST API:
Let’s create a simple StudentController to expose those 2 APIs.
- /student/allendpoint will fetch all the students
- /student/ endpoint will fetch specific student
Now if we run the application and try to access the below URL a few times – will throw RunTimeException.
The response could be something like this.
Let’s see how we could handle and respond better.
@ControllerAdvice:
Spring provides @ControllerAdvice for handling exceptions in Spring Boot Microservices. The annotated class will act like an Interceptor in case of any exceptions.
- We can have multiple exception handlers to handle each exception.
- In our case we throw RunTimeException and StudentNotFoundException – so we have 2 exception handlers. We can also handle all by using a simple Exception.class if we want.
Spring WebFlux Error Handling – Demo:
If I send below request, I get the appropriate response instead of directly propagating 500 Internal Server Error.
This error provides more meaningful error message. So the calling service use this error code might take appropriate action.
Similarly, I invoke below endpoint (after few times), then I below response.
Summary:
We were able to demonstrate Spring WebFlux Error Handling using @ControllerAdvice. This is a simple example. There are various other design patterns as well to make the system more resilient which could be more useful for a large application.
Источник
Error Handling in Spring Webflux
Look at error handling in Spring Webflux.
Join the DZone community and get the full member experience.
The topic of error handling in web applications is very important. From a client perspective it is essential to know on how was the request proceeded and in case of any error is crucial to provide to the client a valid reason, especially if the error was due to the client’s actions. There are different situations, when notifying callers about concrete reasons is important – think about server-side validations, business logic errors that come due to bad requests or simple not found situations.
The mechanism of error handling in Webflux is different, from what we know from Spring MVC. Core building blocks of reactive apps – Mono and Flux brings a special way to deal with error situations, and while old exception-based error handling still may work for some cases, it violates Spring Webflux nature. In this post I will do an overview of how to process errors in Webflux when it comes to business errors and absent data. I will not cover technical errors in this article, as they are handled by Spring framework.
When Do We Need to Handle Errors in Webflux
Before we will move to the subject of error handling, let define what we want to achieve. Assume, that we build application using a conventional architecture with a vertical separation by layers and a horizontal separation by domains. That means, that our app consists of three main layers: repositories (one that handle data access), services (one that do custom business logic) and handlers (to work with HTTP requests/responses; understand them as controllers in Spring MVC). Take a look on the graph below and you can note that potentially errors may occur on any layer:
Figure 1. Typical Webflux app architecture
Although, I need to clarify here, that from a technical perspective errors are not same. On the repository level (and let abstract here also clients, that deal with external APIs and all data-access components) usually occur what is called technical errors. For instance, something can be wrong with a database, so the repository component will throw an error. This error is a subclass of RuntimeException and if we use Spring is handled by framework, so we don’t need to do something here. It will result to 500 error code.
An another case is what we called business errors. This is a violation of custom business rules of your app. While it may be considered as not as a good idea to have such errors, they are unavoidable, because, as it was mentioned before, we have to provide a meaningful response to clients in case of such violations. If you will return to the graph, you will note, that such errors usually occur on the service level, therefore we have to deal with them.
Now, let see how to handle errors and provide error responses in Spring Webflux APIs.
Start From Business Logic
In my previous post, I demonstrated how to build two-factor authentication for Spring Webflux REST API. That example follows the aforesaid architecture and is organized from repositories, services and handlers. As it was already mentioned, business errors take place inside a service. Prior to reactive Webflux, we often used exception-based error handling. It means that you provide a custom runtime exception (a subclass of ResponseStatusException ) which is mapped with specific http status.
However, Webflux approach is different. Main building blocks are Mono and Flux components, that are chained throughout an app’s flow (note, from here I refer to both Mono and Flux as Mono ). Throwing an exception on any level will break an async nature. Also, Spring reactive repositories, such as ReactiveMongoRepository don’t use exceptions to indicate an error situation. Mono container provides a functionality to propagate error condition and empty condition:
- Mono.empty() = this static method creates a Mono container that completes without emitting any item
- Mono.error() = this static method creates a Mono container that terminates with an error immediately after being subscribed to
With this knowledge, we can now design a hypothetical login/signup flow to be able to handle situations, when 1) an entity is absent and 2) error occurred. If an error occurs on the repository level, Spring handles it by returning Mono with error state. When the requested data is not found – empty Mono . We also can add some validation for business rules inside the service. Take a look on the refactored code of signup flow from this post:
Источник
Web on Reactive Stack
This part of the documentation covers support for reactive-stack web applications built on a Reactive Streams API to run on non-blocking servers, such as Netty, Undertow, and Servlet 3.1+ containers. Individual chapters cover the Spring WebFlux framework, the reactive WebClient , support for testing, and reactive libraries. For Servlet-stack web applications, see Web on Servlet Stack.
1. Spring WebFlux
The original web framework included in the Spring Framework, Spring Web MVC, was purpose-built for the Servlet API and Servlet containers. The reactive-stack web framework, Spring WebFlux, was added later in version 5.0. It is fully non-blocking, supports Reactive Streams back pressure, and runs on such servers as Netty, Undertow, and Servlet 3.1+ containers.
Both web frameworks mirror the names of their source modules (spring-webmvc and spring-webflux) and co-exist side by side in the Spring Framework. Each module is optional. Applications can use one or the other module or, in some cases, both — for example, Spring MVC controllers with the reactive WebClient .
1.1. Overview
Why was Spring WebFlux created?
Part of the answer is the need for a non-blocking web stack to handle concurrency with a small number of threads and scale with fewer hardware resources. Servlet 3.1 did provide an API for non-blocking I/O. However, using it leads away from the rest of the Servlet API, where contracts are synchronous ( Filter , Servlet ) or blocking ( getParameter , getPart ). This was the motivation for a new common API to serve as a foundation across any non-blocking runtime. That is important because of servers (such as Netty) that are well-established in the async, non-blocking space.
The other part of the answer is functional programming. Much as the addition of annotations in Java 5 created opportunities (such as annotated REST controllers or unit tests), the addition of lambda expressions in Java 8 created opportunities for functional APIs in Java. This is a boon for non-blocking applications and continuation-style APIs (as popularized by CompletableFuture and ReactiveX) that allow declarative composition of asynchronous logic. At the programming-model level, Java 8 enabled Spring WebFlux to offer functional web endpoints alongside annotated controllers.
1.1.1. Define “Reactive”
We touched on “non-blocking” and “functional” but what does reactive mean?
The term, “reactive,” refers to programming models that are built around reacting to change — network components reacting to I/O events, UI controllers reacting to mouse events, and others. In that sense, non-blocking is reactive, because, instead of being blocked, we are now in the mode of reacting to notifications as operations complete or data becomes available.
There is also another important mechanism that we on the Spring team associate with “reactive” and that is non-blocking back pressure. In synchronous, imperative code, blocking calls serve as a natural form of back pressure that forces the caller to wait. In non-blocking code, it becomes important to control the rate of events so that a fast producer does not overwhelm its destination.
Reactive Streams is a small spec (also adopted in Java 9) that defines the interaction between asynchronous components with back pressure. For example a data repository (acting as Publisher) can produce data that an HTTP server (acting as Subscriber) can then write to the response. The main purpose of Reactive Streams is to let the subscriber to control how quickly or how slowly the publisher produces data.
Common question: what if a publisher cannot slow down?
The purpose of Reactive Streams is only to establish the mechanism and a boundary. If a publisher cannot slow down, it has to decide whether to buffer, drop, or fail.
1.1.2. Reactive API
Reactive Streams plays an important role for interoperability. It is of interest to libraries and infrastructure components but less useful as an application API, because it is too low-level. Applications need a higher-level and richer, functional API to compose async logic — similar to the Java 8 Stream API but not only for collections. This is the role that reactive libraries play.
Reactor is the reactive library of choice for Spring WebFlux. It provides the Mono and Flux API types to work on data sequences of 0..1 ( Mono ) and 0..N ( Flux ) through a rich set of operators aligned with the ReactiveX vocabulary of operators. Reactor is a Reactive Streams library and, therefore, all of its operators support non-blocking back pressure. Reactor has a strong focus on server-side Java. It is developed in close collaboration with Spring.
WebFlux requires Reactor as a core dependency but it is interoperable with other reactive libraries via Reactive Streams. As a general rule, a WebFlux API accepts a plain Publisher as input, adapts it to a Reactor type internally, uses that, and returns either a Flux or a Mono as output. So, you can pass any Publisher as input and you can apply operations on the output, but you need to adapt the output for use with another reactive library. Whenever feasible (for example, annotated controllers), WebFlux adapts transparently to the use of RxJava or another reactive library. See Reactive Libraries for more details.
1.1.3. Programming Models
The spring-web module contains the reactive foundation that underlies Spring WebFlux, including HTTP abstractions, Reactive Streams adapters for supported servers, codecs, and a core WebHandler API comparable to the Servlet API but with non-blocking contracts.
On that foundation, Spring WebFlux provides a choice of two programming models:
Annotated Controllers: Consistent with Spring MVC and based on the same annotations from the spring-web module. Both Spring MVC and WebFlux controllers support reactive (Reactor and RxJava) return types, and, as a result, it is not easy to tell them apart. One notable difference is that WebFlux also supports reactive @RequestBody arguments.
Functional Endpoints: Lambda-based, lightweight, and functional programming model. You can think of this as a small library or a set of utilities that an application can use to route and handle requests. The big difference with annotated controllers is that the application is in charge of request handling from start to finish versus declaring intent through annotations and being called back.
1.1.4. Applicability
Spring MVC or WebFlux?
A natural question to ask but one that sets up an unsound dichotomy. Actually, both work together to expand the range of available options. The two are designed for continuity and consistency with each other, they are available side by side, and feedback from each side benefits both sides. The following diagram shows how the two relate, what they have in common, and what each supports uniquely:
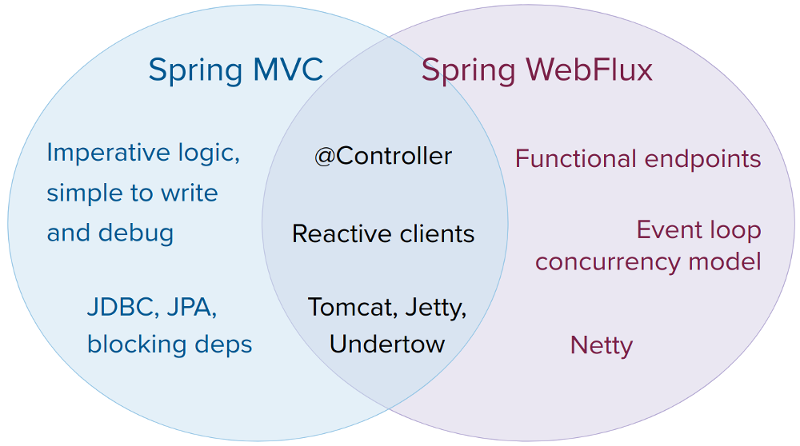
We suggest that you consider the following specific points:
If you have a Spring MVC application that works fine, there is no need to change. Imperative programming is the easiest way to write, understand, and debug code. You have maximum choice of libraries, since, historically, most are blocking.
If you are already shopping for a non-blocking web stack, Spring WebFlux offers the same execution model benefits as others in this space and also provides a choice of servers (Netty, Tomcat, Jetty, Undertow, and Servlet 3.1+ containers), a choice of programming models (annotated controllers and functional web endpoints), and a choice of reactive libraries (Reactor, RxJava, or other).
If you are interested in a lightweight, functional web framework for use with Java 8 lambdas or Kotlin, you can use the Spring WebFlux functional web endpoints. That can also be a good choice for smaller applications or microservices with less complex requirements that can benefit from greater transparency and control.
In a microservice architecture, you can have a mix of applications with either Spring MVC or Spring WebFlux controllers or with Spring WebFlux functional endpoints. Having support for the same annotation-based programming model in both frameworks makes it easier to re-use knowledge while also selecting the right tool for the right job.
A simple way to evaluate an application is to check its dependencies. If you have blocking persistence APIs (JPA, JDBC) or networking APIs to use, Spring MVC is the best choice for common architectures at least. It is technically feasible with both Reactor and RxJava to perform blocking calls on a separate thread but you would not be making the most of a non-blocking web stack.
If you have a Spring MVC application with calls to remote services, try the reactive WebClient . You can return reactive types (Reactor, RxJava, or other) directly from Spring MVC controller methods. The greater the latency per call or the interdependency among calls, the more dramatic the benefits. Spring MVC controllers can call other reactive components too.
If you have a large team, keep in mind the steep learning curve in the shift to non-blocking, functional, and declarative programming. A practical way to start without a full switch is to use the reactive WebClient . Beyond that, start small and measure the benefits. We expect that, for a wide range of applications, the shift is unnecessary. If you are unsure what benefits to look for, start by learning about how non-blocking I/O works (for example, concurrency on single-threaded Node.js) and its effects.
1.1.5. Servers
Spring WebFlux is supported on Tomcat, Jetty, Servlet 3.1+ containers, as well as on non-Servlet runtimes such as Netty and Undertow. All servers are adapted to a low-level, common API so that higher-level programming models can be supported across servers.
Spring WebFlux does not have built-in support to start or stop a server. However, it is easy to assemble an application from Spring configuration and WebFlux infrastructure and run it with a few lines of code.
Spring Boot has a WebFlux starter that automates these steps. By default, the starter uses Netty, but it is easy to switch to Tomcat, Jetty, or Undertow by changing your Maven or Gradle dependencies. Spring Boot defaults to Netty, because it is more widely used in the asynchronous, non-blocking space and lets a client and a server share resources.
Tomcat and Jetty can be used with both Spring MVC and WebFlux. Keep in mind, however, that the way they are used is very different. Spring MVC relies on Servlet blocking I/O and lets applications use the Servlet API directly if they need to. Spring WebFlux relies on Servlet 3.1 non-blocking I/O and uses the Servlet API behind a low-level adapter and not exposed for direct use.
For Undertow, Spring WebFlux uses Undertow APIs directly without the Servlet API.
1.1.6. Performance
Performance has many characteristics and meanings. Reactive and non-blocking generally do not make applications run faster. They can, in some cases, (for example, if using the WebClient to execute remote calls in parallel). On the whole, it requires more work to do things the non-blocking way and that can increase slightly the required processing time.
The key expected benefit of reactive and non-blocking is the ability to scale with a small, fixed number of threads and less memory. That makes applications more resilient under load, because they scale in a more predictable way. In order to observe those benefits, however, you need to have some latency (including a mix of slow and unpredictable network I/O). That is where the reactive stack begins to show its strengths, and the differences can be dramatic.
1.1.7. Concurrency Model
Both Spring MVC and Spring WebFlux support annotated controllers, but there is a key difference in the concurrency model and the default assumptions for blocking and threads.
In Spring MVC (and servlet applications in general), it is assumed that applications can block the current thread, (for example, for remote calls), and, for this reason, servlet containers use a large thread pool to absorb potential blocking during request handling.
In Spring WebFlux (and non-blocking servers in general), it is assumed that applications do not block, and, therefore, non-blocking servers use a small, fixed-size thread pool (event loop workers) to handle requests.
“To scale” and “small number of threads” may sound contradictory but to never block the current thread (and rely on callbacks instead) means that you do not need extra threads, as there are no blocking calls to absorb.
What if you do need to use a blocking library? Both Reactor and RxJava provide the publishOn operator to continue processing on a different thread. That means there is an easy escape hatch. Keep in mind, however, that blocking APIs are not a good fit for this concurrency model.
In Reactor and RxJava, you declare logic through operators, and, at runtime, a reactive pipeline is formed where data is processed sequentially, in distinct stages. A key benefit of this is that it frees applications from having to protect mutable state because application code within that pipeline is never invoked concurrently.
What threads should you expect to see on a server running with Spring WebFlux?
On a “vanilla” Spring WebFlux server (for example, no data access nor other optional dependencies), you can expect one thread for the server and several others for request processing (typically as many as the number of CPU cores). Servlet containers, however, may start with more threads (for example, 10 on Tomcat), in support of both servlet (blocking) I/O and servlet 3.1 (non-blocking) I/O usage.
The reactive WebClient operates in event loop style. So you can see a small, fixed number of processing threads related to that (for example, reactor-http-nio- with the Reactor Netty connector). However, if Reactor Netty is used for both client and server, the two share event loop resources by default.
Reactor and RxJava provide thread pool abstractions, called Schedulers, to use with the publishOn operator that is used to switch processing to a different thread pool. The schedulers have names that suggest a specific concurrency strategy — for example, “parallel” (for CPU-bound work with a limited number of threads) or “elastic” (for I/O-bound work with a large number of threads). If you see such threads, it means some code is using a specific thread pool Scheduler strategy.
Data access libraries and other third party dependencies can also create and use threads of their own.
The Spring Framework does not provide support for starting and stopping servers. To configure the threading model for a server, you need to use server-specific configuration APIs, or, if you use Spring Boot, check the Spring Boot configuration options for each server. You can configure The WebClient directly. For all other libraries, see their respective documentation.
1.2. Reactive Core
The spring-web module contains abstractions and infrastructure to build reactive web applications. For server-side processing, this is organized in two distinct levels:
HttpHandler: Basic, common API for HTTP request handling with non-blocking I/O and (Reactive Streams) back pressure, along with adapters for each supported server.
WebHandler API: Slightly higher level but still general-purpose API for server request handling, which underlies higher-level programming models, such as annotated controllers and functional endpoints.
The reactive core also includes Codecs for client and server side use.
1.2.1. HttpHandler
HttpHandler is a simple contract with a single method to handle a request and response. It is intentionally minimal, as its main purpose is to provide an abstraction over different server APIs for HTTP request handling.
The following table describes the supported server APIs:
Источник