Got stuck with webhook error 400? We can help you in fixing it.
Webhooks facilitate syncing and relaying data between two applications.
At Bobcares, we often receive requests to fix webhook errors as a part of our Server Management Services.
Today, let’s have a look at this error, its causes, and some top fixes.
What is webhook error 400?
A webhook is a popular API concept. It is the way of exchanging real-time information between applications.
API and webhook perform similar functions but have some differences too. In the case of API, it delivers data when requested. But, webhooks get the data in realtime when the criteria are met.
Usually, we design an API for the webhook to use. Therefore, the chances for errors are more.
Webhook error 400 occurs due to the malformation of the request. Sometimes, the data sent by the client to the server have an incorrect format. And, this differs from the way the receiving service want the data to be.
Therefore, it returns error 400.
How we fix webhook error 400?
So far we have discussed the error. Let’s now see how our Support Engineers fix this error effectively.
1. Script errors
When we design API for webhooks, it is possible to have script errors.
Incorrect scripting is a major cause of error 400. So, it is important to double-check the scripts to avoid errors.
Recently, one of our customers approached us with a webhook error. He tried setting up the Stripe webhook for his app.
But, when he sends the test webhook from within Stripe, the following error returns.
“Test webhook error: 400”Our Support Engineers checked this tricky error and found errors with the data provided. He made mistakes while setting up endpoints.
While setting up the endpoints, he accidentally chose the Connect option instead of Accounts.
Selecting the Accounts option resolved the error and then webhooks started working fine.
2. Special characters
Similarly, the appearance of special characters in the given credentials will also cause this error.
For instance, the appearance of ” in username can cause this error.
So, we double-check the data for avoiding such errors.
[Need more help to fix error 400?- We’ll help you.]
Conclusion
In short, the webhook error 400 occurs due to the malformation of the request. In today’s article, we saw this error in detail and also discussed how our Support Engineers fix it for our customers.
PREVENT YOUR SERVER FROM CRASHING!
Never again lose customers to poor server speed! Let us help you.
Our server experts will monitor & maintain your server 24/7 so that it remains lightning fast and secure.
GET STARTED
var google_conversion_label = «owonCMyG5nEQ0aD71QM»;
I am new at this so it is probably a stupid mistake
Im trying to make a program that sends the price of a stock quote to discord as a webhook.
The webhook does not send. But, when I do print(symbol.json()[«Global Quote»]) I get all of the information.
I think there is a problem with the «Content-Type»: «application/json» but im not really sure how to fix it.
This is a snippet:
webhook = 'https://discordapp.com/api/webhooks/609119785015312414/HOkHGPWqfPfLJHpSp15XZ9dUNhUDly_DKQ8OwLgk3Rw0-4G08gx0mOrKN3FKhompb5ig'
session = requests.session()
symbol = session.get("https://www.alphavantage.co/query?function=GLOBAL_QUOTE&symbol=AAPL&apikey=F4RV85MVA2M2YTIY")

data = {}
data["content"] = symbol.json()["Global Quote"]
data["username"] = "AAPL"

result = requests.post(webhook, data=json.dumps(data), headers={"Content-Type": "application/json"})

try:
  result.raise_for_status()
except requests.exceptions.HTTPError as err:
  print(err)
else:
  print("Payload delivered successfully, code {}.".format(result.status_code))
The output for this is: 400 Client Error: BAD REQUEST for url: https://discordapp.com/api/webhooks/609119785015312414/HOkHGPWqfPfLJHpSp15XZ9dUNhUDly_DKQ8OwLgk3Rw0-4G08gx0mOrKN3FKhompb5ig
btw — I deleted the webhook before posting this
asked Aug 8, 2019 at 22:12
![]()
2
There is one problem with your code. The webhooks are functioning properly.
data["content"] = symbol.json()["Global Quote"]
In the line data[«content»] is a dict while it needs to be a string
You have to convert It to a String
There are two ways to fix this:-
First Way Using json —
import json
Then edit this line data["content"] = symbol.json()["Global Quote"] to —
data["content"] = json.dumps(symbol.json()["Global Quote"])
Second way-
Edit this line data["content"] = symbol.json()["Global Quote"] to —
data["content"] = str(symbol.json()["Global Quote"])
![]()
answered Aug 9, 2019 at 10:50
![]()
Weirdo914Weirdo914
1632 silver badges13 bronze badges
Just do:
from dhooks import Webhook

hook = Webhook("your-webhook")

hook.send("message-here")
answered Dec 6, 2021 at 15:23
![]()
1
Introduction
In a previous article, I demonstrated the use of GitHub webhooks in a simple tutorial using a sample API that logged webhook events. In this article, we will learn how to debug common issues with GitHub webhooks using the same sample project. This time, I have introduced some bugs into the project that we are going to learn how to debug.
Troubleshooting GitHub webhooks: Requirements checklist
To begin there are a few things you need to have or set up, including:
- A GitHub repository
- Node.js installed on your system to run the sample project
- A publicly accessible URL to the API endpoint. We will use the Hookdeck CLI to achieve this. To install the Hookdeck CLI, check out this page.
- Clear visualization of error messages. The Hookdeck CLI will help us with event pages where error details can be inspected.
- A text editor for editing code
With this setup, you have an environment in which you can conveniently troubleshoot your GitHub webhooks.
Troubleshooting GitHub webhooks with Hookdeck
Cloning and running a demo API
The sample API we will use is available on the Hookdeck GitHub repository. Follow the instructions to set it up.
Clone the repository by running the following command:
git clone --single-branch --branch github-webhooks-debugging https://github.com/hookdeck/nodejs-webhook-server-example.git
Enter fullscreen mode
Exit fullscreen mode
Navigate to the root of the project and install the required dependencies by running the following commands:
cd nodejs-webhook-server-example
npm install
Enter fullscreen mode
Exit fullscreen mode
When the installation completes, run the Node.js server with the following command:
npm start
Enter fullscreen mode
Exit fullscreen mode
This will boot up the API application and print a message to the screen indicating that the API is now running and listening for connections on port 1337.
We are using two endpoints in this project:
-
/log-github-webhook: This is the endpoint that will be receiving the GitHub webhook and logging it into an in-memory database. It logs a simple object containing a subset of the information from the webhook payload. -
/fetch-webhooks-logs: This endpoint can be called to retrieve a collection of the logged webhook data.
Getting a GitHub webhook URL
The next step is to use the CLI to generate a webhook URL that points to the running API application. To do this, run the following command:
hookdeck listen 1337
Enter fullscreen mode
Exit fullscreen mode
This command starts an interactive session where the CLI collects information about the endpoint you’re about to create. Below are the questions and the answers you should supply to each question. Ensure to hit the Enter key after each answer.
- What source should you select? Ans: select Create new source
- What should your new source label be? Ans: type the text GitHub
- What path should the webhooks be forwarded to (i.e.: /webhooks)? Ans: type /log-github-webhook
- What’s the connection label (i.e.: My API)? Ans: type My Github Response Server
With this information, the CLI will begin the process of generating the URL and once it’s done, you will see the URL printed to the screen and the CLI indicating that it is ready to receive requests.

Note: You will need to use the guest Login URL link in the console to access the dashboard. Copy and paste this into your browser to begin a guest login session.
Confirming webhook delivery
To begin receiving webhooks, you need to set up a webhook on your GitHub repository.
Go to Settings → Webhooks. On the Webhooks page, click on the Add webhook button on the top right-hand corner.
On the webhook form displayed, paste the webhook URL generated by the Hookdeck CLI into the Payload URL field.
Fill the remaining fields as follows:
-
Content type: Select
application/jsonso that you can receive the payload as a JSON object. -
Secret: You can leave this blank, but for this tutorial enter
1234ABCD. -
SSL Verification: Leave this as the default option,
Enable SSL verification. -
Which events would you like to trigger this webhook: This is the point where you subscribe for a GitHub event on your repository. For this tutorial, select the
Just the push eventoption as we are only subscribing to thepushevent. You can either subscribe for all events or a subset of the events using the other two options. - Active: Leave this checked to receive event details when the GitHub webhook is triggered.
See the complete webhook form below:

Click the Add webhook button to complete the process.
With this setup, anytime you push code to your repository, a webhook request will be fired to the specified webhook URL.
Immediately after you complete registration for a webhook in the step above, a ping webhook request will be fired to your webhook URL. Because we are using the Hookdeck CLI, we would already see the ping webhook request logged on the terminal where the Hookdeck CLI is running, as shown below:

This confirms that we are successfully receiving our webhook request. However, did you notice the status code indicated on the webhook request? Yeah, a 404.
Let’s take a look at how to deal with this error in the next section.
Troubleshooting GitHub webhook «not found» error
Our first webhook attempt resulted in a 404 error on the destination endpoint. This tells us that even though we are successfully receiving our webhooks, it cannot locate the endpoint specified, or the endpoint does not exist. 404 errors can be fixed, most of the time, by checking for typos or misspellings in the specified route name. Worst case scenario, the route truly does not exist and needs to be created.
Use the event page link displayed on the CLI to go to the event page, where you will see a page similar to the one below:
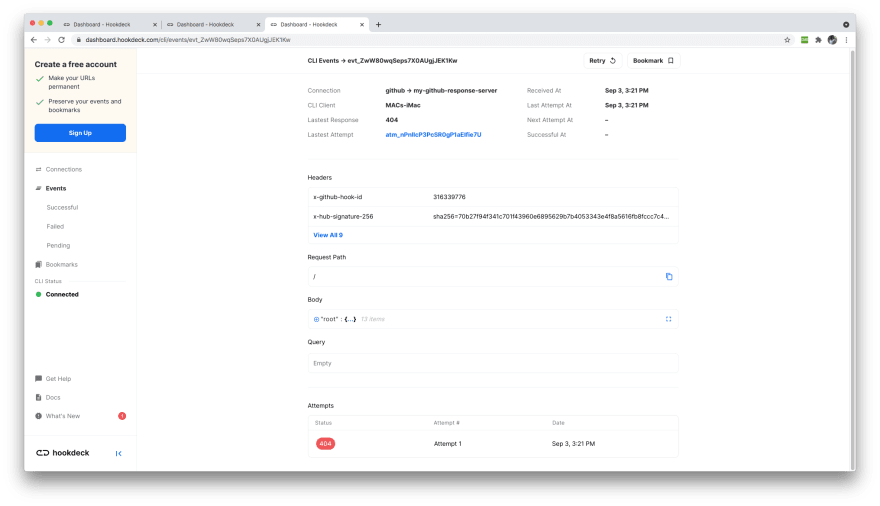
Scroll down to the red status code badge under the Attempts section and click on it to reveal details about the error on the right-hand side of the screen, as shown below:

This helps us see the actual response from the running server, and it also confirms that the specified endpoint cannot be found.
The endpoint specified for the webhook to hit is /log-github-webhook, which can be found in the routes.js file at the root of the project directory.
router.post("/log-github-webhoo", async function(req, res) {
  //console.log(req.body);

  const payload = req.body;

  let webhook_info = {
    repo : payload.repository.name,
    author : payload.sender.login,
    time : payload.head_commit.timestamp
  }

  const save_webhook = await req.db
  .collection("webhooks")
  .insertOne(webhook_info);

  res.status(201).send({
    message: "Webhook Event successfully logged"
  });
});
Enter fullscreen mode
Exit fullscreen mode
Taking a close look at the route handler, you will notice that there is a typo just at the end of the endpoint name: a missing ‘k‘. Simply add the missing character and save the file.
You will need to restart the Node.js server to allow the changes to take effect. Shut down the server using Ctrl + C and restart it with the npm start command.
Now, fire a new webhook to your endpoint by pushing a commit to your GitHub repository. Once this is done, check your Hookdeck CLI session for the new webhook received. You will see an entry similar to the one below:

As seen from the above webhook received, we have been able to clear the 404 error. However, we now have a new error: a 401 error. Let’s deal with this in the following section.
Troubleshooting GitHub webhook error 401
HTTP 401 errors indicate that an unauthorized action is being performed. Before making any assumptions, let’s inspect the server response using the event’s page. Copy the event page link from the Hookdeck CLI session and load it in your browser, and you will see a screen similar to the one below:

Scroll down to the red status code badge under the Attempts section and then click on it. You will see the server response details on the right-hand side as shown below:

Reading the response message, we can see that we are failing the security check on the webhook payload. Because we defined an API secret, GitHub sends the X-Hub-Signature-256 header. This header contains an encrypted version of the real payload and has to be validated against the unencrypted payload received by using the secret key.
This is a security check to prevent attackers from replacing the actual payload with a malicious one with the intention of corrupting our API.
Because we know that we are receiving the actual payload from GitHub since we set everything up and triggered the push event, we know it’s not an attacker’s payload causing the 401 error. Something else must be wrong with our setup.
Let’s take a look at the validation logic on our API. This can be found in the server.js file, as shown below:
//Validate payload
function validatePayload(req, res, next) {

    if(req.method == "POST"){
        if (!req.rawBody) {
            return res.status(400).send({
                message: "Request Body empty"
            });
        }

        const sig = Buffer.from(req.get(sigHeaderName) || '', 'utf8')
        const hmac = crypto.createHmac(sigHashAlg, secret)
        const digest = Buffer.from(sigHashAlg + '=' + hmac.update(req.rawBody).digest('hex'), 'utf8');

        if (sig.length !== digest.length || !crypto.timingSafeEqual(digest, sig)) {
            return res.status(401).send({
                message: `Request body digest (${digest}) did not match ${sigHeaderName} (${sig})`
            });

        }
    }

    return next()

}
app.use(validatePayload);
Enter fullscreen mode
Exit fullscreen mode
There are a couple of variables being used here in our code that are worth checking out to confirm that they are referencing the appropriate values. These are:
-
sigHeaderName: This represents the signature header name sent by GitHub. -
sigHashAlg: This is the algorithm used for the encryption. -
secret: This is the API secret set on our GitHub webhook.
These values are set on lines 10-12 in the server.js file. Lets take a look at these definitions:
const sigHeaderName = 'X-Hub-Signature-256';
const sigHashAlg = 'sha256';
const secret = "XXXXXX";
Enter fullscreen mode
Exit fullscreen mode
After observing these values, have you been able to catch the error? If the secret is not the same as the one we set in our webhook form, the validation will always fail.
GitHub does not allow you to view the API secret you set in your webhooks a second time — you can only reset it. This is why you need to make sure that you remember the value or store it somewhere secure.
For this practice, we know we set the secret as a simple 1234ABCD string. In real-world applications, you want to set a more complicated secret and reference it from an environment variable in your code.
Change the value of the secret to the right value, save the file, and restart the server. Now trigger another webhook by pushing a new commit to your GitHub repository. You will see a webhook entry similar to the one below on your Hookdeck CLI session:

Finally, we have a successful operation on our API. Load the event page, which should display a page similar to the one below:

Now click on the green status badge below the Attempts section to show the server response. The server returns a successful message, as shown below:
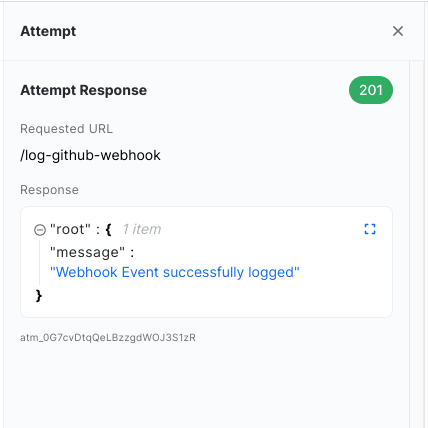
This time, when you visit the endpoint /fetch-webhooks-logs, you will see a collection like the one below:

Troubleshooting GitHub webhook «invalid HTTP response 400» error
Another error that can occur with GitHub webhooks is a 400 HTTP error, which indicates a bad request. One thing to note when working with GitHub webhooks is that GitHub is your client. Your application, or whichever system (SaaS apps, CI/CD server, etc.) that you’re integrating GitHub webhooks with, is the server.
Thus, when you see a bad request, it means that your server is not receiving what it expects from GitHub.
The first thing you want to check is the format in which you’re sending your webhook payload. GitHub allows you to set the Content-type to either application/json or application/x-www-form-urlencoded .

Make sure that the value you configured in your webhook form matches the content type your server is expecting.
Sometimes, 400 errors arise from empty payloads being sent by GitHub. If your server expects a payload to be sent, make sure that the Active option on your GitHub webhook form is checked.

Conclusion
Just like any other architectural component of an application, webhooks run into errors. Debugging is considered part of the workflow when developing applications or setting up application infrastructure. As errors are inevitable, knowing what to look out for when a certain error occurs and having the right tools to debug the situation eases the pains experienced in troubleshooting.
You also save time and push out solutions faster!
Вебхуки отправляются нами на указанный с помощью соответствующих роутов URI. Он может включать в себя query string.
В случае, если нам предоставлен crmKey, мы добавляем заголовок Authorization: Bearer ${crmKey}. Если не предоставлен, не добавляем заголовок Authorization вообще.
Вебхуки всегда отправляются методом POST и содержат в теле JSON (и соответствующий заголовок Content-Type: application/json; charset-utf-8). В JSON закодирован объект, содержащий свойства, соответствующие типам вебхуков.
Один вебхук может содержать типы messages и statuses одновременно.
Вебхуки типов createContact и createDeal всегда содержат только один тип.
Всегда ожидается, что запрос будет завершен с кодом 200 OK. В некоторых случаях, описанных ниже, мы ожидаем определённую информацию в теле ответа. Таймаут стандартный — 30 с.
Подключение
Для подписки на вебхуки, необходимо вызвать:
PATCH https://api.wazzup24.com/v3/webhooks
В теле должен содержаться JSON
 {
“webhooksUri”: “https://someuri.com/”, // длина не более 200 символов
“subscriptions”: {  //  Отсутствие аналогично false
“messagesAndStatuses”: true, // подписка на вебхуки о сообщениях и их статусах, может не требоваться, если используется интеграция через CRM
“contactsAndDealsCreation”: true // подписка на вебхуки о создании сущностей
}
}
В значении url укажите адрес для получения веб-хуков.
При подключении на указанный url будет отправлен тестовый POST запрос с телом {test: true }, в ответ на который сервер должен вернуть 200 при успешном подключении веб-хуков, иначе вернется ошибка :»Webhooks request not valid. Response status must be 200″.
Пример запроса
 curl --location --request PATCH 'https://api.wazzup24.com/v3/webhooks'
--header 'Authorization: Bearer w11cf3444405648267f900520d454368d27'
--header 'Content-Type: application/json'
--data-raw '{
"webhooksUri": "https://example.com/webhooks",

"subscriptions": {

"messagesAndStatuses": true,

"contactsAndDealsCreation": true

}
}'
Пример ответа
 {

ok

}
Ошибки
| Ошибка | Описание |
| 400 Bad Request, { error: ‘uriNotValid’, description: ‘Provided URI is not valid URI’ } | При неверном по формальным признакам URI |
| 400 Bad Request, { error: ‘testPostNotPassed’, description: ‘URI does not return 200 OK on test request’, data: { ‘${код ответа}’ } } |
Если была получена ошибка при отправке тестового запроса на указанный URL |
| Общие ошибки для всех роутов |
Проверка адреса для получения веб-хуков
Для проверки текущего установленного callback URL, необходимо вызвать
GET https://api.wazzup24.com/v3/webhooks
Пример ответа
 HTTP/1.1 200 OK
```json
{
"webhooksUri": "https://example.com/webhooks",

“subscriptions”: {

“messagesAndStatuses”: “true”,

“contactsAndDealsCreation”: “true”

}

}
``
Новые сообщения
Веб-хук пришлет JSON-объект с ключом messages, в значении которого лежит массив объектов со следующими параметрами:
| Параметр | Тип | Описание |
| messageId | String (uuid4) | guid сообщения в Wazzup |
| channelId | String (uuid4) | Id канала |
| chatType | String | Тип чата мессенджера-адресата. Доступные значения «whatsapp», «instagram», «telegram», «vk» |
| chatId | String | Id чата (аккаунт контакта в мессенджере):
|
| dateTime | String | время отправки сообщения, указанное мессенджером в формате yyyy-mm-ddThh:mm:ss.ms |
| type | String | Тип сообщения:
‘text‘— текст ‘image‘ — изображение ‘audio‘ — аудио ‘video‘ — видео ‘document‘ — документ ‘vcard’ — карточка контакта ‘geo‘ — геолокация ‘wapi_template’ — шаблон WABA ‘unsupported’ — неподдерживаемый тип ‘missing_call‘ — пропущенный звонок Иначе — ‘unknown‘ — неизвестная ошибка |
| status | String | Содержит в себе только значение из ENUM из вебхука statuses: ‘sent’ — отправлено — (аналог одной серой галки)‘delivered’ — доставлено (аналог двух серых галок)‘read’ — прочитано (аналог двух голубых галок)Иначе — “error”Виды ошибок:’BAD_CONTACT’ — для instagram: такой аккаунт Instagram не существует. Возможно, клиент изменил имя профиля‘TOO_LONG_TEXT’ — слишком длинный текст сообщения‘BAD_LINK’ — фильтры Instagram не пропускают сообщение из-за ссылки‘TOO_BIG_CONTENT’ — размер файла не должен превышать 50 Mb‘SPAM’ — сообщение не отправлено из-за подозрения на спам‘TOO_MANY_EXT_REQS’ — отправка прервана. С аккаунта поступило слишком много сообщений‘WRONG_CONTENT’ — контент файла не подходит под параметры Instagram
‘MESSAGE_CANCELLED’ — Отправка сообщения прекратилась ’24_HOURS_EXCEEDED’ — 24-часовое диалоговое окно закрыто [WABA] ‘COMMENT_DELETED’ — Комментарий был удален [inst] ‘MENTION_FORBIDDEN’ — отмеченного в сообщение пользователя (mentioned) нельзя отмечать ‘CONTENT_CONVERSION_ERROR’ — контент не удалось конвертировать ‘MESSAGE_DELETED’ — сообщение было удалено отправителем ‘CHATID_IGSID_MISMATCH’ — Не удалось сопоставить ChatId с IGSID [inst] ‘7_DAYS_EXCEEDED’ — 7-дневное диалоговое окно закрыто [inst] ‘COMMENT_ALREADY_PRIVATE_REPLIED’ — На этот комментарий уже ответили в директ [inst] ‘COMMENT_INVALID_FOR_PRIVATE_REPLY’ — Невозможно ответить на этот комментарий в директ [inst] ‘COMMENT_CAN_BE_TEXT_ONLY’ — На комментарий можно отвечать только в текстовом формате [inst] ‘CANNOT_REPLY_TO_DELETED’ — Нельзя ответить на сообщение, потому что пользователь его удалил. ‘GENERAL_ERROR’ — произошла ошибка. Информация уже направлена разработчикам Wazzup ‘UNKNOWN_ERROR’ — произошла неизвестная ошибка. Повторите попытку позже. inbound — входящее сообщение |
| text | String | Текст сообщения. Может отсутствовать, если сообщение с контентом |
| contentUri | String | Ссылка на контент сообщения (может отсутствовать, если сообщение не содержит контента) |
| authorName | String | Имя пользователя, отправившего сообщение, если оно есть. Может быть только у сообщений isEcho == true |
| isEcho | Boolean | Если сообщение входящее — false, если исходящее, отправленное не из этого АПИ (с телефона, или из iframe) — true |
| instPost | Object | Информация о посте из Instagram. Прикладывается, когда сообщение является комментарием в инстаграме |
| contact.name | String | Имя контакта |
| contact.avatarUri | String | URI аватарки контакта. Прикладывается, если аватарка есть у Wazzup |
| contact.usernam | String | Только для Telegram. username (Имя пользователя) контакта в Telegram, без «@» в начале. |
| contact.phone | String | Только для Telegram. Телефон контакта в международном формате. |
| quotedMessage | Object | Cодержит в себе объект с параметрами цитируемого сообщения. |
Вид объекта с информацией о посте Instagram
{
id: '2430659146657243411_41370968890',
src: 'https://www.instagram.com/p/CG7b52ejyET',
sha1: 'dc8c036b4a0122bb238fc38dcb0391c125e916f2',
likes: 0,
author: 'wztestdlv',
comments: 22,
timestamp: 1603977171000,
updatedAt: 1608905897958,
authorName: '',
description: 'Красота',
previewSha1: '3a55c2920912de4b6a66d24568470dd4ad367c34',
imageSrc: 'https://store.dev-wazzup24.com/dc8c036b4a0122bb238fc38dcb0391c125e916f2',
previewSrc: 'https://store.dev-wazzup24.com/3a55c2920912de4b6a66d24568470dd4ad367c34'
}
Обновление статусов исходящих сообщений
Веб-хук пришлет JSON-объект с ключом statuses, в значении которого будет лежать массив объектов со следующими параметрами:
| Параметр | Тип | Описание |
| messageId | String | guid сообщения в Wazzup |
| timestamp | String | Время получения информации об обновлении статуса |
| status | String | статус сообщения, на который обновился: ENUM (‘sent’|’received’|’read’|’error’) |
| [error] | Object | Опционально, приходит только когда “status’:”error”
error.error — код ошибки error.description — описание ошибки error.[data] — дополнительная информация об ошибке |
 statuses: [
{
"messageId": "00010203-0405-0607-0809-0a0b0c0d0e0f", // guid сообщения, об обновлении статуса которого мы оповещаем
"timestamp": "2021-12-14T20:00:05+00:00", // время получения информации об обновлении статуса
"status":read"
}
]
Вебхуки createContact, createDeal
Отправляются, когда требуется создать контакт или сделку в интегрированной СРМ. Это может произойти в двух случаях:
Кейс 1: пишет новый клиент, Wazzup отправляет вебхук о создании нового контакта и сделки, если из CRM загружены воронки с этапами.
Кейс 2: при нажатии на кнопку создания сделки в инструменте чемодан, внутри чатов Wazzup.
 {
createContact: {
responsibleUserId: '1', // id выбранного по очереди или первого ответившего пользователя
name: 'contacts.name', // имя контакта из таблицы contacts
contactData: [{ chatType, chatId }],
source: 'auto'|'byUser', // auto - при входящем, byUser - по кнопке
},
}
 {
createDeal: {
responsibleUserId: '1', // id выбранного по очереди или первого ответившего пользователя
contacts: ['1'] // связь сделки со свежесозданным контактом
source: 'auto'|'byUser', // auto - при входящем, byUser - по кнопке в чемодане
},
}
При получении этого вебхука СРМ должна создать контакт или сделку, и вернуть в теле ответа 200 OK JSON c объектом созданной сущности, соответствующий сигнатуре объекта, принятого для работы роутов CRUD контактов и сделок. Если контакт или сделка уже существуют в CRM, и CRM считает, что создавать новую сущность не следует, то необходимо прислать объект уже существующего контакта или сделки.
17 replies
")
- Author
- Beginner
- 12 replies
-
2 years ago
11 November 2020
@andywingrave, don´t understanbd what do you mean, as all the info about the configuration in zappier is in the message and the code of the webhook in the photo.
Is there other config that I am not showing?
- Like
- Quote
![]()

+9
- Certified Zapier Expert
- 854 replies
-
2 years ago
11 November 2020
Hey! That’s the screenshot of your JSON — I meant can you please share a screenshot of what you have set up in your Zapier webhook?
- Like
- Quote
- Author
- Beginner
- 12 replies
-
2 years ago
11 November 2020
@andywingrave
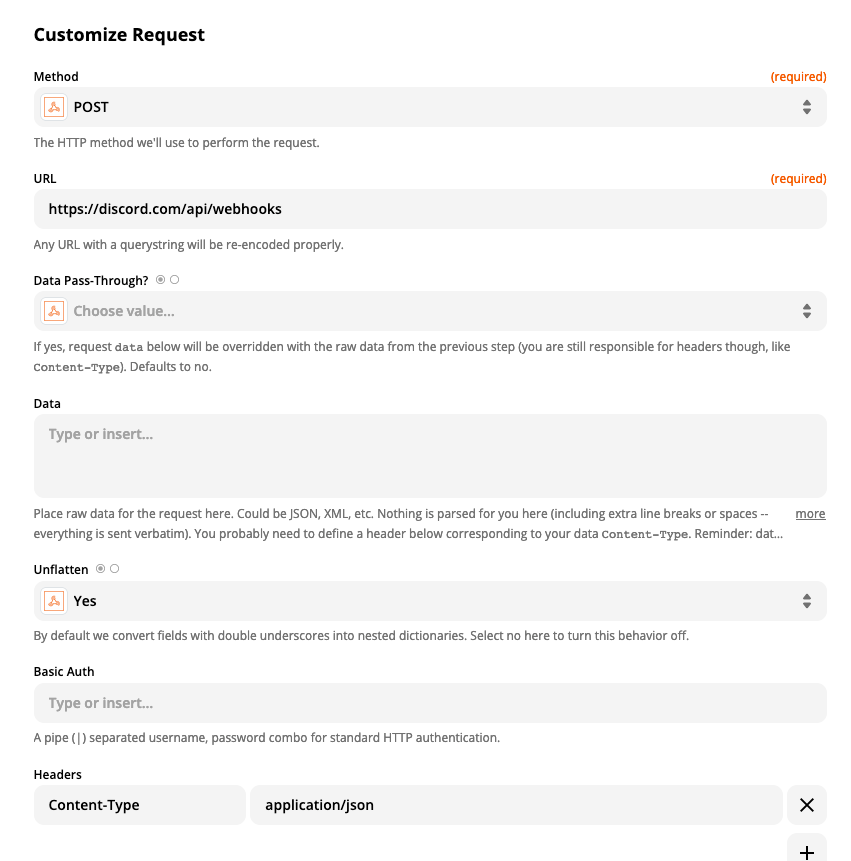
My st up is:
Action Event: Custom Event
Method: POST
The Webhook URL given by Discord (not the one on the screenshot)
Under headers content-type | applications/json
- Like
- Quote
![]()
+9
- Certified Zapier Expert
- 854 replies
-
2 years ago
11 November 2020
Hey — The reason why this is not working is that you need to add authentication to a POST request. Have you tried this?
- Like
- Quote
- Author
- Beginner
- 12 replies
-
2 years ago
11 November 2020
Hey — The reason why this is not working is that you need to add authentication to a POST request. Have you tried this?
No I have not. How can I do that @andywingrave
Thank you.
- Like
- Quote
- Author
- Beginner
- 12 replies
-
2 years ago
12 November 2020
Thank you Andy, but if I have already authorized Zapier as the Bot in Discord, shouldnt Zapier handle de HTTP request authentication? It is not a required field. And if I dont use Embed and only content, it will pass without the Basic Auth.
- Like
- Quote
![]()
+9
- Certified Zapier Expert
- 854 replies
-
2 years ago
12 November 2020
But are you using a Webhook or a Discord task here? It looks to me like you’re using a webhook? (Sorry if I’m wrong)
For your Discord log-in to be used in tasks, you’d need to select a Discord task like one of the ones below
But a webhook is a completely seperate thing, and your credentials don’t carry over.
Hope that makes sense.
- Like
- Quote
- Author
- Beginner
- 12 replies
-
2 years ago
16 November 2020
Hi @andywingrave Its a Webhook.
Looking into Discord developer docs about Webhooks it states clearly that they dont require authentication to be used.
- Like
- Quote
- Author
- Beginner
- 12 replies
-
2 years ago
16 November 2020
Hi Andy,
Managed to make the webhook work without Authentication. The problem was in the code. I got an expert to help me with the Discord code and it works.
BUT
As soon as I insert Zapier Values like {{103505283__COL$D}} that comes from my Worksheet it will break the code again. If I enter the text that is in the worksheet cell, it works.
- Like
- Quote
- New
- 1 reply
-
2 years ago
23 November 2020
I Finallly made it!
If someone needs help with this just write and will help gladly
Hi Juan, I’d like to know how did you fix this error.
- Like
- Quote
- Community Manager
- 1967 replies
-
2 years ago
25 November 2020
Hey @Juan!
That’s fantastic that you got it working. If you’d be able to explain how you accomplished that, we sure would appreciate it 
- Like
- Quote