2019-12-12 10:32:24.079 DEBUG 7488 — [nio-8080-exec-8] o.s.s.w.u.matcher.AntPathRequestMatcher : Checking match of request : ‘/login/facebook’; against ‘/login/facebook’
2019-12-12 10:32:24.079 DEBUG 7488 — [nio-8080-exec-8] uth2ClientAuthenticationProcessingFilter : Request is to process authentication
2019-12-12 10:32:24.081 DEBUG 7488 — [nio-8080-exec-8] g.c.AuthorizationCodeAccessTokenProvider : Retrieving token from https://graph.facebook.com/oauth/access_token
2019-12-12 10:32:45.090 DEBUG 7488 — [nio-8080-exec-8] uth2ClientAuthenticationProcessingFilter : Authentication request failed: org.springframework.security.authentication.BadCredentialsException: Could not obtain access token
org.springframework.security.authentication.BadCredentialsException: Could not obtain access token
at org.springframework.security.oauth2.client.filter.OAuth2ClientAuthenticationProcessingFilter.attemptAuthentication(OAuth2ClientAuthenticationProcessingFilter.java:107) ~[spring-security-oauth2-2.2.1.RELEASE.jar:na]
at org.springframework.security.web.authentication.AbstractAuthenticationProcessingFilter.doFilter(AbstractAuthenticationProcessingFilter.java:212) ~[spring-security-web-5.0.4.RELEASE.jar:5.0.4.RELEASE]
at org.springframework.security.web.FilterChainProxy$VirtualFilterChain.doFilter(FilterChainProxy.java:334) [spring-security-web-5.0.4.RELEASE.jar:5.0.4.RELEASE]
at org.springframework.security.web.authentication.logout.LogoutFilter.doFilter(LogoutFilter.java:116) [spring-security-web-5.0.4.RELEASE.jar:5.0.4.RELEASE]
at org.springframework.security.web.FilterChainProxy$VirtualFilterChain.doFilter(FilterChainProxy.java:334) [spring-security-web-5.0.4.RELEASE.jar:5.0.4.RELEASE]
at org.springframework.security.web.csrf.CsrfFilter.doFilterInternal(CsrfFilter.java:100) [spring-security-web-5.0.4.RELEASE.jar:5.0.4.RELEASE]
at org.springframework.web.filter.OncePerRequestFilter.doFilter(OncePerRequestFilter.java:107) [spring-web-5.0.5.RELEASE.jar:5.0.5.RELEASE]
at org.springframework.security.web.FilterChainProxy$VirtualFilterChain.doFilter(FilterChainProxy.java:334) [spring-security-web-5.0.4.RELEASE.jar:5.0.4.RELEASE]
at org.springframework.security.web.header.HeaderWriterFilter.doFilterInternal(HeaderWriterFilter.java:66) [spring-security-web-5.0.4.RELEASE.jar:5.0.4.RELEASE]
at org.springframework.web.filter.OncePerRequestFilter.doFilter(OncePerRequestFilter.java:107) [spring-web-5.0.5.RELEASE.jar:5.0.5.RELEASE]
at org.springframework.security.web.FilterChainProxy$VirtualFilterChain.doFilter(FilterChainProxy.java:334) [spring-security-web-5.0.4.RELEASE.jar:5.0.4.RELEASE]
at org.springframework.security.web.context.SecurityContextPersistenceFilter.doFilter(SecurityContextPersistenceFilter.java:105) [spring-security-web-5.0.4.RELEASE.jar:5.0.4.RELEASE]
at org.springframework.security.web.FilterChainProxy$VirtualFilterChain.doFilter(FilterChainProxy.java:334) [spring-security-web-5.0.4.RELEASE.jar:5.0.4.RELEASE]
at org.springframework.security.web.context.request.async.WebAsyncManagerIntegrationFilter.doFilterInternal(WebAsyncManagerIntegrationFilter.java:56) [spring-security-web-5.0.4.RELEASE.jar:5.0.4.RELEASE]
at org.springframework.web.filter.OncePerRequestFilter.doFilter(OncePerRequestFilter.java:107) [spring-web-5.0.5.RELEASE.jar:5.0.5.RELEASE]
at org.springframework.security.web.FilterChainProxy$VirtualFilterChain.doFilter(FilterChainProxy.java:334) [spring-security-web-5.0.4.RELEASE.jar:5.0.4.RELEASE]
at org.springframework.security.web.FilterChainProxy.doFilterInternal(FilterChainProxy.java:215) [spring-security-web-5.0.4.RELEASE.jar:5.0.4.RELEASE]
at org.springframework.security.web.FilterChainProxy.doFilter(FilterChainProxy.java:178) [spring-security-web-5.0.4.RELEASE.jar:5.0.4.RELEASE]
at org.springframework.web.filter.DelegatingFilterProxy.invokeDelegate(DelegatingFilterProxy.java:357) [spring-web-5.0.5.RELEASE.jar:5.0.5.RELEASE]
at org.springframework.web.filter.DelegatingFilterProxy.doFilter(DelegatingFilterProxy.java:270) [spring-web-5.0.5.RELEASE.jar:5.0.5.RELEASE]
at org.apache.catalina.core.ApplicationFilterChain.internalDoFilter(ApplicationFilterChain.java:193) [tomcat-embed-core-8.5.29.jar:8.5.29]
at org.apache.catalina.core.ApplicationFilterChain.doFilter(ApplicationFilterChain.java:166) [tomcat-embed-core-8.5.29.jar:8.5.29]
at org.springframework.security.oauth2.client.filter.OAuth2ClientContextFilter.doFilter(OAuth2ClientContextFilter.java:60) [spring-security-oauth2-2.2.1.RELEASE.jar:na]
at org.apache.catalina.core.ApplicationFilterChain.internalDoFilter(ApplicationFilterChain.java:193) [tomcat-embed-core-8.5.29.jar:8.5.29]
at org.apache.catalina.core.ApplicationFilterChain.doFilter(ApplicationFilterChain.java:166) [tomcat-embed-core-8.5.29.jar:8.5.29]
at org.springframework.web.filter.RequestContextFilter.doFilterInternal(RequestContextFilter.java:99) [spring-web-5.0.5.RELEASE.jar:5.0.5.RELEASE]
at org.springframework.web.filter.OncePerRequestFilter.doFilter(OncePerRequestFilter.java:107) [spring-web-5.0.5.RELEASE.jar:5.0.5.RELEASE]
at org.apache.catalina.core.ApplicationFilterChain.internalDoFilter(ApplicationFilterChain.java:193) [tomcat-embed-core-8.5.29.jar:8.5.29]
at org.apache.catalina.core.ApplicationFilterChain.doFilter(ApplicationFilterChain.java:166) [tomcat-embed-core-8.5.29.jar:8.5.29]
at org.springframework.web.filter.HttpPutFormContentFilter.doFilterInternal(HttpPutFormContentFilter.java:109) [spring-web-5.0.5.RELEASE.jar:5.0.5.RELEASE]
at org.springframework.web.filter.OncePerRequestFilter.doFilter(OncePerRequestFilter.java:107) [spring-web-5.0.5.RELEASE.jar:5.0.5.RELEASE]
at org.apache.catalina.core.ApplicationFilterChain.internalDoFilter(ApplicationFilterChain.java:193) [tomcat-embed-core-8.5.29.jar:8.5.29]
at org.apache.catalina.core.ApplicationFilterChain.doFilter(ApplicationFilterChain.java:166) [tomcat-embed-core-8.5.29.jar:8.5.29]
at org.springframework.web.filter.HiddenHttpMethodFilter.doFilterInternal(HiddenHttpMethodFilter.java:81) [spring-web-5.0.5.RELEASE.jar:5.0.5.RELEASE]
at org.springframework.web.filter.OncePerRequestFilter.doFilter(OncePerRequestFilter.java:107) [spring-web-5.0.5.RELEASE.jar:5.0.5.RELEASE]
at org.apache.catalina.core.ApplicationFilterChain.internalDoFilter(ApplicationFilterChain.java:193) [tomcat-embed-core-8.5.29.jar:8.5.29]
at org.apache.catalina.core.ApplicationFilterChain.doFilter(ApplicationFilterChain.java:166) [tomcat-embed-core-8.5.29.jar:8.5.29]
at org.springframework.web.filter.CharacterEncodingFilter.doFilterInternal(CharacterEncodingFilter.java:200) [spring-web-5.0.5.RELEASE.jar:5.0.5.RELEASE]
at org.springframework.web.filter.OncePerRequestFilter.doFilter(OncePerRequestFilter.java:107) [spring-web-5.0.5.RELEASE.jar:5.0.5.RELEASE]
at org.apache.catalina.core.ApplicationFilterChain.internalDoFilter(ApplicationFilterChain.java:193) [tomcat-embed-core-8.5.29.jar:8.5.29]
at org.apache.catalina.core.ApplicationFilterChain.doFilter(ApplicationFilterChain.java:166) [tomcat-embed-core-8.5.29.jar:8.5.29]
at org.apache.catalina.core.StandardWrapperValve.invoke(StandardWrapperValve.java:198) [tomcat-embed-core-8.5.29.jar:8.5.29]
at org.apache.catalina.core.StandardContextValve.invoke(StandardContextValve.java:96) [tomcat-embed-core-8.5.29.jar:8.5.29]
at org.apache.catalina.authenticator.AuthenticatorBase.invoke(AuthenticatorBase.java:496) [tomcat-embed-core-8.5.29.jar:8.5.29]
at org.apache.catalina.core.StandardHostValve.invoke(StandardHostValve.java:140) [tomcat-embed-core-8.5.29.jar:8.5.29]
at org.apache.catalina.valves.ErrorReportValve.invoke(ErrorReportValve.java:81) [tomcat-embed-core-8.5.29.jar:8.5.29]
at org.apache.catalina.core.StandardEngineValve.invoke(StandardEngineValve.java:87) [tomcat-embed-core-8.5.29.jar:8.5.29]
at org.apache.catalina.connector.CoyoteAdapter.service(CoyoteAdapter.java:342) [tomcat-embed-core-8.5.29.jar:8.5.29]
at org.apache.coyote.http11.Http11Processor.service(Http11Processor.java:803) [tomcat-embed-core-8.5.29.jar:8.5.29]
at org.apache.coyote.AbstractProcessorLight.process(AbstractProcessorLight.java:66) [tomcat-embed-core-8.5.29.jar:8.5.29]
at org.apache.coyote.AbstractProtocol$ConnectionHandler.process(AbstractProtocol.java:790) [tomcat-embed-core-8.5.29.jar:8.5.29]
at org.apache.tomcat.util.net.NioEndpoint$SocketProcessor.doRun(NioEndpoint.java:1459) [tomcat-embed-core-8.5.29.jar:8.5.29]
at org.apache.tomcat.util.net.SocketProcessorBase.run(SocketProcessorBase.java:49) [tomcat-embed-core-8.5.29.jar:8.5.29]
at java.util.concurrent.ThreadPoolExecutor.runWorker(ThreadPoolExecutor.java:1149) [na:1.8.0_172]
at java.util.concurrent.ThreadPoolExecutor$Worker.run(ThreadPoolExecutor.java:624) [na:1.8.0_172]
at org.apache.tomcat.util.threads.TaskThread$WrappingRunnable.run(TaskThread.java:61) [tomcat-embed-core-8.5.29.jar:8.5.29]
at java.lang.Thread.run(Thread.java:748) [na:1.8.0_172]
Caused by: org.springframework.security.oauth2.client.resource.OAuth2AccessDeniedException: Error requesting access token.
at org.springframework.security.oauth2.client.token.OAuth2AccessTokenSupport.retrieveToken(OAuth2AccessTokenSupport.java:145) ~[spring-security-oauth2-2.2.1.RELEASE.jar:na]
at org.springframework.security.oauth2.client.token.grant.code.AuthorizationCodeAccessTokenProvider.obtainAccessToken(AuthorizationCodeAccessTokenProvider.java:209) ~[spring-security-oauth2-2.2.1.RELEASE.jar:na]
at org.springframework.security.oauth2.client.token.AccessTokenProviderChain.obtainNewAccessTokenInternal(AccessTokenProviderChain.java:148) ~[spring-security-oauth2-2.2.1.RELEASE.jar:na]
at org.springframework.security.oauth2.client.token.AccessTokenProviderChain.obtainAccessToken(AccessTokenProviderChain.java:121) ~[spring-security-oauth2-2.2.1.RELEASE.jar:na]
at org.springframework.security.oauth2.client.OAuth2RestTemplate.acquireAccessToken(OAuth2RestTemplate.java:221) ~[spring-security-oauth2-2.2.1.RELEASE.jar:na]
at org.springframework.security.oauth2.client.OAuth2RestTemplate.getAccessToken(OAuth2RestTemplate.java:173) ~[spring-security-oauth2-2.2.1.RELEASE.jar:na]
at org.springframework.security.oauth2.client.filter.OAuth2ClientAuthenticationProcessingFilter.attemptAuthentication(OAuth2ClientAuthenticationProcessingFilter.java:105) ~[spring-security-oauth2-2.2.1.RELEASE.jar:na]
… 56 common frames omitted
Caused by: org.springframework.web.client.ResourceAccessException: I/O error on POST request for «https://graph.facebook.com/oauth/access_token»: Connection timed out: connect; nested exception is java.net.ConnectException: Connection timed out: connect
at org.springframework.web.client.RestTemplate.doExecute(RestTemplate.java:741) ~[spring-web-5.0.5.RELEASE.jar:5.0.5.RELEASE]
at org.springframework.web.client.RestTemplate.execute(RestTemplate.java:694) ~[spring-web-5.0.5.RELEASE.jar:5.0.5.RELEASE]
at org.springframework.security.oauth2.client.token.OAuth2AccessTokenSupport.retrieveToken(OAuth2AccessTokenSupport.java:137) ~[spring-security-oauth2-2.2.1.RELEASE.jar:na]
… 62 common frames omitted
Caused by: java.net.ConnectException: Connection timed out: connect
at java.net.DualStackPlainSocketImpl.connect0(Native Method) ~[na:1.8.0_172]
at java.net.DualStackPlainSocketImpl.socketConnect(DualStackPlainSocketImpl.java:79) ~[na:1.8.0_172]
at java.net.AbstractPlainSocketImpl.doConnect(AbstractPlainSocketImpl.java:350) ~[na:1.8.0_172]
at java.net.AbstractPlainSocketImpl.connectToAddress(AbstractPlainSocketImpl.java:206) ~[na:1.8.0_172]
at java.net.AbstractPlainSocketImpl.connect(AbstractPlainSocketImpl.java:188) ~[na:1.8.0_172]
at java.net.PlainSocketImpl.connect(PlainSocketImpl.java:172) ~[na:1.8.0_172]
at java.net.SocksSocketImpl.connect(SocksSocketImpl.java:392) ~[na:1.8.0_172]
at java.net.Socket.connect(Socket.java:589) ~[na:1.8.0_172]
at sun.security.ssl.SSLSocketImpl.connect(SSLSocketImpl.java:673) ~[na:1.8.0_172]
at sun.security.ssl.BaseSSLSocketImpl.connect(BaseSSLSocketImpl.java:173) ~[na:1.8.0_172]
at sun.net.NetworkClient.doConnect(NetworkClient.java:180) ~[na:1.8.0_172]
at sun.net.www.http.HttpClient.openServer(HttpClient.java:463) ~[na:1.8.0_172]
at sun.net.www.http.HttpClient.openServer(HttpClient.java:558) ~[na:1.8.0_172]
at sun.net.www.protocol.https.HttpsClient.(HttpsClient.java:264) ~[na:1.8.0_172]
at sun.net.www.protocol.https.HttpsClient.New(HttpsClient.java:367) ~[na:1.8.0_172]
at sun.net.www.protocol.https.AbstractDelegateHttpsURLConnection.getNewHttpClient(AbstractDelegateHttpsURLConnection.java:191) ~[na:1.8.0_172]
at sun.net.www.protocol.http.HttpURLConnection.plainConnect0(HttpURLConnection.java:1156) ~[na:1.8.0_172]
at sun.net.www.protocol.http.HttpURLConnection.plainConnect(HttpURLConnection.java:1050) ~[na:1.8.0_172]
at sun.net.www.protocol.https.AbstractDelegateHttpsURLConnection.connect(AbstractDelegateHttpsURLConnection.java:177) ~[na:1.8.0_172]
at sun.net.www.protocol.https.HttpsURLConnectionImpl.connect(HttpsURLConnectionImpl.java:162) ~[na:1.8.0_172]
at org.springframework.http.client.SimpleBufferingClientHttpRequest.executeInternal(SimpleBufferingClientHttpRequest.java:76) ~[spring-web-5.0.5.RELEASE.jar:5.0.5.RELEASE]
at org.springframework.http.client.AbstractBufferingClientHttpRequest.executeInternal(AbstractBufferingClientHttpRequest.java:48) ~[spring-web-5.0.5.RELEASE.jar:5.0.5.RELEASE]
at org.springframework.http.client.AbstractClientHttpRequest.execute(AbstractClientHttpRequest.java:53) ~[spring-web-5.0.5.RELEASE.jar:5.0.5.RELEASE]
at org.springframework.web.client.RestTemplate.doExecute(RestTemplate.java:727) ~[spring-web-5.0.5.RELEASE.jar:5.0.5.RELEASE]
… 64 common frames omitted
TL/DR: Let’s take a look at everything required to build custom error handling logic in both Spring Boot Web and Spring Boot Security
REST applications developed in Spring Boot automatically take advantage of its default error handling logic. Specifically, whenever an error occurs, a default response containing some information is returned. The problem is that this information may be poor or insufficient for the API callers to deal with the error properly. This is why implementing custom error handling logic is such a common and desirable task. Achieving it requires more effort than you might think, and you need to delve into a few essential Spring Boot notions. Let’s see everything required to get started with custom error handling in Spring Boot and Java.
Prerequisites
This is the list of all the prerequisites for following the article:
- Java >= 1.8 (Java >= 13 recommended)
- Spring Boot >= 2.5
- Spring Boot Starter Web >= 2.5
- Spring Security >= 5.5
- Project Lombok >= 1.18
- Gradle >= 4.x or Maven 3.6.x
Default Error Handling in Spring Boot
By default, Spring Boot offers a fallback error-handling page, as well as an error-handling response in case of REST requests. Particularly, Spring Boot looks for a mapping for the /error endpoint during the start-up. This mapping depends on what is set on a ViewResolver class. When no valid mappings can be found, Spring Boot automatically configures a default fallback error page. This so-called Whitelabel Error Page is nothing more than a white HTML page containing the HTTP status code and a vague error message. This is what such a page looks like:
<html>
   <head></head>
   <body data-new-gr-c-s-check-loaded="14.1026.0" data-gr-ext-installed="">
      <h1>Whitelabel Error Page</h1>
      <p>This application has no explicit mapping for /error, so you are seeing this as a fallback.</p>
      <div id="created">Sun Aug 15 14:32:17 UTC 2021</div>
      <div>There was an unexpected error (type=Internal Server Error, status=500).</div>
      <div></div>
   </body>
</html>
This is what the Whitelabel HTML page looks like in your browser:

The Spring Boot Whitelabel HTML Error Page
Similarly, when dealing with REST requests, Spring Boot automatically returns a default JSON response in case of errors. This contains the same information as the aforementioned Whitelabel HTML error page and looks as follows:
{
  "timestamp": "2021-15-08T14:32:17.947+0000",
  "status": 500,
  "error": "Internal Server Error",
  "path": "/test"
}
As you can see, the default Spring Boot error handling responses for REST does not provide much information. This can quickly become a problem, especially when trying to debug. It is also problematic for front-end developers, who need detailed information coming from API error response messages to be able to explain to the end users what happened properly.
Let’s see how to replace this default response with custom-defined messages. While this may appear like an easy task, this is actually a tricky one. To achieve it, you first need to know a few Spring Boot fundamentals. Let’s learn more about them.
Custom Error Handling in Spring Boot
You are about to see two different approaches to custom error handling in Spring Boot REST applications. Both are based on a @ControllerAdvice annotated class handling all exceptions that may occur. So, let’s first see what a @ControllerAdvice annotated class is, why to use it, how, and when. Then, you will learn how to implement the two different approaches in detail. Finally, the pros and cons of each method will be explained.
Handling Exceptions with @ControllerAdvice
The @ControllerAdvice annotation was introduced in Spring 3.2 to make exception handling logic easier and entirely definable in one place. In fact, @ControllerAdvice allows you to address exception handling across the whole application. In other words, a single @ControllerAdvice annotated class can handle exceptions thrown from any place in your application. Thus, classes annotated with @ControllerAdvice are powerful and flexible tools. Not only do they allow you to centralize exception-handling logic into a global component, but also give you control over the body response, as well as the HTTP status code. This is especially important when trying to achieve custom error handling. Let’s see @ControllerAdvice in action.
Now, you are about to see everything required to implement two custom error handling approaches based on @ControllerAdvice. First, you should clone the GitHub repository supporting this article. By analyzing the codebase, going through this article will become easier. Also, you will be able to immediately see the two approaches in action.
So, clone the repository with the following command:
git clone https://github.com/Tonel/spring-boot-custom-error-handlingThen, run the DemoApplication main class by following this guide from the Spring Boot official documentation, and reach one of the following 4 endpoints to see the custom error handling responses:
http://localhost:8080/test-custom-data-not-found-exceptionhttp://localhost:8080/test-custom-parameter-constraint-exception?value=12http://localhost:8080/test-custom-error-exceptionhttp://localhost:8080/test-generic-exception
The first two APIs apply the first approach to error handling you are about to see, while the third API uses the second approach. The fourth and last API shows the fallback error handling logic presented above in action. Now, let’s delve into implementing these two approaches to custom error handling in Spring Boot.
Both of them rely on an ErrorMessage class representing the custom error body placed in an error package, containing everything needed to deal with custom error handling logic. This can be implemented as follows:
// src/main/java/com/customerrorhandling/demo/errors/ErrorResponse.java

package com.customerrorhandling.demo.errors;

import com.fasterxml.jackson.annotation.JsonFormat;
import lombok.Getter;
import lombok.Setter;
import org.springframework.http.HttpStatus;
import java.util.Date;

@Getter
@Setter
public class ErrorResponse {
    // customizing timestamp serialization format
    @JsonFormat(shape = JsonFormat.Shape.STRING, pattern = "dd-MM-yyyy hh:mm:ss")
    private Date timestamp;

    private int code;

    private String status;

    private String message;

    private String stackTrace;

    private Object data;

    public ErrorResponse() {
        timestamp = new Date();
    }

    public ErrorResponse(
            HttpStatus httpStatus,
            String message
    ) {
        this();

        this.code = httpStatus.value();
        this.status = httpStatus.name();
        this.message = message;
    }

    public ErrorResponse(
            HttpStatus httpStatus,
            String message,
            String stackTrace
    ) {
        this(
                httpStatus,
                message
        );

        this.stackTrace = stackTrace;
    }

    public ErrorResponse(
            HttpStatus httpStatus,
            String message,
        String stackTrace,
            Object data
    ) {
        this(
                httpStatus,
                message,
        stackTrace
        );

        this.data = data;
    }
}
The @Getter and @Setter annotations used in the code examples above are part of the Project Lombok. They are used to automatically generate getters and setters. This is not mandatory and is just an additional way to avoid boilerplate code. Read this article to find out more about Lombok.
ErrorResponse carries information such as an HTTP status code and name, a timestamp indicating when the error occurred, an optional error message, an optional exception stacktrace, and an optional object containing any kind of data. You should try to provide values to the first three fields, while the latter should be used only when required. In particular, the stackTrace field should be valorized only in staging or development environments, as explained here. Similarly, the data field should be used only when additional data is required. Specifically, to explain in detail what happened or let the front-end better handle the error.
This class can be used to achieve a custom response when handling exceptions with @ControllerAdvice as below:
// src/main/java/com/customerrorhandling/demo/errors/CustomControllerAdvice.java

package com.customerrorhandling.demo.errors;

import exceptions.CustomDataNotFoundException;
import exceptions.CustomErrorException;
import exceptions.CustomParameterConstraintException;
import org.springframework.http.HttpStatus;
import org.springframework.http.ResponseEntity;
import org.springframework.web.bind.annotation.ControllerAdvice;
import org.springframework.web.bind.annotation.ExceptionHandler;
import java.io.PrintWriter;
import java.io.StringWriter;

@ControllerAdvice
class CustomControllerAdvice {
    @ExceptionHandler(NullPointerException.class) // exception handled
    public ResponseEntity<ErrorResponse> handleNullPointerExceptions(
        Exception e
    ) {
        // ... potential custom logic

        HttpStatus status = HttpStatus.NOT_FOUND; // 404

        return new ResponseEntity<>(
            new ErrorResponse(
              status,
              e.getMessage()
            ),
            status
        );
    }

    // fallback method
    @ExceptionHandler(Exception.class) // exception handled
    public ResponseEntity<ErrorResponse> handleExceptions(
        Exception e
    ) {
        // ... potential custom logic

        HttpStatus status = HttpStatus.INTERNAL_SERVER_ERROR; // 500

    // converting the stack trace to String
    StringWriter stringWriter = new StringWriter();
    PrintWriter printWriter = new PrintWriter(stringWriter);
    e.printStackTrace(printWriter);
    String stackTrace = stringWriter.toString();

        return new ResponseEntity<>(
            new ErrorResponse(
              status,
              e.getMessage(),
              stackTrace // specifying the stack trace in case of 500s
            ),
            status
        );
    }
}
As you can see, @ControllerAdvice works by employing the @ExceptionHandler method-level annotation. This annotation allows you to define which method should be called in case of an error. Specifically, the exception thrown is compared to the exceptions passed as parameters to @ExceptionHandler based on type. The first method where there is a match is called. If none matched, then the exception’s parent class is tested, and so on. This is also why you should implement a fallback method to cover all remaining cases. You can achieve this by passing the Exception class to the @ExceptionHandler annotation, just like in the handleExceptions method. In fact, any exception in Java must have Exception as one of its ancestors in their inheritance chain. So, they all extend directly — or as subclasses — the Exception superclass.
Then, each method handles the error and might even implement custom logic, such as logging. In this example, each exception is handled by returning a ResponseEntity having the desired HttpStatus. This will be used as an HTTP status code associated with the error response. Similarly, the ErrorResponse instance passed to the ResponseEntity constructor will be automatically serialized in JSON and used as the message body. This way, custom error handling has just been achieved.
Now, you will dive into how to use @ConfrollerAdvice to implement two different approaches to custom error handling for REST in Spring Boot Web. The first one involves boilerplate code, but it is clean and best-practice based. In contrast, the second represents a good solution in terms of convenience, although it is a bit dirty.
Defining Many Custom Exceptions
This approach involves having as many methods in your @ControllerAdvice as many HTTP error status codes you want to handle. These methods will be related to one or more exceptions and return an error message with a particular HTTP status code. Implementing such an approach required three steps. First, you have to think about all the HTTP error status codes you want your application to return. Then, you have to define a method for each of them in your @ControllerAdvice annotated class. Lastly, you have to associate these methods with their exceptions with the @ExceptionHandler annotation.
This means that all exceptions of a particular type will be traced back to their relative method in the @ControllerAdvice annotated class. This may represent a problem, especially considering some exceptions are more common than others, such as NullPointerException. Since these exceptions can be thrown in many parts of your logic, they might have different meanings. Thus, they represent various errors and, therefore, other HTTP status codes.
The solution is to introduce new custom exceptions wrapping these frequent exceptions. For example, a NullPointerException can become a CustomParameterConstraintException exception at the controller layer, and a CustomDataNotFoundException at the DAO (Data Access Object) layer. In this case, the first one can be associated with a 400 Bad Request, and the second with a 404 Not Found HTTP status. The idea behind these exceptions is to give the error that occurred a more specific meaning. This better characterizes the error and makes it more handleable in the @ControllerAdvice annotated class accordingly. So, you should define a custom exception for each particular error you want to handle. Also, using custom exception classes represents undoubtedly a clean code principle. Thus, by adopting it, you are going to have more than one benefit.
So, let’s see this approach in action through an example. Firstly, you have to define custom exceptions, as shown here:
// src/main/java/exceptions/CustomParameterConstraintException.java

package exceptions;

public class CustomParameterConstraintException extends RuntimeException {
    public CustomParameterConstraintException() {
        super();
    }

    public CustomParameterConstraintException(String message) {
        super(message);
    }
}
// src/main/java/exceptions/CustomDataNotFoundException.java
package exceptions;
public class CustomDataNotFoundException extends RuntimeException {
public CustomDataNotFoundException() {
super();
}
public CustomDataNotFoundException(String message) {
super(message);
}
}Then, use them to wrap frequent exceptions, or to throw them in case of particular circumstances representing errors in your business logic. Let’s see how with two examples:
// DAO-level method
public Foo retrieveFooById(
    int id
) {
    try {
        // data retrieving logic
    } catch (NullPointerException e) {
        throw new CustomDataNotFoundException(e.getMessage());
    }
}
As shown above, a generic NullPointerException is turned into a more meaningful CustomDataNotFoundException.
// controller-level method method
public ResponseEntity<Void> performOperation(
    int numberOfAttempts
) {
    if (numberOfAttempts <= 0 || numberOfAttempts >= 5)
        throw new CustomParameterConstraintException("numberOfAttempts must be >= 0 and <= 5!");

    // business logic
}
Here, a particular behavior that should not happen is intercepted. Then, the custom CustomParameterConstraintException exception describing it is thrown.
Finally, all you have to do is add two particular methods to your @ControllerAdvice annotated class, one for each specific error.
// src/main/java/com/customerrorhandling/demo/errors/CustomControllerAdvice.java

package com.customerrorhandling.demo.errors;

import exceptions.CustomDataNotFoundException;
import exceptions.CustomErrorException;
import exceptions.CustomParameterConstraintException;
import org.springframework.http.HttpStatus;
import org.springframework.http.ResponseEntity;
import org.springframework.web.bind.annotation.ControllerAdvice;
import org.springframework.web.bind.annotation.ExceptionHandler;
import java.io.PrintWriter;
import java.io.StringWriter;

@ControllerAdvice
class CustomControllerAdvice {
    // ...

    @ExceptionHandler(CustomDataNotFoundException.class)
    public ResponseEntity<ErrorResponse> handleCustomDataNotFoundExceptions(
        Exception e
    ) {
        HttpStatus status = HttpStatus.NOT_FOUND; // 404

    // converting the stack trace to String
    StringWriter stringWriter = new StringWriter();
    PrintWriter printWriter = new PrintWriter(stringWriter);
    e.printStackTrace(printWriter);
    String stackTrace = stringWriter.toString();

        return new ResponseEntity<>(
            new ErrorResponse(
              status,
              e.getMessage(),
          stackTrace, // assuming to be in staging environment, otherwise stackTrace should not be valorized
            ),
            status
        );
    }

    @ExceptionHandler(CustomParameterConstraintException.class)
    public ResponseEntity<ErrorResponse> handleCustomParameterConstraintExceptions(
        Exception e
    ) {
        HttpStatus status = HttpStatus.BAD_REQUEST; // 400

        return new ResponseEntity<>(
            new ErrorResponse(
              status,
              e.getMessage()
            ),
            status
        );
    }

    // ...
}
Et voilà! Both errors originally related to the same exception were first characterized and then handled accordingly.
Now, let’s see the difference. This is what the default error response would look like on a 404 error:
{
  "timestamp": "2021-15-08T14:32:17.947+0000",
  "status": 404,
  "error": "Not Found",
  "path": "/test404"
}
And this is what the custom error response just implemented looks like:
{
  "timestamp": "2021-15-08 14:32:17",
  "code": 404,
  "status": "NOT_FOUND",
  "message": "Resource not found",
  "stackTrace": "Exception in thread "main" com.example.demo.exceptions.CustomDataNotFoundException
        at com.example.demo.AuthorController.getAuthor(AuthorController.java:16)
        at com.example.demo.AuthorService.getAuthor(AuthorService.java:37)
        at com.example.demo.AuthorDao.getById(AuthorDao.java:24)"
}
Defining a Single Custom Exception Carrying All Data
This approach involves defining a custom exception carrying the HTTP status to use, and all the data required to describe the error that occurred. The idea is to turn every exception you want to handle, or you would like to throw under special circumstances, into an instance of this particular exception. This way, you are spreading the error characterization logic into all your code. So, you will only have to add a new method in your @ControllerAdvice annotated class to handle this custom exception accordingly.
First, you have to define a custom error handling exception. This can be achieved as follows:
// src/main/java/exceptions/CustomErrorException.java

package exceptions;

import lombok.Getter;
import lombok.Setter;
import org.springframework.http.HttpStatus;

@Getter
@Setter
public class CustomErrorException extends RuntimeException {
    private HttpStatus status = null;

    private Object data = null;

    public CustomErrorException() {
      super();
    }

   public CustomErrorException(
      String message
   ) {
      super(message);
   }

    public CustomErrorException(
        HttpStatus status,
        String message
    ) {
        this(message);
        this.status = status;
    }

    public CustomErrorException(
        HttpStatus status,
        String message,
        Object data
    ) {
        this(
          status,
      message
        );
        this.data = data;
    }
}
Again, the @Getter and @Setter annotations were used to avoid boilerplate code and are not mandatory. As you can see, the CustomErrorException class carries the same data used in the ErrorResponse class to better describe what happened and present the errors to the end-users.
So, you can use this exception to wrap other exceptions, or you can throw it in case of particular circumstances constituting errors in your business logic. Now, let’s see how with two examples:
// DAO-level method
public Foo retrieveFooById(
    int id
) {
    try {
        // data retrieving logic
    } catch (NullPointerException e) {
        throw new CustomErrorException(
          HttpStatus.NOT_FOUND,
          e.getMessage(),
          (Integer) id
        );
    }
}
Here, an insufficiently significant NullPointerException is turned into a more detailed CustomErrorException containing all the data to describe why the error occurred.
// controller-level method method
public ResponseEntity<Void> performOperation(
    int numberOfAttempts
) {
    if (numberOfAttempts <= 0 || numberOfAttempts >= 5) {
        throw new CustomErrorException(
          HttpStatus.BAD_REQUEST,
          "numberOfAttempts must be >= 0 and <= 5!",
          (Integer) numberOfAttempts
        );
    }

    // business logic
}
Similarly, a particular behavior that is not supposed to happen is intercepted. Consequently, a CustomErrorException exception containing all the useful data to represent the error is thrown.
Lastly, add one method to handle CustomErrorException exception instances to your @ControllerAdvice annotated class, as below:
// src/main/java/com/customerrorhandling/demo/errors/CustomControllerAdvice.java

package com.customerrorhandling.demo.errors;

import exceptions.CustomDataNotFoundException;
import exceptions.CustomErrorException;
import exceptions.CustomParameterConstraintException;
import org.springframework.http.HttpStatus;
import org.springframework.http.ResponseEntity;
import org.springframework.web.bind.annotation.ControllerAdvice;
import org.springframework.web.bind.annotation.ExceptionHandler;
import java.io.PrintWriter;
import java.io.StringWriter;

@ControllerAdvice
class CustomControllerAdvice {
    // ...

    @ExceptionHandler(CustomErrorException.class)
    public ResponseEntity<ErrorResponse> handleCustomErrorExceptions(
            Exception e
    ) {
        // casting the generic Exception e to CustomErrorException
        CustomErrorException customErrorException = (CustomErrorException) e;

        HttpStatus status = customErrorException.getStatus();

        // converting the stack trace to String
        StringWriter stringWriter = new StringWriter();
        PrintWriter printWriter = new PrintWriter(stringWriter);
        customErrorException.printStackTrace(printWriter);
        String stackTrace = stringWriter.toString();

        return new ResponseEntity<>(
                new ErrorResponse(
                        status,
                        customErrorException.getMessage(),
                        stackTrace,
                        customErrorException.getData()
                ),
                status
        );
    }

    // ...
}
Note that @ExceptionHandler can accept more than one exception type. This means that the parameter of the method representing the exception must be downcasted. Otherwise, a ClassCastException will be throw. So, upcast the exception e to CustomErrorException inside the method. Then, you will be able to access its particular fields and define a valid ErrorResponse instance.
Done! This way each error that occurs is encapsulated into an exception containing everything required to describe it.
Now, let’s see the difference. This is what the default error response on a 404 error would look like:
{
  "timestamp": "2021-15-08T14:32:17.947+0000",
  "status": 404,
  "error": "Not Found",
  "message": "",
  "path": "/test404"
}
And this is what the custom error response just implemented looks like:
{
  "timestamp": "2021-15-08 14:32:17",
  "code": 404,
  "status": "NOT_FOUND",
  "message": "Resource not found",
  "stackTrace": "Exception in thread "main" com.example.demo.exceptions.CustomErrorException
        at com.example.demo.AuthorController.getAuthor(AuthorController.java:16)
        at com.example.demo.AuthorService.getAuthor(AuthorService.java:37)
        at com.example.demo.AuthorDao.getById(AuthorDao.java:24)"
}
Pros and Cons of Each Approach
The first approach should be used when you do not want to spread error handling logic all over your codebase. In fact, the HTTP status code is only associated with errors in your @ControllerAdvice annotated class. This means that no layer knows how the error will be handled and presented to users. Although this should be the desired behavior because it respects the principle of least privilege, it does involve boilerplate code. In fact, you may easily end up with dozens of custom exceptions, and define them is a tedious and not-scalable approach.
So, you may want a less restricting approach, and this is why the second approach was presented. Unfortunately, this one is definitely dirtier. In fact, it requires you to spread detail about error handling logic in many different points of your code. In contrast, it is scalable and quicker to be implemented. So, despite not being the cleanest approach, it allows you to achieve the desired result with little effort. Plus, it is more maintainable than the first approach because it involves only a custom exception.
Custom Error Handling in Spring Security
Spring Security is a powerful and highly customizable framework that provides both authentication and authorization. It is one of the most widely used Spring dependencies and represents the de-facto standard for securing a Spring Boot application.
In case of authentication and authorization failures, AuthenticationException and AccessDeniedException are thrown respectively. Then, Spring Security takes care of encapsulating them in default error handling responses. If you want to customize them, the two approaches presented above are of no use. This is because @ControllerAdvice can handle only exceptions thrown by controllers, but AuthenticationException and AccessDeniedException are thrown by the Spring Security AbstractSecurityInterceptor component — which is not a controller. In other words, a @ControllerAdvice annotated class cannot catch them. Achieving this requires custom logic.
Implementing Custom Error Handling Logic in Spring Security
Let’s take a look at how to implement custom error handling in Spring Security. Luckily, this is not too complex since you can easily provide Spring Security with two components to handle authentication and authorization errors, respectively. What you need to do is to provide the AuthenticationFailureHandler interface with implementation, as follows:
// src/main/java/com/auth0/hotsauces/security/CustomAuthenticationFailureHandler.java

package com.auth0.hotsauces.security;

import com.fasterxml.jackson.annotation.JsonFormat;
import com.fasterxml.jackson.databind.ObjectMapper;
import org.springframework.http.HttpStatus;
import org.springframework.security.core.AuthenticationException;
import org.springframework.security.web.authentication.AuthenticationFailureHandler;
import java.util.*;
import javax.servlet.http.HttpServletRequest;
import javax.servlet.http.HttpServletResponse;
import java.util.HashMap;

public class CustomAuthenticationFailureHandler implements AuthenticationFailureHandler {
    // Jackson JSON serializer instance
    private ObjectMapper objectMapper = new ObjectMapper();

    @Override
    public void onAuthenticationFailure(
      HttpServletRequest request,
      HttpServletResponse response,
      AuthenticationException exception
    ) throws IOException, ServletException {
        HttpStatus httpStatus = HttpStatus.UNAUTHORIZED; // 401

        Map<String, Object> data = new HashMap<>();
        data.put(
          "timestamp",
          new Date()
        );
        data.put(
          "code",
          httpStatus.value();
        );
        data.put(
          "status",
          httpStatus.name();
        );
        data.put(
          "message",
          exception.getMessage()
        );

        // setting the response HTTP status code
        response.setStatus(httpStatus.value());

        // serializing the response body in JSON
        response
          .getOutputStream()
          .println(
              objectMapper.writeValueAsString(data)
          );
    }
}
This will be used to handle AuthenticationExceptions.
Similarly, you can provide the AccessDeniedHandler interface with implementation to handle AccessDeniedExceptions.
// src/main/java/com/auth0/hotsauces/security/CustomAccessDeniedHandler.java

package com.auth0.hotsauces.security;

import com.fasterxml.jackson.annotation.JsonFormat;
import com.fasterxml.jackson.databind.ObjectMapper;
import org.springframework.http.HttpStatus;
import org.springframework.security.core.AuthenticationException;
import org.springframework.security.web.authentication.AuthenticationFailureHandler;
import java.util.*;
import javax.servlet.http.HttpServletRequest;
import javax.servlet.http.HttpServletResponse;
import java.util.HashMap;

public class CustomAccessDeniedHandler implements AccessDeniedHandler {
    // Jackson JSON serializer instance
    private ObjectMapper objectMapper = new ObjectMapper();

    @Override
    public void handle(
      HttpServletRequest request,
      HttpServletResponse response,
      AccessDeniedException exception
    ) throws IOException, ServletException {
        HttpStatus httpStatus = HttpStatus.FORBIDDEN; // 403

        Map<String, Object> data = new HashMap<>();
        data.put(
          "timestamp",
          new Date()
        );
        data.put(
          "code",
          httpStatus.value();
        );
        data.put(
          "status",
          httpStatus.name();
        );
        data.put(
          "message",
          exception.getMessage()
        );

        // setting the response HTTP status code
        response.setStatus(httpStatus.value());

        // serializing the response body in JSON
        response
          .getOutputStream()
          .println(
              objectMapper.writeValueAsString(data)
          );
    }
}
Now, you just need to register these two custom implementations as authentication and authorization error handlers. You can do this as below:
// src/main/java/com/auth0/hotsauces/security/SecurityConfig.java

package com.auth0.hotsauces.security;

import org.springframework.beans.factory.annotation.Value;
import org.springframework.context.annotation.Bean;
import org.springframework.security.config.annotation.web.builders.HttpSecurity;
import org.springframework.security.config.annotation.web.configuration.EnableWebSecurity;
import org.springframework.security.config.annotation.web.configuration.WebSecurityConfigurerAdapter;
import org.springframework.security.oauth2.core.DelegatingOAuth2TokenValidator;
import org.springframework.security.oauth2.core.OAuth2TokenValidator;
import org.springframework.security.oauth2.jwt.*;
import org.springframework.security.oauth2.server.resource.web.BearerTokenAuthenticationFilter;
import org.springframework.security.web.access.AccessDeniedHandler;
import org.springframework.security.web.authentication.AuthenticationFailureHandler;

@EnableWebSecurity
public class SecurityConfig extends WebSecurityConfigurerAdapter {
    // ...

    @Override
    protected void configure(HttpSecurity http)
      throws Exception {
        http
          .authorizeRequests()
          .anyRequest()
          .authenticated()
          .and()
          .formLogin()
          .failureHandler(authenticationFailureHandler())
          .and()
          .exceptionHandling()
          .accessDeniedHandler(accessDeniedHandler());
    }

    @Bean
    public AuthenticationFailureHandler authenticationFailureHandler() {
        return new CustomAuthenticationFailureHandler();
    }

    @Bean
    public AccessDeniedHandler accessDeniedHandler() {
        return new CustomAccessDeniedHandler();
    }
}
Et voilà! Custom error handling in Spring Boot has just been achieved thanks to the failureHandler and accessDeniedHandler methods, which allows you to register a custom authentication error handler and a custom authorization error handler.
Spring Security Custom Error Handling in Action
Now, let’s see how to implement it in a real-world example. First, read this article on how to protect APIs with Spring Security and Auth0. In the demo application produced in that article, no custom error handling is implemented. So, by making a request to a protected API including a wrong access token, the default Spring Boot error handling logic is applied. Let’s test it out.
If you are a macOS or Linux user, enter this command into the terminal:
curl -i --request GET
     --url http://localhost:8080/api/hotsauces/
     -H "Content-Type: application/json"
     -H "authorization: Bearer wrong-token"
Otherwise, if you are a Windows user, enter this command into PowerShell:
$accessToken = "wrong-token"
$headers = @{
    Authorization = "Bearer $accessToken"
}
$response = Invoke-RestMethod "http://localhost:8080/api/hotsauces/" `
    -Headers $headers
$response | ConvertTo-Json
Then, the following response will be returned:
Invoke-WebRequest: The remote server returned an error: (401) Unauthorized.
At line:1 char:1
+ Invoke-WebRequest "http://localhost:8080/api/hotsauces/"
+ ~~~~~~~~~~~~~~~~~~~~~~~~~~~~~~~~~~~~~~~~~~~~~~~~~~~~~~~~
+ CategoryInfo          : InvalidOperation: (System.Net.HttpWebRequest:HttpWebRequest) [Invoke-WebRequest], WebExc
   eption
+ FullyQualifiedErrorId : WebCmdletWebResponseException,Microsoft.PowerShell.Commands.InvokeWebRequestCommand
As you can see, a 401 error status code is returned, but with no details on what happened.
Now, let’s test the demo application extended with custom error handling logic. You can find it in this GitHub repository. The application is exactly the same as the previous one, except for the error handling logic. In particular, the aforementioned presented logic was implemented.
In this case, by launching the commands above, this message will be returned:
Invoke-RestMethod : {"code":401,"message":"An error occurred while attempting to decode the Jwt: Invalid JWT serialization: Missing dot delimiter(s)","timestamp":1629880611013,"status":"UNAUTHORIZED"}
At line:1 char:1
+ $response = Invoke-RestMethod "http://localhost:8080/api/hotsauces/"  ...
+ ~~~~~~~~~~~~~~~~~~~~~~~~~~~~~~~~~~~~~~~~~~~~~~~~~~~~~~~~
+ CategoryInfo          : InvalidOperation: (System.Net.HttpWebRequest:HttpWebRequest) [Invoke-WebRequest], WebExc
   eption
+ FullyQualifiedErrorId : WebCmdletWebResponseException,Microsoft.PowerShell.Commands.InvokeWebRequestCommand
As you can see, a JSON message representing the custom error handling logic was returned as expected. This contains the status code, the exception message, a timestamp, and the HTTP status code name, as follows:
{
  "code": 401,
  "message": "An error occurred while attempting to decode the Jwt: Invalid JWT serialization: Missing dot delimiter(s)",
  "timestamp": 1629880611013,
  "status": "UNAUTHORIZED"
}
Conclusion
In this article, we looked at how to implement custom error handling logic when dealing with REST applications in Spring Boot. This is not as easy a task as it may seem, and it requires knowing a few Spring Boot fundamentals. First, we delved into default error handling in Spring Boot and saw how poor the responses are. Then, we looked at @ControllerAdvice and learn everything required to implement custom error handling logic. In particular, two different approaches were shown. Both allow you to define custom error handling responses but have specific pros and cons. Finally, we learned how to achieve the same result when dealing with Spring Boot Security errors, which requires specific logic. As shown, achieving custom error handling in Spring Boot is not easy but definitely possible, and explaining when, why, and how to do it was what this article was aimed at.
Thanks for reading! I hope that you found this article helpful. Feel free to reach out to me with any questions, comments, or suggestions.
Структура проекта:

Остальные конфигурации выходят в соответствии с учебником, но не переход на стартовую страницу после запуска Tomcat, показывает страницу:

Это имя пользователя и пароль определенно не знают правильное значение, нажмите «Отмена», подскажите:

После всех видов подбрасывания, хотя Tomcat может запускаться, сообщается, что пакет MVN, поскольку входной класс находится в MSSO-Web, API не найдет класс входа, затем посмотрите на POM API и найдите следующие код для удаления следующего кода достаточно.:
<build>
        <plugins>
            <plugin>
                <groupId>org.springframework.boot</groupId>
                <artifactId>spring-boot-maven-plugin</artifactId>
            </plugin>
        </plugins>
    </build>
В дополнении к пункту Web содержит класс ввода, другие проекты не могут написать эту конфигурацию плагина, см роли пружинных загрузок Maven-плагин, нашел: Этот плагин позволяет проекту быть упакован в пакет JAR или пакет WAR , то можно запустить непосредственно. КлючМакияж, миритьсяРанее в API и основных проектах из-за конфигурации:
<packaging>jar</packaging>Поэтому, когда вы играете пакет JAR, вы найдете класс, содержащий основной метод, но не класса, содержащего основной метод в API, так что пакет является неправильным.
Потому что я игнорировал истинный смысл этого плагина, проект не смог найти причину входа в систему, застойные в течение 3 дней, и мы должны глубоко проанализировать себя! Действительно Действительно
Ниже приведен основной код класса:
import org.mybatis.spring.annotation.MapperScan;
import org.springframework.boot.SpringApplication;
import org.springframework.boot.autoconfigure.EnableAutoConfiguration;
import org.springframework.boot.builder.SpringApplicationBuilder;
import org.springframework.boot.web.support.SpringBootServletInitializer;
import org.springframework.context.annotation.ComponentScan;
import org.springframework.context.annotation.Configuration;

@EnableAutoConfiguration
@Configuration
@ComponentScan("com.mljr.auth.controller")
@MapperScan("com.mljr.auth.dao.*")
public class Application extends SpringBootServletInitializer {

    @Override
    protected SpringApplicationBuilder configure(SpringApplicationBuilder builder) {
        return builder.sources(Application.class);
    }

    public static void main(String[] args) {
        SpringApplication.run(Application.class, args);
    }

}
Содержание
- Русские Блоги
- Основная причина страницы ошибки SpringBoot Whitelabel, три решения и их характеристики
- 0, краткое описание
- 1. Страница ошибки Whitelabel
- 2. Решите проблему с белой страницей.
- Spring выдает ошибку Whitelabel error page, что не так?
- Внутренняя ошибка сервера 500 в Госуслуги — как исправить
- Error 500: причины появления бага
- Произошла ошибка 500: устраняем в 2 способа
- Стандартное руководство для обычных пользователей
- Инструкция для админов
- Что еще нужно знать админу?
- Выводы
Русские Блоги
Основная причина страницы ошибки SpringBoot Whitelabel, три решения и их характеристики
0, краткое описание
Перед изучением этой заметки лучше всего иметь некоторое представление о Spring mvc и Tomcat, чтобы было удобнее понимать.Если вам нужно знать наиболее прямое решение, перетащите его вниз, чтобы увидеть образец кода.
Вводится настоящая причина появления белой страницы Springboot. Основная причина заключается в том, что нет подходящей ситуации соответствия и возникает ситуация 404. Затем перейдите к системной по умолчанию сначала ErrorPage, которая представляет собой содержимое белой страницы, а затем с трех точек зрения в соответствии с его спецификой. , 1. Перехватчик, 2. Новая страница ошибок, 3. Пользовательская маршрутизация / маршрутизация ошибок для решения проблемы, а также знакомство с преимуществами и недостатками каждого метода, включая основные причины ошибок страницы цикла и т. Д.
1. Страница ошибки Whitelabel
То, что называется страницей ошибок Whitelabel (также называемой белой страницей), является страницей описания аномального HTTP-запроса в SpringBoot, как показано ниже.
Содержимое белой страницы будет отображать код состояния, путь и причину ошибки, но реальная среда публикации онлайн-генерации обычно не допускает такой ситуации, и больше — это настраиваемые страницы 404 или 500 страниц.
Итак, теперь мы пришли к пониманию, в какой ситуации будут появляться белые страницы и как решить эту проблему. Давайте воспользуемся случаем 404, чтобы понять причину.
Перейти непосредственно к классу DispatcherServlet protected void doDispatch(HttpServletRequest request, HttpServletResponse response) throws Exception Метод, содержащий фрагменты кода
В методе getHandler будет выполняться обход HandlerMapping в текущем веб-контейнере, чтобы найти соответствующий обработчик
Из приведенного выше рисунка очевидно, что текущий удобный обработчик — SimpleUrlHandlerMapping, потому что URL-адрес содержит /** , Все URL-адреса могут быть сопоставлены, Не войдет в noHandlerFound позади , Обработчик адаптации HandlerAdapter — это объект, созданный HttpRequestHandlerAdapter.
Не удается найти соответствующий ресурс в mv = ha.handle (loadedRequest, response, mappedHandler.getHandler ()), установите код состояния ответа на 404Подробнее см. Метод handleRequest класса ResourceHttpRequestHandler.
Теперь это эквивалентно установке кода состояния запроса на 404, больше ничего не делается, mv также равно null
В это время вам нужно вернуться к процессу вызова Tomcat. Если вы запрашиваете процесс вызова Tomcat, вы должны знать, что когда Tomcat получает запрос сокета Socket на соединителе, он упаковывается в запрос, ответ и другую информацию, которая будет отправлена в Engine-> Host и другие компоненты. Он доставляется слой за слоем, затем принимается конвейером каждого компонента, а затем фильтруется соответствующим клапаном (клапаном) слой за слоем.
На этот раз дошел до класса StandardHostValve private void status(Request request, Response response) метод
Объедините код и диаграмму, а затем внимательно прочтите белую страницу. This application has no explicit mapping for /error , Маршрут error, причина отсюда, а затем переход вперед, адрес маршрута error
Белая страница mv, предоставляемая SpringBoot, используется позже для визуализации содержимого белой страницы, которую мы видим.
Пока что весь процесс выполнен,Подводя итог, это запрос несуществующей ссылки, которая перенаправляется в запрос / error после того, как обнаруживается, что это запрос 404.
Тогда решение очень простое, есть три решения, но эти три решения под разными углами, чтобы решить проблему.
- Добавить перехватчик
- Добавить ErrorPage
- Добавить / путь ошибки
2. Решите проблему с белой страницей.
2.1, добавить перехватчик
После того, как перехватчик перехватит запрос / error, он вынужден изменить mv, так что последний отрендеренный mv для пробного использования является нашей настраиваемой настройкой, а не содержимым белой страницы, где mv самой белой страницы будет проходить Анализатор представления ContentNegotiating Обработка становится ErrorMvcAutoConfiguration$WhitelabelErrorViewConfiguration
Обратите внимание, что все это истечение фактически было обработано 3 HTTP-запросами,На следующем рисунке показана информация журнала, распечатанная с использованием мониторинга событий HTTP.
Пройдите через / abc ==> jump / err ==> jump / error (содержимое не отображается, потому что содержимое, отправленное в браузер, было отображено с помощью / err
Реальный поток обработки вызовов состоит в том, что / abc не находит подходящий обработчик, а затем решает передать его на путь / error для обработки, но он перехватывается перехватчиком и перенаправляется в / err для обработки.
Недостатки: все запросы для этого маршрута будут перехвачены, включая статические файлы ресурсов, что не оказывает большого влияния на внутренние службы, которые предоставляют чистые интерфейсы. Другие службы будут иметь влияние
2.2, добавьте ErrorPage
Добавление подходящей ErrorPage не приведет к переходу к пути по умолчанию / ошибке перехватчика, а перейдет к настраиваемой ErrorPage. Причина этого была указана в методе статуса выше.
В приведенном выше коде добавлено несколько путей перехода к странице ошибки ErrorPage и соответствующие им коды ошибок HTTP. В нашем текущем примере должен быть выполнен переход к соединению / 404, а затем как я могу получить сообщение об ошибке после его выполнения? В принципе, он должен отображать 404 Содержимое файла .html и классическая страница ошибок Tomcat отображаются одновременно, как показано на следующей странице, и содержимое вывода журнала.
Это проблема скачка петли
Когда в системе не указан преобразователь четкого представления, система будет использовать свой собственный преобразователь по умолчанию. InternalResourceView , Он проверит текущий URL-адрес перед отображением. Если обнаружится, что запрошенный URL-адрес соответствует целевому URL-адресу, он будет определен Вперед сам появляются Circular view path Эта проблема
Итак, как ее решить, нужно исходить из фундаментальной цели
- Добавьте синтаксический анализатор шаблона, чтобы синтаксический анализатор по умолчанию не использовался
- Изменить путь перехода
Вы можете понять конкретные решения самостоятельно.В этой статье не используется отрисовка механизма шаблонов, а непосредственно отображаются основные данные.
2.3, путь добавления / ошибки
Как вы знаете выше, поскольку система по умолчанию переходит к / error и завершает рендеринг данных, недостаточно настроить маршрут / error и избежать проблемы отсутствия статических ресурсов, но обратите внимание, что есть Один вопрос, подробности см. На рисунке ниже
Во-первых, я добавил и определил очень простой метод обработки пути ошибки, но при запуске Springboot есть 3 метода обработки пути ошибки, и они одновременно принадлежат одному и тому же дескриптору. Правила маршрутизации URL Обработка, выберите ручку в автоконфигурации,Это должно было привести к тому, что наш заказ / ошибка недействительны
После тестирования он действительно недействителен, и белая страница все еще отображается, так как это решить? Есть несколько способов сделать то же самое
- В соответствии с правилами сопоставления маршрутизации измените соответствующий контент, чтобы при окончательном выборе процессора он достиг нашего пользовательского процессора, но это очень сложно. Вам необходимо очень четко понимать правила сопоставления маршрутизации самого Spring mvc, чтобы гарантировать, что сопоставление URL-адресов Приоритетные вопросы, требующие решения, и т. Д.
Мы уже знаем, что эти три / ошибки находятся в картографе маршрутов RequestMappingHandlerMapping.Мы можем сделать так, чтобы пользовательский процессор не сохранялся в карте маршрутов, и сделать Spring приоритетом согласованного преобразователя маршрутов при опросе. Да, но на самом деле BeanNameUrlMapping в handlerMapping все еще находится после RequestMappingHandlerMapping, если вы измените порядок, это также очень сложно
EndpointHandlerMapping — это конечная точка в исполнительном модуле Springboot. Настроить конечную точку сложно, и она не подходит для текущего проекта.
Использование SimpleUrlHandlerMapping не подходит для Springboot. Если вы используете конфигурацию xml, вы можете напрямую установить ее URL-адрес. Это будет очень удобно. Если вы применяете метод аннотации в springboot, требуется дополнительная настройка, как показано в следующем коде
Хотя / error вводится в SimpleUrlHandlerMapping, он все равно будет отображаться, даже если добавлена дополнительная конфигурация Нет ошибки адаптера ,Этот метод не применим
Оглядываясь назад на наблюдение BasicErrorController, мы можем унаследовать интерфейс ErrorController сами.
Источник
Spring выдает ошибку Whitelabel error page, что не так?

давай читать то, что написано вместе за ручку =)
«это приложение не имеет эксплицитного (явного) маппинга для /error, поэтому ты видишь это»
добавь какой-то любой маппинг напр
@RestController
public class MyController <
@GetMapping(«/error»)
public String smth() <
return «Error world»;
>
>
пробегись по spring boot in action. сам не читал, но говорят годная, странич всего ничего
в пропертях добавь
server.error.whitelabel.enabled=false
ну или нарисуй свою страничку error.html
закинь в resources/templates
создай свой контроллер чтоб перехватить дефолтовое поведение
@Controller
public class MyErrorController implements ErrorController <
@RequestMapping(«/error»)
public String handleError() <
//do something like logging
return «error»;
>
@Override
public String getErrorPath() <
return «/error»;
>
>
можешь под каждую свою ошибку свою error страничку сделать
типа error404.html error500.html
и переписать метод вот так
@RequestMapping(«/error»)
public String handleError(HttpServletRequest request) <
Object status = request.getAttribute(RequestDispatcher.ERROR_STATUS_CODE);
if (status != null) <
Integer statusCode = Integer.valueOf(status.toString());
if(statusCode == HttpStatus.NOT_FOUND.value()) <
return «error404»;
>
else if(statusCode == HttpStatus.INTERNAL_SERVER_ERROR.value()) <
return «error500»;
>
>
return «error»;
>
тогда будет подгружать нужную тебе страничку ошибки.
но как ты уже понял. это всё лишь чтоб настроить что показывать.
почему именно у тебя ошибка происходит — это ты уж в своём аппе копайся.
Источник
Внутренняя ошибка сервера 500 в Госуслуги — как исправить
Внутренняя ошибка сервера «Госуслуги» (500) — частое явление среди активных интернет-пользователей. Частенько приносит неудобства тем, кто собирается посетить сайт Gosuslugi.ru. Эксперты отмечают всплеск таких ошибок на сайте во время активных посещений портала по различным бытовым вопросам. Часто это бывает сезонным явлением — люди записывают детей в школу или встают в очередь в поликлинику, платят по штрафам за правонарушения на дорогах, оформляют заграничные паспорта, вносят налоговые платы и т. д. В обзоре мы разберемся, что делать, если не работает сайт или личный кабинет в сервере «Госуслуги» и как устранить ошибку выполнения операции под номером 500.

Error 500: причины появления бага
Сам код свидетельствует о неправильной обработке запросов. В это же время внутренние сбои не пропускают запросы на прочтение, но при этом ПО работает правильно — такой вот парадокс.
Важно! Код 500 — внутренний, поэтому, появляясь на конкретном ресурсе и не распространяясь по всем порталам, означает, что вы ничего не измените, остается только ждать.
Есть и такой список возможных причин того, что сайт Gosuslugi выдает ошибку:
- Неверно прописаны скрипты cqi.
- Запущен DNS, VPN или же прокси-сервер.
- В работе находятся некоторые плагины или расширения.
- Скрипт в продолжительной работе.
- Права доступа открыты или неверные.
- Сбой с htaccess.
- Нехватка памяти для корректной работы кода.
- Сбой WordPress.
- Барахлит Joomla или другая CMS-ка.

Произошла ошибка 500: устраняем в 2 способа
У нас есть две инструкции — для обычных пользователей и для администраторов ресурсов, начнем с более простой.
Стандартное руководство для обычных пользователей
Если вы посетили сайт Gosuslugi и увидели ошибку, скорее всего, это является внутренним системным сбоем сервера и администратор наверняка уже работает над устранением сбоя.
Правда, бывают случаи, когда проблема кроется в вашем оборудовании и софте — самом ПК, браузере, интернет-подключении или каком-либо ПО. Чтобы устранить баг, попробуйте действовать так:
- Перезагрузите web-страничку.
- Выключите или перезалейте имеющиеся плагины и расширения в браузере.
- Отключите оформление браузера или полностью переустановите программу. Также будет полезным софт CCleaner для чистки лишнего.
- Смените локализацию, выбрав другое государство в настройках браузера.
- Попробуйте зайти с использованием ВПН (или прокси, браузера Тор и т. п.).
- Можете подергать настройки ДНС, установленные провайдером, и прогнать на зловреды онлайн-DNS, если пользуетесь таковыми.
- Дождитесь, пока на сайте Gosuslugi проведут и завершат техработы. Кстати, у сайта государственный статус, поэтому смело можно обращаться в call-центр за помощью.
- Зайдите с софта для Android или IOS — у ресурса есть собственное приложение, оно может работать.
На заметку! Код может отображаться только в некоторых разделах сайта или на этапе авторизации (регистрации). В этом случае вам точно нужно воспользоваться чатом с оператором, который вы найдете в нижнем углу экрана с правой стороны.

Инструкция для админов

- Проверьте корректность работы файла под именем error log.
- Попробуйте поставить права доступа на коды cgi — 0755.
- Если истекло время ожидания ответа от сервера, измените интервал на отрезок побольше.
- Используйте ПО, которое меняет права на папки. Оптимальная цифра для скриптов — 600, а у всех остальных права должны быть 644, у каталогов — 755.
- Что касается файла .htaccess, то из-за модификации его директивы могут быть ошибочными. Отыщите файл и переместите его или же сделайте резервную копию и снесите .htaccess.
Что еще нужно знать админу?
Полезными будут такие советы:
- При массовом посещении сайта хостинг отследил, что некоторым скриптам требуется больше памяти, чем другим, поэтому такие аккаунты блокировались с выдачей кода 500 и внутренней ошибки. Чтобы исправить этот случай, нужно пробивать на корректность работы код, чтобы исключить сверхпотребление.
- Простейший способ — выключение «ВордПресс». Но способ лишь на время устранит проблему, ведь, выключая WP, вы рискуете потерять часть плагинов.
- У админов, работающих с CMS Джумла, также бывают проблемы при входе в профиль. В этом случае рекомендуется перейти в logs, где выбрать error.php для его проверки на корректность работы. Можно еще выставить права доступа — 777. А также пробуйте методом тыка выключать по очереди каждый плагин.
- Закажите платную проверку файлов на хостинге на вирусное ПО. Часто зловреды «пожирают» часть файлов. Ну, а если и это не помогло, остается только путь в техподдержку или call-центр.
Выводы
Теперь вы знаете, что это такое — ошибка 500, и как действовать, кем бы вы ни были: обычным пользователем или продвинутым админом. Мы все же советуем ждать устранения неполадок на сайте, обычно это занимает не больше суток. А тем, у кого есть собственный ресурс, мы советуем сменить хостинг на более дорогой и проверенный, ведь невозможность посещать ресурс оборачивается потерей ваших средств, особенно если у вас интернет-магазин или серьезный портал с уверенным трафиком.
Источник
Страница с ошибкой при обращении к WordPress-сайту всегда вызывает неудобства, вне зависимости от того, ваш это сайт или чужой. Как и в случае со многими другими кодами ответов HTTP, ошибка 401 не содержит детальных данных для диагностики и решения проблемы.
Ошибка 401 может появиться в любом браузере. В большинстве случаев ее легко решить.
В этой статье мы расскажем, что означает 401 ошибка, почему она происходит, и какие методы ее устранения существуют.
Итак, приступим!
Содержание
- Код ошибки 401 – что это?
- Что вызывает ошибку 401
- Как исправить ошибку 401 (5 методов)
Код ошибки 401 – что это?
Коды состояния HTTP 400 возникают в случае проблем с выполнением запросов. В частности, ошибка 401 появляется, когда браузер отказывает вам в доступе к странице, которую вы хотите посетить.
В результате вместо загрузки страниц браузер выведет сообщение об ошибке. Ошибки 401 могут возникать в любом браузере, потому отображаемое сообщение может варьироваться.
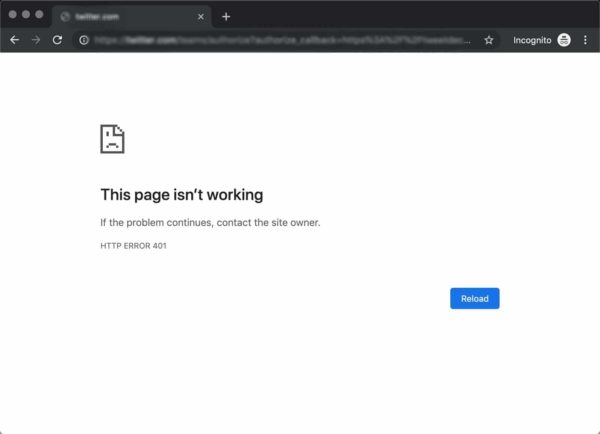
К примеру, в Chrome и Edge вы, скорее всего, увидите иконку бумаги с простым сообщением о том, что запрашиваемая страница не отвечает. Вы увидите фразу «HTTP Error 401». Вам будет предложено связаться с владельцем сайта, если ошибка не пропадет:
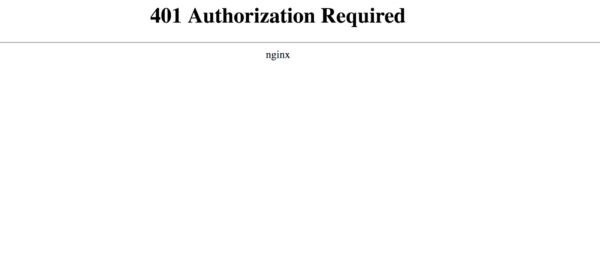
В иных случаях и в других браузерах вы можете получить менее дружелюбное предупреждение. К примеру, может выводиться пустая страница с сообщением «401 Authorization Required»:
Другие вариации текста:
- HTTP 401 Error – Unauthorized
- 401 Unauthorized
- Access Denied
Эти ошибки часто появляются на сайтах, где требуется вводить данные для входа. В большинстве случаев это означает, что что-то не так с учетными данными. Возможно, браузер перестал считать их действительными.
Эта ошибка похожа на HTTP 403 Forbidden Error, когда доступ к сайту для пользователя запрещен. Однако, в отличие от ошибки 403, сообщение об ошибке 401 указывает, что процесс аутентификации завершился неудачно.
Код ошибки передается через заголовок WWW-Authenticate, который отвечает за определение метода аутентификации, используемого для предоставления доступа к веб-странице или ресурсу.
Что вызывает ошибку 401
Если вы столкнулись с кодом ошибки в кодах 400, вы должны знать, что проблема произошла на стороне клиента (либо на стороне браузера). Случается, что виновником проблемы является браузер, но так бывает не всегда. Об этом мы еще расскажем позже.
Ошибки 401 возникают на ресурсах с ограниченным доступом – к примеру, на страницах, защищенных паролем. Потому можно предположить, что причина проблемы связана с данными аутентификации.
Устаревшие Cookie и кэш браузера
Одной из наиболее распространенных причин возникновения ошибки 401 является то, что кэш и файлы cookie вашего браузера устарели, что не позволяет выполнить авторизацию. Если ваш браузер использует недействительные данные для авторизации (либо вообще их не использует их), сервер отклонит запрос.
Несовместимые плагины
Также бывают ситуации, когда ошибка вызвана несовместимостью плагинов или какими-либо сбоями в них. К примеру, плагин безопасности может ошибочно принять вашу попытку входа за вредоносную активность, а потому будет возвращена ошибка 401 для защиты страницы.
Неверный URL или устаревшая ссылка
Бывает, что источником проблемы является незначительная оплошность. К примеру, был неверно введен URL, ссылка была устаревшей и т.д.
Как исправить ошибку 401 (5 методов)
Теперь, когда мы разобрались с причинами ошибки 401, пришло время обсудить, как ее устранить.
Давайте рассмотрим 5 методов, которые вы можете использовать.
- Проверьте ваш URL.
Начнем с самого простого потенциального решения: убедитесь, что вы использовали верный URL. Это может выглядеть банально, но 401 ошибки нередко появляются, если URL-адрес был введен неправильно.
Еще один вариант: ссылка, которую вы использовали для перехода на запрашиваемую страницу, указывает на неправильный URL. К примеру, ссылка устарела, ведет на страницу, которой больше нет (и редиректов не задано).
Стоит тщательно перепроверить URL-адрес, который вы использовали. Если вы набирали адрес самостоятельно, убедитесь, что все написано безошибочно. Если вы переходили по ссылке, убедитесь в том, что она ведет на страницу, к которой вы хотите получить доступ (либо попробуйте перейти на эту страницу непосредственно через сайт).
- Почистите кэш браузера.
Кэш браузера предназначен для улучшения процесса взаимодействия с сайтами в сети за счет сокращения времени загрузки страниц. К сожалению, иногда это может вести к нежелательным последствиям.
Как мы уже говорили выше, одной из распространенных причин появления ошибки 401 являются устаревшие или неправильные данные кэша или cookies. Потому, если URL введен верно, следующий шаг – чистка кэша браузера.
В итоге вы удалите любую недействительную информацию, которая хранится локально в вашем браузере и может приводить к прерываниям процесса аутентификации. Аналогично, файлы cookie вашего браузера могут содержать аутентификационные данные, которые нужно обновить.
Если вы пользуетесь Chrome, вам нужно щелкнуть по иконке с меню в правом верхнем углу браузера и выбрать пункт Settings. В разделе «Privacy and security» нажмите «Clear browsing data:»
![]()
Далее вводим URL требуемого сайта и очищаем для него данные.
![]()
В других браузерах процесс очистки кэша и cookie может отличаться. К примеру, в Firefox нужно щелкать по иконке с библиотекой и выбирать History > Clear Recent History:
![]()
Информацию по остальным браузерам вы можете найти в поисковиках.
- Очистка DNS.
Еще один метод, который вы можете попробовать для устранения ошибки 401 – это очистка DNS. Эта причина встречается относительно редко, но стоит попробовать и такой подход, особенно если первые два ничего не дали.
Чтобы очистить DNS, перейдите в Windows к меню «Пуск» и там уже введите в строку поиска cmd. Нажмите Enter. Откроется командная строка. Далее вставьте команду ipconfig/flushdns, после чего снова нажмите Enter.

Если вы пользуетесь Mac, вы можете открыть командную строку следующим образом: Finder > Applications > Utilities > Terminal.
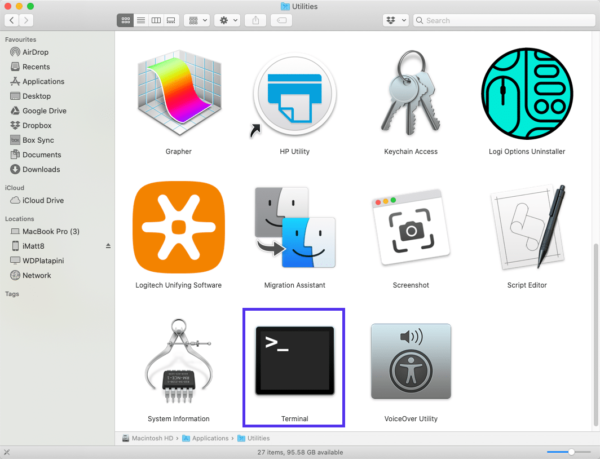
Введите команду sudo killall -HUP mDNSResponder и нажмите Enter. Затем вы можете обновить страницу, чтобы посмотреть, пропала ли ошибка 401 или нет.
- Деактивируйте ваши плагины
Проблема может возникать и по вине плагинов.
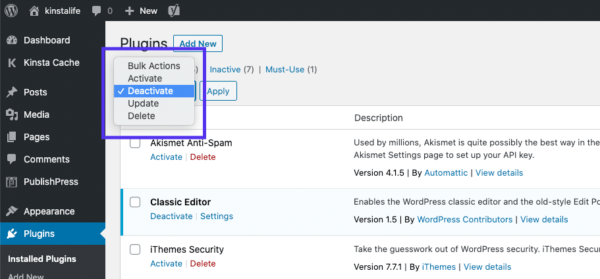
Некоторые плагины, особенно связанные с безопасностью, могут выдавать ошибку 401 при подозрении на вредоносную активность. Также у них могут быть проблемы с совместимостью. Потому лучше всего деактивировать все плагины и посмотреть, будет ли страница работать.
Вы можете деактивировать все плагины разом, перейдя в раздел Plugins > Installed Plugins в консоли WordPress. Выберите все плагины и в меню Bulk Actions задайте Deactivate, после чего щелкните по кнопке Apply:
После этого попробуйте перезагрузить страницу с ошибкой. Если ошибка пропала, вы можете вручную по одному активировать плагины заново, чтобы выявить виновника всех бед.
Далее вы уже можете либо удалить плагин, либо написать его разработчикам, чтобы они предоставили рабочее решение.
- Проверьте заголовок WWW-Authenticate
Если проблема все еще остается, то в таком случае она может быть связана с ошибками на сервере. А значит, исправить ее будет чуть сложнее.
Как мы уже писали ранее, ответ 401 передается через заголовок WWW-Authenticate, который отображается как “WWW-Authenticate: <type> realm=<realm>”. Он включает в себя строки данных, указывающие на то, какой тип аутентификации требуется для предоставления доступа.
Вам нужно посмотреть, был ли отправлен ответ в WWW-Authenticate, а точнее какая схема аутентификации была использована. По крайней мере, это позволит вам приблизиться на один шаг к решению.
Перейдите на страницу с ошибкой 401 и откройте консоль разработчика в Chrome. Вы можете щелкнуть правой кнопкой мыши на странице и выбрать Inspect (Ctrl+Shift+J).
Далее перейдите на вкладку Network и перезагрузите страницу. Это позволит сгенерировать список ресурсов. Выберите заголовок Status, чтобы отсортировать таблицу, и найдите код 401:
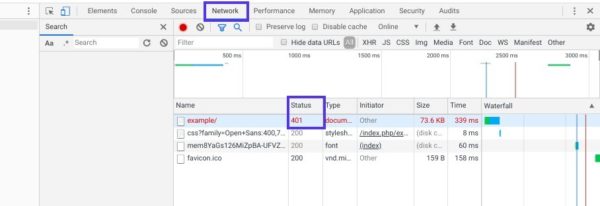
Выберите данную запись, после чего перейдите на вкладку Headers. В Response Headers найдите заголовок WWW-Authenticate:
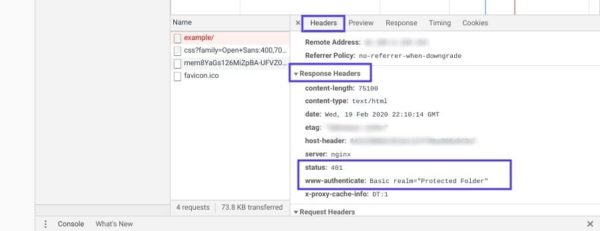
Информация, представленная в заголовке ответа, в частности, в схеме аутентификации, даст вам больше сведений о том, что произошло, и укажет на решение. Это позволит вам понять, какой тип аутентификации требуется серверу.
К примеру, в приведенном выше примере мы видим, что схема аутентификации задана как «Basic». Это означает, что запрос аутентификации требует только ID и password. Для получения более подробной информации и инструкций мы рекомендуем обратиться к HTTP Authentication Scheme Registry.
Источник: kinsta.com