- Обязательно представиться на русском языке кириллицей (заполнить поле «Имя»).
- Фиктивные имена мы не приветствуем. Ивановых и Пупкиных здесь уже достаточно.
- Не писать свой вопрос в первую попавшуюся тему — вместо этого создать новую тему.
- За поиск и предложение пиратского ПО и средств взлома — бан без предупреждения.
- Рекламу и частные объявления «куплю/продам/есть халтура» мы не размещаем ни на каких условиях.
- Перед тем как что-то написать — читать здесь и здесь.
-

LoneWolf
- здесь недавно

- Сообщения: 11
- Зарегистрирован: 01 сен 2016, 07:42
- Имя: Клементьев Сергей Михайлович
- Страна: Россия
- город/регион: Стерлитамак


Резервированные серверы WinCC
Сообщение
LoneWolf » 24 ноя 2016, 13:50
Всем доброго времени суток.
Прошу помощи в решении проблемы с резервируемыми серверами в WinCC v7.4.
Суть проблемы: в конфигурации две Н-системы на S7-412-5H, два трёхсотых и резервированные серверы с СР-1623.
В Step 7 2010 SR4 создал проект. Включил туда контроллеры, Simatic PC station в количестве 2, в которых WinCC Appl и WinCC Appl(stby).
Настроил Ethernet, всё связал, добавил в каждое WinCC Appl подключения к контроллерам.
В WinCC основного сервера поставил галочку Redundancy, поставил партнёра. Проекты дублировал через менеджер.
В Station Configurator импортировал свои конфигурации для каждого сервера.
Основной сервер включается и работает, опрашивая контроллеры, резервный же в упор не видит контроллеры. Общение между серверами есть, внутренние теги синхронизируются.
В S7 connection diagnostic на основном сервере все соединения ОК, на резервном — Not used.
Если на резервном сервере в Station Configurator импортировать конфигурацию от основного, то они начинают конфликтовать, одновременно опрашивая контроллеры и связь чередуется, вывод: СР-1623 работают.
Уже не знаю, что делать! Где-то какая-то мелочь, не поставленная галочка? Куча литературы, но ничего конкретного по конфигурации подобных систем.
Кто занимался, подтолкните к нужной мысли! Что может быть не так?
-

Arist007
- здесь недавно
- Сообщения: 69
- Зарегистрирован: 06 окт 2015, 09:31
- Имя: Антонов Артём Викторочич
- Страна: Россия
- город/регион: Ленинградская область, порт Усть-Луга
- Благодарил (а): 5 раз
- Поблагодарили: 2 раза

Резервированные серверы WinCC
Сообщение
Arist007 » 24 ноя 2016, 21:16
Может быть тебе это поможет. Была когда то проблема — основной сервер тащил, резервный в оффлайне. Останавливал основной, резервный через минуту подхватывался.
LoneWolf писал(а): В S7 connection diagnostic на основном сервере все соединения ОК, на резервном — Not used.
это тоже было так же как и у тебя.
В общем путь решения был таким:
1) Прогрузить конфигурацию с инженерной станции с Simatic Manager: PLC – Configure (Ctrl+K). В Station Configuration проверить все соединения – исправное состояние:

ЭТО ВАЖНО: Перед прогрузкой конфигурации в Siemens Configuration Settings в настройках карты CP1623 в General сменить поле «Mode of the module» с «Configured mode» на «PG mode» (иначе нельзя будет прогрузить). После прогрузки конфигурации вернуть настройки в исходное положение:

Далее проверить корректность конфигурирования сети (пинги до разных станции до разных по маске IP).
Проверить физически корректность подсоединения патч-кордов (кабель до ПЛК, чтобы был подсоединен к сети PlantBus, а не, допустим, к TerminalBus).
При необходимости – перезагрузить сервер.
2) Открыть разделы Redundancy и Time Synchronization и убедиться в правильности сконфигурированных настроек (в разделе Redundancy правильная сетевая карта выбрана, через которую происходит резервирование серверов);
3) Прогрузить на сервер проект (PLC – Download Ctrl+L). Открыть проект (WinCC Runtime), и активировать его.
Попробуйте так.
-
LoneWolf
- здесь недавно
- Сообщения: 11
- Зарегистрирован: 01 сен 2016, 07:42
- Имя: Клементьев Сергей Михайлович
- Страна: Россия
- город/регион: Стерлитамак
Резервированные серверы WinCC
Сообщение
LoneWolf » 25 ноя 2016, 11:46
Что-то пока не получается. А подскажите, нужен ли на резервном сервере Step 7?
И насколько критична операционная система на серверах? У меня стоит Windows 7 Prof, обязательно система должна быть серверной, Windows Server 2008-12? Может ещё и в этом проблема? Хотя без СР1623 и Н-систем получалось опрашивать трёхсотые.
-
Arist007
- здесь недавно
- Сообщения: 69
- Зарегистрирован: 06 окт 2015, 09:31
- Имя: Антонов Артём Викторочич
- Страна: Россия
- город/регион: Ленинградская область, порт Усть-Луга
- Благодарил (а): 5 раз
- Поблагодарили: 2 раза
Резервированные серверы WinCC
Сообщение
Arist007 » 25 ноя 2016, 15:17
На сервере сам Step 7 на сколько помню не нужен. Нужно только специализированное ПО Siemens (ну WinCC).
Я наверняка не знаю, нужна ли серверная ОС или простая, гадать тоже не буду) Но мне кажется что нужна серверная.
Я как то для себя писал инструкцию по конфигурированию сервера, который будет резервируемым (именно Standby-сервера). Надеюсь, что она вам чем-нибудь поможет. Собственно вот:
Необходимые инструкции:
– Station Configuration Authorization
– Compendium
Для построения резервированной системы необходимо следующее:
1. Выполнить установку ОС Windows и необходимого системного ПО Siemens;
2. Присвоить имя компьютеру: ______________;
3. Для построения резервированной системы необходимо два идентичных по ПО и по Hardware(!) сервера (HAL-классификация);
4. Подключить сеть (сегменты) физически – патч-корды в разъемы RJ45 – TerminalBus, PlantBus;
5. Проверить корректность сетевых настроек (пинг именно по имени);
6. На инженерной станции добавить объект (PC Station) (строго по инструкции). Вручную прописать MAC и IP адреса иначе всплывут ошибки в Station Configuration;
7. В HW Config прописать строчку WinCC_StandBy:

8. Загрузить конфигурацию с Simatic Manager (PLC – Configure Ctrl+K)
Примечание. Пока не появится в строке StandBy OS пункта выбора сервера StandBy – не прогружать конфигурацию на сервер

9. Прогрузка проекта на сервер;
10. Проверка настроек в разделе Red Configuration (в WinCC Runtime):

11. Проверка настроек в разделе Time Conf. Editor (в WinCC Runtime):

12. Выбрать необходимый интерфейс для резервирования (TremBus) – выбирается в Redundancy Configuration;
13. После запуска проекта в трее при наведении на значок программы Simatic WinCC RT во всплывающем окне все объекты должны быть окрашены зеленым цветом:

14. Проверить корректное значение тегов резервирования в Tag Management (на Primary: @RM_MASTER = 1, на Backup: @RM_MASTER = 0):

-
LoneWolf
- здесь недавно
- Сообщения: 11
- Зарегистрирован: 01 сен 2016, 07:42
- Имя: Клементьев Сергей Михайлович
- Страна: Россия
- город/регион: Стерлитамак
Резервированные серверы WinCC
Сообщение
LoneWolf » 27 ноя 2016, 02:16
Да в том-то и дело, что серверы друг-друга видят! Внутренние теги синхронизируются, но на резервном контроллеров не видно!
-
LoneWolf
- здесь недавно
- Сообщения: 11
- Зарегистрирован: 01 сен 2016, 07:42
- Имя: Клементьев Сергей Михайлович
- Страна: Россия
- город/регион: Стерлитамак
Резервированные серверы WinCC
Сообщение
LoneWolf » 27 ноя 2016, 02:21
С 1-го по 7-ой выполнил по инструкции! На 8-ом запнулся. В понедельник попробую с ноля.
-
Arist007
- здесь недавно
- Сообщения: 69
- Зарегистрирован: 06 окт 2015, 09:31
- Имя: Антонов Артём Викторочич
- Страна: Россия
- город/регион: Ленинградская область, порт Усть-Луга
- Благодарил (а): 5 раз
- Поблагодарили: 2 раза
Резервированные серверы WinCC
Сообщение
Arist007 » 27 ноя 2016, 14:22
LoneWolf писал(а): Да в том-то и дело, что серверы друг-друга видят! Внутренние теги синхронизируются, но на резервном контроллеров не видно!
судя по:
LoneWolf писал(а): В S7 connection diagnostic на основном сервере все соединения ОК, на резервном — Not used.
то получается на резервном сервере у тебя конфигурация загружена не корректно (ну или сбилась или еще что-то).
Нужно заново ее прогрузить. Связь конечно будет (так как по LAN настроено все нормально). Но синхронизироваться не будут, так как в Simatic что то не то настроено (я про конфигурацию).
LoneWolf писал(а): С 1-го по 7-ой выполнил по инструкции! На 8-ом запнулся. В понедельник попробую с ноля.
8-й шаг — это нужно с инженерной станции прогрузить конфигурацию на резервный сервер. Я не помню в точности как, но с инженерки тебе нужно в Simatic Manager щелкнуть правой кнопкой на Standby сервере и выбрать пункт Загрузить конфигурацию (или что то типа того в точности не помню). И очень важное замечание — не прогружать, пока в строке Standby OS не появится выбор сервера StandBy-машины. Иначе она не прогрузится, или прогрузится но не корректно (при этом выдаст сообщение, что все прошло хорошо).
-
quq
- здесь недавно
- Сообщения: 46
- Зарегистрирован: 08 сен 2014, 08:56
- Имя: Курочкин Петр Александрович
- Благодарил (а): 12 раз
- Поблагодарили: 6 раз
Резервированные серверы WinCC
Сообщение
quq » 15 дек 2016, 09:23
только сейчас по RSS прочитал  , может уже решено, но ответа нет.
LoneWolf писал(а): нужен ли на резервном сервере Step 7?И насколько критична операционная система на серверах? У меня стоит Windows 7 Prof, обязательно система должна быть серверной
Степ ставлю. Так работаю в клиент- сервер, то OS только серверная, резервирование серверов есть, WinCC 703.
По поводу связи с PLC — мне помогло снятиие галочки в: winCC/ внешние теги/ используемый профибас/ системные параметры/ Simatic S7/ Формирование цикла в PLC.
-
LoneWolf
- здесь недавно
- Сообщения: 11
- Зарегистрирован: 01 сен 2016, 07:42
- Имя: Клементьев Сергей Михайлович
- Страна: Россия
- город/регион: Стерлитамак
Резервированные серверы WinCC
Сообщение
LoneWolf » 15 дек 2016, 13:55
Всем доброго времени суток!
Спасибо Arist007 за инструкцию. Всё заработало. Правда перепробовали всё! Остановились на Windows Server 2008 R2. И почему-то не получилось использовать один из серверов в качестве инженерной станции, не понятно, какой путь прописывать в Path to the Target OS Computer. Но с ноутбука всё прогрузилось на ура.
-
Arist007
- здесь недавно
- Сообщения: 69
- Зарегистрирован: 06 окт 2015, 09:31
- Имя: Антонов Артём Викторочич
- Страна: Россия
- город/регион: Ленинградская область, порт Усть-Луга
- Благодарил (а): 5 раз
- Поблагодарили: 2 раза
Резервированные серверы WinCC
Сообщение
Arist007 » 26 дек 2016, 23:45
Хорошо, что все заработало!)
LoneWolf писал(а): И почему-то не получилось использовать один из серверов в качестве инженерной станции
а разве так можно вообще? сервера серверами, а инженерка должна быть отдельно, вроде как.
-
LoneWolf
- здесь недавно
- Сообщения: 11
- Зарегистрирован: 01 сен 2016, 07:42
- Имя: Клементьев Сергей Михайлович
- Страна: Россия
- город/регион: Стерлитамак
Резервированные серверы WinCC
Сообщение
LoneWolf » 07 фев 2017, 10:22
Доброго времени суток!
И снова те же грабли. Поставили серверы на объект, посему пришлось переустановить Windows. После этого ни в какую не получается наладить резервирование. На резервном сервере в выпадающем окне SIMATIC WinCC RT все значки красные. Что опять не так, не могу понять.
В PLC-Configure вижу только основной сервер, хотя настройки одинаковые, поэтому Station Configuration Editor прогружаю принудительно из файла XDB.
Посоветуйте что-нибудь!
-
quq
- здесь недавно
- Сообщения: 46
- Зарегистрирован: 08 сен 2014, 08:56
- Имя: Курочкин Петр Александрович
- Благодарил (а): 12 раз
- Поблагодарили: 6 раз
Резервированные серверы WinCC
Сообщение
quq » 08 фев 2017, 06:51
LoneWolf писал(а): Посоветуйте что-нибудь!
Просмотрите прооект в WinCC Explorer /Tools/Status …
Как переносили проект на сервера? Project Duplicator с основного на резервный?
-
LoneWolf
- здесь недавно
- Сообщения: 11
- Зарегистрирован: 01 сен 2016, 07:42
- Имя: Клементьев Сергей Михайлович
- Страна: Россия
- город/регион: Стерлитамак
Резервированные серверы WinCC
Сообщение
LoneWolf » 08 фев 2017, 07:27
Да, переносил дупликатором. В статусе на основном сервере всё нормально (только Status of Server Connections не открывается), на резервном Disconnected.
В сообщениях видно, что попытки подключения к резервному серверу есть, но нет ответа. Настроено всё вроде нормально.
Раньше было, что серверы видели друг друга, сейчас нет.
Ощущение, что резервный сервер не считает себя сервером.
-
quq
- здесь недавно
- Сообщения: 46
- Зарегистрирован: 08 сен 2014, 08:56
- Имя: Курочкин Петр Александрович
- Благодарил (а): 12 раз
- Поблагодарили: 6 раз
Резервированные серверы WinCC
Сообщение
quq » 09 фев 2017, 07:13
Status of Driver = Disconnected ? = нет соединения с PLC — проверяй в Set PG-PC Interface и канал связи.
При переустановке Имена серверов менял?
По именам пингуются?
Прописанные Имена в проекте соответствуют?
Когда запущены оба, из Simatic Shell друг друга видят?
Проверь в настройках резервирования имена, обнови встроенным поиском, проверь все галочки.
Проверь в проектах значение внутренних тегов @… в группах: Internal tags и Internal tagsRedundancy.
-
LoneWolf
- здесь недавно
- Сообщения: 11
- Зарегистрирован: 01 сен 2016, 07:42
- Имя: Клементьев Сергей Михайлович
- Страна: Россия
- город/регион: Стерлитамак
Резервированные серверы WinCC
Сообщение
LoneWolf » 09 фев 2017, 07:40
Вот, что на основном сервере:
Основной.bmp
А это на резервном:
Резервный.bmp
Что может быть не так? Что не настроено? Почему резервный сервер даже себя не видит? Кто-нибудь сталкивался?
У вас нет необходимых прав для просмотра вложений в этом сообщении.
-
Arist007
- здесь недавно
- Сообщения: 69
- Зарегистрирован: 06 окт 2015, 09:31
- Имя: Антонов Артём Викторочич
- Страна: Россия
- город/регион: Ленинградская область, порт Усть-Луга
- Благодарил (а): 5 раз
- Поблагодарили: 2 раза
Резервированные серверы WinCC
Сообщение
Arist007 » 04 мар 2017, 20:58
LoneWolf писал(а):В сообщениях видно, что попытки подключения к резервному серверу есть, но нет ответа. Настроено всё вроде нормально.
возможно бред, но все же:
1) пингуются ли серверы (как между собой, так и с инженеркой)? пинг обязательно должен проходить по имени сервера.
2) в настройках сетевой карты лучше убрать галку с IPv6 (у нас раз был такой косяк, не видели серверы друг друга, убрали галку, перезапустили и ву-а-ля)
и еще посмотри и проверь вот что:
а) Прогрузить конфигурацию с инженерной станции с Simatic Manager: PLC – Configure (Ctrl+K). В Station Configuration проверить все соединения – исправное состояние
б) Проверить физически корректность подсоединения патч-кордов (кабель до ПЛК, чтобы был подсоединен к сети PlantBus, а не, допустим, к TerminalBus).
При необходимости – перезагрузить сервер.
в) Открыть разделы Redundancy и Time Synchronization и убедиться в правильности сконфигурированных настроек (в разделе Redundancy правильная сетевая карта выбрана, через которую происходит резервирование серверов);
г) Прогрузить на сервер проект (PLC – Download Ctrl+L). Открыть проект (WinCC Runtime), и активировать его.
Прогрузка конфы заново еще никому не помешало.
Вернуться в «WinCC»
Перейти
- Работа форума
- База знаний (Knowledge Exchange)
- ↳ Eplan Electric P8
- ↳ Общий F.A.Q.
- ↳ Общие вопросы
- ↳ Новости
- ↳ Ошибки
- ↳ Проект
- ↳ Изделия
- ↳ Устройства
- ↳ Соединения
- ↳ Кабели
- ↳ Клеммы
- ↳ ПЛК
- ↳ Компоновка 2D
- ↳ Макросы
- ↳ Eplan API
- ↳ Сценарии (Только готовые решения)
- ↳ Внешняя обработка
- ↳ ProPanel
- ↳ Инструкции ProPanel (Только готовые решения)
- ↳ Прочие направления Eplan
- ↳ FieldSys (Топология)
- ↳ Preplanning
- ↳ Harness proD
- ↳ EEC One
- ↳ Advantech
- ↳ F.A.Q., Инструкции
- ↳ Allen Bradley
- ↳ Общие вопросы
- ↳ ПЛК
- ↳ Операторские панели
- ↳ B&R Automation
- ↳ F.A.Q.
- ↳ Danfoss
- ↳ DEIF A/S
- ↳ Общие вопросы
- ↳ UNI-LINE
- ↳ MULTI-LINE
- ↳ MULTI-LINE 300
- ↳ Emerson
- ↳ Общие вопросы
- ↳ КИП и регуляторы
- ↳ DeltaV
- ↳ ОВЕН
- ↳ Прософт-Системы
- ↳ Общие вопросы
- ↳ ПЛК REGUL
- ↳ Schneider Electric
- ↳ Общие вопросы
- ↳ ПЛК
- ↳ Панели оператора
- ↳ SCADA
- ↳ Электротехника
- ↳ Приводная техника
- ↳ SIEMENS
- ↳ Общие вопросы
- ↳ LOGO!
- ↳ ПЛК SIMATIC (S7-200, S7-1200, S7-300, S7-400, S7-1500, ET200)
- ↳ Simatic Step7
- ↳ Simatic TIA Portal
- ↳ Simatic PCS 7
- ↳ Операторские панели
- ↳ WinCC
- ↳ Приводная техника (Sinamics, Micromaster, Masterdrive, Simoreg, Simotics)
- ↳ SmartGen
- ↳ Общие вопросы
- ↳ Промышленные (береговые) контроллеры
- ↳ Морские контроллеры и устройства
- ↳ WEINTEK (операторские панели)
- ↳ F.A.Q., Инструкции
- ↳ Архив
- ↳ Микроконтроллеры и электроника
- ↳ Arduino
- ↳ Другие микроконтроллеры
- ↳ Электроника
- Общие вопросы АСУТП
- ↳ Общие вопросы
- ↳ Вопросы от студентов
- ↳ Литература
- ↳ Новости и отчётность
- ↳ Нормативы, ГОСТы, стандарты
- ↳ Информационная безопасность
- ↳ Проектирование и САПР
- ↳ Системная интеграция
- ↳ Разбор полетов
- ↳ Работа
- ↳ Заготовки для базы знаний
- ↳ Производство и технология
- ↳ MES — Системы автоматизации управления производством
- ↳ Метрология, КИП и датчики
- ↳ Исполнительные устройства, регуляторы
- ↳ Средний уровень автоматизации (управляющий)
- ↳ Алгоритмы
- ↳ Операторские панели
- ↳ Верхний уровень автоматизации (отображение)
- ↳ GE iFix
- ↳ Wonderware Intouch
- ↳ MasterScada
- ↳ SCADA+
- ↳ Alpha.Platform
- ↳ Интерфейсы, протоколы, связь
- ↳ Радиосвязь
- ↳ Полезное ПО
- ↳ Электротехника, энергетика и электропривод
- ↳ Генераторы и электростанции
- ↳ Теплотехника
- ↳ Подбор аналогов
- F.A.Q. (краткая выжимка из некоторых сообщений форума)
- ↳ Электротехника и электроэнергетика
- ↳ Документация
- ↳ Общие вопросы
- ↳ Оформление документации
- ↳ Нижний уровень автоматизации
- ↳ Средний уровень автоматизации
- ↳ Верхний уровень автоматизации
- ↳ Интерфейсы, протоколы, связь
- ↳ Функциональная и промышленная безопасность
- ↳ Электротехника и энергетика
- ↳ Автоматизация предприятия
- ↳ Описания средств автоматизации
- ↳ F.A.Q. по программируемым логическим контроллерам (PLC)
- ↳ Обсуждение F.A.Q. по PLC
- ↳ F.A.Q. по выбору PLC
- ↳ F.A.Q. по аппаратной части PLC
- ↳ F.A.Q. по языкам программирования
- ↳ F.A.Q. по структуре программ
- ↳ F.A.Q. по взаимодействию PLC с HMI
- О жизни
- ↳ Для дома, для семьи
- ↳ Комната смеха
- ↳ Электродвижение
Siemens Simatic Курс Работа с пакетом PCS 7 — файл n516.doc
приобрести
Siemens Simatic Курс Работа с пакетом PCS 7
скачать (23823.3 kb.)
Доступные файлы (529):
| n1.s7l | |||
| n2.s7s | |||
| n3.res | |||
| n4.res | |||
| n5.lnk | |||
| n6.res | |||
| n7.res | |||
| n8.dbf | |||
| n9.mdx | |||
| n10.dbf | |||
| n11.mdx | |||
| n12.lnk | |||
| n13.dbf | |||
| n14.dbt | |||
| n15.id | |||
| n16.lck | |||
| n17.mdx | |||
| n18.lnk | |||
| n19.dbf | |||
| n20.dbt | |||
| n21.dbf | |||
| n22.id | |||
| n23.lck | |||
| n24.mdx | |||
| n25.dbf | |||
| n26.id | |||
| n27.lck | |||
| n28.mdx | |||
| n29.lnk | |||
| n30.scl | |||
| n31.scl | |||
| n32.scl | |||
| n33.dbf | |||
| n34.mdx | |||
| n35.dbf | |||
| n36.lck | |||
| n37.src | |||
| n38.dbf | |||
| n39.mdx | |||
| n40.lck | |||
| n41.dbf | |||
| n42.mdx | |||
| n43.dbf | |||
| n44.mdx | |||
| n45.dbf | |||
| n46. | |||
| n47. | |||
| n48.dat | |||
| n49.dat | |||
| n50.dat | |||
| n51.dat | |||
| n52.dbf | |||
| n53.lck | |||
| n54.pro | |||
| n55.dbf | |||
| n56.mdx | |||
| CROSS_CO.S7P | |||
| CROSS_CO.S7S | |||
| n59.npa | |||
| n60.dbf | |||
| n61.dbt | |||
| n62.mdx | |||
| n63.dbf | |||
| n64.mdx | |||
| n65.dbf | |||
| n66.dbt | |||
| n67.mdx | |||
| n68.dbf | |||
| n69. | |||
| n70.dbf | |||
| n71.mdx | |||
| n72.dbf | |||
| n73.mdx | |||
| n74.dbf | |||
| n75.dbt | |||
| n76.mdx | |||
| n77.dbf | |||
| n78.mdx | |||
| n79.dbf | |||
| n80.dbt | |||
| n81.mdx | |||
| n82.dbf | |||
| n83. | |||
| n84.dbf | |||
| n85.mdx | |||
| n86.dbf | |||
| n87.mdx | |||
| n88.dbf | |||
| n89.dbt | |||
| n90.mdx | |||
| n91.dbf | |||
| n92.mdx | |||
| n93.dbf | |||
| n94.dbt | |||
| n95.mdx | |||
| n96.dbf | |||
| n97. | |||
| n98.dbf | |||
| n99.mdx | |||
| n100.dbf | |||
| n101.mdx | |||
| n102.dbf | |||
| n103.dbt | |||
| n104.mdx | |||
| n105.dbf | |||
| n106.mdx | |||
| n107.dbf | |||
| n108.dbt | |||
| n109.mdx | |||
| n110.dbf | |||
| n111. | |||
| n112.dbf | |||
| n113.mdx | |||
| n114.dbf | |||
| n115.mdx | |||
| n116.dbf | |||
| n117.dbt | |||
| n118.mdx | |||
| n119.dbf | |||
| n120.mdx | |||
| n121.dbf | |||
| n122.dbt | |||
| n123.mdx | |||
| n124.dbf | |||
| n125. | |||
| n126.dbf | |||
| n127.mdx | |||
| n128.dbf | |||
| n129.mdx | |||
| n130.dbf | |||
| n131.dbt | |||
| n132.mdx | |||
| n133.dbf | |||
| n134.mdx | |||
| n135.dbf | |||
| n136.dbt | |||
| n137.mdx | |||
| n138.dbf | |||
| n139. | |||
| n140.dbf | |||
| n141.mdx | |||
| n142.dbf | |||
| n143.mdx | |||
| n144.dbf | |||
| n145.dbt | |||
| n146.mdx | |||
| n147.dbf | |||
| n148.mdx | |||
| n149.dbf | |||
| n150.dbt | |||
| n151.mdx | |||
| n152.dbf | |||
| n153. | |||
| n154.dbf | |||
| n155.mdx | |||
| n156.dbf | |||
| n157.mdx | |||
| n158.dbf | |||
| n159.dbt | |||
| n160.mdx | |||
| n161.dbf | |||
| n162.mdx | |||
| n163.dbf | |||
| n164.dbt | |||
| n165.mdx | |||
| n166.dbf | |||
| n167. | |||
| n168.dbf | |||
| n169.mdx | |||
| n170.dbf | |||
| n171.mdx | |||
| n172.dbf | |||
| n173.dbt | |||
| n174.mdx | |||
| n175.dbf | |||
| n176.mdx | |||
| n177.dbf | |||
| n178.dbt | |||
| n179.mdx | |||
| n180.dbf | |||
| n181. | |||
| n182.dbf | |||
| n183.mdx | |||
| n184.dbf | |||
| n185.mdx | |||
| n186.dbf | |||
| n187.dbt | |||
| n188.mdx | |||
| n189.dbf | |||
| n190.mdx | |||
| n191.dbf | |||
| n192.dbt | |||
| n193.mdx | |||
| n194.dbf | |||
| n195. | |||
| n196.dbf | |||
| n197.mdx | |||
| n198.dbf | |||
| n199.mdx | |||
| n200.dbf | |||
| n201.dbt | |||
| n202.mdx | |||
| n203.dbf | |||
| n204.mdx | |||
| n205.dbf | |||
| n206.dbt | |||
| n207.mdx | |||
| n208.dbf | |||
| n209. | |||
| n210.dbf | |||
| n211.mdx | |||
| n212.dbf | |||
| n213.mdx | |||
| n214.dbf | |||
| n215.dbt | |||
| n216.mdx | |||
| n217.dbf | |||
| n218.mdx | |||
| n219.dbf | |||
| n220.dbt | |||
| n221.mdx | |||
| n222.dbf | |||
| n223. | |||
| n224.dbf | |||
| n225.mdx | |||
| n226.dbf | |||
| n227.mdx | |||
| n228.s7h | |||
| n229.s7h | |||
| n230.s7h | |||
| n231.s7h | |||
| n232.dbf | |||
| n233.dbt | |||
| n234.mdx | |||
| n235.dbf | |||
| n236.dbt | |||
| n237.mdx | |||
| n238.dbf | |||
| n239.mdx | |||
| n240.dbf | |||
| n241.dbt | |||
| n242.mdx | |||
| n243.dbf | |||
| n244. | |||
| n245.dbf | |||
| n246.mdx | |||
| n247.dbf | |||
| n248.mdx | |||
| n249.dbf | |||
| n250.dbt | |||
| n251.mdx | |||
| n252.dbf | |||
| n253.mdx | |||
| n254.dbf | |||
| n255.dbt | |||
| n256.mdx | |||
| n257.dbf | |||
| n258. | |||
| n259.dbf | |||
| n260.mdx | |||
| n261.dbf | |||
| n262.mdx | |||
| n263.dbf | |||
| n264.mdx | |||
| n265.res | |||
| n266.res | |||
| n267.res | |||
| n268.lnk | |||
| n269.res | |||
| n270.res | |||
| n271.res | |||
| n272.dbf | |||
| n273.mdx | |||
| n274.dbf | |||
| n275.mdx | |||
| n276.lnk | |||
| n277.dbf | |||
| n278.dbt | |||
| n279.id | |||
| n280.lck | |||
| n281.mdx | |||
| n282.lnk | |||
| n283.dbf | |||
| n284.dbt | |||
| n285.ini | |||
| n286.dbf | |||
| n287.dbt | |||
| n288.id | |||
| n289.lck | |||
| n290.mdx | |||
| n291.lnk | |||
| n292.dbf | |||
| n293.dbt | |||
| n294.ini | |||
| n295.dbf | |||
| n296.dbt | |||
| n297.id | |||
| n298.lck | |||
| n299.mdx | |||
| n300.lnk | |||
| n301.dbf | |||
| n302.dbt | |||
| n303.ini | |||
| n304.dbf | |||
| n305.dbt | |||
| n306.id | |||
| n307.lck | |||
| n308.mdx | |||
| n309.lnk | |||
| n310.dbf | |||
| n311.dbt | |||
| n312.ini | |||
| n313.dbf | |||
| n314.dbt | |||
| n315.id | |||
| n316.lck | |||
| n317.mdx | |||
| n318.lnk | |||
| n319.dbf | |||
| n320.dbt | |||
| n321.ini | |||
| n322.dbf | |||
| n323.dbt | |||
| n324.id | |||
| n325.lck | |||
| n326.mdx | |||
| n327.lnk | |||
| n328.dbf | |||
| n329.dbt | |||
| n330.ini | |||
| n331.dbf | |||
| n332.dbt | |||
| n333.id | |||
| n334.lck | |||
| n335.mdx | |||
| n336.lnk | |||
| n337.dbf | |||
| n338.dbt | |||
| n339.ini | |||
| n340.dbf | |||
| n341.id | |||
| n342.lck | |||
| n343.mdx | |||
| n344.dbf | |||
| n345.id | |||
| n346.lck | |||
| n347.mdx | |||
| n348.lnk | |||
| n349.res | |||
| n350. | |||
| n351.dbf | |||
| n352.dbf | |||
| n353.dbt | |||
| n354.mdx | |||
| n355.res | |||
| n356. | |||
| n357.dbf | |||
| n358.dbf | |||
| n359.mdx | |||
| n360.awl | |||
| n361.dbf | |||
| n362.mdx | |||
| n363.dbf | |||
| n364.lck | |||
| n365.awl | |||
| n366.dbf | |||
| n367.mdx | |||
| n368.dbf | |||
| n369.lck | |||
| n370.awl | |||
| n371.dbf | |||
| n372.mdx | |||
| n373.dbf | |||
| n374.lck | |||
| n375.dbf | |||
| n376.mdx | |||
| n377.dbf | |||
| n378.lck | |||
| n379.src | |||
| n380.dbf | |||
| n381.mdx | |||
| n382.lck | |||
| n383.npa | |||
| n384.id | |||
| n385.lnk | |||
| n386.tab | |||
| n387.tab | |||
| n388.dbf | |||
| n389.mdx | |||
| n390. | |||
| n391.dbf | |||
| n392.mdx | |||
| n393. | |||
| n394. | |||
| n395. | |||
| n396.pg | |||
| n397.pg | |||
| n398.pg | |||
| n399.pg | |||
| n400.pg | |||
| n401.pg | |||
| n402.pg | |||
| n403.dbf | |||
| n404.dbf | |||
| n405.mdx | |||
| n406.pg | |||
| n407.pg | |||
| n408.pg | |||
| n409.pg | |||
| n410.pg | |||
| n411.pg | |||
| n412.pg | |||
| n413.pg | |||
| n414.pg | |||
| n415.pg | |||
| n416.pg | |||
| n417.pg | |||
| n418.pg | |||
| n419.pg | |||
| n420.dbf | |||
| n421.dbf | |||
| n422.mdx | |||
| n423.pg | |||
| n424.pg | |||
| n425.pg | |||
| n426.pg | |||
| n427.pg | |||
| n428.pg | |||
| n429.pg | |||
| n430.pg | |||
| n431.pg | |||
| n432.pg | |||
| n433.pg | |||
| n434.pg | |||
| n435.pg | |||
| n436.dbf | |||
| n437.dbf | |||
| n438.mdx | |||
| n439.pg | |||
| n440.pg | |||
| n441.pg | |||
| n442.pg | |||
| n443.pg | |||
| n444.pg | |||
| n445.pg | |||
| n446.pg | |||
| n447.pg | |||
| n448.pg | |||
| n449.pg | |||
| n450.pg | |||
| n451.dbf | |||
| n452.dbf | |||
| n453.mdx | |||
| n454.dbf | |||
| n455.mdx | |||
| n456.id | |||
| n457.lck | |||
| n458.lck | |||
| n459.lck | |||
| n460.lck | |||
| n461.dbf | |||
| n462.mdx | |||
| n463.lck | |||
| n464.ubs | |||
| n465.dbf | |||
| n466.mdx | |||
| n467.uct | |||
| n468.lck | |||
| n469.dbf | |||
| n470.dbf | |||
| n471.dbf | |||
| n472.dbf | |||
| n473.dbf | |||
| n474.dbf | |||
| n475.dbf | |||
| n476.dbf | |||
| n477.dbf | |||
| n478.dbf | |||
| n479.mdx | |||
| n480.dbf | |||
| n481.mdx | |||
| n482.dbf | |||
| n483.mdx | |||
| n484.dbf | |||
| n485.mdx | |||
| n486.dbf | |||
| n487.mdx | |||
| n488.dbf | |||
| n489.mdx | |||
| n490.dbf | |||
| n491.dbt | |||
| n492.mdx | |||
| n493.dbf | |||
| n494.dbt | |||
| n495.mdx | |||
| n496.dbf | |||
| n497.dbt | |||
| n498.mdx | |||
| n499.dbf | |||
| n500.mdx | |||
| n501.uxt | |||
| n502.lck | |||
| n503.dbf | |||
| n504.mdx | |||
| n505.dbf | |||
| n506.mdx | |||
| n507.dbf | |||
| n508.mdx | |||
| n509.dbf | |||
| n510.mdx | |||
| n511.dbf | |||
| n512.mdx | |||
| n513.dbf | |||
| n514.doc | 1697kb. | 15.11.2010 23:39 | скачать |
| n515.doc | 592kb. | 15.11.2010 23:39 | скачать |
| n516.doc | 793kb. | 15.11.2010 23:37 | скачать |
| n517.doc | 133kb. | 15.11.2010 23:35 | скачать |
| n518.doc | 1113kb. | 15.11.2010 23:38 | скачать |
| n519.doc | 2380kb. | 15.11.2010 23:38 | скачать |
| n520.doc | 1188kb. | 15.11.2010 23:39 | скачать |
| n521.doc | 856kb. | 15.11.2010 23:36 | скачать |
| n522.doc | 376kb. | 15.11.2010 23:36 | скачать |
| n523.doc | 649kb. | 15.11.2010 23:39 | скачать |
| n524.doc | 1397kb. | 15.11.2010 23:39 | скачать |
| n525.doc | 1956kb. | 15.11.2010 23:39 | скачать |
| n526.doc | 74kb. | 15.11.2010 23:37 | скачать |
| PCS7_PoT.chm | |||
| n528.pdl | |||
| Reactor_NEW.Pdl |
n516.doc
Глава 11:
Резервирование OS и
мультиклиенты
Содержание
Глава 11 Резервирование OS и мультиклиенты 3
1.Резервирование OS 3
1.1Резервирование OS в WinCC 3
1.2Запуск OS-сервера 4
1.3Сценарии отказов 5
1.3.1Сервер не исполняет программы 5
1.3.2Ошибка соединения (connection error) со смежным сервером 6
1.3.3Ошибка сетевого соединения клиента 6
1.3.4Ошибка процессного соединения 6
1.4Конфигурирование резервированных OS-серверов 7
1.5Дубликаты (Duplication) проекта 8
2.Мультиклиент 9
2.1Мультиклиентная архитектура 9
2.2Переключение мультиклиентов и постоянная работоспособность 10
2.3Конфигурирование мультиклиента 11
2.3.1Создание пакетов на сервере 11
2.3.2Создание мультиклиентных проектов 12
2.3.3Исполнение Мастера разделения экрана 12
2.3.4Загрузка серверного пакета 12
2.4Навигация мультиклиента по рисункам 13
2.5Некоторые замечания по мультиклиенту 14
2.5.1Тренды на мультиклиенте 14
2.5.2Элемент управления – сигнализатор (Alarm control) на мультиклиенте 15
2.5.3Администрирование пользователей 15
3.Загрузка проекта 16
3.1Вставка и конфигурирование PC-станций (PC stations) 16
3.2Свойства PC-станций и пути проекта 19
3.3Загрузка проектов на PC-станции 20
Упражнение 22
Упражнение 11.1 Конфигурирование резервированных OS-серверов и мультиклиентов 22
1.Задача 22
2.Указания 22
-
Резервирование OS
Два OS-сервера, соединенные друг с другом и работающие параллельно, формируют пару резервированных серверов. Резервирование OS означает, что резервированные серверы следят друг за другом, синхронизируют проектные архивы, если есть несогласованность, и осуществляют переключение клиентов при сбое на одном из серверов. Резервирование осуществляется на уровне OS.
В части инсталляции программного обеспечения, OS-проекта и элементов физического соединения два сервера являются идентичными. Обратитесь к рисунку 11.1.

Резервированные OS-серверы
OS-клиент
OS-клиент
OS-клиент
Терминальная шина
Системная шина
Рисунок 11.1 Резервированные серверы
-
Резервирование OS в WinCC
WinCC Redundancy (Резервирование WinCC) относится к неосновным пакетам системы программного обеспечения PCS 7. После инсталляции авторизации опции резервирования вы можете конфигурировать функции резервирования с помощью редактора резервирования (Redundancy editor). См. рисунок 11.2.
Рисунок 11.2 Программа WinCC Redundancy (Резервирование WinCC)
-
Запуск OS-сервера
Во время запуска сервера программа резервирования определяет, активизирован ли смежный сервер (partner server) SV1.2 (см. рисунок 11.1). Если это так, SV1.1 примет статус ведомого (slave) сервера. Если смежный сервер SV1.2 не был активирован, SV1.1 будет работать в качестве ведущего или главного (master) сервера.
Вы можете установить, какой сервер будет активизирован в качестве ведущего или ведомого по умолчанию путем отметки флажка «Default Master» («Ведущий по умолчанию»), как показано на рисунке 11.2.
OS-клиенты, для которых не был определен основной сервер, присоединятся к ведущему, т.е. (после запуска) к серверу, чей флажок «Default Master» («Ведущий по умолчанию») отмечен.
Во время исполнения резервированный ведущий должен быть распознан тегами резервирования «@RM_MASTER» или «@RM_MASTER_NAME», которые расположены в Управлении тегами (Tag Management) под «Internal Tags» («Внутренние теги») в группе тегов «Redundancy» («Резервирование»). Обратитесь к рисунку 11.3.
Рисунок 11.3 Теги резервирования (Redundancy tags)
Резервированный компьютер, на котором тег «@RM_MASTER» установлен в «1», является ведущим. Имя компьютера, соответствующее резервированному мастеру, записано в тег «@RM_MASTER_NAME».
Если состояние тега «@RM_MASTER» изменяется, например, из-за сбоя в компьютере, мультиклиенты переключатся на упомянутый ведомый компьютер, который теперь становится ведущим. Мультиклиенты с основным сервером (постоянное использование) игнорируют идентификацию ведущий/ведомый тега резервирования «@RM_MASTER».
Примечание
Убедитесь, что один из двух резервированных серверов определен в качестве «Default Master» («Ведущий по умолчанию»). Флажок не должен быть активирован на обоих компьютерах. Иначе могут возникнуть проблемы при резервированном переключении мультиклиентов.
-
Сценарии отказов
-
Сервер не исполняет программы
Сценарий начинает исполняться, когда проект, например, был деактивирован на SV1.2. Будут активированы следующие действия:
- SV1.1 сохраняет время сбоя (день и время) SV1.2.
- SV1.1 сообщит о сбое SV1.2 посредством системного сообщения.
- Если SV1.1 был ведомым (slave), он станет ведущим (master) путем установки тега «@RM_MASTER». Тег «@RM_MASTER_NAME» изменяется соответственно.
- Если SV1.2 восстановлен, он станет ведомым, тег «@RM_MASTER» будет сброшен. Теги «@RM_MASTER_NAME» изменяются соответственно.
SV1.2 возвращается к работе с образовавшимся пробелом в его архивах. Этот пробел будет заполнен с помощью следующих действий:
- SV1.1 сохраняет время возврата (день и время) SV1.2.
- SV1.1 сообщит о возврате SV1.2 посредством системного сообщения.
- Пробелы в архиве сообщений, архиве данных процесса и пользовательских архивах SV1.2 заполнятся данными архивов SV1.1.
- На обоих серверах теги «@RM_MASTER» остаются неизменными, т.е. тег «@RM_MASTER» SV1.1 остается установленным, а тег «@RM_MASTER» SV1.2 – сброшенным.
-
Ошибка соединения (connection error) со смежным сервером
По этому сценарию оба сервера работают без ошибок, кроме ошибки соединения между двумя РС.
Будут активированы следующие действия:
- Оба сервера записывают время сбоя (день и время).
- Оба сервера сообщат о сбое посредством системного сообщения.
В отсутствие соединения онлайновая синхронизация регистрации предупреждений и пользовательских архивов не производится. Если соединение будет восстановлено, это будет исправлено следующими средствами:
- Оба сервера записывают время возврата (день и время).
- Оба сервера сообщат о возврате посредством системного сообщения.
- Изменения, произведенные в регистрации предупреждений и пользовательских архивах в отсутствие соединения, будут переданы от одного сервера другому.
- Архив процессных данных регистрации тегов не будет синхронизирован, потому что в период сбоя архивирование всех данных продолжается на обоих компьютерах.
-
Ошибка сетевого соединения клиента
Этот сценарий срабатывает, например, между SV1.2 и его клиентом «CL5». Активируются следующие действия:
- Клиент «CL5» будет автоматически переключен с неисправного SV1.2 на работающий SV1.1.
После устранения неисправности сети будут произведены следующие действия:
- Программа резервирования не переключит автоматически клиента «CL5» обратно на SV1.2. Если пользователь хочет переключить клиента «CL5» обратно на SV1.2, это инициируется установкой «@RM_MASTER» на SV1.2.
-
Ошибка процессного соединения
По этому сценарию ошибка процессного соединения возникает, например, на SV1.2, что вызвано прерванным сетевым соединением с контроллерами PLC.
Если прервано соединение только с
одним
сервером, ошибка соединения PLC распознается как сбой только программой резервирования. Если произошло нарушение соединения PLC с
обоими
серверами (вызванное, например, сбоем PLC), то это не распознается программой резервирования как сбой.
Будут произведены следующие действия:
- Об ошибке процессного соединения сообщается серверу 2.
- SV1.1 получает сообщение о сбое смежного сервера SV1.2.
- SV1.1 сохраняет время сбоя (день и время) SV1.2.
Примечание
На обоих серверах теги «@RM_MASTER» и «@RM_MASTER_NAME» остаются неизменными..
Если мониторинг процессного соединения (оперативный мониторинг) активирован, пробел в архиве SV1.2 будет заполнен следующим образом:
- SV1.1 сохраняет время возврата (день и время) SV1.2.
- Пробел в архиве SV1.2 будет заполнен данными из архива SV1.1. Данные всех PLC будут синхронизированы. Это значит, что данные нормально работающих PLC также будут синхронизированы.
- На обоих серверах теги «@RM_MASTER» и «@RM_MASTER_NAME» остаются неизменными.
- Автоматического переключения клиентов не происходит.
- О восстановлении процессного соединения на SV1.2 будет сообщено посредством системного сообщения.
-
Конфигурирование резервированных OS-серверов
Теги (tags) и/или предупреждения (alarms), которые должны синхронизироваться, устанавливаются в диалоге конфигурирования резервирования (Redundancy). Активирование функции резервирования также производится в диалоге. Обратитесь к рисунку 11.4.
Путь к смежн. серверу
сообщения оператора и сообщения с зарезервированными номерами (1.015.000 1.015.999)
если мониторинг процессного соединения активизирован
Рисунок 11.4 Конфигурирование функций резервирования
-
Дубликаты (Duplication) проекта
Оба сервера должны содержать функционально идентичные проекты. По завершению OS-проектирования и конфигурирования дубликатор проектов позволяет вам скопировать все данные Проекта на резервированный смежный сервер.
Дубликатор проектов (Project Duplicator) не только копирует все проектные данные (экраны, скрипты, архивы и т.д.), но также производит все необходимые установки на целевом компьютере, который после этого готов к резервированию.
Утилита «Дубликатор проектов» находится по следующему пути меню: (Windows) Start > SIMATIC > WinCC > Tools > Project Duplicator. Далее вы можете определить проект-источник и цель (назначение) для сохранения проекта, как это проиллюстрировано на рисунке 11.5.
Функция «Save As» («Сохранить как») диалога позволяет вам сделать копию проекта под другим именем.
Рисунок 11.5 Дубликатор проектов (Project duplicator)
Примечание
Необязательно использовать Дубликатор проектов, т.к. можно задействовать функцию загрузки проектов (Project Download) и загрузить OS-проект в целевой OS-компьютер. Функция загрузки проектов рассматривается далее в этой главе.
-
Мультиклиент
-
Мультиклиентная архитектура
Максимум 16 мультиклиентов могут получить доступ к одному серверу. Один мультиклиент может иметь доступ к 6 серверам. Таким образом, мультиклиент может наблюдать обработку данных 6 серверов. Мультиклиентная архитектура показана на рисунке 11.6.

Мультиклиентная архитектура систем PCS 7
16 клиентов
Терминальная шина
6 серверов (также резервированные)
Системная шина
AS (также резервированные)
Рисунок 11.6 Мультиклиентная архитектура
-
Переключение мультиклиентов и постоянная работоспособность
Как было сказано в разделе 3.1, мультиклиенты соединятся с преобладающим главным сервером. Если SV1.1 неисправен, преобладающим главным сервером становится SV1.2, и все мультиклиенты SV1.1 переключаются на SV1.2. В момент переключения может возникнуть серьезная проблема, когда с серверами не соединен ни один мультиклиент. Предприятие, не оперируемое одним сервером (SV1.2) все еще работает. Эта проблема вызвана тем, что все мультиклиенты парных серверов переключаются вместе.
Для достижения постоянной работоспособности вводится концепция предпочтительного сервера (preferred server). Согласно ей с парой серверов соединены два мультиклиента. См. таблицу 11.1.
Таблица 11.1
Распределение мультиклиентов
| Мультиклиент | Резервированный сервер | Предпочтительный сервер | |
| МС_1 | SV1.1 | SV1.2 | SV1.1 |
| МС_2 | SV1.1 | SV1.2 | SV1.2 |
МС_1 определил SV1.1 как предпочтительный сервер, а МС_2 – SV1.2. Установка предпочтительного сервера производится в диалоге данных сервера (Server Data) на мультиклиенте, как показано на рисунке 11.7.
правый клик
Рисунок 11.7 Установка предпочтительного сервера (Preferred Server)
На SV1.1 возникла ошибка, и МС_1 подключается к SV1.2. МС_1 будет недоступен на SV1.2 в период переключения. Система по-прежнему работает с (из) МС_2.
SV1.1 снова доступен. МС_1 переключается обратно на восстановленный SV1.1, т.к. SV1.1 является его предпочтительным сервером. МС_1 будет недоступен на SV1.1 в период переключения. Операционным остается МС_2.
Распределение двух мультиклиентов с различными предпочтительными серверами из числа резервированных серверов распруделяет загрузку для улучшения производительности всей системы.
-
Конфигурирование мультиклиента
-
Создание пакетов на сервере
Шаги по созданию пакета сервера (server package) проиллюстрированы на рисунке 11.8. Пакет включает в себя все необходимые связи (рисунки, скрипты, адреса и т.д.), которые нужны мультиклиенту для визуализации и управления предприятием.
Рисунок 11.8 Создание серверного пакета
После создания серверного пакета он располагается по следующему пути. Путь вам понадобится при загрузке пакета в мультиклиент.
(PCS_7_Project_Name)/Wincproj/(OS_Server_name)/Packages
-
Создание мультиклиентных проектов
Есть два способа создания мультиклиентных проектов. Можно создать такой проект в SIMATIC-менеджере, сконфигурировать его с помощью WinCC-проектирования, затем скопировать его на компьютер, который во время исполнения будет клиентской машиной.
Также можно создать мультиклиентный проект непосредственно в WinCC Explorer на клиенте. См. рисунок 11.9.
Создание мультиклиентного проекта в PCS7
Создание мультиклиентного проекта в WinCC
Рисунок 11.9 Создание мультиклиентных проектов
-
Исполнение Мастера разделения экрана
После создания мультиклиентного проекта запустите Мастер разделения экрана (Split Screen Wizard).
-
Загрузка серверного пакета
Чтобы во время исполнения мультиклиентный проект получил доступ к соответствующим данным сервера, используются пакеты. Они содержат символьные имена относящихся к пакету данных, таких как картинки, теги, сообщения и архивы. Пакет должны генерироваться на серверах и загружаться в мультиклиентов. Генерирование и загрузка могут осуществляться также во время исполнения.
Чтобы загрузить пакеты сервера для мультиклиента, следуйте рисунку 11.10.
правый клик
Полный путь: (Project_Name)/Wincproj/
(Computer_name)/Packages
Рисунок 11.10 Загрузка пакетов для проекта мультиклиента
Чтобы соединить мультиклиента с несколькими серверами, требуется загрузить пакеты, сгенерированные каждым сервером. После загрузки пакетов мультиклиент может быть активирован.
Если изменяются конфигурационные данные, то пакеты вновь генерируются. Обновляет пакеты для мультиклиента функция «Update» («Обновить»).
-
Навигация мультиклиента по рисункам
В системах PCS 7 иерархия рисунков каждого сервера мультиклиенту известна. Таким образом, навигация по рисункам на мультиклиенте использует иерархические деревья рисунков ассоциированных серверов. При выборе одного из серверов в область просмотра мультиклиента загружается обзор выбранного сервера, так что данные сервера могут обрабатываться из мультиклиента. Обратитесь к рисунку 11.11, где области обзора сервера OS_XJ загружены в области обзора мультиклиента.
Рисунок 11.11 Просмотр сервера мультиклиентом
Вы можете создать дополнительные картинки на мультиклиенте. Полезными могут быть следующие изображения в просмотре мультиклиента:
- Рисунки, содержащие графические объекты разных серверов;
- Окна Active X тренда могут содержать кривые разных серверов;
- Окна Active X предупреждений могут содержать сообщения разных серверов;
- Поля ввода/вывода (I/O fields) могут содержать переменные разных серверов.
Эти дополнительные рисунки при конфигурировании на мультиклиенте не организованы в иерархические уровни и должны вызываться во время исполнения индивидуально по именам.
16 стандартных кнопок областей просмотра PCS 7 становятся 12 кнопками при использовании просмотра серверов мультиклиентов. 6 правых кнопок зарезервированы для присоединенных серверов.
-
Некоторые замечания по мультиклиенту
-
Тренды на мультиклиенте
Если группы трендов сконфигурированы на мультиклиенте, есть два способа сохранения этих трендовых групп.
Если на мультиклиенте стандартный сервер сконфигурирован для SSM (Split Screen Manager – Мастер разделения экрана) посредством диалога «Standard Server» («Стандартный сервер»), конфигурационные данные настроенных групп трендов автоматически сохраняются на этом стандартном сервере и его смежном сервере. Другие мультиклиенты также могут определить этот сервер как стандартный для Мастера разделения экрана. Таким образом, сконфигурированные трендовые группы будут доступны и для них.
Если на мультиклиенте не было сконфигурировано стандартных серверов для Мастера разделения экрана, сконфигурированные группы трендов будут сохраняться локально на мультиклиенте. Другие мультиклиенты не могут отображать эти группы трендов. Присоединенный сервер также не может использовать эти трендовые группы.
На рисунке 11.12 показано конфигурирование стандартного сервера.
Определение стандартного сервера
Рисунок 11.12 Определение стандартного сервера (Standard server)
-
Элемент управления – сигнализатор (Alarm control) на мультиклиенте
Мультиклиент не имеет собственной системы регистрации предупреждений (Alarm Logging). Даже запуск Мастера регистрации предупреждений (Alarm Logging Wizard) не позволить создать ни одного класса сообщений (Error, Warning и т.д.).
Если вы хотите создать дополнительные окна элемента управления – сигнализатора, вам следует определить сервер как мультиклиентный стандартный сервер (Standard server) для предупреждений (Alarms). К примеру, на рисунке 11.12 видно, что можно выбрать стандартный сервер для компонента «Alarms».
-
Администрирование пользователей
Регистрация пользователей (User logins) должна быть снова воссоздана на мультиклиентах. Пользователи, определенные на серверах, в пакеты не включены. Если объекту на картинке сервера назначен определенный уровень доступа, в то время как уровень не связан на мультиклиенте, объект не будет доступен из мультиклиента.
-
Загрузка проекта
Станции WinCC, резервированные серверы и мультиклиентные станции могут быть созданы в SIMATIC-менеджере, а данные проекта загружены в целевой компьютер OS. Поэтому компьютеры исполнения OS могут централизованно конфигурироваться и обновляться на инженерной станции по сети.
Для использования загрузки проекта существует строгая последовательность шагов по конфигурированию. Следующий пример демонстрирует конфигурирование двух резервированных серверов.
-
Вставка и конфигурирование PC-станций (PC stations)
Вставка PC-станций проиллюстрирована на рисунке 11.13.
Дважды щелкните на Configuration (Конфигурирование)
Рисунок 11.13 Вставка PC-станций (PC stations)
После добавления PC-станции вставьте WinCC Application (WinCC-приложение) и карту коммуникации (communication card) (например, CP1613) с помощью двойного щелчка на Configuration (Конфигурирование). Тип WinCC-приложения определит PC-станцию в качестве станции-сервера (server station) или станции -резервированного сервера, находящегося в режиме готовности (standby redundant server station). Обратитесь к рисунку 11.14.
Настройка сети
Чтобы открыть NetPro
Рисунок 11.14 Конфигурирование PC-станций (PC stations)
Существует различие между WinCC Application (WinCC-приложение), WinCC Application (stby) (WinCC-приложение в режиме готовности) и WinCC Application MC (WinCC-приложение MC). WinCC-приложение используется для OS-сервера, WinCC-приложение в режиме готовности – для резервированного сервера, находящегося в режиме готовности, а WinCC-приложение MC – для мультиклиента.
Для конфигурирования резервированной OS вам следует воспользоваться WinCC-приложением в режиме готовности для PC-станции.
Чтобы назначить PC-станции сетевой адрес, дважды щелкните на карте СР1613 и в открывшемся окне свойств (Properties) карты установите адрес. См. рисунок 11.15.
Адреса всех вовлеченных в проект станций вы можете сконфигурировать и задокументировать в интерфейсе NETPRO, как показано на рисунке 11.16. Чтобы открыть интерфейс NETPRO, найдите функцию меню «Configure Network» («Настройка сети») в SIMATIC-менеджере или HW Config. Или же можно воспользоваться иконкой, показанной на рисунке 11.14.
Рисунок 11.15 Адресация CP1613
(Промышленный Ethernet)
Интерфейс
Тип: промышленный Ethernet
Адрес: …


Рисунок 11.16 Станции на системной шине
-
Свойства PC-станций и пути проекта
Чтобы открыть диалог свойств (Properties) OS-проекта, следуйте рисунку 11.17.
Рисунок 11.17 Открытие диалога свойств OS-проекта
В диалоге свойств введите путь к WinCC-серверу, как показано на рисунке 11.18.
Рисунок 11.18 Определение пути к целевому компьютера OS-сервера
В диалоге «Standby-OS Properties» («Свойства OS, находящейся в режиме готовности») должен быть определен сетевой путь к WinCC-Standby-Server (WinCC-серверу в режиме готовности). Автоматически регистрируется назначение этого Standby-сервера Master OS (главной OS). См. рисунок 11.19.
Рисунок 11.19 Определение пути к целевому Standby-компьютеру OS
-
Загрузка проектов на PC-станции
Для загрузки WinCC-проекта на сервер и резервированный standby-сервер проделайте следующие процедуры и обратитесь к рисунку 11.20:
- Деактивируйте систему исполнения (Runtime) и закройте WinCC на сервере.
- Подсветите (отметьте) WinCC-проект в SIMATIC-менеджере и выберите Download (Загрузка) ниже PLC. Проект будет скопирован на компьютер сервера, а также будут скопированы все необходимые установки.
- Теперь активируйте проект на компьютере сервера.
- Деактивируйте систему исполнения (Runtime) и закройте WinCC на standby-сервере.
- Подсветите (отметьте) WinCC-проект (stby) в SIMATIC-менеджере и выберите Download (Загрузка) ниже PLC.
- Теперь активируйте проект на компьютере standby-сервера.

Рисунок 11.20 Загрузка OS-проектов
Упражнение
Упражнение 11.1 Конфигурирование резервированных OS-серверов и мультиклиентов
-
Задача
Отметьте две станции PCS 7 как OS-серверы и сконфигурируйте их как резервированные серверы. Выберите две станции PCS 7 и сконфигурируйте их как мультиклиенты.
- Протестируйте на вашей системе сценарии сбоев серверов, описанные в разделе 1.3. Наблюдайте за сообщениями и переключением.
- Мультиклиенты должны быть сконфигурированы с предпочтительным сервером. Протестируйте постоянную работоспособность.
- Сконфигурируйте дисплей тренда на мультиклиенте. Можете ли вы отобразить группу трендов на другом мультиклиенте? Сделайте группу трендов доступной для серверов с помощью определения стандартного сервера (Standard server).
Обратите внимание, что для резервированного сервера PCS 7 мультиклиентной архитектуры PC-станции соединены в рамках среды Windows NT client/server. Убедитесь, что эта сетевая система установлена корректно.
-
Указания
Отнесите ваш проект «RMT1» к мультипользовательскому типу. Настройте резервирование и определите один из серверов в качестве главного (ведущего) по умолчанию. Обратитесь к рисунку 11.4.
Создайте серверный пакет на одном из серверов.
Скопируйте (Duplicate) проект на другой сервер.
Загрузите пакет в мультиклиентов. Запустите Мастер разделения экрана (Split Screen Wizard) на мультиклиентах.
Загрузите проект из SIMATIC-менеджера на станции AS и запустите проект на контроллере.
Активируйте серверы. Активируйте мультиклиентов.
Глава 11:Резервирование OS и
В Simatic Manager есть возможность создания системы: «инженерная станция—сервер—резервный сервер—клиенты». Такая система позволяет делать изменения в проекте WinCC на ходу, без потери связи, и не ограничивая технологический процесс. Кроме того все управление осуществляется от инженерной станции — что очень удобно: открываешь проект WinCC на инженерке (правой кнопкой и open object), меняешь его как надо, а затем делаешь прогрузку (PLC—>Download) по изменениям (Changes).
Сейчас я напишу как это было сделано у нас, возможно это не самый правильный способ, но он работал.
- В первую очередь нужно настроить связь со всеми компьютерами сети, возможно придется все запихивать в отдельную рабочую группу (не возможно а придется, и кроме того нужно создать пользователя на каждом клиенте и сервере с логином и паролем как на инженерной станции, для того чтобы у них были права управления папками). Чтобы поменять рабочую группу, нужно в свойствах компьютера, на вкладке имя компьютера изменить рабочую группу. Кроме того нужно выставить права на возможность чтения и записи в расшаренные папки. Уже на этом этапе можно определить папки под проекты и расшарить их. Чтобы добавить пользователя в систему, нужно через панель управления открыть администрирование и там управление компьютером. Там нам нужны локальные пользователи и группы
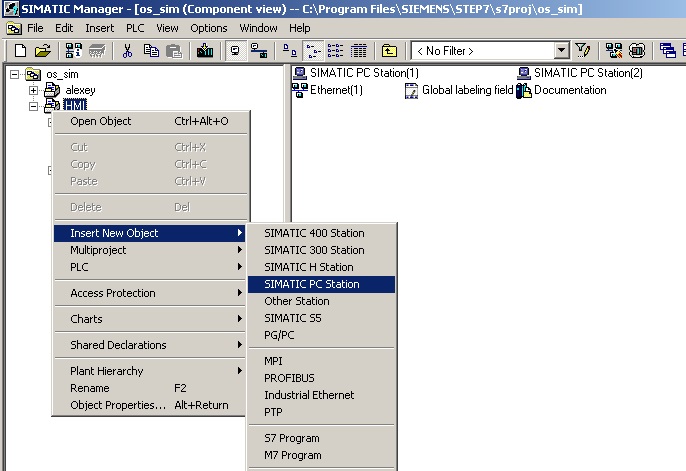
- У нас все было организовано через мультипроект, но суть не меняется, поэтому добавляем в мультипроект новый проект, а в этот проект нужно добавить Simatic PC Station
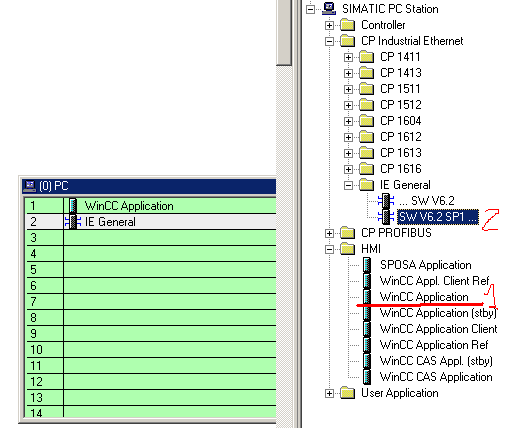
- В конфигурации добавленной станции нужно добавить 2 позиции: первая WinCC Application, вторая IE General, где в свойствах прописываем MAC адрес нашего сервера
- Автоматически создается объект (OS), который можно переименовать (например 777). При открытии объекта запускается WinCC, где и создаются все картинки. В свойствах объекта нужно указать на второй вкладке путь на сервер, куда нужно будет прогружать проект. Эта папка должна быть заранее создана и расшарена с полным доступом для инженерной станции. Опция Standby-OS пока будет недоступна, потому что в ней нужно указать резервный сервер, который будет создан позднее. Внимание! mcp файл не нужно создавать, он создается автоматически. Готовый проект тоже не нужно вручную копировать, т.к. все скопируется автоматически при прогрузке сервера
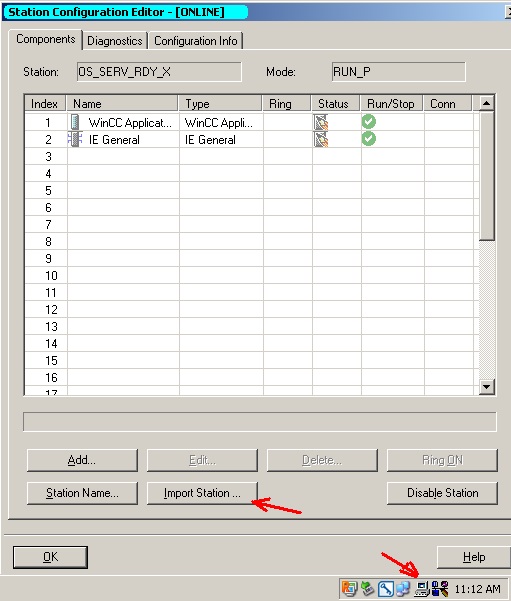
- На стороне сервера нужно заренее создать расшаренную папку с полными правами доступа для инженерной станции, куда будет сохраняться проект. Возможно понадобится сделать импорт станции, для этого нужно в трее найти редактор конфигуратора станций, где сделать импорт файла .xdb, который находится в папке проекта на инженерной станции в папке XDBs
- Клиенты в проект можно добавить как Insert New Object -> OS (Client). В них настраивается путь, так же как настраивается пусть в настройках сервера Target OS. Возможно еще по-другому сделать: на клиентском компьютере при открытии WinCC создать новый клиентский проект, а в настройках Server Data (правой кнопкой —> Loading) нужно открыть путь до .pck файла в проекте на сервере, который находится в папке Packages. но при таком способе в самом проекте не будут отображаться клиенты

- Manuals
- Brands
- Siemens Manuals
- Control Panel
- SIMATIC HMI series
- System manual
-
Contents
-
Table of Contents
-
Bookmarks
Quick Links
SIMATIC HMI
WinCC V7.4 SP1
WinCC: General information and
installation
System Manual
Print of the Online Help
02/2017
A5E40840020-AA
WinCC Installation Notes
WinCC Release Notes
What’s new in WinCC V7?
Service and Support
Migration
WinCC diagnosis
Licensing
Performance Data
1
2
3
4
5
6
7
8
Related Manuals for Siemens SIMATIC HMI Series
Summary of Contents for Siemens SIMATIC HMI Series
-
Page 1
WinCC Installation Notes WinCC Release Notes What’s new in WinCC V7? SIMATIC HMI Service and Support WinCC V7.4 SP1 WinCC: General information and Migration installation WinCC diagnosis System Manual Licensing Performance Data Print of the Online Help 02/2017 A5E40840020-AA… -
Page 2: Contents
Note the following: WARNING Siemens products may only be used for the applications described in the catalog and in the relevant technical documentation. If products and components from other manufacturers are used, these must be recommended or approved by Siemens. Proper transport, storage, installation, assembly, commissioning, operation and maintenance are required to ensure that the products operate safely and without any problems.
-
Page 3: Table Of Contents
Table of contents WinCC Installation Notes……………………..7 Installation Guide……………………7 Scope of delivery……………………8 SIMATIC WinCC: Product compatibility and supported functions……….10 Licenses and Licensing………………….11 Activating and testing ASIA licenses………………14 Installation Requirements…………………..16 1.6.1 WinCC Installation Requirements………………16 1.6.2 Hardware Requirements for the Installation…………….17 1.6.3 Software Requirements for the Installation…………….19 1.6.4 Microsoft SQL Server for WinCC……………….25 1.6.5…
-
Page 4
Table of contents 2.2.5 Network Technology and UPS………………..63 Notes on WinCC……………………69 2.3.1 General information on WinCC and configurations…………..69 2.3.2 WinCC CS……………………..73 2.3.3 WinCC Runtime……………………74 2.3.4 Smart Tools……………………..76 2.3.5 Process communication………………….77 2.3.6 Remote access and Remote Desktop Protocol (RDP)…………78 Notes on WinCC Redundancy………………..81 Notes on Process Control Options………………82 What’s new in WinCC V7?……………………..85 What’s new in WinCC V7.4 SP1?………………85… -
Page 5
Table of contents Important differences compared to previous versions…………138 Conditions for Migration…………………..141 How to migrate SQL Server 2000 databases……………142 How to migrate the WinCC data……………….144 How to migrate S7 projects………………..145 Migrating Multi-User Projects………………..147 Additional Steps……………………148 Upgrading a Redundant System in Normal Operation…………150 5.9.1 Upgrading a Redundant System in Normal Operation…………150 5.9.2… -
Page 6
Table of contents 6.4.2 System messages……………………189 Licensing…………………………193 Software Has a Value………………….193 Overview of the licensing…………………194 Basic license types and license types in WinCC…………..198 WinCC in the Demo Mode………………..201 How to manage licenses………………….202 How to Upgrade Licenses………………..204 Diagnostics of Licensing Problems………………205 Restore license key………………….207 Performance Data……………………….209 Performance Data……………………209… -
Page 7: Wincc Installation Notes
WinCC Installation Notes Installation Guide Contents This documentation contains important information on the scope of delivery, as well as on the installation and operation of WinCC. The information contained here takes precedence over the information contained in the manual and online help. WinCC: General information and installation System Manual, 02/2017, A5E40840020-AA…
-
Page 8: Scope Of Delivery
WinCC Installation Notes 1.2 Scope of delivery Scope of delivery Components supplied WinCC V7.4 SP1 is available as a basic package or upgrade package and as a download package «OSD» (Online Software Delivery). You will receive the following components: Components Basic / Upgrade / Download Package WinCC V7.4 SP1 DVD: ●…
-
Page 9: Licensing
WinCC Installation Notes 1.2 Scope of delivery Communication drivers The following table lists the communication drivers included in the package. Communication drivers Additional license Allen Bradley — Ethernet IP Mitsubishi Ethernet Modbus TCP/ IP PROFIBUS DP PROFIBUS FMS SIMATIC 505 TCPIP SIMATIC S5 Ethernet Layer 4 SIMATIC S5 Profibus FDL SIMATIC S5 Programmers Port AS511…
-
Page 10: Simatic Wincc: Product Compatibility And Supported Functions
In the following entry you can call the compatibility tool and find additional information on the operation of the tool: ● https://support.industry.siemens.com/cs/ww/en/view/64847781 (https:// support.industry.siemens.com/cs/ww/en/view/64847781) WinCC: General information and installation…
-
Page 11: Licenses And Licensing
WinCC Installation Notes 1.4 Licenses and Licensing Licenses and Licensing Introduction The WinCC software is protected and can only be used in its full measure with a valid license. Each installed software and option used requires a valid license for unrestricted operation of WinCC.
-
Page 12
WinCC or after the fact. You will find the Automation License Manager in the Windows start menu in the «Siemens Automation» program group. An after-the- fact installation of a license will take effect upon restart of your computer. -
Page 13
WinCC Installation Notes 1.4 Licenses and Licensing Note After uninstalling WinCC, the licenses remain installed on the system. See also How to Perform an Upgrade Installation (Page 49) How to Perform an Uninstall (Page 46) How to Install Supplementary Components Later (Page 41) How to Install WinCC (Page 36) Microsoft SQL Server for WinCC (Page 25) WinCC: General information and installation… -
Page 14: Activating And Testing Asia Licenses
WinCC Installation Notes 1.5 Activating and testing ASIA licenses Activating and testing ASIA licenses Overview The license keys for WinCC Runtime and WinCC RC (Runtime and Configuration) are provided on the supplied license storage medium «License Key USB Hardlock». The licensed ASIA version is executable in parallel to the European version by switching to Unicode.
-
Page 15
WinCC Installation Notes 1.5 Activating and testing ASIA licenses If necessary, contact WinCC Support and provide the serial number of your software version: ● http://www.automation.siemens.com/partner/index.asp (http:// www.automation.siemens.com/partner/index.asp) You can find the serial number on the «Certificate of License» (CoL). Working with the «License Key USB Hardlock»… -
Page 16: Installation Requirements
WinCC Installation Notes 1.6 Installation Requirements Installation Requirements 1.6.1 WinCC Installation Requirements Introduction You will need special hardware and software for the installation of WinCC. The requirements are described in the chapters «Hardware Requirements for Installation» and «Software Requirements for Installation». Note Windows operating system: Avoid changes in system Windows settings deviating from default can have an effect on operation of WinCC.
-
Page 17: Hardware Requirements For The Installation
WinCC Installation Notes 1.6 Installation Requirements Error Message Explanation Setup has detected that unInstallShield is active. Close unInstallShield. Please close unInstallShield and restart Setup. This message may also indicate that you are lacking administrator rights for this installation. In this case, log on to Windows again as user with administrator rights.
-
Page 18
WinCC Installation Notes 1.6 Installation Requirements Minimum Recommended Windows 7 / Windows 8.1 Dual core CPU Multi core CPU (32-bit) Client / single-user system 2.5 GHz Client: 3 GHz Single-user system: 3.5 GHz Windows 7 / Windows 8.1 / Dual core CPU Multi core CPU Windows 10 (64-bit) Client / single-user system 2.5 GHz… -
Page 19: Software Requirements For The Installation
WinCC clients. You can find additional information about virtual environments with WinCC at the following URL (entry ID=49368181): ● Internet: FAQ Virtualization (http://support.automation.siemens.com/WW/view/en/ 49368181) See also Defining Access Rights in the Operating System (Page 28) Notes about Running the Software (Page 52)
-
Page 20
WinCC Installation Notes 1.6 Installation Requirements Operating systems Operating system languages WinCC is released for the following operating system languages only: ● German ● English ● French ● Italian ● Spanish ● Chinese (Simplified, PR China) ● Chinese (Traditional, Taiwan) ●… -
Page 21
WinCC Installation Notes 1.6 Installation Requirements WinCC Server You can operate a WinCC server in Windows Server 2008 R2, Windows Server 2012 R2 or Windows Server 2016. Operating system Configuration Comments Windows Server 2008 R2 Standard Service Pack 1 64-bit Enterprise Service Pack 1 Windows Server 2012 R2 Standard… -
Page 22
WinCC Installation Notes 1.6 Installation Requirements Note the following: ● Only uppercase relevant ● The first character must be a letter. ● The first 12 characters of the computer name must be unique. Microsoft Message Queuing services WinCC requires Microsoft Message Queuing services. You can find detailed information in the section «Installing Microsoft Message Queuing». -
Page 23
Information System under «Communication > OPC UA WinCC Channel > WinCC OPC UA Configurator». You can find additional information on installation in the Product Support under entry number = «109482513» ● Internet: OPC UA WinCC Channel — FAQ (http://support.automation.siemens.com/WW/ view/en/109482513) WinCC: General information and installation System Manual, 02/2017, A5E40840020-AA… -
Page 24
WinCC Installation Notes 1.6 Installation Requirements Microsoft Internet Information Service (IIS) Before installing the following components or options, you must first install the Microsoft Internet Information Service (IIS): ● WinCC OPC XML DA Server ● WinCC/DataMonitor ● WinCC/WebNavigator ● WinCC/WebUX The IIS settings for the WinCC/DataMonitor, WinCC/WebNavigator and WinCC/WebUX options can be found in the respective installation notes. -
Page 25: Microsoft Sql Server For Wincc
Microsoft SQL Server for WinCC (Page 25) Oracle homepage (http://www.oracle.com/technetwork/java/javase/downloads/jre8- downloads-2133155.html) Internet: OPC UA WinCC Channel — FAQ (http://support.automation.siemens.com/WW/view/ en/109482513) 1.6.4 Microsoft SQL Server for WinCC WinCC requires Microsoft SQL Server 2014 Service Pack 2 in the 32-bit version. SQL Server is included automatically in the WinCC installation.
-
Page 26: Notes On Data And System Security
WinCC Installation Notes 1.6 Installation Requirements «WinCC» instance after removing WinCC When WinCC is removed, the «WinCC» SQL server instance remains installed and must be removed manually for licensing reasons. Installation of SQL Server Express SQL-Express is installed in the following cases: ●…
-
Page 27
A detailed description of this can be found in the FAQ with entry ID «44027453» in the SIMATIC Customer Online Support: ● Internet: WinCC FAQ 44027453 (http://support.automation.siemens.com/WW/view/en/ 44027453) Shortcut key <Ctrl+Esc> If you disable the <Ctrl+Esc> shortcut key, the following shortcut keys are also disabled in… -
Page 28: Access Rights In The Operating System
WinCC Installation Notes 1.6 Installation Requirements WinCC Installation Requirements (Page 16) Internet: WinCC FAQs (http://support.automation.siemens.com/WW/view/en/ 10805583/133000) Internet: WinCC FAQ 44027453 (http://support.automation.siemens.com/WW/view/en/ 44027453) 1.6.6 Access rights in the operating system 1.6.6.1 Defining Access Rights in the Operating System Introduction To support you in protecting your system, WinCC offers a structured user management: ●…
-
Page 29
WinCC Installation Notes 1.6 Installation Requirements WinCC Installation ● Task: WinCC Installation ● Role: Configuration engineer, Administrator ● Authorization: Windows Administrator rights ● Procedure: Prior to installation, ensure that you have local administrator rights on the computer. ● Explanation: You need local administrator rights to install WinCC. Preparation for operation ●… -
Page 30
WinCC Installation Notes 1.6 Installation Requirements ● Procedure: Enter the WinCC users on all computers in the same group. Assign the same password to all the users. ● Explanation: For access to distributed systems, the same user groups must be created on clients and servers. -
Page 31: Including Users In The «Simatic Hmi» User Group
WinCC Installation Notes 1.6 Installation Requirements See also Notes on Data and System Security (Page 26) Notes about Running the Software (Page 52) How to Adapt the Windows Security Policies (Page 33) How to Install WinCC (Page 36) WinCC Installation Requirements (Page 16) 1.6.6.2 Including users in the «SIMATIC HMI»…
-
Page 32: Release Existing Project For «Simatic Hmi» User Group
WinCC Installation Notes 1.6 Installation Requirements Requirements ● The domain administrator creates a domain-global user group. ● Within the domain, the domain administrator includes those users in the domain whose login permits access to WinCC. Procedure 1. Open the workstation administration under Windows. 2.
-
Page 33: How To Adapt The Windows Security Policies
WinCC Installation Notes 1.6 Installation Requirements 1.6.7 How to Adapt the Windows Security Policies Introduction Before you install WinCC, you must check the operating system settings: ● The system must permit the installation of unsigned drivers and files. ● In the case of Windows 7 and Windows Server 2008 R2, the use of the Windows function «Fast User Switching»…
-
Page 34: Installing Wincc
WinCC Installation Notes 1.7 Installing WinCC Installing WinCC 1.7.1 Installing WinCC Introduction This section describes the installation of WinCC. Install MS Message Queuing before you install WinCC. Installation of a WinCC file server If a WinCC server is set up which is to be used for project data archiving only, only the WinCC file server needs to be installed.
-
Page 35: How To Install Ms Message Queuing
WinCC Installation Notes 1.7 Installing WinCC 1.7.2 How to Install MS Message Queuing Introduction WinCC implements the Message Queuing services from Microsoft. It is a component part of the operating system. MS Message Queuing is however not included in the standard Windows installation and must be installed separately if required.
-
Page 36: How To Install Wincc
WinCC Installation Notes 1.7 Installing WinCC Procedure — Windows 10 1. Go to «Control Panel > Programs and Features». 2. Click the «Turn Windows features on or off» button on the left menu bar. The «Windows Features» dialog opens. 3. Activate the «Microsoft Message Queue (MSMQ) server» component. The «Microsoft Message Queue (MSMQ) Server Core»…
-
Page 37
WinCC Installation Notes 1.7 Installing WinCC The components already installed are displayed during setup. The following icons are used: Icon Meaning Current version of program is installed. Program is being updated. Program setup conditions are not met. Click the symbol for more detailed information. Program can be selected. -
Page 38
WinCC Installation Notes 1.7 Installing WinCC Installation of WinCC Options You can installed the desired options during the installation of WinCC itself. The documentation for some of the options will be available only if the concerned option package is installed. Automatic Migration when a WinCC Project of a Previous Version is Opened When you open a project that was created with a version older than WinCC V7.4, the configuration data and Runtime data are automatically migrated. -
Page 39
WinCC Installation Notes 1.7 Installing WinCC 3. Select the languages you want to install. You may install other languages at a later time. 4. Select «Install» as the setup type. If an older WinCC version is found, you can also activate the «Update» setup type. With this setup type, it is not possible to select additional products to be installed. -
Page 40
WinCC Installation Notes 1.7 Installing WinCC New entries in the «Siemens Automation» program group After the installation of WinCC, you will find the new folders in the «Siemens Automation» program group. ● Starting WinCC Explorer: – WinCC Explore ● Tools for working with WinCC: –… -
Page 41: How To Install Supplementary Components Later
WinCC Installation Notes 1.7 Installing WinCC How to Perform an Uninstall (Page 46) How to Install Supplementary Components Later (Page 41) Licenses and Licensing (Page 11) WinCC Installation Requirements (Page 16) 1.7.4 How to Install Supplementary Components Later Introduction Once you have installed WinCC, you can then install further components or options at a later date.
-
Page 42: How To Install Supplementary Languages
WinCC Installation Notes 1.7 Installing WinCC See also WinCC Installation Requirements (Page 16) How to Install WinCC (Page 36) How to Perform an Uninstall (Page 46) Licenses and Licensing (Page 11) 1.7.5 How to Install Supplementary Languages Introduction Once you have installed WinCC, you can later install additional languages. Procedure 1.
-
Page 43: Calling Record Function
WinCC Installation Notes 1.7 Installing WinCC The path length of the drive name, file folder and setup files may be no longer than 255 characters. Record function The Record function supports multiple installation on different computers with identical options. During setup, the Record function records the settings and creates a «Ra_Auto.ini» installation file which supports you during installation.
-
Page 44: Start Central Installation
WinCC Installation Notes 1.7 Installing WinCC Procedure 1. In the Windows Start menu, enter the following command line in the «Run» field: – <Path for the installation data>setup.exe /record Select the DVD drive or a central PC to which the installation data were copied as path for the installation files.
-
Page 45
WinCC Installation Notes 1.7 Installing WinCC 3. Start central installation by calling automatic installation: – <Path for the installation data>setup.exe /silent You may receive a message when the central installation was completed successfully. Note If an error or inconsistency occurs during installation, you will receive messages that require your acknowledgement. -
Page 46: How To Perform An Uninstall
WinCC Installation Notes 1.8 How to Perform an Uninstall How to Perform an Uninstall Introduction On your computer, you can remove WinCC completely or simply remove individual components. You cannot remove individual languages. You can execute the removal via the WinCC product DVD or vial the control panel of the operating system.
-
Page 47
WinCC Installation Notes 1.8 How to Perform an Uninstall Removal when the WebNavigator client is installed If you remove WinCC from a computer on which the WebNavigator client is installed, you must then reinstall the WebNavigator client. Changing the settings in the Windows Event Viewer When WinCC is installed, the WinCC Setup program changes the settings of the Event Viewer. -
Page 48: Upgrading Wincc
Additional information on migration of WinCC versions V4 or higher is available under the following URL (entry ID=44029132): ● Internet: FAQ Migration V4 > V7 (https://support.industry.siemens.com/cs/de/en/view/ 44029132) Upgrading WinCC clients WinCC clients can only be upgraded starting with WinCC V7.2.
-
Page 49: How To Perform An Upgrade Installation
You can update the licensing retroactively. Detailed information is available in the WinCC Information System under the topic «Licensing». See also How to Perform an Upgrade Installation (Page 49) Internet: FAQ Migration V4 > V7 (https://support.industry.siemens.com/cs/de/en/view/ 44029132) 1.9.2 How to Perform an Upgrade Installation Introduction If you currently have WinCC V6.2 SP3 or higher installed on your system, you can perform an…
-
Page 50
If you are upgrading WinCC versions prior to V7.0 SP3, observe the operating system requirements and hardware requirements. Additional information on migration of WinCC versions V4 or higher is available under the following URL (entry ID=44029132): ● Internet: FAQ Migration V4 > V7 (https://support.industry.siemens.com/cs/de/en/view/ 44029132) Upgrade preparation Note Backing up a WinCC project Make a backup copy of your project before upgrading WinCC. -
Page 51
See also Licenses and Licensing (Page 11) How to Install WinCC (Page 36) How to Perform an Uninstall (Page 46) Introduction (Page 135) Internet: FAQ Migration V4 > V7 (https://support.industry.siemens.com/cs/de/en/view/ 44029132) WinCC: General information and installation System Manual, 02/2017, A5E40840020-AA… -
Page 52: Notes About Running The Software
WinCC Installation Notes 1.10 Notes about Running the Software 1.10 Notes about Running the Software Introduction For trouble-free operation and optimal performance of WinCC, observe the notes on operation under Windows and the notes on configuration. You can find this information in the following sections of the WinCC Information System: ●…
-
Page 53: Wincc Release Notes
WinCC Release Notes Release Notes Content These Release Notes contain important information. The information in these Release Notes has priority over that in the manuals and online help with regard to legal validity. Please read these Release Notes carefully since it contains information which may prove helpful.
-
Page 54: Notes On Operation
WinCC. Additional information is available in the section «Working with Projects > Making Runtime Settings > Impact of External Applications on Runtime». Compatibility You can find information on compatibility on the Internet in FAQ No. 64847781: ● https://support.industry.siemens.com/cs/ww/en/view/64847781 (https:// support.industry.siemens.com/cs/ww/en/view/64847781) ● Compatibility tool for automation and drive technology: (https:// support.industry.siemens.com/kompatool/index.html?lang=en)
-
Page 55
The Windows «Logon screen saver» can be used. See also Software Requirements for the Installation (Page 19) https://support.industry.siemens.com/cs/ww/en/view/64847781 (https:// support.industry.siemens.com/cs/ww/en/view/64847781) Compatibility tool for automation and drive technology: (https://support.industry.siemens.com/ kompatool/index.html?lang=en) -
Page 56: Defining Access Rights In The Operating System
WinCC Release Notes 2.2 Notes on operation 2.2.2 Defining Access Rights in the Operating System Introduction To support you in protecting your system, WinCC offers a structured user management: ● Protect your system against unauthorized access. ● Assign each user the required rights. In order to work with WinCC, certain folders can be enabled for access via the network.
-
Page 57
WinCC Release Notes 2.2 Notes on operation Preparation for operation ● Task: Access to WinCC ● Role: Configuration engineer, Administrator ● Authorization: Power user rights, Administrator rights ● Procedure: After installation, set up the administrative settings as administrator or power user. ●… -
Page 58
WinCC Release Notes 2.2 Notes on operation Access rights for local projects ● Task: Access to projects which were created as follows: — Manual copy — Duplicate — Retrieval — Migration ● Role: WinCC user (operator, configuration engineer) ● Authorization: SIMATIC HMI, SIMATIC HMI Viewer ●… -
Page 59: Windows Operating System
Make sure that all current patches and security updates from Microsoft are installed on your computer. For further information, refer to the FAQs in the SIMATIC Customer Online Support: ● SIMATIC Customer Online Support: FAQ search (http://support.automation.siemens.com/ WW/llisapi.dll?query=WinCC+Microsoft&func=cslib.cssearch&content=adsearch %2Fadsearch.aspx&lang=en&siteid=csius&objaction=cssearch&searchinprim=&nodeid9 WinCC interface and 64-bit operating system The public interface of WinCC offer no native 64-bit support.
-
Page 60
A detailed description of this can be found in the FAQ with entry ID «44027453» in the SIMATIC Customer Online Support: ● Internet: WinCC FAQ 44027453 (http://support.automation.siemens.com/WW/view/en/ 44027453) WinCC: General information and installation System Manual, 02/2017, A5E40840020-AA… -
Page 61
WinCC Release Notes 2.2 Notes on operation Without this adjustment, it is generally not possible to disable keys in Windows 7 and Windows Server 2008. Users can then use the shortcut key <Ctrl+Alt+Del> in WinCC Runtime to perform all related actions, e.g., lock computer, change user, log off, change password, start Task Manager. -
Page 62: Database System
Disable the option «Check for publisher’s certificate revocation» on the «Advanced» tab in the Internet Options if you operate WinCC on computers that do not have an Internet connection. See also SIMATIC Customer Online Support: FAQ search (http://support.automation.siemens.com/ WW/llisapi.dll?query=WinCC+Microsoft&func=cslib.cssearch&content=adsearch %2Fadsearch.aspx&lang=en&siteid=csius&objaction=cssearch&searchinprim=&nodeid99=) Internet: WinCC FAQs (http://support.automation.siemens.com/WW/view/en/…
-
Page 63: Network Technology And Ups
WinCC Release Notes 2.2 Notes on operation Notes on Microsoft SQL server Error accessing the SQL master database after switching off the server while the system is running If a server fails unexpectedly in runtime (power failure, disconnection of power plug), the WinCC installation may be corrupted as a result and the SQL server will no longer be able to access the SQL master database following a restart.
-
Page 64
WinCC Release Notes 2.2 Notes on operation Use of redundant servers When redundant pairs of servers are implemented, the master and standby server must be operated in the same IP/subnet band. Network adapters with energy-saving mode When using network adapters provided with energy-saving mode, the energy-saving mode must not be activated. -
Page 65
WinCC Release Notes 2.2 Notes on operation Observe the following here: 1. The IP address becomes invalid when the network adapter is removed or deactivated after installation of the TCP/IP protocol. 2. The IP address may not be initialized yet. This occurs, for example, when the TCP/IP protocol is installed with the IP address derived from a DHCP server. -
Page 66
WinCC Release Notes 2.2 Notes on operation Information for using routers and firewalls Using routers WinCC V7 can also be used to connect WinCC clients to WinCC servers via routers. WinCC clients without their own project cannot be used for configuration with the routers, only for WinCC Runtime. -
Page 67
WinCC Release Notes 2.2 Notes on operation Requirements The following conditions can lead to undesirable reactions when operating WinCC: ● The IP address band used in the terminal network is higher than the APIPA address band (169.254.x.x). ● IP addresses are routed via the default gateway. ●… -
Page 68
WinCC Release Notes 2.2 Notes on operation Prevent damaged files during power outages If a power failure occurs while using Windows systems when the WinCC system is active, files can be corrupted or lost. Operation using the NTFS file system offers more security. Secure continuous operation can only be guaranteed when an uninterruptible power system (UPS) is used. -
Page 69: Notes On Wincc
General information on WinCC and configurations General information WinCC Demo project The WinCC demo project for WinCC V7.4 can be downloaded as a self-extracting ZIP file at: ● http://support.automation.siemens.com/WW/view/de/109482515 (http:// support.automation.siemens.com/WW/view/en/109482515) WinCC passwords: Migration of WinCC projects As of version V7.2, WinCC offers improved encryption of passwords.
-
Page 70
WinCC Release Notes 2.3 Notes on WinCC Openness and system stability WinCC enables high performance actions to be programmed on individual graphic objects and even complete functions and global action scripts independent of the individual components. C scripting: WinCC and Windows API functions can be called in the action scripts. In addition, the integrated script programming contains a C interpreter with a large number of standard functions complying to ANSI-C. -
Page 71
WinCC Release Notes 2.3 Notes on WinCC Instead, select the «Download» option in the SIMATIC manager in the shortcut menu of the operating system. Installation of the examples projects The supplied example projects are located on the WinCC DVD in the directory «Samples WinCC». -
Page 72
● 1000200,4,,<Computer name>, DataManager Runtime, Update data for Client ‘<client name>’ lost, (message frames for the client are discarded on the server) Data may be lost on the client. See also Internet: WinCC demo projects (https://support.industry.siemens.com/cs/products? search=demo&dtp=ExampleOfUse&o=DefaultRankingDesc&pnid=14866&lc=en-WW) http://support.automation.siemens.com/WW/view/de/109482515 (http:// support.automation.siemens.com/WW/view/en/109482515) WinCC: General information and installation… -
Page 73: Wincc Cs
WinCC Release Notes 2.3 Notes on WinCC 2.3.2 WinCC CS General information Using several WinCC editors Do not use multiple WinCC editors at the same time because the editors can access the same WinCC components. For example, use of the «Text Distributor» and «Cross Reference» editors or automatic update of the Cross Reference when the Graphics Designer is being accessed simultaneously via interfaces.
-
Page 74: Wincc Runtime
WinCC Release Notes 2.3 Notes on WinCC The corresponding updates for VBA are made available by Microsoft on the download pages. Siemens does not supply any updates from Microsoft. Install the updates for VBA after installing WinCC. Notes on the channels Name of a channel with national characters When you enter a name with national characters in the «SIMATIC S7 Protocol Suite»…
-
Page 75
WinCC Release Notes 2.3 Notes on WinCC OPC tags: Time stamp for Alarm Logging and Tag Logging If messages are triggered by OPC tags, the message time stamp is used by the OPC server, comparably to chronological reporting. For Tag Logging the time stamp is generated by the Tag Logging server. OPC UA: Displaying OPC UA tags Tags created with a WinCC version older than V7.4 are shown as imported in the «Symbols»… -
Page 76: Smart Tools
WinCC Release Notes 2.3 Notes on WinCC OPC Historical Data Access Return value OPC_E_MAXEXCEEDED for archive access using OPC If the OPC client demands data from more than 2000 values during synchronous or asynchronous reading, the call is rejected with a return message OPC_E_MAXEXCEEDED. This limit serves to limit the computer load and duration of the call.
-
Page 77: Process Communication
WinCC Release Notes 2.3 Notes on WinCC WinCC Configuration Studio replaces the functionality of «Tag Export/Import» To export tags from a WinCC project or import them into a WinCC project, use the WinCC Configuration Studio. Information on the Dynamic Wizard Editor Opening the Dynamic Wizard Editor The Dynamic Wizard Editor and the Graphics Designer should not be opened at the same time.
-
Page 78: Remote Access And Remote Desktop Protocol (Rdp)
WinCC ServiceMode. Also see the information on remote configuration in the WinCC Information System under «Configurations > Multi-User Systems > Remote Configuration». For Current note, see the following FAQ: ● Entry ID 78463889 (https://support.industry.siemens.com/cs/de/de/view/78463889) (http:// support.automation.siemens.com/WW/view/en/78463889) NOTICE…
-
Page 79
WinCC Release Notes 2.3 Notes on WinCC Approved scenarios The following scenarios have been tested: ● WinCC as single-user system ● WinCC as distributed system ● WinCC in redundant mode ● WinCC/WebUX server You can also use communication via OPC in the approved scenarios. Starting the Remote Desktop You can access WinCC systems with a Remote Desktop client via a console session. -
Page 80
Migration: Migrate WinCC projects remotely only with UNC paths Use only UNC paths to migrate WinCC projects remotely. Release the project path or the folder above it. Use this UNC path as project directory for the WinCC Project Migrator. See also https://support.industry.siemens.com/cs/de/de/view/78463889 (http:// support.automation.siemens.com/WW/view/en/78463889) http://support.automation.siemens.com/WW/view/en/55422236 (http:// support.automation.siemens.com/WW/view/en/55422236) -
Page 81: Notes On Wincc Redundancy
WinCC Release Notes 2.4 Notes on WinCC Redundancy Notes on WinCC Redundancy Redundancy behavior in case of double failure Double failures are not covered by redundancy. A double failure occurs, for example, when the terminal bus was pulled on server 1 while server 2 was deactivated.
-
Page 82: Notes On Process Control Options
WinCC Release Notes 2.5 Notes on Process Control Options Notes on Process Control Options Creating a New Project If you create a new project manually, you must first run the OS Project Editor. While creating an OS using PCS7 Engineering Station, the project is automatically called in the background and initialized using the default settings.
-
Page 83
WinCC Release Notes 2.5 Notes on Process Control Options Area names in Alarm Logging and in the Picture Tree Area names in Alarm Logging and in Picture Tree must not contain any spaces at the beginning or end. Area names in distributed systems With distributed systems, the area names in the projects of the various WinCC servers must be unique in order to ensure correct filtering and display of the messages according to the area. -
Page 84
WinCC Release Notes 2.5 Notes on Process Control Options WinCC: General information and installation System Manual, 02/2017, A5E40840020-AA… -
Page 85: What’s New In Wincc V7
What’s new in WinCC V7? What’s new in WinCC V7.4 SP1? Introduction WinCC V7.4 Service Pack 1 is a free upgrade for WinCC V7.4. WinCC V7.4 SP1 guarantees compatibility with current SIMATIC products and Microsoft products. Service Pack 1 provides a series of functional enhancements as well as optimization of the existing software version.
-
Page 86
What’s new in WinCC V7? 3.1 What’s new in WinCC V7.4 SP1? Operating systems WinCC V7.4 SP1 runs on the following operating systems: ● WinCC client projects – Windows 10 (Pro / Enterprise, 64-bit) – Windows 8.1 (Pro / Enterprise, 32-bit) –… -
Page 87
What’s new in WinCC V7? 3.1 What’s new in WinCC V7.4 SP1? Additions to WinCC Explorer You open the WinCC Explorer with the corresponding project by dragging and dropping the «<PROJECT>.MCP» project file on the » WinCCExplorer.exe» file or on the shortcut on the desktop. -
Page 88
What’s new in WinCC V7? 3.1 What’s new in WinCC V7.4 SP1? ● After setting the picture, the picture appears in the picture window above the name and in the center the of preview. ● You can have a separate tooltip text displayed for the customized object and for the contained objects in runtime. -
Page 89
What’s new in WinCC V7? 3.1 What’s new in WinCC V7.4 SP1? Reports: Symbols in the tables of the WinCC controls are output When runtime data is reported, the symbols in the tables of the corresponding WinCC controls are also output. WinCC controls: Adapting the buttons and table elements You can change the designs of the standard configuration of the WinCC controls and, for example, create customized symbols for table elements of the table controls. -
Page 90
What’s new in WinCC V7? 3.1 What’s new in WinCC V7.4 SP1? Offline data import from TIA Portal projects Data records from TIA Portal projects, such as tag tables, messages and text lists, can now also be imported offline. ODK extensions Several functions and structures have been enhanced with regard to the following: ●… -
Page 91: What Is New In Wincc V7
What’s new in WinCC V7? 3.2 What is new in WinCC V7? What is new in WinCC V7? Introduction The following section provides you with information in short form about the most important new features in WinCC V7.4 as compared to WinCC V7.3 SE incl. Update 1. You can find detailed descriptions of the individual functions in the WinCC Information System.
-
Page 92: Supported Operating Systems
What’s new in WinCC V7? 3.3 Supported operating systems Supported operating systems Software requirements and supported operating systems Microsoft SQL Server 2014 WinCC as of V7.4 requires Microsoft SQL Server 2014 Service Pack 1 (32-bit). The SQL server is included in the scope of delivery of the product. Operating systems WinCC as of V7.4 runs on the following operating systems: ●…
-
Page 93: Licensing
What’s new in WinCC V7? 3.4 Licensing Licensing Improved license model for WinCC options As of WinCC V7.4, a uniform license model applies to WinCC/DataMonitor, WinCC/ WebNavigator and WinCC/WebUX: ● Licenses are available for 1 / 3 / 10 / 30 / 100 clients ●…
-
Page 94
What’s new in WinCC V7? 3.4 Licensing Remarks 1) Also contains the upgrades for the following products: ● WinCC User Archives ● WinCC Server ● WinCC Redundancy ● WinCC WebNavigator ● WinCC WebDiag Client ● WinCC Load Balancing ● WinCC Load Balancing step-up ●… -
Page 95: Simplified Runtime Operation
What’s new in WinCC V7? 3.5 Simplified Runtime operation Simplified Runtime operation Touch operation in Runtime With WinCC V7.4, WinCC Runtime supports the usual gestures on a touch screen, for example: ● Change picture by swiping ● Zoom by dragging with two fingers (scaling) ●…
-
Page 96: Simatic S7-1200, S7-1500 Channel» Channel Dll
What’s new in WinCC V7? 3.6 «SIMATIC S7-1200, S7-1500 Channel» channel DLL «SIMATIC S7-1200, S7-1500 Channel» channel DLL With WinCC V7.4, process communication is extended via communication channel «SIMATIC S7-1200, S7-1500 Channel». New functions support stable communication in your plant, for example tag synchronization with the controller and system diagnostics with WinCC SysDiagControl.
-
Page 97
What’s new in WinCC V7? 3.6 «SIMATIC S7-1200, S7-1500 Channel» channel DLL System diagnostics with the WinCC SysDiagControl The system diagnostics of WinCC V7.4 displays faults and errors of the controllers «S7-1200» and «S7-1500». The WinCC SysDiagControl hereby provides an overview of fast error localization. A message view of the controller allows you to navigate directly to the control for the diagnostics overview with detailed information. -
Page 98
What’s new in WinCC V7? 3.6 «SIMATIC S7-1200, S7-1500 Channel» channel DLL See also Extended functionality for WinCC controls (Page 102) WinCC: General information and installation System Manual, 02/2017, A5E40840020-AA… -
Page 99: Easier Configuration With Wincc Configuration Studio
What’s new in WinCC V7? 3.7 Easier configuration with WinCC Configuration Studio Easier configuration with WinCC Configuration Studio Efficient engineering with «drag-and-drop» Configuring is even simpler and more convenient with the «WinCC Configuration Studio» of WinCC V7.4. Drag the values into one of the editors using «drag-and-drop». The corresponding data is automatically created.
-
Page 100: Extended Functionality For Wincc Graphics Designer
What’s new in WinCC V7? 3.8 Extended functionality for WinCC Graphics Designer Extended functionality for WinCC Graphics Designer Efficient engineering with «drag-and-drop» WinCC V7.4 also provides additional support for configuring WinCC objects in Graphics Editor. With the extended «drag-and-drop» function, you can, for example, efficiently use a configuration environment with multiple monitors.
-
Page 101
What’s new in WinCC V7? 3.8 Extended functionality for WinCC Graphics Designer In WinCC Explorer, the new column «Display names» contains the configured display names in the relevant WinCC user interface language. WinCC: General information and installation System Manual, 02/2017, A5E40840020-AA… -
Page 102: Extended Functionality For Wincc Controls
What’s new in WinCC V7? 3.9 Extended functionality for WinCC controls Extended functionality for WinCC controls Two new controls were introduced in WinCC V7.4: ● WinCC BarChartControl Display of archive tags in a bar chart ● WinCC SysDiagControl System diagnostics of the controllers «S7-1200» and «S7-1500» You can find additional information under «»SIMATIC S7-1200, S7-1500 Channel»…
-
Page 103
What’s new in WinCC V7? 3.9 Extended functionality for WinCC controls WinCC BarChartControl The new WinCC BarChartControl shows values of archive tags in a bar chart. You have numerous options for configuring how the bar chart is displayed: ● Diagram window: –… -
Page 104
What’s new in WinCC V7? 3.9 Extended functionality for WinCC controls ● Display of the axes: – Version 1: Each chart has its own axes. – Version 2: All charts use a common time axis and/or value axis. – Individual axes can be hidden if required. ●… -
Page 105: Extended Functionality With Options For Process Control
What’s new in WinCC V7? 3.10 Extended functionality with options for Process Control 3.10 Extended functionality with options for Process Control Improved message filter in the acoustic alarm As of WinCC V7.4, you can specify the user text blocks as filter for triggering the signal in addition to the message class and the message priority.
-
Page 106
What’s new in WinCC V7? 3.10 Extended functionality with options for Process Control WinCC: General information and installation System Manual, 02/2017, A5E40840020-AA… -
Page 107: Extended Functionality For Wincc/Webnavigator
What’s new in WinCC V7? 3.11 Extended functionality for WinCC/WebNavigator 3.11 Extended functionality for WinCC/WebNavigator Requirements WinCC/WebNavigator V7.4 allows access to process pictures with the following Web viewers: ● Internet Explorer as of V10 (32-bit) ● WinCCViewerRT Information on simplified licensing is available under «Licensing (Page 93)». WinCCViewerRT supports load balancing Load balancing on various WebNavigator servers is also supported by WinCC’s own Web viewer «WinCCViewerRT».
-
Page 108
What’s new in WinCC V7? 3.11 Extended functionality for WinCC/WebNavigator See also Licensing (Page 93) WinCC: General information and installation System Manual, 02/2017, A5E40840020-AA… -
Page 109: Extended Functionality For Wincc/Datamonitor
What’s new in WinCC V7? 3.12 Extended functionality for WinCC/DataMonitor 3.12 Extended functionality for WinCC/DataMonitor Requirements You can use the following tools to evaluate process data with WinCC/DataMonitor V7.4: ● Internet Explorer as of V10 (32-bit) ● WinCCViewerRT ● Microsoft Excel 2007 SP2 ●…
-
Page 110: Extended Functionality For Wincc/Webux
What’s new in WinCC V7? 3.13 Extended functionality for WinCC/WebUX 3.13 Extended functionality for WinCC/WebUX WinCC/WebUX V7.4: Extended range of functions WinCC/WebUX provides a solution for operator control and monitoring of the automation system independent of device and browser. With the current version, WebUX supports most functions of WinCC Runtime. These include, e.g.: ●…
-
Page 111
What’s new in WinCC V7? 3.13 Extended functionality for WinCC/WebUX ● WinCC Slider Control ● WinCC Digital/Analog Clock Control ● WinCC Gauge Control ● WebBrowser Control See also Licensing (Page 93) WinCC: General information and installation System Manual, 02/2017, A5E40840020-AA… -
Page 112: Other Innovations
What’s new in WinCC V7? 3.14 Other Innovations 3.14 Other Innovations In addition to the described new features, WinCC V7.4 offers other new functions and extensions: ● WinCC channel «OPC UA WinCC Channel» ● WinCC installation: – Installation «WinCC client» –…
-
Page 113
What’s new in WinCC V7? 3.14 Other Innovations WinCC installation Installation «WinCC client» With the «RT Client» or «RC Client» client licenses you can operate both clients without their own project and clients with their own project. The program package «WinCC Client» is available to you during the WinCC installation. The following components are installed: ●… -
Page 114
What’s new in WinCC V7? 3.14 Other Innovations Use in integrated operation in SIMATIC Manager is not released. Remote configuration: Addressing via computer names When you access computers outside a subnet, use the «Simatic Shell» dialog to configure access to a PC that serves as proxy for distributing your multicast packages. As «Multicast Proxy», you can also directly enter the computer name, as alternative to the IP address. -
Page 115: Service And Support
Service and Support Warnings Safety information Warning notice system This manual contains notices you must observe to ensure your personal safety and to prevent damage to property. Notices referring to your personal safety are highlighted in the manual by a safety alert symbol; notices referring to property damage only have no safety alert symbol. The warning notices shown below are graded according to the degree of danger.
-
Page 116
WARNING Proper use of Siemens products Siemens products may only be used for the applications described in the catalog and in the relevant technical documentation. If products and components from other manufacturers are used, these must be recommended or approved by Siemens. Proper transport, storage, installation, assembly, commissioning, operation and maintenance are required to ensure that the products operate safely and without any problems. -
Page 117
Observe the Release Notes and Installation Notes. Information in the Release Notes and Installation Notes is more binding than that in the manuals and online help. Copyright © Siemens AG 2017 All rights reserved The reproduction, transmission or use of this document or its contents is not permitted without express written authorization. -
Page 118: Customer Support
Online Help is available so that you can successfully use the Support offering. Open the Online Help by selecting the corresponding button on the Internet site or at the following URL: ● https://support.industry.siemens.com/cs/helpcenter/en/index.htm (https:// support.industry.siemens.com/cs/helpcenter/en/index.htm) The app is available for mobile Siemens Support: ● https://support.industry.siemens.com/cs/sc/2067 (https://support.industry.siemens.com/ cs/ww/en/sc/2067) WinCC: General information and installation…
-
Page 119
Internet: Technical support (https://support.industry.siemens.com/cs/ww/en/sc/2090) Internet: Automation Validation Card (AVC) (https://support.industry.siemens.com/cs/ww/en/ sc/2021) Internet: Service and Support (https://support.industry.siemens.com/cs/ww/en/) Internet: Support Online Help (https://support.industry.siemens.com/cs/helpcenter/en/ index.htm) Internet: Mobile use via App (https://support.industry.siemens.com/cs/ww/en/sc/2067) Internet: WinCC FAQs (https://support.industry.siemens.com/cs/ww/en/ps/14866/faq) WinCC: General information and installation System Manual, 02/2017, A5E40840020-AA… -
Page 120
Service and Support 4.2 Customer support Internet: Support Technical Forum (https://support.industry.siemens.com/tf/ww/en/) Internet: Technical documentation for SIMATIC products (http://www.siemens.com/simatic- tech-doku-portal) Internet: Contact person database (http://w3.siemens.com/aspa_app/?lang=en) Internet: Support Search (http://www.siemens.de/automation/csi_en/km) Internet: Information about WinCC (http://www.siemens.com/wincc) Internet: SIMATIC Products (http://www.siemens.com/simatic) WinCC: General information and installation… -
Page 121: Support Request
(see topic «Performance Data»). Support Request form The Support Request form is available at the following URL: ● http://www.siemens.com/automation/support-request (https:// support.industry.siemens.com/My/ww/en/requests) When filling out the report, you will be guided through several steps, which will ask about all required information.
-
Page 122
Your data will be transmitted to Customer Support and processed there. Thank you for your cooperation. We hope that we can be of assistance in solving your problems. Your WinCC Team See also Internet: Error Report (https://support.industry.siemens.com/My/ww/en/requests) Internet: Overview of Support Request (https://support.industry.siemens.com/cs/ww/en/sc/ 2100) -
Page 123: Help On Wincc Documentation
Service and Support 4.4 Help on WinCC Documentation Help on WinCC Documentation 4.4.1 WinCC Documentation WinCC Online Information WinCC assists you in your tasks by providing a wide range of comprehensive information and data. Depending on the actual situation and needs, you can access background information, call up handling instructions, study examples or refer to summary instructions regarding a single operating element.
-
Page 124: Direct Help («What’s This?») In Wincc
Service and Support 4.4 Help on WinCC Documentation Information in the Status Bar The status bar is the bar at the bottom of the WinCC window. It contains general and editor- specific information. General information relates, for example, to the keyboard settings and the current editing language.
-
Page 125
Service and Support 4.4 Help on WinCC Documentation The mouse pointer takes the form of a question mark. After clicking an element with the question mark, the «What’s This?» help opens. The links provided in the «What’s This?» help enable you to access the WinCC Information System. It contains further information, step-by- step instructions and examples. -
Page 126: Wincc Information System
Service and Support 4.4 Help on WinCC Documentation 4.4.4 WinCC Information System Contents of the WinCC Information System The WinCC Information System enables you to access the entire WinCC documentation at any time during configuration. It contains the following components: ●…
-
Page 127
Service and Support 4.4 Help on WinCC Documentation Dropdown texts Some pages of the online help features headings underlined in blue. Click these headings to call up drop-down texts. The additional information consists of text, tables, etc. To hide the drop-down text, click it again. The following notation is used in the online help: Icon Meaning… -
Page 128: Navigation In The Wincc Information System
Service and Support 4.4 Help on WinCC Documentation See also Tooltips and Status Bar (Page 123) Adobe Acrobat Reader (http://www.adobe.com/products/acrobat) 4.4.5 Navigation in the WinCC Information System WinCC Portal The start page contains the WinCC Portal links, providing an overview of the WinCC Information System.
-
Page 129
Service and Support 4.4 Help on WinCC Documentation Navigation on the «Contents» Tab The «Contents» tab contains the table of contents of the WinCC Information System: Description Click this button to display the subordinate hierarchy levels of a book. Double click this button to simultaneously open a help topic and display the subordinate hierarchy levels. -
Page 130: Search In Wincc Information System
Service and Support 4.4 Help on WinCC Documentation Navigation Using the Keyboard The navigation options available for the mouse can also be operated using the keyboard. Operation Function <ALT+RIGHT> Go to next page. <ALT+LEFT> Go to previous page. <LEFT> Move the scroll bar in the active window to the left. <RIGHT>…
-
Page 131
Service and Support 4.4 Help on WinCC Documentation Quotation Marks Use quotation marks to search for phrases. ● Example: «Configuring graphics» Boolean Operators The arrow beside the input field can be used to logically link the search term with AND, OR, NEAR and NOT. -
Page 132: Documentation In The Internet
«My Documentation Manager». There, you compile your own documents which you can then output in the formats PDF, RTF or XML. Searching for WinCC Help topics in the Internet 1. Click support.automation.siemens.com (http://support.automation.siemens.com/WW/view/ en/10805583/133000) to search in the WinCC documentation.
-
Page 133
Service and Support 4.4 Help on WinCC Documentation Searching for Help topics in «My Documentation Manager» In «My Documentation Manager» you can restrict the search within a manual to a specific topic type, such as action or example. 1. Go to the «Search» tab. 2. -
Page 134
Service and Support 4.4 Help on WinCC Documentation WinCC: General information and installation System Manual, 02/2017, A5E40840020-AA… -
Page 135: Migration
Migration Introduction Introduction This section contains information on the migration of WinCC projects created in WinCC V6.2 SP3 or higher. When you open a project of a previous version in WinCC V7.4, you are prompted to migrate it. However, you may also use WinCC Project Migrator to migrate several WinCC projects in a single step.
-
Page 136
Migration 5.1 Introduction ● If the service user is a member of the «SIMATIC HMI» group ● If the service user is able to log on An error message is output and the migration process is aborted if one of these criteria is not met. -
Page 137
Migration 5.1 Introduction Procedure 1. Select the «Tools > Convert project data» menu command in WinCC Explorer. 2. Select the project data to be converted: – Pictures and faceplates – Global libraries – Project libraries – Page layouts and line layouts –… -
Page 138: Important Differences Compared To Previous Versions
Migration 5.2 Important differences compared to previous versions Important differences compared to previous versions Introduction Version 7.4 of WinCC provides new and enhanced functions as compared to the predecessor version. An overview of the new features is provided in the section «What’s New in WinCC V7.4?».
-
Page 139
Migration 5.2 Important differences compared to previous versions WinCC Configuration Studio replaces the functionality of WinCC ConfigurationTool and WinCC Archive ConfigurationTool. Conversion to Unicode in WinCC V7.2 Starting from WinCC V7.2, WinCC is Unicode-capable. ● The Asian version contains all functionalities of the European version. ●… -
Page 140
Migration 5.2 Important differences compared to previous versions See also How to migrate SQL Server 2000 databases (Page 142) WinCC: General information and installation System Manual, 02/2017, A5E40840020-AA… -
Page 141: Conditions For Migration
Migration 5.3 Conditions for Migration Conditions for Migration Introduction You can migrate a WinCC project on any computer on which WinCC V7.4 has been installed. The WinCC Project Migrator is included in the standard installation scope of WinCC V7.4. Use Project Duplicator to copy the configuration data of the project to the migration computer. For information on copying projects, refer to the «Working with projects»…
-
Page 142: How To Migrate Sql Server 2000 Databases
Migration 5.4 How to migrate SQL Server 2000 databases How to migrate SQL Server 2000 databases WinCC projects that were created with versions prior to WinCC V6.2 SP2 include database settings of the SQL Server 2000. To access databases with SQL Server 2014 that were created with versions prior to SQL Server 2005, you must change the compatibility setting.
-
Page 143
Migration 5.4 How to migrate SQL Server 2000 databases 9. Confirm your entries with «OK». The connection to the database was disconnected. 10.Repeat steps 3 to 9 for each database that is part of the WinCC project. Result The WinCC project can be migrated. See also Conditions for Migration (Page 141) WinCC: General information and installation… -
Page 144: How To Migrate The Wincc Data
Migration 5.5 How to migrate the WinCC data How to migrate the WinCC data Introduction This chapter describes the migration of WinCC projects of WinCC V6.2 SP3 or higher to WinCC V7.4. You have two options of migrating the projects: ●…
-
Page 145: How To Migrate S7 Projects
Migration 5.6 How to migrate S7 projects How to migrate S7 projects Introduction You have three options for migrating S7 projects of WinCC V6.2 SP3 or higher to WinCC V7.4: ● Migration of the configuration data and Runtime data of an S7 project when opening the old project ●…
-
Page 146
Migration 5.6 How to migrate S7 projects Using WinCC Migrator to migrate all integrated WinCC projects You may also use WinCC Migrator to migrate all integrated WinCC projects. The procedure corresponds with the description in «How to migrate WinCC data». You are prompted to start migration if you now open an S7 project. -
Page 147: Migrating Multi-User Projects
Migration 5.7 Migrating Multi-User Projects Migrating Multi-User Projects Introduction Clients are migrated together with the associated multi-user project. When migrating multi-user projects, proceed in exactly the same way as in the migration of single user projects. Make a backup copy of the project before the migration. You can rely on this copy of the original project to retrieve your data if migration fails.
-
Page 148: Additional Steps
Migration 5.8 Additional Steps Additional Steps Introduction You still have to make some project settings after migration. Updating System Messages in Alarm Logging Once you have integrated the system messages in the message system and completed migration, you must update the system messages in Alarm Logging. New system messages are also applied with this step.
-
Page 149
Migration 5.8 Additional Steps Procedure 1. In the WinCC Explorer, select the menu command «Tools > Convert project data». 2. Select the project data to be converted and confirm with «OK». – Pictures and faceplates – C and VB project functions and actions 3. -
Page 150: Upgrading A Redundant System In Normal Operation
Migration 5.9 Upgrading a Redundant System in Normal Operation Upgrading a Redundant System in Normal Operation 5.9.1 Upgrading a Redundant System in Normal Operation Introduction You update a redundant system to the new WinCC version in steps. This will not interfere with plant operation.
-
Page 151
Migration 5.9 Upgrading a Redundant System in Normal Operation Initial Situation ● Server1 is the master server. (Server1 stands for all master servers in a redundant server pair.) ● Server2 is the standby server. (Server2 stands for all standby servers in a redundant server pair.) ●… -
Page 152: Phase 1: Upgrading The Standby Server
Migration 5.9 Upgrading a Redundant System in Normal Operation 14. WinCC Client2: Configure Server2 as preferred server 15. WinCC Client2: Activate 16. WinCC Client1 and other WinCC clients: Execute Steps 10 to 15 Phase 3: Upgrading Master Server 17. Server1: Deactivate and exit WinCC 18.
-
Page 153
Migration 5.9 Upgrading a Redundant System in Normal Operation You system will only run on one server while you complete the phase 1 steps. NOTICE Procedure In order not to interrupt operation of the system, observe the sequence of steps described. Complete the steps in phases 1 to 4 without any longer interruption. -
Page 154
Migration 5.9 Upgrading a Redundant System in Normal Operation 2. WinCC Client2: Configure Server1 as preferred server Configure Server1 as the preferred server for WinCC Client2. Deactivate WinCC Client2 and reactivate the client so that the changed preferred server is applied. -
Page 155: Phase 2: Upgrade Wincc Clients
Migration 5.9 Upgrading a Redundant System in Normal Operation 8. Server2: Activate 1. Start WinCC on Server2. 2. Activate WinCC Runtime. The system behaves as follows: ● There is no server switching. The activated Server2 becomes the standby server in the upgraded WinCC project.
-
Page 156
Migration 5.9 Upgrading a Redundant System in Normal Operation ● WinCC Client1 is connected to Server1. ● WinCC Client2 is connected to Server1. Phase 2 procedure For a detailed description of the procedure, please click one of the following working steps. 10. -
Page 157: Phase 3: Upgrading Master Server
Migration 5.9 Upgrading a Redundant System in Normal Operation The system behaves as follows: ● The WinCC client connects to the upgraded Server2. ● Server2 remains the standby server. 16. Other WinCC clients: Execute Steps 10 to 15 For WinCC Client1, the same procedure applies as for WinCC Client2. When a WinCC client has been upgraded, repeat steps 10 to 15 for the next WinCC client until all the WinCC clients in the system have been upgraded.
-
Page 158
Migration 5.9 Upgrading a Redundant System in Normal Operation ● Upgraded WinCC Client1 is connected to Server2. ● Upgraded WinCC Client2 is connected to its preferred server Server2. Procedure, Phase 3 For a detailed description of the procedure, please click one of the following working steps. Note Please note that you must work alternately on Server1 and Server2. -
Page 159
Migration 5.9 Upgrading a Redundant System in Normal Operation The system behaves as follows: ● Server1 becomes the standby server. ● Archive synchronization is performed for the message archives, process value archives and user archives. ● If system messages have been configured, a corresponding process control message is generated. -
Page 160: Phase 4: Defining Master Server And Completing Upgrade
Migration 5.9 Upgrading a Redundant System in Normal Operation 5.9.6 Phase 4: Defining Master Server and Completing Upgrade Introduction After upgrading the system, all WinCC clients, for which no preferred server has been configured, are connected to the master server. As a result of the redundancy switching for upgrading, the original master server, Server1, was set to standby server.
-
Page 161
Migration 5.9 Upgrading a Redundant System in Normal Operation Upgrading your redundant system to the new WinCC version is complete. WinCC: General information and installation System Manual, 02/2017, A5E40840020-AA… -
Page 162: Migration Diagnostics
Migration 5.10 Migration Diagnostics 5.10 Migration Diagnostics Introduction When a fault occurs, clear the fault in a copy of the migrated project. Then restart the migration. Errors During Migration An error during the migration of a component does not interrupt the migration. The Project Migrator writes an error message in a diagnostics file and processes the next components.
-
Page 163: Wincc Diagnosis
WinCC diagnosis Runtime Monitoring of Actions Introduction WinCC script processing is a very open system. It allows Windows APIs and dedicated DLL functions to be called. The underlying programming language C is very comprehensive and offers a high degree of freedom. Incorrect implementation of these capabilities can also lead to crashing the system.
-
Page 164: Starting Apdiag.exe
Starting ApDiag.exe Start ApDiag Apdiag.exe is located in the installation directory in folder «…SiemensWinCCUtools». As soon as WinCC is opened, you can start the application as usual (double click). It is irrelevant whether runtime is activated or not. If no project has been opened, a link to the action controller can be created.
-
Page 165: Apdiag Menu Commands
WinCC diagnosis 6.3 ApDiag Menu Commands ApDiag Menu Commands 6.3.1 Menu Bar Overview Overview ApDiag operation is described in the following chapters. The menu bar is constructed as follows: In the online help, you can click on a menu command with the mouse and display the respective description.
-
Page 166: File — Exit
WinCC diagnosis 6.3 ApDiag Menu Commands Using «Start», «Change» and «Stop», the recording of diagnostic information (tracing) can be controlled. Menu command «OnFile» can be used for defining the output source for the individual types of diagnostics information. The runtime of actions can be measured and queue growth can be monitored with command «Profile».
-
Page 167: Diagnostics
WinCC diagnosis 6.3 ApDiag Menu Commands 6.3.3 Diagnostics 6.3.3.1 Start Description Use menu command «Start» to open a dialog, in which a diagnostics level can be selected. Select the «OK» button to start the diagnosis and write the trace point in the defined level. The higher the level, the more frequent and less serious the trace points are.
-
Page 168: Change
WinCC diagnosis 6.3 ApDiag Menu Commands Since writing the trace points influences the performance, trace should really be switched off for normal operation. Note End ApDiag This setting is also retained after ending ApDiag.exe and after restarting the computer. 6.3.3.2 Change Description With menu command «Change», you can recognize whether a trace is switched on and change…
-
Page 169: Stop
WinCC diagnosis 6.3 ApDiag Menu Commands 6.3.3.3 Stop Description Writing trace points is ended with menu command «Stop». Since writing the trace points influences the performance, trace should really be switched off for normal operation. Note End ApDiag When ending ApDiag or when changing a project, the trace is ended. 6.3.3.4 OnFile Description…
-
Page 170
WinCC diagnosis 6.3 ApDiag Menu Commands Nothing In File This option can be used to centrally centrally suppress the conversion of diagnostics information to a file. Anything In File Use this option to centrally activate the conversion of diagnostics information. The information that is actually concerned, depends on the settings under «In File». -
Page 171
The following applies for the output to a file: The file is called OnErrorN.txt and is located in the installation directory: ● ..SiemensWinCCDiagnose A certain number of entries is written to a file. Then the next file is begun. It is always started with OnError0. -
Page 172: Profile
The following applies for the output to a file: The file is called OnInfoX.txt and is located in the installation directory: ● ..SiemensWinCCDiagnose Particular attention is paid to the file size. 64 KB is written to a file and then the next file is begun.
-
Page 173
WinCC diagnosis 6.3 ApDiag Menu Commands Decreasing the Load Since performance measurements themselves will cause extra load and any settings made in this context are retained after restarting WinCC or the computer, a superordinate switch has been integrated, which allows a quick overview to prevent any diagnostics measurements from remaining switched on. -
Page 174
WinCC diagnosis 6.3 ApDiag Menu Commands General If option «Call On Time for each Action» is activated, a time measurement is performed for every action that is executed and is output with standard function «On Time». Example Check If checkbox «Check wich Action need more than xx msec» is activated, the runtime for all actions that run longer than the defined time is output. -
Page 175: Filltags
WinCC diagnosis 6.3 ApDiag Menu Commands grown by more than 30 entries (less than 70 processed from the 100 new jobs). If this is the case, the following diagnostics information is output in the form of a printf(). Example 6.3.3.6 FillTags Description Using menu command «FillTags», saving important diagnostics values in tags can be switched…
-
Page 176: Output
WinCC diagnosis 6.3 ApDiag Menu Commands 6.3.4 Output 6.3.4.1 Output On Screen Description Use menu command «Output On Screen» to open the diagnostics window. The previously collected trace entries are output here. Unlike Output Window, the diagnostics window is only updated when opening and with the «Refresh» button. The contents are only deleted if Reset is actuated or the diagnostics buffer has been written full.
-
Page 177: Output To File
WinCC diagnosis 6.3 ApDiag Menu Commands 6.3.4.2 Output To File Description Menu command «Output To File» can be used one time to put the previously collected trace entries into a text file. 6.3.4.3 Reset Buffer Description Use menu command «Reset Buffer» to delete the previously collected trace entries. This functionality corresponds with the «Reset»…
-
Page 178
The action which calls the error box is not resumed until the box has been closed. This is comparable to a Message Box with a loop or a Sleep(). To check whether an action is blocking processing: 1. Start …SiemensWinCCuToolsApdiag.exe. 2. Select «Info > FirstAction». 3. Enter the name of a text file in dialog «Save as». -
Page 179
WinCC diagnosis 6.3 ApDiag Menu Commands And the following OnErrorExecute is output: WinCC: General information and installation System Manual, 02/2017, A5E40840020-AA… -
Page 180
WinCC diagnosis 6.3 ApDiag Menu Commands Note «MB_SYSTEMMODAL» parameter Execution of a message box function with parameter «MB_SYSTEMMODAL» ensures that the message box is displayed in the foreground. If this parameter is not specified, the message box is hidden to users and (in the background) and cannot be operated. Mouse click events outside the message box are written to a buffer and processed after you exit the message box. -
Page 181: Count Of Connections
WinCC diagnosis 6.3 ApDiag Menu Commands 6.3.5.2 Count of Connections Description The menu command «Count of Connections» lists all applications that have established a connection to the action control. Example =============================================================== 1.Applikation: GSC_RT 2.Applikation: ITLG-RT 3.Applikation: PDLRuntimeSystem 4.Applikation: APDiagnose =============================================================== 6.3.5.3 Count of Actions in RequestQueue Description…
-
Page 182: Count Of Actions Of Each Transaction
WinCC diagnosis 6.3 ApDiag Menu Commands One transaction is established e.g. for every event-controlled action, for every picture window, which contains at least one cyclic action, and for global scripts. Example =============================================================== 1.Applikation: GSC_RT Count of Transactions 1 2.Applikation: ITLG-RT Count of Transactions 0 3.Applikation: PDLRuntimeSystem Count of Transactions 7 4.Applikation: APDiagnose Count of Transactions 0 ===============================================================…
-
Page 183: Count Of Tags In Each Transaction
WinCC diagnosis 6.3 ApDiag Menu Commands 6.3.5.6 Count of Tags in each Transaction Description Menu command «Count of Tags in each Transaction» lists the number of tags requested in the transactions. The output is in the following form: ● Name of the Application ●…
-
Page 184: Count Of Actions In Cycle
WinCC diagnosis 6.3 ApDiag Menu Commands 6.3.5.7 Count of Actions in Cycle Description Menu command «Count of Actions in Cycle» lists the amount of cyclic actions sorted by trigger. In this case, the numerical values correspond with the following triggers: 250 ms 500 ms 10 s…
-
Page 185: Count Of Functions 112
WinCC diagnosis 6.3 ApDiag Menu Commands 6.3.5.8 Count of Functions Description Menu command «Count of Functions» provides the number of standard functions and project functions and lists the functions by name. Example =============================================================== Count of Functions 112 FunctionName UTC PathName \SERVER1WinCC50_Project_GSLasttest libraryUTC.Fct FunctionName WriteNow PathName \SERVER1WinCC50_Project_GSLasttest libraryWriteNow.Fct…
-
Page 186: Output Window — Open / Close
WinCC diagnosis 6.3 ApDiag Menu Commands 6.3.7 Output Window — Open / Close Description Opens or closes the output window. The output window corresponds with application window GSC diagnosis, but offers the following advantages: • It is independent of the configuration. The configuration does not have to be accessed, especially with third-party projects.
-
Page 187
WinCC diagnosis 6.3 ApDiag Menu Commands • It remains visible with an picture change as well. • It can be opened even before activating runtime and can therefore show error messages during power up, which remain hidden from the application window GSC diagnosis. WinCC: General information and installation System Manual, 02/2017, A5E40840020-AA… -
Page 188: Appendix
WinCC diagnosis 6.4 Appendix Appendix 6.4.1 Trace points and their diagnostics level Introduction Following is a list of selected trace points. The trace points indicated with «d» can be changed in the respective level. These are allocated to level 9 by default. Overview Trace point Level…
-
Page 189: System Messages
WinCC diagnosis 6.4 Appendix Trace point Level Description no PCode A Global Script action or a function con‐ tains no executable code (P-Code). Measures: Compile action or function. Error in FunctionName Incorrect function name. Function %s unknown. Unknown function wrong ReturnTyp Return value type is invalid.
-
Page 190
WinCC diagnosis 6.4 Appendix Overview Legend for the «Type» column: ● 1 = Note ● 2 = Warning ● 3 = Fault Number Type Short description Text in diagnosis Description in Alarm Logging 1007000 Overflow ActionOverflow: more than Overflow, more than 10000 actions in 10000 Actions to work the queue. -
Page 191
1007007 Info FindFirstFile INVALID_HAN‐ On multi-user projects, the directory .. DLE_VALUE GetLastError() SiemensWinCCaplib is enabled with the name SCRIPTFCT. If there is no access to the directory, this entry is found and a second at‐ tempt is started. 1007007 Info Alles vorbei INVALID_HAN‐… -
Page 192
Type Short description Text in diagnosis Description in Alarm Logging 1007007 Info vor share Multi-user project: Before enabling di‐ rectly ..SiemensWinCCaplib. 1007007 Info nach share Multi-user project: After enabling di‐ rectly ..SiemensWinCCaplib. 1007007 Action error 2 Deactivation : Action was… -
Page 193: Licensing
Licensing Software Has a Value Usage Authorization With the purchase of the WinCC software you obtain an unrestricted right to usage of the software. You are entitled to our warranty, our support and service. The software is protected against unlawful use. The programs protected in such a manner can run only in an unrestricted manner when a valid license for the software package has been transferred to the hard disk of the corresponding computer.
-
Page 194: Overview Of The Licensing
Licensing 7.2 Overview of the licensing Overview of the licensing Introduction When you purchase the WinCC Basic software package or a WinCC option you obtain license keys in the following form: ● As storage medium with license keys ● Via the Internet (online software delivery) During the installation of the licenses, the required license keys are copied to the hard disk of the computer.
-
Page 195
Licensing 7.2 Overview of the licensing A copy protection prevents the copying of license keys to a license data storage medium or hard disk. Encryption technology and alteration of the physical file structure prevent the «functional» copying of a license key for a protected program. NOTICE Do not change names and properties of the «AX NF ZZ»… -
Page 196
Licensing 7.2 Overview of the licensing Client licensing for «RT Client» and «RC Client» You can use these licenses for both clients without a custom project as well as for clients with a custom project. Note the following: ● Microsoft SQL Express must be installed. If the SQL Standard Server is installed, the «RT Client»… -
Page 197
Licensing 7.2 Overview of the licensing The following applies for the counting of the licenses for the archive: ● The tags for the process value archives are counted individually. The number of tags is checked in Runtime. ● The tags for the compressed archives are not included in the license count. ●… -
Page 198: Basic License Types And License Types In Wincc
Licensing 7.3 Basic license types and license types in WinCC Basic license types and license types in WinCC Introduction Each valid license key for WinCC is provided with a 20-digit license number. This number is also transferred by the license medium to the computer when the license key is transferred. You can have the license numbers with the associated basic license types and license types displayed with the «Automation License Manager»…
-
Page 199
Licensing 7.3 Basic license types and license types in WinCC Basic license types and license types The following basic license types and license types are differentiated. The software behaves differently for different types. Basic license types Description Single Standard license with no time restrictions; you can transfer it to any computer and only use it locally there. -
Page 200
Licensing 7.3 Basic license types and license types in WinCC License Types Description Count relevant With this license, the use of the software is limited to the number of tags or clients specified in the agreement. In case of several licenses of the «Count Relevant» type, the objects listed under «Validity» are added together. -
Page 201: Wincc In The Demo Mode
Licensing 7.4 WinCC in the Demo Mode WinCC in the Demo Mode Reaction to missing license If a license is missing, WinCC runs in demo mode. This allows you to operate WinCC for testing and presentation purposes or for local configuration modifications if only one WinCC RT license is available.
-
Page 202: How To Manage Licenses
Licensing 7.5 How to manage licenses How to manage licenses Introduction You manage the WinCC licenses with the Automation License Manager. You transfer licenses with the Automation License Manager: ● To use licenses on a computer with WinCC. ● To remove licenses from one computer so that the licenses can, for example, be used on another computer.
-
Page 203
Transferring the licenses 1. Connect the WinCC license data storage medium with the computer. 2. Open the Automation License Manager in the «Siemens Automation» program group. 3. Select the drive in the navigation window. The WinCC licenses on the license data storage medium are displayed. -
Page 204: How To Upgrade Licenses
Procedure 1. Connect the license data storage medium with the computer. 2. Open the Automation License Manager in the «Siemens Automation» program group. 3. In the navigation window, select the drive where the license to be upgraded is located. 4. Select this license from the table.
-
Page 205: Diagnostics Of Licensing Problems
«SIMATIC WinCC» icon. How to check the licenses using the Automation License Manager 1. Open the Automation License Manager in the «Siemens Automation» program group. 2. Select the «Management» view in the Automation License Manager. 3. Select the storage location of the license key in the navigation window. The available license keys are displayed.
-
Page 206
Licensing 7.7 Diagnostics of Licensing Problems The «License.Log» and «LicenseLog.xml» diagnostic files The «License.Log» and «LicenseLog.xml» diagnostic files display the licenses called by WinCC. If a license is missing, a corresponding entry is shown. The files are located in the WinCC installation path in the «diagnose» folder that is automatically set up when WinCC is run for the first time. -
Page 207: Restore License Key
– Serial number (license number). You can find this information on the «Certificate of License» (CoL). See also Basic license types and license types in WinCC (Page 198) Internet: Contact person database (http://www.automation.siemens.com/partner/index.asp) WinCC: General information and installation System Manual, 02/2017, A5E40840020-AA…
-
Page 208
Licensing 7.8 Restore license key WinCC: General information and installation System Manual, 02/2017, A5E40840020-AA… -
Page 209: Performance Data
Performance Data Performance Data Contents This chapter provides important technical data and performance limits on WinCC V7. WinCC: General information and installation System Manual, 02/2017, A5E40840020-AA…
-
Page 210: Configurations
Performance Data 8.2 Configurations Configurations Quantity structure in a multi-user system The performance of the WinCC system depends on the employed hardware and the volume of process data. The following configurations were tested as typical scenarios: Quantity Comment Server or redundant server pairs 18 servers WinCC client with its own project: Access to a maximum of 18 WinCC serv‐…
-
Page 211: Graphics System
Performance Data 8.3 Graphics System Graphics System Configuration Observe the following restrictions: ● The number and complexity of the objects used affect the performance. ● PDL files larger than 100 MB are not displayed in WinCC Runtime. ● The performance data can be limited by system resources. Maximum Objects per picture No limit…
-
Page 212: Message System
Performance Data 8.4 Message system Message system Configuration Maximum Configurable messages per server/single-user station 150 000 Process tags per message line User text blocks per message line Message classes (incl. system message classes) Message types per message class Message priorities 17 (0…16) Runtime The performance data can be limited by system resources.
-
Page 213: Archiving System
Performance Data 8.5 Archiving system Archiving system Configuration Maximum Trend window or diagram window per picture Configurable trends per trend window Bar diagrams per diagram window Tables per picture Columns per table Values per table 30 000 Archives per single user/server Archive tags per single-user station/server 80 000 1) Dependent on number of licensed archive tags (ArchivTags).
-
Page 214: User Archives
Performance Data 8.6 User archives User archives Configuration The performance data can be limited by system resources. The fields of the user archives are mapped as columns in the WinCC Configuration Studio. Maximum Total archives No limit User archive fields Data records per user archive 10 000 User archive views…
-
Page 215
Performance Data 8.6 User archives WinCC: General information and installation System Manual, 02/2017, A5E40840020-AA… -
Page 216: Reports (Report Designer)
Performance Data 8.7 Reports (Report Designer) Reports (Report Designer) Configuration The performance data can be limited by system resources. Maximum Configurable reports No limit Report lines per group Tags per report 1) The number of tags per report is dependent on the performance of the process communication.
-
Page 217: Scripting With Vbs And Ansi-C
Performance Data 8.8 Scripting with VBS and ANSI-C Scripting with VBS and ANSI-C Runtime The performance data can also be influenced by the following factors: ● Hardware used ● Type of configuration ● Running processes, for example, Tag Logging or Alarm Logging The following measured vales indicate the difference between VB scripting and C scripting based on the comparison of orientation values.
-
Page 218: Process Communication
Performance Data 8.9 Process Communication Process Communication Introduction The following table provides information on the possible configurations and maximum number of connections. Note The limit values listed in the table are also dependent on the performance capability of the system and the quantity structure of the WinCC project (e.g. number of process values/time unit).
-
Page 219
Performance Data 8.9 Process Communication Communication channels in WinCC MPI/Profibus MPI/Profibus Industrial Industrial based Soft-Net Hard-Net Ethernet Ethernet Soft-Net Hard-Net ● Industrial Ethernet ISO L4 (1) ● Industrial Ethernet ISO L4 (2) SIMATIC 505 Ethernet TCP/IP ● Industrial Ethernet TCP/IP Profibus FMS ●… -
Page 220
Digi-Board with 8/16 ports. 5) Communication takes place via the standard Ethernet port of the computer or corresponding Siemens communications processors. The maximum possible number of connections is limited by the available system resources and their performance data, particularly CPU, RAM, Ethernet connection. -
Page 221: Index
Index Communication process, 77 Diagnostics data, 77 Compatibility, 54 Component, 8, 36, 41 Access right, 28, 31, 32, 56 Communication drivers, 8 ActiveX controls, 73 Components supplied, 8 Alarm Logging, 83 Connection interruption, 63 ANSI-C, 217 Converting project data, 136 Performance, 217 Customer support, (See support) ApDiag, 163, 164…
-
Page 222
Index Installation, 11, 202 Missing licenses, 205 Powerpack, 194 RC license, 194 General information, 54 Rental, 198 Global Scripts, 217 Repair of license, 207 Performance, 217 RT license, 194 Graphics System, 211 Single, 198 Quantity Structure, 211 Upgrade, 198 Upgrading, 204 WinCC License Analysis, 205 License Agreement, 11 Hardware Requirement, 17… -
Page 223
Index Multiple languages, 82 OPC UA Multi-user project, 147 Raw data tag, 75 Migration, 147 OPC_E_MAXEXCEEDED, 76 Multi-user system, 210 Operating system, 19, 59 Quantity structure, 210 Access rights, 28, 56 Prevent access, 26 Operation, 52 Domain, 19 Netware, 61 Novell Netware client, 61 Network adapter, 63 Energy-saving mode, 63… -
Page 224
Index Trends, 213 SIMATIC HMI, 28, 31, 32, 56 User archive, 214 User group, 28, 56 User archives, 214 SIMATIC Manager WinCC clients, 210 User Rights, 28, 56 SIMATIC Security Controller, 36 Software, 19 Requirement, 19 SQL master database, 63 RAS, 63 Start menu, 36 RDP, 78… -
Page 225
Index Include project, 32 Windows Server 2012, 19 SIMATIC HMI, 28, 31, 32, 56 Windows Start menu, 36 Windows taskbar, 59 Prevent display, 59 VBA, 73 VBS, 217 Performance, 217 Virtualization, 19 Virus scanner, 54 Visual Basic Script in WinCC, 217 WinCC, 63, 69 General information, 69 Installation, 7, 16, 34… -
Page 226
Index WinCC: General information and installation System Manual, 02/2017, A5E40840020-AA…