
“Windows Cannot Access \ Computer Name” is mainly a network-related problem of your Local Area Connection and generally this error occurs due to the lack of network permissions, improper installed Network Drivers, and sometimes a single corrupted Windows Registry can be the reason too. 
Most of the time people have this problem right after creating a new LAN Connection in their network and mainly the error popup message appears when every time you try to open the shared folder located on the other computer.
The bad thing which I really hate about this network error is, not only on the folder you can also get this error message on any network file or even on the network shared drive too. And believe it or not but sometimes it gets really hard to find where the actual fault is, and what do we really need to do to fix the problem.
Network error
Windows cannot access \ Computer Name
You do not have permission to access \ Computer Name contact your network administrator to request access.
If you’re having this problem on your Local Area Network, then I don’t think you should really need to worry about it;
Because with the help of this tutorial I’ll definitely going to help you out by showing you, how you can change the permissions configuration of your computer to read and write the files or folder on the shared network drive through your Windows Network Place.
So, Let’s See How to Troubleshoot This Error;
This problem can occur on any version of windows, even if you are using the latest Windows 10 or running an old Windows 7 Computer. Normally, Access Denied Network Error comes because of some kind of network-related permission problem. But sometimes there are some other reasons for this error to shows up on your computer’s screen and here’s the list of those reasons which can be possibly happening on your computer:
- Improper LAN Connection
- Improper LAN Sharing Setting
- Improper Drive or Folder Security Setting
- TCP/IP NetBIOS Setting is Unconfigured
- Windows Registry got Corrupted
- Network Driver got Corrupted
1# Solution – Improper LAN Connection and Sharing Setting
If you have recently created a LAN connection by yourself, or maybe tried to start the file sharing, or changed the LAN Wire or Modem, or just made any changes in your LAN configuration, then this is the time where you’ll need to rectify it all.
Let’s start with the connections and wires;
To make a connection between two different network devices like a Modem and Computer, we actually need to use a Straight cable. On the other hand, the same network devices like ‘PC to PC’ or ‘Modem to Modem’ need a Cross-over cable to interact properly.
 The reason behind explaining that is because if you have recently changed any cable in your network then make sure the cable you used is suitable for the proper connection.
Both of the cables look exactly the same but the internal wiring is completely different and that’s why people usually get confused while creating their PC to PC LAN connection.
The next configuration is the ‘Sharing Setting’. Check for the proper IP configuration on every connected device in your network. If all the PC’s have an IP address configured in it, then make sure it won’t conflict. Confliction mainly happens when two different PC has the same IP configuration.
You’ll also need to assign the IP address to all of your Share PCs if you found the setting is pre-set on “Obtain the IP Address Automatically”.
To change or check your saved setting, you can go to the ‘Network and Sharing Center‘ and then on the left sidebar, click on “Change Adapter Settings” option. Now right-click on your network adapter and select “Properties“. After that, select “Internet Protocol Version 4 (TCP/IPv4)” and then click on its “Properties” button.
 Then on the ‘Advanced sharing setting’, make sure everything is configured as listed below:
- Turn on network discovery.
- Turn on file and printer sharing.
- Allow windows to manage homegroup connection (recommended).
- Turn on sharing so anyone with network access can read and write files in the public folders.
- Use 128-bit encryption to help protect files sharing connections (recommended).
- Turn off password protected sharing.
Note: Make these changes on your current selected network profile.
 You’ll also need to check that all your shared PC is working on the same network Workgroup. To check or change the workgroup, you can go your ‘Computer properties’ and click on the “Change setting” button under the “Computer name, domain, and workgroup settings”, and then click on “Change…”.
 After that click on the “Network ID” on the same pop-up window and then follow the instruction given in the picture below:

2# Solution – Improper Drive or Folder Security Setting
80% of you will be going to fix your problem by following this particular solution because generally, people do forget to change the security setting while making any drive/file/folder shared in their network place.
So now I’m going to show you how you can easily configure the permission setting to connect with all devices in your network just to read and write the files or folder.
If you’re having this problem with all of your network drives and folder and wanted to grant permission to all of those shared folders or drives at once, then it’s not possible and you’ll need to repeat all these steps for all of your shared drives and even for a single file and folder.
If the list of sharable File/folder contains in a single drive, then granting permission for that single drive can make all the internal File/Folder read and writeable for the other network computer.
Step 1 – Give Sharing Permission to Everyone
To configure the sharing permission, First, you’ll need to right click on that drive, file or folder which you wanted to share and then select ‘Properties’.
In the properties window, select the “Sharing” tab and then click on “Advanced Sharing …” button. Now make sure you have ticked on the “Share this folder” button.
After that, click on the “Permission” button and give “Everyone” user the Full Control.
 Step 2 – Add “Everyone” Username in Security Tab.
This step allows you to add a new username into the security tab of your file/folder/drive’s properties, just to make it accessible to all users which is connected to your LAN.
To grant the access to everyone, we actually need a username called “Everyone” under the security tab, so your OS can permit other connted PC’s to cross the security. But still, there is no username called ‘Everyone’ is mentioned under the security tab of your shared drive, file or folder.
So now again in the properties windows, click on the Security Tab and then select the “Edit” button which will lead you to another pop-up window, where you can add the username by clicking on another “Add…” button.
Now in the third pop-up window, you’ll have to click on the “Advanced …” button which will help to find all of the linked usernames connected to your PC.
On the fourth pop-up, click on the “Find Now” button to make your computer to show you the list of all available users;
And in between all those usernames, you’ll find the username called “Everyone” in the list, which you need to select and then click on “OK”.

After that, you’ll again need to click on the “Ok” and at this moment you will be seeing the username “Everyone” is showing under the users and groups setting.
 Step 3 – Allowing Permission to “Everyone”.
When you have done with adding the username, then it’s the time when you need to grant the full permission to the username “Everyone” in the security tab, just to make it accessible from any LAN connected computer.
Now, click on the username “Everyone” and then tick on the Full control option and then click on “Apply”.
 After that, you will able to see the “Windows Security” pop-up on the screen, which will apply the setting for all of your files containing in that shared drive or folder.
So, at this moment you’ll just need to sit back and watch the whole process until it gets completed and make sure you don’t click on the cancel button or otherwise you’ll get the same problem while accessing some files in the future.
After that, you can actually able to read and write the files on that drive right after when this whole security configuration gets done. If not, then just continue.
3# Solution – Configure TCP/IP NetBIOS
‘TCP/IP NetBIOS’ also known by its another name “NetBT” and it’s a network protocol based on session layer of the OSI model, allowing applications on separate computers to communicate over a local area network.
Using the NetBIOS over TCP/IP (NetBT) service on the network allows users to share files, printers, and log on to the network. If the NetBT service is unconfigured, some of these functions might not be available to the user. If this service is disabled, any services that explicitly depend on it will fail to start.
So, make sure on every shared computer of your network the ‘NetBIOS over TCP/IP’ is enabled and to confirm that, here is the procedure given below: 
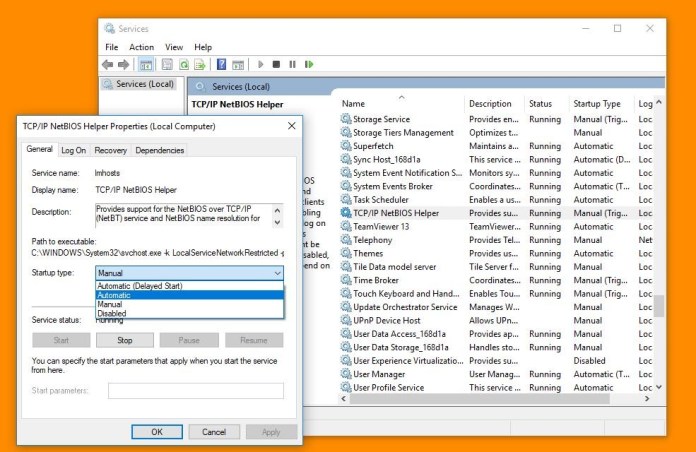
- To change the configuration, first, you’ll need to search the “services.msc” on the Windows Starts Menu to open the ‘Windows Servies’ (where you can easily start, stops, and configures any Windows services).
- Now on the Services window, search for a service named “TCP/IP NetBIOS Helper” and double-click on it. Then on the pop-up general tab, change the ”Startup type setting” to the ‘Automatic’.
 After when you have done with the services configuration, then now it’s the time when you need to enable the ‘NetBIOS over TCP/IP’ setting in your computer’s Network Adaptor.
To do that, you’ll have to again open the “Internet Protocol Version 4 (TCP/IPv4)” properties. Then on the pop-up, click on the “Advanced…” button, select “WINS” tab and pick “Enable NetBIOS over TCP/IP” as your main preference. And that’s it.
 4# Solution – Corrupted Windows Registry
 4# Solution
 The Windows Registry is a hierarchical configuration storage database that stores settings for the Microsoft Windows Operating System and other installed software in your Windows.
The registry is the main target when a virus or malware starts to corrupt your windows and a single changed value in your Windows Registry can cause this network related problem. You can fix your Windows Registry by using some best in class Registry Cleaner and that will fix your problem by just doing some simple steps.
But before using that, I have some couple of manual registry settings which you can try to fix the issue;
First, open your Windows Registry Database by using the run command “regedit”. You can press Windows + R Key to instantly show the Run Commander. Or you can just search the “regedit” on Starts Menu.
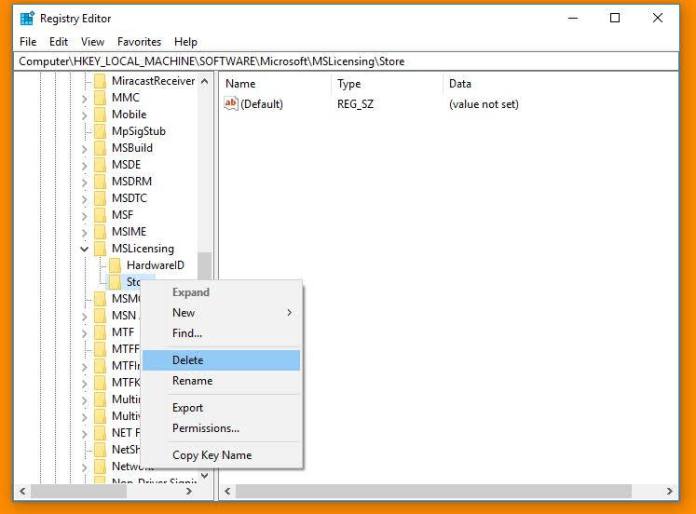
When it gets open, go to this location “HKEY_LOCAL_MACHINESOFTWAREMicrosoftMSLicensing” into the database.
Now expand the ‘MSLicensing’ folder and then delete both of the “HardwareID” and “Store” sub-folders listed under the expansion. Make sure you only delete sub-folders and not the whole MSLicensing.
This can fix the connection licensing problems in case, your connection is having any.
 After that, go to the “HKEY_LOCAL_MACHINESOFTWAREMicrosoftWindowsCurrentVersionpoliciessystem” location and then create a new DWORD Value named LocalAccountTokenFilterPolicy and then click Modify or double click on the key and type “1” under the ‘Value data’.
 If still not fixed? here’s an article about;
How to Fix Registry Related Issues using a Registry Cleaner?
The Registry is a very important database that resides within your Operating System. It contains vital information on all the settings, preferences, etc. on hardware and software installed in your rig. When it comes to programs, the Registry also maintains data like the location of the program, what is required to launch the program, what sort of resources it needs from the computer, and so on and so forth… Read More

5# Solution – Corrupted Windows Drivers

Computer operating systems are able to support network adapters via software known as Network driver. Network drivers are actually that you needed in order to connect your computer to any network. If something bad happens to your network drivers then it’s quite possible that you get some constant errors on your screen while working in the network area.
Now updating the drivers is the best thing what you can do to fix all the drivers related issue and make everything back to normal.
What Is a Network Driver, And How To Install It?
As a PC user at some point, you have heard of Network Drivers. Have you ever wondered what network drivers is all about? Prior to figuring out what a network driver is, let us get to know few things about something called Network Adapter… Read More

“That’s all for now, thanks for sticking with the article, and you know it will always good to let me know about the article, in the comments below.” 🙂
Still Finding Solution or Need Some Help ?
If you still can’t find your solution then maybe you’ll need to contact us and we will definitely gonna help you out by our technical support.
Click Here For The Technical Support
How do I fix the network error windows Cannot access the computer name?
Step 1: Enable NetBIOS over TCP/IP
- Click Start, click Control Panel, and then click Network and Internet Connections.
- Click Network Connections.
- Right-click Local Area Connection, and then click Properties.
- Click Internet Protocol (TCP/IP), and then click Properties.
- Click the General tab, and then click Advanced.
Resolution
- Right-click the file or folder, and then select Properties.
- Select the Security tab.
- Under Group or User names, click your name to see the permissions you have. …
- Select Edit, and then select to check the check boxes for the permissions that you need, and then select OK.
How do I give permission to access a network computer?
Setting Permissions
- Access the Properties dialog box.
- Select the Security tab. …
- Click Edit.
- In the Group or user name section, select the user(s) you wish to set permissions for.
- In the Permissions section, use the checkboxes to select the appropriate permission level.
- Click Apply.
- Click Okay.
1 мар. 2021 г.
How do I give permission to access a network drive in Windows 10?
Right-click the drive you want to share, click Share with, then click Advanced sharing. Click the Sharing tab, and then click Advanced Sharing. Fill in Share name with the desired name of the drive, then click Permissions button.
Why can’t my computer connect to a network?
“Windows Cannot Access Computer Name” is mainly a network-related problem of your Local Area Connection and generally this error occurs due to the lack of network permissions, improper installed Network Drivers, and sometimes a single corrupted Windows Registry can be the reason too.
Can’t connect to network drive Windows 10?
Can’t connect to shared network drive
- Close all running programs.
- Click on Start Menu and then rt-click on This PC and choose Properties.
- Click on “Advanced System Settings” on the left side of the window.
- Click on Computer Name tab.
- Click on Network ID button.
- Accept the default of “This computer is part of a business network”.
- Click on the Next button.
28 авг. 2018 г.
How do I fix not accessible?
After the data recovery, you can try to format your hard drive to fix the “drive is not accessible” error. To do it, go to My Computer or This PC, right-click the disk you need to repair and then choose Format. In the pop-up window, you can set the file system and cluster size and then click the OK button.
How do I fix you don’t have permission to access contact your network administrator?
Method 2: Provide permissions through settings.
- Go to Control panel > Click on network and internet > Click on Network and sharing.
- Click on Change advance sharing settings on the left pane.
- Select the options.
27 нояб. 2018 г.
Can’t connect to this network WIFI?
Your Windows computer recognizes your network adapter because you have its drivers installed on your machine. If there’s an issue with the drivers, it can cause issues like “Windows can’t connect to this network”. One of the ways to resolve the driver-related issues is to uninstall the device and the drivers.
Can not access network drive?
If you receive “Error message 0x80070035” while trying to access your network drive, the network path can’t be found by your computer. … To resolve the issue, go to Control Panel > Network and Internet > Network and Sharing Center > Advanced Sharing Settings.
How do I give permission to access my hard drive?
Here is the full procedure: Right-click the folder, select Properties > Security Tab > Advanced at the bottom > Owner Tab > Edit > Highlight your username and put a tick in ‘Replace owner on subcontainers…’ and Apply > OK. You will only have the ‘Replace owner on subcontainers…’ box for folders not files.
How do you fix you don’t have permission to access on this server?
How can I fix the Access Denied error?
- Disable VPN software. The Access Denied error can be due to VPN software, which you can disable. …
- Turn off VPN extensions. …
- Use a premium VPN service. …
- Deselect the proxy server option. …
- Clear browser data. …
- Clear all data for a specific website in Firefox. …
- Reset your browser.
12 февр. 2021 г.
How do I allow network access?
Enable network discovery
- Open Settings. …
- Click Network & Internet. …
- In the panel on the left, click either Wi-Fi (if you’re connected to a wireless network) or Ethernet (if you’re connected to a network using a network cable). …
- Find the Related setting section on the right, then click Change Advanced Sharing Settings.
How do I change permissions on a drive?
Change sharing permissions of shared folders
- On your computer, go to drive.google.com.
- Select the folder that you want to change owners. …
- At the top right, click Share .
- Click Advanced.
- To the right of the person’s name, click the Down arrow .
- Click Is owner.
- Click Save changes.
How do I change network permissions?
To do this:
- Click Status in the main menu.
- In the Protection section, click Settings.
- Select the Firewall option.
- In the Rules section, click Settings to define the programs that can access the network/Internet.
- Find the program whose permissions you want change and modify them.
- Status
- Not open for further replies.
-
- Nov 16, 2017
-
- 16
-
- 0
-
- 4,510
-
- 0
-
#1
I have turned on network discovery and file sharing for all the network types (private, guest, public) and I have also given permissions in folders sharing property. I’m able to access the other PC that is connected on the same network on my laptop (that has this problem) but that working PC does not see my laptop on the shared network, though both the laptop and PC are in same work group and network.
After running the troubleshooter, it says the remote device or resource won’t accept the connection. Please help with this issue, i have tried the majority of the methods to fix this but nothing works, it’s like the network feature doesn’t even exist on my Windows now as it is not being discovered anywhere.
Last edited by a moderator: Sep 24, 2019
-
#14
But, then I was really fed up and gave one last try, i removed the home-group from every system on my network and ran home-group troubleshooter, nothing happened from the troubleshooter but then I created a new home-group on my laptop after removing the home-groups from every system and now, when I double clicked on my PC name in networks, the shared folder opened.
Also, when I tried same on another system in the same network, it opened there too, so I think just by removing home-groups from every system and making a new home-group from your system would work. Maybe also disabling every service using the network such as xampp and filezilla.
Last edited by a moderator: Sep 24, 2019
-
- Nov 29, 2016
-
- 280
-
- 1
-
- 4,865
- 36
-
#2
try to ping «pc-name» see if you got «pc-name» ip v4 or ip v6?
-
- Nov 16, 2017
-
- 16
-
- 0
-
- 4,510
- 0
-
#3
this is what i get after ping pc-name
ping pc-name
Pinging pc-name [192.168.0.100] with 32 bytes of data:
Reply from 192.168.0.100: bytes=32 time<1ms TTL=128
Reply from 192.168.0.100: bytes=32 time<1ms TTL=128
Reply from 192.168.0.100: bytes=32 time<1ms TTL=128
Reply from 192.168.0.100: bytes=32 time<1ms TTL=128
Ping statistics for 192.168.0.100:
Packets: Sent = 4, Received = 4, Lost = 0 (0% loss),
Approximate round trip times in milli-seconds:
Minimum = 0ms, Maximum = 0ms, Average = 0ms
-
- Nov 29, 2016
-
- 280
-
- 1
-
- 4,865
- 36
-
#4
-
- Nov 16, 2017
-
- 16
-
- 0
-
- 4,510
- 0
-
#5
-
- Nov 29, 2016
-
- 280
-
- 1
-
- 4,865
- 36
-
#6
the latest one has removed homegroup.
go to 192.168.0.100 make sure that youre sharing D.
right click D folder -> properties -> sharing -> advanced sharing -> check «share this folder» -> click permissions -> give everyone full control.
-
- Nov 16, 2017
-
- 16
-
- 0
-
- 4,510
- 0
-
#7
-
- Nov 29, 2016
-
- 280
-
- 1
-
- 4,865
- 36
-
#8
make sure both pc/laptop on private connection,
setting -> network & internet -> change connection properties
-
- Nov 16, 2017
-
- 16
-
- 0
-
- 4,510
- 0

-
- Dec 27, 2012
-
- 1,232
-
- 3
-
- 19,965
- 252
-
#10
— verify Both connection are labeled as home network
— Both computers : System > advanced setting > rename this computer or change it’s domaine = put in new work group name
— Activate file sharing and discovery for both computers
Usually you do not need computer to join a home group as they already belonging to the same work group
-
- Nov 16, 2017
-
- 16
-
- 0
-
- 4,510
- 0
-
#11
to be clear the problem is not in the network or another system the problem is in my laptop, when you go to this pc>network>your pc name>shared folder, you will be able to access the folder that you have shared from there but in my case i am not able to open the folder from my pc itself, when i go to network>pc-name>sharedfolder, it says windows cannot access \ but when go to that folder directly from my drive it opens up.
-
- Nov 16, 2017
-
- 16
-
- 0
-
- 4,510
- 0
-
#12
Let’s verify if these services are started.
a. Press Windows key + R.
b. Type ‘sevices.msc’ and hit ENTER.
1. DHCP Client
2. DNS Client
3. Network Connections
4. Network Location Awareness
5. Remote Procedure Call (RPC)
6. Server
7. TCP/IP Netbios helper
8. Workstation
9. Function Discovery Resource Publication,
10. UPnP Device Host services
All of these services should be started, and their startup type should be automatic.
i have tried this too
-
- Nov 16, 2017
-
- 16
-
- 0
-
- 4,510
- 0
-
#14
But, then I was really fed up and gave one last try, i removed the home-group from every system on my network and ran home-group troubleshooter, nothing happened from the troubleshooter but then I created a new home-group on my laptop after removing the home-groups from every system and now, when I double clicked on my PC name in networks, the shared folder opened.
Also, when I tried same on another system in the same network, it opened there too, so I think just by removing home-groups from every system and making a new home-group from your system would work. Maybe also disabling every service using the network such as xampp and filezilla.
Last edited by a moderator: Sep 24, 2019
-
- Dec 27, 2012
-
- 1,232
-
- 3
-
- 19,965
- 252
-
#15
Great news then, thanks for your feedback.
-
- Nov 16, 2017
-
- 16
-
- 0
-
- 4,510
- 0
-
- Dec 27, 2012
-
- 1,232
-
- 3
-
- 19,965
- 252
- Status
- Not open for further replies.
| Thread starter | Similar threads | Forum | Replies | Date |
|---|---|---|---|---|
|
|
Question Why is there suddenly a network folder in file explorer? | Windows 10 | 2 | Tuesday at 2:14 AM |
|
D
|
Question lost network connection | Windows 10 | 1 | Jan 28, 2023 |
|
Z
|
[SOLVED] Unresponsive Web Pages (Network OK) | Windows 10 | 10 | Jan 25, 2023 |
|
|
Question Does Windows 10 connect to internet automatically after fresh installation? | Windows 10 | 4 | Jan 5, 2023 |
|
|
[SOLVED] Unidentified Network After Wake from Sleep, fixed with unplug/re-plug network cable | Windows 10 | 2 | Jan 4, 2023 |
|
N
|
Question Serious and never experienced before network problem | Windows 10 | 6 | Jan 4, 2023 |
|
|
Question Try as I may, I cannot see a certain computer from another on my home network | Windows 10 | 7 | Nov 30, 2022 |
|
K
|
Question Problem after network reset | Windows 10 | 1 | Oct 12, 2022 |
|
|
Question Map Network Drive, Username/Password incorrect | Windows 10 | 3 | Sep 25, 2022 |
|
|
Question My Network Card always gives error on cold/hard boot ? | Windows 10 | 13 | Jul 6, 2022 |


- Advertising
- Cookies Policies
- Privacy
- Term & Conditions
- Topics
При настройке локальной сети на Windows 7,8 и 10 требуется правильно назначать доступы пользователям и настраивать службы. Иначе возникает сетевая ошибка с кодами 0x800070035, 0x80004005 или 0x800704cf и появляется сообщение, что Windows не удается получить доступ к нужной сетевой папке, диску, устройству или файлу.
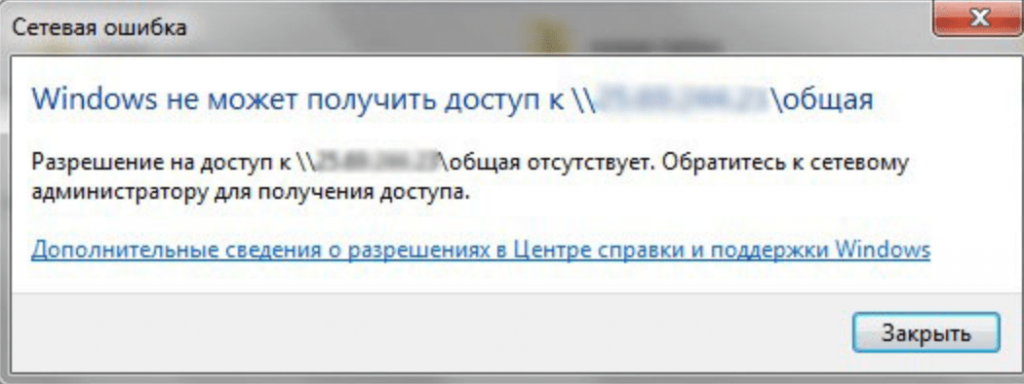
Сообщение об ошибке, в зависимости от версии ОС, может выглядеть следующим образом:
- Windows не может получить доступ к компьютеру в локальной сети. Не найден сетевой путь. Код ошибки:
- Windows не может получить доступ к сетевой папке/диску/иному расположению в локальной сети.
- Windows не может получить доступ к *Папка или файл*. Разрешение на доступ к *Путь до папки* отсутствует. Обратитесь к сетевому администратору для получения доступа.
[Обновление] Быстро исправить ошибки с кодом 0x80004005 (а иногда и с остальными) удается, веся всего одну запись в реестр:
- Открыть «Пуск» -> «Выполнить», ввести regedet и нажать Enter.
- В разделе реестра HKEY_LOCAL_MACHINE перейти по пути Software Policies Microsoft Windows LanmanWorkstation.
- ПКМ — создать новый параметр имя AllowInsecureGuestAuth тип REG_DWORD Enabled Value 1 (значение 1 — включено). Перезагрузить ПК.
Оглавление статьи:
- Исправление сетевых ошибок 0x800070035 и 0x80004005
- Способ 1: Проверка настроек общего доступа
- Способ 2: Проверка работоспосоности службы Сервер
- Способ 3: Настройка свойств сетевой карты
- Способ 4: Настройка Службы компонентов
- Способ 5: Настройка доступа к сетевой папке
Исправление сетевых ошибок 0x800070035 и 0x80004005
Причины, по которым Windows 7 или 10 может получить доступ к сетевой папке или файлам, практически всегда кроются в неправильно выставленных настройках системы, нежели в каких-либо ошибках. По аналогичным причинам в локальной сети может отсутствовать доступ к другому компьютеру, и система будет выдавать ошибку «Не удалось установить соединение. Не найден сетевой путь.» с аналогичными кодами. Большинство проблем исправляется элементарно, при помощи простых изменений настроек.
Если Windows не может получить доступ к сетевой папке и выдает ошибки 0x800070035 или 0x80004005, нужно:
- Проверить настройки общего доступа.
- Убедиться, что включена сетевая служба «Сервер».
Проверка настроек общего доступа
Ошибки при получении доступа к сетевой папке часто возникают в Windows по причине неправильно выставленных доступов. Если к диску, папке, файлу или компьютеру не открыть общий доступ, то другие участники локальной сети не смогут установить соединение.
Последовательность действий:
- Выбрать сетевую папку или диск, для которых требуется создать общий доступ.
- Нажать правой кнопкой мыши, выбрать в контекстном меню «Общий доступ».
- Перейти по пункту подменю «Конкретные пользователи».
- В открывшемся окне нажать на треугольную стрелочку, расположенную рядом с кнопкой «Добавить».
- Выбрать из появившегося списка пользователя, которому требуется предоставить доступ. В случае, если в списке не будет никаких пользователей, следует выбрать вариант «Все».
- Установить права доступа для пользователя: только чтение (просмотр файлов), либо чтение и запись (возможность изменения, добавления и удаления файлов из сетевой папки).
После этого нужно нажать кнопку «Общий доступ» и, если система не покажет никаких ошибок или предупреждений, нажать на кнопку «Готово».
В Windows 8 и 10 есть более простой способ поделиться содержимым папки или диска с пользователями домашней группы:
- Нажать правой кнопкой мыши по нужной папке.
- Выбрать в контекстном меню пункт «Поделиться».
- Выбрать подпункт «Домашняя группа (просмотр и изменение)».
После этого система должна открыть доступ к указанному пути для всех пользователей локальной сети.
Проверка работоспособности службы Сервер
«Сервер» является встроенной службой в Windows, необходимой для работоспособности локальной сети и подключения к удаленным компьютерам, устройствам или файлам. Если компьютер ранее не использовался в качестве сервера или для подключения к домашней сети, служба может быть отключена. Это часто становится причиной ошибок доступа к сетевым папкам, даже когда права для всех пользователей выставлены корректно и остальные настройки ОС в норме.
Включение и выключение служб в Windows 7 и 10 происходит в Панели управления:
- Нажать «Пуск» — «Администрирование» — «Службы».
- Если вкладка «Администрирование» отсутствует в меню «Пуск», перейти в «Панель управления» и найти в списке пункт «Службы» во вкладке «Администрирование».
- Откроется окно со всеми службами, в котором требуется отыскать «Сервер».
- Кликнуть по строке «Сервер» правой кнопкой мыши, в появившемся контекстном меню выбрать пункт «Свойства».
- В открывшемся окне во вкладке «Общее» выбрать «Тип запуска»: автоматически или вручную.
Если служба изначально была выключена, «Тип запуска» будет установлен в положение «Отключена». Запуск вручную вынудит перезапускать службу каждый раз, когда потребуется доступ к сетевой папке, удаленному компьютеру или файлам в домашней группе. В автоматическом режиме служба будет запускаться самостоятельно, и заново проделывать указанные действия не потребуется.
Настройка свойств сетевой карты
Ошибки подключения к сетевым устройствам с кодами 0x800070035 и 0x80004005 могут быть решены путем выставления настроек сетевого подключения. В настройках сетевой карты нужно снять флажок с протокола iPv6, а также выполнить настройку iPv4. Метод одинаково хорошо работает в Windows 7 и 10 всех версией. Сначала следует попробовать только выключить протокол iPv6, а уже потом выполнять остальные действия, если этот простой способ не помог.
Пошаговая инструкция:
- Зайти в пеню «Пуск», перейти в «Панель управления».
- В Windows 7: Перейти в раздел «Центр управления сетями и общим доступом», затем «Изменение параметров адаптеров». Для Windows 10: В панели управления выбрать «Сеть и интернет», затем «Центр управления сетями и общим доступом», выбрать в левом меню пункт «Изменение параметров адаптеров».
- Выбрать подключение по локальной сети, по которому не удается получить доступ. Кликнуть по нему правой кнопкой мыши и выбрать пункт «Свойства».
- В свойствах сетевой карты убрать значок с протокола iPv6.
- Открыть свойства протокола iPv4, перейти во вкладку «Дополнительно».
- Открыть вкладку с названием «WINS», нажать на «Параметры NetBIOS».
- Поставить отметку, в зависимости от типа ip-адресации: «По умолчанию» для динамической ip-адресации и «Включить NetBIOS через TCP/IP» для статической.
- Нажать три раза «Ок», «Ок», «Ок».
После этого требуется выполнить несколько простых действий в Диспетчере устройств:
- Открыть «Пуск» — «Панель управления» — «Оборудование и звук» — «Диспетчер устройств».
- Перейти на вкладку «Вид», выбрать отметку «Показать скрытые устройства».
- Нажать «Сетевые адаптеры» и удалить все адаптеры 6to4.
Изменения вступят в силу после перезагрузки компьютера.
Настройка Службы компонентов
Настройки данной службы нечасто становятся причиной ошибок доступа к сетевым папкам и устройствам. По этой причине изменять настройки службы желательно в последнюю очередь, если остальные методы не помогли.
Инструкция по настройке локального доступа через Службу компонентов:
- Нажать кнопку «Пуск», ввести в поле поиска «Службы компонентов».
- Кликнуть по найденному результату правой кнопкой мыши, выбрать в контекстном меню «Запуск от имени администратора».
- В выскочившем окошке разрешить программе внести изменения на этот компьютер. Должно открыться окно со службой.
- Раскрыть окно «Службы компонентов», открыть второе окно «Компьютеры».
- Нажать по надписи «Мой компьютер» правой кнопкой мыши, перейти на вкладку «Свойства», затем «Свойства по умолчанию».
- Поставить «Уровень проверки подлинности по умолчанию» в положение «По умолчанию».
- Поставить «Уровень олицетворения по умолчанию» в положение «Олицетворение».
- Нажать кнопку «Применить».
- Нажать кнопку «Ок».
- Закрыть окно со «Службой компонентов».
Желательно сразу перезагрузить компьютер, после чего снова попробовать подключиться. Если ошибка сохраняется, следует проверить настройки доступа к сетевой папке.
Настройки доступа к сетевой папке
Windows может выдавать ошибку при доступе к папке и просить обратиться к администратору при неправильных настройках общей папки, где находятся раздаваемые файлы. При этом все устройства внутри локальной сети могут нормально обнаруживать друг-друга, и подключение устанавливается без проблем.
Просматривать содержимое сетевой папки могут только те пользователи, у которых есть доступ. Это легко проверить:
- Кликнуть по нужной папке правой кнопкой мыши, открыть «Свойства».
- Перейти на вкладку «Безопасность».
- В окне «Группы или пользователи» должна быть выбрана позиция «Все».
Если так и есть, то все в порядке. В противном случае требуется добавить новую группу:
- Нажать кнопку «Изменить» под окном «Группы или пользователи».
- Кликнуть по кнопке «Добавить», перейти во вкладку «Дополнительно…».
- Нажать «Поиск», выбрать в результатах поиска строку «Все», после чего кликнуть «Ок».
- Еще раз нажать «Ок».
Осталось выставить права для созданной группы пользователей «Все» — чтение, доступ, изменение и так далее. Аналогичным образом можно устанавливать разные настройки для отдельных групп, но это не обязательно. Одни настройки для всех пользователей снизят риск возникновения повторных ошибок доступа к минимуму.
Some Windows 11/10 users might encounter the error message Unable to access Network drive, accompanied by the error code 0x80004005 during a failed attempt to use a shared resource over the network such as a shared network hard drive. This post offers the most suitable solutions to this issue, which doesn’t include enabling SMB1; since SMBv1 is a very insecure protocol and should not be used, given that Microsoft has deprecated this feature.

When you encounter this issue, you’ll receive a similar error prompt as shown above with the following full error message;
Network Error
Windows cannot access \Computerl
Check the spelling of the name. Otherwise, there might be a problem with your network. To try to identify and resolve network problems, click Diagnose.Error code: 0x80004005
Unspecified error
Quite a number of factors can lead to the error. For instance, insufficient or no network permissions, improper installed network drivers or corrupted Windows registry.
What does the error code 0x80004005 mean?
The error code 0x80004005 is an unspecified error that can occur in different scenarios, like while extracting files from a Zip file, accessing a Network drive, etc. In some cases, a third-party backup utility or an antivirus is responsible for this error code.
If you’re faced with this issue, you can try our recommended solutions below in no particular order and see if that helps to resolve the issue.
- Disable IPV6
- Allow Full Permissions for the shared drive/folder
- Ensure NetBIOS is enabled
- Make sure Network Discovery is enabled
- Disable SMB 1.0 Protocol
- Change Network and Sharing Center settings
- Check if required services are running
- Disable/Uninstall 3rd party security software (if applicable)
Let’s take a look at the description of the process involved concerning each of the listed solutions.
1] Disable IPV6
This solution requires you to disable IPv6 and see if the Unable to access Network drive error 0x80004005 issue is resolved.
2] Allow Full Permissions for the shared drive/folder
You might be unable to access a computer on a network in Windows 11/10 due to the improper networking sharing permissions for the shared folder or drive. In this case, you can allow/grant full permissions on the shared drive/folder.
3] Ensure NetBIOS is enabled
NetBIOS allows networked computers to share resources. If this isn’t working or isn’t enabled, it could be causing the error. So, ensure that NetBIOS is enabled on your Windows computer.
4] Make sure Network Discovery is enabled
This solution requires you to make sure that Network Discovery is turned on for Private Network and make sure that the automatic setup checkbox is enabled. Also, make sure Turn on file and printer sharing is also enabled – and make sure the Turn off password-protected network sharing is enabled for All Networks.
5] Disable SMB 1.0 Protocol
SMB 1.0 Protocol has now become obsolete. Microsoft deprecated it in 2014. It is insecure and should not be used. Check if it is enabled. If yes, disable it. You can disable it via Windows Optional Features. The following instructions will guide you on this:

- Click on Windows Search and type Turn Windows features on or off.
- Select the desired option from the search results.
- In the Windows Features, expand the SMB 1.0/CIFS File Sharing Support.
- Now, uncheck the following options:
- SMB 1.0/CIFS Automatic Removal
- SMB 1.0/CIFS Server
- Restart your computer.
Turning off these two optional features resolved the issue for many users. Hence, this should also work for you.
6] Change Network and Sharing Center Settings
Turn off the password-protected sharing and see if it helps. The steps to disable password-protected sharing on Windows 11/10 are as follows:

- Open the Control Panel.
- Click on the Control Panel search bar and type network and sharing center.
- Select the Network and Sharing Center from the search results.
- Click Change advanced sharing settings link on the left side.
- Expand the All Networks section.
- Select the Turn off password-protected sharing option.
- Click Save Changes.
7] Check if required services are running
Check if the required services are running or not. Follow the instructions provided below:

- Open the Run command box and type services.msc. Click OK.
- When the Service Manager app appears, check the status of the following services:
- Function Discovery Provider Host
- Function Discovery Resource Publication
- SSDP Discovery
- UPnP Device Host
- DHCP Client
- DCP Client
- If the status of any of the above-mentioned services shows Stopped, right-click on it and select Properties.
- Set its Startup type to Automatic and click Start.
- Click Apply and then click OK.
8] Disable/Uninstall 3rd party security software (if applicable)
You may encounter this error if you have any third-party security software installed on your Windows 11/10 computer because File sharing turned out to be managed by a 3rd-party security software making use of the Windows Firewall. In this case, you can temporarily disable any third-party security software or allow file sharing via the security software firewall – this largely depends on the security software you have installed. Refer to the instruction manual.
However, if despite the two aforementioned actions, the issue still persists, you’ll have to remove all third-party security software from your PC using the dedicated removal tool to remove all files associated with the security software.
If uninstalling the security software fixes this error, you can now install the same antivirus again, or you can switch to an alternative AV software or better still stick to Windows 10 native AV program – Windows Defender.
Any of these solutions should work for you!
How do I fix error 0x80004005 in Outlook?
The error 0x80004005 in Outlook may occur due to the size limit. Apart from that, your antivirus software may also be the culprit for this error code. If you see this error in Microsoft Outlook, check for the Office Updates manually. If the updates are available, install them.
Read next: Can’t connect to this network WiFi error in Windows 11/10.