- Руководство пользователя Adobe XD
- Введение
- Новые возможности Adobe XD
- Распространенные вопросы
- Создание дизайна, прототипов и совместная работа в Adobe XD
- Системные требования
- Требования к оборудованию и программному обеспечению
- Adobe XD, Big Sur и Apple Silicon | macOS 11
- Основные сведения о рабочей среде
- Изменение языка приложения в Adobe XD
- Доступ к наборам для дизайна пользовательского интерфейса
- Доступность в Adobe XD
- Сочетания клавиш
- Советы и рекомендации
- Варианты условий подписки на Adobe XD
- Изменения в начальном плане XD
- Дизайн
- Монтажные области, направляющие и слои
- Начало работы с монтажными областями
- Использование направляющих и сеток
- Создание прокручиваемых монтажных областей
- Работа со слоями
- Создание групп прокрутки
- Фигуры, объекты и путь
- Выделение, изменение размера и поворот объектов
- Перемещение, выравнивание, распределение и упорядочивание объектов
- Группирование, блокирование, дублирование, копирование и зеркальное отражение объектов
- Задание обводки, заливки и теней для объектов
- Создание повторяющихся элементов
- Создание перспективных проектов с помощью 3D-преобразований
- Редактирование объектов с помощью логических операций
- Текст и шрифты
- Работа с инструментами для рисования и создания текста
- Шрифты в Adobe XD
- Компоненты и состояния
- Работа с компонентами
- Работа с вложенными компонентами
- Добавление нескольких состояний для компонентов
- Маскировка и эффекты
- Создание маски с фигурами
- Работа с эффектами размытия
- Создание и изменение градиентов
- Применение эффектов наложения
- Макет
- Адаптивное изменение размера и ограничения
- Установка фиксированного отступа для компонентов и групп
- Создание динамичных проектов с подборками
- Видео и анимации Lottie
- Работа с видео
- Создание прототипов при помощи видео
- Работа с анимацией Lottie
- Монтажные области, направляющие и слои
- Создание прототипа
- Создание интерактивных прототипов
- Анимирование прототипов
- Свойства объекта, которые поддерживаются при автоматическом анимировании
- Создание прототипов с клавиатуры и геймпада
- Создание прототипов с помощью голосовых команд и воспроизведения
- Создание синхронизированных переходов
- Добавление наложений
- Создание голосовых прототипов
- Создание якорных ссылок
- Создание гиперссылок
- Предварительный просмотр проектов и прототипов
- Публикация, экспорт и проверка
- Публикация выбранных монтажных областей
- Предоставление совместного доступа к проектам и прототипам
- Настройка разрешений на доступ к ссылкам
- Работа с прототипами
- Просмотр прототипов
- Работа со спецификациями дизайна
- Предоставление общего доступа к спецификациям дизайна
- Проверка спецификаций дизайна
- Навигация в спецификациях дизайна
- Проверка и комментирование спецификаций дизайна
- Экспорт ресурсов дизайна
- Экспорт и загрузка ресурсов из спецификаций дизайна
- Корпоративный групповой совместный доступ
- Системы дизайна
- Системы дизайна с библиотеками Creative Cloud Libraries
- Работа с ресурсами документа в Adobe XD
- Работа с библиотеками Creative Cloud Libraries в Adobe XD
- Переход от связанных ресурсов к библиотекам Creative Cloud Libraries
- Работа с проектными токенами
- Использование ресурсов из библиотек Creative Cloud Libraries
- Облачные документы
- Облачные документы в Adobe XD
- Совместная работа и совместное редактирование проектов
- Совместное редактирование документов, к которым вам предоставили доступ
- Интеграция и плагины
- Работа с внешними ресурсами
- Работа с ресурсами проекта из Photoshop
- Копирование ресурсов из Photoshop
- Как импортировать или открыть проекты Photoshop
- Работа с ресурсами Illustrator в Adobe XD
- Импортирование и открытие проектов Illustrator
- Копирование векторных объектов из Illustrator в XD
- Плагины для Adobe XD
- Создание плагинов и управление ими
- Интеграция Jira с XD
- Подключаемый модуль Slack для XD
- Подключаемый модуль Zoom для XD
- Публикация работы из XD на Behance
- XD для iOS и Android
- Предварительный просмотр на мобильных устройствах
- Часто задаваемые вопросы по Adobe XD для мобильных устройств
- Устранение неполадок
- Выявленные неполадки и исправленные ошибки
- Выявленные неполадки
- Исправленные неполадки
- Установка и обновления
- XD отображается как несовместимый в Windows
- Код ошибки 191
- Код ошибки 183
- Проблемы при установке плагинов XD
- Запрос на удаление и переустановку XD в Windows 10
- Проблемы с миграцией предпочтений
- Запуск и сбой
- XD аварийно завершает работу при запуске в Windows 10
- XD закрывается при выходе из Creative Cloud
- Проблема со статусом подписки в Windows
- Предупреждение о заблокированном приложении при запуске XD в Windows
- Создание аварийного дампа в Windows
- Сбор и отправка журнала сбоев
- Облачные документы и библиотеки Creative Cloud Libraries
- Проблемы с облачными документами XD
- Проблемы со связанными компонентами
- Проблемы с библиотеками и ссылками
- Прототип, публикация и обзор
- Не удается записать взаимодействия прототипов в macOS Catalina
- Проблемы с процессами публикации
- Опубликованные ссылки не отображаются в браузерах
- Прототипы некорректно отображаются в браузерах
- На общих ссылках внезапно появляется панель комментариев
- Невозможно опубликовать библиотеки
- Импорт, экспорт и работа с другими приложениями
- Импорт и экспорт в XD
- Файлы Photoshop в XD
- Файлы Illustrator в XD
- Экспорт из XD в After Effects
- Файлы Sketch в XD
- В разделе экспорта не представлены сторонние приложения
- Выявленные неполадки и исправленные ошибки
В данной статье описывается создание аварийных дампов на компьютере Windows.
Включение аварийных дампов
Аварийные дампы по умолчанию выключены в Windows. Для включения этой функции требуются права администратора. Ниже приведены инструкции по включению аварийных дампов.
Эта информация взята с веб-страницы Microsoft. Если возникнут какие-либо проблемы, обратитесь в службу поддержки Microsoft.
-
Откройте редактор реестра.
Выполните следующие действия, чтобы открыть редактор реестра:
- Нажмите Win + R, чтобы открыть окно команды Выполнить.
- Введите regedit в окно Выполнить и нажмите клавишу «Ввод».
- Нажмите Да во всплывающем окне Управление пользователями .
-
Создайте резервную копию раздела Windows Error Reporting.
Перед внесением каких-либо изменений в редакторе реестра рекомендуется создать резервную копию раздела реестра, который вы собираетесь редактировать. Ниже приведены инструкции по созданию резервной копии:
- Перейдите в расположение HKEY_LOCAL_MACHINESOFTWAREMicrosoftWindows.
- Щелкните правой кнопкой мыши раздел Windows Error Reporting.
- Выберите Экспортировать и сохраните файл .reg на рабочем столе.

-
Создайте раздел LocalDumps.
Выполните следующие действия:
- Перейдите в расположение: HKEY_LOCAL_MACHINESOFTWAREMicrosoftWindowsWindows Error Reporting.
- Выберите раздел Windows Error Reporting и создайте новый раздел с именем LocalDumps, если его там еще нет:
1. Щелкните правой кнопкой мыши Windows Error Reporting.
2. Выберите Создать, а затем Раздел.
3. Назовите раздел LocalDumps.
Убедитесь, что вы создали резервную копию раздела Windows Error Reporting перед созданием нового раздела.
-
Создайте значения реестра в разделе LocalDumps.
Выберите раздел LocalDump и создайте три значения реестра, указанные ниже:
- Значение реестра DumpFolder
- Щелкните правой кнопкой мыши на пустом месте в правой части и выберите Создать > Расширяемый строковый параметр
- Назовите его DumpFolder
- Дважды щелкните по нему и введите %LOCALAPPDATA%CrashDumps в поле Значение.
- Значение реестра DumpCount
- Щелкните правой кнопкой мыши на пустом месте в правой части и выберите Создать > Параметр DWORD (32 бита).
- Назовите его DumpCount
- Дважды щелкните по нему и введите 10 в поле Значение.
- Значение реестра DumpType
- Щелкните правой кнопкой мыши на пустом месте в правой части и выберите Создать > Параметр DWORD (32 бита).
- Назовите его DumpType
- Дважды щелкните по нему и введите 2 в поле Значение.


Сбор аварийных дампов
После выполнения инструкций в разделе Включение аварийных дампов воспроизведите сбой программного обеспечения и найдите соответствующий файл .dmp с названием программного обеспечения в папке %localAppdata%PackagesAdobe.CC.XD_adky2gkssdxteACDumps.
Чтобы сделать это, можно запустить команду Пуск > Выполнить > %localAppdata%PackagesAdobe.CC.XD_adky2gkssdxteACDumps.
Debugging Stack Traces from Crash Dumps
On windows, you can configure your system to automatically collect crash dumps of your applications and use Visual Studio or WinDBG to debug them.
Collecting Crash Dumps
Configuring Windows Error Reporting
Windows Error Reporting (WER) can be configured to collect full dumps from application crashes, and store them locally on your machine. Since this feature is not enabled by default, its activation requires administrator privileges. Follow the steps below to configure it.
- Open the Registry Editor by typing “regedit” (1) in the Start Menu and pressing Enter.

- Navigate to the Windows Error Reporting (1) key under HKEY_LOCAL_MACHINESOFTWAREMicrosoftWindowsWindows Error Reporting.

- If it’s not present already, add the LocalDumps key by right-clicking (1) on the Windows Error Reporting key and selecting New (2) > Key (3).

- Name the key LocalDumps (1) and press Enter.

- Following the same steps, create another new key for your application under the LocalDumps key. For example, HKEY_LOCAL_MACHINESoftwareMicrosoftWindowsWindows Error ReportingLocalDumpsMyApplication.exe (1).
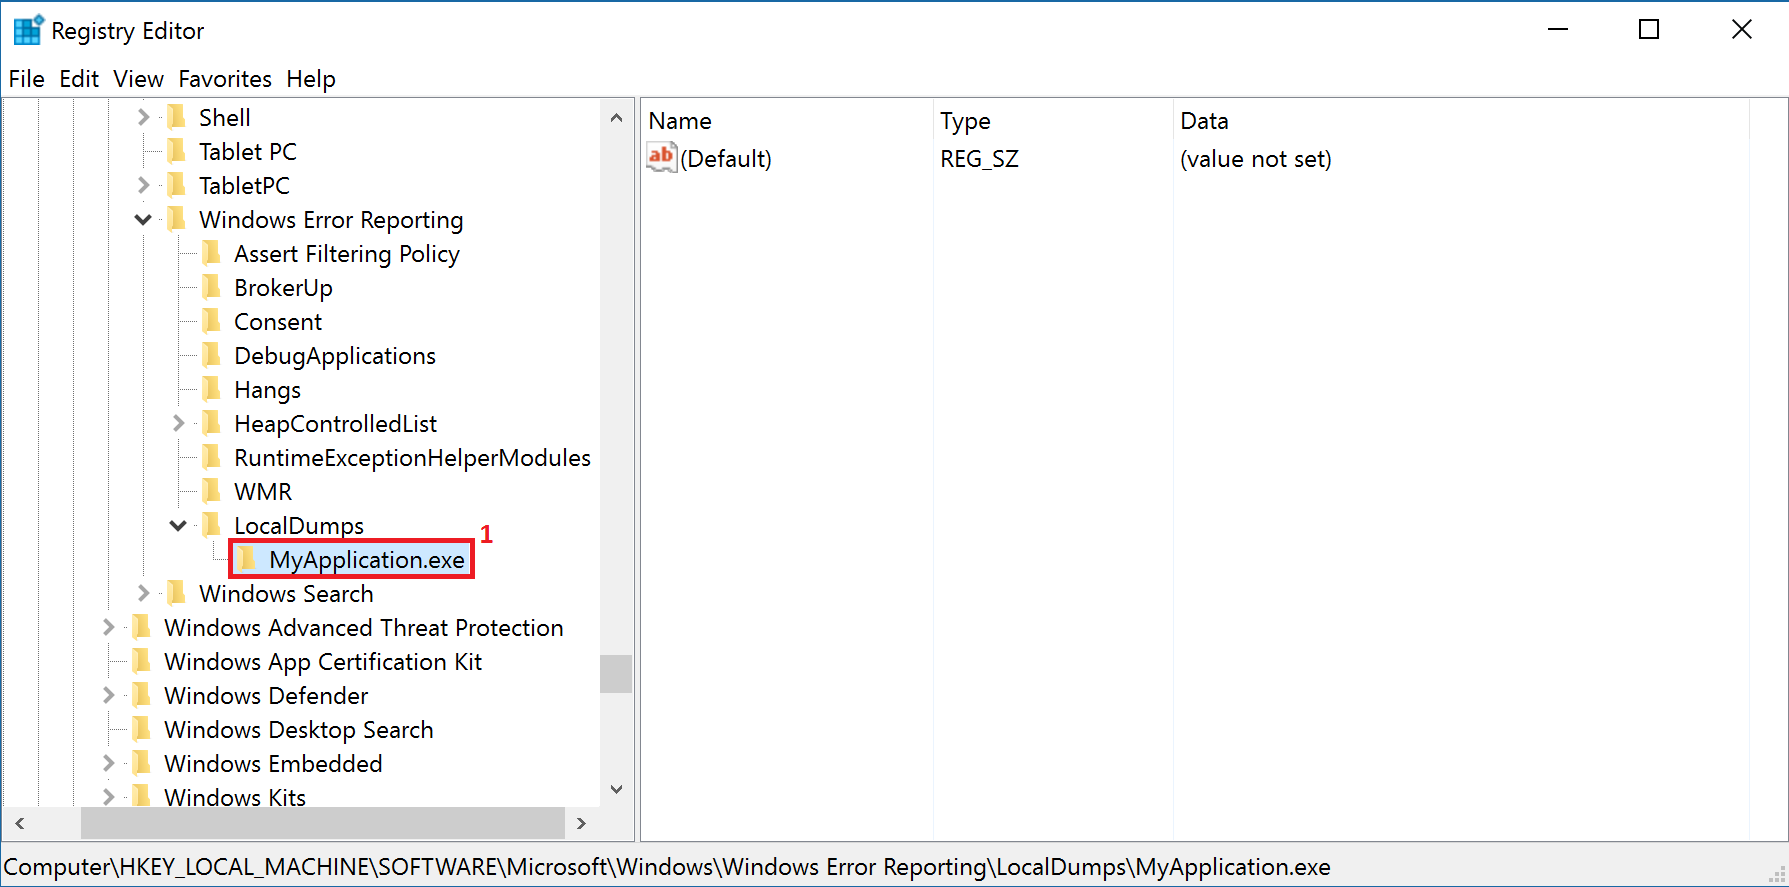
- Under the MyApplication.exe key, add the values on the table below by right-clicking on the right pane of the Registry Editor and selecting New (1) followed by the corresponding value type (2).

Table 1: Registry Values for Collecting Crash Dumps
| Value | Description | Type | Value Data |
|---|---|---|---|
| DumpFolder | The path where the dump files are going to be stored. | Expandable String Value (REG_EXPAND_SZ) | %LOCALAPPDATA%CrashDumps |
| DumpCount | The maximum number of dump files in the folder. When the maximum value is exceeded, the oldest dump file in the folder will be replaced with the new dump file. | DWORD (32-bit) Value (REG_DWORD) | 10 |
| DumpType | 0: Custom dump 1: Mini dump 2: Full dump |
DWORD (32-bit) Value (REG_DWORD) | 2 |
| CustomDumpFlags | The custom dump options to be used. This value is used only when DumpType is set to 0. | DWORD (32-bit) Value (REG_DWORD) | 0 |
- Once you have created the above values, right-click (1) on them and select Modify (2) to set their value data, still according to the table of the previous step.

- Enter the corresponding value data (1) for each value, selecting its Base (2) if necessary, and click OK (3).

Once you’re done, you should have the keys and values below:

Your system should now collect crash dumps for your application whenever it crashes. For more information on the process above, check the Windows Dev Center Collecting User-Mode Dumps documentation.
Configuring your Visual Studio Solution
Removing Spaces from the Application Executable Name
To properly generate and debug the crash dump files, your application executable name must not contain any spaces. To change your executable name:
- Right-click on your project (1) in Visual Studio and select Properties (2).

- In the Properties Window, select General (1) under Configuration Properties (2) in the left menu and change the Target Name (3) field, which corresponds to your executable name.

If you changed your executable name, don’t forget to rebuild your app with the new settings.
Setting the Debug Information Option
For the crash dump files to be fully generated, your project Debug Information option must be enabled.
- Right-click on your project (1) in Visual Studio and select Properties (2).
- In the Properties Window, select General (1) under Clang (2) in the left menu and change the Debug Information field to “Yes (-g)” (3) if it’s not already enabled.

If you changed the Debug Information field, don’t forget to rebuild your app with the new settings.
Using Visual Studio to Debug Crash Dumps
You can open a crash dump in Visual Studio to debug it.
- Open Visual Studio.
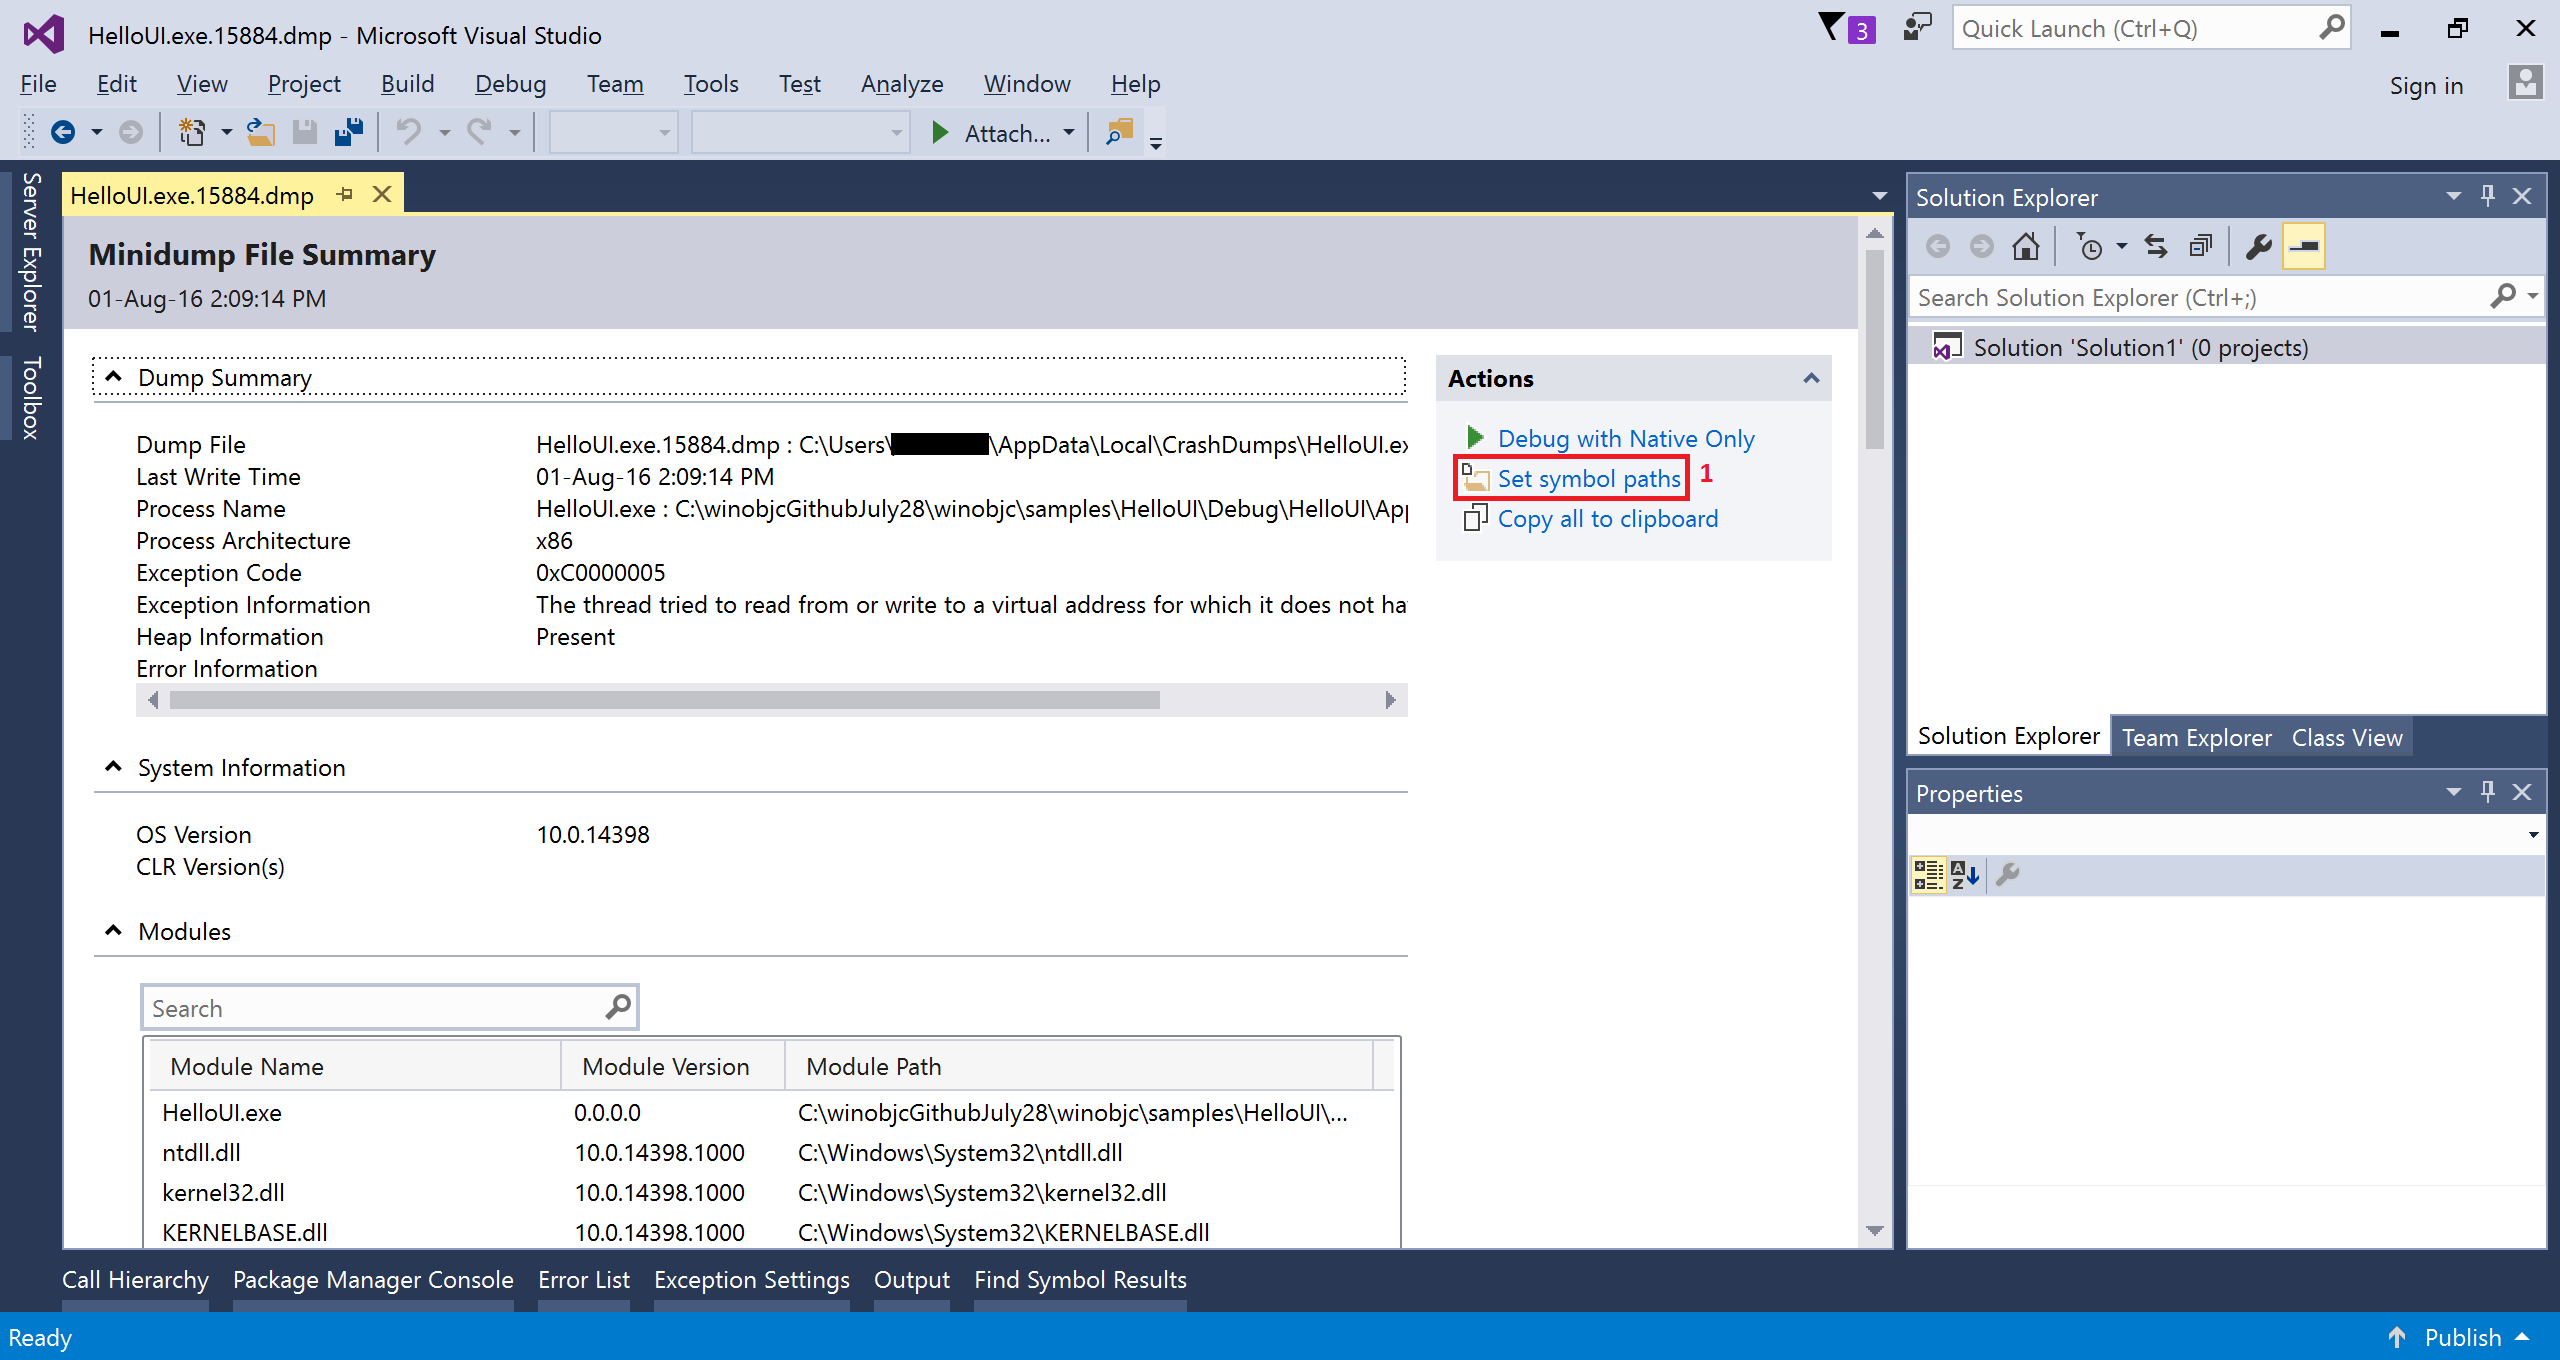
- Drag and drop your crash dump (.dmp) file into Visual Studio to open it. It should be under %LOCALAPPDATA%CrashDumps, where %LOCALAPPDATA% usually corresponds to C:UsersuserAppDataLocal.

- Click on Set symbol paths (1).
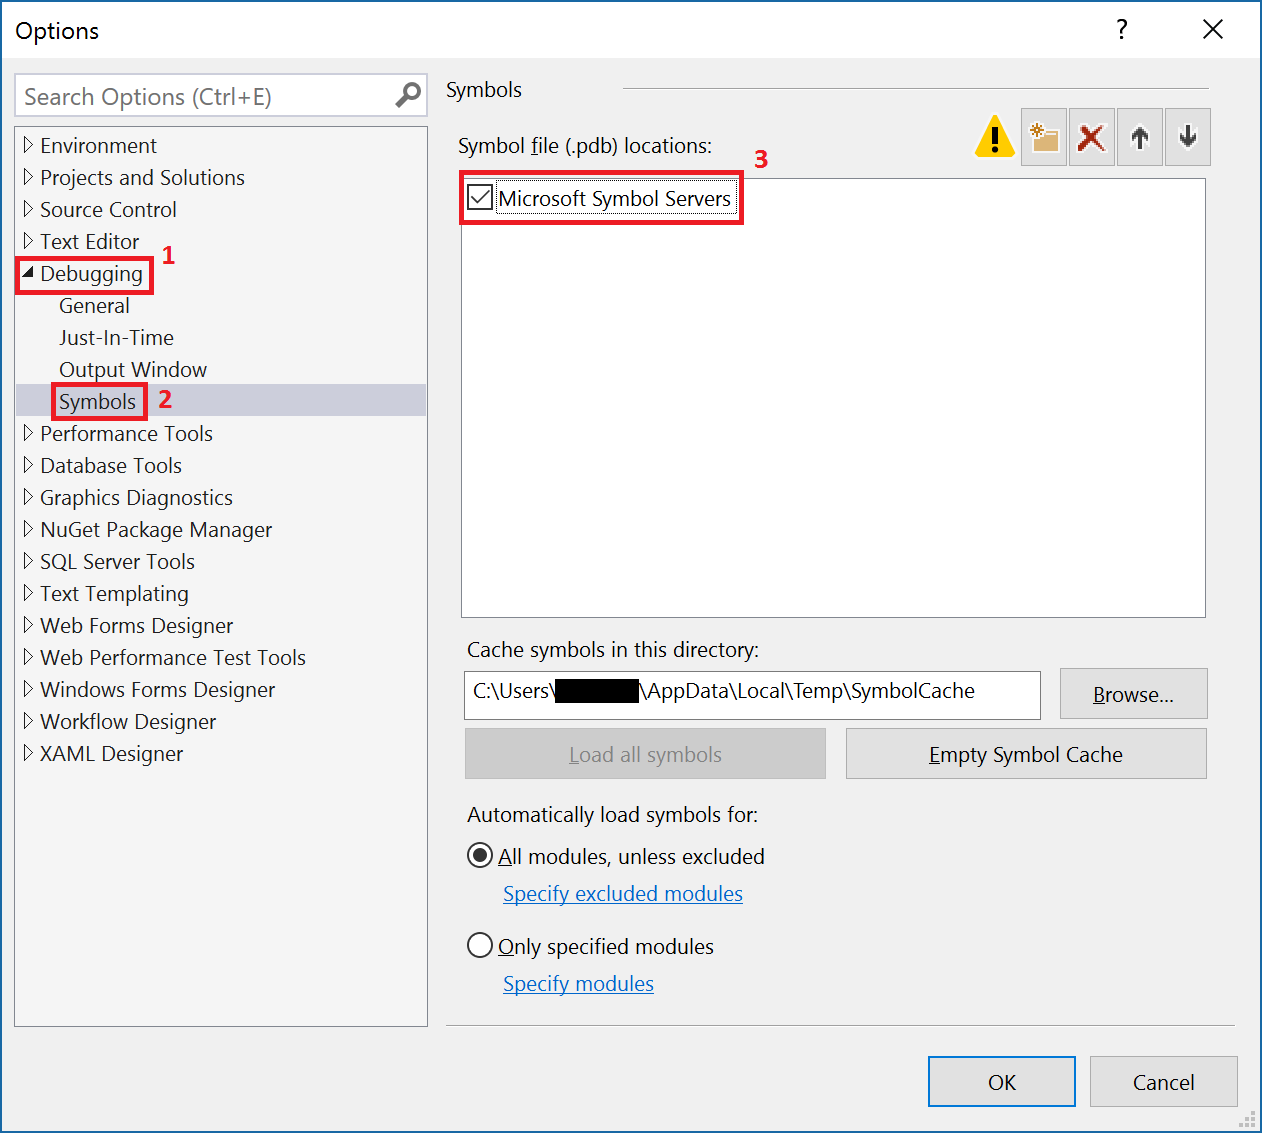
- Under Debugging (1) > Symbols (2), check the Microsoft Symbol Servers (3).
- Click on the new symbol file location button (1), and add the path to your application symbols (2). If you created your app under the samples folder of the SDK, your path would be c:winobjcsamplesMyApplicationDebugMyApplication. Then, click OK (3).

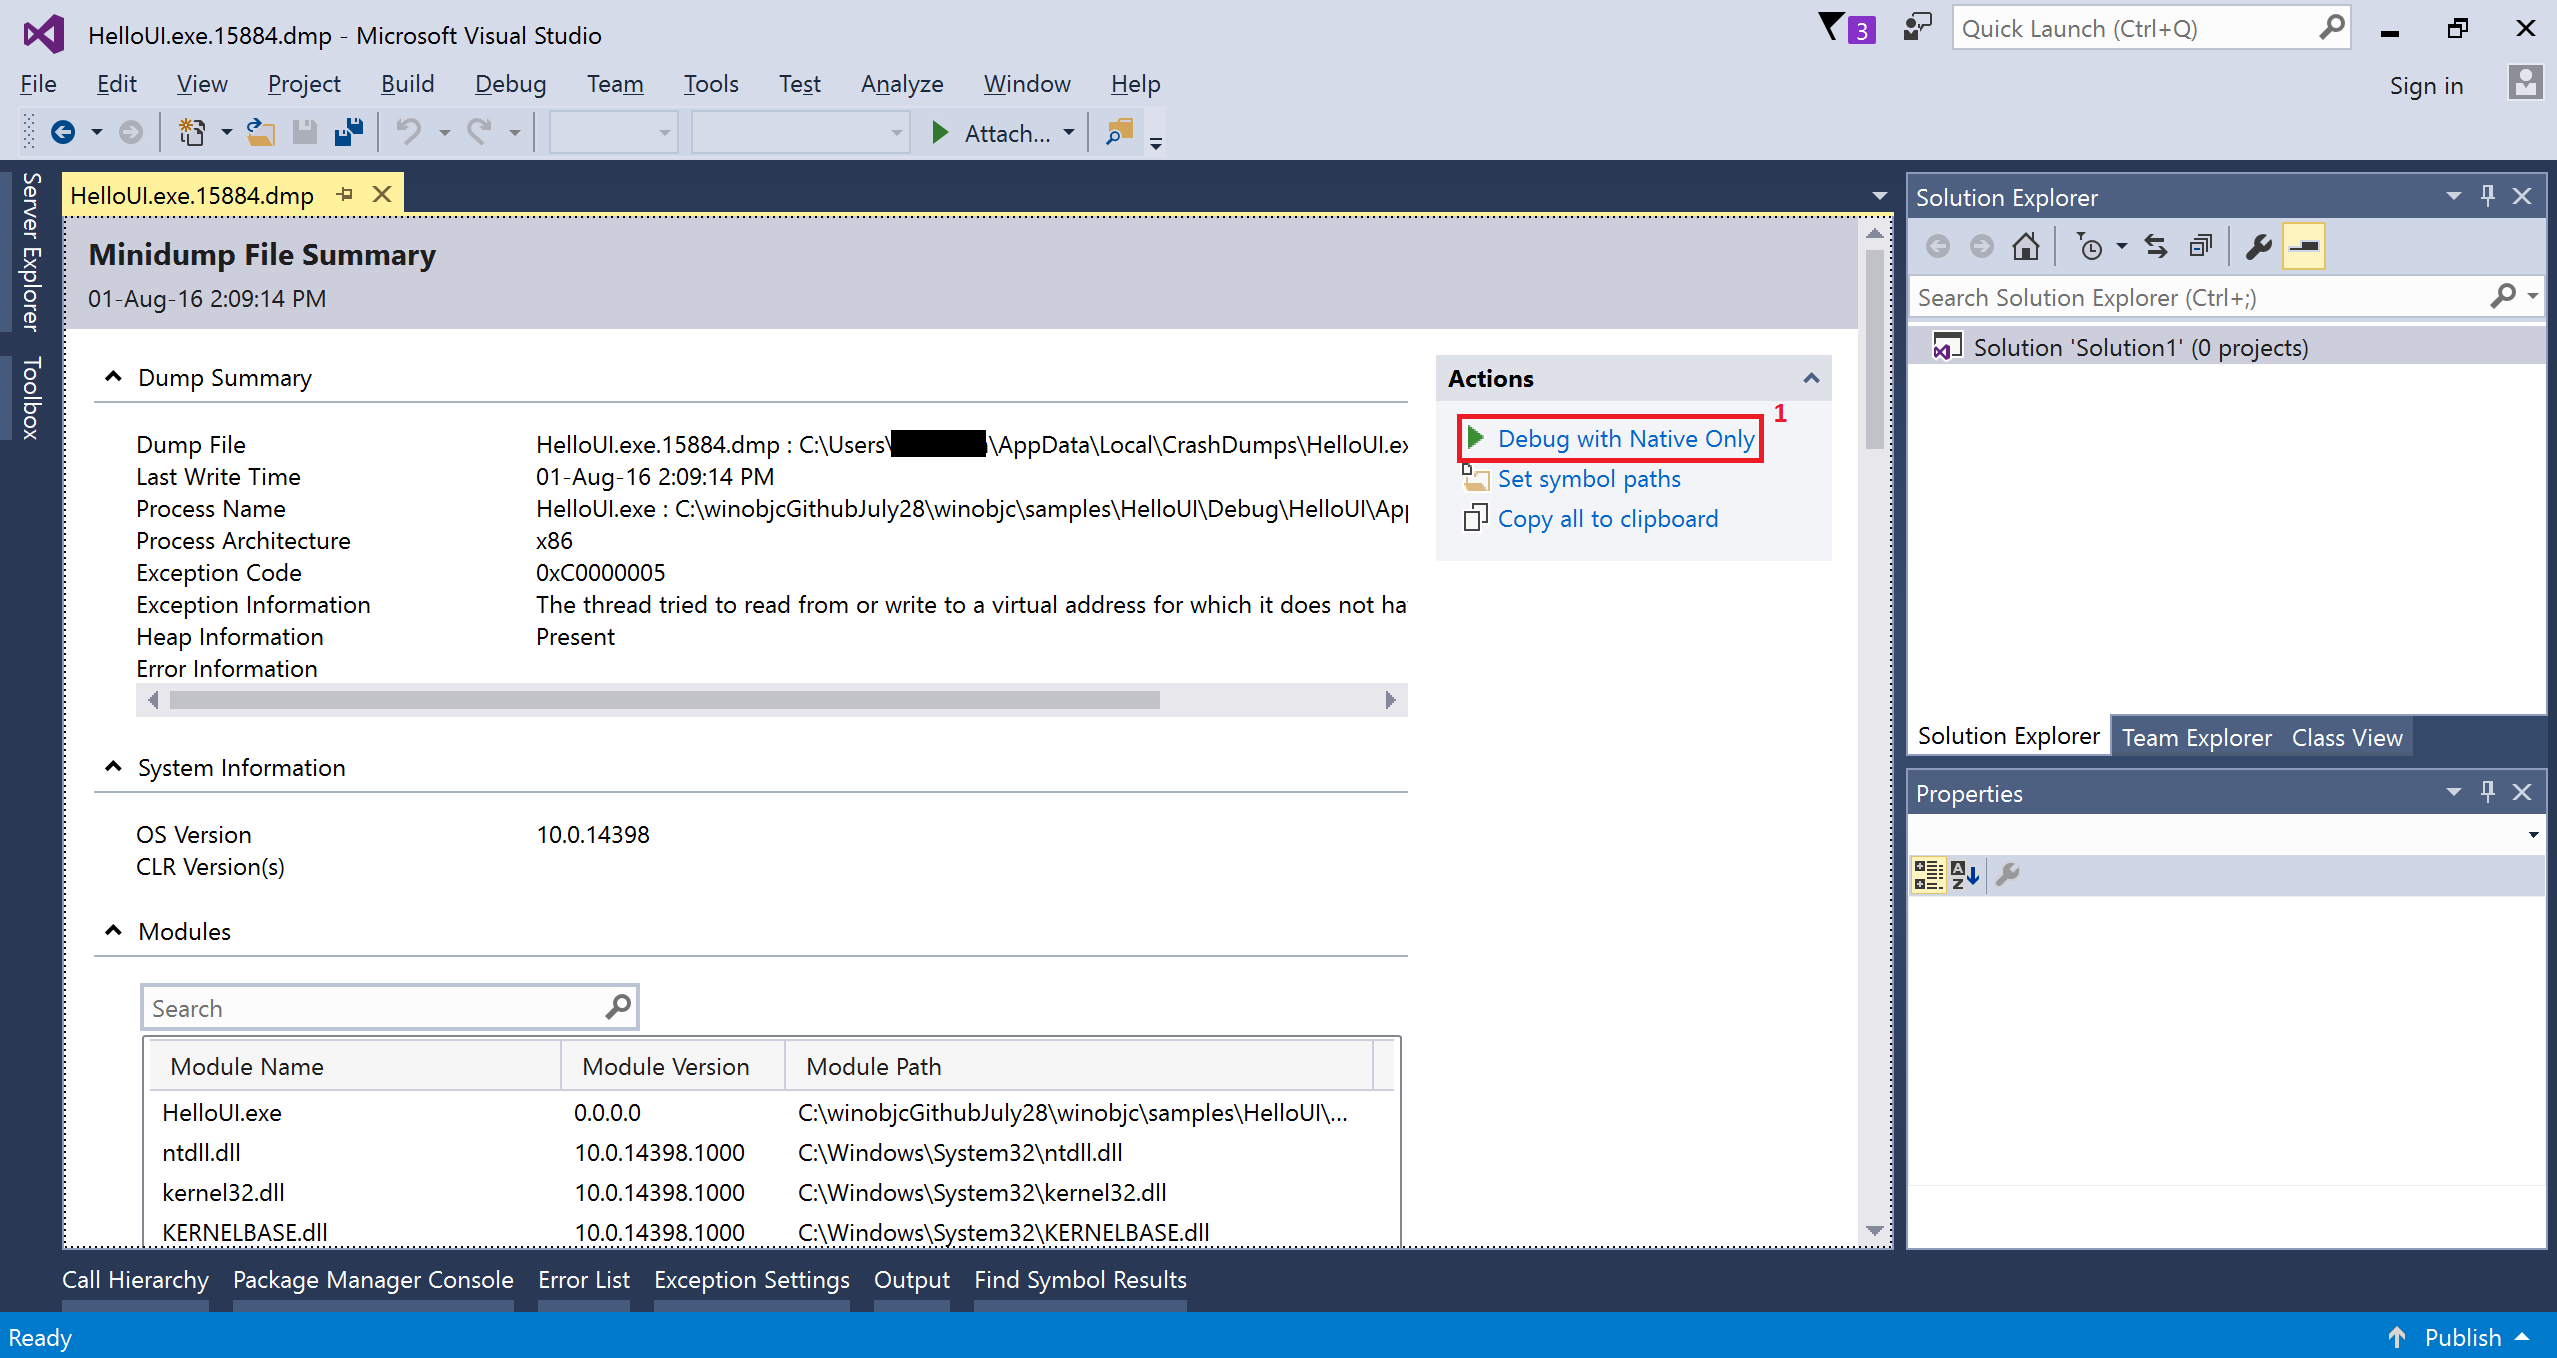
- Click on Debug with Native Only (1) to start debugging the crash dump.
- When an exception is thrown, Visual Studio will give you a warning. Click Break (1) to start debugging.

- When execution stops, you’ll be able to see variables in the Locals window (1), the assembly code in the Disassembly window (2) and the call stack in the Call Stack window (3). When possible, Visual Studio will also open the source file that originated the function calls on the stack when you double-click on them in the call stack window. You’ll see a marker (4) where execution is currently stopped.

- You can now debug your crash dump with the usual Visual Studio debugging functionalities. For more information, check out the Debugging in Visual Studio documentation on the Microsoft Developer Network.
Using WinDBG to Debug Crash Dumps
Installing WinDbg
If you prefer, you can also use WinDbg to debug a crash dump. It’s a debugger that is part of the Windows Debugging Tools, which you can download using the Get Debugging Tools for Windows (WinDbg) (from the SDK) link, under the “Get debugging tools” section of the Download the WDK, WinDbg, and associated tools page from the Hardware Dev Center.
Using WinDbg
- Open Windbg by typing “windbg” (1) in the Start menu and pressing Enter.

- Drag and drop your crash dump (.dmp) file into the WinDbg window to open it. It should be under %LOCALAPPDATA%CrashDumps, where %LOCALAPPDATA% usually corresponds to C:UsersuserAppDataLocal.

- Set your application executable file search path by entering the .exepath+ (1) command followed by the path to your application executable. If you created your app under the samples folder of the SDK, your path would be c:winobjcsamplesMyApplicationDebugMyApplication.

- Add the Microsoft public symbol server to your symbol path by entering the .sympathy+ srv*https://msdl.microsoft.com/download/symbols (1) command.

- Add your application symbols to your symbol path by entering the .sympathy+ (1) command followed by the path to your application symbols. If you created your app under the samples folder of the SDK, your path would be c:winobjcsamplesMyApplicationDebugMyApplication.

- Set the exception context by entering the .ecxr (1) command, allowing the stack walk to work properly. Note that, when possible, WinDbg will automatically open the source file and point to the code line that originated the exception (2).

- Display the stack frame by entering the k (1) command.

- You should now be able to explore your crash dump stack frame. Try out the !analyze -v command, which displays information about the current exception or bug check, or check out the Debugger Reference on the Hardware Dev Center for more commands.
Additional Reading
Want a deeper dive into what the debugging tools for Windows can do? Check out:
- The Crash dump analysis using the Windows debuggers (WinDbg) documentation for more information on debugging crash dumps with WinDbg.
- The Debugging a UWP app using WinDbg documentation to learn how to debug a running UWP with WinDbg.
- The Debugging Tools for Windows documentation for an overview of all the tools available.
- The Debugger Operation documentation for details on how to use the different debugging tools for Windows.
- The Debugging Techniques documentation for information on standard and specialized debugging techniques for Windows.
Known Issues
- Having a space in your application executable name will prevent you from generating and debugging crash dumps properly. To rename your application executable, check Removing Spaces section of this page.
- Updating your Operating system may reset the registry keys enabling the collection of crash dumps. If so, re-create the registry keys according to the Collecting Crash Dumps section of this page.
- When using WinDbg, you might receive errors stating that some symbols files could not be found, even after setting the symbol paths for your application and the Microsoft public symbol servers. That’s because some symbols are internal to Microsoft and are not publicly available.

Всякий раз, когда система падает, используя дамп файла . DMP, мы можем легко проанализировать,что вызвало падение системы.Это особенно полезно, чтобы найти проблему в сторонних модулей и является причиной этой проблемы или нет. Таким образом, используя анализ дампа,могут быть решены ошибки и сбои.Функция Windows Error Reporting (WER) ,была введена в Windows Vista,и работает для сбора пользовательского режима сбора ошибок.
Но эта услуга не включена по умолчанию в ОС Windows 8 и трюк с реестром может заставить работать эту функцию, чтобы привести её в действие.
Активировать Windows Error Reporting Service
В этой статье я покажу вам, как включить эту службу отчета об ошибках Windows с тем, что бы Вы могли легко собрать дамп файла в папке внутри Проводника. Обратите внимание и на то, что в том числе и приложения, которые делают свои собственные пользовательские отчеты об аварии . NET приложений, которые не поддерживаются этой функцией.
Использование редактора реестра для сбора User Mode
Так как функция отчёт об ошибках Windows не включена по умолчанию, вы можете использовать следующий трюк параметра реестра , чтобы запустить его:
1.Нажмите комбинацию клавиш Windows Key+R,в диалоговом окне в Run введите тип Regedt32.exe и нажмите Enter,чтобы открыть Редактор реестра .
. 2 Перейдите к этой записи :
HKEY_LOCAL_MACHINE SOFTWARE Microsoft Windows Windows Error Reporting LocalDumps

3.На правой панели, вы можете создавать различные значения данных для настройки WER. Вот различные данные, которые вы можете создавать здесь:
. DumpFolder — (Создание: с помощью правой кнопкой мыши -> New -> Расширяемый строковый параметр)
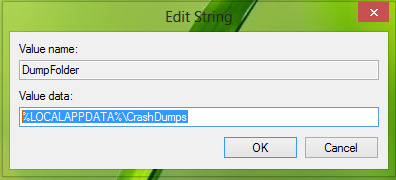
Эта строка значения обрабатывает место для сбора данных о сбоях системы в папке. Вы можете дважды щелкнуть над созданной строкой для изменения её значения данных. Данные по умолчанию должны быть LOCALAPPDATA%% CrashDumps . Чтобы найти файлы, хранящие отчёт после аварии, нажмите Windows Key + R ,введите тип % LOCALAPPDATA% CrashDumps и получите дамп файлов.
б. DumpCount — {Создание: с помощью правой кнопкой мыши -> New -> DWORD (32 бита) }
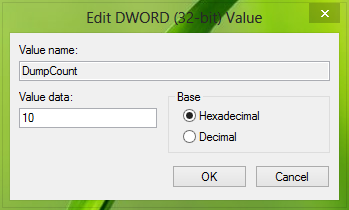
Созданный DWORD заботится о том, сколько файлов дампа должны храниться по месту нахождения созданного ранее в шаге 1. По умолчанию это число равно 10 . Поскольку количество файлов превышает 10 , наиболее старые файлы будут удалены, а новые файлы получат своё место.
C. DumpType — {Создание: с помощью правой кнопкой мыши -> New -> DWORD (32 бита)}
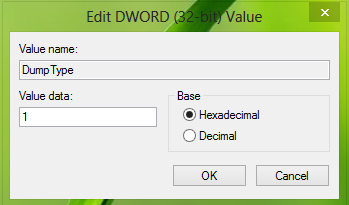
Этот DWORD может быть настроен, чтобы получить файл дампа в качестве пользовательского отчёта;мини отчёта;полного дампа по вашему требованию.Используйте соответственно Value Data 0 , 1 , 2.Таким образом, в этом случае вы можете хранить файлы дампа для сбоев системы. Если вы ищете для хранения файлов дампа для конкретного применения,то вам необходимо создать подраздел для ключа LocalDumps :
HKEY_LOCAL_MACHINE Software Microsoft Windows Windows Error Reporting LocalDumps
Например, если вы хотите хранить файлы дампа для ImageReady , компонентов Adobe Photoshop,вы можете назвать подраздел как ImageReady.exe . Подразделы могут быть расположены как:
HKEY_LOCAL_MACHINE Software Microsoft Windows Windows Error Reporting LocalDumps ImageReady.exe.
То вы можете выполнять шаг 3 для настройки,и ввести нужный вам тип данных,которые будут храниться в этом подразделе.Пожалуйста, обратите внимание,что параметры подраздела т.е. ImageReady.exe отменяют настройки основных ключей т.е. LocalDumps.
[share-locker locker_id=»3f8a01b2edcbb8f0f» theme=»blue» message=»Если Вам понравилась эта статья,нажмите на одну из кнопок ниже.СПАСИБО!» facebook=»true» likeurl=»CURRENT» vk=»true» vkurl=»CURRENT» google=»true» googleurl=»CURRENT» tweet=»true» tweettext=»» tweeturl=»CURRENT» follow=»true» linkedin=»true» linkedinurl=»CURRENT» ][/share-locker]
- Распечатать
Оцените статью:
- 5
- 4
- 3
- 2
- 1
(0 голосов, среднее: 0 из 5)
Поделитесь с друзьями!
Table of Contents
- Windows Error Reporting
- Program Database Files (PDB)
- Creating an Application to Crash
- Opening and Analyse a Dump File in Visual Studio 2010
- Conclusion
For many years unhandled exceptions were the bane of my existence. On some occasions caused by me but mostly caused by other rouge developers (grin). There is a seedy underbelly to development which can be directly correlated to the dark alleys where things
that are up to no good should stay. Unfortunately from time to time, these nasties do rear their ugly heads and for us developers they come in the form of unhandled exceptions.
In today’s world of .NET the tools that are provided for us are far beyond anything that we could have imagined 15 years ago. Although Dr Watson could generate crash dumps, most developers at the time had no idea what to do with them once they were generated,
especially an old school Visual Basic 6 developer such as myself.
Windows Error Reporting
Crash dumps are a valuable resource for us developers and Windows 7 provides us with some great features for generating crash dumps through Windows Error Reporting (WER). It is where WER lives in the Registry that will be our starting point for this article,
shown in Figure 1.

Figure 1: Location of WER in the Registry.
The registry key (LocalDumps) is not created by default for us in the registry so you will have to roll up your sleeves and do the dirty work yourself. A description of the values in the LocalDumps registry key is show in
Table 1.
| Registry Value | Description |
| CustomDumpFlags | Will only be referenced if DumpType is set to 0. Table 2 shows all possible enumerations. |
| DumpCount | The limit of the number of dumps to be stored in the DumpFolder |
| DumpFolder | The folder that will store the dumps |
| DumpType | There are three possible values
1. 0 – Custom dump 2. 1 – Mini dump 3. 2 – Full dump |
Table 1: Description of LocalDumps registry key
If a Mini dump is too small or a full dump is too big then we have the option of creating a Custom dump. When the DumpType is set to 0, we are indicating to WER that we would like to generate the dump using the value in CustomDumpFlags.
Table 2 shows all possible values for CustomDumpFlags
|
Minidump Type |
Value |
| MiniDumpNormal
MiniDumpWithDataSegs MiniDumpWithFullMemory MiniDumpWithHandleData MiniDumpFilterMemory MiniDumpScanMemory MiniDumpWithUnloadedModules MiniDumpWithIndirectlyReferenced MemoryMiniDumpFilterModulePaths MiniDumpWithProcessThreadData MiniDumpWithPrivateReadWriteMemory MiniDumpWithoutOptionalData MiniDumpWithFullMemoryInfo MiniDumpWithThreadInfo MiniDumpWithCodeSegs MiniDumpWithoutAuxiliaryState MiniDumpWithFullAuxiliaryState MiniDumpWithPrivateWriteCopyMemory MiniDumpIgnoreInaccessibleMemory MiniDumpWithTokenInformation |
0x00000000
0x00000001 0x00000002 0x00000004 0x00000008 0x00000010 0x00000020 0x00000040 0x00000080 0x00000100 0x00000200 0x00000400 0x00000800 0x00001000 0x00002000 0x00004000 0x00008000 0x00010000 0x00020000 0x00040000 |
Table< 2: Minidump Type Enumerations
Program Database Files (PDB)
Whenever you compile an application using either Debug or Release configuration, a PDB file will be generated along with the Portable Executable. Most developers throw these files away without any consideration for what they contain. In fact, PDB files are
just as important as the Portable Executable. PDB files in general, contain a pointer to the source code and all of the symbols required to debug the Portable Executable. It is not the purpose of this article to go in depth with PDB Files. If you would to
discover more about PDB Files then take a look at the following links.
- http://www.wintellect.com/CS/blogs/jrobbins/archive/2009/05/11/pdb-files-what-every-developer-must-know.aspx
- http://en.wikipedia.org/wiki/Program_database
Creating an Application to Crash
Now that we have a background on Crash dumps and PDB Files it is time to create an application that will crash and generate for us, a Crash dump. To do this we will create a Console application that generates a NullReferenceException. Of course, someone
like yourself would never let an application fall over in this manner as you have full respect for exception handling. This is what one of those other developers would do, the ones that have loose morals and a blatant disregard for development standards.
- Open Visual Studio 2010
- File->New Project and select Console Application from the Visual Studio Templates
- Name the Application CrashDumpTest and click OK
- Switch the configuration from Debug to Release using the Configuration Manager
Here is where we will create an object of type generic List(Of String). We will not use the New keyword and as a result our List will contain a Null Reference. We then will try to add an item to the list. Navigate to the Main method of the console application
and add the following code.
Dim
l As
List(Of String)
l.Add("string")
OK, all that is left now is to build the Console Application. After the application has been built do the following:
- 1. Navigate to the Release Folder which was the destination for your build
- 2. Open Windows Explorer and create a Folder on the C Drive called Temp
- 3. Copy CrashDumpTest.exe and CrashDumpTest.pdb to the Temp folder
NOTE: The reason why I’m asking you to do the above is so you can easily navigate to the PDB file later on in this article.
It is now time to execute CrashDumpTest.exe and generate a Crash Dump. My Crash dump will be generated in a folder C\DrivesTemp which is the value of DumpFolder registry value described earlier in this article. You can specify whatever folder you like.
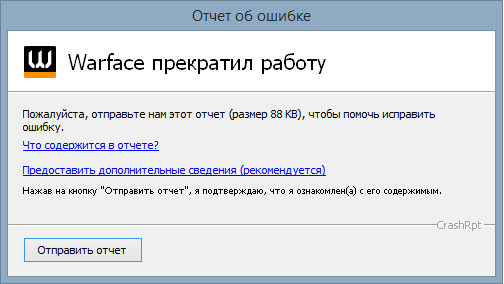
After running CrashDumpTest.exe the dialog in Figure 2 will be displayed.

Figure 2: Windows Error Reporting Dialog after application crash
Rather than debugging the program from here, we will choose Close Program. We are trying to simulate the scenario where a user of your application has sent you the dump file and we will open the dump file directly from the file system in Visual Studio 2010.
Figure 3 shows the Crash dump file in Windows Explorer

Figure 3: Crash dump file generated by Window Error Reporting
Opening and Analyse a Dump File in Visual Studio 2010
In earlier versions of Visual Studio you had the option of creating a Dump Project. This has changed in Visual Studio 2010. Do the following to open your dump file in Visual Studio 2010.
- Open Visual Studio 2010
- File->Open File, navigate to your Dump folder and select the CrashDumpTest dump file shown in
Figure 3
Upon opening the Crash dump in Visual Studio 2010 you will be presented with the following information.

Figure 4: Illustrate a Crush dump file opened in Visual Studio 2010
At this point we are ready to debug our Crash dump. Let me just make this clear. To debug a crash dump is a bit of a misconception as you cannot actually step through the code. Visual Studio will actually load a snapshot of when the application failed. There
is something I should mention about what is in the Dump Summary in Figure 4. Notice that Heap Information is Present. The advantage of having the Heap Information present is that when we do analyse our Crash dump we will have DataTips available.
Our watch window can also be populated with reference type information.
Using the Actions expander on the right of Figure 4, click the Debug with Mixed. This will allow us to analyse our .NET code.
The first dialog that will appear is shown in Figure 5

Figure 5: Visual Studio Dialog when we start debugging a Crash Dump
Select Break on the dialog show in Figure 5. The screen shot of Visual Studio in
Figure 6 will appear. Don’t be disheartened from what you initially see. We haven’t yet specified a location for our PDB File. Also, note that the Call Stack window is shown in
Figure 6. To show the Call Stack window, Select on the menu Debug->Windows->Call Stack

Figure 6: Visual Studio showing No Source Available when PDB File is not specified.
To specify the location of your PDB File, on the Menu choose Debug->Options and Settings. The dialog in
Figure 7 will appear.

Figure 7: Debug Settings and Options Dialog
Select the Symbols tree item that is located under the Debugging tree item. You can add a folder to the Symbol file (.pdb) locations by clicking the yellow folder button on the top right of the screen show in
Figure 7. Remember in the Creating the Application to Crash section of this article I asked you to copy your PDB file into the C:Temp folder. Well, this is the reason why. Add C:Temp to the symbol location. Once you have
added the folder click the Load All Symbols button. This will load our symbols into the current process. Click OK to close the dialog.
Figure 8 now shows the results of our previous operation. Actually, what is shown in
Figure 8 does not immediately appear. The Call Stack window now shows our CrashDumpTest.exe which it did not in
Figure 6. To display our code you have to double click on our CrashDumpTest.exe in the Call Stack window.

Figure 8: Crash dump with Code window and Symbols loaded
Conclusion
That brings us to the conclusion of this article. After today you should have the skills to setup Windows Error Reporting to generate dump files, understand the importance of PDB files and also know how to open and analyse a Crash dump in Visual Studio 2010.
#1
![]()
VVS
-
- Moderators
- 18 998 Сообщений:
The Master

Отправлено 09 Июнь 2016 — 16:25
Для настройки Windows Vista+ на создание дампов падающих процессов необходимо выполнить следуюшее:
1-ый вариант:Запускаем редактор реестра и находим:
- HKEY_LOCAL_MACHINESoftwareMicrosoftWindowsWindows Error Reporting
Создаем новый ключ:
LocalDumps
Создаем параметры:
имя DumpFolder
тип REG_EXPAND_SZ
значение %LOCALAPPDATA%CrashDumps
имя DumpType
тип REG_DWORD
значение 2Возможные значения DumpType
0 — Custom dump
1 — Minidump (default)
2 — Full dumpНаходим
- HKEY_CURRENT_USERSoftwareMicrosoftWindowsWindows Error Reporting
И проделываем то же самое. 2-ой вариант:
Распаковываем wer_dump.zip, запускаем wer_dump.reg (он сделает ровно то, что описано выше).Независимо от того, какой вариант внесения изменений в реестр использовался, перезагружаем машину, воспроизводим ситуацию. Если нам повезло, crash-dump будет лежать в каталоге %LOCALAPPDATA%CrashDumps
Сообщение было изменено VVS: 09 Июнь 2016 — 17:25
меня вот что возмутило. что даже не начинают толком диалог сразу дампы…… © alehas777
———————————
Антивирус это как ремень безопасности — всего лишь увеличивает шансы выжить или получить менее тяжкую травму при аварии.
Есть, однако, категория людей, которые рассматривают средства безопасности как ауру неуязвимости. © basid
- Наверх
#2
![]()
VVS
VVS
-
- Moderators
- 18 998 Сообщений:
The Master
Отправлено 09 Июнь 2016 — 16:34
Использование программы procdump для создания дампов:
0) procdump -ma {PID или имя процесса}
команда выполняется в следующих случаях:
— завершение приложения с показом окна ошибки. Команду необходимо выполнить до закрытия окна с сообщением об ошибке
— ложное срабатывание защиты от эксплоитов. В этом случае необходимо переключить в интерактивный режим и выполнить команду при возникновении запроса на действие с процессом
— зависание или аномалии в ходе исполнения процесса (например, повышенное использование ресурсов CPU или диска). Команду необходимо выполнить при воспроизведении.1) procdump -e -ma {PID или имя процесса}
команда ввозится до воспроизведения, но после запуска процесса, procdump снимет дамп процесса с указанных PID при возникновении необработанного исключения
2) procdump -t -ma {PID или имя процесса}
команда ввозится до воспроизведения, но после запуска процесса, procdump снимет дамп процесса с указанным PID при получении события process terminated
3) procdump -w -e -ma {имя процесса}
команда вводится ДО воспроизведения и ДО запуска провесса, procdump будет ожидать появления процесса c указанным именем и снимет дамп при возникновении необработанного исключения
4) procdump -w -t -ma {имя процесса}
команда вводится ДО воспроизведения и ДО запуска провесса, procdump будет ожидать появления процесса c указанным именем и снимет дамп при получении события process terminated
5) аргументы -t и -e можно комбинировать (в этом случае дамп снимется при возникновении необработанного исключения ИЛИ при получении события process terminated).
6) procdump -i -ma
устанавливает procdump в качестве postmortem дебаггера, т.е. прокдамп будет пытаться снимать полный дамп памяти любого процесса, который упал
Примечание:
Если процессов с одинаковым именем несколько, то нужно использовать PID, а не имя процесса.
Сообщение было изменено VVS: 09 Июнь 2016 — 17:11
меня вот что возмутило. что даже не начинают толком диалог сразу дампы…… © alehas777
———————————
Антивирус это как ремень безопасности — всего лишь увеличивает шансы выжить или получить менее тяжкую травму при аварии.
Есть, однако, категория людей, которые рассматривают средства безопасности как ауру неуязвимости. © basid
- Наверх
#3
![]()
VVS
VVS
-
- Moderators
- 18 998 Сообщений:
The Master
Отправлено 09 Июнь 2016 — 16:39
Для настройки Windows XP на создание дампов падающих процессов необходимо выполнить следуюшее:
Нажмите кнопку Пуск и выберите пункт Выполнить.
Введите команду drwtsn32 и нажмите кнопку ОК.
В открывшемся окне укажите путь к папке с Log-файлами (или оставьте дефолтным) и путь к папке с crash-дампами (или оставьте дефолтным)
Выберите тип создаваемого дампа (Crash Dump Type) — полный (Full)
В области опций (Options) выберите следующие пункты:
— Dump Symbol Table
— Dump All Thread Contexts
— Append to Existing Log File
— Create Crash Dump File
меня вот что возмутило. что даже не начинают толком диалог сразу дампы…… © alehas777
———————————
Антивирус это как ремень безопасности — всего лишь увеличивает шансы выжить или получить менее тяжкую травму при аварии.
Есть, однако, категория людей, которые рассматривают средства безопасности как ауру неуязвимости. © basid
- Наверх
#4
![]()
VVS
VVS
-
- Moderators
- 18 998 Сообщений:
The Master
Отправлено 09 Июнь 2016 — 17:06
Все © принадлежат Диане Лебедевой, за что ей громадное СПАСИБО! 
меня вот что возмутило. что даже не начинают толком диалог сразу дампы…… © alehas777
———————————
Антивирус это как ремень безопасности — всего лишь увеличивает шансы выжить или получить менее тяжкую травму при аварии.
Есть, однако, категория людей, которые рассматривают средства безопасности как ауру неуязвимости. © basid
- Наверх
Collectives™ on Stack Overflow
Find centralized, trusted content and collaborate around the technologies you use most.
Learn more about Collectives
Asked
11 years, 1 month ago
Viewed
23k times
I just want to find out which location does the WER write its dump file? Also is this location specific to OS?
- windows
- windbg
- windows-error-reporting
![]()
ThinkingStiff
64.5k30 gold badges145 silver badges239 bronze badges
asked Jan 6, 2012 at 21:36
![]()
imakimak
6,4297 gold badges50 silver badges73 bronze badges
5
-
my app keep crashing, i couldn’t find much info from dump file i generated from adplus. Just curious if WER dump file has any other info
Jan 6, 2012 at 22:26
-
Are you able to debug and see what exceptions are being thrown?
Jan 6, 2012 at 22:34
-
Like I said i couldn’t find much info from that dump file.
Jan 6, 2012 at 22:39
-
Not through the dump file but like visual studio and run your code. Are you able to do that?
Jan 6, 2012 at 22:43
1 Answer
The documentation for WER says you can set registry setting to control the dump location and the type of dump
HKEY_LOCAL_MACHINESOFTWAREMicrosoftWindowsWindows Error ReportingLocalDumpsDumpFolder
HKEY_LOCAL_MACHINESOFTWAREMicrosoftWindowsWindows Error ReportingLocalDumpsDumpType
Default value for DumpFolder is %LOCALAPPDATA%CrashDumps.
![]()
answered Jan 6, 2012 at 22:45
![]()
jcopenhajcopenha
3,9251 gold badge16 silver badges15 bronze badges
2
-
In windows 10, it appears the directory is
%ProgramData%MicrosoftWindowsWERReportArchive, but no directory related key exists within theHKEY_LOCAL_MACHINESOFTWAREMicrosoftWindowsWindows Error ReportingbranchJul 26, 2017 at 18:46
-
there are relevant entries at
Control PanelAll Control Panel ItemsSecurity and MaintenanceProblem ReportsandControl PanelAll Control Panel ItemsSecurity and Maintenanceunder the top entry of theMaintenanceheadingJul 26, 2017 at 18:56
- The Overflow Blog
- Featured on Meta
Linked
Related
Hot Network Questions
-
When targeted by a Nightwalker, can a Monk get rid of Finger of Doom effect by using Stillness of Mind?
-
Fair scoring system for multiple levels and multiple players
-
How can we exactly calculate the volume?
-
How can lossless compression ever exist?
-
How much would a slave cost in current day Europe?
-
Does the noun ‘curb’ have the meaning of the word ‘bridle’?
-
De Gruyter and De Gruyter Mouton: the difference
-
How is a huge criminal expected to get a good lawyer?
-
What is a sure shot way of proving citizenship of India?
-
What could have caused this failure in my main breaker?
-
Can a rocky planet form between gas giants?
-
Do conference organizers make a good profit?
-
Weak law vs strong law of large numbers — intuition
-
Why isn’t something like compound syscalls not implemented?
-
Why all the warnings about failure to raise the U.S. debt ceiling when some argue that Biden could just ignore it?
-
Is a one hour and a half layover enough time to go through customs?
-
Do astronauts use plumber’s bifocals?
-
Is interference of light a quantum phenomenon?
-
Aggregate a list in Python without using any libraries
-
Is there an adjective for «of eight years, eight years old»?
-
At what point is it «legal» to overthrow the government?
-
Why is Turkey campaigning to get their name changed to Türkiye in English but not other languages?
-
.ssh Directory has no id files after installing ssh service
-
Threading arguments from lists of different size
more hot questions
Question feed
Your privacy
By clicking “Accept all cookies”, you agree Stack Exchange can store cookies on your device and disclose information in accordance with our Cookie Policy.
Содержание
- WER Settings
- Windows Error Reporting subkey
- WER Live Kernel Reports Settings
- FullLiveKernelReports subkey
- LiveKernelReports subkey
- Для чего нужна служба «Windows Error Reporting» и как отключить ее в Windows 7, 8.1 и 10
- Отключение Error Reporting в Windows 7 и 8.1
- Отключение Error Reporting в Windows 10
- Универсальный способ отключения Error Reporting
WER Settings
Windows Error Reporting (WER) provides many settings to customize the problem reporting experience. All of these settings can be set using Group Policy. Some can also be changed in Action Center for WindowsВ 7 and WindowsВ 8. For Windows 10, use the search function in Settings to locate View advanced system settings. WER settings are located in one of the following registry subkeys:
- HKEY_CURRENT_USERSoftwareMicrosoftWindowsWindows Error Reporting
- HKEY_LOCAL_MACHINESoftwareMicrosoftWindowsWindows Error Reporting
Windows Error Reporting subkey
BypassDataThrottling
REG_DWORD
0 — Disable data bypass throttling. If the bypass is disabled or not configured as a policy setting, WER throttles data by default. WER does not upload more than one CAB file for a report that contains data about the same event types.
1 — Enable data bypass throttling. WER does not throttle data. WER uploads additional CAB files that can contain data about the same event types as an earlier uploaded report.
Whether to enable the bypass of WER client data throttling
ConfigureArchive
REG_DWORD
Possible values: 1 — Parameters only (default on WindowsВ 7) 2 — All data (default on WindowsВ Vista)
Whether to archive parameters only or all data
ConsentDefaultConsent
REG_DWORD
Possible values: 1 — Always ask (default) 2 — Parameters only 3 — Parameters and safe data 4 — All data
Default consent choice
ConsentDefaultOverrideBehavior
REG_DWORD
Possible values: 0 — Vertical consent will override the default consent (default) 1 — Default consent will override the application-specific consent
Whether default consent overrides vertical consent
Consent[VerticalName]
REG_DWORD
Possible values: 1 — Always ask (default) 2 — Parameters only 3 — Parameters and safe data 4 — All data
Consent choice for the WER plug-in
CorporateWERDirectory
REG_SZ
The directory path
Target directory on the server
CorporateWERPortNumber
REG_DWORD
The port number
Port number to be used with the corporate server
CorporateWERServer
REG_SZ
The name of the server
Corporate server name
CorporateWERUseAuthentication
REG_DWORD
Possible values: 0 — No (default) 1 — Yes
Whether to use Windows Integrated Authentication
CorporateWERUseSSL
REG_DWORD
Possible values: 0 — No (default) 1 — Yes
Whether to use SSL
DebugApplications[ExeName] (replace «[ExeName]» with an actual name of an .exe file, for example, «notepad.exe»)
REG_DWORD
0 — Processes with an executable image name of **[ExeName]** do not require the user to choose **Debug** or **Continue** (default) 1 — Processes with an executable image name of **[ExeName]** require the user to choose **Debug** or **Continue**
DebugApplications* («*» is the literal value name)
REG_DWORD
0 — All processes except ones specified explicitly in the setting **DebugApplications\[ExeName]** do not require the user to choose **Debug** or **Continue** (default) 1 — All processes except ones specified explicitly in the setting **DebugApplications\[ExeName]** require the user to choose **Debug** or **Continue**
DisableArchive
REG_DWORD
Possible values: 0 — Enabled 1 — Disabled
Enable or disable the archive
Disabled
REG_DWORD
Possible values: 0 — Enabled (default) 1 — Disabled
Enable or disable WER
DisableQueue
REG_DWORD
Possible values: 0 — Enabled 1 — Disabled
Enable or disable report queuing
DontShowUI
REG_DWORD
Possible values: 0 — UI (default) 1 — No UI
Enable or disable the WER UI
DontSendAdditionalData
REG_DWORD
Possible values: 0 — Send (default) 1 — Do not send
Whether to prevent sending second-level data
ExcludedApplications[Application Name]
REG_SZ
List of excluded applications
ForceQueue
REG_DWORD
Possible values: 0 — No (default) 1 — Yes
Whether to send all reports to the user’s queue
LocalDumpsDumpFolder or LocalDumps[Application Name]DumpFolder
REG_EXPAND_SZ
The directory path. The default value is %LOCALAPPDATA%CrashDumps. If the default is not used, the application must ensure that the folder has a sufficient ACL.
WindowsВ Vista: The registry values under the LocalDumps key are not supported. Note that this behavior changed with Windows ServerВ 2008 and WindowsВ Vista with Service PackВ 1 (SP1).
The path where the dump files are to be stored.
Note that per-process settings will override any global settings that exist For more information, see Collecting User-Mode Dumps.
This setting is not supported in the HKEY_CURRENT_USER registry hive.
LocalDumpsDumpCount or LocalDumps[Application Name]DumpCount
REG_DWORD
The maximum number. The default is 10. When the maximum value is exceeded, the oldest dump file in the folder will be replaced with the new dump file.
WindowsВ Vista: The registry values under the LocalDumps key are not supported. Note that this behavior changed with Windows ServerВ 2008 and WindowsВ Vista with SP1.
The maximum number of dump files in the folder.
This setting is not supported in the HKEY_CURRENT_USER registry hive.
LocalDumpsDumpType or LocalDumps[Application Name]DumpType
REG_DWORD
Possible values: 0 — Custom dump 1 — Minidump (default) 2 — Full dump
WindowsВ Vista: The registry values under the LocalDumps key are not supported. Note that this behavior changed with Windows ServerВ 2008 and WindowsВ Vista with SP1.
This setting is not supported in the HKEY_CURRENT_USER registry hive.
LocalDumpsCustomDumpFlags or LocalDumps[Application Name]CustomDumpFlags
REG_DWORD
WindowsВ Vista: The registry values under the LocalDumps key are not supported. Note that this behavior changed with Windows ServerВ 2008 and WindowsВ Vista with SP1.
The custom dump options to be used. This value is used only when DumpType is set to 0.
This setting is not supported in the HKEY_CURRENT_USER registry hive.
LoggingDisabled
REG_DWORD
Possible values: 0–Enabled (default) 1–Disabled
Enable or disable logging
MaxArchiveCount
REG_DWORD
Range of possible values: 1–5000. The default is 1000.
Maximum size of the archive, in files
MaxQueueCount
REG_DWORD
Range of possible values: 1–500. The default is 50.
Maximum size of the queue
QueuePesterInterval
REG_DWORD
Interval between reminders to the user to check for solutions, in days
RuntimeExceptionHelperModules![ pwszOutOfProcessCallbackDll name including path]
REG_DWORD
The contents of the value are ignored.
The name of the value is used to fetch the pwszOutOfProcessCallbackDll value.
Windows ServerВ 2008, WindowsВ Vista, Windows ServerВ 2003 and WindowsВ XP: This registry value is not supported.
WER Live Kernel Reports Settings
WER’s Live Kernel Reports settings, which are described next, are both located under the following registry subkey:
For Windows 10 1703, Windows Server 2019, and later:
- HKEY_LOCAL_MACHINESYSTEMCurrentControlSetControlCrashControl
For Windows 10 builds 1607 and older, Windows 8.1, Windows Server 2016, and Windows Server 2012 R2:
- HKEY_LOCAL_MACHINESOFTWAREMicrosoftWindowsWindows Error Reporting
FullLiveKernelReports subkey
ComponentThrottleThreshold
REG_DWORD
The threshold (in hours) of how often any single component can create a full live dump. This value must be greater than or equal to SystemThrottleThreshold. Setting both to zero (0) will disable all time-based throttling. The default is 168 (7 days).
FullLiveReportsMax
REG_DWORD
The maximum number of full live dumps that may be on disk at any given time. The default is 1. On Windows 10 1803, Windows Server 2019, and later, setting this value to zero (0) will disable the live dump feature.
LastFullLiveReport
REG_QWORD
A SystemTime indicating the last full live report time, for the system or a specific ReportType. This is used to calculate whether a policy threshold has been satisfied.
SystemThrottleThreshold
REG_DWORD
The threshold (in hours) of how often any component on the system can create a full live dump. The default is 120 (5 days).
LiveKernelReports subkey
LiveKernelReportsPath
REG_SZ
The redirected storage location of live kernel reports. The default location is %systemroot%LiveKernelReports. This value must be a valid path. The path must be in NT path format. For example, ??C:LiveDumpsFolder. For more information on path formats, see File path formats on Windows systems.
Источник
Для чего нужна служба «Windows Error Reporting» и как отключить ее в Windows 7, 8.1 и 10

Когда в работе какой-то программы происходит ошибка, Windows автоматически регистрирует это событие и запускает штатную утилиту Windows Error Reporting, которая формирует отчет и предлагает отправить его на сервера Microsoft. Отправка лога не осуществляется автоматически, более того, большинство пользователей предпочитают не делиться информацией о программных ошибках и были бы не прочь отключить эту функцию вообще.
В Windows 7 и 8.1 это можно сделать через графический интерфейс системы, если же вы хотите отключить Windows Error Reporting в Windows 10, нужно отредактировать один ключ в реестре или изменить значение соответствующей ему политики в редакторе gpedit.msc . Существует и универсальный способ, одинаково подходящий для всех версий Windows, но о нём будет сказано ниже.
Отключение Error Reporting в Windows 7 и 8.1
Откройте через окошко «Выполнить» ( Win + R ) Центр поддержки командой wscui.cpl апплет «Центр поддержки».
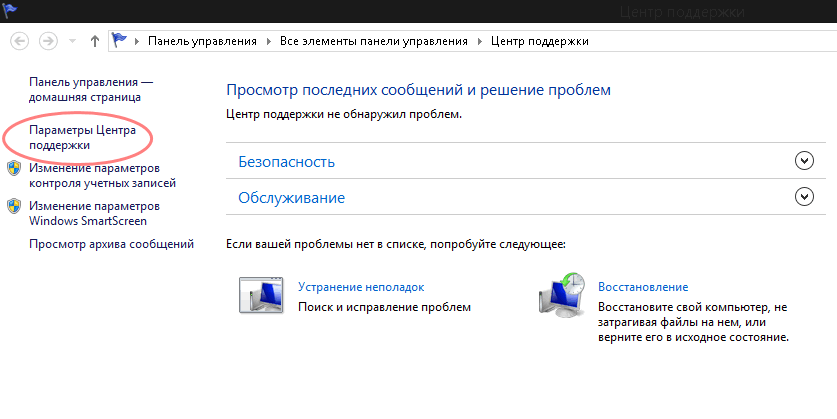
Нажмите в меню справа ссылку «Параметры центра поддержки».
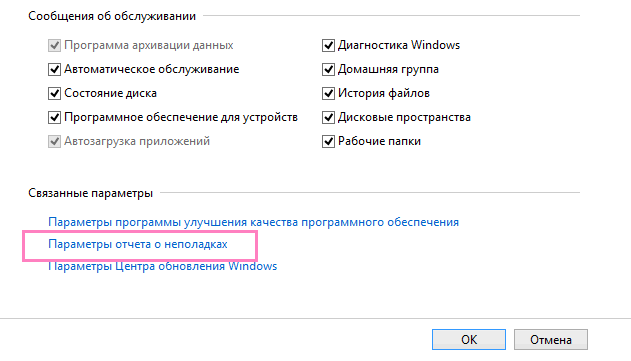
На следующей странице нажмите ссылку «Параметры отчета о неполадках».
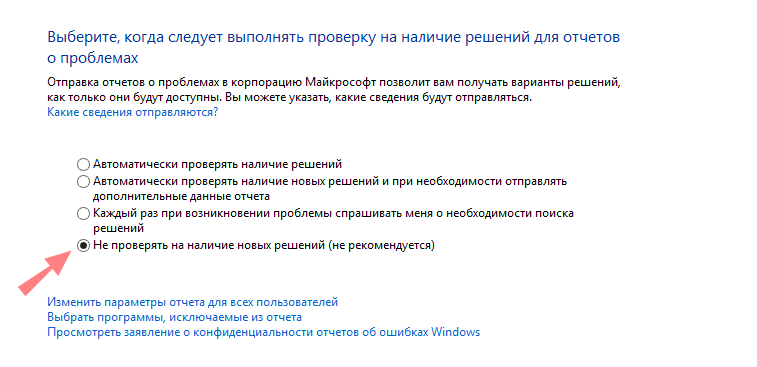
И активируйте радиокнопку «Не проверять на наличие новых решений».
Отключение Error Reporting в Windows 10
В Windows 10 опция «Параметры отчета о неполадках» была удалена из окна параметров центра поддержки, поэтому для отключения формирования отчетов о программных ошибках в этой версии системы придется действовать в обход.
Откройте через окошко «Выполнить» одноименной командой редактор реестра Regedit и раскройте ключ:
HKLMSOFTWAREMicrosoftWindowsWindows Error Reporting
Справа создайте новый DWORD -параметр.
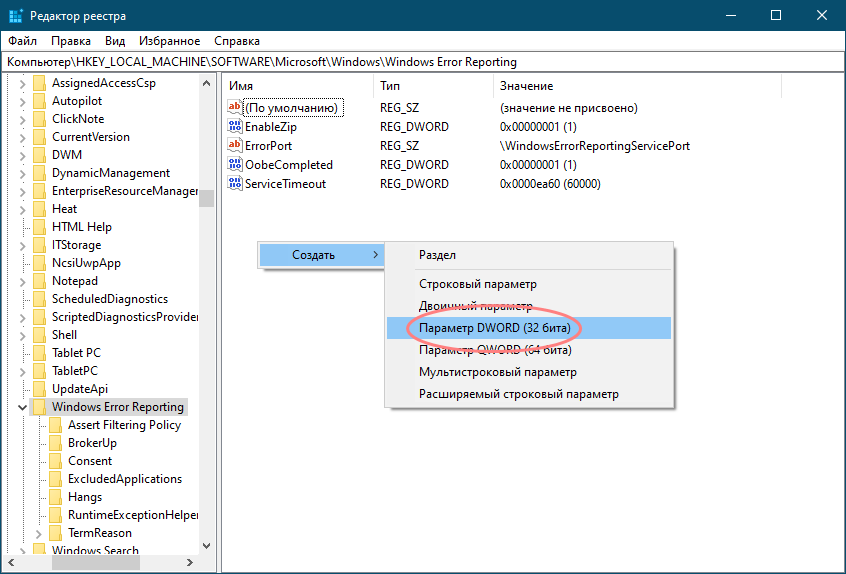
Назовите его Disabled и задайте в качестве его значения единицу.
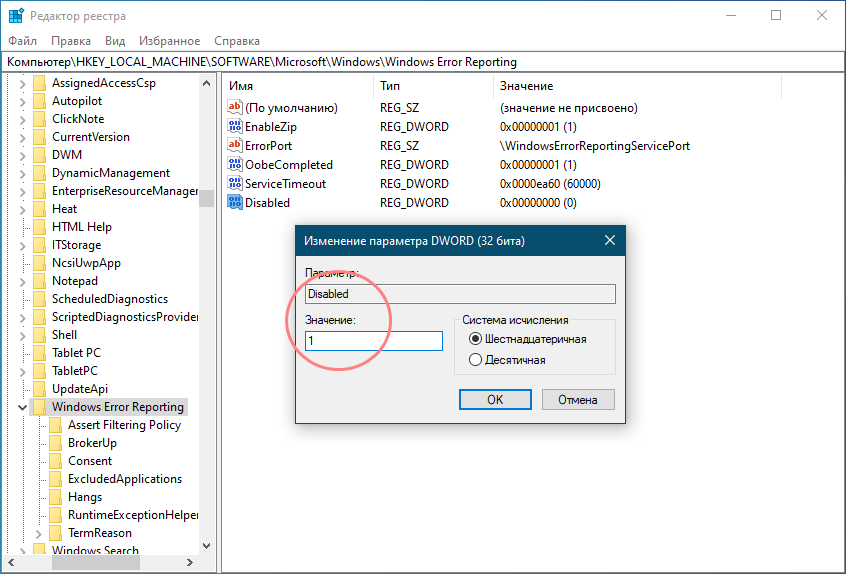
Сохраните настройки, закройте редактор реестра и перезагрузите компьютер.
Описание примера отключения функции Error Reporting через редактор групповых политик мы опускаем, поскольку его результат является эквивалентным применяемому твику реестра, к тому же редактор gpedit.msc доступен не всех редакциях Windows.
Универсальный способ отключения Error Reporting
Предложенный ниже способ является универсальным и одинаково работает в Windows 7, 8.1 и Windows 10.
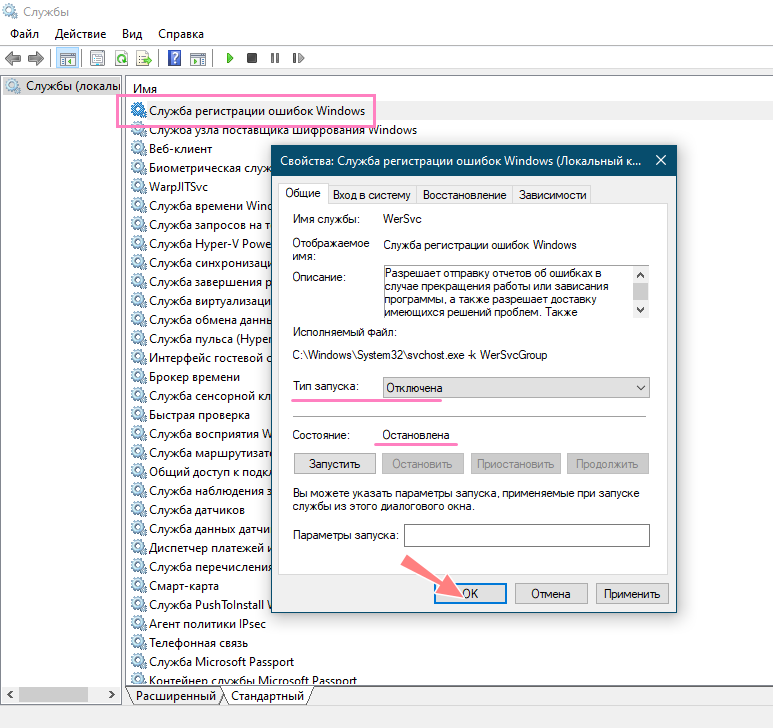
Вызовите окошко «Выполнить» и выполните в нём команду services.msc , чтобы открыть оснастку управления службами.
Отыщите справа службу «Служба регистрации ошибок Windows», откройте ее свойства и выставьте параметры так, как показано на скриншоте после чего сохраните настройки.
Любители командной строки могут отключить ее через консоль.
Запустив командную строку или PowerShell от имени администратора и выполните в ней команду:
sc config wersvc start=disabled
gpupdate /force
Чтобы обновить политику без перезагрузки компьютера.
Источник