На чтение 4 мин. Просмотров 3.5k. Опубликовано 03.09.2019
Служба отчетов об ошибках Windows 10 предназначена для обеспечения оптимальной работы вашего ПК. Основная идея Windows Error Report (WER) – информировать Microsoft о проблемах пользователей при работе с Windows.
Однако в каждой версии ОС Windows служба включена по умолчанию. Но отдельный пользователь может отключить его, если возникнет такая необходимость. В этой статье рассматривается, как включить или отключить службу отчетов об ошибках в Windows 10.
Содержание
- Как работает служба отчетов об ошибках Windows 10 и почему
- Должен ли я отключить службу отчетов об ошибках Windows?
- Действия по отключению службы отчетов об ошибках Windows 10
- Способ первый: используйте команду , чтобы отключить отчет об ошибках Windows 10.
- Способ второй: использовать редактор реестра
Как работает служба отчетов об ошибках Windows 10 и почему
В отчете об ошибках Windows 10 основное внимание уделяется обнаружению аппаратных и программных проблем с ПК пользователя и отправке отчетов в Microsoft. Имея базу данных о вероятных жалобах на использование Windows 10, Microsoft может затем отправить решения для устранения неполадок.
При работе с ПК у некоторых пользователей появляются всплывающие окна или оповещения, требующие отправки отчета о проблеме. Отчет об ошибках Windows обычно появляется после сбоя системы, сбоя программы, отказа в правильной загрузке или ошибок операционной системы. Windows обычно предлагает пользователю отправить отчет об ошибке в Интернете, чтобы помочь найти решения в будущем. Отчет о проблеме может содержать название программы, дату, время ошибки и версию.
Должен ли я отключить службу отчетов об ошибках Windows?
Пользователи Windows часто отключают отчеты об ошибках из-за дискового пространства или из-за проблем с конфиденциальностью, но им, возможно, придется проявлять сдержанность. Служба отчетов об ошибках для Windows 10 предлагает двойную выгоду для Microsoft и пользователей ПК.
Каждый отчет об ошибках помогает Microsoft разрабатывать более продвинутые пакеты обновлений для устранения сбоев. Это означает лучшее взаимодействие с Windows 10 на основе собранной информации.
Действия по отключению службы отчетов об ошибках Windows 10
- Используйте команду, чтобы отключить отчет об ошибках Windows 10 .
- Используйте редактор реестра, чтобы отключить отчет об ошибках Windows 10
Как и в других версиях, Windows 10 имеет несколько иной графический интерфейс пользователя для отключения отчета об ошибках. Более низкие версии ОС Windows имеют отчеты об ошибках в настройках Центра поддержки. В Windows 10 это функция безопасности и обслуживания, требующая работы с реестрами.
Способ первый: используйте команду , чтобы отключить отчет об ошибках Windows 10 .
Это простой и понятный процесс. Вот шаги, чтобы следовать:
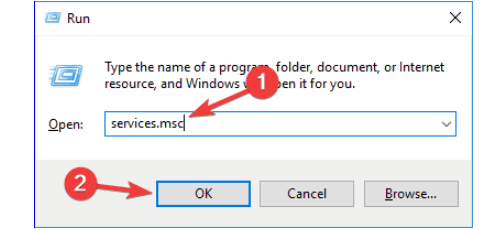
- Используйте сочетание клавиш. С клавиатуры нажмите клавишу Windows + R. Следует перейти к диалоговому окну «Выполнить».
-
В открытое пространство диалогового окна введите service.msc .

-
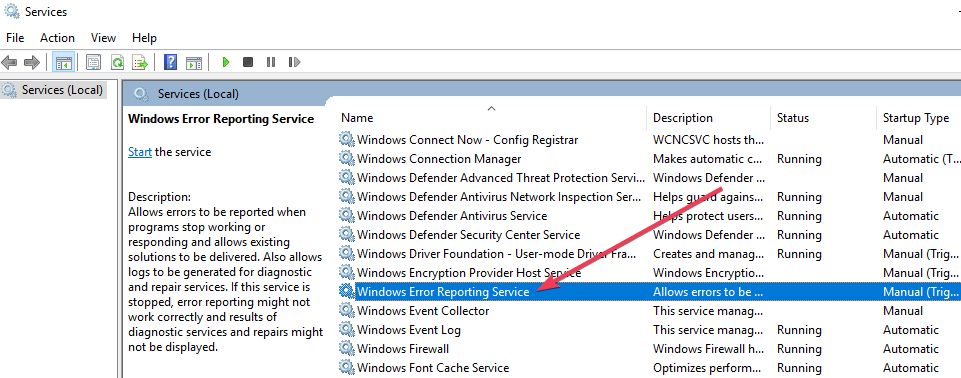
Переместите курсор в службу отчетов об ошибках Windows и щелкните ее правой кнопкой мыши.
-
Найдите Типы запуска и прокрутите список раскрывающегося меню справа.
- Нажмите Отключено , расположенную внизу списка.
- Нажмите em ОК ‘или примените, чтобы завершить действие.
- Закройте сервисное окно для выхода. Теперь процесс завершен.


- СВЯЗАННЫЕ: 5 лучших программ для исправления ошибок времени выполнения в Windows 10
Примечание:
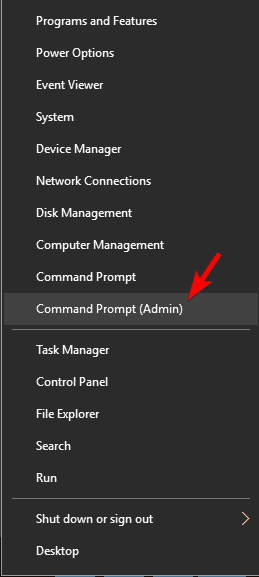
В некоторых случаях тип запуска, близкий к отключенному, может отображаться серым цветом. Это означает, что пользователю необходимы права администратора для продолжения процесса. Поэтому выйдите и войдите как администратор. Или найдите административную командную строку, нажав клавишу Windows + X, чтобы выбрать командную строку администратора.

Способ второй: использовать редактор реестра
Использование редактора реестра – это еще один способ безопасного отключения службы отчетов об ошибках Windows 10. Этот второй способ отключения службы отчетов об ошибках Windows включает настройку реестра. Но сначала вам нужно проверить наличие сообщений об ошибках:
- Найдите панель управления из автозагрузки Windows.
-
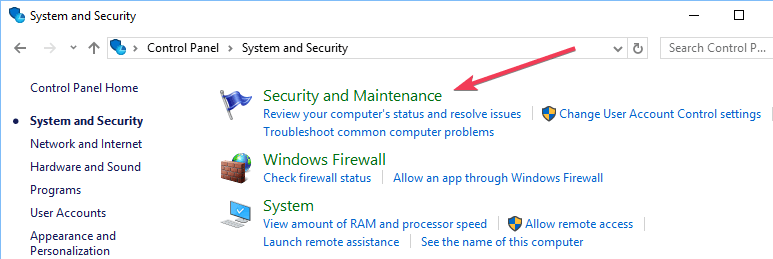
Нажмите Панель управления> Система и безопасность> Безопасность и обслуживание.
-
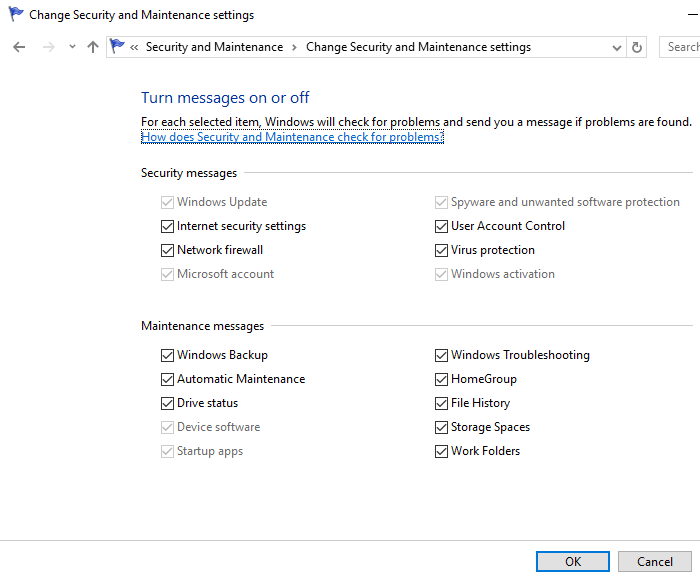
Остерегайтесь проблем с отчетами. Отчет о проблемах должен по умолчанию отображать «Вкл».


- СВЯЗАННЫЕ: исправьте ошибки Blue Screen of Death с помощью этих 4 программных решений
Действия по отключению службы отчетов об ошибках Windows с помощью редактора реестра
-
Найдите приложение для редактирования реестра ниже:
-
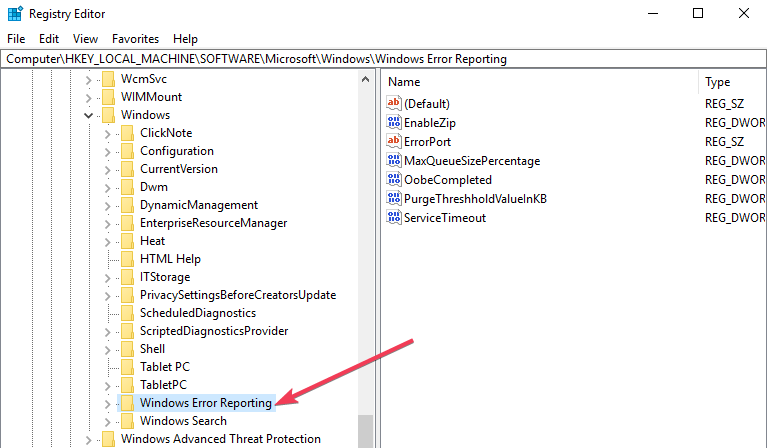
HKEY_LOCAL_MACHINE/ПРОГРАММНОЕ ОБЕСПЕЧЕНИЕ/Microsoft/Windows/Отчеты об ошибках Windows
-
HKEY_LOCAL_MACHINE/ПРОГРАММНОЕ ОБЕСПЕЧЕНИЕ/Microsoft/Windows/Отчеты об ошибках Windows
- Справа от вашего окна найдите раздел реестра в диалоговом окне.
- Нажмите на опцию «отключен», чтобы появилось диалоговое окно. Замените значение «0» на «1».
- Если значения нет, создайте новое с тем же именем: Отключено ’.
- Затем установите новое 32-битное значение DWORD на «1».
- Нажмите «ОК», чтобы внести изменения.

Примечание:
- Чтобы убедиться, что служба отчетов об ошибках Windows отключена, перейдите в раздел «Безопасность и обслуживание». Проверьте комментарий к сообщению о проблеме, чтобы увидеть, включен он или нет.
- Чтобы снова включить службу отчетов об ошибках в Windows 10, просто установите для отключенного значения значение ноль. Другим вариантом будет удалить отключенное значение.
- Чтобы создать новый DWORD из редактора реестра, необходимо найти в меню «Правка»> «Создать».
Это довольно просто отключить и включить службу отчетов об ошибках Windows 10 в любое время. А понимание того, как использовать редактор реестра или поиск, делает все намного проще.
Advanced users can manage the service by tweaking their Registry
by Madalina Dinita
Madalina has been a Windows fan ever since she got her hands on her first Windows XP computer. She is interested in all things technology, especially emerging technologies… read more
Updated on September 29, 2022
Reviewed by
Vlad Turiceanu

Passionate about technology, Windows, and everything that has a power button, he spent most of his time developing new skills and learning more about the tech world. Coming… read more
- The Windows error reporting service is enabled by default on Windows PCs.
- Users have been looking for ways to manually turn it off.
- We create a guide on how to disable the Windows problem reporting in Windows 10.

XINSTALL BY CLICKING THE DOWNLOAD FILE
This software will repair common computer errors, protect you from file loss, malware, hardware failure and optimize your PC for maximum performance. Fix PC issues and remove viruses now in 3 easy steps:
- Download Restoro PC Repair Tool that comes with Patented Technologies (patent available here).
- Click Start Scan to find Windows issues that could be causing PC problems.
- Click Repair All to fix issues affecting your computer’s security and performance
- Restoro has been downloaded by 0 readers this month.
The Windows 10 error reporting service is designed to help ensure your PC works optimally. The central idea behind Windows Error Report (WER) is to keep Microsoft informed about user issues working with Windows.
However, every Windows OS version has the service enabled on default settings. But an individual user can choose to disable it if the need arises.
This article explores how to enable or disable the error reporting service on Windows 10.
How the Windows 10 error reporting service works
Windows 10 Error Report focuses on discovering hardware and software issues from the user’s PC and reports to Microsoft.
With a database of likely complaints experienced with using the Windows 10, Microsoft can then send solutions for troubleshooting.
While working with the PC, some users experience pop-ups or alerts requesting the submission of the problem report.
Windows error report usually occurs after a system failure, program crashes, refused to load properly or operating system errors. W
Windows usually prompts the user to submit an error report online to help proffer solutions in the future. The problem report may include the program name, date, time of error, and version.
Should I disable the Windows problem reporting service?
Windows users often disable error reporting due to disk space or privacy issues but might need to exercise restraint. Error reporting service for Windows 10 offers dual benefits to Microsoft and PC users.
Each error report helps Microsoft develop more advanced service packs for dealing with glitches. That means a better user experience with Windows 10 based on the information gathered.
How can I disable the Window error reporting Service?
Just like other versions, Windows 10 does have a slightly different graphical user interface for disabling error reports.
Lower versions of Windows OS have error reporting under Action Center Setting. On Windows 10 it is the Security & Maintenance function that requires working with registries.
1. Use the Run dialog
1. Press down the Windows +R keys on your keyboard.
2. The Run dialog box will open.
Some PC issues are hard to tackle, especially when it comes to corrupted repositories or missing Windows files. If you are having troubles fixing an error, your system may be partially broken.
We recommend installing Restoro, a tool that will scan your machine and identify what the fault is.
Click here to download and start repairing.
3. Type service.msc in the box and click on OK or press Enter to run the command.
4. Locate the Windows Error Reporting Service in the list that opens.
5. Right click on it.
6. Go to the Startup type section and press the button next to it to open a drop-down menu.
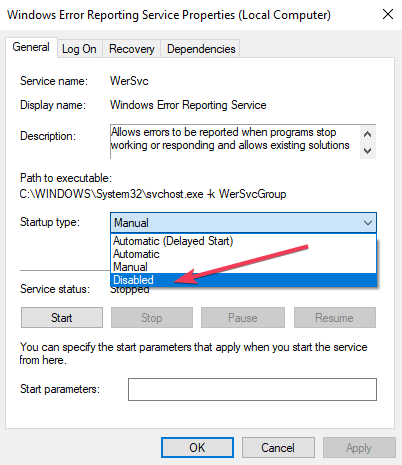
7. Click on the Disabled button, which is at the bottom of the list.
8. Click on Apply and OK to save the changes.
9. Close the service window to exit. Now the process has been completed.
The easiest way to manage the Windows error reporting service is via the built-in Settings app. From there, you can enable or disable the problem reporting service in a few clicks.
- RELATED: 5 best software to fix runtime errors in Windows 10
In some cases, the Startup type which is close to disabled might appear gray. That means the user needs admin rights to continue the process. Therefore, log out and log in as an administrator. Or locate the administrative command prompt by pressing Windows key+ X to select command prompt admin.
2. Use the Registry Editor
Using the Registry Editor is another way to safely disable the Windows 10 Error Reporting Service. This second method for disabling the Windows error reporting service includes tweaking the registry. But first, you need to check for error report issues:
- Locate Control Panel from Windows startup.
- Click Control Panel> System and Security> Security and Maintenance.

- Look out for Report problems. Report problems should by default display ‘On’.

- RELATED: Fix Blue Screen of Death errors with these 4 software solutions
2.1 Steps to disable Windows Error Reporting Service using the Registry Editor
- Locate the registry editor app below:
- HKEY_LOCAL_MACHINESOFTWAREMicrosoftWindowsWindows Error Reporting

- HKEY_LOCAL_MACHINESOFTWAREMicrosoftWindowsWindows Error Reporting
- To the right of your window, locate the registry key in the dialog box.
- Click on the option ‘disabled’ so the dialog box can appear. Replace the value ‘0’ with ‘1’.
- If there is no value then create a new one with the same name, ‘Disabled’.
- To create a new DWORD from the registry editor, one needs to locate Edit > New on the menu.
- Then set the new 32-Bit DWORD value to ‘1’.
- Tap ‘OK’ to effect changes.
- How to Disable Pagefile in Windows 7
- How to Resolve Microsoft Office Error Code 30204-44
- How to Disable Xbox Game Bar on Windows 10 [4 ways]
- 4 Ways to Disable Xbox Game Bar on Windows 11
- How to Get Sound From Computer to TV [Multiple Ways]
To confirm that the Windows error reporting service has been disabled, go to Security and Maintenance. Check the comment on the report problem to see if it reads on or off.
Can I enable the problem reporting service after I disable it?
To re-enable the error reporting service on Windows 10, simply set the disabled value back to zero.
Another option would be to delete the disabled value in the Registry Editor.
It’s quite simple to disable and enable Windows 10 error reporting service anytime. And understanding how to use the Registry Editor or finder makes everything much simpler.
We hope that our guide helped you disable this service. Let us know your thoughts in the comments section below.
![]()
Newsletter
Advanced users can manage the service by tweaking their Registry
by Madalina Dinita
Madalina has been a Windows fan ever since she got her hands on her first Windows XP computer. She is interested in all things technology, especially emerging technologies… read more
Updated on September 29, 2022
Reviewed by
Vlad Turiceanu
Passionate about technology, Windows, and everything that has a power button, he spent most of his time developing new skills and learning more about the tech world. Coming… read more
- The Windows error reporting service is enabled by default on Windows PCs.
- Users have been looking for ways to manually turn it off.
- We create a guide on how to disable the Windows problem reporting in Windows 10.
XINSTALL BY CLICKING THE DOWNLOAD FILE
This software will repair common computer errors, protect you from file loss, malware, hardware failure and optimize your PC for maximum performance. Fix PC issues and remove viruses now in 3 easy steps:
- Download Restoro PC Repair Tool that comes with Patented Technologies (patent available here).
- Click Start Scan to find Windows issues that could be causing PC problems.
- Click Repair All to fix issues affecting your computer’s security and performance
- Restoro has been downloaded by 0 readers this month.
The Windows 10 error reporting service is designed to help ensure your PC works optimally. The central idea behind Windows Error Report (WER) is to keep Microsoft informed about user issues working with Windows.
However, every Windows OS version has the service enabled on default settings. But an individual user can choose to disable it if the need arises.
This article explores how to enable or disable the error reporting service on Windows 10.
How the Windows 10 error reporting service works
Windows 10 Error Report focuses on discovering hardware and software issues from the user’s PC and reports to Microsoft.
With a database of likely complaints experienced with using the Windows 10, Microsoft can then send solutions for troubleshooting.
While working with the PC, some users experience pop-ups or alerts requesting the submission of the problem report.
Windows error report usually occurs after a system failure, program crashes, refused to load properly or operating system errors. W
Windows usually prompts the user to submit an error report online to help proffer solutions in the future. The problem report may include the program name, date, time of error, and version.
Should I disable the Windows problem reporting service?
Windows users often disable error reporting due to disk space or privacy issues but might need to exercise restraint. Error reporting service for Windows 10 offers dual benefits to Microsoft and PC users.
Each error report helps Microsoft develop more advanced service packs for dealing with glitches. That means a better user experience with Windows 10 based on the information gathered.
How can I disable the Window error reporting Service?
Just like other versions, Windows 10 does have a slightly different graphical user interface for disabling error reports.
Lower versions of Windows OS have error reporting under Action Center Setting. On Windows 10 it is the Security & Maintenance function that requires working with registries.
1. Use the Run dialog
1. Press down the Windows +R keys on your keyboard.
2. The Run dialog box will open.
Some PC issues are hard to tackle, especially when it comes to corrupted repositories or missing Windows files. If you are having troubles fixing an error, your system may be partially broken.
We recommend installing Restoro, a tool that will scan your machine and identify what the fault is.
Click here to download and start repairing.
3. Type service.msc in the box and click on OK or press Enter to run the command.
4. Locate the Windows Error Reporting Service in the list that opens.
5. Right click on it.
6. Go to the Startup type section and press the button next to it to open a drop-down menu.
7. Click on the Disabled button, which is at the bottom of the list.
8. Click on Apply and OK to save the changes.
9. Close the service window to exit. Now the process has been completed.
The easiest way to manage the Windows error reporting service is via the built-in Settings app. From there, you can enable or disable the problem reporting service in a few clicks.
- RELATED: 5 best software to fix runtime errors in Windows 10
In some cases, the Startup type which is close to disabled might appear gray. That means the user needs admin rights to continue the process. Therefore, log out and log in as an administrator. Or locate the administrative command prompt by pressing Windows key+ X to select command prompt admin.
2. Use the Registry Editor
Using the Registry Editor is another way to safely disable the Windows 10 Error Reporting Service. This second method for disabling the Windows error reporting service includes tweaking the registry. But first, you need to check for error report issues:
- Locate Control Panel from Windows startup.
- Click Control Panel> System and Security> Security and Maintenance.
- Look out for Report problems. Report problems should by default display ‘On’.
- RELATED: Fix Blue Screen of Death errors with these 4 software solutions
2.1 Steps to disable Windows Error Reporting Service using the Registry Editor
- Locate the registry editor app below:
- HKEY_LOCAL_MACHINESOFTWAREMicrosoftWindowsWindows Error Reporting
- HKEY_LOCAL_MACHINESOFTWAREMicrosoftWindowsWindows Error Reporting
- To the right of your window, locate the registry key in the dialog box.
- Click on the option ‘disabled’ so the dialog box can appear. Replace the value ‘0’ with ‘1’.
- If there is no value then create a new one with the same name, ‘Disabled’.
- To create a new DWORD from the registry editor, one needs to locate Edit > New on the menu.
- Then set the new 32-Bit DWORD value to ‘1’.
- Tap ‘OK’ to effect changes.
- How to Disable Pagefile in Windows 7
- How to Resolve Microsoft Office Error Code 30204-44
To confirm that the Windows error reporting service has been disabled, go to Security and Maintenance. Check the comment on the report problem to see if it reads on or off.
Can I enable the problem reporting service after I disable it?
To re-enable the error reporting service on Windows 10, simply set the disabled value back to zero.
Another option would be to delete the disabled value in the Registry Editor.
It’s quite simple to disable and enable Windows 10 error reporting service anytime. And understanding how to use the Registry Editor or finder makes everything much simpler.
We hope that our guide helped you disable this service. Let us know your thoughts in the comments section below.
![]()
Newsletter

Всякий раз, когда система падает, используя дамп файла . DMP, мы можем легко проанализировать,что вызвало падение системы.Это особенно полезно, чтобы найти проблему в сторонних модулей и является причиной этой проблемы или нет. Таким образом, используя анализ дампа,могут быть решены ошибки и сбои.Функция Windows Error Reporting (WER) ,была введена в Windows Vista,и работает для сбора пользовательского режима сбора ошибок.
Но эта услуга не включена по умолчанию в ОС Windows 8 и трюк с реестром может заставить работать эту функцию, чтобы привести её в действие.
Активировать Windows Error Reporting Service
В этой статье я покажу вам, как включить эту службу отчета об ошибках Windows с тем, что бы Вы могли легко собрать дамп файла в папке внутри Проводника. Обратите внимание и на то, что в том числе и приложения, которые делают свои собственные пользовательские отчеты об аварии . NET приложений, которые не поддерживаются этой функцией.
Использование редактора реестра для сбора User Mode
Так как функция отчёт об ошибках Windows не включена по умолчанию, вы можете использовать следующий трюк параметра реестра , чтобы запустить его:
1.Нажмите комбинацию клавиш Windows Key+R,в диалоговом окне в Run введите тип Regedt32.exe и нажмите Enter,чтобы открыть Редактор реестра .
. 2 Перейдите к этой записи :
HKEY_LOCAL_MACHINE SOFTWARE Microsoft Windows Windows Error Reporting LocalDumps

3.На правой панели, вы можете создавать различные значения данных для настройки WER. Вот различные данные, которые вы можете создавать здесь:
. DumpFolder — (Создание: с помощью правой кнопкой мыши -> New -> Расширяемый строковый параметр)
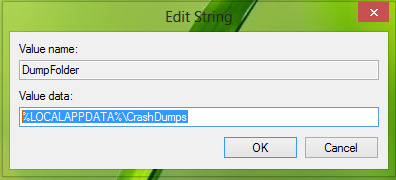
Эта строка значения обрабатывает место для сбора данных о сбоях системы в папке. Вы можете дважды щелкнуть над созданной строкой для изменения её значения данных. Данные по умолчанию должны быть LOCALAPPDATA%% CrashDumps . Чтобы найти файлы, хранящие отчёт после аварии, нажмите Windows Key + R ,введите тип % LOCALAPPDATA% CrashDumps и получите дамп файлов.
б. DumpCount — {Создание: с помощью правой кнопкой мыши -> New -> DWORD (32 бита) }
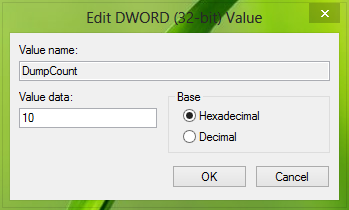
Созданный DWORD заботится о том, сколько файлов дампа должны храниться по месту нахождения созданного ранее в шаге 1. По умолчанию это число равно 10 . Поскольку количество файлов превышает 10 , наиболее старые файлы будут удалены, а новые файлы получат своё место.
C. DumpType — {Создание: с помощью правой кнопкой мыши -> New -> DWORD (32 бита)}
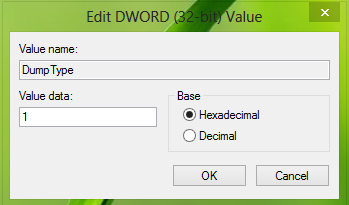
Этот DWORD может быть настроен, чтобы получить файл дампа в качестве пользовательского отчёта;мини отчёта;полного дампа по вашему требованию.Используйте соответственно Value Data 0 , 1 , 2.Таким образом, в этом случае вы можете хранить файлы дампа для сбоев системы. Если вы ищете для хранения файлов дампа для конкретного применения,то вам необходимо создать подраздел для ключа LocalDumps :
HKEY_LOCAL_MACHINE Software Microsoft Windows Windows Error Reporting LocalDumps
Например, если вы хотите хранить файлы дампа для ImageReady , компонентов Adobe Photoshop,вы можете назвать подраздел как ImageReady.exe . Подразделы могут быть расположены как:
HKEY_LOCAL_MACHINE Software Microsoft Windows Windows Error Reporting LocalDumps ImageReady.exe.
То вы можете выполнять шаг 3 для настройки,и ввести нужный вам тип данных,которые будут храниться в этом подразделе.Пожалуйста, обратите внимание,что параметры подраздела т.е. ImageReady.exe отменяют настройки основных ключей т.е. LocalDumps.
[share-locker locker_id=»3f8a01b2edcbb8f0f» theme=»blue» message=»Если Вам понравилась эта статья,нажмите на одну из кнопок ниже.СПАСИБО!» facebook=»true» likeurl=»CURRENT» vk=»true» vkurl=»CURRENT» google=»true» googleurl=»CURRENT» tweet=»true» tweettext=»» tweeturl=»CURRENT» follow=»true» linkedin=»true» linkedinurl=»CURRENT» ][/share-locker]
- Распечатать
Оцените статью:
- 5
- 4
- 3
- 2
- 1
(0 голосов, среднее: 0 из 5)
Поделитесь с друзьями!
Служба Windows Error Reporting (WER) служит для сбора и отправки отладочной информации о падении системных и сторонних приложений в Windows на сервера Microsoft. По задумке Microsoft, эта информация должна анализироваться и при наличии решения, вариант исправления проблемы должен отправляется пользователю через Windows Error Reporting Response. Но по факту мало кто пользуется этим функционалом, хотя Microsoft настойчиво оставляет службу сбора ошибок WER включенной по умолчанию во всех последних версиях Windows. В большинстве случае о службе WER вспоминают, когда каталог C:ProgramDataMicrosoftWindowsWERReportQueue начинает занимать много места на системном диске (вплоть до нескольких десятков Гб), даже не смотря на то что на этом каталоге по умолчанию включена NTFS компрессия.
Содержание:
- Служба Windows Error Reporting
- Очистка папки WERReportQueue в Windows
- Отключение Window Error Reporting в Windows Server
- Отключаем сбор и отправки отчетов об ошибках в Windows 10
- Отключение Windows Error Reporting через GPO
Служба Windows Error Reporting
Служба Windows Error Reporting при появлении ошибки показывает диалоговое окно, предлагающее отправить отчет об ошибке в корпорацию Microsoft. Когда в Windows вы видите сообщение об ошибке
YourApp has stop working
, в это время в служба Windows Error Reporting запускает утилиту WerFault.exe для сбора отладочных данных (могут включать в себя дамп памяти).

Данные пользователя сохраняются в профиль пользователя:
%USERPROFILE%AppDataLocalMicrosoftWindowswer
Системные данные – в системный каталог:
%ALLUSERSPROFILE%MicrosoftWindowsWER
Служба Windows Error Reporting представляет собой отдельный сервис Windows. Вы можете проверить состояние службы командой PowerShell:
Get-Service WerSvc
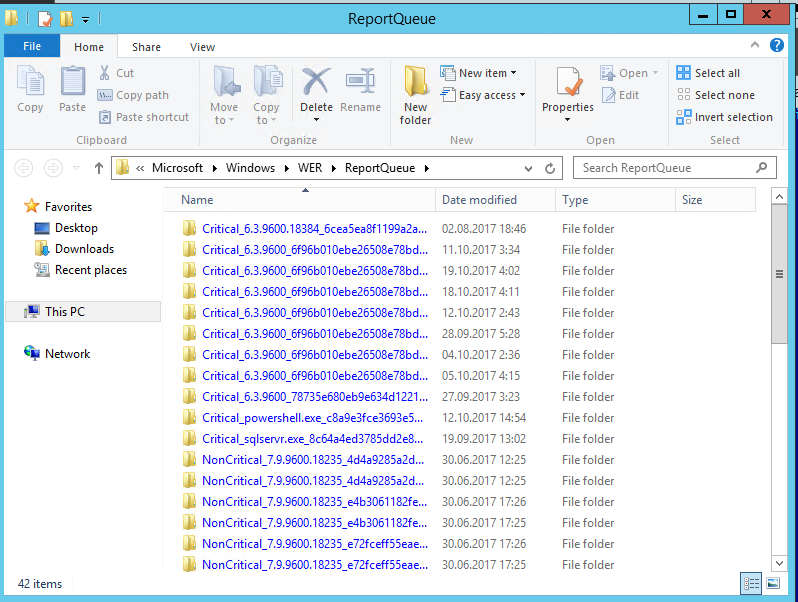
Внутри каталога WERReportQueue содержится множество каталогов, с именами в формате:
- Critical_6.3.9600.18384_{ID}_00000000_cab_3222bf78
- Critical_powershell.exe_{ID}_cab_271e13c0
- Critical_sqlservr.exe__{ID}_cab_b3a19651
- NonCritical_7.9.9600.18235__{ID}_0bfcb07a
- AppCrash_cmd.exe_{ID}_bda769bf_37d3b403
Как вы видите, имя каталога содержит степень критичности события и имя конкретного exe файла, который завершился аварийно. Во всех каталогах обязательно имеется файл Report.wer, который содержит описание ошибок и несколько файлов с дополнительной информацией.
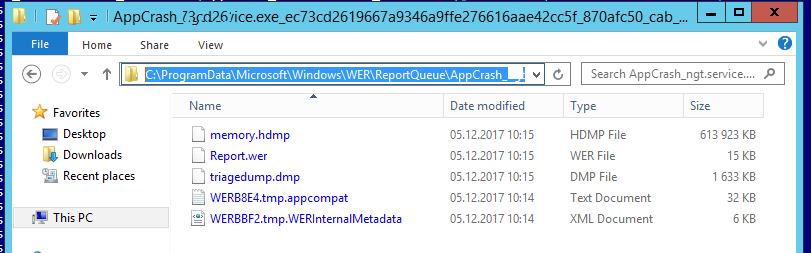
Очистка папки WERReportQueue в Windows
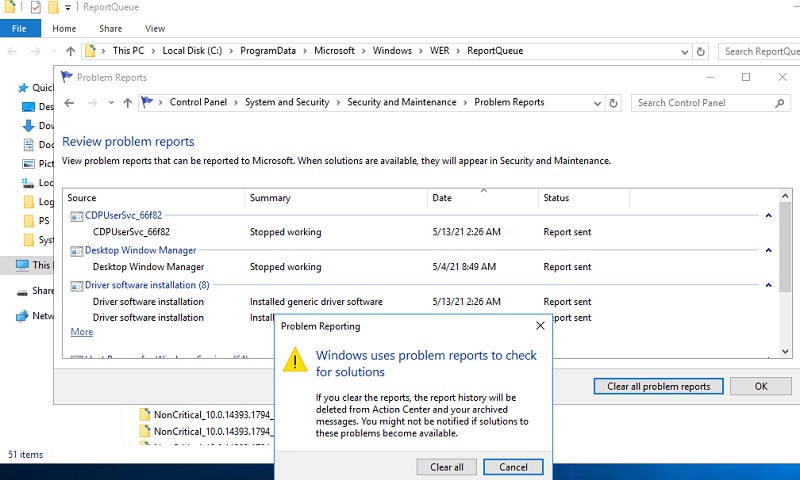
Как правило, размер каждой папки в WER незначителен, но в некоторых случаях для проблемного процесса генерируется дамп памяти, который занимает довольно много места. На скриншоте ниже видно, что размер файла дампа memory.hdmp составляет около 610 Мб. Парочка таким дампов – и на диске исчезло несколько свободных гигибайт.
Чтобы очистить все эти ошибки и журналы штатными средствами, откройте панель управления и перейдите в раздел ControlPanel -> System and Security -> Security and Maintenance -> Maintenance -> View reliability history -> View all problem reports (Control PanelSystem and SecuritySecurity and MaintenanceProblem Reports) и нажмите на кнопку Clear all problem reports.
Для быстрого освобождения места на диске от файлов отладки, сгенерированных службой WER, содержимое следующих каталогов можно безболезненно очистить вручную.
- C:ProgramDataMicrosoftWindowsWERReportArchive
- C:ProgramDataMicrosoftWindowsWERReportQueue
Следующие команды PowerShell удалят из каталога каталогов WER все файлы, старше 15 дней:
Get-ChildItem -Path  'C:ProgramDataMicrosoftWindowsWERReportArchive' -Recurse | Where-Object CreationTime -lt (Get-Date).AddDays(-15) | Remove-Item -force -Recurse
Get-ChildItem -Path  'C:ProgramDataMicrosoftWindowsWERReportQueue' -Recurse | Where-Object CreationTime -lt (Get-Date).AddDays(-15) | Remove-Item -force –Recurse
Для очистки каталогов WER в пользовательских профилях используйте такой скрипт:
$users = Get-ChildItem c:users|where{$_.name -notmatch 'Public|default'}
foreach ($user in $users){
Get-ChildItem "C:Users$UserAppDataLocalMicrosoftWindowsWER " –Recurse -ErrorAction SilentlyContinue | Remove-Item –force –Recurse
}
Отключение Window Error Reporting в Windows Server
В Windows Server 2019/2016/2012R2 вы можете управлять состоянием WER с помощью PowerShell. Вы можете отключить службу Windows Error Reporting:
Get-Service WerSvc| stop-service –passthru -force
Set-Service WerSvc –startuptype manual –passthru
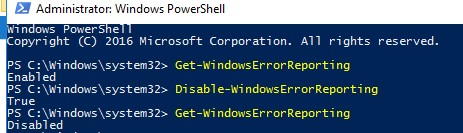
Но есть более корректные способы отключения WER в Windows. В версии PowerShell 4.0 добавлен отдельный модуль WindowsErrorReporting из трех командлетов:
Get-Command -Module WindowsErrorReporting

Проверить состояние службы Windows Error Reporting можно командой:
Get-WindowsErrorReporting
Для отключения WER, выполните:
Disable-WindowsErrorReporting
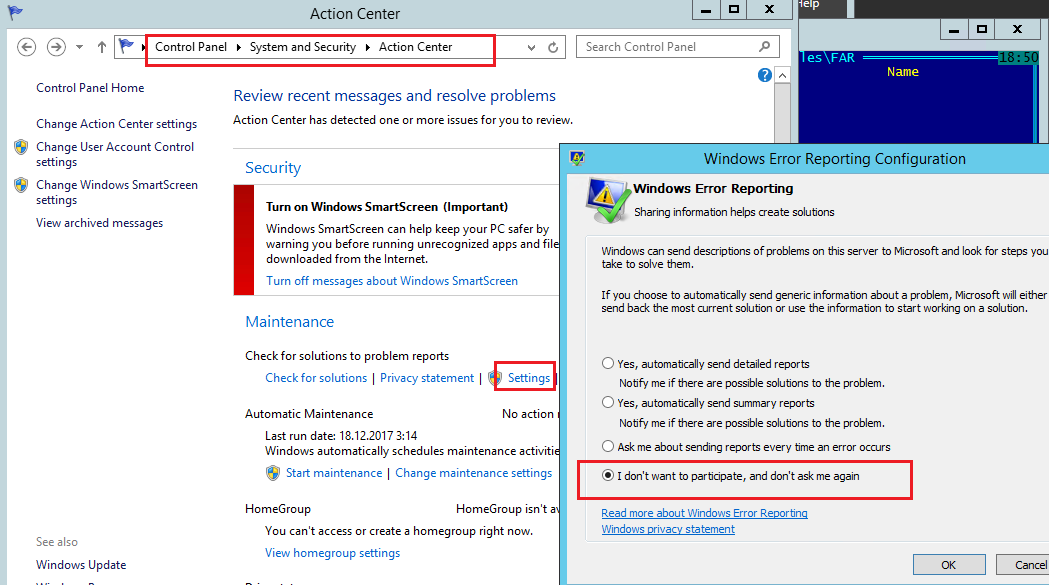
В Windows Server 2012 R2 можно отключить запись информации об ошибках Windows Error Reporting через панель управления (Control Panel -> System and Security -> Action Center -> раздел Maintenance -> Settings -> выберите опцию I don’t want to participate, and don’t ask me again
Отключаем сбор и отправки отчетов об ошибках в Windows 10
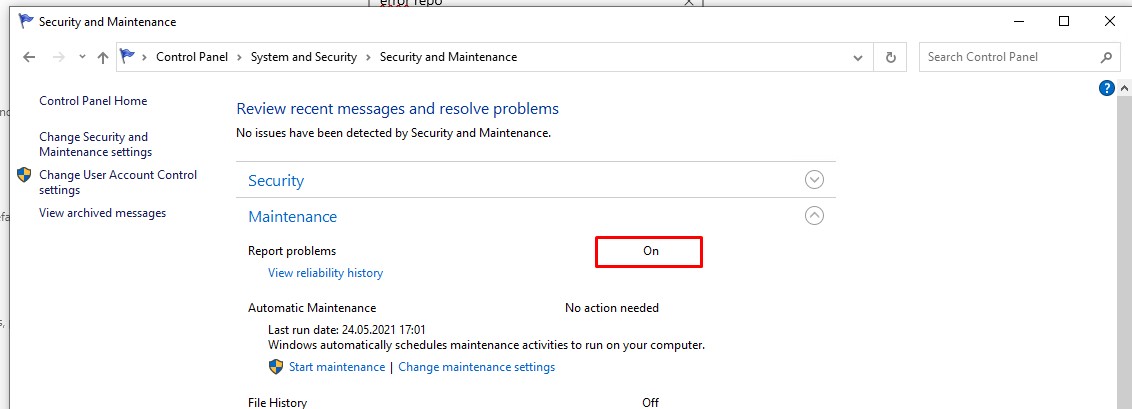
В Windows 10 нельзя отключить Error Reporting через панель управления. В графическогм интерфейсе можно только проверить ее статус (Система и безопасность ->Центр безопасности и обслуживания -> секция Обслуживание). Как вы видите, по умолчанию параметр Поиск решения для указанных в отчетах проблем включен (Control Panel -> System and Security -> Security and Maintenance -> Maintenance -> Report problems = On).
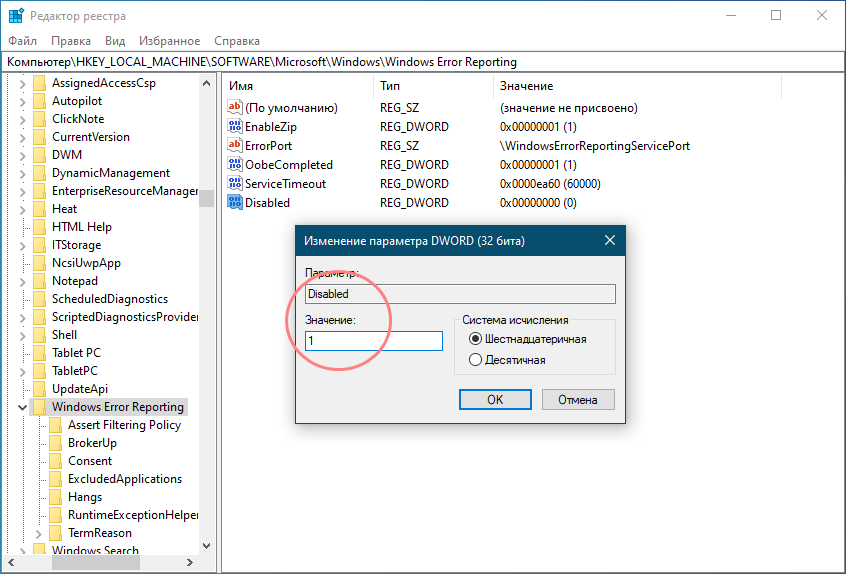
HKLMSOFTWAREMicrosoftWindowsWindows Error Reporting нужно создать новый параметр типа DWORD (32 бита) с именем Disabled и значением 1.
Можно отключить сбор ошибок WER для конкретных пользователей:
reg add "HKCUSoftwareMicrosoftWindowsWindows Error Reporting" /v "Disabled" /t REG_DWORD /d "1" /f
Или отключить WER для всех:
reg add "HKLMSoftwareMicrosoftWindowsWindows Error Reporting" /v "Disabled" /t REG_DWORD /d "1" /f

Измените параметр реестра и проверьте статус параметра Поиск решения для указанных в отчетах проблем в панели управления. Его статус должен изменится на Отключено.

Отключение Windows Error Reporting через GPO
Также вы можете управлять настройками службы Windows Error Reporting через групповые политики.
Запустите редактор локальной (
gpedit.msc
) или доменной GPO (
gpmc.msc
) и перейдите в ветку реестра Computer Configuration -> Administrative Templates -> Windows Components -> Windows Error Reporting (Компоненты Windows -> Отчеты об ошибках Windows). Для отключения сбора и отправки ошибок через WER включите политику Disable Windows Error Reporting (Отключить отчеты об ошибках Windows).
Аналогичная политика есть в пользовательском разделе политик (User Configuration).

Обновите GPO (перезагрузка не потребуется).
В результате в Windows перестанут формироваться сообщения об ошибках Windows и отправляться в Microsoft.
Содержание
- WER Settings
- Windows Error Reporting subkey
- WER Live Kernel Reports Settings
- FullLiveKernelReports subkey
- LiveKernelReports subkey
- Для чего нужна служба «Windows Error Reporting» и как отключить ее в Windows 7, 8.1 и 10
- Отключение Error Reporting в Windows 7 и 8.1
- Отключение Error Reporting в Windows 10
- Универсальный способ отключения Error Reporting
WER Settings
Windows Error Reporting (WER) provides many settings to customize the problem reporting experience. All of these settings can be set using Group Policy. Some can also be changed in Action Center for WindowsВ 7 and WindowsВ 8. For Windows 10, use the search function in Settings to locate View advanced system settings. WER settings are located in one of the following registry subkeys:
- HKEY_CURRENT_USERSoftwareMicrosoftWindowsWindows Error Reporting
- HKEY_LOCAL_MACHINESoftwareMicrosoftWindowsWindows Error Reporting
Windows Error Reporting subkey
BypassDataThrottling
REG_DWORD
0 — Disable data bypass throttling. If the bypass is disabled or not configured as a policy setting, WER throttles data by default. WER does not upload more than one CAB file for a report that contains data about the same event types.
1 — Enable data bypass throttling. WER does not throttle data. WER uploads additional CAB files that can contain data about the same event types as an earlier uploaded report.
Whether to enable the bypass of WER client data throttling
ConfigureArchive
REG_DWORD
Possible values: 1 — Parameters only (default on WindowsВ 7) 2 — All data (default on WindowsВ Vista)
Whether to archive parameters only or all data
ConsentDefaultConsent
REG_DWORD
Possible values: 1 — Always ask (default) 2 — Parameters only 3 — Parameters and safe data 4 — All data
Default consent choice
ConsentDefaultOverrideBehavior
REG_DWORD
Possible values: 0 — Vertical consent will override the default consent (default) 1 — Default consent will override the application-specific consent
Whether default consent overrides vertical consent
Consent[VerticalName]
REG_DWORD
Possible values: 1 — Always ask (default) 2 — Parameters only 3 — Parameters and safe data 4 — All data
Consent choice for the WER plug-in
CorporateWERDirectory
REG_SZ
The directory path
Target directory on the server
CorporateWERPortNumber
REG_DWORD
The port number
Port number to be used with the corporate server
CorporateWERServer
REG_SZ
The name of the server
Corporate server name
CorporateWERUseAuthentication
REG_DWORD
Possible values: 0 — No (default) 1 — Yes
Whether to use Windows Integrated Authentication
CorporateWERUseSSL
REG_DWORD
Possible values: 0 — No (default) 1 — Yes
Whether to use SSL
DebugApplications[ExeName] (replace «[ExeName]» with an actual name of an .exe file, for example, «notepad.exe»)
REG_DWORD
0 — Processes with an executable image name of **[ExeName]** do not require the user to choose **Debug** or **Continue** (default) 1 — Processes with an executable image name of **[ExeName]** require the user to choose **Debug** or **Continue**
DebugApplications* («*» is the literal value name)
REG_DWORD
0 — All processes except ones specified explicitly in the setting **DebugApplications\[ExeName]** do not require the user to choose **Debug** or **Continue** (default) 1 — All processes except ones specified explicitly in the setting **DebugApplications\[ExeName]** require the user to choose **Debug** or **Continue**
DisableArchive
REG_DWORD
Possible values: 0 — Enabled 1 — Disabled
Enable or disable the archive
Disabled
REG_DWORD
Possible values: 0 — Enabled (default) 1 — Disabled
Enable or disable WER
DisableQueue
REG_DWORD
Possible values: 0 — Enabled 1 — Disabled
Enable or disable report queuing
DontShowUI
REG_DWORD
Possible values: 0 — UI (default) 1 — No UI
Enable or disable the WER UI
DontSendAdditionalData
REG_DWORD
Possible values: 0 — Send (default) 1 — Do not send
Whether to prevent sending second-level data
ExcludedApplications[Application Name]
REG_SZ
List of excluded applications
ForceQueue
REG_DWORD
Possible values: 0 — No (default) 1 — Yes
Whether to send all reports to the user’s queue
LocalDumpsDumpFolder or LocalDumps[Application Name]DumpFolder
REG_EXPAND_SZ
The directory path. The default value is %LOCALAPPDATA%CrashDumps. If the default is not used, the application must ensure that the folder has a sufficient ACL.
WindowsВ Vista: The registry values under the LocalDumps key are not supported. Note that this behavior changed with Windows ServerВ 2008 and WindowsВ Vista with Service PackВ 1 (SP1).
The path where the dump files are to be stored.
Note that per-process settings will override any global settings that exist For more information, see Collecting User-Mode Dumps.
This setting is not supported in the HKEY_CURRENT_USER registry hive.
LocalDumpsDumpCount or LocalDumps[Application Name]DumpCount
REG_DWORD
The maximum number. The default is 10. When the maximum value is exceeded, the oldest dump file in the folder will be replaced with the new dump file.
WindowsВ Vista: The registry values under the LocalDumps key are not supported. Note that this behavior changed with Windows ServerВ 2008 and WindowsВ Vista with SP1.
The maximum number of dump files in the folder.
This setting is not supported in the HKEY_CURRENT_USER registry hive.
LocalDumpsDumpType or LocalDumps[Application Name]DumpType
REG_DWORD
Possible values: 0 — Custom dump 1 — Minidump (default) 2 — Full dump
WindowsВ Vista: The registry values under the LocalDumps key are not supported. Note that this behavior changed with Windows ServerВ 2008 and WindowsВ Vista with SP1.
This setting is not supported in the HKEY_CURRENT_USER registry hive.
LocalDumpsCustomDumpFlags or LocalDumps[Application Name]CustomDumpFlags
REG_DWORD
WindowsВ Vista: The registry values under the LocalDumps key are not supported. Note that this behavior changed with Windows ServerВ 2008 and WindowsВ Vista with SP1.
The custom dump options to be used. This value is used only when DumpType is set to 0.
This setting is not supported in the HKEY_CURRENT_USER registry hive.
LoggingDisabled
REG_DWORD
Possible values: 0–Enabled (default) 1–Disabled
Enable or disable logging
MaxArchiveCount
REG_DWORD
Range of possible values: 1–5000. The default is 1000.
Maximum size of the archive, in files
MaxQueueCount
REG_DWORD
Range of possible values: 1–500. The default is 50.
Maximum size of the queue
QueuePesterInterval
REG_DWORD
Interval between reminders to the user to check for solutions, in days
RuntimeExceptionHelperModules![ pwszOutOfProcessCallbackDll name including path]
REG_DWORD
The contents of the value are ignored.
The name of the value is used to fetch the pwszOutOfProcessCallbackDll value.
Windows ServerВ 2008, WindowsВ Vista, Windows ServerВ 2003 and WindowsВ XP: This registry value is not supported.
WER Live Kernel Reports Settings
WER’s Live Kernel Reports settings, which are described next, are both located under the following registry subkey:
For Windows 10 1703, Windows Server 2019, and later:
- HKEY_LOCAL_MACHINESYSTEMCurrentControlSetControlCrashControl
For Windows 10 builds 1607 and older, Windows 8.1, Windows Server 2016, and Windows Server 2012 R2:
- HKEY_LOCAL_MACHINESOFTWAREMicrosoftWindowsWindows Error Reporting
FullLiveKernelReports subkey
ComponentThrottleThreshold
REG_DWORD
The threshold (in hours) of how often any single component can create a full live dump. This value must be greater than or equal to SystemThrottleThreshold. Setting both to zero (0) will disable all time-based throttling. The default is 168 (7 days).
FullLiveReportsMax
REG_DWORD
The maximum number of full live dumps that may be on disk at any given time. The default is 1. On Windows 10 1803, Windows Server 2019, and later, setting this value to zero (0) will disable the live dump feature.
LastFullLiveReport
REG_QWORD
A SystemTime indicating the last full live report time, for the system or a specific ReportType. This is used to calculate whether a policy threshold has been satisfied.
SystemThrottleThreshold
REG_DWORD
The threshold (in hours) of how often any component on the system can create a full live dump. The default is 120 (5 days).
LiveKernelReports subkey
LiveKernelReportsPath
REG_SZ
The redirected storage location of live kernel reports. The default location is %systemroot%LiveKernelReports. This value must be a valid path. The path must be in NT path format. For example, ??C:LiveDumpsFolder. For more information on path formats, see File path formats on Windows systems.
Источник
Для чего нужна служба «Windows Error Reporting» и как отключить ее в Windows 7, 8.1 и 10

Когда в работе какой-то программы происходит ошибка, Windows автоматически регистрирует это событие и запускает штатную утилиту Windows Error Reporting, которая формирует отчет и предлагает отправить его на сервера Microsoft. Отправка лога не осуществляется автоматически, более того, большинство пользователей предпочитают не делиться информацией о программных ошибках и были бы не прочь отключить эту функцию вообще.

В Windows 7 и 8.1 это можно сделать через графический интерфейс системы, если же вы хотите отключить Windows Error Reporting в Windows 10, нужно отредактировать один ключ в реестре или изменить значение соответствующей ему политики в редакторе gpedit.msc . Существует и универсальный способ, одинаково подходящий для всех версий Windows, но о нём будет сказано ниже.
Отключение Error Reporting в Windows 7 и 8.1
Откройте через окошко «Выполнить» ( Win + R ) Центр поддержки командой wscui.cpl апплет «Центр поддержки».
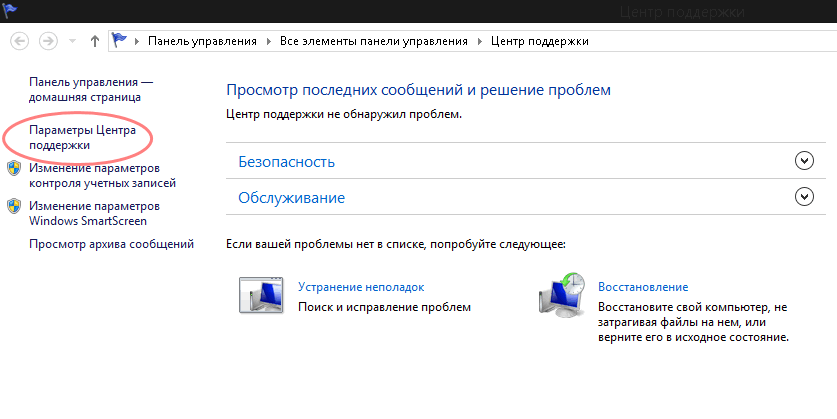
Нажмите в меню справа ссылку «Параметры центра поддержки».
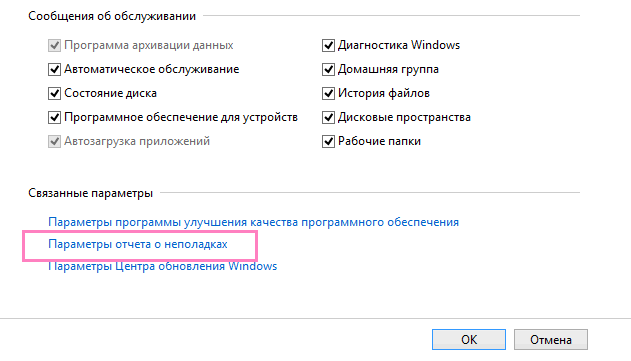
На следующей странице нажмите ссылку «Параметры отчета о неполадках».
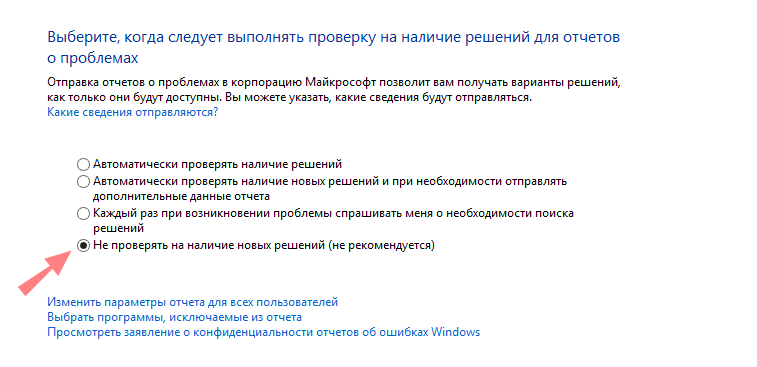
И активируйте радиокнопку «Не проверять на наличие новых решений».
Отключение Error Reporting в Windows 10
В Windows 10 опция «Параметры отчета о неполадках» была удалена из окна параметров центра поддержки, поэтому для отключения формирования отчетов о программных ошибках в этой версии системы придется действовать в обход.
Откройте через окошко «Выполнить» одноименной командой редактор реестра Regedit и раскройте ключ:
HKLMSOFTWAREMicrosoftWindowsWindows Error Reporting
Справа создайте новый DWORD -параметр.
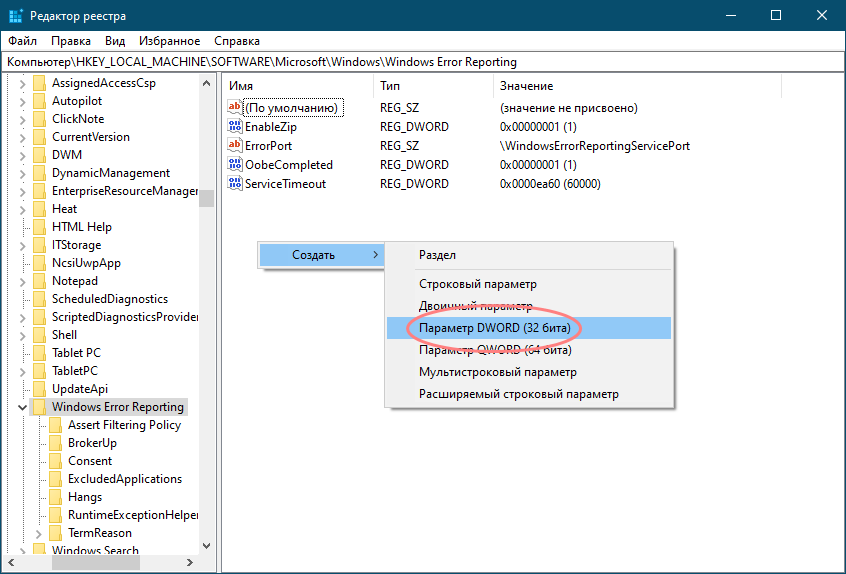
Назовите его Disabled и задайте в качестве его значения единицу.
Сохраните настройки, закройте редактор реестра и перезагрузите компьютер.
Описание примера отключения функции Error Reporting через редактор групповых политик мы опускаем, поскольку его результат является эквивалентным применяемому твику реестра, к тому же редактор gpedit.msc доступен не всех редакциях Windows.
Универсальный способ отключения Error Reporting
Предложенный ниже способ является универсальным и одинаково работает в Windows 7, 8.1 и Windows 10.
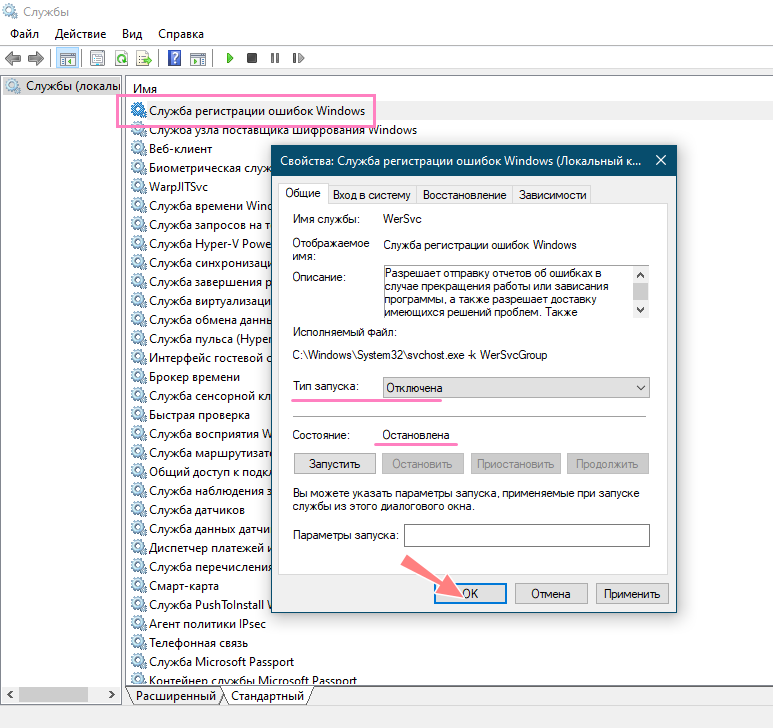
Вызовите окошко «Выполнить» и выполните в нём команду services.msc , чтобы открыть оснастку управления службами.
Отыщите справа службу «Служба регистрации ошибок Windows», откройте ее свойства и выставьте параметры так, как показано на скриншоте после чего сохраните настройки.
Любители командной строки могут отключить ее через консоль.
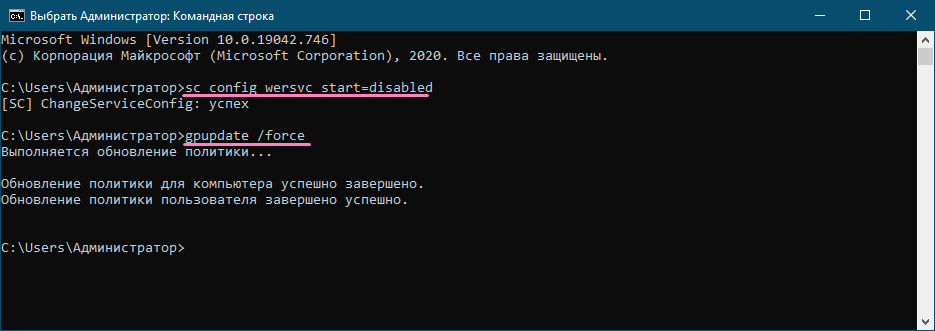
Запустив командную строку или PowerShell от имени администратора и выполните в ней команду:
sc config wersvc start=disabled
gpupdate /force
Чтобы обновить политику без перезагрузки компьютера.
Источник
Когда в работе какой-то программы происходит ошибка, Windows автоматически регистрирует это событие и запускает штатную утилиту Windows Error Reporting, которая формирует отчет и предлагает отправить его на сервера Microsoft. Отправка лога не осуществляется автоматически, более того, большинство пользователей предпочитают не делиться информацией о программных ошибках и были бы не прочь отключить эту функцию вообще.
В Windows 7 и 8.1 это можно сделать через графический интерфейс системы, если же вы хотите отключить Windows Error Reporting в Windows 10, нужно отредактировать один ключ в реестре или изменить значение соответствующей ему политики в редакторе gpedit.msc. Существует и универсальный способ, одинаково подходящий для всех версий Windows, но о нём будет сказано ниже.
Отключение Error Reporting в Windows 7 и 8.1
Откройте через окошко «Выполнить» ( Win + R ) Центр поддержки командой wscui.cpl апплет «Центр поддержки».
Нажмите в меню справа ссылку «Параметры центра поддержки».
На следующей странице нажмите ссылку «Параметры отчета о неполадках».
И активируйте радиокнопку «Не проверять на наличие новых решений».
Сохраните настройки.
Отключение Error Reporting в Windows 10
В Windows 10 опция «Параметры отчета о неполадках» была удалена из окна параметров центра поддержки, поэтому для отключения формирования отчетов о программных ошибках в этой версии системы придется действовать в обход.
Откройте через окошко «Выполнить» одноименной командой редактор реестра Regedit и раскройте ключ:
HKLMSOFTWAREMicrosoftWindowsWindows Error Reporting
Справа создайте новый DWORD-параметр.
Назовите его Disabled и задайте в качестве его значения единицу.
Сохраните настройки, закройте редактор реестра и перезагрузите компьютер.
Описание примера отключения функции Error Reporting через редактор групповых политик мы опускаем, поскольку его результат является эквивалентным применяемому твику реестра, к тому же редактор gpedit.msc доступен не всех редакциях Windows.
Универсальный способ отключения Error Reporting
Предложенный ниже способ является универсальным и одинаково работает в Windows 7, 8.1 и Windows 10.
Вызовите окошко «Выполнить» и выполните в нём команду services.msc, чтобы открыть оснастку управления службами.
Отыщите справа службу «Служба регистрации ошибок Windows», откройте ее свойства и выставьте параметры так, как показано на скриншоте после чего сохраните настройки.
Любители командной строки могут отключить ее через консоль.
Запустив командную строку или PowerShell от имени администратора и выполните в ней команду:
sc config wersvc start=disabled
А затем:
gpupdate /force
Чтобы обновить политику без перезагрузки компьютера.
![]() Загрузка…
Загрузка…