-
MiniTool
-
MiniTool News Center
- 3 Fixes for Error 1067: the Process Terminated Unexpectedly
By Vera | Follow |
Last Updated March 05, 2021
![]()
Have you received error 1067: the process terminated unexpectedly when trying to perform an operation that usually causes a service to start? What should you do when encountering the Windows service error 1067? Now, MiniTool offers you some simple methods in this post.
Windows Error 1067 on Services
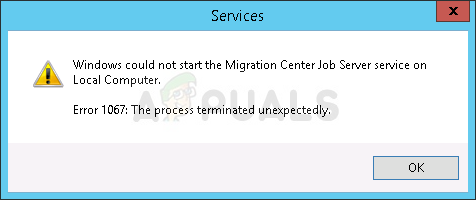
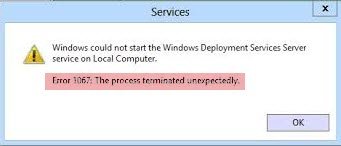
Many users of Windows 10/8/7, Server 2012 R2/2016, etc. are reporting to have a problem while trying to execute an operation that is based on a service. And the detailed error message that appears on the computer screen is:
“Windows could not start the XX service on Local Computer.
Error 1067: The process terminated unexpectedly.”
Tip: Here XX refers to the name of the problematic service. Usually, the error commonly occurs in the SQL, MySQL, Windows Deployment Services Server, Migration Center Job Server service or other services.
The 1067 error code appears mainly because of corrupted settings of that particular service, faulty services, Windows system malfunction, etc. Now, in this article, we will tell you how to fix the service error and all of them have been proved to be useful by users who had the same problem.
Fixes for Windows Service Error 1067
Method 1: Fix Permissions Issues
Sometimes the permissions problems are responsible for the error 1067. To fix the issue, having access to the service controls from a personal user profile is helpful.
What you should do is here:
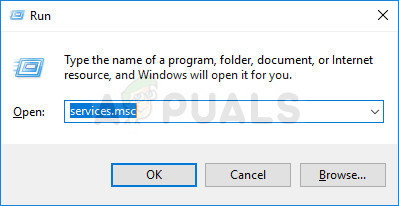
1. Press Win+ R keys at the same time to open the Run utility, type services.msc and hit Enter.
2. Find the service which has the error 1067 from the services list, right-click on it and choose Properties from the context menu.
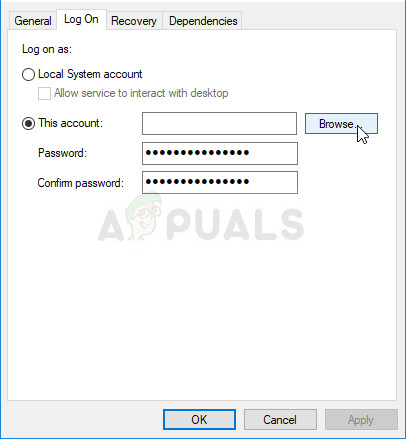
3. If the service is running, stop it. If it is stopped, go to the Log On tab and click the Browse button.
4. Type your account name to the Enter the object name to select section and click Check Names. Wait for the name to be available.

5. Click OK If needed, input the password. Now, the service should start without error code 1067.
Method 2: Repair the Problematic Service
Sometimes error 1067: the process terminated unexpectedly occurs because the service you are trying to start becomes faulty or corrupted. So, you can try to delete and install the service to get rid of the trouble.
The detailed instructions are described here:
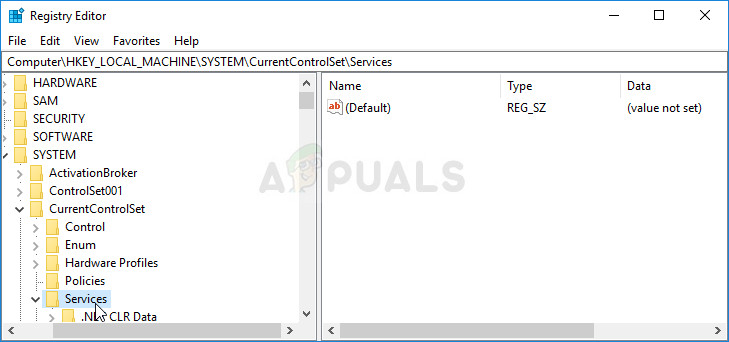
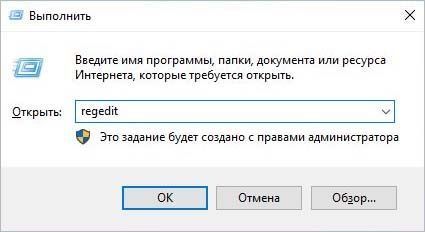
1. Launch the Run dialog (mentioned in method 1), input regedit and click Enter.
2. After opening the Registry Editor window, head to the path: HKEY_LOCAL_MACHINE > SYSTEM > CurrentControlSet > Services.

3. Find the service that has the error 1067 from the list (Here, we take the ACPI service as an example). Right-click on it, click Export to save it to the desktop or any place, name it ACPI and click Save. We do this process is to create a backup for the service.
4. Then right-click on the service and choose Delete to remove it from the services list.
5. Run Command Prompt with administrative rights, input sfc /scannow, and press Enter to perform a scan for your Windows system.
6. Restart your computer. Then, find the backup of the registry key you have saved, right-click on it and choose Merge.

7. Open the Services window via the Windows search bar, right-click on the service and click Start.
Now, you can try to check if the Windows service error 1067 is resolved.
Method 3: Delete Certain Files
If you are bothered by SQL or MySQL error 1067, you can delete some log files from the install directory to fix it.
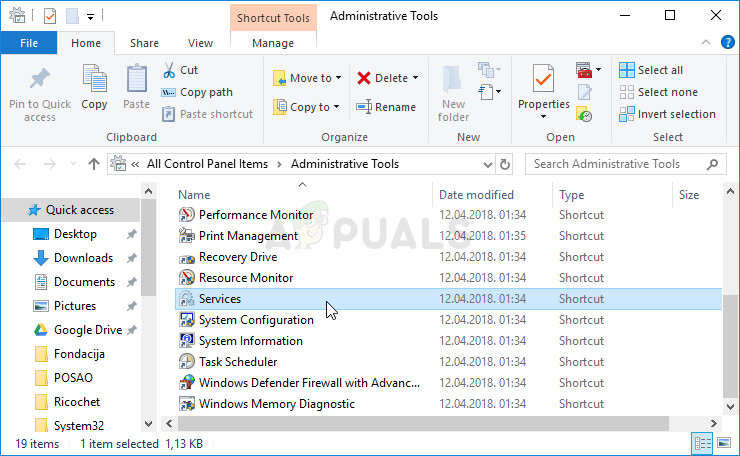
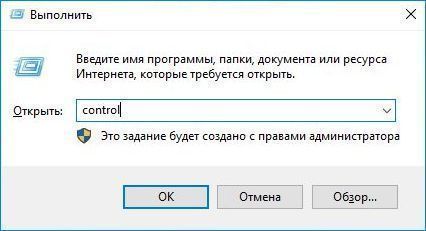
- Open Control Panel and let it show all items by large icons.
- Click Administrative Tools and Services.
- Find the MySQL service, right-click on it and choose Properties.
- Click Stop and OK.
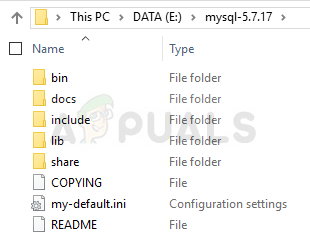
- Go to the folder where you have installed MySQL. Usually, it is C:Program Files or C:Program Files (x86).
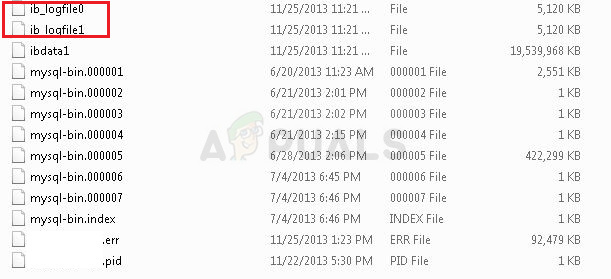
- In the folder, click the Data folder, find ib_logfile0 and ib_logfile1, and then delete them.
- Go to the Services window and start the MySQL service again.
The End
If you are having the error 1067: the process terminated unexpectedly, now try these 3 common methods to troubleshoot the issue. These solutions are proved to be useful and hope you can also get rid of the trouble.
About The Author

Position: Columnist
Vera is an editor of the MiniTool Team since 2016 who has more than 5 years’ writing experiences in the field of technical articles. Her articles mainly focus on disk & partition management, PC data recovery, video conversion, as well as PC backup & restore, helping users to solve some errors and issues when using their computers. In her spare times, she likes shopping, playing games and reading some articles.
Содержание
- Ошибка 1067: Процесс был неожиданно завершен
- Исправить ошибку 1067, когда процесс был неожиданно завершен
- 1. Удалить поврежденную службу из реестра
- 2. Запуск службы вручную
- 3. Проверка системных файлов
- 4. Безопасный режим
- Как исправить: Ошибка 1067: Процесс был неожиданно завершен в Windows 10.
- Исправление: Ошибка 1067: Процесс был неожиданно завершен В операционной системе Windows 10 / 8,1 / 8/7
- How to Fix Error 1067: ‘The process terminated unexpectedly’
- Solution 1: Take Control of the Service
- Solution 2: Reinstall the Problematic Service
- Solution 3: Delete Certain Files
- Solution 4: Tweak MySQL Configuration Files
- Solution 5: Reinstall SQL Server
- Solution 6: Method for EAServer Windows Service
Ошибка 1067: Процесс был неожиданно завершен
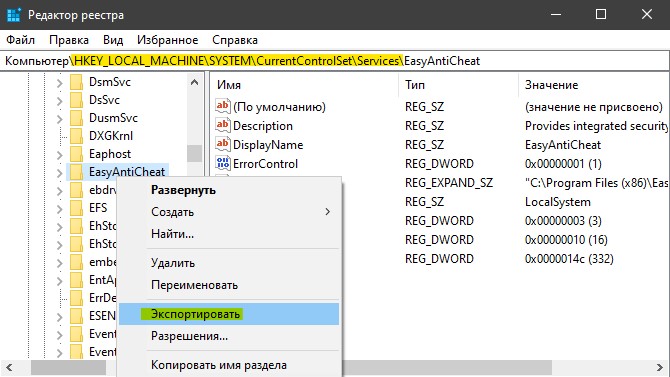
Когда вы установили программу или игру, которая устанавливает в систему Windows свою службу, то вы можете при запуске этой службы столкнуться с ошибкой «Ошибка 1067: Процесс был неожиданно завершен«. Эта ошибка возникает в основном из-за неисправных служб или поврежденных настроек этой конкретной службы. Ошибка 1067 может возникнуть с любой из фоновых служб на вашем компьютере с Windows 10, но в основном она встречается в SQL, MySQL и audio. Я буду показывать пример на службе EasyAntiCheat, которая при запуске выдавала мне ошибку 1067.
Исправить ошибку 1067, когда процесс был неожиданно завершен
Прежде чем приступить, перезагрузите ПК и проверьте ошибку. Отключите сторонние антивирусные программы и переустановите программу или игру, если ошибка в этих службах. И прежде чем приступить к исправлениям, рекомендую создать точку восстановления системы для безопасности.
1. Удалить поврежденную службу из реестра
Нажмите сочетание кнопок Win + R и введите regedit, чтобы открыть редактор реестра. В редакторе реестра перейдите по пути:
- HKEY_LOCAL_MACHINESYSTEMCurrentControlSetServices
- Далее найдите проблемную службу, в моем случаи это EasyAntiCheat.
- Нажмите по ней правой кнопкой мыши и выберите «Экспортировать», чтобы сделать резервную копию.
- Далее нажмите по ней правой кнопкой мыши и выберите «Удалить«.
- Перезагрузите ПК и это обновит или переустановит службу в Windows.
Если не помогло, то вы можете объединить параметры этой службы. У нас есть резервная копия, которую мы создали. Нажмите по ней два раза и установите параметры реестра для этой службы.
2. Запуск службы вручную
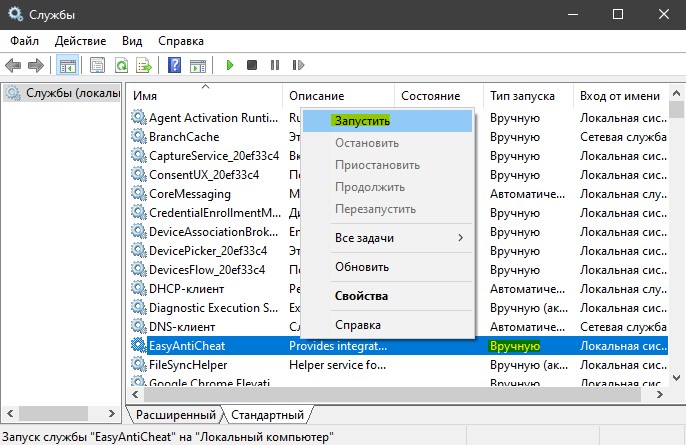
Нажмите комбинацию кнопок Win + R и введите services.msc, чтобы открыть службы. Найдите службу, которая выдает вам ошибку 1067, в моем случае эта EasyAntiCheat, и нажмите по ней правой кнопкой мыши, и выберите «Запустить«. Тип запуска не должен быть «отключено». Проверьте, устранена ли ошибка.
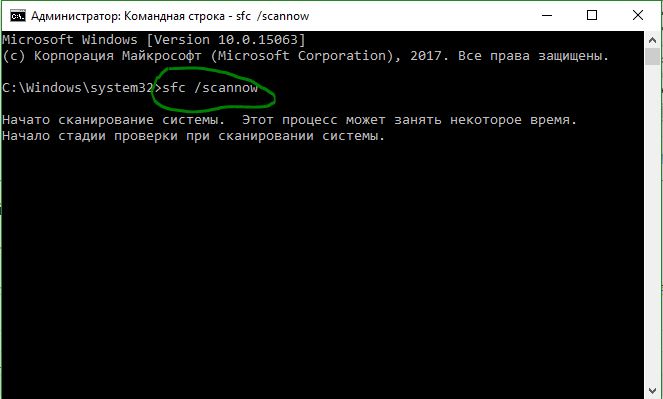
3. Проверка системных файлов
Поврежденные системные файлы могут выдавать ошибку 1067 при запуске службы. Попробуем восстановить системные поврежденные файлы, если они имеются. Откройте командную строку от имени администратора и введите две команду по очереди, дожидаясь окончания процесса после каждой:

- sfc /scannow
- Dism /Online /Cleanup-Image /RestoreHealth
4. Безопасный режим
Этот метод поможет вам, если вы у вас ошибка в системной службе, а не той, которая устанавливает сторонняя программа или драйвер. Загрузитесь в безопасном режиме и посмотрите, запускается ли та системная служба, которая выдает ошибку 1067. Иногда сторонние драйвера и службы могут мешать нормальному функционированию системы.
- Попадите в дополнительные параметры, выберите «Параметры загрузки» > «Перезагрузить» > и нажать кнопку F4 (Включить безопасный режим).
Источник
Как исправить: Ошибка 1067: Процесс был неожиданно завершен в Windows 10.
Публикация: 19 February 2017 Обновлено: 2 October 2018
Исправление ошибки 1067, в данной статье, для примера приведено для службы Факса, однако метод применим ко всем службам ОС Windows 10 8.
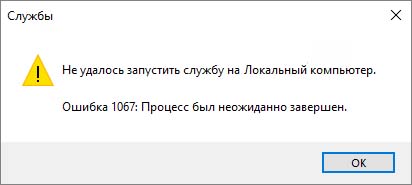
Характерной чертой правильной работы в ОС Windows – это фоновая работа служб системы. Если служба не работает или ее не удалось запустить / остановить, пользователи начинают сталкиваться с неприятностями, пока они не устранят причину ошибки. В этой статье мы рассмотрим одну распространенную ошибку, — «Не удалось запустить службу факсов на локальном компьютере. Ошибка 1067: Процесс был неожиданно завершен».
Ошибка 1067 может произойти с любой фоновой службой на любой ПК с ОС Windows. Если вы получаете эту ошибку, вы можете следовать предложенному ниже способу:
Исправление: Ошибка 1067: Процесс был неожиданно завершен В операционной системе Windows 10 / 8,1 / 8/7
Отказ от ответственности: Дальнейшие шаги будут включать в себя редактирование реестра. Ошибки при изменении параметров реестра могут повлиять на вашу систему отрицательно. Так что будьте осторожны при редактировании записей реестра и в первую очередь создайте Точку Восстановления системы.
2. Перейдите к следующему разделу реестра:
Здесь, вам необходимо заменить на ту службу, с которой вы получаете сообщение об ошибке 1067. В нашем случае, это служба факса, поэтому мы перейдем:
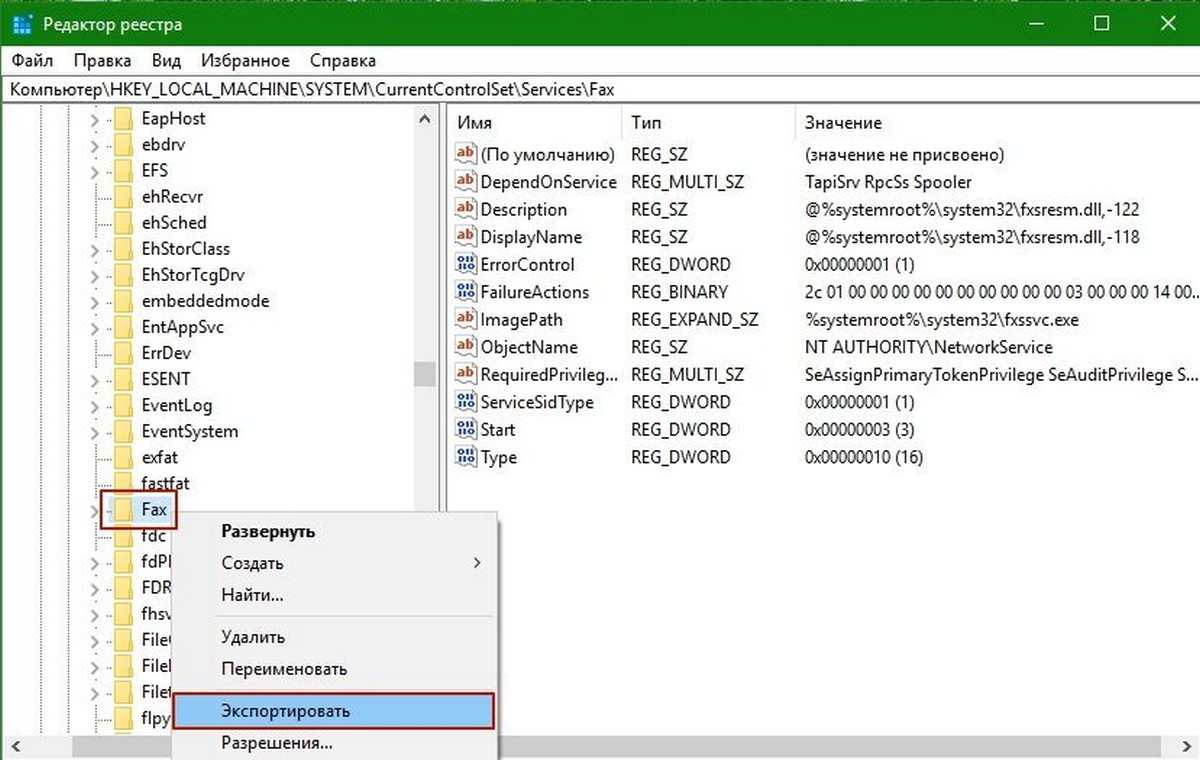
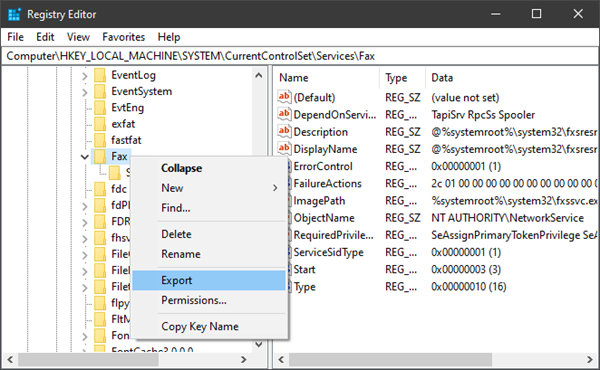
КомпьютерHKEY_LOCAL_MACHINESYSTEMCurrentControlSetServicesFax
3. Кликните правой кнопкой мыши на раздел реестра нужной службы и выберите «Экспортировать», в контекстном меню. Сохраните настройки реестра файл в любом удобном месте, например, на рабочий стол.
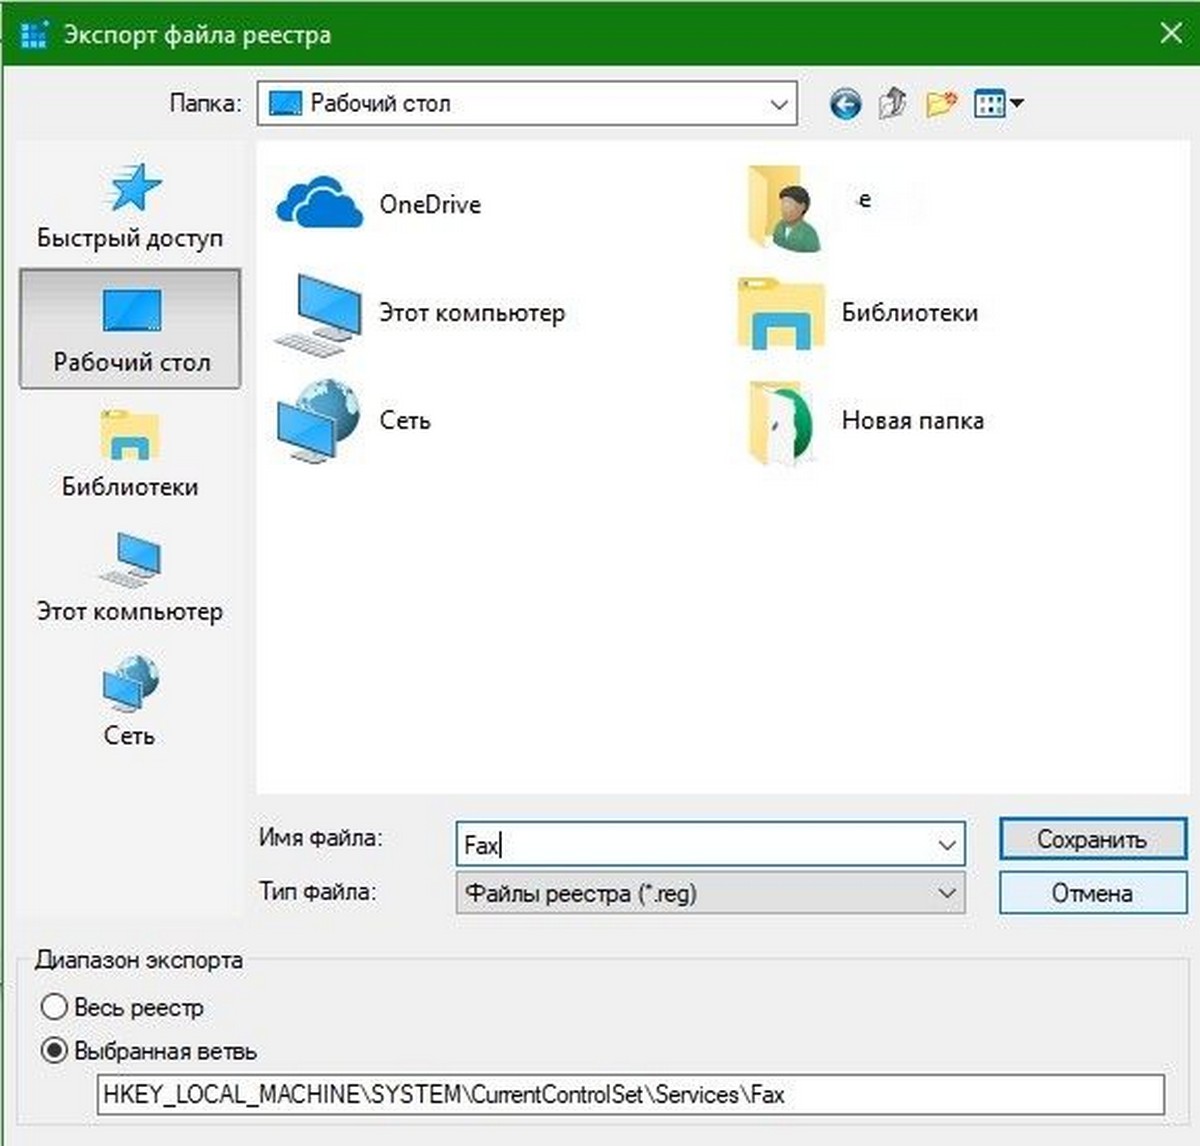
4. Теперь снова кликните правой кнопкой мыши на тот же раздел реестра службы и на этот раз выберите «Удалить». Закройте редактор реестра.

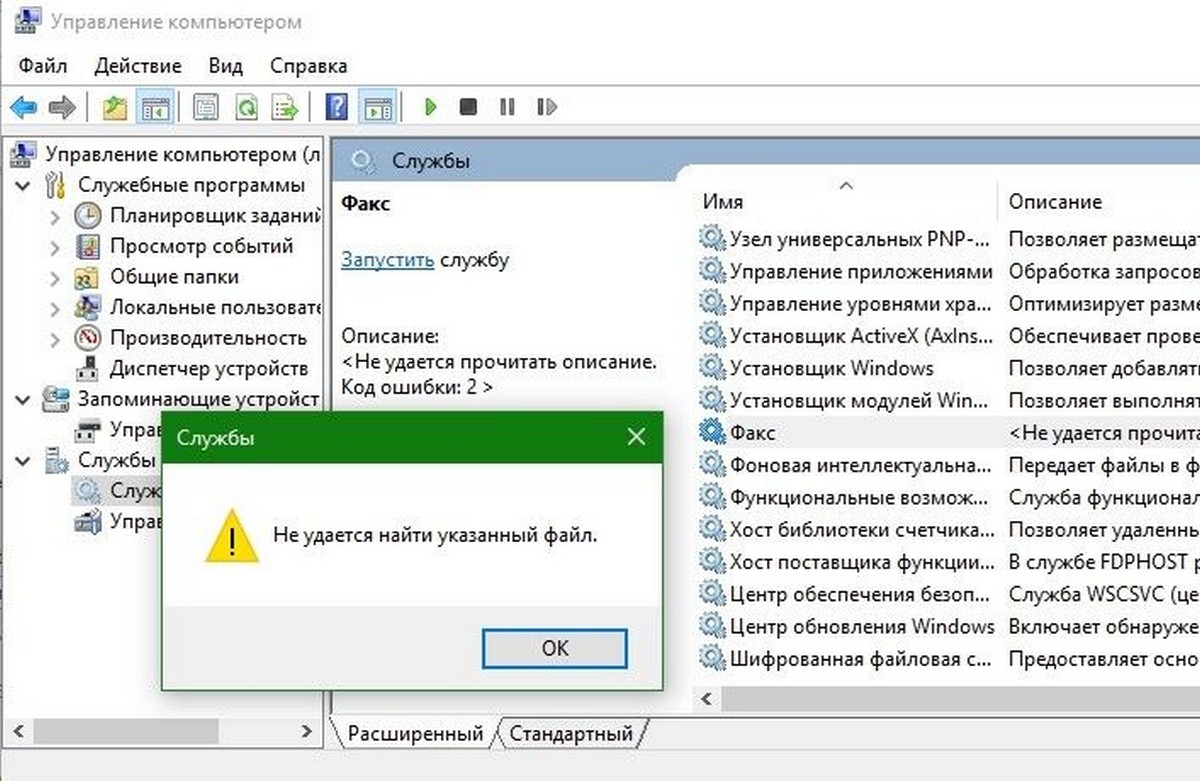
Служба будет удалена, если вы сейчас откроете Консоль управления службами services.msc — то при клике на этой службе получите .
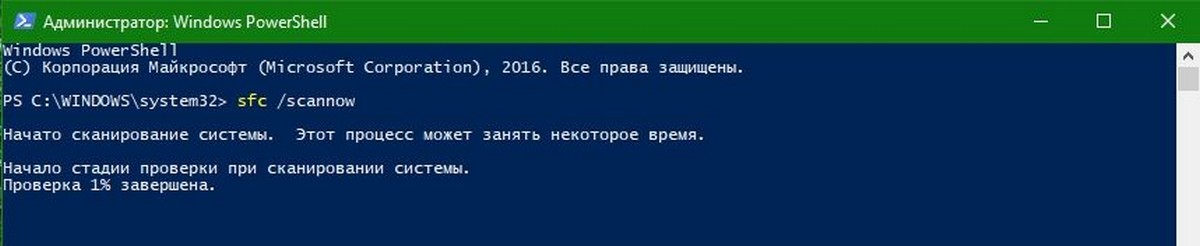
5. Откройте командную строку или PowerShell от имени администратора и запустите команду :
Дождитесь завершения и перезагрузите компьютер.
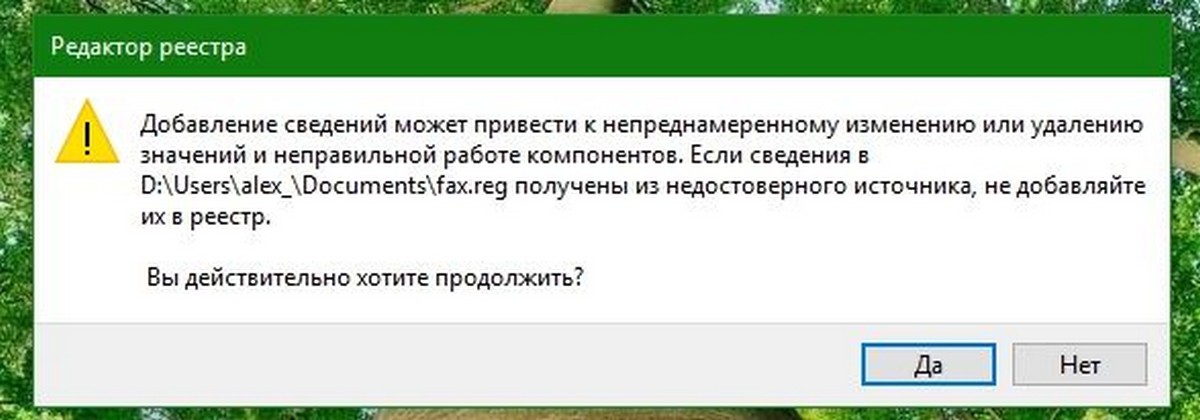
6. После перезапуска системы, кликните правой кнопкой мыши на экспортируемом ранее файле реестра, полученным в шаге 3 и выберите «Слияние».

7. Нажмите кнопку «Да» при появлении запроса, это должно установить службу обратно.
Теперь откройте консоль управления службами и попытайтесь запустить эту службу, на этот раз она должна запустится без каких — либо ошибок.
Источник
How to Fix Error 1067: ‘The process terminated unexpectedly’
The error 1067 can occur with various Windows service and the message usually appears when you are trying to execute an action which would usually cause a service to start. The most common occurrence for this error message would be the SQL service and service similar to it.
There are quite a few methods which can be used to solve this problem and we have chosen several methods which have proven to be successful for other users who experienced the same problem. Follow the methods below and good luck!
Solution 1: Take Control of the Service
This problem is usually related to various permissions and it can be solved by giving your personal user profile the access to the service controls. This method should be your number one priority because of several reasons.
First of all, it’s universal and it can be applied no matter which service displays the error 1067 message. Second of all, it’s easy to do it and the changes can be reverted in no time.
- Open the Run utility by using the Windows Key + R key combination on your keyboard (press these keys at the same time.. Type “services.msc” in the newly opened box without the quotation marks and click OK in order to open the Services tool.
- The alternative way is to open Control Panel by locating it in the Start menu. You can also search for it using the Start menu’s search button.
- After the Control Panel window opens, change the “View by” option at the top right part of the window to “Large Icons” and scroll down until you locate the Administrative Tools entry. Click on it and locate the Services shortcut at the bottom. Click on it to open it as well.
- Locate the service which is giving you the error in the services list, right-click on it and select Properties from the context menu which appears.
- If the service is started (you can check that just next to the Service status message), you should stop it for now by clicking the Stop button in the middle of the window. If it is stopped, leave it stopped until we proceed. Navigate to the Log On tab and click on the Browse… button.
- Under the “Enter the object name to select” entry box, type in your account’s name, click on Check Names and wait for the name to become available.
- Click OK when you are finished and type in the password in the Password box when you are prompted with it, if you have setup a password. It should now start without issues!
Solution 2: Reinstall the Problematic Service
This method can also be used to solve the error 1067 with any problematic service as long as it can be deleted via the registry editor. This is a more advanced way of restarting a service which has gone corrupt and which can’t be fixed simply by resetting it in Services.
- Since you are going to delete a registry key, we recommend you check out this article we have published for you to safely backup your registry to prevent other problems. Still, nothing wrong will occur if you follow the steps carefully and correctly.
- Open the Registry Editor window by typing “regedit” in either the search bar or the Run dialog box which can be opened with the Windows Key + R key combination. Navigate to the following key in your registry by navigating in the left pane:
- In the Services key opened, locate the problematic service key, right-click on it, and choose the Delete option. Confirm any pending dialogues and restart your computer afterwards.
Note: If you are not able to delete this key, you might need to add extra access to your user account. This can be done while still in Registry Editor.
- Right-click the problematic service’s key at the left navigation pane and choose the Permissions option from the context menu.
- Under the Group or user names option, try to locate your computer’s username on the list. If you can’t find it, click on Add >> Advanced >> Find Now. You should be able to see your user account in the Search results so choose it and click OK twice until you back in the Permissions folder.
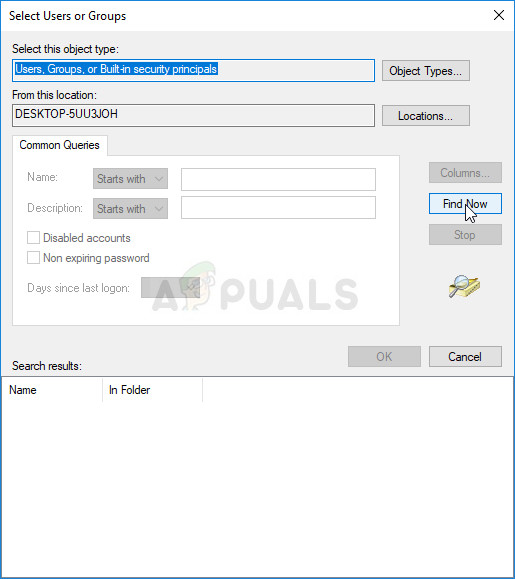
- Select you account in the Group or user names section and check the Full Control checkbox under Permissions for (YourUsername) and apply the changes you have made.
- After that, you can try and delete the key again. Restart your computer afterwards.
- After the restart, follow the instructions in this article in order to run a SFC scan which should help you locate the deleted service from the registry and bring it back easily. Check to see if the problem has disappeared.
Solution 3: Delete Certain Files
If the error 1067 is related to the MySQL Service on your computer, there are quite a few methods which can be used to solve the problem. The first one might be the easiest and it requires that you stop the MySQL service and delete a couple of log files in the install directory.
- Open Control Panel by locating it in the Start menu. You can also search for it using the Start menu’s search button.
- After the Control Panel window opens, change the “View by” option at the top right part of the window to “Large Icons” and scroll down until you locate the Administrative Tools entry. Click on it and locate the Services shortcut at the bottom. Click on it to open it as well.
- Locate the MySQL service which in the services list, right-click on it and select Properties from the context menu which appears. At the middle of the window, click on Stop and click OK.
- Navigate to the folder where you have installed MySQL. It’s usually either the C >> Program Files or the C >> Program Files (x86) folder. Open the folder and double-click on the “data” folder inside.
- Locate the two files called ib_logfile0 and ib_logfile1, right-click on both of them, and choose the Delete option from the context menu.
- Head back to the Services window, open the Properties of the MySQL service, and click the Start button. Check to see if the problem is gone.
Solution 4: Tweak MySQL Configuration Files
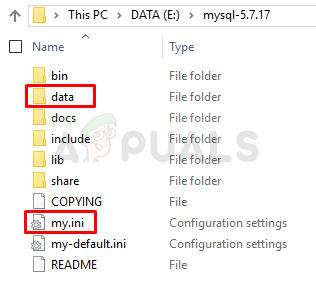
This MySQL configuration file is called “my.ini” and there is an option inside it which is known to cause this problem. You can either delete it or set it to disabled but, either way, you should definitely consider this method if the error 1067 is occurring with MySQL.
- Navigate to the root folder where you have installed MySQL. It’s usually either the C >> Program Files or the C >> Program Files (x86) path. Open the folder and try to locate the “my.ini” file.
- Right click on the located file and choose the Open with… Notepad option is the default program meant to open it isn’t already Notepad.
- Inside, you should see a list of various commands and options. Use the Ctrl + F key combination or click on Edit at the top menu and choose Find.
- Type in “innodb_flush_method” and check to see if there are any search results. If there is, make sure you set it to normal:
- If such a command doesn’t exist, you can add it to the bottom of the “my.ini” file by pasting the text above. Make sure you save the changes using Ctrl + S key combination and restart your computer afterwards. Check to see if the problem is gone.
The second configuration file which should be edited if the process above has failed to solve your problem is the “my-default.ini” file. This method is useful if the directory folders were messed up after an update.
- In the same root folder where you navigated to before, locate and open “my-default.ini” file.
- Right click on it and choose the Open with… Notepad option is the default program meant to open it isn’t already Notepad.
- Under the “[mysqld]” line in the file, make sure everything looks as it does in this article, below this line. If certain options are missing add them but you should edit the existing ones.
- Use the Ctrl + S key combination in order to save the changes and restart your computer in order to apply them. Check to see if the problem is gone now.
Solution 5: Reinstall SQL Server
This method appeals to SQL Server users which is another tool which deals with databases It’s time to perform a clean install of the program as that should solve the problem immediately. A clean install is absolutely needed if you definitely want to get rid of all files since sometimes even the temporary files can cause this problem.
- First of all, make sure you have logged in with an admin account as you won’t be able to uninstall SQL Server if you are not an admin.
- Make sure you create backups of the databases you want to preserve since this process will delete them.
- Click on the Start menu and open Control Panel by searching for it and clicking it. Alternatively, you can click on the gear icon in order to open Settings if you are running Window 10
- In Control Panel, select the View as: Category option at the top right corner and click on Uninstall a Program under the Programs section.
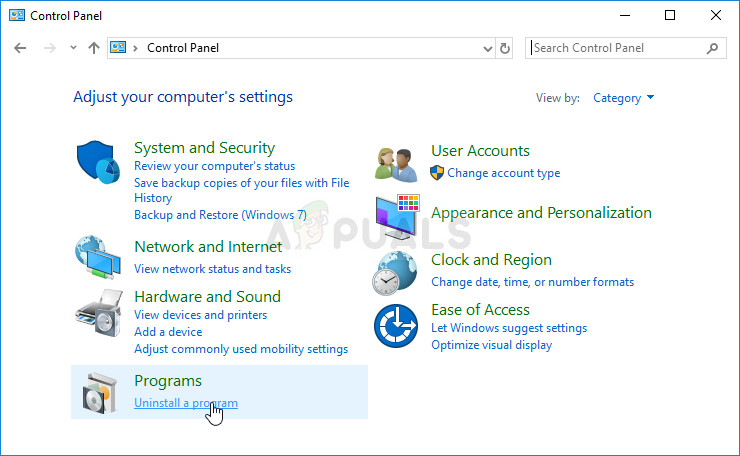
- If you are using the Settings app, clicking on Apps should open a list of all installed apps and programs on your computer.
- Locate the SQL Server entry on the list and click on it. Click on the Uninstall button above the list and confirm any dialogs which may appear. Follow the instructions on-screen in order to uninstall SQL Server and make sure you restart your computer afterwards.
After this, you will need to delete Spotify’s registry data left behind on your computer by following the set of steps below:
- Open the Registry Editor window by typing “regedit” in either the search bar or the Run dialog box which can be opened with the Windows Key + R key combination. Locate and delete the following keys in the Registry:
HKEY_LOCAL_MACHINESOFTWAREMicrosoftMicrosoft SQL Server
HKEY_LOCAL_MACHINESOFTWAREMicrosoftMSSQLServer
- After that, navigate to following location in the registry and delete all keys which reference SQL Server:
- Search for SQL on your computer and rename all folders referencing it. Restart your computer after you have performed these steps.
- Navigate to this link in order to download the SQL tool you have installed, save the file to your computer, and run it. Follow the steps below in order to install it and check to see if the problem is still there.
Solution 6: Method for EAServer Windows Service
If the error 1067 appears when the EAServer service is about to start, you can fix it with this method without much problems. It only involved editing a registry key representing the name of the service which might have gone corrupt in a recent period, possibly after an update of either your operating system or the program you are using.
We hope you still have your registry backup ready and that you have made it way back in the first solution!
- Open the Registry Editor window by typing “regedit” in either the search bar or the Run dialog box which can be opened with the Windows Key + R key combination. Navigate to the following key in your registry by navigating in the left pane:
- Try to locate the EAServer entry in the list under Services and click on it once to open its list of related registry keys.
- Locate the SERVERNAME key, right-click on it, and choose the Modify option. Under the Value data bar, make sure you type EAServer and apply the changes. Check to see if the problem is gone.
Источник
The error 1067 can occur with various Windows service and the message usually appears when you are trying to execute an action which would usually cause a service to start. The most common occurrence for this error message would be the SQL service and service similar to it.
There are quite a few methods which can be used to solve this problem and we have chosen several methods which have proven to be successful for other users who experienced the same problem. Follow the methods below and good luck!
Solution 1: Take Control of the Service
This problem is usually related to various permissions and it can be solved by giving your personal user profile the access to the service controls. This method should be your number one priority because of several reasons.
First of all, it’s universal and it can be applied no matter which service displays the error 1067 message. Second of all, it’s easy to do it and the changes can be reverted in no time.
- Open the Run utility by using the Windows Key + R key combination on your keyboard (press these keys at the same time.. Type “services.msc” in the newly opened box without the quotation marks and click OK in order to open the Services tool.
- The alternative way is to open Control Panel by locating it in the Start menu. You can also search for it using the Start menu’s search button.
- After the Control Panel window opens, change the “View by” option at the top right part of the window to “Large Icons” and scroll down until you locate the Administrative Tools entry. Click on it and locate the Services shortcut at the bottom. Click on it to open it as well.
- Locate the service which is giving you the error in the services list, right-click on it and select Properties from the context menu which appears.
- If the service is started (you can check that just next to the Service status message), you should stop it for now by clicking the Stop button in the middle of the window. If it is stopped, leave it stopped until we proceed. Navigate to the Log On tab and click on the Browse… button.
- Under the “Enter the object name to select” entry box, type in your account’s name, click on Check Names and wait for the name to become available.
- Click OK when you are finished and type in the password in the Password box when you are prompted with it, if you have setup a password. It should now start without issues!
Solution 2: Reinstall the Problematic Service
This method can also be used to solve the error 1067 with any problematic service as long as it can be deleted via the registry editor. This is a more advanced way of restarting a service which has gone corrupt and which can’t be fixed simply by resetting it in Services.
- Since you are going to delete a registry key, we recommend you check out this article we have published for you to safely backup your registry to prevent other problems. Still, nothing wrong will occur if you follow the steps carefully and correctly.
- Open the Registry Editor window by typing “regedit” in either the search bar or the Run dialog box which can be opened with the Windows Key + R key combination. Navigate to the following key in your registry by navigating in the left pane:
HKEY_LOCAL_MACHINESYSTEMCurrentControlSetServices
- In the Services key opened, locate the problematic service key, right-click on it, and choose the Delete option. Confirm any pending dialogues and restart your computer afterwards.
Note: If you are not able to delete this key, you might need to add extra access to your user account. This can be done while still in Registry Editor.
- Right-click the problematic service’s key at the left navigation pane and choose the Permissions option from the context menu.
- Under the Group or user names option, try to locate your computer’s username on the list. If you can’t find it, click on Add >> Advanced >> Find Now. You should be able to see your user account in the Search results so choose it and click OK twice until you back in the Permissions folder.
- Select you account in the Group or user names section and check the Full Control checkbox under Permissions for (YourUsername) and apply the changes you have made.
- After that, you can try and delete the key again. Restart your computer afterwards.
- After the restart, follow the instructions in this article in order to run a SFC scan which should help you locate the deleted service from the registry and bring it back easily. Check to see if the problem has disappeared.
Solution 3: Delete Certain Files
If the error 1067 is related to the MySQL Service on your computer, there are quite a few methods which can be used to solve the problem. The first one might be the easiest and it requires that you stop the MySQL service and delete a couple of log files in the install directory.
- Open Control Panel by locating it in the Start menu. You can also search for it using the Start menu’s search button.
- After the Control Panel window opens, change the “View by” option at the top right part of the window to “Large Icons” and scroll down until you locate the Administrative Tools entry. Click on it and locate the Services shortcut at the bottom. Click on it to open it as well.
- Locate the MySQL service which in the services list, right-click on it and select Properties from the context menu which appears. At the middle of the window, click on Stop and click OK.
- Navigate to the folder where you have installed MySQL. It’s usually either the C >> Program Files or the C >> Program Files (x86) folder. Open the folder and double-click on the “data” folder inside.
- Locate the two files called ib_logfile0 and ib_logfile1, right-click on both of them, and choose the Delete option from the context menu.
- Head back to the Services window, open the Properties of the MySQL service, and click the Start button. Check to see if the problem is gone.
Solution 4: Tweak MySQL Configuration Files
This MySQL configuration file is called “my.ini” and there is an option inside it which is known to cause this problem. You can either delete it or set it to disabled but, either way, you should definitely consider this method if the error 1067 is occurring with MySQL.
- Navigate to the root folder where you have installed MySQL. It’s usually either the C >> Program Files or the C >> Program Files (x86) path. Open the folder and try to locate the “my.ini” file.
- Right click on the located file and choose the Open with… Notepad option is the default program meant to open it isn’t already Notepad.
- Inside, you should see a list of various commands and options. Use the Ctrl + F key combination or click on Edit at the top menu and choose Find.
- Type in “innodb_flush_method” and check to see if there are any search results. If there is, make sure you set it to normal:
innodb_flush_method=normal
- If such a command doesn’t exist, you can add it to the bottom of the “my.ini” file by pasting the text above. Make sure you save the changes using Ctrl + S key combination and restart your computer afterwards. Check to see if the problem is gone.
The second configuration file which should be edited if the process above has failed to solve your problem is the “my-default.ini” file. This method is useful if the directory folders were messed up after an update.
- In the same root folder where you navigated to before, locate and open “my-default.ini” file.
- Right click on it and choose the Open with… Notepad option is the default program meant to open it isn’t already Notepad.
- Under the “[mysqld]” line in the file, make sure everything looks as it does in this article, below this line. If certain options are missing add them but you should edit the existing ones.
basedir="Full path to the install location of MySql (the folder where you are currently located)"
datadir="The same path but with the data folder opened; e.g. C:MySqldata"
port=3306
server-id=1
bind-address=127.0.0.1
- Use the Ctrl + S key combination in order to save the changes and restart your computer in order to apply them. Check to see if the problem is gone now.
Solution 5: Reinstall SQL Server
This method appeals to SQL Server users which is another tool which deals with databases It’s time to perform a clean install of the program as that should solve the problem immediately. A clean install is absolutely needed if you definitely want to get rid of all files since sometimes even the temporary files can cause this problem.
- First of all, make sure you have logged in with an admin account as you won’t be able to uninstall SQL Server if you are not an admin.
- Make sure you create backups of the databases you want to preserve since this process will delete them.
- Click on the Start menu and open Control Panel by searching for it and clicking it. Alternatively, you can click on the gear icon in order to open Settings if you are running Window 10
- In Control Panel, select the View as: Category option at the top right corner and click on Uninstall a Program under the Programs section.
- If you are using the Settings app, clicking on Apps should open a list of all installed apps and programs on your computer.
- Locate the SQL Server entry on the list and click on it. Click on the Uninstall button above the list and confirm any dialogs which may appear. Follow the instructions on-screen in order to uninstall SQL Server and make sure you restart your computer afterwards.
After this, you will need to delete Spotify’s registry data left behind on your computer by following the set of steps below:
- Open the Registry Editor window by typing “regedit” in either the search bar or the Run dialog box which can be opened with the Windows Key + R key combination. Locate and delete the following keys in the Registry:
HKEY_LOCAL_MACHINESOFTWAREMicrosoftMicrosoft SQL Server
HKEY_LOCAL_MACHINESOFTWAREMicrosoftMSSQLServer
- After that, navigate to following location in the registry and delete all keys which reference SQL Server:
HKEY_LOCAL_MACHINESOFTWAREMicrosoftWindowsCurrentVersionUninstall
HKEY_LOCAL_MACHINESYSTEMCurrentControlSetServices
- Search for SQL on your computer and rename all folders referencing it. Restart your computer after you have performed these steps.
- Navigate to this link in order to download the SQL tool you have installed, save the file to your computer, and run it. Follow the steps below in order to install it and check to see if the problem is still there.
Solution 6: Method for EAServer Windows Service
If the error 1067 appears when the EAServer service is about to start, you can fix it with this method without much problems. It only involved editing a registry key representing the name of the service which might have gone corrupt in a recent period, possibly after an update of either your operating system or the program you are using.
We hope you still have your registry backup ready and that you have made it way back in the first solution!
- Open the Registry Editor window by typing “regedit” in either the search bar or the Run dialog box which can be opened with the Windows Key + R key combination. Navigate to the following key in your registry by navigating in the left pane:
HKEY_LOCAL_MACHINESYSTEMCurrentControlSetServices
- Try to locate the EAServer entry in the list under Services and click on it once to open its list of related registry keys.
- Locate the SERVERNAME key, right-click on it, and choose the Modify option. Under the Value data bar, make sure you type EAServer and apply the changes. Check to see if the problem is gone.

Kevin Arrows
Kevin is a dynamic and self-motivated information technology professional, with a Thorough knowledge of all facets pertaining to network infrastructure design, implementation and administration. Superior record of delivering simultaneous large-scale mission critical projects on time and under budget.
I ran into the same errors. Similar approach for me. From what I can tell, there is something weird going on with the reference to the datadir in the my.ini file. Even when I manually edited it I could not seem to have any effect on it, until I blew EVERYTHING AWAY. Wish I had better news…do a DB backup first.
For me the key to getting this to work was:
1) Remove the previous installation from settings->control panel. Restart your machine.
2) Once machine comes back up, forcefully delete the previous installation directory.
[mine is C:appsMySQLMySQLServer-5.5, as I REFUSE to use c:program files..]
3) Forcefully delete the previous datadir directory [mine was c:datamysql].
4) Forcefully delete the previous default data directory [C:Documents and SettingsAll UsersApplication DataMySQL].
5) Re-run the install, selected the same installation directory. Skip the instance configurator/wizard at the end of the install.
6) Make sure the ../bin directory gets added to the path. Verify it.
7) Manually run the instance configurator/wizard.
Set the root password, port [3306].
It will try to start it. Again, mine FAILED to start
[duh! nothing new there!!!]
 Now, manually edit the
 my.ini file in the install directory, and correct the datadir setting to be [datadir="C:/Data/MySQL/"] MATCH CAPITALIZATION !!!!
9) Verify the service is setup correctly via the command-prompt [sc qc mysql <enter>].
Should look like:
C:devcmdz>sc qc mysql

[SC] GetServiceConfig SUCCESS

SERVICE_NAME: mysql
        TYPE               : 10  WIN32_OWN_PROCESS
        START_TYPE         : 2   AUTO_START
        ERROR_CONTROL      : 1   NORMAL
        BINARY_PATH_NAME   : "C:appsMySQLMySQLServer-5.5binmysqld" --defaults-file="C:appsMySQLMySQLServer-5.5my.ini" MySQL
        LOAD_ORDER_GROUP   :
        TAG                : 0
        DISPLAY_NAME       : MySQL
        DEPENDENCIES       :
        SERVICE_START_NAME : LocalSystem
10) Copy the contents of the default data-directory created under C:Documents and SettingsAll UsersApplication DataMySQL [basically everything in this directory to your desired data directory c:datamysql]. Make sure you get the C:Documents and SettingsAll UsersApplication DataMySQLmysql directory. This has host.frm file, and others.
You should end up with a directory now of c:dataMySQLmysql...
11) Rename the default directory
C:Documents and SettingsAll UsersApplication DataMySQL
To
C:Documents and SettingsAll UsersApplication DataMySQLxxx
So it cannot find it…
12) Say a quick prayer…
13) Give it a kick start from command line with [net start mysql]
That got it working for me…
Best of Luck!
Download PC Repair Tool to quickly find & fix Windows errors automatically
Windows background Services enable Windows features to function properly. One of the errors occurring for Windows Services is Error 1067, The process terminated unexpectedly. This is an error that you might encounter when you are trying to start a service-based operation on your Windows 11/10. This error occurs mainly due to faulty services, or corrupted settings of that particular service. The fix for this issue is outlined in this post.
Error 1067 can occur with any of the background services in Windows 10 PC. Whichever is the service affected, the fix described here is applicable. In this post, we will choose the Fax service as our case in point.
Before you proceed with the fix, try to restart your computer and check if the error persists. If it persists, then follow the steps below.
- Refresh the potentially corrupted Service settings in the Registry
- Run System File Checker or DISM
- Manually start the Service
- Troubleshoot in Clean Boot State
- Use Refresh Windows Tool or reinstall the program.
Before you begin, remember to create a system restore point first.
1] Refresh the potentially corrupted Service settings in Registry
Press Windows key + R key to launch the Run dialog box. Type regedit in the box and hit Enter to open the Registry Editor window.
On Registry Editor window, navigate to
HKEY_LOCAL_MACHINESYSTEMCurrentControlSetServices
Locate and right-click on your service with error 1067 (in this case, Fax service) under Services branch. Then choose Export. Choose a place to save it on the pop-up window. This is for safety reasons.
Back on Registry Editor window, right-click on the Fax service, but this time choose Delete. Exit the window.
Restart your computer.
This will refresh or reinstall the Windows Service.
If this does not help, you may Merge back the saved Registry file. Go to the Fax service file; you saved to the desktop when you performed the export action above in Step 1. Right-click on the file and select Merge (see screenshot below).
Click Yes on the confirmation prompt. This will install the Fax service back.
2] Run System File Checker or DISM
Run the System File Checker, ie. Run sfc /scannow from an elevated command prompt. Reboot on completion and check. Windows 10 users may repair their Windows System Image and see if it helps.
3] Manually start the Service
Press Windows logo key + R to launch the Run dialog box. Type services.msc and hit Enter to open the Windows Services window.
In the Services window, locate and right-click on Fax service.
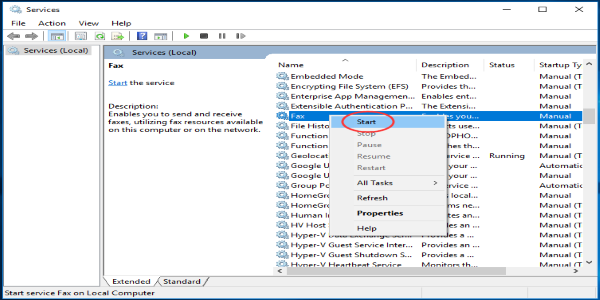
Ensure that its Startup type is not set to Disabled. Click Start and close the window.
The Windows Service this time should start without the error 1067.
4] Troubleshoot in Clean Boot State
Boot in Safe Mode and see if the Service is starting. Many times, non-Microsoft services or Drivers can interfere with the proper functioning of System Services. Alternatively, you could also execute a Clean Boot and troubleshoot manually to find the offending process that may be interfering.
5] Use Refresh Windows Tool or reinstall the program
If your Windows 10 computer is facing a lot of issues, including corrupt files, then it’s best to use Windows 10 Refresh Tool. The process does the following:
- Keeps your personal files and settings
- Replaces all Windows 10 system files with a new copy.
- Keeps the apps that came with your PC
- Keep the apps you installed from the Microsoft Store.
It ultimately fixes your computer without you worrying about any data loss. To use it, you need to download the Refresh Windows Tool from Microsoft.
Windows 11 or Windows 10 users may also use the Reset This PC option.
If the Service giving errors are related to any software, reinstalling the software would be the best option.
PS: If you need more suggestions, then please see this post – Windows Services will not start.

Anand Khanse is the Admin of TheWindowsClub.com, a 10-year Microsoft MVP (2006-16) & a Windows Insider MVP (2016-2022). Please read the entire post & the comments first, create a System Restore Point before making any changes to your system & be careful about any 3rd-party offers while installing freeware.
Когда вы установили программу или игру, которая устанавливает в систему Windows свою службу, то вы можете при запуске этой службы столкнуться с ошибкой «Ошибка 1067: Процесс был неожиданно завершен«. Эта ошибка возникает в основном из-за неисправных служб или поврежденных настроек этой конкретной службы. Ошибка 1067 может возникнуть с любой из фоновых служб на вашем компьютере с Windows 10, но в основном она встречается в SQL, MySQL и audio. Я буду показывать пример на службе EasyAntiCheat, которая при запуске выдавала мне ошибку 1067.
Исправить ошибку 1067, когда процесс был неожиданно завершен
Прежде чем приступить, перезагрузите ПК и проверьте ошибку. Отключите сторонние антивирусные программы и переустановите программу или игру, если ошибка в этих службах. И прежде чем приступить к исправлениям, рекомендую создать точку восстановления системы для безопасности.
1. Удалить поврежденную службу из реестра
Нажмите сочетание кнопок Win + R и введите regedit, чтобы открыть редактор реестра. В редакторе реестра перейдите по пути:
HKEY_LOCAL_MACHINESYSTEMCurrentControlSetServices- Далее найдите проблемную службу, в моем случаи это EasyAntiCheat.
- Нажмите по ней правой кнопкой мыши и выберите «Экспортировать», чтобы сделать резервную копию.
- Далее нажмите по ней правой кнопкой мыши и выберите «Удалить«.
- Перезагрузите ПК и это обновит или переустановит службу в Windows.
Если не помогло, то вы можете объединить параметры этой службы. У нас есть резервная копия, которую мы создали. Нажмите по ней два раза и установите параметры реестра для этой службы.
2. Запуск службы вручную
Нажмите комбинацию кнопок Win + R и введите services.msc, чтобы открыть службы. Найдите службу, которая выдает вам ошибку 1067, в моем случае эта EasyAntiCheat, и нажмите по ней правой кнопкой мыши, и выберите «Запустить«. Тип запуска не должен быть «отключено». Проверьте, устранена ли ошибка.
3. Проверка системных файлов
Поврежденные системные файлы могут выдавать ошибку 1067 при запуске службы. Попробуем восстановить системные поврежденные файлы, если они имеются. Откройте командную строку от имени администратора и введите две команду по очереди, дожидаясь окончания процесса после каждой:
sfc /scannowDism /Online /Cleanup-Image /RestoreHealth
4. Безопасный режим
Этот метод поможет вам, если вы у вас ошибка в системной службе, а не той, которая устанавливает сторонняя программа или драйвер. Загрузитесь в безопасном режиме и посмотрите, запускается ли та системная служба, которая выдает ошибку 1067. Иногда сторонние драйвера и службы могут мешать нормальному функционированию системы.
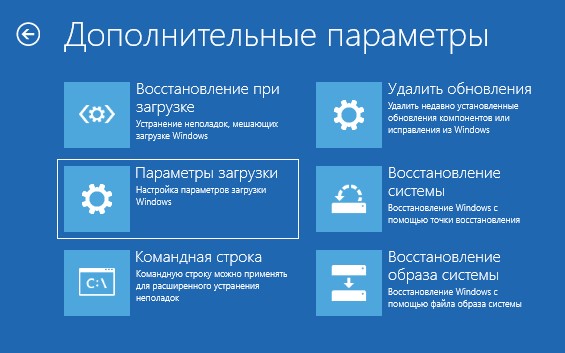
- Попадите в дополнительные параметры, выберите «Параметры загрузки» > «Перезагрузить» > и нажать кнопку F4 (Включить безопасный режим).
Смотрите еще:
- Ошибка 1053: Служба не ответила на запрос
- Ошибка DistributedCOM Код события 10016 Windows 10
- Cлужба узла: Служба репозитория состояний грузит ЦП в Windows 10
- Решено: Служба профилей пользователей не удалось войти в систему windows 10
- Windows Modules Installer Worker (Tiworker.exe): Грузит ЦП и Диск
[ Telegram | Поддержать ]
Сообщение об ошибке 1067 «Процесс был неожиданно завершен» возникает при попытке выполнить действие, которое вызывает запуск службы. Чаще происходит при запуске службы SQL и ей подобных. Узнаем подробнее, как ее исправить.
Предоставление учетной записи управлять службой
Проблема часто связана с различными разрешениями и для ее решения предоставьте текущей учетной записи пользователя доступ к элементам управления службой. Это решение примените в первую очередь. Поскольку оно универсально и может быть использовано независимо от того, какая служба отображает сообщение об ошибке 1067.
Нажмите Win + R и выполните команду services.msc.

Найдите службу, которая выдает ошибку, щелкните на нее правой кнопкой мыши и перейдите в Свойства. На вкладке Общие посмотрите состояние. Если она запущена, остановите ее нажатием на соответствующую кнопку.
Затем на вкладке Вход в систему кликните на «Обзор».
В поле ввода имен выбираемых объектов наберите имя текущей учетной записи, кликните на «Проверить имена», чтобы проверить ее правильность, и нажмите на «ОК». Либо выберите имя с помощью кнопок Дополнительно – Поиск.
Затем введите пароль, и примените изменения на «ОК». Закройте окно, и перезагрузите компьютер. В большинстве случаев, этим способом удается исправить ошибку с кодом 1607.
Переустановка службы
В этом решении используем более продвинутый способ перезапуска службы, которая была повреждена и ее не удается исправить в свойствах.
Откройте редактор реестра выполнением команды regedit из окна Win + R.
На левой панели перейдите к разделу:
HKEY_LOCAL_MACHINESYSTEMCurrentControlSetServices
В разделе Services найдите проблемную службу, кликните на нее правой кнопкой мыши и удалите. Подтвердите все запросы, которые могут возникнуть в процессе удаления, и перезагрузите компьютер
Если не удается удалить проблемный раздел, попробуйте добавить дополнительные разрешения.
Правым щелчком мыши на службе в левой панели вызовите контекстное меню и выберите «Разрешения».
В разделе группы или имена пользователей найдите текущую учетную запись. Если не отображается, нажмите Добавить – Дополнительно – Найти. Выберите ее из результатов поиска.
Установите курсор на текущую учетную запись в разделе группы и имена пользователей, отметьте флажком поле полный доступ в разделе Разрешения и примените изменения.
После этого попробуйте снова удалить раздел и перезагрузите компьютер.
После перезагрузки запустите командную строку от имени администратора с помощью системного поиска.
Запустите следующую команду, которая позволит восстановить удаленный раздел из реестра:
sfc /scannow

Дождитесь завершения сканирования и перезапустите ПК. Проверьте, решена ли проблема.
Перезапуск MySQL
Если ошибка 1607 связана со MySQL, сначала ее остановим, затем удалим несколько файлов в каталоге установки.
Откройте Панель управления командой control из окна Win + R.
В правом верхнем углу экрана установите просмотр на крупные значки и перейдите в раздел Администрирование. В правой части окна выберите Службы.
Найдите MySQL и дважды кликните на нее, чтобы открыть свойства. Остановите ее нажатием на соответствующую кнопку.
Затем перейдите в проводнике в каталог установки MySQL, который находится на системном диске в папке Program Files (x86). Откройте его и перейдите в папку Data. Найдите два файла ib_logfile0 и ib_logfile1, кликните на них правой кнопкой мыши и удалите.
Вернитесь в окно служб и запустите MySQL. Проверьте, удалось ли устранить ошибку 1067.
На чтение 10 мин. Просмотров 617 Опубликовано 27.04.2021
Ошибка 1067 может возникать с различными службами Windows, и сообщение обычно появляется, когда вы пытаетесь выполнить действие, которое обычно вызывает запуск службы. Чаще всего это сообщение об ошибке встречается в службе SQL и аналогичной ей.

Существует довольно много методов, которые можно использовать для решения этой проблемы, и мы выбрали несколько методов, которые оказались успешными для других пользователей, столкнувшихся с той же проблемой. Следуйте приведенным ниже методам и удачи!
Содержание
- Решение 1. Возьмите под свой контроль службу
- Решение 2. Переустановите проблемную службу
- Решение 3. Удалите определенные файлы
- Решение 4. Настройте файлы конфигурации MySQL
- Решение 5. Переустановите SQL Server
- Решение 6. Метод для EAServer Windows Service
Решение 1. Возьмите под свой контроль службу
Эта проблема обычно связана с различными разрешениями, и ее можно решить, предоставив вашему личному профилю пользователя доступ к элементам управления службами. Этот метод должен быть вашим приоритетом номер один по нескольким причинам.
Прежде всего, он универсален и может применяться независимо от того, какая служба отображает сообщение об ошибке 1067. Во-вторых, это легко сделать, и изменения могут быть отменены в кратчайшие сроки.
- Откройте утилиту «Выполнить», используя комбинацию клавиш Windows + R на клавиатуре ( нажмите эти клавиши одновременно .. Введите «services.msc» во вновь открывшемся поле без кавычек и нажмите «ОК», чтобы открыть инструмент «Службы».

- Альтернативный способ – открыть панель управления, указав ее в меню “Пуск”. Вы также можно найти его с помощью кнопки поиска в меню «Пуск».
- После открытия окна панели управления измените параметр «Просмотр по» в верхней правой части окна на «Большие значки» и прокрутите вниз, пока не найдете запись “Администрирование”. Нажмите на нее и найдите ярлык “Службы” внизу. Щелкните по нему, чтобы открыть его.

- Найдите службу, которая выдает ошибку, в списке служб, щелкните правой кнопкой мыши ck на нем и выберите “Свойства” в появившемся контекстном меню.
- Если служба запущена (вы можете проверить это рядом с сообщением о состоянии службы), вам следует остановить ее на данный момент, щелкнув значок Кнопка остановки посередине окна. Если он остановлен, оставьте его, пока мы не продолжим. Перейдите на вкладку «Вход в систему» и нажмите кнопку «Обзор…».

- В поле ввода «Введите имя объекта для выбора» введите имя своей учетной записи, нажмите «Проверить имена» и дождитесь, пока имя станет доступным.
- Нажмите OK, когда закончите, и введите пароль в поле Пароль, когда вам будет предложено его ввести, если вы установили пароль.. Теперь он должен запуститься без проблем!
Решение 2. Переустановите проблемную службу
Этот метод также можно используется для устранения ошибки 1067 с любой проблемной службой, если ее можно удалить с помощью редактора реестра. Это более продвинутый способ перезапуска поврежденной службы, которую нельзя исправить, просто сбросив ее в службах.
- Поскольку вы собираетесь удалить реестр key, мы рекомендуем вам ознакомиться с этой статьей, которую мы опубликовали, чтобы вы могли безопасно сделать резервную копию реестра и предотвратить другие проблемы. Тем не менее, ничего плохого не произойдет, если вы будете внимательно и правильно следовать инструкциям.
- Откройте окно редактора реестра, набрав «regedit» либо в строке поиска, либо в диалоговом окне «Выполнить», которое можно открыть с помощью Клавиша Windows + комбинация клавиш R. Перейдите к следующему разделу в реестре на левой панели:
HKEY_LOCAL_MACHINE SYSTEM CurrentControlSet Services

- В открытом ключе служб найдите проблемный служебный ключ, щелкните его правой кнопкой мыши и выберите параметр «Удалить». Подтвердите все незавершенные диалоги и после этого перезагрузите компьютер.
Примечание . Если вы не можете удалить этот ключ, вам может потребоваться добавить дополнительные доступ к вашей учетной записи. Это можно сделать еще в редакторе реестра.
- Щелкните правой кнопкой мыши клавишу проблемной службы на левой панели навигации и выберите параметр “Разрешения” в контекстном меню.
- В разделе “Группа или имена пользователей” попробуйте найти имя пользователя вашего компьютера в списке. Если вы не можете его найти, нажмите Добавить >> Дополнительно >> Найти. Вы должны увидеть свою учетную запись пользователя в результатах поиска, поэтому выберите ее и дважды нажмите «ОК», пока не вернетесь в папку «Разрешения».

- Выберите свою учетную запись в разделе «Группа или имена пользователей» и установите флажок «Полный доступ» в разделе «Разрешения для (YourUsername)» и примените внесенные вами изменения.
- После этого вы можете попробовать удалить ключ еще раз. После этого перезагрузите компьютер.
- После перезагрузки следуйте инструкциям в этой статье, чтобы запустить сканирование SFC, которое должно помочь вам найти удаленную службу из реестра и легко восстановить ее. Проверьте, исчезла ли проблема.
Решение 3. Удалите определенные файлы
Если ошибка 1067 связан со службой MySQL на вашем компьютере, существует несколько методов, которые можно использовать для решения проблемы. Первый из них может быть самым простым и требует, чтобы вы остановили службу MySQL и удалили пару файлов журнала в каталоге установки.
- Откройте панель управления, указав ее в папке Стартовое меню. Вы также можете найти его, используя кнопку поиска в меню “Пуск”..
- После открытия окна панели управления измените параметр «Просмотр по» в верхней правой части окна на «Большие значки» и прокрутите вниз, пока не найдете запись «Инструменты администрирования». Щелкните по нему и найдите внизу ярлык «Службы». Щелкните по нему, чтобы открыть его.
- Найдите службу MySQL в списке служб, щелкните ее правой кнопкой мыши и выберите “Свойства” в появившемся контекстном меню. В середине окна нажмите «Остановить» и нажмите «ОК».
- Перейдите в папку, в которую вы установили MySQL. Обычно это папка C >> Program Files или C >> Program Files (x86). Откройте папку и дважды щелкните папку «data» внутри.
- Найдите два файла с именами ib_logfile0 и ib_logfile1 , щелкните их обе правой кнопкой мыши и выберите в контекстном меню команду «Удалить».

- Вернитесь в окно” Службы ” , откройте Свойства службы MySQL и нажмите кнопку Пуск. Проверьте, исчезла ли проблема.
Решение 4. Настройте файлы конфигурации MySQL
Эта конфигурация MySQL файл называется «my.ini», и внутри него есть опция, которая, как известно, вызывает эту проблему. Вы можете либо удалить его, либо отключить, но в любом случае вам обязательно следует рассмотреть этот метод, если ошибка 1067 возникает с MySQL.
- Перейдите в корневую папку, в которой вы установили MySQL. Обычно это путь C >> Program Files или C >> Program Files (x86). Откройте папку и попробуйте найти файл «my.ini».
- Щелкните правой кнопкой мыши по найденному файлу и выберите «Открыть с помощью… Блокнот» – это программа по умолчанию, предназначенная для его открытия. Блокнот.

- Внутри вы должны увидеть список различных команд и опций. Используйте комбинацию клавиш Ctrl + F или нажмите «Правка» в верхнем меню и выберите «Найти».
- Введите «innodb_flush_method» и проверьте, есть ли результаты поиска. Если есть, убедитесь, что вы установили нормальный режим:
innodb_flush_method = normal
- Если такая команда не существует , вы можете добавить его в конец файла «my.ini», вставив текст выше. Убедитесь, что вы сохранили изменения, используя комбинацию клавиш Ctrl + S, а затем перезагрузите компьютер. Убедитесь, что проблема исчезла.
Второй файл конфигурации, который следует отредактировать, если описанный выше процесс не помог решить вашу проблему, – это файл «my-default.ini» . Этот метод полезен, если папки каталога были испорчены после обновления.
- В той же корневой папке, в которую вы перешли ранее, найдите и откройте «my-default.ini» файл.
- Щелкните его правой кнопкой мыши и выберите параметр «Открыть с помощью… Блокнота» – это программа по умолчанию, предназначенная для открытия этого блокнота.

- Убедитесь, что в строке «[mysqld]» в файле все выглядит как это делается в этой статье под этой строкой. Если некоторые параметры отсутствуют, добавьте их, но вы должны отредактировать существующие.
basedir = "Полный путь к месту установки MySql (папка, в которой вы сейчас находитесь)" datadir = "Тот же путь, но с открытой папкой данных; например, C: MySql data" port = 3306server-id = 1bind-address = 127.0.0.1
- Используйте Ctrl + Комбинация клавиш S, чтобы сохранить изменения и перезагрузить компьютер, чтобы применить их. Убедитесь, что проблема исчезла.
Решение 5. Переустановите SQL Server
Этот метод подходит пользователям SQL Server, который является еще одним инструментом для работы с базами данных. Пришло время выполнить чистую установку программы, поскольку это должно немедленно решить проблему. Чистая установка абсолютно необходима, если вы определенно хотите избавиться от всех файлов, поскольку иногда даже временные файлы могут вызвать эту проблему.
- Прежде всего, убедитесь, что вы вошли в систему с учетной записью администратора, так как вы не сможете удалить SQL Server, если не являетесь администратором.
- Убедитесь, что вы создали резервные копии баз данных, которые хотите сохранить, поскольку этот процесс удалит их .
- Щелкните меню “Пуск” и откройте панель управления, выполнив поиск и щелкнув по нему. Кроме того, вы можете щелкнуть значок шестеренки, чтобы открыть настройки, если вы работаете в Window 10.
- В панели управления выберите параметр «Просмотреть как: Категория» в правом верхнем углу и нажмите «Удалить». Программа в разделе “Программы”.

- Если вы используете приложение «Настройки», нажатие на «Приложения» должно открыть список всех установленных приложений и программ на вашем компьютере.
- Найдите в списке запись SQL Server и щелкните по ней . Нажмите кнопку «Удалить» над списком и подтвердите все диалоговые окна, которые могут появиться. Следуйте инструкциям на экране, чтобы удалить SQL Server и после этого обязательно перезагрузите компьютер.
После этого вам нужно будет удалить данные реестра Spotify, оставшиеся на вашем компьютере. выполнив следующие действия:
- Откройте окно редактора реестра, набрав «regedit» либо в строке поиска, либо в диалоговом окне «Выполнить», которое можно открыть с помощью ключа Windows. + Комбинация клавиш R. Найдите и удалите следующие ключи в реестре:
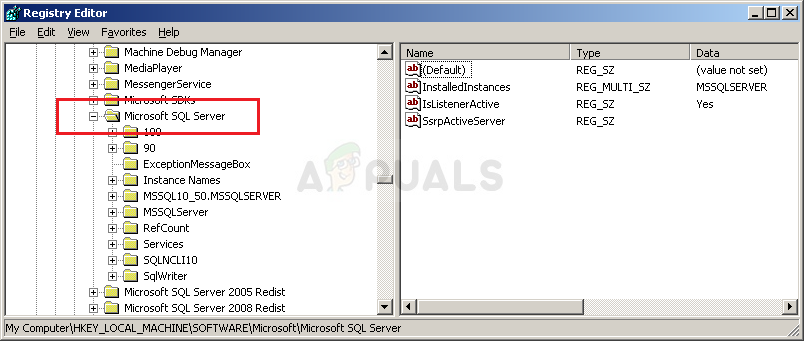
HKEY_LOCAL_MACHINE SOFTWARE Microsoft Microsoft SQL Server
HKEY_LOCAL_MACHINE SOFTWARE Microsoft MSSQLServer

- После этого перейдите в следующее место в реестре и удалите все ключи, которые ссылаются на SQL Server:
HKEY_LOCAL_MACHINE SOFTWARE Microsoft Windows CurrentVersion Uninstall
HKEY_LOCAL_MACHINE SYSTEM CurrentControlSet Services
- Найдите SQL на своем компьютер и переименуйте все папки, ссылающиеся на него. После выполнения этих действий перезагрузите компьютер.
- Перейдите по этой ссылке, чтобы загрузить установленный инструмент SQL, сохранить файл на свой компьютер и запустите его. Выполните следующие действия, чтобы установить его и проверить, сохраняется ли проблема.
Решение 6. Метод для EAServer Windows Service
Если ошибка 1067 появляется перед запуском службы EAServer, вы можете исправить ее с помощью этого метода без особых проблем. Это включало только редактирование раздела реестра, представляющего имя службы. которые могли бы стать коррумпированными в последнее время, поз. возможно, после обновления вашей операционной системы или программы, которую вы используете.
Мы надеемся, что у вас все еще есть резервная копия реестра, и что вы вернулись к ней в первом решении!
- Откройте окно редактора реестра, набрав «regedit» либо в строке поиска, либо в диалоговом окне «Выполнить», которое можно открыть с помощью комбинации клавиш Windows + R. Перейдите к следующему разделу в реестре на левой панели:
HKEY_LOCAL_MACHINE SYSTEM CurrentControlSet Services
- Попытайтесь найти запись EAServer в списке в разделе Services and щелкните по нему один раз, чтобы открыть список связанных разделов реестра.
- Найдите раздел SERVERNAME, щелкните его правой кнопкой мыши и выберите параметр «Изменить». Убедитесь, что вы ввели EAServer под панелью данных значения и применили изменения. Убедитесь, что проблема исчезла.