Наличие товара в Woocommerce — настройки, хаки, надпись «Нет в наличии», функция is_in_stock и др.
 Поговорим о разных ситуациях, которые возникают с показателем наличия товара в Woocommerce. Недавно пришлось решить несколько задач по теме, и захотелось собрать все сниппеты в одном посте. Сегодня расскажу про: функцию is_in_stock для проверки статуса продукции на складе, отображение соответствующих бейджей и модификацию цены.
Кое-какие смежные нюансы я уже затрагивал в блоге, плюс, думаю, вопросы в публикации далеко не последние по данной теме, поэтому статья будет дополнятся новыми хаками.
Список задач:
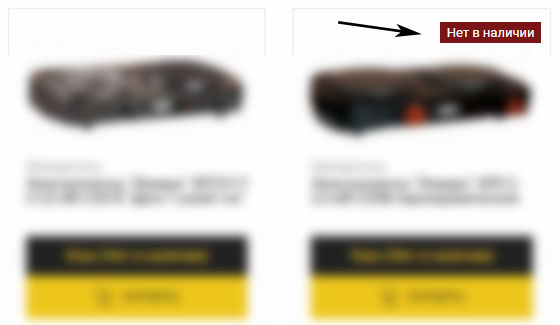
- Вывод бейджа «Нет в наличии».
- Меняем надпись/перевод.
- Функция is_in_stock.
- Надпись нет товара возле цены.
- Скрытие/вывод категорий без продукции.
- Сортировка по наличию товара (ссылка на другую статью блога) — хак позволяет расположить отсутствующие объекты в самом конце каталога магазина.
Начнем с базовых понятий. В настройках каждого продукта есть вкладка «Запасы», где можете управлять данной характеристикой: укажите, что та или иная позиция сейчас недоступна либо наоборот измените статус остатка нет в наличии на противоположный (когда она появится).
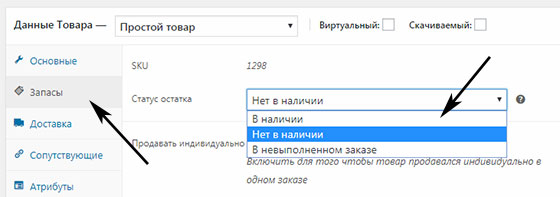
Как правило, в современных Woocommerce шаблонах разработчики заранее предусматривают подобные ситуации, и при смене настроек вы увидите соответствующую реакцию/сообщение на сайте. Но иногда нужно сделать некоторые дополнительные штуки во фронтенде…
Чтобы добавить соответствующую надпись на страницу каталога (категории) магазина, размещаете в файле функций functions.php код:
add_action( 'woocommerce_before_shop_loop_item_title', 'my_sold_out_loop' );

function my_sold_out_loop() {
    global $product;

    if ( !$product->is_in_stock() ) {
        echo '<span class="soldout">Нет в наличии</span>';
    }
}
Текст появится в правом верхнем углу. Дополнительно для класса soldout сможете задать какой-то стиль:
span.soldout {
padding: 3px 7px;
background: #7b1616;
color: white;
font-size: 13px;
}
С помощью add_action допускается вставка данного бейджа в любое место Woocommerce шаблона, например, в единичное отображение продукции интернет-магазина:
add_action( 'woocommerce_before_single_product_summary', 'my_sold_out_loop' );
Меням надпись нет в наличии
Сниппет опять же вставляете в functions.php (или похожие файлы). Тем самым вы задаете 2 перевода для доступной продукции (Available) и распроданной (Sold Out). Если нужно что-то одно, можете просто убрать другой блок IF условия:
add_filter( 'woocommerce_get_availability', 'wcs_custom_get_availability', 1, 2);
function wcs_custom_get_availability( $availability, $_product ) {
    if ( $_product->is_in_stock() ) {
        $availability['availability'] = __('Available!', 'woocommerce');
    }
    if ( ! $_product->is_in_stock() ) {
        $availability['availability'] = __('Sold Out', 'woocommerce');
    }
    return $availability;
}
Функция is_in_stock и наличие товара
Как вы могли догадаться из прошлого сниппета, is_in_stock является булевой функцией, то есть возвращает значения true/false. Следовательно вы можете использовать ее в условном операторе IF:
    if ( $product->is_in_stock() ) {
        echo '<div class="stock" >' . $product->get_stock_quantity() . ' в наличии</div>';
    } else {
        echo '<div class="out-of-stock" >Нет в наличии</div>';
    }
Выводите в Woocommerce фразу в наличии или нет для товара (в зависимости от его статуса) на страницах архива каталога:
function my_stock_loop() {
    global $product;
    if ( $product->is_in_stock() ) {
        echo '<div class="stock" >' . $product->get_stock_quantity() . ' в наличии</div>';
    } else {
        echo '<div class="out-of-stock" >Нет в наличии</div>';
    }
}
add_action( 'woocommerce_after_shop_loop_item_title', 'my_stock_loop' );
Надпись нет в наличии для цены
Возможно, это достаточно узкоспециализированная задача, но недавно мне нужно было вставить фразу об отсутствии товара не в качестве бейджа, а рядом с ценой. При этом я использовал несколько иное условия проверки:
add_filter( 'woocommerce_get_price_html', 'my_price_html', 100, 2 );
function my_price_html( $price, $product ){
  global $product;
  $return_string = $price;
  if ( $product->stock_status == 'outofstock' ) {
  	  $return_string = $price .'  (Нет в наличии)';
     }
  return $return_string;
}
Здесь вместо функции is_in_stock просто считывал значение параметра $product->stock_status, и в случае когда оно равно «outofstock», дописывал соответствующую фразу к цене.
Важно! Во-первых, я не тестировал фишку с ценами вариаций товаров (у меня все были простые) — в статье по ссылке может видеть, что там используется другой фильтр woocommerce_variable_price_htm. Вполне вероятно, придется добавить срабатывание функции и для него. Также не забывайте, что есть еще sale_price. Во-вторых, изменения затрагивают и админку — если это критично, вставьте в функцию соответствующую проверку/условие.
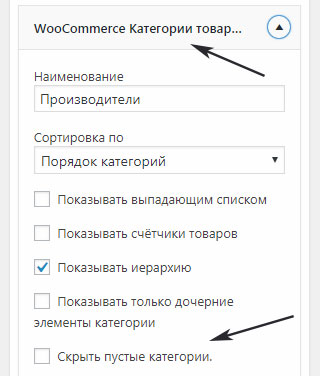
Скрытие/вывод «пустых» подкатегорий на сайте
Данная фишка/задача актуальная, если в настройках WooCommerce рубрик у вас указано отображение не только товаров магазина, но и подкатегорий. При этом плагин по умолчанию не будет показывать разделы, которые не содержат ни единого элемента. Возможно, вам захочется данное поведение изменить.
В таком случае следует воспользоваться небольшим хаком, добавляете его в файл функций. В версии WooCommerce 3.х и выше он имеет вид:
add_filter( 'woocommerce_product_subcategories_hide_empty', 'hide_empty_categories', 10, 1 );
function hide_empty_categories ( $hide_empty ) {
    $hide_empty  =  FALSE;
    // You can add other logic here too
    return $hide_empty;
}
Для младших релизов модуля (до 3.x) следует использовать немного другой код:
add_filter( 'woocommerce_product_subcategories_hide_empty', 'show_empty_categories', 10, 1 );
function show_empty_categories ( $show_empty ) {
    $show_empty  =  TRUE;
    // You can add other logic here too
    return $show_empty;
}
Тестировал оба варианта сниппета — все работало.
Кстати, когда выводите список категорий с помощью виджета, то там пустые подрубрики можно скрывать через соответствующую настройку. А еще почитайте как убрать категории Woocommerce если надо избавиться от какого-то конкретного раздела.
Если вас интересует еще что-то по теме наличия товара Woocommerce, задавайте вопросы в комментариях. Позже допишу новые полезности и сниппеты, если найду интересные.
 Do you want to display in the stock text in the WooCommerce theme that does not show this text by default? In stock or stock availability text is not shown by default on Storefront theme and you may want to show this text. In this quick tutorial, I will guide you on how to show in stock text in the WooCommerce theme.
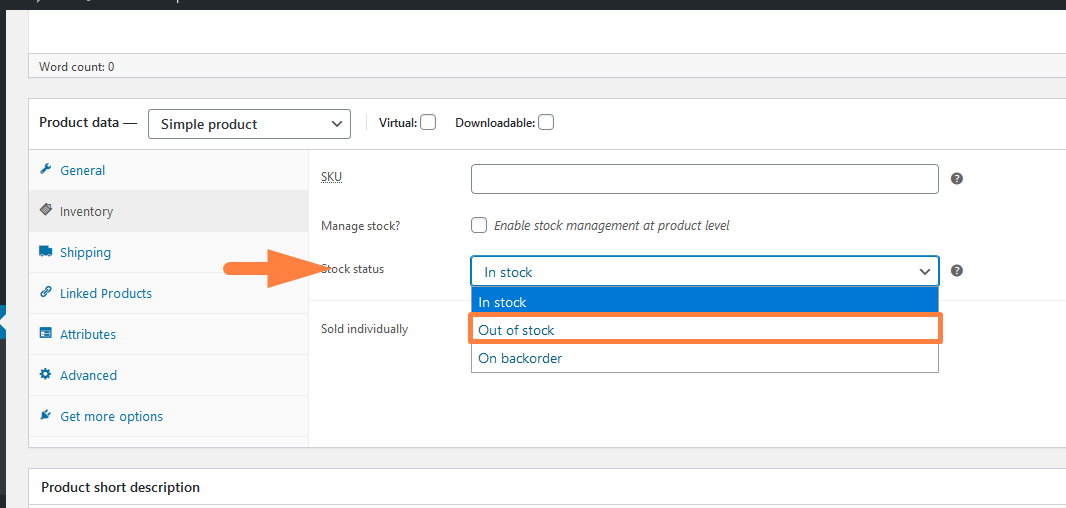
First, you need to understand how inventory management works in WooCommerce. When you are publishing a product in WooCommerce it is possible to set the stock status as we highlighted in the previous two tutorials – change out of stock text and change in stock text in WooCommerce.
The stock availability text in WooCommerce can be out of stock, backorder or in stock status. These statuses can be set for each WooCommerce product under the inventory tab as shown on the image below:
If this is set and you still do not see the WooCommerce stock availability text, you need to add a filter to your theme functions.php file to display the missing stock availability text.
This hook filters the content that is added to the functions.php and then displays the content after we add the text we want to display as the stock availability text.
By default, the WooCommerce storefront theme does not display in stock text and you may have to add a code snippet to display this text.
How to Display In Stock Text in WooCommerce or Out Stock
The best approach to display stock availability text is to combine both the in stock and out stock text in one filter and display them conditionally. The following are the steps:
- Login to your WordPress site to access the dashboard
- Open the theme editor under Appearance Menu > Theme Editor
- Open the functions.php file where we will add the code snippet.
- Create the WooCommerce filter hook that will hook on the
‘woocommerce_get_availablity’example :add_filter(‘‘woocommerce_get_availablity’, ‘njengah_woocommerce_stock_availablity_display’) - Create a callback function where you should have the conditional check on the status of the stock using the
is_in_stock()function.
Now lets us illustrate these steps with an example
Display the In stock Text in WooCommerce
The following code should be added to the functions.php to add the WooCommerce stock availability text. When you add this code you can test the stock status by changing on one of the products:
/**
* WooCommerce Display Stock Availablity
*/

add_filter( 'woocommerce_get_availability', 'njengah_display_stock_availability', 1, 2);

function njengah_display_stock_availability( $availability, $_product ) {

   global $product;

   // Change In Stock Text
    if ( $_product->is_in_stock() ) {
        $availability['availability'] = __('Product is Available!', 'woocommerce');
    }

    // Change Out of Stock Text
    if ( ! $_product->is_in_stock() ) {
    	$availability['availability'] = __('Product sold out!', 'woocommerce');
    }

    return $availability;
}
How the Code Works
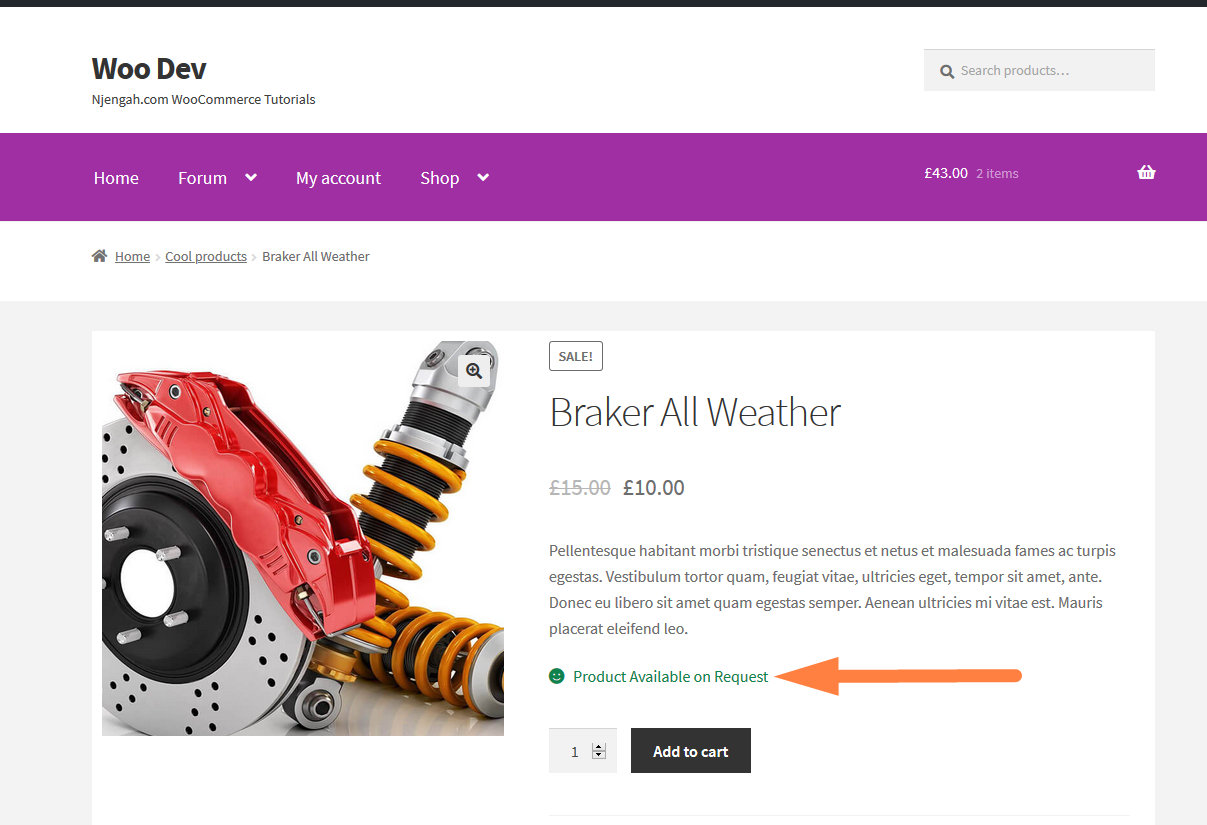
This callback function has two parameters that are passed (product and availability). These two parameters are used to check the status of the product in the function – is_in_stock().
The first block of code we are checking if the product we passed to the function is available and if this is the case we display in stock text:
 // Change In Stock Text
    if ( $_product->is_in_stock() ) {
        $availability['availability'] = __('Product is Available on Request', 'woocommerce');
    }
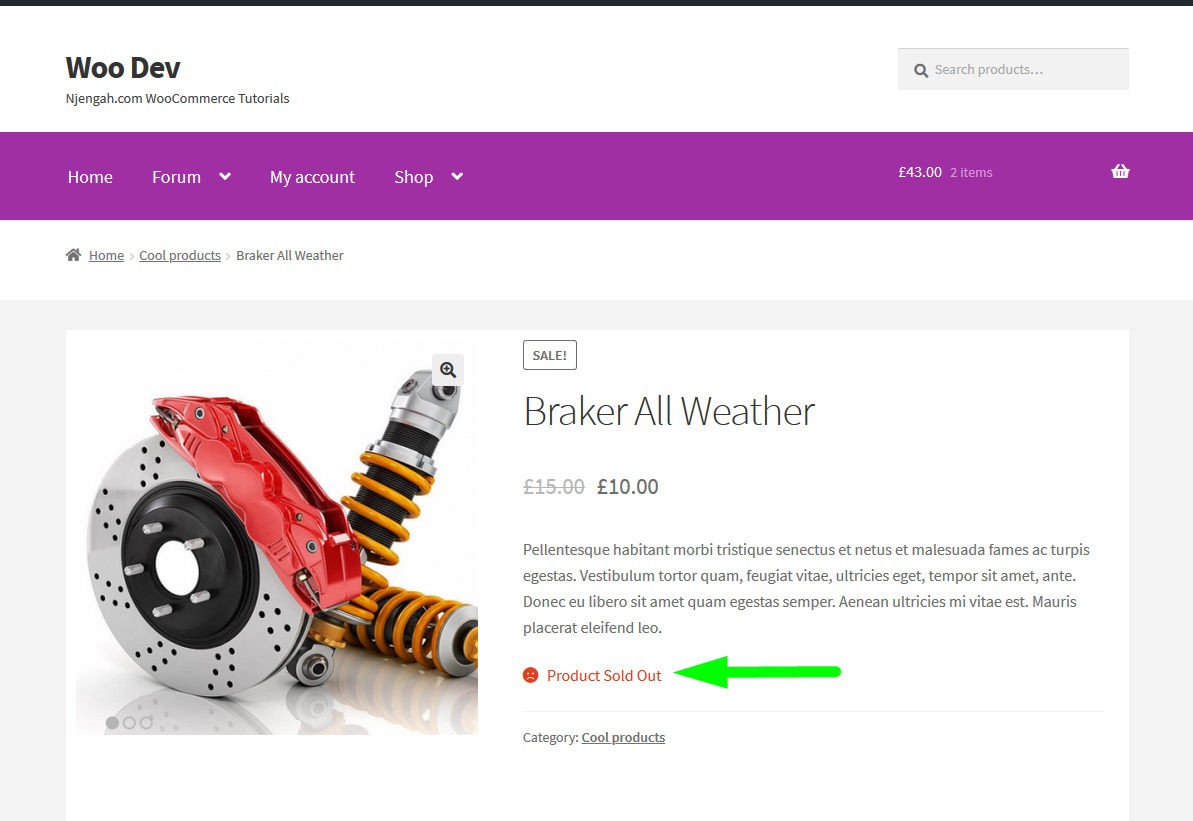
The second code block we are checking if the product we passed to the function is out of stock if you check keenly we are using the! / Not symbol to get the reverse of the first condition and when this evaluates to true the product is out of stock and we display the out of stock text:
   // Change Out of Stock Text
    if ( ! $_product->is_in_stock() ) {
    	$availability['availability'] = __('Product sold out!', 'woocommerce');
    }
Finally, in the function’s return, we have to return the modified availability so that we can display the appropriate message. You can edit WooCommerce stock availability text to a custom text for either case by changing the respective text in each of the code blocks above.
Conclusion
In this tutorial, we have outlined how you can display WooCommerce stock availability text and in particular how you can display both the in stock and out of stock text in one function. This code can be edited to have custom text that is tailored to your specific needs as I explained in these two tutorials – how to change WooCommerce in stock text and how to change out of stock text in WooCommerce.
Add custom stock status based on quantity ranges to communicate precise information about your stock availability.
Installation
↑ Back to top
- Download the .zip file from your WooCommerce account.
- Go to: WordPress Admin > Plugins > Add New and Upload Plugin the file you have downloaded.
- Install Now and Activate.
More information at Install and Activate Plugins/Extensions.
Setup and Configuration
↑ Back to top
As soon as the plugin has been installed, you can view the plugin in WordPress Admin Panel > Custom Stocks. To customize plugin settings, click on Custom Stock.
How to Add Custom Stock Status:
↑ Back to top
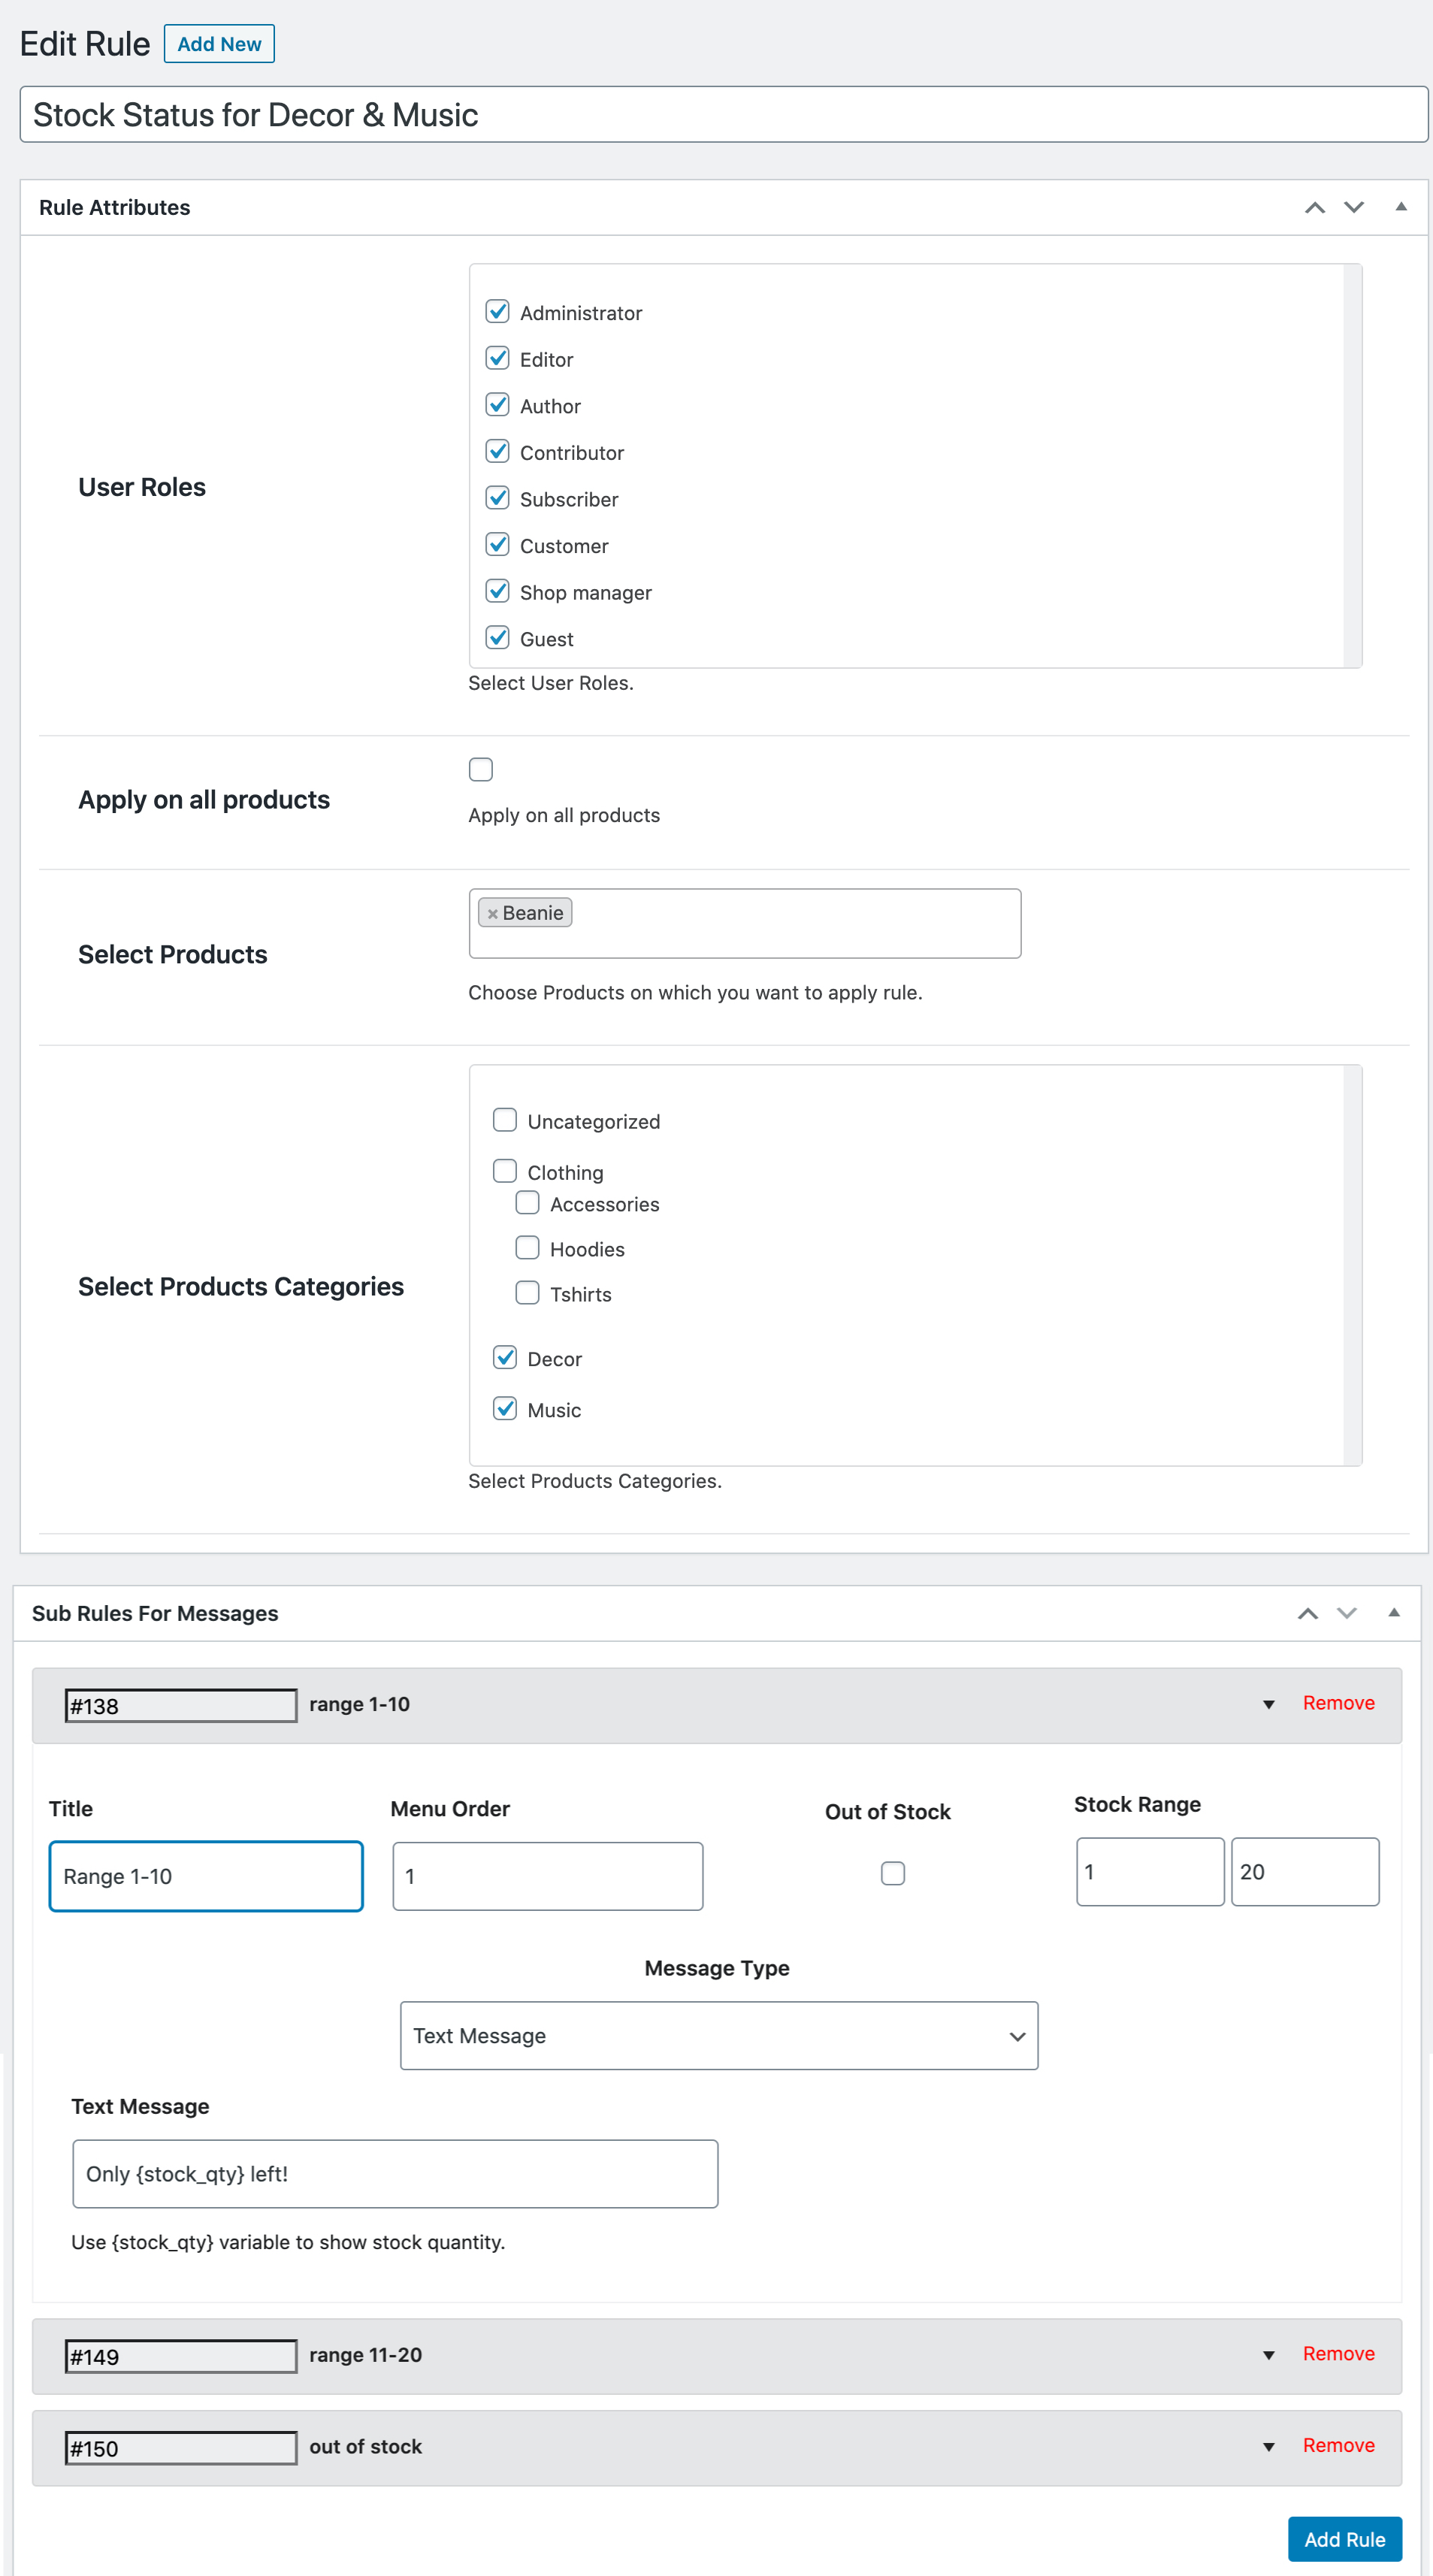
To create new stock status, go to Custom Stocks > Add New. While adding custom stock status you can customize the following options. Each stock rule should be assigned a self-explanatory title as it will be shown in the Custom Stock Status section for future reference.
- User Roles: Select the User Role(s) to assign this custom stock rule to.
- Apply to Product: Place a check in this box to apply this single rule to all products. (Note: If you check this box, both Select Products and Select Product Categories options will be hidden as this no longer is relevant to your selection)
- Select Products: Assign a selective product(s) to this newly created custom stock rule. Typing in a minimum of three characters will trigger predictive text.
- Select Product Categories: Select any one or multiple product categories that the rule is intended to include.
Message Related Sub Rules
- Add Title: Add a title that helps you easily find this when you need to edit this in future..
- Menu Order: If you choose to create multiple sub-rules within the same rule, use this option to prioritize which sub-rule should apply first, second, and so on.
- Out of Stock: Check this box to create a custom message for out-of-stock. (Please note that by default this box is not selected, if you select this box it will remove Stock Range as this no longer remains applicable to your selection).
- Stock Range: Define maximum and minimum quantities to trigger the message. Your message will be shown when the product stock lies within the defined range.
- Message Type: In the dropdown, you will find four different types of messages to choose from:
-
- Text Message: Use this option to create urgency with simple text. Selecting this option will reveal a text field. Type in an influential message. Remember to use the {stock_qty} variable in with your text to show a message with the stock quantity.
- Text Message with Icon: Use this option to attract customers with text and a relevant icon.
- Image: To display an image only.
- Text Message with Date: Use this option to convey a limited stock or inventory restock. Selecting this option will reveal a text field. Type in an influential message and add a date to it. To assign a date, click on the date-picker, and pick a date.
- Remember to use the {stock_qty} variable in your text message to show a message with the current stock quantity.
- Rule Priority: You can set the priority of the entire rule here.
Save and apply your settings by clicking on Publish.
General Configuration Options
↑ Back to top
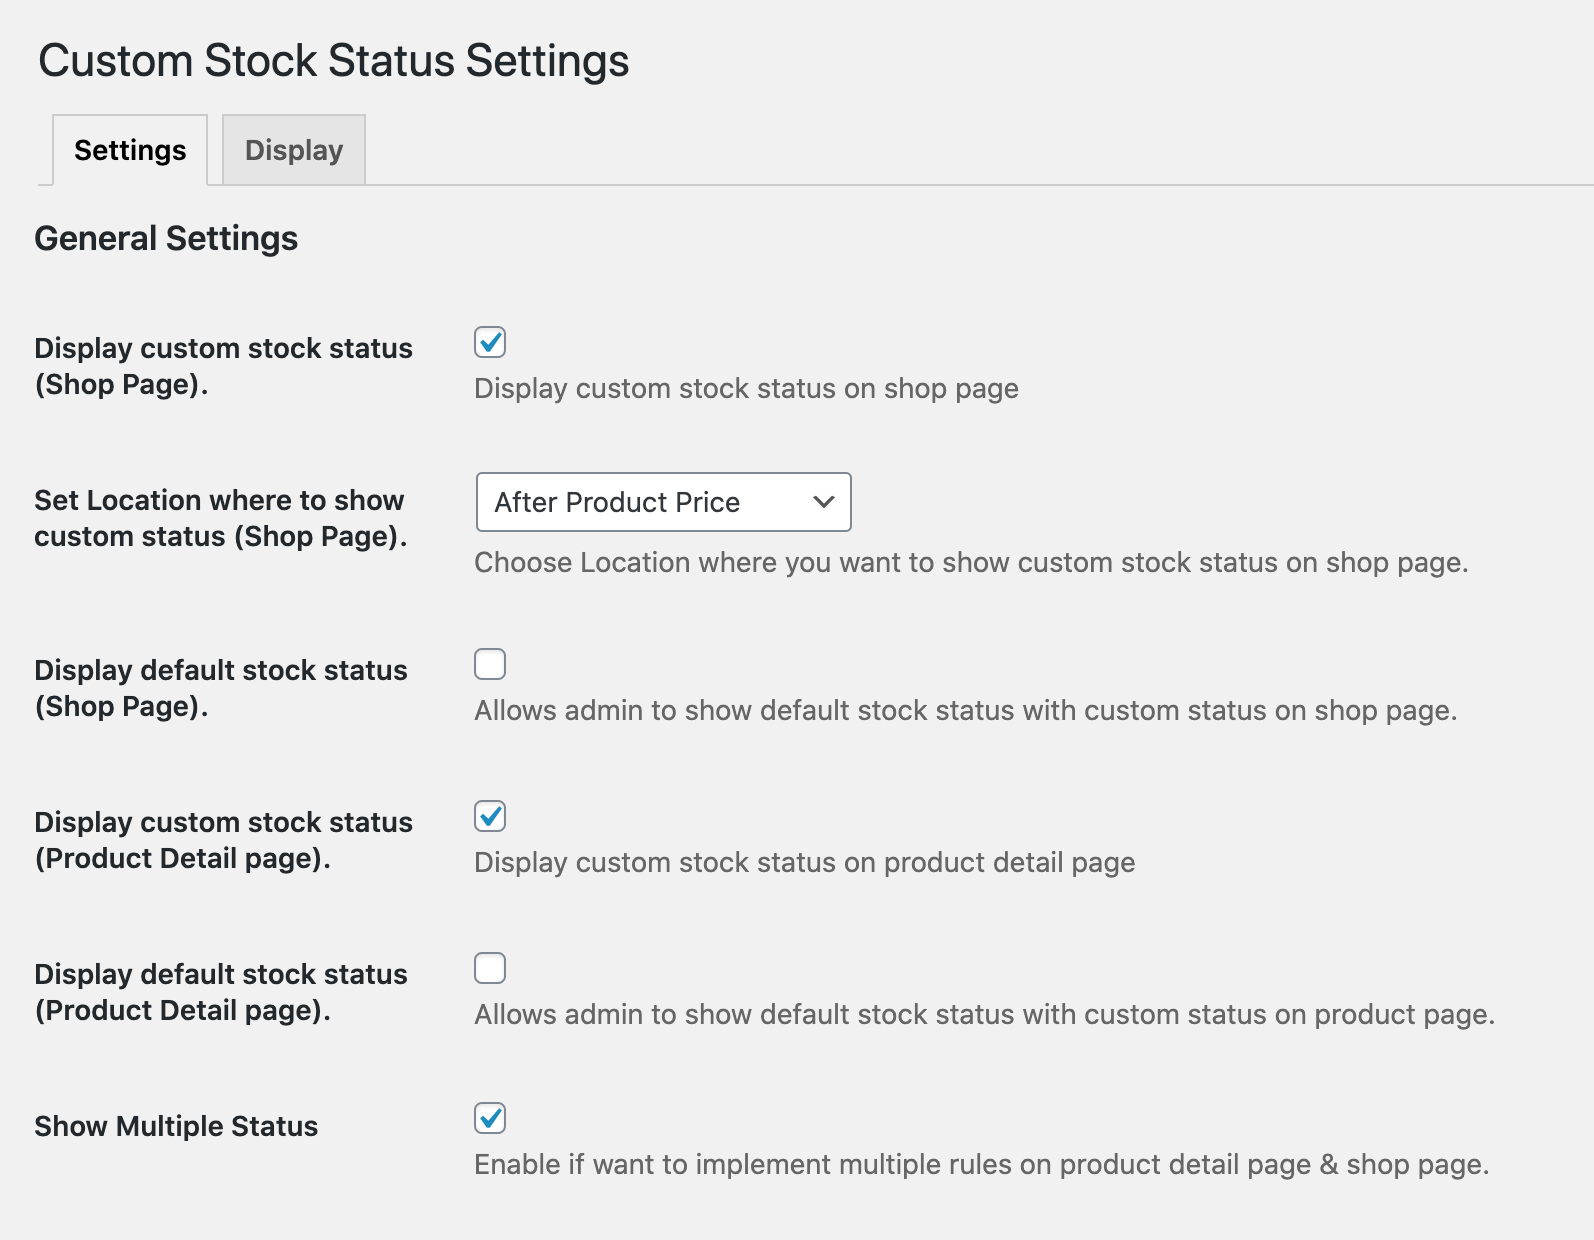
Go to Custom Stock Status > Settings to manage the general configuration options which includes,
Manage Custom Status Visibility
↑ Back to top
- Display Stock Status –Shop Page: This option allows you to display your custom stock status on the shop page
- Define Display Location – Shop Page: Use this option to set where to display the shop status. Clicking on the dropdown reveals the following four locations to choose from.
-
- Before Product Title: stock message/image will be placed above the entire product description and below the product image
- After Product Title: stock message/image will be placed below product title and above price/sale price
- After Product Price: stock message/image will be placed below price and above Add to Cart button
- After Add to Cart Button: stock message/image will be placed under the entire product description including the Add to Cart button
- Display Stock Status – Product Page: Check this checkbox to allow the custom stock status to show on the product page(s). The custom stock message will appear under the price and above the Add to Cart button.
Disabling Default Stock Statuses
↑ Back to top
- Display Default Stock Status – Shop Page: Enable the default stock status to show under the price, on the shop page. (Note: Default stock status settings cannot be changed through the plugin, you can only enable and disable its display)
- Display Default Stock Status – Product Page: Activating this option will reflect the default stock status under the custom stock status and above the Add to Cart. (Note: Default stock status settings cannot be changed through the plugin, you can only enable and disable the option)
Displaying Multiple Statuses
↑ Back to top
Place a check in “Display Multiple Status” checkbox to display multiple rules on the product and shop page(s), according to your selection above. For example, if you have created 2 rules and both have statuses configured for the same product and same quantity range, should the extension display both or the one with high priority?
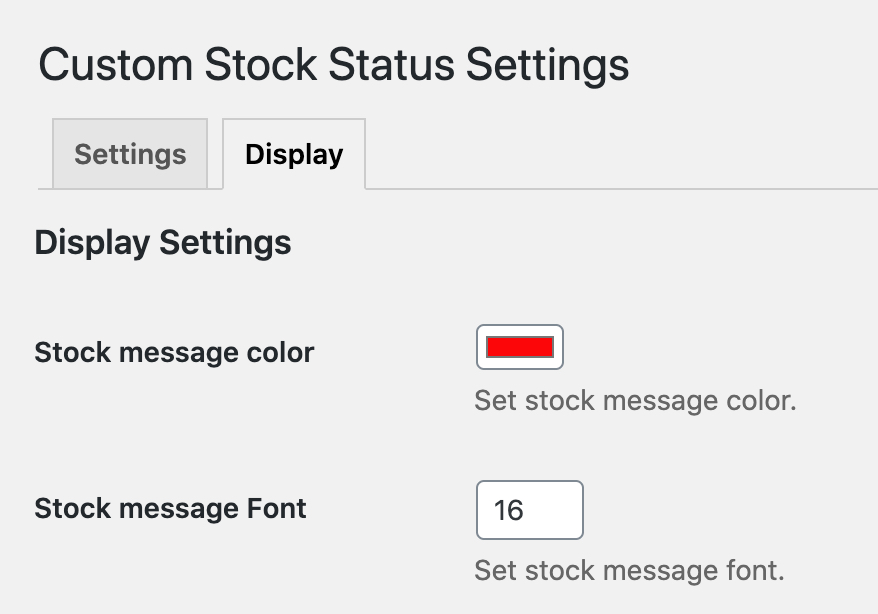
Customize Status Font & Color
↑ Back to top
Go to Custom Stock Status> Settings > Display tab to manage the font style of any text in the custom stock status.
- Stock Status Color: Choose a color for the text in the custom stock status. To select a color, click on the color box to reveal a color-spectrum and select any color from the predefined range. For more precise color selection, enter the RGB code of the desired color.
- Stock Status Font: Define the stock status’s font size, from a range of 9pt-72pt.
Click Save Changes each time to apply any modification to the frontend.
The default stock status messages in WooCommerce aren’t as informative for customers as I’d like.
Therefore I’ve written this guide, let me show you how you can change and customize any of the “out of stock” or “in stock” messages with PHP snippets.
Changing “Out of stock” text with a snippet
Simple products will have the default “out of stock” message. It’s really easy to change this to display another message, such as sold out or anything else. We need to access the woocommerce_get_availability_text filter to change the availability message. We can also change the available stock message.
Advanced users can tap into the product details and create unique messages based on any conditions. For example, one condition could be if the product is in a specific category or not. I’ll include some bonus product conditions at the bottom for you to mix and match.
Code language: PHP (php)
/** * Change "Out of stock" to "Sold Out" * @param string $text * @param WC_Product $product * @return string */ function puri_woocommerce_get_availability_text( $text, $product ) { if (!$product->is_in_stock()) { $text = 'Sold out'; } else { // You can add more conditions here. e.g if product is available. // $text = 'Available right now'; } return $text; } add_filter( 'woocommerce_get_availability_text', 'puri_woocommerce_get_availability_text', 999, 2);
Changing “product is currently out of stock” text on variable products
Variable products have the default out of stock message “This product is currently out of stock and unavailable.” The WooCommerce filter we need to change is woocommerce_out_of_stock_message. Let’s change it via PHP functions.
You can add the below function to your child theme’s functions.php or a custom plugin.
Code language: PHP (php)
/** * Out of stock message for product variations. * @param string $text default message. * @return string */ function puri_out_of_stock_message( $text ){ $text = 'This product is currently sold out, check back again soon.'; return $text; } add_filter( 'woocommerce_out_of_stock_message', 'puri_out_of_stock_message', 999);
You can replace the default message with your own text. For example, “This product is currently sold out, check back again soon” could be a little more inviting.
Conditional WooCommerce “out of stock” messages
You can conditionally apply a specific stock message per product or product category.
Here are a couple of examples to get you started. These snippets can be used within the above functions.
// Assuming you have access to the $product object. // If the product has category if( !has_term( 'uncategorized', 'product_cat', $product->get_id() )){ $text = 'uncategorized products are restocked every friday'; } // If the product is a specific product by ID. if( $product->get_id() == '123' )){ $text = 'This product is only restocked every friday'; }Code language: PHP (php)
Wrapping up
These snippets are fully compatible with WooCommerce 3.0 and WooCommerce 5.9+
I highly recommend adding these code snippets to your themes function.php file or using a plugin like Code Snippets.
If you looking for more ways to optimize stock handling in WooCommerce you should have a look at your plugins (Reserved Stock Pro & Stock Editor for WooCommerce) as well as more WooCommerce related articles on our blog.
I’ve seen many snippets that change the “In Stock” text on the single product page, but not the FULL string. In this particular case, not only I needed to change the text, but also edit the order of display: from “2 in stock” to “Quantity: 2“.
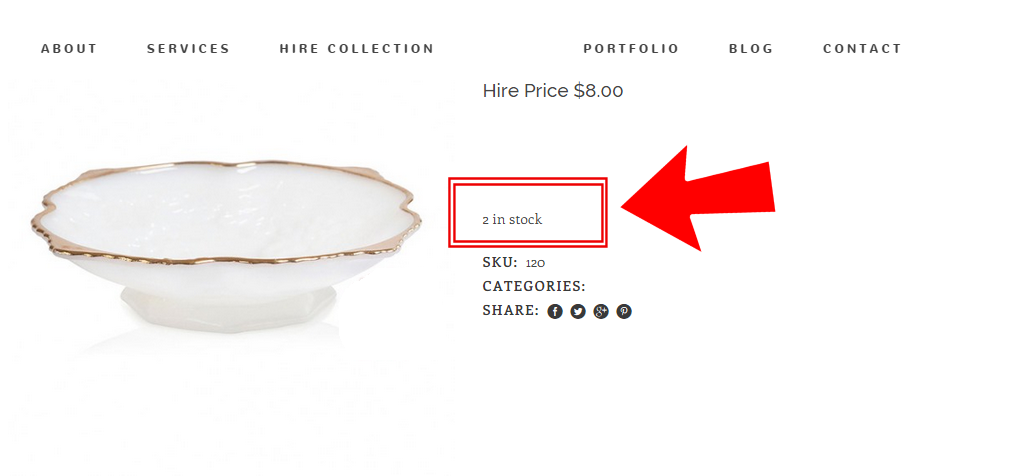
PHP Snippet: Change “# in stock” to “Quantity: #” @ WooCommerce Single Product Page
/**
 * @snippet       Display "Quantity: #" @ WooCommerce Single Product Page
 * @how-to        Get CustomizeWoo.com FREE
 * @author        Rodolfo Melogli
 * @testedwith    WooCommerce 4.4
 * @donate $9     https://businessbloomer.com/bloomer-armada/
 */

add_filter( 'woocommerce_get_availability_text', 'bbloomer_custom_get_availability_text', 99, 2 );

function bbloomer_custom_get_availability_text( $availability, $product ) {
   $stock = $product->get_stock_quantity();
   if ( $product->is_in_stock() && $product->managing_stock() ) $availability = 'Quantity: ' . $stock;
   return $availability;
}
Where to add this snippet?
You can place PHP snippets at the bottom of your child theme functions.php file (delete «?>» if you have it there). CSS, on the other hand, goes in your child theme style.css file. Make sure you know what you are doing when editing such files — if you need more guidance, please take a look at my free video tutorial «Where to Place WooCommerce Customization?»
Does this snippet (still) work?
Please let me know in the comments if everything worked as expected. I would be happy to revise the snippet if you report otherwise (please provide screenshots). I have tested this code with Storefront theme, the WooCommerce version listed above and a WordPress-friendly hosting on PHP 7.3.
If you think this code saved you time & money, feel free to join 14,000+ WooCommerce Weekly subscribers for blog post updates or 250+ Business Bloomer supporters for 365 days of WooCommerce benefits. Thank you in advance 
Need Help with WooCommerce?
Check out these free video tutorials. You can learn how to customize WooCommerce without unnecessary plugins, how to properly configure the WooCommerce plugin settings and even how to master WooCommerce troubleshooting in case of a bug!

Rodolfo Melogli
Business Bloomer Founder
Author, WooCommerce expert and WordCamp speaker, Rodolfo has worked as an independent WooCommerce freelancer since 2011. His goal is to help entrepreneurs and developers overcome their WooCommerce nightmares. Rodolfo loves travelling, chasing tennis & soccer balls and, of course, wood fired oven pizza.
Follow @rmelogli
Join 75,000+ Monthly Readers & 16,500+ Subscribers.
Become a Business Bloomer Supporter.
Join BloomerArmada and become an Official Business Bloomer Supporter:
easy-peasy, and lots of perks for you.
See your Benefits →