
Are you looking for ways to update the error notices at checkout? We’ve got you covered. In this guide, we’ll show you different methods to change the WooCommerce checkout error messages.
When running an online store, at some point you will face conflicts and errors. We’ve previously seen how to fix general problems on the checkout, what to do when the Add to Cart button doesn’t work, and some solutions when the Shop Page is empty. In this tutorial, we’ll show different ways to change the WooCommerce checkout error messages and create custom ones.
Before we have a look at the different ways to do so, let’s better understand the benefits of customizing the error messages on the checkout page.
Why Change the Checkout Error Messages?
By default, WooCommerce comes with basic and quite generic checkout error messages. Most store owners leave them as they are, so by changing those messages, you can easily stand out from the crowd.
Leaving the checkout notices unchanged is a great missed opportunity. The checkout is the most important moment as it defines whether you close the sale or not. If there’s an error during the checkout, shoppers might back down and you might end up losing the sale. By customizing these error messages at checkout, you can make the most of them and explain what happened to provide security to the customers.
By default, WooCommerce displays error messages when there are required fields that are missing or when the payment method the customer introduced isn’t valid. These are the typical error messages you see at checkout:
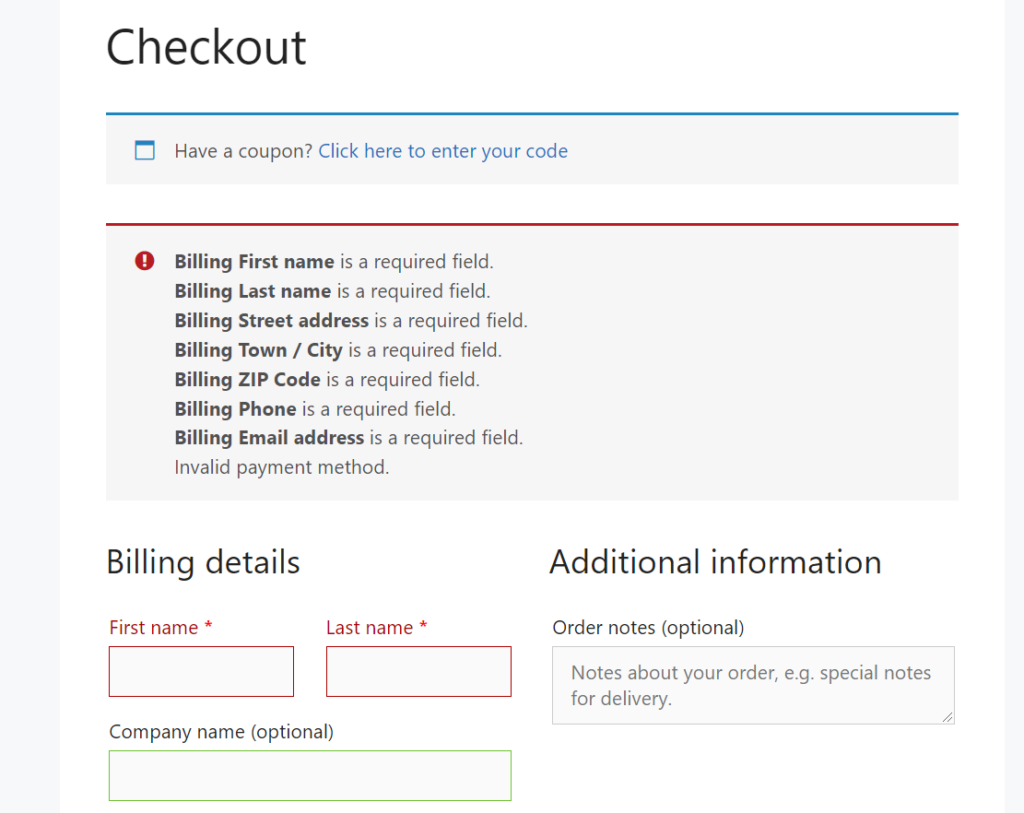
As you can see, they are clear but there’s a lot more you can do with them. For example, you can add elements that reflect your brand, add more text, and so on.
Now that you know why you should change the checkout error messages in WooCommerce, let’s see how you can complete the task.
How to Change the WooCommerce Checkout Error Messages
There are two ways to edit the WooCommerce checkout error messages:
- With plugins
- Programmatically
Let’s have a look at both methods, so you can pick the right one according to your skills and needs.
1) Customize the checkout error messages with plugins
If you don’t have coding skills or prefer to use plugins to edit WooCommerce error messages, you can use the Say What plugin. This tool helps you modify your website strings without writing a single line of code or editing template files.
The free version comes with basic features, while the premium version starts at 39 USD per year and unlocks more advanced customization opportunities.
Once you have installed and activated the plugin, you will see the configuration options on the left-hand side. From there, you can select the string you need to replace and enter the target content. Once you have done that, hit Save, and that’s it.
If you need help with the plugin, you can raise a support ticket or email the support team using the contact form.
2) Edit checkout error messages programmatically
If you don’t want to use a plugin and have programming skills, you can edit the error messages with a bit of code. In this section, we will show you how to use PHP to change the error messages in WooCommerce.
There’s a lot you can do here. For this demonstration, we’ll focus on displaying one error message instead of the default multiple warnings on the checkout page.
To do this, we’ll modify the theme’s functions.php file, so before starting we recommend you backup your site and create a child theme if you don’t have one yet.
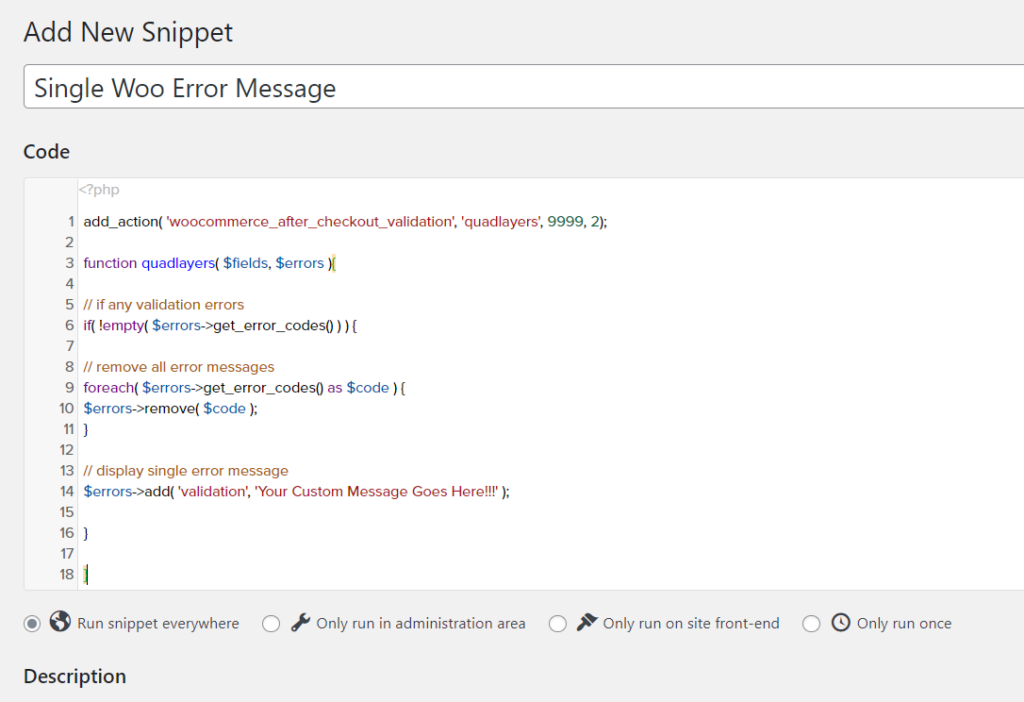
After that, you can add the below code to the funtions.php file of your child theme. As mentioned before, it will display a single error message on the checkout page instead of several notices.
add_action( 'woocommerce_after_checkout_validation', 'quadlayers', 9999, 2);
function quadlayers( $fields, $errors ){
// in case any validation errors
if( !empty( $errors->get_error_codes() ) ) {// omit all existing error messages
foreach( $errors->get_error_codes() as $code ) {
$errors->remove( $code );
}
// display custom single error message
$errors->add( 'validation', 'Your Custom Message Goes Here!!!' );
}
}
If you have a closer look at the code, you’ll see that we have set quadlayers as the function, and Your Custom Message Goes Here!!! as the single message. Feel free to take this snippet as a base and adjust it according to your requirements.
For this demonstration, we’re using a site-specific plugin to paste the code as you can see below.
Now check the front end, add any product to the cart, and go to the checkout page. If you try to complete the purchase without filling any required fields, you will see an error like this:
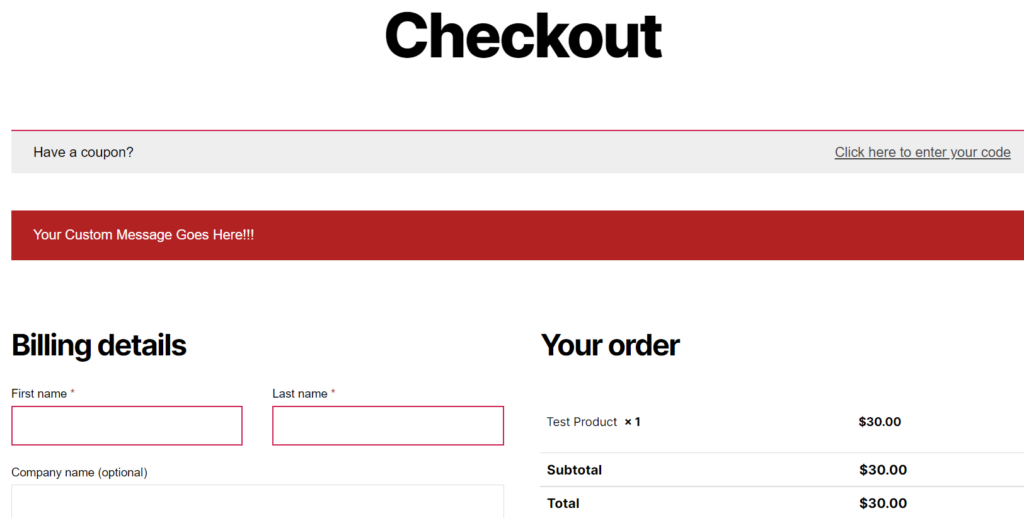
This way, you can change the WooCommerce checkout error messages with a bit of code.
As you can see, this is a simple example. We recommend you combine this approach with conditional to improve your customers’ shopping experience. To learn more about that, have a look at our guide on how to add conditional fields to the WooCommerce checkout.
So far, we’ve seen a few ways to customize the error messages at checkout. But there’s more you can do to improve your online store. Let’s see how you can add custom messages.
How to Add a Custom Checkout Message
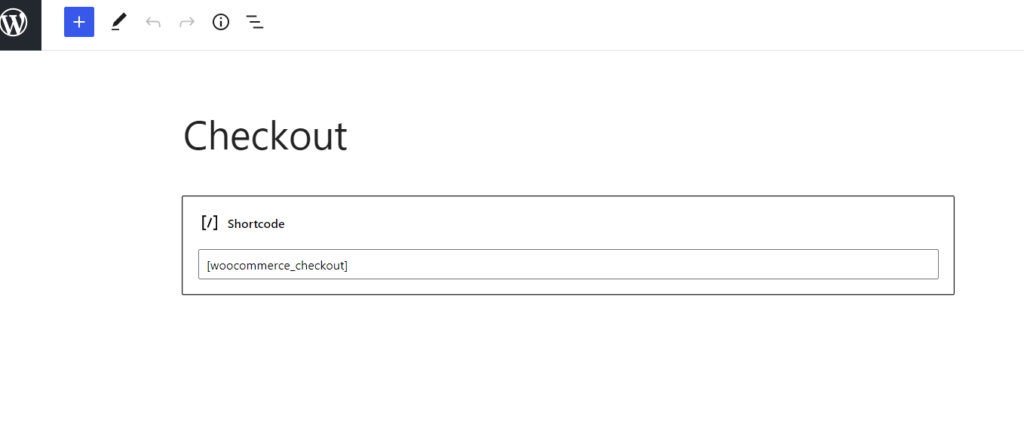
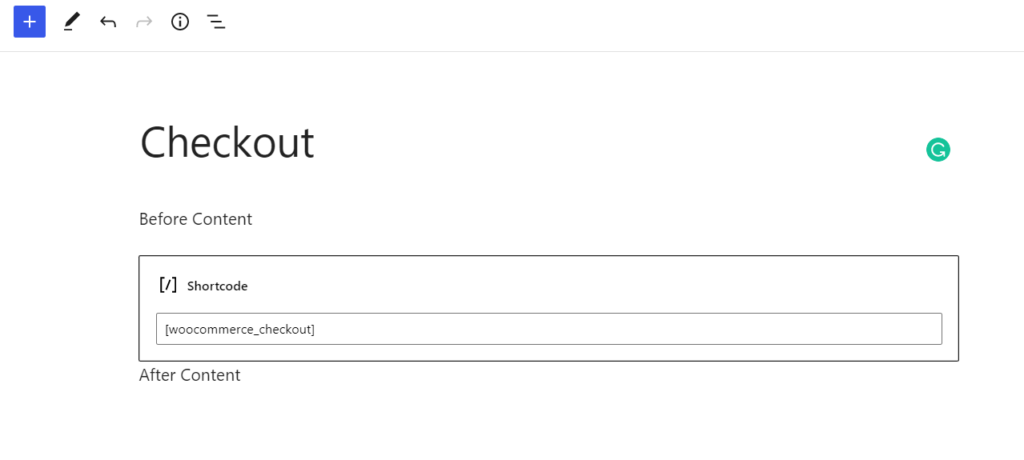
In this section, you’ll learn to display a custom message on your checkout page. First, in your dashboard, go to Pages > Checkout.

Here, you can modify the page content and display custom messages, add media, and much more. By default, the checkout page contains the WooCommerce checkout shortcode.
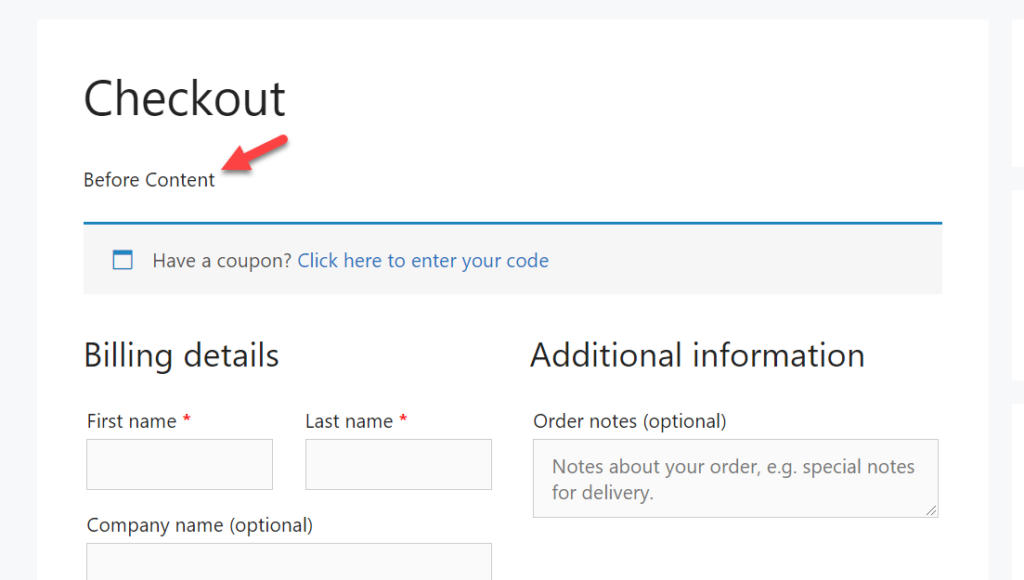
If you want to display a custom message before and after the checkout fields, you can use the paragraph block. For this demonstration, we will add one paragraph block before and another one after the checkout shortcode. We’ll simply call them “Before Content” and “After Content”.
After updating the page, have a look at the checkout page from the front end and you will see the custom messages that we have just added.
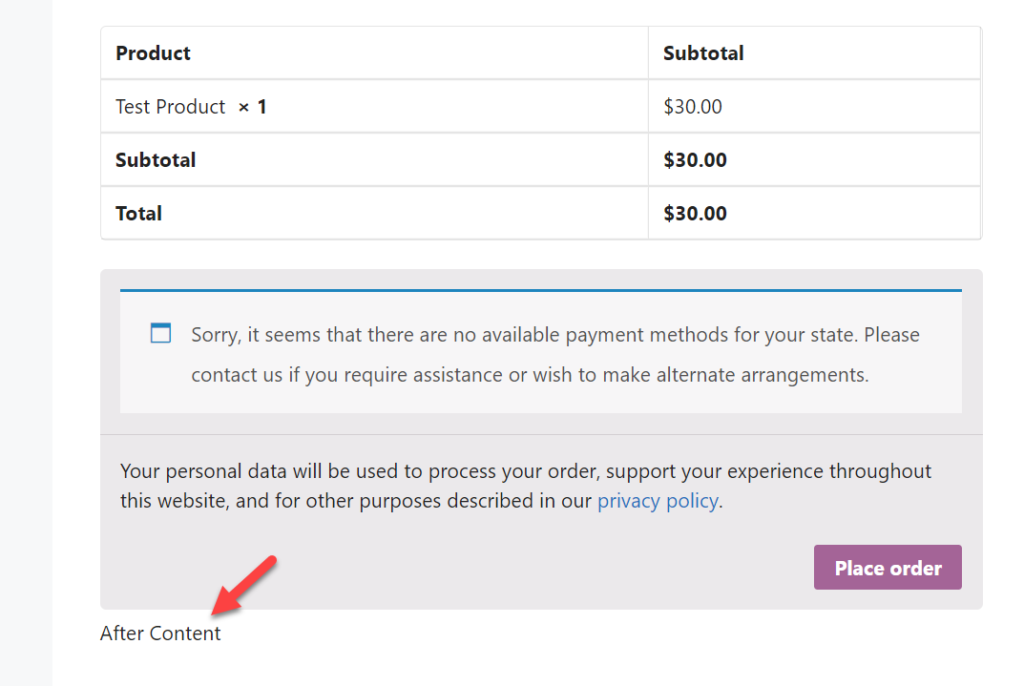
Similarly, you can add any type of content such as images, custom messages, coupon codes, and more to the checkout page.
How to Change the Error Message Position
By default, WooCommerce displays the error messages on the left-hand side. The good news is that you can change that with a bit of CSS. In this section, we will show you how you can change the error message position with a CSS snippet.
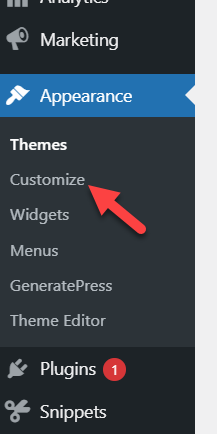
First, log in to your WordPress admin dashboard and go to Appearance > Customize.
Open the Customizer and go to the Additional CSS section.
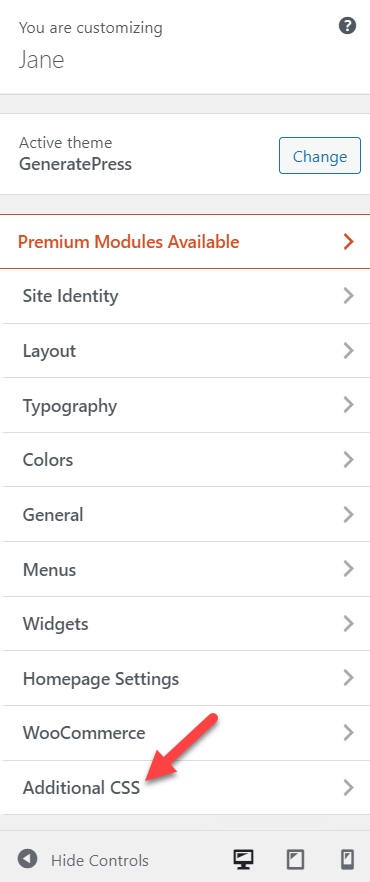
This is where you can add your CSS snippets. The WordPress customizer will display the changes in the live-preview section, so you can see every update in real-time.
Simply copy this snippet and paste it into the wizard.
form.checkout {
-ms-flex-wrap: wrap;
flex-wrap: wrap;
}.woocommerce-NoticeGroup-checkout {
-webkit-box-flex: 1;
-ms-flex: 1 1 100%;
flex: 1 1 100%;
max-width: 100%;
width: 100%;
margin-bottom: 40px;
margin-top:20px;
}
.woocommerce-NoticeGroup-checkout ul.woocommerce-error {
position: relative;
top:auto;
bottom: auto;
left:auto;
right:auto;
padding-right: 30px;
z-index: auto;
cursor: default;
-ms-transform: none;
transform: none;
-webkit-transform: none;
animation: none;
-webkit-animation: none;
}
.woocommerce-NoticeGroup-checkout ul.woocommerce-error:after {
content: none;
}
.woocommerce-NoticeGroup-checkout ul.woocommerce-error.hidden-notice {
animation: none;
-webkit-animation: none;
}
In this case, we’re giving the message a margin of 40 pixels on the bottom, 20 pixels at the top, 30 pixels of padding on the right, and 100% of width. Adjust these values according to your preferences and remember to save the changes.

Bonus: How to Hide WooCommerce Errors
Before we finish this guide, let’s have a look at a different alternative. What if instead of changing the WooCommerce checkout error messages you want to hide the error messages? If that’s your case, this section is for you. We will show you how to remove errors with a bit of code.
As we’ll edit some core files, make sure to create a full backup of your site and use a child theme if you don’t have one already.
To hide errors, we customize the wp-config.php file. First, we recommend downloading a copy of the wp-config.php file to your local computer to have a backup that you can restore if needed.
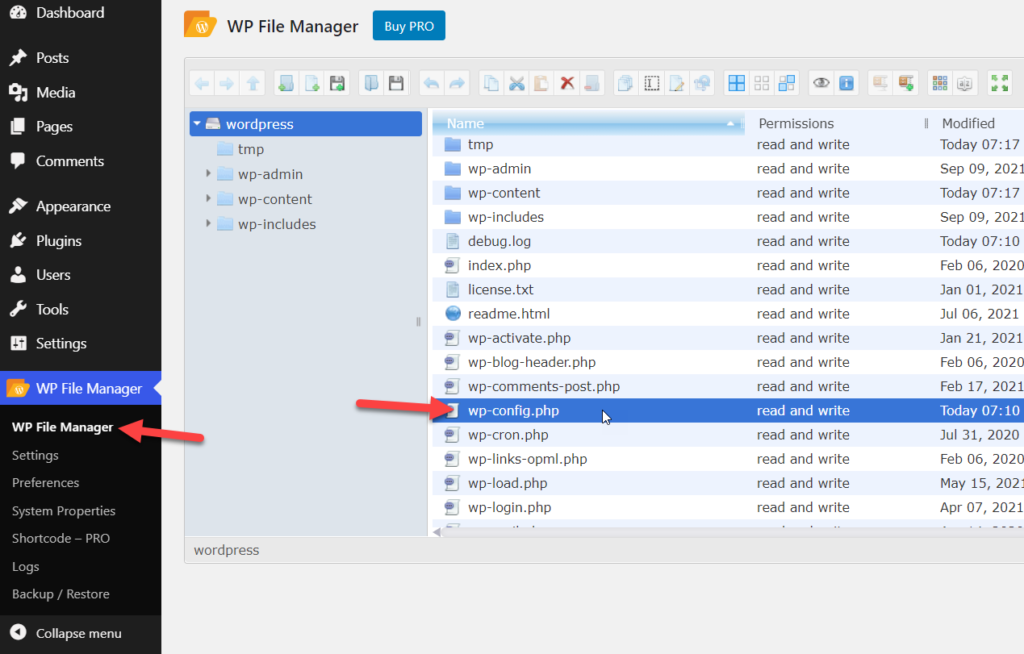
There are several ways to access WordPress core files. For this demo, we’ll use a dedicated plugin called File Manager. First, in your dashboard, go to Plugins > Add New and search for File Manager. Once you have found the plugin, install it and activate it on your website.
After activation, you will see the plugin’s configuration on the left-hand side. Look for the wp-config.php file.
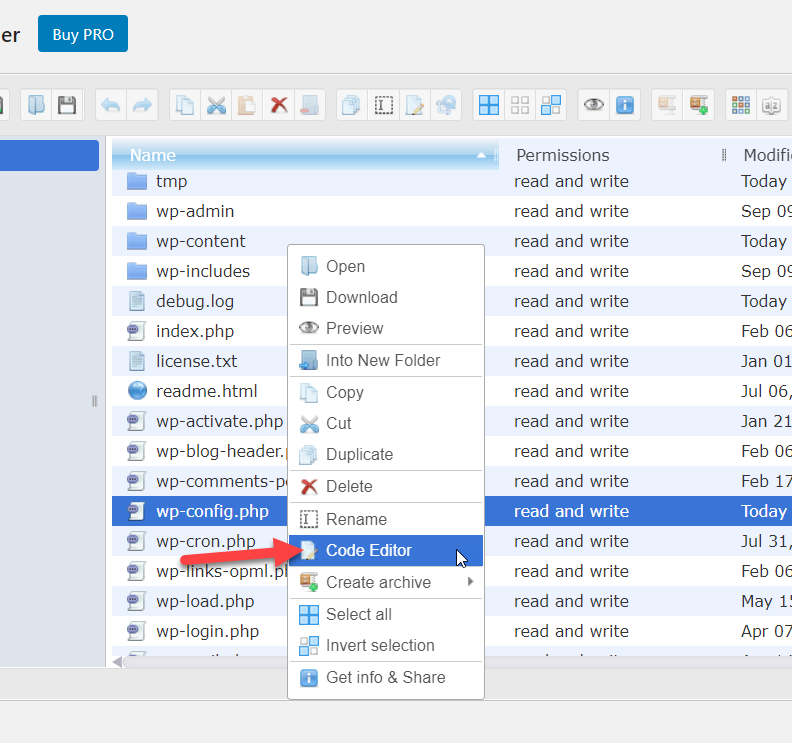
Right-click on the file and select the Code Editor option.
In the middle of the file, you will see one of the following lines:
define('WP_DEBUG', true);
or
define('WP_DEBUG', false);

Once you find it, replace that line with the following code and save the file:
ini_set('display_errors','Off');
ini_set('error_reporting', E_ALL );
define('WP_DEBUG', false);
define('WP_DEBUG_DISPLAY', false);
The code will turn off all the error messages.

That’s it! From now on, your store won’t display any error messages.
More ways to customize the checkout
Finally, let’s see other ways to further customize your WooCommerce checkout.
Add custom fields to checkout
In this section, we’ll show you how you can add custom fields to the checkout page.
As you can imagine, you can add many different types of fields. For this demonstration, we will add a custom checkbox at the end of the checkout page to give shoppers the option to subscribe to your newsletter and build your email list.
Simply paste the following script in the functions.php file of your child theme:
// checkbox field
add_action( 'woocommerce_after_order_notes', 'quadlayers_subscribe_checkout' );

function quadlayers_subscribe_checkout( $checkout ) {
woocommerce_form_field( 'subscriber', array(
'type' => 'checkbox',
//'required' => true,
'class' => array('custom-field form-row-wide'),
'label' => ' Subscribe to our newsletter.'
), $checkout->get_value( 'subscriber' ) );
}
As you can see, we’ve added the label “Subscribe to our newsletter” next to the checkbox. You can take this as a base and adapt it to your store.
Make fields optional
Another interesting option is to make mandatory fields optional. This way, you make shoppers fill in only the fields that are necessary for the transaction. This way you make the checkout process faster and improve customers’ experience.
If you sell virtual products, for example, you can make the Address field in the Billing section optional pasting the following code into the functions.php file of your child theme.
add_filter( 'woocommerce_billing_fields', 'wc_address_field_optional');
function wc_address_field_optional( $fields ) {
$fields['billing']['billing_address_1']['required'] = false;
return $fields;
}
For more information about this, check out our guide to customize the WooCommerce checkout.
Conclusion
In summary, by editing the checkout notices, you can add another customization layer to your checkout and stand out from your competitors.
In this guide, we’ve seen two main ways to change WooCommerce checkout error messages: using a dedicated plugin and programmatically with a bit of code. Using a plugin is a good alternative for those who don’t have coding skills or prefer to customize their stores in a few clicks.
On the other hand, if you have programming knowledge and don’t want to install more plugins, you can code your own solution. This gives you much more flexibility and allows you to do anything you want. Make sure that you paste the snippet into your child theme, so you don’t lose your customization after updating your parent theme.
We hope you have found this article helpful and learned how to change WooCommerce checkout error messages. If you did, please share this post with your friends on social media.
For more interesting articles, have a look at these posts:
- How to change Proceed to Checkout text
- Best WooCommerce checkout plugins
- How to create direct checkout links in WooCommerce
 If you are familiar with the Gutenberg editor, you probably know that there have been many issues regarding accessibility. One accessibility fix is the error notification system on the checkout page. The missing fields error show on top of the page when trying to place an order, but once you scroll down to fill them out again.
In this tutorial, you will learn how to change the error message on the WooCommerce Checkout page completely. Alternatively, you can set a reminder of which field is missing without having to scroll back up to check the error.
Stick to the end and see how you can change the checkout error messages.
WooCommerce Show Only One Error Message for WooCommerce Checkout Field
There are approximately 7 to 10 required fields on the WooCommerce Checkout page. This is how the errors are displayed: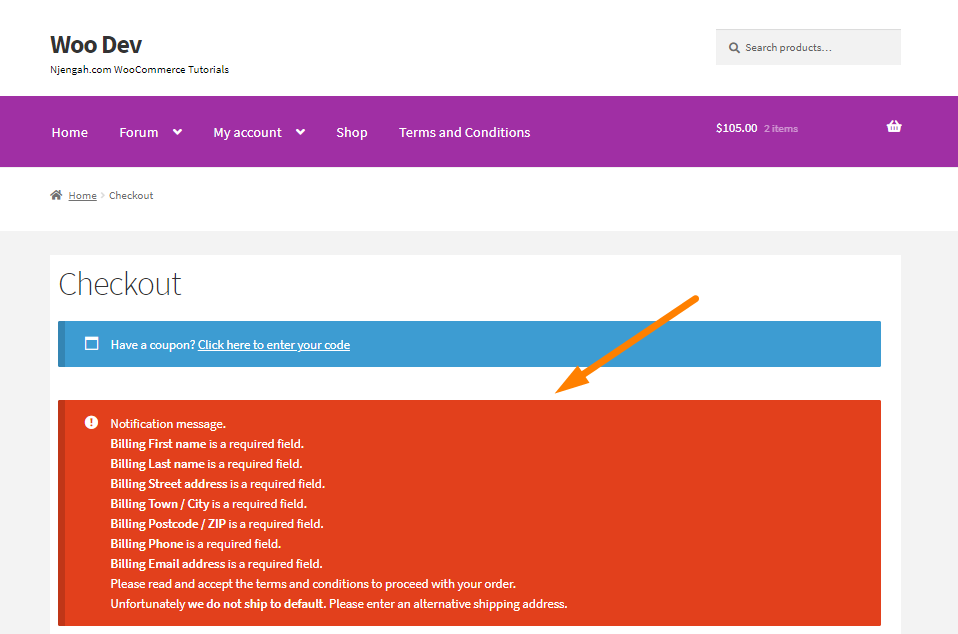
To replace the required field errors with one, here are the steps that you need to follow:
- Log into your WordPress site and access the dashboard as the admin user
- From the dashboard menu, click on the Appearance Menu > Theme Editor Menu. When the theme editor page is opened, look for the theme functions file with the extension functions.php. Open this functions file to add the function to show only one error message for the WooCommerce checkout field.
- Add the following code to the functions.php file:
function ShowOneError( $fields, $errors ){
// if their is any validation errors
if( !empty( $errors->get_error_codes() ) ) {
// remove all of Error msg
foreach( $errors->get_error_codes() as $code ) {
$errors->remove( $code );
}
// our custom Error msg
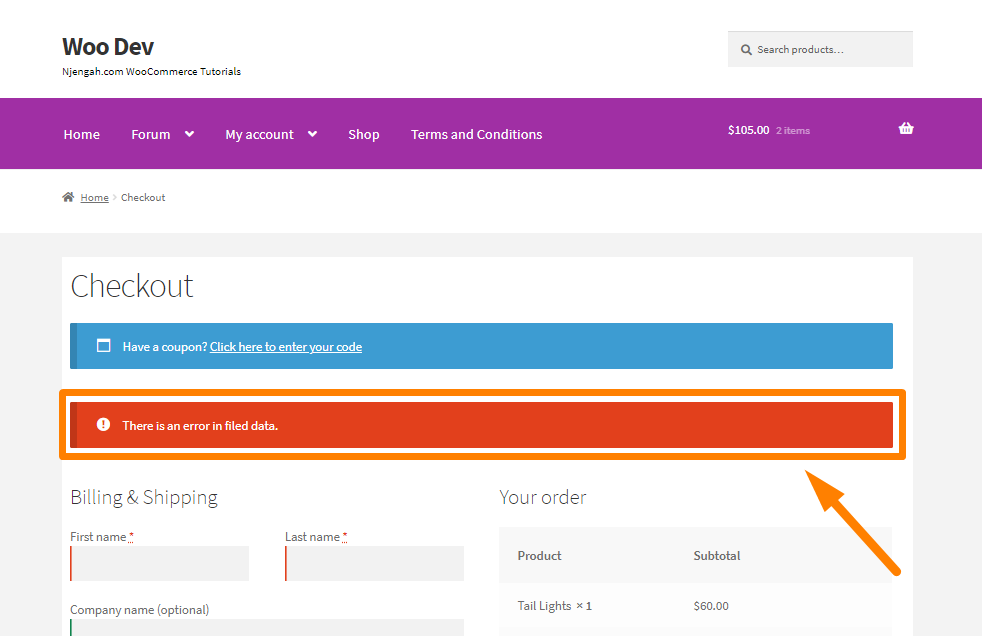
$errors->add('validation','There is an error in filed data.');
}
}
add_action('woocommerce_after_checkout_validation','ShowOneError',999,2);
- This is the outcome:

Conclusion
In summary, this post shares how you can change the required field error messages. This solution will help you to declutter the checkout page when there are many errors. Remember to place the PHP snippet at the bottom of your child theme functions.php file and update the file. Ensure that you know what you are doing when editing this file, as you can easily break down your site. If you need assistance, please consider hiring a WordPress developer.
Similar Articles
- How to Hide Shipping Rates if Free Shipping Available WooCommerce
- How to Hide Product Image on Cart Page WooCommerce
- How to Remove Cart Page WooCommerce Storefront Theme
- How to Send to Mpesa WooCommerce Payment for Free
- How to Hide Prices From Google In WooCommerce
- How to Change WooCommerce Storefront Layout
- How to Change WooCommerce Storefront Logo Size
- How to Hide Update Cart Button WooCommerce Cart Page
- How to Get Payment Methods in WooCommerce » Code Example
- How to Hide WooCommerce Product from Search Results
- How to Move Primary Menu Storefront WooCommerce
- How to Add Extra Field in WooCommerce Checkout Form
- How to Add a Trust or Secure Logo on WooCommerce Checkout Page
- How to Remove Checkout Button WooCommerce
- How to Display Error Message in WordPress : Debug WordPress Errors Quickly & Easily
- How to Hide, Change or Remove WooCommerce On Sale Badge
- How to Remove Has Been Added to Your Cart Message WooCommerce
- How to Hide Tax Label In WooCommerce
I’m trying to figure out where WooCommerce creates it’s messages for when there is a success, error or notice in WooCommerce. I want to edit those messages to fit the scenario more neatly and also edit the HTML. Where are these messages located and how do I edit them?
asked Oct 4, 2014 at 2:10
![]()
4
Many of them are directly in the plugin files — unfortunately. Some messages are tied to filter hooks that allow you to edit them without messing with plugin files but that’s not always the case.
The message you wanted to change was «Product Name was successfully added to your cart». This one is set in the function wc_add_to_cart_message in wc-cart-functions.php and this function allows you to change it using a filter:
wc_add_notice( apply_filters( 'wc_add_to_cart_message', $message, $product_id ) );
So in your functions.php file you could add something like:
add_filter('wc_add_to_cart_message', 'handler_function_name', 10, 2);
function handler_function_name($message, $product_id) {
    return "Thank you for adding product" . $product_id;
}
![]()
Rahil Wazir
9,92911 gold badges42 silver badges64 bronze badges
answered Oct 9, 2014 at 16:18
![]()
YavorYavor
6613 silver badges9 bronze badges
3
Open the plugin files and search for wc_add_notice:

This function has a filter:
apply_filters( 'woocommerce_add_' . $notice_type, $message );
The $notice_type is the second argument passed in all those occurrences.
Using something like this should work:
add_filter( 'woocommerce_add_error', function( $message ) {
    if( $message == 'Some message' )
        $message = '';

    return $message;
});
answered Oct 7, 2014 at 4:00
![]()
brasofilobrasofilo
25.2k15 gold badges90 silver badges178 bronze badges
4
The filters mentioned here work fine for editing the message itself, but if you want to edit the actual HTML markup containing the notice message, then you need to use the notice templates under templates > notices.
There are three different files here, each for the different kinds of notices. In my case, I wanted to add a class to the coupon applied successfully notice, so I copied success.php over into my theme file. My code then looked like below:
<?php foreach ( $messages as $message ) : ?>
    <?php
        $om_css_class = "";
        if ( $message == "Coupon code applied successfully." ) {
            $om_css_class = "coupon-notice-msg";
        }
    ?>
    <div class="woocommerce-message <?php echo $om_css_class; ?>"><?php echo wp_kses_post( $message ); ?></div>
<?php endforeach; ?>
answered Dec 23, 2015 at 4:59
![]()
I came across this answer and was able to implement for a production site. This answer is related to woocommerce error codes notices. You need to find the codes in the separate class files (~woocommerce/includes/). For my purpose the code was in ~woocommerce/includes/class-wc-coupon.php
/**
 * Modify the coupon errors:
*/

 add_filter( 'woocommerce_coupon_error', 'wpq_coupon_error', 10, 2 );

 function wpq_coupon_error( $err, $err_code ) {
  return ( '103' == $err_code ) ? '' : $err;
 }
Thanks to this page: http://wpquestions.com/WooCommerce_Remove_Coupon_code_already_applied_error_message/10598
answered Feb 19, 2017 at 21:26
![]()
user3795286user3795286
1461 silver badge14 bronze badges
I did it for error.php file. file path is woocommerce/templates/notices/error.php
<ul class="woocommerce-error" role="alert">
    <?php
  foreach ( $messages as $message ) :

  if($message=="<strong>Billing Email address</strong> is a required field.") { $message="<strong>Email address</strong> is a required field."; }?>
        <li><?php echo wp_kses_post( $message ); ?></li>
    <?php endforeach; ?>
</ul>
![]()
LuFFy
8,33110 gold badges38 silver badges59 bronze badges
answered Aug 31, 2018 at 6:11
![]()
The WooCommerce System Status report is useful for troubleshooting issues with your store. Containing a wide variety of information and tools, you can check software versions, server settings, and more from within.
To view your System Status report:
- Go to: WooCommerce > Status.
- Troubleshoot using the info below, before opening a ticket at Woo Support.
- Click Get System Report and then Copy for support to copy/paste it into your Support Request, if you’re still having issues. The information included will help our support team narrow down the issue much quicker.
This provides general information about your site and WordPress installation and features you have enabled.
| Field Name | Description | Example |
|---|---|---|
| WP address (URL) | URL of your site’s homepage. | https://example.com |
| Site address (URL) | Root URL of your site. | https://example.com |
| WC Version | Version of WooCommerce installed on your site. | 6.5.1 |
| WC REST API package | Version of WooCommerce REST API package installed on your site. | 6.5.1 /srv/htdocs/wp-content/plugins/woocommerce/packages/woocommerce-rest-api |
| WC Blocks package | Version of WooCommerce Blocks package installed on your site. | 7.4.3 /srv/htdocs/wp-content/plugins/woocommerce/packages/woocommerce-blocks/ |
| Action Scheduler package | Version of Action Scheduler package installed on your site. | 3.4.0 /srv/htdocs/wp-content/plugins/woocommerce/packages/action-scheduler |
| Log Directory Writable | Whether the WooCommerce log directory is writable, and the location. | ✔ /srv/www/wp-content/uploads/wc-logs/ |
| WP Version | Version of WordPress installed on your site. | 6.0 |
| WP Multisite | Whether you have WordPress Multisite enabled. | – (no) |
| WP Memory Limit | Maximum memory (RAM) that your site can use at one time. Learn how to increase this limit here. | 256 MB |
| WP Debug Mode | Displays whether WordPress is in Debug Mode. | – |
| WP Cron | Displays whether WordPress Cron is enabled. | ✔ |
| Language | Current language used by WordPress. Default = English | en_US |
| External Object Cache | Whether WordPress is using an external cache. | ✔ |
This provides general information about your server.
| Field Name | Description | Example |
|---|---|---|
| Server Info | Information about the webserver currently hosting your site. | nginx / apache |
| PHP Version | Version of PHP installed on your hosting server. | 8.1.5 |
| PHP Post Max Size | Largest file size that can be contained in one post. | 1 GB |
| PHP Time Limit | Amount of time in seconds that your site spends on a single operation before timing out (to avoid server lockups). | 1200 |
| PHP Max Input Vars | The maximum number of variables your server can use for a single function to avoid overloads. | 6144 |
| cURL Version | Version of cURL installed on your server, if any. | 7.83.0, OpenSSL/1.1.1o |
| SUHOSIN Installed | Suhosin is an advanced protection system for PHP installations. It was designed to protect your servers against a number of well-known problems in PHP applications; and also against potential unknown vulnerabilities within these applications or the PHP core itself. If enabled on your server, Suhosin may need to be configured to increase its data submission limits. More info at: Data not saving variations and rates. | – |
| MySQL Version | Version of MySQL installed on your hosting server. | 5.6.47-13.1.20 |
| Max Upload Size | Largest file size that can be uploaded to your WordPress installation. | 2GB |
| Default Timezone is UTC | Whether the timezone for your server is UTC. | ✔ |
| fsockopen/cURL | Payment gateways can use cURL to communicate with remote servers to authorize payments. Other plugins may also use it when communicating with remote services. | ✔ |
| SoapClient | Some Web services use SOAP to get information from remote servers, e.g., Live shipping quotes from FedEx require SOAP be installed. | ✔ |
| DOMDocument | HTML/Multipart emails use DOMDocument to generate inline CSS in templates. | ✔ |
| GZip | GZip (gzopen) is used to open the GEOIP database from MaxMind. | ✔ |
| Multibyte String | Multibyte String (mbstring) functions are used to support UTF-8 characters. | ✔ |
| Remote Post | PayPal uses this method of communication when sending back transaction information. More info at: wp_remote_post Codex page. | ✔ |
| Remote Get | WooCommerce plugins may use this method of communication when checking for updates. | ✔ |
This tells you your current database version, and lists all database tables and whether or not they exist.
| Field Name | Example |
|---|---|
| WC Database Version Version of WooCommerce that the database is formatted for. |
6.5.1 |
| Database prefix | wp_ |
| Total Database Size | 2.06MB |
| Database Data Size | 8.48MB |
| Database Index Size | 2.21MB |
| wp_woocommerce_sessions | Data: 0.02MB + Index: 0.02MB + Engine InnoDB |
| wp_woocommerce_api_keys | Data: 0.02MB + Index: 0.03MB + Engine InnoDB |
| wp_woocommerce_attribute_taxonomies | Data: 0.02MB + Index: 0.02MB + Engine InnoDB |
| wp_woocommerce_downloadable_product_permissions | Data: 0.02MB + Index: 0.06MB + Engine InnoDB |
| wp_woocommerce_order_items | Data: 0.02MB + Index: 0.02MB + Engine InnoDB |
| wp_woocommerce_order_itemmeta | Data: 0.02MB + Index: 0.03MB + Engine InnoDB |
| wp_woocommerce_tax_rates | Data: 0.02MB + Index: 0.06MB + Engine InnoDB |
| wp_woocommerce_tax_rate_locations | Data: 0.02MB + Index: 0.03MB + Engine InnoDB |
| wp_woocommerce_shipping_zones | Data: 0.02MB + Index: 0.00MB + Engine InnoDB |
| wp_woocommerce_shipping_zone_locations | Data: 0.02MB + Index: 0.03MB + Engine InnoDB |
| wp_woocommerce_shipping_zone_methods | Data: 0.02MB + Index: 0.00MB + Engine InnoDB |
| wp_woocommerce_payment_tokens | Data: 0.02MB + Index: 0.02MB + Engine InnoDB |
| wp_woocommerce_payment_tokenmeta | Data: 0.02MB + Index: 0.03MB + Engine InnoDB |
| wp_woocommerce_log | Data: 0.02MB + Index: 0.02MB + Engine InnoDB |
| wp_actionscheduler_actions | Data: 0.02MB + Index: 0.11MB + Engine InnoDB |
| wp_actionscheduler_claims | Data: 0.02MB + Index: 0.02MB + Engine InnoDB |
| wp_actionscheduler_groups | Data: 0.02MB + Index: 0.02MB + Engine InnoDB |
| wp_actionscheduler_logs | Data: 0.02MB + Index: 0.03MB + Engine InnoDB |
| wp_commentmeta | Data: 0.02MB + Index: 0.03MB + Engine InnoDB |
| wp_comments | Data: 0.02MB + Index: 0.09MB + Engine InnoDB |
| wp_links | Data: 0.02MB + Index: 0.02MB + Engine InnoDB |
| wp_mailchimp_carts | Data: 0.02MB + Index: 0.00MB + Engine InnoDB |
| wp_mailchimp_jobs | Data: 0.02MB + Index: 0.00MB + Engine InnoDB |
| wp_options | Data: 2.05MB + Index: 0.06MB + Engine InnoDB |
| wp_postmeta | Data: 0.06MB + Index: 0.03MB + Engine InnoDB |
| wp_posts | Data: 0.05MB + Index: 0.06MB + Engine InnoDB |
| wp_termmeta | Data: 0.02MB + Index: 0.03MB + Engine InnoDB |
| wp_terms | Data: 0.02MB + Index: 0.03MB + Engine InnoDB |
| wp_term_relationships | Data: 0.02MB + Index: 0.02MB + Engine InnoDB |
| wp_term_taxonomy | Data: 0.02MB + Index: 0.03MB + Engine InnoDB |
| wp_usermeta | Data: 0.02MB + Index: 0.03MB + Engine InnoDB |
| wp_users | Data: 0.02MB + Index: 0.05MB + Engine InnoDB |
| wp_wc_admin_notes | Data: 0.02MB + Index: 0.00MB + Engine InnoDB |
| wp_wc_admin_note_actions | Data: 0.02MB + Index: 0.02MB + Engine InnoDB |
| wp_wc_category_lookup | Data: 0.02MB + Index: 0.00MB + Engine InnoDB |
| wp_wc_customer_lookup | Data: 0.02MB + Index: 0.03MB + Engine InnoDB |
| wp_wc_download_log | Data: 0.02MB + Index: 0.03MB + Engine InnoDB |
| wp_wc_order_coupon_lookup | Data: 0.02MB + Index: 0.03MB + Engine InnoDB |
| wp_wc_order_product_lookup | Data: 0.02MB + Index: 0.06MB + Engine InnoDB |
| wp_wc_order_stats | Data: 0.02MB + Index: 0.05MB + Engine InnoDB |
| wp_wc_order_tax_lookup | Data: 0.02MB + Index: 0.03MB + Engine InnoDB |
| wp_wc_product_meta_lookup | Data: 0.02MB + Index: 0.09MB + Engine InnoDB |
| wp_wc_tax_rate_classes | Data: 0.02MB + Index: 0.02MB + Engine InnoDB |
| wp_wc_webhooks | Data: 0.02MB + Index: 0.02MB + Engine InnoDB |
This shows what post types exist in your store and how many posts exist within each type. Varies according to what plugins you have installed.
| Post Type Name | Count | |
|---|---|---|
| attachment | 16 | |
| customize_changeset | 3 | |
| nav_menu_item | 5 | |
| page | 7 | |
| post | 25 | |
| product | 36 | |
| product_variation | 4 | |
| scheduled-action | 2 | |
| shop_order | 10 |
Displays whether your connection is protected. Errors should be hidden from untrusted visitors trying to view your information.
| Security | ||
|---|---|---|
| Secure connection (HTTPS): | Is the connection to your store secure? | ✔ |
| Hide errors from visitors | Error messages can contain sensitive information about your store environment. These should be hidden from untrusted visitors. | ✔ |
This displays all plugins installed and active on your site. You can view current version numbers of your software and if any extensions have updates available.
| Active Plugins (5) | |
|---|---|
| Jetpack by WordPress.com | by Automattic – 10.9.1 |
| WooCommerce Blocks | by Automattic – 7.7.0 |
| WooCommerce | by Automattic – 6.5.1 |
| WooCommerce Stripe Gateway | by WooCommerce – 6.4.0 |
This displays all plugins installed but inactive on your site. You can view current version numbers of your software and if any extensions have updates available.
| Inactive Plugins (3) | |
|---|---|
| Classic Editor | by WordPress Contributors – 1.5 |
| Health Check & Troubleshooting | by The WordPress.org community – 1.4.2 |
| Homepage Control | by WooThemes – 2.0.3 |
These are in the wp-content but only specific file names. They replace/augment very specific functionality within WordPress.
| Dropin Plugins (1) | |
|---|---|
| object-cache.php | Memcached |
This shows general settings for your site.
| Field Name | Description | Example |
|---|---|---|
| API Enabled | Does your site have REST API enabled? | ✔ |
| Force SSL | Does your site force an SSL certificate for transactions? | ✔ |
| Currency | What currency are prices displayed in and payments processed in | USD ($) |
| Currency Position | Position of the currency symbol when displaying prices. | left |
| Thousands Separator | Character used for a thousands separator in displayed prices. | , |
| Decimal Separator | Character used for decimal points in displayed prices. | . |
| Number of Decimals | Places shown after decimal points in displayed prices. | 2 |
| Taxonomies: Product types | Terms used for product types/statuses | booking, bundle, external, grouped, simple, subscription, variable |
| Taxonomies: Product visibility | A list of terms used for product visibility. | exclude-from-catalog, exclude-from-search, featured, outofstock, rated-1, rated-2, rated-3, rated-4, rated-5. |
| Connected to WooCommerce.com | Are your sites connected to WooCommerce.com? | ✔ |
| Enforce Approved Product Download Directories: | Are Approved Product Download Directories being enforced? | – |
This shows page IDs and Permalinks designated as WooCommerce pages.
For example: If your site is https://example.com, a user would get to the Cart page by going to https://example.com/cart/
| Field Name | Description | Example |
|---|---|---|
| Shop Base | URL of your WooCommerce shop’s homepage (along with the Page ID). | #3 – /shop/ |
| Cart | URL of your WooCommerce shop’s cart (along with the page ID). | #4 – /cart/ |
| Checkout | URL of your WooCommerce shop’s checkout (along with the page ID). | #5 – /checkout/ |
| My Account | URL of your WooCommerce shop’s “My Account” Page (along with the page ID). | #6 – /my-account/ |
| Terms and conditions | URL of your Terms and conditions page. (along with the page ID). | #361 – /terms-and-conditions/ |
This displays information about the current theme running on your installation.
This could be a more problematic area of a site, as there is no standard on what themes should and should not do, and non-Woo themes can cause conflicts with WooCommerce or one of its extensions.
If you’re experiencing issues with your site, we recommend temporarily switching to the free Storefront Theme. If your problem is resolved while the Storefront theme is active, then the issue is with the theme. To resolve, check for updates or contact the theme developer to see if there is a fix.
| Field Name | Description | Example |
|---|---|---|
| Name | Name of the active theme. | Pharmacy |
| Version | Installed version of the current active theme. | 2.0.14 |
| Author URL | Developer or theme URL | https://woocommerce.com |
| Child Theme | Whether the active theme is a child theme, and what the parent theme is. | ✔ |
| Parent theme name: | Name of the parent theme. | Storefront |
| Parent theme version: | Version of the the parent theme. | 4.1.0 |
| Parent theme author URL: | Developer or theme URL of the parent theme. | https://woocommerce.com |
| WooCommerce Support | Whether the theme declares WooCommerce support. | ✔ |
This section shows any files that are overriding the default WooCommerce template pages, and also notes if the templates are outdated.
| Templates | |
|---|---|
| Overrides | child-theme/woocommerce/checkout/form-checkout.php |
If you are experiencing trouble with any of the pages displayed, switching to the Storefront theme will ensure that the original template files are used. For more information, see Fixing Outdated WooCommerce Template Files. For a long-term fix, you need to contact the theme developer.

This shows scheduled action counts with previous and most recent dates. For more technical information about the Action Scheduler and FAQ, please see ActionScheduler.org.
| Action Scheduler | ||||
|---|---|---|---|---|
| Version: | 3.4.0 | |||
| Data store: | ActionScheduler_HybridStore | |||
| Action Status | Count | Oldest Scheduled Date | Newest Scheduled Date | |
| Canceled | 3 | 2020-02-27 18:22:53 +0000 | 2020-08-29 14:18:37 +0100 | |
| Complete | 35,320 | 2020-02-20 10:01:00 +0000 | 2020-03-06 13:15:31 +0000 | |
| Failed | 68 | 2018-03-12 10:18:36 +0000 | 2019-11-28 13:26:52 +0000 | |
| Pending | 20 | 2020-03-06 13:16:31 +0000 | 2020-04-01 04:00:00 +0100 |
In the Tools tab are helpful buttons that can address items such as user capabilities and customer sessions.
With transients, you can clear both WooCommerce transients and all expired transients from WordPress with the Clear transients and the Clear expired transients buttons. Transients are a standardized way to store cached data temporarily in the database.
If you have a collection of variations that don’t have a parent you can remove those with one click using the Delete orphaned variations button. You can then order address indexes, which can help improve order search results.
Following that, you can recount terms and reset capabilities. Recounting terms can be useful if you change any settings that hide products from the catalog and have issues from that. And if you find any users that can’t access all of the WooCommerce admin pages, resetting capabilities can be used in that case.
Clear customer sessions will remove any session data from the database. This includes any carts your customers are currently working on so use with caution.
Our next useful tool is the Create default WooCommerce pages button, if you’re having issues with WooCommerce pages or don’t want to create them one by one again you can select Install pages and it will create any missing WooCommerce pages. Pages already defined and set up won’t be replaced.
After that, you can delete all the tax rates you’ve set in WooCommerce. If you were going to delete them anyway use this tool versus going through each tax class and remove those rates one by one.
Finally, you can delete WebHook logs and reset the usage tracking settings. When you first installed WooCommerce you may have opted in to send us non-sensitive data that helps us make WooCommerce better for everyone. You can opt-out now by resetting your usage tracking settings.
The Logs tab is where WooCommerce keeps logs of all events happening in your store. Some logs, like fatal-errors are kept automatically, while others, like those for payment gateways, first need to be enabled in the relevant extension’s settings.
In the dropdown, you can choose the logs you want to see, then select the View button to see events captured there. This can be useful to get exact errors with timestamps on parts of your store.

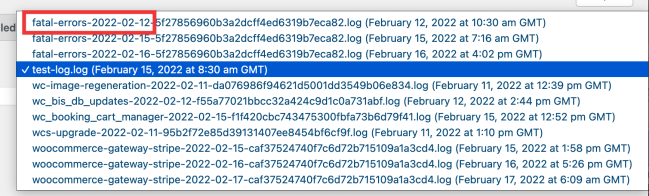
If your site experiences a fatal error, they may be logged here under a log named fatal-errors. This is useful when debugging.
By default, logs are kept for 30 days before being purged as of WooCommerce 3.4. This can be changed using the woocommerce_logger_days_to_retain_logs filter which defaults to 30.
There may be many logs depending on which extensions are installed and enabled for debug logging. For support purposes, the most relevant logs are usually the one with fatal-errors in the name, plus the log named for the extension in question. Any log with a date relevant to when the error occurred would be of interest though. Notice how the name of the log is followed by a date.
Users of WooCommerce Services have a fifth tab that allows you to check the health of Services, specific Services in use, a debugging section, and more.
Health displays the status of connected parts – if anything with WooCommerce or Jetpack needs attention, and if Services is up or down.
Services display how specific Services are doing. Perhaps they’re unused, have an error needing attention, or working fine. You can enable debug logging to capture issues, and also contact our Support team to help configure your printer for printing shipping labels.

 — Posted on May 18, 2022 —
Need to Change WooCommerce Coupon Error Messages?
WooCommerce is absolutely the most popular online store solution for WordPress users all over the world.
If you are using WooCommerce to sell your products or services online there’s a good chance that you are also using the built-in coupon system to provide discounts and special offers to your customers.
With this built-in coupon system there are pre-written error codes that will display when a coupon is not applied correctly to a customer’s order.
Take a look at the image below as an example of one of these are messages that a customer may see when trying to apply a WooCommerce coupon to their order.

There’s no native way to edit the messages that are displayed when there is a coupon error. So we wanted to put together a post that will show you how you can change these messages to anything you desire.
STEP #1 – Change WooCommerce Coupon Error Messages
In order to change WooCommerce coupon error messages you will need access to the functions. PHP file of your active theme. You can gain access to this file within your hosting control panels file manager or connecting to your website files using an FTP program.
Once you have connected and have access the functions.php file of your active theme you will need to paste in the custom function below into this file and re-save it and then re-upload it to your server.
function coupon_error_message_change($err, $err_code, $WC_Coupon) {
    switch ( $err_code ) {

//CHANGE HIGHLIGHTED COUPON CODE

        case $WC_Coupon::E_WC_COUPON_NOT_EXIST:

            $err = 'YOUR CUSTOM MESSAGE HERE';
    }
    return $err;
}

add_filter( 'woocommerce_coupon_error','coupon_error_message_change',10,3 );
There are two areas in the code snippet above that you will customize based on which WooCommerce coupon messages you wish to edit.
STEP #2 – Change WooCommerce Coupon Error Messages
The first piece will be the coupon code which is the call for the error message depending on which error is being triggered with the applied coupon.
The second area in this custom function that you will change will be the custom coupon message you wish to display to your customers when the error is triggered with an applied coupon.
Below is the list of coupon codes and the original message that will display which is built into WooCommerce.
This information below is from WooCommerce version 6.5.1.
COUPON CODE:
INVALID_FILTERED

ORIGINAL MESSAGE:
Coupon is not valid.
___________________________________

COUPON CODE:
NOT_EXIST

ORIGINAL MESSAGE:
Coupon "%s" does not exist!
___________________________________

COUPON CODE:
INVALID_REMOVED

ORIGINAL MESSAGE:
Sorry, it seems the coupon "%s" is invalid - it has now been removed from your order.
___________________________________

COUPON CODE:
NOT_YOURS_REMOVED

ORIGINAL MESSAGE:
Sorry, it seems the coupon "%s" is not yours - it has now been removed from your order.
___________________________________

COUPON CODE:
ALREADY_APPLIED

ORIGINAL MESSAGE:
Coupon code already applied!
___________________________________

COUPON CODE:
ALREADY_APPLIED_INDIV_USE_ONLY

ORIGINAL MESSAGE:
Sorry, coupon "%s" has already been applied and cannot be used in conjunction with other coupons.
___________________________________

COUPON CODE:
USAGE_LIMIT_REACHED

ORIGINAL MESSAGE:
You have already used this coupon and that is the maximum usage.
___________________________________

COUPON CODE:
EXPIRED

ORIGINAL MESSAGE:
This coupon has expired.
___________________________________

COUPON CODE:
MIN_SPEND_LIMIT_NOT_MET

ORIGINAL MESSAGE:
The minimum spend for this coupon is %s.
___________________________________

COUPON CODE:
MAX_SPEND_LIMIT_MET

ORIGINAL MESSAGE:
The maximum spend for this coupon is %s.
___________________________________

COUPON CODE:
NOT_APPLICABLE

ORIGINAL MESSAGE:
Sorry, this coupon is not applicable to your cart contents.
___________________________________

COUPON CODE:
USAGE_LIMIT_COUPON_STUCK

ORIGINAL MESSAGE:
Coupon usage limit has been reached. If you were using this coupon just now but order was not complete, you can retry or cancel the order by going to the <a href="%s">my account page</a>.
STEP #3 – Change WooCommerce Coupon Error Messages
What you have finalized your custom function with the coupon error code and the custom message you wish to display you just want to make sure you save your functions.php file and load it back up on the server.
If you get stuck trying to implement this please feel free to comment below and we can give you some guidance. Enjoy!
Do all this above with a plugin we created for FREE
If you would like to bypass all the extra steps of hard coding these functions into your theme file you can simply use the free plugin that we created which is hosted at wordpress.org.

If you wish to do this for multiple coupon codes you can duplicate this function and give it a unique function name.
Сообщения woocommerce — система сопроводительной информации при использовании интернет-магазина. В системе есть 3 типа сообщений: информационные (notice), успешные действия (success), ошибки/предупреждения (error)
Стандартные сообщения
Это перечень стандартных сообщений разделенных по типам.
Информационные сообщения:
- У вас есть купон? Нажмите здесь для введения кода (Оформление)
- Товаров, соответствующих вашему запросу, не обнаружено. (Категория без товаров, Результат поиска)
- Оформление заказа не доступно, пока ваша корзина пуста. (Оформление, переадрессация на пустую корзину)
- Заказов ещё не создано. Перейти в магазин (Личный кабинет/Заказы)
Сообщения при успешных действиях
- Корзина обновлена. (Корзина)
- Вы отложили “Товар” в свою корзину. (Страница товара)
- Товар удален. Отменить? (Страница товара, Архив)
- Product correctly added to cart (Архив). Сообщение появляется при добавлении товара в корзину. Изначально данное уведомление не выводится. Начинает выводится если переместить уведомления в пользовательский хук, который идет раньше woocommerce (см. ниже)
Ошибки/предупреждения
- К сожалению, у нас недостаточно «Наименование товара» для выполнения заказа (в наличии 3). Пожалуйста, измените свой заказ и попробуйте ещё раз. Приносим извинения за доставленные неудобства. (Корзина)
- Вы не можете добавить это количество в корзину — у нас в наличии 3, у вас в корзине уже 3. (Страница товара)
- Платёж Ваш телефон (название поля) является обязательным для заполнения полем. (Оформление)
- Введите код купона, пожалуйста. (Корзина, Оформление)
- Купона «123456» не существует! (Корзина, Оформление)
- Жаль, но этот купон не может быть использован для товаров, которые находятся у вас в корзине. (Корзина, Оформление)
- Этот товар не может быть куплен. (Категория)
- Пожалуйста, укажите опции товара… (Категория)
Пользовательские сообщения
Создадим пользовательские сообщения. Как пример, сообщение появляется на странице Оформление товара.
// Информационное сообщение
add_action( 'woocommerce_before_checkout_form', 'skyverge_add_checkout_notice', 11 );
function skyverge_add_checkout_notice() {
	wc_print_notice( __( 'Сообщение уведомления вместо', 'woocommerce' ), 'notice' );
}

// Сообщение success
add_action( 'woocommerce_before_checkout_form', 'skyverge_add_checkout_success', 9 );
function skyverge_add_checkout_success() {
	wc_print_notice( __( 'Вы находитесь на странице оформления', 'woocommerce' ), 'success' );
}

// Сообщение предупреждение/ошибка
add_action( 'woocommerce_review_order_before_payment', 'skyverge_before_paying_notice' );
function skyverge_before_paying_notice() {
	wc_print_notice( __( 'Сообщение об ошибке', 'woocommerce' ), 'error' );
}
Условия появления сообщений
Сообщения на сайте появляются на определенных страницах при каких-либо условиях. Исследуем это.
function sp_custom_notice() {
$subtotal = WC()->cart->get_cart_subtotal();
$free_shipping_threshold = 5000;
if ( $subtotal < $free_shipping_threshold ) {
wc_add_notice( 'Сумма покупки больше 5000 руб. Бесплатная доставка!', 'notice' );
}
}

add_action( 'wp', 'sp_custom_notice' );
Вообще у пользовательских сообщений woocommerce странная логика, на них некорректно действуют условия. В данном случае проще использовать пользовательские функции с условием.
Отключить сообщения
В карточке товара и в архивах уведомления отключаются так:
remove_action( 'woocommerce_before_shop_loop', 'wc_print_notices', 10 ); remove_action( 'woocommerce_before_single_product', 'wc_print_notices', 10 );Чтобы отключить уведомления в корзине, нужно в файле cart.php закомментировать строку wc_print_notices();
При этом, если закомментировать ту же строку в файле form-checkout.php для отключения сообщений на странице Оформления товара — это не сработает. Уведомления все равно выводятся.
Перенести (пока не знаю зачем это может пригодиться) уведомления в пользовательский хук «выше» вывода woocommerce
remove_action( 'woocommerce_before_shop_loop', 'wc_print_notices', 10 ); remove_action( 'woocommerce_before_single_product', 'wc_print_notices', 10 ); add_action( 'body-after', 'wc_print_notices', 10 ); add_action( 'body-after', 'wc_print_notices', 10 );Сообщение «товар добавлен в корзину..»
Отключить это уведомление
// Удалить сообщение «Товар добавлен в корзину..»
add_filter( 'wc_add_to_cart_message_html', '__return_null' );
Редактировать его
add_filter( 'wc_add_to_cart_message_html', 'bbloomer_custom_add_to_cart_message' );

function bbloomer_custom_add_to_cart_message() {
$message = 'Nicely done!' ;
return $message;
}
Сообщение «товар удален. Вернуть?»
Отключить это сообщение
// Отключить уведомление о том что товар удален
function sw_delete_remove_product_notice(){
	$notices = WC()->session->get( 'wc_notices', array() );
	if(isset($notices['success'])){
		for($i = 0; $i < count($notices['success']); $i++){
			if (strpos($notices['success'][$i], __('removed','woocommerce')) !== false) {
				array_splice($notices['success'],$i,1);
			}
		}
		WC()->session->set( 'wc_notices', $notices['success'] );
	}
}

add_action( 'woocommerce_before_shop_loop', 'sw_delete_remove_product_notice', 5 );
add_action( 'woocommerce_shortcode_before_product_cat_loop', 'sw_delete_remove_product_notice', 5 );
add_action( 'woocommerce_before_single_product', 'sw_delete_remove_product_notice', 5 );
Убрать слово Billing из уведомления об обязательных полях при оформлении
function customize_wc_errors( $error ) {
    if ( strpos( $error, 'Billing ' ) !== false ) {
        $error = str_replace("Billing ", "", $error);
    }
    return $error;
}
add_filter( 'woocommerce_add_error', 'customize_wc_errors' );
Спасибо! Наш менеджер свяжется с Вами в течении 5 минут.
Where possible, the WooCommerce Quantity Manager plugin encourages customers to add the correct quantities to the cart without displaying an error. For example:
- The available values in the quantity selectors reflect the current rules. For example, if there is a product or variation-level step value of 5 then the initial quantity value will appear as 5, and the up/down arrows should change the quantity in multiples of 5. (However, this isn’t done for global/category step values because this is calculated across multiple products.)
- It is coded to prevent people from finding workarounds to break the rules — for example, if the minimum quantity is 5 then they cannot type ‘2’ directly into the quantity field.
Where it is not possible to avoid an error, then WooCommerce Quantity Manager will display a prominent error message. This will always be worded appropriately and contains clear information on what the customer needs to do in order to complete their purchase.
Error message locations
Error messages are displayed in the following locations:
- Global and category-level rules — The errors appear on the cart page, after the customer tries to add a product to the cart. This is because the global and category-level rules are calculated across multiple products, so it is not possible to control the customer’s behavior on the single product page.
- Product and variation-level rules — The errors should inline as soon as you try to add an invalid quantity to the cart.
- Other plugins — When you use WooCommerce Quantity Manager with compatible plugins such as WooCommerce Restaurant Ordering, WooCommerce Product Table, WooCommerce Quick View Pro and WooCommerce Bulk Variations, the error messages appear in the appropriate location for that plugin.
Error message wording
The error messages which appear directly on the quantity picker if you try to type an invalid quantity come from the user’s browser, and cannot be changed. The errors which appear in boxes are set by WooCommerce Quantity Manager.
The plugin has the following built-in error messages:
| Type of error | Error location | Wording |
| Global order quantity rule not met | Cart page | «Your cart must contain [between X and X products; at least X products; X products or less] before you can complete your order.» |
| Global order value rule not met | Cart page | «Your cart total must be [between $X and $X; at least $X; $X or less] before you can complete your order.» |
| Global quantity increment rule not met | Cart page | «The total number of items in your cart must be a multiple of X before you can complete your order.» |
| Category quantity rule not met | Cart page | «Your cart must contain [between X and X items; at least X items; X items or less] from the {category-name} category before you can complete your order.» |
| Category order value rule not met | Cart page | «Your total spend from the {category-name} category must be [between $X and $X; at least $X; $X or less] before you can complete your order.» |
| Category quantity increment rule not met | Cart page | «The number of items from the {category-name} category must be a multiple of X before you can complete your order.» |
| Product/variation quantity rules not met | Cart page | «Your cart must contain [between X and X units; at least X units; X units or less] of {product-or-variation-name} before you can complete your order.» |
| Product/variation value rules not met | Cart page | «You must spend [between $X and $X; at least $X; $X or less on {product-or-variation-name}] before you can complete your order.» |
| Product/variation quantity increment rule not met | Cart page | «The quantity of {product-or-variation-name} must be a multiple of X before you can complete your order.» |
| Adding products to the cart is restricted by the global order quantity | Adding to cart | «You cannot add this product because the cart has a maximum quantity of X.» |
| Adding products to the cart is restricted by the global order value | Adding to cart | «You cannot add this product because the cart value must be less than $X.» |
| Adding products to the cart is restricted by the category quantity | Adding to cart | «You cannot add this product because your cart cannot contain more than X products from the {category-name} category.» |
| Adding products to the cart is restricted by the category value | Adding to cart | «You cannot add this product because the value of items from the {category-name} category must be less than $X.» |
| Maximum product/variation quantity exceeded | Adding to cart | «You cannot add this product because it has a maximum quantity of X.» |
| Maximum product/variation value exceeded | Adding to cart | «You cannot add this product because it has a maximum value of X.» |
FAQ
Can I change the wording of the error messages?
The error messages have been worded to be suitable for all types of business. You can translate them into other languages by using a string translation plugin like Loco Translate or Translate Words, which is ideal whether you are just rewording the error messages in the same language, or translating them into another languages.
If you are creating a multilingual site then please also our article on translating WooCommerce Quantity Manager.
How are the error messages styled?
WooCommerce itself has an error class which controls how the errors are styled. We use this for the quantity-related error messages, which helps to create a consistent look and feel across your store.
If your theme has added any custom styling for the WooCommerce errors then these should be used for your quantity errors too.
Can customers check out if they haven’t met the quantity rules?
No — WooCommerce Quantity Manager prevents customers from completing their purchase until all the quantity rules are met. For example, if a customer clicks on a link to the checkout then they will be redirected back to the cart, which will display an error message with information about what changes are needed in order to proceed.
Can multiple errors appear at the same time?
WooCommerce Quantity Manager works hard to prevent the need for multiple errors to be displayed at the same time, even if the customer breaks several quantity rules at once. Where possible, it combines errors in a single notification box, while providing clear information about what changes are required in order to complete the purchase.
Related Articles
If searching the knowledge base hasn’t answered your question, please contact support.
Updated on June 9, 2022
I decided to publish a separate tutorial where we are going to talk about WooCommerce checkout form AJAX validation. Some of the fields in this form already has some default validation like email or zip-code validation, I will show you how to turn it off if you wish and how to add some custom validation rules as well.
Turn off Default Validation
If you need to remove validation for some of WooCommerce checkout fields, let’s say email, phone or postcode, all you have to do is to remove validate parameter from a field. You can do it in woocommerce_checkout_fields filter hook.
Phone number validation
By default WooCommerce allows you to use only numbers, - and _ for your phone number. If you input some letters into the fields, you will get an error like this.

/**
 * Turn off checkout phone number validation
 *
 * @author Misha Rudrastyh
 * @link https://rudrastyh.com/woocommerce/custom-checkout-validation.html#phone-number-validation
 */
add_filter( 'woocommerce_checkout_fields', 'misha_no_phone_validation' );

function misha_no_phone_validation( $fields ) {
	// billing phone
	unset( $fields[ 'billing' ][ 'billing_phone' ][ 'validate' ] );
	// shipping phone
	unset( $fields[ 'shipping' ][ 'shipping_phone' ][ 'validate' ] );

	// uncomment the following lines if you would like to make a phone field optional
	//unset( $fields[ 'billing' ][ 'billing_phone' ][ 'required' ] );
	//unset( $fields[ 'shipping' ][ 'shipping_phone' ][ 'required' ] );

	return $fields;
}
ZIP code validation
WooCommerce validates postcode automatically for some countries only. Anyway, you can still completely turn it off.
/**
 * Remove checkout ZIP code validation
 *
 * @author Misha Rudrastyh
 * @link https://rudrastyh.com/woocommerce/custom-checkout-validation.html#zip-code-validation
 */
add_filter( 'woocommerce_checkout_fields', 'misha_no_zip_validation' );

function misha_no_zip_validation( $fields ) {
	// billing postcode
	unset( $fields[ 'billing' ][ 'billing_postcode' ][ 'validate' ] );
	// shipping postcode
	unset( $fields[ 'shipping' ][ 'shipping_postcode' ][ 'validate' ] );

	return $fields;
}
Remove email validation
/**
 * Remove email validation
 *
 * @author Misha Rudrastyh
 * @link https://rudrastyh.com/woocommerce/custom-checkout-validation.html#email-validation
 */
add_filter( 'woocommerce_checkout_fields', 'misha_no_email_validation' );

function misha_no_email_validation( $fields ) {

	unset( $fields[ 'billing' ][ 'billing_email' ][ 'validate' ] );
	unset( $fields[ 'shipping' ][ 'shipping_email' ][ 'validate' ] );

	return $fields;
}
Custom Checkout Validation
You can also validate custom checkout fields or default ones with your own validation. And now we are about to create one. My goal would be to check both first name and last name fields to make sure that there are no numbers entered, only letters.
When creating custom validation rules, we’re using woocommerce_after_checkout_validation, not woocommerce_checkout_fields by the way.
/**
 * Custom validation for billing first name and last name fields
 *
 * @author Misha Rudrastyh
 * @link https://rudrastyh.com/woocommerce/custom-checkout-validation.html#custom-validation
 */
add_action( 'woocommerce_after_checkout_validation', 'misha_validate_fname_lname', 10, 2 );

function misha_validate_fname_lname( $fields, $errors ){

    if ( preg_match( '/\d/', $fields[ 'billing_first_name' ] ) || preg_match( '/\d/', $fields[ 'billing_last_name' ] ) ){
        $errors->add( 'validation', 'Your first or last name contains a number. Really?' );
    }
}
If you’re creating validation rules for a custom field, you can also get it from the $fields array, like $fields[ 'custom_checkout_field' ].
Here is my result:

JavaScript validation
Did you notice something weird on the previous screenshot? 😁 No? Do you see that the error message says that either first name or last name is incorrect, but both of the fields are highlighted in green, not in red?
Let me show what I mean:

Much better, huh? How to implement it?
WooCommerce JavaScript validation function is in checkout.js but it only checks if email matches the pattern and if the required fields are not empty. We have to add some custom JavaScript somewhere to create our own validation function. All we need is to operate with two wrapper classes: woocommerce-validated and woocommerce-invalid.
Below is a very simple example for the Billing Last Name field, you can improve this code for any field if you want.
$( 'body' ).on( 'blur change', '#billing_last_name', function(){
	const wrapper = $(this).closest( '.form-row' );
	// you do not have to removeClass() because Woo do it in checkout.js
	if( /d/.test( $(this).val() ) ) { // check if contains numbers
		wrapper.addClass( 'woocommerce-invalid' ); // error
	} else {
		wrapper.addClass( 'woocommerce-validated' ); // success
	}
});
Just in case if you do not know where to put the code – you can insert it to any of your website existing JS files or even to website wp_footer().
And here is the complete code.
<?php
/**
 * Custom validation for billing first name and last name fields
 *
 * @author Misha Rudrastyh
 * @link https://rudrastyh.com/woocommerce/custom-checkout-validation.html#custom-validation
 */
add_action( 'woocommerce_after_checkout_validation', 'misha_validate_fname_lname', 10, 2 );

function misha_validate_fname_lname( $fields, $errors ){

    if ( preg_match( '/\d/', $fields[ 'billing_first_name' ] ) || preg_match( '/\d/', $fields[ 'billing_last_name' ] ) ){
        $errors->add( 'validation', 'Your first or last name contains a number. Really?' );
    }
}

add_action( 'wp_footer', function(){

	// we need it only on our checkout page
	if( ! is_checkout() ) {
		return;
	}

	?>
	<script>
	jQuery(function($){
		$( 'body' ).on( 'blur change', '#billing_last_name', function(){
			const wrapper = $(this).closest( '.form-row' );
			// you do not have to removeClass() because Woo do it in checkout.js
			if( /d/.test( $(this).val() ) ) { // check if contains numbers
				wrapper.addClass( 'woocommerce-invalid' ); // error
			} else {
				wrapper.addClass( 'woocommerce-validated' ); // success
			}
		});
	});
	</script>
	<?php
} );
How to Show Only One Error Message?
Below on the screenshot is what I mean:

So, how to prevent it and display just one error message instead?

Easy peasy 😁
add_action( 'woocommerce_after_checkout_validation', 'misha_one_err', 9999, 2);

function misha_one_err( $fields, $errors ){

	// if any validation errors
	if( ! empty( $errors->get_error_codes() ) ) {

		// remove all of them
		foreach( $errors->get_error_codes() as $code ) {
			$errors->remove( $code );
		}

		// add our custom one
		$errors->add( 'validation', 'Please fill the fields!' );

	}

}
Please note, that the above code removes all types of errors, not only “this field is required” kind of stuff. So, you can check what type of error it is before removing it.
Types of errors:
required-fieldterms(Terms and Conditions checkbox)payment
So, you can add a condition like this for example:
if( 'terms' !== $code ) {
	$errors->remove( $code );
}
# WooCommerce, Checkout, Checkout Fields

Misha Rudrastyh
Hey guys and welcome to my website. For more than 10 years I’ve been doing my best to share with you some superb WordPress guides and tips for free.
Need some developer help? Contact me
Follow me on Twitter
Woocommerce Checkout — Display custom inline error messages (including custom validation messages)
This file contains bidirectional Unicode text that may be interpreted or compiled differently than what appears below. To review, open the file in an editor that reveals hidden Unicode characters.
Learn more about bidirectional Unicode characters
| <?php | |
| /** | |
| * adds custom js file to handle inline error messages | |
| */ | |
| add_action( ‘woocommerce_after_checkout_form’, ‘add_custom_validation_script’, 20 ); | |
| function add_custom_validation_script() { | |
| wp_enqueue_script( | |
| ‘inline_validation_script’, | |
| get_stylesheet_directory_uri() . ‘/js/inline-validation.js’, | |
| [‘jquery’] | |
| ); | |
| } | |
| /** | |
| * adds error message field element to get inline error messages working | |
| * | |
| * @param array $fields | |
| * @param object $errors | |
| */ | |
| add_filter( ‘woocommerce_form_field’, ‘add_inline_error_messages_element’, 10, 4 ); | |
| function add_inline_error_messages_element( $field, $key, $args, $value ) { | |
| if ( strpos( $field, ‘</span>’ ) !== false ) { | |
| $error = ‘<span class=»js-custom-error-message» style=»display:none»></span>’; | |
| $field = substr_replace( $field, $error, strpos( $field, ‘</span>’ ), 0); | |
| } | |
| return $field; | |
| } | |
| /** | |
| * process custom checkout validations | |
| * | |
| * @param array $fields | |
| * @param object $errors | |
| */ | |
| add_action(‘woocommerce_after_checkout_validation’, ‘custom_checkout_validations’, 10, 2); | |
| function custom_checkout_validations($data, $errors) | |
| { | |
| $your_custom_checkout_field = filter_input(INPUT_POST, ‘your_custom_input_field’); | |
| // your custom validations goes here | |
| // this is an example to check for the length of the string | |
| if ( !empty($your_custom_checkout_field) && strlen($your_custom_checkout_field) > 50 ) { | |
| $errors->add(‘your_custom_input_field’, __(‘This field needs to be max 50 chars’, ‘YourThemeName’)); | |
| } | |
| // this loop adds a data array to all error messages which will be applied as a «data-error-for» HTML attribute | |
| // to read out the corresponding field ids with javascript and display the error messages inline | |
| foreach( $errors->errors as $original_key => $error ) { | |
| $field_key = $original_key; | |
| // filter and rewrite the field id for native woocommerce error messages with a key containing _required | |
| if(strpos($original_key, ‘_required’) !== false) { | |
| $field_key = str_replace(‘_required’,», $original_key); | |
| $error[0] = __(‘This is a required field’, ‘YourThemeName’); | |
| } | |
| // switch out the old error messages with the ones including a spiced up data array | |
| // to display with javascript | |
| $errors->remove($original_key); | |
| $errors->add($original_key, trim($error[0]), [‘error-for’ => $field_key . ‘_field’]); | |
| } | |
| } |
This file contains bidirectional Unicode text that may be interpreted or compiled differently than what appears below. To review, open the file in an editor that reveals hidden Unicode characters.
Learn more about bidirectional Unicode characters
| jQuery(function ($) { | |
| ‘use strict’; | |
| addInlineMessages(); | |
| // Implementation | |
| // Listen to js event | |
| $(document.body).on(‘updated_checkout’, function() { | |
| addInlineMessages(); | |
| }); | |
| function addInlineMessages() { | |
| var woocommerceErrorsEl = $(‘.woocommerce-error’); | |
| var woocommerceInlineErrorsEl = $(‘li[data-error-for]’, woocommerceErrorsEl); | |
| var inlineErrorMessagesEl = $(‘.js-custom-error-message’); | |
| // as we use ajax submitting hide old validation messages | |
| if(inlineErrorMessagesEl.length) { | |
| inlineErrorMessagesEl.hide(); | |
| } | |
| if(woocommerceInlineErrorsEl.length) { | |
| woocommerceInlineErrorsEl.each(function () { | |
| var errorEl = $(this); | |
| var errorText = $.trim(errorEl.text()); | |
| var targetFieldId = errorEl.data(‘error-for’); | |
| if(errorText && targetFieldId) { | |
| var targetFieldEl = $(‘#’ + targetFieldId); | |
| var errorMessageField = $(‘.js-custom-error-message’, targetFieldEl); | |
| if(targetFieldEl.length && errorMessageField.length) { | |
| targetFieldEl.removeClass(‘woocommerce-validated’); | |
| targetFieldEl.addClass(‘woocommerce-invalid’); | |
| errorMessageField.text(errorText); | |
| errorMessageField.show(); | |
| errorEl.hide(); | |
| } | |
| } | |
| }); | |
| if(woocommerceInlineErrorsEl.filter(‘:visible’).length === 0) { | |
| woocommerceErrorsEl.hide(); | |
| if(inlineErrorMessagesEl.filter(‘:visible’).length > 0) { | |
| scrollToElement(inlineErrorMessagesEl.filter(‘:visible’).first()); | |
| } | |
| } else { | |
| $(‘li:not([data-error-for])’, woocommerceErrorsEl).hide(); | |
| scrollToElement(woocommerceErrorsEl); | |
| } | |
| } | |
| } | |
| function scrollToElement(el) { | |
| if(el.length) { | |
| $([document.documentElement, document.body]).animate({ | |
| scrollTop: el.offset().top — 100 | |
| }, 2000); | |
| } | |
| } | |
| // event listeners | |
| $(document.body).on(‘checkout_error’, function (event) { | |
| jQuery(‘html, body’).stop(); | |
| addInlineMessages(); | |
| }); | |
| }); |