В этом уроке я покажу вам несколько способов, как вы сможете добавить какой-нибудь произвольный текст или HTML-код на страницу «Спасибо» в WooCommerce.
И прежде, чем мы приступим, я бы хотел порекомендовать вам свой видеокурс по WooCommerce, который доступен по этой ссылке.
Начнём вот с такого нехитрого примера:

woocommerce_before_thankyou в теме Storefront, готовый код чуть ниже.
Для того, чтобы добавить текст как на скриншоте, вы можете использовать код:
add_action( 'woocommerce_before_thankyou', 'truemisha_before_thankyou', 25 );

function truemisha_before_thankyou( $order_id ) {
	echo '<h2>20% на следующую покупку!</h2>';
	echo '<p>Мы благодарим вас за покупку и поэтому дарим вам промокод "<strong>PROMO20</strong>" на получение 20% скидки на вашу следующий заказ!</p>';
}
А вот и полный набор хуков изменения и добавления текста на странице «Заказ принят»:
woocommerce_before_thankyou– ну этот мы и использовали с вами в примере – позволяет добавить текст или HTML прямо в самом начале страницы «Спасибо», сразу после заголовка.woocommerce_thankyou– то же самое, только в самом конце странице.woocommerce_thankyou_ПЛАТЁЖНЫЙ ШЛЮЗ, напримерwoocommerce_thankyou_paypal– позволяет вывести что-либо в конце страницы «Спасибо» в зависимости от используемого метода оплаты покупателем, как узнать ярлык метода оплаты вы можете найти в этом уроке.
Каждый из перечисленных выше экшн-хуков имеет один и тот же параметр – $order_id (ID заказа).
Как изменить или удалить текст «Спасибо, ваш заказ был принят»
Ещё на самом первом скриншоте этого урока вы могли заметить, что сразу после нашего добавленного текста есть ещё какая-то строчка «Спасибо, ваш заказ был принят», так вот, это автоматический текст WooCommerce, который был в шаблоне, но благодаря фильтр-хуку woocommerce_thankyou_order_received_text мы можем изменить его или удалить.
Меняем текст:
add_filter( 'woocommerce_thankyou_order_received_text', 'truemisha_thank_you_text', 25 );

function truemisha_thank_you_text( $order ) { // объект заказа доступен внутри
	return 'Спс!';
}
Если хотите удалить, то можете просто возвратить пустую стркоу, но к сожалению оборачивающие этот текст теги <p> никуда не денутся, возможно придётся применить CSS.

Миша
Впервые познакомился с WordPress в 2009 году. Организатор и спикер на конференциях WordCamp. Преподаватель в школе Нетология.
Пишите, если нужна помощь с сайтом или разработка с нуля.
This repository has been archived by the owner on Aug 10, 2022. It is now read-only.
Permalink
Cannot retrieve contributors at this time
WooCommerce Custom Thank You
The WooCommerce Custom Thank You extension enables you to do the following things:
- Set a global «Thank You» page to redirect customers to after checkout.
- Set a custom «Thank You» page on a per-product basis.
This is handy when you want to:
- Send a customer to a page outlining your fulfillment process.
- Prompt a customer to sign up for you mailing list.
- Give a customer a list of next steps (installation instructions, course reading, etc.) post-purchase.
Installation
- Upload the
woocommerce-custom-thank-youdirectory into the/wp-content/plugins/directory. - Activate the plugin through the «Plugins» menu in WordPress.
- Set a global «Thank You» page under «WooCommerce -> Settings -> General -> General options». (Optional, but suggested)
Setting a custom «Thank You» page
- Edit an individual product.
- In the «Product data — Simple product» meta box, enter a page into the «Thank you redirect» field.
- Update the product.
Custom «Thank You» page customizations
Since this plugin overwrites the default WooCommerce thank you page, we have included four shortcodes that you can use to display order details to your customers. They are:
[woo_order_details]— The standard WooCommerce thank you page receipt view[woo_order_stub]— A short, one line order synopsis containing: order number, order date, customer email, order total, payment method[woo_order_table]— A table containing: a list of purchased products with prices, order subtotal, shipping cost, payment method, order taxes, order total[woo_customer_details]— A brief collection of customer details such as: customer name, customer email, billing address
Notes
- Setting a global or custom «Thank You» page overrides the normal «Order received» display post-checkout.
- If a customer has multiple products with multiple custom thank you pages in their cart, the global default is used.
Screenshots
Global setting

Product setting


Checkout with thank you redirect set

Shortcodes
[woo_order_stub]

[woo_order_table]

[woo_customer_details]

This repository has been archived by the owner on Aug 10, 2022. It is now read-only.
Permalink
Cannot retrieve contributors at this time
WooCommerce Custom Thank You
The WooCommerce Custom Thank You extension enables you to do the following things:
- Set a global «Thank You» page to redirect customers to after checkout.
- Set a custom «Thank You» page on a per-product basis.
This is handy when you want to:
- Send a customer to a page outlining your fulfillment process.
- Prompt a customer to sign up for you mailing list.
- Give a customer a list of next steps (installation instructions, course reading, etc.) post-purchase.
Installation
- Upload the
woocommerce-custom-thank-youdirectory into the/wp-content/plugins/directory. - Activate the plugin through the «Plugins» menu in WordPress.
- Set a global «Thank You» page under «WooCommerce -> Settings -> General -> General options». (Optional, but suggested)
Setting a custom «Thank You» page
- Edit an individual product.
- In the «Product data — Simple product» meta box, enter a page into the «Thank you redirect» field.
- Update the product.
Custom «Thank You» page customizations
Since this plugin overwrites the default WooCommerce thank you page, we have included four shortcodes that you can use to display order details to your customers. They are:
[woo_order_details]— The standard WooCommerce thank you page receipt view[woo_order_stub]— A short, one line order synopsis containing: order number, order date, customer email, order total, payment method[woo_order_table]— A table containing: a list of purchased products with prices, order subtotal, shipping cost, payment method, order taxes, order total[woo_customer_details]— A brief collection of customer details such as: customer name, customer email, billing address
Notes
- Setting a global or custom «Thank You» page overrides the normal «Order received» display post-checkout.
- If a customer has multiple products with multiple custom thank you pages in their cart, the global default is used.
Screenshots
Global setting
Product setting
Checkout with thank you redirect set
Shortcodes
[woo_order_stub]
[woo_order_table]
[woo_customer_details]
- Download the .zip file from your WooCommerce Account.
- On your WordPress Dashboard, go to Plugins > Add New and click Upload Plugin – choose the .zip file you have downloaded.
- Proceed to install and activate the extension.
For additional information see also Install and Activate Plugins/Extensions.
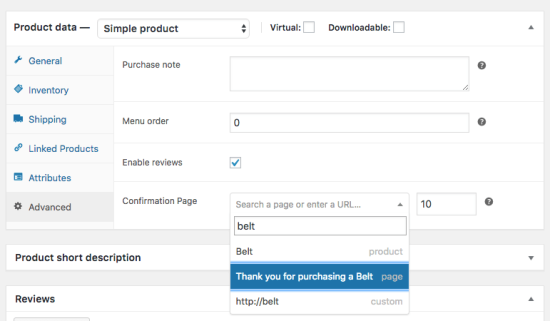
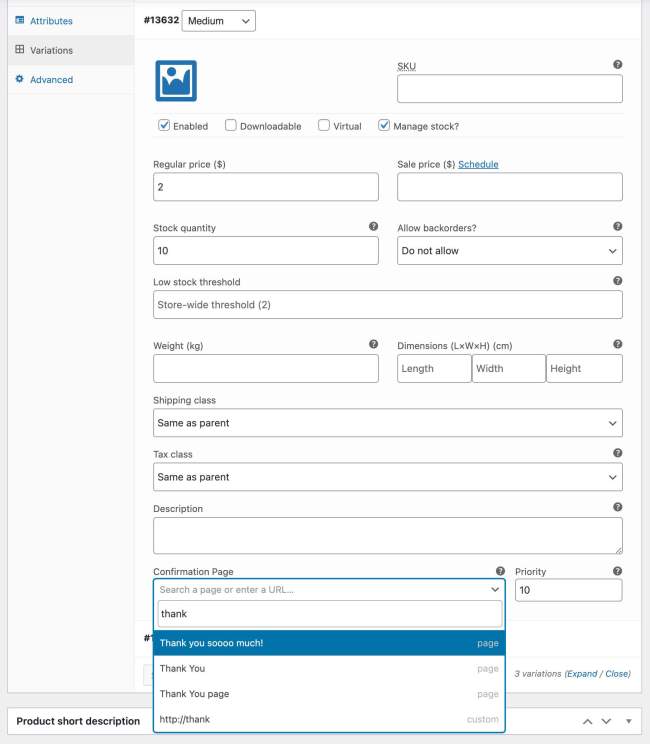
Thank you pages can be configured from the ‘Advanced’ section on every product, and the variation settings for each variation. There you’ll have a field where a custom URL can be entered, or searched for any page, post or custom post type.

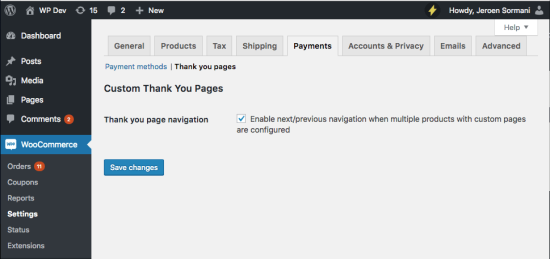
Above you can configure the different custom confirmation page(s) per product and variation. A global custom thank you page that applies to all products can also be configured. The setting for this can be found at WooCommerce > Settings > Payments (previously Checkout) > Thank you pages.

All fields have a ‘priority’ setting included. This setting determines the priority in which the thank you page will be picked / showing. The order is ascending, so starting with 0 it will display that confirmation page first, and the page with priority 10 after that.p
When a variable product has both a thank you page configured in the product and in the variation it will only take the thank you page from the variation, the product one will be ignored. When no specific thank you page is configured for the variation, but there is one for the variable product, it will use that one.
The Custom Thank You Pages for products are also configurable using the well known WordPress quick and bulk edit features.
When a customer purchases multiple products that have custom thank you pages configured there are two ways to handle that.
The redirect pages are sorted by their priority from low to high. When only wanting to show one thank you page it will show the first in line, so the page with the lowest priority.
There’s also a possibility to show multiple thank you page. In the WooCommerce > Settings > Payments > Thank you pages section there is a setting to enable “Thank you page navigation”. When enabled and multiple products with custom thank you pages configured are purchased it will add a navigation to the top of the thank you page which will allow the customer to navigate between the different thank you pages. These are sorted according to the priority that can be configured individually.
Here’s an example where I’ve purchased two products with different thank you pages and the setting enabled.

The following shortcodes can be used to display details of the order;
This shortcode can be used for many different details. The {KEY} needs to be replaced by one of the values below to determine what will be displayed by the shortcode. The following keys are available:
- ‘id’
- ‘order_number’
- ‘order_date’
- ‘total’
- ‘subtotal’
- ‘payment_method’
- ‘shipping_method’
- ‘status’
- ‘quantity’
- ‘shipping_address’
- ‘billing_address’
- ‘download_urls’
- ‘gateway_action’ – Performs actions related to the payment gateway, e.g. outputs bank details when BACS is used
- ‘thankyou_action’ – Performs the ‘woocommerce_thankyou’ action
- ‘thankyou_order_received_text’ – Output text that can be specific for payment gateways
For example, to display the order date, use the shortcode:
[order_detail key="order_date"]
This is for those who need additional order details and are comfortable getting in a bit more detail/depth. The [order_detail] shortcode offers dynamic retrieval of data based on the methods available in the WC_Order class. Any method that starts with get_* can be used in the ‘key’ attribute to output its return value.
E.g. the method get_billing_email exists in the WC_Order class. In order to use the value returned from this, you can simply use [order_detail key="billing_email"] (omitting the ‘get_’ part).
These are ALL the available methods
This displays the standard order details table and details that is used on the default thank you page.
![Example of the standard output of the [confirmation_order_details] shortcode](https://woocommerce.com/wp-content/uploads/2018/11/custom-thank-you-page-standard-order-details-shortcode.png?w=550)
This displays a page switcher when there are multiple thank you pages available. The setting already does this automatically, but if you want to position it somewhere differently you can use this shortcode.
Have a question before you buy? Please fill out this pre-sales form.
Already purchased and need some assistance? Get in touch with the developer via the Help Desk.

-
#1
После подтверждения заказа клиентом его пересылает на пустую корзину. Как сделать, чтобы отправляло на другую страницу?
-
#15
в functions.php шаблона добавить
add_filter('woocommerce_get_checkout_order_received_url','my_order_received_url',0,2);
function my_order_received_url($return_url, $order){
    if( preg_match('~/order-received/d+?~', $return_url) ){
        $return_url = str_replace('?','&',$return_url);
        $return_url = str_replace('/order-received/','/?order-received=',$return_url);
    }
    return $return_url;
}
-
#2
Неужто никто не знает?
Вот нарыл код в инете :
function mysite_woocommerce_order_status_completed( $order_id ) {
error_log( "Order complete for order $order_id", 0 );
}
add_action( 'woocommerce_order_status_completed',
'mysite_woocommerce_order_status_completed' );
Может тогда кодеры подскажут что можно написать вместо error_log? Ну хотя бы алерт с текстовкой «заказ номер 6677 принят на обработку».
Последнее редактирование модератором: 22 Март 2016

-
#3
blacksm, сделайте сами сенкс пэйдж и пересылайте на нее…
-
#4
Fishka, как пересылать на нее? Страница у меня уже есть. Сейчас ситуация такая что после нажатия посылает в пустую корзину, а как переслать на мою страницу я не знаю.
Вот только что определил что если из payment.php убрать
<?php do_action( ‘<?php do_action( ‘woocommerce_review_order_before_submit’ ); ?>’ ); ?>
то заказ не будет создаваться. Как изменить этот
<?php do_action( ‘woocommerce_review_order_before_submit’ ); ?>
?
Последнее редактирование модератором: 22 Март 2016

-
#5
blacksm, Пользуйтесь специальными кнопками в редакторе для вставки кода. Под «+» есть кнопка для вставки кода.
В интернете нашел Редирект (перенаправление) в Woocommerce после покупки:
add_action( 'template_redirect', 'wc_custom_redirect_after_purchase' );
function wc_custom_redirect_after_purchase() {
    global $wp;

    if ( is_checkout() && ! empty( $wp->query_vars['order-received'] ) ) {
        wp_redirect( 'http://www.yoururl.com/your-page/' );
        exit;
    }
}
Проверять некогда, да и не на чем. Так что тестируйте. По результатам будьте добры напишите тут, что у вас получилось.
-
#6
В@Попай, ничего не происходит. Вернее все происходит как раньше. Так как опыта с WP практически нет, то не сразу понял что происходит. Теперь думаю я понял в чем проблема: вместо точно чтобы переходить на так называемый эндпоинт «/checkout/order-received/» (в котором объявляется клиенту выполнившему заказ благодарность) — сайт перенаправляет клиента на эндпойнт «/cart/». А вот в коде происходит это неправильное перенаправления я так и не могу найти. Может кто знает?
Вот эндпоинты которые прописаны у меня в настройках woocom merce:

Эндпоинты оформления заказа
Эндпоинты добавляются к URL вашей страницы для обработки определенных действий в процессе оформления заказа. Они должны быть уникальными.
Оплатить = order-pay
Заказ принят = order-received
Добавить метод оплаты = add-payment-method
-
#7
blacksm, Ради вас поставил себе тестовый сайт с Woocommerce. Протестировал и все нормально работает, перекидывает на yoururl.com/your-page/ Так что смотрите у себя настройки Woocommerce, что-то вы там намудрили.
-
#8
blacksm, Ради вас поставил себе тестовый сайт с Woocommerce. Протестировал и все нормально работает, перекидывает на yoururl.com/your-page/ Так что смотрите у себя настройки Woocommerce, что-то вы там намудрили.
1. Это при использовании хука «wc_custom_redirect_after_purchase»?
2. Это же сайт посвященный WordPress-у. Странно если бы тут все были те у кого на сайте джумла установлена!!!! Я к тому что и у админов должен был быть WP где-то в доступе.
-
#9
blacksm, Да. Вот ничего не настраивал. Вставил только код, который вам привел. Провел тестовую покупку и все переадресовалось.
-
#10
Так или иначе проблема все равно существует. Сегодня поставил на отдельном сервере wp/wc/мою тему и использовал как первоначальный источник. Подменил файлы на своем сайте из свежеустановленного сервера- проблема сохранилась((( теперь думаю что возможно проблема либо в плагине которого либо в БД. буду рыть, обязательно отпишусь
-
#11
и использовал как первоначальный источник. Подменил файлы на своем сайте из свежеустановленного сервера- проблема сохранилась(((
Вот тут я не понял, что вы вообще делали. Я не написал, может вы не так делаете. Код который я приводил выше надо вставлять в функцию functions.php вашего шаблона. И все чистый WP и чистый WC больше ничего и всё должно работать.
-
#12
Вот тут я не понял, что вы вообще делали
. Я не написал, может вы не так делаете. Код который я приводил выше надо вставлять в функцию functions.php вашего шаблона. И все чистый WP и чистый WC больше ничего и всё должно работать.
Я понял, что Вы установили с нуля wp/wc и проверили тот хук про который я говорил. Результатом Вашей проверки оказалось что все работает. Тогда вопрос почему у меня не работает? я решил что проблема в каком-нибудь шаблоне или скрипте. Чтобы это отсечь я взял тоже чистую сборку и начал из нее брать файлы и заменять на моем рабочем сайте. Оказалось что дело не в шаблонах/скриптах — проблема сохранилась.
________теперь решение_________
Сейчас я перебрал все установленные плагины на рабочем сайте — сначала отключил все и потом по одному начал включать и проверять. Оказалось что проблема в плагине WooCommerce Custom Payment Gateways. Этот плагин добавляет дополнительные методы оплаты. Если пользователь при оформлении заказа выбирает метод созданный при помощи этого плагина, то он после оформления заказа попадает в пустую корзину. Если пользователь выбирает один из стандартных методов оплаты (я имею ввиду те методы которые по умолчанию включены в wc) то работает и хук и без хука.
В настройках каждого метода оплаты (сделанного при помощи этого плагина) есть поле Instructions (Instructions that will be added to the thank you page.) Теперь видимо я начну читать инструкцию к данному плагину, так как отказаться от него не могу.
-
#13
Рад, что нашли причину проблемы.
Только можно было немного облегчить поиски, не надо было по очереди заменять файлы шаблона, а сразу установить шаблон по умолчанию от WordPress. Если все заработало, то проблема в шаблоне. Если нет, то уже отключаем все плагины и смотрим результат. Если заработало, то по очереди включаем плагины и отслеживаем работу. Если и с отключенными плагинами не заработало, то чешем репу и думаем дальше, что за херня творится. Но главное не паниковать и идем сюда на форум просим о помощи. Найдутся добрые люди, которые всегда помогут. Я обычно так делаю.
-
#14
ну и собственно чтобы закрыть тему решением ее явилось редактирование способа оплаты (плагины->редактор->WooCommerce Custom Payment Gateways->выбрать нужный метод и изменить в нем перенаправление на такое :
// Remove cart
//$woocommerce->cart->empty_cart();
WC()->cart->empty_cart();

// Return thankyou redirect
return array(
'result' => 'success',
'redirect' => $this->get_return_url( $order )
);
Последнее редактирование модератором: 23 Март 2016