Some Office users are complaining that whenever they try to print documents with their home or work printers, the reference field disappears completely and all the reference text reads “Error Reference Source Not found“. This is reported to occur with Word. This problem is not exclusive to a certain Windows or Office version since is reported to occur on Windows 7, Windows 8.1 and Windows 10 with various Office versions including Office 2010, Office 2013 and Office 2016.

What is causing the Error Reference Source Not Found an error?
We investigated this particular by looking at various user reports and the repair strategies that are commonly being used to either fix or circumvent this particular issue. Based on our investigations, there are several potential different culprits that are known to trigger this error message:
- Cross-referenced bookmark has been deleted – In most cases, the error message appears when a cross-referenced bookmark has been deleted. If this scenario is applicable, you will be able to resolve the issue by unlocking the affected fields and update them to a healthy state manually or by using a third-party tool. Additionally, you can lock the fields prior to printing the document.
- Corrupted Office installation – There are some reports of people saying the issue can also occur due to a corrupted Office installation. Whenever this occurs, healthy cross-reference fields are triggering this error message. In this case, you can resolve the issue by repairing the Office installation.
If your situation is similar and you’re struggling to resolve this exact issue, this article will provide you with several troubleshooting steps that will help you fix the problem. Down below, you’ll discover a collection of methods that other users in a similar situation have successfully used. In fact, every method featured below is confirmed to be effective by at least one user.
In order to remain as efficient as possible, we advise you to follow the methods in the order that they are presented because they are ordered by efficiency and difficulty. One of them is bound to resolve the issue since we tried to cover every possible scenario.
Method 1: Locking the fields before printing (temporary fix)
If you’re looking for a temporary fix that will allow you to print the document in quickly and without the Error Reference Source Not Found by locking the field prior to printing the document. Several users that tried to resolve the very same issue have reported that this issue was effective in allowing them to circumvent the issue.
Note: Keep in mind that this fix is only a workaround and doesn’t fix the underlying problem that is triggering the error message. If you’re looking for a viable fix (not a workaround), move down to the next method below.
Here’s a quick guide on locking the fields prior to printing the documents:
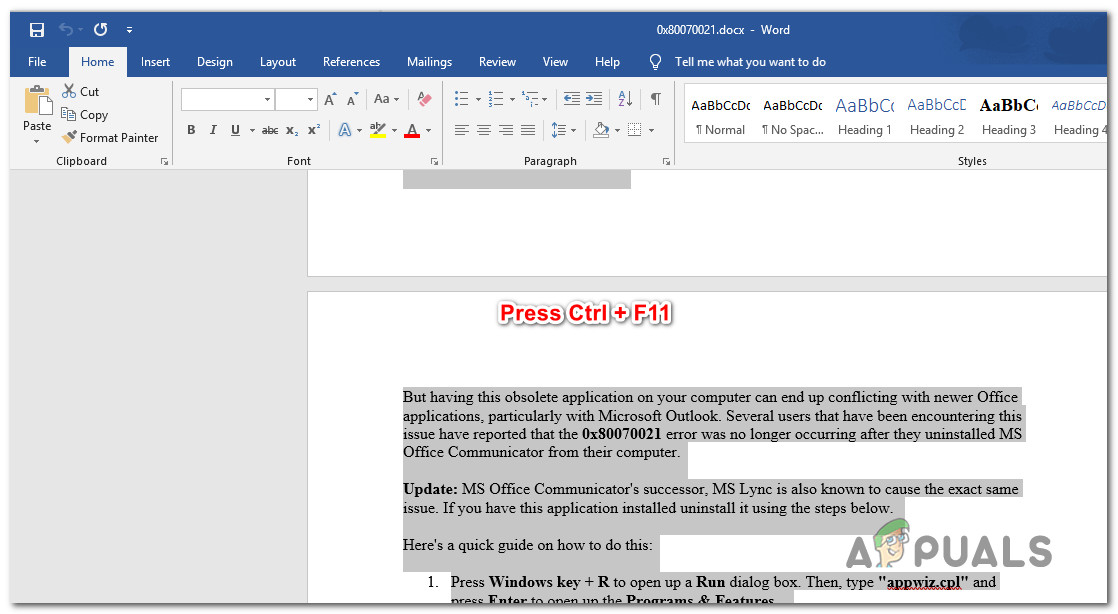
- Open the document in your Word application.
- Select the whole document by pressing Ctrl + A or by using your mouse.
- Once the whole document is selected, press Ctrl + F11 to lock the cross-reference (REF) fields.

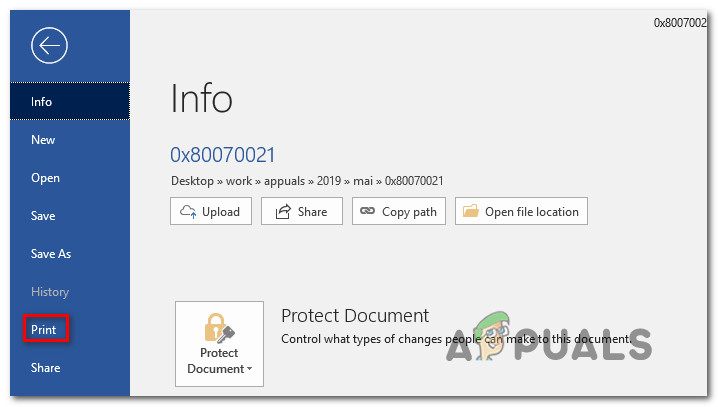
Selecting the whole documents and locking the REF fields - When the cross-reference fields have been locked, go to File (using the ribbon-bar at the top) and click on Print.

Printing the Word document - Once the document is physically printed, see if the Error Reference Source Not Found message has been resolved.
If you’re still seeing the same message or you’re looking for a permanent fix, move down to the next method below.
Method 2: Removing all broken references manually
If you’re dealing with cross-reference (REF) fields, chances are you’re struggling with the issue because the bookmarks have been deleted from the document. In this case, the most efficient fix is to unlock the fixes and then update them until they no longer contain errors.
Here’s a quick guide on how to do this:
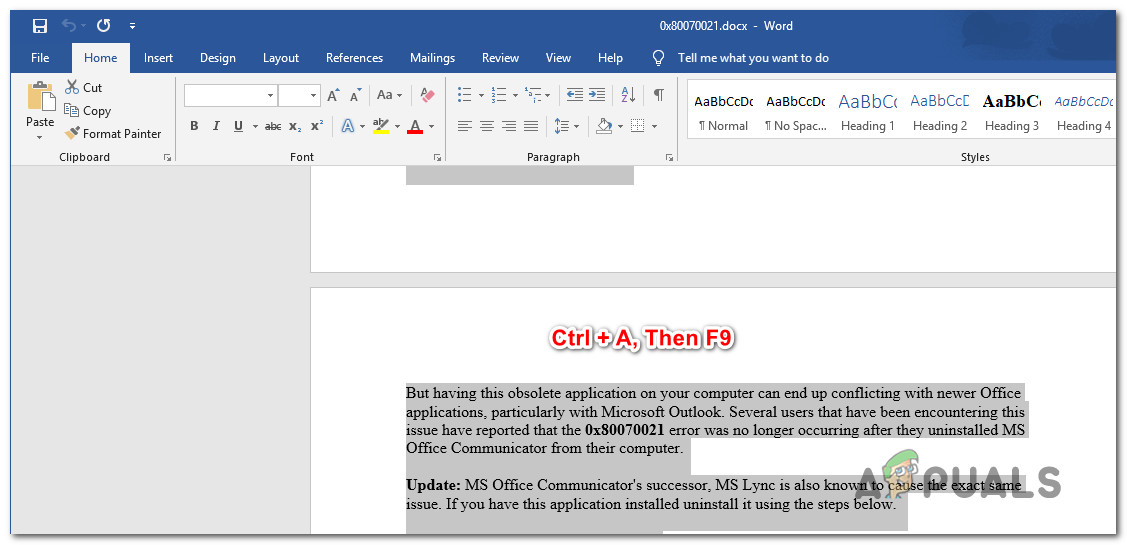
- First, select all text by pressing Ctrl + A. Once the whole text is selected, press F9 to unlock the fields.

Unlocking the fields of the text documents - Once the fields have been unlocked, take the time to revise all text that is referenced to the broken content.
- After you’ve done this, save the changes and go to File > Print and print out the document to see if the error has been resolved.
Printing the Word document
If the Error Reference Source Not Found error message is still occurring or you’re looking for a different fix, move down to the next method below.
Method 3: Using the Kutools for Word tool
If you’re looking to install a Word add-in, there’s a much more convenient way of deleting your corrupted Cross-References fields. If you have a whole lot of broken fields, these solutions should be preferred since it makes it very easy to correct the issue.
To use this shortcut, you’ll need to install Kutools for Word – it includes groups of tools that will make your job easier. Here’s a quick guide on using Kutools for Word to fix the Cross-References errors:
- Visit this link (here) and click on the Free Download button to download the Kutools for Word installer.
- Double-click on the installation executable and follow the on-screen prompts to install the add-in on your Word application. When the install is completed, restart your computer.
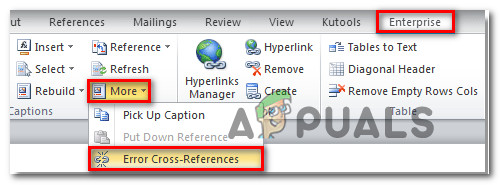
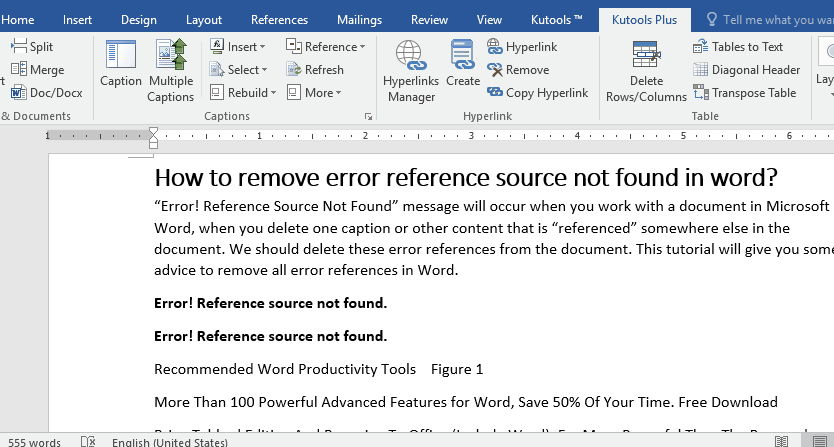
- At the next system startup, open Word and go to the newly appeared menu Enterprise > More and click on Error Cross-References.

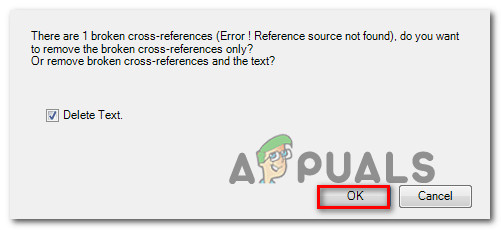
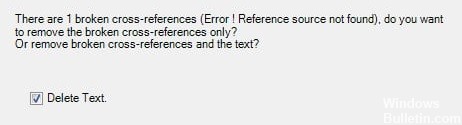
Using the Kutools for Word - After a short while, you will get a dialog box telling you how many errors where found. Decide whether you want to delete the text or not and click Ok to resolve the Cross-References errors.

Deleting cross-references errors - In a couple of seconds, all your broken references will be resolved.
If this didn’t allow you to resolve the issue, move down to the final method below.
Method 4: Repairing the Office installation
As it turns out, this particular issue can also occur if files from the Office installation have become corrupted. Several affected users have reported that the issue was resolved after they repaired the Office installation. After doing so and restarting their computer, printing the document no longer triggered the Error Reference Source Not Found message.
Here’s a quick guide on repairing the Office installation:
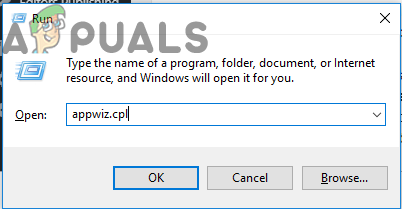
- Press Windows key + R to open up a Run dialog box. Then, type “appwiz.cpl” and press Enter to open up the Programs and Features screen.

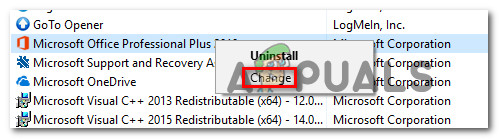
Typing in “appwiz.cpl” in the Run prompt - Inside the Programs and Features screen, scroll down through the list of applications and locate your office installation.
- Once you see it, right-click on it and choose Change.

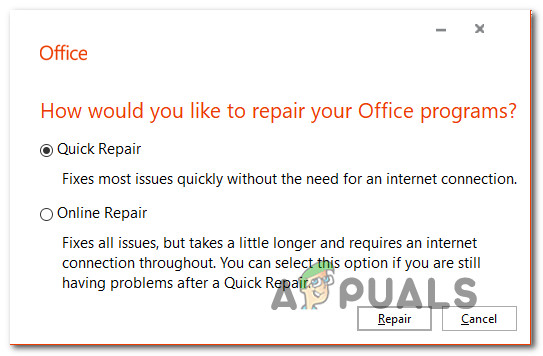
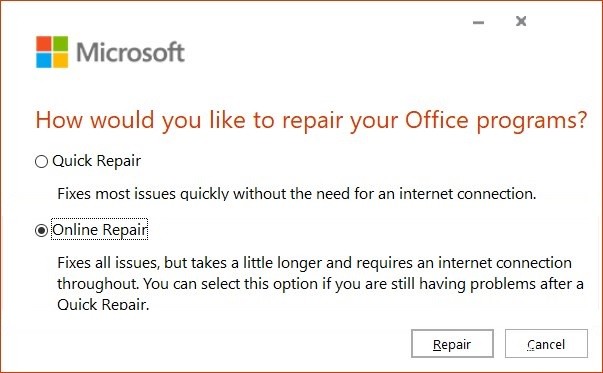
Changing the Office installation - At the repair prompt, choose Quick Repair and click the Repair button. Then, wait for the process to complete.

Repairing the Office installation - Once the repair sequence completes, restart your computer and see if the issue is resolved at the next startup.
- If the issue is still not resolved, use the Online Repair method instead.

Kevin Arrows
Kevin is a dynamic and self-motivated information technology professional, with a Thorough knowledge of all facets pertaining to network infrastructure design, implementation and administration. Superior record of delivering simultaneous large-scale mission critical projects on time and under budget.
Download PC Repair Tool to quickly find & fix Windows errors automatically
In Microsoft 365, when you update a field that has a broken link to a bookmark, you may notice that Word displays Error! Bookmark Not Defined or Error! Reference source not found – in this post, we will offer the most suitable solution to the Microsoft Office issue in view.

Some Windows 10/11 PC users reported that they also encounter this error when they try to print documents with their home or work printers.
The most likely culprits to this error includes;
- Cross-referenced bookmark has been deleted.
- Corrupted Office installation.
If you’re faced with this Error! Reference source not found issue, you can try our recommended solutions below in no particular order and see if that helps to resolve the issue.
- Lock the fields before printing
- Manually remove all broken references
- Delete corrupted Cross-References fields using Kutools
- Repair Office installation
Let’s take a look at the description of the process involved concerning each of the listed solutions.
1] Lock the fields before printing
This is more of a workaround than a solution.
To lock the fields prior to printing the documents on your Windows PC, do the following:
- Open the document in Word application.
- Press Ctrl + A keyboard shortcut to select the whole document content.
- Next, press Ctrl + F11 to lock the cross-reference (REF) fields.
- Now, go to File menu on the ribbon-bar at the top.
- Click Print or press Ctrl + P.
Once you have the document physically printed, see if the Error! Reference Source Not Found error message has been resolved. If not, try the next solution.
2] Manually remove all broken references
If the bookmarks have been deleted from the Word document, you’ll encounter this issue. In this case, you can manually remove all broken references.
- Open the document in Word application.
- Press Ctrl + A keyboard shortcut to select the whole document content.
- Next, press F9 to unlock the fields.
- Now revise all text that is referenced to the broken content.
- Once done, save the changes and go to File > Print and print out the document.
Now see if the issue is resolved. Otherwise, try the next solution.
3] Delete corrupted Cross-References fields using Kutools
This solution requires you to install a Word add-in, and then delete your corrupted Cross-References fields. Using the Kutools add-on is a much more easy and convenient way If you have a whole lot of broken fields.
To delete corrupted Cross-References fields using Kutools, do the following:
- Download the Kutools for Word installer.
- Install the add-on for Word application.
- Restart your computer when installation is complete.
- On boot, open Word.
- On the Menu bar, click the newly appeared menu Enterprise > More.
- Click on Error Cross-References.
- On the dialog box that appears, click OK.
It will now take a couple of seconds for all your broken references to be resolved.
4] Repair Office installation
If nothing has worked so far for you, you can repair the Word application or repair the entire Office installation. If repairing didn’t help, you can uninstall Office and then reinstall Microsoft 365.
That’s it!
How do I fix error source not found in a PDF?
When you try to print or save as PDF, the referenced fields are updated. So, to fix the issue, navigate to File > Options > Display and uncheck the option Update fields before printing and see if that works. If it does not work, you may need to manually find out where the error messages occur and re-create the cross-references.
How do you fix not a valid bookmark self reference?
Not a valid bookmark self-reference error message suggests that you are inserting a cross-reference to the paragraph where the cross-reference resides.
Hope you find this our guide helpful!

Obinna Onwusobalu has studied Information & Communication Technology and is a keen follower of the Windows ecosystem. He has been a Windows Insider MVP (2020). He runs a computer software clinic.
Updated January 2023: Stop getting error messages and slow down your system with our optimization tool. Get it now at this link
- Download and install the repair tool here.
- Let it scan your computer.
- The tool will then repair your computer.
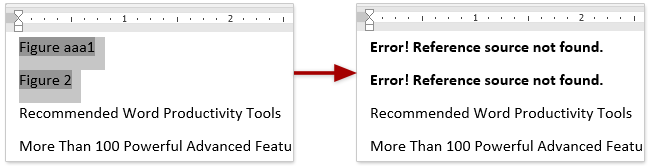
“Error! The message “Error Source Not Found” appears when you delete a header or other content that is “referenced” elsewhere in a Word document. Some users need to remove these error references from the document. In this guide, you will find some tips on how to remove all error references in MS Office.
What causes the ‘Error reference source not found’ error message?

- A cross-text marker has been deleted: In most cases, the error message appears when a cross-text marker has been deleted.
- Office installation is corrupt: Some people report that the problem can also occur due to a corrupt Office installation. In this case, healthy cross-reference fields cause this error message.
How do you fix the ‘Reference source not found’ error?
January 2023 Update:
You can now prevent PC problems by using this tool, such as protecting you against file loss and malware. Additionally it is a great way to optimize your computer for maximum performance.
The program fixes common errors that might occur on Windows systems with ease — no need for hours of troubleshooting when you have the perfect solution at your fingertips:
- Step 1 : Download PC Repair & Optimizer Tool (Windows 10, 8, 7, XP, Vista – Microsoft Gold Certified).
- Step 2 : Click “Start Scan” to find Windows registry issues that could be causing PC problems.
- Step 3 : Click “Repair All” to fix all issues.


Repair the Office installation
You can restore Word or restore the entire Office installation. If restoring doesn’t work, you can uninstall Office and then install Microsoft 365 again.
Locking fields before printing
- Open a document in the Word application.
- Press Ctrl + A to highlight the entire contents of the document.
- Then press Ctrl + F11 to lock the cross-reference (REF) fields.
- Now select the File menu on the top panel of the ribbon.
- Click the Print button or press Ctrl + P.
Manually delete any broken links
- Open the document in the Word application.
- Press Ctrl + A to select all the contents of the document.
- Then press F9 to release the margins.
- Now review all the text that refers to the wrong content.
- Save your changes, choose File -> Print, and print the document.
Expert Tip: This repair tool scans the repositories and replaces corrupt or missing files if none of these methods have worked. It works well in most cases where the problem is due to system corruption. This tool will also optimize your system to maximize performance. It can be downloaded by Clicking Here
Frequently Asked Questions
The «Reference source not found» message appears when you update a field that contains an incorrect bookmark reference. You can restore the original text by pressing Ctrl+Z immediately after receiving the error message. You can press Ctrl+Shift+F9 to convert the field text to plain text.
Press the Ctrl+A key combination to select all the contents of the document. Then press F9 to release the margins. Now go through all the text that refers to the wrong content. Then save your changes and print the document via File -> Print.
When you try to print a document or save it as a PDF, the reference fields are updated. To fix this problem, go to File -> Preferences -> View and disable the Refresh Fields Before Printing option to see if it works.
Post Views: 61
Как удалить источник ссылки на ошибку, не найденный в слове?
«Ошибка! Сообщение «Ссылочный источник не найден» появится, когда вы удалите один заголовок или другое содержимое, на которое «есть ссылки» в другом месте документа Word. Некоторым пользователям может потребоваться удалить эти ссылки на ошибки из документа. Это руководство даст вам несколько советов по удалению всех ссылок на ошибки в Word.
- Удалить все ссылки на ошибки вручную
- Удалите все ссылки на ошибки с помощью Kutools for Word
Быстро удалите все сообщения «Ошибка! Справочный источник не найден». ссылки в Word
Скучно убирать «Ошибка! Ссылочный источник не найден». ссылки на ошибки по очереди вручную? Kutools for Word‘s Ссылки на ошибки Функция освободит вас от поиска этих ссылок на ошибки и удалит их сразу одним щелчком мыши!
Kutools for Word: мощная надстройка содержит более 100 инструментов и может повысить эффективность ежедневной работы Word на 80%! Получи это сейчас!
Удалить все ссылки на ошибки вручную
Однако при удалении из документа заголовка или содержимого, на которые имеется ссылка, вы можете не увидеть сообщение об ошибке. (Ошибка! Справочный источник не найден) на экране, пока вы не попытаетесь распечатать документ, или если вы сохраните его и снова не откроете. Тогда как мы можем удалить все такие ссылки на ошибки в Word? Вы можете сделать это, следуя инструкциям.
1, нажмите Ctrl + вместе, чтобы выбрать весь документ, а затем нажмите F9 ключ для разблокировки полей. Вы можете увидеть ссылку на ошибку следующим образом:
2. Выберите сообщение об ошибке и нажмите Возврат на одну позицию or Удалить , чтобы удалить эти ссылки на ошибки одну за другой.
С помощью этого метода довольно легко удалить ссылку на ошибку. Однако будет очень ужасно и утомительно удалять десятки ссылок на ошибки вручную.
Удалите все ссылки на ошибки с помощью Kutools for Word
На самом деле есть более удобный и быстрый способ удалить все ссылки на ошибки в Word. Обновлять поле не нужно. Kutools for WordАвтора Удалить все ссылки на ошибки Утилита позволяет удалить все ссылки на ошибки одним щелчком мыши.
Kutools for Word: мощная надстройка содержит более 100 инструментов и может повысить эффективность ежедневной работы Word на 80%! Получи это сейчас!
1. Нажмите Кутулс Плюс > Больше > Перекрестная ссылка на ошибку. Смотрите скриншот:

2. В Подписи диалоговое окно, щелкните OK кнопку, чтобы продолжить.

3. Теперь появляется диалоговое окно, в котором сообщается, сколько «ошибка! Справочный источник не найден.Будет удалено в вашем документе. Нажмите OK чтобы закончить удаление.

Рекомендуемые инструменты для повышения производительности Word


Kutools For Word — Более 100 расширенных функций для Word, сэкономьте 50% времени
- Сложные и повторяющиеся операции можно производить разово за секунды.
- Вставляйте сразу несколько изображений из папок в документ Word.
- Объединяйте и объединяйте несколько файлов Word из папок в одну в желаемом порядке.
- Разделите текущий документ на отдельные документы в соответствии с заголовком, разрывом раздела или другими критериями.
- Преобразование файлов между Doc и Docx, Docx и PDF, набор инструментов для общих преобразований и выбора и т. Д.
Комментарии (0)
Оценок пока нет. Оцените первым!
It is the bane of everyone who uses Microsoft Word to fill out forms – the dreaded “Error! Reference Source Not Found.” Today we’re going to shed a little light on this annoyingly vague error message.
Why It Happens
This error occurs when you work with a form in Microsoft Word, and you delete one of the gray highlighted form fields that is “referenced” somewhere else in the document.
Sometimes this happens by accident, when you are editing a form. Sometimes there’s just no way around it – you have to delete something that doesn’t apply, for example. However, many times people encounter this error message frequently – and that can be very frustrating. If you encounter this message frequently, then chances are you might be editing your documents while “unlocked” when you don’t need to.
The whole concept of “referenced fields” and “unlocked documents” can be a bit confusing, so here’s some pictures to help clarify things.

This is a typical form field that might appear in a document. You can tell it is a form field because of the gray shading. TurboLaw documents are full of fields; and when the document is opened, you can only type in these fields, like so:

Anything that is not shaded in gray cannot be edited, because TurboLaw documents open in protected mode – what we sometimes call tab and type mode. You can type in the gray shaded areas, and press the TAB key on your keyboard to move to the next area. This is a simple and commonplace way to fill out on-line forms.
When Things Get Tricky
Things can get a little complicated once you unprotect, or unlock the document by clicking the Edit Document button. When you unprotect a document, it looks the same, but now you can edit the text that is not shaded in gray. In other words, it’s just like a normal Microsoft Word document – you can do literally anything you want to it.
Now, this is a necessary editing mode – often you need to change text that is not shaded in gray to complete a document. And that’s fine – as long as you don’t accidentally delete any of the gray shaded form fields. You see, when the document is unprotected, you are no longer in tab and type mode – if you try to type in one of the gray shaded areas, you will actually overwrite it – erasing it from the document, as shown below.


You can see that we clicked on the field to select it (as many people do), and then we typed “Person A.” However, notice that it is no longer shaded in gray – the form field has been deleted. This is because the document is unprotected.
The Consequences
When a field is deleted, the effects may not appear right away. Depending on what version of Microsoft Word you have, you might not see the error message until you try to print the document, or if you save it and re-open it. You might also see it once you click the Edit Document button again to protect the document and switch back to tab and type mode. In any case, the error message you will see might look like this:

You can see that the error appears under a signature line – which would normally have said “Person A” (if we hadn’t deleted the gray shaded form field). However, because the original gray shaded form field was deleted, this reference field has nothing to refer to – because the original field is gone! So Word just throws up its hands in defeat, and prints this message instead.
How To Avoid The Error
Fortunately, avoiding this error is pretty simple. Just watch what you’re typing, and if you ever type in a gray shaded area, and the gray shading goes away after you type, you have probably deleted the form field. Use the Undo function in Microsoft Word (CTRL-Z for those of you who like the keyboard) to bring it back, and then click the Edit Document button to protect the document and switch back to tab and type mode. Now you can type in the gray shaded form field without fear!

Now the reference field under the signature line correctly picks up the name “Person A” that we typed at the beginning of the document.
How To Fix The Error
If you’ve already erased a gray shaded form field, and can’t “undo” the change, here’s how to fix it. (These steps are also outlined in our Help Center article “Error! Reference source not found” appears in printed document.) Note that you need to have the document unprotected (unlocked) before you can remove the error message – use the Edit Document button to unprotect (unlock) the document before you begin.
First, you need to find the error message. If you can see it on your screen, just click after the error message and press the backspace key twice to erase it.

The first time you press the backspace key, the error message will be selected in gray, as shown above. The second type you press the backspace key, the error message will be deleted. Now you can type whatever is supposed to go there.
Note: if you just try to type over the error message, it may come back. This is because of the way Microsoft Word handles fields. To be on the safe side, always use the method described above to delete the error message.
If you can’t see the error message on the screen, you’ll have to do a little detective work to find the word or phrase that is being referenced. For example, if you still see “Person A” under the signature line, but when you print it out, all you see is the error message, then you know that “Person A” under the signature line is the problem field. Right-click on “Person A” and select “Update Field.” This will “refresh” the field, displaying the error message on your screen. Now you can use the steps described above to remove it.
If you have encountered this error message a lot in your use of TurboLaw’s documents, now you know how to avoid it, and you’ll be able to spend less time fighting with Microsoft Word, and more time doing other things – and that’s what TurboLaw is all about!