На днях мы получили вопрос от читателя, есть ли простой способ изменить цвет текста в WordPress. Ответ – да. Вы можете легко менять цвет шрифта в WordPress как для всего сайта, так и даже для одного слова в публикации.
В этом руководстве мы пошагово покажем вам, как легко изменить цвет текста в WordPress.
Есть много причин, почему вы могли бы захотеть скорректировать цвет текста в своих постах и страницах. Возможно, вы хотите выделить ключевое слово или использовать цветные подзаголовки на определенной странице.
Кроме того, вы можете изменить цвет текста на всем сайте. Возможно, ваша тема использует серый цвет для текста, но вы хотели бы сделать его черным или темно-серым для лучшей читаемости.
В этой статье мы рассмотрим следующие методы:
- Смена цвета текста с помощью визуального редактора (подходит для корректировки цвета некоторых слов, абзацев или заголовков).
- Изменение цвета текста в кастомайзере тем (идеальный способ для смены цвета шрифта по всему сайту, но поддерживается не всеми темами).
- Изменение цвета текста с помощью CSS (подходит для изменения цвета шрифта по всему сайту с любыми темами).
Содержание
- Метод 1. Изменение цвета текста с помощью визуального редактора.
- Метод 2. Смена цвета текста в кастомайзере
- Метод 3. Смена цвета текста через CSS
Метод 1. Изменение цвета текста с помощью визуального редактора.
Вы можете использовать стандартный редактор WordPress, чтобы выделить слова, абзацы или даже подзаголовки нужным цветом, отличающимся от основного текста.

Вот как вы можете изменить цвет текста с помощью редактора блоков.
Сначала вам нужно отредактировать пост или страницу (либо создать новую). Далее введите свой текст. Вам потребуется создать блок абзаца или заголовка в зависимости от ситуации.
Как только ваш текст будет добавлен, вы сможете изменить его цвет.
Смена цвета текста блока
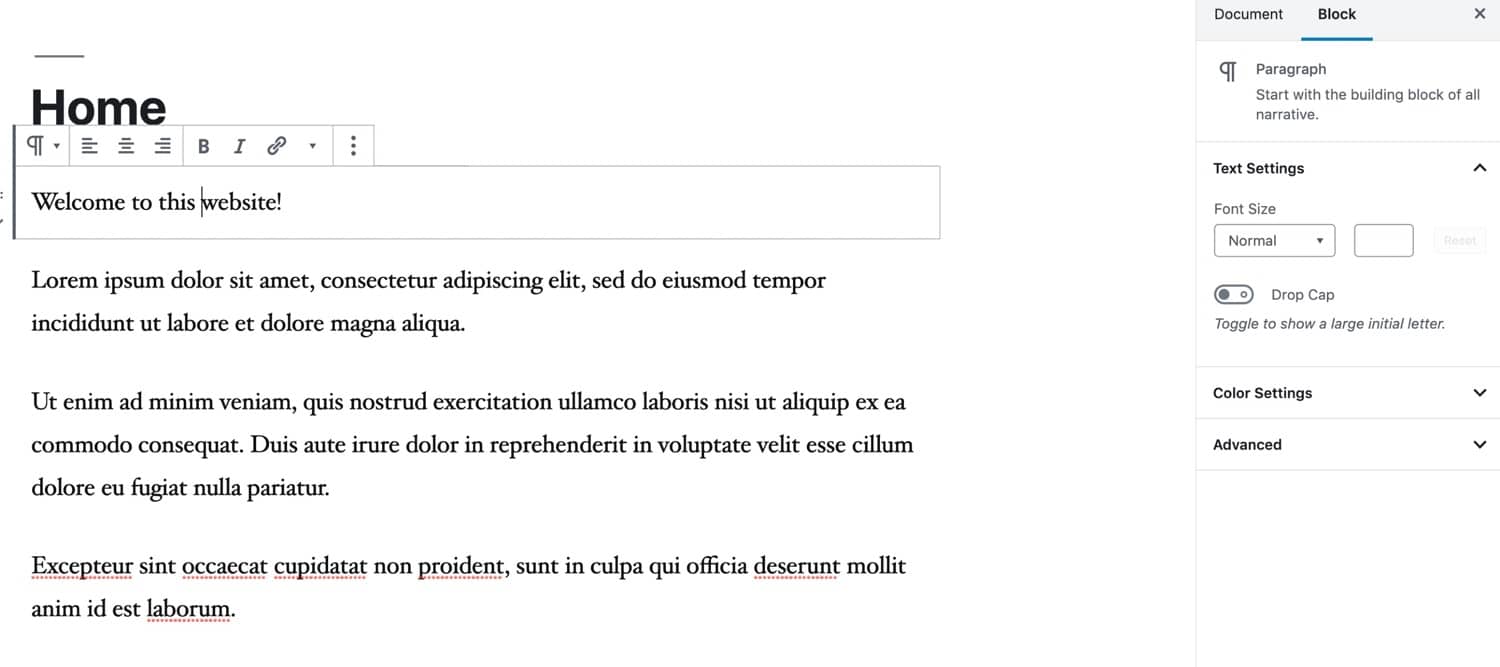
Для данного примера мы собираемся изменить цвет текста всего блока.
Нажмите на блок. С правой стороны экрана должна появиться панель Block Settings. Нажмите на стрелочку рядом с Color settings, чтобы развернуть вкладку. Вы увидите здесь настройки цвета.

Теперь вы можете выбрать новый цвет текста. Визуальный редактор покажет несколько вариантов, основанных на вашей теме. Вы можете нажать на один из них, чтобы изменить цвет текста.
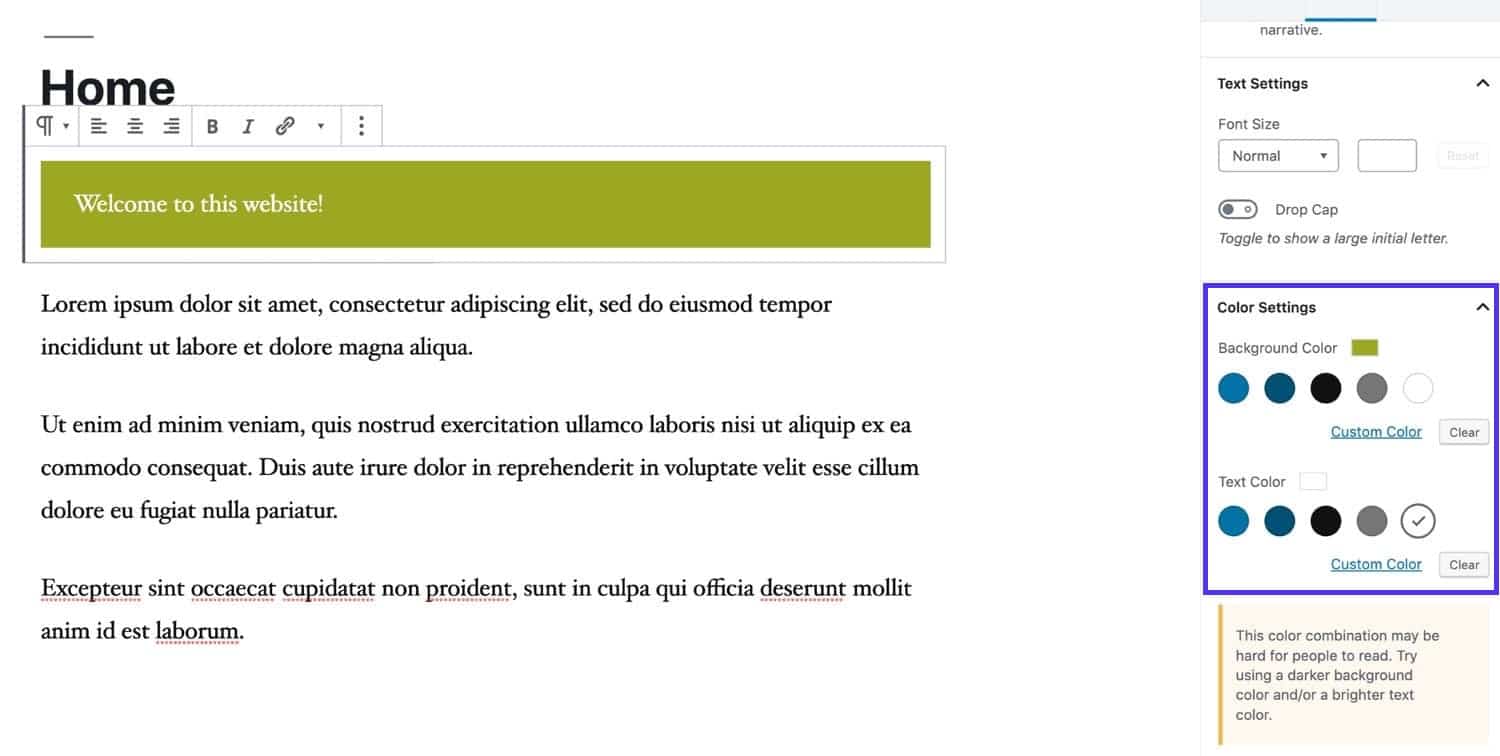
В качестве альтернативы вы можете задать любой цвет, который вам нужно. Для этого нажмите на ссылку Custom Color. Откроется цветовая палитра, где вы можете выбрать любой цвет вручную. Вы также можете использовать палитру для ввода hex-кода цвета.
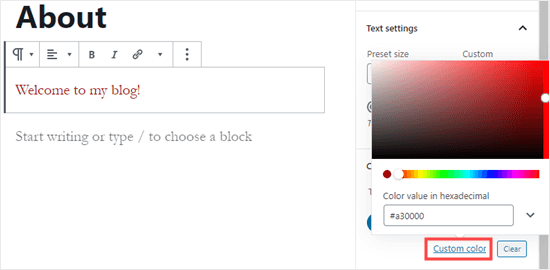
Если вы передумали и хотите вернуться к цвету текста по умолчанию, просто нажмите кнопку Clear сразу под цветовыми опциями.
![]()
Совет: если вы хотите изменить цвет фона для блока, вы тоже можете сделать это здесь.
Изменение цвета текста для слова или фразы
Что делать, если вы хотите изменить цвет одного или нескольких слов? Это легко делается с помощью редактора блоков.
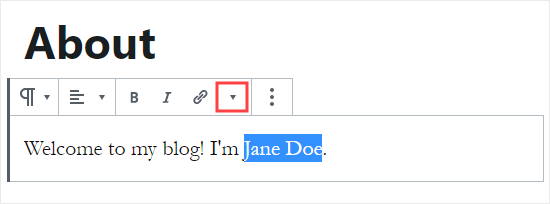
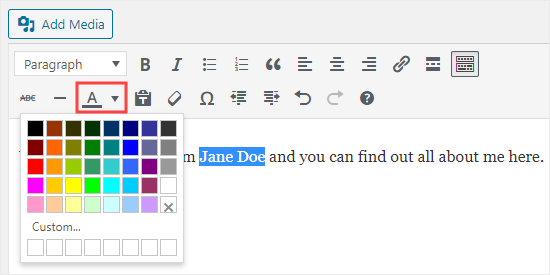
Сначала вам нужно выделить слово (слова), которые вы хотите изменить. Затем нажмите на небольшую стрелочку на панели инструментов редактора контента.
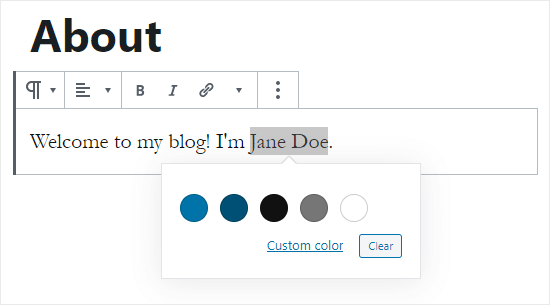
Далее нажмите на ссылку Text Color в нижней части списка.

Теперь вы увидите те же самые параметры, что и для всего блока. Вы можете выбрать как параметр по умолчанию, так и свой цвет с помощью Custom color.
Параметры цвета не ограничиваются блоками абзацев. Вы можете изменить также цвет блоков заголовков. Вы можете установить цвет текста для всего блока в настройках. Кроме того, вы можете выделять отдельные слова и менять их цвет.

Примечание: вы не можете задавать цвет фона для заголовков.
Вы также можете изменить цвет текста в блоке списка, однако только при выделении слов. В настройках блока нет возможности изменить цвет текста для всего блока.
Меняем цвет шрифта с помощью классического редактора
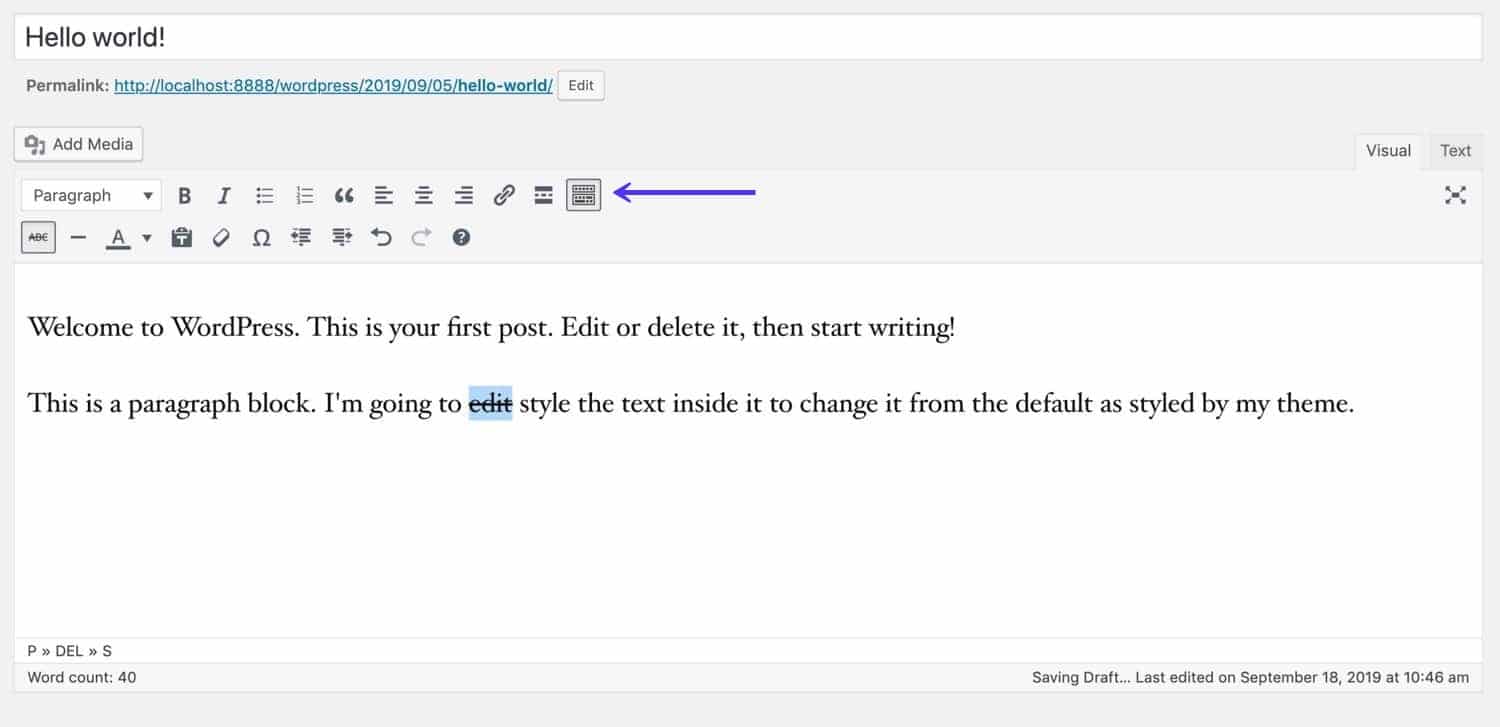
Если вы все еще используете классический редактор WordPress, то вы можете изменить цвет шрифта с помощью панели инструментов.
В классическом редакторе нажмите на Toolbar Toggle в правом углу. Вы увидите еще один ряд иконок:
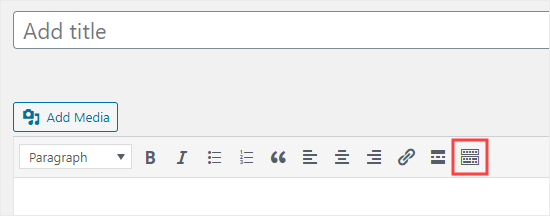
Теперь вы можете выбрать свой текст и изменить цвет текста, используя раскрывающийся список с цветовыми предложениями.
Метод 2. Смена цвета текста в кастомайзере
Как быть, если вы хотите изменить цвет текста на всем сайте? Многие из тем WordPress позволяют это делать через кастомайзер.
В качестве примера мы возьмем тему OceanWP. Это одна из лучших бесплатных тем для WordPress.
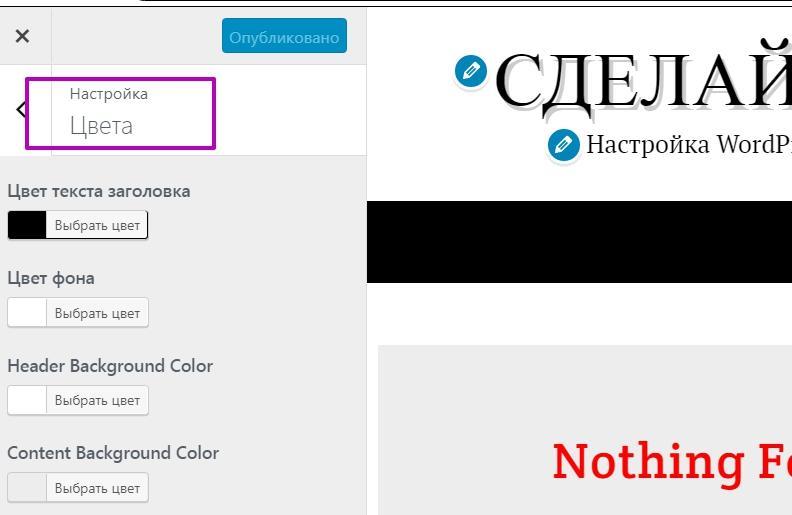
В консоли перейдите в раздел Внешний вид – Настроить, чтобы открылся кастомайзер.

Далее вам нужно найти такую опцию, как Typography. Список доступных опций может различаться в зависимости от вашей темы.
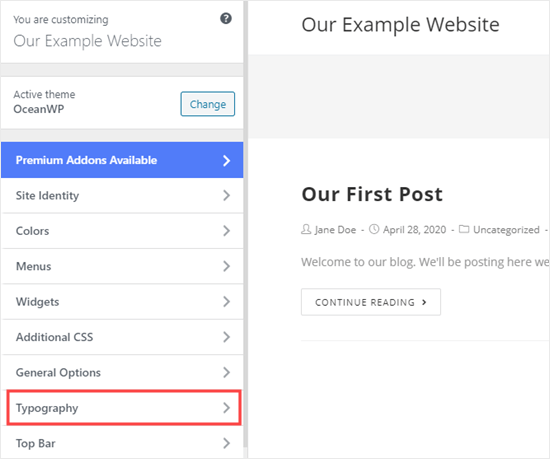
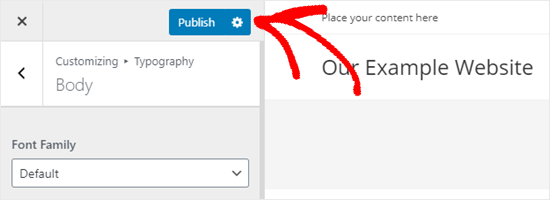
Перейдем на вкладку Typography. Ищем параметр, который позволяет менять цвет текста для постов и страниц. В OceanWP этот параметр называется «Body». Вам нужно щелкнуть по нему и настроить цвет шрифта и другие опции.

При щелчке по Font Color вы увидите цветовую палитру. Выберите любой цвет, который вы хотите использовать для вашего текста. В итоге цвет текста изменится на всех страницах и в записях.

Вы можете также изменить цвета заголовков аналогичным образом, используя соответствующие параметры для смены H1, H2 и т.д.
Когда вы будете довольны изменениями, просто нажмите на Publish в самом верху экрана.
Совет: выбор черного цвета или темно-серого для текста на белом или светлом фоне – идеальный вариант в плане удобочитаемости.
Метод 3. Смена цвета текста через CSS
Как быть, если в теме отсутствует возможность настройки цвета текста?
Вы по-прежнему можете изменить цвет шрифта на сайте через кастомайзер. Для этого перейдите в раздел Внешний вид – Настроить.
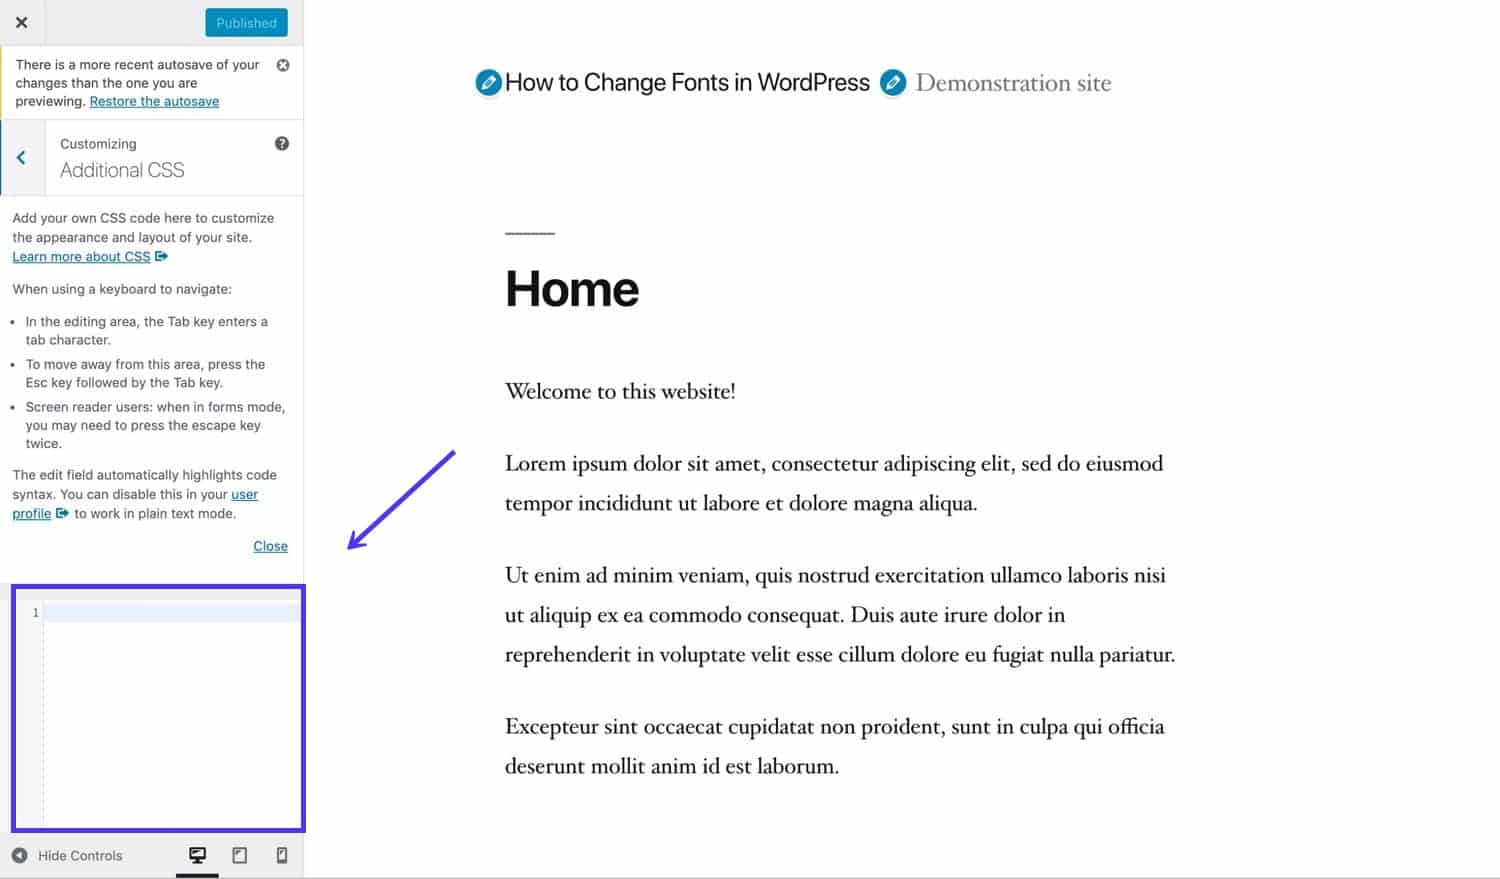
В самом низу списка опций вы можете найти вкладку с надписью Additional CSS.
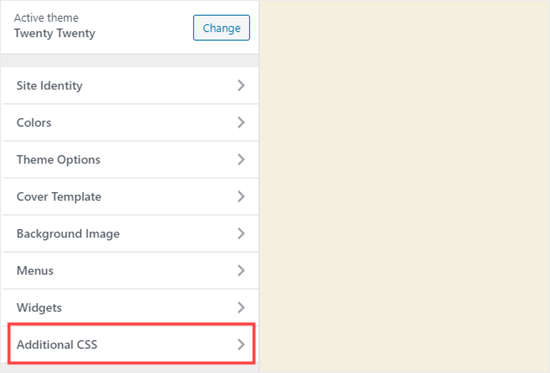
Щелкните по вкладке Additional CSS. Вы увидите некоторые инструкции плюс поле, в которое вы можете ввести CSS-код.
Для начала вы можете попробовать ввести следующий код в данное поле:
p { color:#990000; }
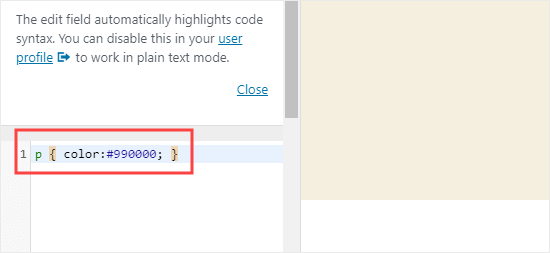
В итоге цвет шрифта основного текста во всех ваших записях и на страницах сменится на темно-красный (или любой другой цвет, который вы выберете).

Если вы хотите изменить цвет заголовков в своих постах, вы можете добавить следующий код:
h2 { color:#990000; }
Опять же, вы можете сменить hex-код на любой другой цвет.
Если вы не знакомы с CSS, то в таком случае вы можете попробовать плагин CSS Hero. Это мощный визуальный редактор, который позволяет настраивать стили своего сайта.

Источник: wpbeginner.com
 Сегодня поговорим о таком, казалось бы, простом вопросе как изменить цвет шрифта в WordPress сайте. Однако тема будет полезна не только новичкам, а и более продвинутым пользователям, т.к. я собираюсь включить в рассказ небольшой хак для добавления своего варианта цвет текста в WordPress редакторе. Это можно сделать как с помощью базовых функций системы, так и через специальный модуль TinyMCE Color Grid (который мы тоже рассмотрим).
Хочу заметить, что все скриншоты ниже показывают работу в плагине TinyMCE Advanced для WordPress. Это продвинутый функциональный текстовый редактор, что я ставлю на все свои проекты и рекомендую другим. Тем не менее, рассмотренные в посте решения для вордпресс шрифтов (хак и дополнительный модуль TinyMCE Color Grid) будут также отлично работать и в базовом редакторе системы.
Итак, начнем с изменения цвета текста.
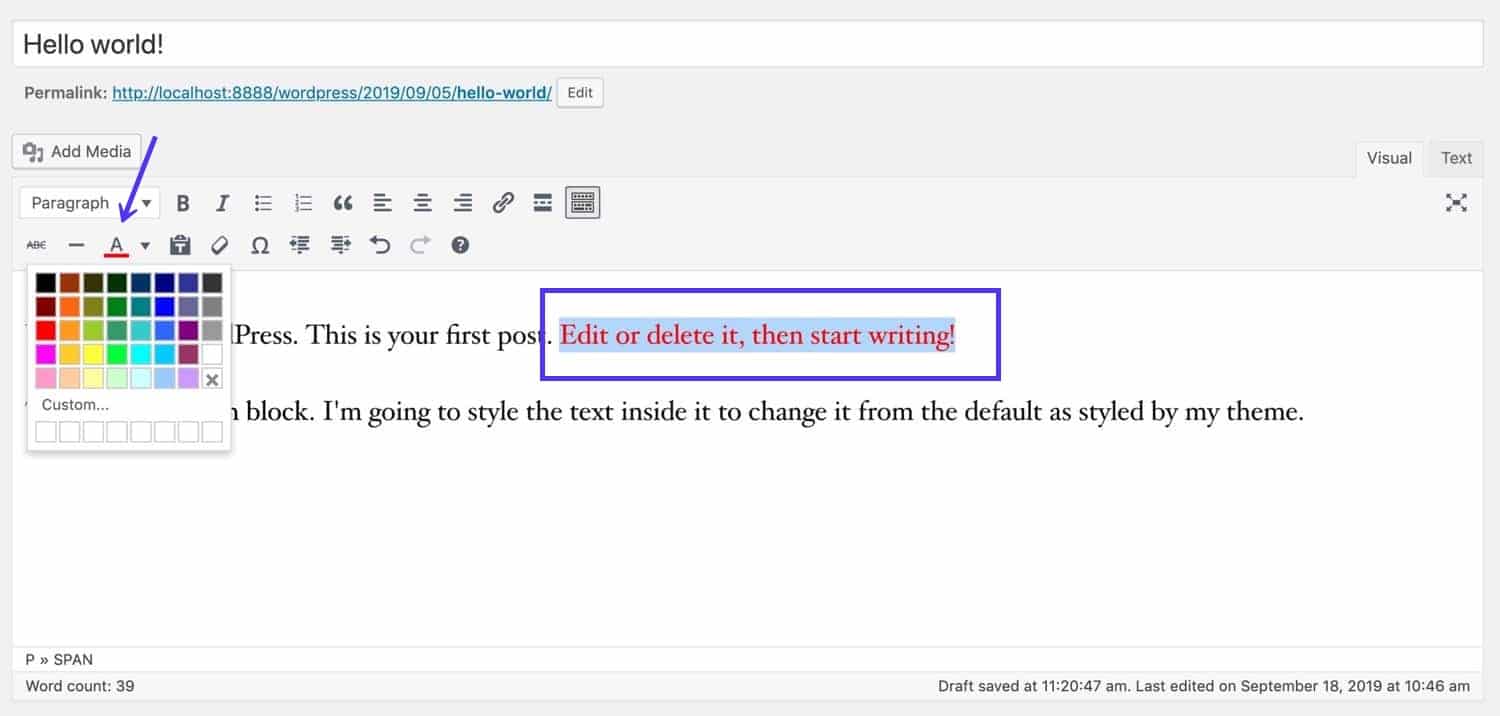
В панели текстового редактора найдете иконку с буквой «А» и прозрачным фоном. При клике откроется палитра цветов для выбора. Чтобы изменить цвет текста в WordPress, просто выделяете фрагмент контента (слово, букву, абзац) и выбираете ему нужный окрас. Если переключиться в режим HTML (Текст), то увидите, что форматирование осуществляется за счет тега span:
<span style="color: #ff6600;">Пример</span> <span style="color: #00ff00;">выделения</span> <span style="color: #3366ff;">цветом</span>.
В первом скриншоте рядом с буквой «А» находится еще одна похожая кнопка, которая используется в WordPress для цвета фона. В базовом редакторе ее по умолчанию найти не удалось, а вот в TinyMCE Advanced она добавляется в панель инструментов через настройки.
Также на картинке выше под вариантами цветов найдете ссылку «Произвольный» — она откроет инструмент палитры для выбора других вариантов кроме базовых.
Цвет текста можно задать через RGB и Hex коды или просто выбрать на палитре. После этого новый вариант сохранится вместе с базовыми. Правда, все это будет работать лишь во время редактирования данной конкретной заметки до перехода на другие страницы админки.
Именно поэтому более надежным способом добавления своего цвета изменения шрифта является следующий хак. Вам нужно открывать файл функций functions.php и дописать туда такой код:
function my_mce4_options($init) {
  $default_colours = '"000000", "Black",
                      "993300", "Burnt orange",
                      "333300", "Dark olive",
                      "003300", "Dark green",
                      "003366", "Dark azure",
                      "000080", "Navy Blue",
                      "333399", "Indigo",
                      "333333", "Very dark gray",
                      "800000", "Maroon",
                      "FF6600", "Orange",
                      "808000", "Olive",
                      "008000", "Green",
                      "008080", "Teal",
                      "0000FF", "Blue",
                      "666699", "Grayish blue",
                      "808080", "Gray",
                      "FF0000", "Red",
                      "FF9900", "Amber",
                      "99CC00", "Yellow green",
                      "339966", "Sea green",
                      "33CCCC", "Turquoise",
                      "3366FF", "Royal blue",
                      "800080", "Purple",
                      "999999", "Medium gray",
                      "FF00FF", "Magenta",
                      "FFCC00", "Gold",
                      "FFFF00", "Yellow",
                      "00FF00", "Lime",
                      "00FFFF", "Aqua",
                      "00CCFF", "Sky blue",
                      "993366", "Red violet",
                      "bfbfbf", "Light gray",
                      "FF99CC", "Pink",
                      "FFCC99", "Peach",
                      "FFFF99", "Light yellow",
                      "CCFFCC", "Pale green",
                      "CCFFFF", "Pale cyan",
                      "99CCFF", "Light sky blue",
                      "CC99FF", "Plum",
                      "FFFFFF", "White"';

  $custom_colours =  '"4c83c3", "Nice Blue Header",
                      "D83131", "Color 2 Name",
                      "ED1C24", "Color 3 Name",
                      "F99B1C", "Color 4 Name",
                      "50B848", "Color 5 Name",
                      "00A859", "Color 6 Name",
                      "00AAE7", "Color 7 Name"';

  // build colour grid default+custom colors
  $init['textcolor_map'] = '['.$default_colours.','.$custom_colours.']';

  // enable 6th row for custom colours in grid
  $init['textcolor_rows'] = 6;

  return $init;
}
add_filter('tiny_mce_before_init', 'my_mce4_options');
Немного пояснений. Здесь вначале в переменной default_colours определяется список базовых цветов, затем — ваши новые значения в custom_colours. После оба массива объединяются в один. Всего получится 40 пар «код цвета + название». Переменная textcolor_rows:
$init['textcolor_rows'] = 6;
… добавляет новую строку в элемент выбора цвета. Вот как в итоге выглядит результат (можете сравнить с первым сриншотом).
Кстати, вы можете задавать разное число колонок (rows) и строк (cols) для этого элемента, например:
$init['textcolor_rows'] = 5;
$init['textcolor_cols'] = 10;
Хак работает для версий WP 3.9+ и для редактора TinyMCE 4+.
С помощью плагина вордпресс для редактирования цвета текста TinyMCE Color Grid добавить свои варианты оформления в систему сможет даже начинающий пользователь. Модуль установило более 2 тыс. человек, оценка пока что максимальная, поддерживается WP начиная с 2.7.
По факту, TinyMCE Color Grid содержит 2 функции. Первая значительно расширяет стандартную палитру цветов:
С таким то выбором вы легко сможете изменять цвета вордпресс в любом сайте. Если их недостаточно, плагин позволяет добавлять свои персональные варианты. Для этого заходите в меню «Настройки» — «TinyMCE Color Grid» и отмечаете галочкой опцию «I’d like to define some custom colors». Сразу после этого появится инструмент как на картинке ниже:
Здесь можно определить свои варианты и далее использовать их в текстовом редакторе. В принципе, действие аналогично описанному выше хаку, но без необходимости вникать и править PHP код. В целом, плагин изменения цветов интуитивно понятен + базовая палитра побольше.
Итого. Выбор из этих двух методов изменения цвета текста в WordPress зависит от вашего уровня подготовки. Мне лично проще использовать хак: в нем меньше кода, он проще, не требуется следить за новыми версиями модуля. Хотя здесь есть такой нюанс, что движок TinyMCE может изменится, и тогда нужно будет обновлять код.
Напоследок советую глянуть решение похожей задачи, когда нужно добавить шрифт в вордпресс редактор TinyMCE Advanced, заменив/дополнив базовые функции. Если у вас есть что сказачать по теме изменения цвета текста в вордпресс, пишите в комментариях.
В этом руководстве рассказывается о работе с классическим редактором. Если вы используете редактор WordPress по умолчанию (редактор блоков), см. это руководство.
⚠️
Вы по-прежнему можете пользоваться классическим редактором, однако это не рекомендуется. С помощью редактора блоков можно создавать уникальные веб-сайты с медиаданными и адаптивным дизайном для поддержки мобильных устройств, к которым привыкли современные интернет-пользователи. Перейти на редактор блоков поможет это руководство.
Содержание
Доступ к классическому редактору
Эти инструкции относятся к интерфейсу консоли. Чтобы увидеть этот интерфейс, щёлкните вкладку Вид в правом верхнем углу и выберите Стандартный вид.
Наведите указатель мыши на страницу, которую нужно отредактировать, и дождитесь появления меню. Выберите пункт Классический редактор.

Если у вас тарифный план с поддержкой плагинов, вы можете активировать плагин «Классический редактор» в меню Плагины → Установленные плагины.
Основные сведения о классическом редакторе
В классическом редакторе можно создавать, редактировать и форматировать содержимое практически так же, как в текстовом редакторе.
💡
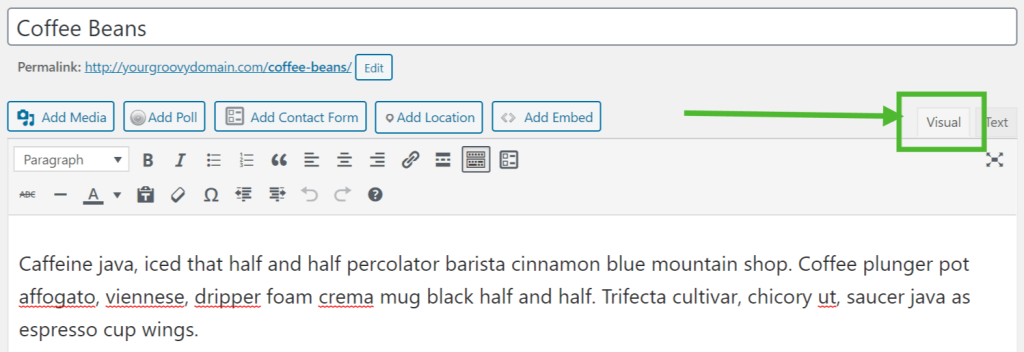
Чтобы убедиться, что вы не просматриваете запись или страницу в режиме HTML, откройте вкладку Визуальный редактор в правом верхнем углу области редактирования, как показано ниже.
📌
Содержимое в классическом редакторе оформляется с помощью стилей CSS (это тип кода, который определяет такие атрибуты HTML, как цвет, интервал, ширина и т. д.) в выбранной теме. То, что вы видите в редакторе, может совершенно не соответствовать реальному сайту. Чтобы посмотреть, как запись или страница выглядят на реальном сайте, воспользуйтесь кнопкой Предварительный просмотр.
Обзор кнопок классического редактора
В классическом редакторе есть два ряда кнопок редактирования. Чтобы узнать, для чего предназначена кнопка, наведите на неё указатель мыши. Появится небольшая подсказка с описанием иконки и ее назначением.
Первый ряд кнопок редактирования
Когда классический редактор открывается первый раз, в нём отображается один ряд значков:

- Добавить медиафайл
- Стиль — различные стили форматирования, определённые в теме
- Полужирный
- Курсив
- Неупорядоченный список (пункты маркированного списка):
- Пункт 1
- Пункт 2
- Упорядоченный список
- Пункт 1
- Пункт 2
- Цитата (способ оформления цитируемого текста; в каждой теме для этого предусмотрен отдельный стиль)
- По левому краю
- По центру
- По правому краю
- Вставить/изменить/удалить ссылку
- Вставить тег «Далее»
- Переключатель панели инструментов (включает второй ряд значков редактирования)
- Добавить контактную форму
Второй ряд кнопок редактирования
Чтобы отобразить второй ряд значков, включите переключатель панели инструментов справа от первого ряда (кнопка номер 13 выше). Откроется вторая панель инструментов, которая выглядит следующим образом:
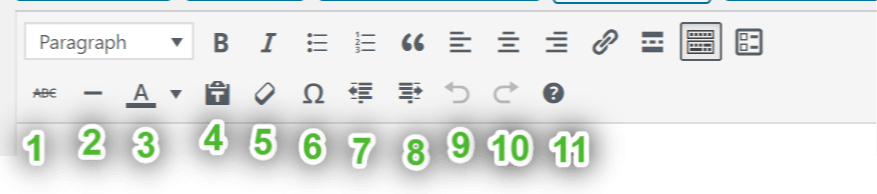
- Перечёркнутый
- Горизонтальная линия
- Выбрать цвет текста — изменить цвет текста
- Вставить как текст
- Очистить форматирование
- Вставить специальный символ
- Выступ — переместить текст дальше влево
- Отступ — переместить текст дальше вправо
- Отменить — отменить последнее действие
- Повторить — повторить последнее действие
- Помощь — показать горячие клавиши.
Выравнивание
С помощью соответствующих иконок можно выровнять как текст, так и изображения:
Слева

Справа
По центру
Стили
Выпадающее меню стиля позволяет изменять форматирование любого выделенного фрагмента текста. Сюда относятся различные заголовки и другие предустановленные стили, встроенные в вашу тему.
Обратите внимание, что для других модификаций стиля требуются Пользовательские CSS (и соответствующие знания по CSS).

Цвет текста
Чтобы изменить цвет текста, сначала необходимо выделить фрагмент текста:

При нажатии на стрелку вниз рядом с кнопкой выбора цвета текста откроется панель выбора цветов. Стрелка будет направлена вверх, пока панель выбора цветов будет открытой. Вы можете нажать на нее, чтобы закрыть панель, не выбрав при этом цвет:

С помощью опции выбора цвета такой цвет будет применен к выбранному фрагменту текста и станет цветом по умолчанию для кнопки выбора цветов.
При нажатии на саму кнопку выбора цвета текста будет применен последний цвет по умолчанию.

Вставка текста
Если вы копируете и вставляете текст из другого места, вы можете обнаружить, что он не всегда выглядит точно так, как вы ожидали. Это происходит из-за того, что при вставке из другой программы (например, из почтового клиента или текстового редактора) может копироваться нежелательное форматирование.
Если вы воспользуетесь кнопкой Вставить как текст, запустится специальный процесс очистки и будут удалены все специальные теги форматирования и теги HTML, которые в противном случае могут изменить форматирование вашего текста.
Ниже показано, как выглядит панель инструментов в режиме «Отключить простой текст». Обратите внимание, что вокруг нее нет рамки:

Ниже показано, как выглядит панель инструментов в режиме «Включить простой текст». Обратите внимание, что значок теперь обведён рамкой, а кнопка имеет чёрный цвет:

«Очистить форматирование»

Кнопка «Очистить форматирование» удаляет все форматирование (жирный шрифт, курсив, цвета и т. д.) в выделенном фрагменте текста. Сначала выделите фрагмент текста:

При нажатии на кнопку будет удалено все форматирование:

Специальные символы
Вы можете вставить специальный символ в пост или на страницу. Поместите курсор туда, куда вы хотите вставить символ, и нажмите кнопку «Вставить пользовательский символ». Появится всплывающее окно:

Нажмите на символ, и он будет вставлен в позицию курсора.
Выступ/отступ
Кнопка отступа переместит текст на один уровень, а кнопка выступа один уровень заберет.


Интервал
Нажатием клавиши Enter (Return) вы завершите ввод абзаца текста и начнете новый абзац. Если вы хотите начать новую строку, не создавая новый абзац, нажмите клавишу «Ввод», удерживая при этом клавишу Shift.
Горячие клавиши
В классическом редакторе есть несколько встроенных горячих клавиш или клавиш быстрого доступа.
Чтобы просмотреть список всех доступных горячих клавиш, нажмите на переключатель панели инструментов для отображения второго ряда значков и затем нажмите на значок Горячие клавиши (вопросительный знак) в конце второго ряда.
Появится окно со списком горячих клавиш, доступных в редакторе.

Чтобы использовать горячие клавиши по умолчанию, нажмите Command + клавиша на Mac или Control + клавиша на Windows:
| Ключ | Действие | Ключ | Действие |
|---|---|---|---|
| с | Копировать | x | Вырезать |
| v | Вставить | a | Выбрать всё |
| z | Отменить | y | Повторить |
| b | Полужирный | i | Курсив |
| u | Подчёркнутый | k | Вставить/изменить ссылку |
Чтобы использовать дополнительные горячие клавиши, нажмите Control + Option + клавиша на Mac или Control + Alt + клавиша на Windows:
| Ключ | Действие | Ключ | Действие |
|---|---|---|---|
| 1 | Заголовок 1 | 2 | Заголовок 2 |
| 3 | Заголовок 3 | 4 | Заголовок 4 |
| 5 | Заголовок 5 | 6 | Заголовок 6 |
| l | По левому краю | с | По центру |
| r | По правому краю | j | Выравнивание |
| дн. | Перечёркнутый | q | Цитата |
| u | Маркированный список | o | Нумерованный список |
| a | Вставить/изменить ссылку | с | Удалить ссылку |
| м | Вставить/изменить картинку | t | Вставить тег «Далее» |
| ч | Горячие клавиши | x | Код |
| p | Вставить тег разрыва страницы |
Changing the font color in your WordPress site is something you can easily do for a small section of text or a block. Alternatively, you can change the color of a specific element or a CSS class throughout your site.
In this quick tutorial, I’ll show you how to quickly change the font color in your WordPress site.
I’ll show you two methods:
- Changing the font color of an individual block.
- Adding a CSS class to a block for color and then styling the class.
I’ll also give you an overview of changing the font color across your site, using your stylesheet.
If you want to learn how to add completely new fonts to WordPress or how to change the font size in WordPress, you can also learn how here.
How to Change the Font Color of a Section of Text
You can choose to make a section of text or a whole block of text in one of your posts or pages a different color from the rest. You can use this to highlight some text and make it stand out, or to enhance the design of your site.
A word of warning: too many colors will make your site look messy and unprofessional. Make sure you use colors that don’t clash.
Start by finding the section of text whose color you want to change.


Select the text you want to change the color of by double-clicking it. Click the arrow icon above the block and select Text Color.


Choose the color you want the text to have. The color will change for you in the editing screen.


Alternatively, you can use a hex code to select a specific color. This is a good idea if you want to use a color that’s used elsewhere in your site.
Click the Custom color link and either select a color from the picker or type in the hex code.


Repeat this for any other blocks of text or sections of text whose color you want to change. You don’t have to change the color of a whole block—you can just change one word if you want.
Finally, click Update to update your post or Publish to publish it. That will save your changes.
Now your text will be whatever color you gave it:


How to Use a CSS Class to Change Font Color
If you want to change a bunch of text blocks so they’re all the same color, the best way to do this is by using a CSS class. This way, you know they’ll all be the same color, and you won’t have to remember what color you used.
Find your text block again and, in the Block pane, open the Advanced tab.
In the Additional CSS class(es) field, type in a CSS class. I’m going to use highlight-color. I’m deliberately not naming the color in case I decide to change it later on.


Now click Update or Publish to save your post.
You now have two options for editing the color of blocks using that class:
- add styling in the Customizer
- add styling to your theme’s stylesheet
Styling the class in the Customizer is the easiest way to do it, and it won’t cause you any problems when you update your theme.
Go to Appearance > Customize in the WordPress admin and click Additional CSS.


In the Additional CSS pane, type in the CSS to change your font color:
1 |
.highlight-color { |
2 |
color: #e76d16; |
3 |
}
|
Change your color in that code to whatever color you want to use, using a hex code. It’s a good idea to use a color that’s in use elsewhere in your theme, or one that looks good with your theme while making the text stand out.


Click the Publish button to save your changes.
Now go to your post in your live site, and you’ll see that your block with the highlight-color class is a different color than the text around it:


Now you can use this class for any blocks you want to make that color.
Changing Font Color in Your Theme’s Stylesheet
With the two methods I’ve shown you, you don’t need to edit the files in your theme or have an in-depth understanding of CSS. And they give you a quick way to change the font color in WordPress.
But if you want to edit the color of existing elements in your site (such as all paragraphs or links), or you want to add CSS in the stylesheet instead of in the customizer, you’ll need to edit your theme’s stylesheet.
You can find out more about editing your stylesheet in our guide to adding custom CSS to your WordPress site. If you want to go into more depth, that’s a great place to start.
Conclusion
Changing the font color of text in your WordPress site just takes minutes to do. You can either edit the font color directly or give it a class and then write CSS for your class.
But however you choose to do this, don’t overdo it. And make sure you use colors that work together well to avoid having a site that looks messy and unprofessional.
Make Your Site Stand Out With a Professional WordPress Theme
Are you designing a new WordPress website? Our collection of professionally designed WordPress themes can give your website a beautiful new look and feel, within minutes.


Here are a few of the best-selling and up-and-coming WordPress themes available on ThemeForest for 2020.
Did you find this post useful?

WordPress Developer and Writer, Birmingham UK
Rachel McCollin is a WordPress developer who writes books, articles and tutorials about web design and development, with a focus on WordPress and on responsive and mobile development. She runs a web design agency in Birmingham, UK and has published three books on WordPress, including WordPress: Pushing the Limits, an advanced resource for WordPress developers. She’s currently writing her fourth book.
Recently, one of our readers asked if there was an easy way to change the text color in WordPress?
The answer is yes. You can easily change your font color in WordPress across your whole site, or even just for a single word inside your post content.
In this guide, we’ll show you how to easily change the text color in WordPress, step by step.

There are lots of reasons why you might want to change the text color in your posts or pages. Maybe you’d like to emphasize a keyword, or perhaps you want to use colored subheadings on a particular page.
Alternatively, you might want to change the text color across your whole site. Perhaps your theme uses a gray color for text, but you’d rather make it black for better contrast with your background color.
In this tutorial, we’ll be covering the following methods:
- Changing the text color using the visual editor (great for changing a few words, a paragraph, or a heading when writing content).
- Changing the text color in the theme customizer (the best way to change font colors across your whole site, but not supported by all themes).
- Changing the text color using CSS code (suitable for changing the font color across your whole site with any themes).
Just click one of those links to jump straight to that method.
Video Tutorial
Subscribe to WPBeginner
If you’d prefer written instructions, just keep reading.
Method 1. Changing the Text Color Using the Visual Editor
You can use the default WordPress editor to put words, paragraphs, or even subheadings in a different color from your main text.

Here’s how you can change your text color using the block editor.
First, you’ll need to edit the post or page that you want to change, or create a new one.
Next, type in your text. You’ll need to create a paragraph block or a heading block as appropriate. For help with this, take a look at our tutorial on how to use the WordPress block editor.
Once your text is in place, you can change the color.
Changing the Text Color of a Block
For this first example, we’re going to change the text color of the whole block.
Simply click on the block and the Block Settings panel should open up on the right hand side of your screen. Next, click on the arrow for ‘Color settings’ to expand that tab. You’ll see the text color settings here.

Now, you can pick a new color for the text. The visual editor will show you some options based on your theme. You can simply click on one of these to change your text color.
Alternatively, if you have a specific color in mind, click the ‘Custom Color’ link. This will open up a color picker where you can manually select a color. You can also use this to type in a hex code.

If you change your mind and want to go back to the default text color, just click the ‘Clear’ button below the color options:

Pro Tip: If you want to change the background color for a block, you can do that here too.
Changing the Text Color of a Word or Phrase
What if you only want to change the color of one or two words? That’s easy using the block editor as well.
First, you’ll need to highlight the word(s) that you want to change. Then, click the small downward arrow on the content editor toolbar.

Next, simply click on the ‘Text Color’ link at the bottom of the dropdown list:

You’ll now see the same color options as for the whole block. Again, you can pick from one of the default options or use the ‘Custom color’ link to select any color you want.
")
The color options aren’t limited to paragraph blocks. You can also change the text color of heading blocks. As with paragraph blocks, you can set text color for the whole block in the block settings. Alternatively, you can highlight individual words and change their color.

Note: You cannot set a background color for heading blocks.
You can also change the text color in a list block, but only by highlighting the word(s) and using the toolbar. There’s no option in the block settings to change the text color for the whole of a list block.
Changing the Font Color Using the Classic Editor
If you’re still using the classic WordPress editor, then you can change the font color using the toolbar.
In the classic editor, click on the Toolbar Toggle on the far right. You’ll then see a second row of icons:

Now, you can select your text and change the font color using the font color dropdown.

Method 2. Changing the Text Color in the Theme Customizer
What if you want to change the text color across your whole website? Many of the best WordPress themes will allow you to do this using the theme customizer.
For this example, we’re using the OceanWP theme. It’s one of the top free themes available for WordPress.
In your WordPress dashboard, go to Appearance » Customize to open up the Theme Customizer.

Next, you need to look for an option such as ‘Typography’. The available options, and what they’re called, will vary depending on your theme.

Let’s go ahead and click on the Typography tab, or an equivalent option. Next, look for a setting where you can change the text of your posts and pages. In OceanWP, this is called the ‘Body’ text. You need to click on this, so you’ll can customize the font color and more.

When you click on the Font Color selector, you’ll see a color picker. Choose whatever color you want to use for your text. This will change the text color in all your posts and pages.

You can also change your heading colors in a similar way, by using the options to change H1, H2, and so on.
Once you’re happy with your changes, click the ‘Publish’ button at the top of the screen.

Tip: Choosing black or dark gray text on a white or very light background is usually best for readability.
Method 3. Changing the Text Color Using CSS Code
What if your theme doesn’t have the option to change the text color?
You can still change font color across a whole site by using the theme customizer. Go to Appearance » Customizer in the WordPress dashboard.
At the bottom of the list of options, you’ll see a tab that reads ‘Additional CSS’.

Next, click on the Additional CSS tab, and you’ll see some instructions plus a box where you can enter CSS code.
For starters, you can copy this code into the box. After that, you can change the 6 numbers to the hex code of your chosen color.
p { color:#990000; }

This will change the font color of the regular text in all your posts and pages to dark red (or whatever color you chose), like this:

If you want to change the color of the headings within your post, you can add this code instead:
h2 { color:#990000; }
Again, change the hex code to whatever color you want.
Note: You can also use this method to change the link color in WordPress.
If you’re not familiar with CSS or want a beginner-friendly CSS editor that lets you easily customize the entire styles of your website, then we recommend looking into CSS Hero. It’s a powerful visual editor that lets you customize the styles of your entire site.

We hope this tutorial helped you learn how to change the text color in WordPress. You might also like our tutorials on how to change the font size in WordPress, and how to add custom fonts in WordPress.
If you liked this article, then please subscribe to our YouTube Channel for WordPress video tutorials. You can also find us on Twitter and Facebook.
Disclosure: Our content is reader-supported. This means if you click on some of our links, then we may earn a commission. See how WPBeginner is funded, why it matters, and how you can support us.
Editorial Staff at WPBeginner is a team of WordPress experts led by Syed Balkhi. We have been creating WordPress tutorials since 2009, and WPBeginner has become the largest free WordPress resource site in the industry.
Как изменить шрифт (цвет, размер) текста, меню, заголовков в wordpress + видео
Как изменить шрифт (цвет, размер) текста, меню, заголовков в wordpress, чтобы улучшить вид страниц сайта. Внести кардинальные правки с минимальными знаниями кода. Предлагаю два способа. Первый — без использования плагинов, потому что для новичков настройки выглядят сложными. Второй — видео, если предпочитаете установить расширение.
 Примечание: Программисты, создавая темы, используют нестандартные методы кодировки. Поэтому давать 100% гарантию, что ручной метод поможет всегда, нельзя. Тогда установите плагин. Но большинство шаблонов легко измените сами.
Шаг №1
Сделайте бэкап файла style.css
Прежде всего обезопасьте ресурс от некорректного вмешательства. Сделав что-то не так, вернете прежний вид. В зависимости от того, где вносите правки, локальный это ресурс или находящийся в интернете, используйте удобный для вас метод:
- скопируйте содержание файла, с которым будете работать;
- создайте бэкап файла (сайта) с помощью плагина;
- сделайте скриншот файла стилей до внесения изменений;
- проверьте на локалке, как выглядит страница по-новому.
Примечание: Если нет локального ресурса (домашняя платформа для экспериментов и проверки результатов), рекомендую обратить внимание на OpenServer или Denwer. Это пошаговое руководство по созданию бесплатного сайта-тренажера на ПК. Прежде чем отдадите предпочтение какому-либо серверу, узнайте о различиях, выберите лучший.
В первом случае, перейдите: Консоль управления WP → Внешний вид → Редактор тем. Откройте файл стилей, скопируйте весь код. Сохраните в каком-либо редакторе на компьютере. При необходимости, заменив содержание файла, вернете первоначальные настройки.

- Если работаете на локалке, используя «Денвер», проще скопировать файл style.css, перейдя в директорию: Z: (или папка Сервер) → home → localhost → www → web → wp-content → themes → название установленной темы. Найдите файл стилей, скопируйте, сохраните в удобном месте.
- В случае использования OpenServer, путь будет таким: Диск, на который установили платформу (у меня это D:/) — OSPanel — domains — домен сайта — wp-content — themes — название Темы — style.css.
Если не понравится новый вид страниц (не заметили, что изменились блоки связанные одним кодом настроек), замените содержание или файл стилей на копию. Неважно, какой вариант используете, главное — возможность вернуть прежние настройки.
Обратите внимание: Если изменяемый параметр, например, цвет, есть в кастомных настройках Темы, правка кода не нужна. Меняйте цвет в окне, которое открывается слева. Этот функционал имеет приоритет.
Шаг №2:
Как просто выбрать шрифт для замены
Выбрать шрифт можно, используя сервис Google fonts. Там же предлагается код для вставки в файлы header и style.css. Но проще и нагляднее вносить правки вручную. Если хотите внедрить не слишком вычурный тип шрифта, найдите его в редакторе, имеющем подобный список.
Например, для создания текстов использую OpenOffice. Выбираю шрифт, смотрю, как он выглядит (обычный, курсив, жирность, цифры), запоминаю название.
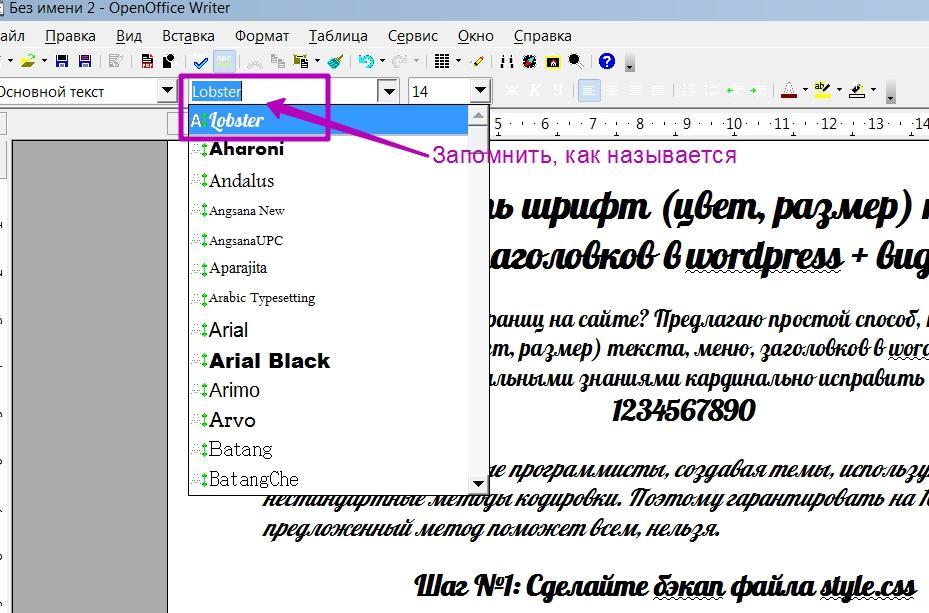
Подбирайте вариант, чтобы текст легко читался. Учитывайте, выбранный шрифт будет отражаться у пользователя, только в том случае, если имеется в его системе (браузере).
Например, шрифты, входящие в Windows могут отсутствовать в Linux и на телефонах. Поэтому лучше использовать популярные, более распространенные, имеющиеся в каждом браузере. В кодировке приведено несколько вариантов. Если первого по списку у читателя нет, отображаться будет следующий и т. д.
Нежелательно применять много разных стилей: особый для заголовка, подзаголовка, виджетов, текстов и пр. Многообразие влияет на скорость загрузки сайта. Поэтому увлекаться шрифтами не следует. Подобрав нужный, скопируйте название и переходите на сайт.
Примечание: В кодировке блоки могут быть объединены. Выбрав одну область, изменения отображаются в других, если программист задал одинаковые параметры. Поэтому, сначала проверяют, на что влияет правка. Только потом, если все устраивает, обновляют код.
Шаг №3
Предварительный визуальный обзор
измененных параметров шрифта
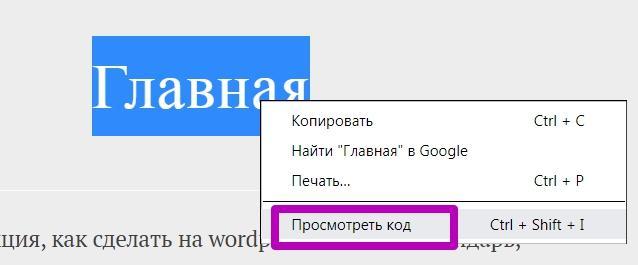
Перейдите на сайт, выделите область, которую хотите изменить. Это может быть любой блок: заголовок, контекст, записи, виджеты, меню и т. д. Правой кнопкой мыши вызовите контекстное меню, нажмите «Просмотреть код». Попадете на страницу, где меняют визуальные настройки. При этом содержание файлов останется нетронутым.
В wordpress предусмотрена функция демонстрации вносимых изменений. Это прекрасная возможность, ничего не ломая, предварительно увидеть правки. Скорректировав шрифт, как только переключитесь на другую страницу, все вернется к прежнему виду. Поэтому не бойтесь, на этой стадии ничего не испортите.
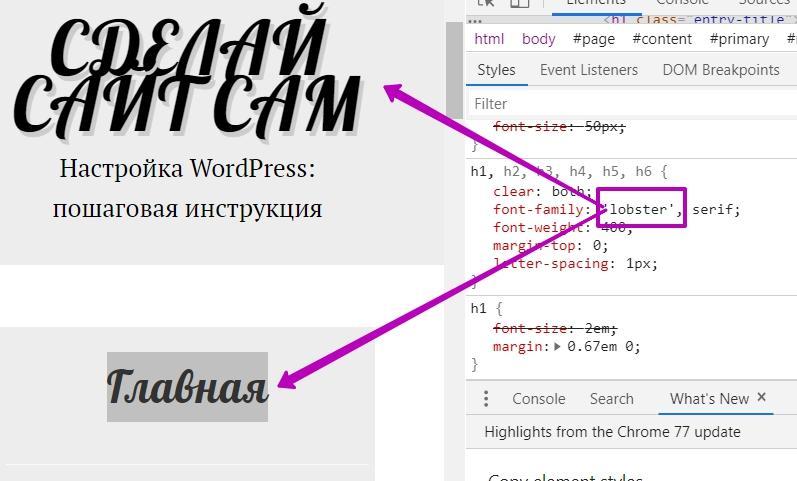
Поле с кодом может располагаться как внизу, так и справа. Это зависит от браузера. В Google работать удобнее, лучше виден блок для внесения правок. Открывается мобильная версия сайта. Прокрутите экран, чтобы выделенный фрагмент был в поле зрения. Справа ищите параметры, соответствующие шрифтам. Это все связанное с наименованием «font». Окна, если они закрыты, раздвигайте направляющими стрелочками.
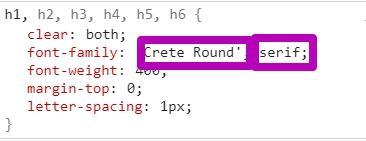
Параметры шрифтов для изменения
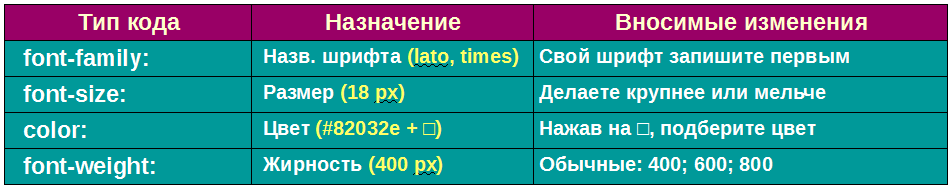
Примечание: Сохраняйте все знаки препинания, обозначения. Меняйте только числа. Список шрифтов не удаляйте, просто первым пропишите свое название. Подобрав нужный цвет, скопируйте код (типа # e34a83d). В файле стилей нет цветных квадратиков, только эти значения.
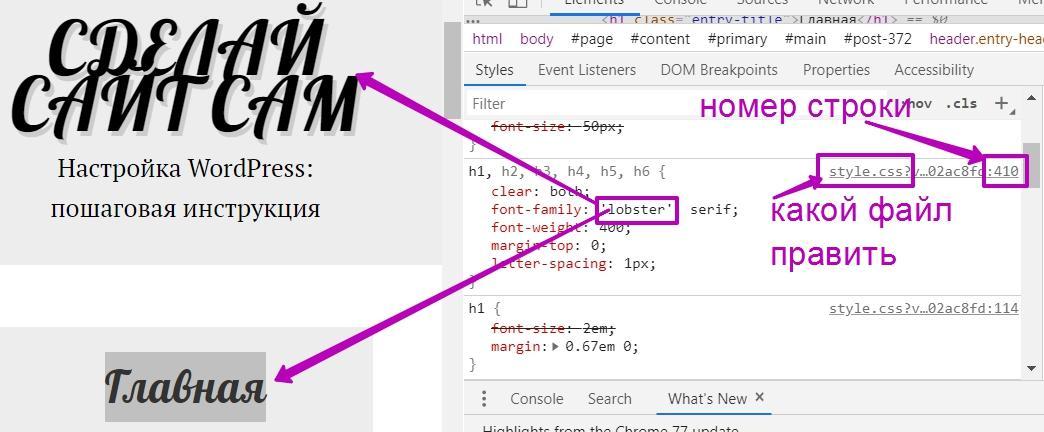
Запишите номер строки файла style.css и данные, которые меняли. Аналогично меняют цвет и размер шрифтов. Подобрав параметры, закройте панель с блоком кодировки, не страницу. Иначе настройки пропадут. Посмотрите внимательно, возможно изменения коснулись других блоков.
Шаг №4
Как изменить шрифт в файле Стилей
Если все устраивает, переходите в консоль управления: Внешний вид → Редактор тем. Ищите в открытом файле style номера строк, в которые внесете правки. Не нарушая обозначений (артиклей, запятых, кавычек), пропишите вместо имеющихся параметров свои настройки шрифта. Сохраните новые значения, нажав кнопку внизу (можно несколько раз, чтобы ускорить обновление).
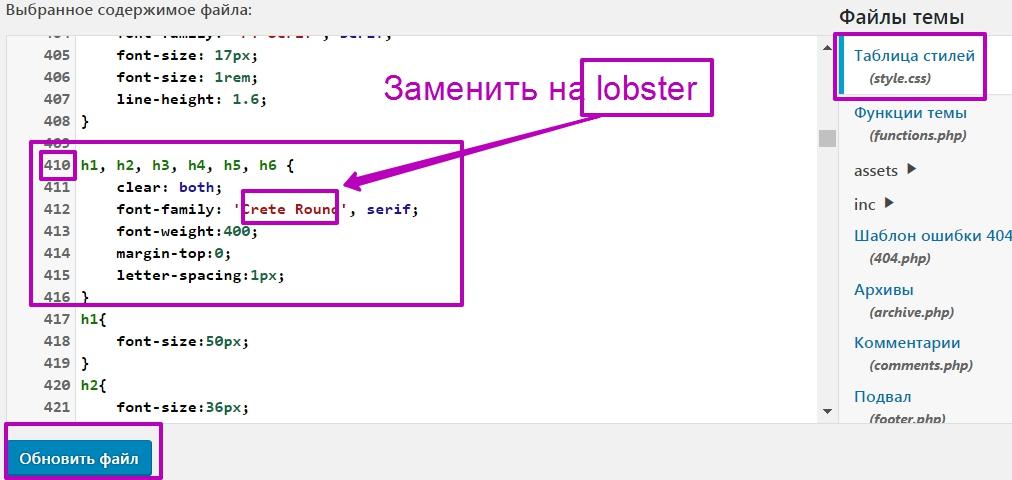
Важно: Если изменений на сайте нет, не спешите расстраиваться. Все нормально. Это браузер использует кешированые данные. Надо либо почистить кеш, либо перегрузить пару раз страницу, либо подождать, пока система, наконец-то, учтет новые параметры. Это зависит от скорости интернета, загруженности ресурса, плагинов-оптимизаторов, истории и т. п. Со временем все отобразится, если не забыли сохранить правки.
Заключение
Описывать процесс пошагово — долго, но проделав это пару раз, будете корректировать шаблон, ничего не опасаясь, очень быстро (так же меняют вид кнопок). Единственное препятствие — особо сгруппированный код. Когда для разных блоков прописывают параметры в общем разделе. Изменяя шрифт в одном месте, то же самое происходит в другом.
На какие-то элементы могут налагаться ограничения. Как не меняй, они останутся прежними, где-то есть более приоритетное указание. Поэтому адаптируя шрифты Темы, проверяйте все сначала на локальном сайте.
Важно: При обновлении темы, настройки, сделанные таким способом, пропадут. Чтобы этого не случилось, скопируйте и сохраните файл стилей перед этим процессом. После замените обновленный (дефолтный style.css). Либо восстановите данные из бэкапа, либо не обновляйте шаблон, пока не найдете оптимального решения. Например, создав дочернюю Тему. При нестандартном коде поможет установка шрифтов через плагин.
Изменение шрифтов с помощью плагина
Опытом делится известный в сети вебмастер А. Абрамович. Автор чудо- скрипта Art Decoration Shortcode для красивого оформления статей. Сама часто пользуюсь советами Артема при работе с wordpress, поэтому рекомендую посмотреть ролик.
На чтение 2 мин Опубликовано 20.03.2017
![]() Привет ! Мы продолжаем разбирать самые интересные и самые полезные плагины для сайта WordPress ! Сегодня вы узнаете как можно очень просто и быстро изменить цвет текста на сайте WordPress. Вы сможете очень просто изменить цвет текста в любом месте на вашем сайте. Изменить цвет текста на сайте вы сможете с помощью специального визуального редактора. При изменении текста вы сможете сразу же видеть все изменения на сайте. Очень простой и полезный плагин !
Привет ! Мы продолжаем разбирать самые интересные и самые полезные плагины для сайта WordPress ! Сегодня вы узнаете как можно очень просто и быстро изменить цвет текста на сайте WordPress. Вы сможете очень просто изменить цвет текста в любом месте на вашем сайте. Изменить цвет текста на сайте вы сможете с помощью специального визуального редактора. При изменении текста вы сможете сразу же видеть все изменения на сайте. Очень простой и полезный плагин !
Установить плагин SiteOrigin CSS вы сможете прямо из админ-панели WordPress. Перейдите на страницу: Плагины — Добавить новый, введите название плагина в форму поиска, нажмите Enter, установите и активируйте плагин.

Данный плагин я уже разбирал, поэтому все функции плагина мы не будем разбирать. Подробнее о плагине Смотрите Здесь !!! Далее я вам покажу как изменить цвет текста и всё.
После установки и активации плагина, перейдите на страницу: Внешний вид — Custom CSS. На странице плагина, вверху справа, нажмите на кнопку в виде одного глазика.

Далее, у вас откроется ваш сайт с CSS редактором. Обратите внимание, вверху страницы вы можете указать URL адрес страницы вашего сайта, на которой вы хотите изменить цвет текста.
Далее, нажмите по тексту, который вы хотите изменить. В CSS редакторе, вверху слева, появится CSS название элемента. Нажмите по полю Text Color, чтобы выбрать цвет текста. После выбора цвета, нажмите вверху на кнопку в виде галочки.

Далее, на странице плагина у вас появятся CSS стили для изменения цвета текста. Чтобы сохранить стили, нажмите на кнопку — Save CSS.

Всё готово ! После сохранения стилей, на вашем сайте изменится цвет текста. Если вы используете кэш плагина, удалите кэш и обновите страницу.
Остались вопросы ? Напиши комментарий ! Удачи !
Fonts can make the difference between a dull website and a beautiful one. By learning how to change font in WordPress, you can make your site look modern, professional, and branded.
But what’s the best way to use fonts in your WordPress site, and how do you choose the right fonts for your design?
In this guide, I’ll walk you through you everything you need to know about fonts in WordPress. You’ll learn about:
Fonts: The Terminology
Let’s start by looking at the terminology around fonts on the web.
- Web fonts (aka HTML fonts) are fonts hosted on a third-party website and linked to in your site.
- Locally hosted fonts are just that (hosted on your website’s servers.)
- Web-safe fonts are a limited range of fonts that are pre-installed on (almost) all computers and that you can be fairly confident all your visitors will have access to.
Let’s have a look at the options for adding fonts to your website.
How to Add Fonts to Your WordPress Site (the Options)
Before leaping into adding fonts to your site, it helps if you understand the options available to you.
Fonts are part of your site’s design, so in most cases, they will be coded via your theme – but not always. In some cases, you might decide to use a plugin to enable a wider range of fonts in your site.
Here are some of the options available to you:
- Using web fonts such as Google Fonts by installing a plugin that gives you access.
- Using web fonts by coding them into your theme and enqueuing them (not as tricky as it sounds).
- Hosting your fonts on your own website and adding those to your theme.
There are two main distinctions – whether you use web fonts, which are hosted outside your site, or whether you choose to host your font files yourself. In this guide, we’ll look at the pros and cons of each.
Let’s start by looking at web fonts: why you might choose to use them and the ways of adding them to your site.
Using Web Fonts in WordPress
Web fonts are the most popular way of adding fonts to your website because they make it easy to add a vast range of fonts.
What Are Web Fonts?
Web fonts are fonts that are hosted on a third-party provider’s website. Instead of copying the files to your own site, you link to the provider’s website and they are pulled in from there.
This means that you have access to a large range of fonts without having to use server space on your own hosting. It also means that if the font files should change over time, you don’t have to update your files and you’ll automatically have access to the new versions of the files from the provider.
Web fonts can be free or you can pay for them, usually via a subscription. Some popular providers are:
- Google Fonts. The biggest provider of free web fonts. You can also download all of their fonts to your computer, meaning if you want to create offline materials using the same fonts as your website, you can. And it’s all free.
- Adobe Edge Web Fonts. These are also free. While they’re designed to be used with Adobe products, they work well on any website.
- Fonts.com is a premium provider of fonts, which you may need to use if you have to match your web font to a font from your printed material and the font isn’t available via a free provider.
- fontfabric is a font designer providing premium fonts for use as web fonts and online. You’ll need to pay for these but will get something more individual than if you used Google fonts.
All of these providers let you serve the fonts direct from their servers by adding some code to your WordPress site or sometimes by using a plugin that means you don’t have to add any code.
Web fonts are different from web-safe fonts. You can use these as a fallback for web fonts just in case your website visitor can’t connect to the web font for some reason. I’ll show you how to do that later in this post.
Why Use Web Fonts?
So now you know what web fonts are, why would you choose to use them instead of hosting your own fonts?
Here are some of the benefits:
- Ease: adding a few lines of code or installing a plugin is quicker than downloading and uploading the font files and makes it easier to change the fonts if you decide to in the future.
- Range of fonts: there are thousands of fonts available as web fonts and the list is growing all the time.
- Updates: If the font file needs to be updated, maybe to add variable fonts (more of which shortly) or to add extra characters, your site will have access to the new version without you having to do anything.
Most websites use web fonts, with a web-safe font as a backup. And with WordPress, it’s very easy to do.
Finding the Best Web Fonts For Your Site
Having decided you’re going to use web fonts, you now have a tough decision: which fonts to use?
In the good old days when all web developers had access to were those pre-installed web-safe fonts, this was a very easy decision. Did you want to use a serif font or sans-serif? (Serif fonts have a little line or stroke at the end of a larger stroke in each character, sans-serif fonts don’t.) Having made that decision, your choices were very limited.
But now, the world is your oyster.
Here are some tips to help you choose the best font for your site:
- Look at your printed materials. Are there fonts already being used that you can find as web fonts? If not, can you find something similar?
- Look at your competitors’ websites. What kinds of fonts are they using? I don’t recommend you copy them, but there may be certain styles that convey the right sort of image to your website users.
- Think about what kind of mood you want to convey with your fonts. Some fonts look more modern, others more traditional. Some are fun, others more serious.
- Stick to fonts that are easy to read for body text, and use more interesting fonts for headlines if you want.
- Pick from the most popular Google fonts – these will be familiar to website visitors and are easy to read.
Once you’ve chosen your fonts, spend some time experimenting with them. Font providers like Google Fonts let you type in custom text to see what it looks like in your chosen font. Once you see your own text in the font, it might help you decide if that’s the right font for you.
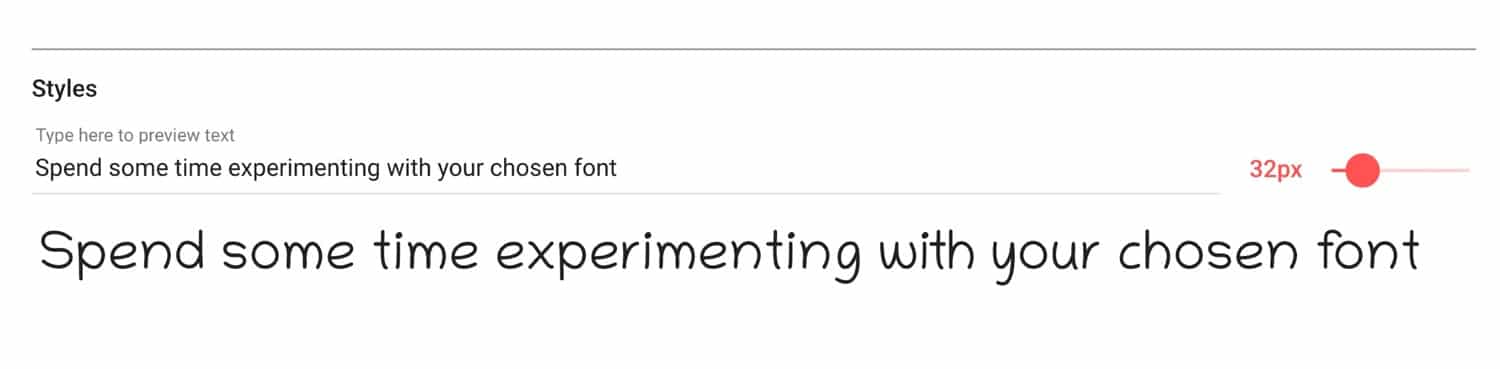
And remember, using web fonts makes it very easy to change your fonts so you can always switch to another option while you’re developing your theme or setting your site up.
How to Add Web Fonts with a WordPress Plugin
So you’ve picked your chosen font, now it’s time to add it to your site.
If you don’t feel comfortable adding code to your theme files, you can install a plugin that will let you access Google Fonts and use whichever font you want on your site.
The Google Fonts Typography plugin gives you access to the entire library of Google fonts and lets you review them via the WordPress Customizer.
Install the plugin on your site just as you would any other plugin, and then activate it.
Go to Appearance > Customize to access the Customizer. You’ll see a section for Google Fonts.

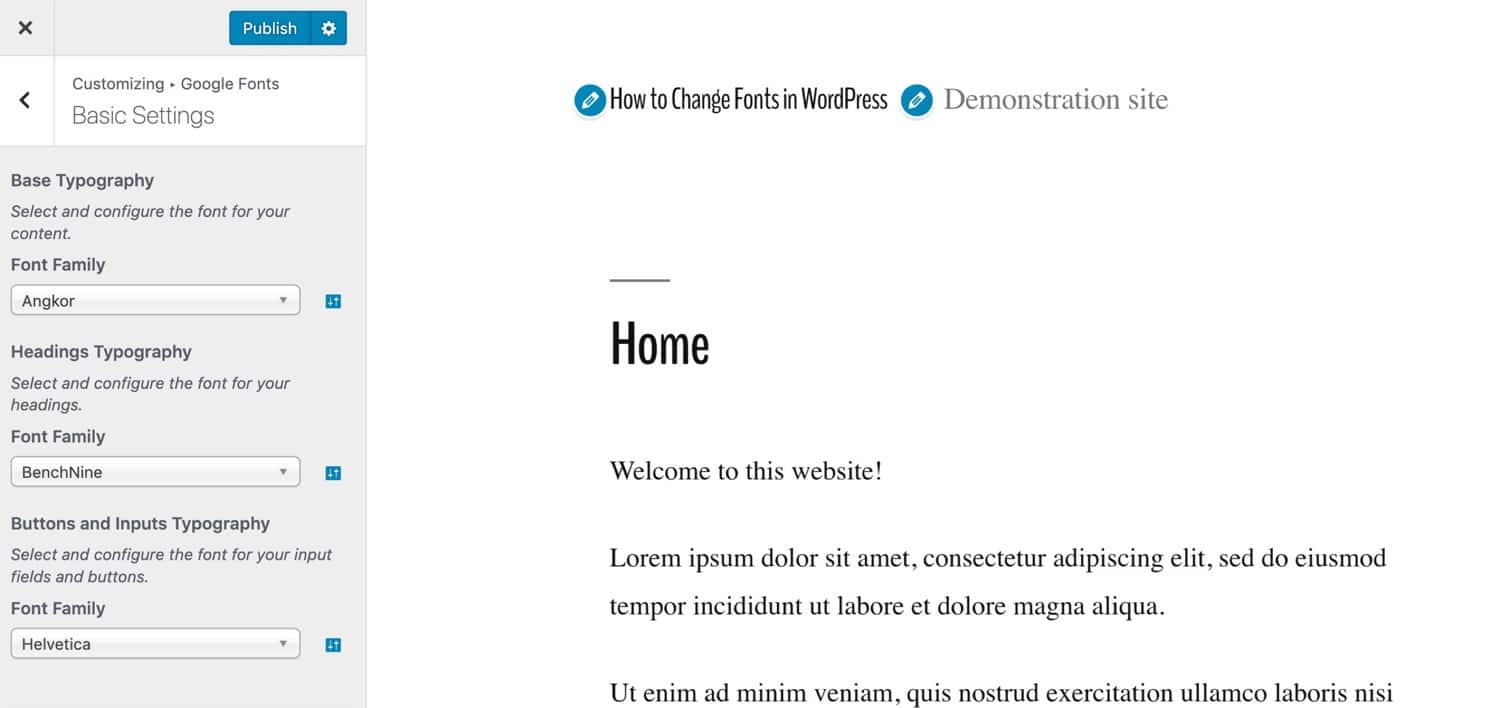
Click on that link to access the settings for your fonts. Configure them as follows:
Basic Settings: configure the default font for your body text and your headings, as well as any buttons. In the screenshot below you can see that I’ve added an easy-to-read serif font for the body and a more distinctive font for headings.
Advanced Settings: Here you can configure branding (site title and description), navigation (your menu), content and headings in more detail, your sidebar and footer. You can also load fonts without assigning them to anything, which means you can add them to any custom CSS in the Customizer.
Font Loading: If there are any font weights you don’t need (i.e. bold, italics, that kind of thing), you can uncheck them here so they don’t slow your site down needlessly.
Debugging: Use this to force any fonts to display if they’re not working as they should.
Spend some time working with these settings and testing them in the Customizer to ensure they work the way you want. Then when you’re happy with your settings, click the Publish button. Don’t leave the Customizer without clicking Publish or you will lose your changes.
Editing Font Colors
The free version of the plugin doesn’t let you edit the colors of your fonts. To do that, you’ll have to either buy the premium version or use the Additional CSS option in the Customizer.
Go back to the home screen of the Customizer and click the Additional CSS tab. You’ll be presented with an empty text area where you can add your own CSS.
To find the element you need to style, select it and use the code inspector in your browser to find out what color styling it already has.
Below I’m using Google Chrome and I’ve targeted an h1 element.
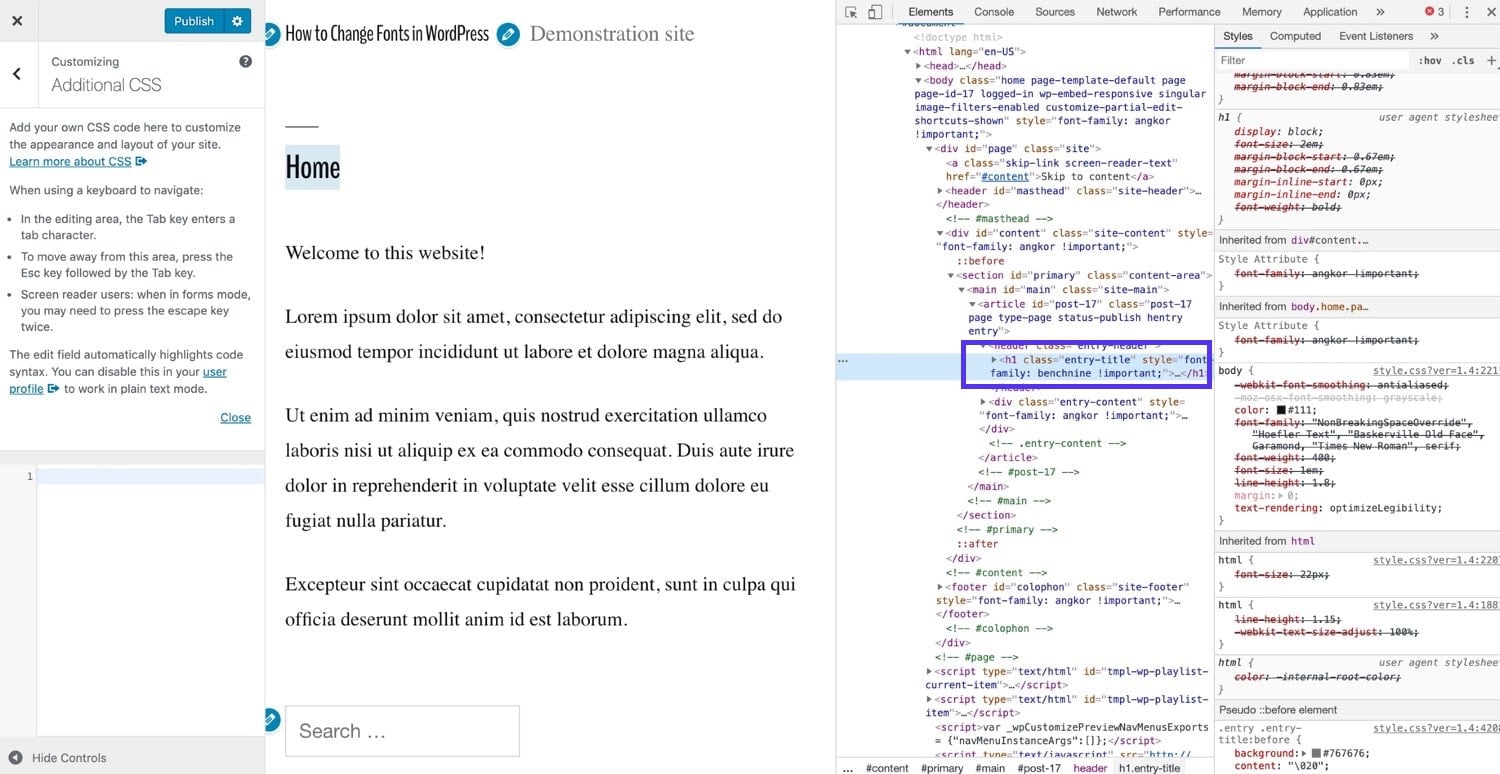
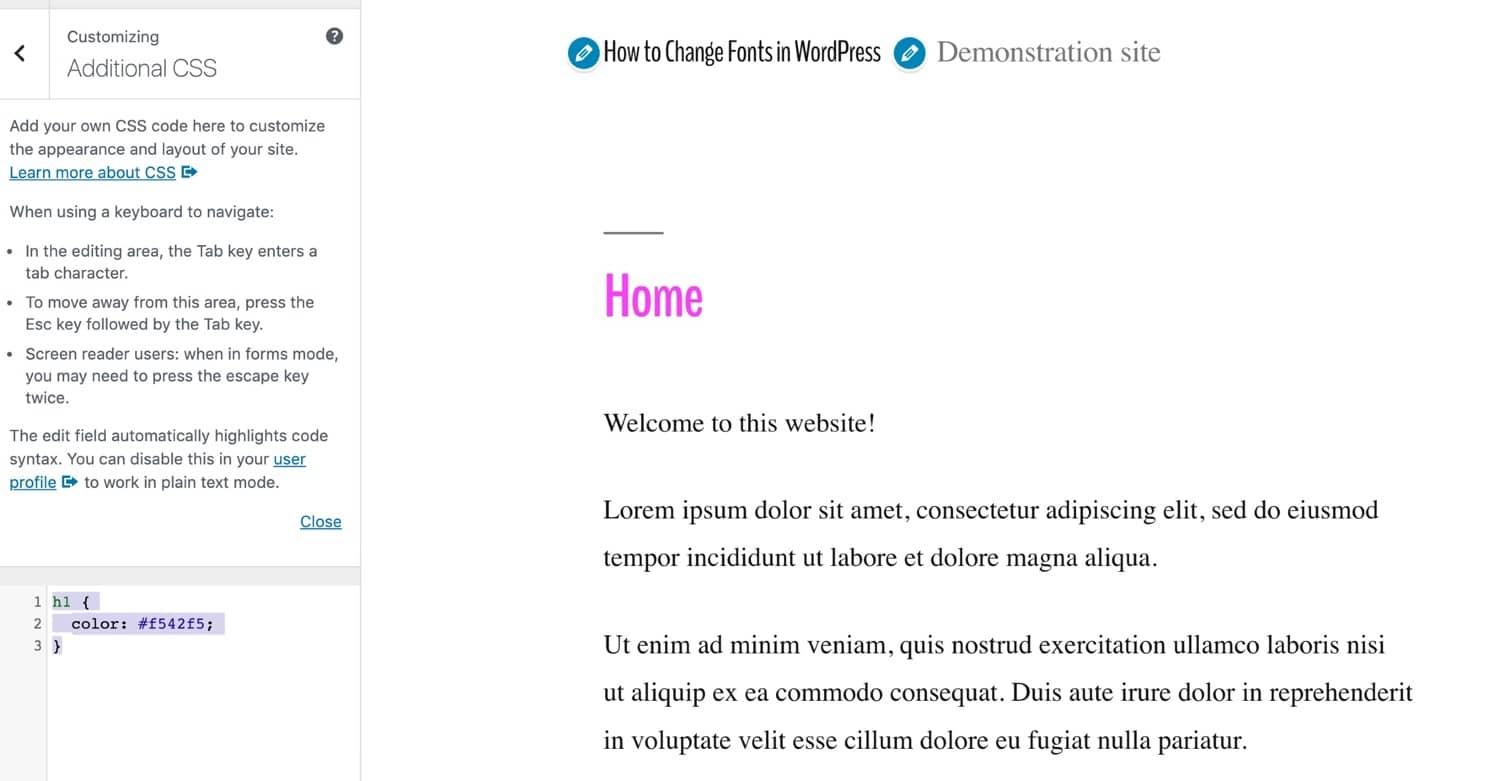
In my WordPress theme, it’s inherited its color from the body element. I want to add something more specific. In the text area for your CSS, type in the CSS for your element and the color you want to use. Mine looks like this:
h1 {
 color: #f542f5;
}
That gives me a bright pink h1 element:
You can repeat this with any text elements you want to add color to, and also to any you want to add custom fonts too that weren’t included in the options in the other screens. If you want to know what CSS to use for fonts, read on to the section of this post on amending your fonts via CSS.
How to Add Web Fonts Manually
If you don’t want to add an extra plugin to your site and have access to the code for your theme, you can install and use web fonts by adding some code to your functions file and your stylesheet.
If your site is using a bespoke theme that you can edit, then you can edit the functions file and stylesheet from your theme. But if you’re using a third party theme that you bought or got from the WordPress theme directory, then you’ll need to create a child theme. You’ll then need to give it two files: functions.php and style.css.
Let’s work through the process of manually adding web fonts to your theme. I’m going to work with Google Fonts for this example, as that’s the most commonly used and it’s free.
Picking a Font and Grabbing the Link
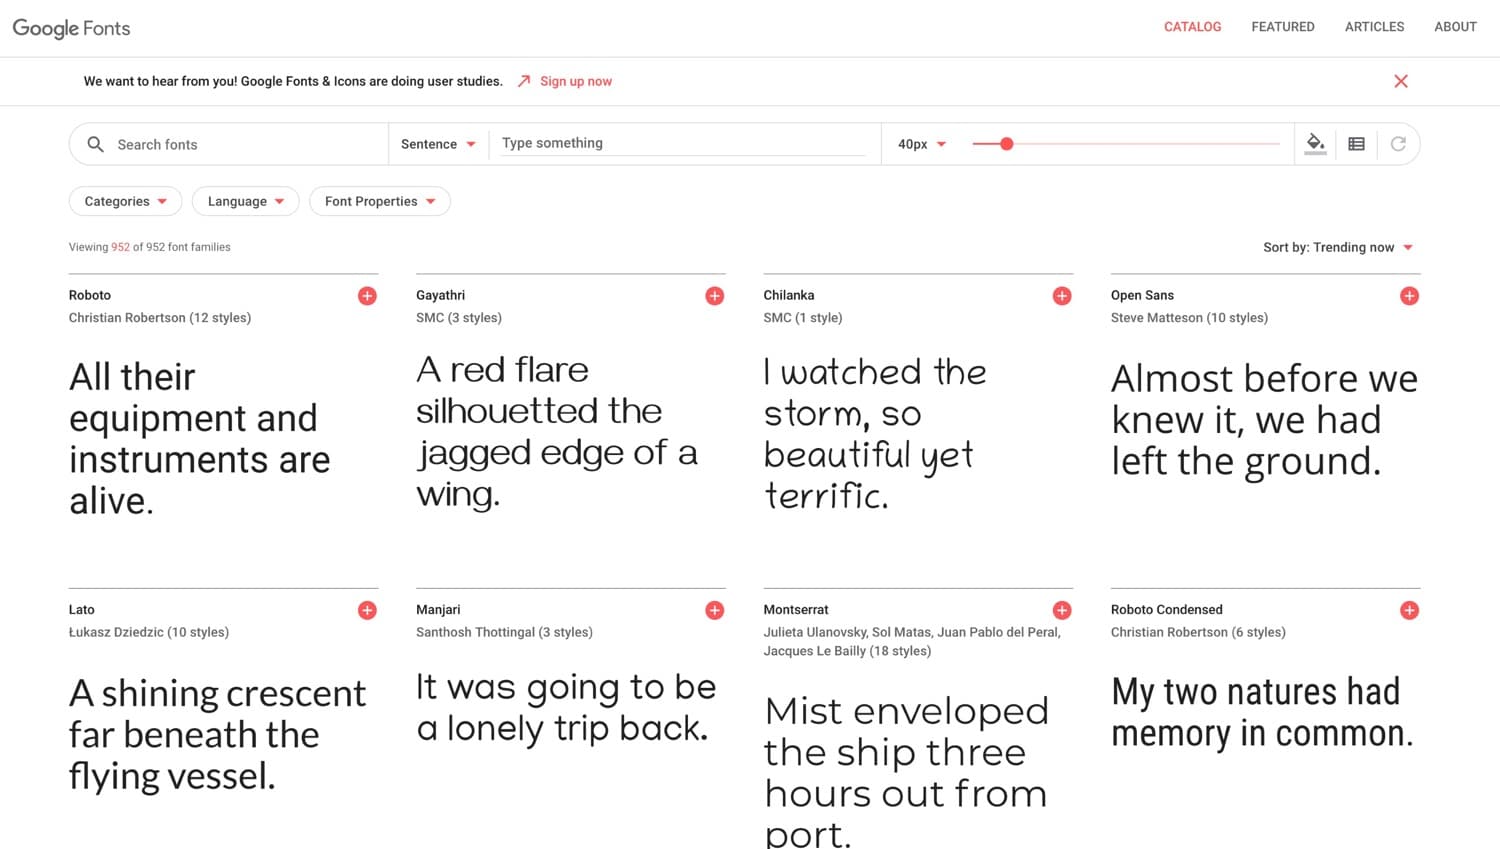
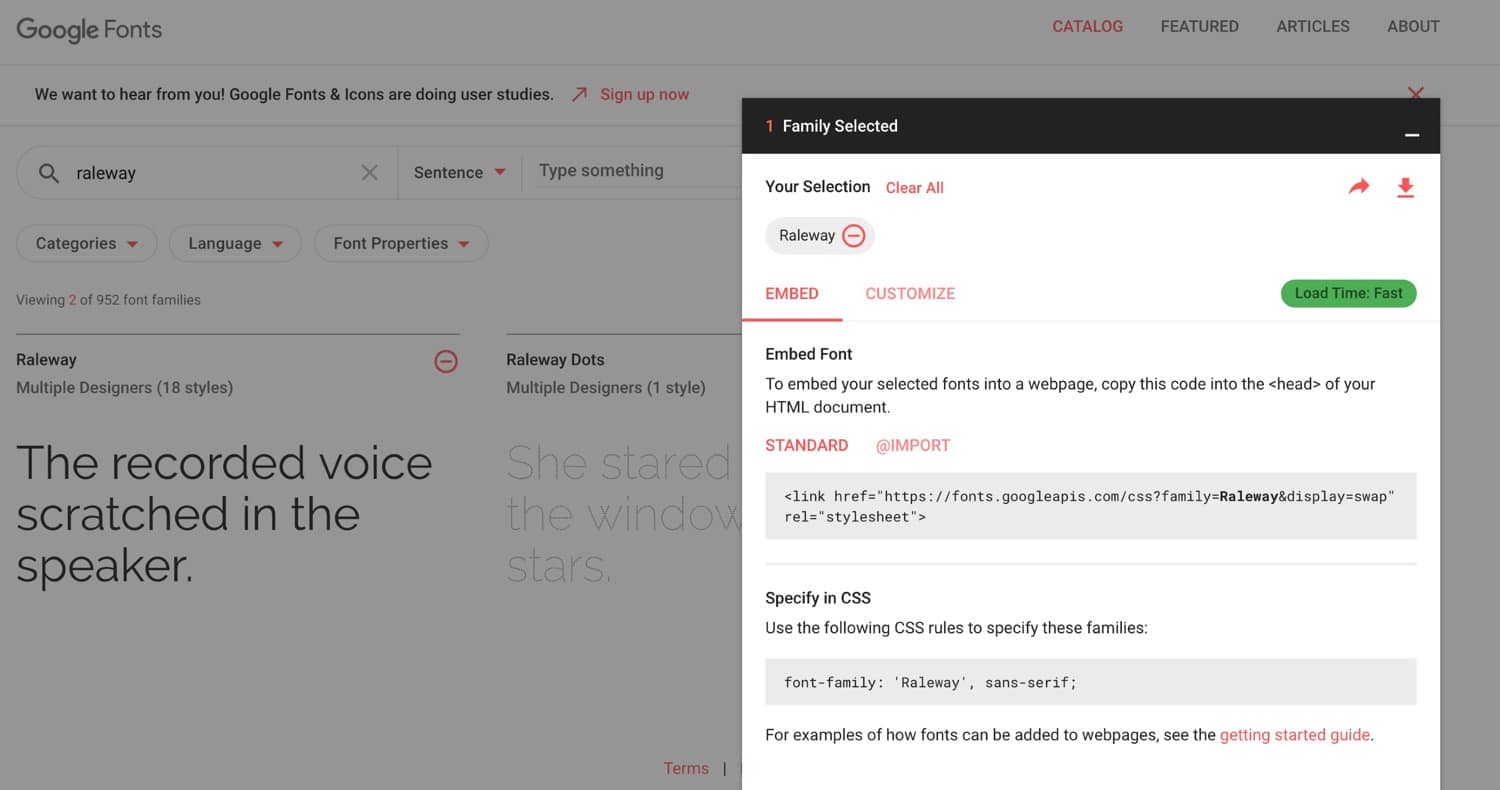
Start by choosing your font from Google Fonts. Add it to your library by clicking the plus icon next to it.
Click on the tab at the bottom of the screen for your library and you’ll see some code for you to add to your site. If you want to add extra font weights and styles, click the Customize tab and select the ones you want. Then go back to the Embed tab.
Don’t copy the code exactly: you’ll be using it, but instead of calling the font in the <head> section of your site’s header, you’ll be enqueuing the fonts. This is the correct way to do it in WordPress.
Instead, from the Embed font section, copy just the link to the font.
So, in my case, Google Fonts is giving me this code:
<link href="https://fonts.googleapis.com/css?family=Raleway" rel="stylesheet">I just need to copy this bit:
https://fonts.googleapis.com/css?family=RalewayEnqueuing the Font(s)
Open your theme’s functions file and add the following, replacing the link for my font with the link Google has given you for yours:
function kinsta_add_google_fonts() {
 wp_register_style( 'googleFonts', 'https://fonts.googleapis.com/css?family=Raleway');
 wp_enqueue_style( 'googleFonts');
}
add_action( 'wp_enqueue_scripts', 'kinsta_add_google_fonts' );
This enqueues the style from the Google Fonts servers. If you need to add more fonts to it in future, you can either add a new line to your function or add it into the same line, like so:
function kinsta_add_google_fonts() {
 wp_register_style( 'googleFonts', 'https://fonts.googleapis.com/css?family=Merriweather|Raleway');
 wp_enqueue_style( 'googleFonts');
}
add_action( 'wp_enqueue_scripts', 'kinsta_add_google_fonts' );
This will enqueue both the Merriweather and Raleway fonts.
Adding the Font(s) to Your Stylesheet
This won’t make the font work in your site yet: you still need to add it to your theme’s stylesheet.
Open the style.css file in your theme and add the code to style individual elements with your web fonts. Make sure you add it after any existing CSS for fonts, or it may get overridden by that.
Which elements you style will be up to you, but it’s common to use a legible font for the body element and something more fancy for the headings.
body {
 font-family: 'Raleway', sans-serif;
}

h1, h2, h3 {
 font-family: 'Merriweather', serif;
}
In the case above, everything on the page will use the Raleway font, except the h1, h2 and h3 elements, which will use Merriweather.
Now, save your stylesheet and check your site to make sure it all works as you expect. If the new fonts aren’t showing, try clearing your browser cache and checking that the fonts aren’t being overridden by any styling for fonts lower down in the stylesheet. This is why it’s a good idea to either add your new styling at the bottom of the stylesheet or to replace the existing font styling with your new styling (even better).
Adding a Backup Font
There may be occasions when someone visits your site and can’t access the web font files for some reason. Maybe they’re on a poor connection or using an old device that won’t render web fonts. Or maybe your web font provider is having technical issues.
For this reason, it’s a good idea to have a backup in place.
The code you’re given by Google fonts already has a backup of simply specifying serifor sans-serif, but we can go a step further than that.
Use one of the web-ready fonts that’ll already be installed on your visitor’s machine, and then include the second fallback of just serifor sans-serif, in case they’re using a mobile device that doesn’t even have the web-ready fonts.
Go back to your stylesheet and edit your CSS so it reads something like this:
body {
 font-family: 'Raleway', Helvetica, sans-serif;
}

h1, h2, h3 {
 font-family: 'Merriweather', Georgia, serif;
}
This means that people visiting your site will see your web fonts if all is well; but if it isn’t, they’ll see Helvetica or Georgia, or failing that, they’ll see whatever serif and sans-serif fonts their browser is able to load.
Hosting Your Own Fonts in WordPress
Some developers prefer not to use web fonts but instead to host fonts on their own servers and you might be one of them.
This could be for one or more of a number of reasons, including security, performance or budget.
If you’re concerned about performance, you can optimize the performance of your web fonts in a number of ways, which are covered later in this post. But if you’ve decided to go down the local route, you’ll need to know how to do it.
Why Host Your Own Fonts?
Using web fonts is often easier and can give you more flexibility as well as taking up less space on your server. But that doesn’t mean there aren’t occasions when locally hosting fonts might not be more appropriate.
Reasons you might want to host fonts locally include:
You might find that you can get around some of these issues
- You might prefer not to pull in resources from third-party providers for security reasons, knowing that your own site’s security is controlled by you.
- You might find that using a third-party service impacts on your site’s performance.
- You might have bought a font file and want to use that. Make sure your license includes website use as well as use in printed materials.
- Your site might be hosted locally, for example on an intranet, and users won’t have access to web fonts when they’re using it.
Where to Find Fonts You Can Host Locally
Many web fonts can also be downloaded for use as locally hosted fonts, but you’ll have to check that this is permitted by the license. In the case of Google Fonts, it is allowed.
You’ll also find that there are fonts not available as web fonts that you can download and host yourself. Any font file that you can download to your computer can also be uploaded to your website and stored there. If you need to use a font that isn’t available as a web font to tie in with your branding, this will be the solution but make sure your license allows it.
How to Add Locally Hosted Fonts to Your WordPress Site
So you know you want to host your fonts locally, how do you go about setting it up?
The process is different from using web fonts. You have to upload the file(s) to your site and you link to them in your stylesheet without having to enqueue them in your functions file.
Download and Convert the Fonts
Start by downloading the fonts you want to use. In Google Fonts, you can do this by clicking on the download icon when viewing the font in your library.
Unzip the font file on your computer and delete any font weights you don’t need to use on your site: there’s no point uploading files you won’t be using.
To use on your website, the files will need to be in the .woff format. If they aren’t (they won’t be if you got them from Google fonts), you can use a service like Convertio to convert them.
Upload the Fonts to Your Theme
Now upload the font file(s) to your theme, in wp-content/themes/themename, where themename is the folder for your theme. It’s a good idea to put any font files in their own folder in the theme, for example, a fonts folder.
If you’re working with a third-party theme, create a child theme for your font files and your stylesheet.
Once you’ve done that, you’ll need to add the font to your stylesheet.
Add the Fonts(s) in CSS
Open your theme’s stylesheet.
Add code like this, replacing the fonts I’ve used with your own:
@font-face {
 font-family: ‘Raleway';
 src: url( “fonts/Raleway-Medium.ttf”) format(‘woff’); /* medium */
 font-weight: normal;
 font-style: normal;
}

@font-face {
 font-family: ‘Raleway';
 src: url( “fonts/Raleway-Bold.ttf”) format(‘woff’); /* medium */
 font-weight: bold;
 font-style: normal;
}

@font-face {
 font-family: ‘Merriweather';
 src: url( “fonts/Merriweather.ttf”) format(‘woff’); /* medium */
 font-weight: normal;
 font-style: normal;
}
Add any more that you need to. Note that if you want to use the bold, italics, etc. variations of your font, you need to declare each one using @fontface and then specify the weight or style for each, as I’ve done above with Raleway for bold and normal weights.
Now add the styling for your elements, as you would when using web fonts:
body {
 font-family: 'Raleway', Helvetica, sans-serif;
 src: url( “/fonts/Raleway-Medium.ttf” );
}

h1, h2, h3 {
 font-family: 'Merriweather', Georgia, serif;
}
Your locally hosted fonts will now work with your theme.
How to Change Fonts in WordPress
Now you know how to install fonts in your WordPress site in one of two ways. How about editing them? What about changing them?
You can edit your fonts in one of three ways: via the Customizer, in the post or page editing screen, or using CSS.
Let’s look at each of those options for changing the font style, color, and size.
How to Change Font Styles in WordPress
Let’s see how we can do that both if you’re using the Block Editor or the Classic Editor.
Changing Font Styles in Block Editor (Gutenberg)
If you’re using a recent version of WordPress with the Gutenberg editor, you can change the style of your text when editing it in your post or page.
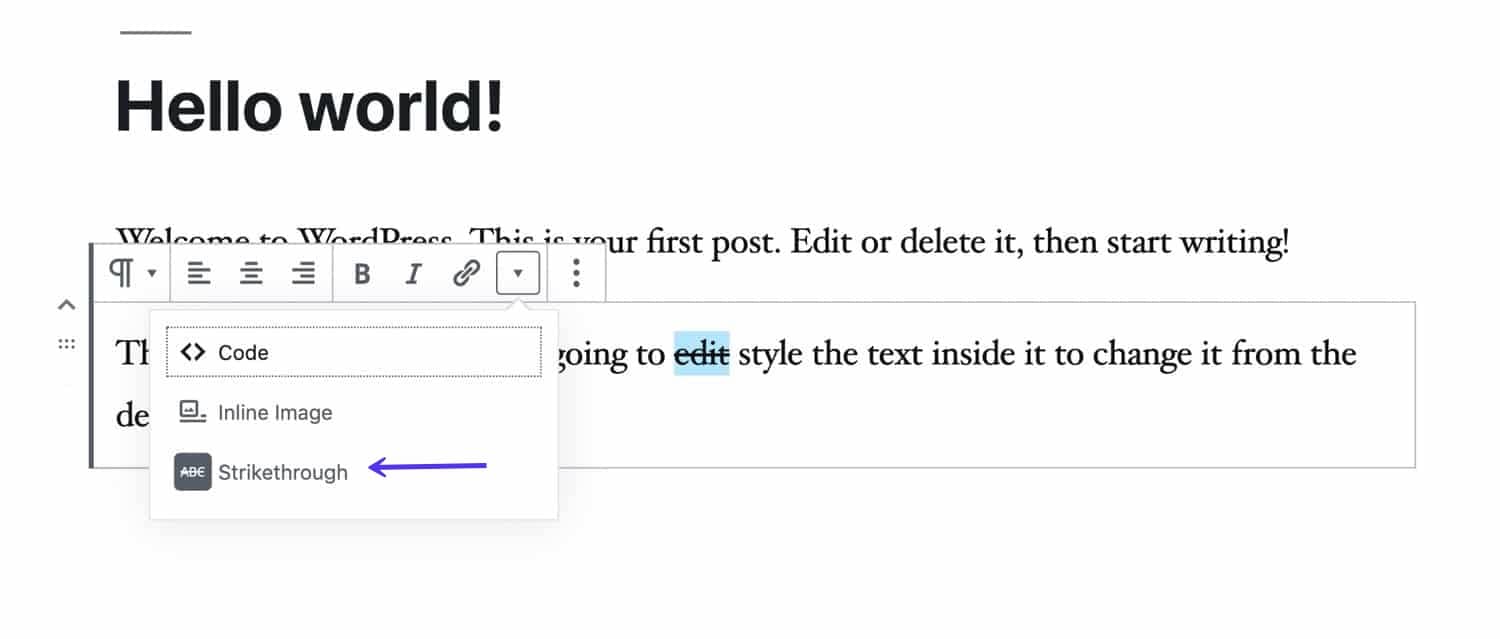
Select the block you want to edit and a styling menu will appear above it.

Select the text you want to edit and then click on the icons to make it bold or italicized. If you click the arrow next to those, you’ll see that you can also select strikethrough.
Changing Font Styles in the Classic Editor
If you’re running an older version of WordPress or you have the Classic Editor plugin installed, you can also edit font styles. (If you don’t want the Gutenberg editor, it’s better to update WordPress and disable Gutenberg.)
The Classic Editor includes a toolbar above the main editing pane where you can change the styles of your text. If you click on the Toolbar Toggle icon to its right, you can access more options, including strikethrough.
Changing Font Styles in the Customizer
If you want to change the font style for a specific element, you can do this by adding manual CSS to the Customizer.
Open the Customizer and click on Additional CSS. This will open a screen where you can type in CSS.
Now you can type in the CSS for your fonts in the box. So if you wanted to change all h1 and h2 elements to italics, you would add this CSS:
h1, h2 {
 font-style: italics;
}
Changing Font Styles in Your Stylesheet
If you’re comfortable adding code to your stylesheet, this is a better way to do it.
If you’re using a third-party theme, create a child theme for your own styling otherwise any changes you make will be lost when you update the theme. You’ll have to create a stylesheet in the child theme to tell WordPress that it’s a child theme: that’s where you put your new font styling.
If you’re using your own theme, you can edit and amend the CSS in your own stylesheet. The file is style.css and you’ll find it in your theme folder in wp-content/themes.
Add any font styling at the end of your stylesheet so it isn’t canceled out by anything already there. Or even better, remove and overwrite any existing font styling, unless you want to retain it.
Change the weight of an element with font-weight:
span.featured {
 font-weight = bold;
}
Change the style of an element with font-style:
span.featured {
 font-style = italic;
}
Change the alignment with text-alignment:
span.featured {
 text-alignment: center;
}
How to Change Font Colors in WordPress
Another change you might want to make is to change the color of certain text in your site. Beware of going overboard with this: your theme has been designed with colors that work well together and if you add too many colors, it could look garish and unprofessional.
Changing Font Colors in Gutenberg
Gutenberg text blocks let you edit text color and background. To do this, open the block you want to amend and click on the Color Settings tab in the Block section on the right of the screen.
From here you can edit the background color and the text color for text blocks.
Note that WordPress will warn you if the combination of colors you use will be bad for accessibility, such as in the example I’ve used above. Avoid the temptation to go overboard with your colors – after all you chose your theme because its color design was appropriate for your site, and adding lots more colors could make it look garish.
If you click the Advanced tab below the Color Settings tab, you can also add a class to that block, which you can then style in the Customizer or your stylesheet. So for example if you added a class of .featuredto your block, you could then style it using that class.
Changing Font Colors in the Classic Editor
The classic editor’s toolbar lets you change the color of whatever text you select. So you can select an individual word and change its color. Below I’ve made a sentence red.
While this does, in theory, give you plenty of flexibility, beware overusing it. If you start adding lots more colors to your text it could result in a site that’s difficult to read and bad for accessibility.
Changing Font Colors in the Customizer
If your theme includes options to change the website color scheme, this is the best place to do it.
For example, in the site below I’m using a theme that lets me choose a new color scheme for the entire theme. This helps ensure the new colors work together well and are coherent.
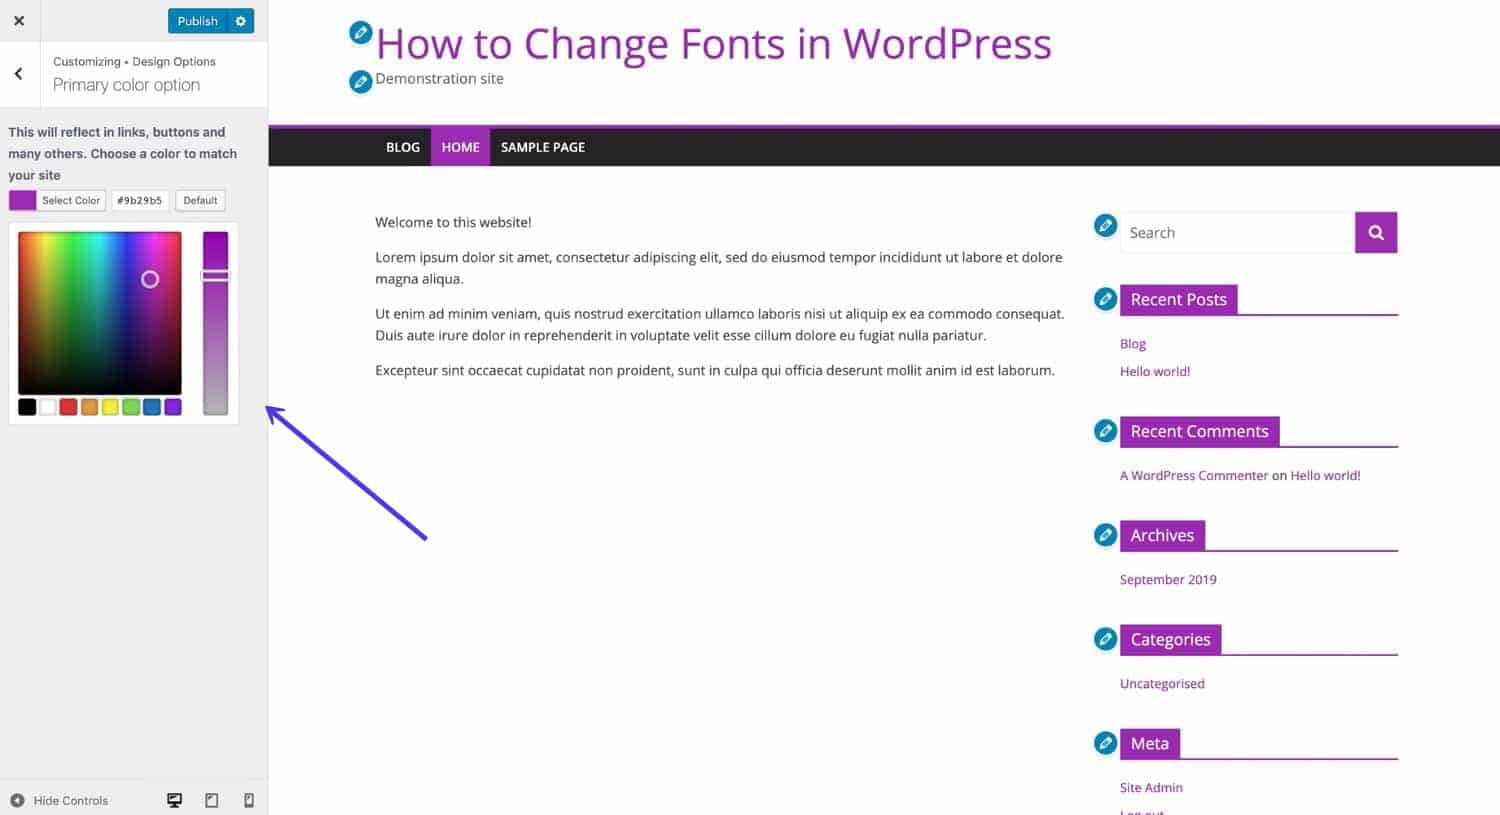
The options for this will vary according to your theme – some themes let you target headings, links and other elements and change their color.
If you want to target specific elements to change their color but this isn’t an option with your theme, you can add CSS in the Customizer to do this.
Select Customize > Additional CSS, and type your CSS in the text box.
For example, if you want to change the color of your h1headings, you type this:
h1 {
 color: #564534;
}
If that doesn’t work, you may need to add more specific CSS. In my theme, the color for the site heading link is coded using the #site-titleID, so I need to add this CSS:
#site-title a {
 color: #564534;
}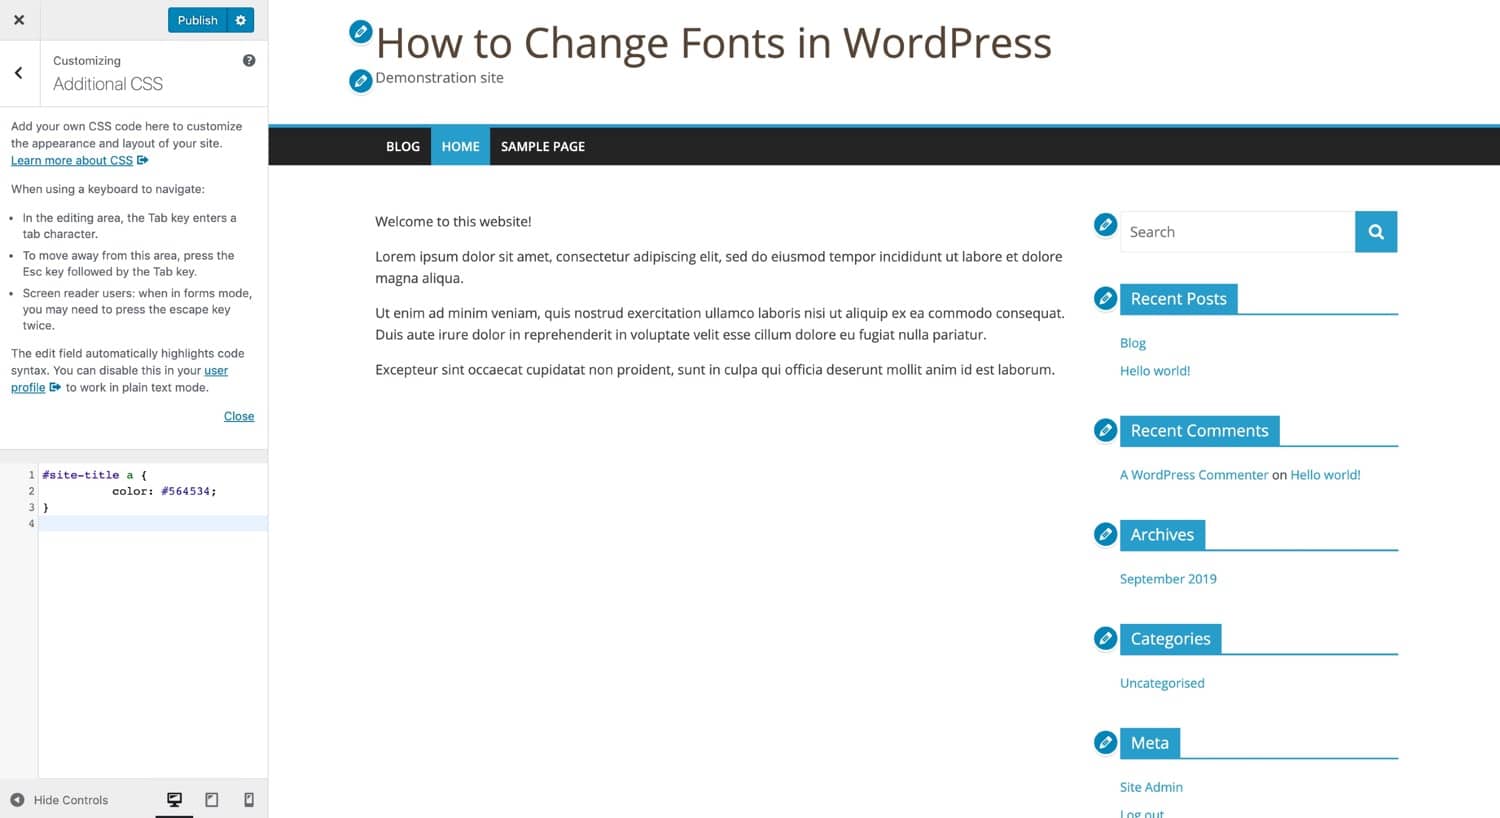
Replace the color I’ve used above with your own color.
When you’re happy with your changes, click the Publish button.
Changing Font Colors in Your Stylesheet
As with font styles, you can also edit your theme’s stylesheet (or create a child theme) to change the font colors.
Change the color with color. Below I’m changing the main color for my site’s text, using the bodyelement:
body {
 color = #222222;
}
Make sure you override any existing styling for the same elements and that you also style any elements that inherit that styling if you want them to have a different color. All text will inherit the color of the body element unless it has its own styling.
Changing Font Sizes in WordPress
For accessibility reasons, you might decide you want your fonts to be bigger than they are by default in your theme. Or you might decide the headings in your widget areas are too small, for example.
Changing Font Size in Gutenberg
With the Gutenberg editor, you can change the size of the text within each block.
Select the block and then click on the Text Settings tab in the Blocks menu on the right of the screen. You can make the text in the block smaller or larger, as shown below.
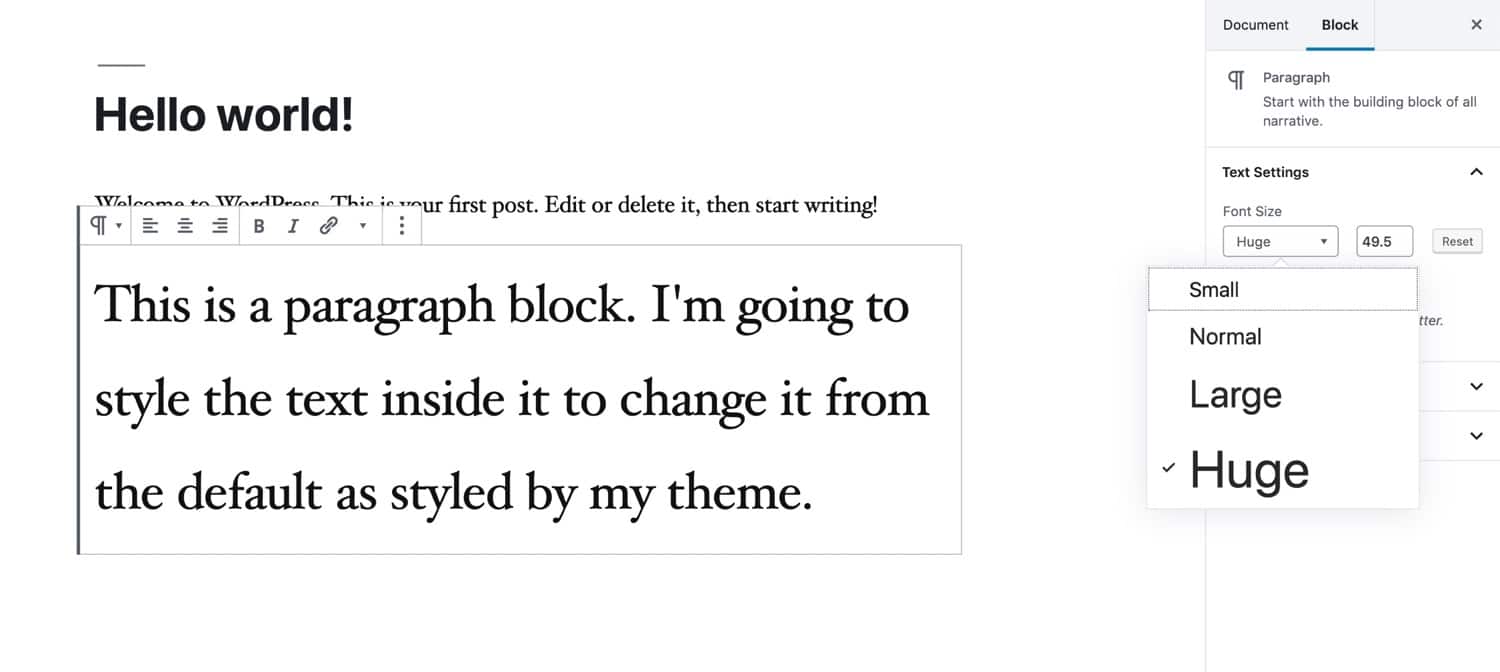
Beware doing this too much: if all the paragraphs on your page are different sizes, it will look disjointed and be difficult to read.
Changing Font Size in the Classic Editor
The classic editor doesn’t give you the option to select specific text and change its size: so if you do need this feature, you’ll need to upgrade to Gutenberg. Sorry!
Changing Font Size in the Customizer
Depending on your theme, you may have an option to change the font sizes in the Customizer, either changing the font size for the whole site or targeting headers and body text.
If your theme doesn’t include a Customizer option to change font sizes, but you can use the Additional CSS option. Go to Customize > Additional CSS and type the CSS in the box.
Below I’m making the headings in the widget areas bigger, with this CSS:
h2.widget-title {
 font-size: 3em;
}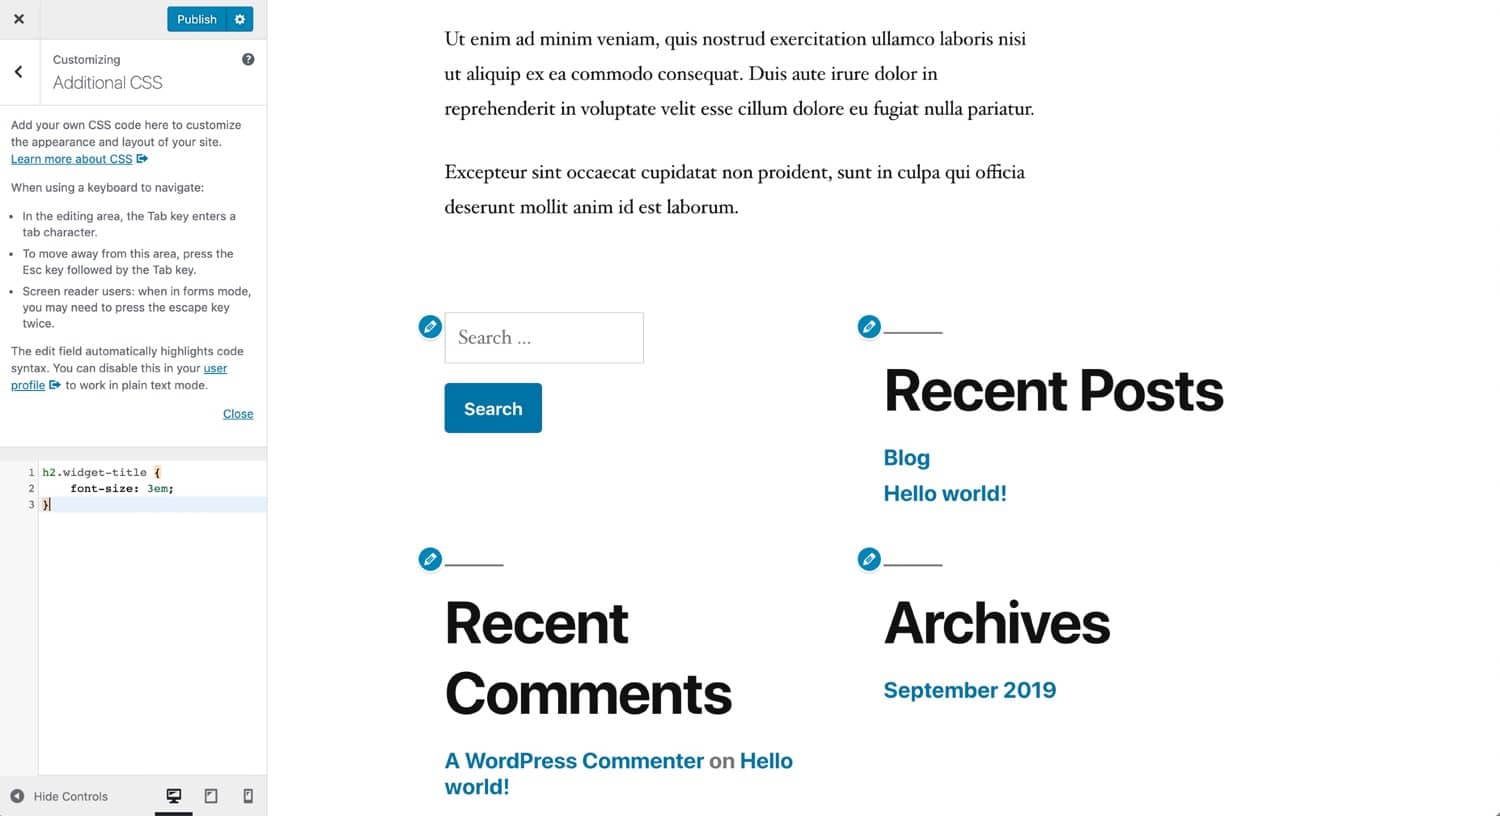
Maybe that’s a bit too big, but it gives you the general idea.
Changing Font Size in Your Stylesheet
Changing the size of fonts in your stylesheet works in a similar way to changing any other styling for your fonts.
If you want to change the size of all the text in your site, you would use the bodyelement:
body {
 font-size: 14px;
}
For the bodyelement you use pixels, but for other elements you use emso the size is relative to the size of the bodyelement.
h1,
#site-title {
 font-size: 2em;
}
Remember if you’re going to make changes to the fonts in your theme stylesheet, test it on a development or staging site first so you don’t run the risk of ruining your live site.
How to Optimize Fonts in WordPress
Whether you’re using web fonts or locally hosted fonts, it makes sense to do everything you can to optimize your fonts.
Here I’ll give you some tips on optimizing your fonts, both for speed and for design.
Optimizing Fonts for Performance
If you’re using web fonts on your site, you’ll want to do everything they can to ensure that they’re delivered to your pages as fast as possible and that the fact they’re hosted elsewhere doesn’t slow things down.
- Use caching to ensure pages don’t need to be rebuilt every time they’re loaded. Kinsta hosting plans come with caching built-in.
- Use a web fonts provider that delivers fonts using a Content Delivery Network or CDN. Google Fonts does this and it speeds up delivery of the fonts.
- Only use those fonts you need. Don’t enqueue variations of fonts (weights, styles) you won’t be using in your stylesheet. If you find you need them at a later date, you can always add them then.
- If using web fonts, make sure you enqueue them properly. Don’t use an @import line in your stylesheet, even if this is what your web font provider tells you to do.
- When adding CSS manually, add it to your theme’s stylesheet and not to the <head> section of your header.php file. This is one reason why it’s better practice to code the CSS manually into your theme rather than using the Customizer or a block, as both of those will add inline CSS to the page instead of adding it to the stylesheet.
- Consider using CSS inlining to shave a few extra milliseconds off page load times. This is a process that uses base64 encoding to add CSS from your stylesheet into the page before loading it, saving the browser having to load extra files. It may seem counterintuitive given the advice above about not writing inline CSS, but it still works from a separate CSS file and doesn’t mean manually coding inline CSS. If you’re loading multiple fonts, inlining can speed up your site a little.
- Use minification to reduce the size of your stylesheet. This can easily be done if you are a Kinsta customer by taking advantage of the code minification feature located right in the MyKinsta dashboard. This allows customers to enable automatic CSS and JavaScript minification with a simple click, speeding up their sites with zero manual effort.
- If you’re hosting fonts locally, only upload the files for the fonts and the font weights and styles you need. Only add those variations that you need using the @font-face declaration.
- Consider using a CDN to host your own fonts instead of hosting them on your own server.
- When hosting your own fonts, include additional formats: woff2, woff, ttf, and eot. Browsers can then select the version that’s going to load fastest.
- If you’re using a different font for your site title, enqueue just the characters you need instead of the whole font library.
So if your site title is Kinsta, you could make a small performance improvement by ensuing the stylesheet like this:
function kinsta_add_title_font() {
 wp_register_style( 'googleFonts', ‘https://fonts.googleapis.com/css?family=Raleway&text=“kinsta');
 wp_enqueue_style( 'googleFonts');
}
add_action( 'wp_enqueue_scripts', 'kinsta_add_title_font' );
Optimizing Fonts for Design
As well as optimizing the performance of your fonts, it also makes sense to make sure they’re visually optimized: that they fit well with the design of your site and with your offline materials.
This is particularly the case if you use a plugin or a child theme to add extra fonts on top of the ones already bundled with your theme. There is a risk of your theme looking messy if there are too many fonts in too many colors and styles.
Before you add extra fonts to your site, consider the following:
- Are the new fonts consistent with your existing fonts? Do they convey a similar style or mood?
- If you need to match a font that’s been used for print materials but can’t use the same font as a web font, try finding as close a match as possible on Google Fonts.
- Are the fonts you’ve chosen consistent with your brand? If you’re running a serious business, you don’t want to use Comic Sans (in fact, whatever kind of website you’re running, you don’t want to use Comic Sans).
- If you’re changing the colors of your fonts, try to use colors that are already in the design of your theme or that coordinate with them. Adding too many colors will make your site look garish and unprofessional.
- If you’re trying to pick out a pair of fonts on Google Fonts, try using a service like fontpair to find two that work well together.
The fonts you use in your design will have an impact on the impression visitors get when they reach your site. Make sure you’ve considered this and chosen fonts that will reinforce your brand.
Working with Variable Fonts
Variable fonts are a new kind of fonts that make adding more fonts to your site more efficient.
They allow more information to be stored in one font file, so that if you want variations on your font (bold, italics, etc.), you don’t have to load multiple font files, but can just load the one.
For a font with multiple font weights, styles and slants, this could save a lot of file space and make the process of enqueuing the font or adding it via @fontface easier too.
Variable fonts are supported in the latest versions of Chrome, Edge, Firefox, and Safari, but not by older browsers; so if you do use them, you’ll need a fallback. And there aren’t many variable fonts available just yet. Google Fonts doesn’t include any, but Google does support the specification, so it’s likely they will be added over time.
Font developers are working on creating more variable fonts and improving their reliability, so it’s worth watching progress so that you can use variable fonts to optimize your fonts once they become more stable.
Fonts are taken for granted but they’re crucial for ANY website (no exceptions). Learn how to change font, font size, and font color in WordPress! 🎨👨👦Click to Tweet
Summary
Changing fonts on your WordPress site isn’t a straightforward task. You have different possibilities to choose from:
- Using web fonts by installing a plugin.
- Using web fonts by coding them into your theme and enqueuing them.
- Hosting your fonts.
Then, you should focus on how to optimize your fonts for better performance. If you follow the tips in this guide, you should be able not only to change fonts in WordPress but also have more control over them in your theme.
Want to declutter your page or blog layout to make your readers focus on your content? Then, check out this: How to Remove the Sidebar in WordPress (4 Methods).
Get all your applications, databases and WordPress sites online and under one roof. Our feature-packed, high-performance cloud platform includes:
- Easy setup and management in the MyKinsta dashboard
- 24/7 expert support
- The best Google Cloud Platform hardware and network, powered by Kubernetes for maximum scalability
- An enterprise-level Cloudflare integration for speed and security
- Global audience reach with up to 35 data centers and 275 PoPs worldwide
Test it yourself with $20 off your first month of Application Hosting or Database Hosting. Explore our plans or talk to sales to find your best fit.
Fonts can make the difference between a dull website and a beautiful one. By learning how to change font in WordPress, you can make your site look modern, professional, and branded.
But what’s the best way to use fonts in your WordPress site, and how do you choose the right fonts for your design?
In this guide, I’ll walk you through you everything you need to know about fonts in WordPress. You’ll learn about:
Fonts: The Terminology
Let’s start by looking at the terminology around fonts on the web.
- Web fonts (aka HTML fonts) are fonts hosted on a third-party website and linked to in your site.
- Locally hosted fonts are just that (hosted on your website’s servers.)
- Web-safe fonts are a limited range of fonts that are pre-installed on (almost) all computers and that you can be fairly confident all your visitors will have access to.
Let’s have a look at the options for adding fonts to your website.
How to Add Fonts to Your WordPress Site (the Options)
Before leaping into adding fonts to your site, it helps if you understand the options available to you.
Fonts are part of your site’s design, so in most cases, they will be coded via your theme – but not always. In some cases, you might decide to use a plugin to enable a wider range of fonts in your site.
Here are some of the options available to you:
- Using web fonts such as Google Fonts by installing a plugin that gives you access.
- Using web fonts by coding them into your theme and enqueuing them (not as tricky as it sounds).
- Hosting your fonts on your own website and adding those to your theme.
There are two main distinctions – whether you use web fonts, which are hosted outside your site, or whether you choose to host your font files yourself. In this guide, we’ll look at the pros and cons of each.
Let’s start by looking at web fonts: why you might choose to use them and the ways of adding them to your site.
Using Web Fonts in WordPress
Web fonts are the most popular way of adding fonts to your website because they make it easy to add a vast range of fonts.
What Are Web Fonts?
Web fonts are fonts that are hosted on a third-party provider’s website. Instead of copying the files to your own site, you link to the provider’s website and they are pulled in from there.
This means that you have access to a large range of fonts without having to use server space on your own hosting. It also means that if the font files should change over time, you don’t have to update your files and you’ll automatically have access to the new versions of the files from the provider.
Web fonts can be free or you can pay for them, usually via a subscription. Some popular providers are:
- Google Fonts. The biggest provider of free web fonts. You can also download all of their fonts to your computer, meaning if you want to create offline materials using the same fonts as your website, you can. And it’s all free.
- Adobe Edge Web Fonts. These are also free. While they’re designed to be used with Adobe products, they work well on any website.
- Fonts.com is a premium provider of fonts, which you may need to use if you have to match your web font to a font from your printed material and the font isn’t available via a free provider.
- fontfabric is a font designer providing premium fonts for use as web fonts and online. You’ll need to pay for these but will get something more individual than if you used Google fonts.
All of these providers let you serve the fonts direct from their servers by adding some code to your WordPress site or sometimes by using a plugin that means you don’t have to add any code.
Web fonts are different from web-safe fonts. You can use these as a fallback for web fonts just in case your website visitor can’t connect to the web font for some reason. I’ll show you how to do that later in this post.
Why Use Web Fonts?
So now you know what web fonts are, why would you choose to use them instead of hosting your own fonts?
Here are some of the benefits:
- Ease: adding a few lines of code or installing a plugin is quicker than downloading and uploading the font files and makes it easier to change the fonts if you decide to in the future.
- Range of fonts: there are thousands of fonts available as web fonts and the list is growing all the time.
- Updates: If the font file needs to be updated, maybe to add variable fonts (more of which shortly) or to add extra characters, your site will have access to the new version without you having to do anything.
Most websites use web fonts, with a web-safe font as a backup. And with WordPress, it’s very easy to do.
Finding the Best Web Fonts For Your Site
Having decided you’re going to use web fonts, you now have a tough decision: which fonts to use?
In the good old days when all web developers had access to were those pre-installed web-safe fonts, this was a very easy decision. Did you want to use a serif font or sans-serif? (Serif fonts have a little line or stroke at the end of a larger stroke in each character, sans-serif fonts don’t.) Having made that decision, your choices were very limited.
But now, the world is your oyster.
Here are some tips to help you choose the best font for your site:
- Look at your printed materials. Are there fonts already being used that you can find as web fonts? If not, can you find something similar?
- Look at your competitors’ websites. What kinds of fonts are they using? I don’t recommend you copy them, but there may be certain styles that convey the right sort of image to your website users.
- Think about what kind of mood you want to convey with your fonts. Some fonts look more modern, others more traditional. Some are fun, others more serious.
- Stick to fonts that are easy to read for body text, and use more interesting fonts for headlines if you want.
- Pick from the most popular Google fonts – these will be familiar to website visitors and are easy to read.
Once you’ve chosen your fonts, spend some time experimenting with them. Font providers like Google Fonts let you type in custom text to see what it looks like in your chosen font. Once you see your own text in the font, it might help you decide if that’s the right font for you.
And remember, using web fonts makes it very easy to change your fonts so you can always switch to another option while you’re developing your theme or setting your site up.
How to Add Web Fonts with a WordPress Plugin
So you’ve picked your chosen font, now it’s time to add it to your site.
If you don’t feel comfortable adding code to your theme files, you can install a plugin that will let you access Google Fonts and use whichever font you want on your site.
The Google Fonts Typography plugin gives you access to the entire library of Google fonts and lets you review them via the WordPress Customizer.
Install the plugin on your site just as you would any other plugin, and then activate it.
Go to Appearance > Customize to access the Customizer. You’ll see a section for Google Fonts.
Click on that link to access the settings for your fonts. Configure them as follows:
Basic Settings: configure the default font for your body text and your headings, as well as any buttons. In the screenshot below you can see that I’ve added an easy-to-read serif font for the body and a more distinctive font for headings.
Advanced Settings: Here you can configure branding (site title and description), navigation (your menu), content and headings in more detail, your sidebar and footer. You can also load fonts without assigning them to anything, which means you can add them to any custom CSS in the Customizer.
Font Loading: If there are any font weights you don’t need (i.e. bold, italics, that kind of thing), you can uncheck them here so they don’t slow your site down needlessly.
Debugging: Use this to force any fonts to display if they’re not working as they should.
Spend some time working with these settings and testing them in the Customizer to ensure they work the way you want. Then when you’re happy with your settings, click the Publish button. Don’t leave the Customizer without clicking Publish or you will lose your changes.
Editing Font Colors
The free version of the plugin doesn’t let you edit the colors of your fonts. To do that, you’ll have to either buy the premium version or use the Additional CSS option in the Customizer.
Go back to the home screen of the Customizer and click the Additional CSS tab. You’ll be presented with an empty text area where you can add your own CSS.
To find the element you need to style, select it and use the code inspector in your browser to find out what color styling it already has.
Below I’m using Google Chrome and I’ve targeted an h1 element.
In my WordPress theme, it’s inherited its color from the body element. I want to add something more specific. In the text area for your CSS, type in the CSS for your element and the color you want to use. Mine looks like this:
h1 {
 color: #f542f5;
}
That gives me a bright pink h1 element:
You can repeat this with any text elements you want to add color to, and also to any you want to add custom fonts too that weren’t included in the options in the other screens. If you want to know what CSS to use for fonts, read on to the section of this post on amending your fonts via CSS.
How to Add Web Fonts Manually
If you don’t want to add an extra plugin to your site and have access to the code for your theme, you can install and use web fonts by adding some code to your functions file and your stylesheet.
If your site is using a bespoke theme that you can edit, then you can edit the functions file and stylesheet from your theme. But if you’re using a third party theme that you bought or got from the WordPress theme directory, then you’ll need to create a child theme. You’ll then need to give it two files: functions.php and style.css.
Let’s work through the process of manually adding web fonts to your theme. I’m going to work with Google Fonts for this example, as that’s the most commonly used and it’s free.
Picking a Font and Grabbing the Link
Start by choosing your font from Google Fonts. Add it to your library by clicking the plus icon next to it.
Click on the tab at the bottom of the screen for your library and you’ll see some code for you to add to your site. If you want to add extra font weights and styles, click the Customize tab and select the ones you want. Then go back to the Embed tab.
Don’t copy the code exactly: you’ll be using it, but instead of calling the font in the <head> section of your site’s header, you’ll be enqueuing the fonts. This is the correct way to do it in WordPress.
Instead, from the Embed font section, copy just the link to the font.
So, in my case, Google Fonts is giving me this code:
<link href="https://fonts.googleapis.com/css?family=Raleway" rel="stylesheet">I just need to copy this bit:
https://fonts.googleapis.com/css?family=RalewayEnqueuing the Font(s)
Open your theme’s functions file and add the following, replacing the link for my font with the link Google has given you for yours:
function kinsta_add_google_fonts() {
 wp_register_style( 'googleFonts', 'https://fonts.googleapis.com/css?family=Raleway');
 wp_enqueue_style( 'googleFonts');
}
add_action( 'wp_enqueue_scripts', 'kinsta_add_google_fonts' );
This enqueues the style from the Google Fonts servers. If you need to add more fonts to it in future, you can either add a new line to your function or add it into the same line, like so:
function kinsta_add_google_fonts() {
 wp_register_style( 'googleFonts', 'https://fonts.googleapis.com/css?family=Merriweather|Raleway');
 wp_enqueue_style( 'googleFonts');
}
add_action( 'wp_enqueue_scripts', 'kinsta_add_google_fonts' );
This will enqueue both the Merriweather and Raleway fonts.
Adding the Font(s) to Your Stylesheet
This won’t make the font work in your site yet: you still need to add it to your theme’s stylesheet.
Open the style.css file in your theme and add the code to style individual elements with your web fonts. Make sure you add it after any existing CSS for fonts, or it may get overridden by that.
Which elements you style will be up to you, but it’s common to use a legible font for the body element and something more fancy for the headings.
body {
 font-family: 'Raleway', sans-serif;
}

h1, h2, h3 {
 font-family: 'Merriweather', serif;
}
In the case above, everything on the page will use the Raleway font, except the h1, h2 and h3 elements, which will use Merriweather.
Now, save your stylesheet and check your site to make sure it all works as you expect. If the new fonts aren’t showing, try clearing your browser cache and checking that the fonts aren’t being overridden by any styling for fonts lower down in the stylesheet. This is why it’s a good idea to either add your new styling at the bottom of the stylesheet or to replace the existing font styling with your new styling (even better).
Adding a Backup Font
There may be occasions when someone visits your site and can’t access the web font files for some reason. Maybe they’re on a poor connection or using an old device that won’t render web fonts. Or maybe your web font provider is having technical issues.
For this reason, it’s a good idea to have a backup in place.
The code you’re given by Google fonts already has a backup of simply specifying serifor sans-serif, but we can go a step further than that.
Use one of the web-ready fonts that’ll already be installed on your visitor’s machine, and then include the second fallback of just serifor sans-serif, in case they’re using a mobile device that doesn’t even have the web-ready fonts.
Go back to your stylesheet and edit your CSS so it reads something like this:
body {
 font-family: 'Raleway', Helvetica, sans-serif;
}

h1, h2, h3 {
 font-family: 'Merriweather', Georgia, serif;
}
This means that people visiting your site will see your web fonts if all is well; but if it isn’t, they’ll see Helvetica or Georgia, or failing that, they’ll see whatever serif and sans-serif fonts their browser is able to load.
Hosting Your Own Fonts in WordPress
Some developers prefer not to use web fonts but instead to host fonts on their own servers and you might be one of them.
This could be for one or more of a number of reasons, including security, performance or budget.
If you’re concerned about performance, you can optimize the performance of your web fonts in a number of ways, which are covered later in this post. But if you’ve decided to go down the local route, you’ll need to know how to do it.
Why Host Your Own Fonts?
Using web fonts is often easier and can give you more flexibility as well as taking up less space on your server. But that doesn’t mean there aren’t occasions when locally hosting fonts might not be more appropriate.
Reasons you might want to host fonts locally include:
You might find that you can get around some of these issues
- You might prefer not to pull in resources from third-party providers for security reasons, knowing that your own site’s security is controlled by you.
- You might find that using a third-party service impacts on your site’s performance.
- You might have bought a font file and want to use that. Make sure your license includes website use as well as use in printed materials.
- Your site might be hosted locally, for example on an intranet, and users won’t have access to web fonts when they’re using it.
Where to Find Fonts You Can Host Locally
Many web fonts can also be downloaded for use as locally hosted fonts, but you’ll have to check that this is permitted by the license. In the case of Google Fonts, it is allowed.
You’ll also find that there are fonts not available as web fonts that you can download and host yourself. Any font file that you can download to your computer can also be uploaded to your website and stored there. If you need to use a font that isn’t available as a web font to tie in with your branding, this will be the solution but make sure your license allows it.
How to Add Locally Hosted Fonts to Your WordPress Site
So you know you want to host your fonts locally, how do you go about setting it up?
The process is different from using web fonts. You have to upload the file(s) to your site and you link to them in your stylesheet without having to enqueue them in your functions file.
Download and Convert the Fonts
Start by downloading the fonts you want to use. In Google Fonts, you can do this by clicking on the download icon when viewing the font in your library.
Unzip the font file on your computer and delete any font weights you don’t need to use on your site: there’s no point uploading files you won’t be using.
To use on your website, the files will need to be in the .woff format. If they aren’t (they won’t be if you got them from Google fonts), you can use a service like Convertio to convert them.
Upload the Fonts to Your Theme
Now upload the font file(s) to your theme, in wp-content/themes/themename, where themename is the folder for your theme. It’s a good idea to put any font files in their own folder in the theme, for example, a fonts folder.
If you’re working with a third-party theme, create a child theme for your font files and your stylesheet.
Once you’ve done that, you’ll need to add the font to your stylesheet.
Add the Fonts(s) in CSS
Open your theme’s stylesheet.
Add code like this, replacing the fonts I’ve used with your own:
@font-face {
 font-family: ‘Raleway';
 src: url( “fonts/Raleway-Medium.ttf”) format(‘woff’); /* medium */
 font-weight: normal;
 font-style: normal;
}

@font-face {
 font-family: ‘Raleway';
 src: url( “fonts/Raleway-Bold.ttf”) format(‘woff’); /* medium */
 font-weight: bold;
 font-style: normal;
}

@font-face {
 font-family: ‘Merriweather';
 src: url( “fonts/Merriweather.ttf”) format(‘woff’); /* medium */
 font-weight: normal;
 font-style: normal;
}
Add any more that you need to. Note that if you want to use the bold, italics, etc. variations of your font, you need to declare each one using @fontface and then specify the weight or style for each, as I’ve done above with Raleway for bold and normal weights.
Now add the styling for your elements, as you would when using web fonts:
body {
 font-family: 'Raleway', Helvetica, sans-serif;
 src: url( “/fonts/Raleway-Medium.ttf” );
}

h1, h2, h3 {
 font-family: 'Merriweather', Georgia, serif;
}
Your locally hosted fonts will now work with your theme.
How to Change Fonts in WordPress
Now you know how to install fonts in your WordPress site in one of two ways. How about editing them? What about changing them?
You can edit your fonts in one of three ways: via the Customizer, in the post or page editing screen, or using CSS.
Let’s look at each of those options for changing the font style, color, and size.
How to Change Font Styles in WordPress
Let’s see how we can do that both if you’re using the Block Editor or the Classic Editor.
Changing Font Styles in Block Editor (Gutenberg)
If you’re using a recent version of WordPress with the Gutenberg editor, you can change the style of your text when editing it in your post or page.
Select the block you want to edit and a styling menu will appear above it.
Select the text you want to edit and then click on the icons to make it bold or italicized. If you click the arrow next to those, you’ll see that you can also select strikethrough.
Changing Font Styles in the Classic Editor
If you’re running an older version of WordPress or you have the Classic Editor plugin installed, you can also edit font styles. (If you don’t want the Gutenberg editor, it’s better to update WordPress and disable Gutenberg.)
The Classic Editor includes a toolbar above the main editing pane where you can change the styles of your text. If you click on the Toolbar Toggle icon to its right, you can access more options, including strikethrough.
Changing Font Styles in the Customizer
If you want to change the font style for a specific element, you can do this by adding manual CSS to the Customizer.
Open the Customizer and click on Additional CSS. This will open a screen where you can type in CSS.
Now you can type in the CSS for your fonts in the box. So if you wanted to change all h1 and h2 elements to italics, you would add this CSS:
h1, h2 {
 font-style: italics;
}
Changing Font Styles in Your Stylesheet
If you’re comfortable adding code to your stylesheet, this is a better way to do it.
If you’re using a third-party theme, create a child theme for your own styling otherwise any changes you make will be lost when you update the theme. You’ll have to create a stylesheet in the child theme to tell WordPress that it’s a child theme: that’s where you put your new font styling.
If you’re using your own theme, you can edit and amend the CSS in your own stylesheet. The file is style.css and you’ll find it in your theme folder in wp-content/themes.
Add any font styling at the end of your stylesheet so it isn’t canceled out by anything already there. Or even better, remove and overwrite any existing font styling, unless you want to retain it.
Change the weight of an element with font-weight:
span.featured {
 font-weight = bold;
}
Change the style of an element with font-style:
span.featured {
 font-style = italic;
}
Change the alignment with text-alignment:
span.featured {
 text-alignment: center;
}
How to Change Font Colors in WordPress
Another change you might want to make is to change the color of certain text in your site. Beware of going overboard with this: your theme has been designed with colors that work well together and if you add too many colors, it could look garish and unprofessional.
Changing Font Colors in Gutenberg
Gutenberg text blocks let you edit text color and background. To do this, open the block you want to amend and click on the Color Settings tab in the Block section on the right of the screen.
From here you can edit the background color and the text color for text blocks.
Note that WordPress will warn you if the combination of colors you use will be bad for accessibility, such as in the example I’ve used above. Avoid the temptation to go overboard with your colors – after all you chose your theme because its color design was appropriate for your site, and adding lots more colors could make it look garish.
If you click the Advanced tab below the Color Settings tab, you can also add a class to that block, which you can then style in the Customizer or your stylesheet. So for example if you added a class of .featuredto your block, you could then style it using that class.
Changing Font Colors in the Classic Editor
The classic editor’s toolbar lets you change the color of whatever text you select. So you can select an individual word and change its color. Below I’ve made a sentence red.
While this does, in theory, give you plenty of flexibility, beware overusing it. If you start adding lots more colors to your text it could result in a site that’s difficult to read and bad for accessibility.
Changing Font Colors in the Customizer
If your theme includes options to change the website color scheme, this is the best place to do it.
For example, in the site below I’m using a theme that lets me choose a new color scheme for the entire theme. This helps ensure the new colors work together well and are coherent.
The options for this will vary according to your theme – some themes let you target headings, links and other elements and change their color.
If you want to target specific elements to change their color but this isn’t an option with your theme, you can add CSS in the Customizer to do this.
Select Customize > Additional CSS, and type your CSS in the text box.
For example, if you want to change the color of your h1headings, you type this:
h1 {
 color: #564534;
}
If that doesn’t work, you may need to add more specific CSS. In my theme, the color for the site heading link is coded using the #site-titleID, so I need to add this CSS:
#site-title a {
 color: #564534;
}
Replace the color I’ve used above with your own color.
When you’re happy with your changes, click the Publish button.
Changing Font Colors in Your Stylesheet
As with font styles, you can also edit your theme’s stylesheet (or create a child theme) to change the font colors.
Change the color with color. Below I’m changing the main color for my site’s text, using the bodyelement:
body {
 color = #222222;
}
Make sure you override any existing styling for the same elements and that you also style any elements that inherit that styling if you want them to have a different color. All text will inherit the color of the body element unless it has its own styling.
Changing Font Sizes in WordPress
For accessibility reasons, you might decide you want your fonts to be bigger than they are by default in your theme. Or you might decide the headings in your widget areas are too small, for example.
Changing Font Size in Gutenberg
With the Gutenberg editor, you can change the size of the text within each block.
Select the block and then click on the Text Settings tab in the Blocks menu on the right of the screen. You can make the text in the block smaller or larger, as shown below.
Beware doing this too much: if all the paragraphs on your page are different sizes, it will look disjointed and be difficult to read.
Changing Font Size in the Classic Editor
The classic editor doesn’t give you the option to select specific text and change its size: so if you do need this feature, you’ll need to upgrade to Gutenberg. Sorry!
Changing Font Size in the Customizer
Depending on your theme, you may have an option to change the font sizes in the Customizer, either changing the font size for the whole site or targeting headers and body text.
If your theme doesn’t include a Customizer option to change font sizes, but you can use the Additional CSS option. Go to Customize > Additional CSS and type the CSS in the box.
Below I’m making the headings in the widget areas bigger, with this CSS:
h2.widget-title {
 font-size: 3em;
}
Maybe that’s a bit too big, but it gives you the general idea.
Changing Font Size in Your Stylesheet
Changing the size of fonts in your stylesheet works in a similar way to changing any other styling for your fonts.
If you want to change the size of all the text in your site, you would use the bodyelement:
body {
 font-size: 14px;
}
For the bodyelement you use pixels, but for other elements you use emso the size is relative to the size of the bodyelement.
h1,
#site-title {
 font-size: 2em;
}
Remember if you’re going to make changes to the fonts in your theme stylesheet, test it on a development or staging site first so you don’t run the risk of ruining your live site.
How to Optimize Fonts in WordPress
Whether you’re using web fonts or locally hosted fonts, it makes sense to do everything you can to optimize your fonts.
Here I’ll give you some tips on optimizing your fonts, both for speed and for design.
Optimizing Fonts for Performance
If you’re using web fonts on your site, you’ll want to do everything they can to ensure that they’re delivered to your pages as fast as possible and that the fact they’re hosted elsewhere doesn’t slow things down.
- Use caching to ensure pages don’t need to be rebuilt every time they’re loaded. Kinsta hosting plans come with caching built-in.
- Use a web fonts provider that delivers fonts using a Content Delivery Network or CDN. Google Fonts does this and it speeds up delivery of the fonts.
- Only use those fonts you need. Don’t enqueue variations of fonts (weights, styles) you won’t be using in your stylesheet. If you find you need them at a later date, you can always add them then.
- If using web fonts, make sure you enqueue them properly. Don’t use an @import line in your stylesheet, even if this is what your web font provider tells you to do.
- When adding CSS manually, add it to your theme’s stylesheet and not to the <head> section of your header.php file. This is one reason why it’s better practice to code the CSS manually into your theme rather than using the Customizer or a block, as both of those will add inline CSS to the page instead of adding it to the stylesheet.
- Consider using CSS inlining to shave a few extra milliseconds off page load times. This is a process that uses base64 encoding to add CSS from your stylesheet into the page before loading it, saving the browser having to load extra files. It may seem counterintuitive given the advice above about not writing inline CSS, but it still works from a separate CSS file and doesn’t mean manually coding inline CSS. If you’re loading multiple fonts, inlining can speed up your site a little.
- Use minification to reduce the size of your stylesheet. This can easily be done if you are a Kinsta customer by taking advantage of the code minification feature located right in the MyKinsta dashboard. This allows customers to enable automatic CSS and JavaScript minification with a simple click, speeding up their sites with zero manual effort.
- If you’re hosting fonts locally, only upload the files for the fonts and the font weights and styles you need. Only add those variations that you need using the @font-face declaration.
- Consider using a CDN to host your own fonts instead of hosting them on your own server.
- When hosting your own fonts, include additional formats: woff2, woff, ttf, and eot. Browsers can then select the version that’s going to load fastest.
- If you’re using a different font for your site title, enqueue just the characters you need instead of the whole font library.
So if your site title is Kinsta, you could make a small performance improvement by ensuing the stylesheet like this:
function kinsta_add_title_font() {
 wp_register_style( 'googleFonts', ‘https://fonts.googleapis.com/css?family=Raleway&text=“kinsta');
 wp_enqueue_style( 'googleFonts');
}
add_action( 'wp_enqueue_scripts', 'kinsta_add_title_font' );
Optimizing Fonts for Design
As well as optimizing the performance of your fonts, it also makes sense to make sure they’re visually optimized: that they fit well with the design of your site and with your offline materials.
This is particularly the case if you use a plugin or a child theme to add extra fonts on top of the ones already bundled with your theme. There is a risk of your theme looking messy if there are too many fonts in too many colors and styles.
Before you add extra fonts to your site, consider the following:
- Are the new fonts consistent with your existing fonts? Do they convey a similar style or mood?
- If you need to match a font that’s been used for print materials but can’t use the same font as a web font, try finding as close a match as possible on Google Fonts.
- Are the fonts you’ve chosen consistent with your brand? If you’re running a serious business, you don’t want to use Comic Sans (in fact, whatever kind of website you’re running, you don’t want to use Comic Sans).
- If you’re changing the colors of your fonts, try to use colors that are already in the design of your theme or that coordinate with them. Adding too many colors will make your site look garish and unprofessional.
- If you’re trying to pick out a pair of fonts on Google Fonts, try using a service like fontpair to find two that work well together.
The fonts you use in your design will have an impact on the impression visitors get when they reach your site. Make sure you’ve considered this and chosen fonts that will reinforce your brand.
Working with Variable Fonts
Variable fonts are a new kind of fonts that make adding more fonts to your site more efficient.
They allow more information to be stored in one font file, so that if you want variations on your font (bold, italics, etc.), you don’t have to load multiple font files, but can just load the one.
For a font with multiple font weights, styles and slants, this could save a lot of file space and make the process of enqueuing the font or adding it via @fontface easier too.
Variable fonts are supported in the latest versions of Chrome, Edge, Firefox, and Safari, but not by older browsers; so if you do use them, you’ll need a fallback. And there aren’t many variable fonts available just yet. Google Fonts doesn’t include any, but Google does support the specification, so it’s likely they will be added over time.
Font developers are working on creating more variable fonts and improving their reliability, so it’s worth watching progress so that you can use variable fonts to optimize your fonts once they become more stable.
Fonts are taken for granted but they’re crucial for ANY website (no exceptions). Learn how to change font, font size, and font color in WordPress! 🎨👨👦Click to Tweet
Summary
Changing fonts on your WordPress site isn’t a straightforward task. You have different possibilities to choose from:
- Using web fonts by installing a plugin.
- Using web fonts by coding them into your theme and enqueuing them.
- Hosting your fonts.
Then, you should focus on how to optimize your fonts for better performance. If you follow the tips in this guide, you should be able not only to change fonts in WordPress but also have more control over them in your theme.
Want to declutter your page or blog layout to make your readers focus on your content? Then, check out this: How to Remove the Sidebar in WordPress (4 Methods).
Get all your applications, databases and WordPress sites online and under one roof. Our feature-packed, high-performance cloud platform includes:
- Easy setup and management in the MyKinsta dashboard
- 24/7 expert support
- The best Google Cloud Platform hardware and network, powered by Kubernetes for maximum scalability
- An enterprise-level Cloudflare integration for speed and security
- Global audience reach with up to 35 data centers and 275 PoPs worldwide
Test it yourself with $20 off your first month of Application Hosting or Database Hosting. Explore our plans or talk to sales to find your best fit.
Цвета — один из важнейших элементов веб-дизайна, который может вызвать определенные эмоции у вашей целевой аудитории и вызвать их реакцию. Они могут повысить узнаваемость бренда и повлиять на то, как кто-то воспринимает ваш бренд, побудить людей к действию, передать сообщения и эмоции, повлиять на разборчивость текста и многое другое.
Когда вы создаете свой веб-сайт WordPress, вы можете почувствовать, что цвета текста по умолчанию на самом деле вам не подходят, поэтому, естественно, вы захотите их изменить. В этой статье мы покажем вам, как изменить цвет текста в WordPress пятью различными способами:
Изменение цвета текста в WordPress с помощью параметров темы Qode
Даже когда вы покупаете тему WordPress, которая соответствует всем вашим требованиям, вы все равно можете настроить некоторые ее элементы, чтобы они лучше соответствовали стилю, которого вы пытаетесь достичь.
Некоторые темы на рынке позволяют вам управлять визуальным аспектом вашего веб-сайта и изменять цвета текста, обычно нажав на Внешний вид > Настроить а затем выберите параметры, связанные с типографикой (где находятся настройки цвета шрифта).
Но темы Qode имеют значительно больше возможностей настройки, позволяя вам изменять цвета практически любого раздела на вашем веб-сайте. Ты сможешь перейдите к общим параметрам вашей темы и изменить не только цвет текста, но и размер шрифта, вес, высоту и многое другое (заголовок раздела основных параметров в меню обычно содержит название темы или имя профиля + параметры, например Варианты лейтмотивов, варианты Микадо, и т.д.).
Например, если вы установили Bridge, вы можете перейти к Параметры Qode > Шрифты и настройте все основные глобальные настройки, связанные с типографикой.

В зависимости от темы мы также разрешить пользователям изменять цвет текста в верхних и нижних колонтитулах своего сайта, в заголовках и т. д.. Все, что вам нужно сделать, это выбрать раздел, который вы хотите изменить (из общих параметров), и настроить цвет текста по своему вкусу.
Задача изменения цветов на вашем веб-сайте WordPress значительно облегчилась с запуском нашей новой интерактивной среды Qode, которая подняла пользовательский опыт на совершенно новый уровень. Эта мощная структура включает в себя множество практических функций, которые делают создание веб-сайта пользователем более удобным, одна из них — Поиск вариант. При переходе к общим параметрам темы Qode с новой структурой вы увидите панель поиска в верхней части страницы. Вы можете ввести Цвета и вы увидите список всех разделов, где возможно изменение цвета.

Мы также не привыкли упаковывать мощные шорткоды, которые позволяют пользователям создавать веб-сайты, полностью соответствующие их требованиям, поэтому, в зависимости от темы, мы можем включать некоторые шорткоды с текстовым содержимым, например наш Изображение с текстом короткий номер. Было бы справедливо позволить нашим пользователям также настраивать шорткоды, поэтому мы включили параметры, позволяющие изменять цвет текста.

Вот и все для общих параметров темы. Теперь давайте посмотрим, как изменить цвет текста на отдельных страницах.
Для тех, кто использует классический редактор, изменение цвета текста требует нескольких щелчков мыши.
Для начала перейдите на страницу, которую вы хотите отредактировать, или создайте новую и добавьте текстовое содержимое. В меню панели инструментов нажмите кнопку Переключить панель инструментов значок , чтобы отобразить вторую строку параметров, где Цвет текста Опция размещена.

Затем выделите части текста, цвет которых вы хотите изменить, и нажмите кнопку Цвет текста значок для игры с цветами.

Если вы имеете в виду определенный цвет, которого нет в списке, нажмите на Обычай… и выберите оттенок на цветовой панели или введите его шестнадцатеричный код.
Как изменить цвет текста в WordPress с помощью Гутенберга
Если вы работаете со страницей или публикацией в Гутенберге и хотите изменить цвет текста всего блока, сначала щелкните поле, содержащее текст. Теперь взгляните на правую часть экрана и нажмите кнопку Настройки цвета вариант.

Вы можете изменить не только цвет текста, но и установить цвет фона для блока так, как вам больше нравится.
Если вы хотите изменить оттенок только части текста, а не всего блока, выделите текст, который вы хотите окрасить другим цветом, щелкните стрелку вниз и выберите Цвет текста.

Затем появится цветовая палитра, и все, что вам нужно сделать сейчас, это выбрать оттенок, который соответствует стилю вашего бренда.

NB В Гутенберге вы можете изменить цвет текста как для блоков заголовков, так и для блоков абзацев, но вы не можете изменить цвет фона для блоков заголовков.
Как изменить цвет текста в WordPress с помощью Elementor
Если вы хотите отредактировать текст в Elementor, вы можете использовать Текстовый редактор виджет, похожий на классический редактор WordPress. Все параметры перечислены в левой части экрана, но нас интересует Цвет текста. Выделите часть текста, которую вы хотите покрасить в другой оттенок, и выберите цвет по своему вкусу.

Elementor также поставляется с практичным Редактировать раздел вариант, который отображается над виджетом, который вы добавили на страницу.

Нажмите на нее и в меню слева выберите Стиль вариант, а затем нажмите на Типография.

Помимо изменения цвета текста, вы также можете установить выравнивание текста, цвет заголовка, цвет ссылки и многое другое.
Как изменить цвет текста в WordPress с помощью CSS
И последнее, но не менее важное: мы хотели бы показать вам, как изменить цвета шрифта в WordPress глобально с помощью CSS. Если параметров выбранной вами темы недостаточно, вы можете внести некоторые коррективы в цвет текста.
В меню панели инструментов выберите Внешний вид > Настроить.

Несколько вариантов появятся в левой части экрана, но вы должны нажать на Дополнительный CSS.

Теперь появится окно CSS, в которое вы должны вставить следующие строки кода:
h1 {
color: #some_hex_code;
}
Конечно, вы можете изменить цвет любого понравившегося вам заголовка, будь то h2, h3 и т. д. в зависимости от того, какие заголовки есть у вас на сайте. Например, мы хотели покрасить наш h1 в красный цвет, поэтому мы добавили следующий код:
Этого кода достаточно, чтобы изменить цвет текста в заголовках, но если вы хотите изменить цвет других текстовых элементов, используйте другие селекторы, например «а» для ссылок, «п» для абзацев и т.д.
Давайте завершим это
Создать привлекательный веб-сайт значительно проще, если вы знаете, как изменить цвет текста в WordPress. В этом руководстве мы хотели показать вам, как изменять оттенки текста глобально и на отдельных страницах, используя все популярные редакторы и компоновщики страниц, и метод, который вы решите использовать, зависит от ваших предпочтений и, возможно, навыков. В конце концов, не все знают, как использовать CSS, но с правильной темой WordPress, которая содержит множество параметров настройки, вам даже не нужно знать, как кодировать.

Moyens I/O Staff мотивировал вас, давая советы по технологиям, личному развитию, образу жизни и стратегиям, которые помогут вам.