Since a WordPress footer is so useful, at some point, you must learn about the footer, how it works, what’s possible in terms of editing it, and how to remove preset footer content that’s not relevant to your brand. That’s why we want to show you how to edit a footer in WordPress, along with a full explanation of a footer’s benefits and what can go into one.
Website footers have a long history of containing whatever information doesn’t fit within a website’s main menu. From links to support documents and social media pages, various elements go rather well in a footer.
Let’s get started!
Check Out Our Video Guide to Editing the WordPress Footer
What Is a WordPress Footer?
Footers aren’t exclusive to WordPress. Most website builders and content management systems offer the ability to include a footer. However, WordPress offers its unique footer functionality, along with a preset footer design that generally comes with the theme you install.
A WordPress footer sits at the base of your website. It’s a static content area that shows up at the very bottom, regardless of which page a user lands on. Although not as visited as the header, the footer is still extremely important to provide users with social media buttons, customer support links, and contact information.
Overall, if you make a website on WordPress, you can expect to see a footer placed in your design by default. WordPress has a core file built into its system specifically to manage the footer (footer.php).
Footers come in all shapes and sizes, and you can edit them to include different colors, fonts, and backgrounds. You can also insert content elements within the footer, such as blog post lists, security badges, and even forms and images.
Website footers: extremely useful, but potentially confusing to edit. 🥴 Learn how to get started here ⬇️Click to Tweet
The footer is like the conclusion to your entire website. It shows essential links and information for those interested in and dug deep into your content. Finally, the footer completes the overall design of your site, much like the final slide in a slideshow presentation or the conclusion to a speech.
Reasons To Have (and Edit) a WordPress Footer
It’s tempting to forget about your footer or leave it as the last item you design. Many people even want to remove their footers since they don’t see much value in them. This isn’t the greatest plan. The footer does have value, even if it’s not viewed or clicked on as much as your main menu or primary content areas.
To give you an idea of what makes a footer valuable, here’s a list of all the reasons to have one and learn how to edit a footer in WordPress to fit your brand.
- The WordPress footer offers a static module shown on every page of your website, making it more visible than a standard page that disappears when someone clicks away.
- It completes the website’s design, both visually and in your WordPress files. It tells WordPress where to end its code and indicates to users when the content ends. Not to mention, it makes for a cleaner interface.
- Many internet users have come to expect specific links and content in the footer, so they’ll go directly to the footer to find them. Think support links and social media buttons.
- The footer provides more conversion and engagement opportunities, like a call to action at the end of a blog post. You can add forms, links to other content, or even a company tagline.
- It’s a place to include important links that may not make the cut for the main menu.
Now that we know the benefits of using a footer, the big question of what to place in the footer comes into play. All themes differ, but it’s common to see a “Powered by WordPress” message in the footer after installing a new theme.
Other times, theme developers might include their own premade designs or messages about who made the theme.

None of that’s bad, but the goal is to customize your WordPress footer to link to your valuable pages, include content related to your brand, and clear out the default content like messages from theme developers or WordPress. It’s also wise to adjust the styling to match your branding with custom fonts and colors.
So, what are some elements to put inside your WordPress footer?
- Forms for users to subscribe to your newsletter messages or blog updates
- Links to customer support resources, like FAQs, knowledgebase articles, and forums
- Icon links to download digital products like apps and podcasts
- A list of upcoming events
- A list of recent blog post articles
- Links to loyalty and affiliate programs
- Links to informational pages, like an About Us or Career page
- Badges and icons to promote your reputation, past awards, or site security
- Social media icons that link to the pages
- A full sitemap for easier navigation throughout your website
- Legal statements like copyright claims, privacy policies, and terms and conditions
- Contact information such as your address, locations, phone number, and business hours, or a contact form
- A search box for improved navigation
- Any other additional pages that don’t fit in your main menu but still need a place on your site
How To Edit a Footer in WordPress (Self-Hosted Version)
There are a handful of tactics to edit the footer of a WordPress.org (self-hosted) website. In the following sections, we’ll talk about editing a footer in WordPress using the theme customizer, widgets, plugins, and code. As a bonus, we’ll discuss managing the WordPress footer with a visual page builder like Elementor.
Edit WordPress Footer with Theme Customizer
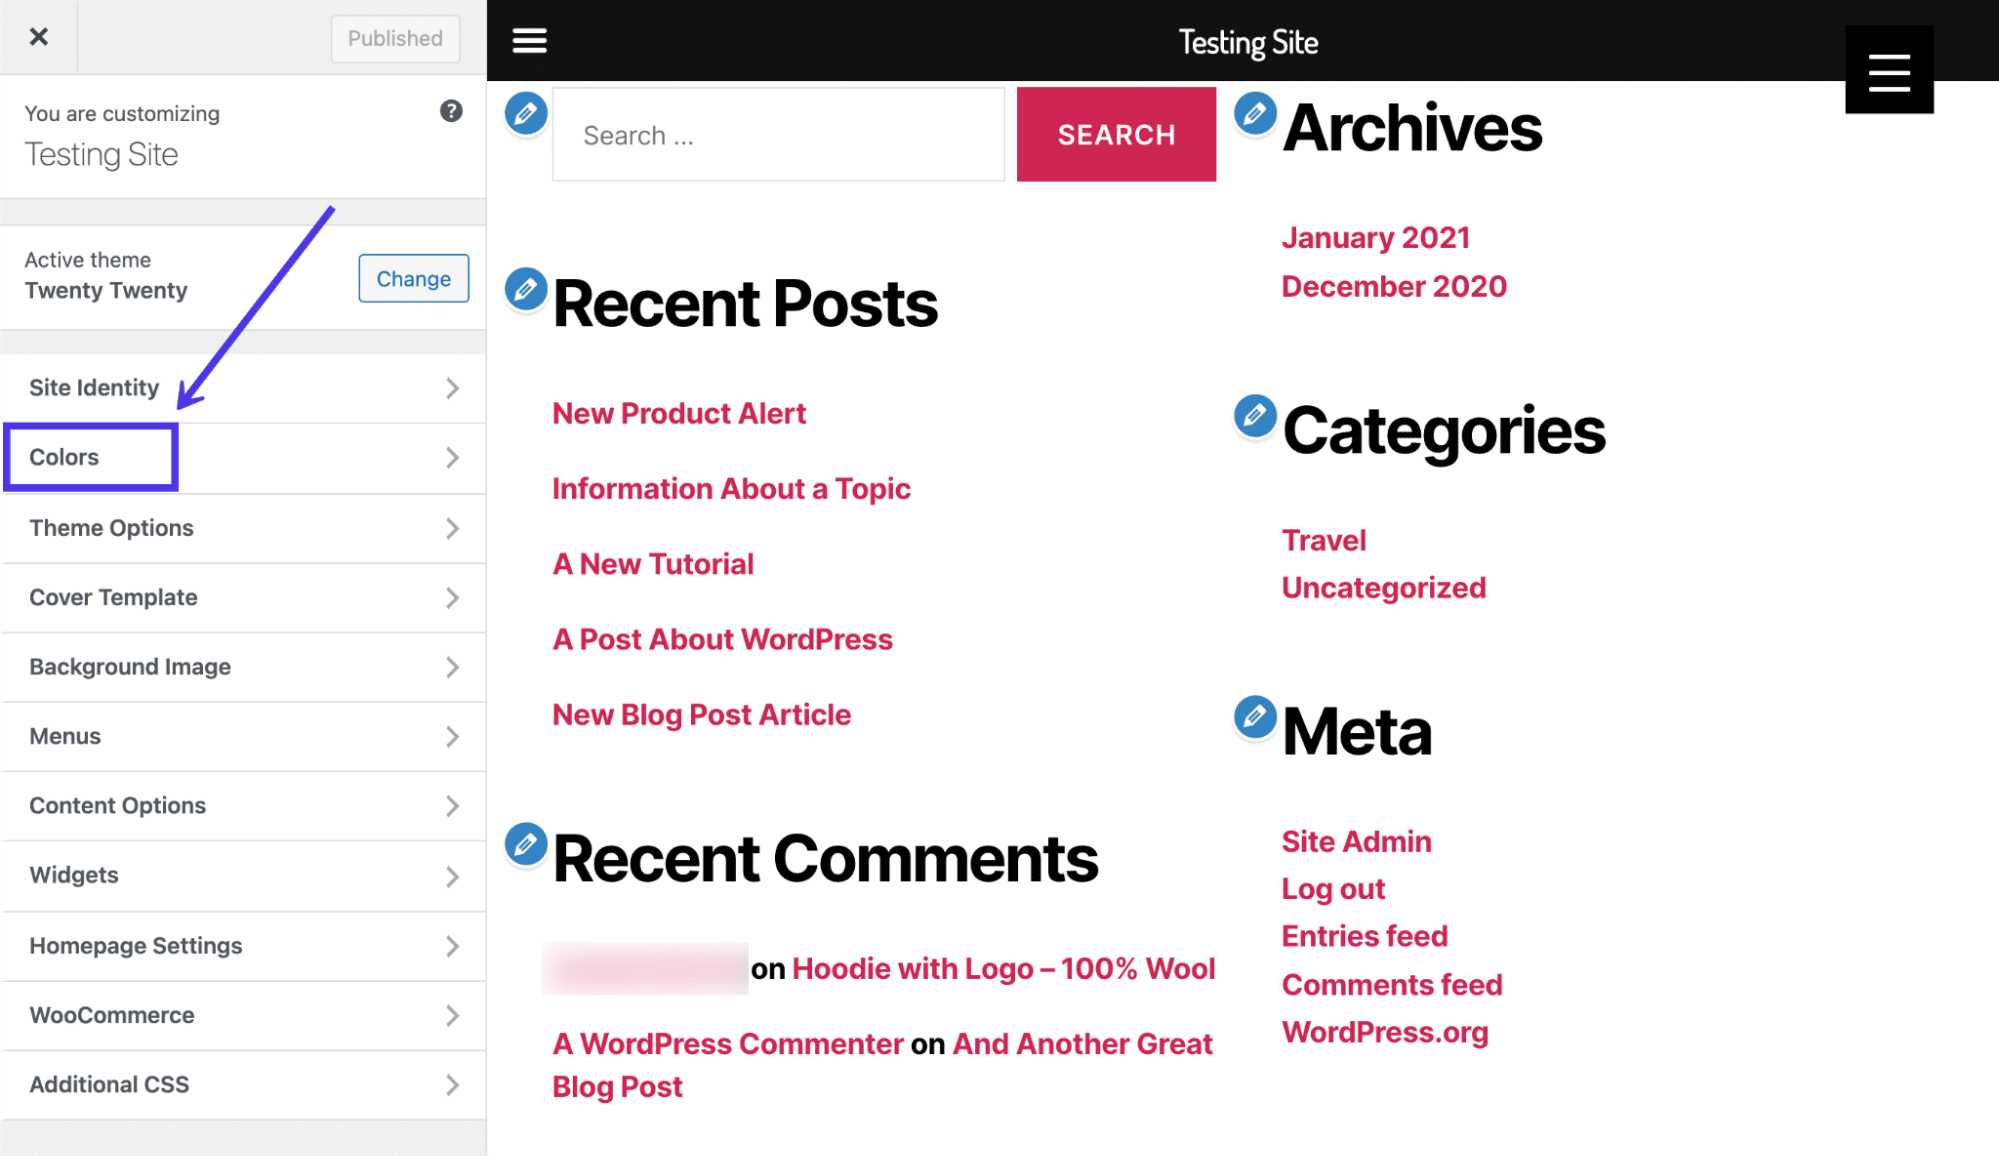
The fastest and most efficient way to edit a WordPress footer is by utilizing the built-in WordPress Theme Customizer. The Theme Customizer settings vary depending on your chosen theme, but the customizer itself is always located in the exact location on the WordPress dashboard.
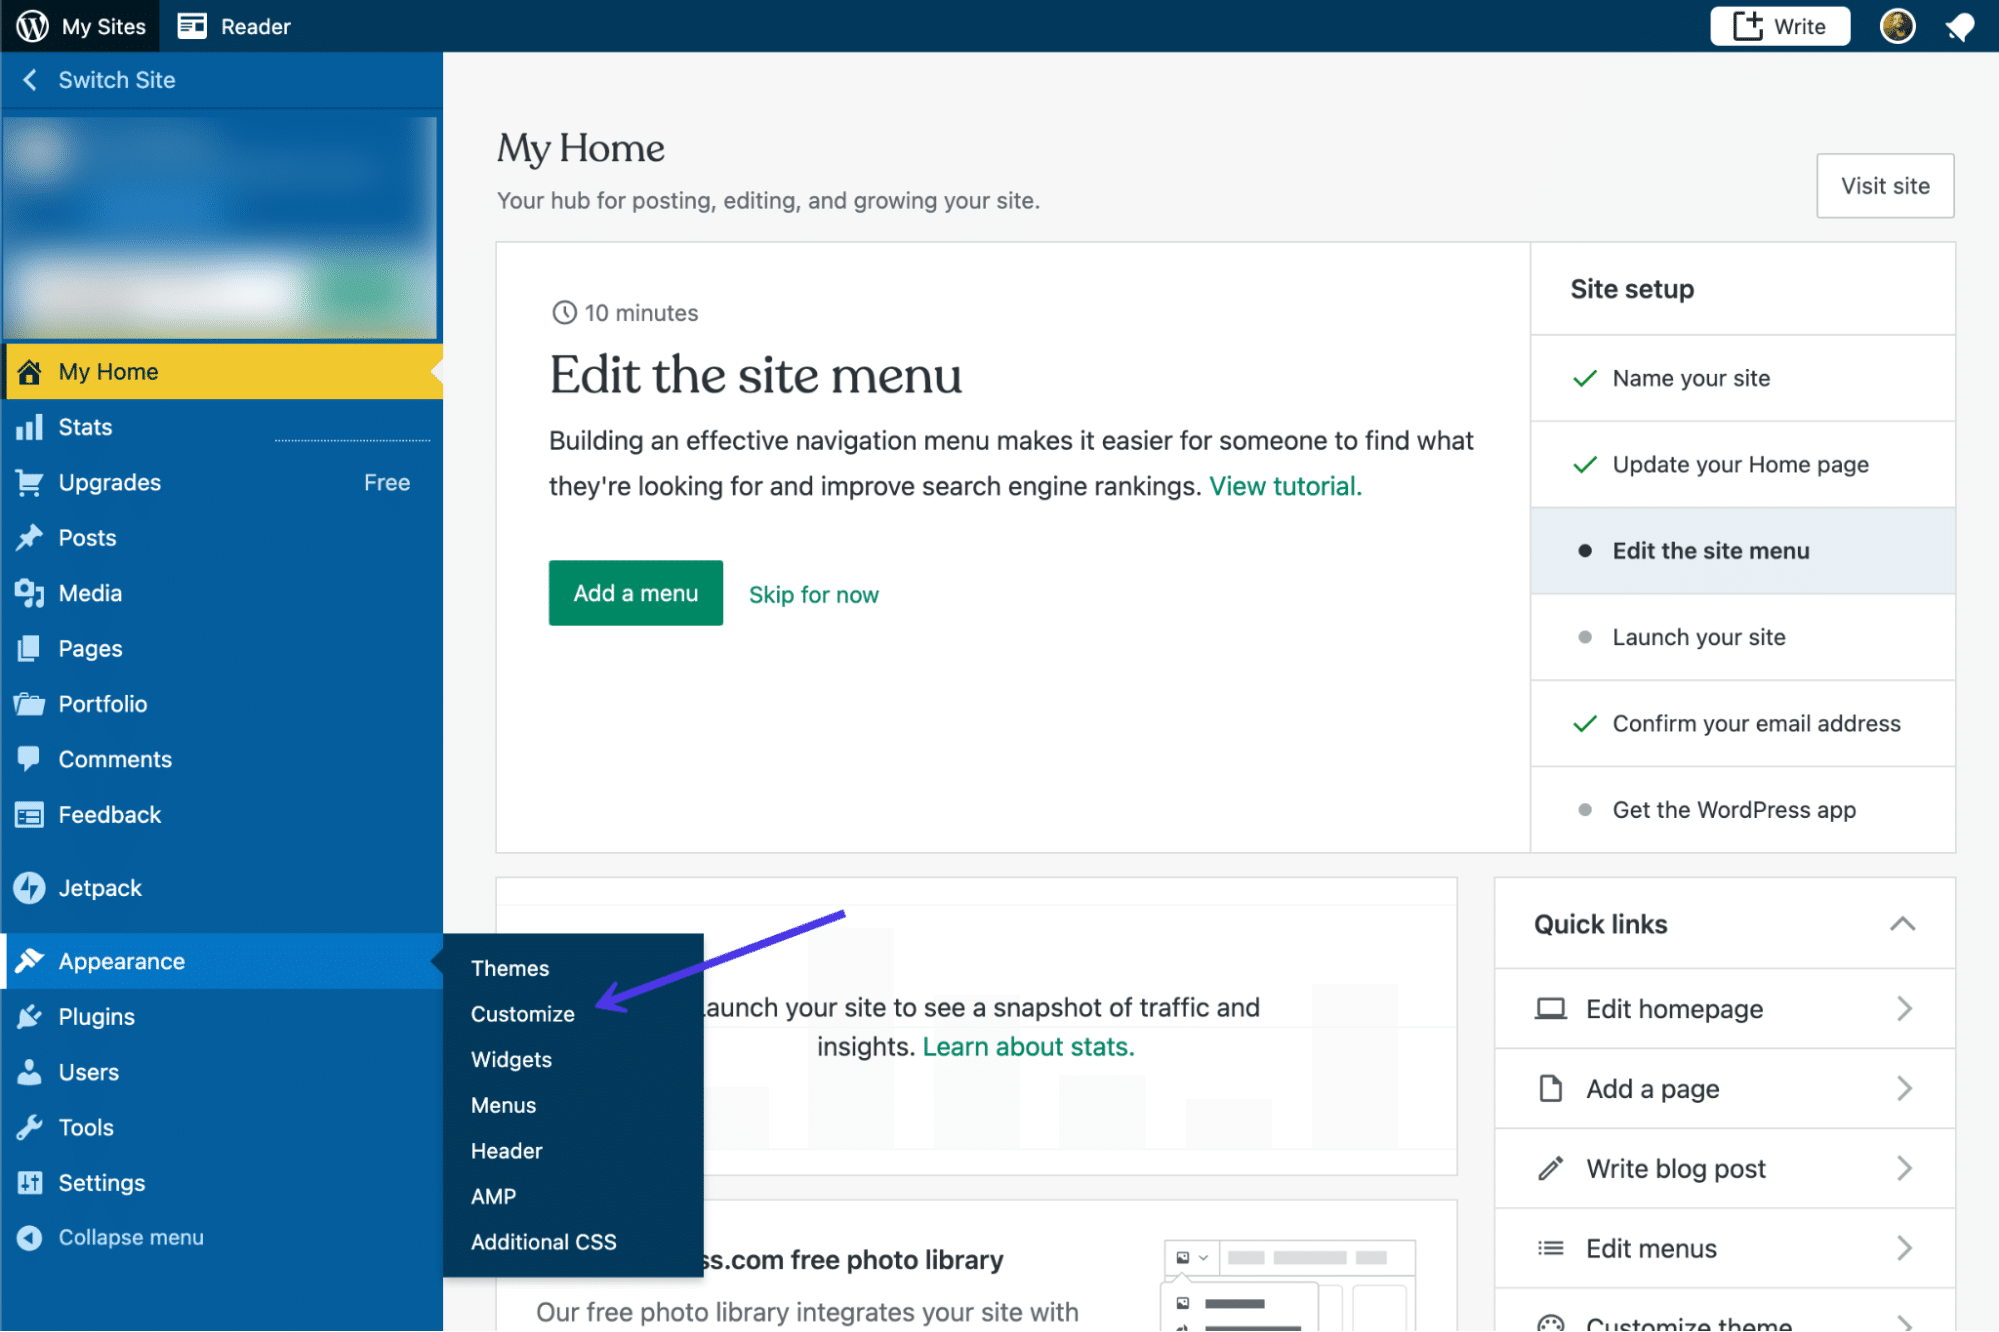
To begin the process, go to the dashboard and click on Appearance and then Themes.
Then, click the Customize button underneath the currently active theme.
Feel free to swap out themes to see how the footers change from theme to theme.
As a slightly faster alternative, you can also click on Appearance > Customize, which brings you directly to the WordPress Theme Customizer for the active theme.
The WordPress Theme Customizer presents a visual of your website on the right side and several menu items on the left that lead to settings and customization tools. Again, every theme has varying customization options, so your screen may look a little different than what’s in our screenshots.
A wonderful place to start with your footer customization is with the colors.
Our current theme has a Colors button, making it easy to identify where we need to go.
Select the Colors button if that’s available in your theme.
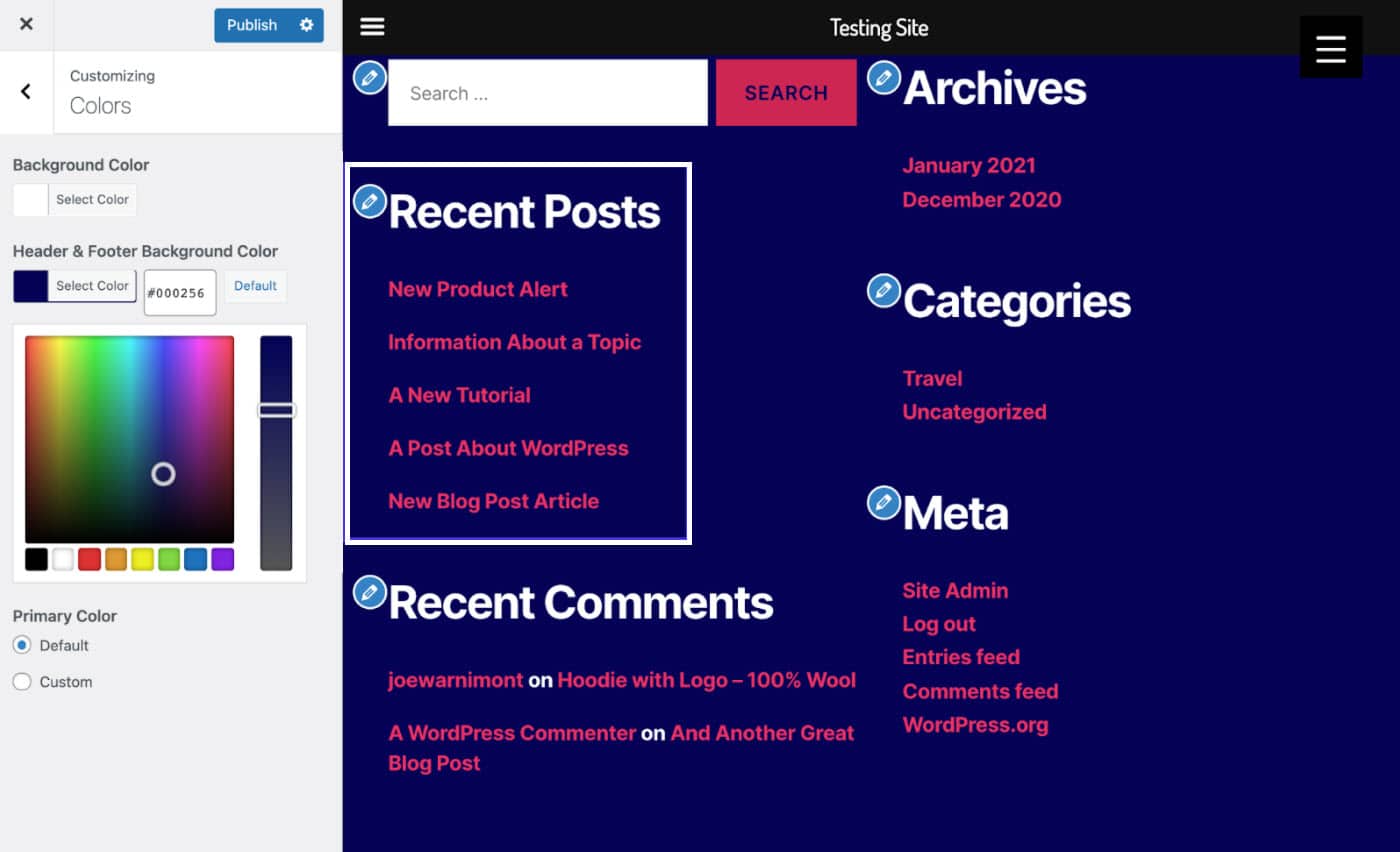
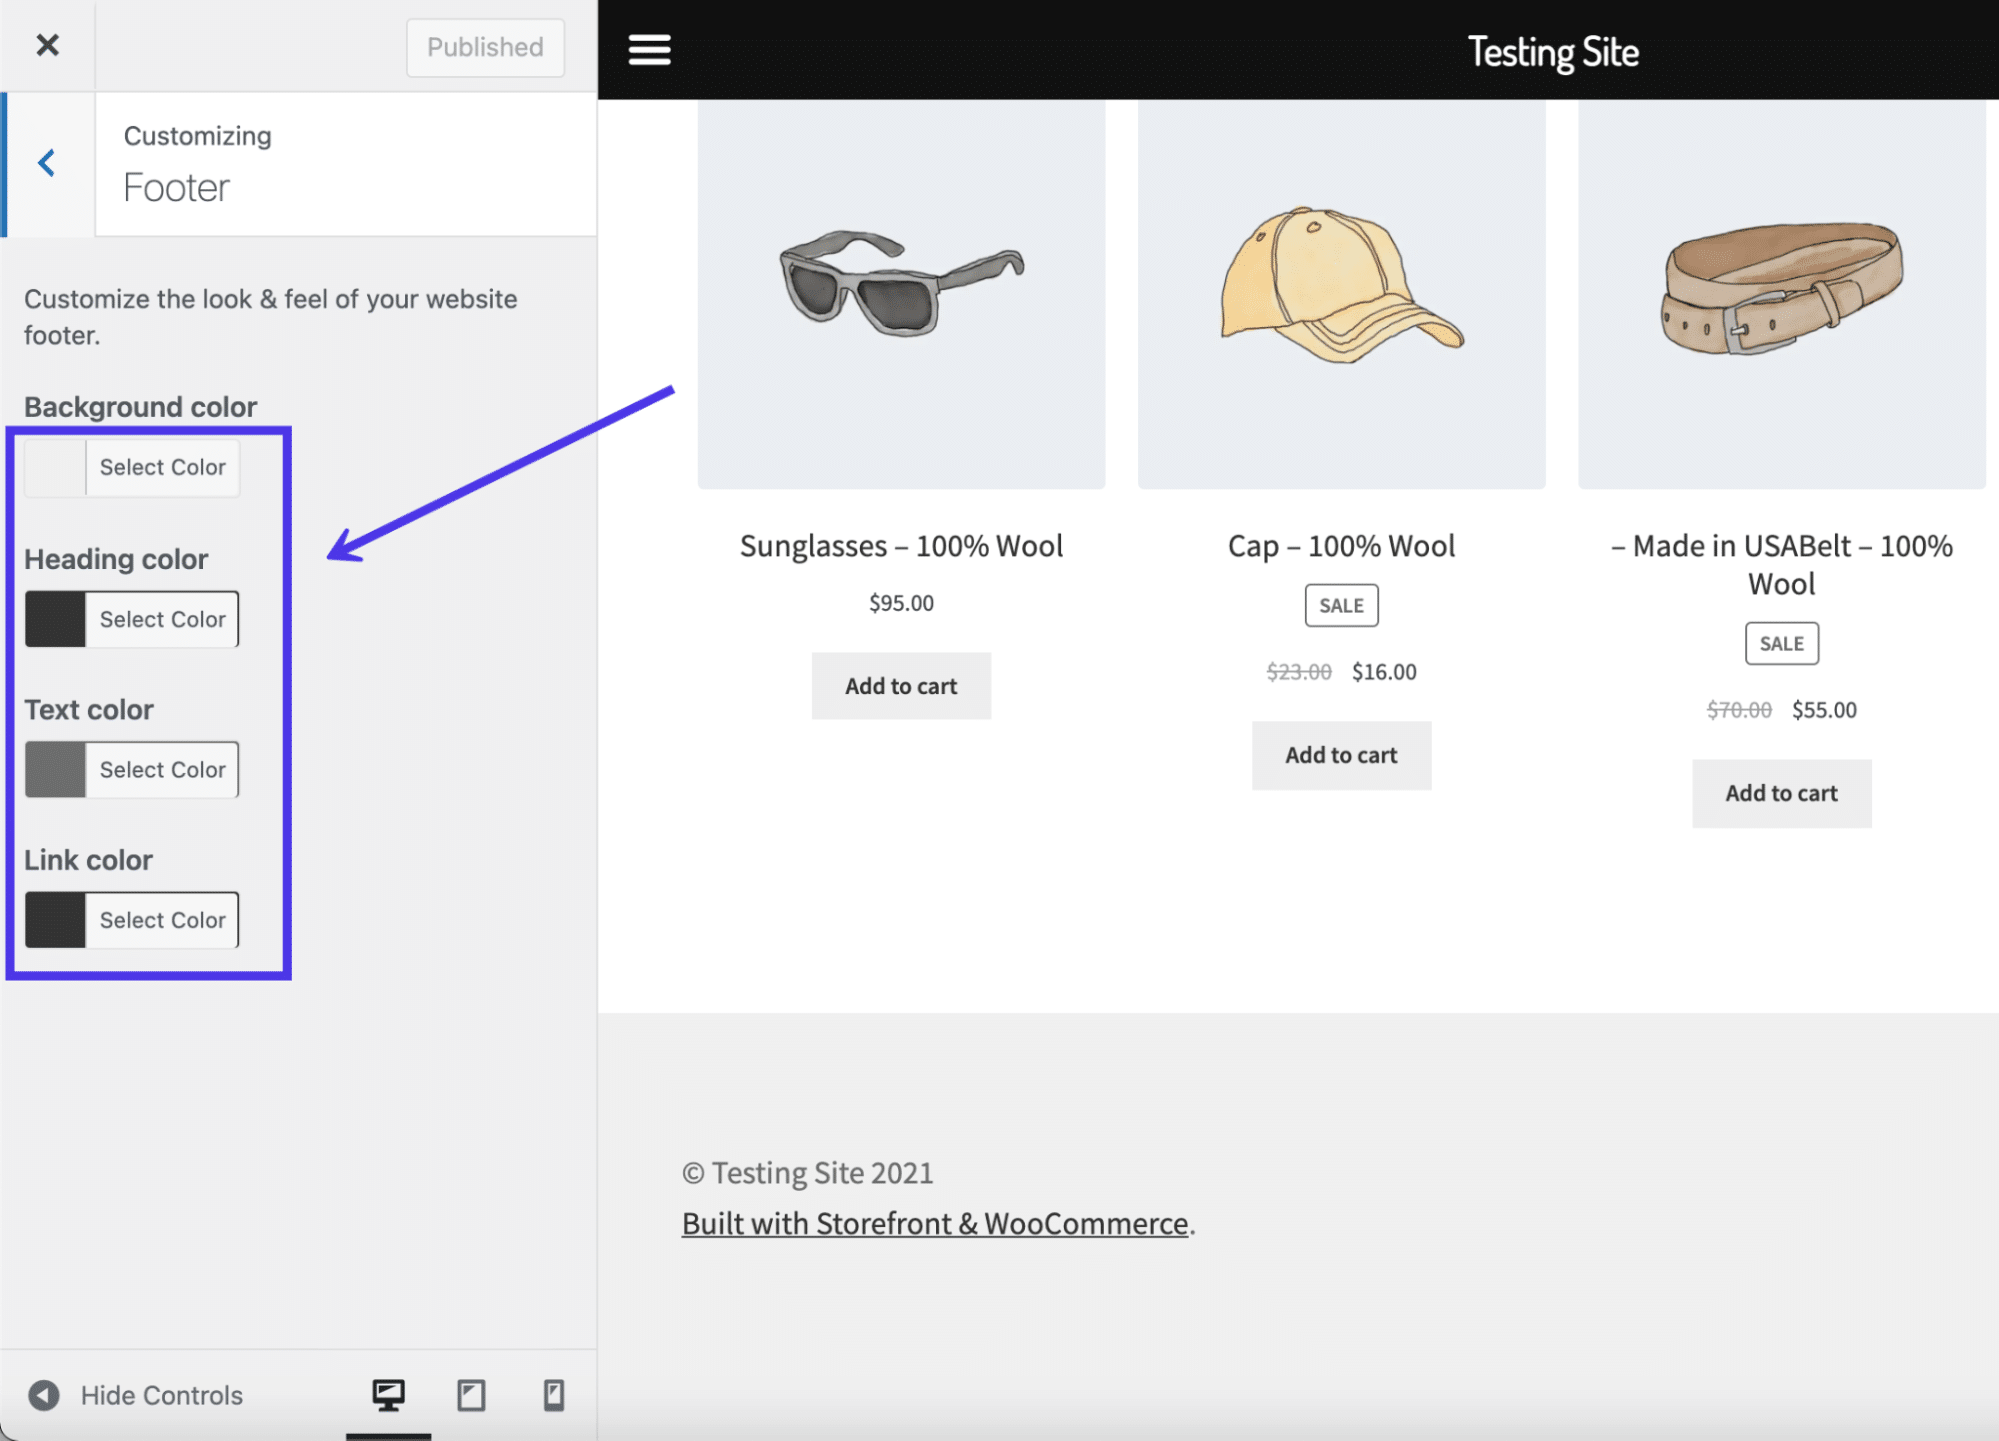
Choose the Select Color button under the Header and Footer Background Color field.
Use the color picker to test all types of colors and see which ones match your brand or look good towards the end of your page.
With this particular theme, any color modifications actually adjust the font colors as well, making them look clear regardless of the background color.
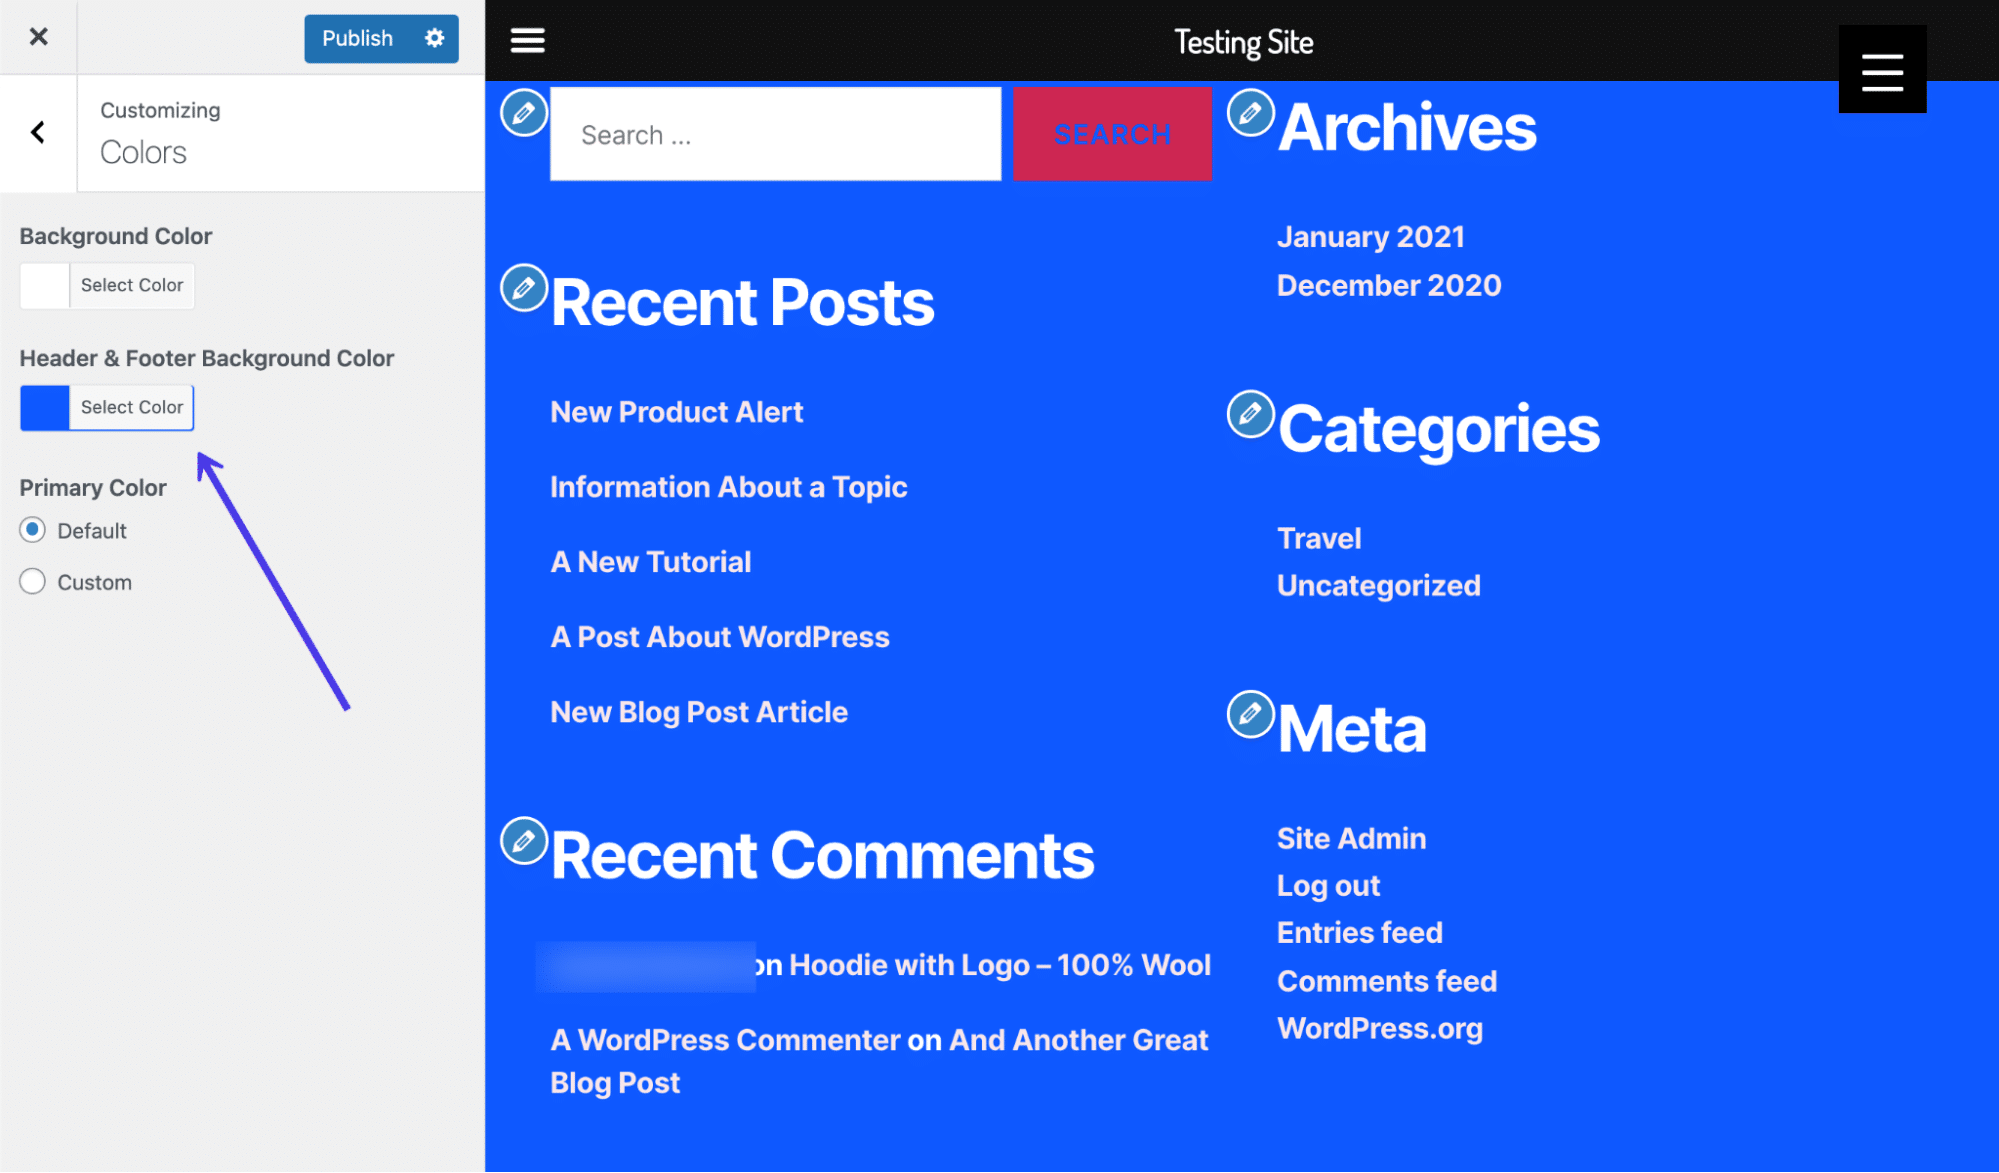
As you can see, a darker WordPress footer color automatically changes the font colors for links, headers, and paragraph text, eliminating the need for you to do that on your own.
Now let’s try another theme. In this case, we’ve swapped out the Twenty Twenty theme for the Storefront theme.
Sure enough, the WordPress Customizer for the Storefront theme displays buttons not shown in the Twenty Twenty theme.
Therefore, your theme dictates how much control you have over the footer in the WordPress Customizer. Some themes are better than others in this respect.
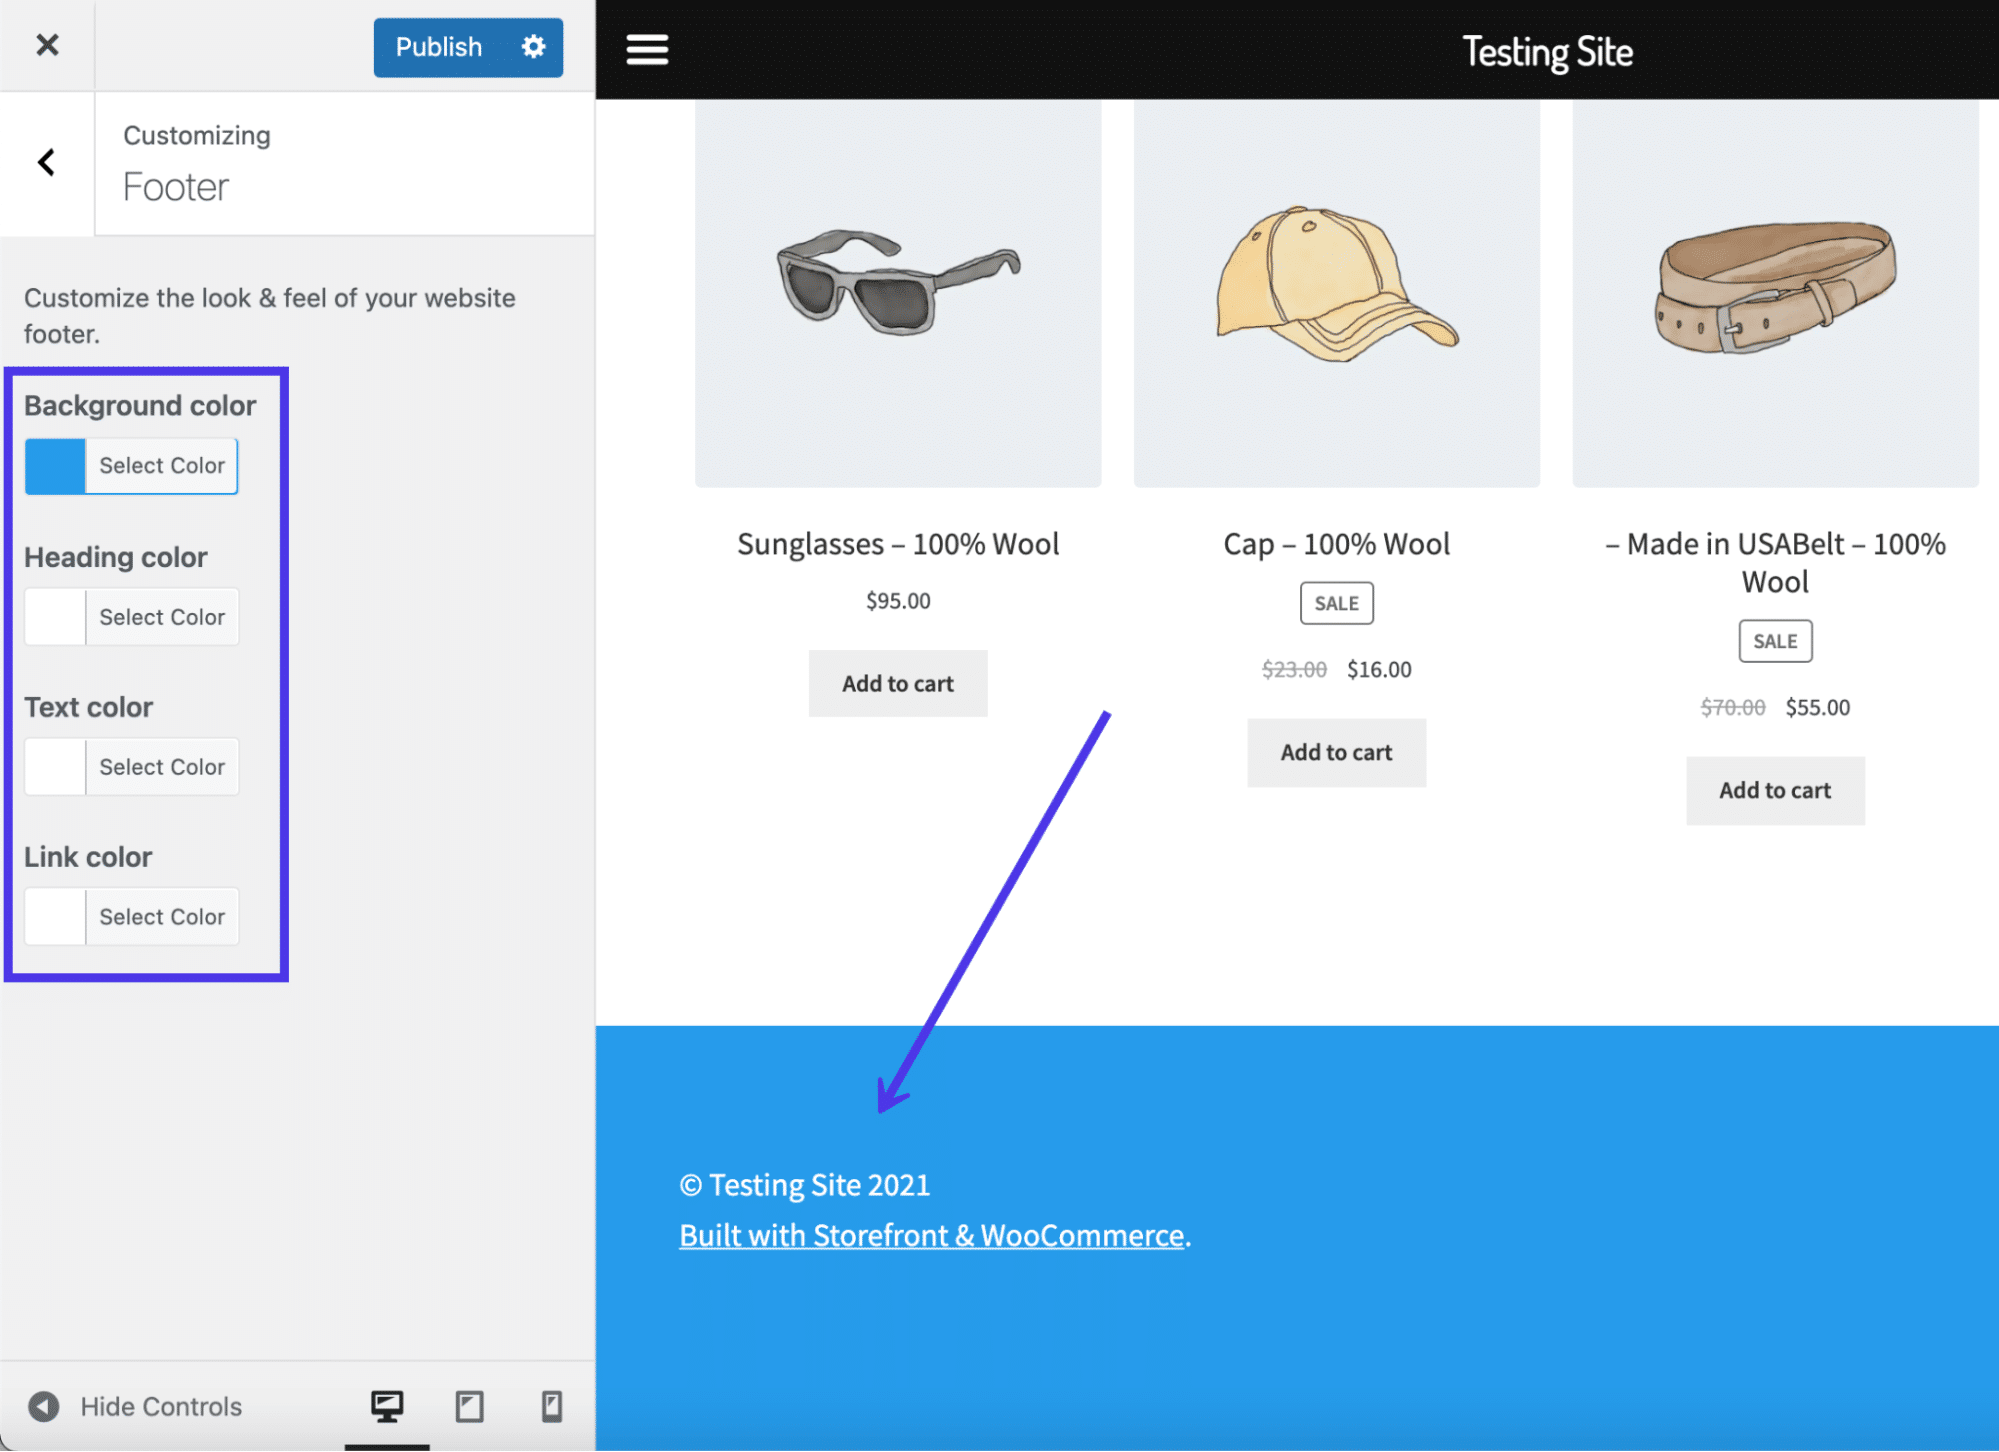
For the Storefront theme, we have a Footer tab. Click on that to see what’s available for customizing the footer.
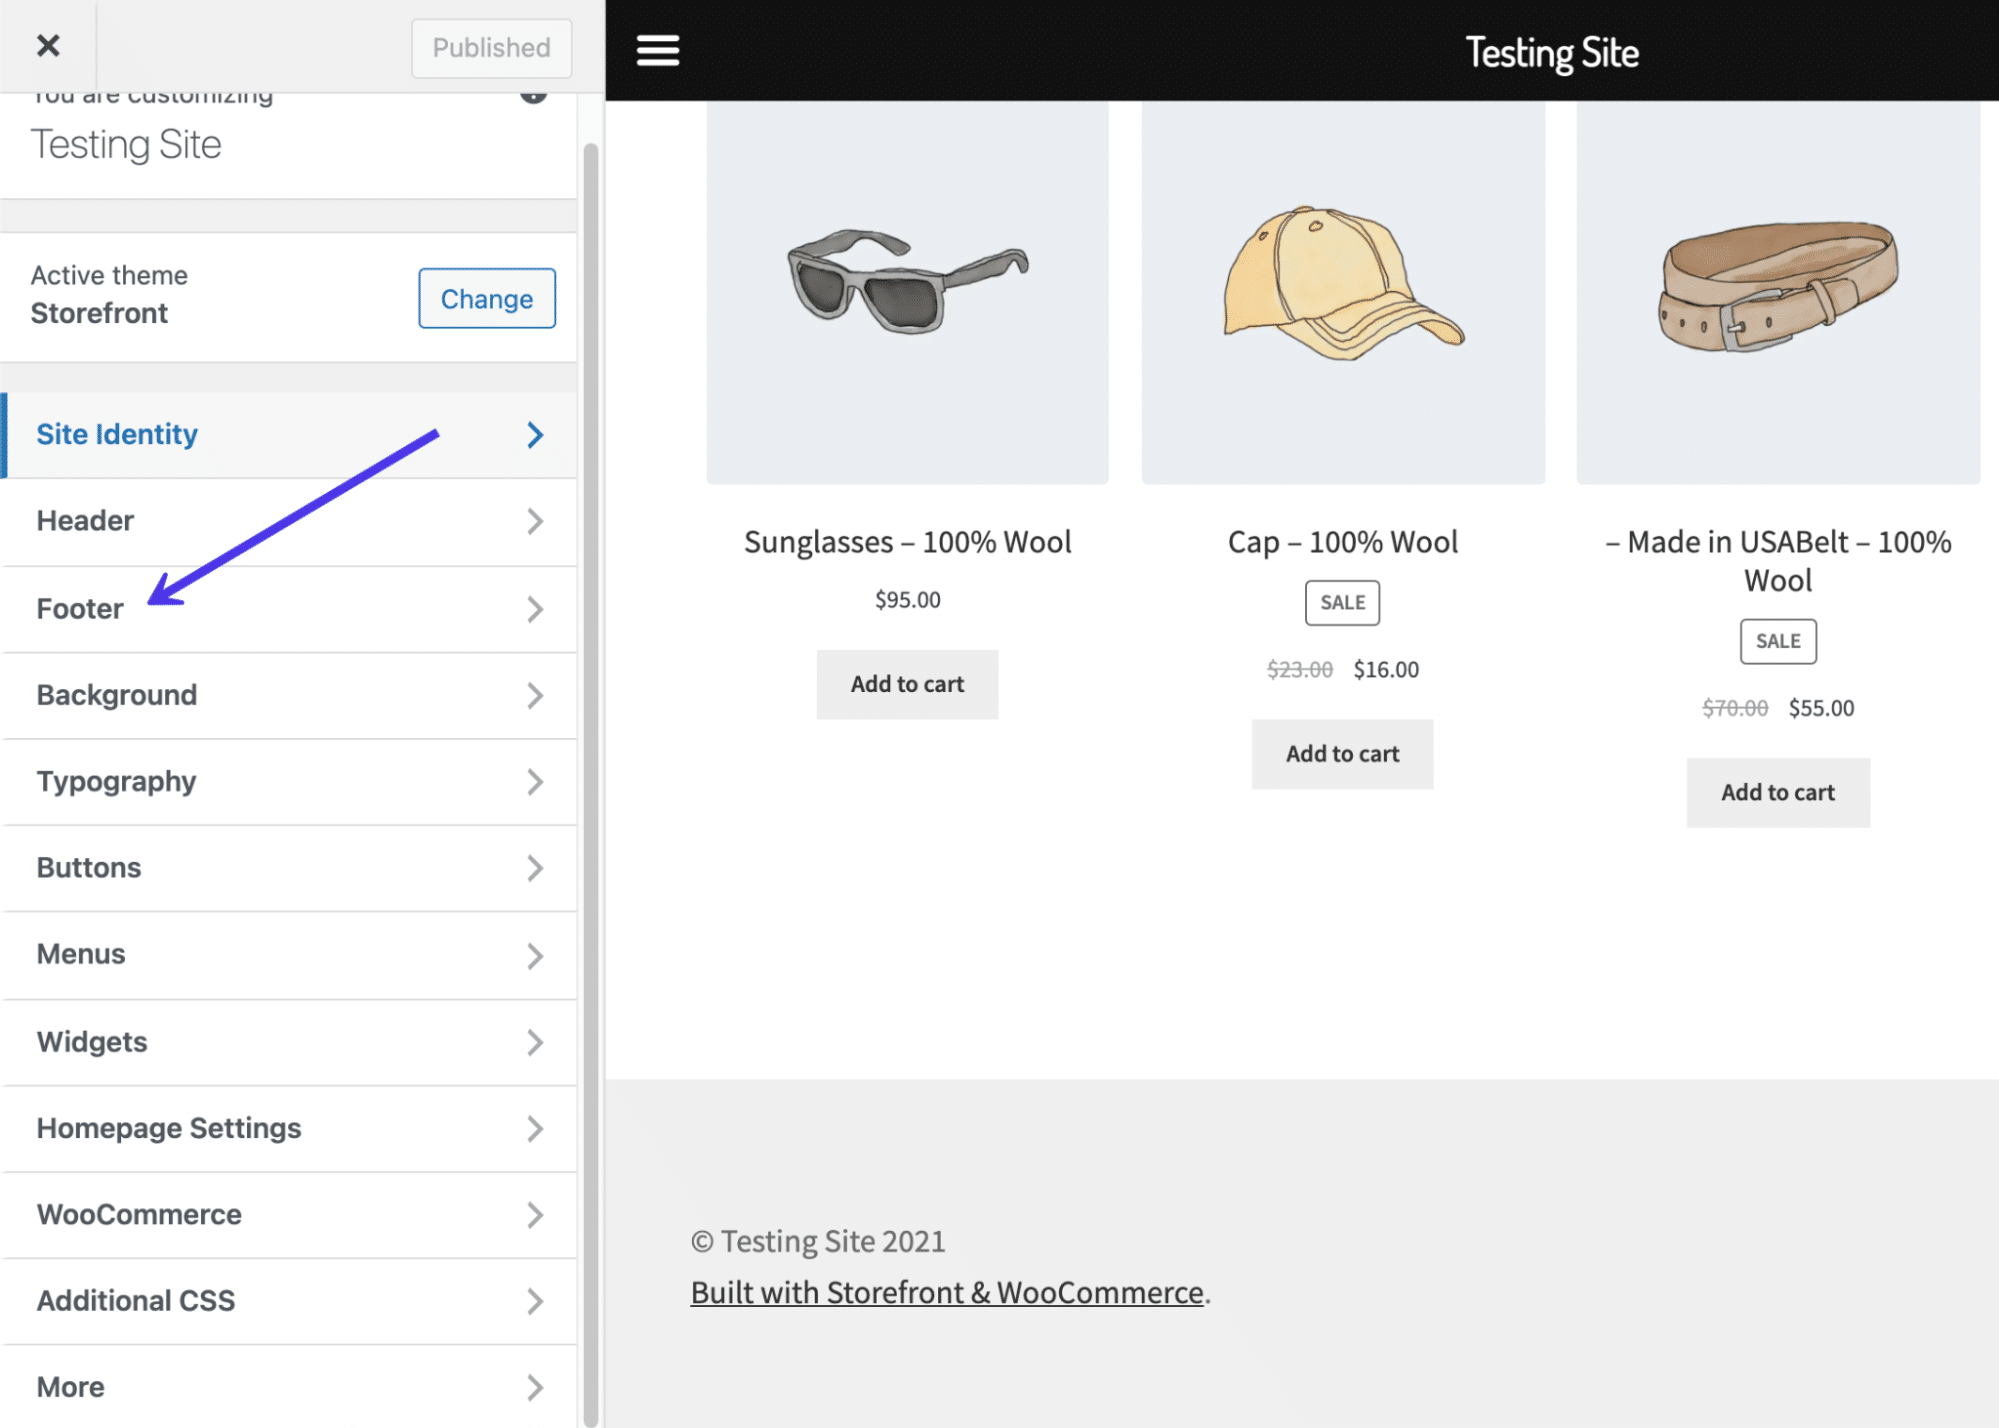
Unlike the previous theme, Storefront doesn’t automatically change text and link colors when you adjust the background colors. However, you are able to control all of these colors on their own, with fields for the Background Color, Heading Color, Text Color, and Link Color.
Footer color settings
A quick selection reveals the results in our WordPress footer preview. After this, you should click on the Publish button to see the new footer colors on the front end.
But what about the links and text elements presented by default in the footer?
Again, the primary method to adjust the footer content is in the WordPress Customizer. In the coming sections, we’ll explain how to add and remove text and link content from the footer using two methods: as menu items and as widgets.
Adding Widgets to Your WordPress Footer
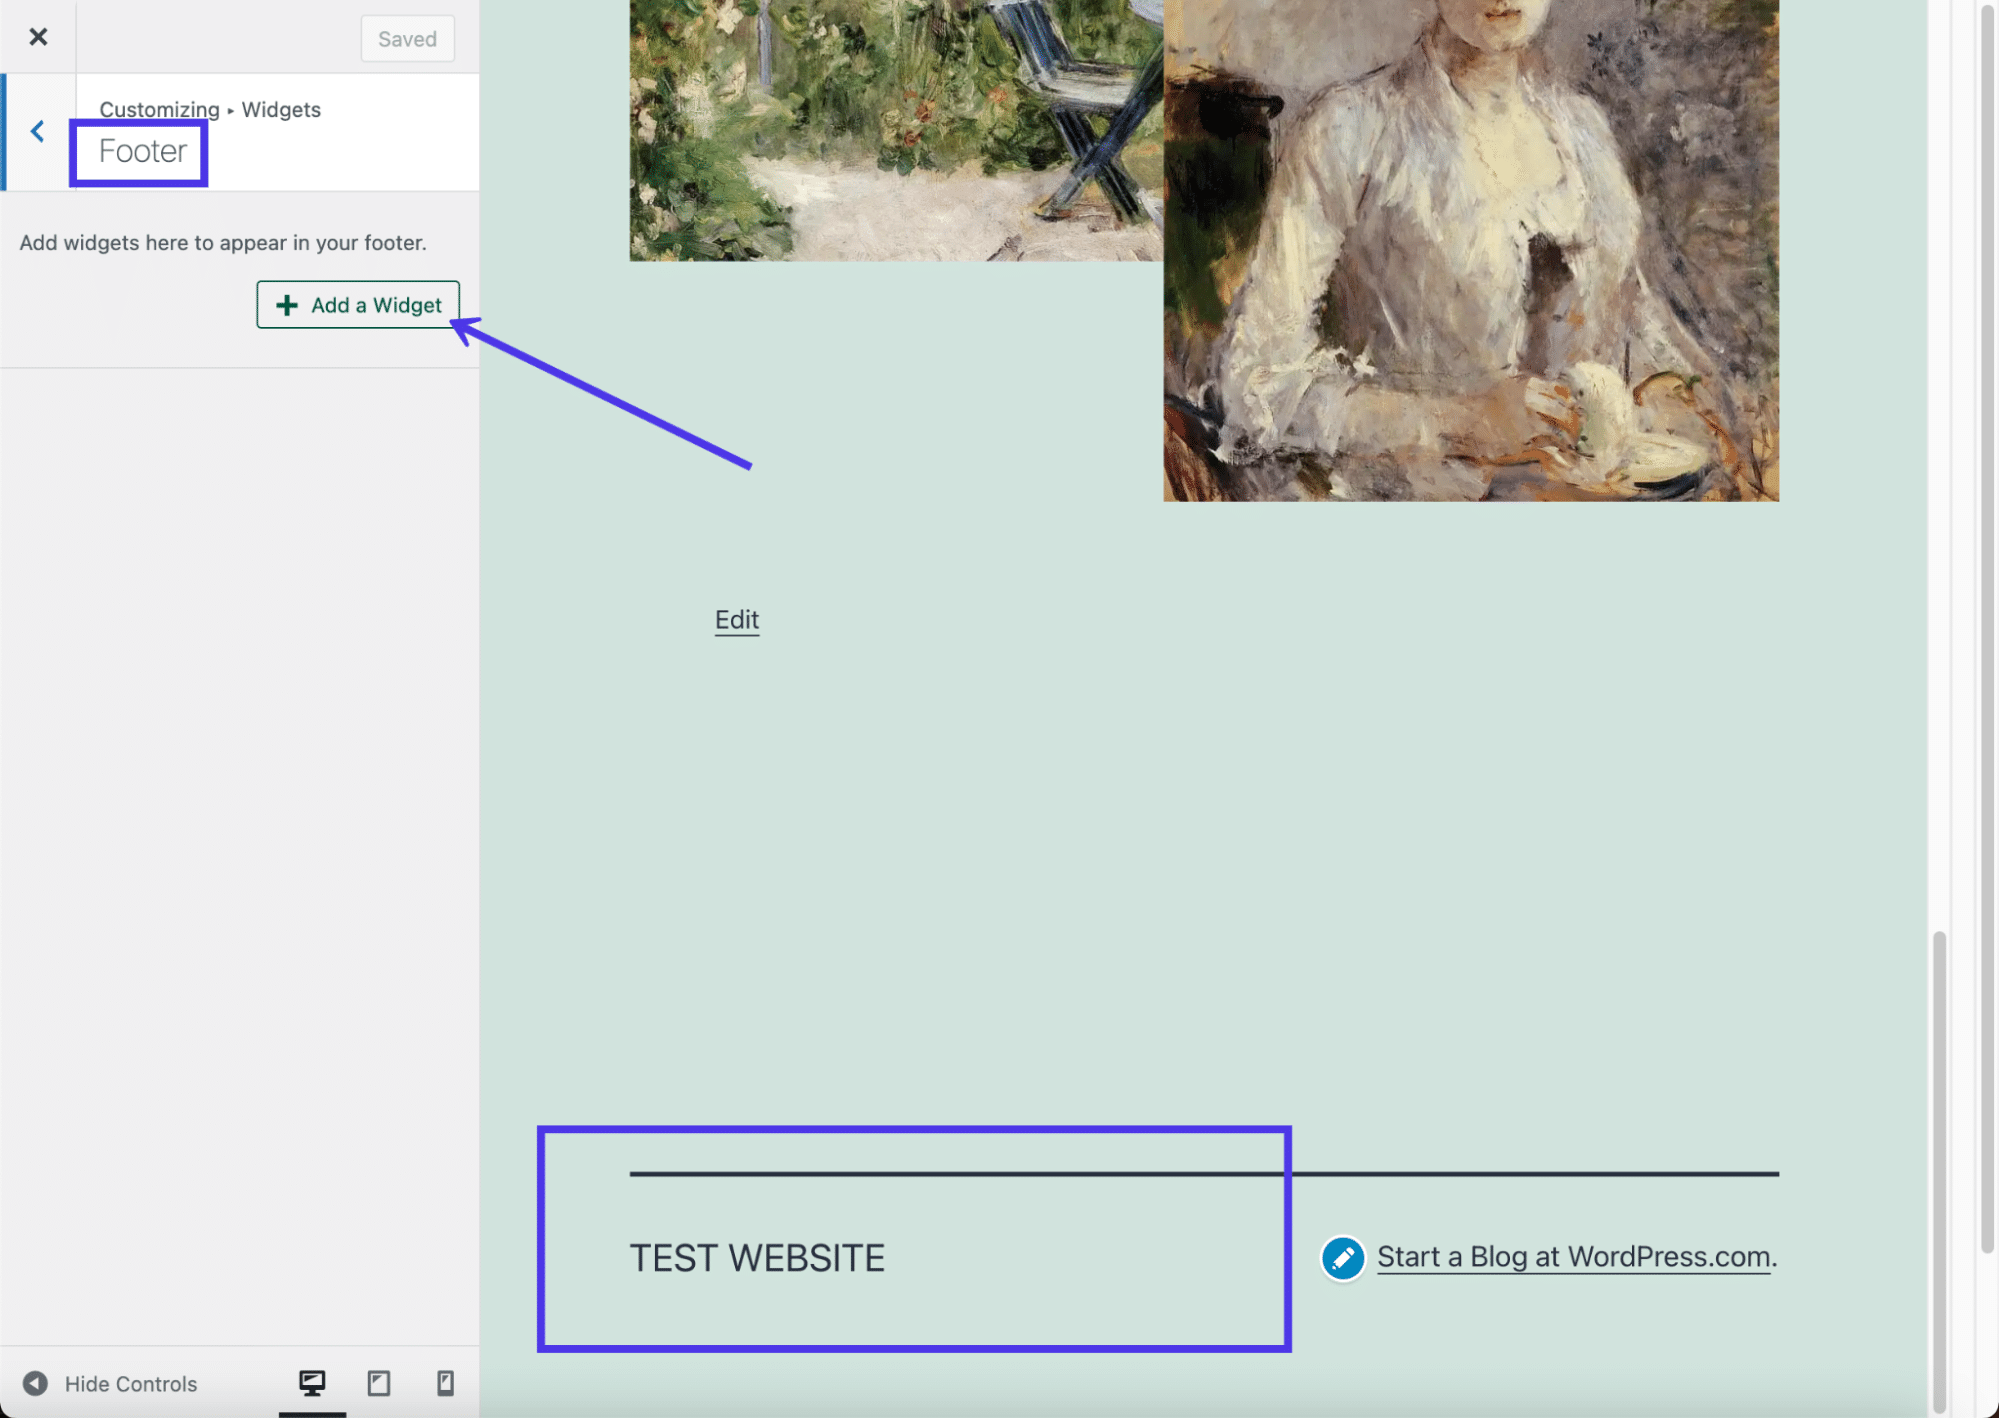
One way to edit the footer content is by adding widgets. WordPress widgets have many functions, along with several locations for them to go, including the sidebar and footer, provided your theme supports that.
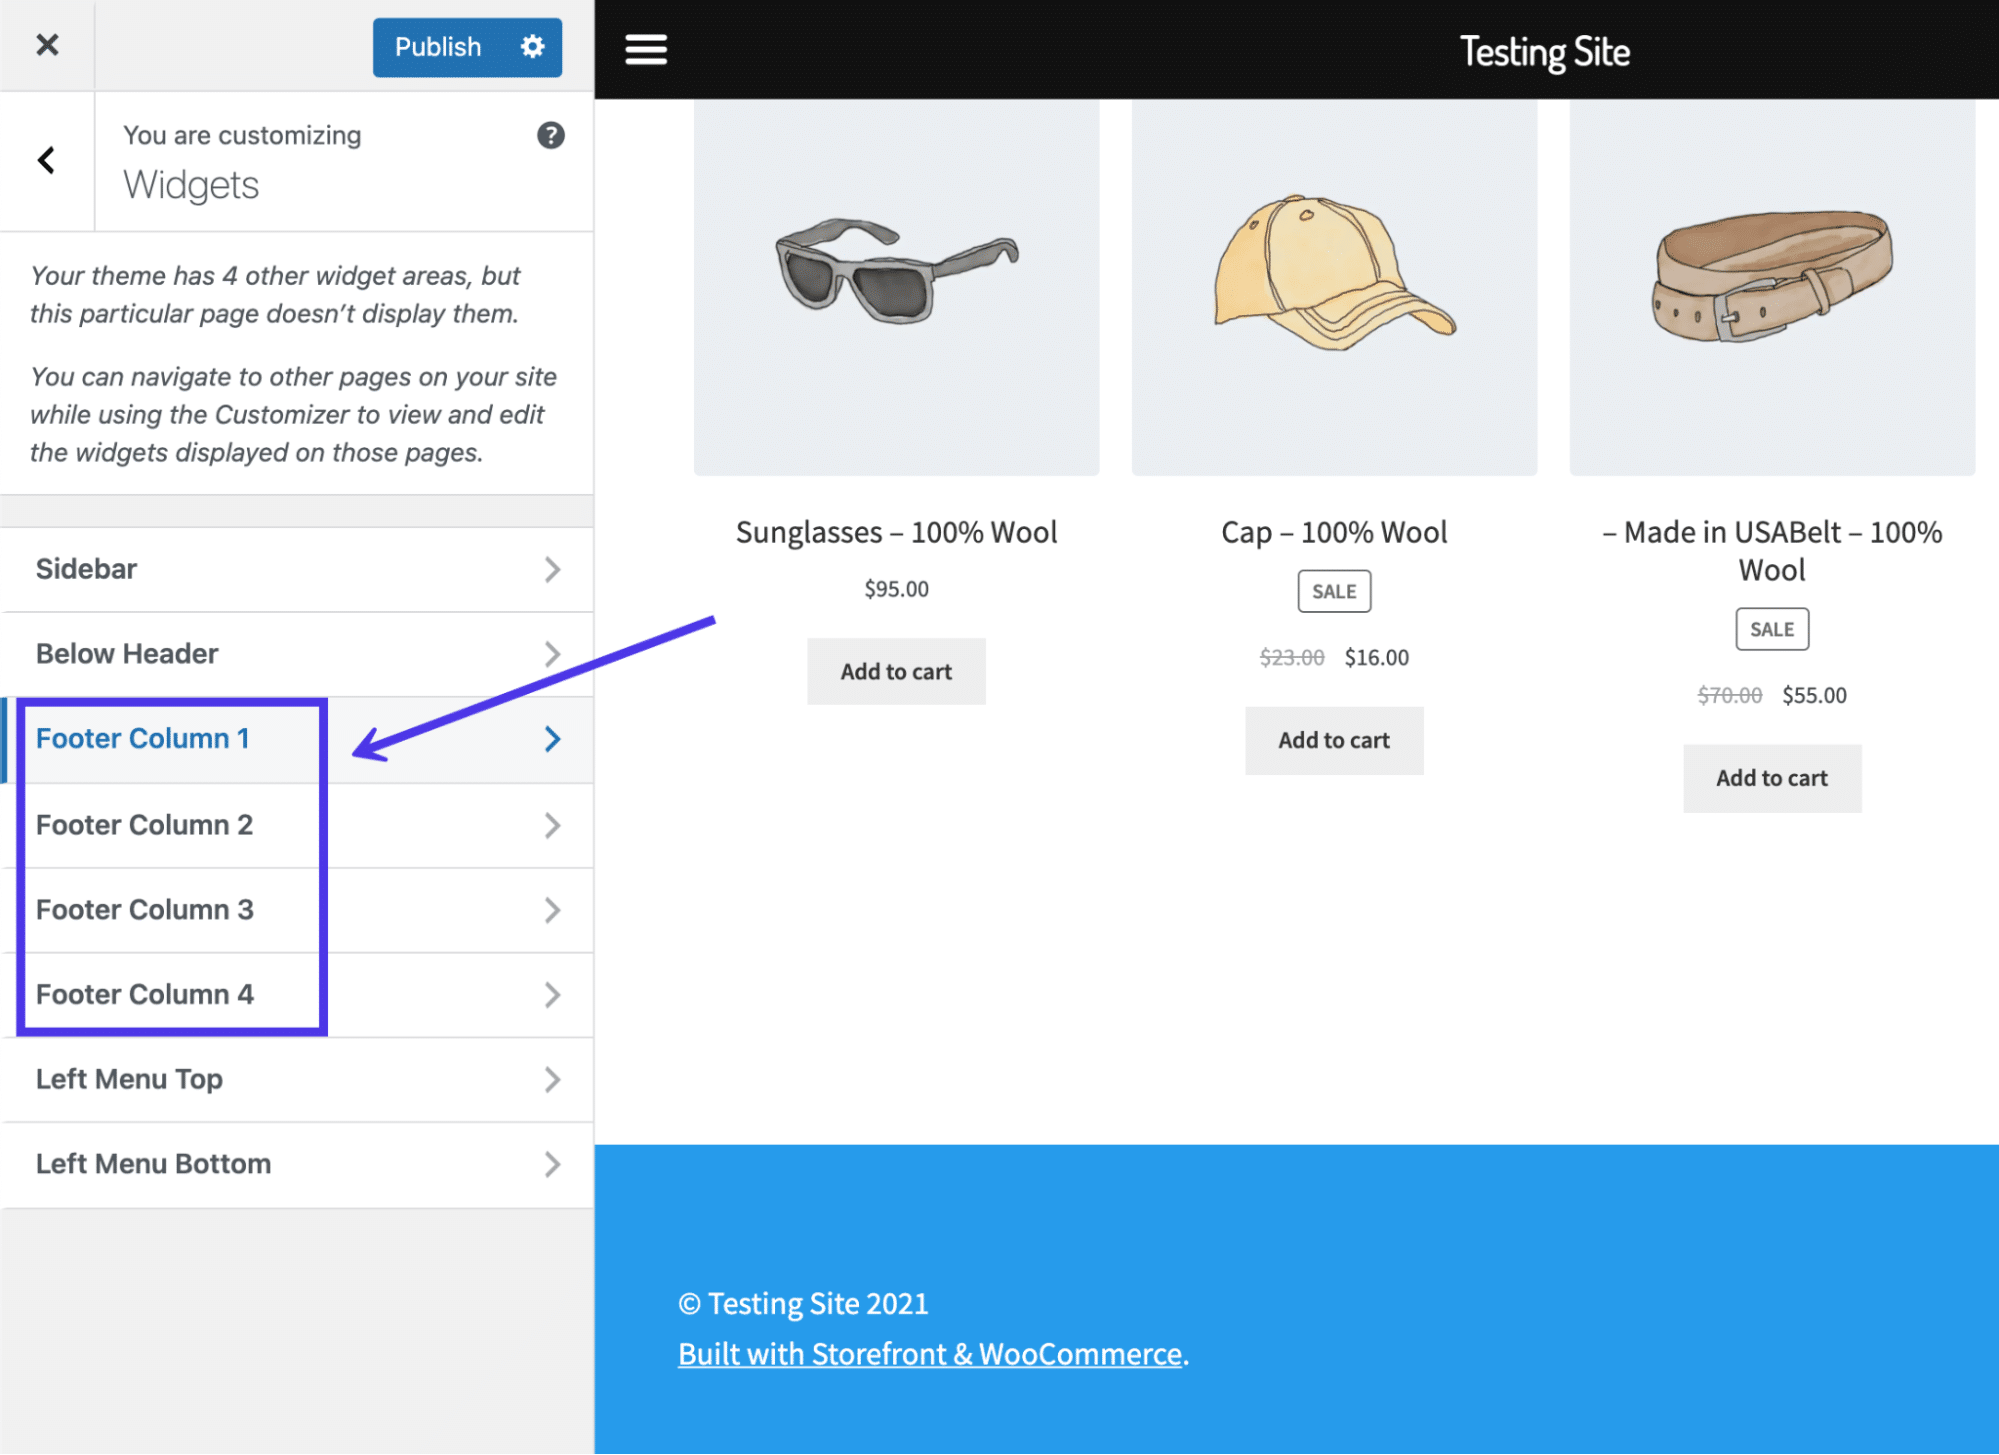
Back in the WordPress Customizer, look for the Widgets tab.

Peruse the list of areas to place widgets on your website. You may see options for regions like the sidebar, top menu, and bottom menu. Hopefully, your theme also includes the footer as an area to place widgets. If not, there are other ways to edit your footer, though if you’d rather go with widgets, consider switching to a different theme that allows for widgets inside the footer.
This theme actually provides four widget locations in the footer, arranged in four columns stacked side by side to make a beautiful format that fits as much content inside the footer as possible.
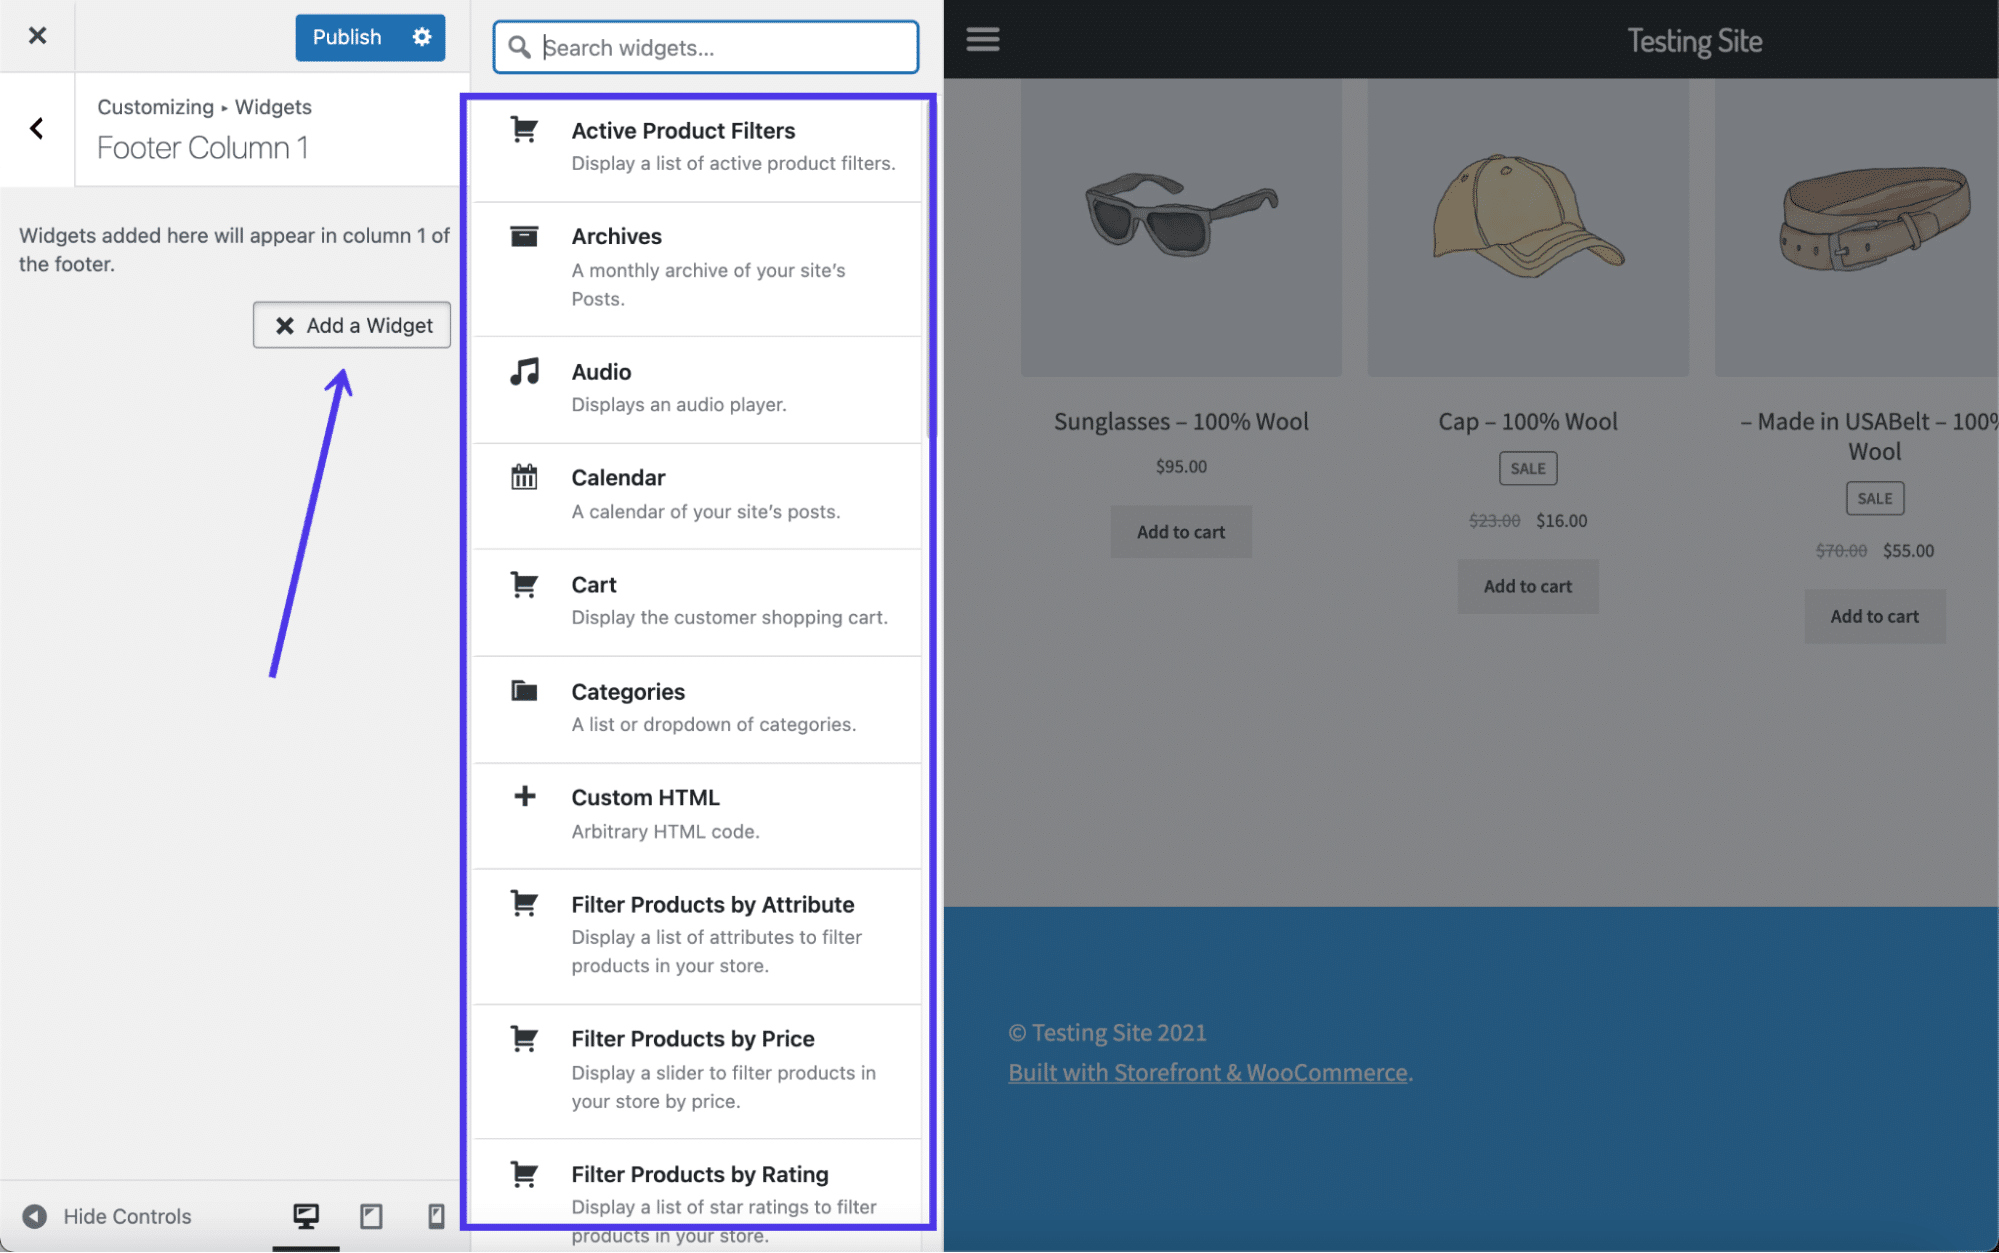
Click on any of the footer widget locations to reveal an area to Add A Widget. Click on that button to show a slideout view of all available widgets on WordPress and the theme. Once again, you may see a completely different set of widgets, considering some themes include their own widgets, or you may have installed an extension or plugin to add more widgets to your dashboard.
Common widgets range from Archives to Audio and Custom HTML to Product Filters.
All you have to do is select the widgets to add to this particular widget area. They’ll show up on the left-hand side for you to reorganize and configure their individual settings.
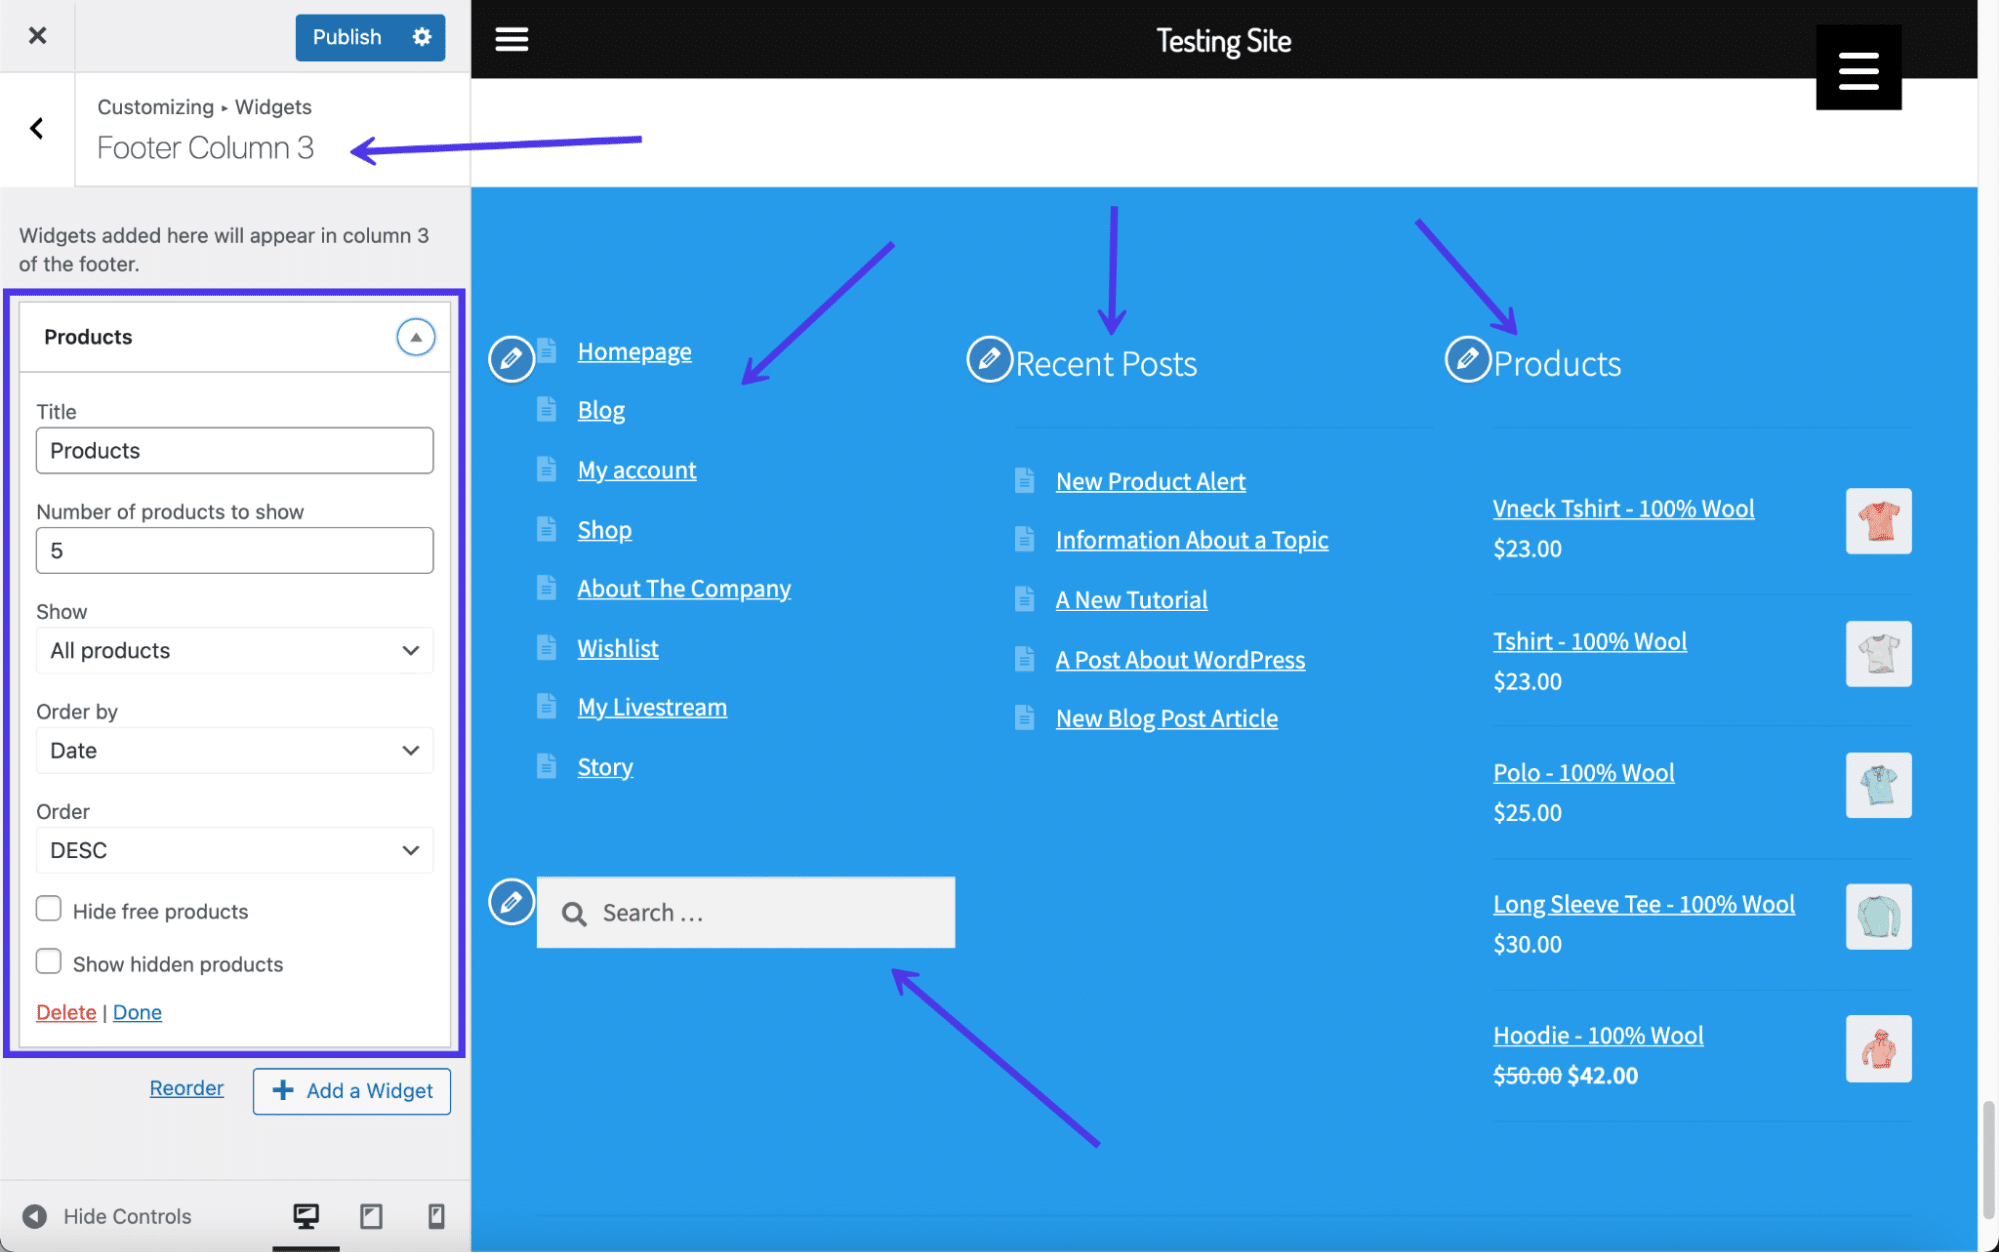
After some quick work, we’ve placed several widgets in three of the footer column modules, including a main menu, a list of recent posts, and a few of the products from our shop. You’ll also notice we added a search bar to make navigation a little easier for our users.
One important area to note is the widget settings section. Each widget has its own settings on the left, so be sure to walk through those fields and make them look exactly as you want.
As you may learn while browsing through the theme settings, not all themes have ways to add menus directly to the footer area using the standard Add Menu setting. Our theme here, for example, has spots to activate menus as primary, secondary, handheld, and mobile menus, but nothing for footers.
We’ll cover menus in the next section, but we wanted to explain a quick workaround to add a menu with a widget, just in case your theme doesn’t support menus in the usual manner.
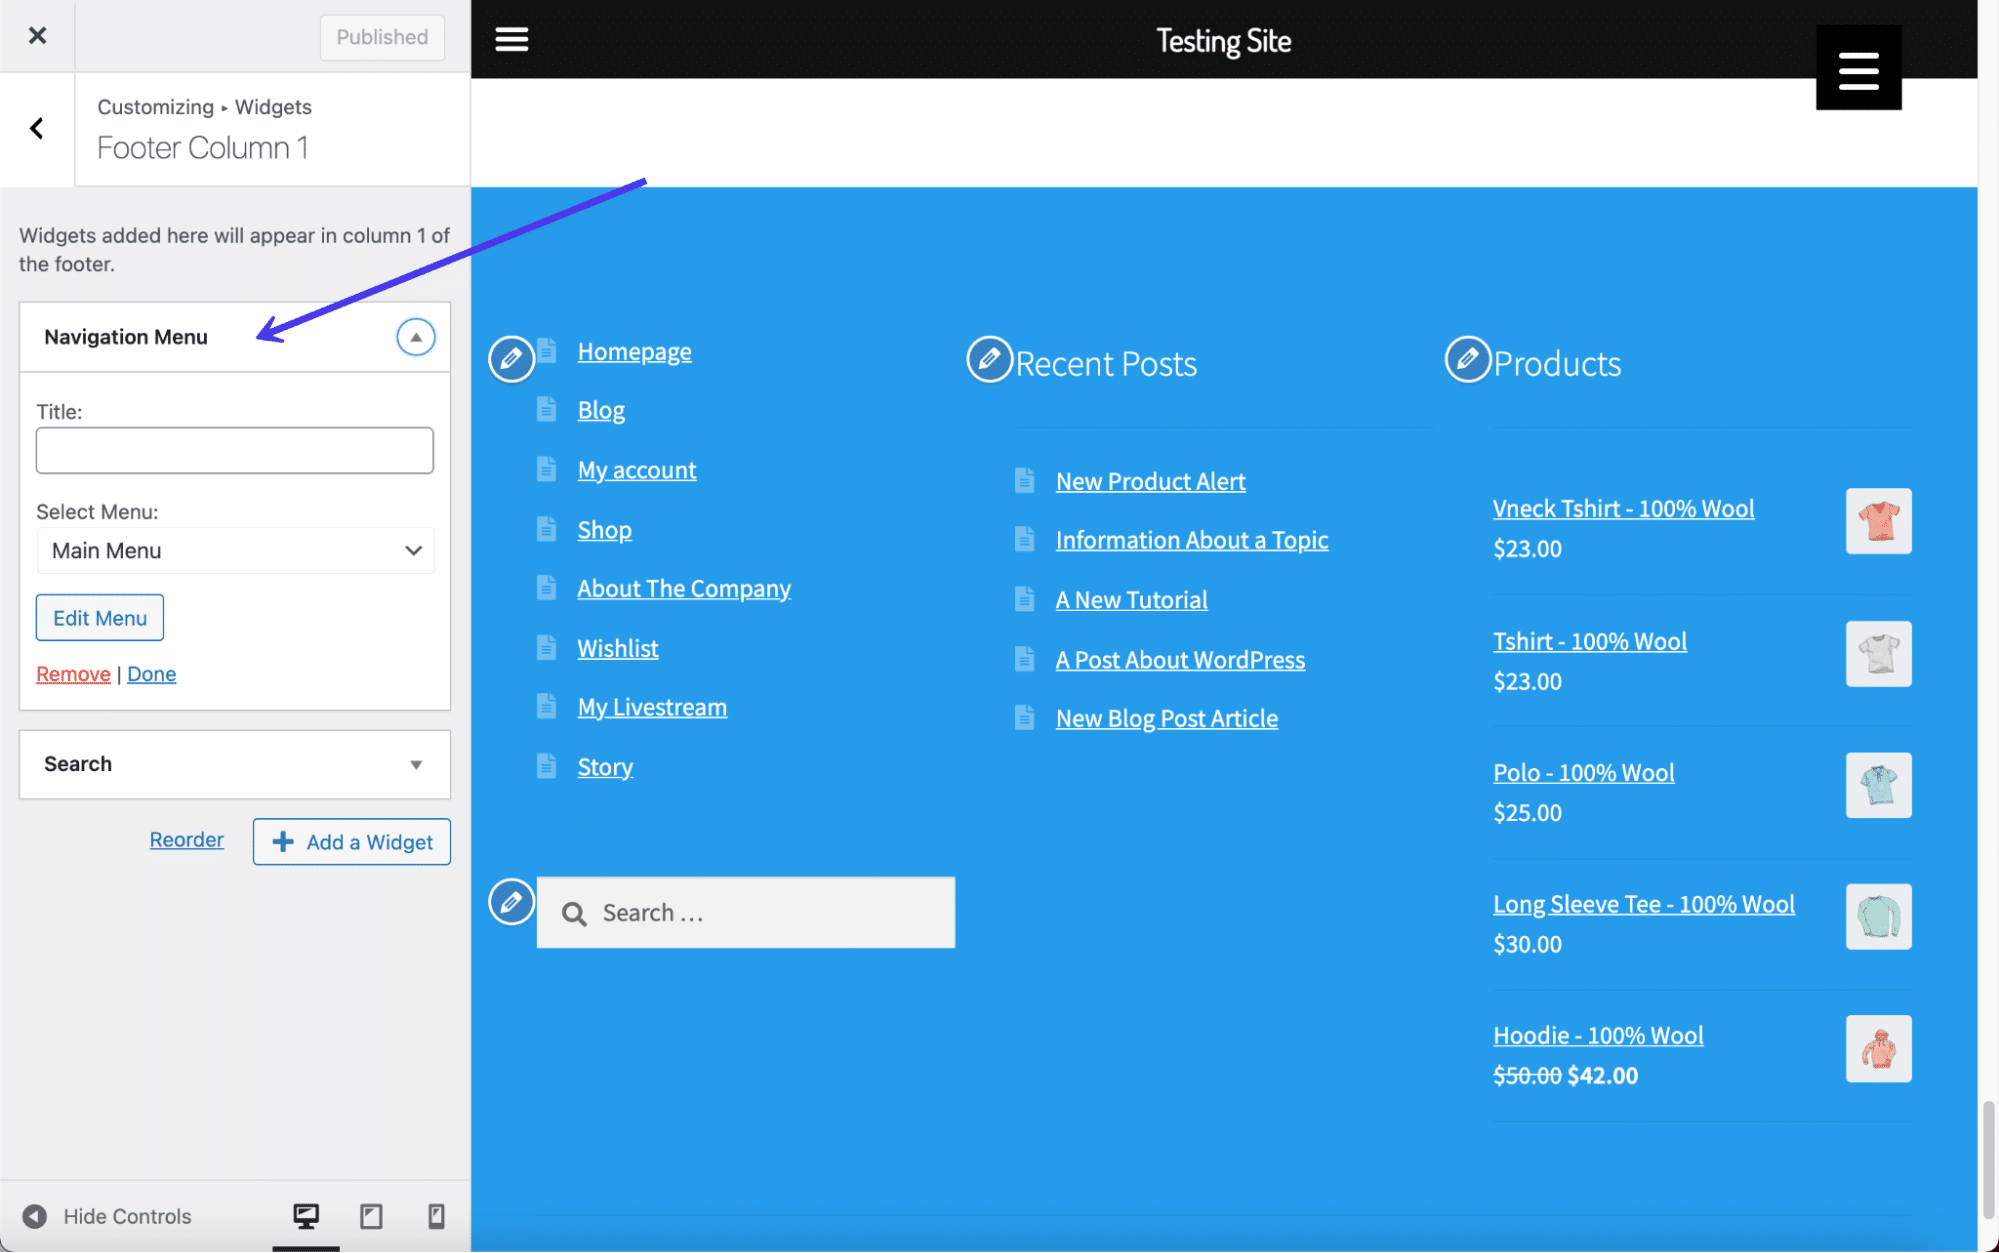
Essentially, all you have to do is go to one of your widget footer modules and search for the Navigational Menu widget. Here, you can click on a dropdown field to view all created menus on your website. Feel free to generate a menu specifically for your footer (in the Menus section of the dashboard) and add it as a widget in this section.
As an alternative, opt for the main menu, or whatever menus you’ve created. They should all show up in the menu widget dropdown.
After that, the menu of your choice shows up in the footer, as long as you’ve added the Navigational Menu widget in the right footer area and clicked the Publish button. You can even type in a title for that menu if you’d like to explain what the following links contain.
How To Insert Custom Text, Images, and Code as Footer Widgets
Many WordPress widgets offer pre-configured lists of content, like the Recent Posts widget or the Search Bar.
However, sometimes you may want to edit the WordPress footer to include entirely custom content, such as simple text, images, or a bit of code, to create something completely new.
WordPress provides a widget for each of these.
All that’s required is to go to the Theme Customizer > Widgets. Then, choose the widget area that reflects where you want the widgets to go in the footer.
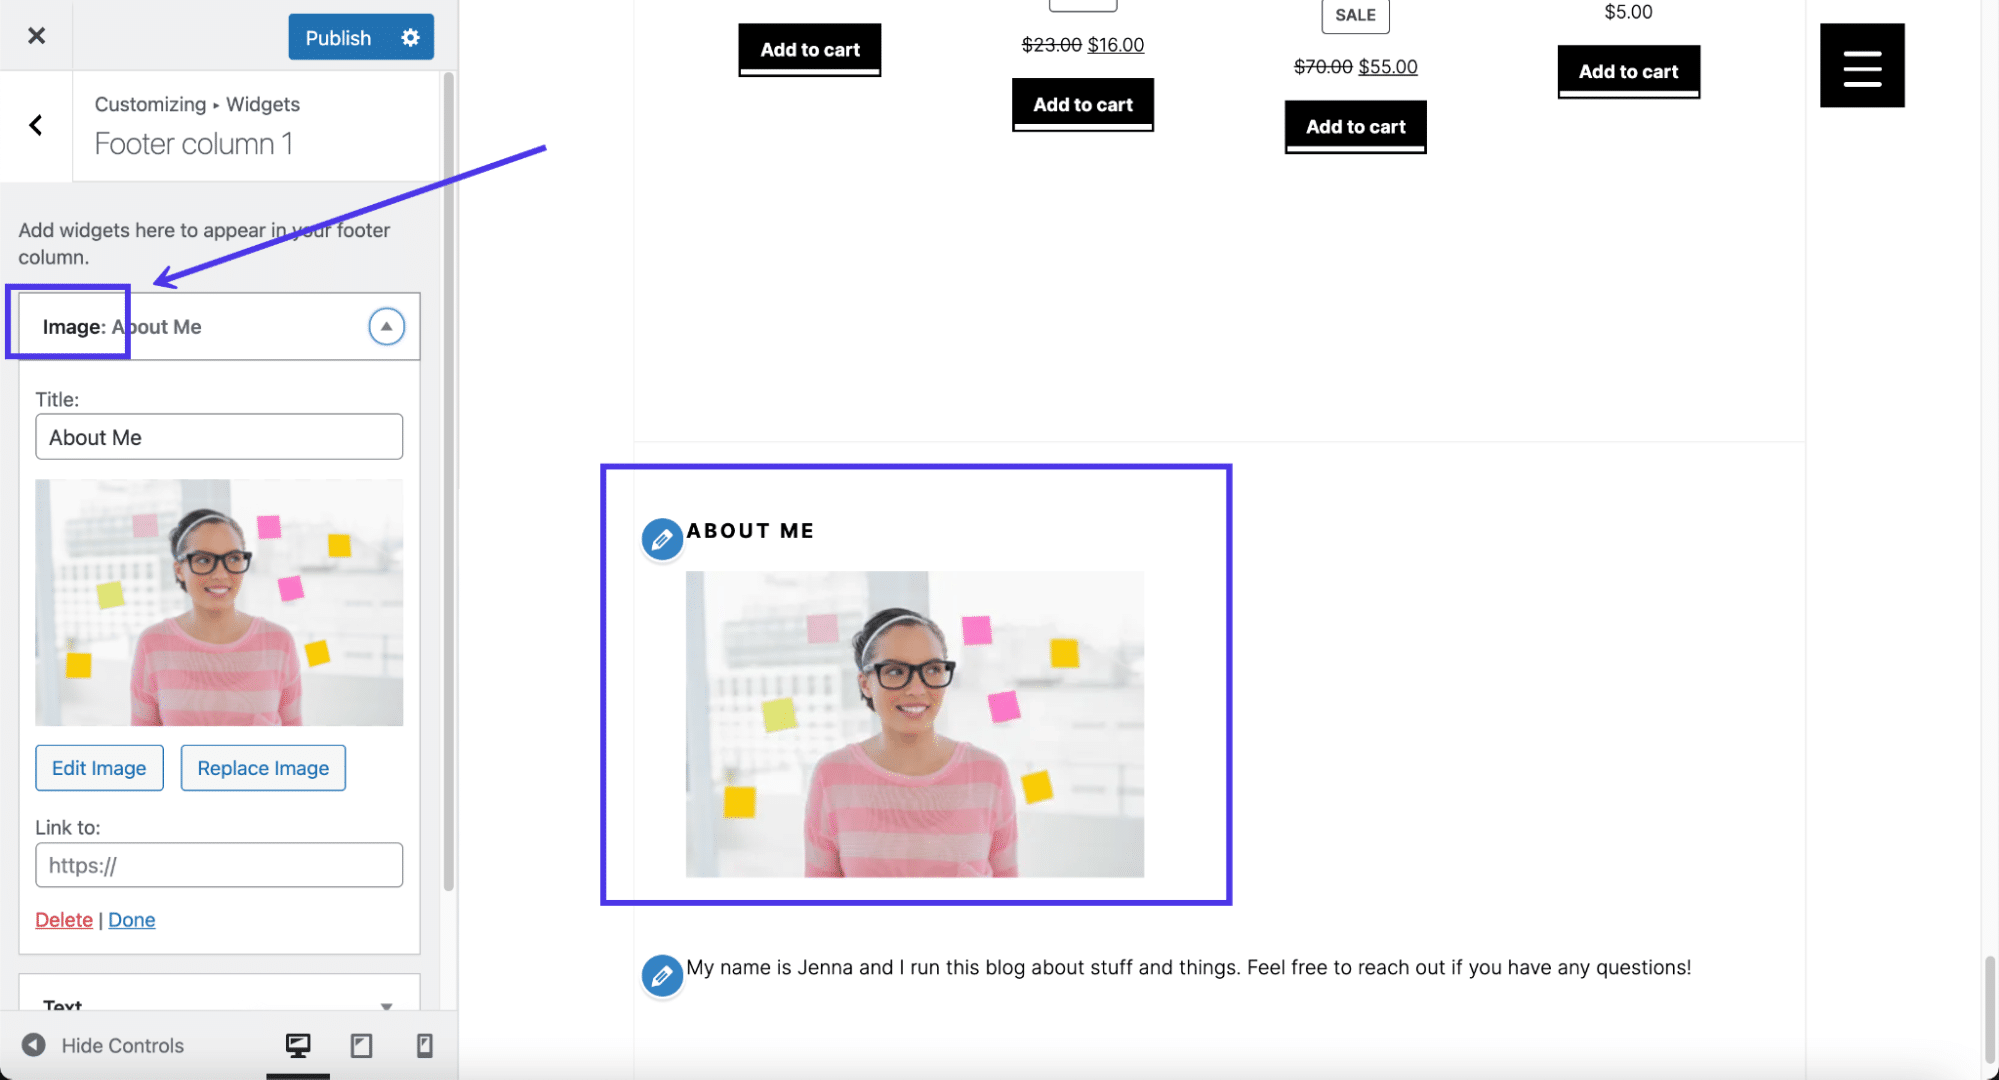
Click on the Add A Widget button and search for “image”.
Add the Image widget and customize the title. Click on Add Image, then consider including a link to the image as well. You can edit the image size by clicking on Edit Image.
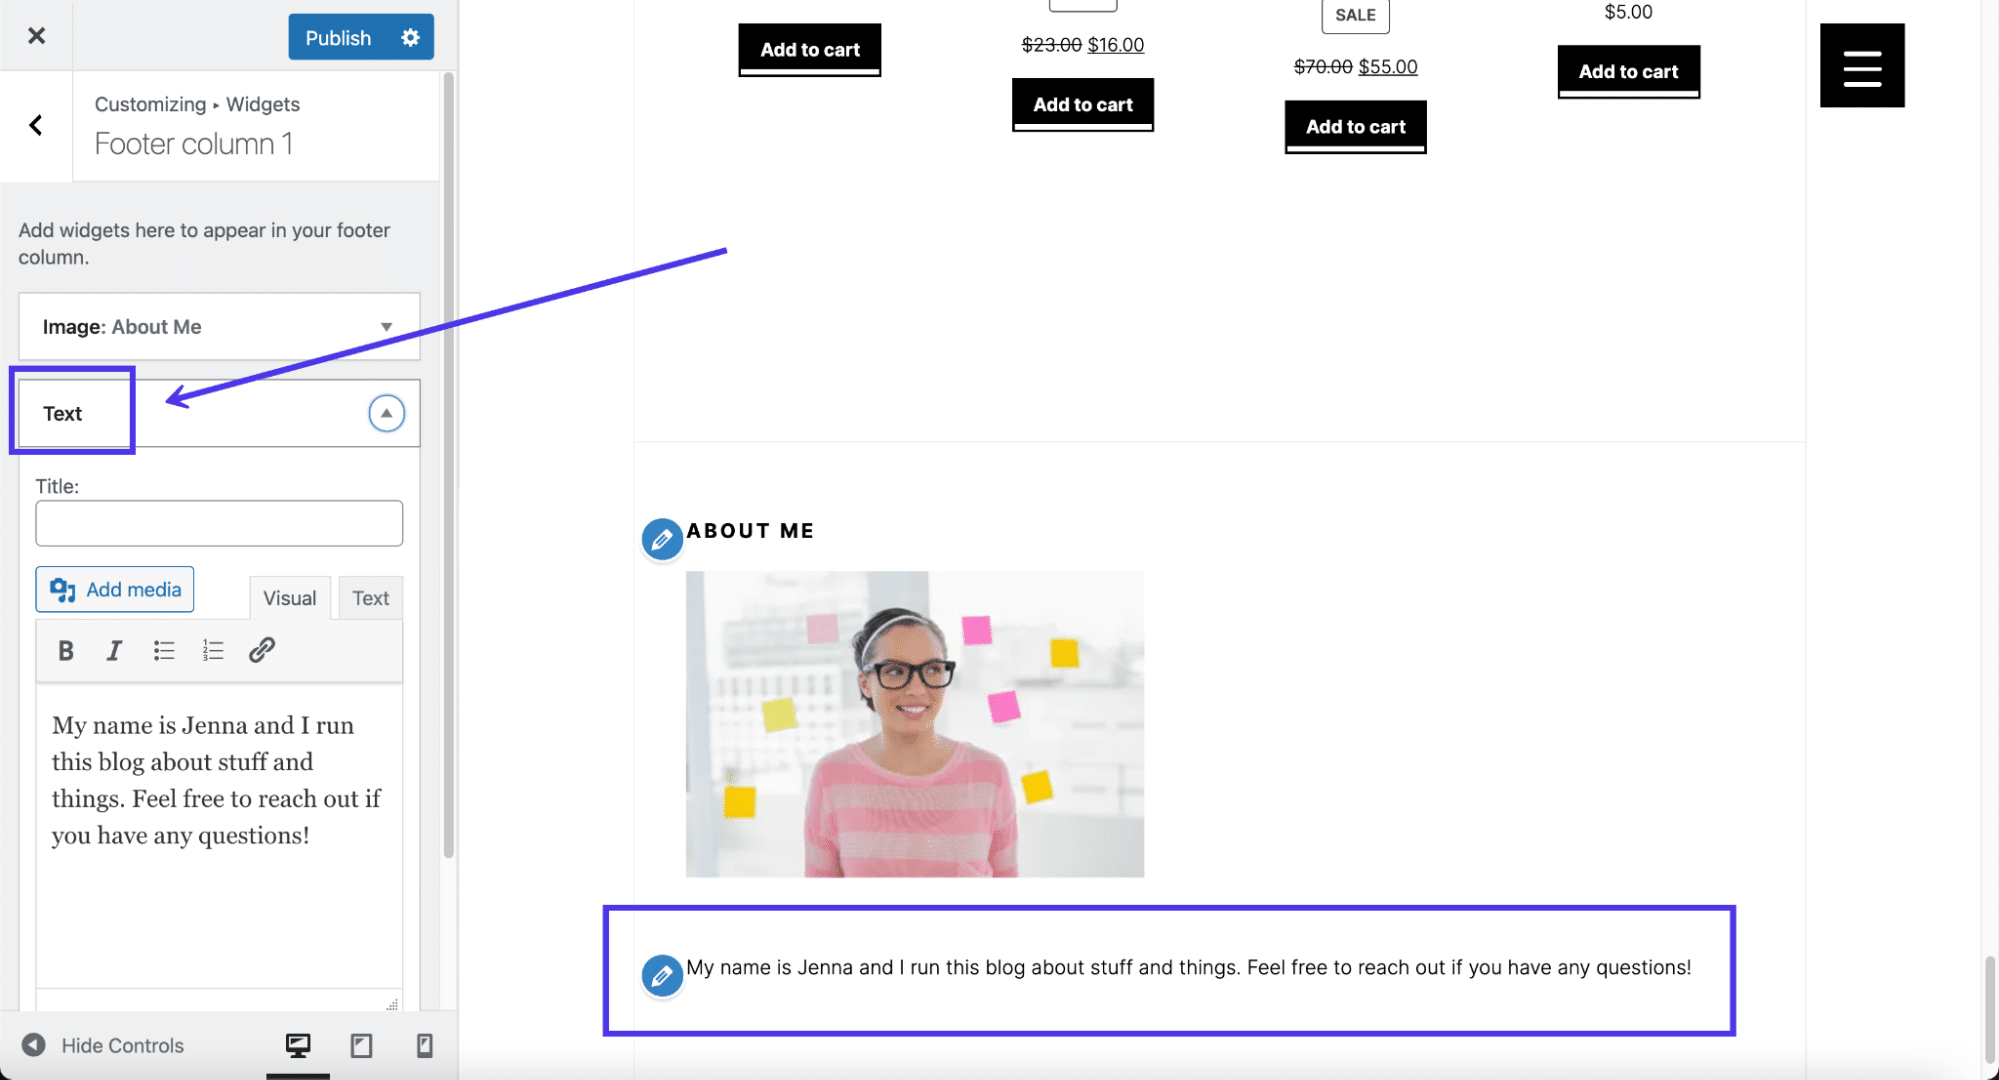
Next up, search for “text” in the widget library.
Add the Text widget to your footer and type in anything you want. It also has a title field along with a visual editor, much like you receive when making a blog post or page in WordPress. We’ve tried inserting images through the Text widget (since it’s technically possible) but many themes don’t allow it.
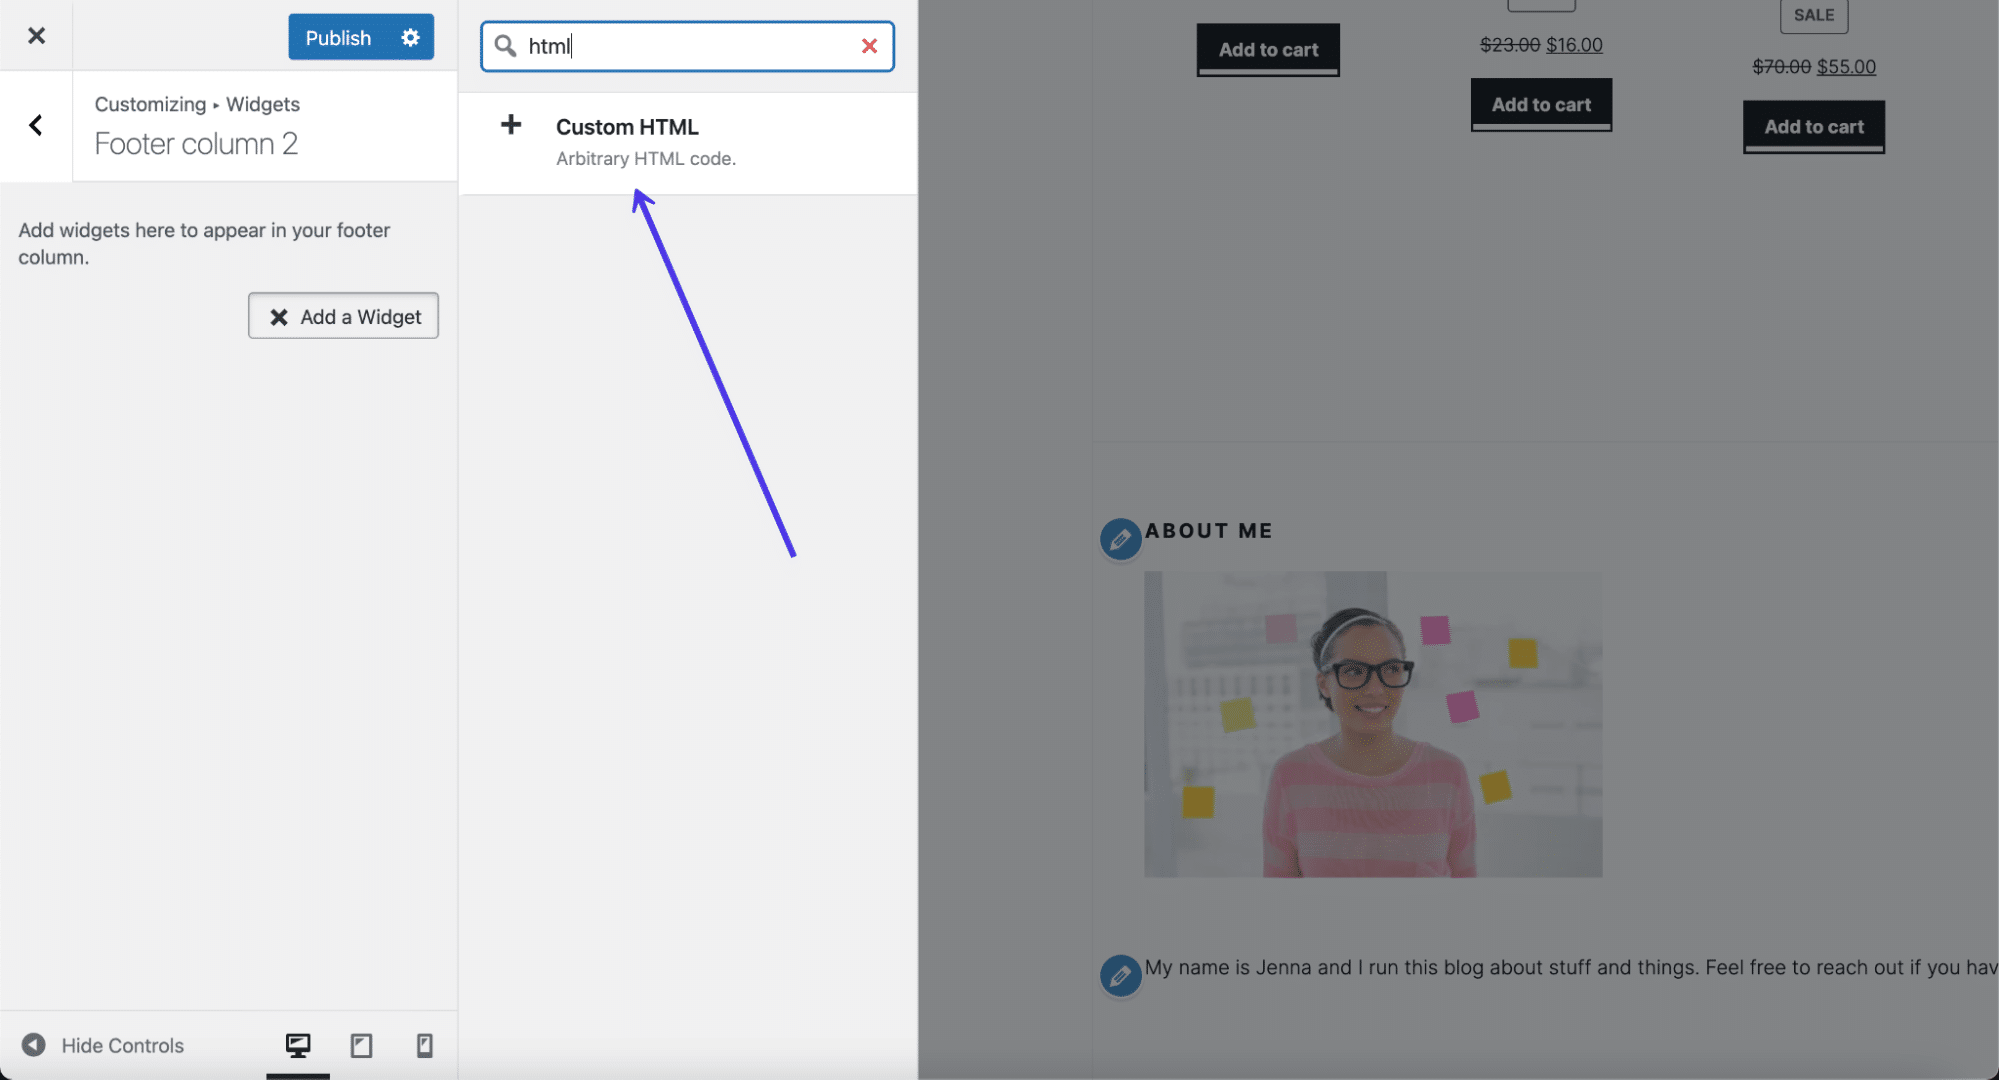
Finally, you may find that using a Custom HTML widget is the best course of action, especially if you want full control over the footer design or to incorporate a unique design for something like an email signup form.
For that, search for “HTML” in the widget library and choose the Custom HTML widget.
Paste or type in your custom HTML and keep an eye on the right-side preview to ensure it looks the way it’s supposed to. You may also have to add some CSS styling to make it appear the way you want.
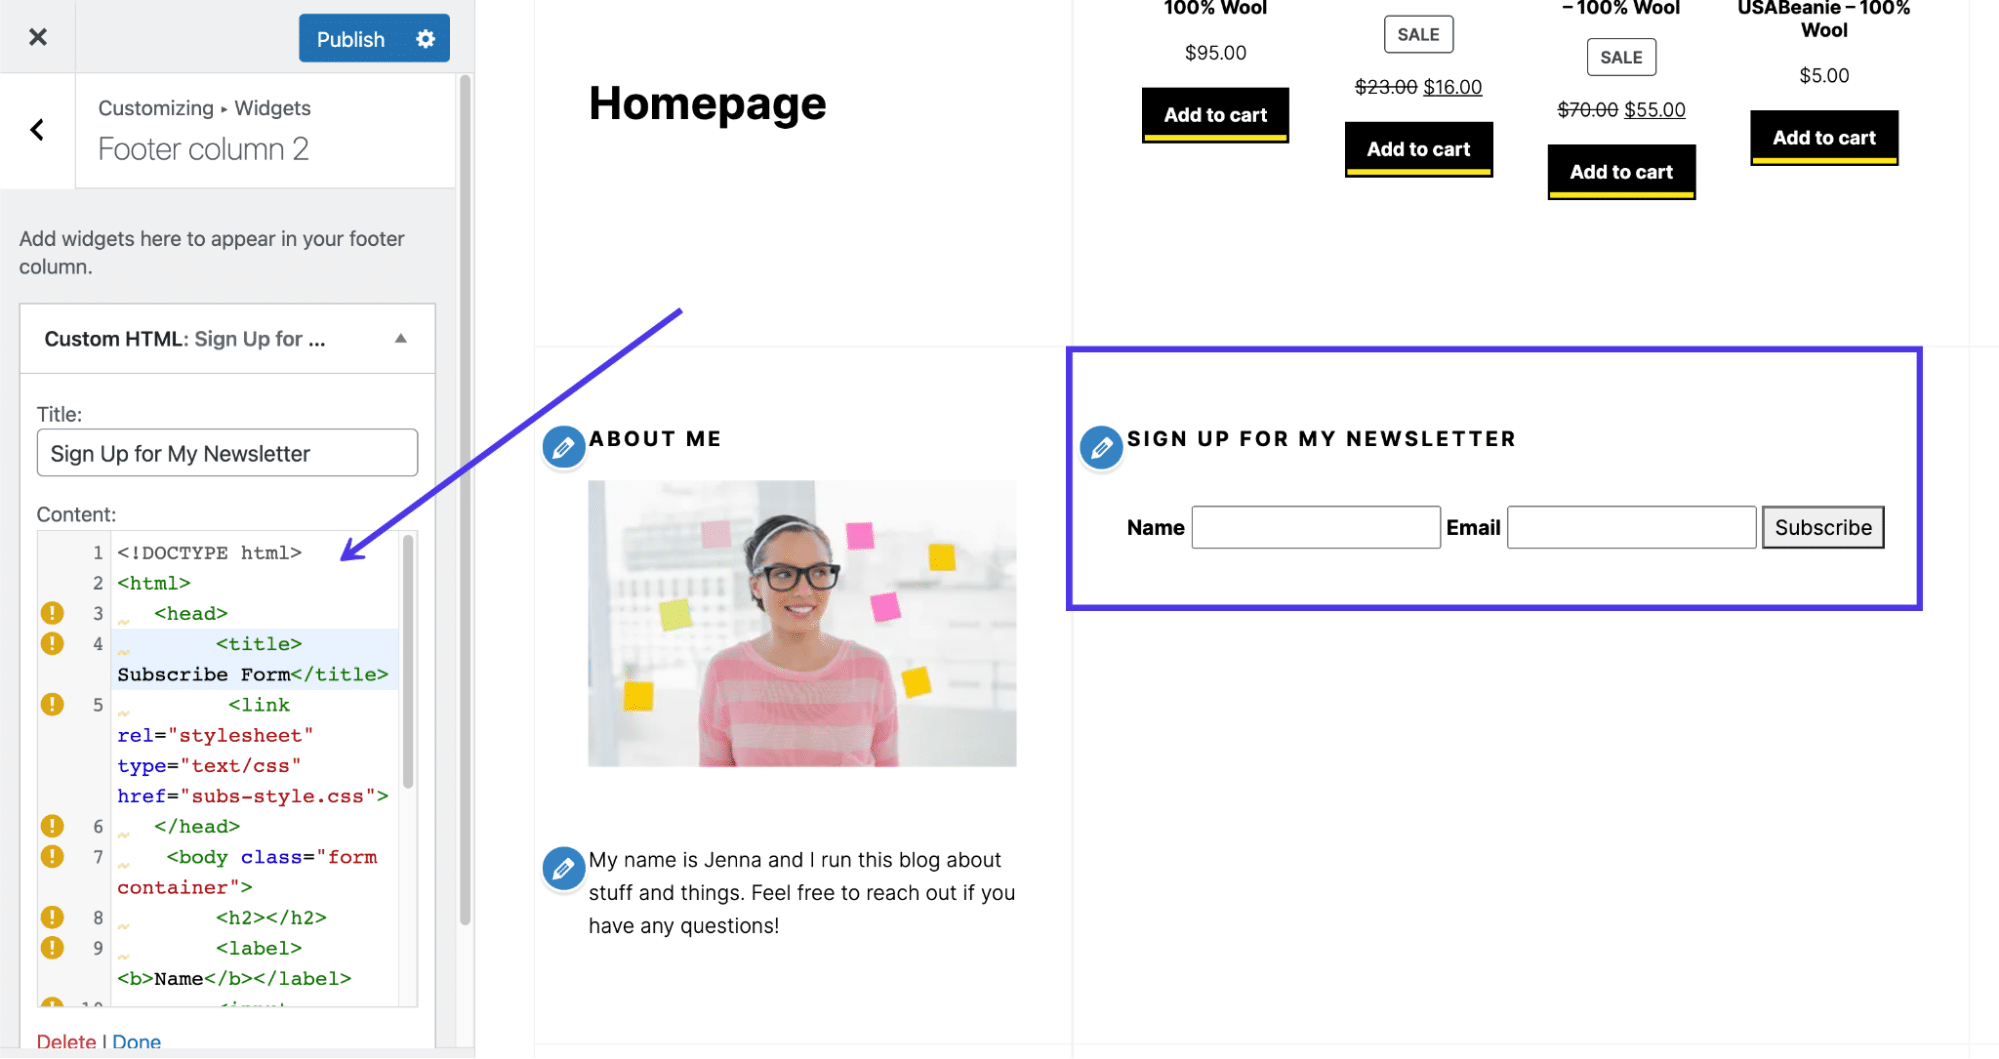
As always, remember to click the Publish button at the end.
Adding Menus to the WordPress Footer
You make menus in WordPress by going to Appearance > Menus. Once you’ve established a menu, it’s ready to add, at least the locations supported by your chosen theme.
It’s also possible to create your menu within the WordPress Customizer, so it just depends on where you feel most comfortable adding new pages and links to your menus.
Check Out Our Video Guide to Adding Menus to the WordPress Footer
As a reminder, not all WordPress themes allow for menus within the footer. In fact, some of them only have one or two menu locations, so you’ll have to check to see if your theme supports menus. If not, refer back to the previous section for a workaround that uses a widget to incorporate a menu in the footer.
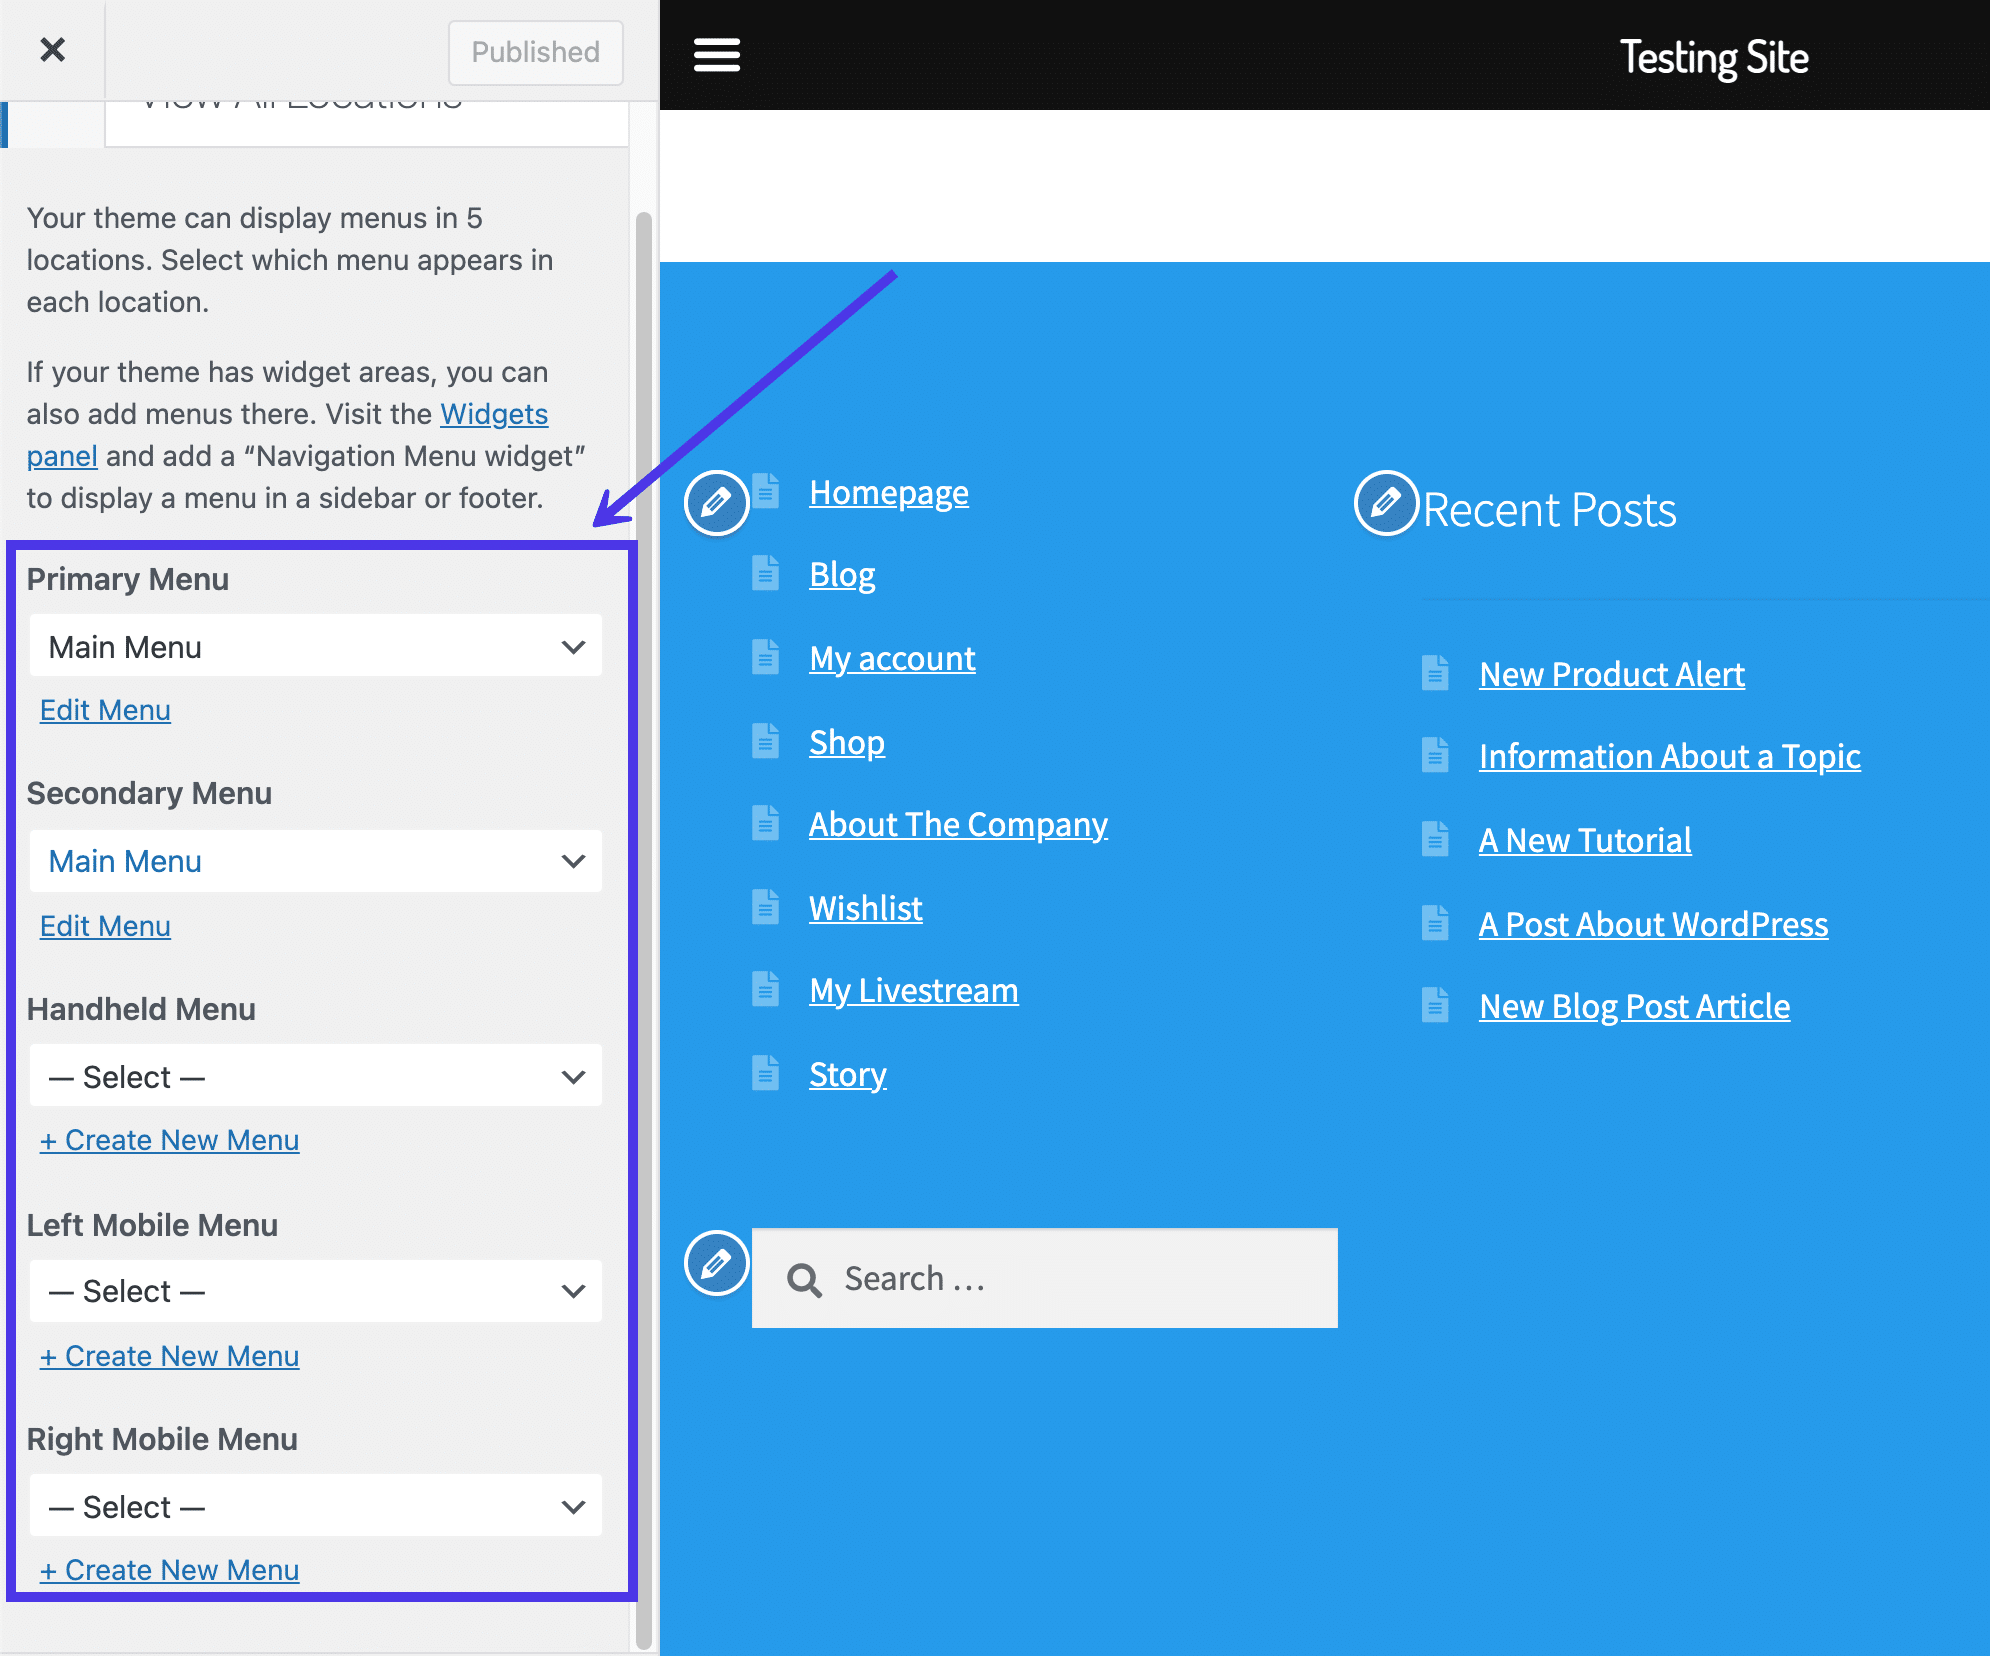
If using a theme that allows for menus in the footer, go to the WordPress Customizer and click on the Menus tab.
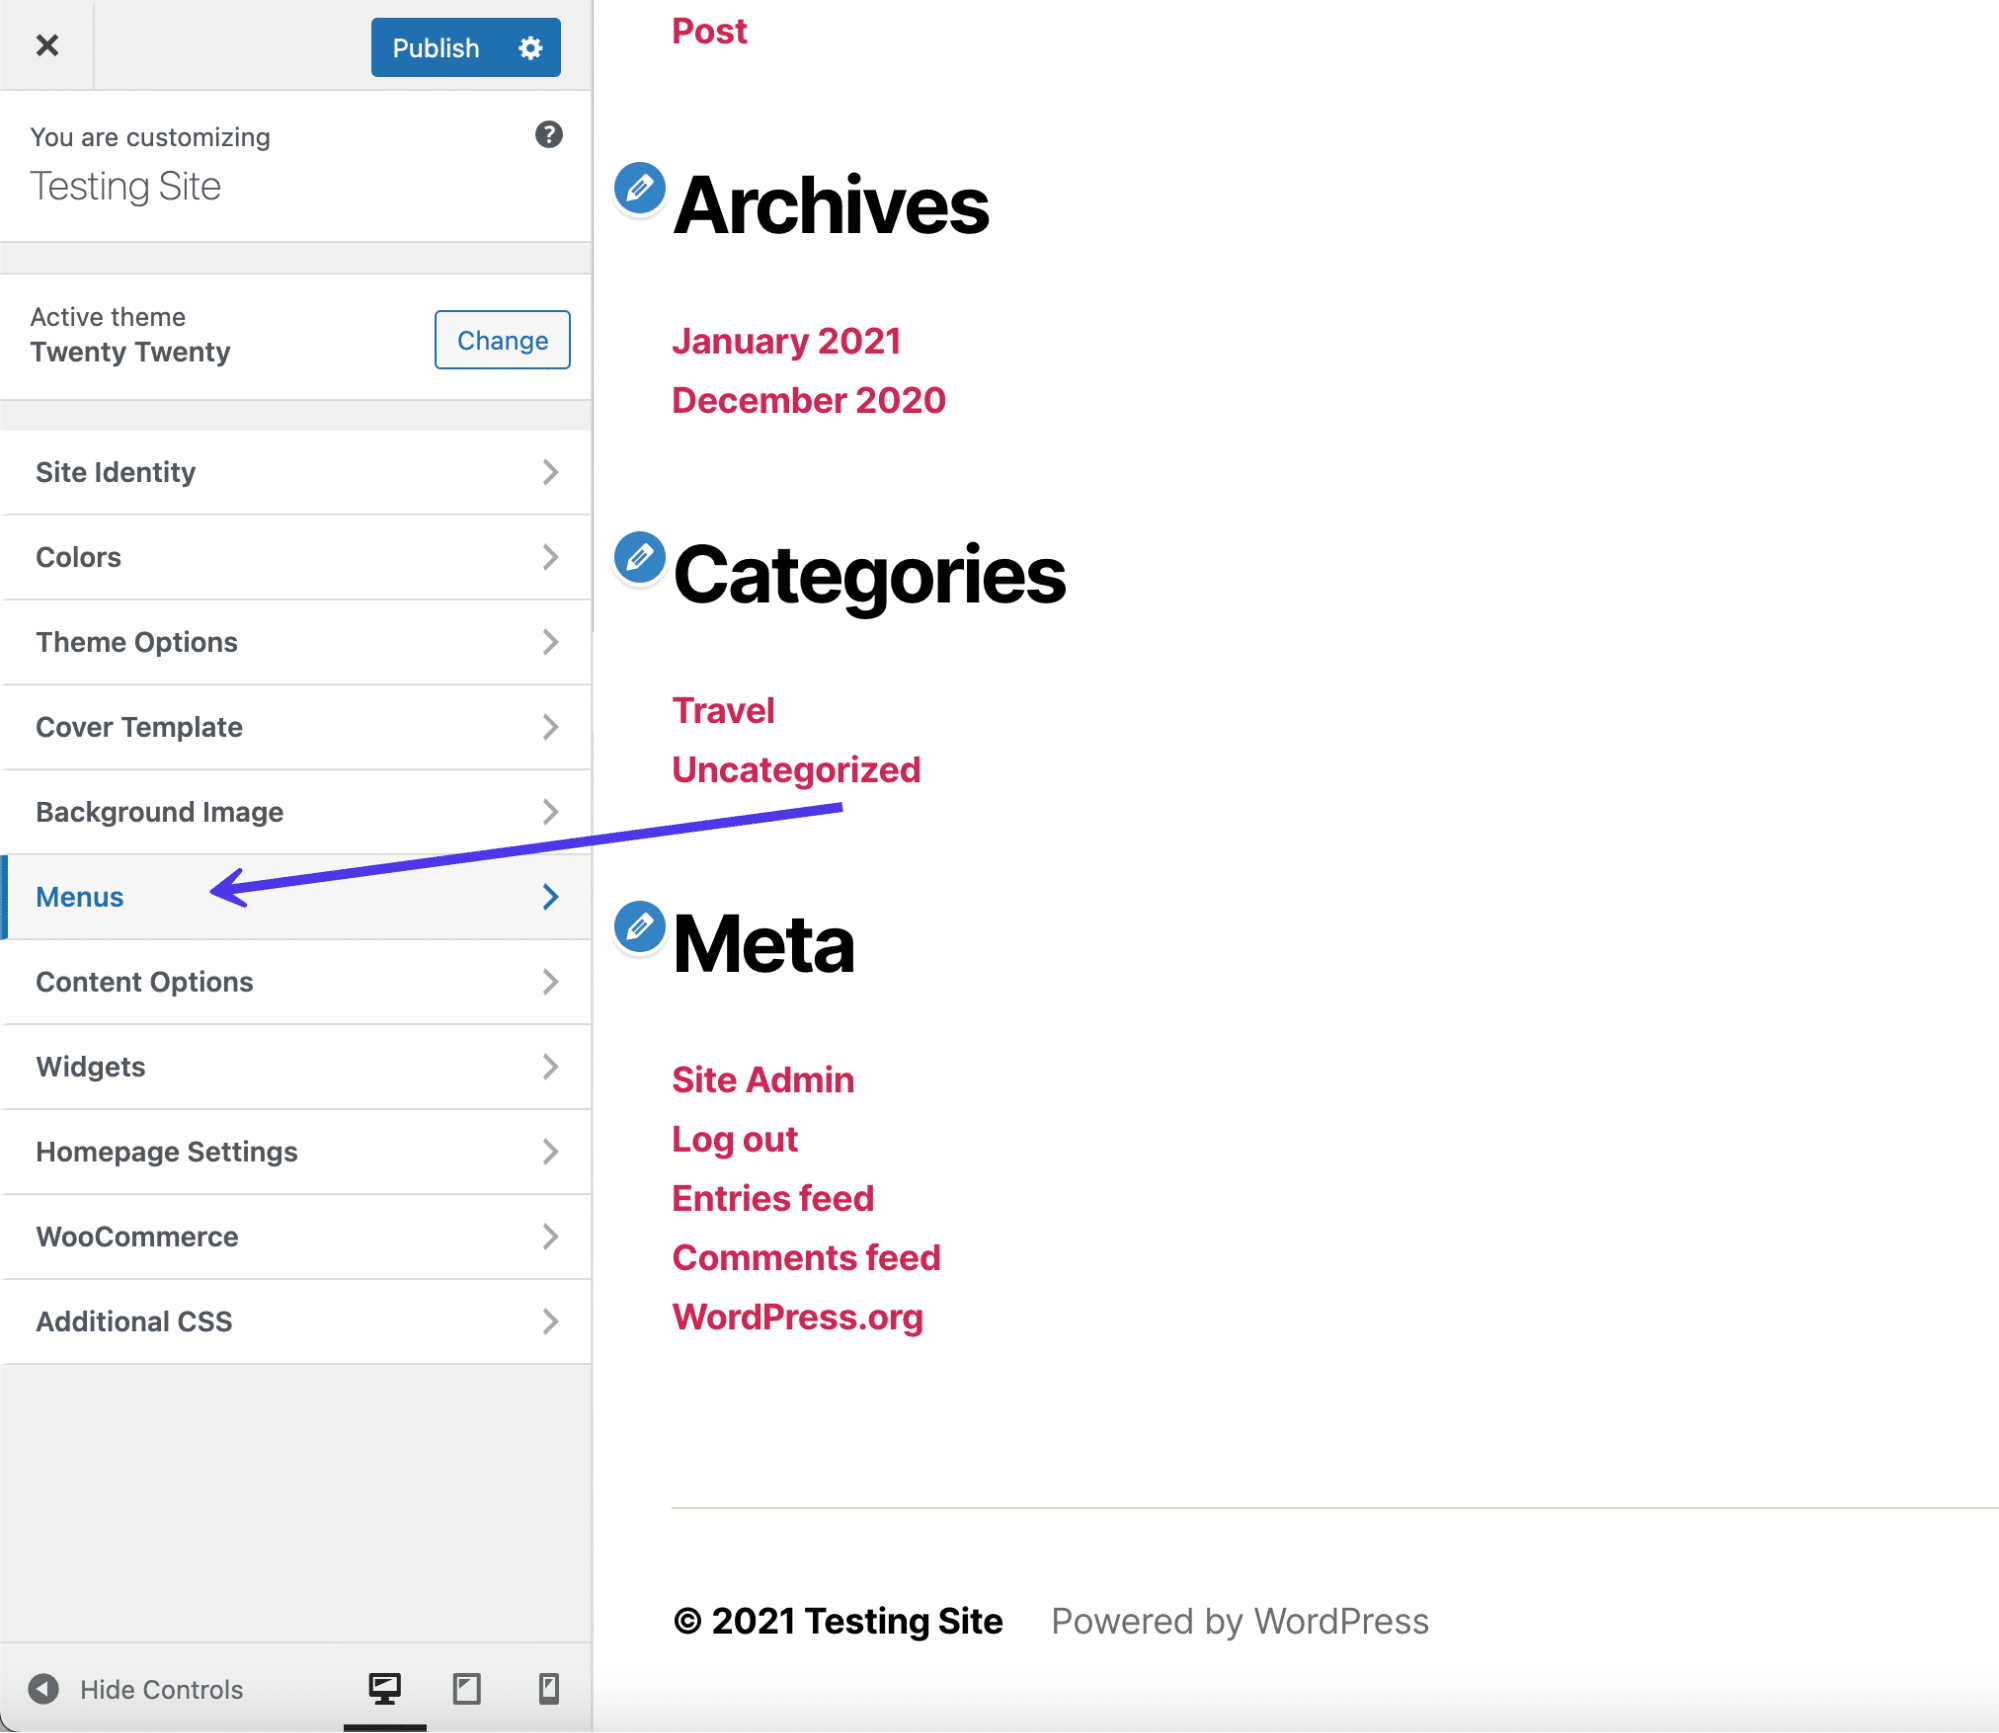
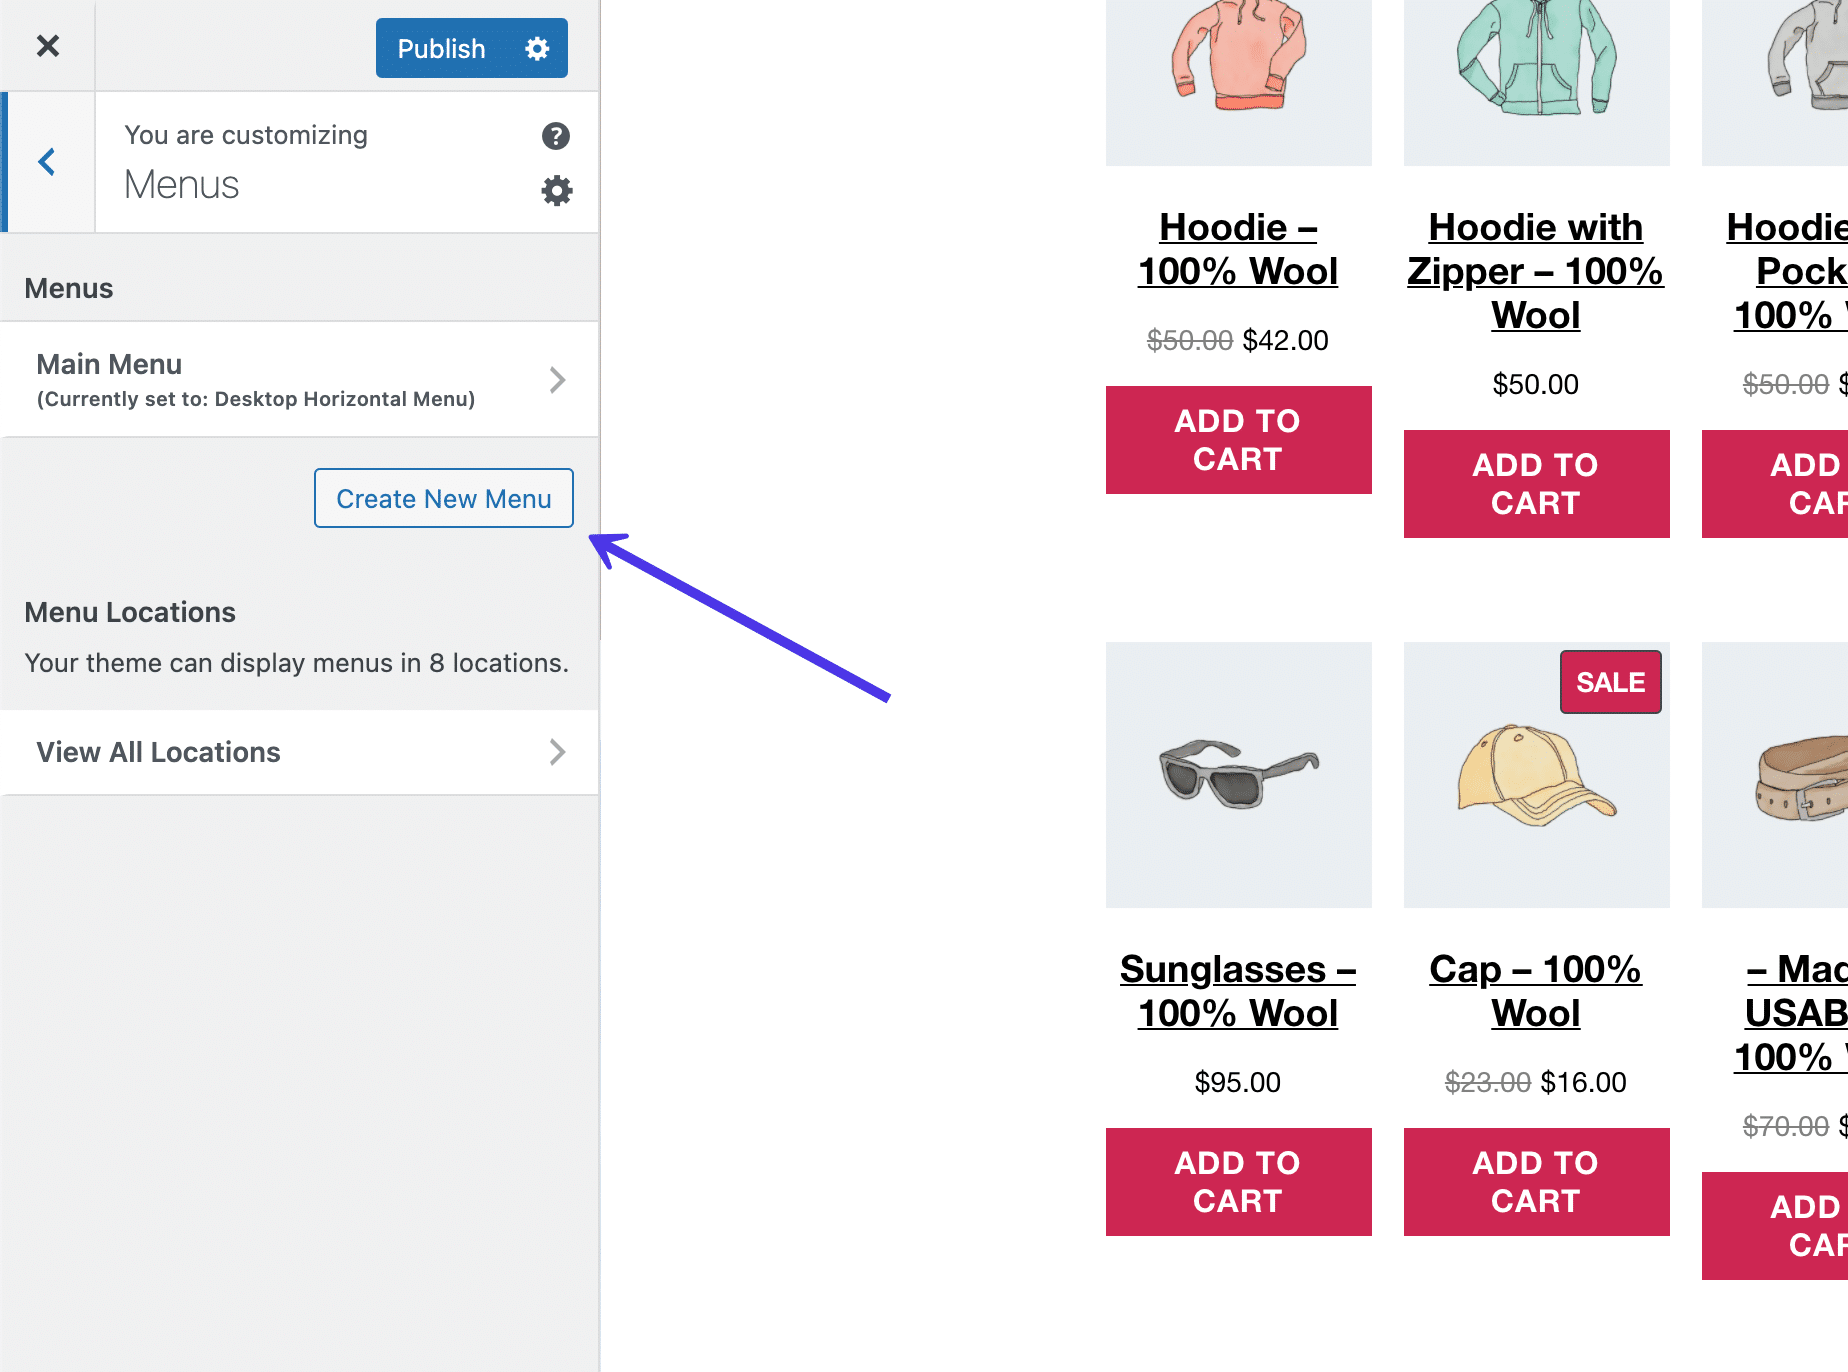
You’ll most likely see an empty menu page with several buttons to decide on. One of the buttons lets you select which menus to reveal and where to show them. The View All Locations tab shares where menus are supported on your theme.
Finally, the Create New Menu button works much like the standard menu creation panel in the dashboard, except it doesn’t require you to exit out of the Customizer.
Click on the Create New Menu button. If you already have a menu ready to go, you can add it to the footer by going to View All Locations.
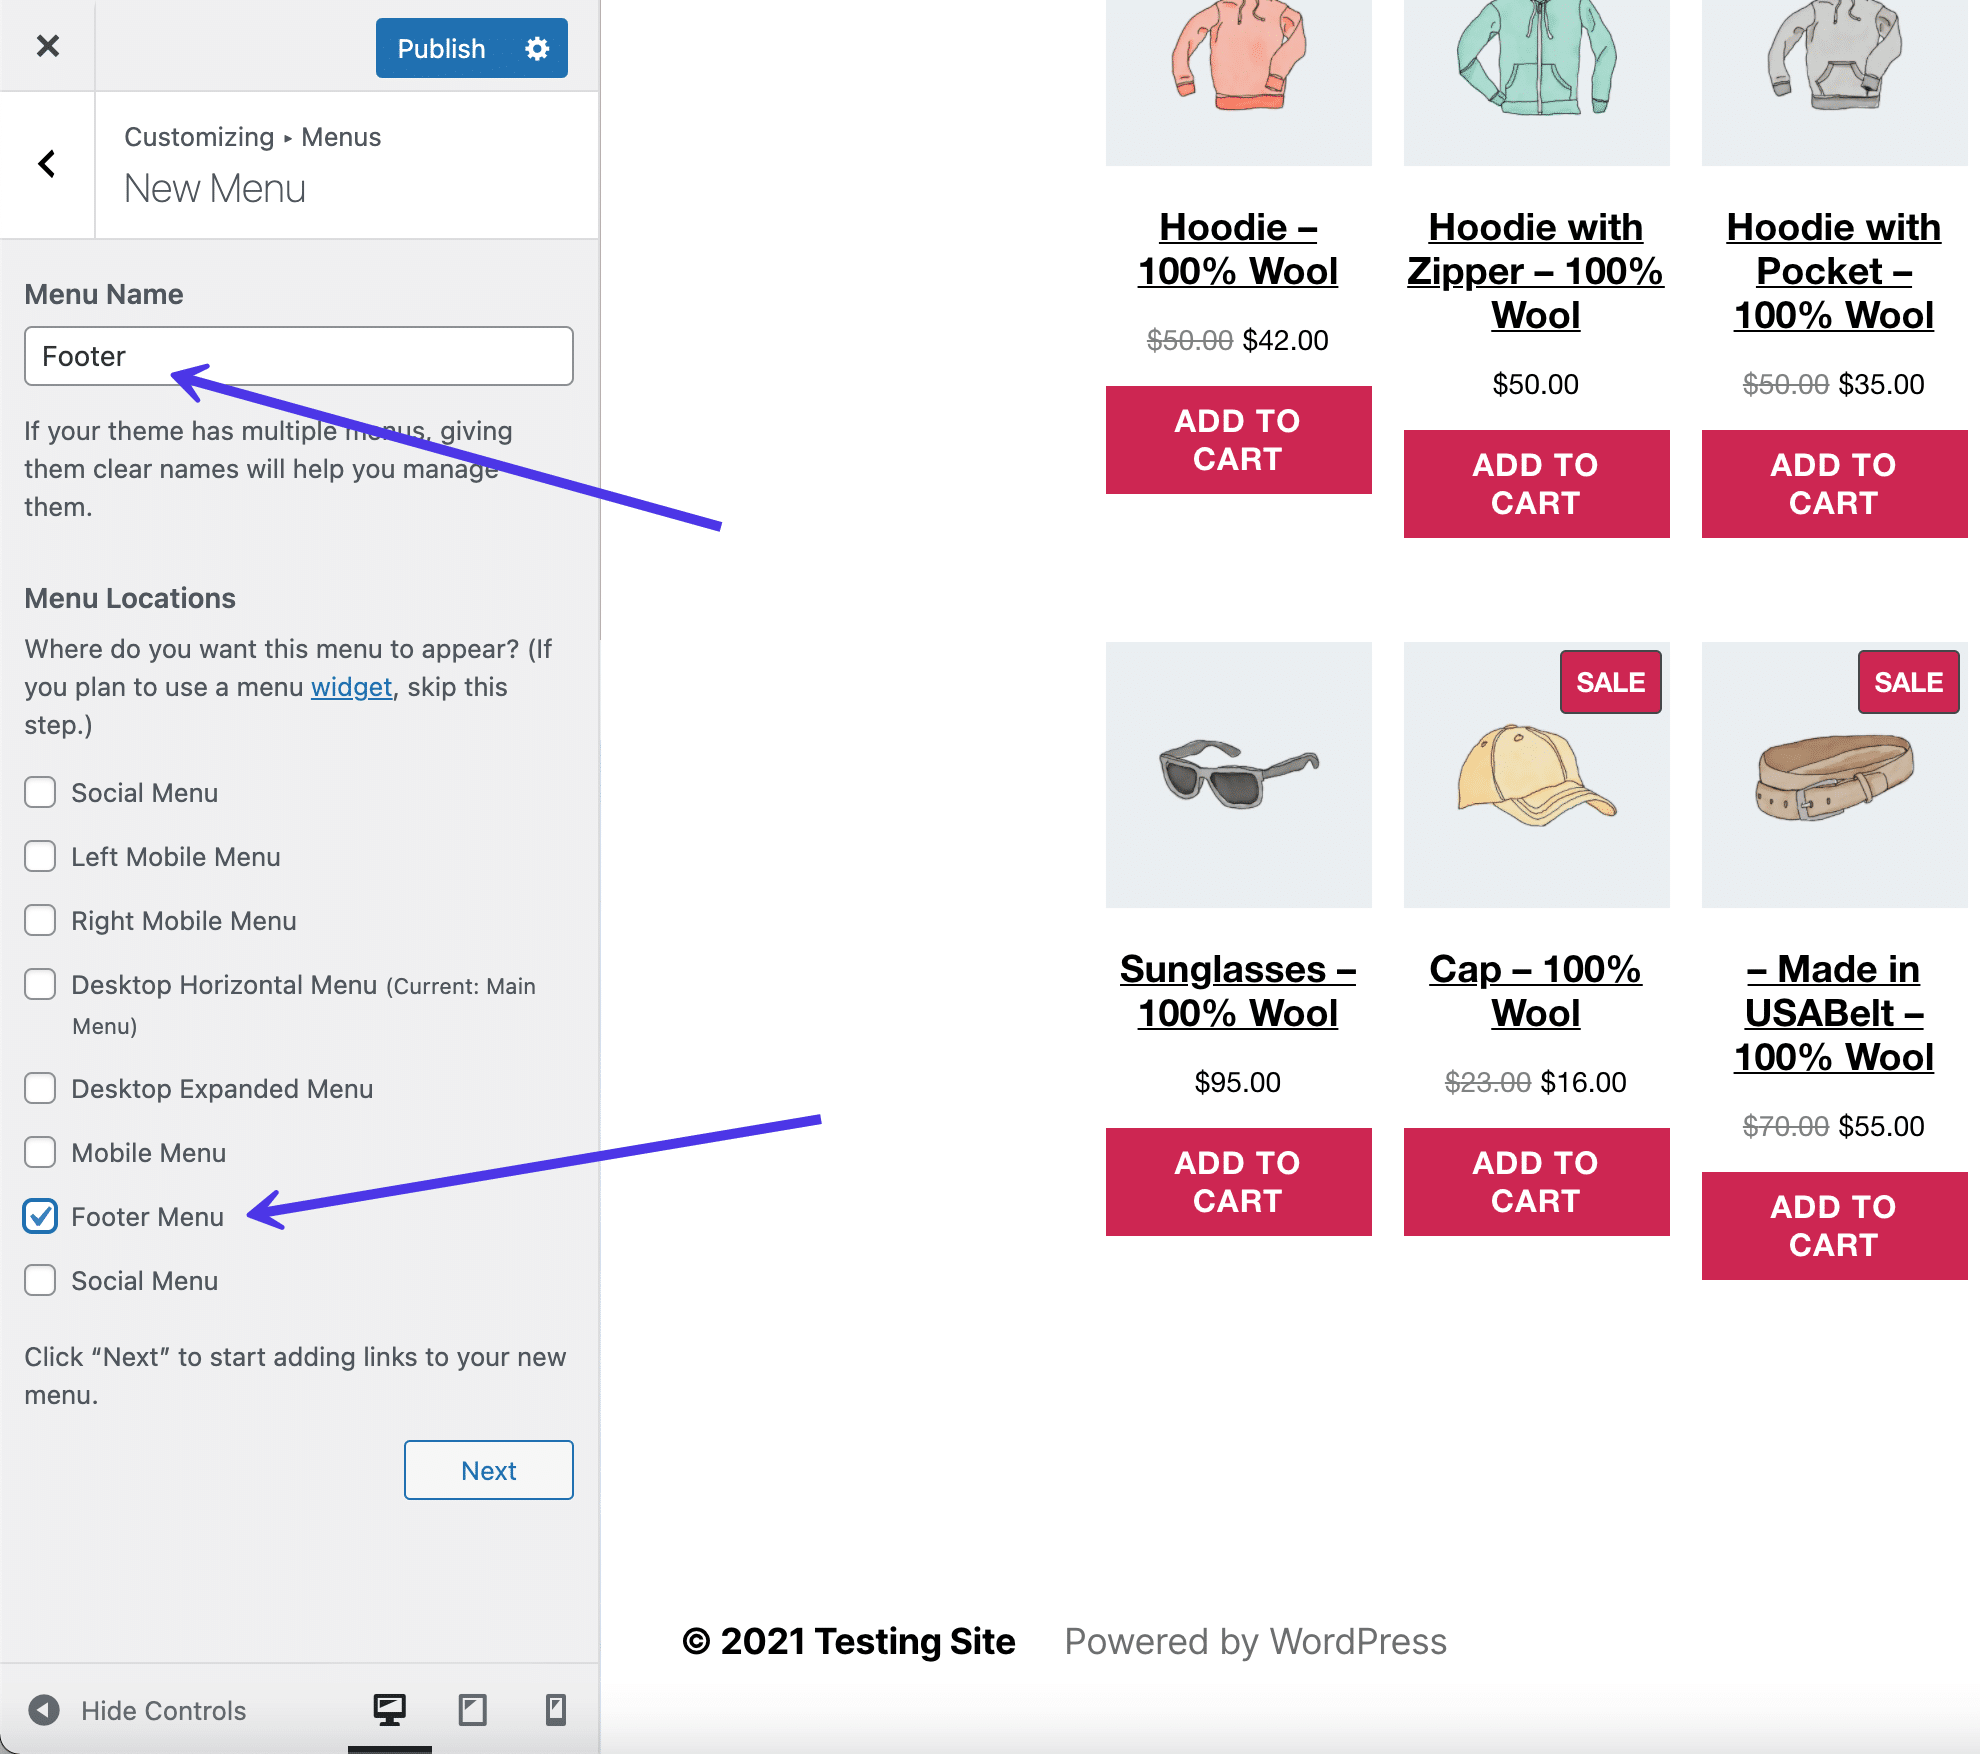
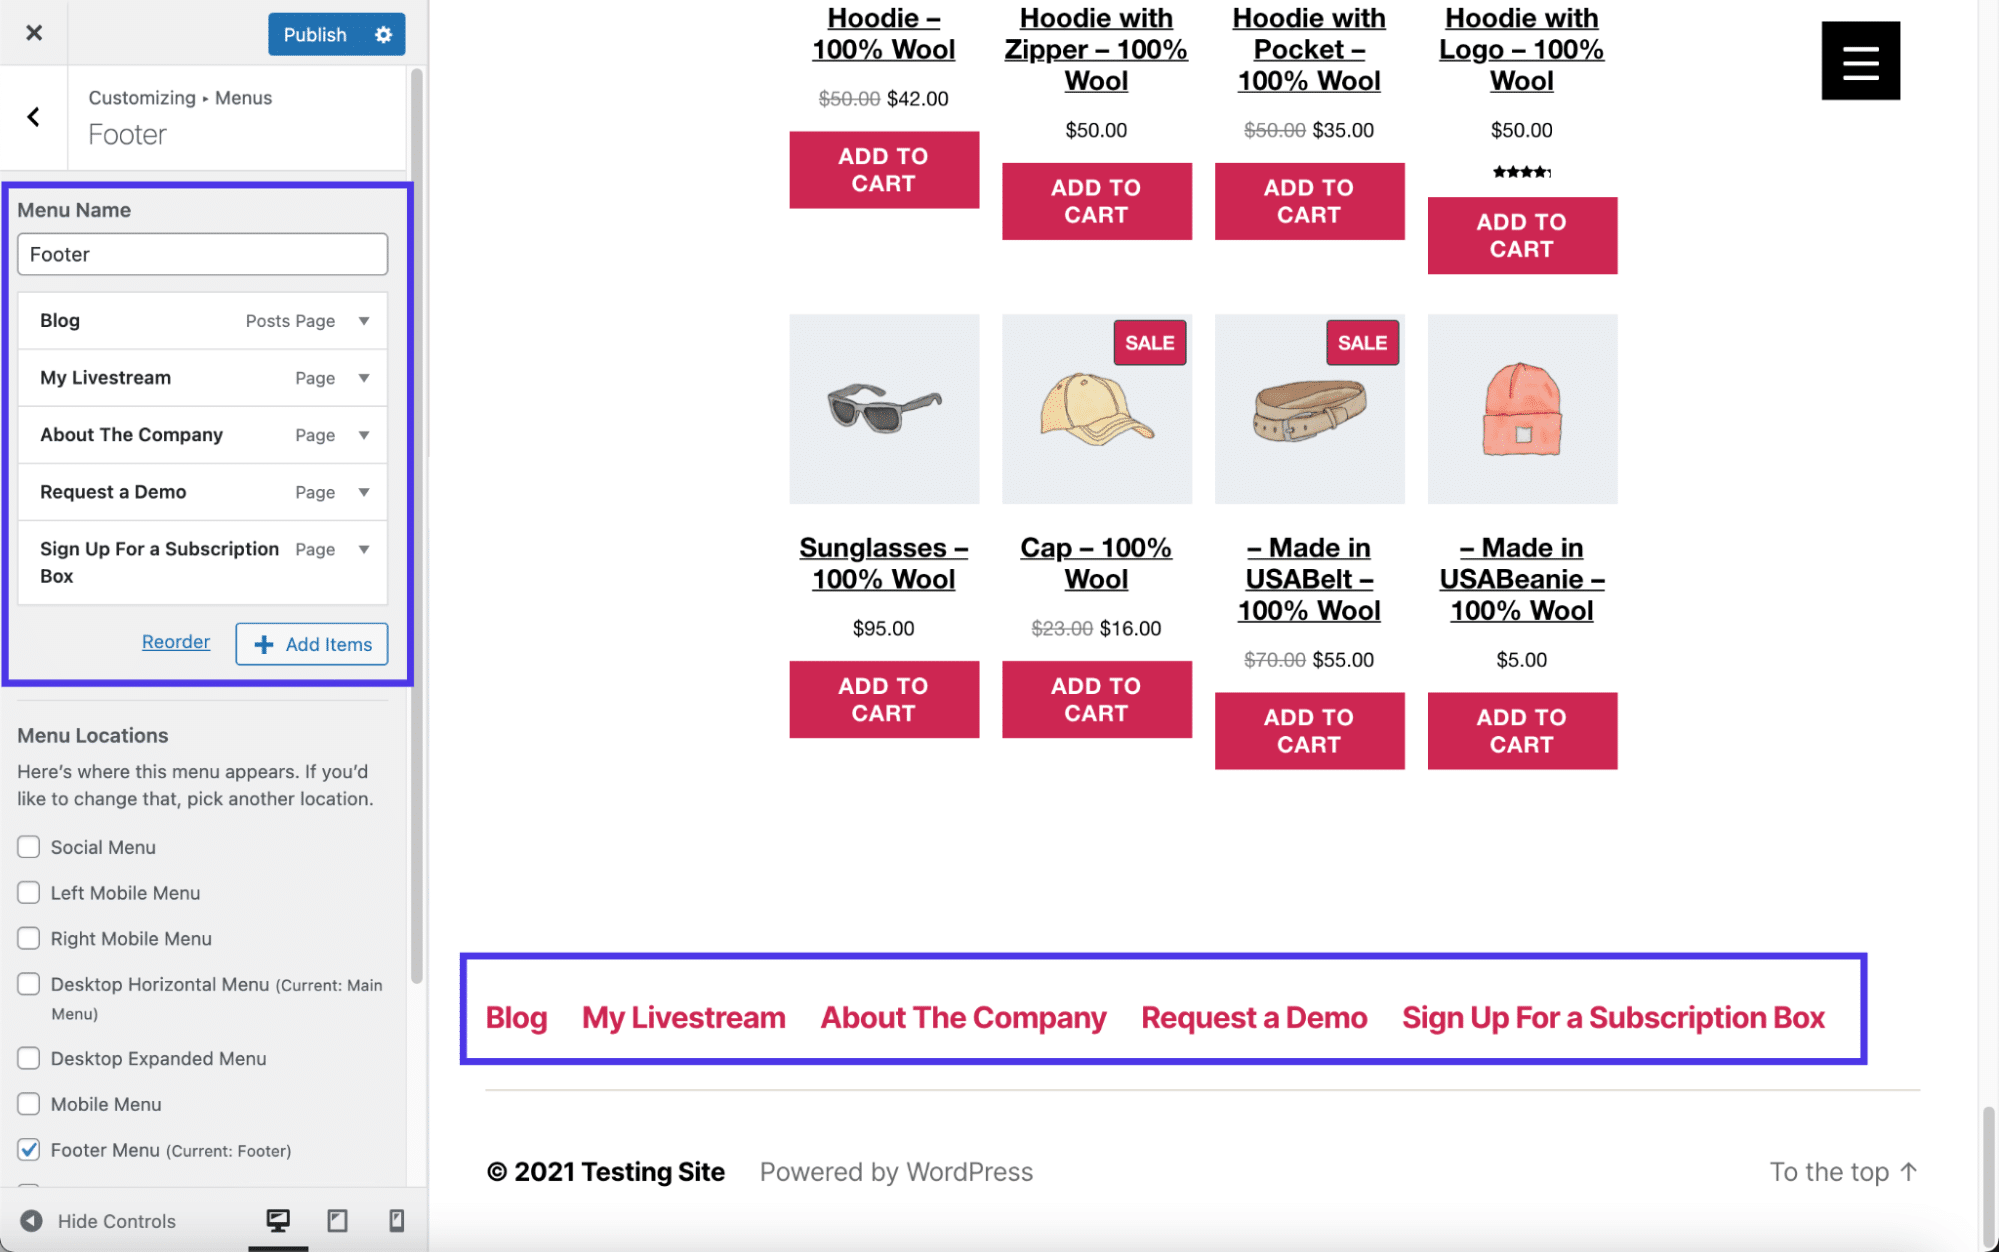
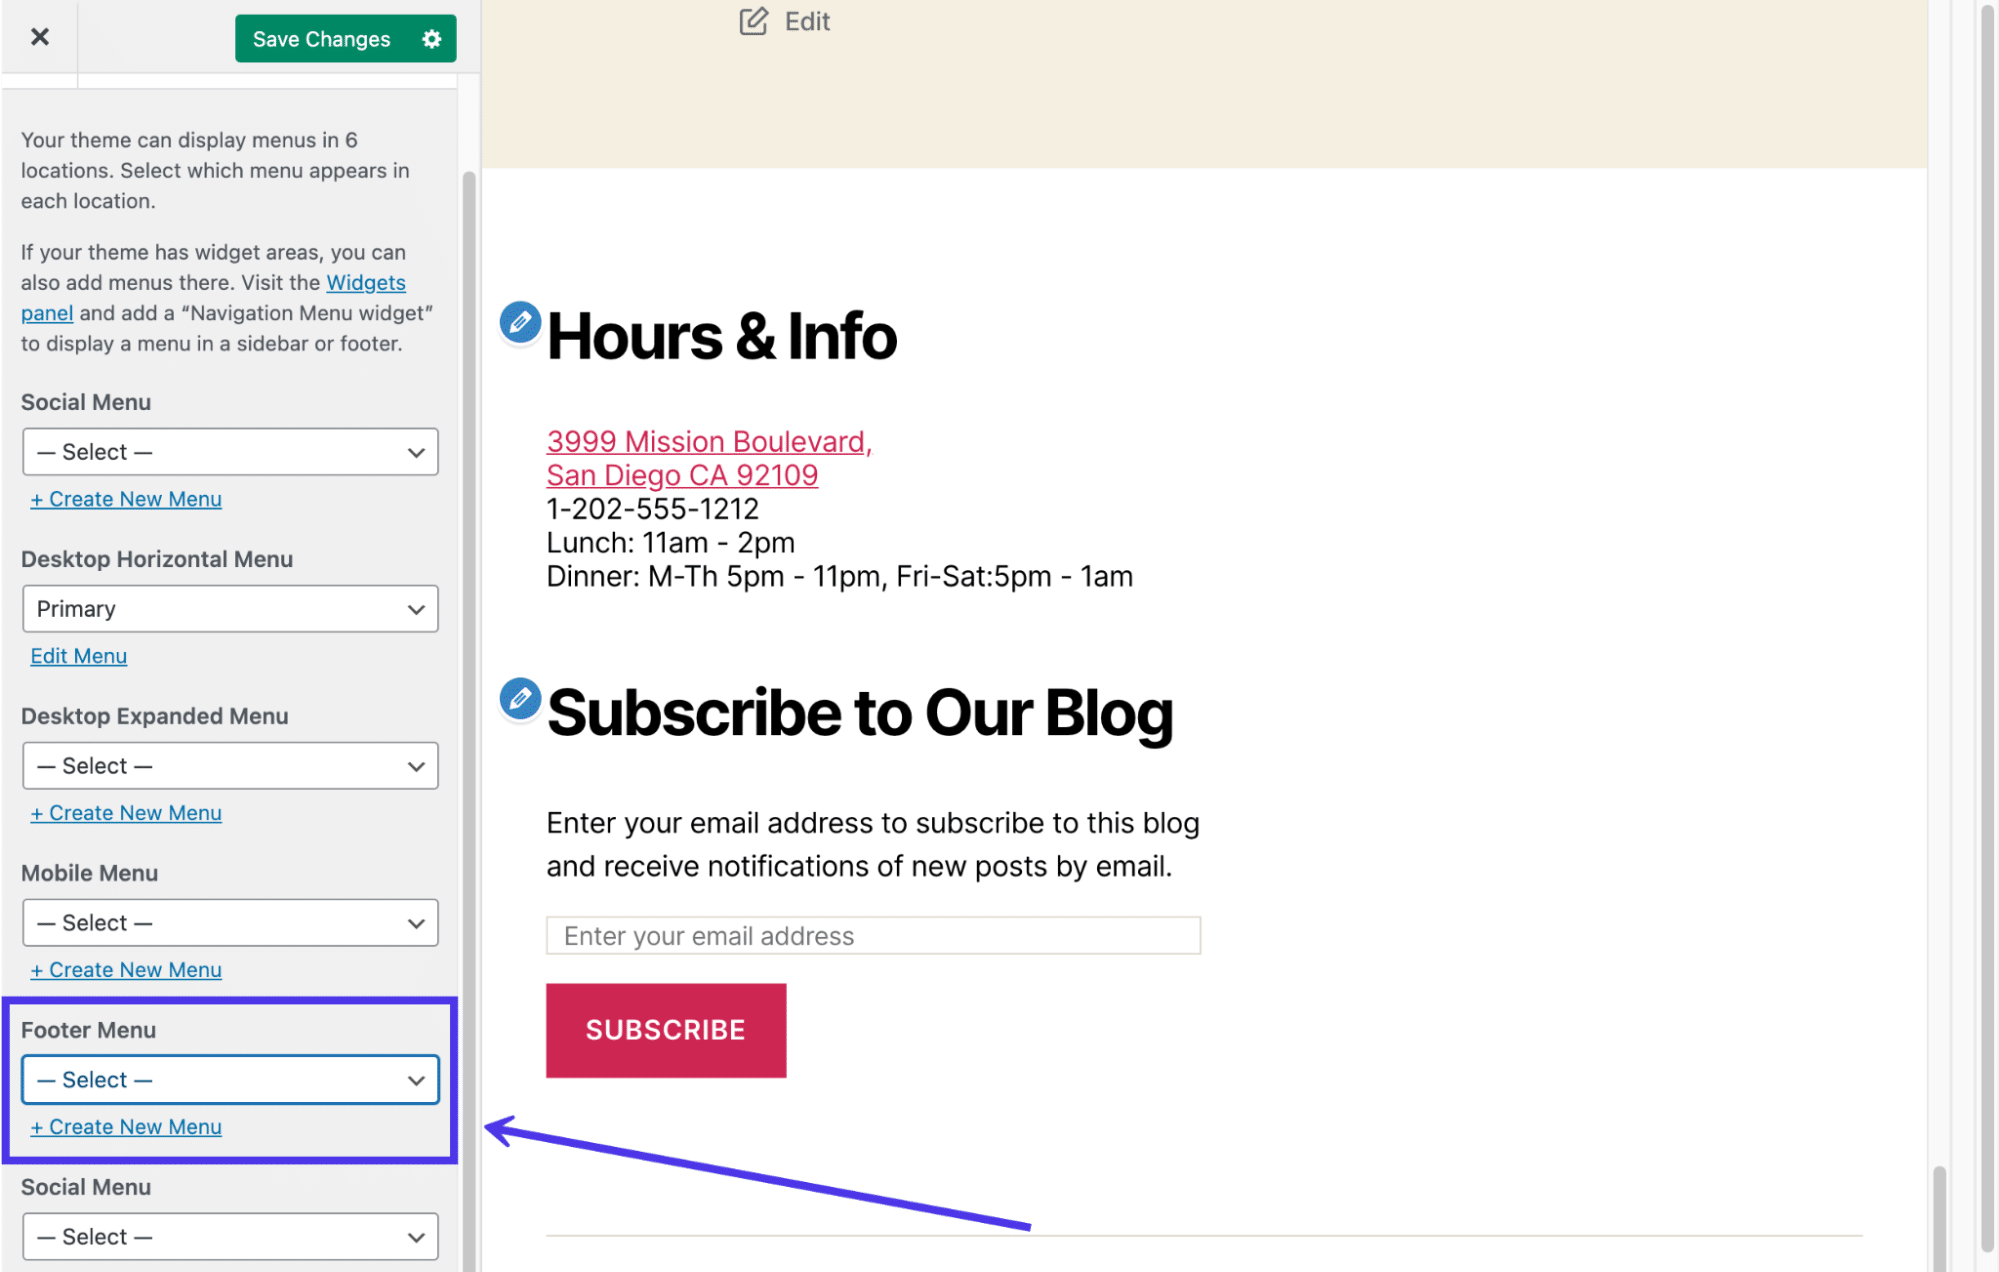
Name your menu (in this case we’ll go with the obvious Footer name) and check the box called Footer Menu. This tells WordPress you want the Footer menu you create to show up in the Footer location. They’re separate things; one is the actual menu and the other is the region of your website where the menu goes. You’re more than welcome to switch the name of your footer menu if you find it a bit confusing.
Click on the Next button at the bottom of the panel to proceed.
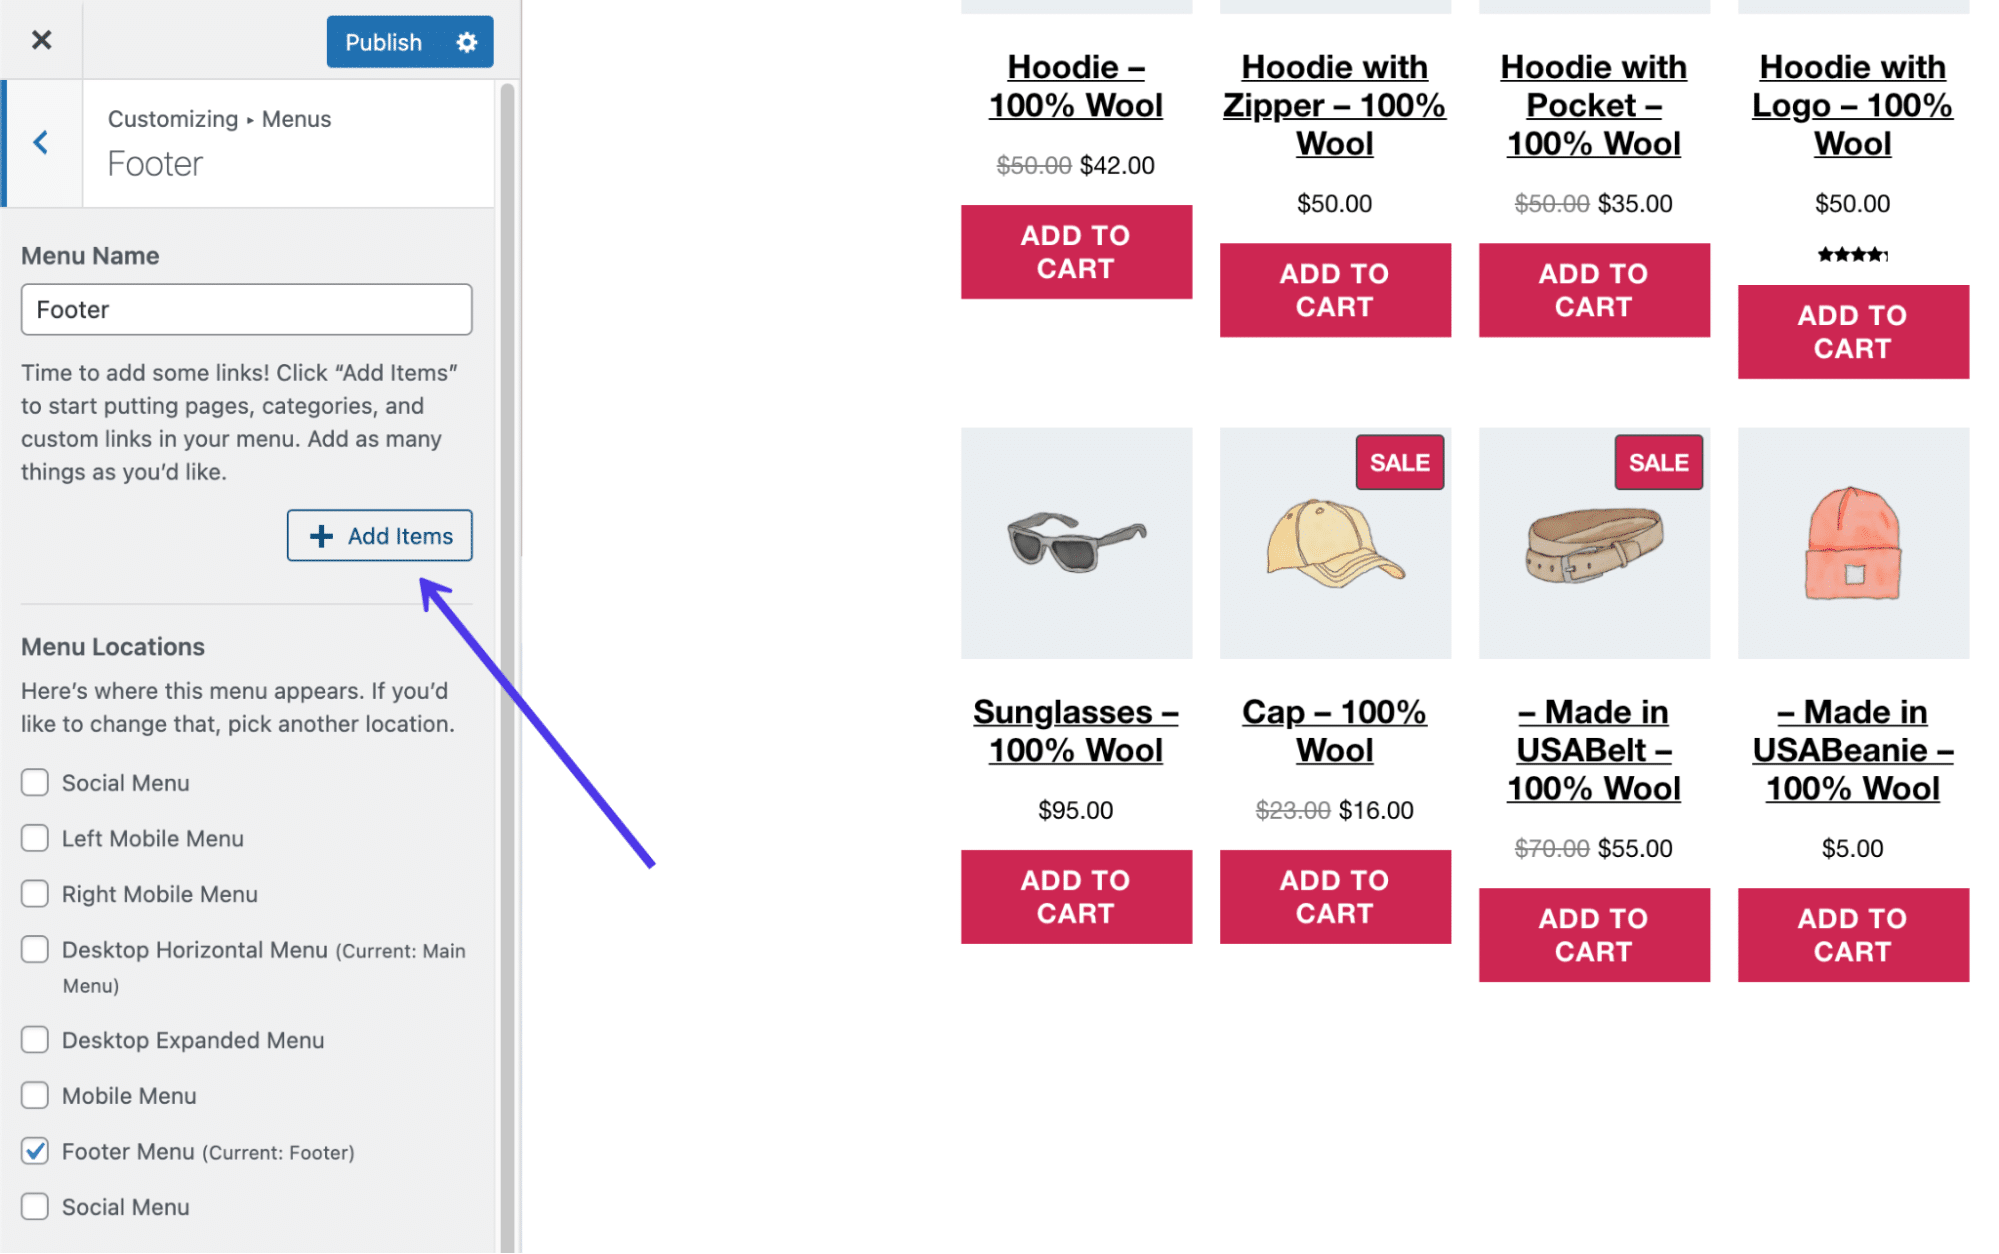
Now you have a menu named Footer, but it lacks any buttons or links to make it a truly functional menu.
Click the Add Items button to start placing links and buttons to pages in your menu.
A new slideout panel appears with all the options to add to your menu. For instance, you can include custom links to internal or external pages, posts from your blog, pages from your own site (already created pages), products, tags, and categories, along with whatever other types of content pages you may have.
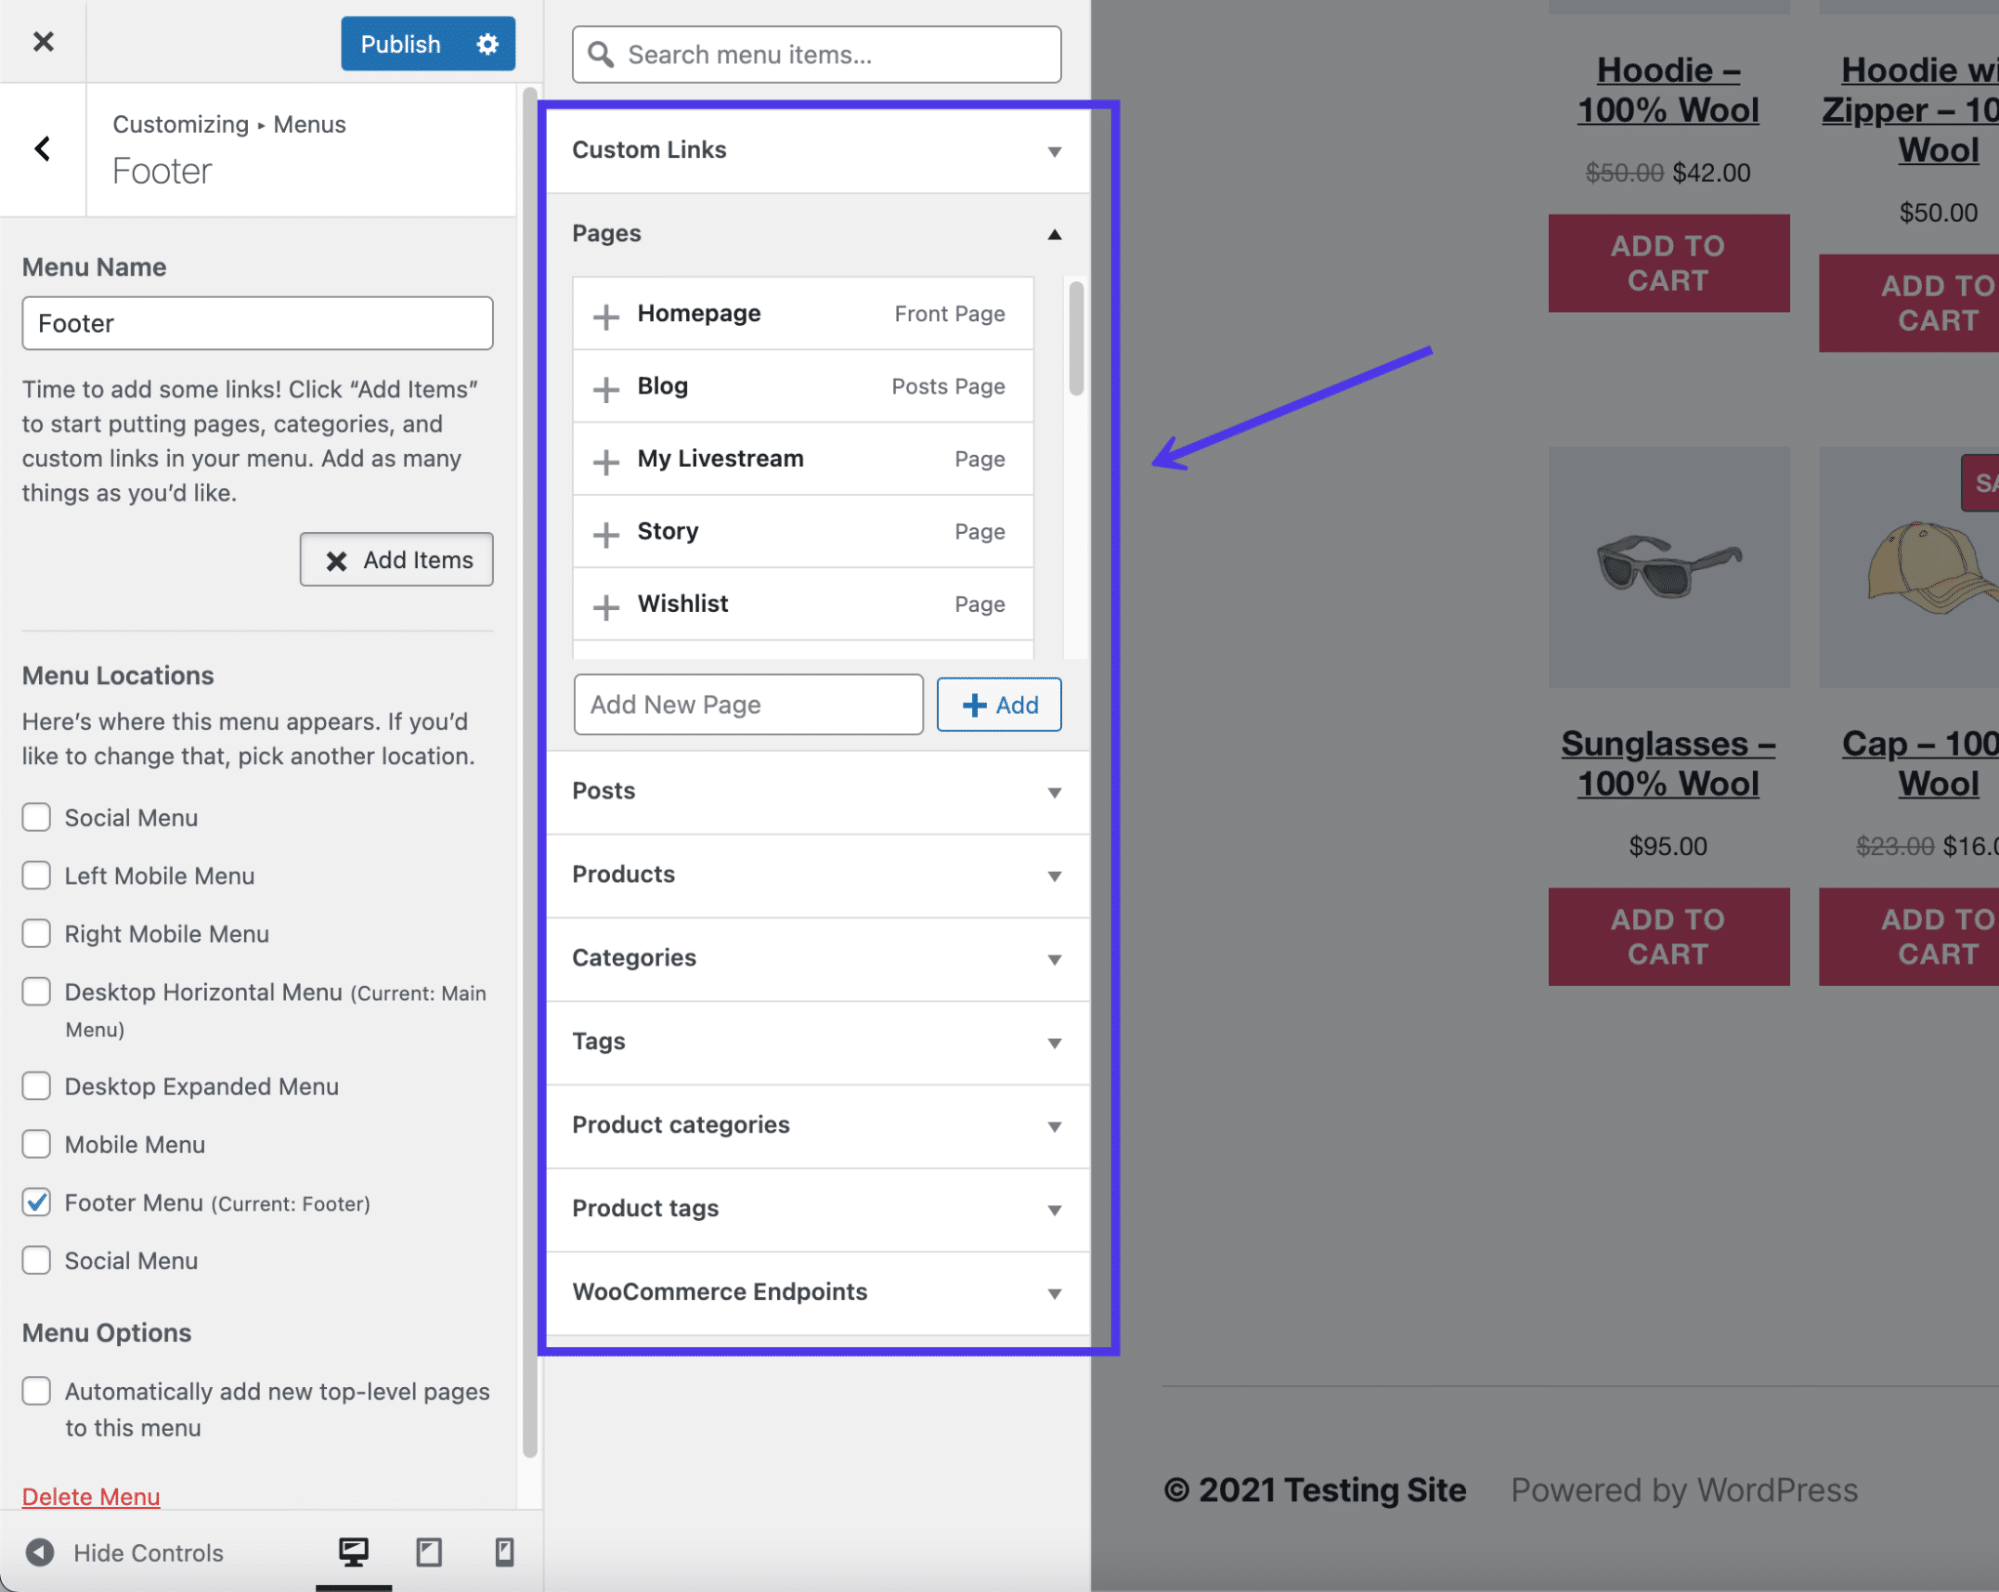
Each menu item you choose gets placed and shown in the menu panel, where you’re able to reorganize them and click on each one to edit their individual settings. For this example, we’ve added five links to pages throughout our website, including the blog, a livestream page, and an About The Company page.
Refer back to our list at the beginning of this article for ideas on what to include in your footer.
Edit Footer in WordPress With Plugins
WordPress already has built-in tools to modify your footer, but the extent to which you can edit your particular site’s footer relies on your theme of choice and whether or not you want to mess with any code.
Check Out Our Video Guide to the Best Footer Plugins
As you’ll learn further down in this article, removing the default “Powered By” text requires you to tap into the footer.php file and remove some code. Therefore, it’s clear several aspects of footer editing may be out of your reach if you don’t have the experience or willingness to mess with code or find a new theme.
That’s where WordPress plugins come into play. Quite a few plugins offer footer editing and expansion features to remove the need to edit code manually and sometimes to make quick changes to your footer, like with colors and columns.
WordPress footer plugins we recommend include the following:
- Footer Mega Grid Columns — This plugin fixes any problems you have with a theme where the footer lacks a grid format with three columns. Some themes only offer one or two columns, while other times a footer gets entirely stripped from the theme. Footer Mega Grid Columns adds a footer widget to not only display three columns but additional ones if needed.
- Remove Footer Credit — Use this plugin to completely remove the footer credit placed there by WordPress or your theme developer. You also have the option to type in your own HTML code to create a footer credit or a bit of content that’s more suitable for your site.
- Header Footer Code Manager — This plugin has a slight learning curve, but it’s an ideal solution for intermediate WordPress users who would rather have access to footer and header coding areas in the dashboard, as opposed to opening up the site files. You can add an unlimited number of styles and scripts to the footer, which often comes in handy for showing information after every blog post or page.
- Footer Putter — Use this plugin to insert a widget for copyright information or for your trademarks. This is a rather useful solution for placing details about your company in the footer area, including things like links, business hours, telephone numbers, and more.
- Footer Text — As one of the simplest ways to modify your WordPress footer, the Footer Text plugin activates a frontend and backend editing panel to change what’s in your footer. It comes with a WYSIWYG (What You See Is What You Get) editor, so it’s possible to format your text and potentially add items like pictures.
In the following sections, we’ll explore how to use some of these plugins for tasks like adding social media buttons or inserting custom code into the WordPress footer.
Manually Edit the WordPress Footer With Code
A more technical way of editing your WordPress footer involves tapping into the footer.php file and editing its contents.
You must have experience with coding — or be eager to learn — in order to make this method useful for you, but there are some minor tweaks that all beginners can handle (mainly just removing preset text in the footer). Take a look at our guide to adding header and footer code for the most detailed information.
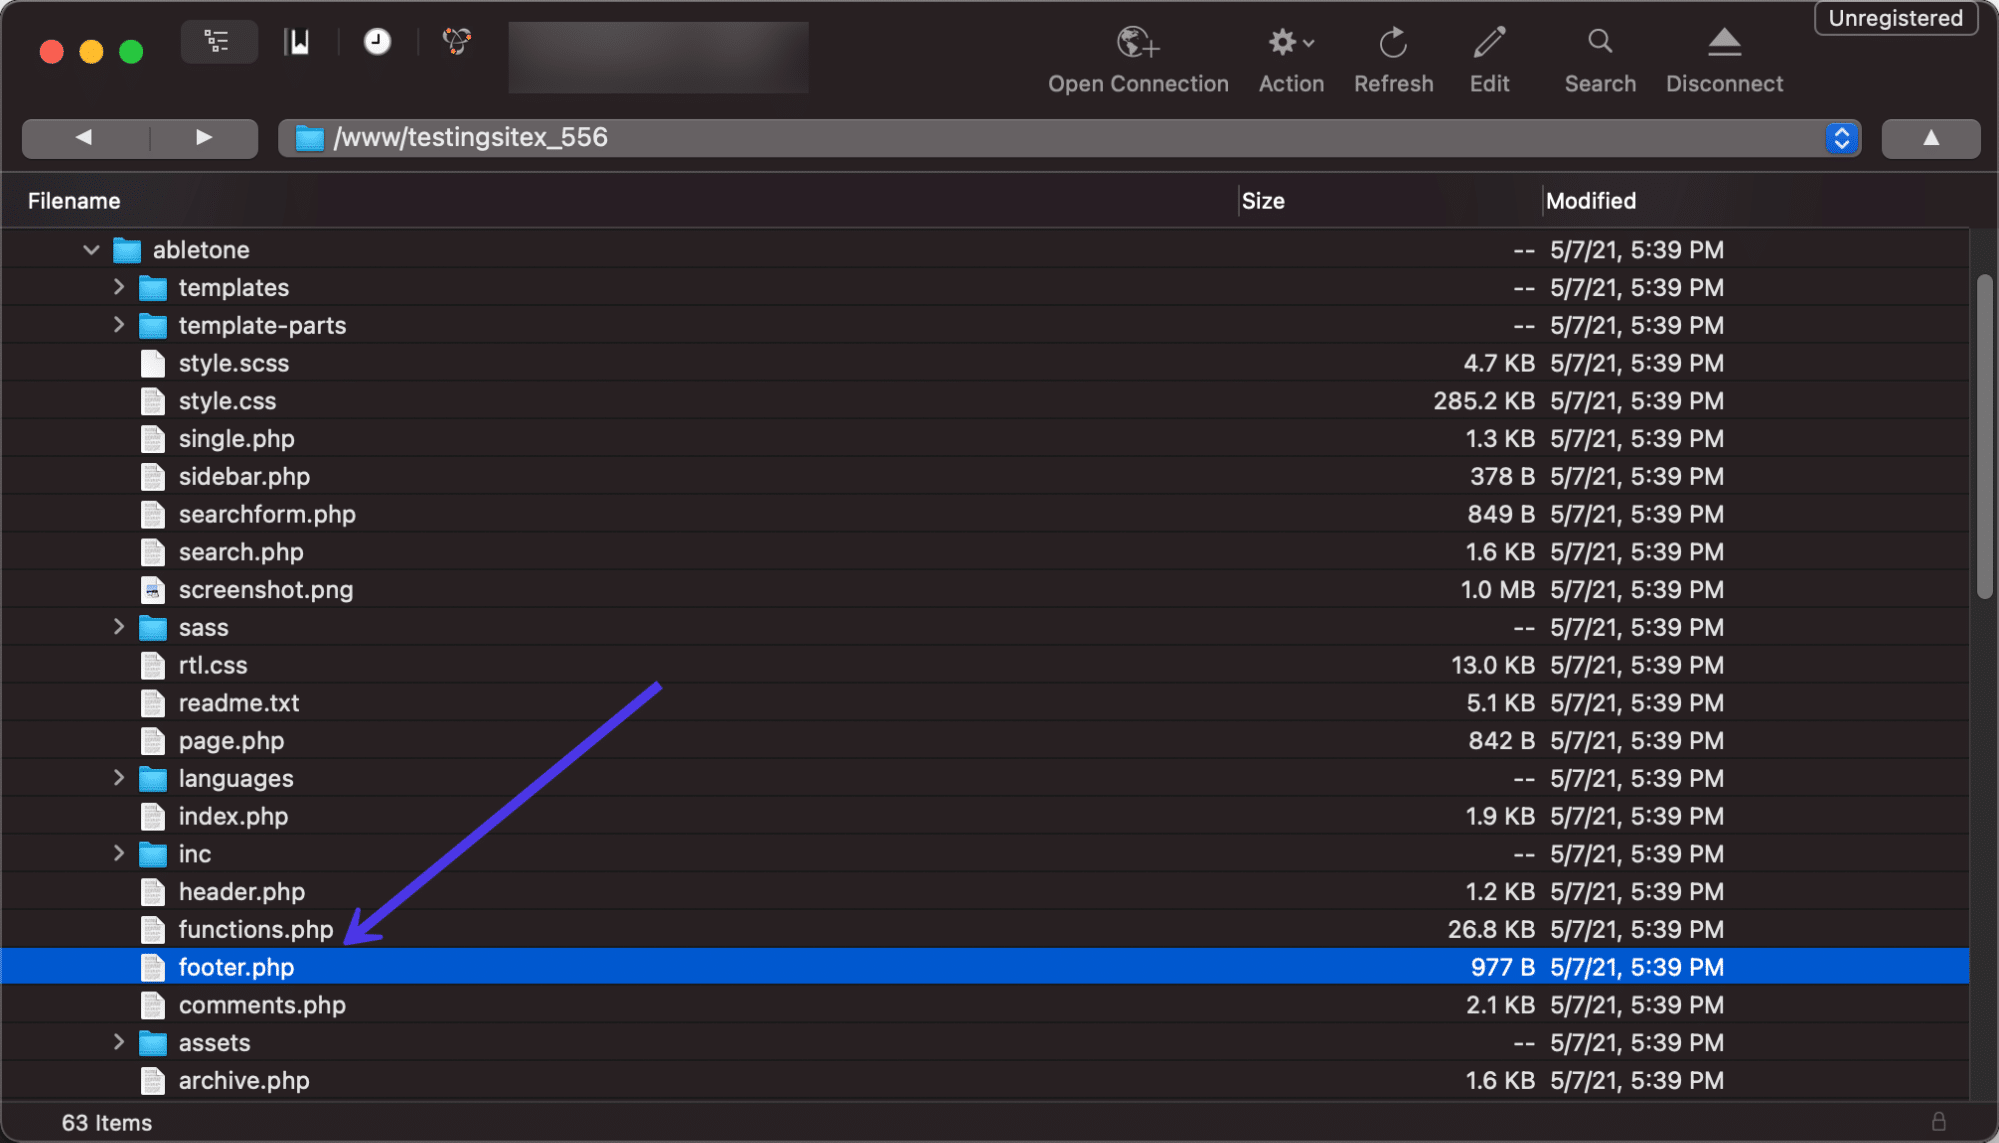
To access the footer.php file, link to your WordPress site files by using an FTP client. We also recommend checking out this article on how to use SFTP to link to WordPress as SFTP is more secure than FTP.
Once connected to your WordPress site files through your FTP client, locate the /public folder. Click on /wp-content and then /themes to reveal all themes currently installed on your WordPress dashboard. Note which theme is active on the site and open the folder for that one.
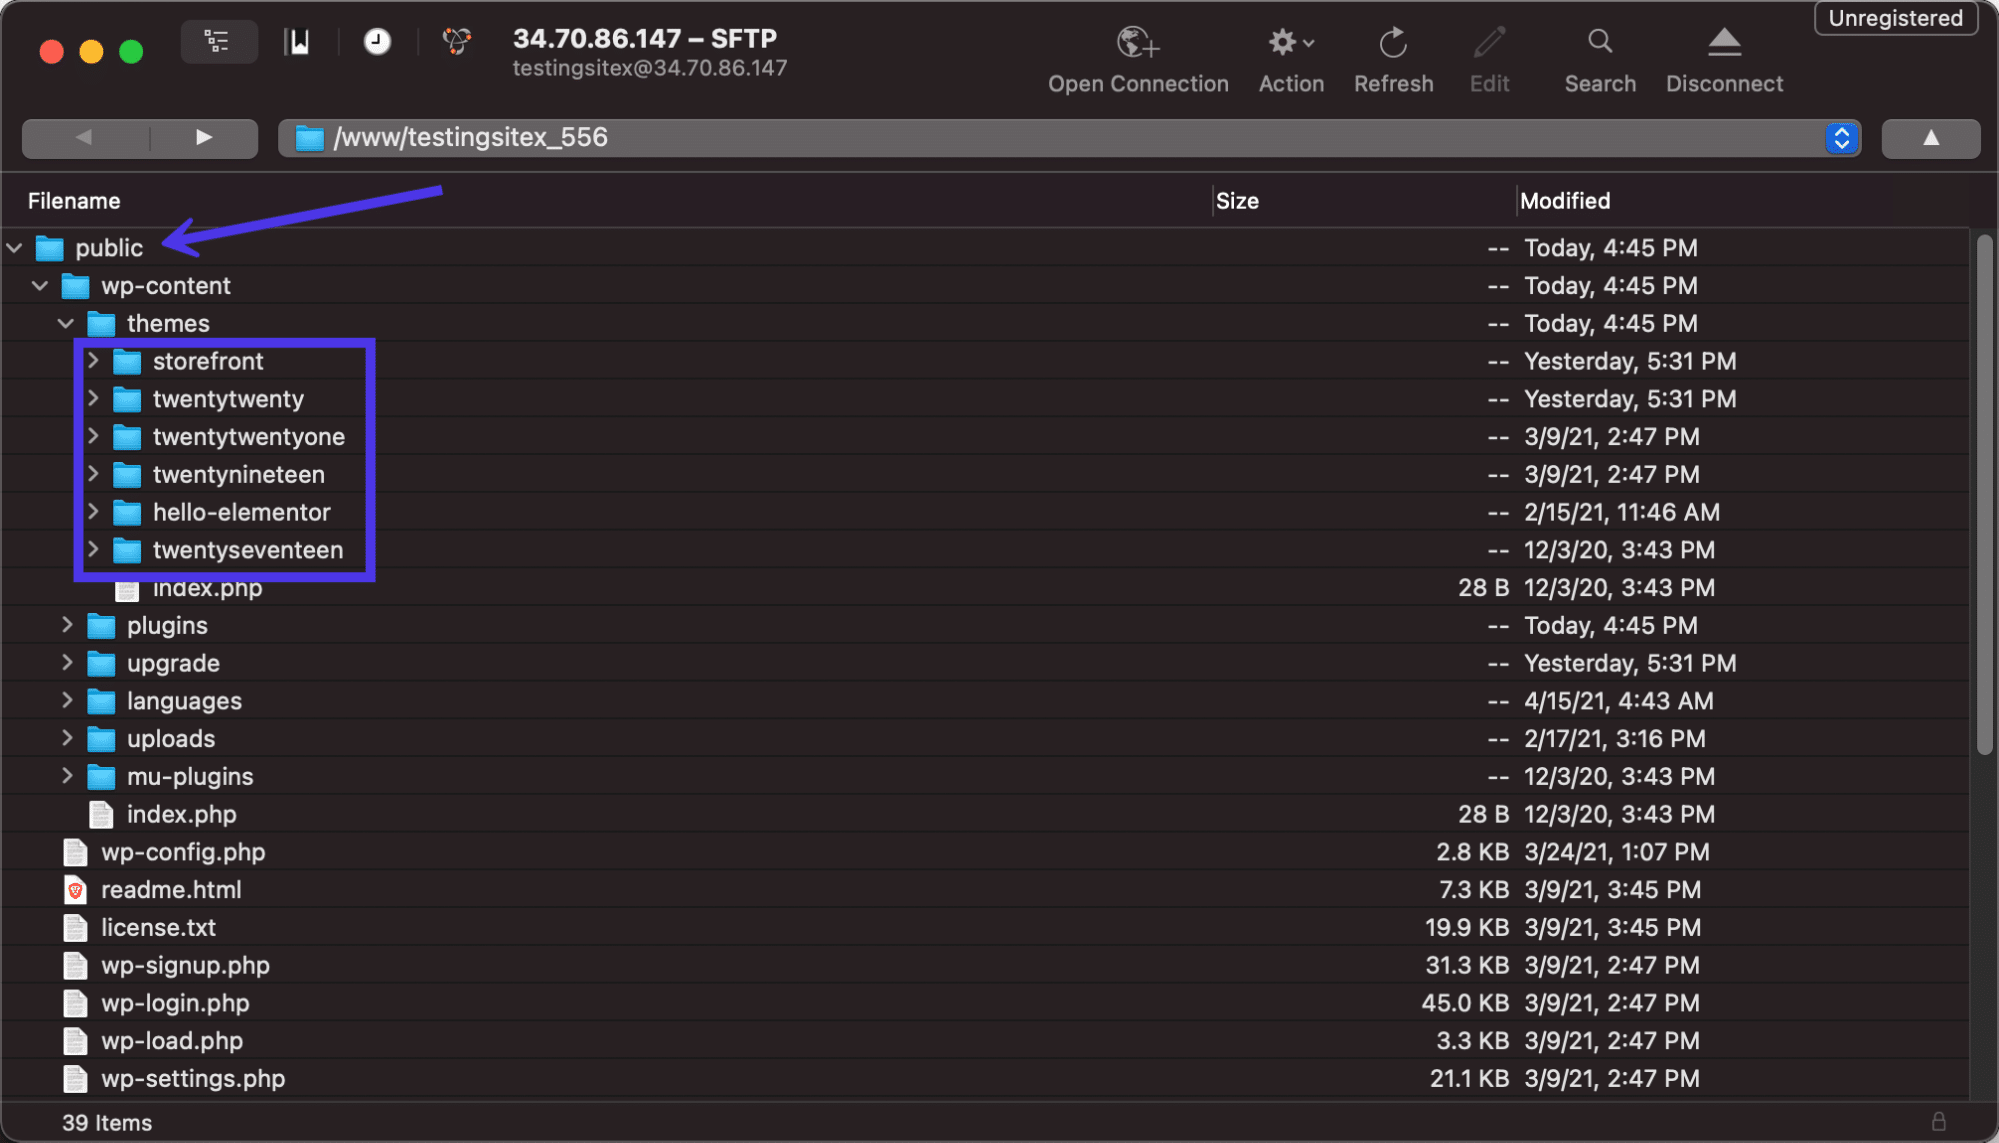
All WordPress themes have a footer.php file somewhere in the theme folder. Scroll through the batch of files to locate that footer.php file.

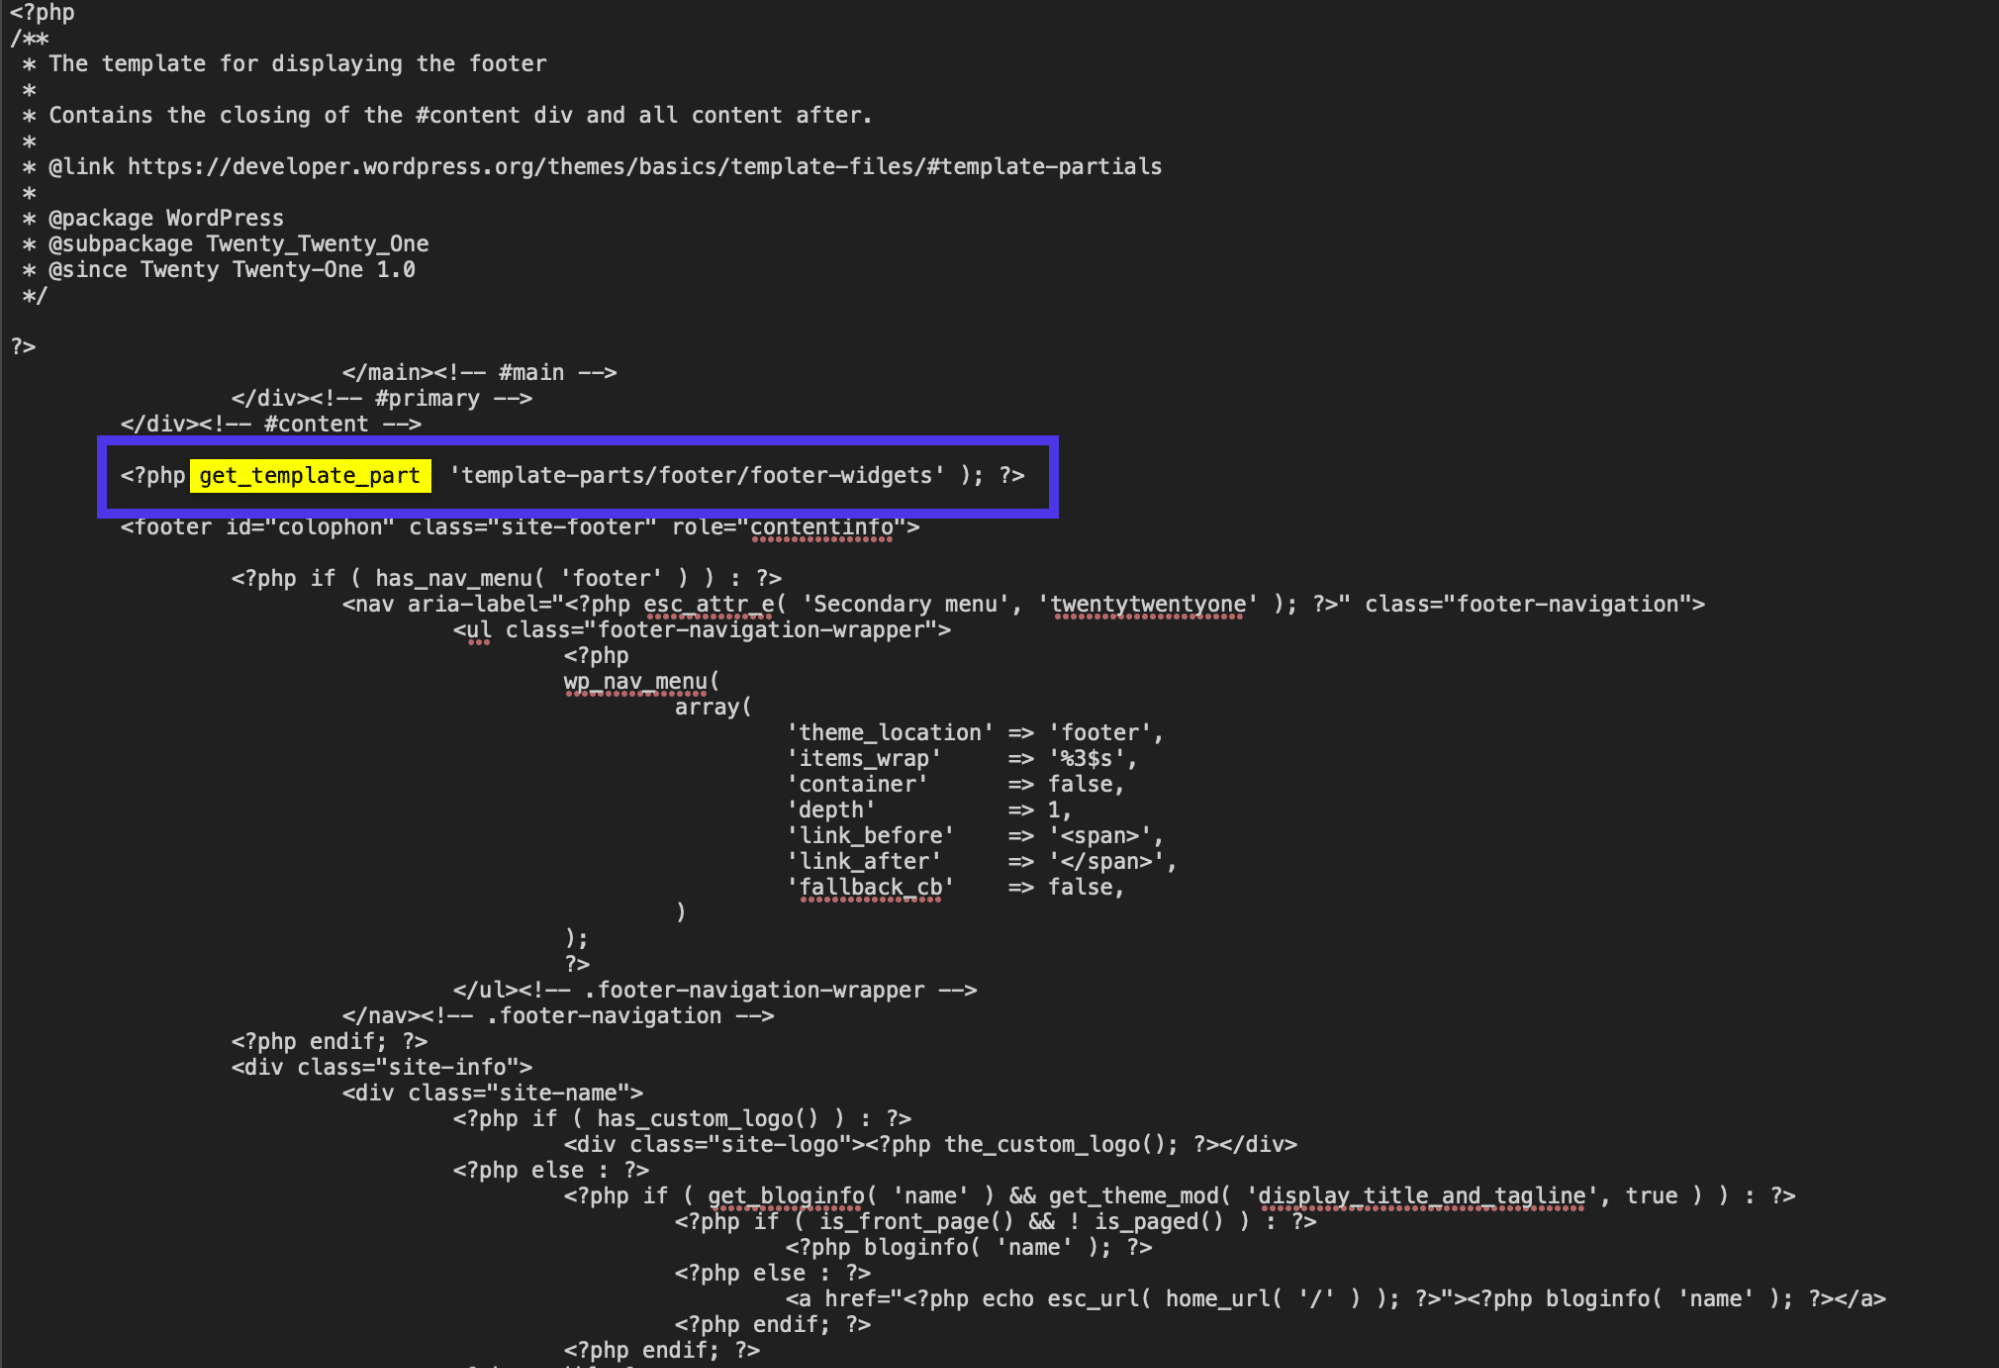
Open the file with the editor of your choice. Once in there, you can edit the current code or add new content depending on what you’re trying to achieve. The get_template_part section is often modified to insert new bits of text, but we’ll leave that up to you since every footer is different.
As an alternative, you can edit the footer code by using a plugin that displays a visual field for the footer.php file. This way, you don’t have to install an FTP client and link it to your website. It’s also a more intuitive, beginner-friendly process that remains available on your dashboard at all times for future edits.
To make this happen, install and activate the Header Footer Code Manager plugin.

Once it’s been installed, click on the HFCM tab that appears in the WordPress dashboard. Then, name the snippet, choose where you want it displayed and set the location as Footer.
The most important part is the Snippet/Code field, which you’ll fill in with whatever code you want. Some people use this plugin for things like verification or tracking codes that don’t show up on the front end. However, it’s also available for you to use for typing in new text and gaining almost complete control over the content in your footer.
Make sure you click on the Save button to see the results.
Use a Page Builder With Footer Designer
A bonus way to modify your WordPress footer, without the need for code or many of the standard WordPress footer tools, is with a page builder. Not all page builders offer footer editors, so it’s important to conduct some research and ensure that either your current page builder offers it or the one you plan on buying has footer features.
Check Out Our Video Guide to Editing the WordPress Footer with Page Builders
Regardless, this is a relatively basic feature for a page builder, so it’s a good idea to only go for a page builder if you plan on customizing your entire site with it.
A few other page builders offer footer editing, but our favorites include Elementor and Visual Composer.
To create a custom footer with Visual Composer, you must have the Pro version. There are some workarounds to edit the lower part of your website with the free version, but the true drag-and-drop builder for the footer requires an upgrade.
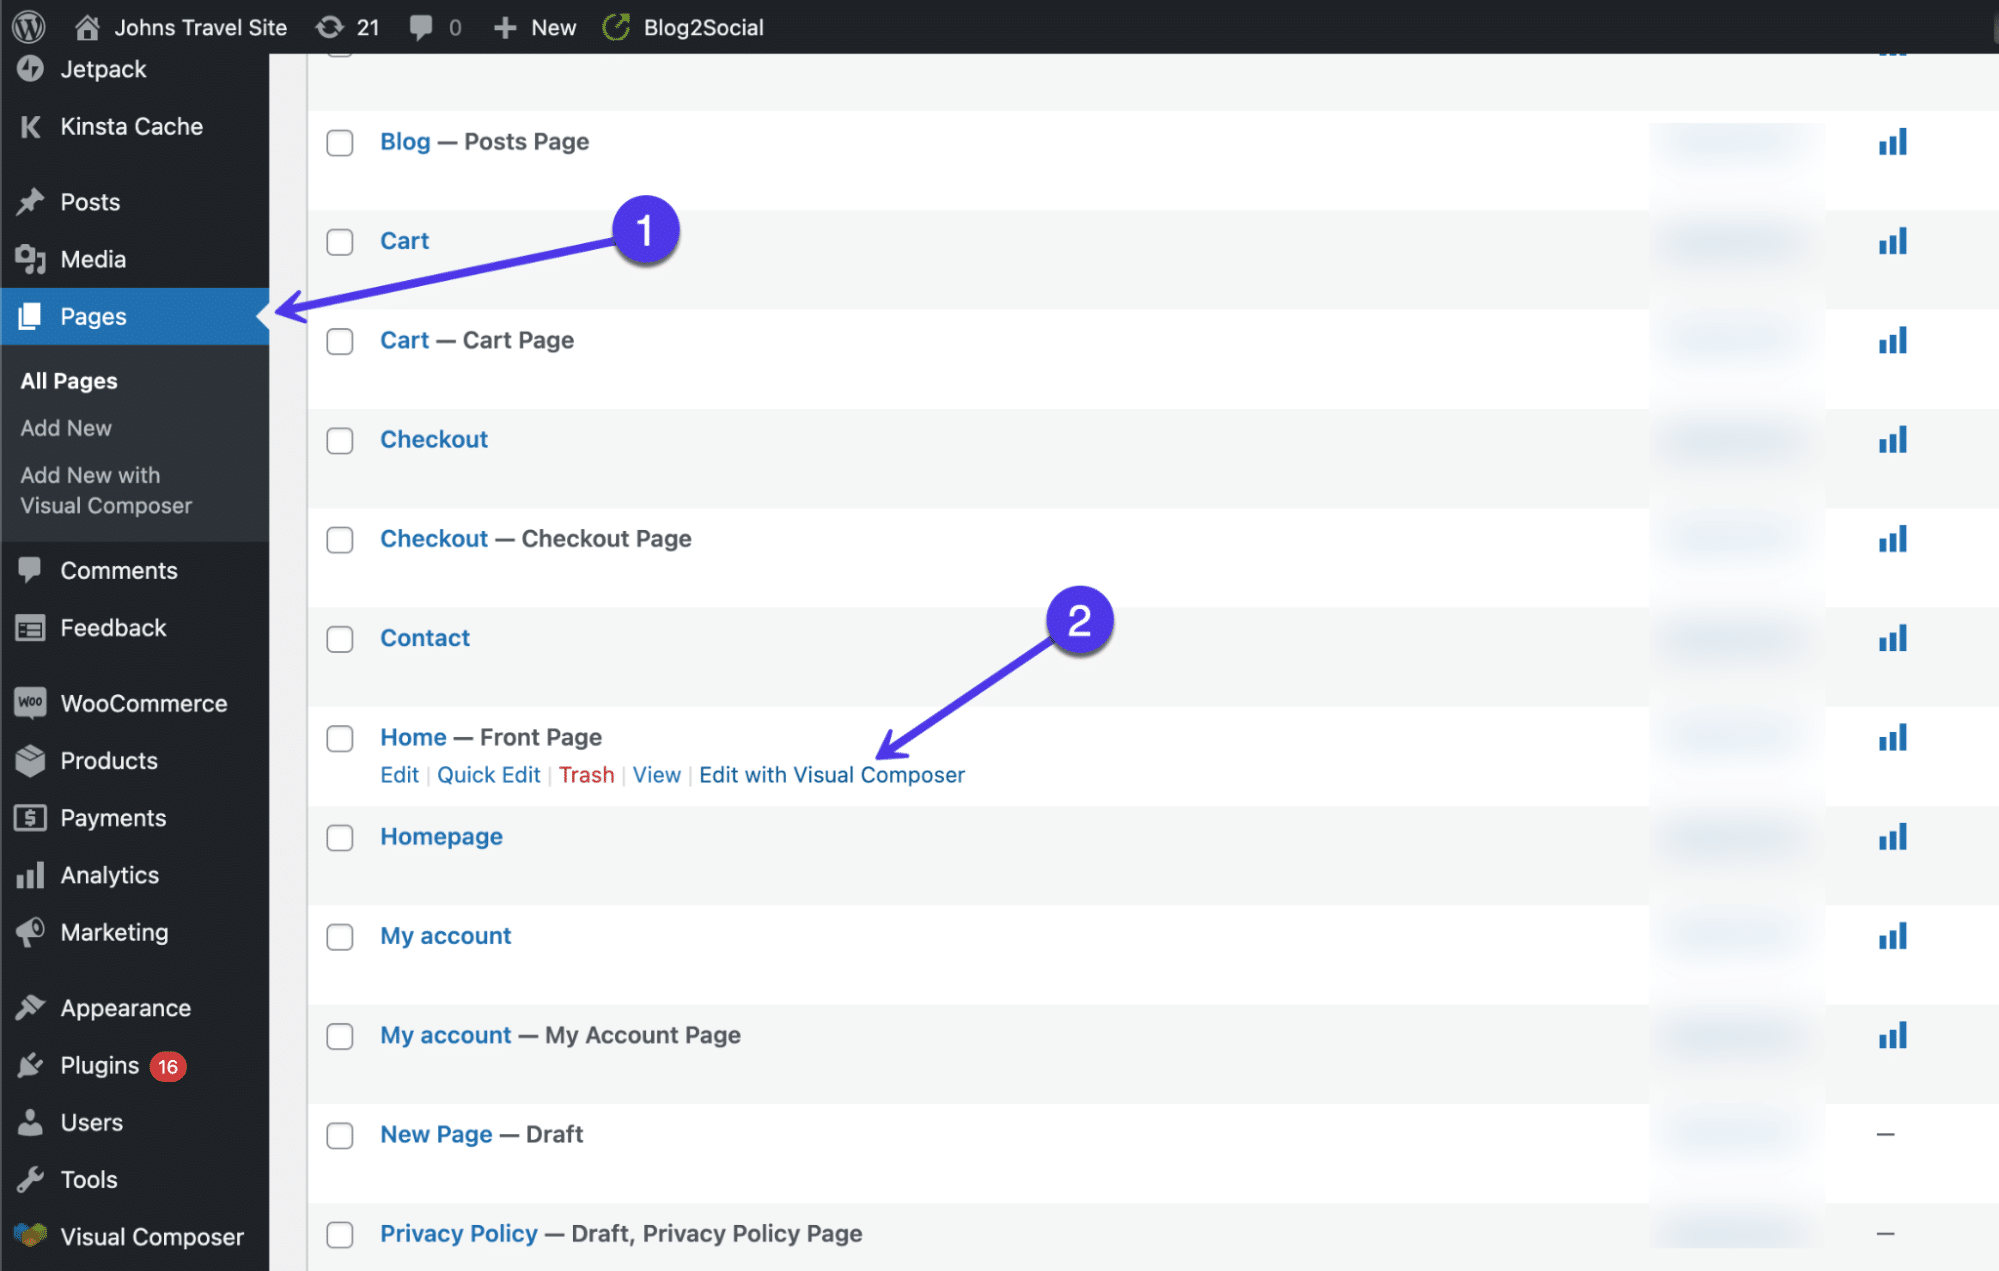
Once installed, click on the Pages button in your dashboard. Scroll through the pages you want to edit and select the Edit With Visual Composer link on any of those pages.
That brings up the Visual Composer designer, with a live preview of your webpage on the right side and drag-and-drop design tools like elements and templates on the left.
One of the easiest ways to implement a beautiful footer is to simply choose a template (many of which are free). These templates provide professional designs for your entire site, along with a nice footer that’s customizable.
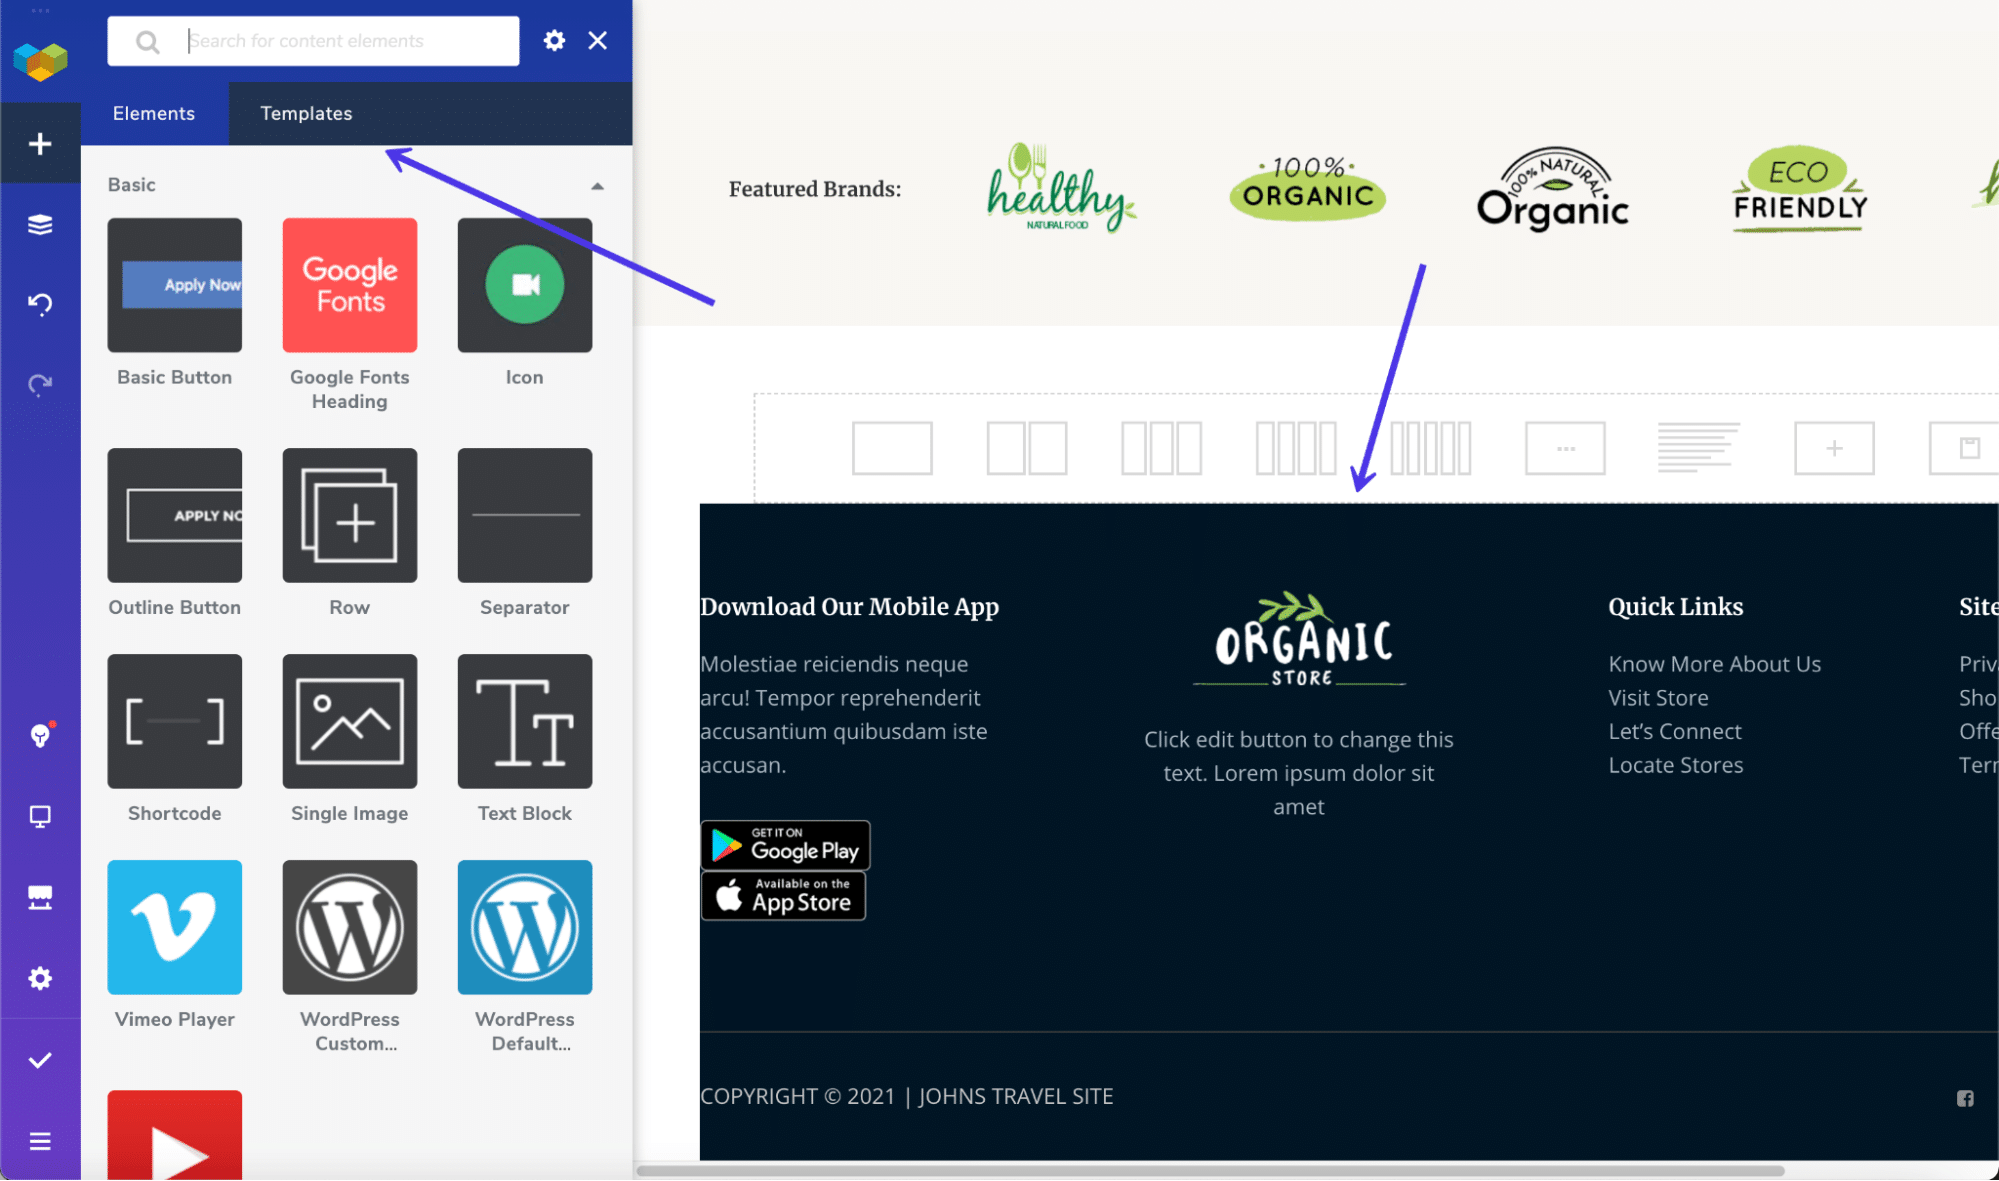
To see what’s available, you can click on the Templates tab, then the Get More Templates button. Visual Composer offers templates for all aspects of your site, including headers, footers, and sidebars.
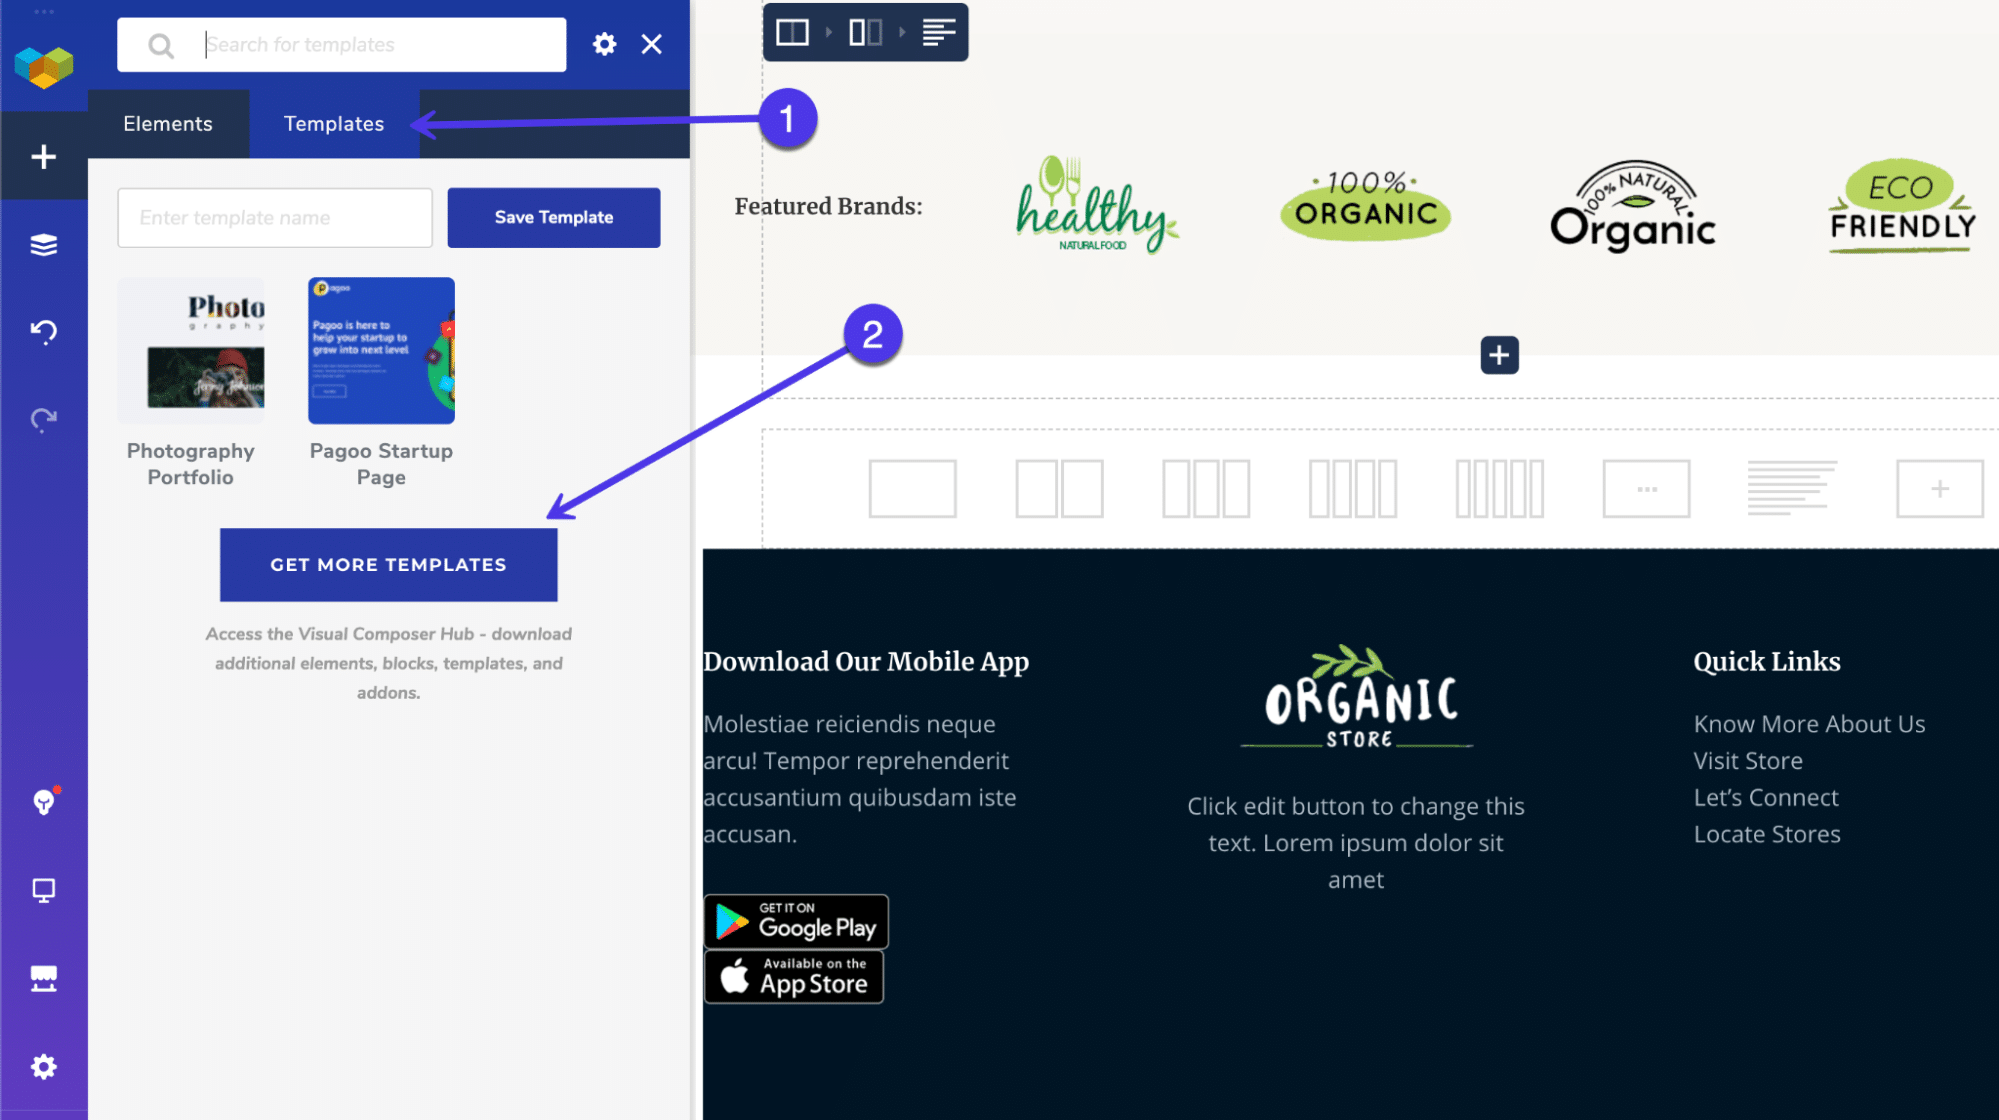
The next window shows a large library of templates, all categorized under filters for things like Elements, Templates, Blocks, and Footers.
Choose the Footers tab to show all premade footer templates.
Once again, this part of Visual Composer requires the Pro version. Once active, you can scroll through the dozens of footer templates to implement them on your website and edit them as you please.
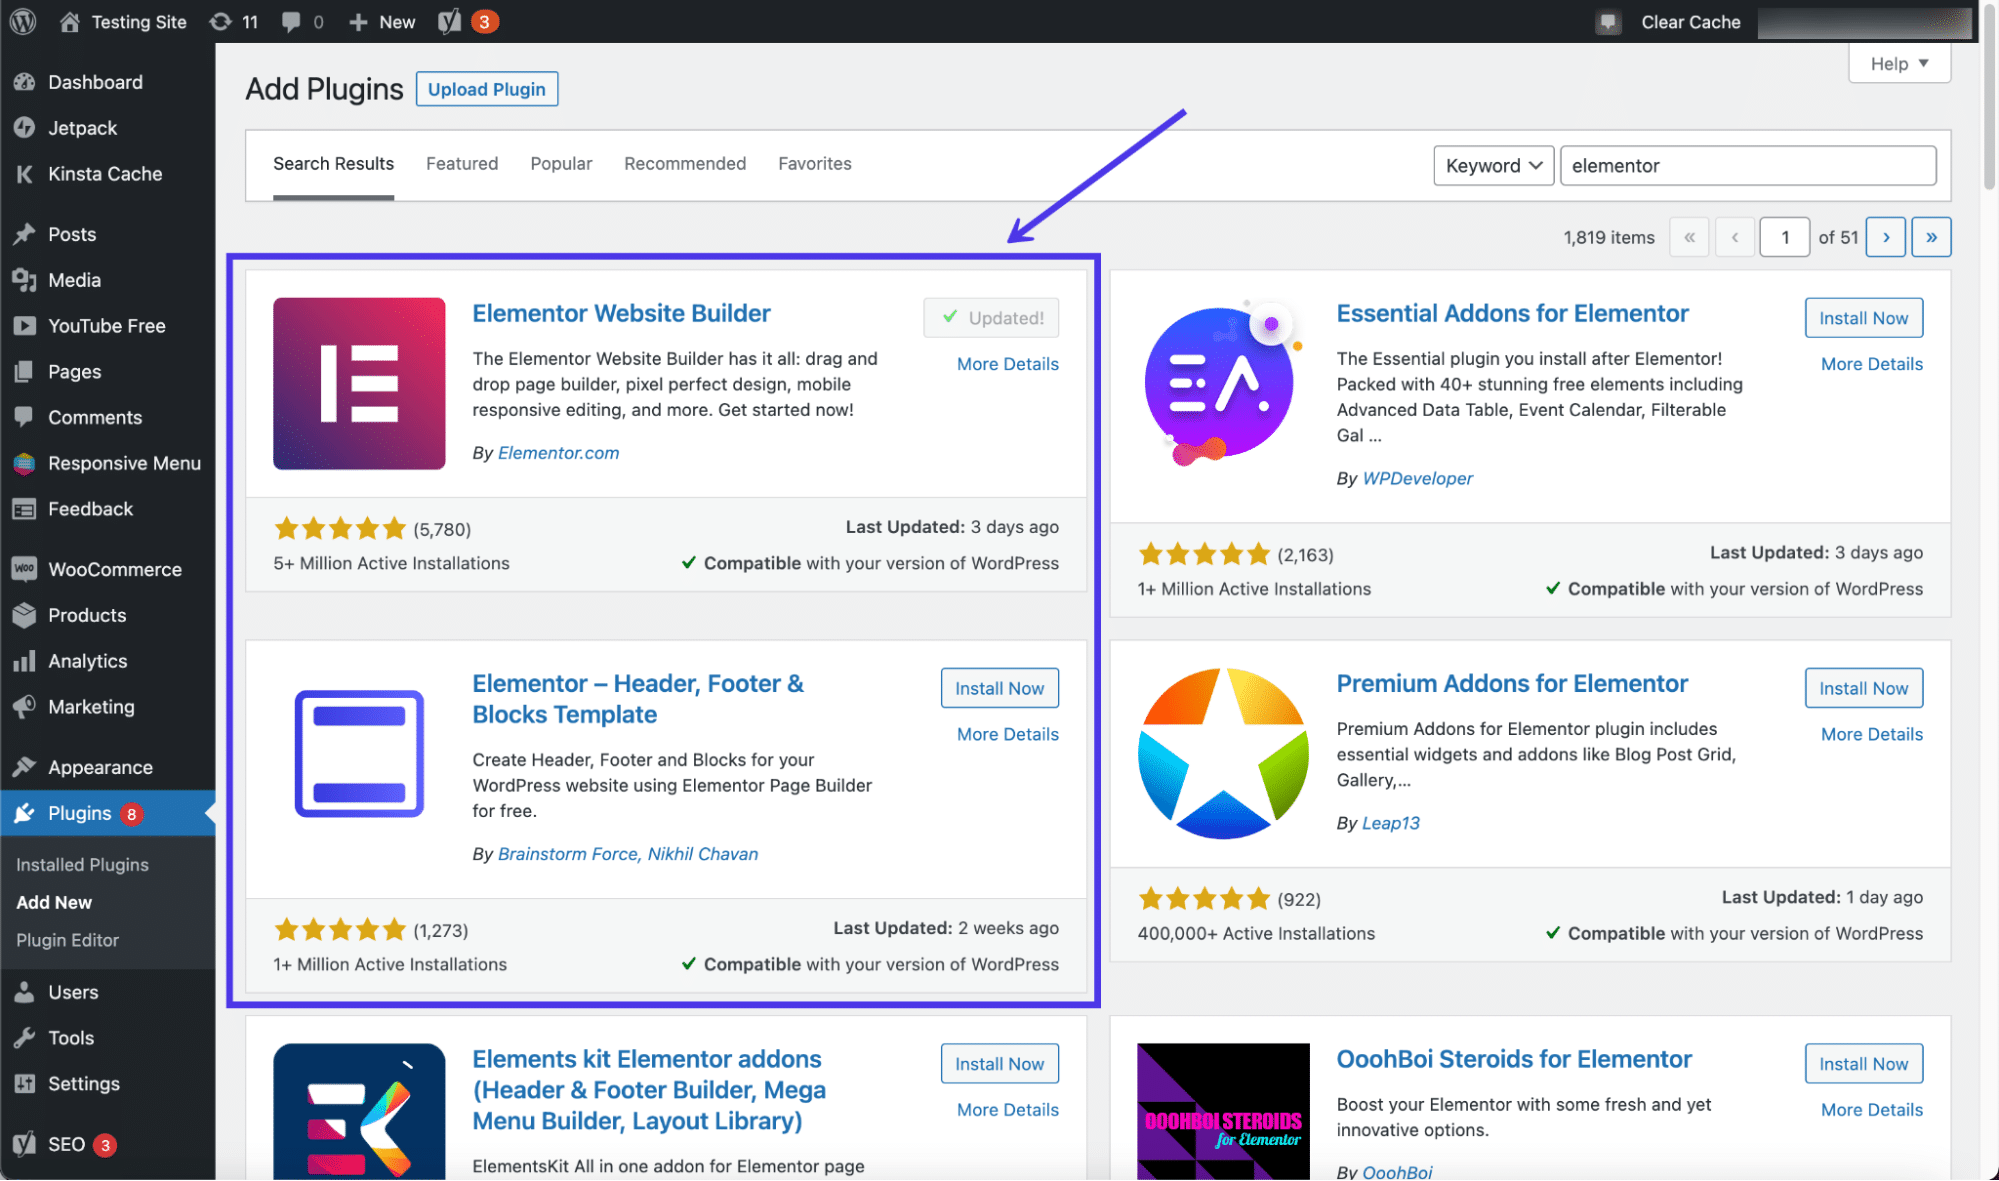
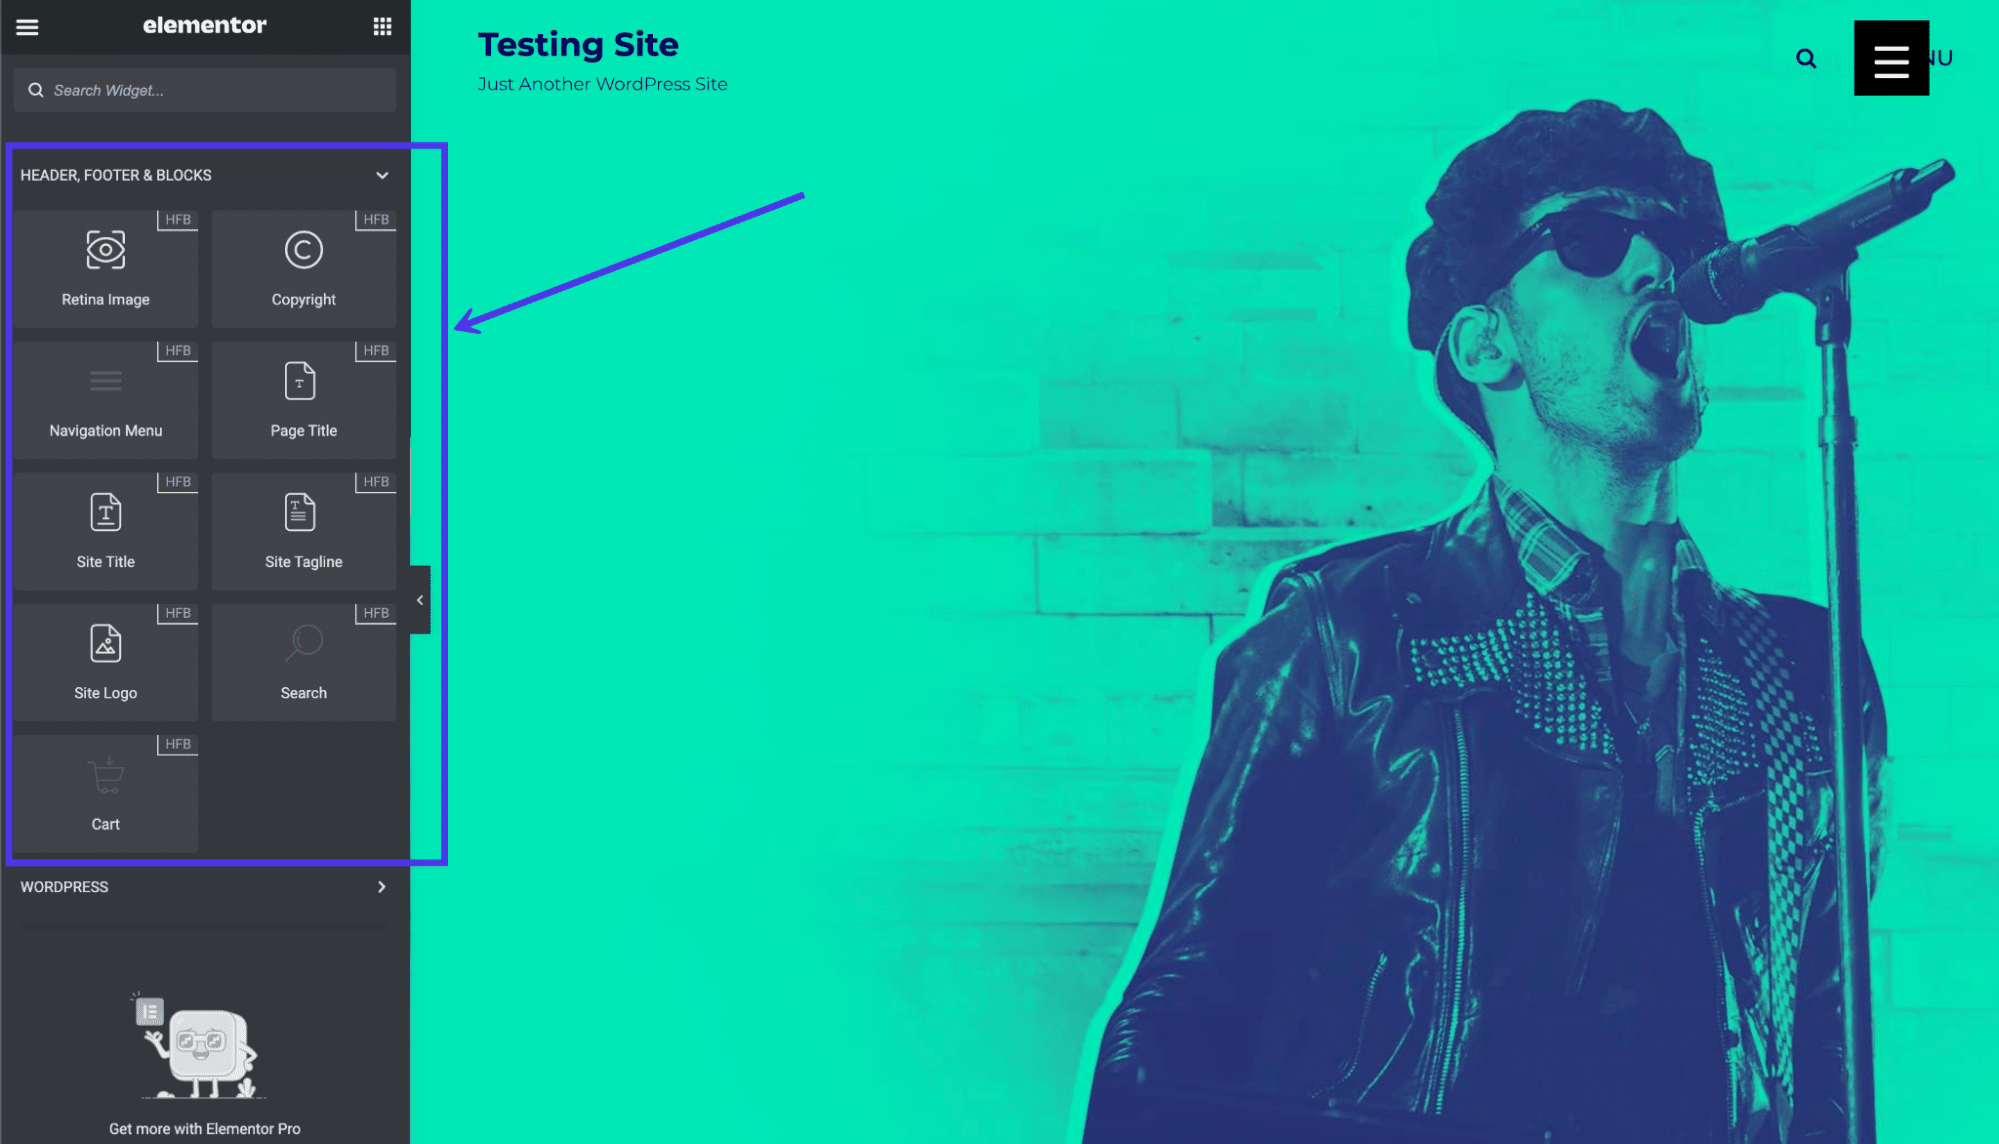
One of the other page builders with footer editing tools is called Elementor. Much like Visual Composer, Elementor provides a full website builder for constructing homepages, product pages, footers, and more.
Keep in mind that you do receive footer content blocks for free with this method, but the actual footer builder uses the Pro version of Elementor. Like Visual Composer, you need to upgrade for full functionality.
To get started, install and activate both Elementor and the Elementor Header Footer and Blocks Template plugins.
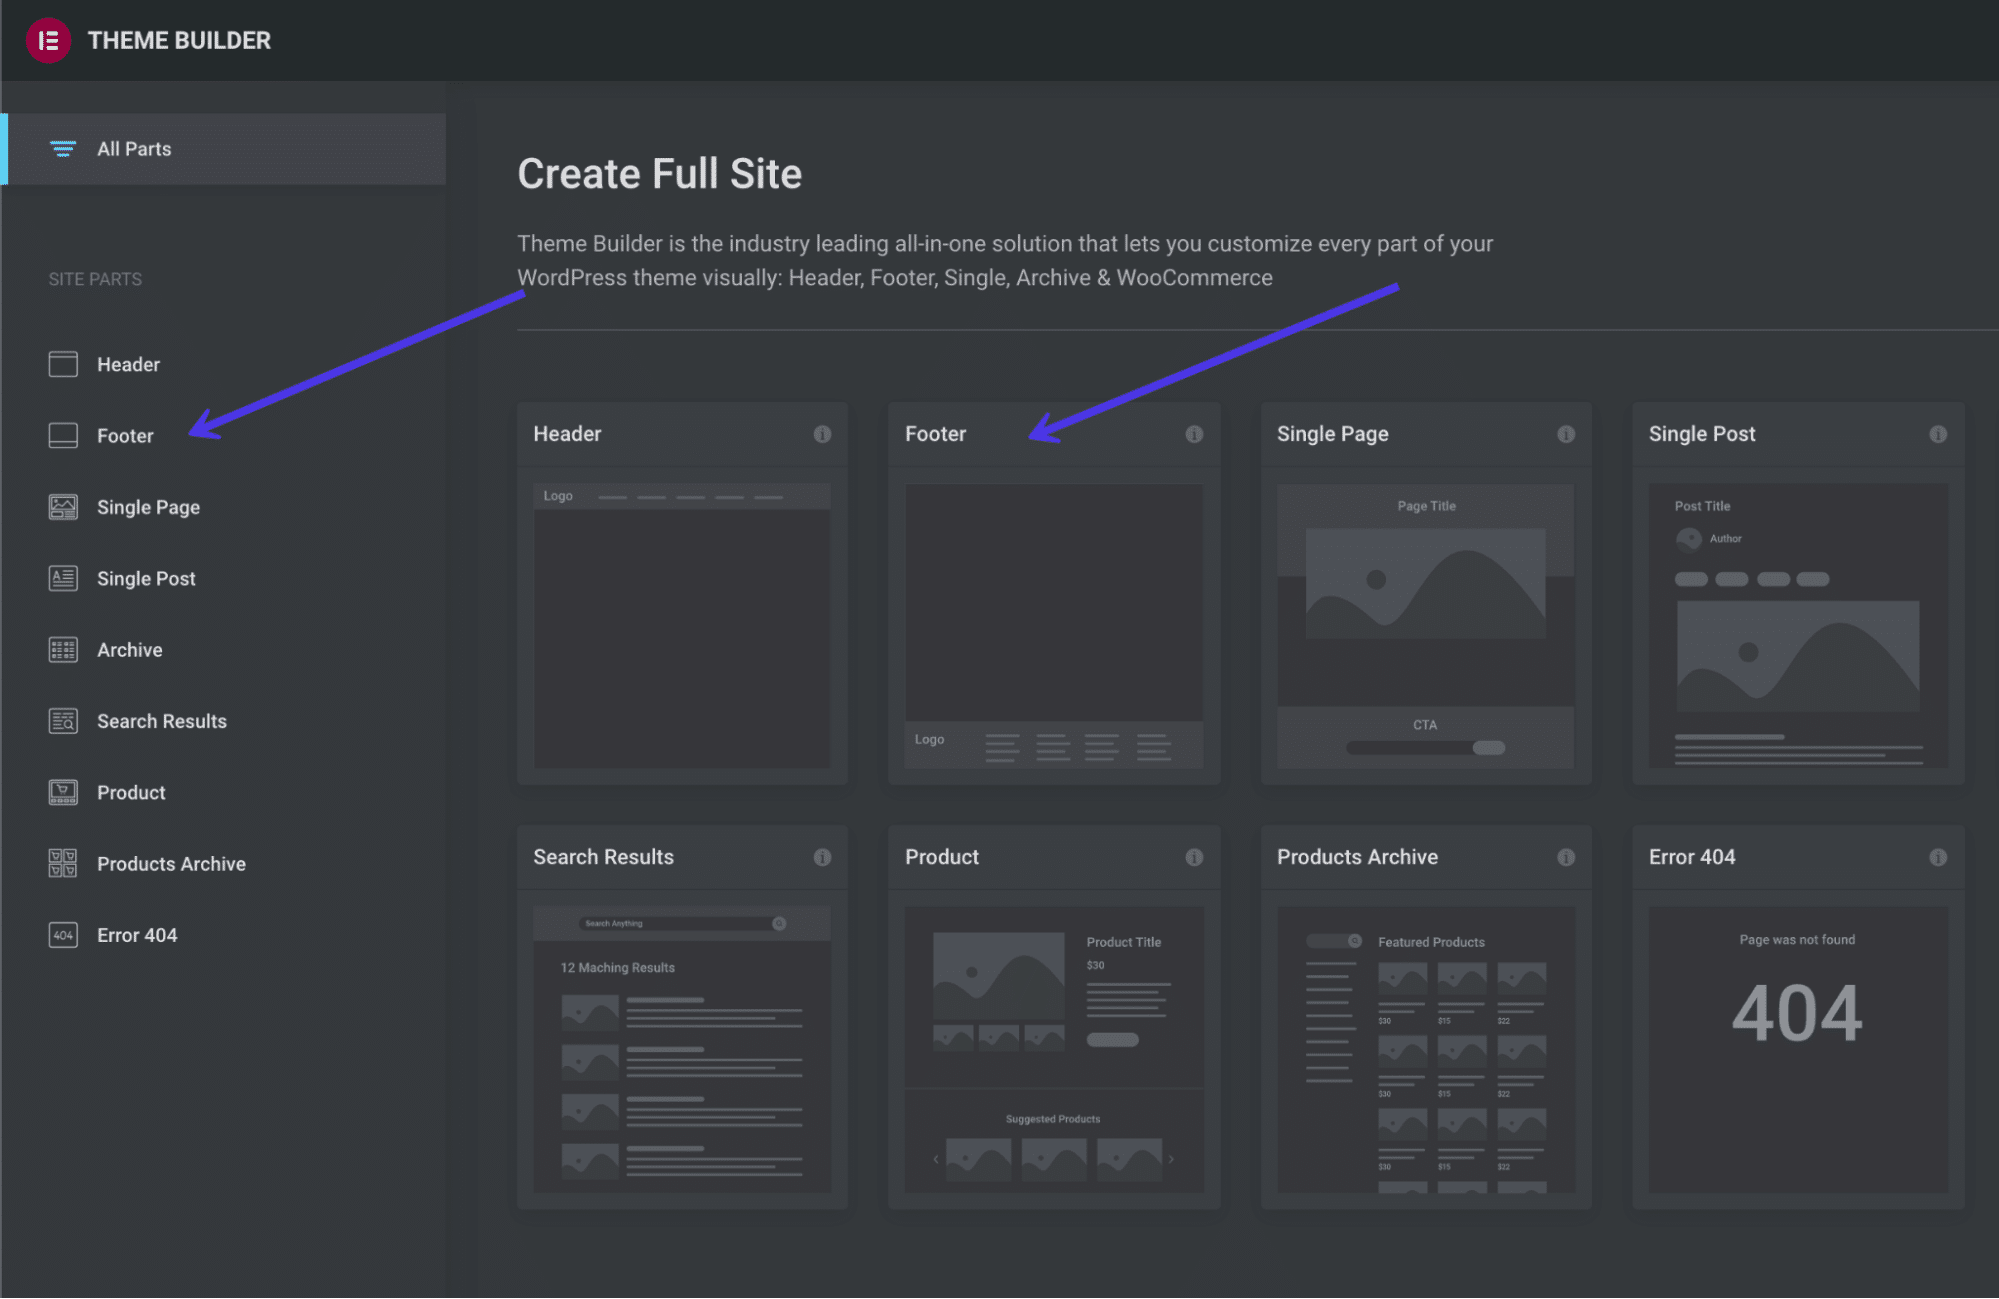
Click on Templates > Theme Builder to open the complete website builder from Elementor.
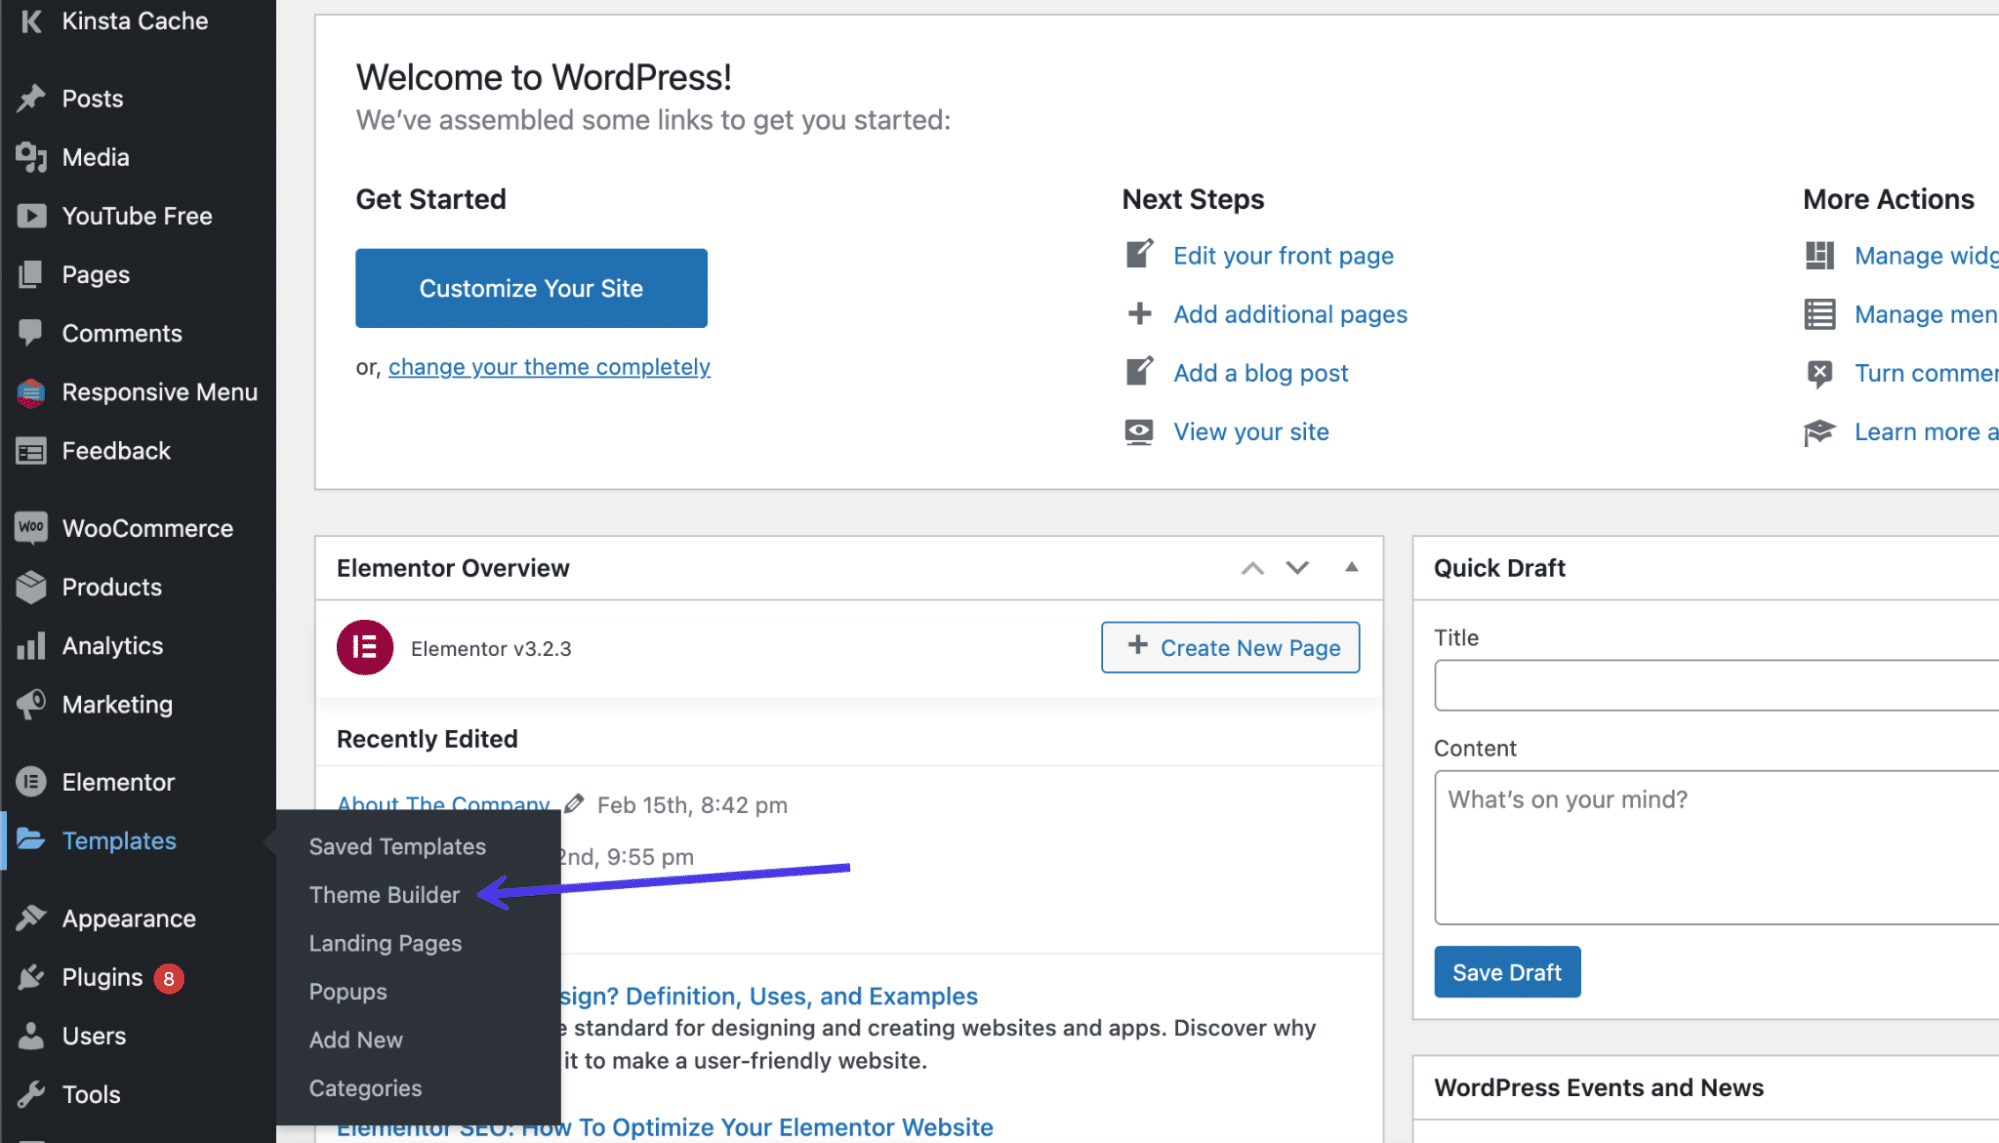
Here, you’ll see a menu to edit various parts of your site such as the header, footer, and single pages.
Select the parts of your site you want to customize on the left side menu or with the icon buttons in the middle of the page. As you can see, there’s a Footer link in two places.
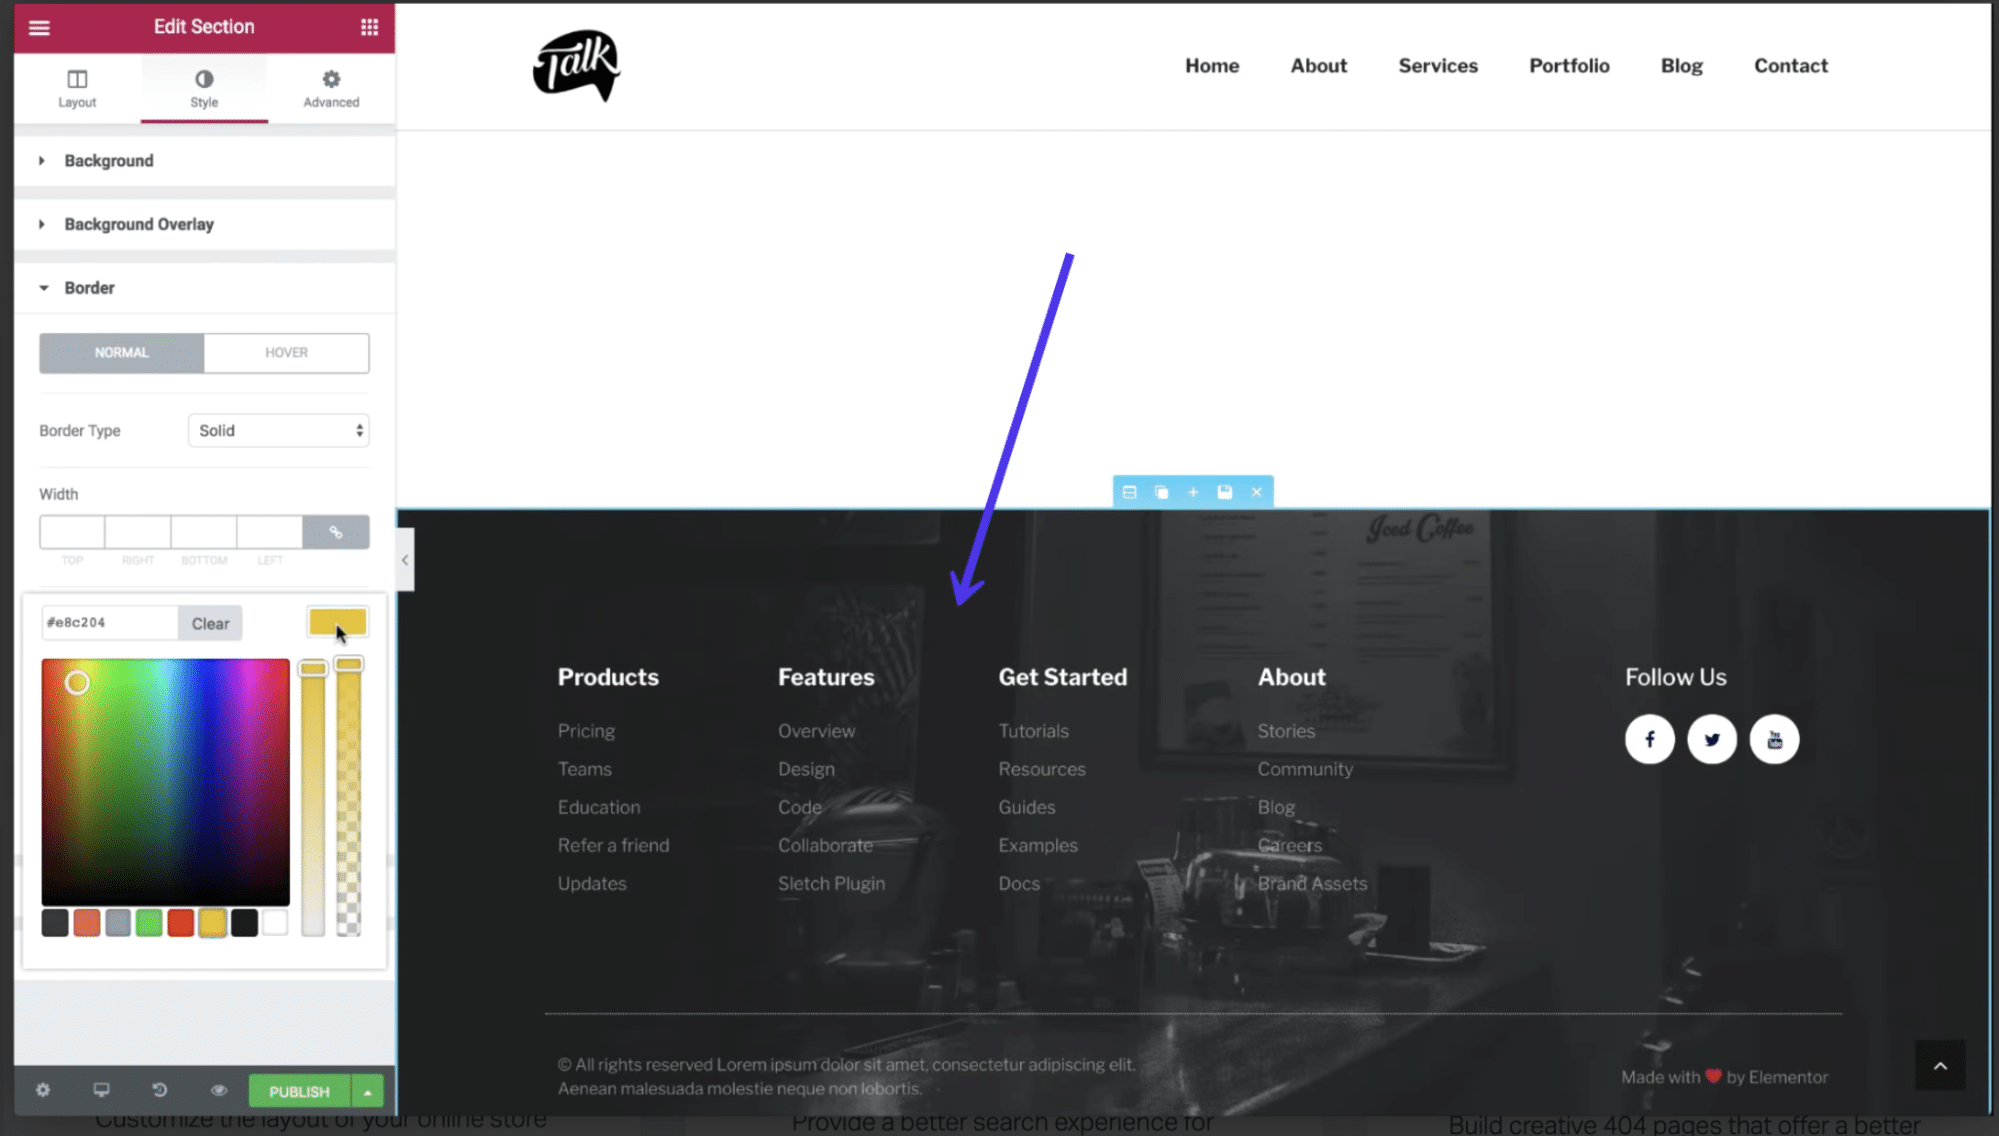
The footer editor works similarly to every other editor in Elementor: You can change the layout, adjust the style, and click on the block to type in new content. Every aspect of the footer is customizable when using Elementor, making it one of the more flexible and desirable options when it comes to footer control and learning how to edit a footer in WordPress.
The Header Footer and Blocks plugin provides content modules made specifically for headers and footers. In terms of the footer blocks, you can choose from modules like copyright information, images, site titles, and taglines.
To utilize these blocks, go to Appearance > Header Footer and Blocks in the dashboard.
You can also make a unique block and choose to edit it in the Elementor page builder. Once in Elementor, scroll down to the block collection for Headers Footers and Blocks, then drag any of these elements into your current design to activate some of the more common content items within a footer. As mentioned, you can find everything from search bars to site logos and cart icons to copyright text in these blocks.
How To Edit a Footer in WordPress.com
WordPress.com, the hosted version of WordPress, includes footers for many of its themes, with options to remove or change the footers with a few clicks. The methods for editing footers in WordPress.com are somewhat similar to how it’s done in the self-hosted WordPress.org version, but with a few differences.
Check Out Our Video Guide to Editing a Footer in WordPress.com
First of all, the interface doesn’t look exactly the same.
You must log in to your WordPress.com dashboard and manage your footer in the Theme Customizer. Luckily, many of the themes offered for WordPress.com are similar or exactly the same as what you’d find for WordPress.org. However, that also means the way in which you edit the footer in WordPress.com depends on which theme you install.
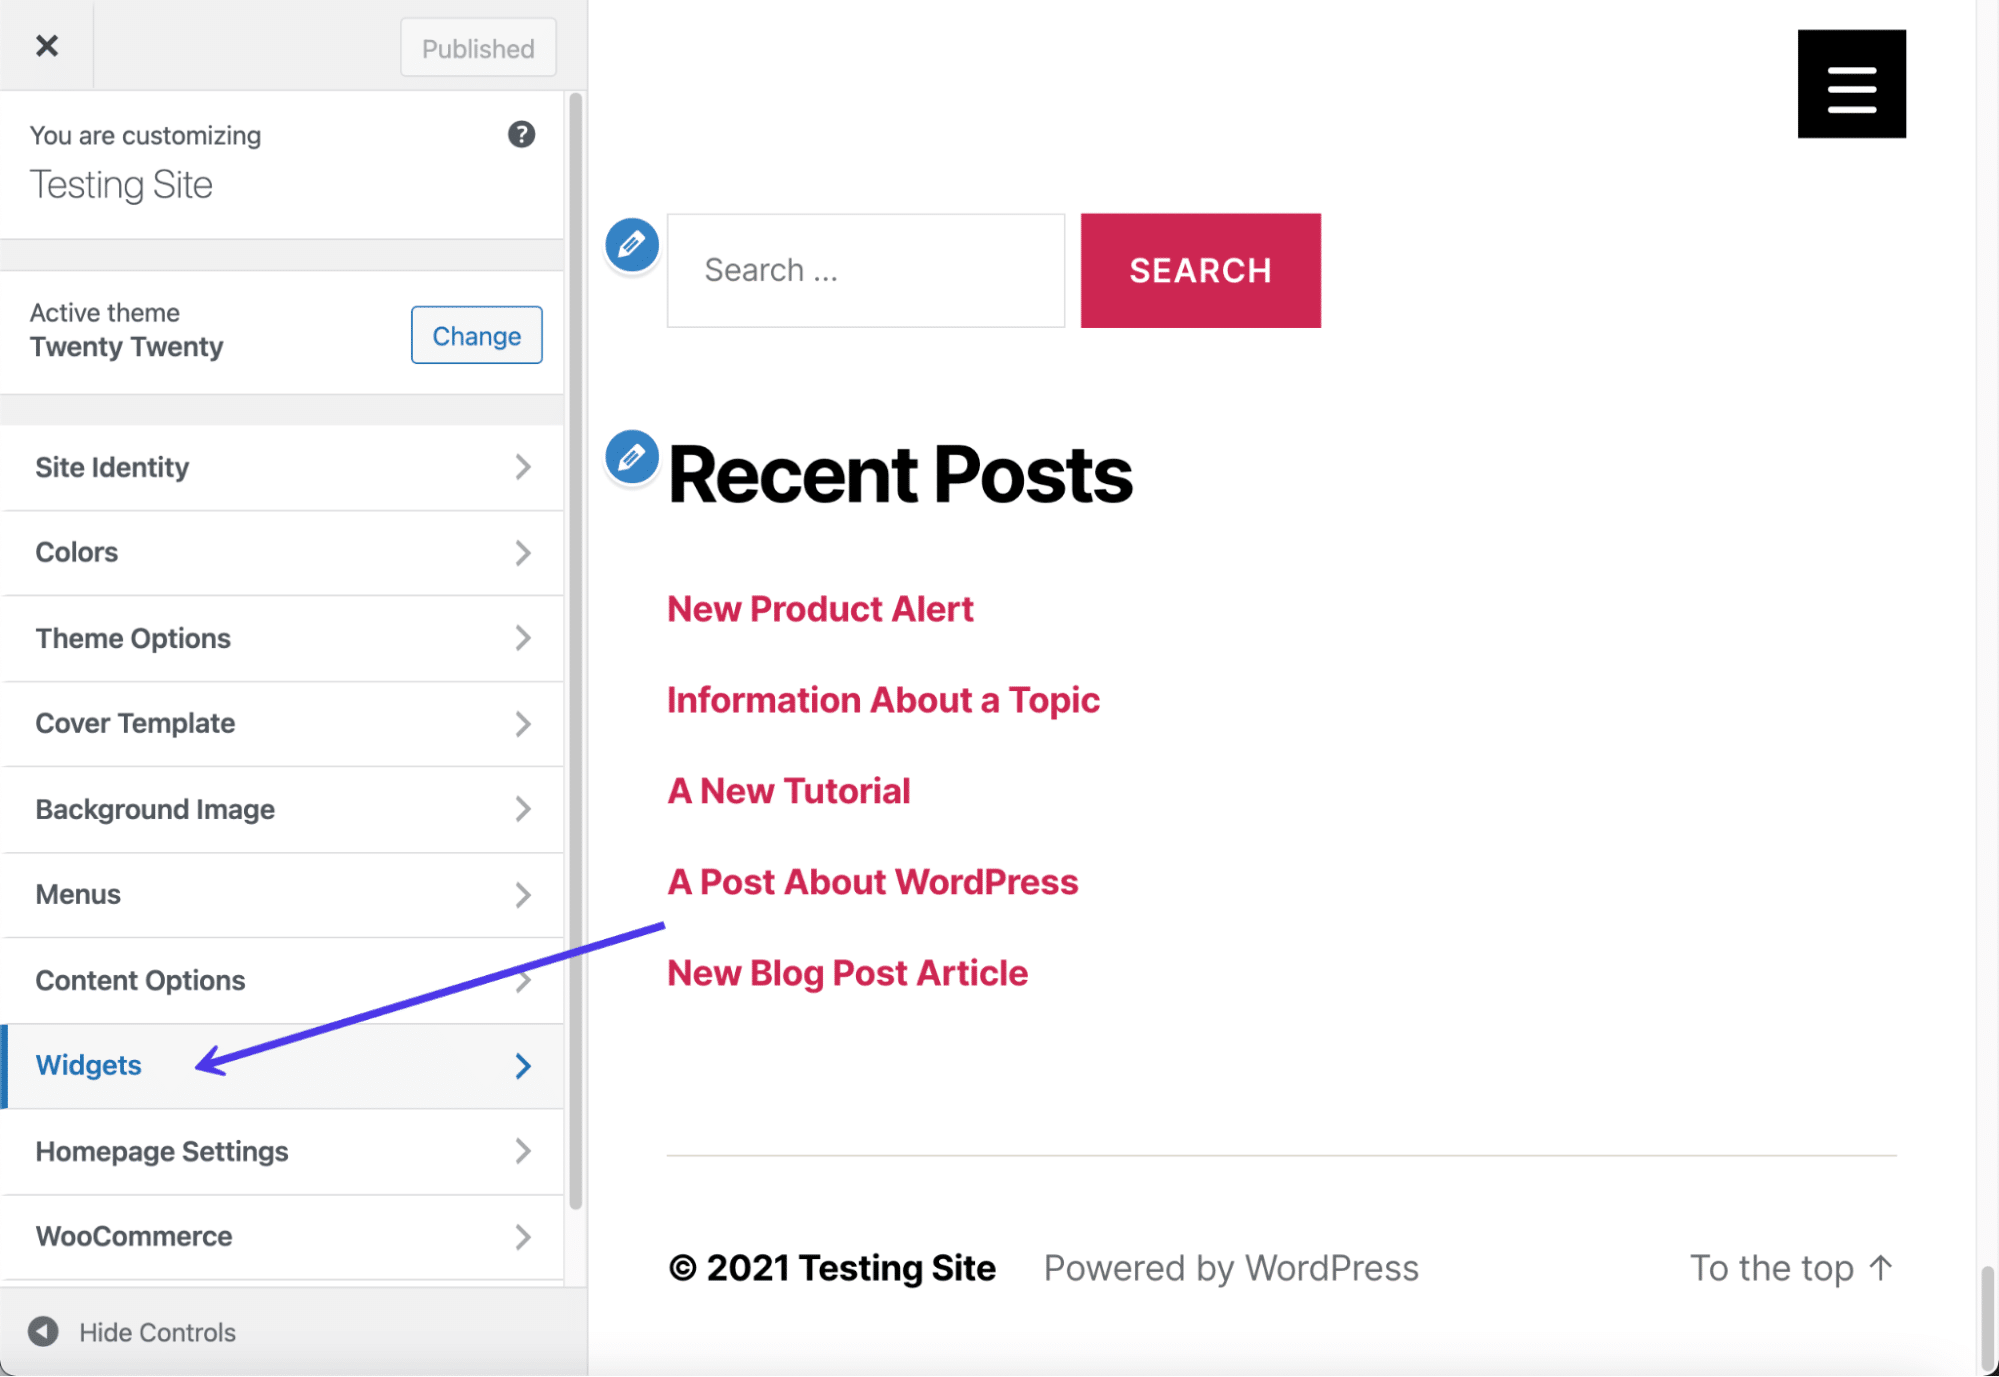
To begin, go to Appearance > Customize in the dashboard.
Look at the Theme Customizer tabs available for that particular theme. Most themes have a Widgets tab, but you must figure out if a footer area for placing widgets is provided with your theme. Click on the Widgets tabs to find out.
This current theme we’re using provides a Footer Widget module. If you don’t see an option to put widgets in the footer, consider trying a new theme, or use menus instead of widgets.
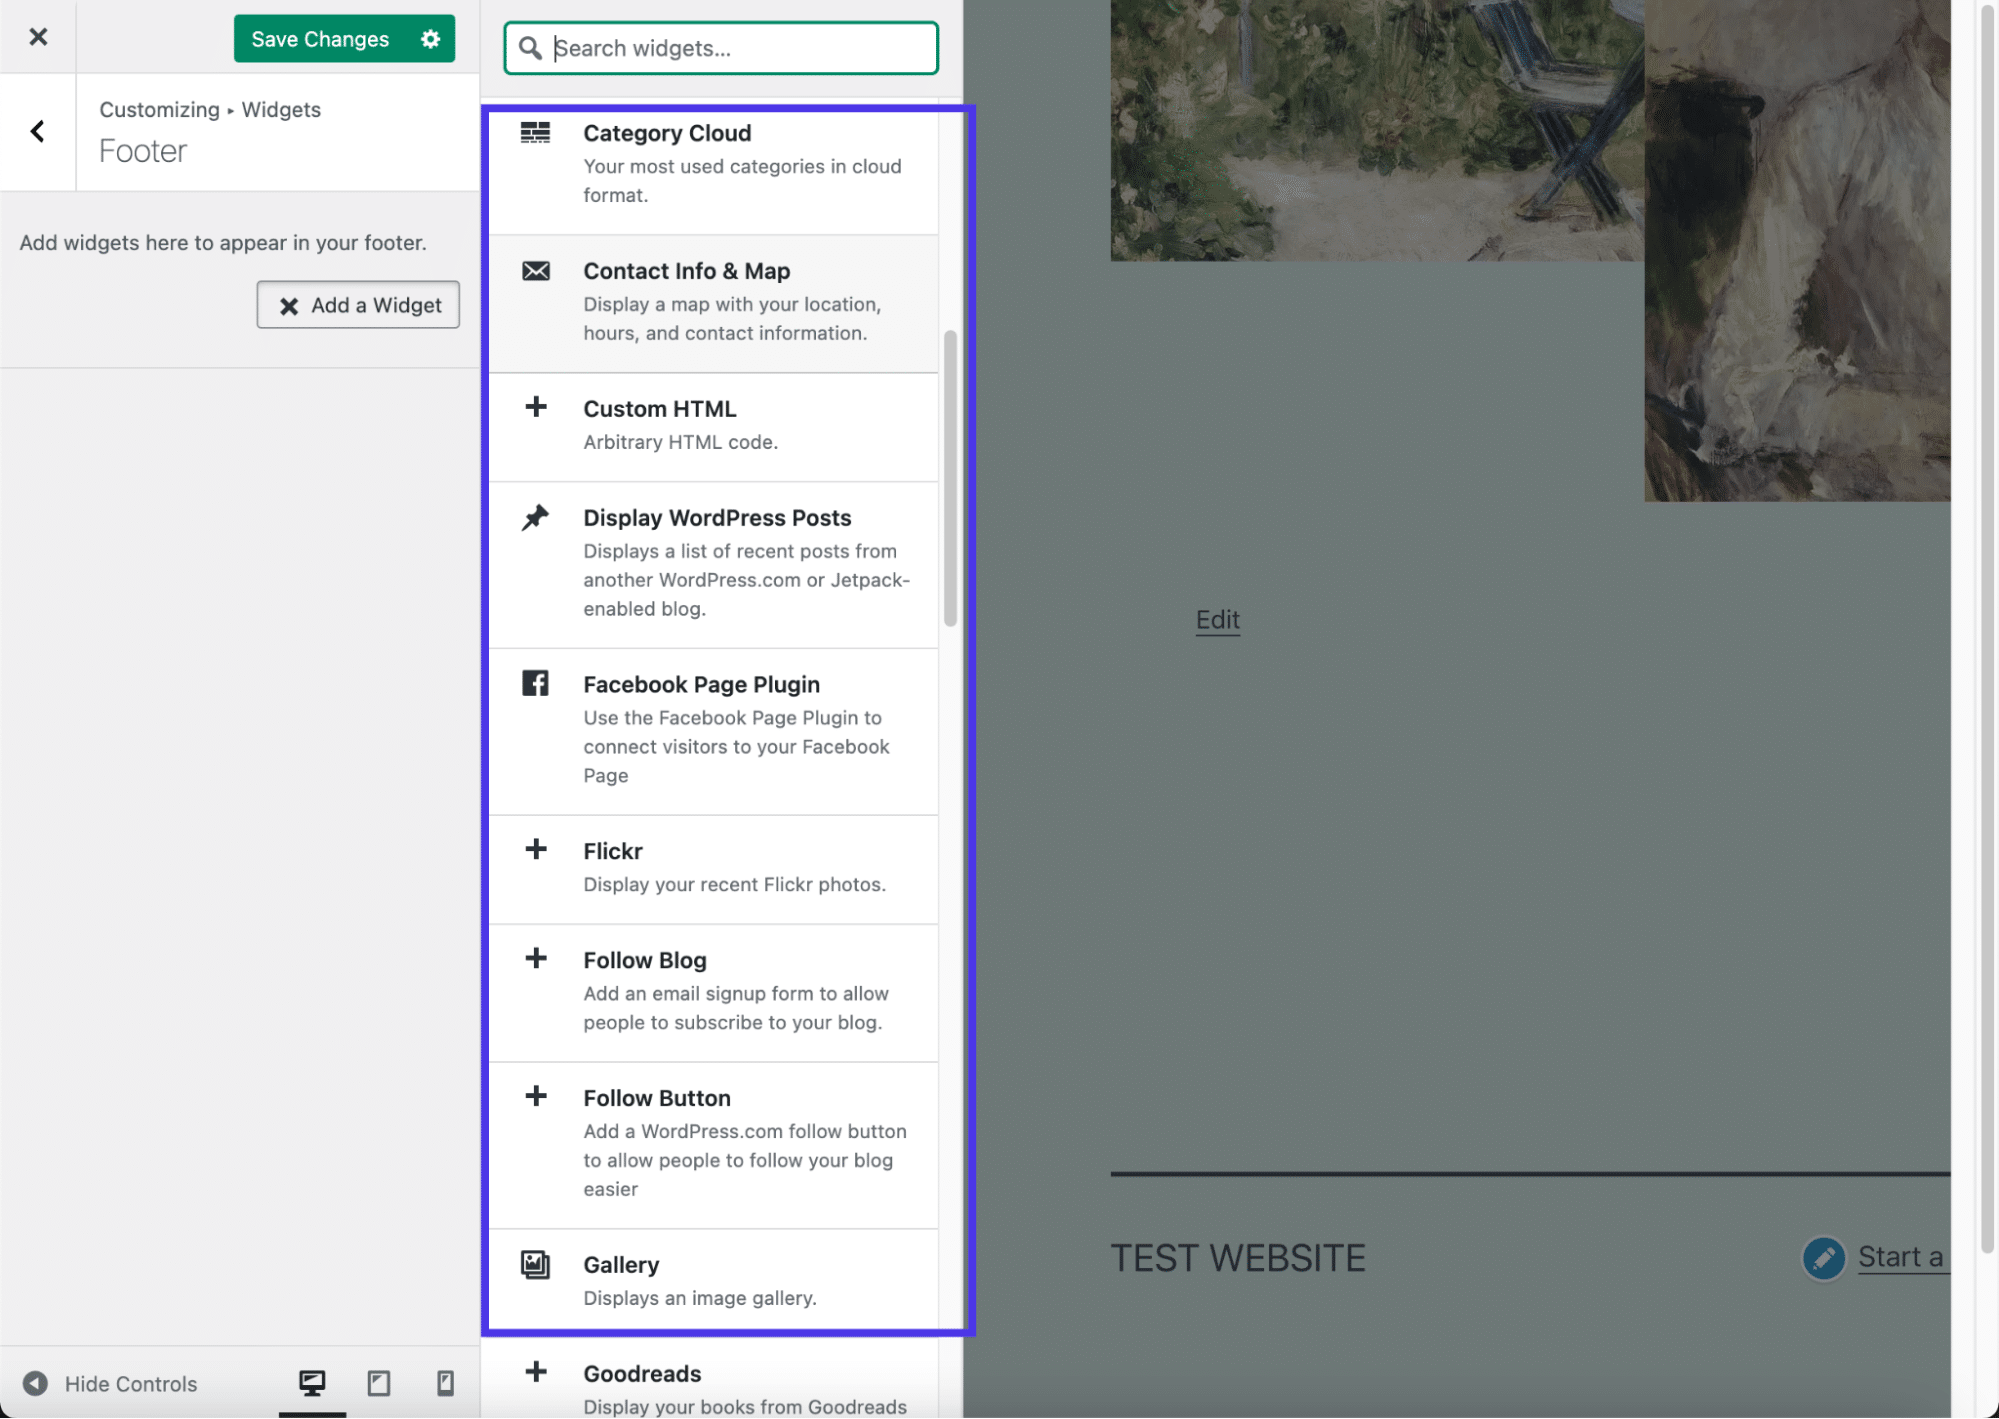
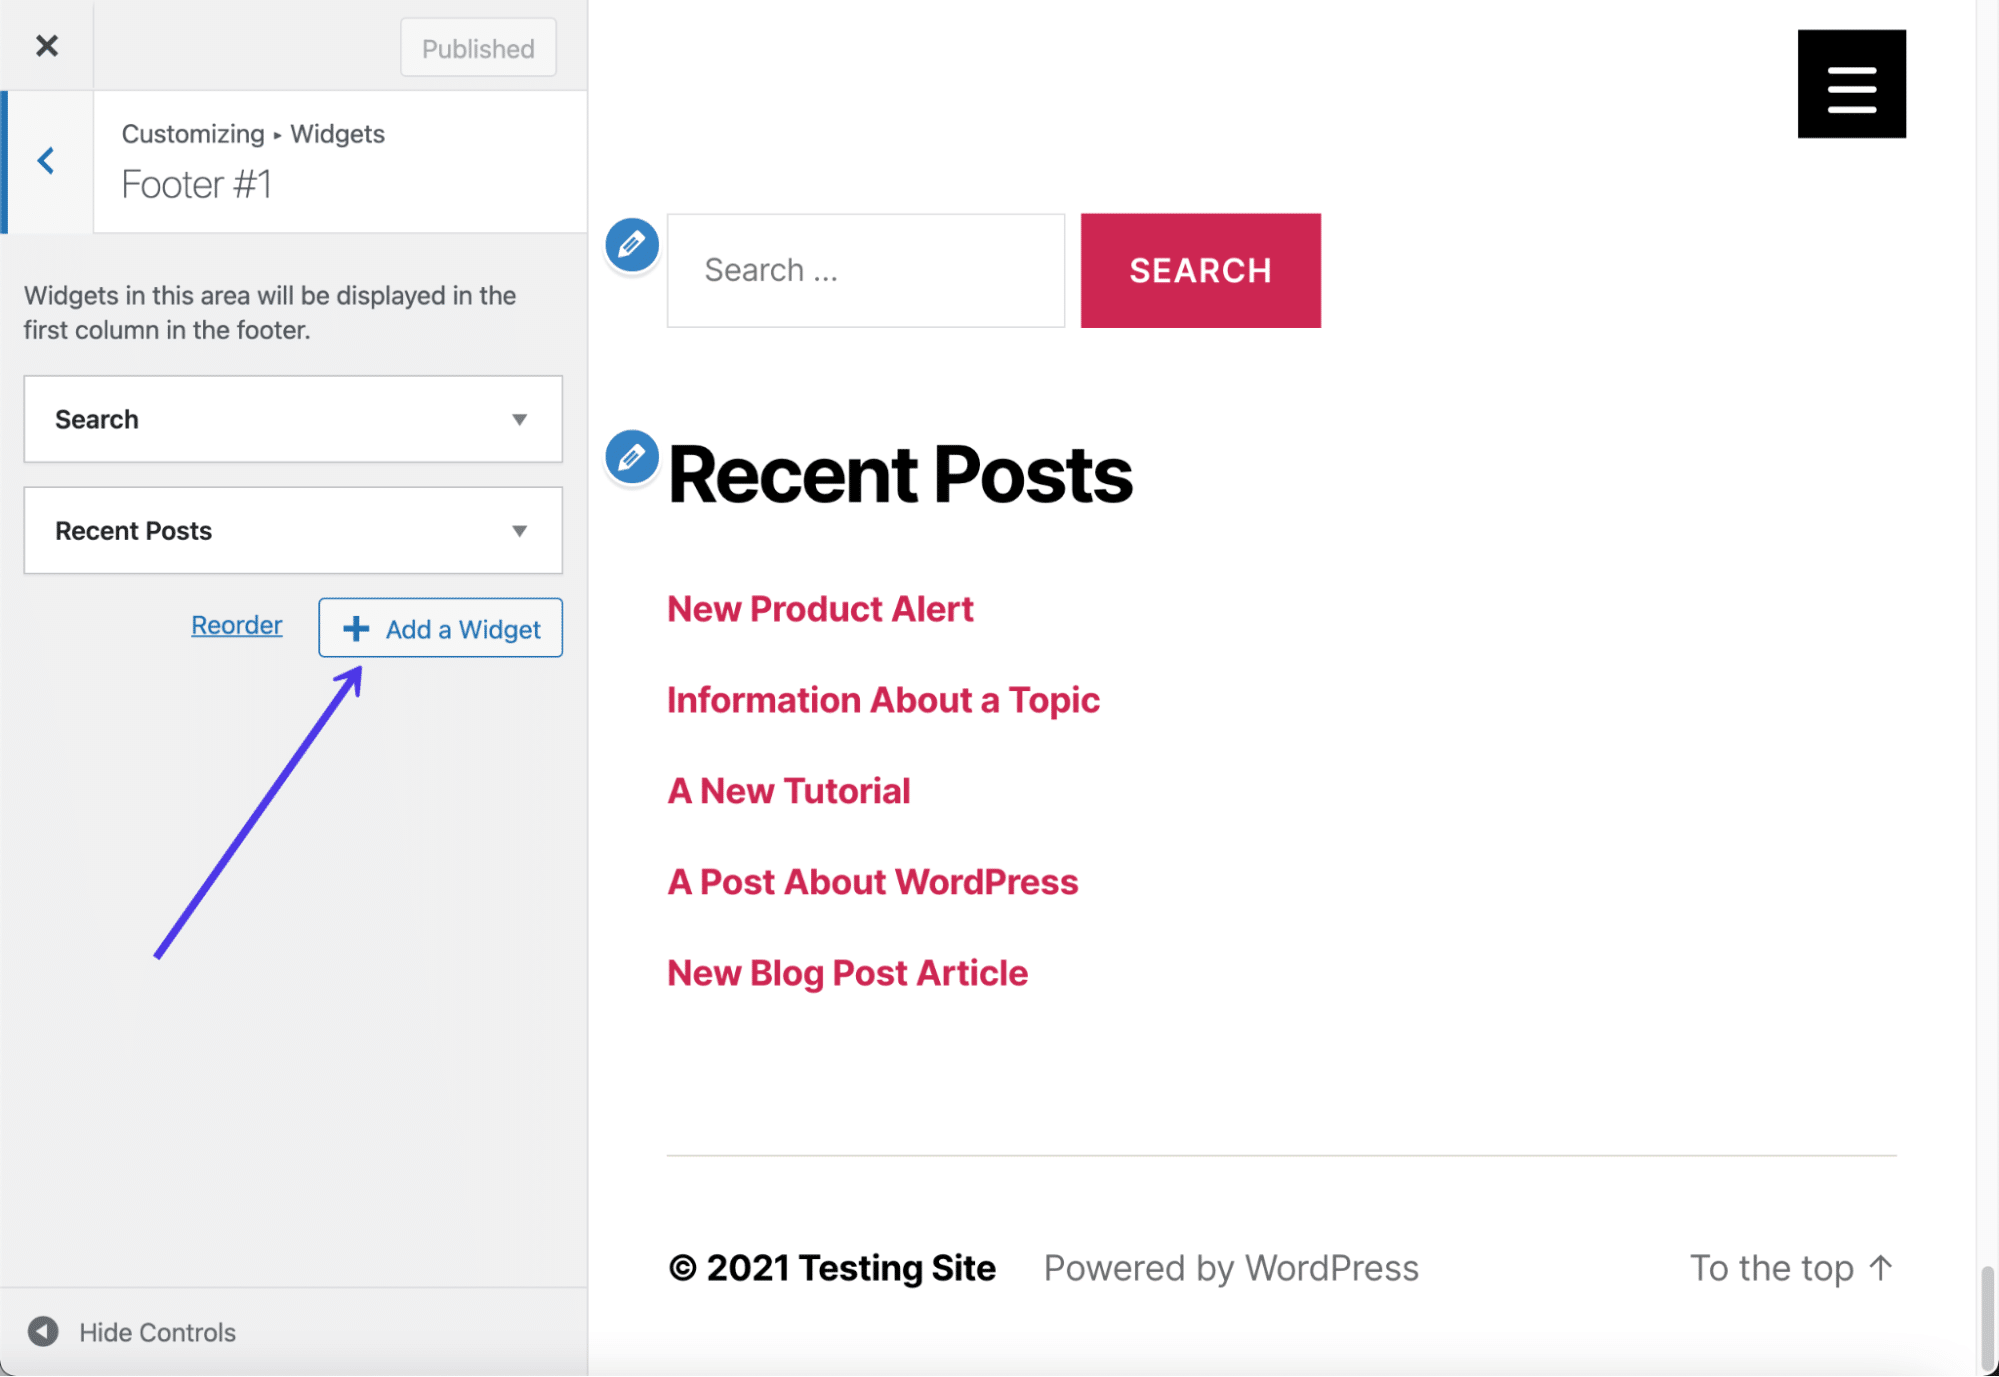
For this example (with a footer widget area), click on the Add A Widget button.
A slideout menu appears with a collection of widgets. You can select whichever widgets make the most sense for your company.
Again, the theme dictates how many widgets you can fit into the footer without it looking too cluttered. It appears this particular theme allows for about three columns of widgets before the design starts looking messy.
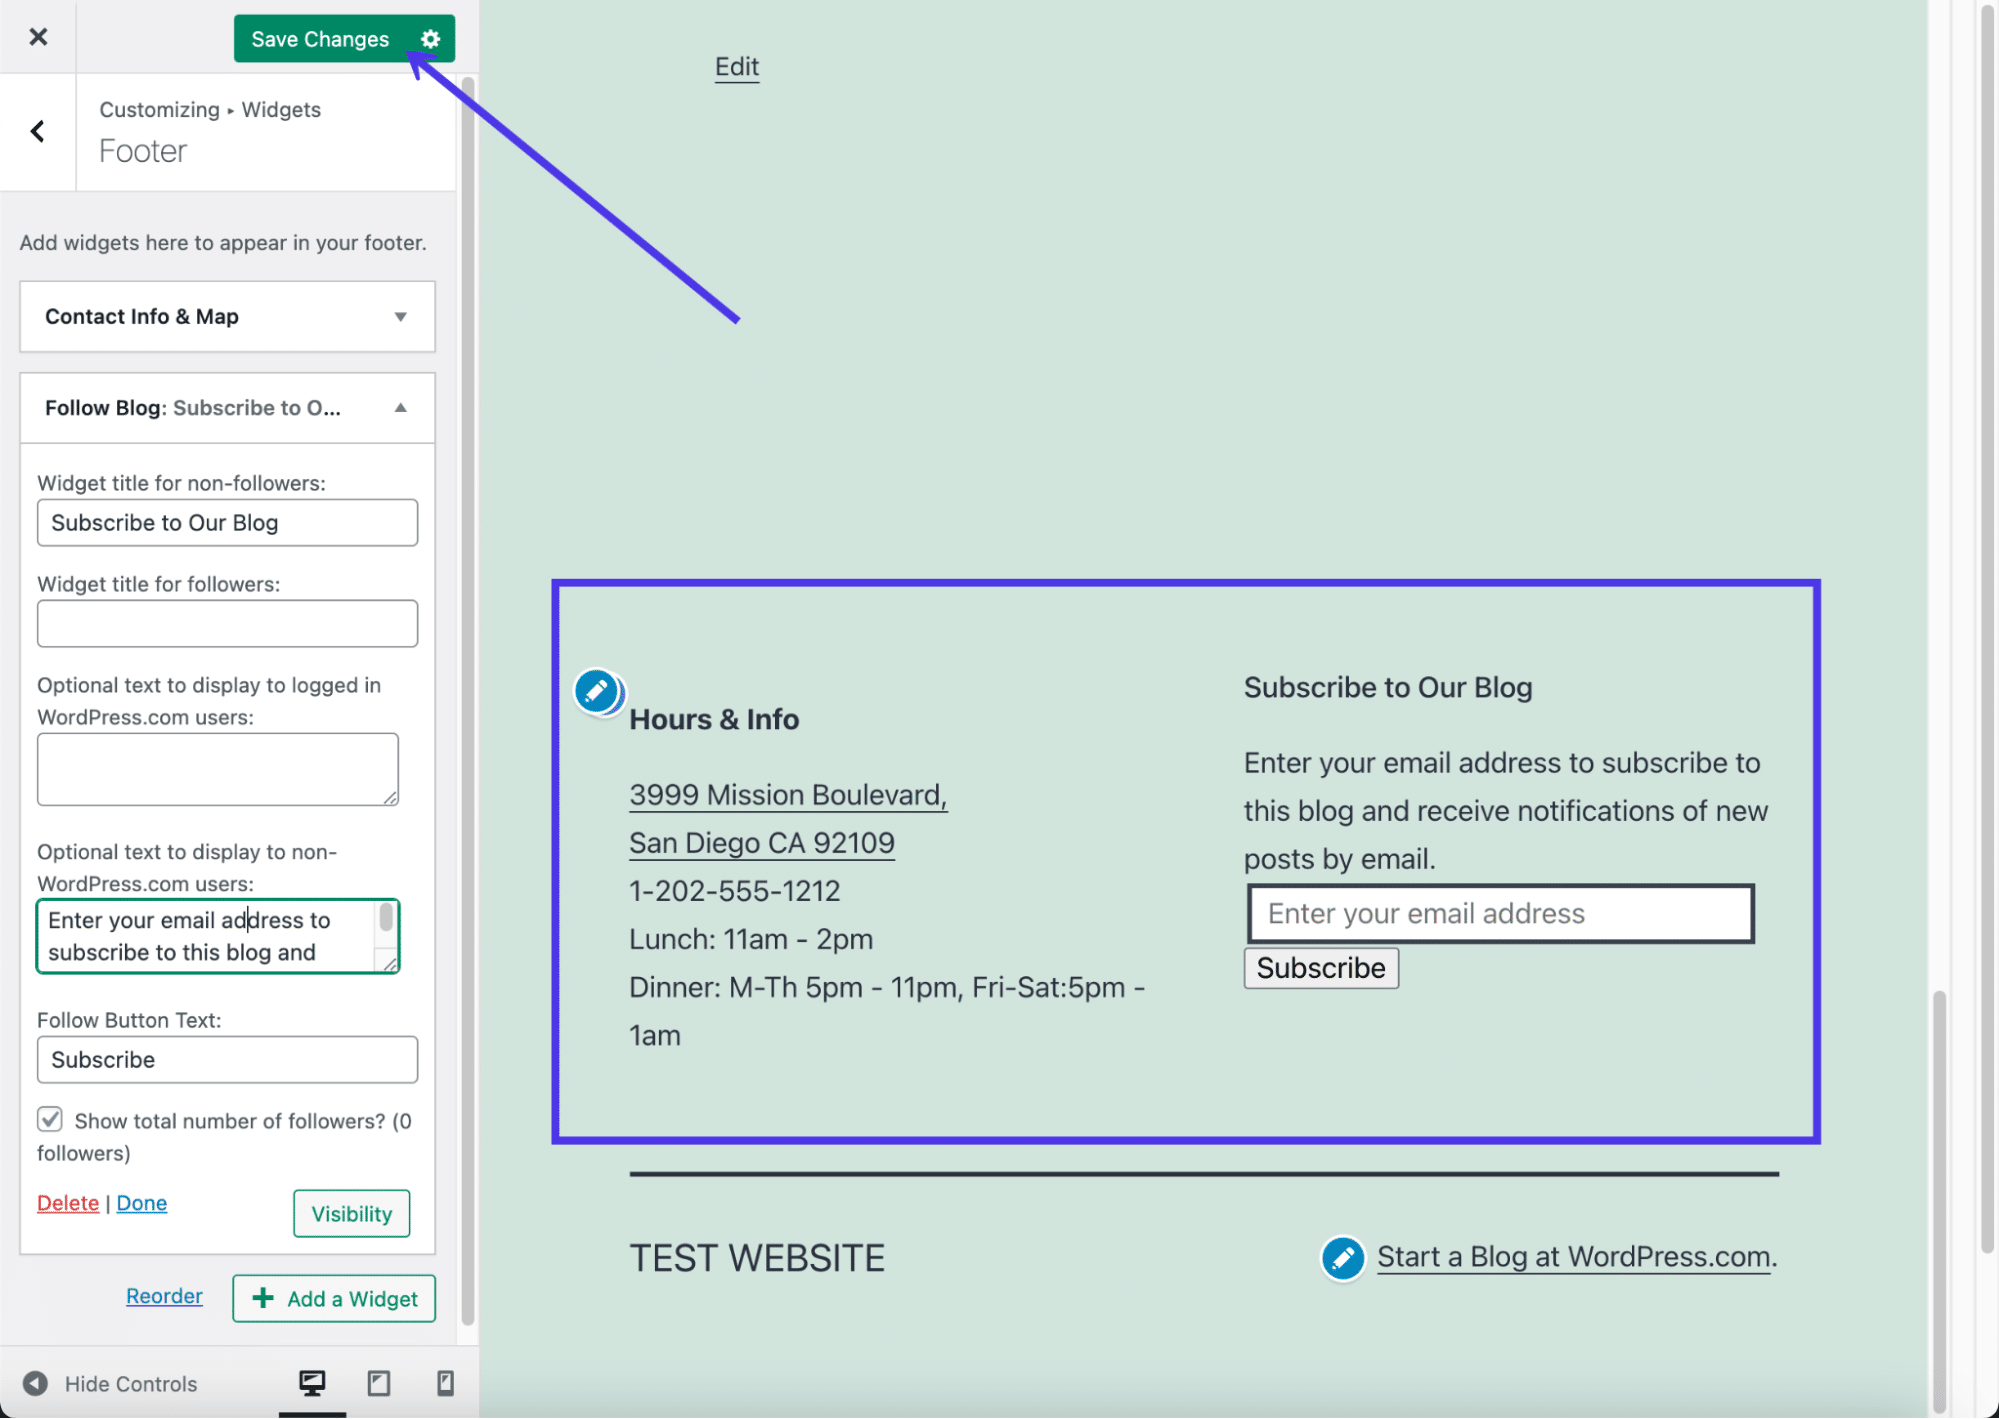
For our example, we’ll choose a Contact Info and Map widget, along with a Follow Blog widget, which prompts visitors to sign up with their email addresses.
The preview on the right shows the widgets in action. We recommend going through each widget settings panel to configure individual elements like the display text and choose which fields you want to show in each widget.
Make sure you click on the Save Changes button so the widgets appear on the front end of your website.
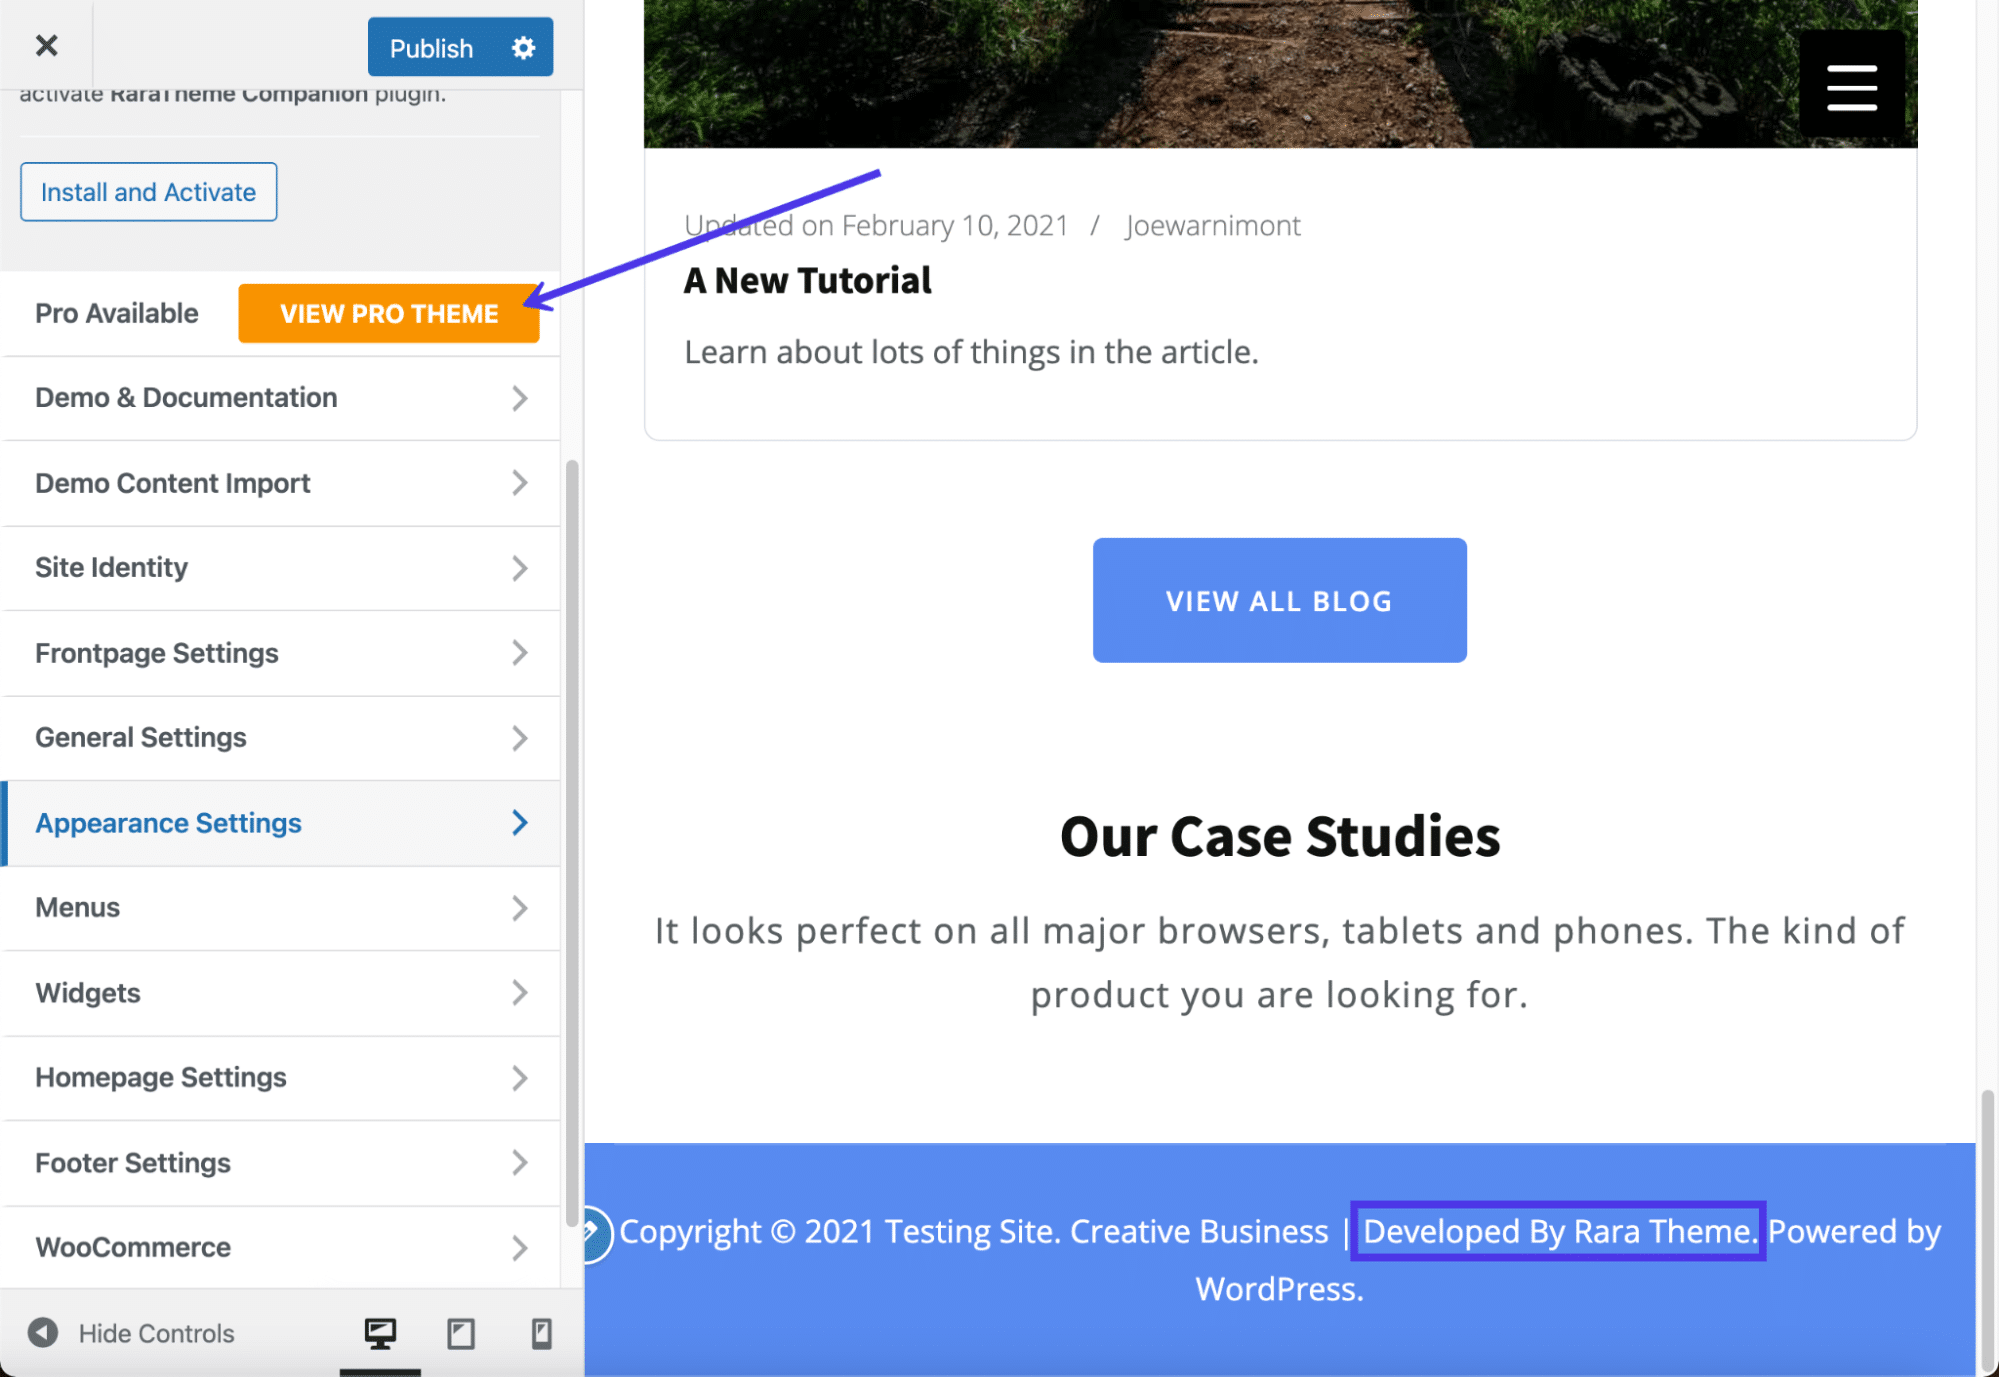
You also may notice that WordPress.com automatically adds your site title and a WordPress credit at the very bottom of your footer. You can usually get rid of the site title if you want, but the WordPress credit removal requires you to pay for the Business Plan.
To modify both of these elements, click on the Site Identity button.
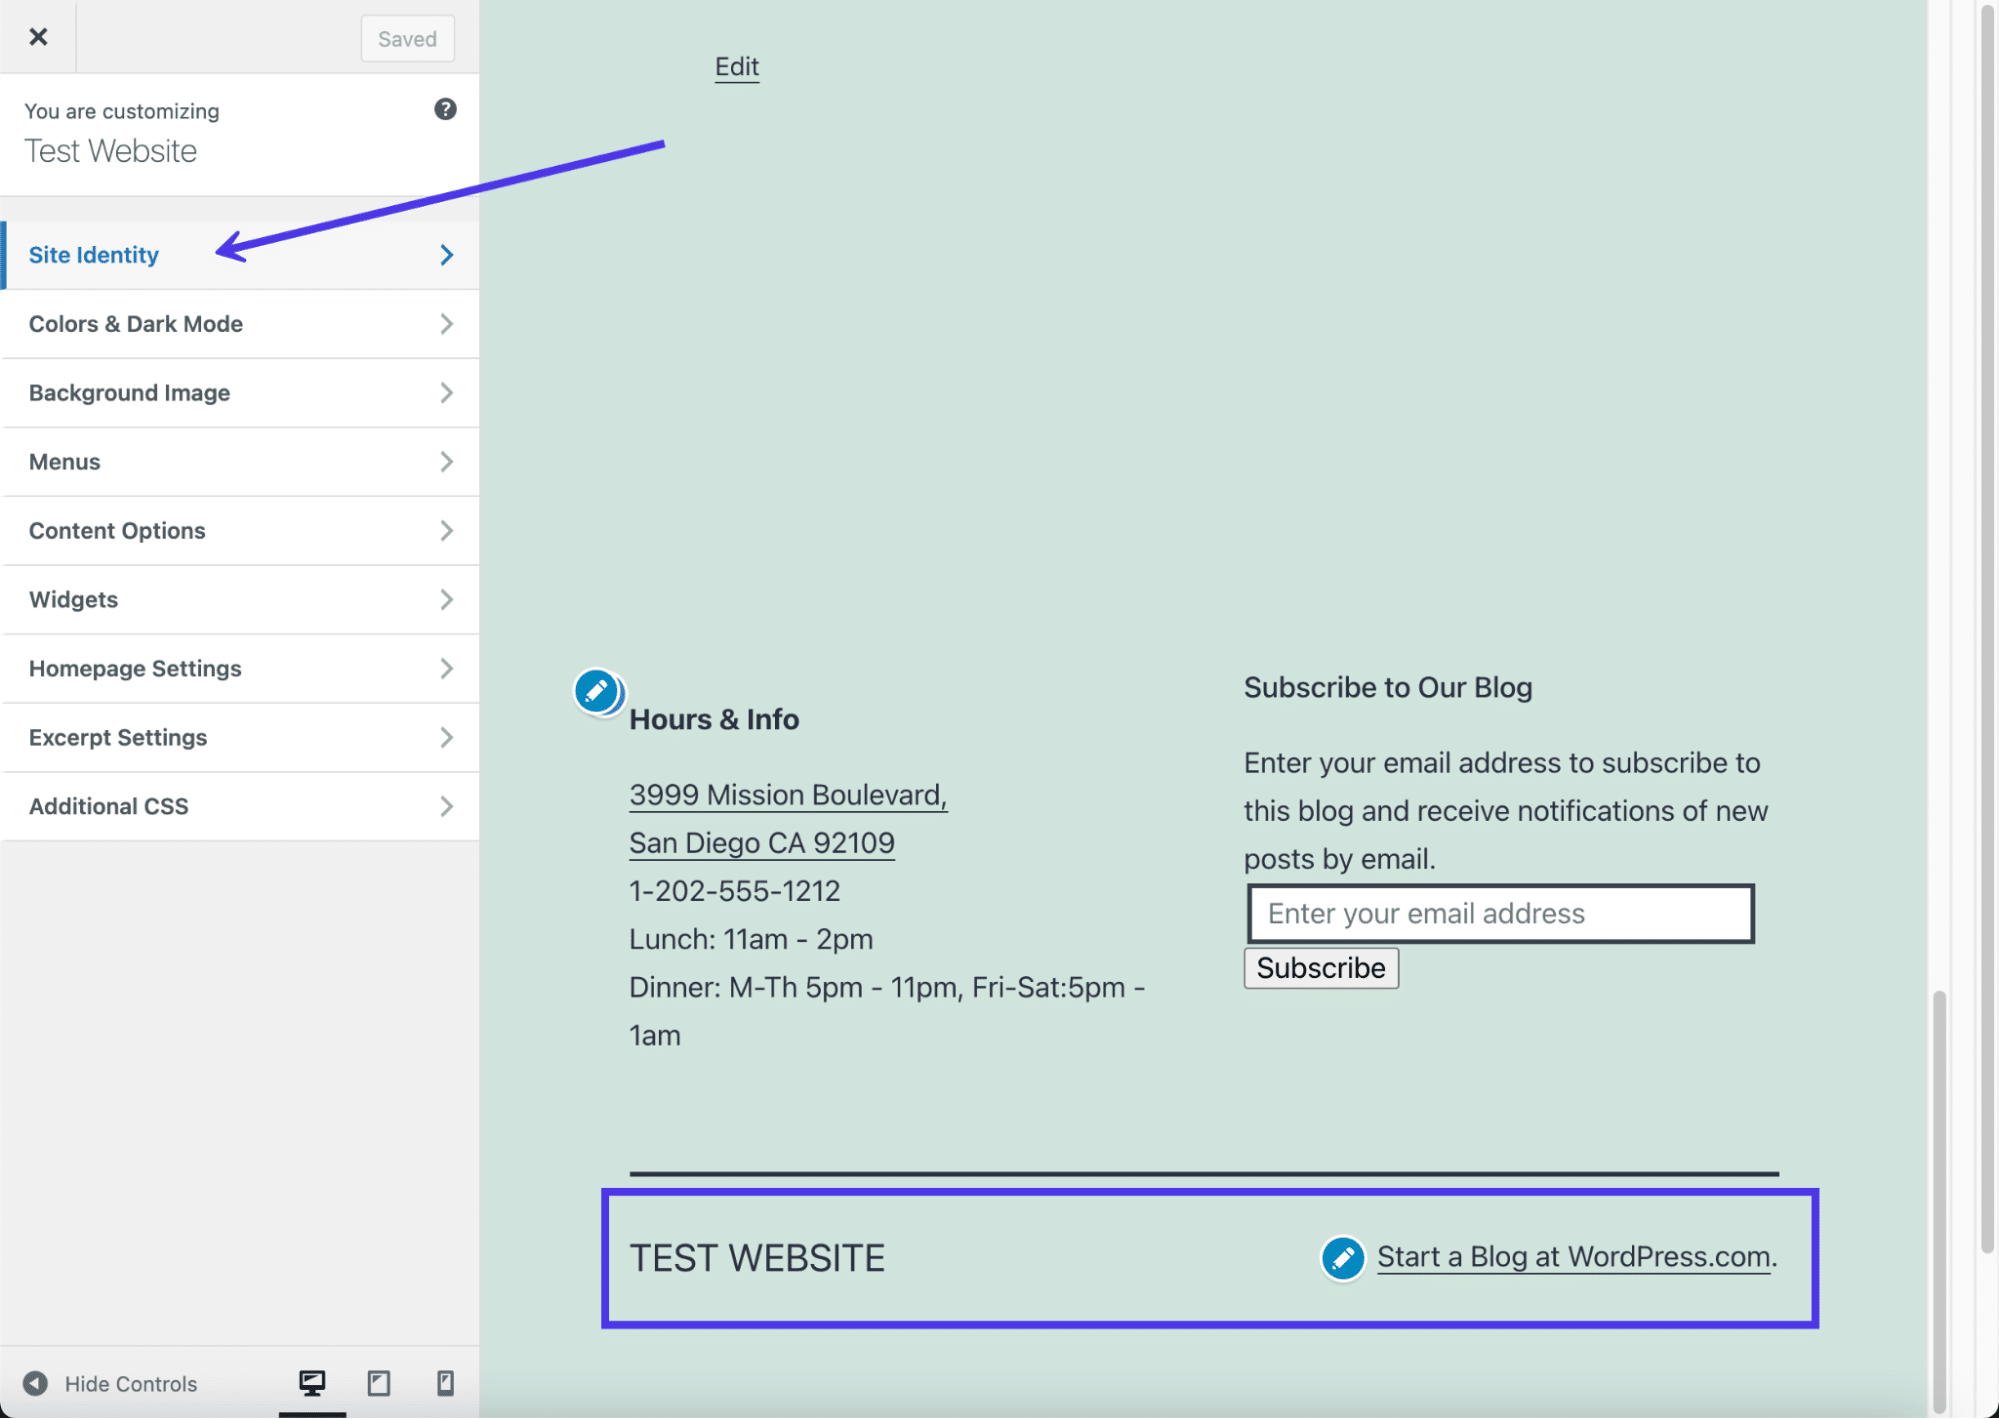
First off, go to the bottom of the settings to find the Footer Credit field. Click that dropdown to reveal all possible options.
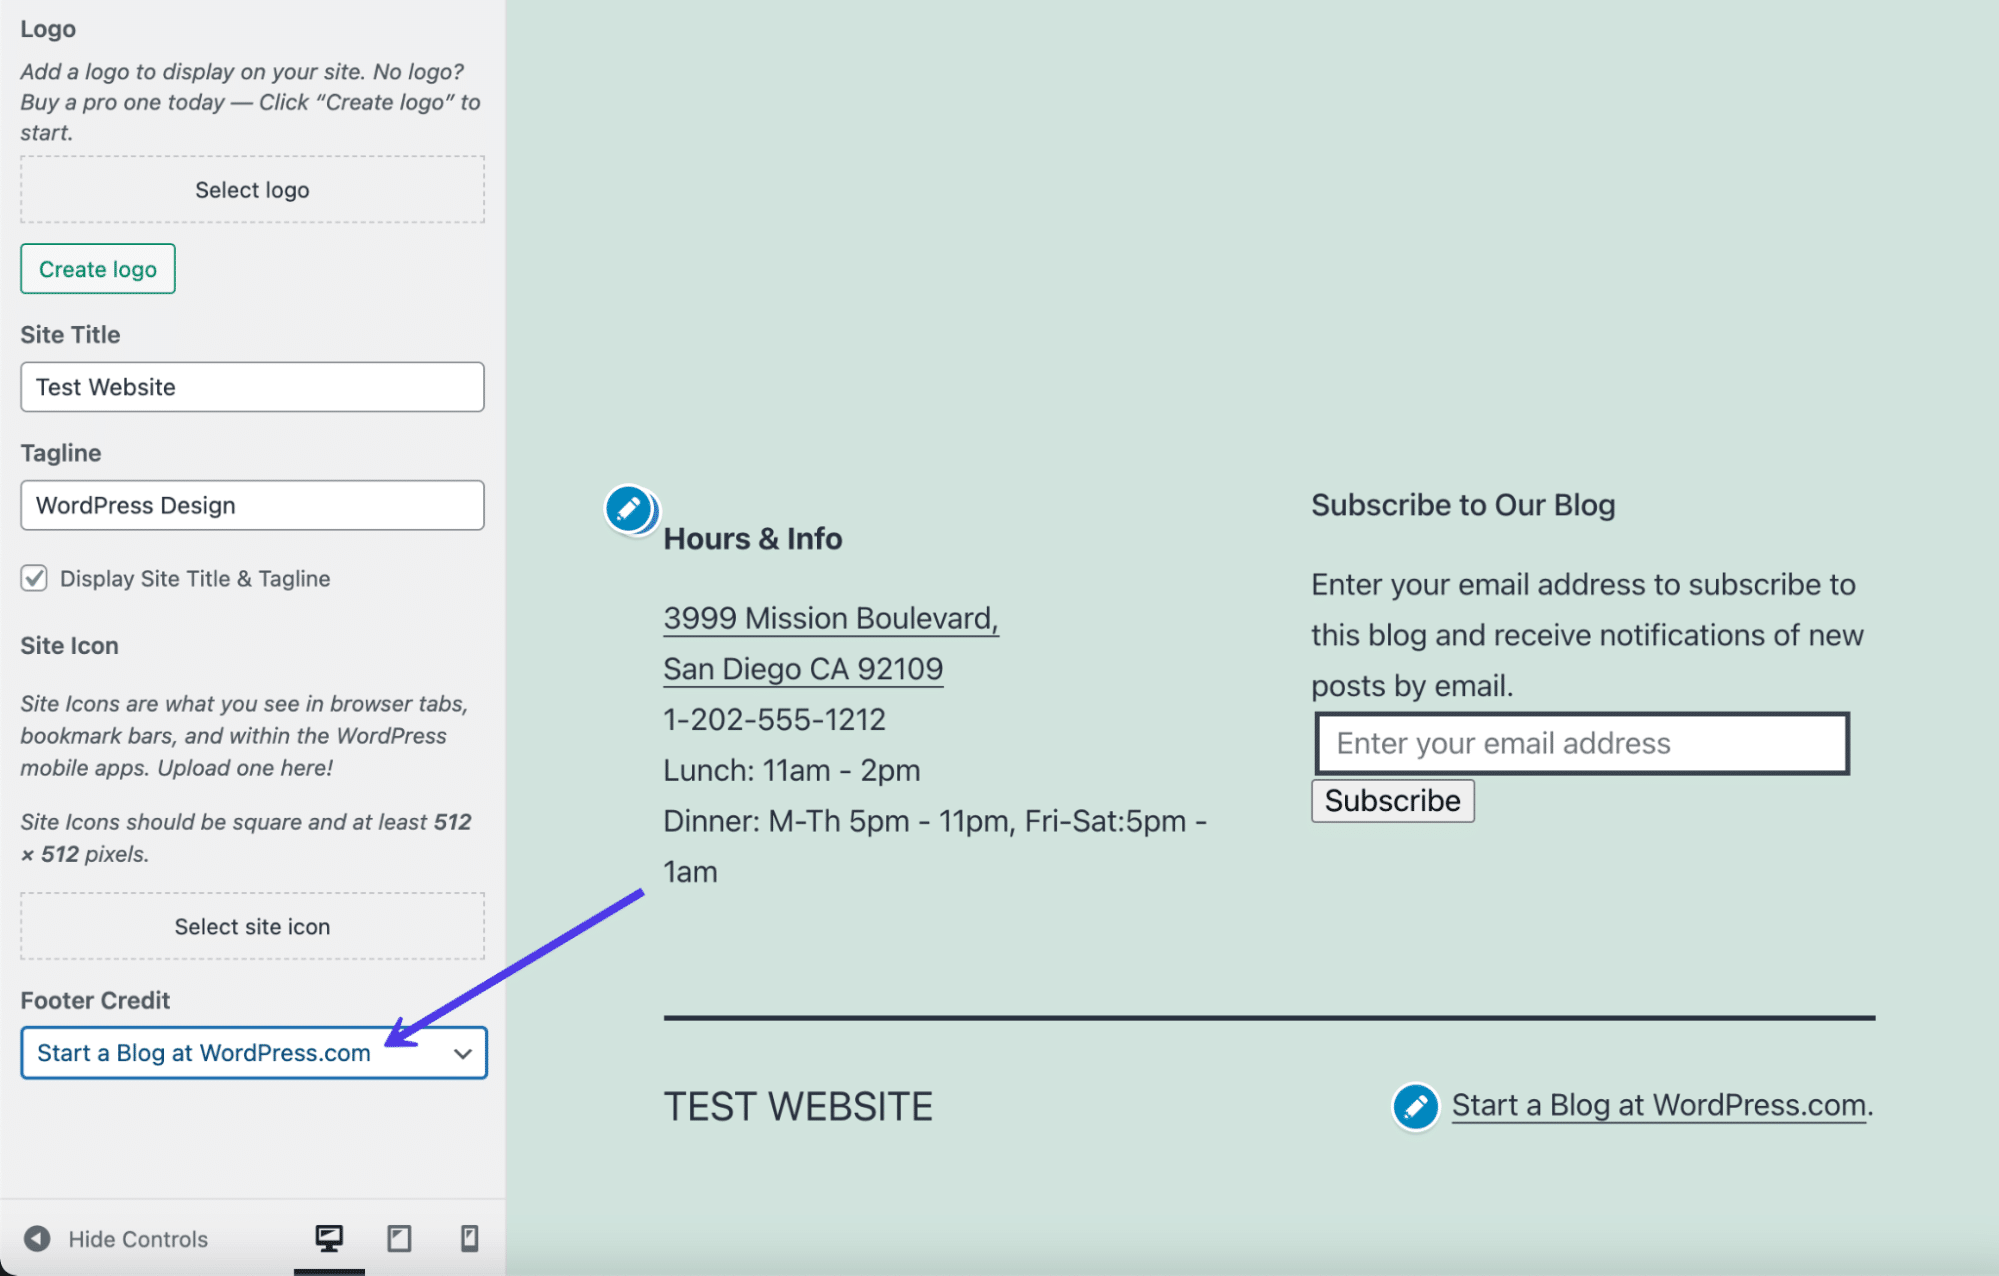
Every one of the credits has some sort of reference to WordPress. A WordPress credit isn’t a big deal if you’re running a personal blog or online journal, but we suggest you upgrade to the Business Plan and remove the credit if your site is for a legitimate business.
After that, you can click on the dropdown menu and choose the Hide option to get rid of the credit completely.

The credit then disappears in the preview, leaving whatever widgets you added to the footer along with the site title.
Some themes have the ability to remove the site title from the footer as well. The easiest way is to uncheck the Display Site Title and Tagline box. That gets rid of the site title in the footer and potentially the header. For the header, we recommend uploading a logo anyway.
Other themes have different ways of removing the site title and tagline. Sometimes it’s not possible at all, while other times the site title isn’t included in the footer, to begin with. When in doubt, try deleting what’s inside the Site Title field if you don’t have the Display Site Title and Tagline check box.
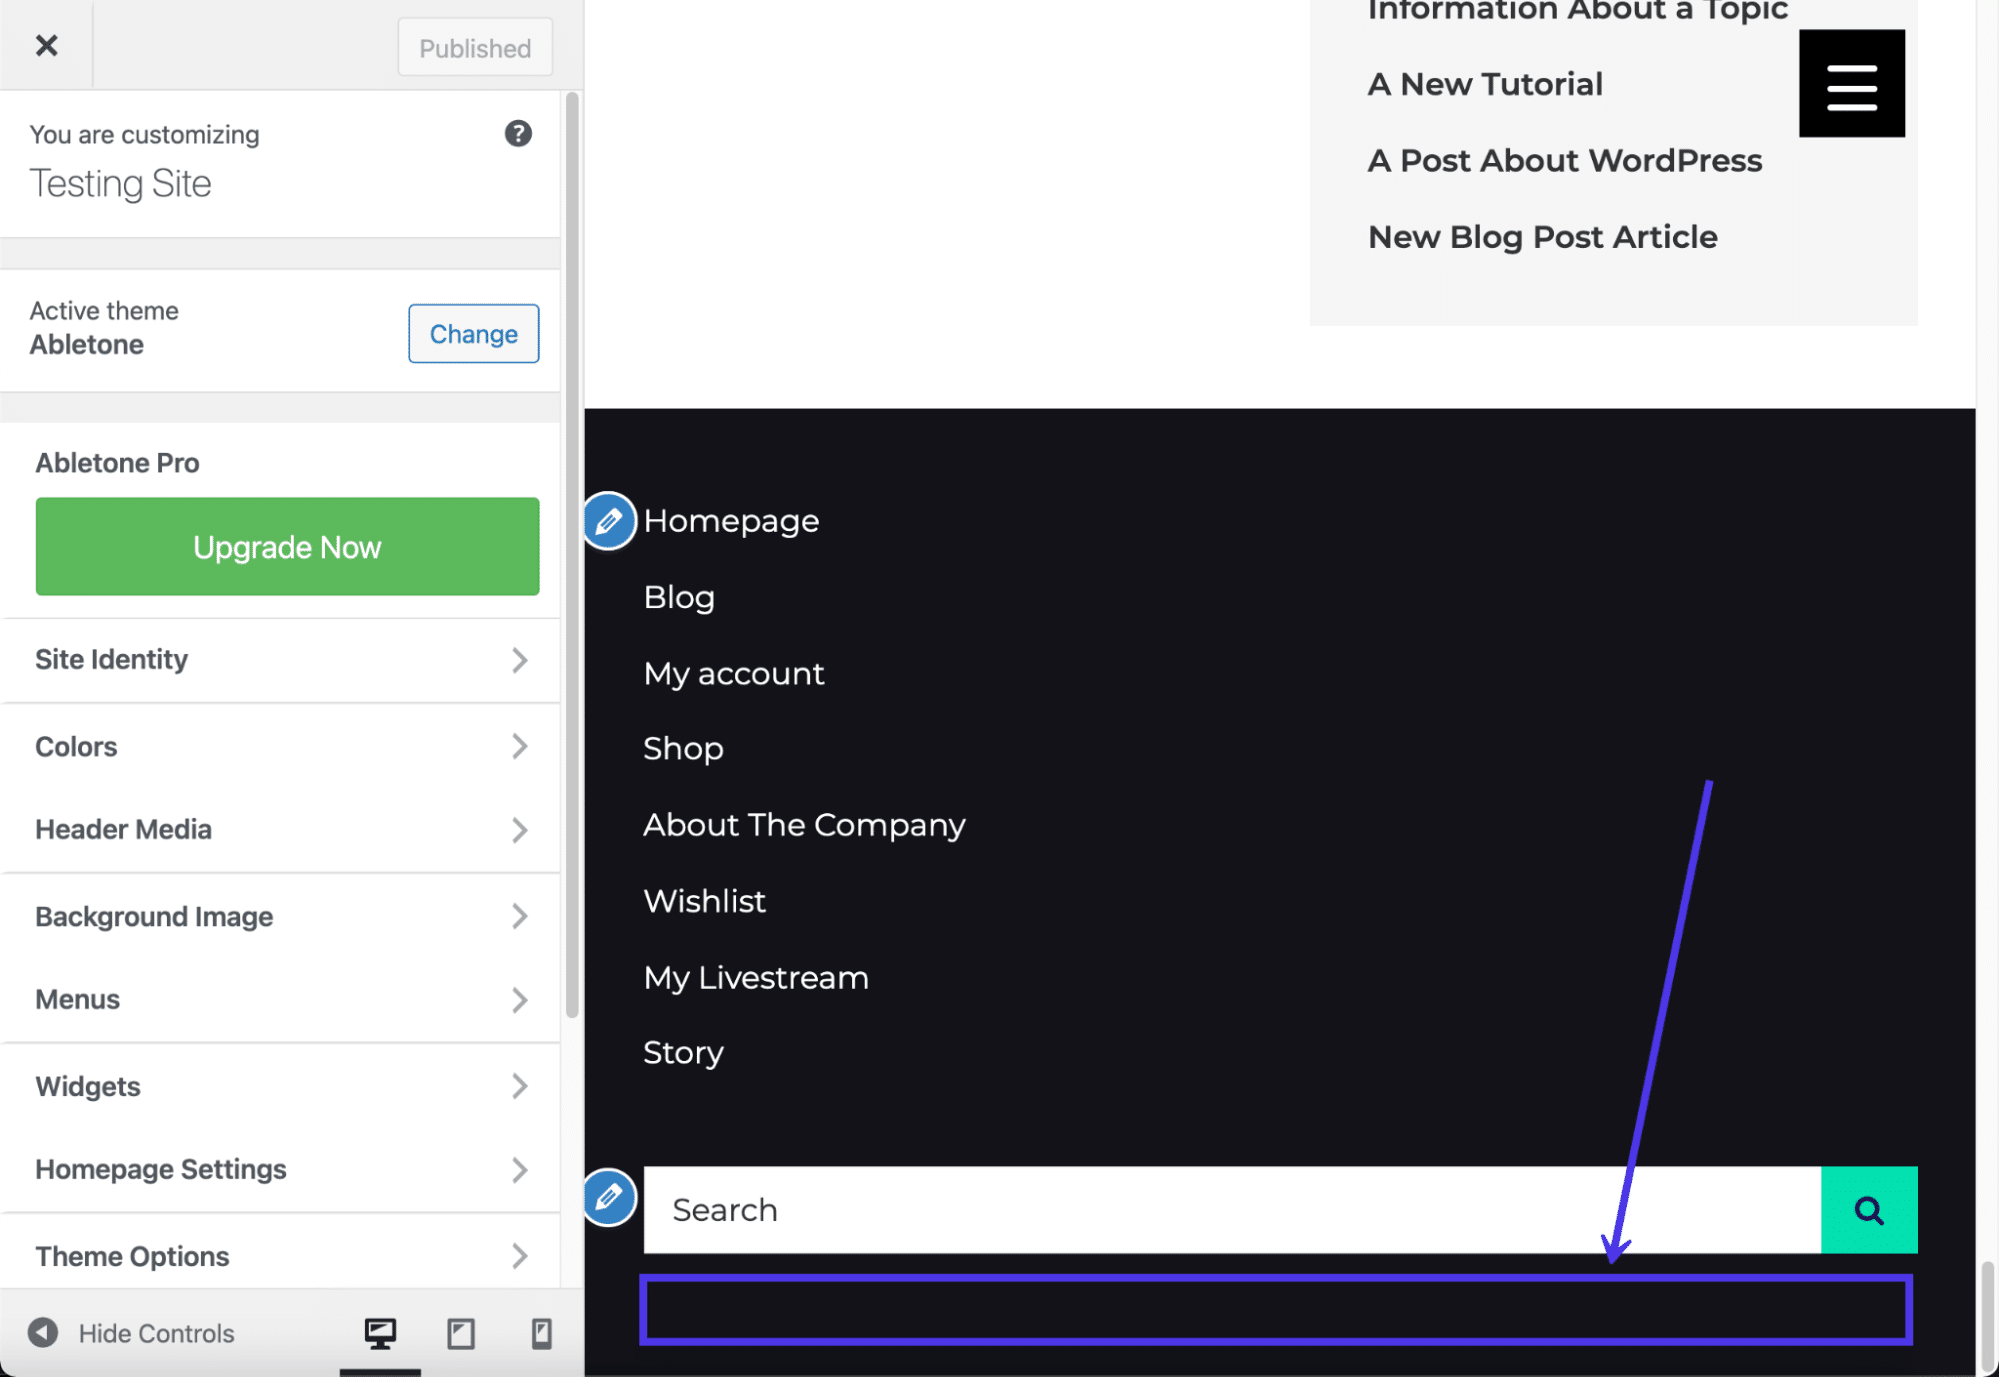
Another way to insert content in your WordPress footer is by utilizing the Menus panel. Not all themes allow for menus in the footer, but it’s a good idea to at least check.
Click on the Menus tab to continue.
Select View All Locations. This brings up a list of where you’re allowed to place menus in this particular theme.
For our example theme, we have quite a few menu location options, one of which is for the footer. You won’t be so lucky with every theme you encounter, so be prepared to either swap them out or consider using the widget technique for editing your footer instead.
With themes that support footer menus, click on the Footer dropdown field.
We chose a premade Social menu for the footer. Feel free to select the Create New Menu link if you don’t already have a suitable menu.
The result is a simple text/link menu that appears above whatever widgets you already added to the footer. It’s possible you’re unable to add widgets to your theme, so you may not see the exact same format.
Keep in mind that all menus are simply lists of text and links, so you won’t be able to incorporate something like a social media icon menu unless you consider a separate plugin that supports that.

How To Add Social Media Icons to WordPress Footer
A mainstay of the footer area is the classic list of social media buttons. Many websites add them in their primary menus, but it’s also a wonderful idea to have them at the bottom of your website as well, or as an alternative to placing the social buttons at the top of your site. In general, if you feel the header is already cluttered, go for footer placement instead.
Quite a few plugins provide widgets to add social media icons and links to your footer and header. Therefore, we suggest straying away from any custom coding here.
Although many social icon plugins exist, the goal for our purposes is to find one that specifically provides a quick widget for adding your links and customizing the buttons.
A popular, highly-rated solution is called Social Icons Widget & Block by WPZoom. It has over 400 icons for social media and other platforms, along with a widget to place your icons directly into your footer. Not only that, but you can upload your own custom icons and switch settings for colors and sizes.
![]()
After installing the plugin, you can go to the Settings page and disable certain font packages if you don’t want them. However, all of them are already active, so skip the settings if you’d rather have everything available to you.
To add social icons to your WordPress footer, go to Appearance > Customize.
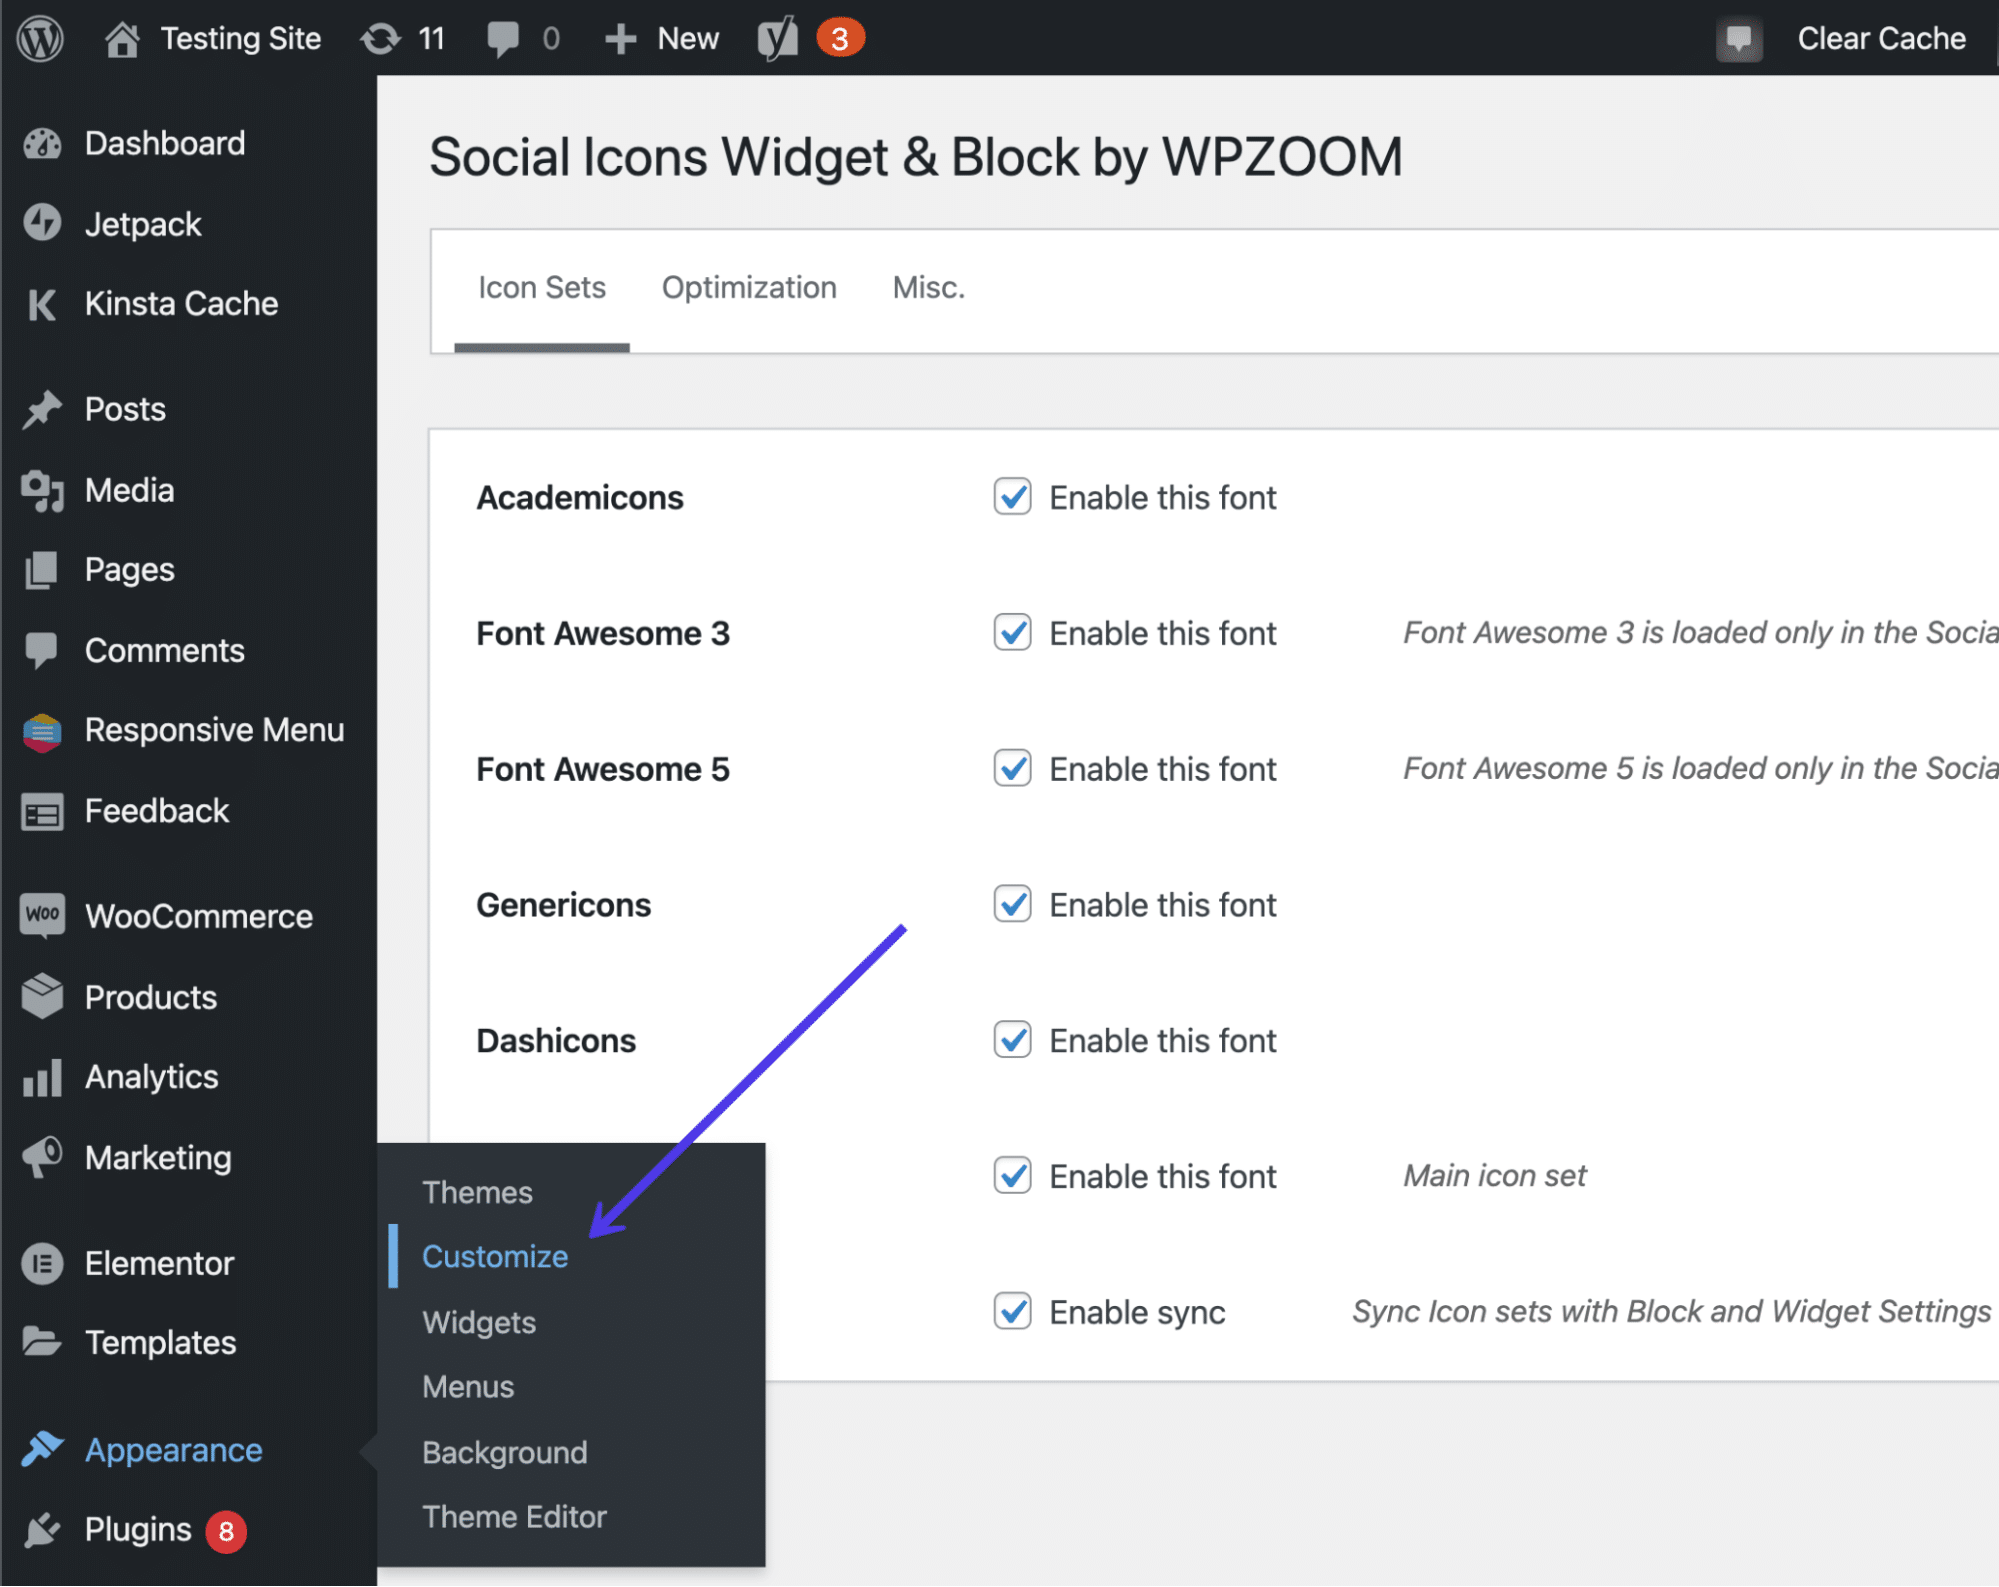
This brings you into the WordPress Theme Customizer, where you’re able to add widgets to the footer (as long as your theme supports widgets in the footer). As we’ve mentioned earlier in the article, the only way to get around a theme that doesn’t have a footer widget is to find a new theme or custom code the footer yourself.
Find and click on the Widgets tab to proceed.
This theme has two areas to add widgets to the footer. That’s not the case with all themes, so you may find that your theme has no footer widgets areas. On the other hand, you might get lucky and have four or five spots to place widgets in your footer. It all depends on the theme you install.
Click on one of the Footer tabs.

It’s possible to add a myriad of widgets — or at least whichever widgets you have installed — to the footer.
Click on the Add A Widget button to show the menu of widgets available to you.
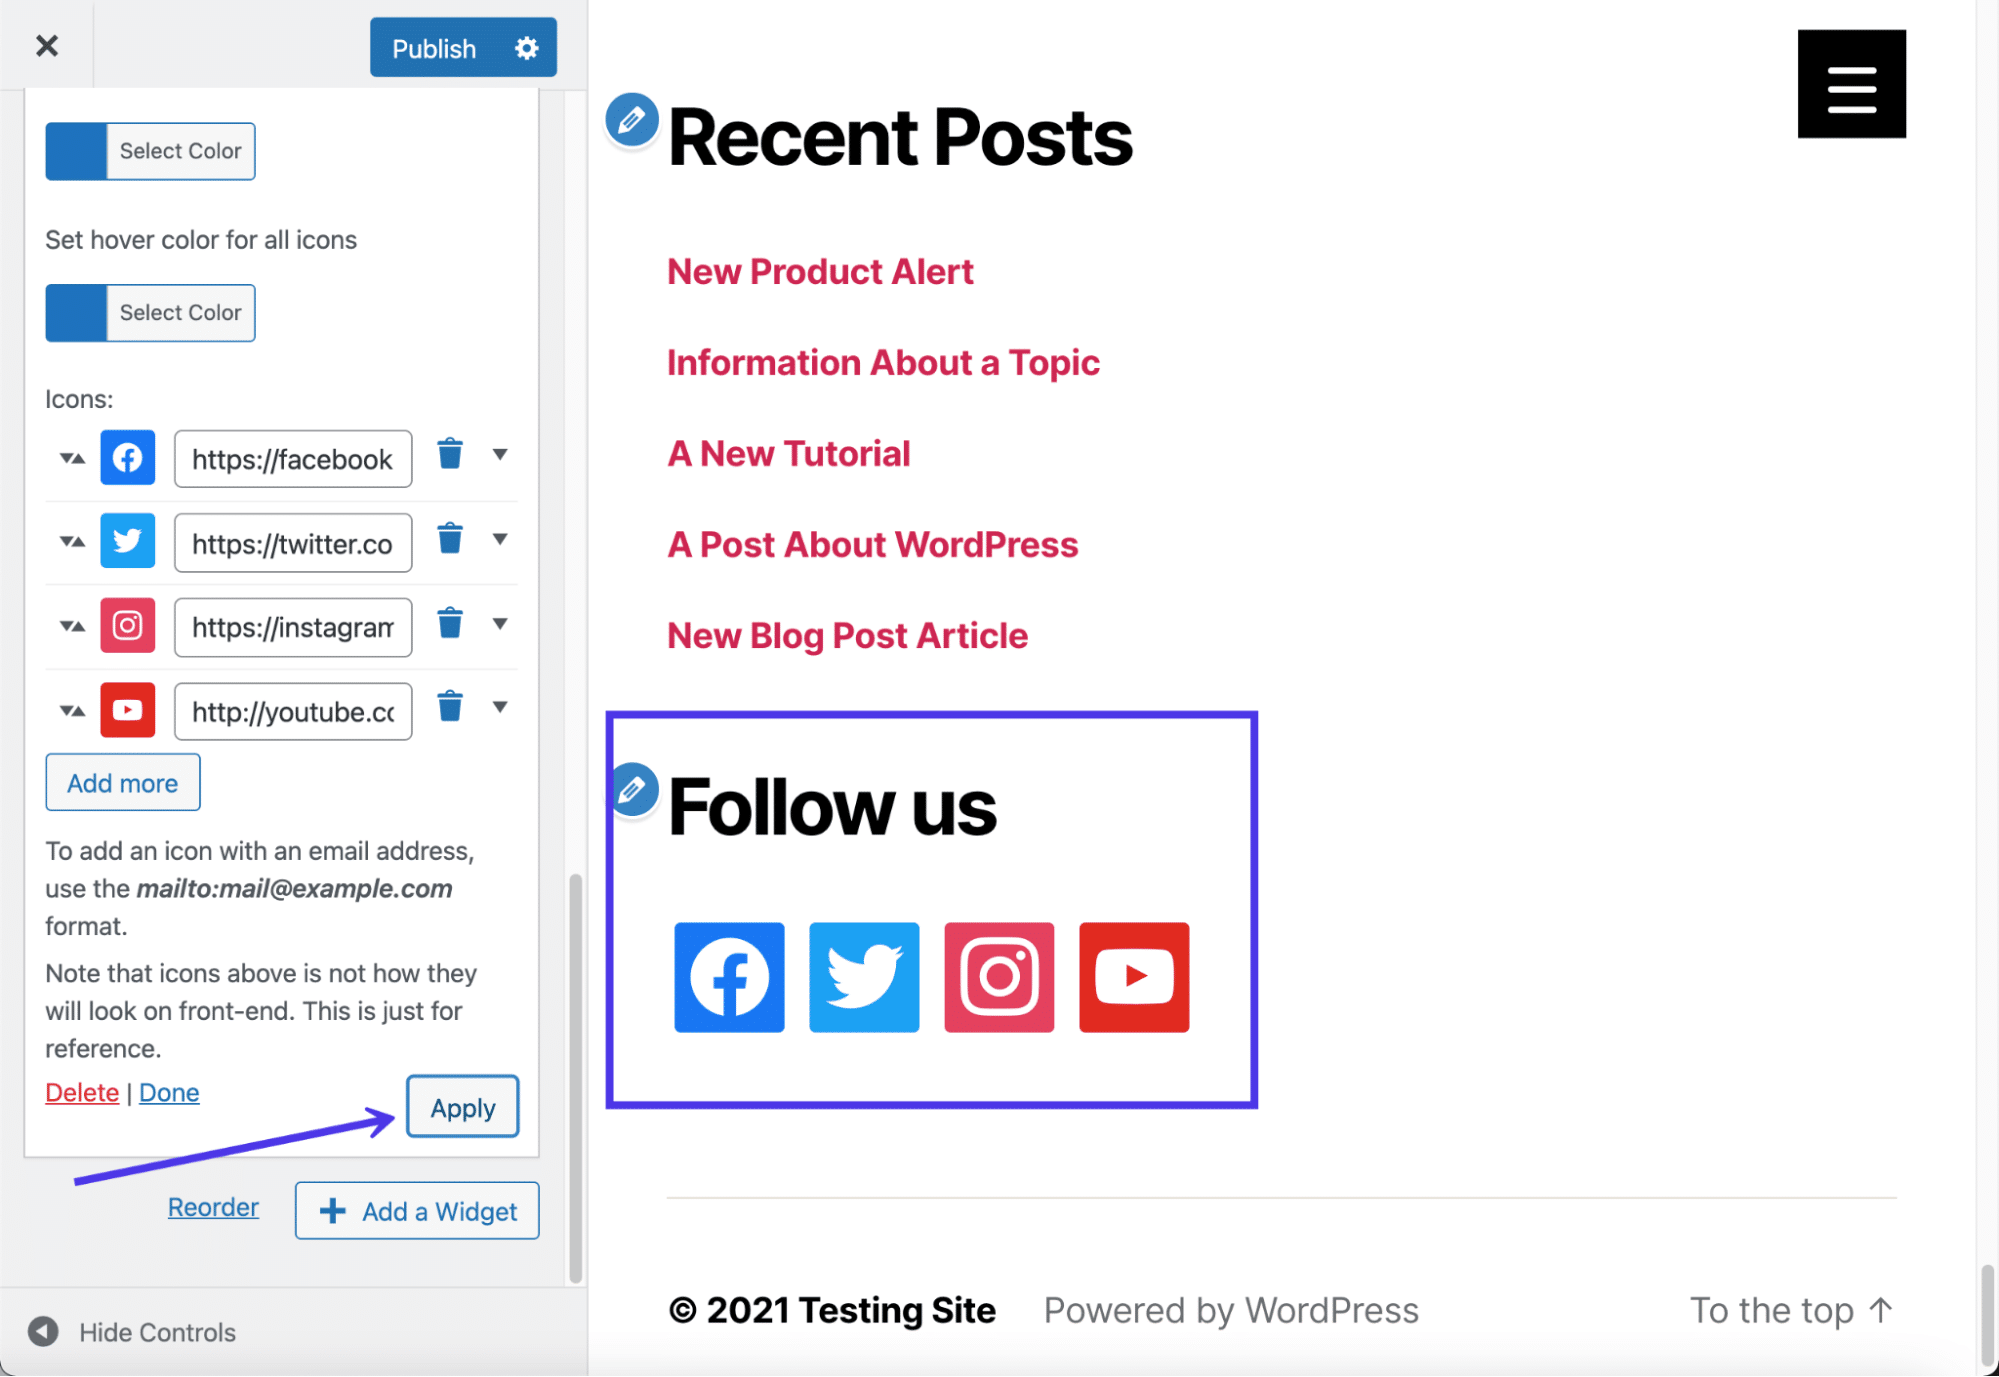
The slide-out menu provides a search bar and a list of possible widgets. Scroll down to locate the widget called Social Icons By WPZOOM.
![]()
You should now see the default social media icons and buttons in the preview for your website.
However, you’ll still need to customize the settings for these buttons to settle on the size of those buttons, coloring, and which links you want them to lead to.
Start by typing in a title for the widget, which appears in the footer (you can also leave this blank if you’d like). Continue by specifying settings like whether you want icon labels, nofollow links, and specific icon alignments.
![]()
Continue on with the settings to specify the icon style, background style, and padding. You can also choose an icon size and color. Keep in mind that you need to click on the Save button at the bottom of the widget customization module in order to see the results of your changes in the preview.
![]()
The Icons field already has some default social icons in there for you. Make a list of the social media sites you run for your company, and copy and paste the links into the respective fields. Remove any icons that don’t make sense for your business.
To open up the icon library and add more icons, click on the Add More button at the bottom of the field list.
![]()
The plugin offers a large collection of icons, with options to set icon colors, hover colors, and the icon kit source. The primary kit is called Socicons, but several other kits come with the plugin for free. Click on the Select Icon Kit dropdown to see your options.
Finally, browse through the icons provided with each kit. Many of them you may not even recognize, so only stick to the ones that you actively run and which will provide value to your customers.
In our example, we’ll choose the YouTube icon to add to our footer as well.
Click on the Save button to place it into the list, then click the next Save button at the bottom of the widget box to see your changes.
![]()
As you can see, we’ve made changes to the size and shape of the icons, while also adding an extra social icon. If your alterations don’t look quite right, go back into the widget settings to resolve the issues.
Always remember to hit the Publish button in order for the widget to take effect on the front end of your website. We also recommend checking the frontend yourself to ensure the social icons appear the right way.
How To Add a Background to Your WordPress Footer
Footer backgrounds are possible with the help of some footer plugins and page builders. However, you also have the ability to place an image or color background behind your footer by using the basic settings that come with your theme.
Check Out Our Video Guide to Adding a WordPress Footer Background
In case all else fails, we’ll show you how to insert CSS code to add a background to the WordPress footer.
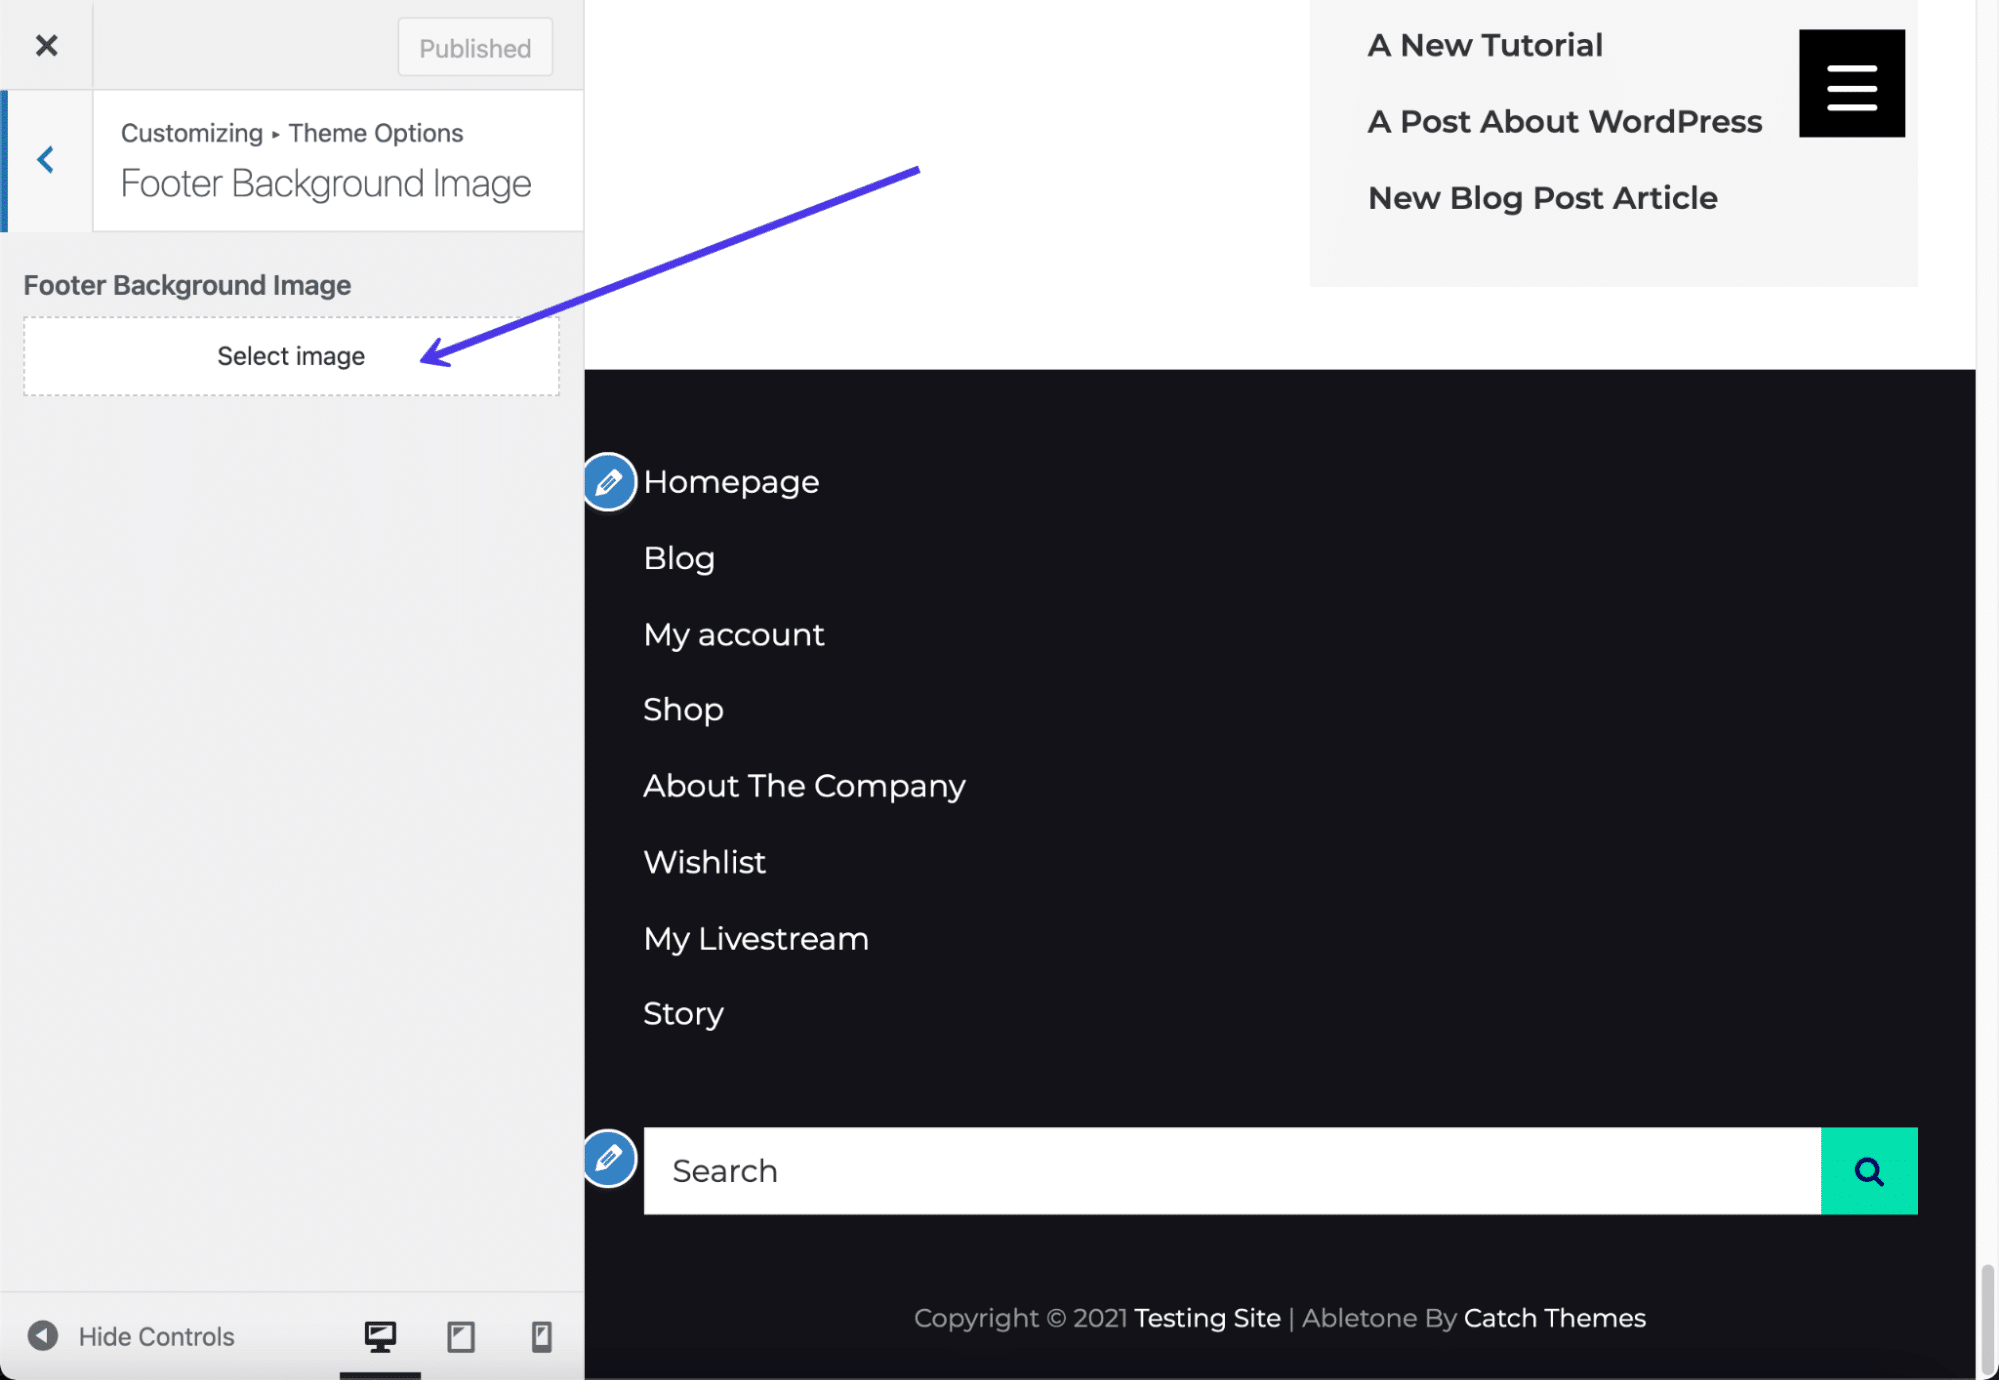
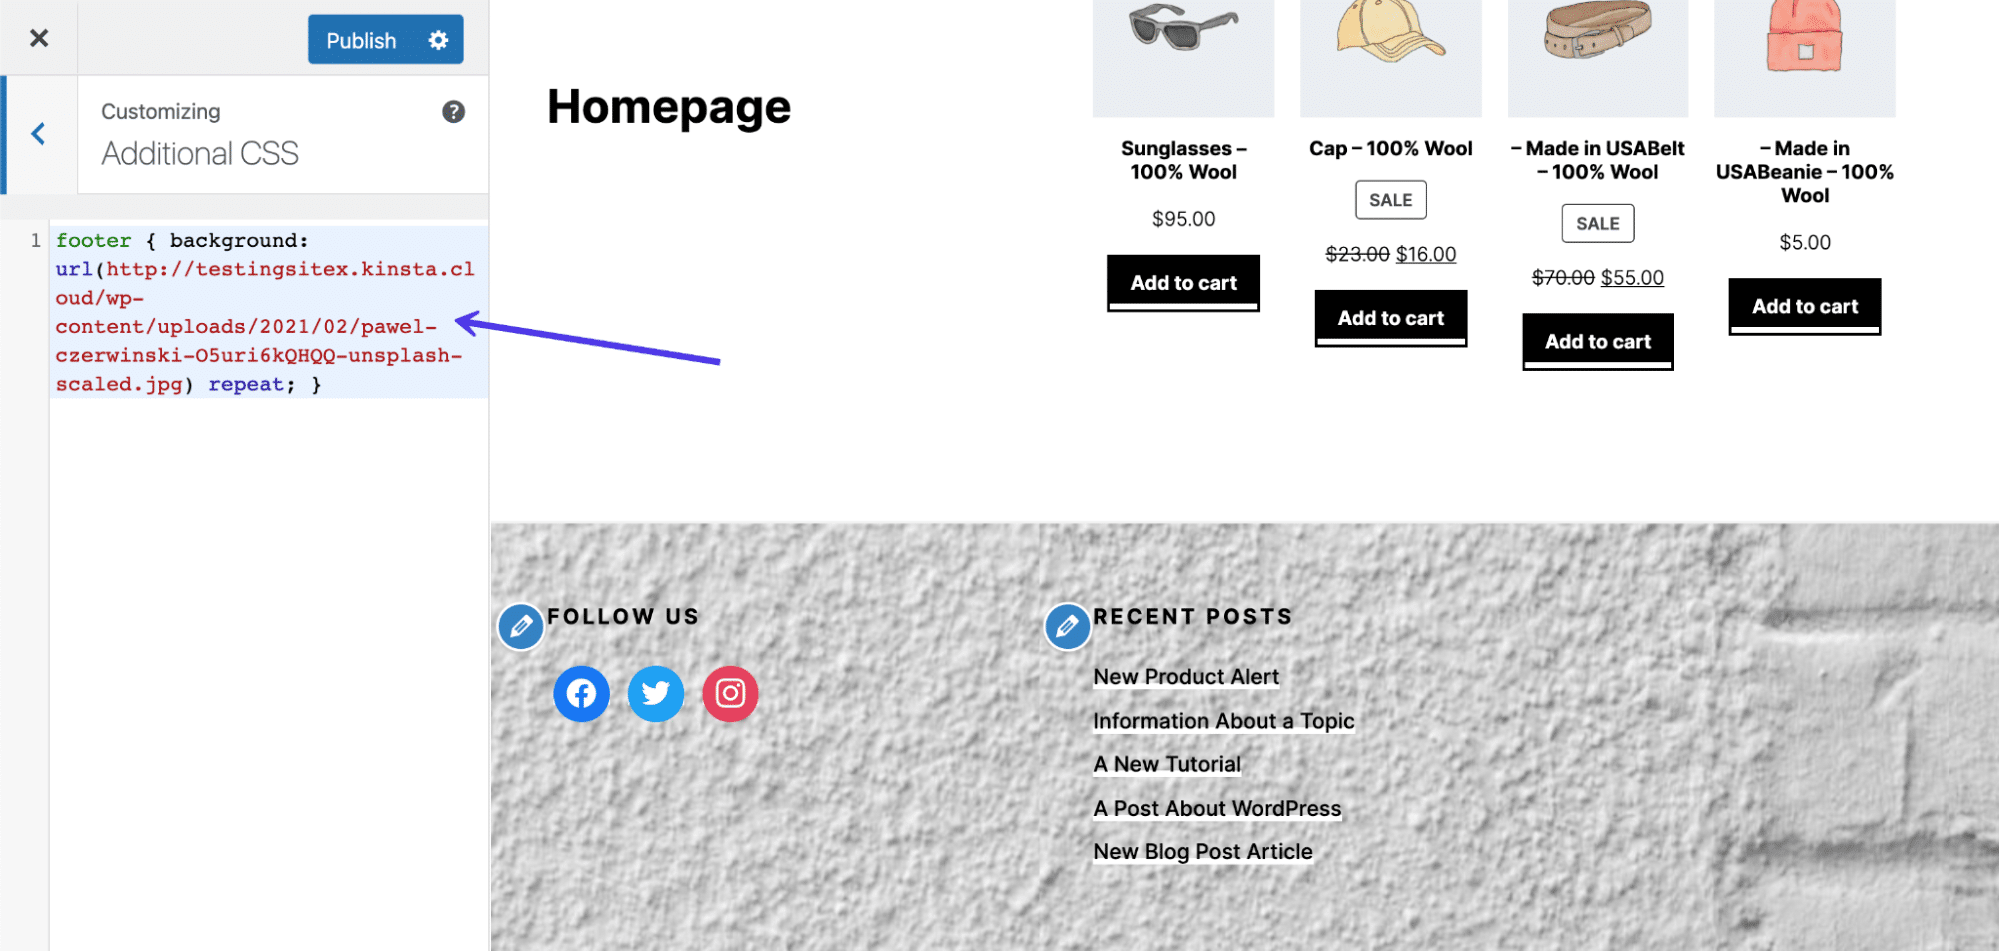
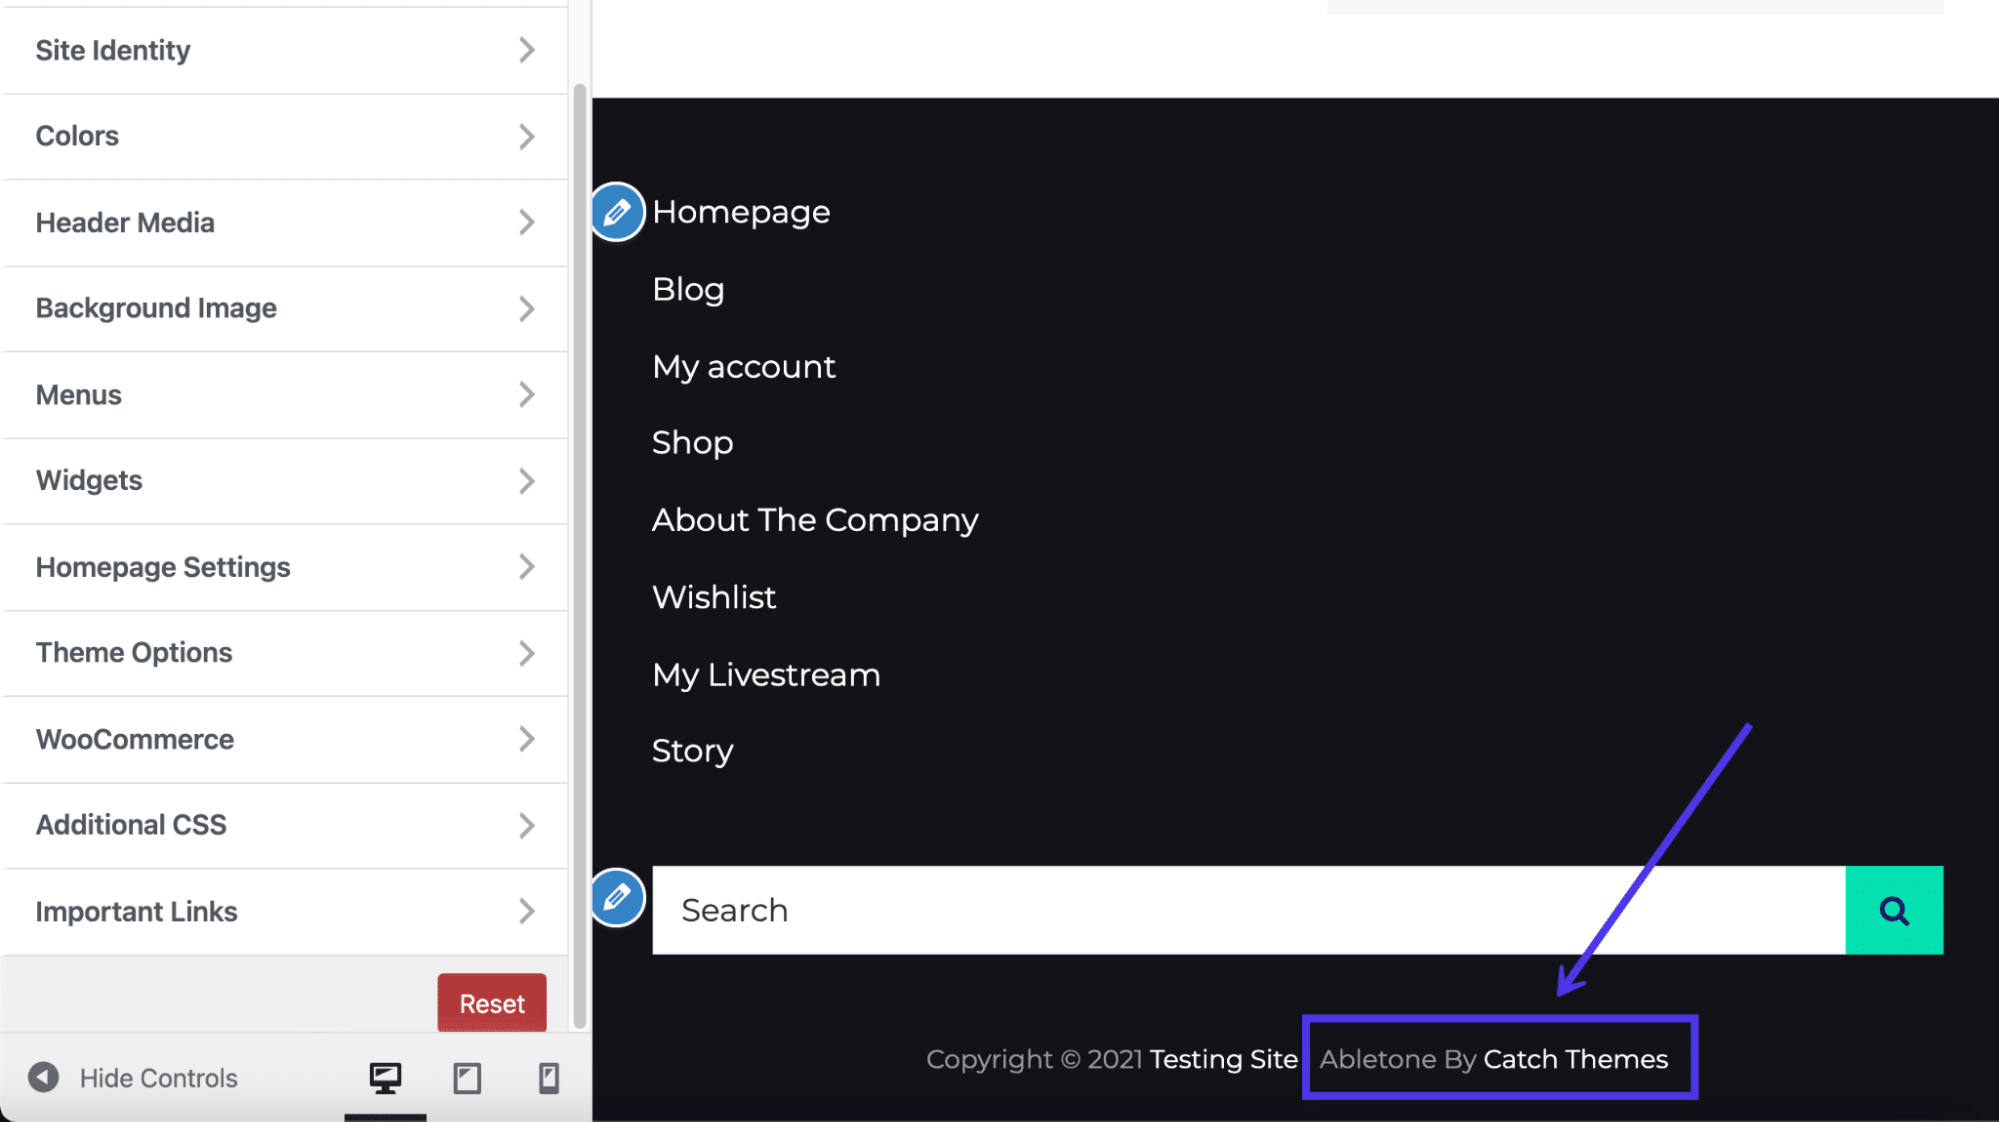
Before anything, check your theme settings to see if footer background capabilities come standard. The Abletone Theme, for instance, offers a Footer Background Image tab inside the Theme Customizer.
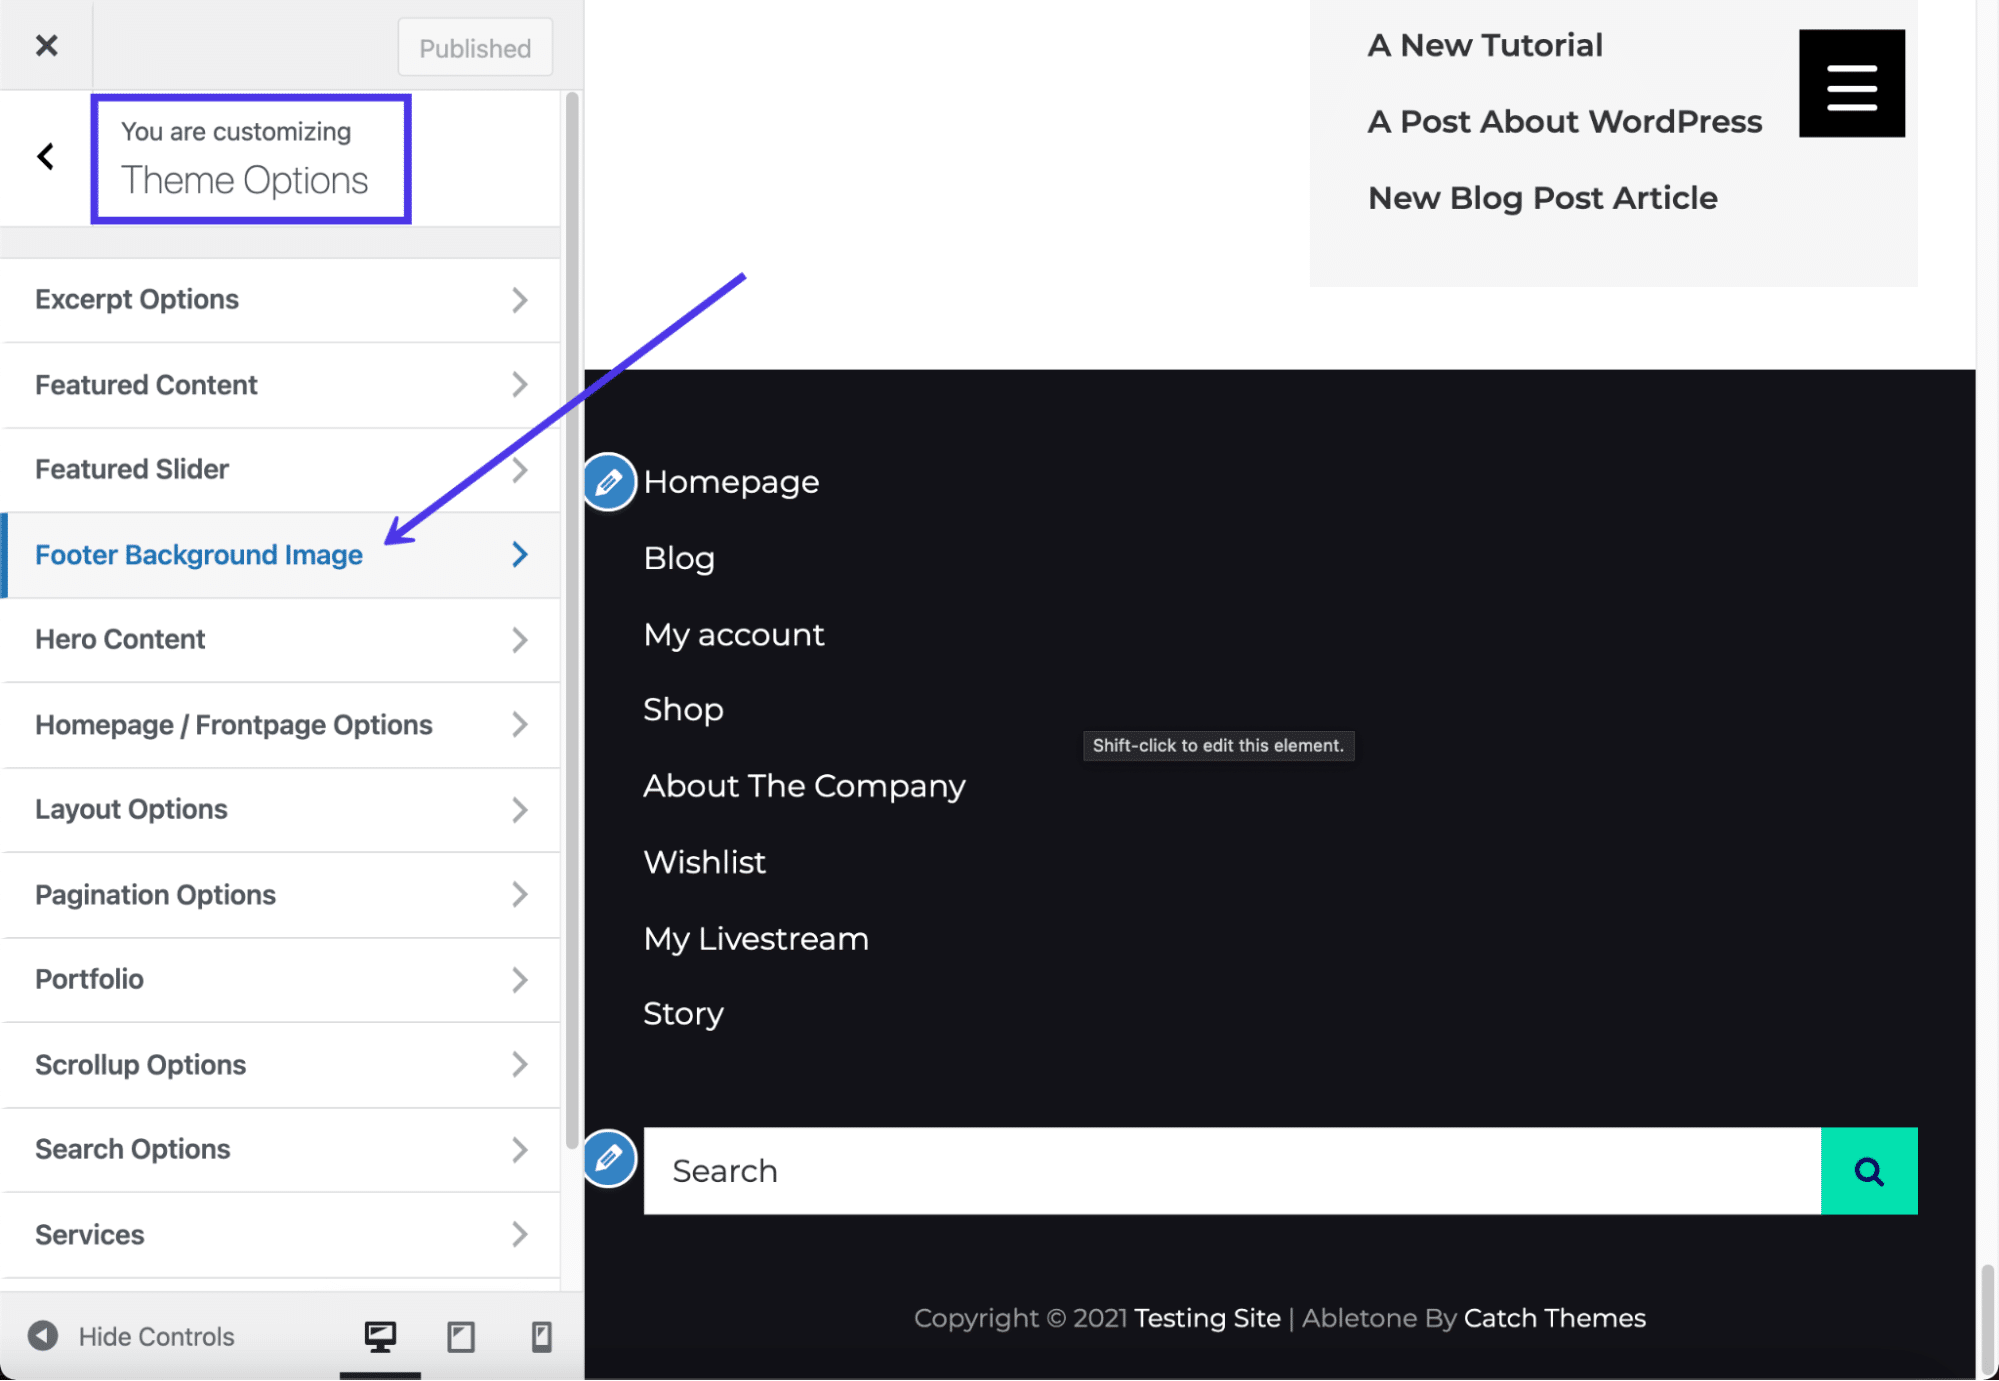
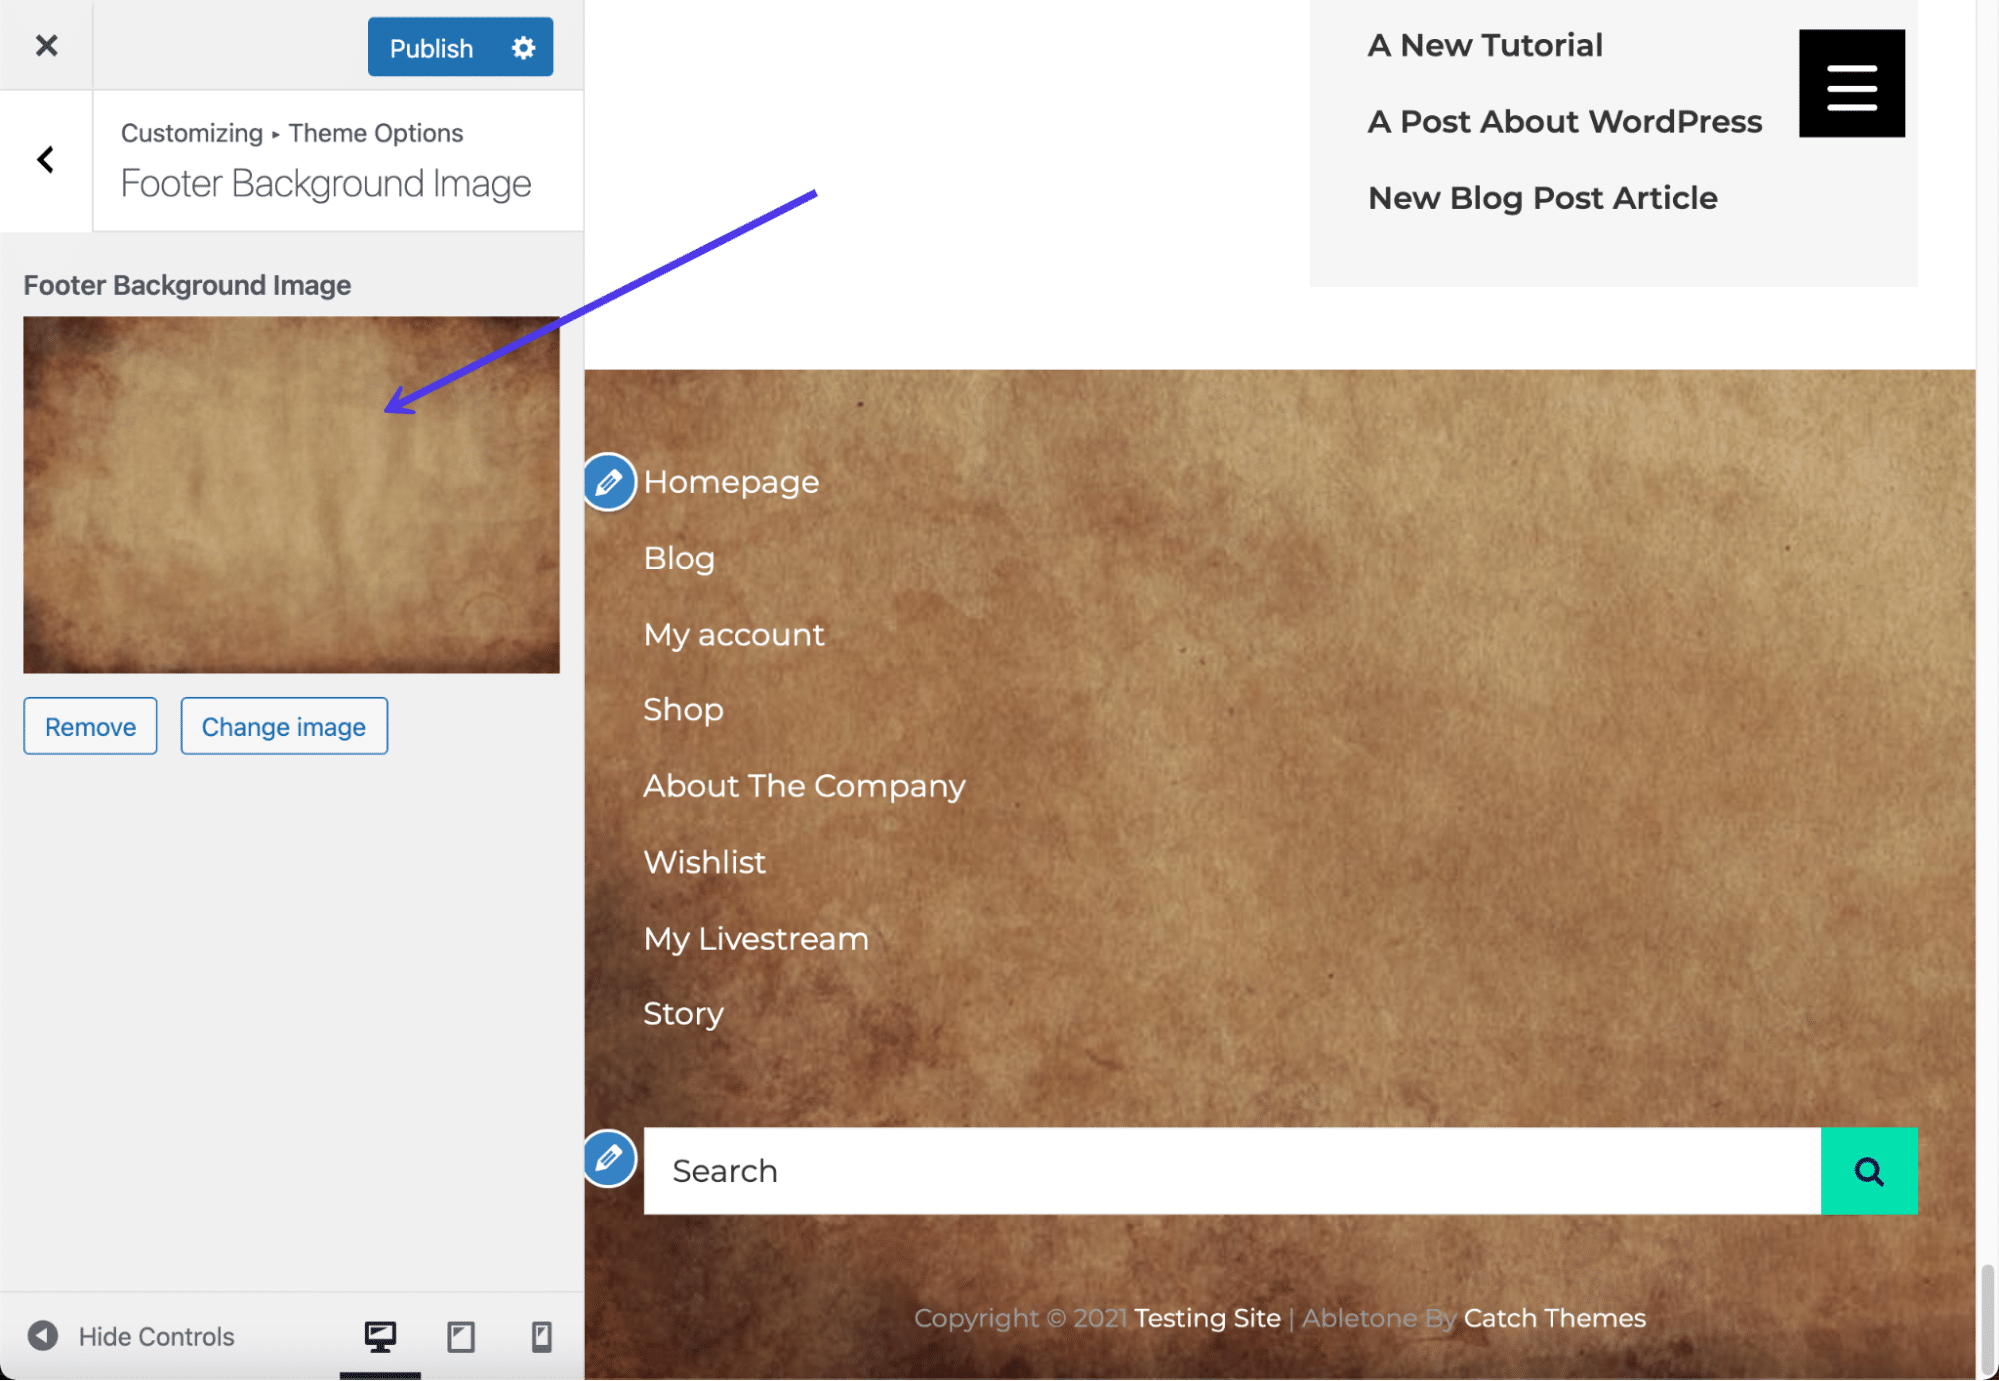
All that’s required is for you to click on the Select Image button and search for an image in your Media Library, upload a new one from your computer, or look for a stock photo that will suit your needs.
Once uploaded, the image appears as the background for your WordPress footer. Some themes offer additional settings for stretching or tiling the image, but without editing the CSS yourself, you’re stuck with whatever settings come with the theme.
If you don’t have a theme, page builder, or plugin that does the trick for adding a footer background, though, adding CSS code handles this task regardless of your theme or page builder.
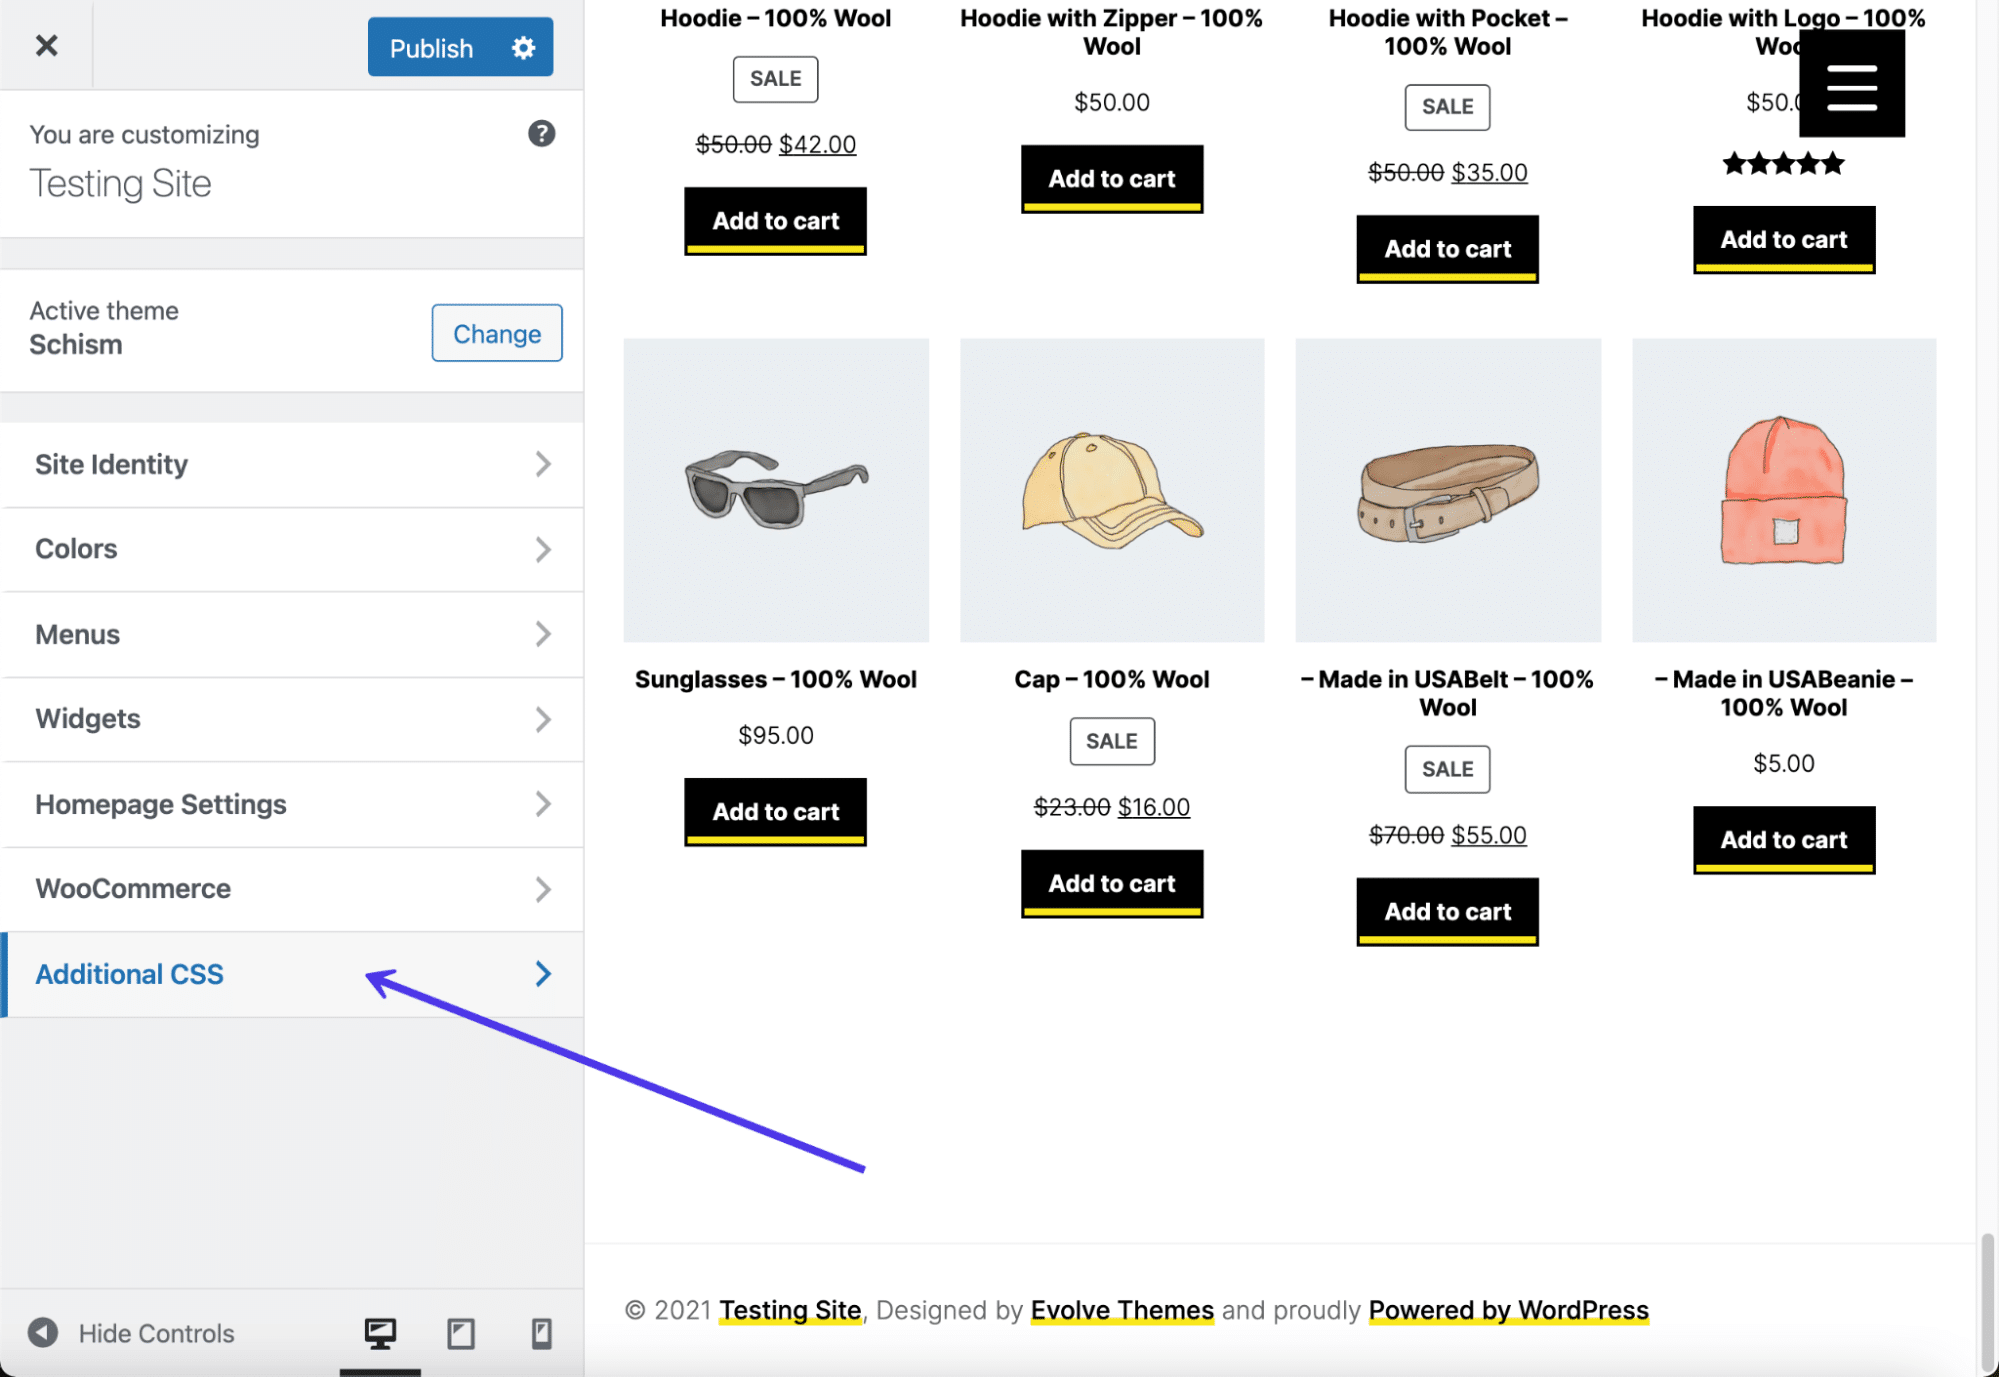
Go to the Theme Customizer in WordPress, then click on the Additional CSS menu item.
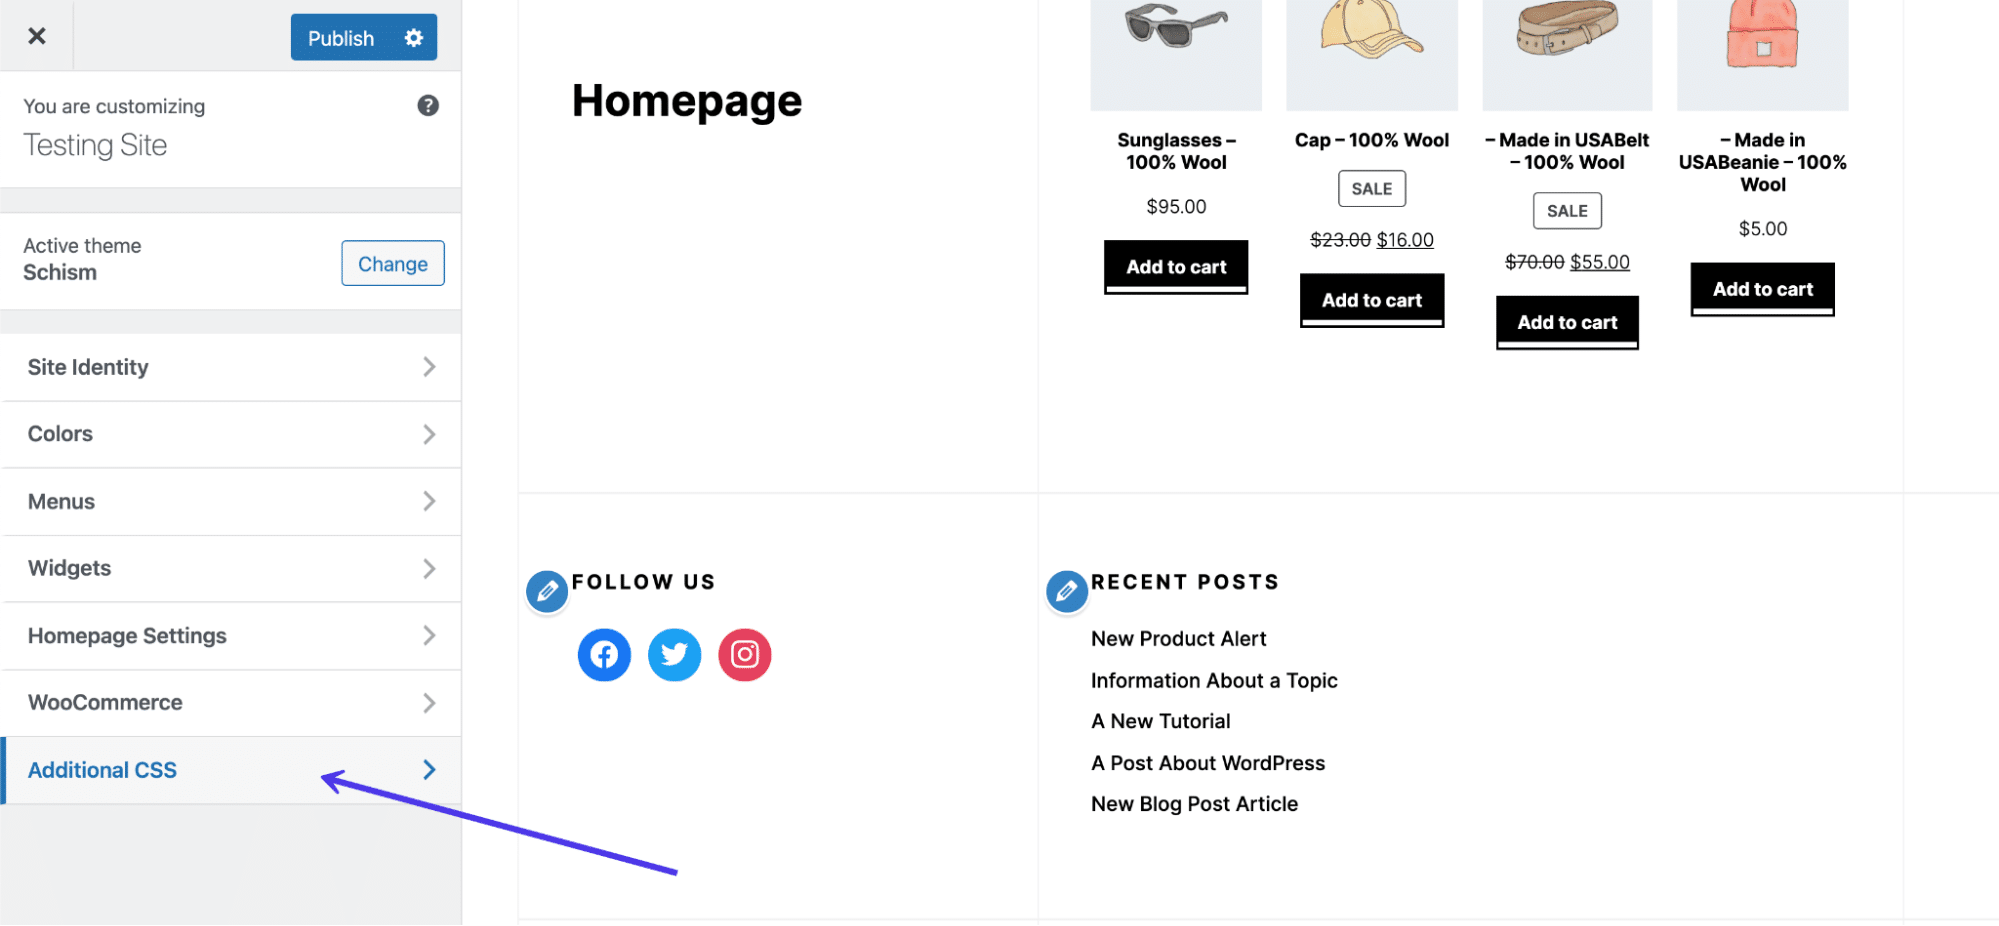
Paste this CSS code into the field, but replace the YOURIMAGEURL with the URL of your desired image:
footer { background: url(YOURIMAGEURL) repeat; }You can find the URL for any image in its details view after it’s been uploaded to your Media Library.
Be sure to click on the Publish button to see it on the front end.
You can also insert other bits of code to change elements like sizing and background stretch size or repetition. As you may imagine, adding the CSS code is a little less simple than clicking on plugin buttons, but a quick search online can help you find the right code for your needs.
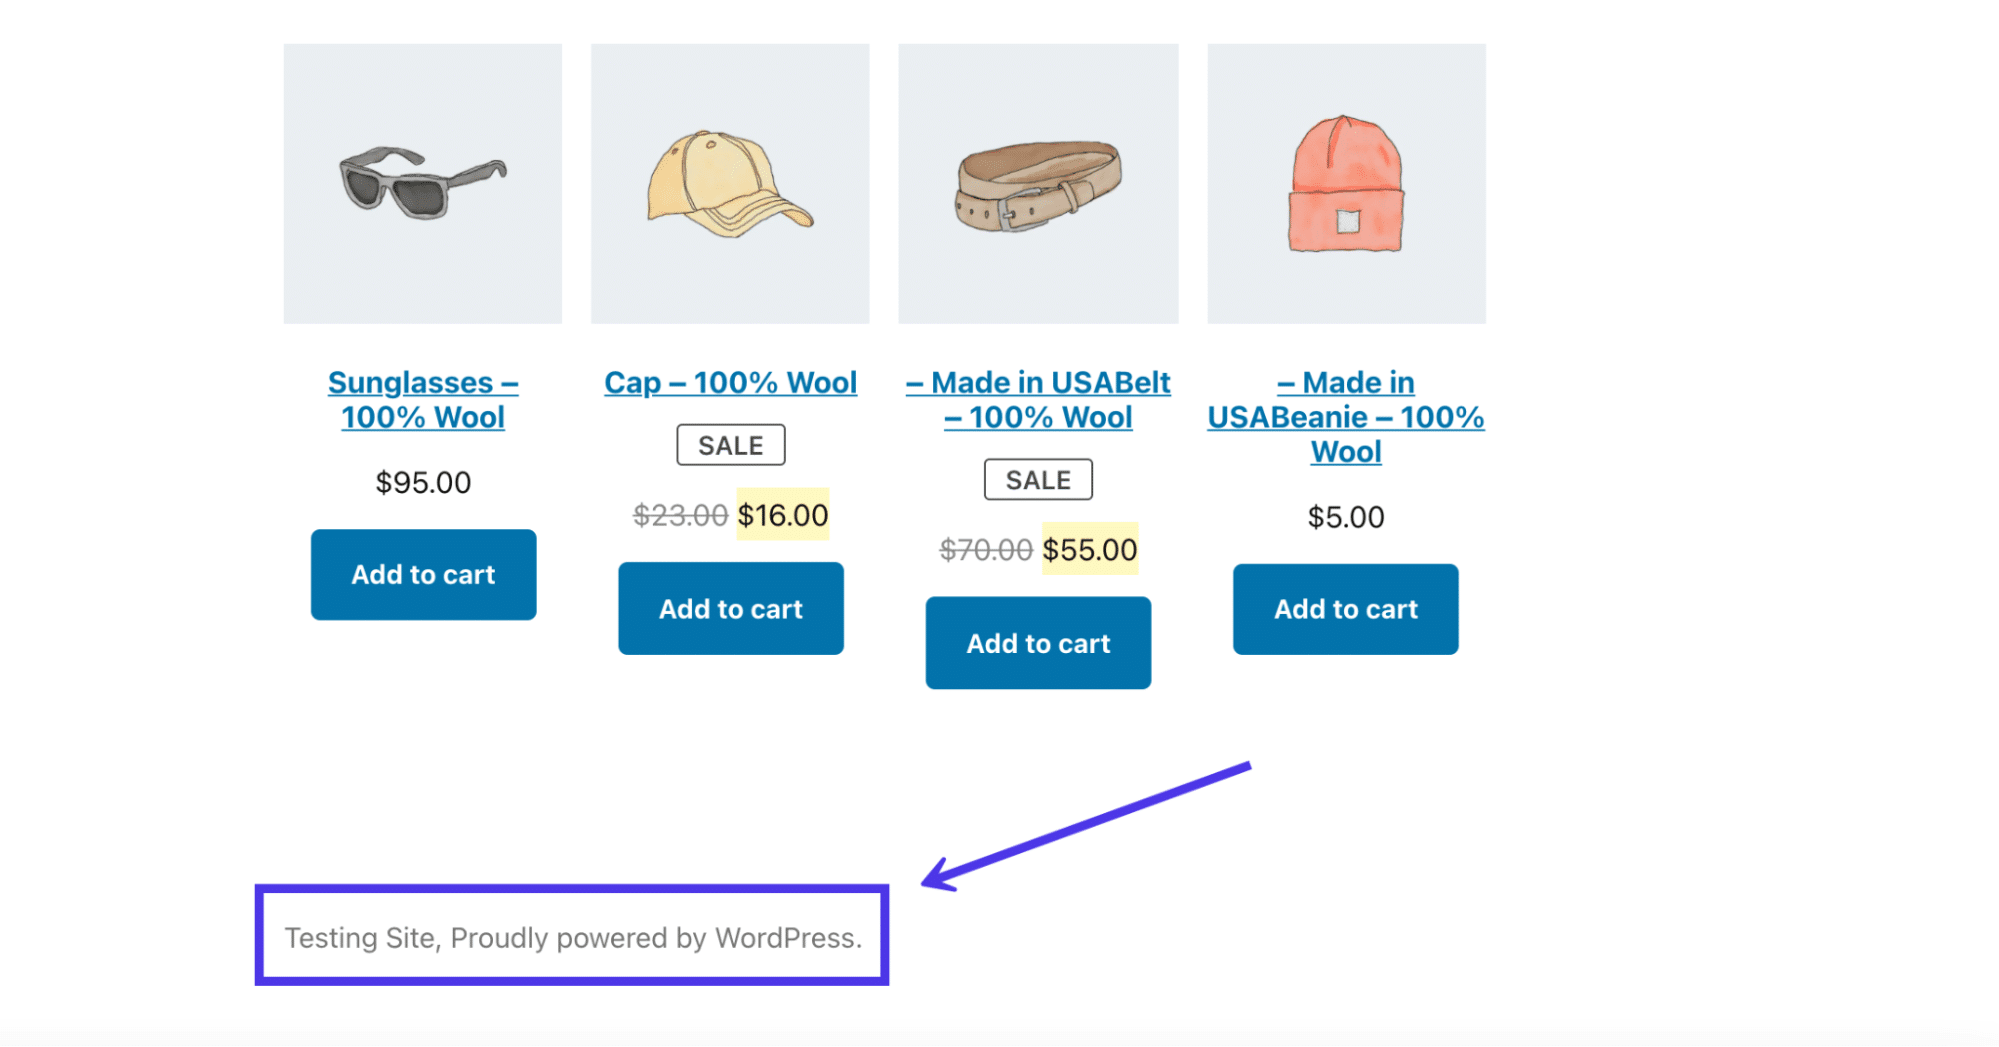
Removing “Powered by WordPress” Text
In the previous section, we covered how to remove the WordPress credit in your WordPress.com footer. It’s a little tricker on a self-hosted WordPress site since most themes don’t offer a way to remove the credit in the Site Identity section of the Theme Customizer.
Therefore, we must look at other ways to remove the “Powered by WordPress” text in the footer.

To tackle this process, read our in-depth guide on removing the “Powered By WordPress” tag in your footer. This knowledge base article covers all of the following topics:
- Why you may want to remove the “Powered By WordPress” message
- When you might not want to remove it
- Methods to avoid when trying to remove the credit
- How to remove the credit with a plugin
- How to manually remove the “Powered By WordPress” credit
- Replacing the footer credit with your own code
Editing the footer credit with a plugin is significantly easier for the average WordPress user. However, going the manual route ensures you have full control over the footer, and it eliminates the need to have another plugin installed on your dashboard.
Is It Legal to Remove “Proudly Powered by WordPress”?
Considering that WordPress makes it a little tricky to remove the “Proudly Powered by WordPress” text from your footer, you may wonder whether it’s kosher to get rid of the message.
The answer is that you’re more than welcome to take out the “Powered by WordPress” text in your footer without having to worry about any legal repercussions or violations of the WordPress Terms of Service. This is because WordPress use falls under a GPL (General Public License), meaning anyone can redistribute and alter WordPress in any way they see fit.
Overall, we highly recommend removing the “Proudly Powered by WordPress” text since it has nothing to do with your brand and simply promotes another organization. Yes, it’s nice to get the word out about WordPress, but not at the expense of your own branding and valuable website space.
Now, footer messages shown by your theme developer are a different story. We’ll talk about that in the next section.
How to Remove “Powered by XYZ Theme” Text in WordPress Footer
We now know that you’ll have no problems with the law or WordPress when eliminating the “Proudly Powered by WordPress” footer message. But what about some of the theme developers who put “Powered by XYZ Theme” in the footer?
Luckily, the vast majority of WordPress themes also fall under a General Public License, making it entirely acceptable to cut out that text and replace it with something more suitable for your business. However, it’s prudent to double-check with your theme developer to ensure they don’t have a requirement in their terms and conditions that stipulates that you keep the development credit in the footer.
You can do this by simply asking the developer if the theme falls under a General Public License. And if it doesn’t, or their terms and conditions make it a requirement to leave the credit, we suggest seeking out another theme, as that’s not exactly a desirable item to have on your website.
So how do you go about removing the “Powered by XYZ Theme” text in your footer?
Check Out Our Video Guide to Removing “Powered by WordPress” from your WordPress Footer
Some plugins that remove the “Powered by WordPress” message also can scrap any messaging inserted by the theme developer. However, this isn’t a sure thing.
Therefore, we suggest opting for one of the following methods:
- Edit the footer site files directly to eliminate the credit message.
- Ask the developer to remove it for you.
- Upgrade to the premium version of the theme.
Editing the footer site files takes a bit of technical knowledge, but you can often get this done in a matter of minutes. Asking the developer to remove the theme developer credit could end up working, but you’re essentially hoping you’ll get a friendly developer who’s willing to walk you through the process. Usually, they won’t offer this if you’re only using the free version of their theme.
The easiest option is to upgrade to the premium version of that theme. Many premium theme developers give away simplified, free versions of their themes in the hopes you’ll upgrade for improved features and increased control.
Since upgrading to a premium theme and speaking with the developer can be done on your own, we’ll mainly talk about how to edit the theme site files to get rid of that credit message.
To begin, check out your theme’s footer to confirm if you have developer credit on the bottom. If so, take note of the exact text being displayed, as this could help seek out the message in your site files.
Connect to your site files using an FTP client, as discussed earlier in this article. Each theme developer differs on where they put the footer credit, but a good place to start is going to /public/wp-content/themes.
Choose the theme you have activated on your website.
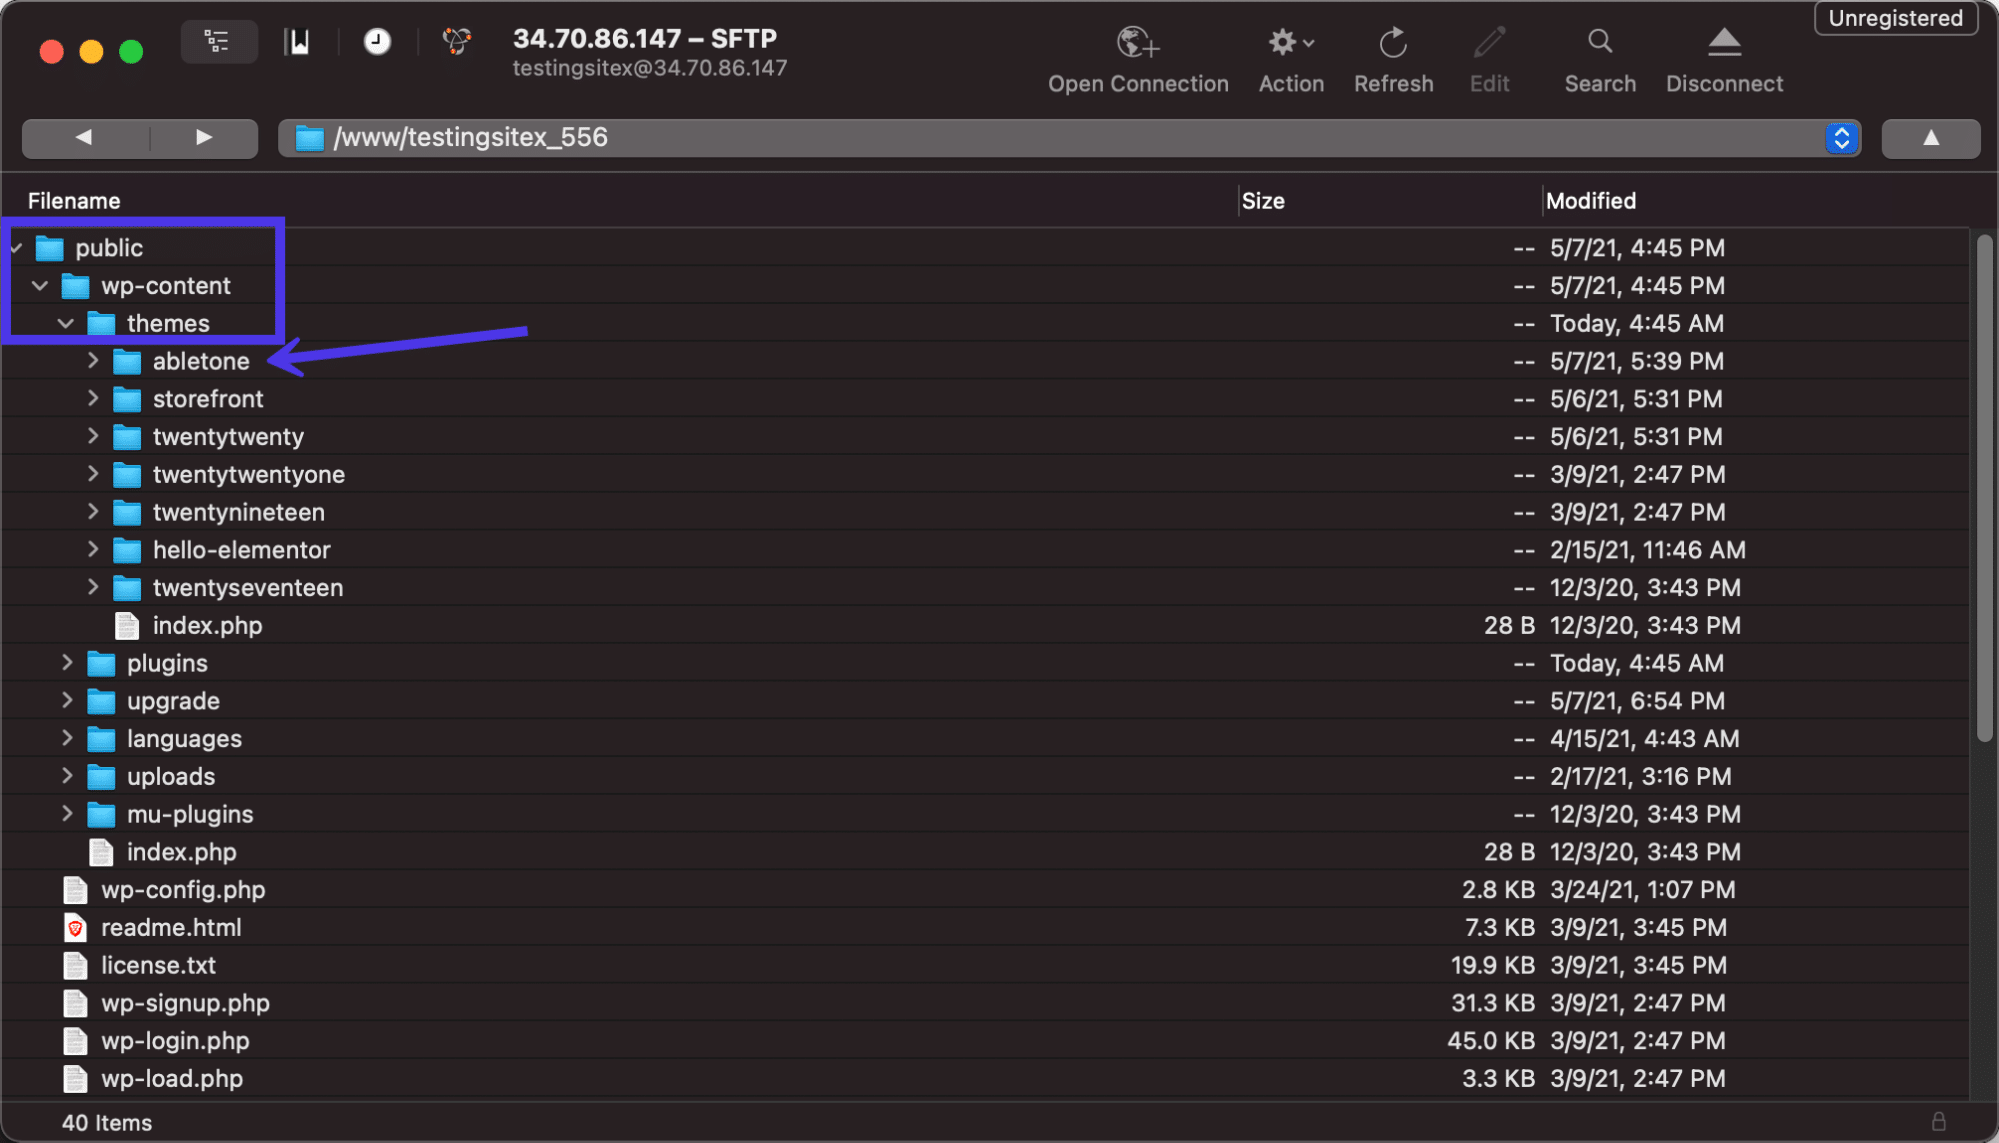
From here, one option is to open the main footer.php file in a text editor or PHP IDE and search for references to the footer credit. Use the Find function in your chosen editor to type in and search for the exact text that appears as the credit message in your footer.
As with all themes, this may not be the right file for removing the footer credit; it entirely depends on how the theme was built. If you have no luck with the footer.php file, continue looking elsewhere.
One of the most common places to find the footer credit information code is in the /template-parts folder. We found this was the case for the current test theme we have installed for this tutorial.
We can go to the /footer folder, then click on the site-info.php file. That site-info.php file (or some variant of that) is a common place for storing the theme’s footer credit information.

Feel free to either delete the footer credits or replace them with something else. For this situation, we’ll simply remove the credits hook and the do_action credits code at the bottom.
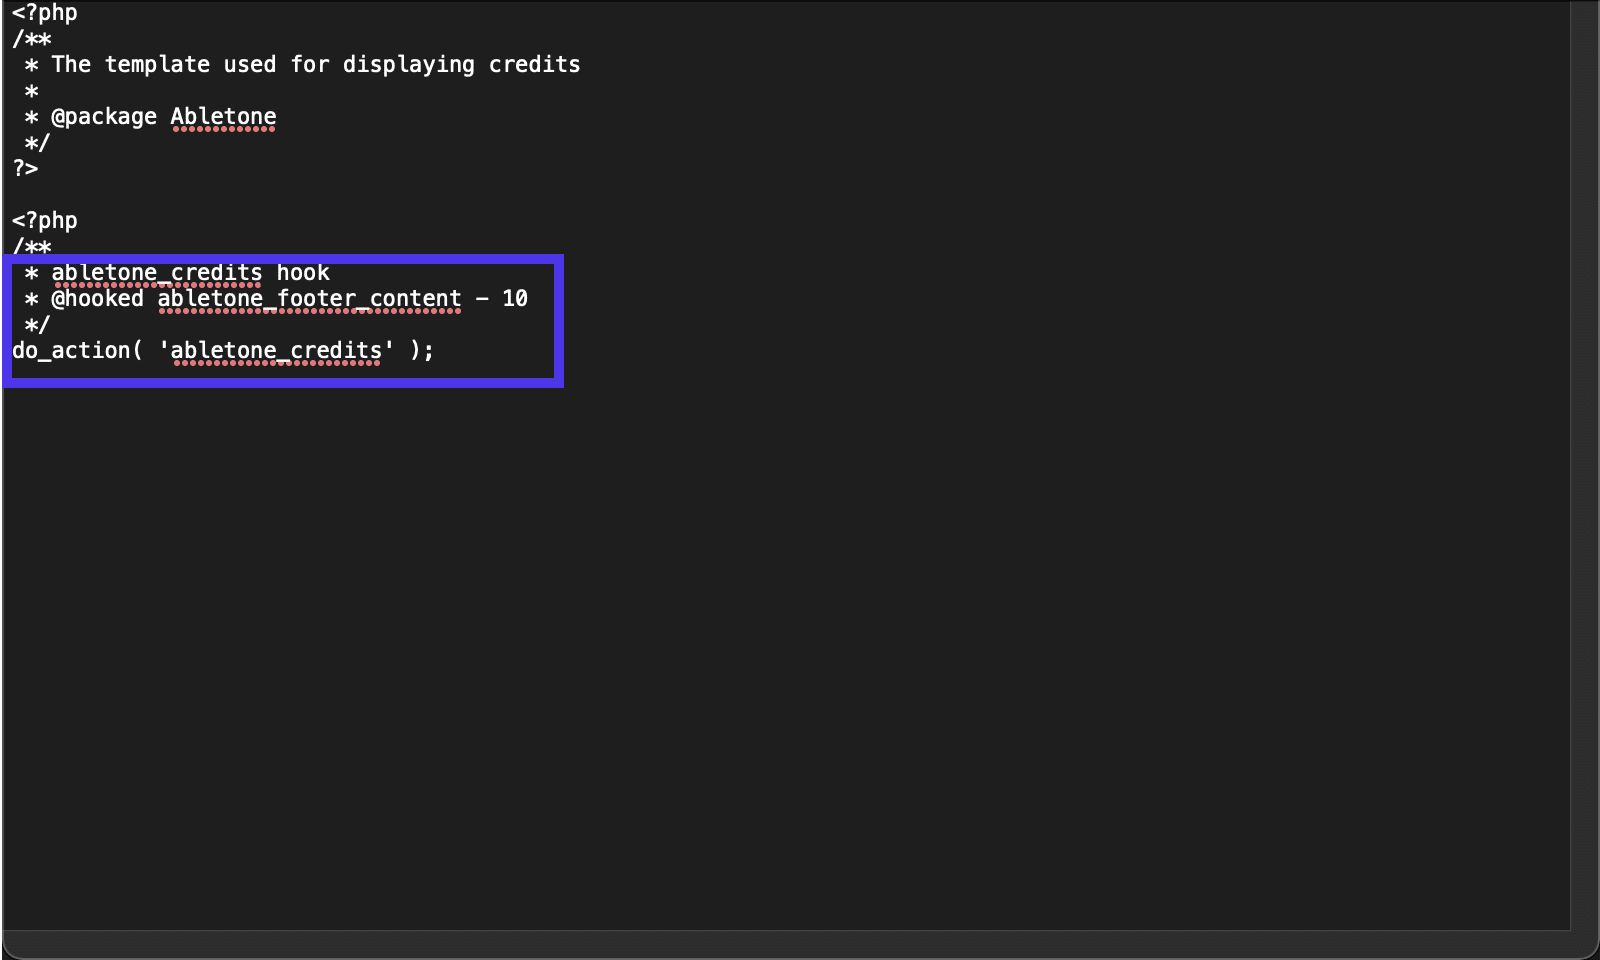
And that’s successfully removed the entirety of the credit being shown for the theme developer. It also didn’t have any effect on the footer content, like our widgets and menus.
As mentioned before, one way to hide the footer credit, while also supporting the theme developer and receiving far better features, is to upgrade to the premium version of the theme. Keep an eye out for a button in your dashboard to upgrade to a Pro version, or go to the developer’s site to make a payment.
How To Remove the WordPress Footer Entirely
Although not recommended for most sites, it sometimes makes sense to remove the WordPress footer in certain situations altogether.
If you find that a WordPress footer causes too much clutter (which is common with landing pages), or if you’d instead the footer didn’t get crawled by search engines, taking the footer out of the equation entirely may not be a bad option.
Keep in mind, however, that you’re not deleting the footer from your WordPress files. The footer.php file is a core part of the WordPress files, so you must leave it. However, we can use CSS code to tell WordPress not to display the footer and its content.
To hide the WordPress footer completely, go to the Theme Customizer and click on the Additional CSS tab.
The goal is to paste CSS to tell WordPress that we don’t want to see the footer on our website.
We’re trying to hide everything in this example, from the copyright information to the WordPress and theme developer credits. You can also use this method to hide items like widgets and menus within your footer.
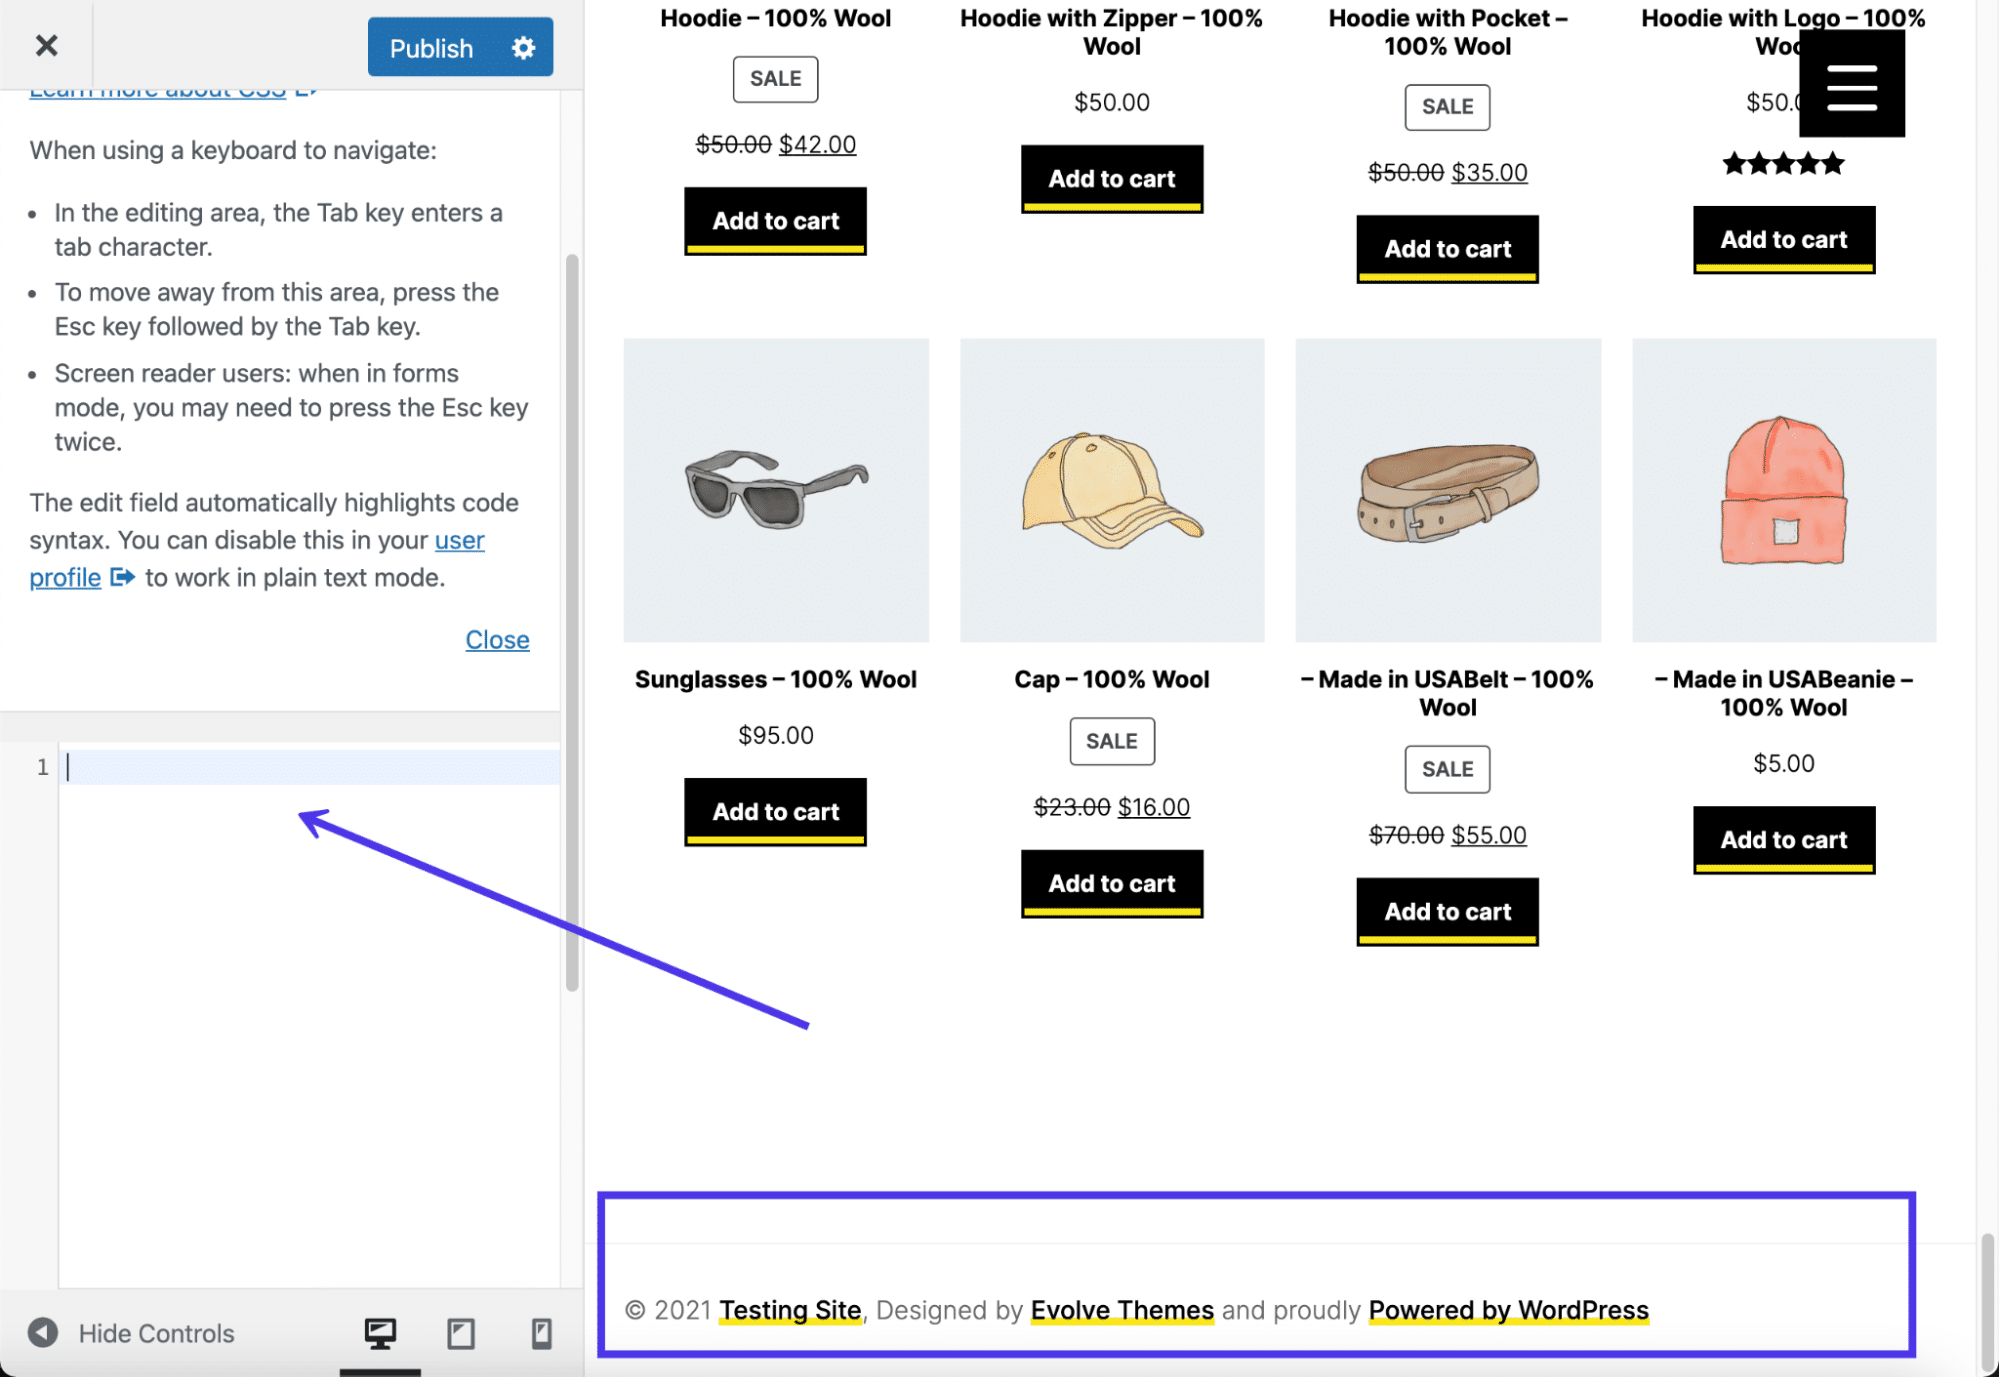
Go ahead and paste the following code in the CSS box:
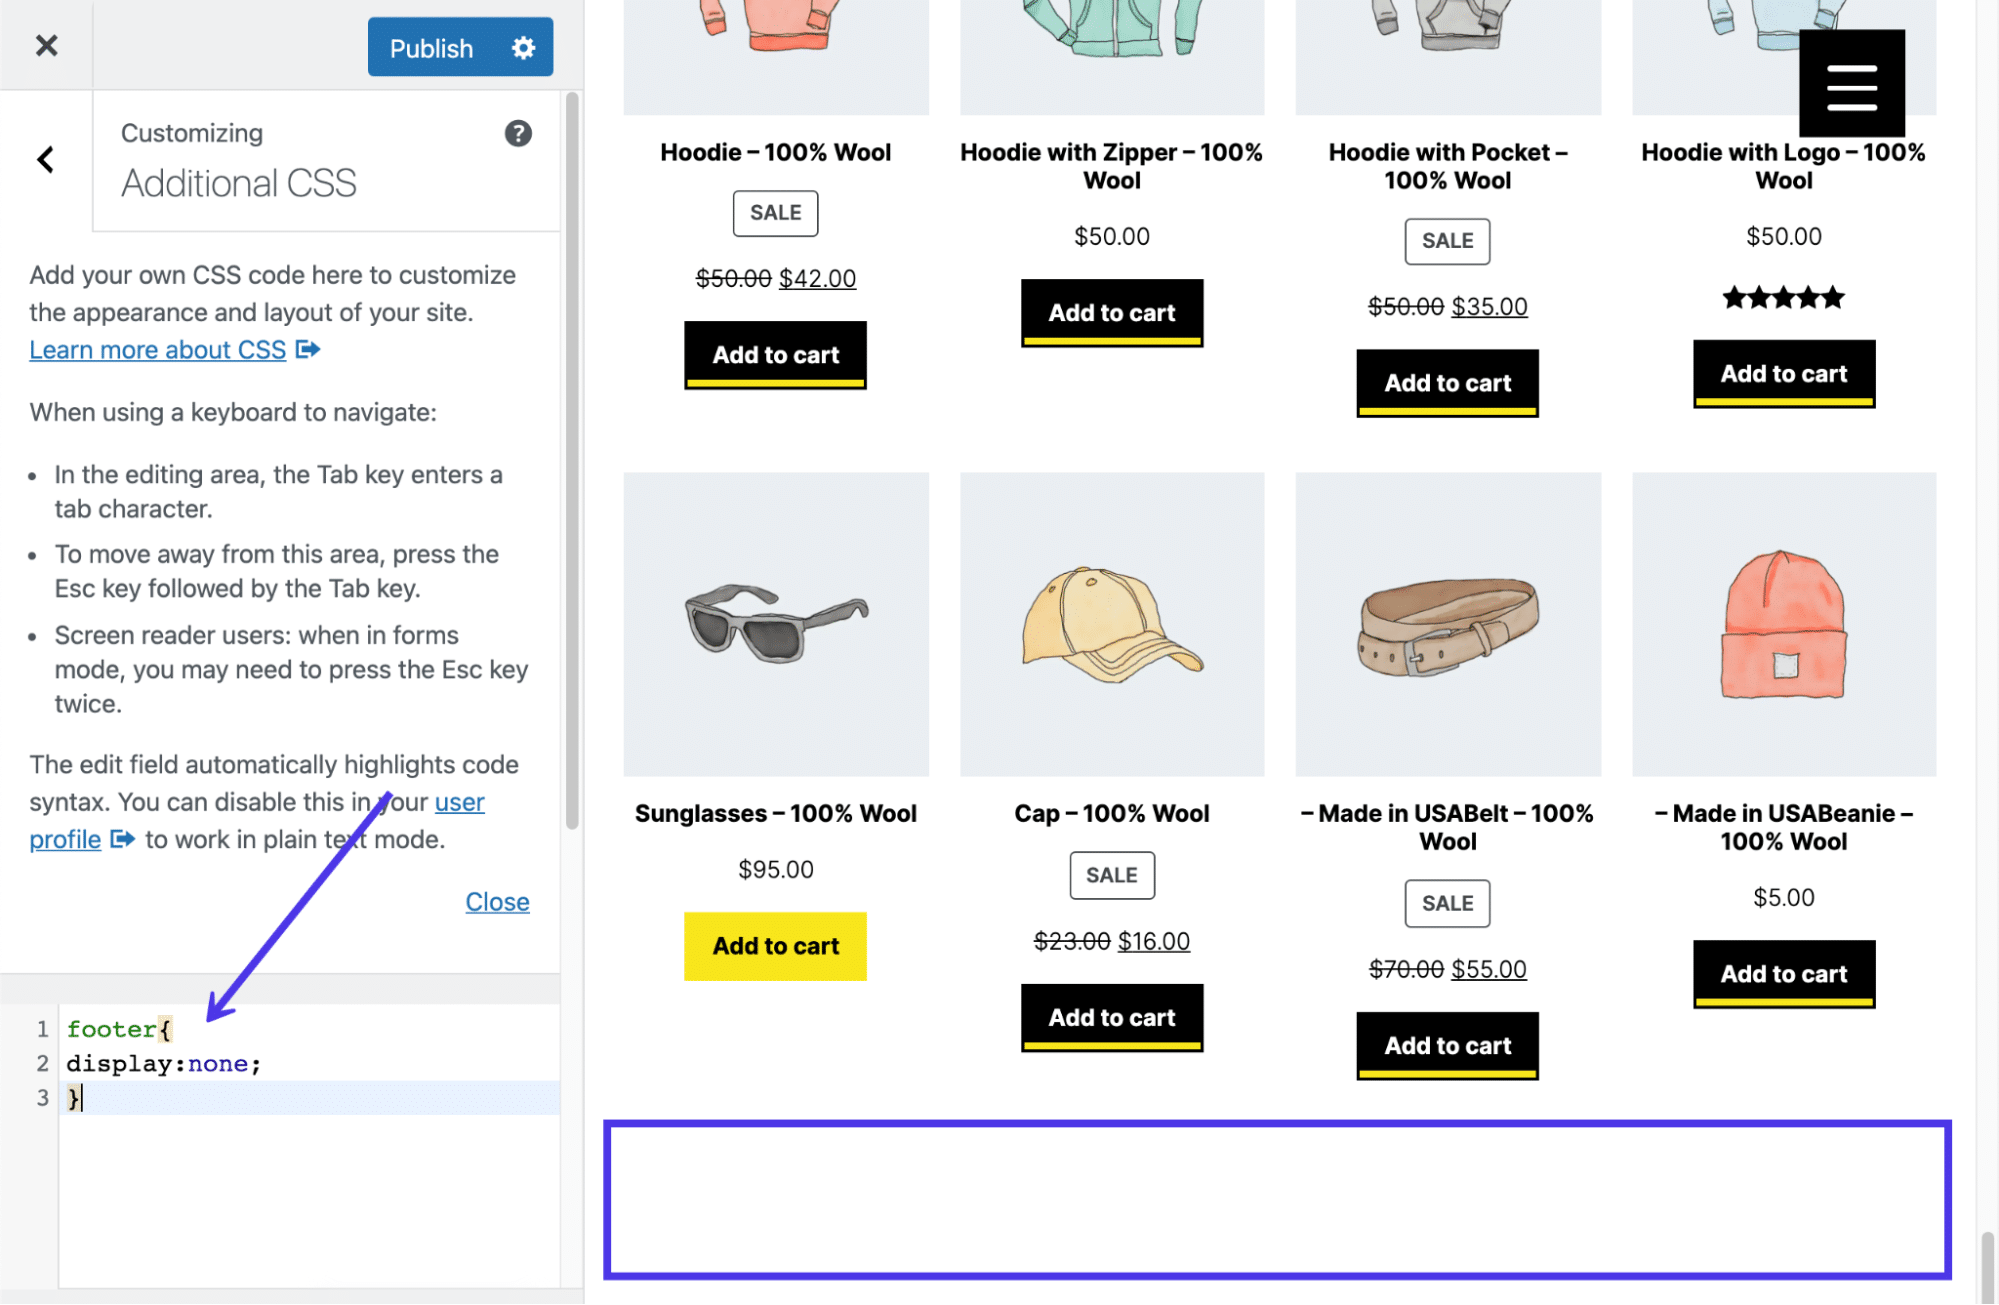
footer{

display:none;

}
This tells WordPress to hide everything within the footer.php file. The file remains inside your file directory, just in case you’d like to re-add content in the future.
The Theme Customizer preview should now show a blank space. Make sure you hit the Publish button to see the results on the front end.
Although that CSS should work for most themes, you may find that the theme developer has a different file configuration. Another way to potentially remove most of the footer content is by using the following code instead of the previous code discussed:
.site-info { display:none; }This option is less likely to work, but it’s not unheard of for theme developers to make a file called site-info.php in a footer’s template-parts folder.
From links to support documents and social media pages, your website footer contains a lot of important info. 💪 Learn how it works in this guide ⤵️Click to Tweet
Summary
WordPress footers have many purposes, from adding social media buttons to displaying recent blog posts, support pages, and forms. The goal is to take advantage of this extra space, since it’s not wise to pack your main menu with too many links or try to fill your sidebar with an onslaught of content.
You’ve learned many ways to edit a WordPress footer. We hope you can now successfully edit and customize footers on any WordPress site!
Let us know in the comments below if you have any questions about editing the footer in WordPress!
Get all your applications, databases and WordPress sites online and under one roof. Our feature-packed, high-performance cloud platform includes:
- Easy setup and management in the MyKinsta dashboard
- 24/7 expert support
- The best Google Cloud Platform hardware and network, powered by Kubernetes for maximum scalability
- An enterprise-level Cloudflare integration for speed and security
- Global audience reach with up to 35 data centers and 275 PoPs worldwide
Test it yourself with $20 off your first month of Application Hosting or Database Hosting. Explore our plans or talk to sales to find your best fit.
Since a WordPress footer is so useful, at some point, you must learn about the footer, how it works, what’s possible in terms of editing it, and how to remove preset footer content that’s not relevant to your brand. That’s why we want to show you how to edit a footer in WordPress, along with a full explanation of a footer’s benefits and what can go into one.
Website footers have a long history of containing whatever information doesn’t fit within a website’s main menu. From links to support documents and social media pages, various elements go rather well in a footer.
Let’s get started!
Check Out Our Video Guide to Editing the WordPress Footer
What Is a WordPress Footer?
Footers aren’t exclusive to WordPress. Most website builders and content management systems offer the ability to include a footer. However, WordPress offers its unique footer functionality, along with a preset footer design that generally comes with the theme you install.
A WordPress footer sits at the base of your website. It’s a static content area that shows up at the very bottom, regardless of which page a user lands on. Although not as visited as the header, the footer is still extremely important to provide users with social media buttons, customer support links, and contact information.
Overall, if you make a website on WordPress, you can expect to see a footer placed in your design by default. WordPress has a core file built into its system specifically to manage the footer (footer.php).
Footers come in all shapes and sizes, and you can edit them to include different colors, fonts, and backgrounds. You can also insert content elements within the footer, such as blog post lists, security badges, and even forms and images.
Website footers: extremely useful, but potentially confusing to edit. 🥴 Learn how to get started here ⬇️Click to Tweet
The footer is like the conclusion to your entire website. It shows essential links and information for those interested in and dug deep into your content. Finally, the footer completes the overall design of your site, much like the final slide in a slideshow presentation or the conclusion to a speech.
Reasons To Have (and Edit) a WordPress Footer
It’s tempting to forget about your footer or leave it as the last item you design. Many people even want to remove their footers since they don’t see much value in them. This isn’t the greatest plan. The footer does have value, even if it’s not viewed or clicked on as much as your main menu or primary content areas.
To give you an idea of what makes a footer valuable, here’s a list of all the reasons to have one and learn how to edit a footer in WordPress to fit your brand.
- The WordPress footer offers a static module shown on every page of your website, making it more visible than a standard page that disappears when someone clicks away.
- It completes the website’s design, both visually and in your WordPress files. It tells WordPress where to end its code and indicates to users when the content ends. Not to mention, it makes for a cleaner interface.
- Many internet users have come to expect specific links and content in the footer, so they’ll go directly to the footer to find them. Think support links and social media buttons.
- The footer provides more conversion and engagement opportunities, like a call to action at the end of a blog post. You can add forms, links to other content, or even a company tagline.
- It’s a place to include important links that may not make the cut for the main menu.
Now that we know the benefits of using a footer, the big question of what to place in the footer comes into play. All themes differ, but it’s common to see a “Powered by WordPress” message in the footer after installing a new theme.
Other times, theme developers might include their own premade designs or messages about who made the theme.
None of that’s bad, but the goal is to customize your WordPress footer to link to your valuable pages, include content related to your brand, and clear out the default content like messages from theme developers or WordPress. It’s also wise to adjust the styling to match your branding with custom fonts and colors.
So, what are some elements to put inside your WordPress footer?
- Forms for users to subscribe to your newsletter messages or blog updates
- Links to customer support resources, like FAQs, knowledgebase articles, and forums
- Icon links to download digital products like apps and podcasts
- A list of upcoming events
- A list of recent blog post articles
- Links to loyalty and affiliate programs
- Links to informational pages, like an About Us or Career page
- Badges and icons to promote your reputation, past awards, or site security
- Social media icons that link to the pages
- A full sitemap for easier navigation throughout your website
- Legal statements like copyright claims, privacy policies, and terms and conditions
- Contact information such as your address, locations, phone number, and business hours, or a contact form
- A search box for improved navigation
- Any other additional pages that don’t fit in your main menu but still need a place on your site
How To Edit a Footer in WordPress (Self-Hosted Version)
There are a handful of tactics to edit the footer of a WordPress.org (self-hosted) website. In the following sections, we’ll talk about editing a footer in WordPress using the theme customizer, widgets, plugins, and code. As a bonus, we’ll discuss managing the WordPress footer with a visual page builder like Elementor.
Edit WordPress Footer with Theme Customizer
The fastest and most efficient way to edit a WordPress footer is by utilizing the built-in WordPress Theme Customizer. The Theme Customizer settings vary depending on your chosen theme, but the customizer itself is always located in the exact location on the WordPress dashboard.
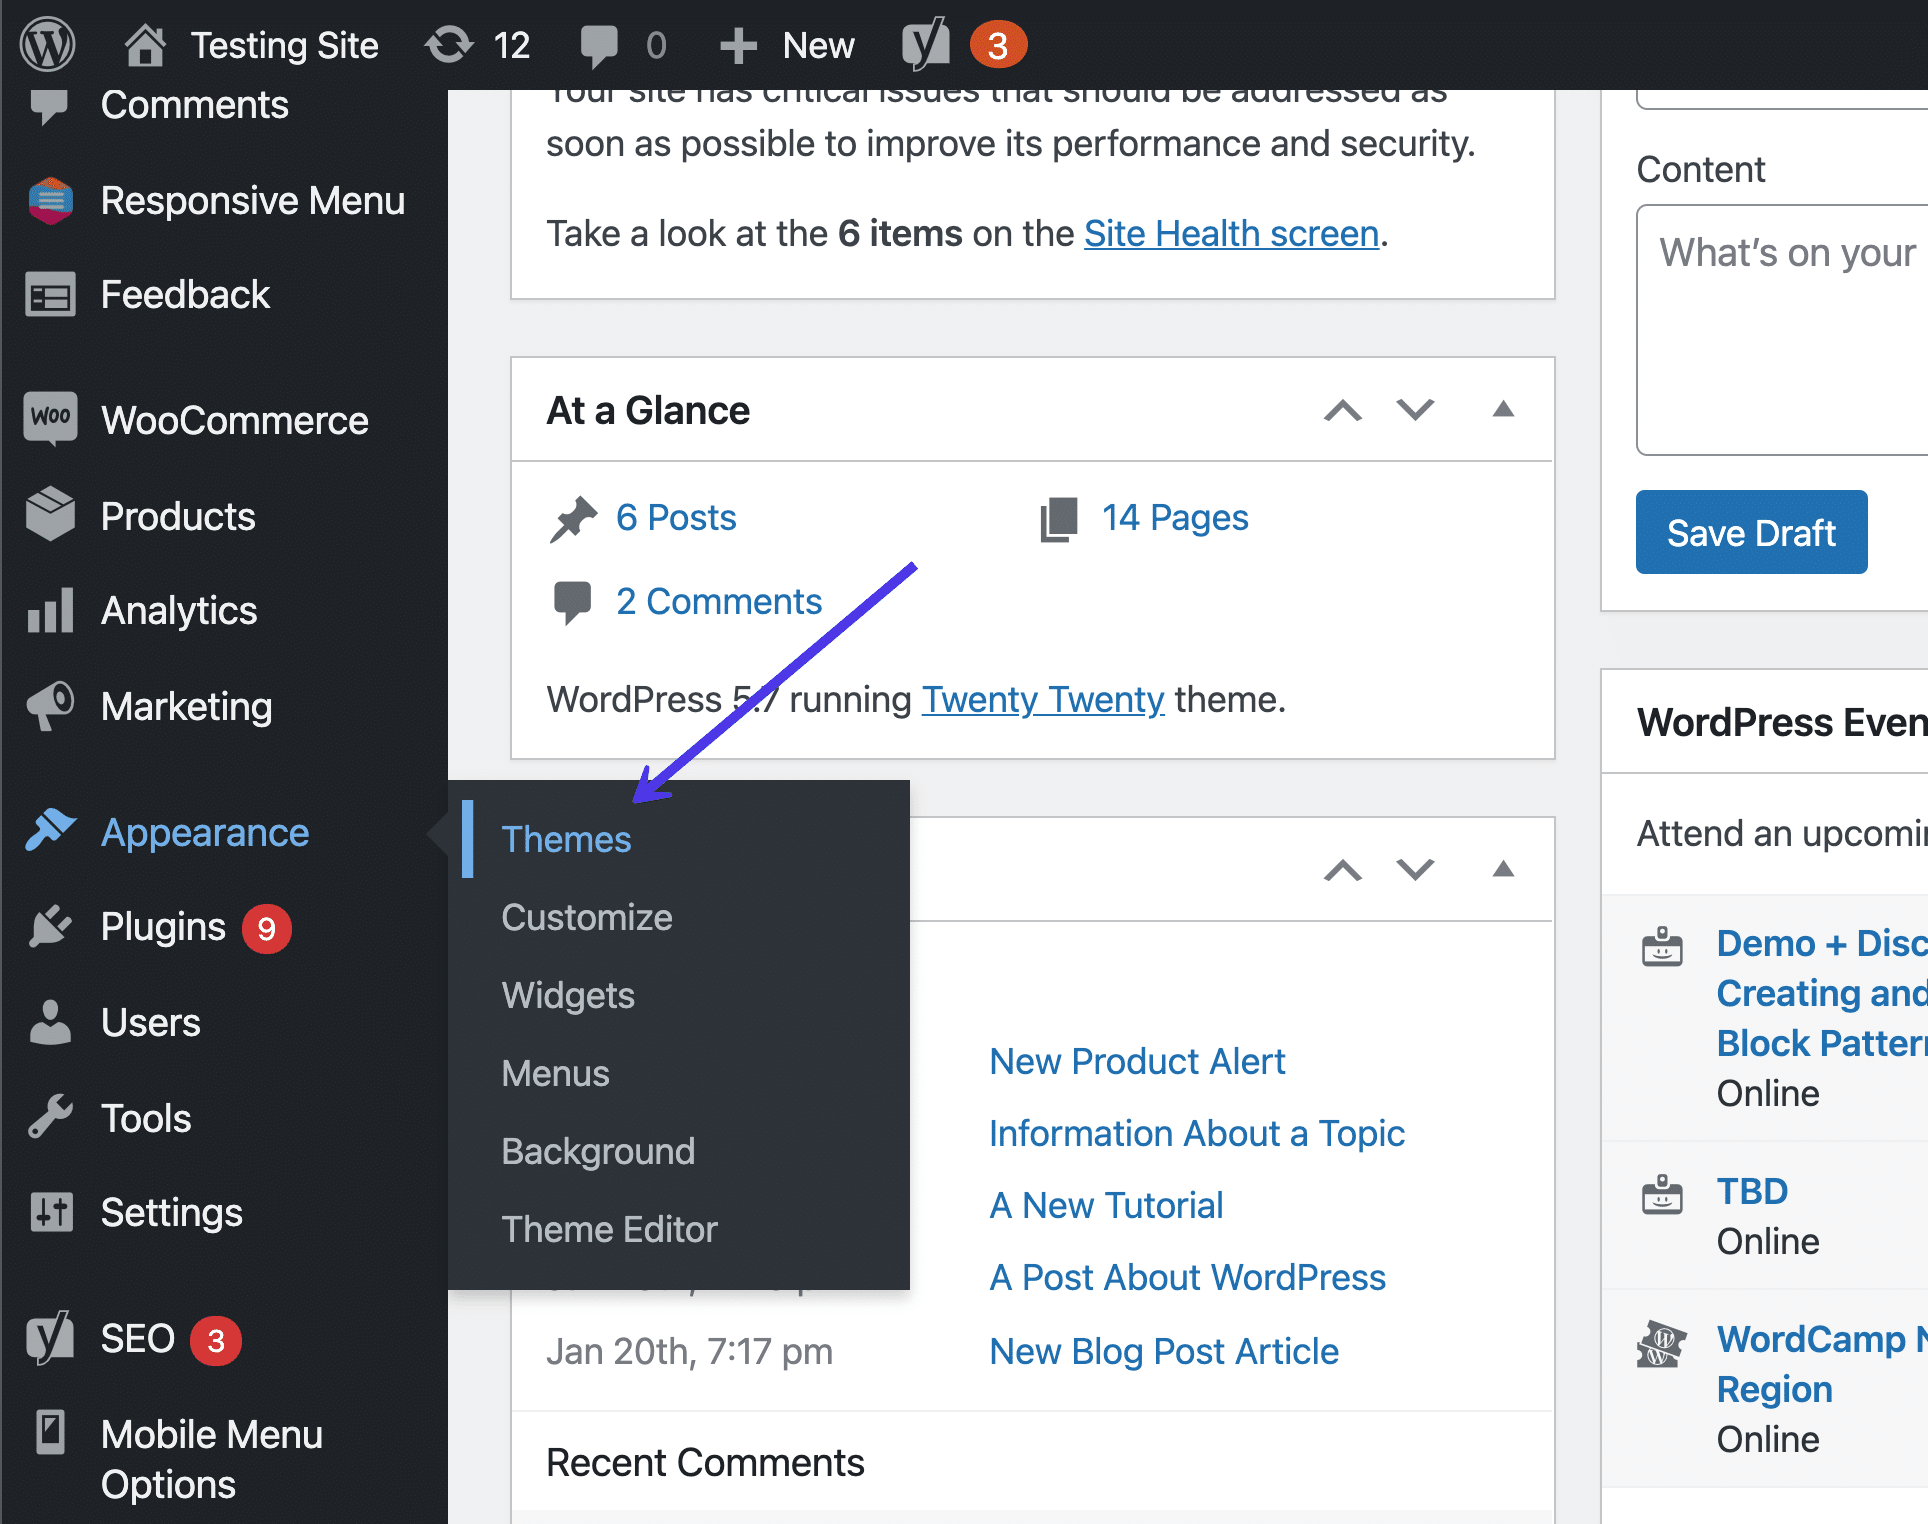
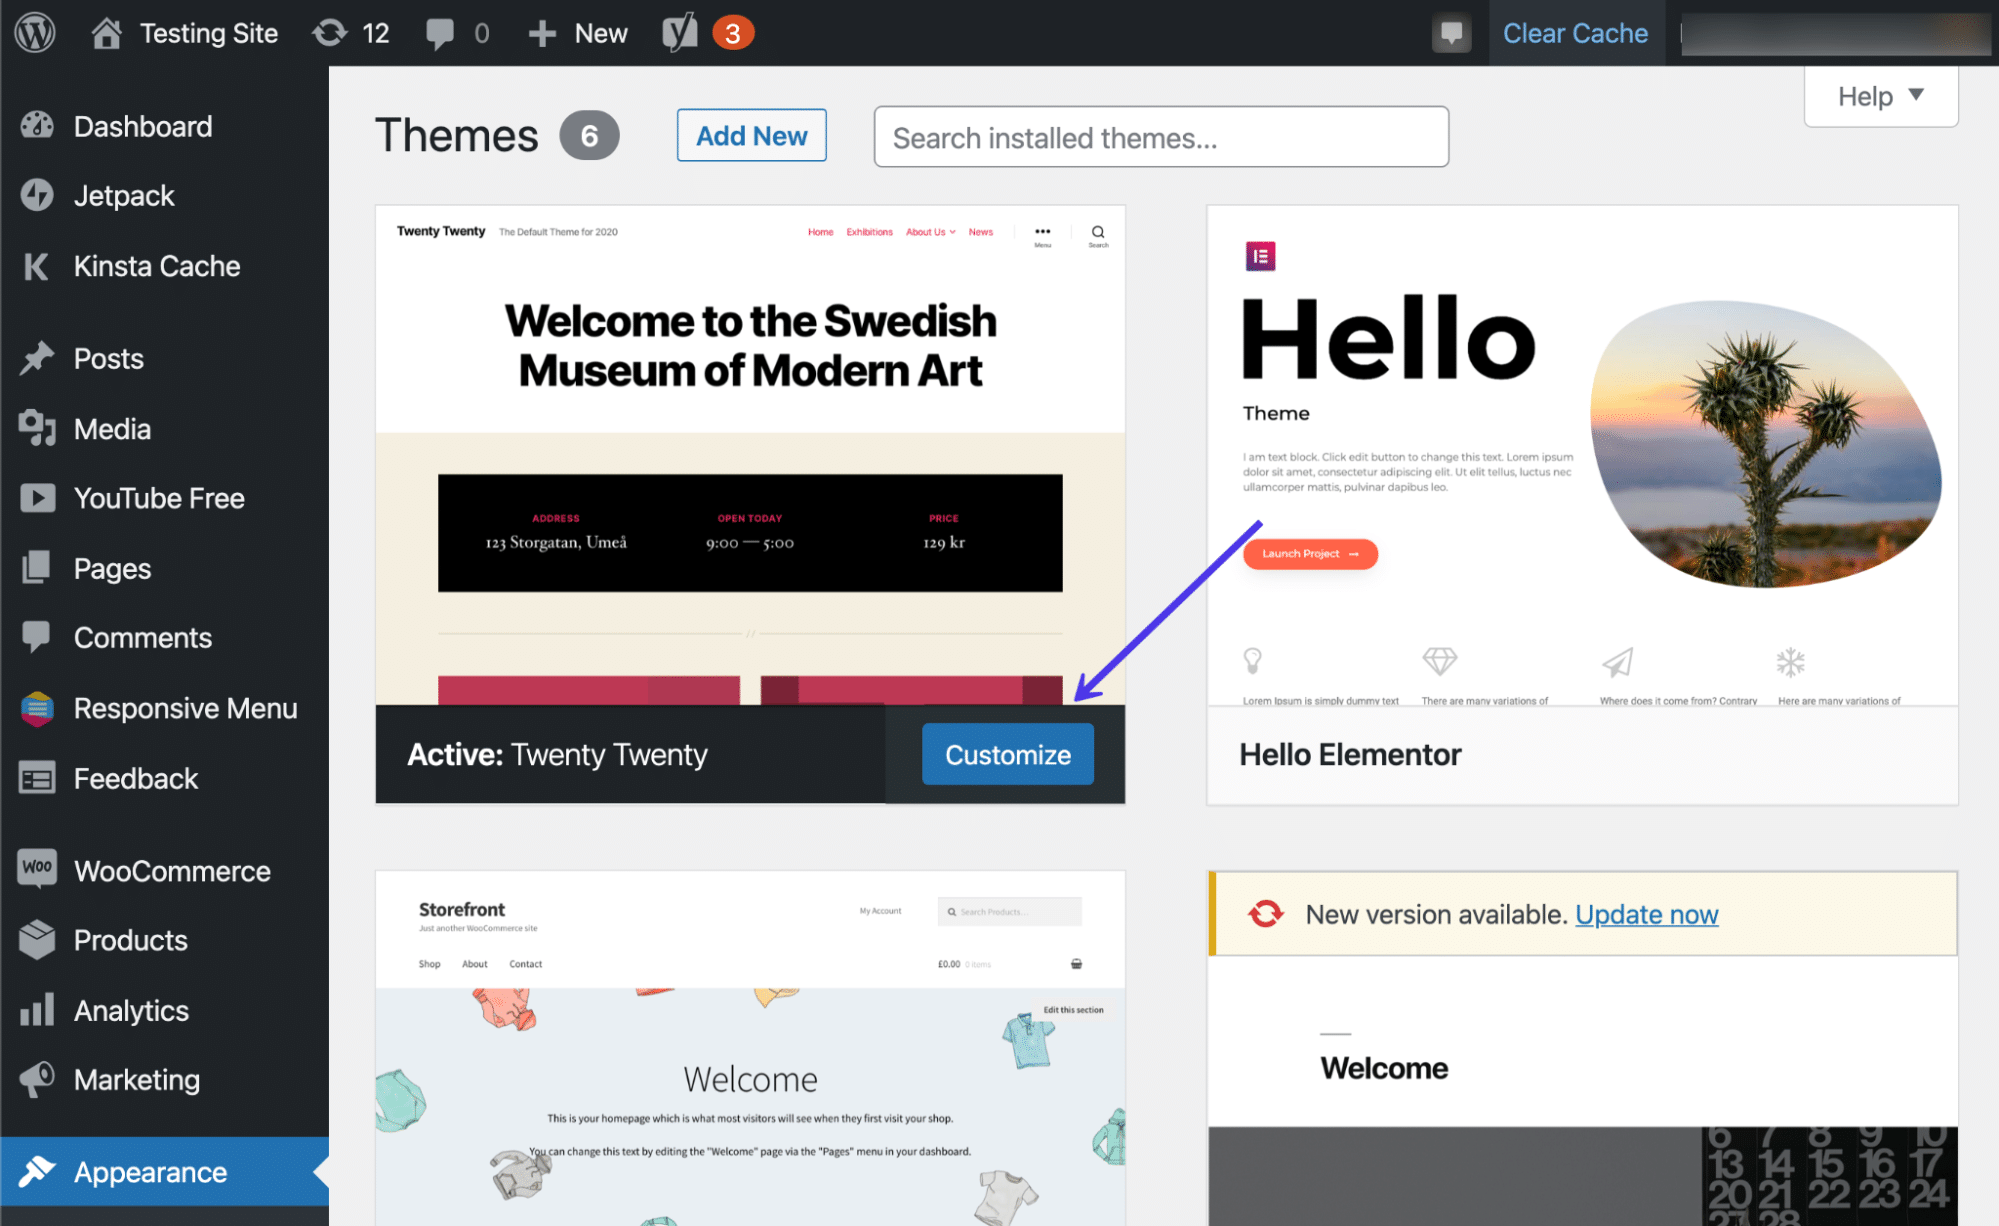
To begin the process, go to the dashboard and click on Appearance and then Themes.
Then, click the Customize button underneath the currently active theme.
Feel free to swap out themes to see how the footers change from theme to theme.
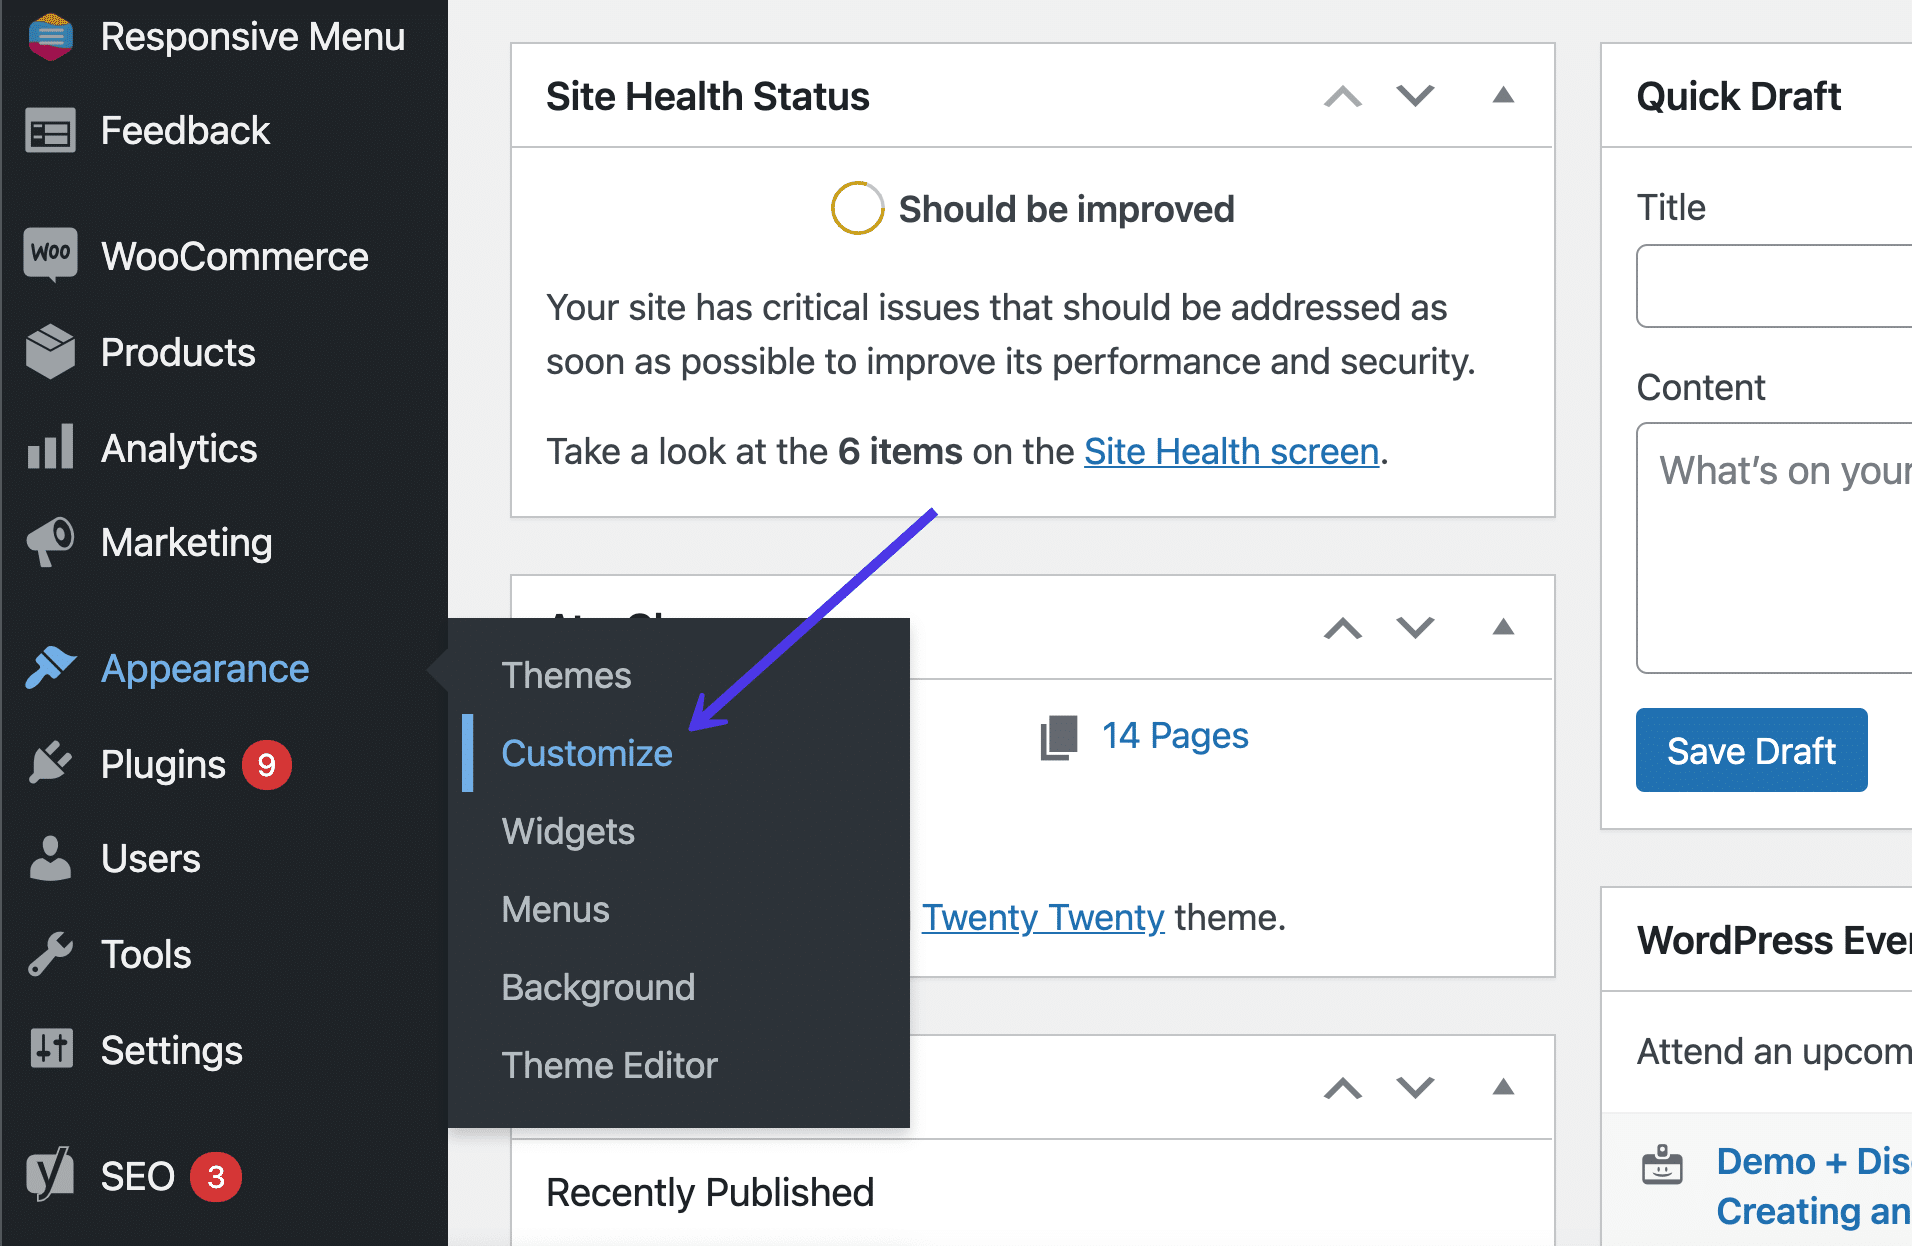
As a slightly faster alternative, you can also click on Appearance > Customize, which brings you directly to the WordPress Theme Customizer for the active theme.
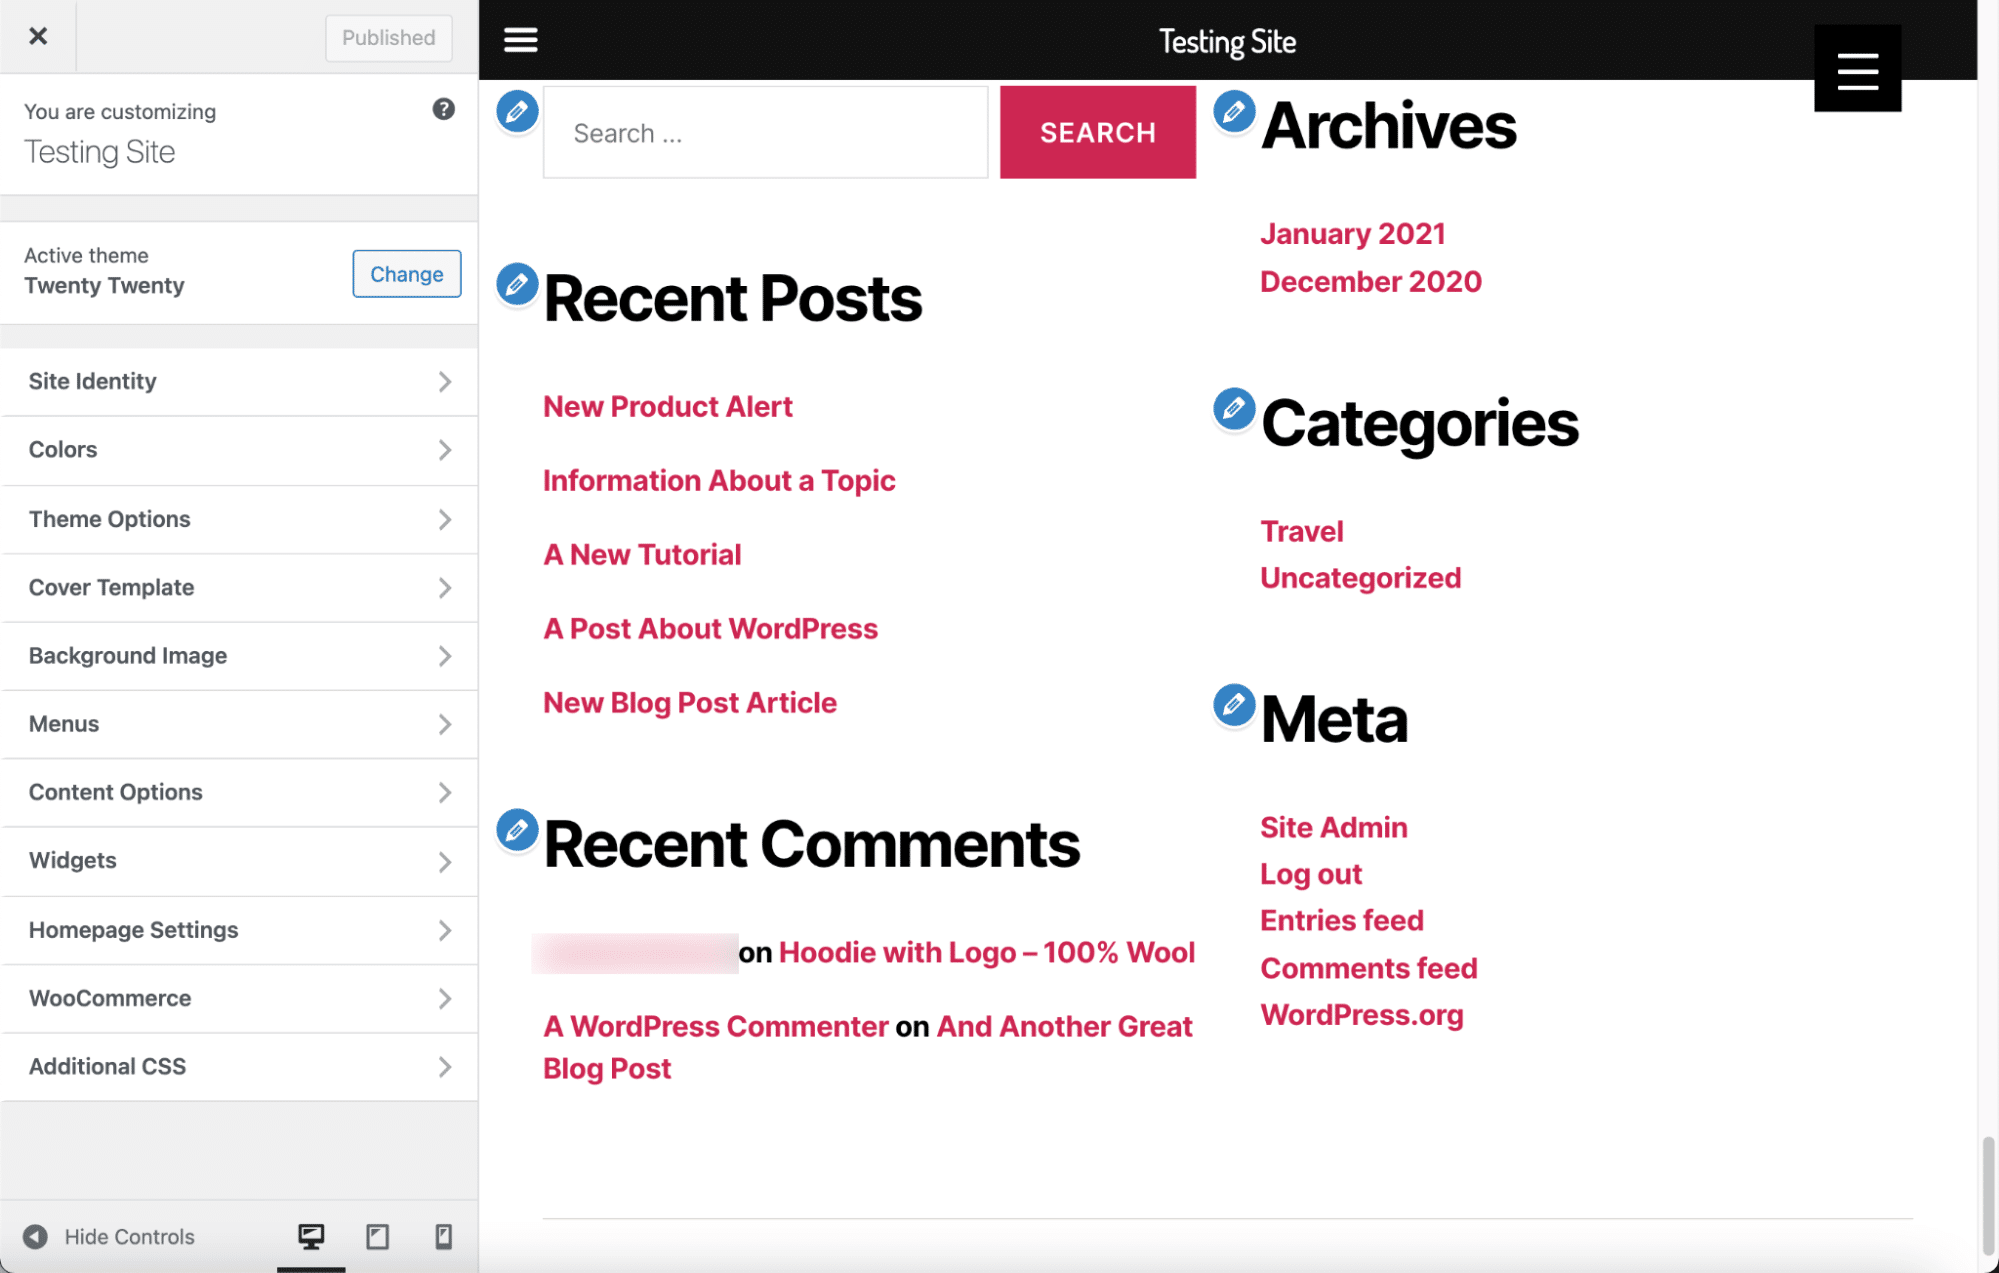
The WordPress Theme Customizer presents a visual of your website on the right side and several menu items on the left that lead to settings and customization tools. Again, every theme has varying customization options, so your screen may look a little different than what’s in our screenshots.
A wonderful place to start with your footer customization is with the colors.
Our current theme has a Colors button, making it easy to identify where we need to go.
Select the Colors button if that’s available in your theme.
Choose the Select Color button under the Header and Footer Background Color field.
Use the color picker to test all types of colors and see which ones match your brand or look good towards the end of your page.
With this particular theme, any color modifications actually adjust the font colors as well, making them look clear regardless of the background color.
As you can see, a darker WordPress footer color automatically changes the font colors for links, headers, and paragraph text, eliminating the need for you to do that on your own.
Now let’s try another theme. In this case, we’ve swapped out the Twenty Twenty theme for the Storefront theme.
Sure enough, the WordPress Customizer for the Storefront theme displays buttons not shown in the Twenty Twenty theme.
Therefore, your theme dictates how much control you have over the footer in the WordPress Customizer. Some themes are better than others in this respect.
For the Storefront theme, we have a Footer tab. Click on that to see what’s available for customizing the footer.
Unlike the previous theme, Storefront doesn’t automatically change text and link colors when you adjust the background colors. However, you are able to control all of these colors on their own, with fields for the Background Color, Heading Color, Text Color, and Link Color.
Footer color settings
A quick selection reveals the results in our WordPress footer preview. After this, you should click on the Publish button to see the new footer colors on the front end.
But what about the links and text elements presented by default in the footer?
Again, the primary method to adjust the footer content is in the WordPress Customizer. In the coming sections, we’ll explain how to add and remove text and link content from the footer using two methods: as menu items and as widgets.
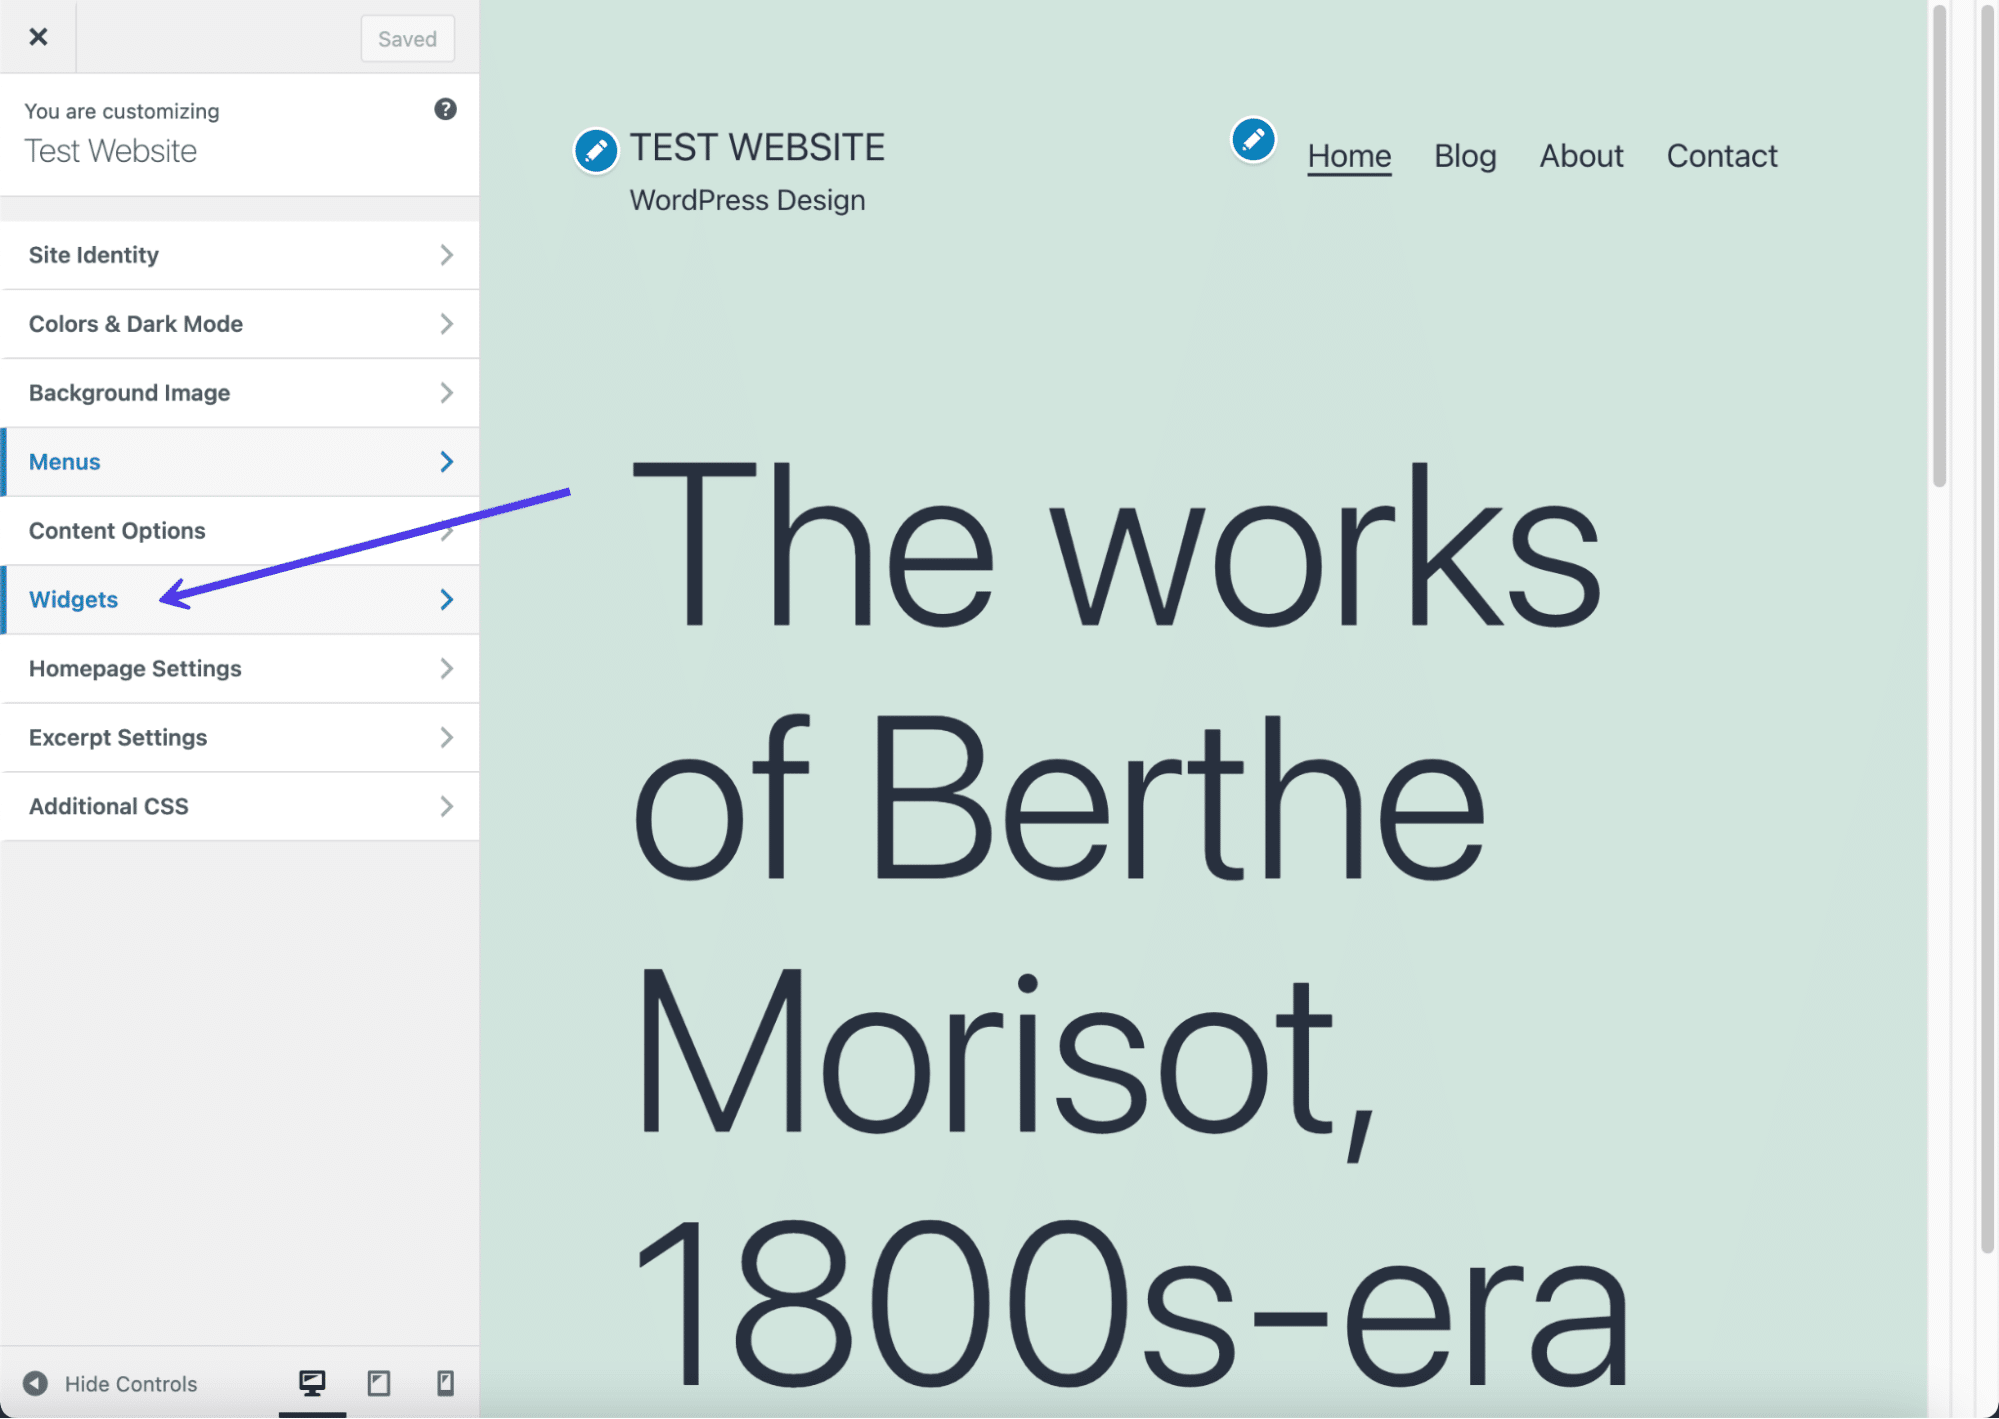
Adding Widgets to Your WordPress Footer
One way to edit the footer content is by adding widgets. WordPress widgets have many functions, along with several locations for them to go, including the sidebar and footer, provided your theme supports that.
Back in the WordPress Customizer, look for the Widgets tab.
Peruse the list of areas to place widgets on your website. You may see options for regions like the sidebar, top menu, and bottom menu. Hopefully, your theme also includes the footer as an area to place widgets. If not, there are other ways to edit your footer, though if you’d rather go with widgets, consider switching to a different theme that allows for widgets inside the footer.
This theme actually provides four widget locations in the footer, arranged in four columns stacked side by side to make a beautiful format that fits as much content inside the footer as possible.
Click on any of the footer widget locations to reveal an area to Add A Widget. Click on that button to show a slideout view of all available widgets on WordPress and the theme. Once again, you may see a completely different set of widgets, considering some themes include their own widgets, or you may have installed an extension or plugin to add more widgets to your dashboard.
Common widgets range from Archives to Audio and Custom HTML to Product Filters.
All you have to do is select the widgets to add to this particular widget area. They’ll show up on the left-hand side for you to reorganize and configure their individual settings.
After some quick work, we’ve placed several widgets in three of the footer column modules, including a main menu, a list of recent posts, and a few of the products from our shop. You’ll also notice we added a search bar to make navigation a little easier for our users.
One important area to note is the widget settings section. Each widget has its own settings on the left, so be sure to walk through those fields and make them look exactly as you want.
As you may learn while browsing through the theme settings, not all themes have ways to add menus directly to the footer area using the standard Add Menu setting. Our theme here, for example, has spots to activate menus as primary, secondary, handheld, and mobile menus, but nothing for footers.
We’ll cover menus in the next section, but we wanted to explain a quick workaround to add a menu with a widget, just in case your theme doesn’t support menus in the usual manner.
Essentially, all you have to do is go to one of your widget footer modules and search for the Navigational Menu widget. Here, you can click on a dropdown field to view all created menus on your website. Feel free to generate a menu specifically for your footer (in the Menus section of the dashboard) and add it as a widget in this section.
As an alternative, opt for the main menu, or whatever menus you’ve created. They should all show up in the menu widget dropdown.
After that, the menu of your choice shows up in the footer, as long as you’ve added the Navigational Menu widget in the right footer area and clicked the Publish button. You can even type in a title for that menu if you’d like to explain what the following links contain.
How To Insert Custom Text, Images, and Code as Footer Widgets
Many WordPress widgets offer pre-configured lists of content, like the Recent Posts widget or the Search Bar.
However, sometimes you may want to edit the WordPress footer to include entirely custom content, such as simple text, images, or a bit of code, to create something completely new.
WordPress provides a widget for each of these.
All that’s required is to go to the Theme Customizer > Widgets. Then, choose the widget area that reflects where you want the widgets to go in the footer.
Click on the Add A Widget button and search for “image”.
Add the Image widget and customize the title. Click on Add Image, then consider including a link to the image as well. You can edit the image size by clicking on Edit Image.
Next up, search for “text” in the widget library.
Add the Text widget to your footer and type in anything you want. It also has a title field along with a visual editor, much like you receive when making a blog post or page in WordPress. We’ve tried inserting images through the Text widget (since it’s technically possible) but many themes don’t allow it.
Finally, you may find that using a Custom HTML widget is the best course of action, especially if you want full control over the footer design or to incorporate a unique design for something like an email signup form.
For that, search for “HTML” in the widget library and choose the Custom HTML widget.
Paste or type in your custom HTML and keep an eye on the right-side preview to ensure it looks the way it’s supposed to. You may also have to add some CSS styling to make it appear the way you want.
As always, remember to click the Publish button at the end.
Adding Menus to the WordPress Footer
You make menus in WordPress by going to Appearance > Menus. Once you’ve established a menu, it’s ready to add, at least the locations supported by your chosen theme.
It’s also possible to create your menu within the WordPress Customizer, so it just depends on where you feel most comfortable adding new pages and links to your menus.
Check Out Our Video Guide to Adding Menus to the WordPress Footer
As a reminder, not all WordPress themes allow for menus within the footer. In fact, some of them only have one or two menu locations, so you’ll have to check to see if your theme supports menus. If not, refer back to the previous section for a workaround that uses a widget to incorporate a menu in the footer.
If using a theme that allows for menus in the footer, go to the WordPress Customizer and click on the Menus tab.
You’ll most likely see an empty menu page with several buttons to decide on. One of the buttons lets you select which menus to reveal and where to show them. The View All Locations tab shares where menus are supported on your theme.
Finally, the Create New Menu button works much like the standard menu creation panel in the dashboard, except it doesn’t require you to exit out of the Customizer.
Click on the Create New Menu button. If you already have a menu ready to go, you can add it to the footer by going to View All Locations.
Name your menu (in this case we’ll go with the obvious Footer name) and check the box called Footer Menu. This tells WordPress you want the Footer menu you create to show up in the Footer location. They’re separate things; one is the actual menu and the other is the region of your website where the menu goes. You’re more than welcome to switch the name of your footer menu if you find it a bit confusing.
Click on the Next button at the bottom of the panel to proceed.
Now you have a menu named Footer, but it lacks any buttons or links to make it a truly functional menu.
Click the Add Items button to start placing links and buttons to pages in your menu.
A new slideout panel appears with all the options to add to your menu. For instance, you can include custom links to internal or external pages, posts from your blog, pages from your own site (already created pages), products, tags, and categories, along with whatever other types of content pages you may have.
Each menu item you choose gets placed and shown in the menu panel, where you’re able to reorganize them and click on each one to edit their individual settings. For this example, we’ve added five links to pages throughout our website, including the blog, a livestream page, and an About The Company page.
Refer back to our list at the beginning of this article for ideas on what to include in your footer.
Edit Footer in WordPress With Plugins
WordPress already has built-in tools to modify your footer, but the extent to which you can edit your particular site’s footer relies on your theme of choice and whether or not you want to mess with any code.
Check Out Our Video Guide to the Best Footer Plugins
As you’ll learn further down in this article, removing the default “Powered By” text requires you to tap into the footer.php file and remove some code. Therefore, it’s clear several aspects of footer editing may be out of your reach if you don’t have the experience or willingness to mess with code or find a new theme.
That’s where WordPress plugins come into play. Quite a few plugins offer footer editing and expansion features to remove the need to edit code manually and sometimes to make quick changes to your footer, like with colors and columns.
WordPress footer plugins we recommend include the following:
- Footer Mega Grid Columns — This plugin fixes any problems you have with a theme where the footer lacks a grid format with three columns. Some themes only offer one or two columns, while other times a footer gets entirely stripped from the theme. Footer Mega Grid Columns adds a footer widget to not only display three columns but additional ones if needed.
- Remove Footer Credit — Use this plugin to completely remove the footer credit placed there by WordPress or your theme developer. You also have the option to type in your own HTML code to create a footer credit or a bit of content that’s more suitable for your site.
- Header Footer Code Manager — This plugin has a slight learning curve, but it’s an ideal solution for intermediate WordPress users who would rather have access to footer and header coding areas in the dashboard, as opposed to opening up the site files. You can add an unlimited number of styles and scripts to the footer, which often comes in handy for showing information after every blog post or page.
- Footer Putter — Use this plugin to insert a widget for copyright information or for your trademarks. This is a rather useful solution for placing details about your company in the footer area, including things like links, business hours, telephone numbers, and more.
- Footer Text — As one of the simplest ways to modify your WordPress footer, the Footer Text plugin activates a frontend and backend editing panel to change what’s in your footer. It comes with a WYSIWYG (What You See Is What You Get) editor, so it’s possible to format your text and potentially add items like pictures.
In the following sections, we’ll explore how to use some of these plugins for tasks like adding social media buttons or inserting custom code into the WordPress footer.
Manually Edit the WordPress Footer With Code
A more technical way of editing your WordPress footer involves tapping into the footer.php file and editing its contents.
You must have experience with coding — or be eager to learn — in order to make this method useful for you, but there are some minor tweaks that all beginners can handle (mainly just removing preset text in the footer). Take a look at our guide to adding header and footer code for the most detailed information.
To access the footer.php file, link to your WordPress site files by using an FTP client. We also recommend checking out this article on how to use SFTP to link to WordPress as SFTP is more secure than FTP.
Once connected to your WordPress site files through your FTP client, locate the /public folder. Click on /wp-content and then /themes to reveal all themes currently installed on your WordPress dashboard. Note which theme is active on the site and open the folder for that one.
All WordPress themes have a footer.php file somewhere in the theme folder. Scroll through the batch of files to locate that footer.php file.
Open the file with the editor of your choice. Once in there, you can edit the current code or add new content depending on what you’re trying to achieve. The get_template_part section is often modified to insert new bits of text, but we’ll leave that up to you since every footer is different.
As an alternative, you can edit the footer code by using a plugin that displays a visual field for the footer.php file. This way, you don’t have to install an FTP client and link it to your website. It’s also a more intuitive, beginner-friendly process that remains available on your dashboard at all times for future edits.
To make this happen, install and activate the Header Footer Code Manager plugin.
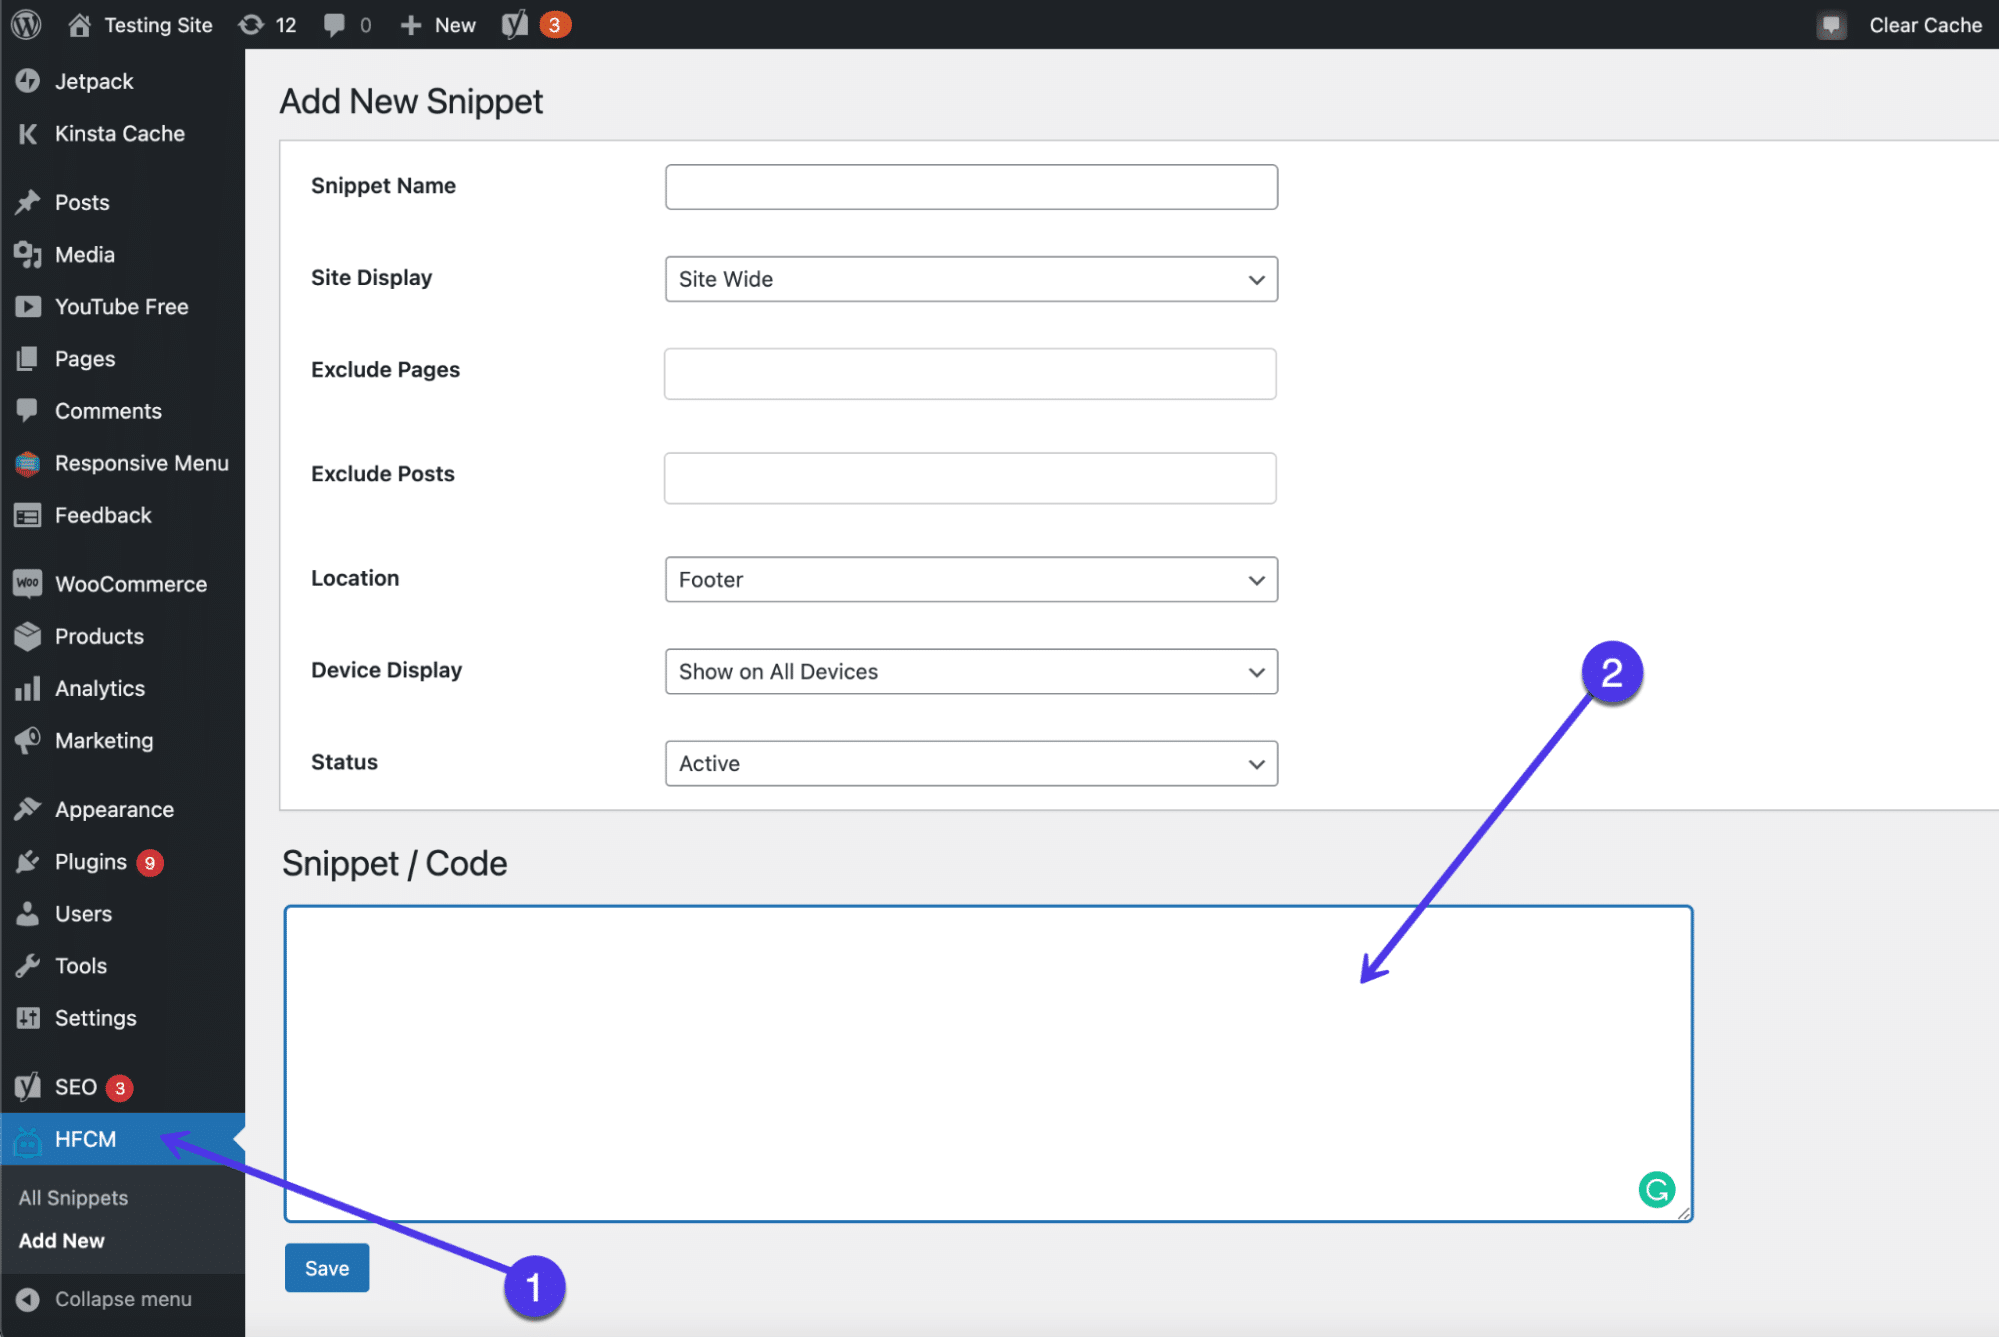
Once it’s been installed, click on the HFCM tab that appears in the WordPress dashboard. Then, name the snippet, choose where you want it displayed and set the location as Footer.
The most important part is the Snippet/Code field, which you’ll fill in with whatever code you want. Some people use this plugin for things like verification or tracking codes that don’t show up on the front end. However, it’s also available for you to use for typing in new text and gaining almost complete control over the content in your footer.
Make sure you click on the Save button to see the results.
Use a Page Builder With Footer Designer
A bonus way to modify your WordPress footer, without the need for code or many of the standard WordPress footer tools, is with a page builder. Not all page builders offer footer editors, so it’s important to conduct some research and ensure that either your current page builder offers it or the one you plan on buying has footer features.
Check Out Our Video Guide to Editing the WordPress Footer with Page Builders
Regardless, this is a relatively basic feature for a page builder, so it’s a good idea to only go for a page builder if you plan on customizing your entire site with it.
A few other page builders offer footer editing, but our favorites include Elementor and Visual Composer.
To create a custom footer with Visual Composer, you must have the Pro version. There are some workarounds to edit the lower part of your website with the free version, but the true drag-and-drop builder for the footer requires an upgrade.
Once installed, click on the Pages button in your dashboard. Scroll through the pages you want to edit and select the Edit With Visual Composer link on any of those pages.
That brings up the Visual Composer designer, with a live preview of your webpage on the right side and drag-and-drop design tools like elements and templates on the left.
One of the easiest ways to implement a beautiful footer is to simply choose a template (many of which are free). These templates provide professional designs for your entire site, along with a nice footer that’s customizable.
To see what’s available, you can click on the Templates tab, then the Get More Templates button. Visual Composer offers templates for all aspects of your site, including headers, footers, and sidebars.
The next window shows a large library of templates, all categorized under filters for things like Elements, Templates, Blocks, and Footers.
Choose the Footers tab to show all premade footer templates.
Once again, this part of Visual Composer requires the Pro version. Once active, you can scroll through the dozens of footer templates to implement them on your website and edit them as you please.
One of the other page builders with footer editing tools is called Elementor. Much like Visual Composer, Elementor provides a full website builder for constructing homepages, product pages, footers, and more.
Keep in mind that you do receive footer content blocks for free with this method, but the actual footer builder uses the Pro version of Elementor. Like Visual Composer, you need to upgrade for full functionality.
To get started, install and activate both Elementor and the Elementor Header Footer and Blocks Template plugins.
Click on Templates > Theme Builder to open the complete website builder from Elementor.
Here, you’ll see a menu to edit various parts of your site such as the header, footer, and single pages.
Select the parts of your site you want to customize on the left side menu or with the icon buttons in the middle of the page. As you can see, there’s a Footer link in two places.
The footer editor works similarly to every other editor in Elementor: You can change the layout, adjust the style, and click on the block to type in new content. Every aspect of the footer is customizable when using Elementor, making it one of the more flexible and desirable options when it comes to footer control and learning how to edit a footer in WordPress.
The Header Footer and Blocks plugin provides content modules made specifically for headers and footers. In terms of the footer blocks, you can choose from modules like copyright information, images, site titles, and taglines.
To utilize these blocks, go to Appearance > Header Footer and Blocks in the dashboard.
You can also make a unique block and choose to edit it in the Elementor page builder. Once in Elementor, scroll down to the block collection for Headers Footers and Blocks, then drag any of these elements into your current design to activate some of the more common content items within a footer. As mentioned, you can find everything from search bars to site logos and cart icons to copyright text in these blocks.
How To Edit a Footer in WordPress.com
WordPress.com, the hosted version of WordPress, includes footers for many of its themes, with options to remove or change the footers with a few clicks. The methods for editing footers in WordPress.com are somewhat similar to how it’s done in the self-hosted WordPress.org version, but with a few differences.
Check Out Our Video Guide to Editing a Footer in WordPress.com
First of all, the interface doesn’t look exactly the same.
You must log in to your WordPress.com dashboard and manage your footer in the Theme Customizer. Luckily, many of the themes offered for WordPress.com are similar or exactly the same as what you’d find for WordPress.org. However, that also means the way in which you edit the footer in WordPress.com depends on which theme you install.
To begin, go to Appearance > Customize in the dashboard.
Look at the Theme Customizer tabs available for that particular theme. Most themes have a Widgets tab, but you must figure out if a footer area for placing widgets is provided with your theme. Click on the Widgets tabs to find out.
This current theme we’re using provides a Footer Widget module. If you don’t see an option to put widgets in the footer, consider trying a new theme, or use menus instead of widgets.
For this example (with a footer widget area), click on the Add A Widget button.
A slideout menu appears with a collection of widgets. You can select whichever widgets make the most sense for your company.
Again, the theme dictates how many widgets you can fit into the footer without it looking too cluttered. It appears this particular theme allows for about three columns of widgets before the design starts looking messy.
For our example, we’ll choose a Contact Info and Map widget, along with a Follow Blog widget, which prompts visitors to sign up with their email addresses.
The preview on the right shows the widgets in action. We recommend going through each widget settings panel to configure individual elements like the display text and choose which fields you want to show in each widget.
Make sure you click on the Save Changes button so the widgets appear on the front end of your website.
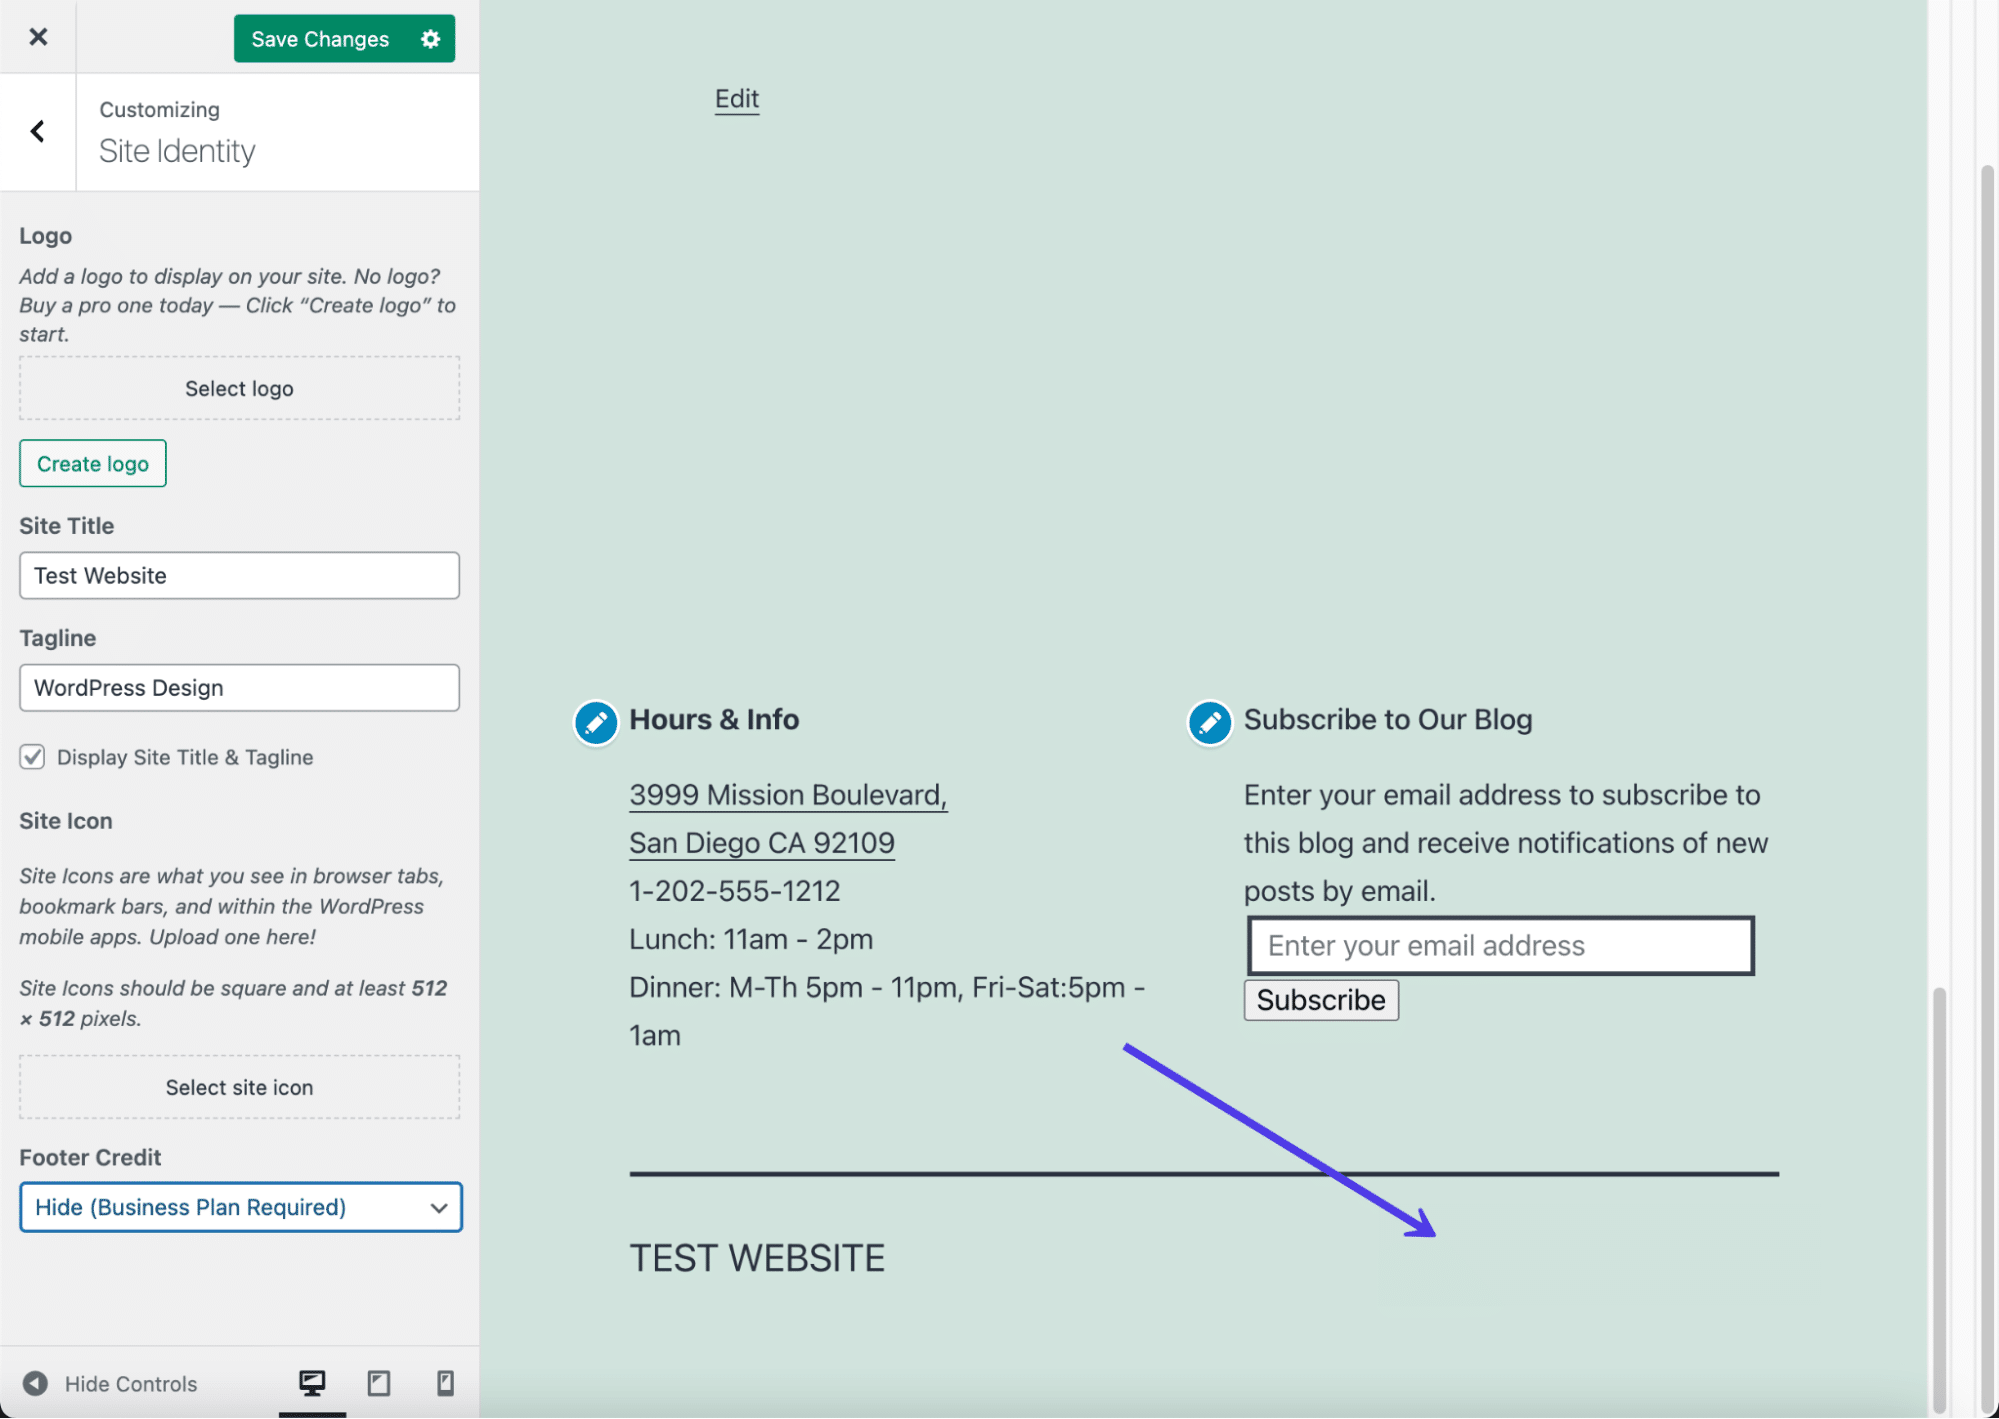
You also may notice that WordPress.com automatically adds your site title and a WordPress credit at the very bottom of your footer. You can usually get rid of the site title if you want, but the WordPress credit removal requires you to pay for the Business Plan.
To modify both of these elements, click on the Site Identity button.
First off, go to the bottom of the settings to find the Footer Credit field. Click that dropdown to reveal all possible options.
Every one of the credits has some sort of reference to WordPress. A WordPress credit isn’t a big deal if you’re running a personal blog or online journal, but we suggest you upgrade to the Business Plan and remove the credit if your site is for a legitimate business.
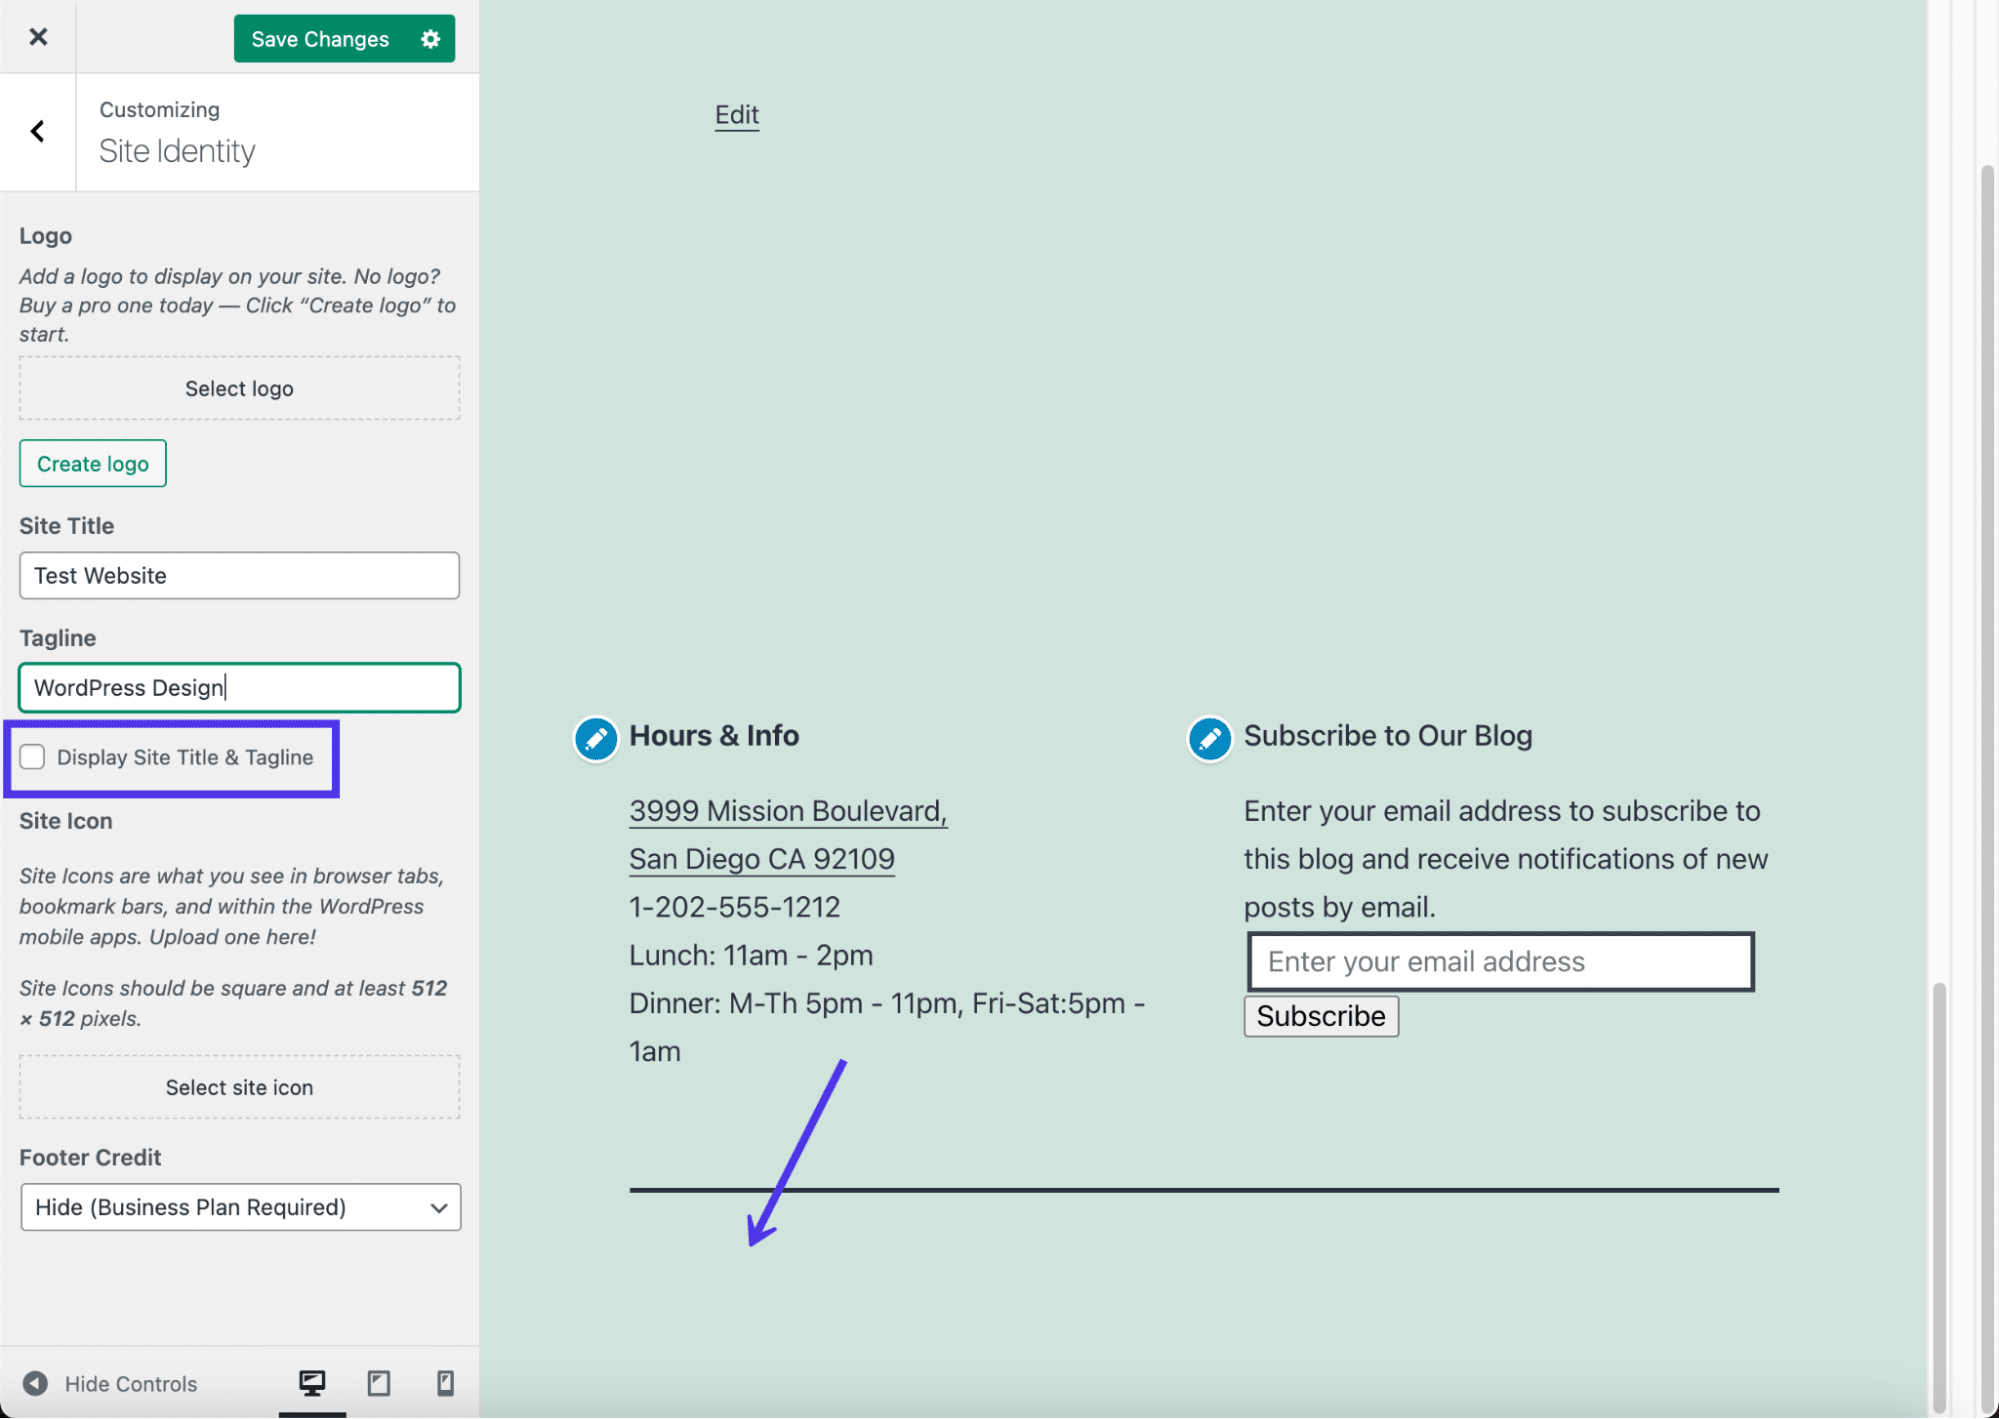
After that, you can click on the dropdown menu and choose the Hide option to get rid of the credit completely.
The credit then disappears in the preview, leaving whatever widgets you added to the footer along with the site title.
Some themes have the ability to remove the site title from the footer as well. The easiest way is to uncheck the Display Site Title and Tagline box. That gets rid of the site title in the footer and potentially the header. For the header, we recommend uploading a logo anyway.
Other themes have different ways of removing the site title and tagline. Sometimes it’s not possible at all, while other times the site title isn’t included in the footer, to begin with. When in doubt, try deleting what’s inside the Site Title field if you don’t have the Display Site Title and Tagline check box.
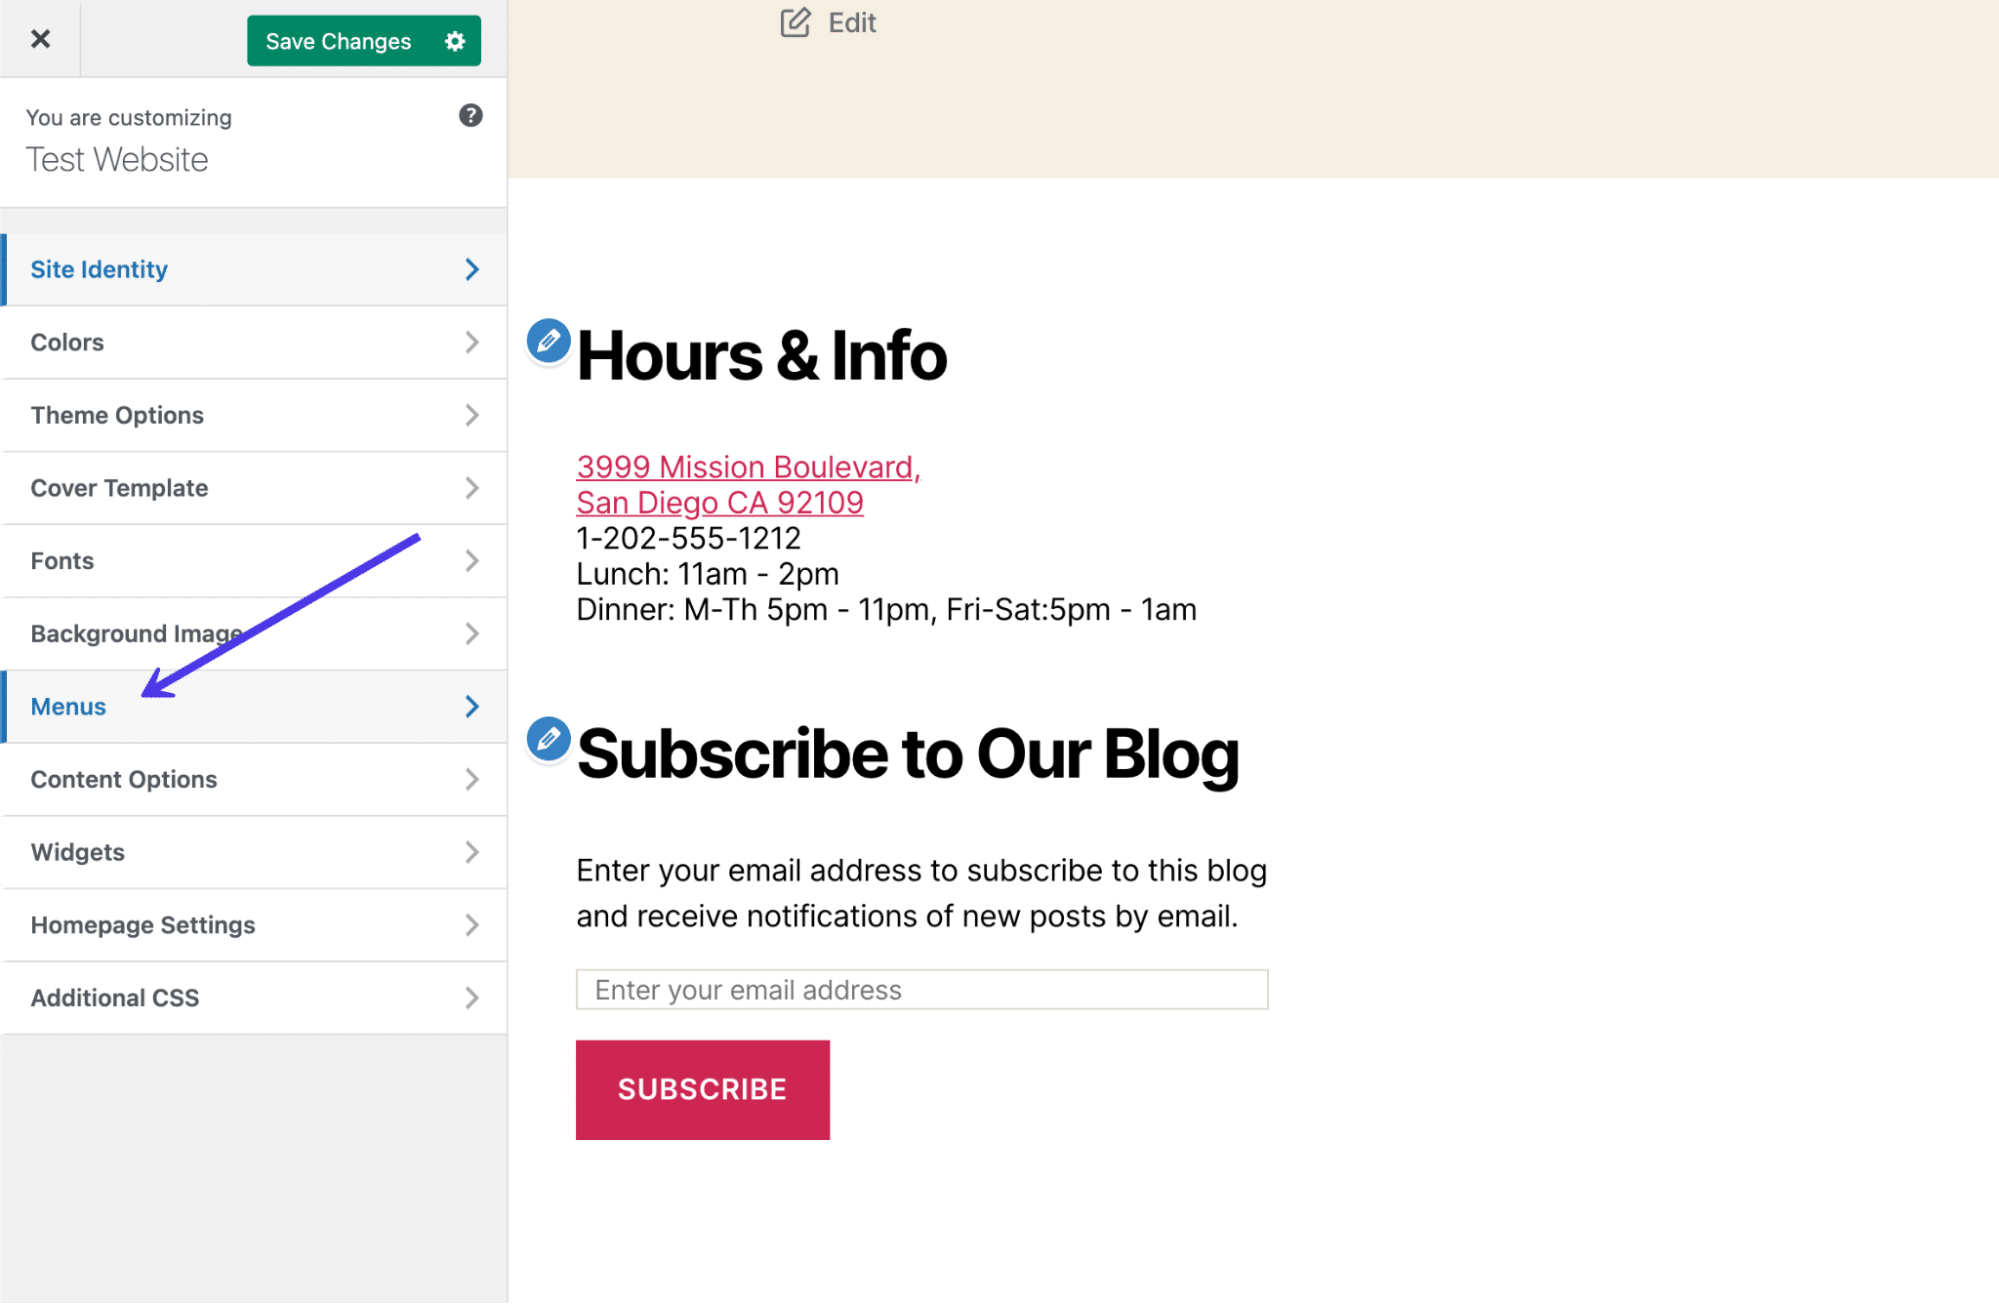
Another way to insert content in your WordPress footer is by utilizing the Menus panel. Not all themes allow for menus in the footer, but it’s a good idea to at least check.
Click on the Menus tab to continue.
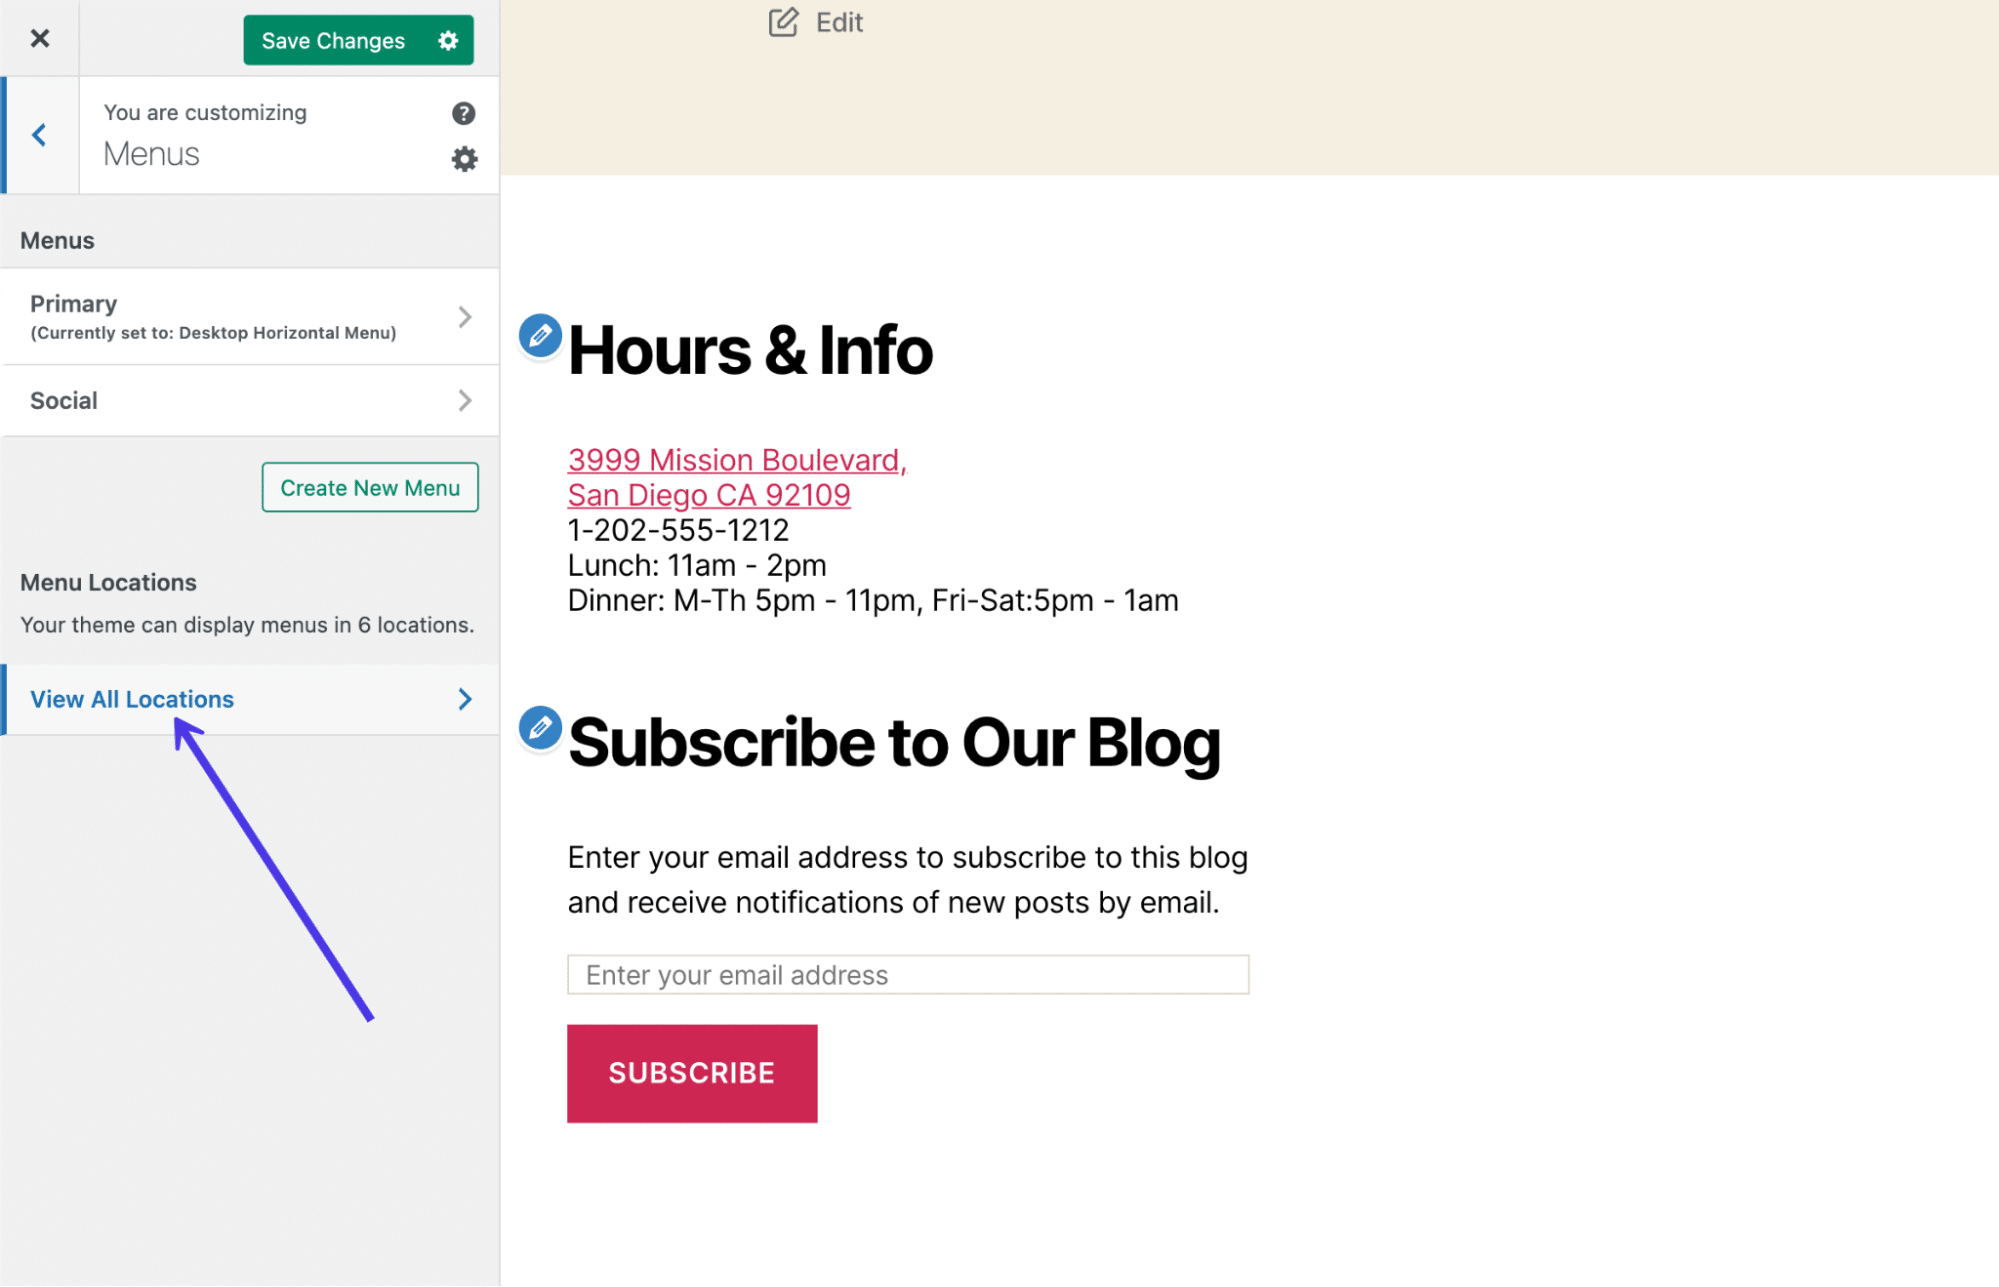
Select View All Locations. This brings up a list of where you’re allowed to place menus in this particular theme.
For our example theme, we have quite a few menu location options, one of which is for the footer. You won’t be so lucky with every theme you encounter, so be prepared to either swap them out or consider using the widget technique for editing your footer instead.
With themes that support footer menus, click on the Footer dropdown field.
We chose a premade Social menu for the footer. Feel free to select the Create New Menu link if you don’t already have a suitable menu.
The result is a simple text/link menu that appears above whatever widgets you already added to the footer. It’s possible you’re unable to add widgets to your theme, so you may not see the exact same format.
Keep in mind that all menus are simply lists of text and links, so you won’t be able to incorporate something like a social media icon menu unless you consider a separate plugin that supports that.
How To Add Social Media Icons to WordPress Footer
A mainstay of the footer area is the classic list of social media buttons. Many websites add them in their primary menus, but it’s also a wonderful idea to have them at the bottom of your website as well, or as an alternative to placing the social buttons at the top of your site. In general, if you feel the header is already cluttered, go for footer placement instead.
Quite a few plugins provide widgets to add social media icons and links to your footer and header. Therefore, we suggest straying away from any custom coding here.
Although many social icon plugins exist, the goal for our purposes is to find one that specifically provides a quick widget for adding your links and customizing the buttons.
A popular, highly-rated solution is called Social Icons Widget & Block by WPZoom. It has over 400 icons for social media and other platforms, along with a widget to place your icons directly into your footer. Not only that, but you can upload your own custom icons and switch settings for colors and sizes.
![]()
After installing the plugin, you can go to the Settings page and disable certain font packages if you don’t want them. However, all of them are already active, so skip the settings if you’d rather have everything available to you.
To add social icons to your WordPress footer, go to Appearance > Customize.
This brings you into the WordPress Theme Customizer, where you’re able to add widgets to the footer (as long as your theme supports widgets in the footer). As we’ve mentioned earlier in the article, the only way to get around a theme that doesn’t have a footer widget is to find a new theme or custom code the footer yourself.
Find and click on the Widgets tab to proceed.
This theme has two areas to add widgets to the footer. That’s not the case with all themes, so you may find that your theme has no footer widgets areas. On the other hand, you might get lucky and have four or five spots to place widgets in your footer. It all depends on the theme you install.
Click on one of the Footer tabs.
It’s possible to add a myriad of widgets — or at least whichever widgets you have installed — to the footer.
Click on the Add A Widget button to show the menu of widgets available to you.
The slide-out menu provides a search bar and a list of possible widgets. Scroll down to locate the widget called Social Icons By WPZOOM.
![]()
You should now see the default social media icons and buttons in the preview for your website.
However, you’ll still need to customize the settings for these buttons to settle on the size of those buttons, coloring, and which links you want them to lead to.
Start by typing in a title for the widget, which appears in the footer (you can also leave this blank if you’d like). Continue by specifying settings like whether you want icon labels, nofollow links, and specific icon alignments.
![]()
Continue on with the settings to specify the icon style, background style, and padding. You can also choose an icon size and color. Keep in mind that you need to click on the Save button at the bottom of the widget customization module in order to see the results of your changes in the preview.
![]()
The Icons field already has some default social icons in there for you. Make a list of the social media sites you run for your company, and copy and paste the links into the respective fields. Remove any icons that don’t make sense for your business.
To open up the icon library and add more icons, click on the Add More button at the bottom of the field list.
![]()
The plugin offers a large collection of icons, with options to set icon colors, hover colors, and the icon kit source. The primary kit is called Socicons, but several other kits come with the plugin for free. Click on the Select Icon Kit dropdown to see your options.
Finally, browse through the icons provided with each kit. Many of them you may not even recognize, so only stick to the ones that you actively run and which will provide value to your customers.
In our example, we’ll choose the YouTube icon to add to our footer as well.
Click on the Save button to place it into the list, then click the next Save button at the bottom of the widget box to see your changes.
![]()
As you can see, we’ve made changes to the size and shape of the icons, while also adding an extra social icon. If your alterations don’t look quite right, go back into the widget settings to resolve the issues.
Always remember to hit the Publish button in order for the widget to take effect on the front end of your website. We also recommend checking the frontend yourself to ensure the social icons appear the right way.
How To Add a Background to Your WordPress Footer
Footer backgrounds are possible with the help of some footer plugins and page builders. However, you also have the ability to place an image or color background behind your footer by using the basic settings that come with your theme.
Check Out Our Video Guide to Adding a WordPress Footer Background
In case all else fails, we’ll show you how to insert CSS code to add a background to the WordPress footer.
Before anything, check your theme settings to see if footer background capabilities come standard. The Abletone Theme, for instance, offers a Footer Background Image tab inside the Theme Customizer.
All that’s required is for you to click on the Select Image button and search for an image in your Media Library, upload a new one from your computer, or look for a stock photo that will suit your needs.
Once uploaded, the image appears as the background for your WordPress footer. Some themes offer additional settings for stretching or tiling the image, but without editing the CSS yourself, you’re stuck with whatever settings come with the theme.
If you don’t have a theme, page builder, or plugin that does the trick for adding a footer background, though, adding CSS code handles this task regardless of your theme or page builder.
Go to the Theme Customizer in WordPress, then click on the Additional CSS menu item.
Paste this CSS code into the field, but replace the YOURIMAGEURL with the URL of your desired image:
footer { background: url(YOURIMAGEURL) repeat; }You can find the URL for any image in its details view after it’s been uploaded to your Media Library.
Be sure to click on the Publish button to see it on the front end.
You can also insert other bits of code to change elements like sizing and background stretch size or repetition. As you may imagine, adding the CSS code is a little less simple than clicking on plugin buttons, but a quick search online can help you find the right code for your needs.
Removing “Powered by WordPress” Text
In the previous section, we covered how to remove the WordPress credit in your WordPress.com footer. It’s a little tricker on a self-hosted WordPress site since most themes don’t offer a way to remove the credit in the Site Identity section of the Theme Customizer.
Therefore, we must look at other ways to remove the “Powered by WordPress” text in the footer.
To tackle this process, read our in-depth guide on removing the “Powered By WordPress” tag in your footer. This knowledge base article covers all of the following topics:
- Why you may want to remove the “Powered By WordPress” message
- When you might not want to remove it
- Methods to avoid when trying to remove the credit
- How to remove the credit with a plugin
- How to manually remove the “Powered By WordPress” credit
- Replacing the footer credit with your own code
Editing the footer credit with a plugin is significantly easier for the average WordPress user. However, going the manual route ensures you have full control over the footer, and it eliminates the need to have another plugin installed on your dashboard.
Is It Legal to Remove “Proudly Powered by WordPress”?
Considering that WordPress makes it a little tricky to remove the “Proudly Powered by WordPress” text from your footer, you may wonder whether it’s kosher to get rid of the message.
The answer is that you’re more than welcome to take out the “Powered by WordPress” text in your footer without having to worry about any legal repercussions or violations of the WordPress Terms of Service. This is because WordPress use falls under a GPL (General Public License), meaning anyone can redistribute and alter WordPress in any way they see fit.
Overall, we highly recommend removing the “Proudly Powered by WordPress” text since it has nothing to do with your brand and simply promotes another organization. Yes, it’s nice to get the word out about WordPress, but not at the expense of your own branding and valuable website space.
Now, footer messages shown by your theme developer are a different story. We’ll talk about that in the next section.
How to Remove “Powered by XYZ Theme” Text in WordPress Footer
We now know that you’ll have no problems with the law or WordPress when eliminating the “Proudly Powered by WordPress” footer message. But what about some of the theme developers who put “Powered by XYZ Theme” in the footer?
Luckily, the vast majority of WordPress themes also fall under a General Public License, making it entirely acceptable to cut out that text and replace it with something more suitable for your business. However, it’s prudent to double-check with your theme developer to ensure they don’t have a requirement in their terms and conditions that stipulates that you keep the development credit in the footer.
You can do this by simply asking the developer if the theme falls under a General Public License. And if it doesn’t, or their terms and conditions make it a requirement to leave the credit, we suggest seeking out another theme, as that’s not exactly a desirable item to have on your website.
So how do you go about removing the “Powered by XYZ Theme” text in your footer?
Check Out Our Video Guide to Removing “Powered by WordPress” from your WordPress Footer
Some plugins that remove the “Powered by WordPress” message also can scrap any messaging inserted by the theme developer. However, this isn’t a sure thing.
Therefore, we suggest opting for one of the following methods:
- Edit the footer site files directly to eliminate the credit message.
- Ask the developer to remove it for you.
- Upgrade to the premium version of the theme.
Editing the footer site files takes a bit of technical knowledge, but you can often get this done in a matter of minutes. Asking the developer to remove the theme developer credit could end up working, but you’re essentially hoping you’ll get a friendly developer who’s willing to walk you through the process. Usually, they won’t offer this if you’re only using the free version of their theme.
The easiest option is to upgrade to the premium version of that theme. Many premium theme developers give away simplified, free versions of their themes in the hopes you’ll upgrade for improved features and increased control.
Since upgrading to a premium theme and speaking with the developer can be done on your own, we’ll mainly talk about how to edit the theme site files to get rid of that credit message.
To begin, check out your theme’s footer to confirm if you have developer credit on the bottom. If so, take note of the exact text being displayed, as this could help seek out the message in your site files.
Connect to your site files using an FTP client, as discussed earlier in this article. Each theme developer differs on where they put the footer credit, but a good place to start is going to /public/wp-content/themes.
Choose the theme you have activated on your website.
From here, one option is to open the main footer.php file in a text editor or PHP IDE and search for references to the footer credit. Use the Find function in your chosen editor to type in and search for the exact text that appears as the credit message in your footer.
As with all themes, this may not be the right file for removing the footer credit; it entirely depends on how the theme was built. If you have no luck with the footer.php file, continue looking elsewhere.
One of the most common places to find the footer credit information code is in the /template-parts folder. We found this was the case for the current test theme we have installed for this tutorial.
We can go to the /footer folder, then click on the site-info.php file. That site-info.php file (or some variant of that) is a common place for storing the theme’s footer credit information.
Feel free to either delete the footer credits or replace them with something else. For this situation, we’ll simply remove the credits hook and the do_action credits code at the bottom.
And that’s successfully removed the entirety of the credit being shown for the theme developer. It also didn’t have any effect on the footer content, like our widgets and menus.
As mentioned before, one way to hide the footer credit, while also supporting the theme developer and receiving far better features, is to upgrade to the premium version of the theme. Keep an eye out for a button in your dashboard to upgrade to a Pro version, or go to the developer’s site to make a payment.
How To Remove the WordPress Footer Entirely
Although not recommended for most sites, it sometimes makes sense to remove the WordPress footer in certain situations altogether.
If you find that a WordPress footer causes too much clutter (which is common with landing pages), or if you’d instead the footer didn’t get crawled by search engines, taking the footer out of the equation entirely may not be a bad option.
Keep in mind, however, that you’re not deleting the footer from your WordPress files. The footer.php file is a core part of the WordPress files, so you must leave it. However, we can use CSS code to tell WordPress not to display the footer and its content.
To hide the WordPress footer completely, go to the Theme Customizer and click on the Additional CSS tab.
The goal is to paste CSS to tell WordPress that we don’t want to see the footer on our website.
We’re trying to hide everything in this example, from the copyright information to the WordPress and theme developer credits. You can also use this method to hide items like widgets and menus within your footer.
Go ahead and paste the following code in the CSS box:
footer{

display:none;

}
This tells WordPress to hide everything within the footer.php file. The file remains inside your file directory, just in case you’d like to re-add content in the future.
The Theme Customizer preview should now show a blank space. Make sure you hit the Publish button to see the results on the front end.
Although that CSS should work for most themes, you may find that the theme developer has a different file configuration. Another way to potentially remove most of the footer content is by using the following code instead of the previous code discussed:
.site-info { display:none; }This option is less likely to work, but it’s not unheard of for theme developers to make a file called site-info.php in a footer’s template-parts folder.
From links to support documents and social media pages, your website footer contains a lot of important info. 💪 Learn how it works in this guide ⤵️Click to Tweet
Summary
WordPress footers have many purposes, from adding social media buttons to displaying recent blog posts, support pages, and forms. The goal is to take advantage of this extra space, since it’s not wise to pack your main menu with too many links or try to fill your sidebar with an onslaught of content.
You’ve learned many ways to edit a WordPress footer. We hope you can now successfully edit and customize footers on any WordPress site!
Let us know in the comments below if you have any questions about editing the footer in WordPress!
Get all your applications, databases and WordPress sites online and under one roof. Our feature-packed, high-performance cloud platform includes:
- Easy setup and management in the MyKinsta dashboard
- 24/7 expert support
- The best Google Cloud Platform hardware and network, powered by Kubernetes for maximum scalability
- An enterprise-level Cloudflare integration for speed and security
- Global audience reach with up to 35 data centers and 275 PoPs worldwide
Test it yourself with $20 off your first month of Application Hosting or Database Hosting. Explore our plans or talk to sales to find your best fit.

The WordPress footer appears at the bottom of each page on your website. This makes it perfect website real estate to add content to. For example, you can link to important pages on your website from the footer to make it useful for people who visit your site.
You might be wondering: what kind of things should you put in your footer?
The short answer is anything and everything can work, but there are a few standard items that are traditionally found in footers.
You can use the WordPress footer to link to pages on your site that don’t fit in the main menu but are still important for users to be able to discover quickly. It’s also a great place to add contact information, link to your privacy policy and terms and conditions, add social media links, and share company information.
You can also use it to provide an easy-to-navigate sitemap, link to apps, share your latest blog posts, or let people subscribe to your newsletter.
The possibilities are endless!
With this in mind, in this tutorial, we’ll show you how to customize your WordPress footer in a variety of different ways.
Finding and editing your WordPress footer area
The phrase “footer” refers to the bottom section of your website. Generally speaking, this is where you find links to the website’s privacy policy, terms and conditions, and other useful links.
If you’re new to WordPress, you might not know exactly how to access the footer customization section. The thing is, different WordPress themes have different numbers of footer areas, and they’re used differently.

So, before you publish any changes, you should preview any changes to make sure that they make sense on your site. You can adjust the WordPress footer’s width, height, spacing, rows, fonts, and background from the Layout tab.
Adding widgets to the footer
You can add all sorts of widgets to the WordPress footer area. To get started, log into your WordPress.com account and head over to the admin panel. Next, navigate to Appearance → Widgets to start adding widgets to the footer.
On the Available Widgets screen, you’ll see a list of all the available widgets you can add to your website. It will look something like this:

Simply scroll to the widget you want to show on your website’s footer and click the Add Widget button. The customizer will display a list of configuration options for your chosen widget. For example, if you choose to add the Pages widget, you’ll be able to give it a title, set the sort by options, choose which pages to exclude, and set conditional logic.

Once you’re done, click the Save button to save changes and continue. You can also drag and drop widgets directly from the block editor.

So, what kind of widgets can you add to your WordPress footer? Loads!
Here are examples of some of the widgets WordPress.com lets you add to your website’s footer:
- Archives. The Archives widget organizes blog posts you’ve published by month. This is particularly useful for visitors that want an easy way to browse through your older content.
- Authors. The Authors widget lets you show the names of authors and writers in the footer. You can display author names or avatars, links to a list of their blog posts, both recent and old. The widget shows posts from the Contributors, Authors, Editors, and Administrators user roles.
- Calendar. The Calendar widget lets you display links to your posts by date.
- Category. The Categories widget lets you show posts by category in the footer area. It’s perfect for websites that want to organize blog posts by topics.
- Contact Info & Map. You can use the Contact Info & Map widget to display a location, hours, and contact information. It also lets you display a map if you’d like.
- Gallery. The WordPress Gallery widget lets you display a photo gallery in your website’s footer.
- Links. The Links widget lets you display a list of links in the WordPress footer. This is perfect for linking to specific blog posts from the footer.
- Navigation Menu. The Navigation Menu widget is the easiest way to display pages, categories, and custom links in the footer area. You need to have a custom menu to add a navigation menu widget to your website’s footer.
- Recent Comments. As the name suggests, the Recent Comments widget lets you display the most recent comments people have left on your blog.
- RSS. You can use the RSS widget to display posts from any RSS feed. If you have multiple blogs or want to share posts from your favorite blogs, you can use this widget in your WordPress site’s footer.
- Search. You can use the Search widget to add a search box to your website’s footer. This is incredibly useful for visitors as it allows them to quickly search your website.
- Video. The Video widget lets you add a video to the footer of your site. You can add videos that you’ve uploaded to your site’s Media Library.
There are many more widgets in addition to these that you can add to your website. To delete a widget from the footer, simply click the Delete link in the configuration options. The widget will automatically be removed from the WordPress footer.
Adding links to the footer widget area
Lots of website owners choose to add links to the WordPress footer widget area. It’s great for helping people find their way around your website. Besides helping with site navigation, it improves internal links, thereby keeping visitors on your site for longer. This also helps boost your website’s SEO.
To add links to the footer widget area, you need to create a new menu first. Go to Appearance → Menus → Edit Menus and click the create a new menu link to get started.

Next, give your menu a name and add links. You can add links to different pages, categories, or legal pages. For example, you might consider linking to your contact page, privacy policy, and terms and conditions page from the footer.
When you’ve finished creating the menu, go to Appearance → Widgets and add a Navigation Menu widget to the footer. This will display the selected links in the WordPress footer area on your website.
You can add as many links to each menu and as many menus to your footer as you’d like using the Navigation Menu widget. For example, you can create a separate menu for different categories or different types of pages such as Company Information or About Us.
Customizing the footer credit
By default, all WordPress.com websites link to the main WordPress.com website to help visitors set up a WordPress site of their own and further grow the WordPress community. This is the Powered by WordPress text in the footer.

However, you can customize the footer credit to something else, if you’d like.
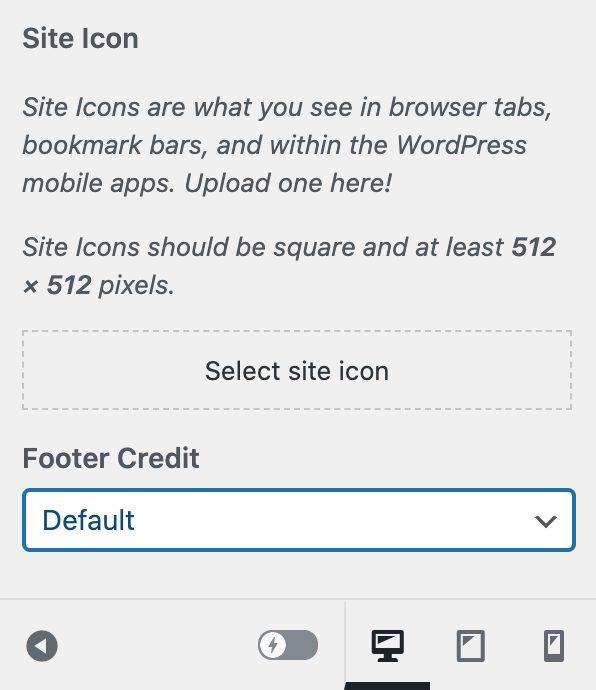
To customize the appearance of the footer credit, go to My Sites → Design → Customize → Site Identity → Footer Credit and choose the one you like. The different options you can choose from include:
- WordPress.com
- WordPress.com logo
- A WordPress.com website
- Blog at WordPress.com
- Powered by WordPress.com
You can even modify the style of the footer text with custom CSS code. And, if you’re on the WordPress.com plugin-enabled plan or higher, you can remove the footer credit altogether. You’ll see an option to hide the footer credit in the Footer Credit dropdown menu. You can also add your own text to the footer credit. For example, you can display something like © 2021 MyBusinessDotCom in the footer.
Start customizing your WordPress footer
Your WordPress footer is one of the most valuable parts of your website. For this reason, it’s important that you don’t overlook it.
If you’re running a WordPress.com-powered website, it’s effortless to customize your footer. You can add widgets to it, drag and drop blocks from the Gutenberg editor, and modify the footer credit.
We showed you different ways to customize your WordPress footer. Hopefully, you’re in a good position now to take the next steps.
Ready to set up your WordPress.com website and start customizing the WordPress footer? Sign up for WordPress.com today!
Любой посещаемый сайт, состоит из множества различных элементов, таких как шапка, основная колонка, левая колонка и подвал сайта.
Что такое футер сайта.
Футер, он же, подвал сайта — это нижняя часть вашего веб-сайта, которая появляется после основного содержимого. Обычно он присутствует на всех страницах вашего сайта.

Эта часть сайта расположена далеко внизу и часто игнорируется большинством веб-мастеров. Однако есть несколько способов использовать эту область, сделав ее более полезной для ваших пользователей, для SEO и для вашего бизнеса.
Большинство популярных тем WordPress имеют область виджетов для подвала сайта, которую легко редактировать. Вы также можете осторожно отредактировать файл шаблона footer.php в своей теме, чтобы удалить нежелательные ссылки из этой области.
Редактирование виджетов в футере в WordPress
Многие популярные темы WordPress имеют области виджетов для подвала сайта.
Вы можете использовать эти области виджетов для добавления текста, изображений или для добавления различных ссылок, включая ссылку на вашу политику конфиденциальности.
Добавить текст и изображения довольно просто. Вам просто нужно перейти в меню Внешний вид, перейти в Виджеты и добавить виджет Текст, Изображение или Галерея в область виджетов футера.

Чтобы добавить виджет, просто перетащите его в область Footer. Если вы плаваете с термином Виджет, то вы можете прочитать урок, по работе с виджетами.
Обратите внимание, что у многих тем будет несколько областей футера, и они могут использовать их по-разному.
Так, например, на скриншоте выше, сайт содержит три отдельных области (левая область, середина, правая область), и виджет на всю ширину.
Но в различных темах, комплектация может различаться.
После добавления виджетов, вы можете предварительно просмотреть свой веб-сайт, чтобы убедиться, что они отображаются там, где вы хотите.
Добавление ссылок в область виджетов футера
Вы также можете добавить ссылки на разные страницы, категории или на страницу с политикой конфиндициальности в области подвала сайта.
Для этого, в WordPress есть свой инструмент, для управления навигацией. Просто перейдите на страницу Внешний вид, Меню.

WordPress попросит вас указать имя для вашего нового меню. Введите имя, которое поможет вам легко идентифицировать это меню, а затем нажмите кнопку «Создать меню».

Теперь ваше меню готово, и вы можете добавлять в него ссылки. Просто выберите страницы, записи, рубрики и добавьте их в свое меню.

Когда вы закончите, нажмите кнопку «Сохранить меню», чтобы сохранить изменения.
Теперь ваше меню готово и вы можете добавить его в область виджетов в подвале сайта. Для этого перейдите на страницу Внешний вид — Виджеты в админке WordPress, а затем добавьте виджет Меню навигации в область футера.
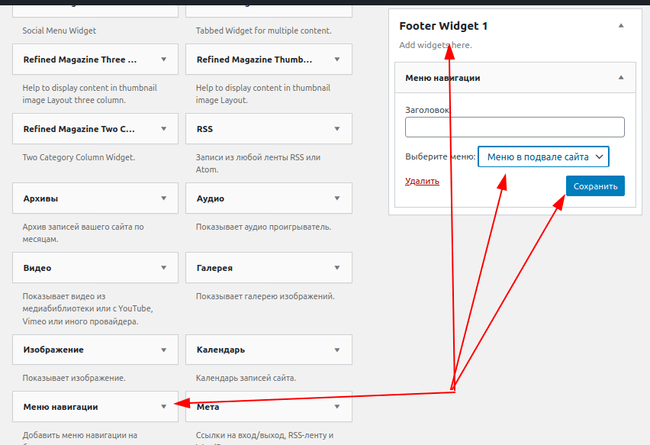
В настройках виджета, из раскрывающегося списка, выберите меню навигации подвала, которое вы только что создали, и нажмите кнопку «Сохранить».
Теперь вы можете посетить свой веб-сайт, и на нем вы увидите, только что добавленное меню.
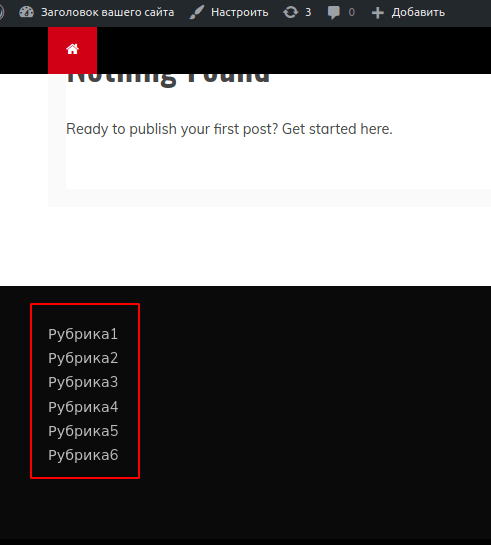
Если ваша тема позволяет, то вы можете создать несколько меню навигации и добавить столько виджетов в меню навигации в подвал своего сайта, сколько вам нужно.
Удаление текста «Powered by WordPress» из футера сайта.
Когда вы впервые устанавливаете WordPress, ваш сайт может иметь текст в подвале — Powered by WordPress (Работает на WordPress). Этот текст или ссылка находится не в виджете, поэтому часто непонятно, как эту надпись удалить или изменить.
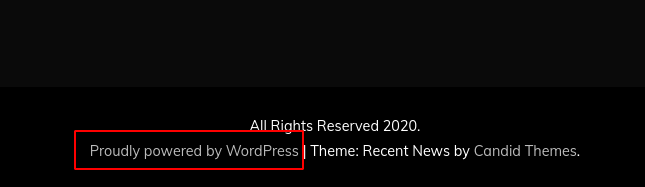
Большинство PRO версий тем WordPress, позволяют легко изменить этот текст. Для этого перейдите в меню Внешний вид, далее выберите пункт Настроить. Ищите возможность отредактировать подвал вашего сайта:
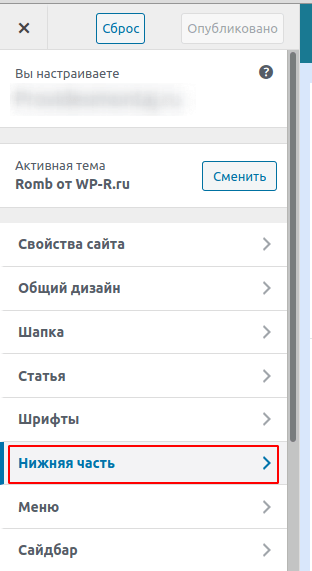
В этом примере я использую тему Romb. В ней, для изменения текста в нижней части сайта, мне нужно перейти в раздел Нижняя часть. Теперь у меня появилась возможность изменить текст подвала сайта:
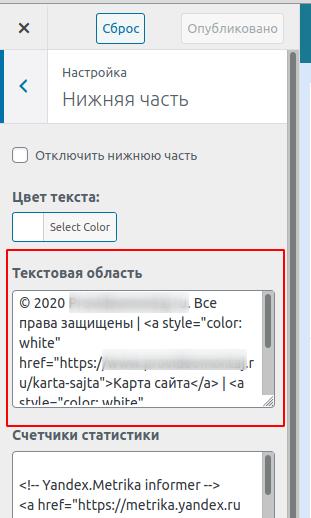
Закончив редактирование текста, для того чтобы изменения вступили в силу, не забудьте нажать кнопку «Опубликовать» в верхней части экрана.
Перейдите на свой сайт, и вы увидите измененный вами футер:
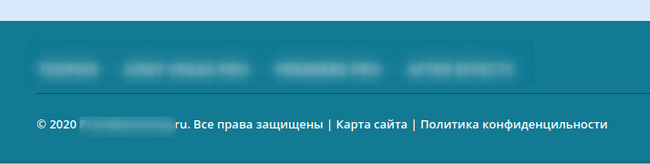
Ручное редактирование текст футера.
Что делать, если в вашей теме нет возможности редактировать текст футера с помощью настройщика?
В этом случае вам необходимо отредактировать файл footer.php. Это файл шаблона, который хранится в папке вашей темы WordPress и отвечает за отображение подвала вашего сайта, для этой конкретной темы.
Самый простой способ отредактировать это — встроенный редактор файлов темы.
Для этого, на панели управления вашим сайтом, перейдите в меню Редактор тем. WordPress выдаст вам предупреждение. Действительно, если редактировать необдуманно, то можно «поломать» свой сайт. Впрочем, это не страшно, если перед этим вы сделаете резервную копию своего сайта.
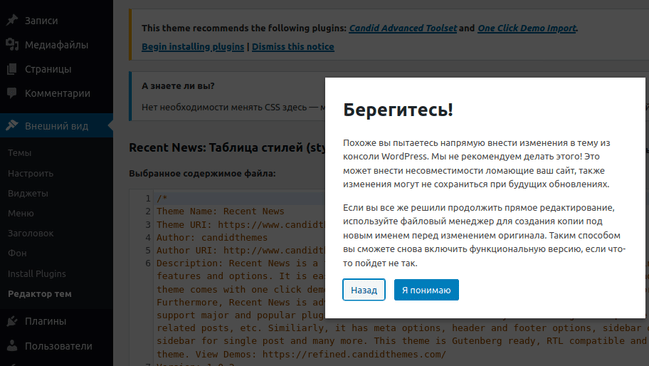
Нажав кнопку Я понимаю, найдите в правой части файл footer.php (или Подвал).
Просто кликните по нему, и файл откроется во встроенном редакторе кода.
Теперь вам нужно найти строку Сайт работает на WordPress. Хотя в вашей теме, она может быть несколько другой. И обязательно кликните на кнопку Обновить файл. Вот как это выглядит в теме Twenty Sixteen:
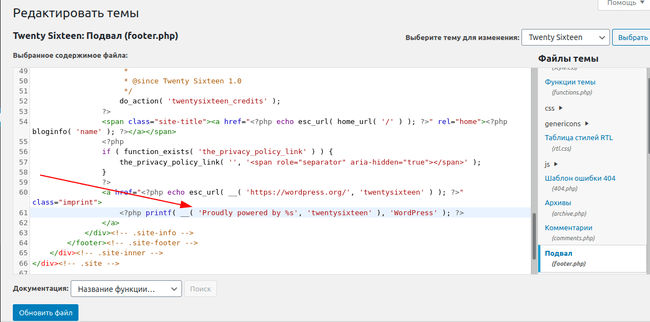
Добавление кода в подвал сайта
Иногда вам может потребоваться добавить фрагменты кода в подвал вашего сайта. Например, вы хотите поставить код Google Analytics.
Самый простой способ сделать это — установить и активировать плагин Insert Headers and Footers.
После установки и активации плагина, в админке WordPress перейдите в Настройки и выберите Insert Headers and Footers. Скопируйте и вставьте код в поле Scripts in Footer:
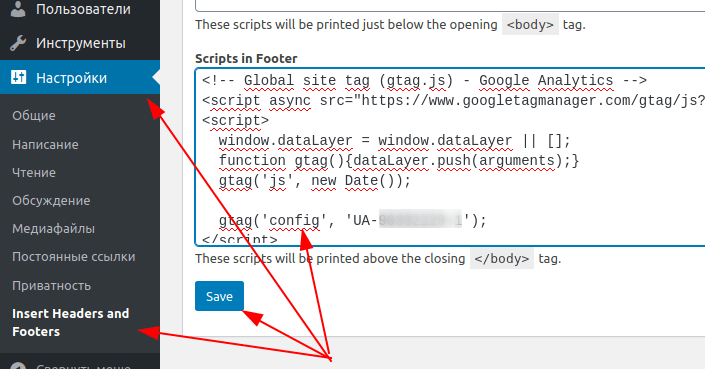
Не забудьте сохранить изменения.
Заключение.
Теперь вы знаете, как можно создать меню в подвале сайта, как там разместить произвольные ссылки, и как разместить код в нижней части сайта.
А если у вас остались вопросы, то задавайте их в разделе с комментариями.
Do you need to edit the footer area of your WordPress website? The footer area appears at the bottom of each page on your WordPress site.
There are several different ways website owners can use this space and make it more useful for their website visitors.
In this article, we will show you how to edit the footer in WordPress, step by step.
")
What is the Footer in WordPress?
The footer in WordPress is the bottom part of your website that appears after the main content area. It’s generally on every page of your WordPress website.
Many beginners overlook this area, but there are several ways you can make it more helpful for your visitors. You can even use your footer to boost your WordPress SEO and your business.
Here’s an example of our footer on WPBeginner that millions of readers see every month.

All top WordPress themes come with a footer widget area that’s easy to edit. You can improve this area by adding widgets, removing links, adding code, and even creating fully custom footers for different pages.
That being said, let’s take a look at how to easily edit the footer in WordPress. You can use the following links to jump to the section you want to read.
- Adding widgets in your footer
- Removing the ‘Powered by WordPress’ footer text
- Creating a custom footer for different WordPress pages
- Adding code to WordPress footer
Many of the best WordPress themes have widget areas in the footer.
You can use these widget areas to add text, images, or links to your privacy policy, legal disclaimers, and other important pages.
Adding text and images is quite simple. To do this, navigate to Appearance » Widgets and then click the ‘Plus’ add block icon in your ‘Footer Sidebar’ section.

To add a widget, simply click the block and it will automatically display. If you need more help, then see our guide on how to add and use widgets in WordPress.
Note that many themes will have multiple footer widget areas, and they may use them differently. After adding widgets, you can preview your website to make sure they appear where you want them to be.
Adding Links in WordPress Footer Widget Area
You may also want to add links to different pages, posts, and categories in your website footer area.
WordPress comes with an easy way to manage those links using navigation menus. Simply head over to the Appearance » Menus page and click on the ‘Create new menu’ link.

WordPress will ask you to provide a name for your new menu.
Enter a name that helps you easily identify this menu, then select the relevant footer location, and click on the ‘Create Menu’ button.

Your menu is now ready, and you can start adding links to it.
Simply select the pages, posts, or categories from the left-hand column to add them to your menu.

Once you are finished customizing your menu, click on the ‘Save Menu’ button to store your changes. For more details, see our guide on how to add a navigation menu in WordPress.
Your menu is now ready to be added to the WordPress footer widget area. Simply visit the Appearance » Widgets page in your WordPress admin panel.
Next, click the ‘Plus’ icon, search for ‘Menu’, then click the ‘Navigation Menu’ block.

After that, select your footer navigation menu from the ‘Select Menu’ drop-down, and give your widget a title if you like. The title will appear above the menu in your footer.
Then, click the ‘Update’ button to save your changes.

You can now visit your website to see your footer links in action. If you need another set of links, then simply repeat the same steps again.
2. Removing ‘Powered by WordPress’ Text from Your Footer
When you first install WordPress, your site may have a ‘Powered by WordPress’ link in a footer bar at the bottom of your site. This isn’t a widget, so it’s often not clear how to change it.

Some themes will alter this to their own text and links. If so, then you can normally change this text using the WordPress theme customizer. Simply go to Appearance » Customize in your WordPress admin panel.
Then, look for a heading called ‘Footer’, or something similar.

We’re using the Astra theme for this example. With Astra, you need to click on ‘Footer Builder’ in the theme customizer.
This brings you to a screen with customization options to change the footer text, add social media links, and more.
Simply click the ‘Copyright’ button to replace the footer text.

Then, you can delete the existing text and add your own message.
Once you’ve finished editing the footer, don’t forget to click the ‘Update’ or ‘Publish’ button at the top of the screen to make your changes live.

For more details, take a look at our in-depth guide on how to use the WordPress theme customizer.
Editing the Footer Text Manually
What if your theme doesn’t have the option to edit the footer text using the customizer?
In this case, you need to edit the footer.php file directly. It’s a template file in your WordPress theme folder and is responsible for displaying the footer area for that particular theme.
Editing the footer manually is an advanced option, and you’ll need to know PHP code in order to make changes to the file.
The easiest way to edit this file is by using an FTP client to connect with your WordPress hosting account. For more details, see our guide on how to use FTP to upload files to WordPress.
First, download yourfooter.phpfile, which can be found in your theme folder.

Then, you need to find the line of code in the file with the ‘Powered by WordPress’ text.
Next, simply delete or change that text, and upload your newfooter.phpfile.
It’s a good idea to make a copy of the file before making changes. That way, if you accidentally break anything, then you can easily upload the original file.
For more details, see our guide on how to remove the ‘Powered by WordPress’ footer links.
Many small business websites use landing pages to drive leads, make sales, and grow their email list.
Landing pages are slightly different than regular web pages since they have a single goal. See our guide on the difference between websites and landing pages to find out more.
You can create different WordPress footers to suit these individual pages, like your checkout page, thank you page, 404 page, home page, and more.
The best way to do this is with the SeedProd plugin. It’s the best drag and drop WordPress page builder used by over 1 million websites. It makes it easy to create high-converting pages without having to write any code.
The first thing you need to do is install and activate the plugin. For more details, see our guide on how to install a WordPress plugin.
Note: There is a free version of SeedProd available that you can use, but for this tutorial, we’ll show the Pro version since it can be used to create a variety of WordPress pages.
Upon activation, you need to go to SeedProd » Settings and enter your license key.

You can find this information under your account on the SeedProd website.
Next, you need to visit SeedProd » Pages and then click on ‘Add New Landing Page’ to build your first page.

On the next screen, you need to choose a template. SeedProd has dozens of professionally designed templates to choose from.
To select a template, simply over it and click the ‘Checkmark’ icon.

After that, you’ll be asked to give your page a name and URL.
Then, click the ‘Save and Start Editing the Page’ button.

This launches the drag and drop builder interface. You’ll see a live preview of the template you selected.
To change different elements, you can point and click to select any item on the page. Then, use the left-hand column to add new blocks, sections, and make changes.

Next, click on the ‘Sections’ tab in the left hand panel.
This brings up a menu of premade sections you can use to build your page.

Then, click the ‘Footer’ option.
This takes you to a section of different premade footer layouts. You can preview the footer section by clicking on the magnifying glass icon.
To add it to your page, click the ‘Plus’ icon.

After that, you can fully customize your footer with the drag and drop editor. For example, you can change the background color, add images, links, and more.

Once you’re done customizing your page, make sure to click the ‘Save’ drop-down arrow, and then the ‘Publish’ button to make your page live.
For more details on page customization, see our guide on how to create a custom page in WordPress.
Update: SeedProd is now a complete theme builder, which means you can easily design a custom WordPress theme without editing any code.
This also gives you the ability to redesign your WordPress footer across your entire website.
First, install and activate the SeedProd Pro plugin on your WordPress site. Then, go to SeedProd » Theme Builder from your WordPress dashboard. On this page, click the ‘Themes’ button.

This will open a window where you can select one of SeedProd’s 28+ pre-built themes that you can customize.
To select a theme, simply hover over it and click the checkmark button.

Once you choose a theme, SeedProd will automatically create all of the parts that make up your theme including the header, footer, homepage, sidebar, and more.
To edit the footer, click on the ‘Edit Design’ link.

Now you’ll be taken to SeedProd’s drag and drop theme builder where you can customize your footer.
You can delete any of the existing footer design by hovering over a block and clicking the trash icon. We’ll delete all of the existing blocks for this tutorial.

After deleting all of the blocks, you can pick a layout for your footer. We’ll choose the 3 columns.

Now you can start adding content to your footer by dragging blocks from the left side and dropping them into your footer.

In this example, we’ve added headings, text, social profiles, a navigation menu, and a newsletter optin form.
Once you’re happy with the footer design, click the ‘Save’ button and then click the drop-down arrow and hit the ‘Publish’ button.

You can then exit the visual editor and return to the theme builder dashboard.
After that, you can finish customizing the rest of your custom WordPress theme with SeedProd. For step-by-step instructions, you can follow our tutorial on how to easily create a custom WordPress theme.
Sometimes, you may need to add code snippets to your WordPress footer. This is often done to connect your site with external apps or plugins.
For example, you’ll need to add a script to your WordPress header or footer to add analytics tracking to your website. For more details, see our beginner’s guide on how to install Google Analytics in WordPress.
If you need to add additional code to your WordPress footer, then the easiest way to do this is using the WPCode plugin.
The first thing you need to do is activate and install the plugin. For more details, see our step by step guide on how to install a WordPress plugin.
Upon activation, go to Code Snippets » Header & Footer in your WordPress admin panel. Then, you can add your code into the ‘Footer’ box.

After that, click the ‘Save Changes’ button in the top-right corner of the screen before moving on.

For more help, take a look at our guide on how to add header and footer code in WordPress.
We hope this article helped you learn how to edit the footer in WordPress. You may also want to see our guide on how to get a free email domain and our picks on the best virtual business phone number apps.
If you liked this article, then please subscribe to our YouTube Channel for WordPress video tutorials. You can also find us on Twitter and Facebook.
Disclosure: Our content is reader-supported. This means if you click on some of our links, then we may earn a commission. See how WPBeginner is funded, why it matters, and how you can support us.
Editorial Staff at WPBeginner is a team of WordPress experts led by Syed Balkhi. We have been creating WordPress tutorials since 2009, and WPBeginner has become the largest free WordPress resource site in the industry.
Want to edit the footer on your WordPress website?
You know, the part of your website that usually has a ‘Powered by WordPress’?
It might also have a copyright statement, your social media links, contact information, an additional set of links such as privacy policy, disclaimers, and maybe even a Google map.
Your website visitors may feel the default statement is a little out of place and sometimes, a little unprofessional too.
So, it makes sense to edit the WordPress website footer and choose to display information related to your brand.
If you want to know how to edit a footer in WordPress, you’ll want to check this article out as we’ve got it all covered step-by-step!
Table Of Contents
- What Is a WordPress Footer?
- Examples of Website Footers to Inspire You
- How to Access and Edit the Website Footer in WordPress
- Removing the ‘Powered by WordPress’ Text From WordPress Footer
- Method 1: Edit Website Footer Using WordPress Customizer
- Method 2: Using the Astra Header Footer Builder
- Method 3: Edit the Footer in WordPress Using the Header Footer & Blocks Plugin
- Method 4: By Editing the footer.php File
- Customizing the WordPress Footer
- What You Should Not Be Doing
- How to Add Code to Your WordPress Footer
- Add Code to Your Website Footer Using the Astra Custom Layout Module
- FAQs on Editing the Footer in WordPress
- 1. Does a Website Require a Footer?
- 2. Is It Legal to Remove “Proudly Powered By WordPress”?
- 3. Can I Add Images to the Footer?
- 4. How Do I Add Social Media Icons to the Footer?
- 5. How Do I Add a Contact Form in the Footer?
- 6. How Do I Add a Google Map to the WordPress Footer?
- Final Thoughts
What Is a WordPress Footer?
As the name suggests, the website footer is at the bottom, or foot, of a website.
For instance, at the bottom of this page (and for that matter, across our WP Astra site) you’ll notice the following:
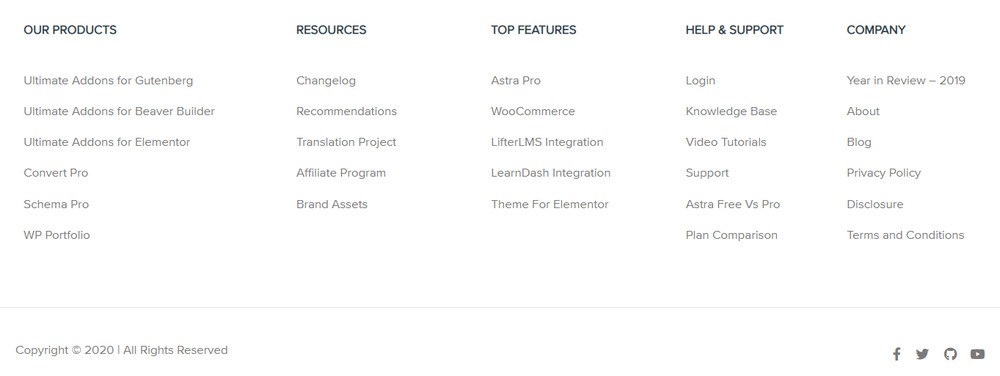
In addition to the copyright statement and social media icons, you’ll notice a set of additional links. These can be added using footer widgets.
If planned carefully, the website footer can increase your user experience significantly by including a collection of links letting users access them from just about any page.
Examples of Website Footers to Inspire You
Here are some examples from our very own website templates.
While you could let your imagination run wild and get creative with your website footer design, these examples should serve as inspiration to get you started.
Online Health Coach
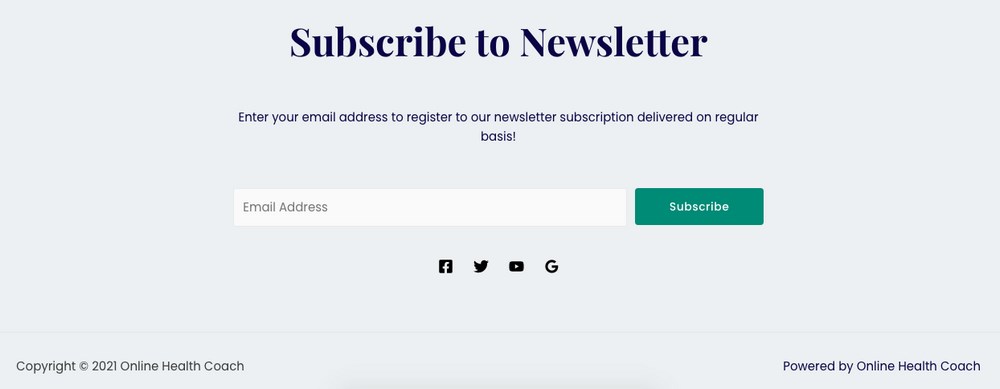
A simple straightforward website footer that includes a ‘Subscribe to Newsletter’ CTA, social media icons, copyright statement, and the ‘powered by’ line.
Business Consultancy Firm

In this example, the footer includes the address, in addition to the elements mentioned earlier.
Digital Marketing Agency
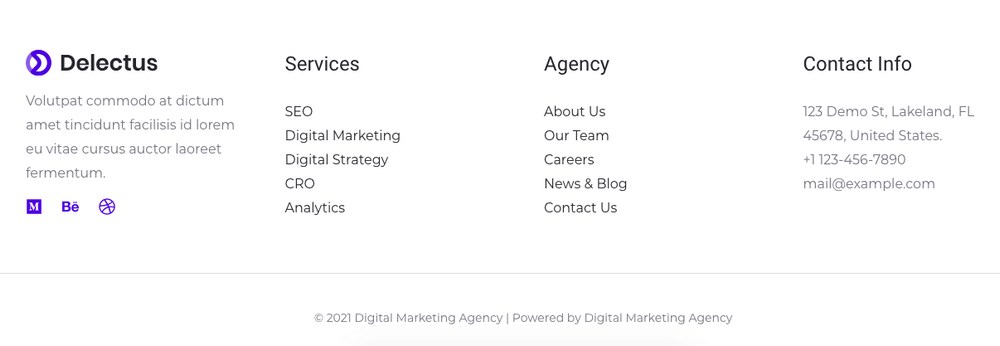
Want to promote your business? Want to remind your user of the services that you offer? Well, include them all in the website footer!
As shown in this example, the user is reminded of your business services as they scroll to the bottom of your website. This also works if you have an eCommerce store as you have another opportunity to showcase products.
Furniture Store
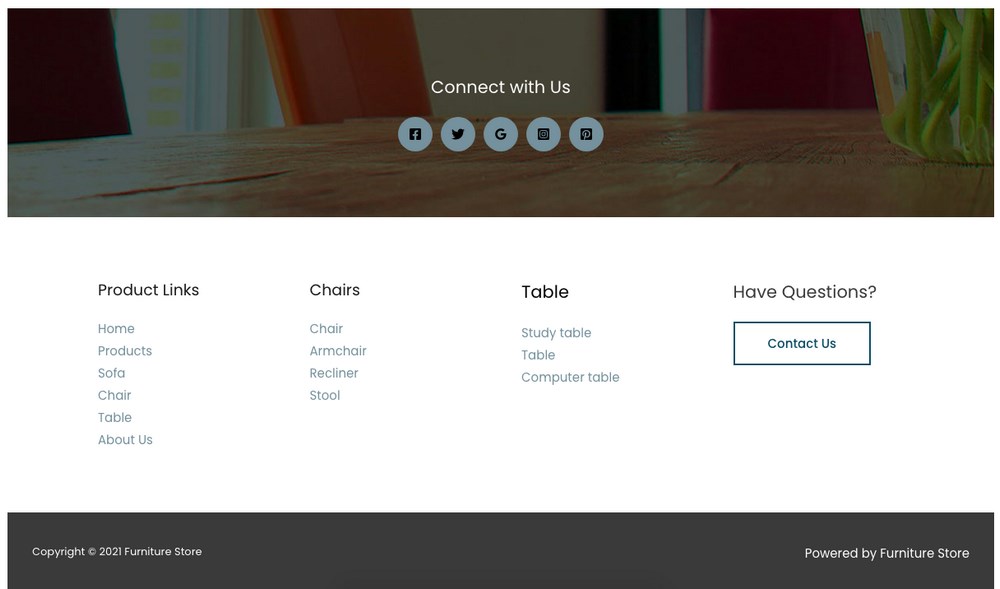
Like we mentioned in the earlier example, this footer includes links to individual product categories. This helps especially when you are limited for space on your top menu navigation.
Tech Blogger

On a final note, this example includes all the elements we just covered, i.e., the social media links, newsletter CTA, individual links, address, copyright, and a powered-by line.

Hello! My name is Sujay and I’m CEO of Astra.
We’re on a mission to help small businesses grow online with affordable software products and the education you need to succeed.
Leave a comment below if you want to join the conversation, or click here if you would like personal help or to engage with our team privately.
How to Access and Edit the Website Footer in WordPress
Once you’ve set up a WordPress website, you’ll notice your website footer with a copyright statement and a ‘Powered by WordPress’ statement, similar to the image below.

The domain name mentioned in the copyright statement, i.e., ‘Copyright © 2020 Domain Name’, would typically be replaced by your own domain.
Whether you’re an organization wanting to display your brand name in the footer or a freelancer who’d like to include your contact information, editing the footer in WordPress gives you that additional customization you want.
Removing the ‘Powered by WordPress’ Text From WordPress Footer
Fortunately, editing the website footer in WordPress is pretty straightforward.
But, first things first.
How do you access the footer? Is it a file, and if so, where is it located?
Typically, there are two methods of editing your footer.
- Through a WYSIWYG editor (e.g., the built-in WordPress customizer, page builders such as Elementor, installing WordPress Plugins, and so on)
Or
- By accessing the ‘footer.php’ file
If we share the same sentiments, then editing the footer through the WYSIWYG (What You See Is What You Get) editor is much simpler than opening the PHP file with never-ending lines of code!
While the process of editing the footer is the same, what you should look out for is the location of the footer.
This may vary across different themes.
In 9 out of 10 themes, you can access the footer by going into the ‘Customize’ section, under ‘Appearance’ (Appearance > Customize), as shown below.
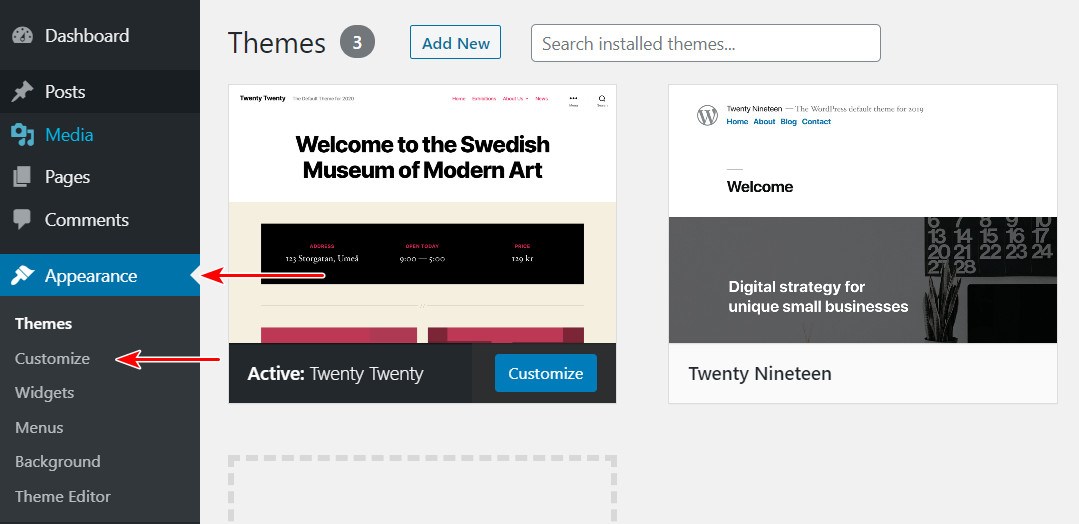
An alternate method, if you are using the Astra theme, is to head over to Appearance > Header Footer & Blocks.
So now you know how to find the footer, let’s jump to our first method.
Method 1: Edit Website Footer Using WordPress Customizer
Head over to ‘Appearance > Customize > Footer > Footer Bar’.
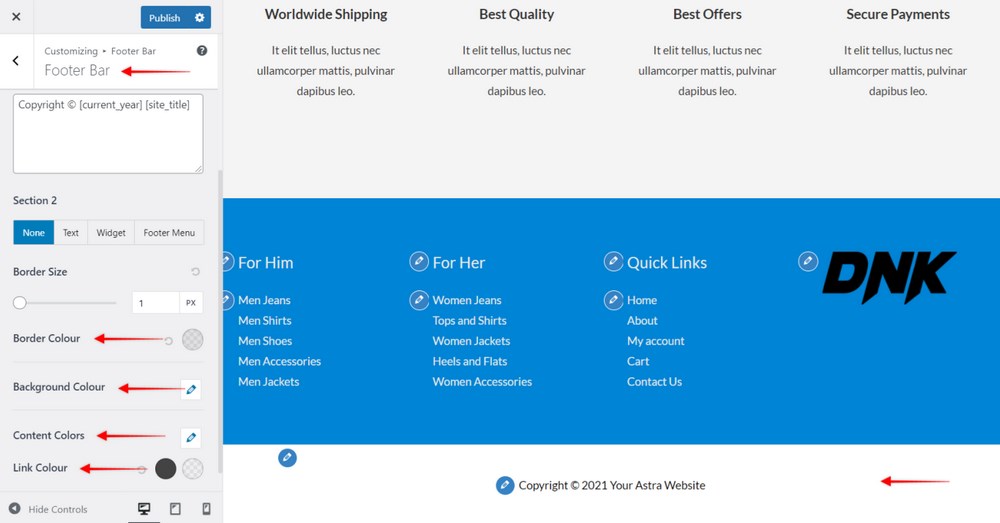
We are assuming you’re using the Astra theme, just as we have in this article.
If you are using any other theme, then the settings may look a little different. But you can still edit the footer via the WordPress customizer.
As shown in the above image, you can edit the Astra copyright link from the footer bar.
With the Astra footer bar setting, you can also add a widget and menu.
With the widget option, you can unlock limitless possibilities, such as adding social media icons, show recent posts, categories, and a whole lot more.
You’ll also notice built-in tags within the custom text areas, such as 2023 and [site_title]. You should leave this as it is unless you’d like to come back every year and update the current year and site title!
Want to add some custom HTML here?
For instance, you might want to add the text ‘Hosted on BlueHost’ and hyperlink it in our example above.
The link could also be your affiliate link, just in case you’d like to earn a referral fee for recommending a hosting service.
How is that done?
Well, you will have to add some HTML tags.
To insert a link, you will need to include an ‘Anchor’ (<a>) tag. So, if you wanted to link only ‘Hosted on BlueHost,’ your line of code would be as follows,
Without link:
Website Hosted on BlueHost
With affiliate link (anchor tag):
Website <a href=”https://wpastra.com/go/bluehost”>Hosted on BlueHost</a>
With affiliate link (anchor tag) opening in a new window:
Website <a href=”https://wpastra.com/go/bluehost” target=”_blank”>Hosted on BlueHost</a>
Don’t forget to hit the ‘Publish’ button on the top once you’re done to save your changes.
Voila! Your footer has just been updated across your website.
Method 2: Using the Astra Header Footer Builder
This method is exclusive to those using the Astra theme.
Astra has introduced a drag and drop Header and Footer Builder. This gives you the freedom to customize your website navigation and footer without writing a single line of code. Just drag and drop!
You have complete control over the positioning and styling of footer elements using a live editor.
Assuming you have Astra installed, head over to Appearance > Customize > Footer Builder.
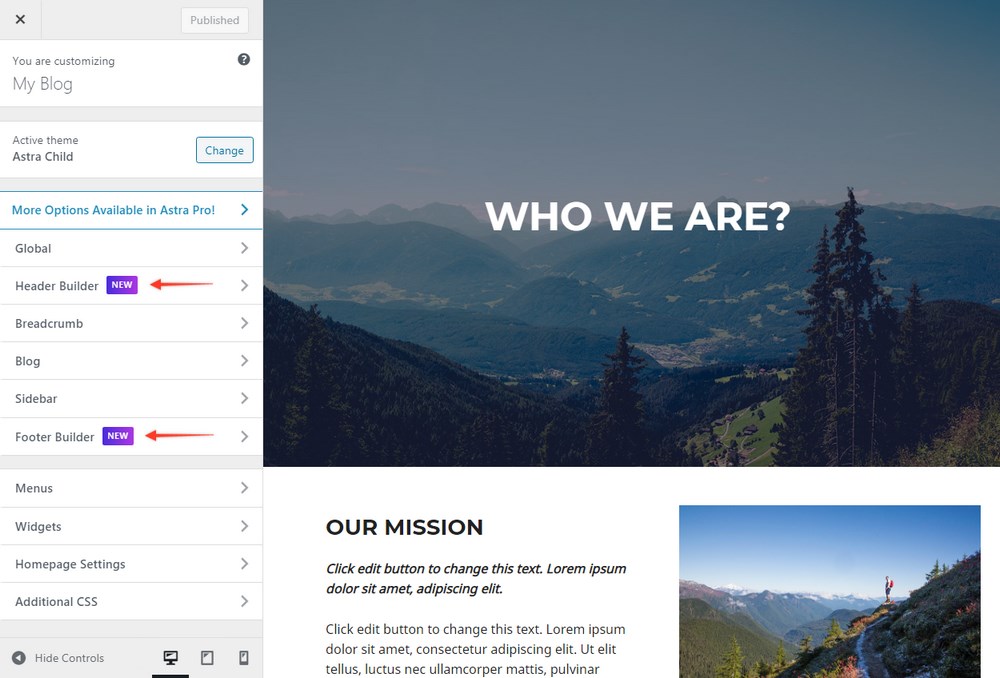
Using the Visual Builder (as shown in the image), you can add and manage the various footer elements.
When it comes to customizing the elements you’ve just added, you can do so from the General and Design tab.

The new Visual Footer Builder is an advanced footer builder that allows you to make changes that reflect across your website instantly.
Simply drag and drop the required widgets into different sections, and you’re done.
Method 3: Edit the Footer in WordPress Using the Header Footer & Blocks Plugin
In our second method, we will assume you have Astra and the Elementor page builder installed. It just makes creating and editing web pages a lot easier.
To begin with, let’s install a plugin.
Head over to ‘Plugins > Add New’ and search for the ‘Elementor Header Footer & Blocks’ plugin.

Install and activate this plugin.
Once this plugin is activated, head over to ‘Appearance > Header Footer & Blocks.’ You will find the ‘Footer’ template.
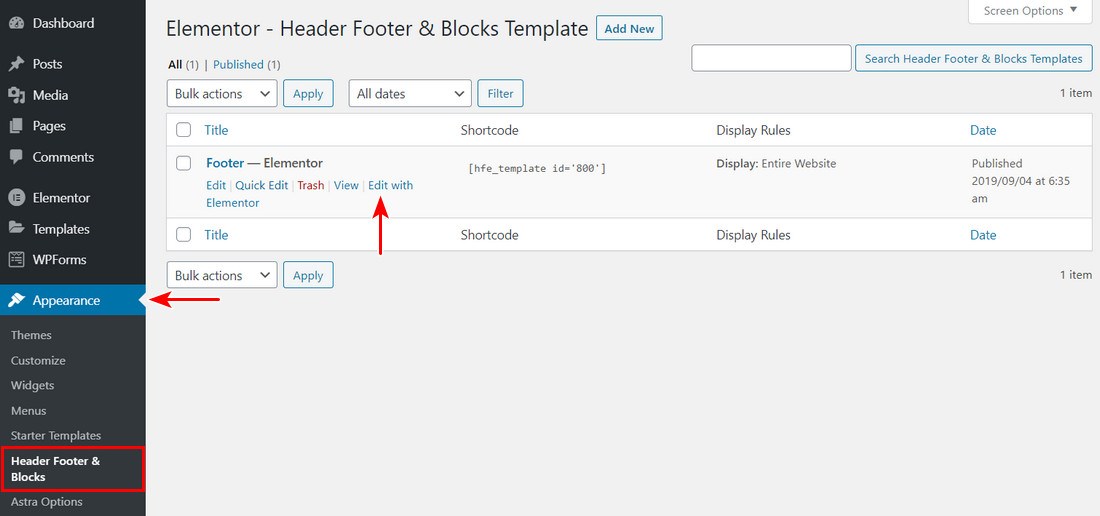
Click on ‘Edit with Elementor’ under the ‘Footer’ template.
You’ll now be directed to the ‘Edit Copyright’ section within your Elementor page builder.
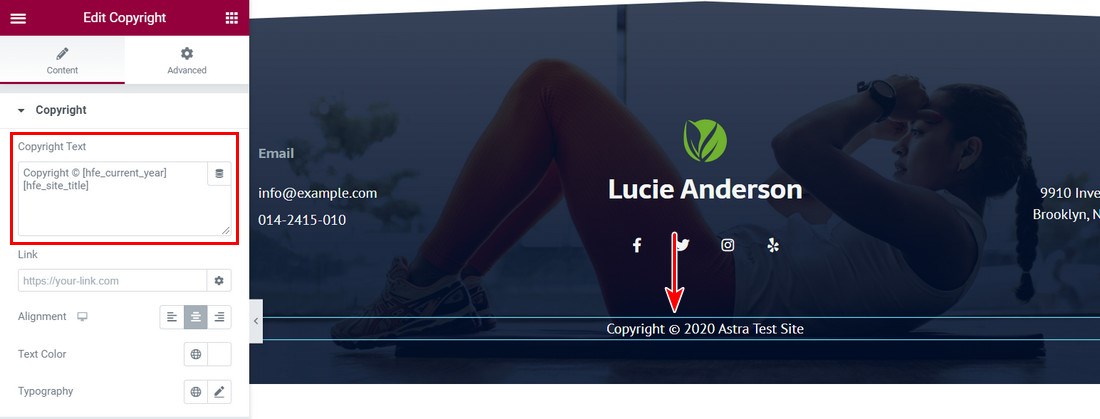
As you make the changes to the text, you can visually preview how it will appear on the website footer.
Once you’re done making the necessary changes and edits, click on ‘Update’ (at the bottom of the page). Your changes will now be live across your website.
Didn’t we say editing your website footer in WordPress is easy! Similarly, you can edit the WordPress header with Elementor.
Method 4: By Editing the footer.php File
While the above three methods were pretty straightforward, this method will involve a bit of coding. While this method isn’t too technical, you must cover all the steps mentioned here.
To begin with, you will need to install a child theme. Why?
Let’s say you made changes to the core PHP files and the next time you have a theme update notification, you go ahead and update your theme.
Which, of course, is the right thing to do. Always have your themes and plugins updated!
You will notice that once your theme is updated, all the changes you made in the PHP files will be gone. Overwritten by fresh new versions as part of the update.
To avoid this from happening, we recommend create a child theme.
This brings us to the all-important question.
How Do We Create a Child Theme?
Head over to ‘Astra Child Theme Generator.’
Enter a name for the Child Theme you would like to create. It can be any name of your choice.
For the sake of this article, we’ll create a child theme and call it ‘mychildtheme.’
You could now click on the ‘Generate’ button to download your child theme but we recommend you click on the ‘Advanced Options’ instead.
Under Advanced Options, you can customize fields such as Author, Author URL, Folder Name, and select a Screenshot (which appears as the cover design for the theme).

For instance, under ‘Author’, ‘Author URL’, and ‘Folder Name’, we’ve entered ‘My Child Theme’ (a name of your choice), ‘https://mychildthemedomain.com’ (this has to be the domain name, under which you are installing the child theme) and ‘mychildtheme’ (name of the folder under which the child theme will be installed on the live server), respectively.
Select a screenshot, preferably a 1200×900 image, in line with the Astra theme. This is, again, purely your choice.
Once all the above steps are completed, click on ‘Generate.’ Your child theme, in this case, ‘mychildtheme.zip’ will be downloaded.
Now, head over to ‘Appearance > Themes > Add New > Upload Theme.’
Upload the child theme, and then install and activate it.
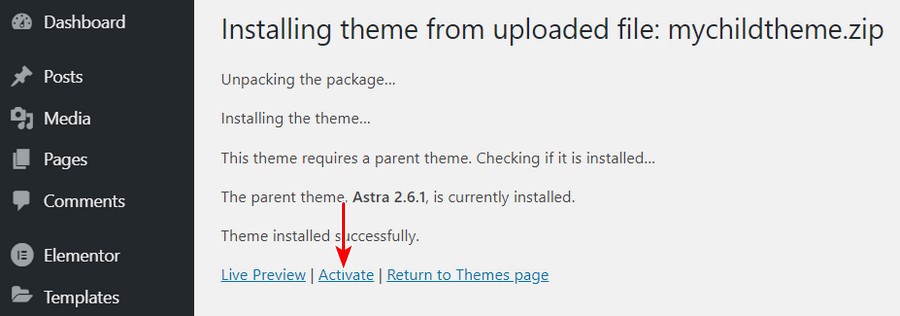
Great, your child theme has now been activated.
Now, head over to ‘Appearance > Theme Editor.’
You may be prompted, at times, to avoid using the theme editor. As long as you’re careful and do not end up editing (or even deleting) the files, it is perfectly fine.
By default, you’ll notice the child theme you just installed is selected under the Theme Editor.
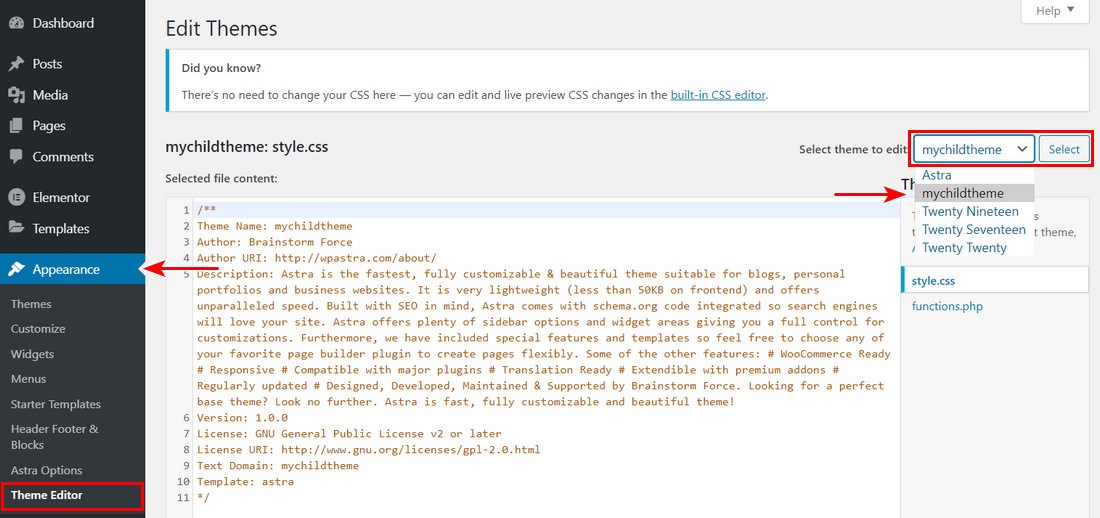
The default files under the child theme will be ‘style.css’ and ‘functions.php.’
So, if you would like to edit the ‘footer.php,’ you will have to copy the file from the parent theme into your child theme.
One such method is to create a new empty file called footer.php on your system and upload it to the child theme folder.
You can also copy and upload the footer.php of the parent theme (if you can’t create a footer.php file).
Just make sure you remove the code from inside it and only add the code you want to modify. This will override the parent theme’s footer.php
Once you are in the theme editor (back on the WordPress dashboard), look for the ‘footer.php’ file under ‘Theme files.’ This is amongst the files on the right hand of your dashboard.
Look out for the ‘Powered by WordPress’ text amongst the code (as highlighted below)
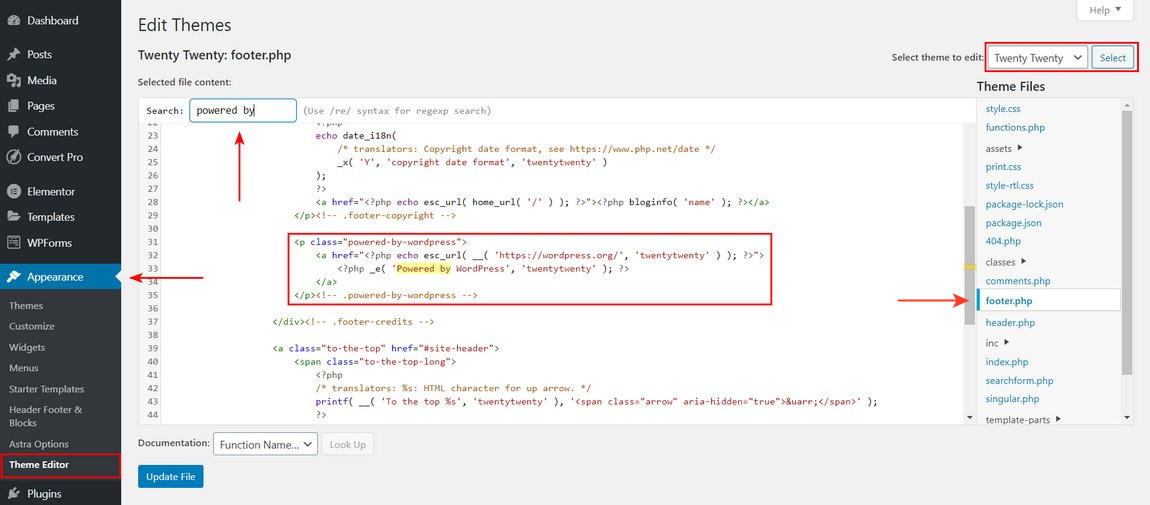
Replace the text with your branding, and once completed, click on ‘Update File.’
Now, that wasn’t too difficult was it?
Customizing the WordPress Footer
We mentioned earlier in this article how to edit the footer using the WordPress customizer.
Using the customizer, you can modify colors, add a background image and play around with the typography of your WordPress footer.
Once you’ve activated the Colors & Background module available with Astra Pro, you get an additional option to add a background image to your footer bar.
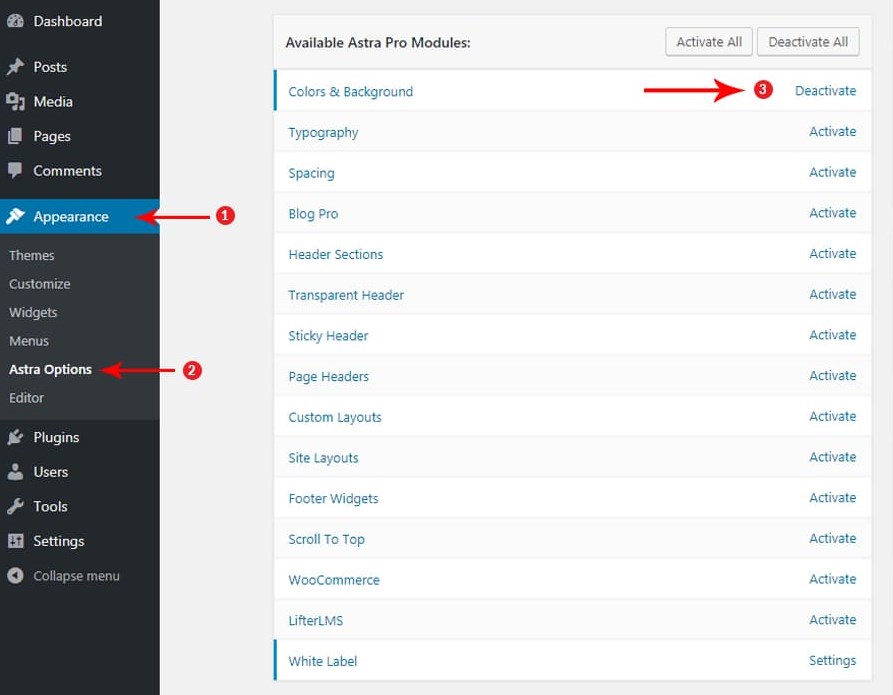
Once activated, head over to Appearance > Customize > Footer > Footer Bar.
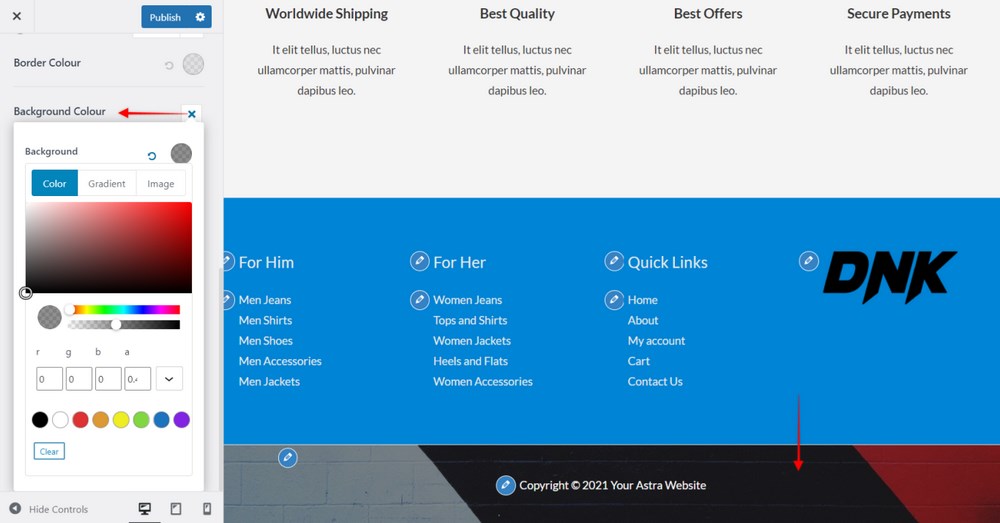
Under the Background Color option, you’ll notice a tab to add an image. Go ahead and incorporate a background image that blends with your website footer.
The same goes for the typography as well.
Once the typography module is activated from the Astra Pro settings, you can find some dedicated typography options under Appearance > Customize > Footer > Footer Bar.
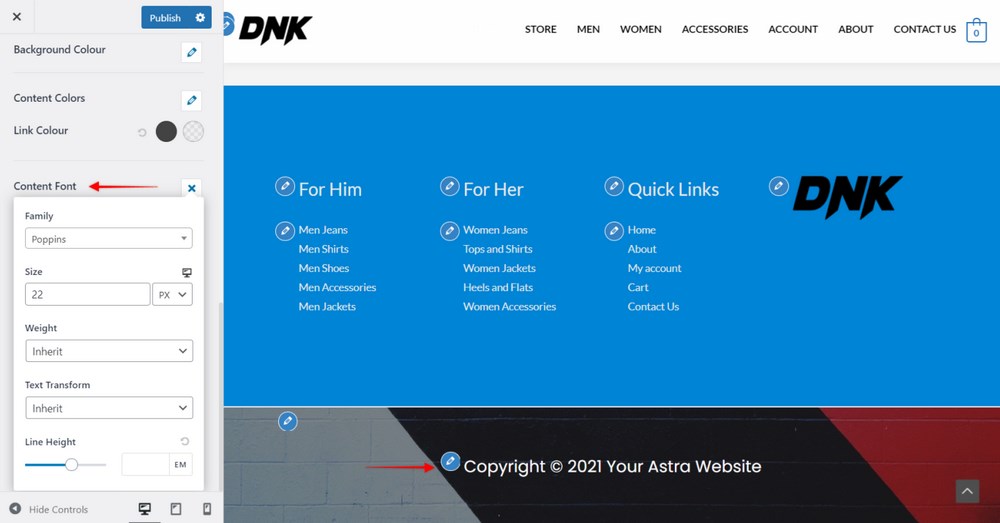
Want more styling options? Check out the Footer Widgets module that comes with Astra Pro Addon.
What You Should Not Be Doing
In addition to the methods mentioned above, there is yet another method to edit the footer in WordPress. That is by editing the ‘.css’ file.
While we’ll explain how it is done, this is an option we recommend you do not use. The reason for this will be covered soon.
Head back again to ‘Appearance > Theme Editor’, and this time around, select the file ‘style.css’ from the list of files on the right, under ‘Theme Files.’

Search (CTRL + F) for ‘.site’.
You will notice a block of code, all starting with ‘.site’. Like the one highlighted in the image above.
Include the following line of code.
.site-info {display: none;}
You could insert this line after the closing parentheses (}) and before the ‘.site-’.
E.g., in the image shown above, the original code is as follows (from line #1875).
}
.site-title {
This can be replaced with
}
.site-info {display: none;}
.site-title {
Once you’re done, click on ‘Update File.’ And that’s it.
While this option isn’t too technical, we wouldn’t recommend this option purely from an SEO standpoint.
The above line of code, i.e., .site-info {display: none;}, is a means of hiding the site info. Which boils down to hiding content on your web page.
Hiding content doesn’t go well with Google and can have negative SEO outcomes such as poor keyword ranking and, in some cases, not ranking at all!
Check out this article on Everything You Need to Know About Hidden Text & SEO by Search Engine Journal if you would like to know more.
So while we share how to do it, this is one method we highly recommend you don’t use.
How to Add Code to Your WordPress Footer
Want to add some custom code to your WordPress footer? Maybe embed a video, some website stats counter, or maybe even some tracking code?
Agreed, most tracking codes are incorporated into the header of your website, but, why rule that option out?
While there are a number of ways to add code to your WordPress website footer, we’ll cover one using the Custom Layouts that Astra Pro comes with.
Add Code to Your Website Footer Using the Astra Custom Layout Module
You’ll need the Astra Pro version to use the Custom Layouts. Go ahead, install and activate Astra Pro.
Once activated, head over to Appearance > Astra Options and scroll down to the part where you see Custom Layouts.
Go ahead and activate Custom Layouts.
You’ll notice a new tab under Appearance > Astra Options, which is Custom Layouts.
Click on Custom Layouts and then on Add New.
You’ll be directed to a page as shown below.
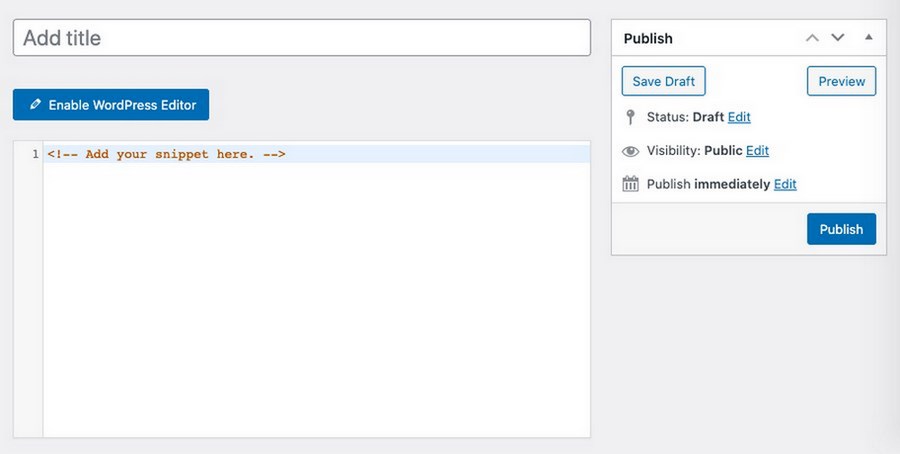
Go ahead and include the custom code in the area that says ‘<!– Add your snippet here. –>’.
If you scroll down a little, you notice some custom layout setting options.
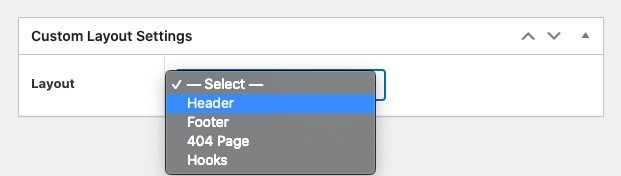
One option is to select where you’d like to include the custom code, i.e., either in the header, footer, 404 page, or as hooks.
In this case, let’s select Footer.
Moving on, you’ve got a few more settings, such as Stick, Display On, and User Roles.
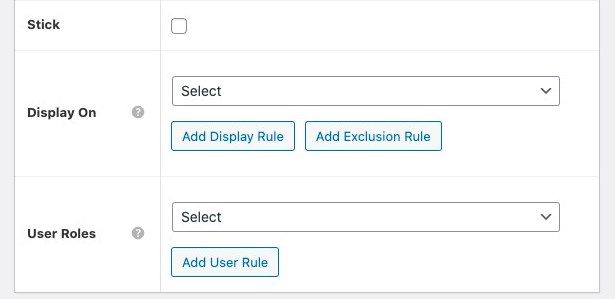
Notice those headers and footers that stick to the top or bottom of the screen? The Stick option allows you to do just that.
You get to decide where to display the code snippet using the Display On option. You could also choose not to show the code on select pages as well by adding an exclusion rule.
Once you are done with all your settings, don’t forget to save and publish it.
Your footer changes will now be displayed across the website.
Want more options to edit the website footer and add custom code? Check out our detailed article on how to add code to the WordPress header and footer.
FAQs on Editing the Footer in WordPress
1. Does a Website Require a Footer?
A website doesn’t require a footer but it benefits from using one. Typically your footer houses the copyright statements, the social media icons, a set of menu links, the address, a map in some cases, and other page elements.
Can we have these included elsewhere? Most definitely, you can. It all boils down to how you would like to organize your website links. Most organizations use the prime real estate of their website to highlight the most important links, such as their products and services.
Ideally, you wouldn’t want to overcrowd the prime real estate with links such as Privacy policy, Disclaimers, and FTC disclosures. Thus, while these links are equally important, we could have a secondary set of links (secondary menu) added to the footer menu.
2. Is It Legal to Remove “Proudly Powered By WordPress”?
Yes, it is legal to remove “Proudly Powered by WordPress” footer credit links. To begin with, WordPress is free. WordPress is licensed under the GPL, i.e., General Public License, which provides four core freedoms.
As shown in the above image, sourced from WordPress themselves, the platform gives us the freedom to use, modify, and even redistribute WordPress. This is not limited to only the WordPress platform but also any of the WordPress themes and plugins. Of course, the themes and plugins have to be from the official WordPress.org directory.
So, don’t fret. You can go ahead and edit the footer in WordPress.
3. Can I Add Images to the Footer?
Yes, you can add images to the footer, and here’s how. To begin, go to ‘Appearance > Customise > Footer > Footer Widgets’ (We’ve made it easier with the series of images below).
Under Footer Widgets, select the alternate layout option. Select the layout option that displays four boxes.

Now that you’ve selected the 4 widget layout option for the footer, go ahead and set the widgets for each block under Appearance > Customize > Widgets > Footer Widget Area 1/2/3/4.
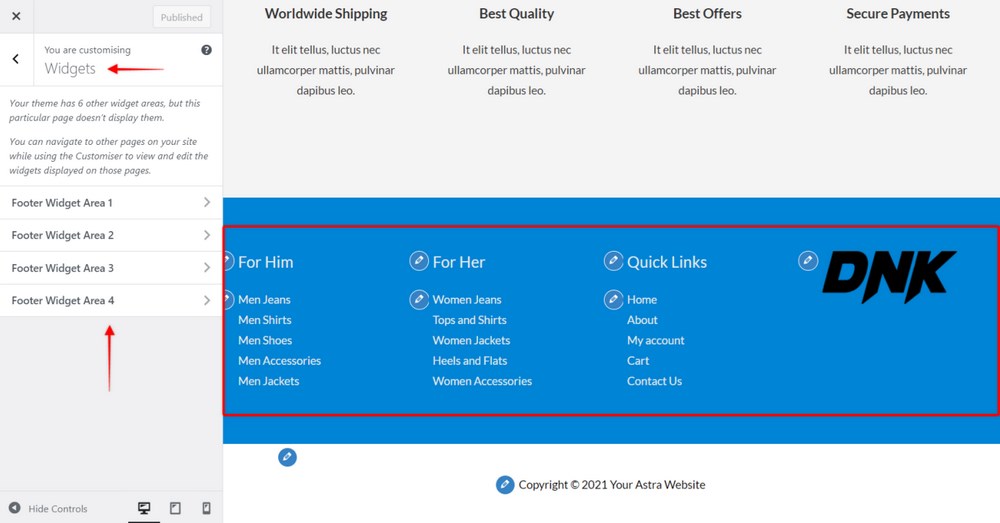
Include the image within the respective footer widget area.
Alternatively if you have the latest version of WordPress installed, i.e., WordPress 5,8, head over to Appearance > Widgets.
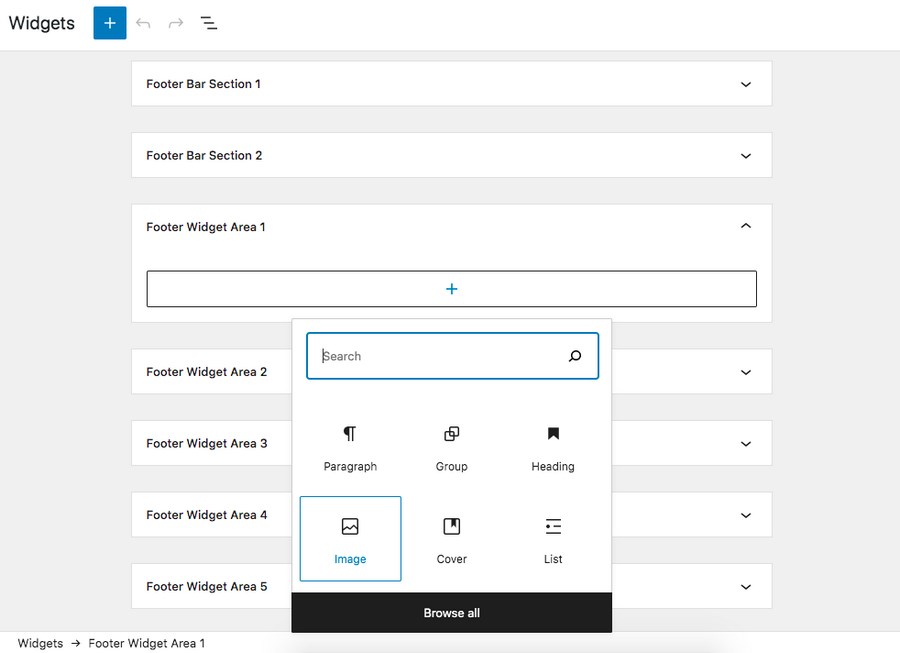
Scroll down to the part where you notice the four footer widget areas. Click on the appropriate footer widget and add an image block.
Don’t forget to update your changes once you are done.
And that’s how simple it is to add an image to your WordPress footer!
4. How Do I Add Social Media Icons to the Footer?
It’s very easy to add social media icons to the footer. Instead of the ‘image widget,’ you add your social icons widget. Yes, you would require a social media plugin to make it happen but the rest is easy.
You could select from several options available in the WordPress plugin repository.
![]()
Once you have installed and activated the plugin, under the social icons, select ‘Add Widget’ into the Footer Widget of your choice, and your social media icons will appear in the footer.
5. How Do I Add a Contact Form in the Footer?
It’s very straightforward to add a contact form to the footer. As shown below, instead of adding the ‘Image Widget’ to your footer, add the ‘WPForms’ widget.
To get the WPForms widget, you first need to install the WPForms plugin and create a contact form.
Once you have added the WP Forms widget to your footer widget, e.g., Footer Widget Area 1, select the form you’d like to include in the footer.
E.g., select ‘Contact Form 1’ as shown in the image and click ‘Save’ when you are done.
Refresh your webpage, and you will notice the form in your footer.
6. How Do I Add a Google Map to the WordPress Footer?
You can add a Google Map to the WordPress footer with ease. Instead of using the image widget, there are two methods to add your Google Map to the footer.
The first method is by embedding the code. Consider a map you would like to include in your footer or website.
Copy the HTML code that appears under the ‘Embed a map.’
Then within the footer widget of your choice, add the ‘Custom HTML,’ block.
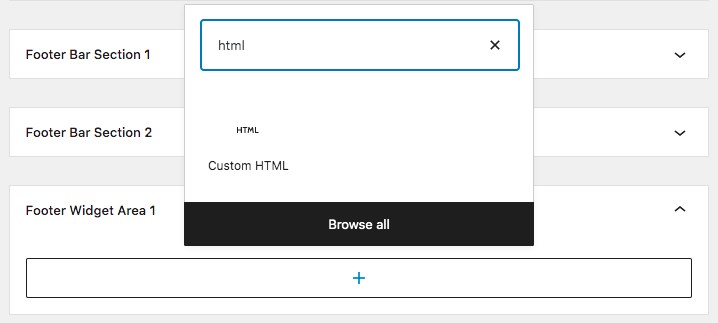
Once you have added the ‘Custom HTML’ block to the footer widget, paste the HTML code you’ve copied into the content area.
And then click ‘Save.’
The alternate option is to install a plugin, such as Maps Widget for Google Maps, and add the widget to your footer. And the rest of the procedure is the same as explained above.
Final Thoughts
While the footer is the last thing your visitors may notice, it’s a pretty important element of your WordPress website. It’s one more way of including important information and links that could serve as a reminder for your visitors as they scroll to the bottom of your website.
From including your social media links, listing your products or services, adding contact information, copyright statement, and a bunch of not so important yet useful links, your website footer can serve an important function.
Editing your website footer in WordPress is pretty straightforward. Whether it’s using a WYSIWYG editor or editing some PHP files, we’ve got it all covered here.
We’d like to hear from you now. How do you edit the website footer? Is there a method we missed out on? Do let us know.
After installing WordPress, you’ll notice some WordPress branded copy at the bottom of your webpages that reads «Proudly powered by WordPress.» This is the default text that appears on all new WordPress websites in the footer.
What is a WordPress footer?
A WordPress footer is the section of your WordPress website that typically appears at the bottom of every web page after the main content. By default, it contains copyright that reads ‘Proudly powered by WordPress.’ The WordPress footer is usually designated in the footer.php template file.
To your visitors, the default text can seem unprofessional and even out of place. So, it makes sense not to display a default footer on your WordPress website. You’ll be relieved to know that you can remove it or edit it to your specifications should you choose to display more pertinent branded information like the logo, copyright notice, or a link to your privacy policy.
To learn what to put in a website footer, check out Website Footers: Best Design Practices & Examples.
A customized footer will help visitors identify with your brand. Read on to learn how to remove and/or edit the footer on your site.
Is It Legal to Remove “Proudly Powered By WordPress”?
In short: Yes. WordPress is open-source software. It’s designed to allow anyone to change the source code.
You have the ability to modify your default WordPress templates. You won’t be breaking any laws if you change your footer to fit your company’s brand.
But before you make any changes, you’ll want to backup your WordPress website. This proactive step ensures that you can quickly restore your site if you make a mistake. Whether you’re editing your footer or doing a full redesign, it’s a good habit to backup your site.
There are a few common methods to edit WordPress footers: removing the footer completely, changing the copyright area using the built-in Customizer, using a footer widget, revising the footer.php code, or using a theme builder. The method you choose will depend on the specific theme you’re using and what will work best for your goals.
Method 1: How to Remove WordPress Footer
If you simply want to remove the footer altogether, the easiest solution is using a plugin.
WordPress plugins extend the functionality of your site. It’s an easy solution when you want to make minor tweaks or major changes to your site. Plus, it requires no coding experience. Follow the steps below to edit your footer with a plugin.
1. Install and activate the Remove Footer Credit plugin.

Image Source
2. Go to Tools > Remove Footer Credit.
3. Enter the text or HTML you would like to remove in the first text field. Then, add your own footer text to the second text field.
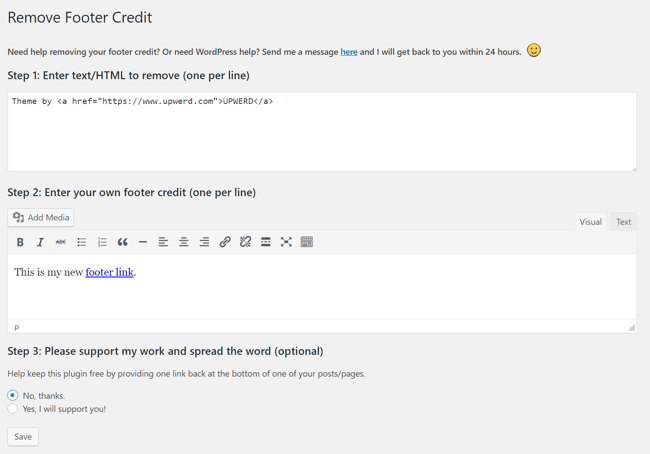
4. Click Save.
If the above option doesn’t work for you or you want to do some more advanced edits, read on for additional ways to make changes to the default branded footer.
Method 2: How to Change the Copyright Footer in WordPress
Most theme developers know that you’ll want to edit their default footers. So, they usually offer a built-in option in the theme to make changes.
Every WordPress theme is different. So, this setting may be available in different sections within the theme.
1. Log in to the WordPress dashboard.
2. Go to Appearance > Customise.
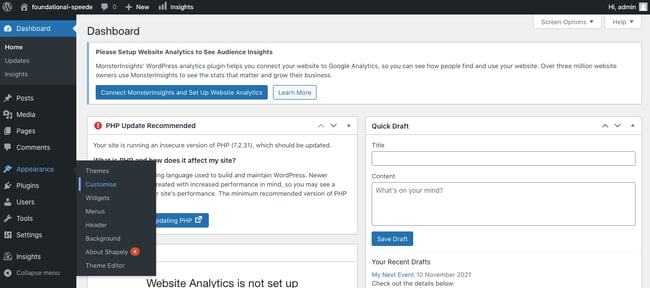
3. Look to see if you have a Footer option.
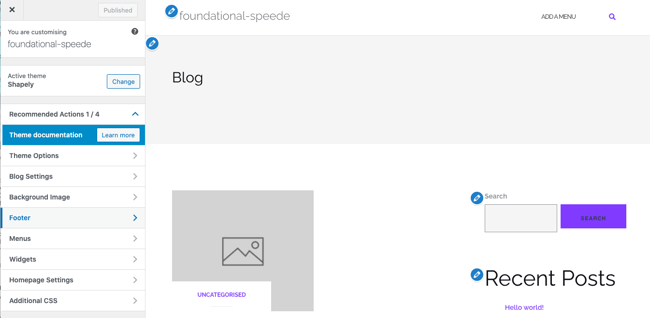
4. If you do, select Footer > Bottom Bar. From there, you’ll be able to disable the footer or put in your own text.
5. If you have the Copyright Area option. If you do, you can make changes to this footer as well.
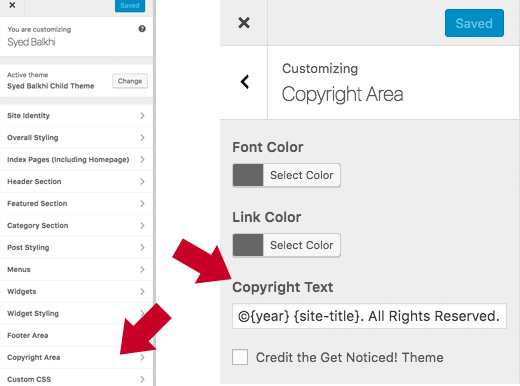
Image Source
If your theme does not have these presets built in, you’ll have to remove the default WordPress footer using another method. We’ve included other options below.
Method 3: How to Edit WordPress Footer Widgets
Some WordPress themes use widgets to add specific features, like footers.
1. You can find your footer widget by going to Appearance > Widgets.
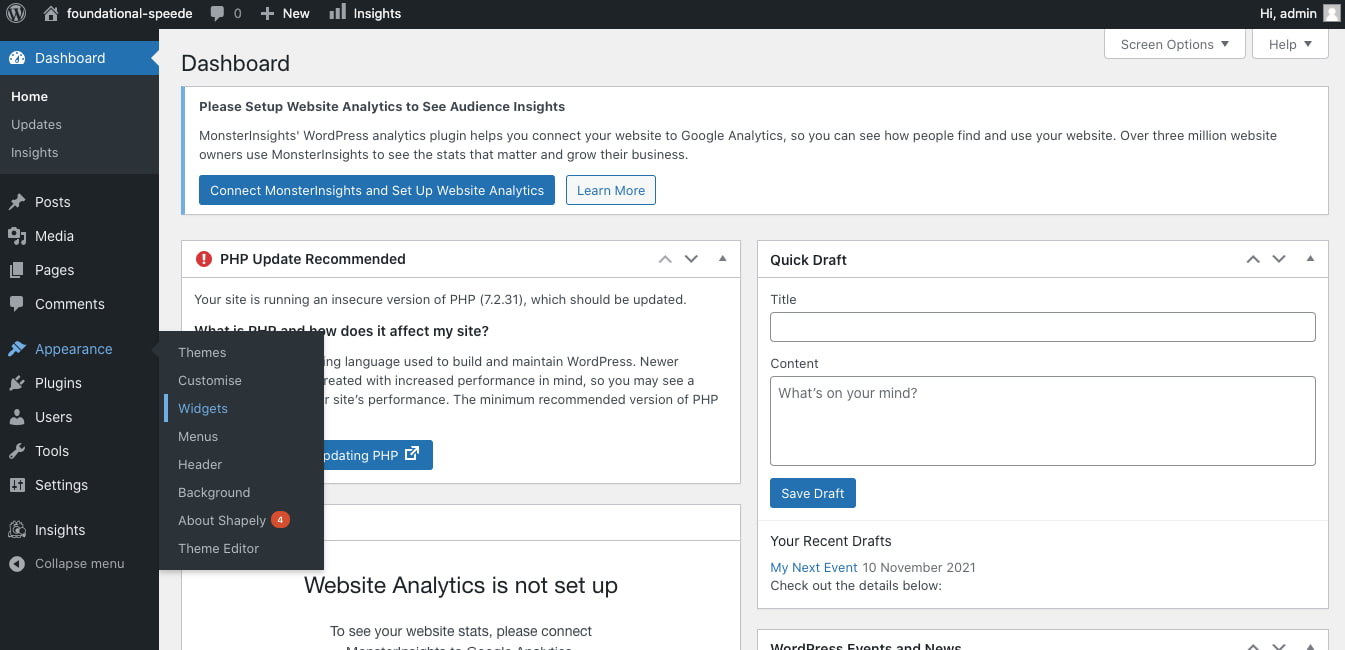
2. On the right, you’ll find the footer widget section, Footer.
3. From the list on the left, drag and drop the Text widget underneath the Footer.
4. Click the down arrow and then add your content in the text field.
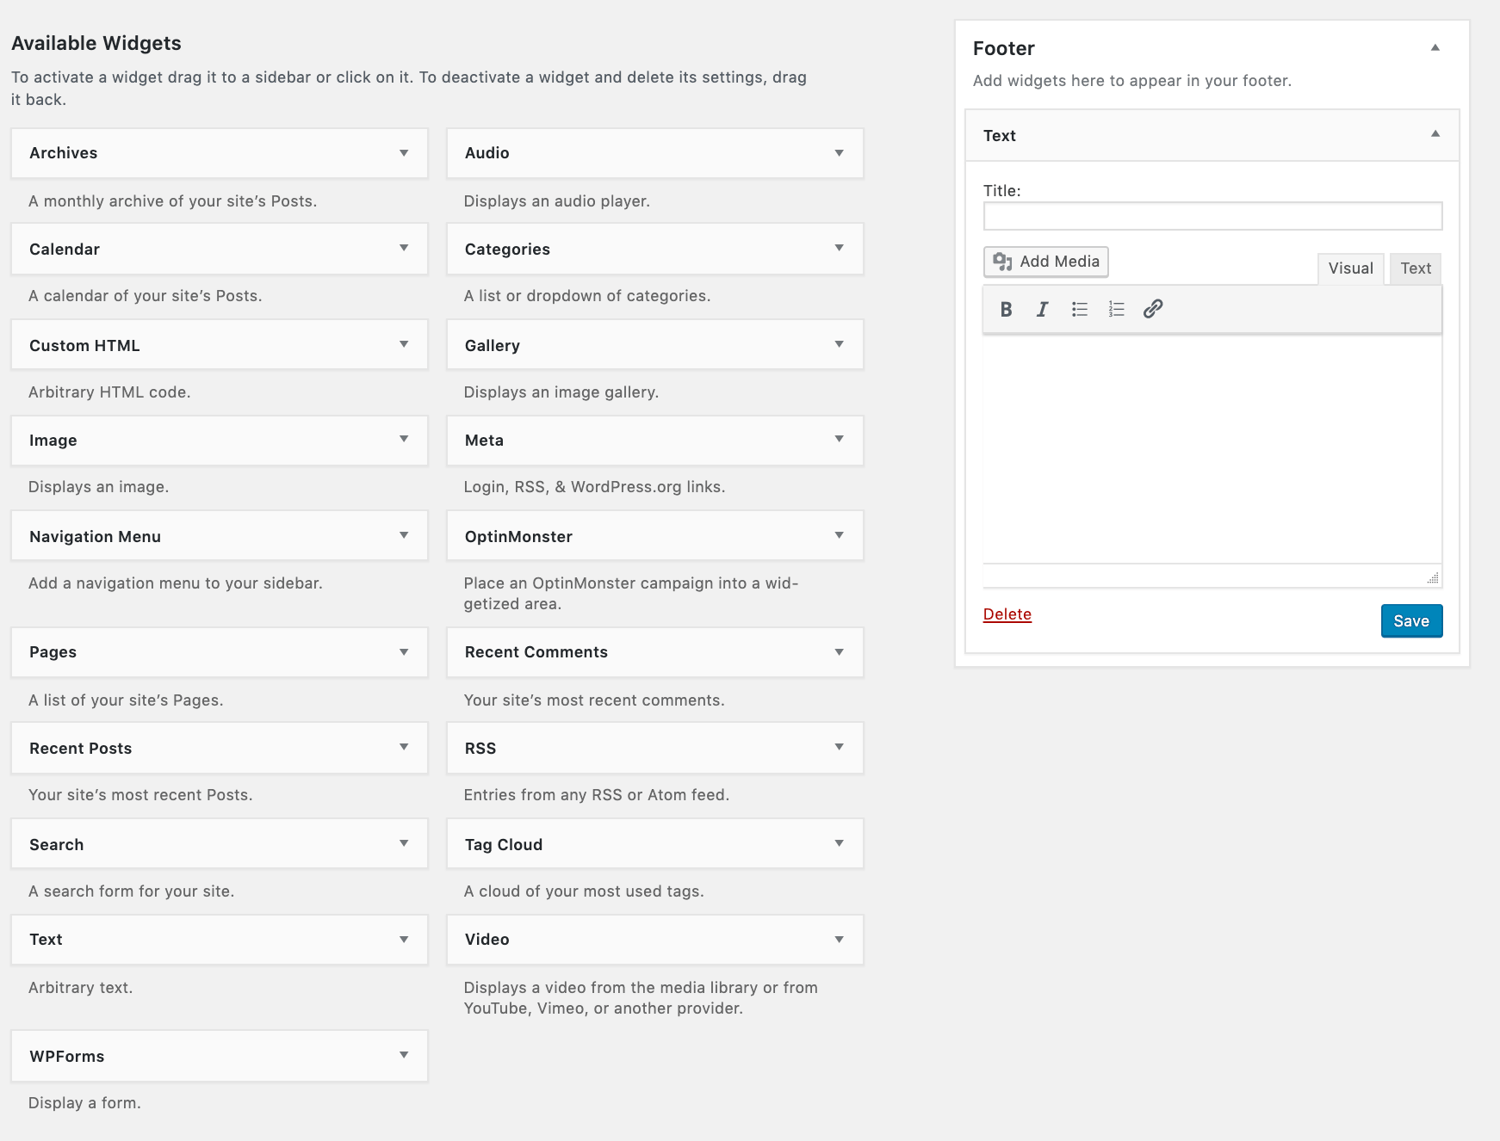
Method 4: How to Edit WordPress Footer PHP File
The footer is defined in a WordPress template file as footer.php. You can edit the file by going to Appearance > Theme Editor. Then, follow the steps below.
1. Select the specific theme in the right-hand corner.
2. Locate the theme footer (footer.php) under Theme Files on the righthand side. You can use Crtl+F to find it if you’re having trouble.
3. Find this PHP code:
get_template_part( 'template-parts/footer/site', 'info' );
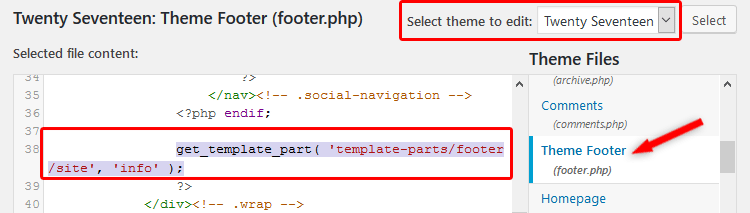 Image Source
4. Replace the PHP code with the code below and change “add text here” with your specific content.
//get_template_part( 'template-parts/footer/site', 'info' );
echo “add text here”;
?>
5. Press the Update File button.
The final result will look like this:

Method 5: How to Edit the WordPress Footer through Your Theme
Theme builders make it easy for you to tweak your website to match the look and feel of your brand. Most theme builders come with a built-in footer plugin.
For example, Jupiter X lets you customize your footer with the help of a drag-and-drop visual editor. You can add, modify, and remove the widgets in real time. There are also dozens of ready-made footer templates available if you’re in a hurry.
The Themify Builder is another intuitive page designer. You can remove the default copyright information and create custom footers with a few simple clicks.
Elementor also offers dynamic templates to build beautiful pages with no coding skills. Let’s walk through the process of editing the WordPress footer with Elementor below.
1. Log in to your WordPress dashboard.
2. Click Templates > ThemeBuilder.
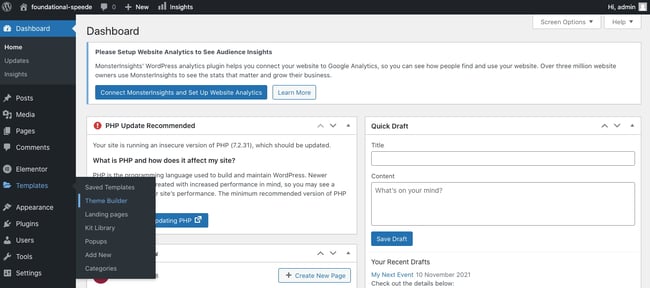
3. Click the plus icon next to Footer in the left panel.
4. You can either choose a premade footer block from the library, or exit out and create one from scratch. Here’s an example of a premade footer block:
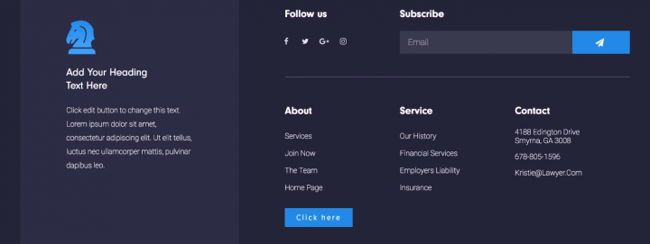
Image Source
5. When you’re ready, click Publish.
6. You can click Add Condition to choose where to publish the footer or stick with the default option (ie. the entire site).
Mistakes When Editing a Footer in WordPress
Editing any part of your website is a big deal. A harmless error can temporarily shut down your entire website. Here are a few common mistakes to avoid when editing your footer.
1. Using CSS to hide the links.
One method of removing the footer involves adding the following code snippet to the CSS editor.
.site-info{display: none;}
This method works simply by hiding the links in your footer. However, hiding links was a common trick used in black hat SEO (search engine optimization) to boost website rankings in search engines. Google sees this action as a violation of its website guidelines and may penalize your site as a result. So, we recommend avoiding this method altogether.
2. Not reading the license documentation.
Third-party themes may have stipulations in their license agreements that could restrict you from removing copyright notices. You’ll want your legal team to contact the theme developer with any questions or concerns.
Removing WordPress Branding from Your Footer
Editing your site footer removes unwanted copy and helps you create a customized look that your visitors will come to recognize each time they come in contact with your brand.
Editor’s note: This post was originally published in January 2020 and has been updated for comprehensiveness.

In this quick tip I’ll show you how to edit the footer of your WordPress website.
How to Edit the Footer in WordPress

What is the Footer in WordPress?
“The footer” in web design refers to the foot of a web page (surprise!). With WordPress you can edit the content and the layout of that footer, and I’ll demonstrate how that’s possible.
I’m using the Twenty Twenty WordPress theme, which was installed by default when I installed WordPress. What your footer looks like depends greatly on the theme you have installed, but the basic editing principles remain the same.


There are two basic approaches to edit the footer in WordPress, let’s take a look:
1. Edit Footer Using WordPress Theme Editor
Go to the admin dashboard of your website and navigate to Appearance > Theme Editor. In the file tree to the right of the page you’ll be able to find which file is used for the Theme’s Footer (in this case footer.php):


footer.php is a “partial” which is included in pretty much all pages of the website. You can click on it here in order to open up the contents for editing. Make your changes to the code then hit Update File to save.
Note: you need to be careful editing files in this way. This is a PHP file which contains executable code as well as the page markup. You could easily break your website by making a mistake here! Luckily, WordPress does run a check on any code before you save here, so you will get an error message if your code doesn’t work.
How Else Can I Edit footer.php?
You might prefer to edit the footer.php file in your own coding environment, in which case you’ll find it in your WordPress installation wp-content/themes/twentytwenty/footer.php. Make your changes on your own computer, then upload the changed file to your web host via FTP.
2. Use the WordPress Customizer
You might also be able to edit the WordPress footer using the customizer, but this will depend on whether the theme author in your case has allowed for that.
When logged in, go to Appearance > Customize. From there you’ll possibly be given a range of options to customize the contents and layout of the footer, which might look a bit like this:


The advantages to this approach are that you needn’t touch any code and risk breaking the website. The downside is that you’re reliant on whatever options the theme author has built, so there’s less flexibility.
WordPress Themes on Envato Elements
For the single price of membership to Envato Elements you’ll have access not only to thousands of WordPress themes and plugins, but also to graphics, photography, stock video, audio, and all kinds of other creative assets to build your ideal website.
Think what you could do to your WordPress footer with all that?!


Sign up now and also enjoy hundreds of Tuts+ courses to learn everything from illustration, video editing, and 3D design, to coding and mobile development!
Learn How to Use WordPress With Tuts+
That’s it for this quick tip, I hope you now have a better understanding of how to edit the footer of your WordPress website. If you’re a beginner WordPress user, check out our other foundation tutorials to get you up to speed:
Did you find this post useful?

Adi Purdila is a web design instructor for Tuts+. With over 100 courses and 200 tutorials published to date, Adi’s goal is to help students become better web designers and developers by creating content that’s easy to follow and offers great value.
Being self-taught himself, Adi strongly believes that constant learning (academic or otherwise) is the only way to move forward and achieve your goals.
When not typing away at his keyboard, he loves woodworking and caring for his ever-growing family of rescue pets.
You can stay up to date with what he’s doing by following him on social media or visiting his website at adipurdila.com.
We recently went in depth on how to customize the WordPress navigation. This time, in order to provide a more complete picture, we thought it only good and proper that we now deal with the other end of a website and learn how to customize the footer of a WordPress site.
The footer is an often neglected part of a website. After all, lots of visitors will never actually scroll down that far. However, this kind of attitude could leave you behind.
First of all, the footer usually appears on every page of a website (unless you are using a separate landing page). Secondly, it can contain very important information. From contact details over menus and links to the privacy policy and terms of service over legal disclaimers to social icons, lots of stuff can find their place there.
To make sure any information in this part of your site looks good, we will now go over many ways to customize the WordPress footer so you can make the most of it.
Footer Customization in WordPress: Native Options
When looking to make changes to your footer, the first place you can usually turn to is the Appearance > Widgets menu in WordPress.
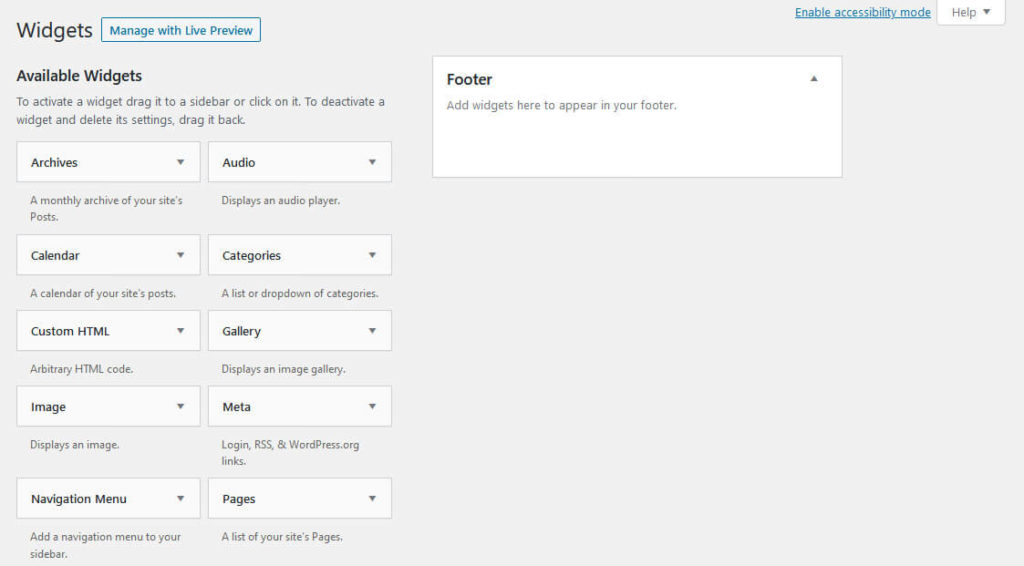
Most WordPress themes include at least one widget area in the footer, however, it’s also common to have two or three so you can add content in columns if needed.
Adding information is quite straightforward. Simply drag and drop a widget of your choice to where you want it to appear, configure it, and save.
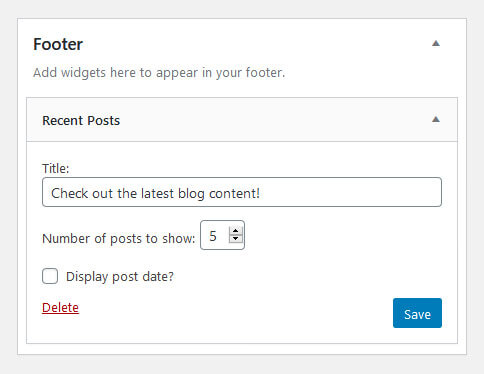
Widget Options
You can theoretically use all widgets you have at hand in your WordPress footer. However, some will make more sense than others. Here are some good widget options for the footer:
- Archives — Give your visitors access to your monthly content archives by adding this widget.
- Categories — Allows your audience to access your blog categories from the footer.
- Gallery — Show off a gallery of relevant images. Just drag to the widget area, than add images as you would usually do in a post or page.
- Image — Same as the gallery but for a singular image. Adding your logo is a good idea here.
- Navigation Menu — Add links to other pages on your site. Just be sure to first create a menu under Appearance > Menus and equip it with the pages you want to link to. Then move Navigation Menu to the footer widget, optionally give it a title (can be call to action), and pick your menu from the drop-down.
- Recent Posts — Helps readers who reach the end of the page discover more content on your blog or website.
- Search — It’s always a good idea to have a search form on your site. It helps visitors find what they are looking for and the WordPress footer is a good place to put it.
- Sign-up form — If you are collecting emails on your site, a sign-up form in the footer can function as the final push to get someone to jump on your newsletter.
- Text — Add any type of text to your footer with the help of the Classic WordPress editor. You can also use formatting like headings, etc. It’s great for disclaimers or any message you want to leave your audience with.
Always remember to save your widgets after making changes!
Remove “Proudly powered by WordPress” From the Footer
Removing the “Powered by WordPress” footer text is a common request in search engines. There are several ways to remove it, depending on what your theme offers.
Use the Customizer
Some themes allow you to customize this part of the WordPress footer in the WordPress Customizer. For that, go to Appearance > Customize, then look for footer-related options.
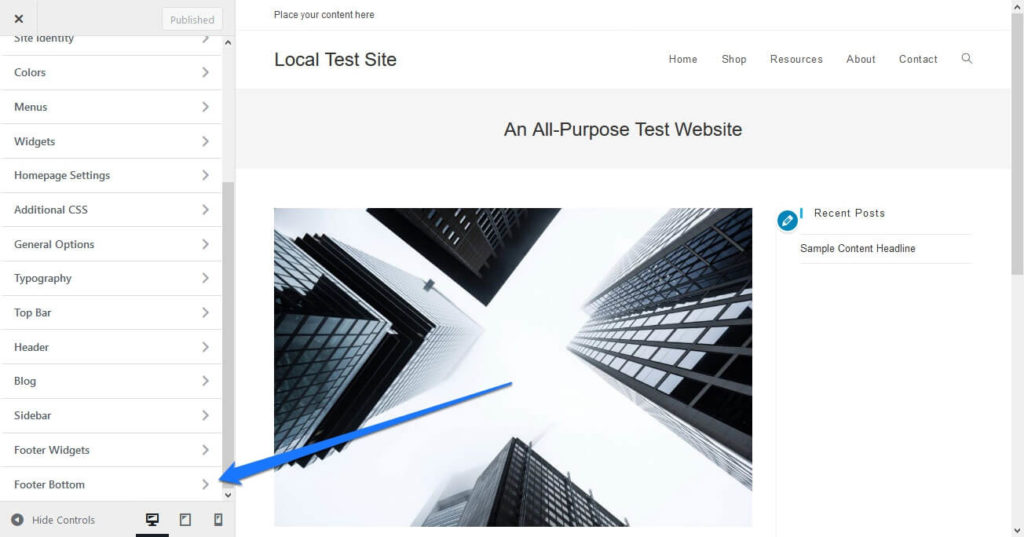
For example, in the OceanWP theme you find these options under Footer Bottom.
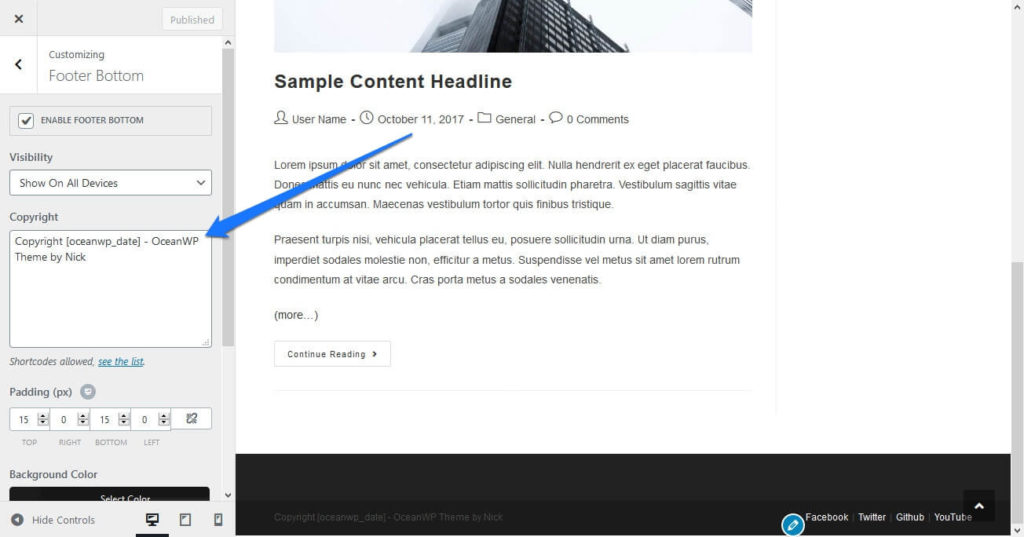
As you can see, it not only overwrites the usual “Proudly powered by WordPress” message by default but also gives you the option to customize it to whatever you want instead. The theme even lets you use shortcodes to dynamically input information like the current year and more.
Options like this are very common with a lot of themes. Just don’t forget to click Publish at the top to make your changes permanent.
Remove It via Plugin
Another option to customize the footer content in WordPress can be plugins. There are several out there that can help you remove the “powered by WordPress” message.
The first is Remove “Powered by WordPress”. When activated on your site, it gives you additional theme options inside the Customizer to switch off the footer credits.
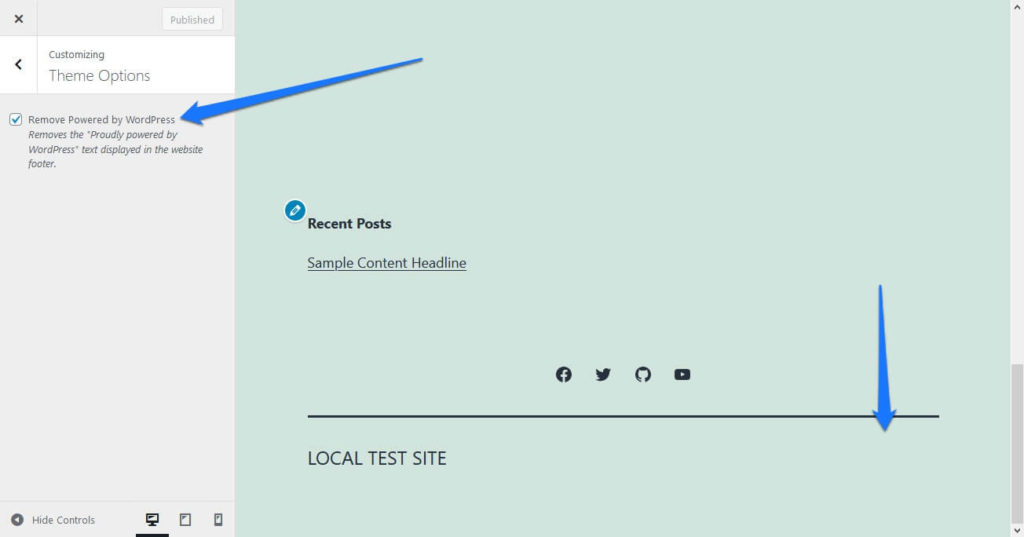
However, this only works for default WordPress markup, not anything that might be present due to your theme or some other plugin,
If that’s the case on your site, you can try Remove Footer Credit. Here, under Tools > Remove Footer Credit you are able to insert any text or HTML code (find it with the browser developer tools) to have the plugin remove it or replace it with a defined alternative.
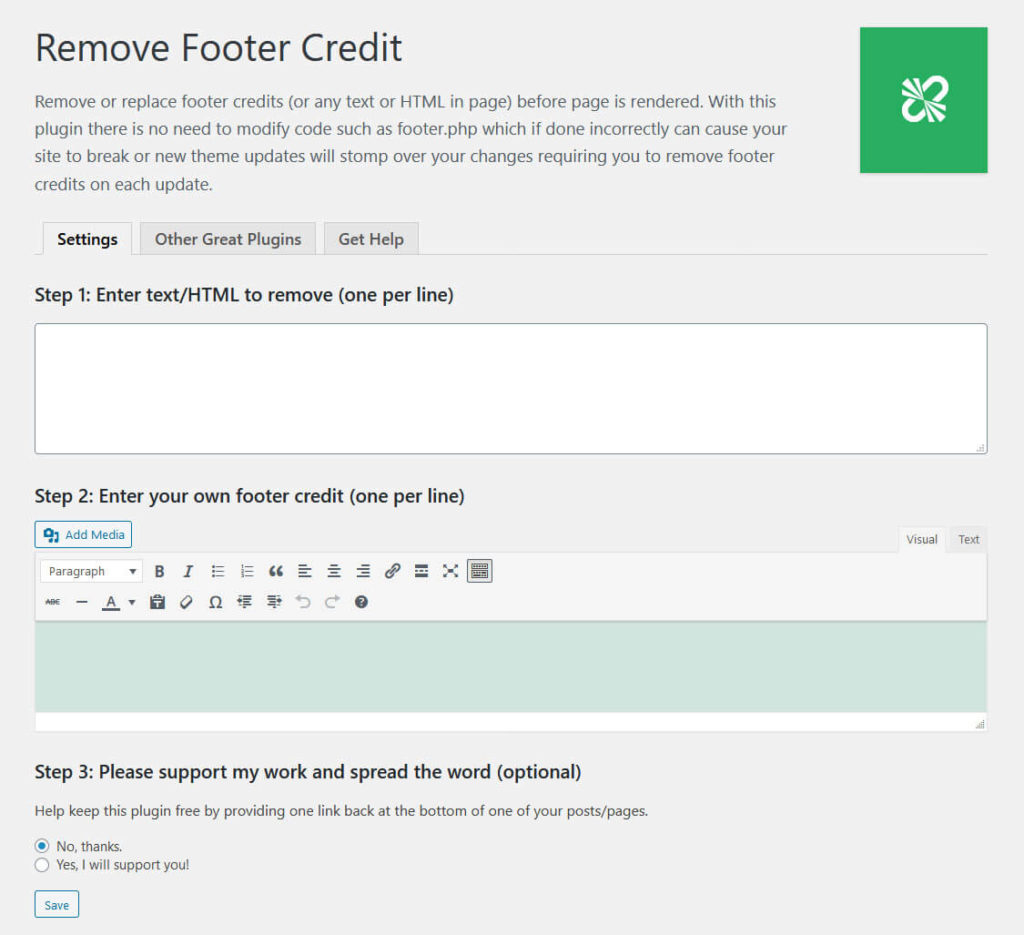
Edit the Template File
If the above fails, you still have the option to edit your template files. Most themes have a file called footer.php, which contains the entire markup for the WordPress footer. If you want to customize it, this is where to start (more on that below).
Quick note: Changes to template files and other theme files should always be done in form of a child theme.
To edit footer.php, log into your server with an FTP client and go to wp-content/themes/yourthemedirectory. Here, find the footer.php file and download it. Then, edit it with your favorite code editor.
Here’s what the part outputting “Powered by WordPress” looks like in the Twenty Twenty-One theme.
<div class="powered-by">
	<?php
	printf(
		/* translators: %s: WordPress. */
		esc_html__( 'Proudly powered by %s.', 'twentytwentyone' ),
		'<a href="' . esc_url( __( 'https://wordpress.org/', 'twentytwentyone' ) ) . '">WordPress</a>'
	);
	?>
</div><!-- .powered-by -->
Simply delete the entire thing or change it to whatever you want. Save the file, re-upload it to your (child) theme, and it should be all done.
Change the Footer Design
Just like for the WordPress navigation, if you want to make more sweeping changes to how your website’s footer looks, you will have to apply some CSS or even PHP.
Here, the first step is also to find the correct CSS selectors for the element you want to modify. The easiest way to do that is to use the aforementioned browser developer tools. Basically, right-click any footer element you want to make changes to and then choose to inspect it.
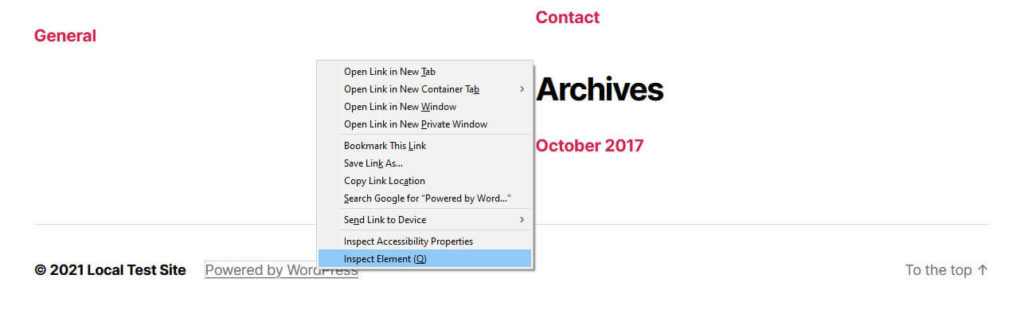
This will show you both the HTML structure of your footer as well as each element’s CSS selectors and styling.
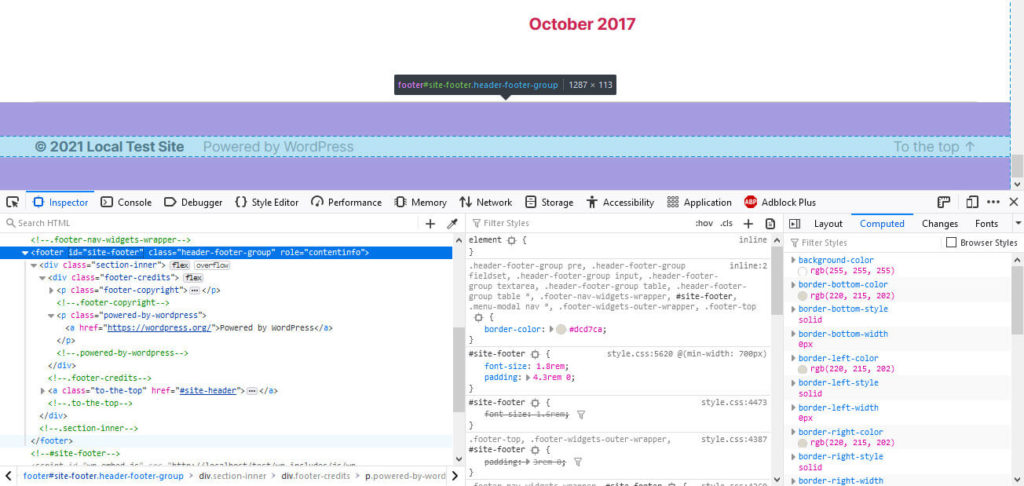
Knowing this allows you to overwrite and modify anything you want. It’s also especially important to check this since the latest WordPress default themes (Twenty Twenty and Twenty Twenty-One) both split the footer into a bottom widget area and then the actual footer.
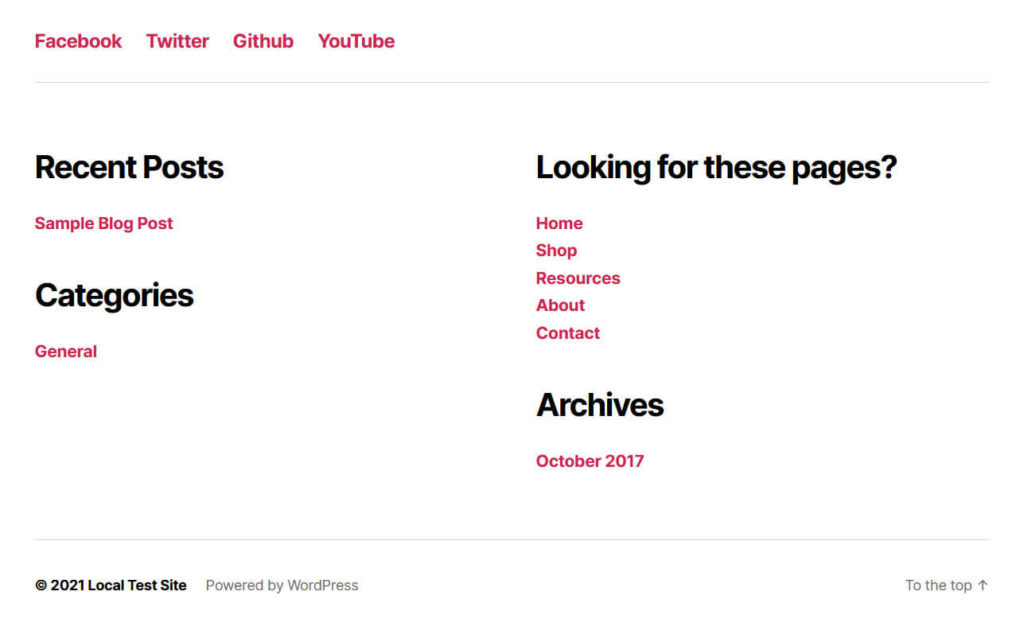
Below, we will go over some examples using the aforementioned Twenty Twenty theme. While Twenty Twenty-One is the latest default theme, it uses a lot of CSS variables in its markup, which would maybe make this too difficult for beginners.
We will show you the principles for how to customize your WordPress footer, however, keep in mind that the markup might not be exactly the same in your theme. So be sure to adapt as necessary.
If you are just going to make a few changes, doing this in the custom CSS field of the Customizer is fine, for larger changes, it’s a good idea to, again, use a child theme.
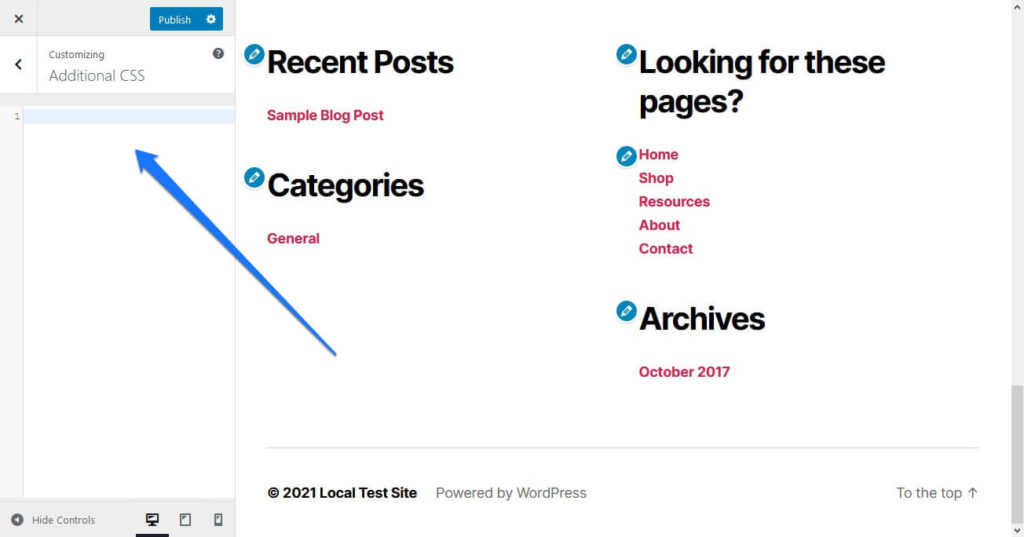
Modify the Footer Background Color
The first thing we want to do is pretty simple: change the background color of the site footer. You can do this relatively easily with some CSS markup. The only thing we need to keep in mind is that Twenty Twenty has its footer part split in two, with one widget area and then the actual footer.
Looking at them with the developer tools, you see that the first has a class called .footer-nav-widgets-wrapper and the latter an id called #site-footer (to learn more about HTML classes vs ids, check this post). So, in order to change both of them, you can use markup like so:
.footer-nav-widgets-wrapper, #site-footer {
	background-color: #DFE5F5;
}

.footer-widgets-outer-wrapper, .footer-top {
    border-color: #000;
}
As you might be able to see, while at it, we also changed the color of the borders so that they harmonize with the rest and don’t just disappear into the background. Here is the result:
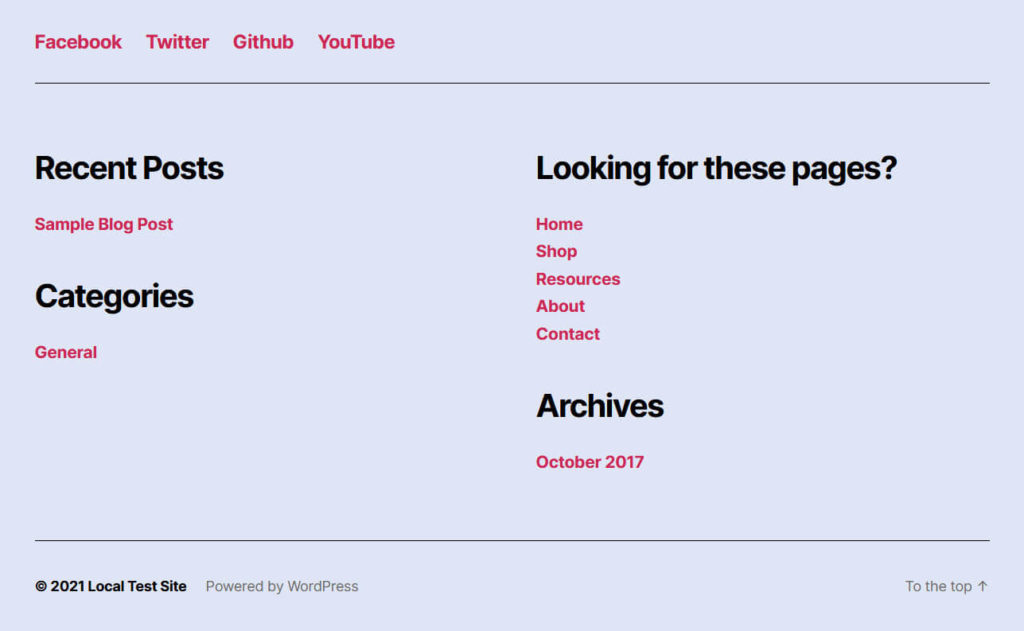
Make Changes to Fonts and Text
Next up, we want to make some changes to the widget fonts. Currently the widget titles are quite large and look a bit disconnected from their content. Also, we want to try out what it looks like when the text underneath is indented a bit.
After some examination, the browser developer tools reveal the following CSS selectors:
.widget .widget-title.footer-widgets a
We can now apply some new styling to them like so:
.widget .widget-title {
	margin-bottom: 1rem;
}

.footer-widgets a {
    padding-left: 5rem;
}
When I insert that into my custom CSS field or child theme style sheet, it looks like this:

Add Widgets to the WordPress Footer
As a final step to customize the design of our WordPress footer, we want to add a widget in the actual site footer in order to display some contact information.
The first step for that is to register a new widget area, which we can do with this code snippet inside functions.php:
function ns_register_footer_widget() {

	register_sidebar(
		array(
			'before_title'  => '<h4 class="bottom-footer-widget-title">',
			'after_title'   => '</h4>',
			'before_widget' => '<div class="bottom-footer-widget">',
			'after_widget'  => '</div>',
			'name'        => __( 'Footer-Widget', 'twentytwenty' ),
			'id'          => 'bottom-footer-widget',
			'description' => __( 'This is the widget area in the bottom footer.', 'twentytwenty' ),
		)
	);
}

add_action( 'widgets_init', 'ns_register_footer_widget' );
When it’s present, you can already see it in the Widgets menu inside the WordPress back end.
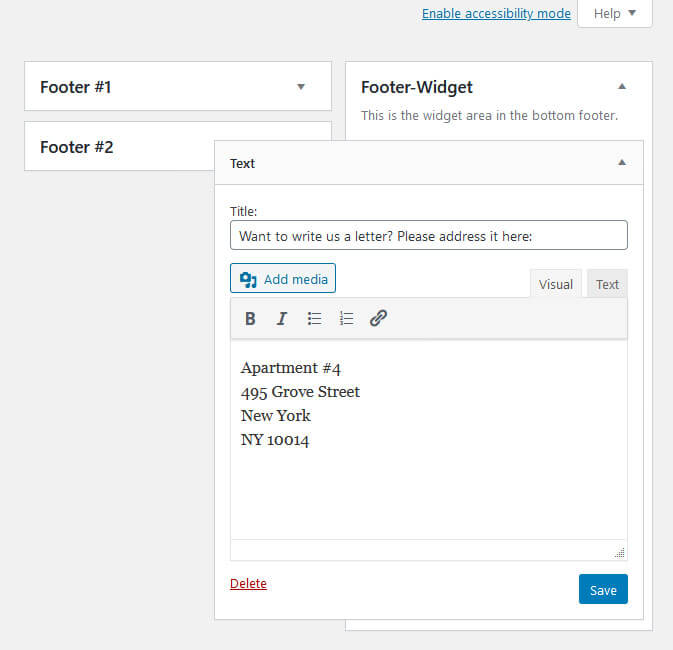
However, we now need to make it show up on the page as well. For that, we need to edit footer.php of the theme. Again, this is something for a child theme, so be sure to copy over the theme file before making changes.
Here’s the code to make the new widget area show up in the footer:
<?php if ( is_active_sidebar( 'bottom-footer-widget' ) ) :
	dynamic_sidebar( 'bottom-footer-widget' );
endif; ?>
We will add this now in the file here:
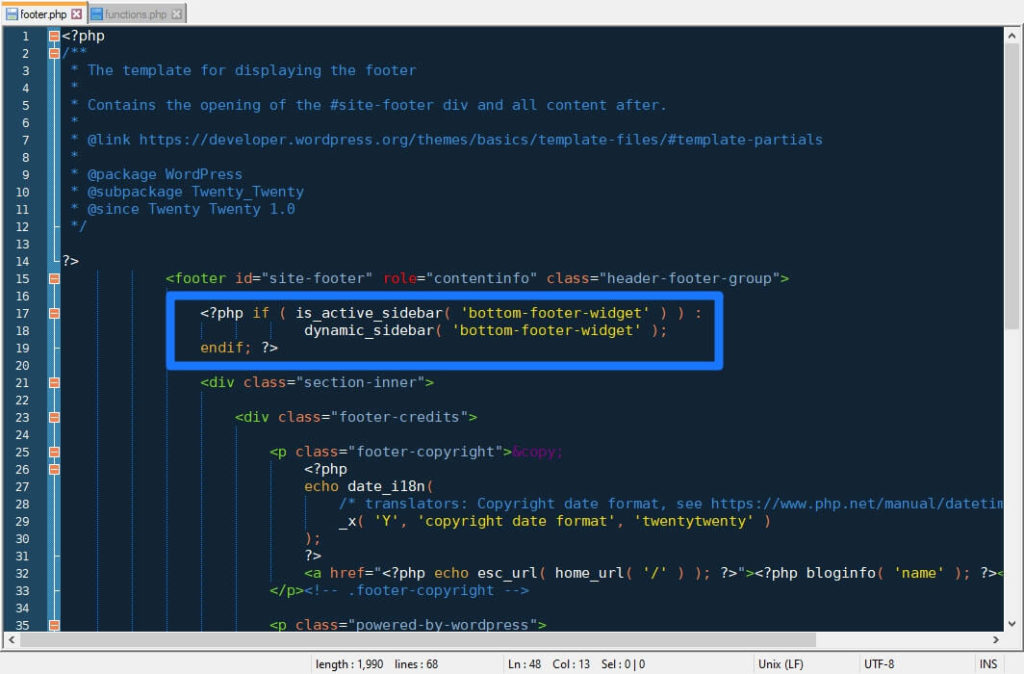
When we now reload the page, we can already see the contact information on there:

All that’s left is to apply some proper styling to it like so:
.bottom-footer-widget {
    text-align: center;
}

.bottom-footer-widget-title {
	font-size: 2.2rem;
	margin: 0 auto 0.5rem;
}
Then, it actually looks good:
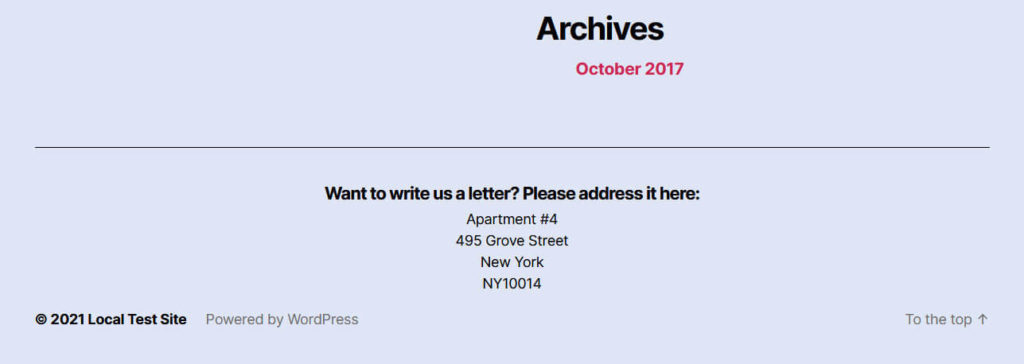
Not so hard after all, was it?
Add Scripts to Footer
The final thing we want to talk about is how to add custom scripts to the footer. One of the easiest ways is to use a plugin like Insert Headers and Footers.
Just install it and you get the option to include footer scripts via the UI.
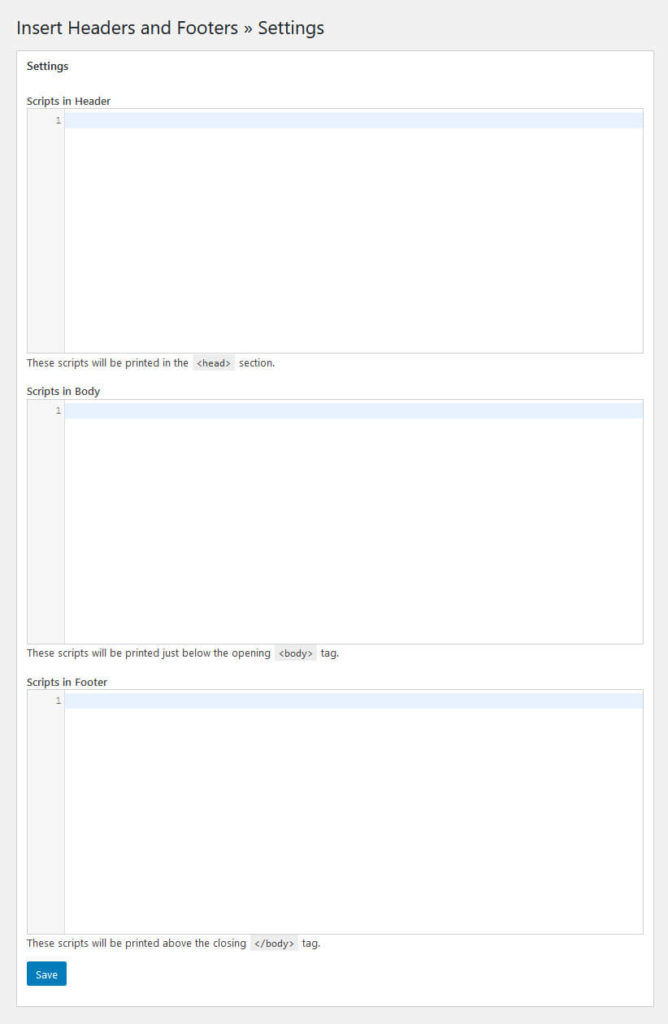
Simply copy, paste, save, and you are good. Some themes like Genesis also have stuff like this built in.
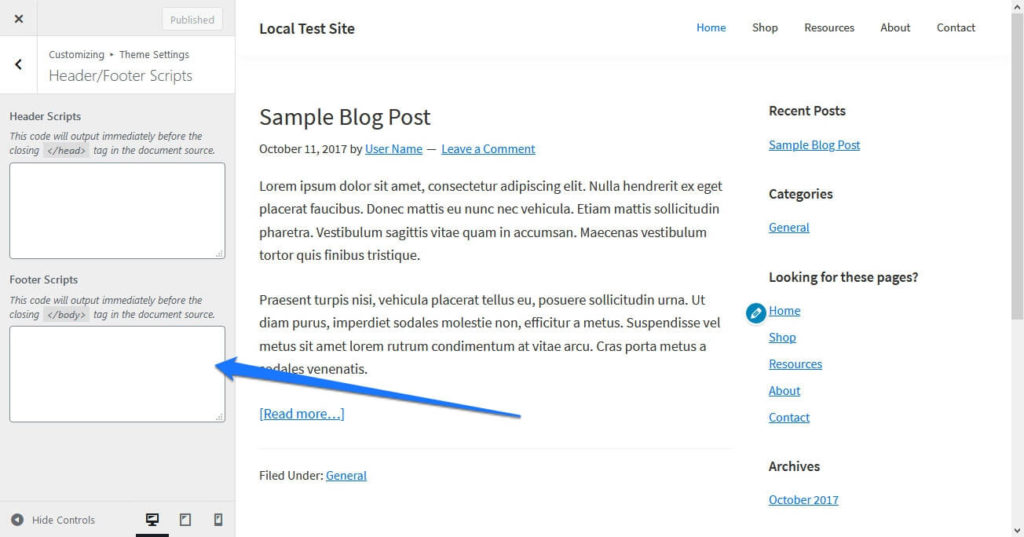
You can also do this manually with a function (place it into functions.php):
function ns_load_footer_scripts() {
	wp_enqueue_script('script-name', get_stylesheet_directory_uri() . '/scripts/myscript.js', false, '1.0', true );
}

add_action( 'wp_enqueue_scripts', 'ns_load_footer_scripts' );
One thing you need to keep in mind is to set the last parameter to true. That’s the part that moves the script to the footer instead of the header. More information in the WordPress documentation.
Customizing the WordPress Footer in a Nutshell
The footer is a central layout element of any WordPress website. To make sure you get the most out of it, you can use many different ways to make changes to it.
Above, we have gone over several options how to customize the WordPress footer. You now know how to use native functionality, CSS, PHP, and plugins to make different changes to the footer elements.
In short, you are now ready to make it your own.
How do you customize the footer on your WordPress site? Anything to add to the above? Let us know in the comments section below.
Disclosure: This content is reader-supported, which means if you click on some of our links that we may earn a commission.
If you’re looking for step-by-step instructions on editing the footer in your WordPress website, this article is for you.
There are many ways to utilize your site’s footer space. You could use it to add the links to your privacy policy or affiliate disclosure, add attractive social media icons, an email opt-in box, or a small text snippet from your About page.
Or maybe you just want to remove “Proudly powered by WordPress” from the bottom of your site.
Whatever it is, we’ve got you covered.
What Is A WordPress Footer?
A footer is an area that appears at the bottom of a website after the main body content. Just like a site’s header, the footer also usually appears on every page of a site.
For example, here’s the footer of the CrazyEgg blog.

Most sites use their footer area to house important links like disclaimers, privacy policy, and other key pages of your site.
In WordPress, the footer exists as a separate file named footer.php, which loads with every page of your site. So any changes that you make to footer.php will reflect across your site.
Why Editing The Footer In WordPress is Worth It
The footer appears on every page of your WordPress site. You can’t just waste this space with unimportant links or default messaging from your WordPress theme.
You should use your site’s footer to your advantage by highlighting essential links you can’t feature in the header.
The footer also gives you an excellent opportunity to strengthen your brand image and make a long-lasting impression on your visitors.
Instead of leaving this space empty or with useless information, you can add your logo to it along with a quick introduction to your brand or a punch line that captures the essence of your business.
The site’s footer is also critical from an SEO perspective. Since it appears on every page of your site, any links in the footer will be considered site-wide links. Never use this space to stuff keywords or internal links to get more page authority. Only feature links that are useful to your audience or legally required.
These are just some of the reasons why you should always edit your WordPress site’s footer after installing a theme.
Thankfully, most WordPress themes come with dedicated options to edit the footer, which means you don’t need to open footer.php to edit the code manually. Tinkering directly with footer.php is not recommended because if anything goes wrong with the code, footer.php will stop loading, and your site will stop working.
The Investment Needed to Edit the Footer in WordPress
Whether you’re using a free or premium WordPress theme for your site, editing the footer doesn’t require any monetary investment.
If you understand coding, you can directly edit footer.php from your WordPress dashboard. But, as I’ve already mentioned, we don’t recommend that method.
Instead, there are several secure methods with which you can add images, text, links, or menus to your site’s footer.
Here are the methods that I’ll cover in this post.
- Using WordPress Customizer
- Using WordPress Widgets
- Using a WordPress plugin
There are many free and premium WordPress plugins to edit your site’s footer. In my opinion, the free plugins do the job well. But if you prefer to use premium plugins, you can add that as a potential investment when editing your WordPress site’s footer.
Other than that, you only need to invest some time to edit your footer.
Let’s now explore the different ways you can edit your WordPress site’s footer.
Edit Footer With WordPress Theme Customizer
The WordPress Theme Customizer is an option in your WordPress dashboard that allows you to customize your site’s appearance, edit its header and footer, change its titles, and many other universal settings.
This is the most secure and user-friendly way to edit the footer in WordPress.
Here are the steps you need to follow.
Note: We’re using a popular WordPress theme named Astra, which has additional customization options. But you’ll find the footer editing options in every theme.
Sign in to your WordPress dashboard.
Go to Appearance → Customize.
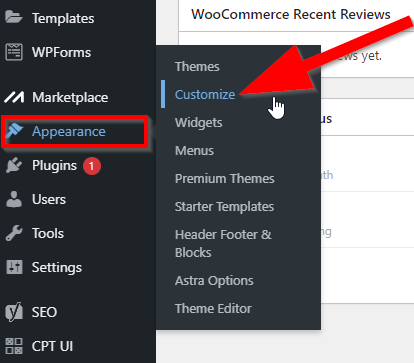
In the website customization menu, click on Footer.
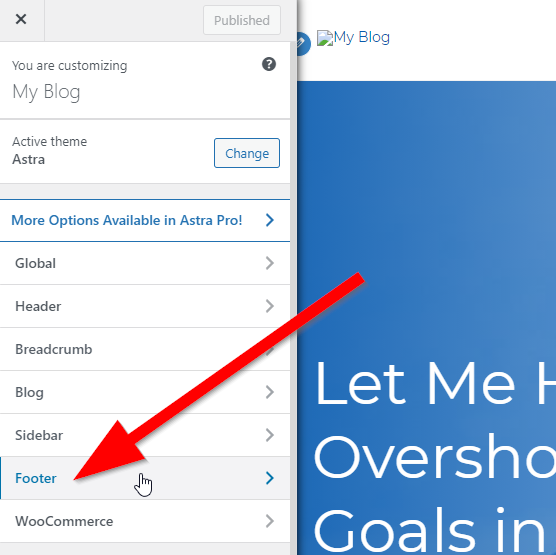
You can edit the footer by using widgets to add new sections or by editing the content and style of the footer bar. Click on Footer Bar to continue.
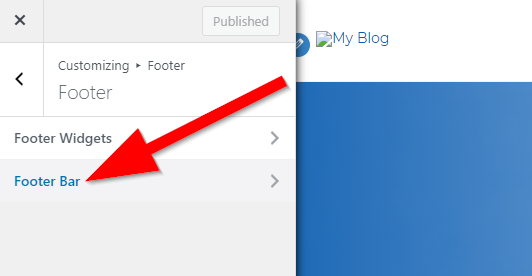
In this section, you can edit the footer layout and text. Use the text box to change the default text of your site’s theme.
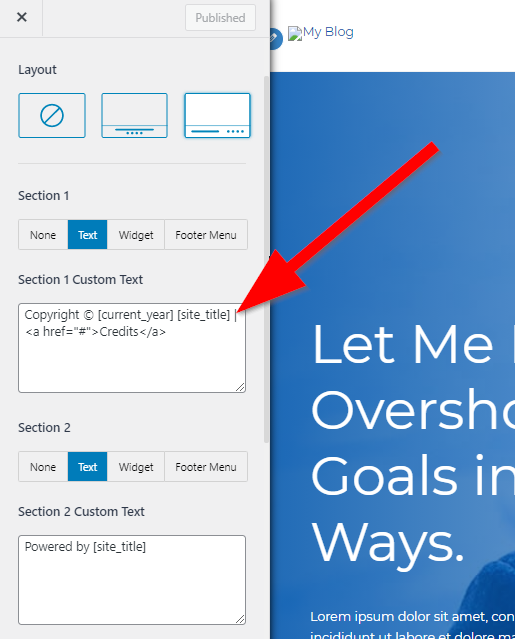
Scroll down this page to get different styling options for your site’s footer.
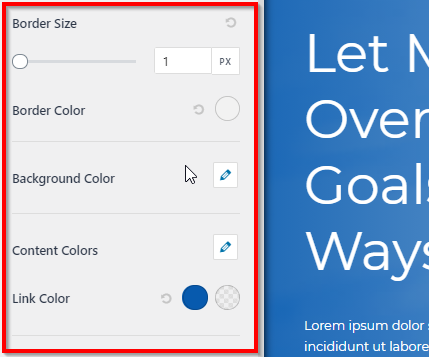
When you make the desired changes, click Publish to save your footer settings.
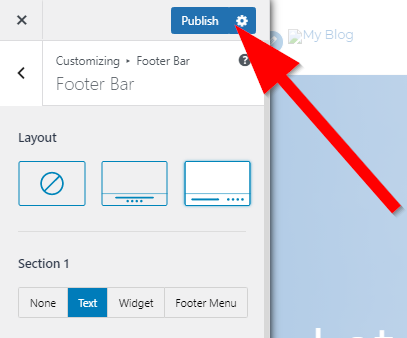
You’ve successfully edited your WordPress site’s footer.
You can always come back to this section if you want to add or remove something from your site’s footer in the future.
Add Widgets To Your WordPress Footer
Widgets are among the most valuable features in WordPress. These are small content blocks that you can drag & drop in different sections of your site to insert text, videos, images, HTML code, etc.
Most WordPress themes give you the option to use widgets in the footer as well.
Here’s how you can use them to edit your WordPress site’s footer.
Log in to your WordPress site’s dashboard.
Go to Appearance → Widgets.
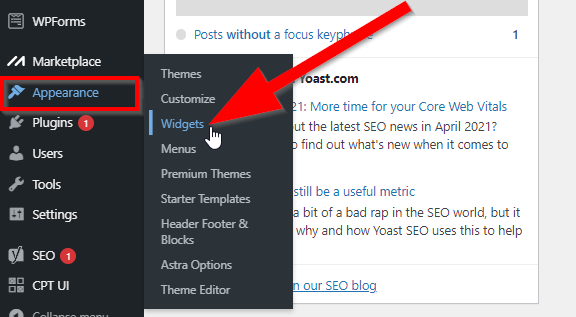
On this page, you’ll see multiple footer sections. These are the different blocks within your site’s footer that you can edit using widgets. Click on Footer Widget Area 1 to open it.
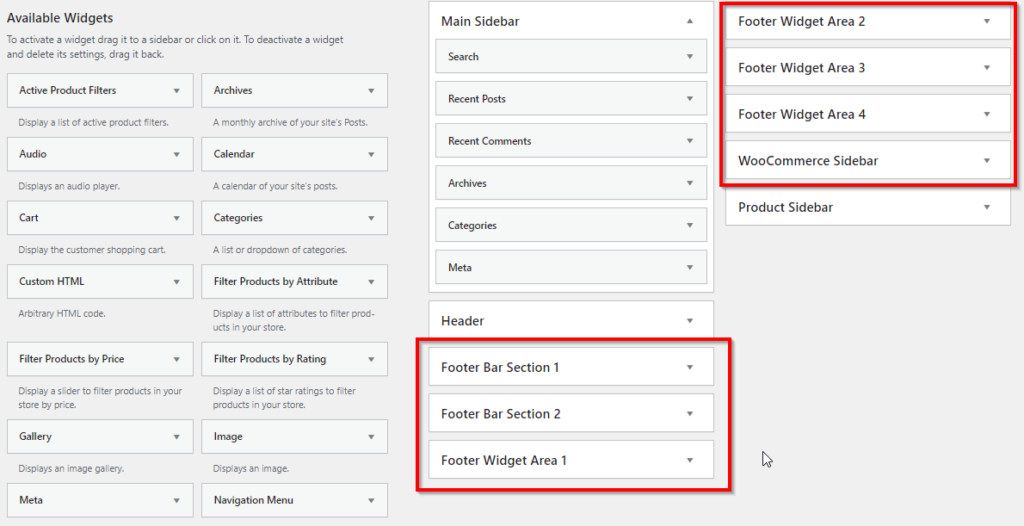
On the left side of the Widgets page, you can see different widgets that you can drag and drop to the different footer bar sections. Click and drag the Custom HTML widget to Footer Bar Section 1.
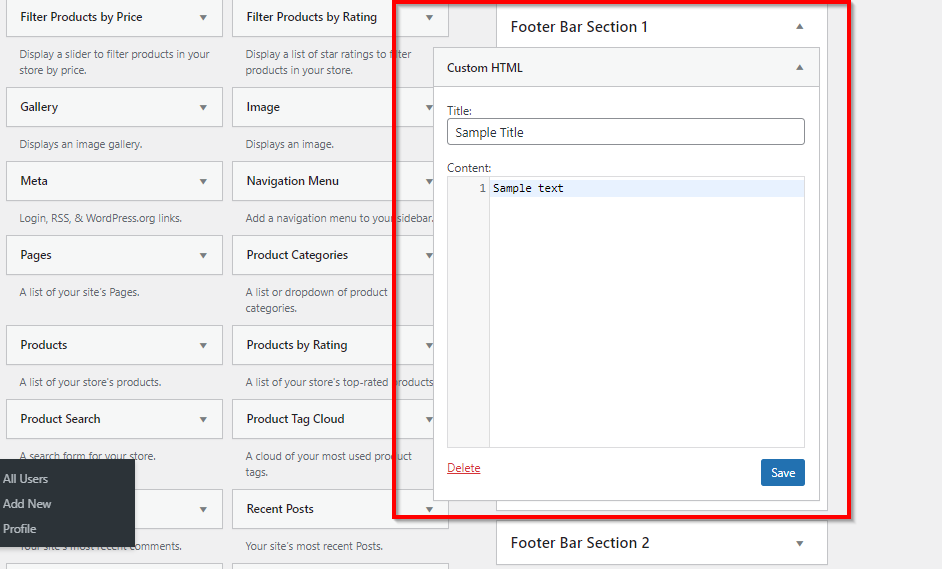
You can copy any script or code to this footer widget. Once you’re done, click Save.
The text widget is also quite popular and comes with the standard WordPress editor and the full formatting options, including adding media. Drag it to Footer Bar Section 2.
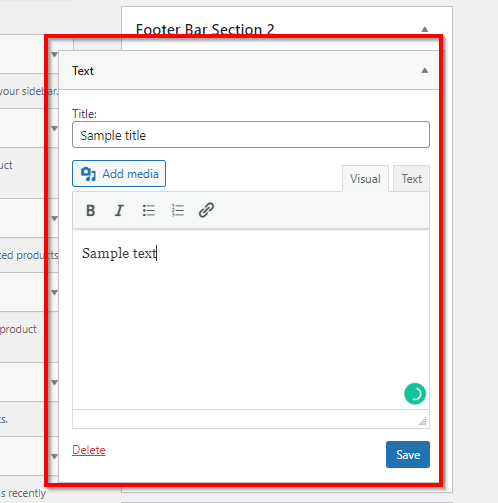
After entering your text, click Save to publish the widget in your footer.
As you can see, editing your site’s footer using widgets is even easier than the previous method.
Add A Menu To WordPress Footer
Most website owners add one or more navigation menus to their site’s footer. These are often secondary menus that consist of links that aren’t important enough to feature in your header but still important for your users.
Here’s how you can create such menus for your site’s footer.
Sign in to your WordPress site’s dashboard
Go to Appearance → Menus.
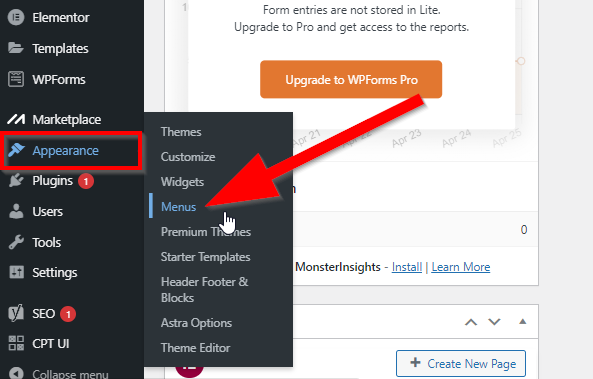
Click on create a new menu.
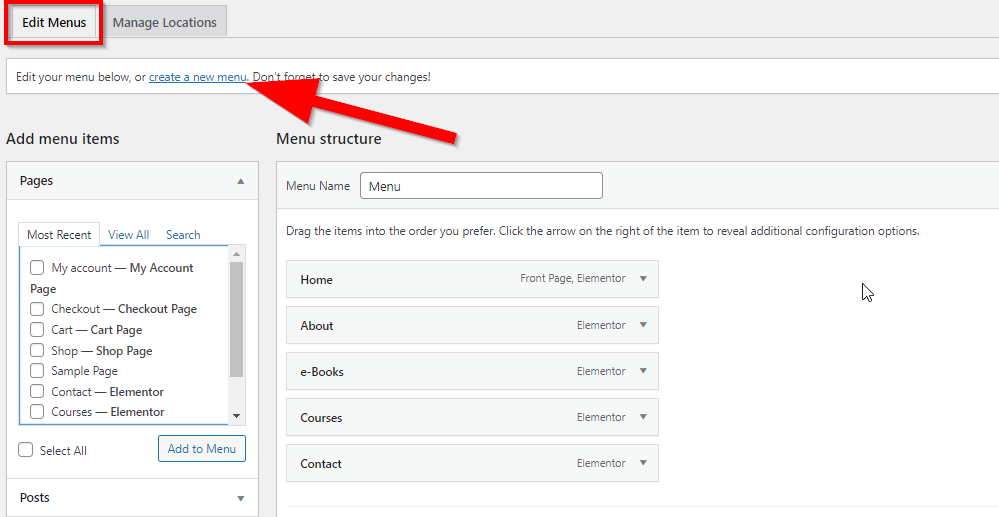
Give your footer menu a unique name that’s easily identifiable.
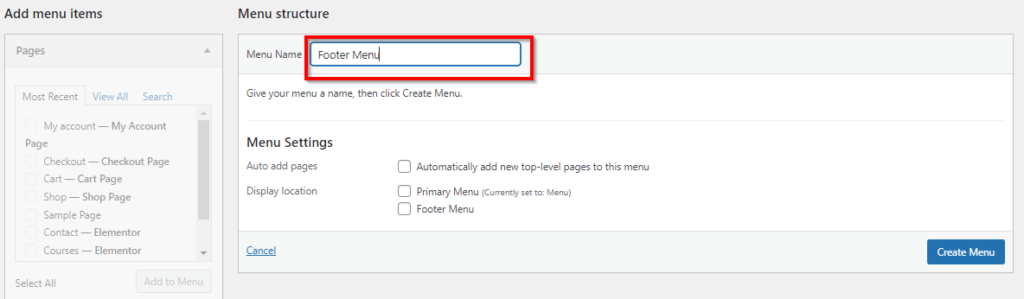
In Menu Settings under Display Location, select the checkbox next to Footer Menu.
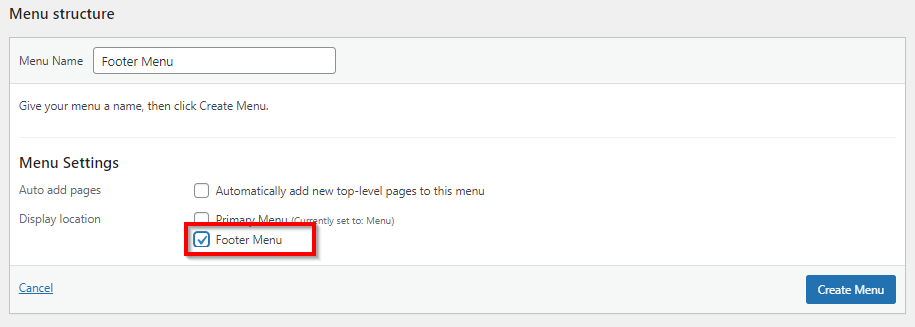
Click Create Menu to finish the basic setup of your menu and move to the next step.
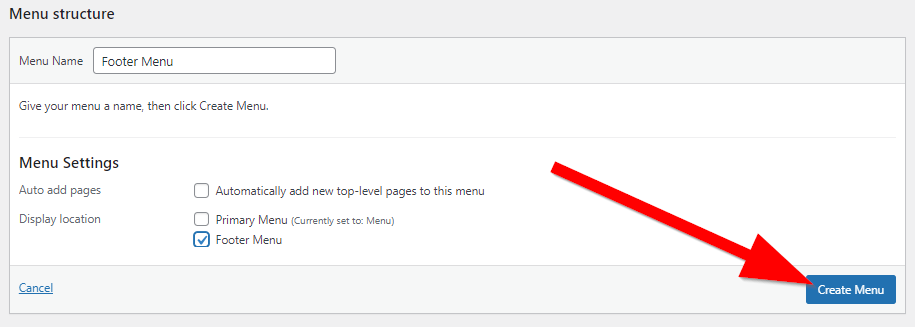
You have successfully created your footer menu, but now you need to choose the links that appear in it. Select all the relevant pages from Add menu items.
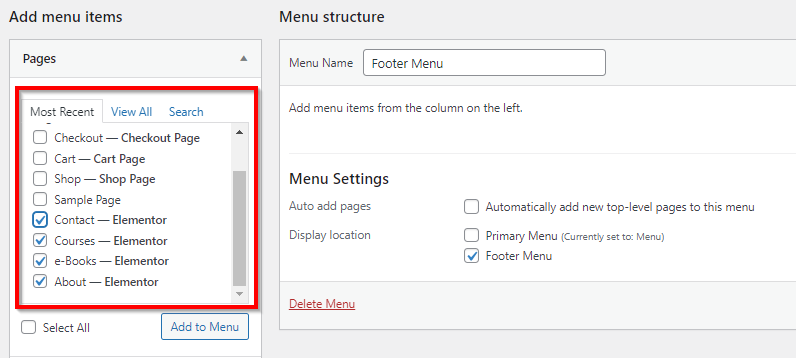
Click Add to Menu to move these pages to your footer menu.
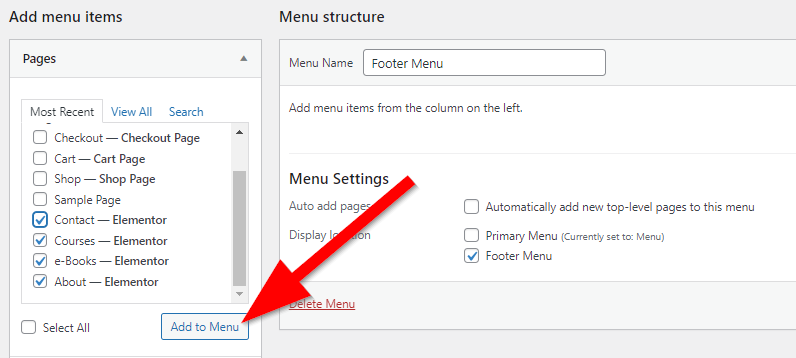
You can also add any posts, custom links, and categories to your menu from the “add menu items” section.
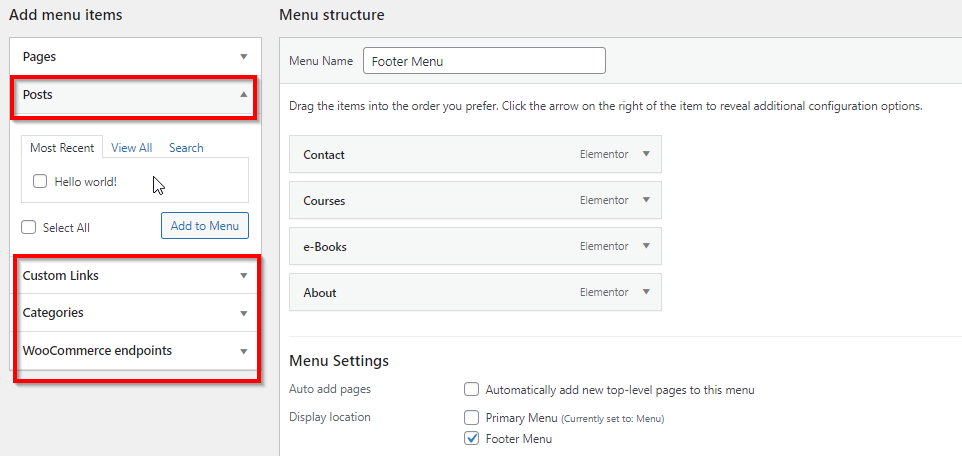
Once you add all the pages to your menu, you can drag them into any order you like.
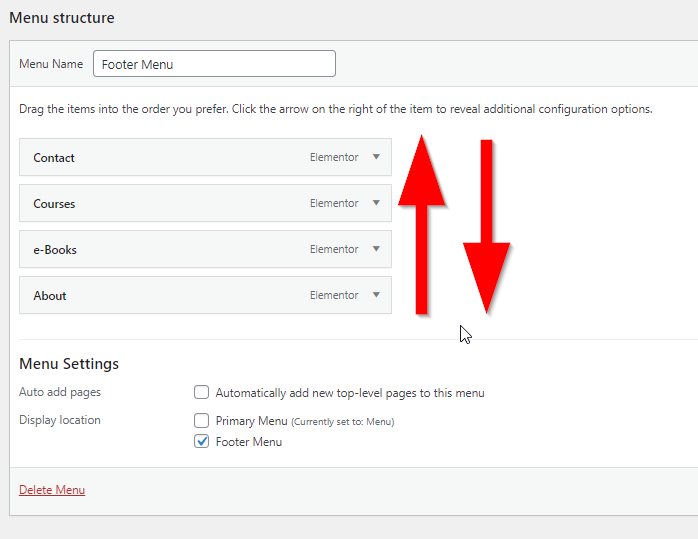
Click Save Menu to publish it in your site’s footer.
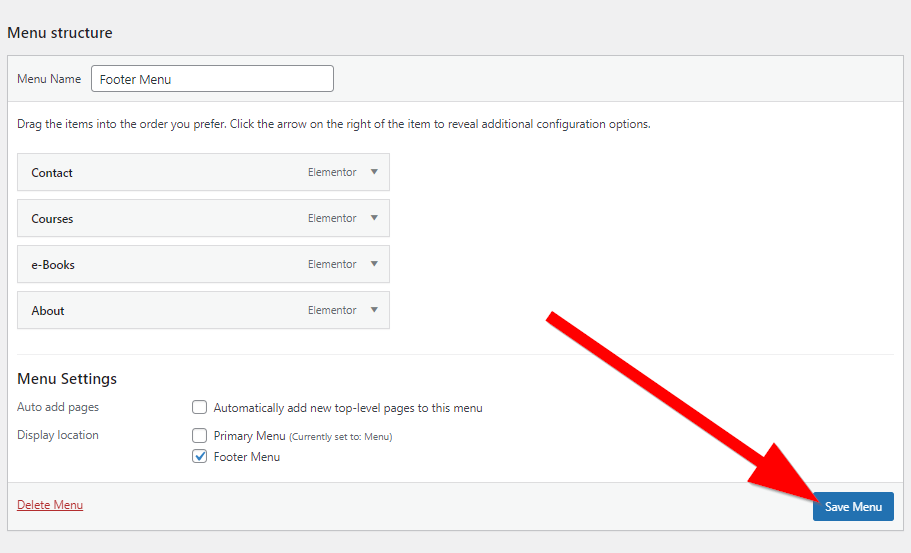
That was the process for adding a new menu to your WordPress site’s footer.
But if you want to add an existing menu to your footer, follow these steps:
Click on Manage Location on the Menus page.
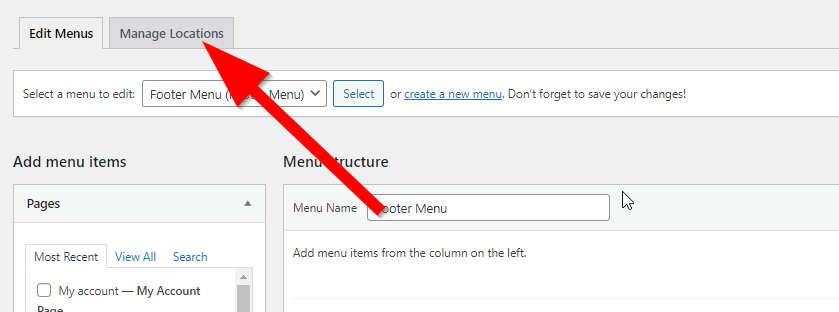
Click on the dropdown next to Footer Menu and choose a menu from the list.
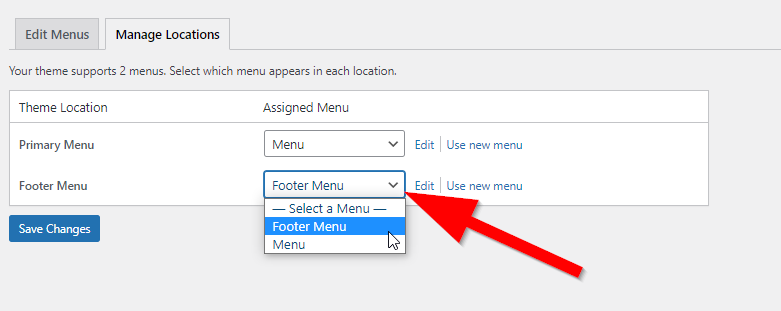
Click Save Changes to publish the menu in your site’s footer.
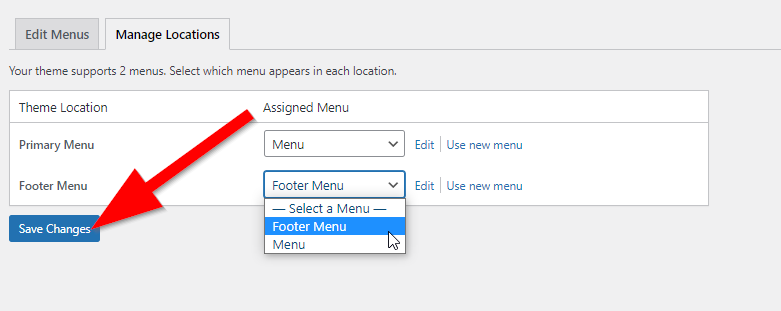
You have successfully created a footer menu for your WordPress site. To place it in the footer, go to Appearance → Widgets from your WordPress dashboard.
Click on the Footer Widget Area where you want to place the menu.
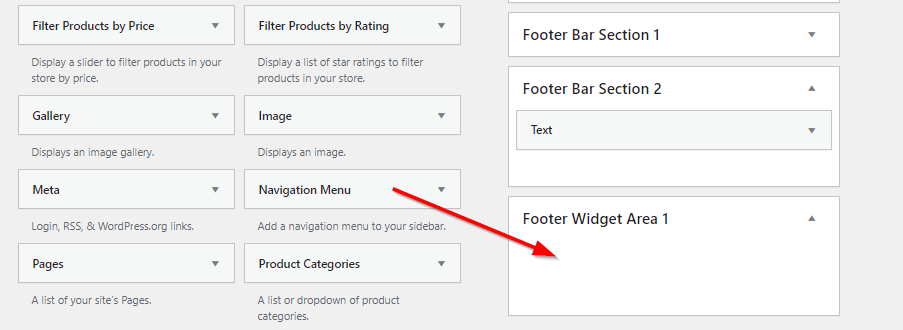
Now drag the Navigation Menu widget to the Footer Widget Area.
Give your menu a title (optional).
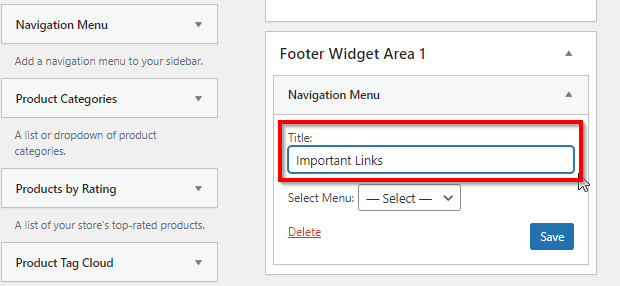
From the dropdown below the title field, select the menu you created for your site’s footer.
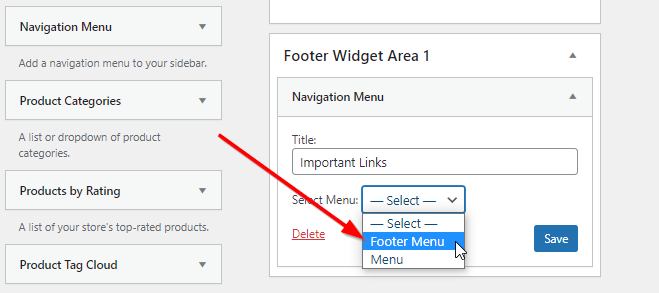
Click Save to publish the changes.
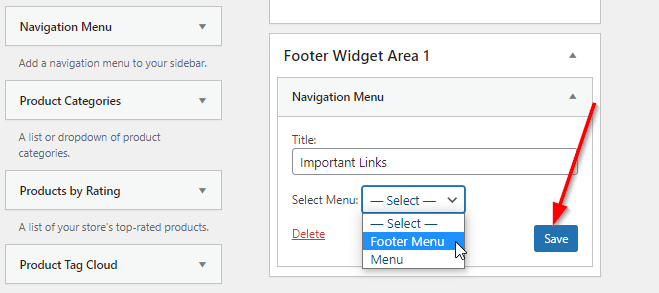
Your new menu will now display in the footer area of your WordPress site. Using this same process, you can create multiple menus for your site’s footer.
Add An HTML Code Or Script To The Footer
Many site owners usually place different scripts and tracking codes of applications like Google Analytics, etc., in their footer.
If you want to do the same or ad any kind of code to your site’s footer, here’s the process you need to follow.
Log in to your WordPress dashboard.
Go to Plugins → Add New
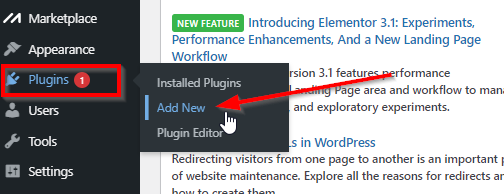
Search for the plugin “Insert Headers and Footers” in the search bar.
Locate the Insert Headers and Footers plugin and click Install.
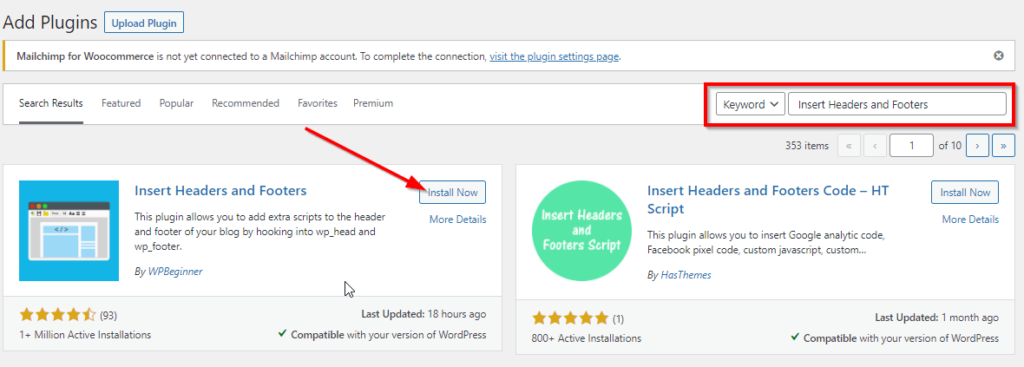
Click Activate.
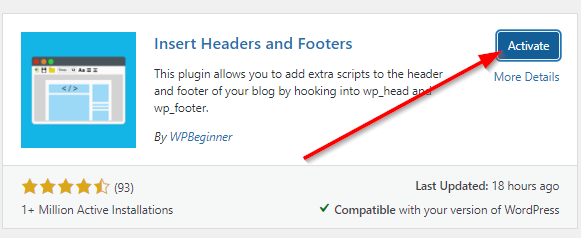
Now go to Settings → Insert Headers and Footers on your WordPress dashboard.
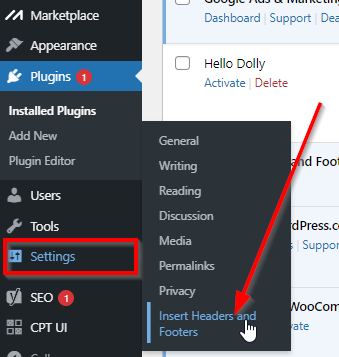
On the plugin’s page, scroll down to Scripts in Footer.
Copy your code/script in this text box.
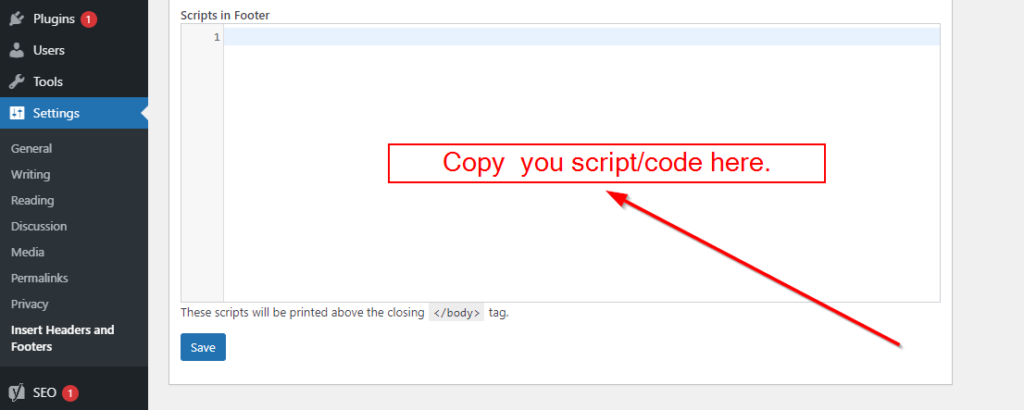
Click Save to publish the changes.
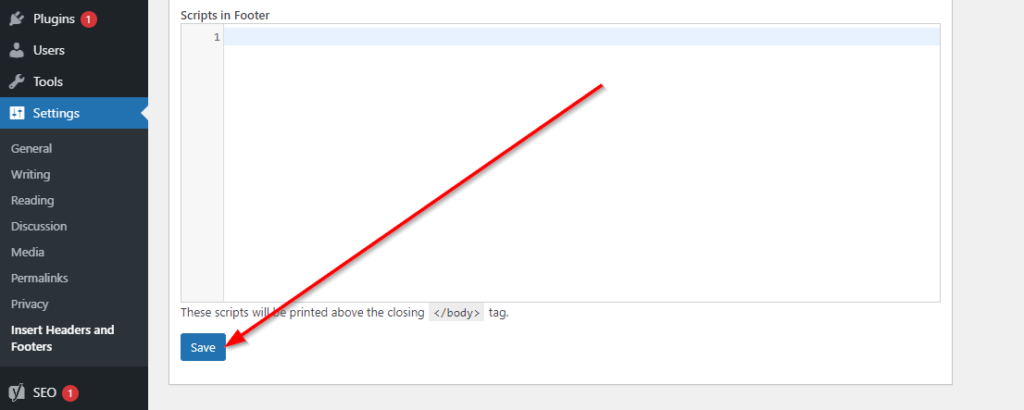
You’ve successfully added your script between the <body></body> tags of your site’s footer.php file.
Remove “Powered By WordPress” From The Footer
The default footer text in many WordPress themes is “Powered by WordPress.” If you want to remove this text, you’ll need to edit your site’s footer.
You can do this through Appearance → Customizer in your WordPress dashboard in some themes, as I’ve already shown in this post.
But if your theme’s customization options don’t allow editing the footer, you’ll need to remove it by editing the code of your site’s footer.php file.
We don’t usually recommend editing the code directly, but this one’s simple.
Here’s how to do it.
Note: We’ve used the TwentySixteen WordPress theme for this example.
Sign in to your site’s WordPress dashboard.
Go to Appearance → Theme Editor.

In the Theme Files list on the right of your screen, find and click on footer.php.
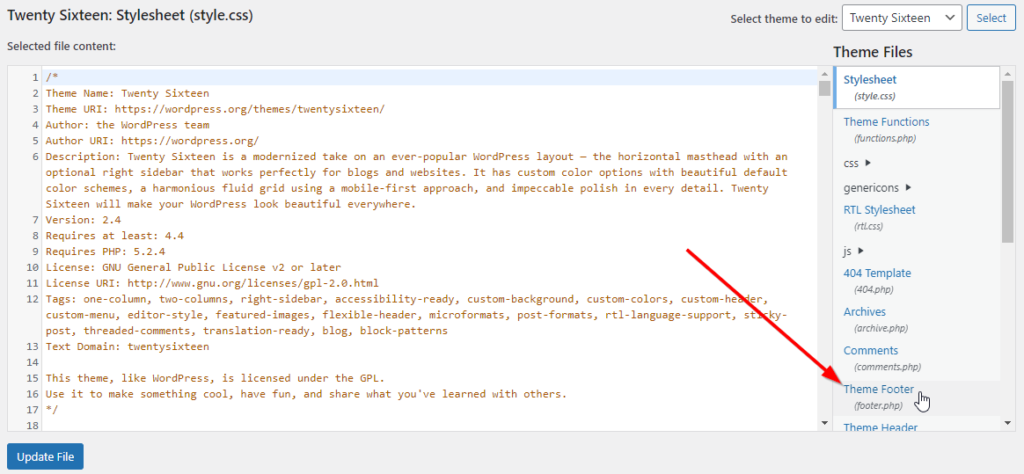
Before editing the code of this file, press CTRL+A to select the code and press CTRL+C to copy it.
Now, open a new Notepad file on your computer. Paste the code in the blank Notepad file. This is your code’s backup in case anything goes wrong.
Back in the footer.php window, press CTRL+F to open the text search box. Type “powered by” into the search box.
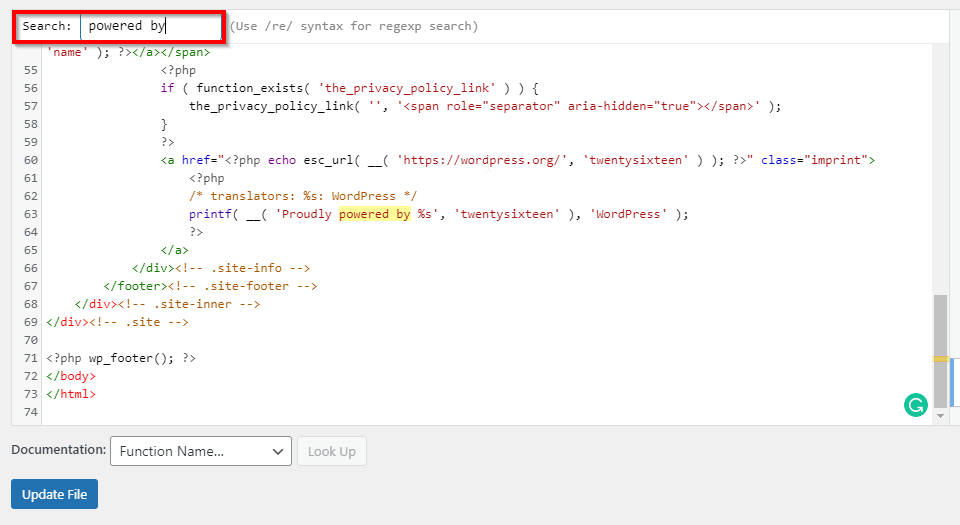
Select and remove the highlighted line from your code.
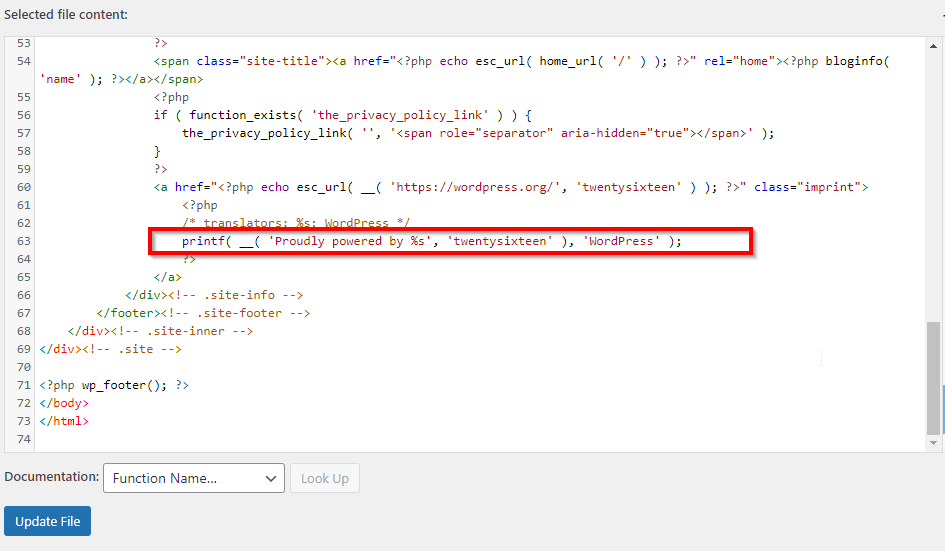
Click Update File.
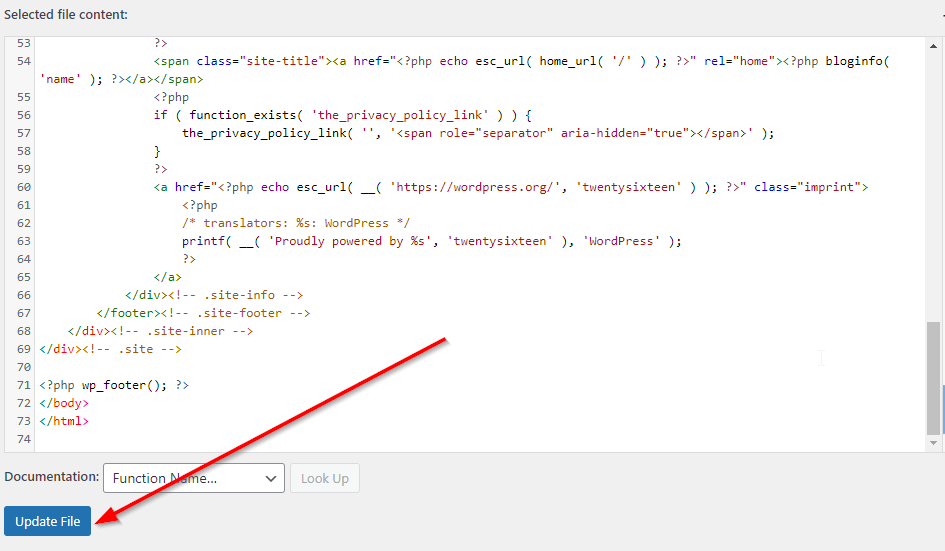
You’ve successfully removed “Powered by WordPress” from your site’s footer.
Next Steps
As I’ve shown you in detail, editing the footer of your WordPress website is not difficult at all. There are multiple ways to edit your footer, and none of them takes more than a few minutes of your time.
Using the methods I’ve explained, you can edit your site’s footer in many other ways, such as adding social media icons, adding a Google Maps widget, adding an email opt-in box widget, etc.