Постоянные ссылки — это постоянные URL-адреса отдельных страниц и записей в блоге, а также архивов рубрик и тегов. Слаги — это сокращённые названия записей, страниц, рубрик и меток для включения в URL-адрес.
Ниже приведён пример постоянной ссылки:
https://yourgroovydomain.com/2020/01/01/first-blog-post
В этом примере слагом записи является first-blog-post.
Содержание
Принципы работы слагов
При создании заголовка для записи, страницы, рубрики или тега в WordPress автоматически создаётся слаг.
Слаг представляет собой часть URL-адреса, указывающий на конкретную страницу. В целом слаги очень похожи на оригинальный заголовок.
Слаг будет отличаться от заголовка, если последний содержит определённые символы, например пробелы или знаки валюты, а также любые знаки, не являющиеся буквами или числами. В таких случаях специальный символ заменяется эквивалентом, подходящим для URL, или полностью удаляется из слага.
Чаще всего подстановки применяются в заголовках, которые содержат несколько слов, разделённых пробелами. В этом случае каждый пробел заменяется дефисом ( — ).
Идентификация слагов
Записи и страницы
Слаг можно просмотреть в редакторе для записи или страницы в настройках документа в разделе «Постоянная ссылка»:

В этом разделе можно отредактировать слаг, если вы не хотите использовать слаг по умолчанию, созданный автоматически.
Рубрики и теги
Эти инструкции относятся к интерфейсу консоли. Чтобы увидеть этот интерфейс, щёлкните вкладку Вид в правом верхнем углу и выберите Стандартный вид.
Если вам нужно найти слаг для рубрики или тега, перейдите в раздел Записи → Рубрики или Записи → Теги на консоли.
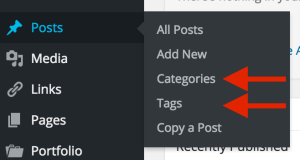
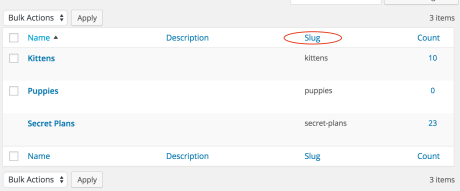
После загрузки страницы «Рубрика» или «Тег» в правой части экрана появится список всех текущих элементов. В столбце Слаг будет отображаться слаг для каждой рубрики.
Числа в конце слагов
Иногда в конце слага может появляться число, даже если вы его туда не вводили. Это происходит, когда WordPress обнаруживает, что один и тот же слаг используется несколько раз.
Так как слаг служит для идентификации каждого адреса записи, страницы, рубрики или тега, он должен быть уникальным.
Примером подобной ситуации может быть запись под названием «С Новым годом!» В этом случае слагом по умолчанию будет happy-new-year. Если вам потребуется создать подобную запись с таким же названием на следующий год, слагом по умолчанию будет happy-new-year-2, что позволит таким записям иметь уникальные адреса.
Изменение структуры постоянных ссылок
Этот раздел руководства применяется к сайтам с тарифными планами WordPress.com Business или eCommerce. Если на вашем сайте действует один из устаревших тарифных планов, эта функция доступна для плана Pro.
По умолчанию WordPress использует URL-адреса записей, содержащие дату и имя. Тем не менее WordPress позволяет создать пользовательскую структуру URL-адресов для постоянных ссылок. Это поможет сделать ссылки более эстетичными и удобными.
На экране Мой сайт → Настройки → Постоянные ссылки можно выбрать одну из распространённых структур постоянных ссылок или ввести новую структуру в поле «Пользовательская структура».
⚠️
Если настройку «День и имя» постоянной ссылки, заданную по умолчанию, изменить на «Имя записи», записи не будут автоматически перенаправляться из старых ссылок. Для этого установите плагин «Переадресация».

Сброс постоянных ссылок
Иногда у вас могут возникать ошибки, связанные с постоянными ссылками. Чтобы устранить неполадки, необходимо сбросить постоянные ссылки, выполнив следующие действия:
- Перейдите в раздел Настройки → Постоянные ссылки
- В разделе Общие настройки обратите внимание на выбранную опцию. Если это опция Пользовательская структура, скопируйте и вставьте её в блокнот, чтобы вставить её позже
- Выберите другую структуру постоянной ссылки и щёлкните Сохранить изменения
- Затем выберите структуру постоянной ссылки, которая была изначально, и щёлкните Сохранить изменения
Возможно, вы встречали слово «слаг» в руководствах WordPress по SEO или статьях с советами по увеличению посещаемости сайта. Но действительно ли вы знаете, что такое слаг? Если вы не знакомы с WordPress или веб-сайтами, вашей первой мыслью может быть маленький садовый вредитель. Однако слаг WordPress — это не одно и то же.
Сегодня мы ответим на все вопросы, которые могут у вас возникнуть о том, что такое слаги WordPress, как устанавливать или редактировать слаги в WordPress, а также как использовать SEO-оптимизацию слагов для лучшего ранжирования в результатах поиска. Давайте начнем!
- Что такое слаг?
- Постоянные ссылки и слаги
- Как установить и отредактировать слаг в WordPress
- Слаг записи
- Слаг страницы
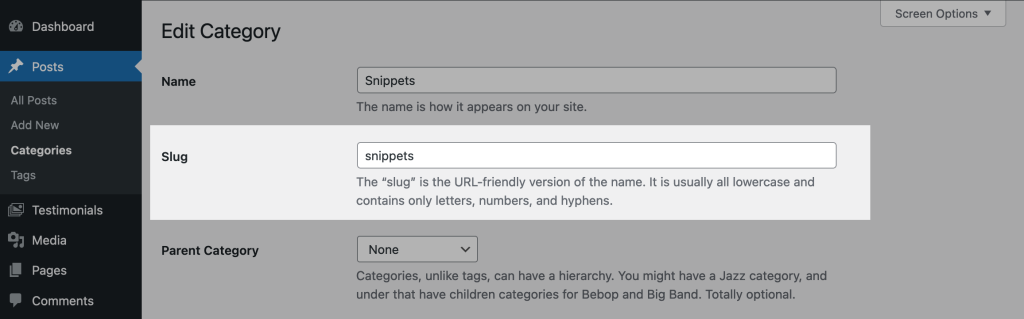
- Слаг категории
- Слаг тега
- Слаг автора
- Как SEO-оптимизировать слаги в WordPress
- Используйте в слагах ключевые слова
- Делайте слаги короткими и релевантными
- Удалите ненужные слова-вставки (или стоп-слова)
- Избегайте замены слагов в будущем
С самого начала давайте убедимся в том, что вы действительно знаете, что такое слаг WordPress. Когда вы создаете запись в WordPress, URL-адрес записи создается автоматически на основе заголовка. Итак, запись под названием “WordPress Slugs Are Cool And Fun” может выглядеть следующим образом:
https://www.wpexplorer.com/wordpress-slugs-are-cool-and-fun
Слаг – это последний фрагмент URL-адреса «wordpress-slugs-are-cool-and-fun».
Это может сбивать с толку, поскольку постоянная ссылка является URL-адресом, а слаг также является URL-адресом. Но постоянные ссылки и слаги — это не одно и то же. Чтобы упростить, вот краткое сравнение этих двух понятий.

Постоянная ссылка — это структура URL-адреса, которая определяет, как ссылки создаются на сайте. Постоянные ссылки устанавливаются глобально в разделе «Настройки»> «Постоянные ссылки».

Слаг – это последняя часть URL-адреса, которая идентифицирует конкретную страницу на WordPress-сайте. Слаги устанавливаются для каждой конкретной страницы, записи или таксономии.
Изменить слаги WordPress очень просто. Однако этот процесс немного отличается в зависимости от того, для чего вы хотите изменить слаг. Вот несколько базовых примеров.

Когда вы создаете новую запись или редактируете уже существующую, вы увидите URL-адрес постоянной ссылки прямо под заголовком. По умолчанию WordPress добавляет полный заголовок записи с дефисами, заполняющими пробелы. Просто нажмите кнопку «Изменить», чтобы настроить или изменить слаг для записи (в идеале, используя подсказки по поисковой оптимизации, которые мы рассмотрим в следующем разделе).

Как и в случае с записями, при создании новой страницы или редактировании уже существующей вы сможете найти поле слага прямо под заголовком. WordPress автоматически добавит в качестве слага полный заголовок страницы.

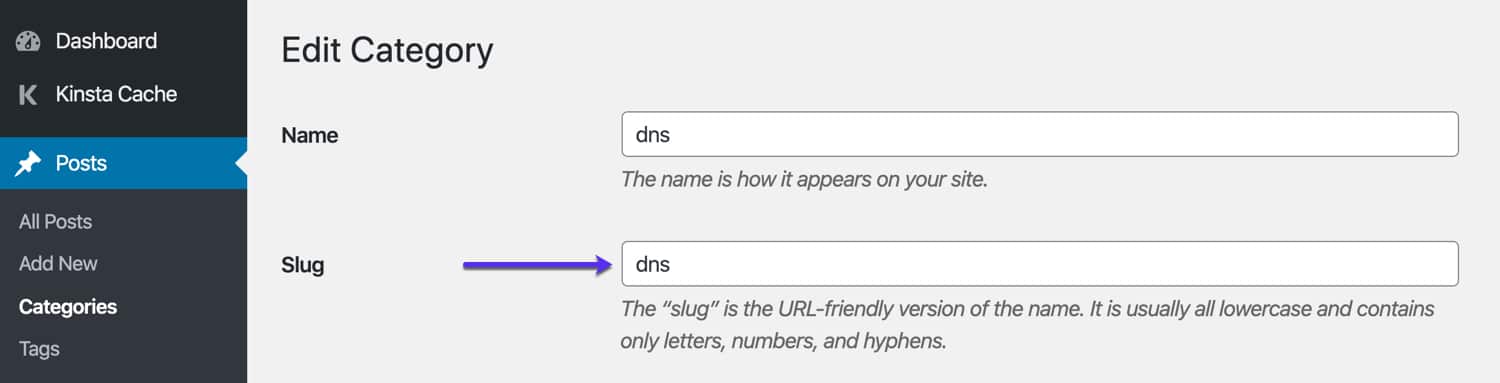
По умолчанию категории будут использовать введенное вами «название» в качестве слага, или же можно ввести пользовательский слаг. В примере, приведенном выше, можно увидеть, что мы сократили слаг категории «Miscellaneous» до “misc”. Но обычно названия категорий бывают короткими и конкретными, и вам не нужно будет (или не захочется) их менять.

Теги работают так же, как категории, и будут использовать имя тега в качестве заголовка. Вы, конечно, можете настроить это, но чаще всего в этом нет необходимости.

WordPress по умолчанию будет использовать имя пользователя-автора в качестве слага. Это функция, встроенная в WordPress. В примере, приведенном выше, с именем пользователя «username» ссылка на автора будет выглядеть следующим образом:
https://www.wpexplorer.com/author/username
В настоящее время не существует встроенного способа редактирования или настройки слага автора, кроме создания нового пользователя с новым именем пользователя. Так что, если вы хотите внести изменения в слаги авторов, вам понадобится специальный плагин. Одним из возможных вариантов является бесплатный плагин Edit Author Slug, который позволяет изменять как структуру постоянных ссылок (/ author/часть URL-адреса), так и слаг (имя пользователя) для страниц авторов.
Теперь, когда вы точно понимаете, что такое слаг и как его можно изменить, давайте рассмотрим поисковую оптимизацию слагов. Далее приведено несколько простых советов, которые помогут вам оптимизировать слаги в WordPress.
Ключевые слова — важнейшая часть SEO, поэтому должно быть понятно, что если вы хотите SEO-оптимизировать слаги в WordPress, необходимо использовать ключевые слова. Статья «Лучший рецепт бананового хлеба моей прабабушки из старых бананов» с гораздо большей вероятностью будет ранжироваться по ключевому слову «рецепт бананового хлеба», если в URL-адресе будет — лучший рецепт бананового хлеба, а не рецепт моей прабабушки или старые бананы.
Делайте их простыми и конкретными. Крайне важно, чтобы URL-адрес легко запоминался читателями, если они хотят на него сослаться, а также был легким для понимания роботами поисковых систем при сканировании сайта. Слаг должен быть связан с заголовком записи и целевыми ключевыми словами — в любом случае ни то, ни другое нельзя делать излишне длинными.
Следуя последнему пункту, вы сможете легко сократить заголовки, удалив стоп-слова или ненужные слова. Думайте об этом как о сокращении — оставьте только те слова, которые действительно нужны, чтобы донести ключевую мысль.
Например, мы сократили название публикации “SEO Optimization for WordPress Slugs” до «wordpress-slugs-seo». Мы удалили «Optimization», поскольку не считали эту часть важной, и «for», поскольку это слово-вставка.
После публикации записи, страницы, категории или чего-либо еще лучше просто оставьте их в покое. Внесение изменений в слаги в будущем может привести к ошибке 404, если вы неправильно перенаправите старый URL-адрес на новый.
Надеюсь, наше руководство помогло вам лучше понять, что такое слаги в WordPress, как устанавливать и редактировать слаги в WordPress для вашего контента и как действительно SEO- оптимизировать слаги WordPress. С помощью перечисленных ниже советов вы сможете оптимизировать URL-адреса своего WordPress-сайта:
- Используйте ключевые слова.
- Создавайте короткие слаги.
- Удалите ненужные слова-вставки (или стоп-слова).
- Не меняйте слаги
Но если у вас есть другие вопросы о слагах d WordPress, или если у вас есть собственные советы или инструменты оптимизации слагов, которые, по вашему мнению, мы должны добавить, расскажите об этом в комментариях. Мы будем рады услышать от вас об этом.
When you search for “what is a slug?”, Google serves back images of slimy gastropods. But that’s not what we’re interested in for this post. Instead, we’ll be digging into everything about what a WordPress slug is, along with how to use them correctly on your site.

What is a WordPress Slug?
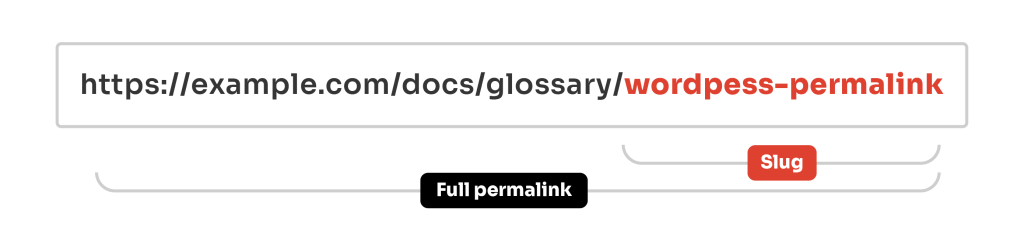
In WordPress, a slug is the bit of text that appears after your domain name in the URL of a page. Essentially, it’s the part of your site’s URL that identifies every single page on your site (except for the homepage). For example, on this glossary entry, it’s “wordpress-slug”. You can see this in the actual URL below:

Sometimes, as in the example above, you’ll actually have two slugs back-to-back. The “knowledgebase” part of the URL represents the slug for our Knowledge Base section and the “what-is-a-slug” part represents the slug for the specific post.
By default, every single public page on your WordPress site, including posts, pages, categories, and author archives, has its own slug. And in one form or another, you have full control over every single slug on your WordPress site.
Slugs play an important role in search engine optimization and usability, so they are definitely something you want to consider.
How to Set Slugs in WordPress
Below, we’ll show you how to set slugs for various parts of your WordPress site. If you need to skip ahead to a specific section, you can use the links below:
- How to Set Post Slug
- How to Set Page Slug
- How to Change Category or Tag Slug
- How to Change Author Slug
What Can You Put in WordPress Slugs?
Because slugs are part of a site’s URL, you should follow some basic best practices:
- Replace spaces with dashes
- Use only lowercase letters
WordPress will actually automatically correct these issues for you. We mention them only so that you’re not confused when WordPress replaces spaces with dashes or makes your capital letters lowercase (check out the different ways in which you can do a search and replace on your own).
How to Set WordPress Post Slug
You can set the slug for a WordPress post whenever you’re creating or editing a post. If you’re writing a new post, be sure to save it as a draft first. Click on the Title box, and you’ll see a box containing the Permalink URL with an Edit icon.

When you click Edit, you’ll be able to edit the slug portion of the URL.

When you’re finished, click Save and make sure to Publish or Update your post. And remember that Google likes WordPress sites that are clean, organized, and structured; this includes using short URLs and or slugs. They can also help improve your CTR. MarketingSherpa ran a study and they discovered that executives are 250% more likely to click on an organic listing if it:
- Had a fairly short slug
- Appeared directly below a listing with a long slug
So keeping your slugs as short as possible can be an enormous competitive advantage. The one thing to keep in mind is that WordPress automatically creates a slug for you based on the title.
How to Set WordPress Page Slug
As with a post, you can set a WordPress page’s slug by looking for the Permalink URL and clicking Edit:

Enter your desired slug, click Save, and make sure to Publish or Update your page.
How to Change WordPress Category or Tag Slug
When you create a new category or tag from inside the WordPress Editor, WordPress automatically assigns that item a slug without any input from you. But if you’d prefer to manually set the slug for a category or tag, you can always go back later and change the slug. The process is essentially identical for both categories and tags.
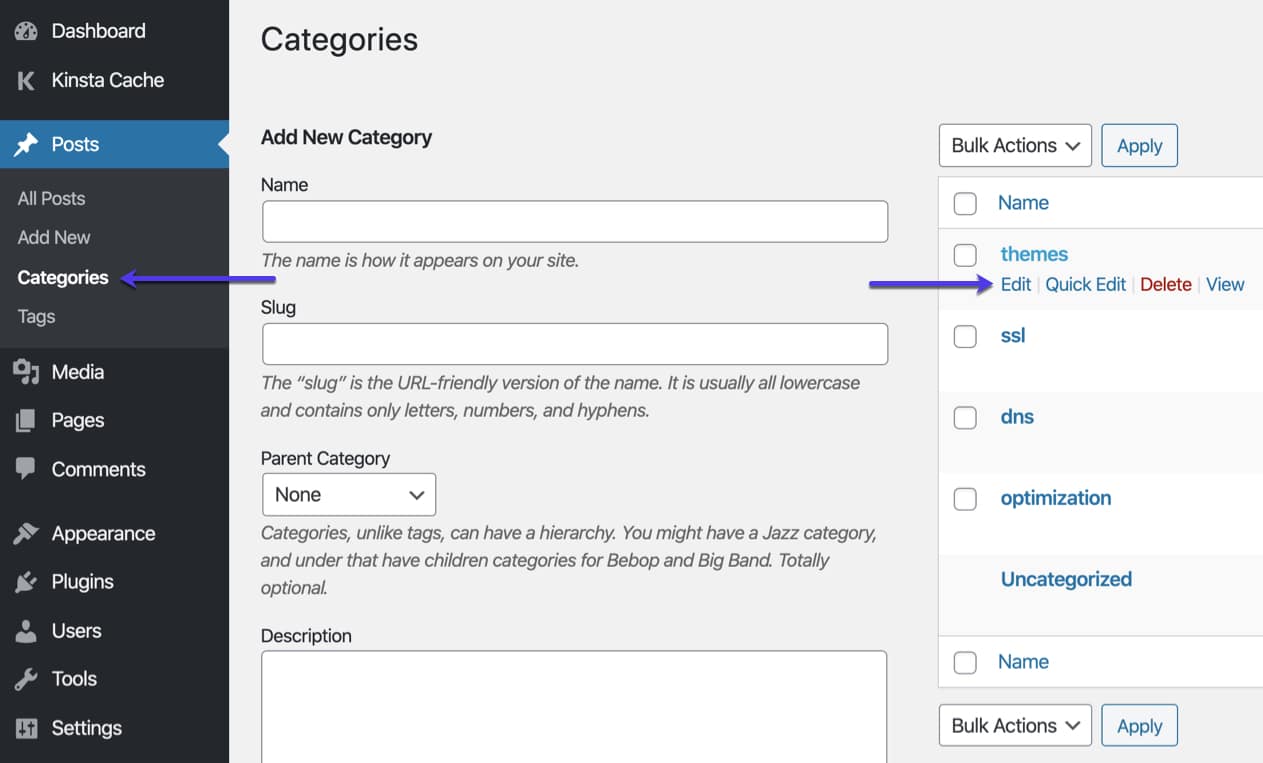
Go to Posts → Categories (for categories) or Posts → Tags (for tags). Then, look for the category or tag you want to edit, hover over it, and click the Edit button.
Enter your desired slug in the box and make sure to click Update at the bottom of the page:
How to Change WordPress Author Slug
By default, the author slug for an author’s archive page is their username. Unfortunately, you cannot change a WordPress account’s username after it’s been created. But what you can do is use a free plugin to change the WordPress author slug.
Once you activate the plugin, you’ll get a new Edit Author Slug box on a user’s profile page that lets you change the author’s archive slug.
Be Careful Changing WordPress Slugs At a Later Date
One area you need to be careful with is changing the slug for content after you’ve created it. Whenever you change the slug for a piece of content, anytime someone tries to reach that content by visiting the URL with the original slug, they might have trouble accessing your content.
For posts and pages, WordPress will try to automatically redirect users to the new slug. And while this works most of the time, it doesn’t always work. In which case you will need to setup a redirect to your new URL. Why? Because you don’t want the visitors to end up on a 404 page, and for SEO purposes you will want to retain any link juice that the page/slug has built up by using a 301 redirect.
If you are a Kinsta user you can easily implement 301 redirects from right within the MyKinsta dashboard. Or you can utilize a free WordPress plugin like Redirection or Safe Redirect Manager.
Also, WordPress doesn’t even try to redirect slugs that have changed for categories or tags. For that reason, you should try to avoid changing slugs later on whenever possible.
How Are Permalinks and Slugs Related?
Permalinks help you set your entire site’s URL structure. Essentially, they tell WordPress where to put each individual slug that you manually set. You can access your permalinks by going to Settings → Permalinks.
For example, if you make your permalink structure Month and name, WordPress will append your slug after the year and month when the post was published:

The %postname% part of the permalink structure is what WordPress replaces with your post’s slug. Most of the time, it’s best to use the Post name permalink structure. With this configuration, the only thing that appears after your domain name is the slug that you set.

As with individual WordPress slugs, you need to be careful changing your permalink structure if your site is already receiving traffic.
A few more recommended tutorials from our blog:
Best SEO Plugins for WordPress (And Must-Have SEO Tools)
WordPress SEO Checklist – 45 Tips to Increase Traffic by 571% in 13 Months
Get all your applications, databases and WordPress sites online and under one roof. Our feature-packed, high-performance cloud platform includes:
- Easy setup and management in the MyKinsta dashboard
- 24/7 expert support
- The best Google Cloud Platform hardware and network, powered by Kubernetes for maximum scalability
- An enterprise-level Cloudflare integration for speed and security
- Global audience reach with up to 35 data centers and 275 PoPs worldwide
Test it yourself with $20 off your first month of Application Hosting or Database Hosting. Explore our plans or talk to sales to find your best fit.
When you search for “what is a slug?”, Google serves back images of slimy gastropods. But that’s not what we’re interested in for this post. Instead, we’ll be digging into everything about what a WordPress slug is, along with how to use them correctly on your site.
What is a WordPress Slug?
In WordPress, a slug is the bit of text that appears after your domain name in the URL of a page. Essentially, it’s the part of your site’s URL that identifies every single page on your site (except for the homepage). For example, on this glossary entry, it’s “wordpress-slug”. You can see this in the actual URL below:
Sometimes, as in the example above, you’ll actually have two slugs back-to-back. The “knowledgebase” part of the URL represents the slug for our Knowledge Base section and the “what-is-a-slug” part represents the slug for the specific post.
By default, every single public page on your WordPress site, including posts, pages, categories, and author archives, has its own slug. And in one form or another, you have full control over every single slug on your WordPress site.
Slugs play an important role in search engine optimization and usability, so they are definitely something you want to consider.
How to Set Slugs in WordPress
Below, we’ll show you how to set slugs for various parts of your WordPress site. If you need to skip ahead to a specific section, you can use the links below:
- How to Set Post Slug
- How to Set Page Slug
- How to Change Category or Tag Slug
- How to Change Author Slug
What Can You Put in WordPress Slugs?
Because slugs are part of a site’s URL, you should follow some basic best practices:
- Replace spaces with dashes
- Use only lowercase letters
WordPress will actually automatically correct these issues for you. We mention them only so that you’re not confused when WordPress replaces spaces with dashes or makes your capital letters lowercase (check out the different ways in which you can do a search and replace on your own).
How to Set WordPress Post Slug
You can set the slug for a WordPress post whenever you’re creating or editing a post. If you’re writing a new post, be sure to save it as a draft first. Click on the Title box, and you’ll see a box containing the Permalink URL with an Edit icon.
When you click Edit, you’ll be able to edit the slug portion of the URL.
When you’re finished, click Save and make sure to Publish or Update your post. And remember that Google likes WordPress sites that are clean, organized, and structured; this includes using short URLs and or slugs. They can also help improve your CTR. MarketingSherpa ran a study and they discovered that executives are 250% more likely to click on an organic listing if it:
- Had a fairly short slug
- Appeared directly below a listing with a long slug
So keeping your slugs as short as possible can be an enormous competitive advantage. The one thing to keep in mind is that WordPress automatically creates a slug for you based on the title.
How to Set WordPress Page Slug
As with a post, you can set a WordPress page’s slug by looking for the Permalink URL and clicking Edit:
Enter your desired slug, click Save, and make sure to Publish or Update your page.
How to Change WordPress Category or Tag Slug
When you create a new category or tag from inside the WordPress Editor, WordPress automatically assigns that item a slug without any input from you. But if you’d prefer to manually set the slug for a category or tag, you can always go back later and change the slug. The process is essentially identical for both categories and tags.
Go to Posts → Categories (for categories) or Posts → Tags (for tags). Then, look for the category or tag you want to edit, hover over it, and click the Edit button.
Enter your desired slug in the box and make sure to click Update at the bottom of the page:
How to Change WordPress Author Slug
By default, the author slug for an author’s archive page is their username. Unfortunately, you cannot change a WordPress account’s username after it’s been created. But what you can do is use a free plugin to change the WordPress author slug.
Once you activate the plugin, you’ll get a new Edit Author Slug box on a user’s profile page that lets you change the author’s archive slug.
Be Careful Changing WordPress Slugs At a Later Date
One area you need to be careful with is changing the slug for content after you’ve created it. Whenever you change the slug for a piece of content, anytime someone tries to reach that content by visiting the URL with the original slug, they might have trouble accessing your content.
For posts and pages, WordPress will try to automatically redirect users to the new slug. And while this works most of the time, it doesn’t always work. In which case you will need to setup a redirect to your new URL. Why? Because you don’t want the visitors to end up on a 404 page, and for SEO purposes you will want to retain any link juice that the page/slug has built up by using a 301 redirect.
If you are a Kinsta user you can easily implement 301 redirects from right within the MyKinsta dashboard. Or you can utilize a free WordPress plugin like Redirection or Safe Redirect Manager.
Also, WordPress doesn’t even try to redirect slugs that have changed for categories or tags. For that reason, you should try to avoid changing slugs later on whenever possible.
How Are Permalinks and Slugs Related?
Permalinks help you set your entire site’s URL structure. Essentially, they tell WordPress where to put each individual slug that you manually set. You can access your permalinks by going to Settings → Permalinks.
For example, if you make your permalink structure Month and name, WordPress will append your slug after the year and month when the post was published:
The %postname% part of the permalink structure is what WordPress replaces with your post’s slug. Most of the time, it’s best to use the Post name permalink structure. With this configuration, the only thing that appears after your domain name is the slug that you set.
As with individual WordPress slugs, you need to be careful changing your permalink structure if your site is already receiving traffic.
A few more recommended tutorials from our blog:
Best SEO Plugins for WordPress (And Must-Have SEO Tools)
WordPress SEO Checklist – 45 Tips to Increase Traffic by 571% in 13 Months
Get all your applications, databases and WordPress sites online and under one roof. Our feature-packed, high-performance cloud platform includes:
- Easy setup and management in the MyKinsta dashboard
- 24/7 expert support
- The best Google Cloud Platform hardware and network, powered by Kubernetes for maximum scalability
- An enterprise-level Cloudflare integration for speed and security
- Global audience reach with up to 35 data centers and 275 PoPs worldwide
Test it yourself with $20 off your first month of Application Hosting or Database Hosting. Explore our plans or talk to sales to find your best fit.
WordPress использует различные жаргоны, которые трудно понять новым пользователям. Таксономия, постоянная ссылка, ярлык и некоторые термины, часто используемые в документации WordPress и учебных статьях. Вы можете проверить страницу глоссария WordPress, чтобы понять значение часто используемых терминов в мире WordPress. В этой статье мы более подробно рассмотрим, что такое слаг в WordPress, его важность для SEO, как изменить слаг и как это повлияет на SEO.
Что такое Слизень?
URL-адрес веб-страницы, который вы используете для доступа к странице в браузере, содержит несколько компонентов:
- протокол HTTP или HTTPS
- С поддоменом WWW или без него
- Основной домен или домен верхнего уровня
- Слизняк
Ниже на картинке понятно показаны компоненты:
Slug — это термин, используемый в WordPress для обозначения описательной части URL-адреса, которая используется для дифференциации каждой страницы вашего сайта.
Поскольку части протокола и домена всегда фиксированы для сайта WordPress, слаг — единственный компонент, который изменяется для каждой страницы, чтобы иметь уникальную структуру URL.
Как генерируется слаг в WordPress?
Теперь, когда вы знаете, что такое slug в WordPress, приведенный выше пример URL не является стандартной структурой для всех сайтов WordPress. Вы можете обнаружить, что некоторые сайты WordPress имеют другую структуру URL-адресов, которая содержит настраиваемые параметры, такие как год и месяц. WordPress автоматически генерирует слаг для каждой страницы на основе следующих настроек:
- Настройка постоянных ссылок в разделе «Настройки > Постоянные ссылки» в панели администратора WordPress. Этот глобальный параметр определяет структуру и параметры, которые будут включены в URL-слаг.
- Заголовок сообщения, введенный в Gutenberg или Classic Editor, затем преобразуется в краткую часть вашего URL-адреса путем добавления дефисов между каждым словом заголовка.
Если вы не хотите использовать автоматически сгенерированный ярлык с заголовком сообщения, вы также можете вручную ввести описание в текстовое поле «URL Slug» на экране редактора. Обратите внимание, что поле «URL Slug» доступно в мета-поле «Постоянная ссылка». Вы можете редактировать только последнюю часть URL-адреса (т. е. слаг) и не можете изменять структуру URL-адреса (т. е. постоянную ссылку).
Слаг создается во время автосохранения контента или когда вы нажимаете одну из опций «Сохранить черновик/опубликовать/обновить». Ниже приведен пример того, как WordPress генерирует слаг:
- Структура постоянной ссылки — https://www.mysite.com/образец-пост/
- Заголовок сообщения — Это мой первый пост
- Слаг — это мой первый пост
- URL — https://www.mysite.com/this-is-my-first-post/
Структура слагов в WordPress
WordPress следует некоторым правилам при создании slug.
- Slug не чувствителен к регистру, все буквы в названии преобразуются в строчные.
- Пробел между каждым словом в заголовке преобразуется в дефис в слаге. Любые существующие дефисы и множественные пробелы игнорируются.
- WordPress автоматически игнорирует все специальные символы, включая «вопросительный знак (?)», «восклицательный знак (!)» и «равно (=)».
Изменение слага в WordPress Gutenberg
Вы можете изменить слаг, отредактировав настройку постоянных ссылок, заголовок или описание слага. Как вы можете видеть на странице настроек постоянных ссылок, WordPress будет четко отображать предупреждение о том, что не следует изменять структуру постоянных ссылок на действующем сайте после настройки. Изменение постоянной ссылки повлияет на всю структуру URL вашего сайта, и в WordPress нет возможности иметь пользовательскую структуру постоянной ссылки только для определенного сообщения или страницы.
Поэтому вы можете отредактировать мета-поле заголовка или слага, чтобы изменить слаг в URL-адресе вашей статьи. Однако для нового и старого сообщения это работает по-разному:
- Для нового сообщения — изменение заголовка автоматически изменит слаг в мета-поле.
- Для существующего поста изменение заголовка никак не повлияет на ваш слаг, в этом случае вы можете отредактировать слаг вручную. Вы можете просто ввести описательные слова, не беспокоясь о дефисах. WordPress автоматически добавит дефисы и проигнорирует специальные символы, как указано выше.
Когда длина заголовка сообщения очень длинная, слаг можно изменить, чтобы создать короткий и содержательный URL-адрес. Ниже приведен пример модифицированного короткого слага с длинным заголовком записи:
- Заголовок сообщения — это мой первый пост с длинным заголовком
- Автоматически сгенерированный слаг в WordPress — это мой первый пост с длинным заголовком
- Отредактированный вручную короткий слаг — это мой первый пост
- Конечный URL — https://www.mysite.com/this-is-my-first-post/
Иногда вы не увидите мета-окно «Постоянная ссылка», в котором есть опция редактирования «URL Slug». В этом случае нажмите «Параметры» (три вертикальные точки в верхней части редактора Gutenberg) и выберите «Настройки» в меню. Здесь вы можете включить поле «Постоянная ссылка» на вкладке «Панели».
Обработка слагов в классическом редакторе
Если вы используете старый классический редактор или используете настраиваемые типы записей, такие как продукты WooCommerce, то обработка слагов будет немного отличаться от того, как описано выше в редакторе Gutenberg.
- Во-первых, вы можете изменить заголовок сообщения, чтобы он имел правильный слаг, прежде чем публиковать содержимое сообщения.
- После сохранения или публикации контента Classic Editor покажет короткую ссылку под заголовком вместе с кнопкой «Редактировать». Вы можете нажать на эту кнопку редактирования и изменить краткую часть URL-адреса.
- Нажмите «Параметры экрана» и выберите параметр «Slug», чтобы просмотреть мета-поле. В этом поле слага вы можете отредактировать текст, чтобы он имел другой слаг.
Обратите внимание, что редактирование короткой ссылки или изменение текста в мета-поле не изменит заголовок сообщения. Вы должны изменить заголовок вручную, если требуется, чтобы у вашей статьи был тот же заголовок и слаг.
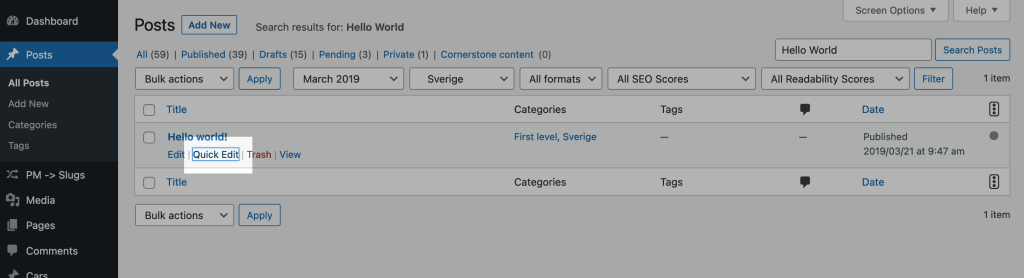
Независимо от того, используете ли вы Gutenberg или Classic Editor, вышеуказанный метод позволяет легко редактировать слаг в редакторе. Однако будет сложно открыть редактор, если вы хотите изменить слаг для нескольких статей. К счастью, у вас есть альтернативный вариант редактирования ярлыка на странице сообщений или страниц.
- Перейдите в меню «Сообщения > Все сообщения» или «Страница > Все страницы».
- Найдите сообщение, ярлык которого вы хотите изменить, используя окно поиска, и наведите указатель мыши на заголовок.
- Теперь у вас появятся дополнительные параметры, и вы нажмете ссылку «Быстрое редактирование».
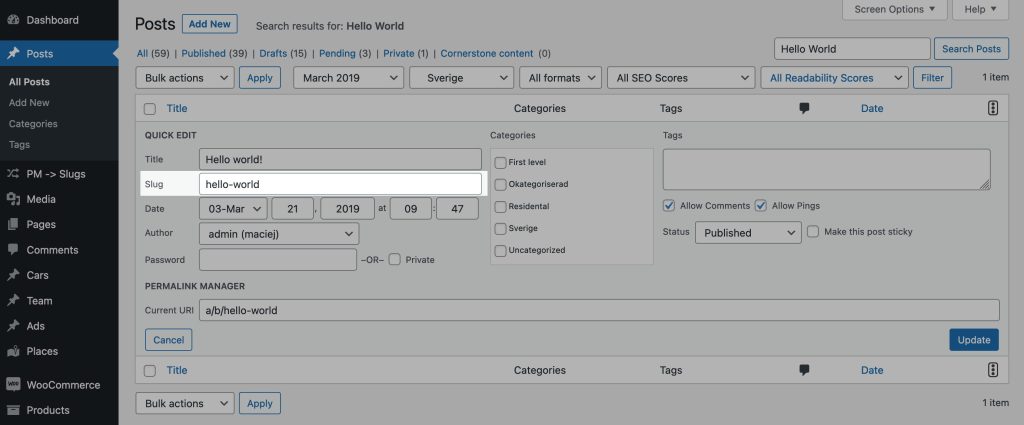
- Это покажет варианты редактирования деталей выбранного поста или страницы.
- Измените текст слага в поле «Слаг» и при необходимости измените заголовок.
- Нажмите кнопку «Обновить», чтобы сохранить изменения.
Массовое редактирование слагов в WordPress
Проблема в том, что вы не можете массово редактировать слаг в WordPress ни из редактора, ни со страницы сообщений. Однако вы можете сделать это с помощью стороннего плагина.
- Установить и активировать Плагин редактора листов WP на вашем сайте. Этот плагин позволит вам редактировать все детали сообщений в электронной таблице Excel на панели администратора.
- Вы можете следовать инструкциям по использованию бесплатной версии плагина и перейти в меню «Сообщения > Редактор листов».
- Вы увидите, как откроется лист Excel, показывающий слаг и другие сведения обо всех ваших сообщениях.
- По умолчанию поле slug будет заблокировано для редактирования и отображается со значком замка.
- Нажмите на ссылку «Включить», отображаемую в поле, и откройте его для редактирования.
- Измените ярлык для нескольких сообщений, как при редактировании содержимого в листе Excel, и сохраните изменения.
- Вы можете увидеть предупреждение о том, что изменения являются постоянными и не могут быть отменены. Подтвердите всплывающее окно и сохраните изменения слагов.
SEO-перспектива использования оптимизированного слага
Слаг очень важен с точки зрения SEO, так как это URL-адрес публикации Google и других поисковых систем, отображаемый в результатах поиска. При использовании или редактировании slug в WordPress учитывайте следующее.
- Рекомендуется оставить его описательным с желаемой длиной, чтобы Google не обрезал его на странице результатов поиска.
- Если возможно, оставьте заголовок и слаг одинаковыми, чтобы пользователи могли легко запомнить важные страницы вашего сайта.
- Обязательно настройте перенаправление 301 со старого URL на новый URL при изменении слага. Бесплатные плагины, такие как Redirection и Rank Math, могут сделать это автоматически, в то время как Yoast SEO нуждается в премиум-версии.
- Также рекомендуется удалить все бессмысленные слова из слага, не затрагивая SEO статьи. Такие слова, как «the», «a» и т. д., являются стоп-словами и не добавляют ценности в результаты поиска. Вы можете не использовать эти стоп-слова для настройки длины слага.
Are you wondering what a slug is in WordPress? Trust us, it’s not as gross as it sounds.

When search engines crawl a page on your site, they look everywhere for clues to what your content is about: the title, headers, body text, image alt text, meta description, and even the URL.
In fact, URLs are one of the first elements search engines crawl. For these reasons, optimizing your URLs is an essential step in improving your on-page SEO.
URLs also contribute to your visitors’ first impressions. URLs that are too long or contain strings of random numbers and letters appear less trustworthy than URLs that convey information about the page. Usually, the culprit here is the URL slug.
In this post, you’ll learn what a slug in WordPress is and explore some best practices for optimizing them. Then, we’ll look at the different ways you change them on your WordPress website.

What is a slug in WordPress?
In WordPress, the slug is the editable part of the URL of a page. Located at the very end of a URL, the slug most often contains keywords separated by hyphens. It may also contain the day, month, time, identifying numbers, author name, and more, depending on the site’s permalink structure.
To understand what a slug really is, let’s briefly look at the different parts of a URL. We’ll break down this post’s URL:
https://blog.hubspot.com/website/what-is-wordpress-slug
From left to right, we have:
- The scheme — most often you’ll see https:// (or http:// if the page isn’t SSL-encrypted).
- The subdomain, like “blog” in this URL or simply “www” in others
- The second-level domain — the name of the website (“hubspot” in this case)
- The top-level domain, which is most often .com, but could be .org, .net, .io, etc.
- The subdirectory, which comes after the first slash. This indicates what subsection of the website we’re on. A URL can have one, multiple, or no subdirectories. In this post, the subdirectory is “website” because we’re on the Website section of the HubSpot blog.
- The slug, which comes after the second slash and identifies the specific page within the subdirectory.
Before we walk through how to change the slugs on a WordPress site, let’s review some best practices for optimizing them.
WordPress Permalinks vs. Slugs
With WordPress, the terms “permalink” and “slug” are sometimes used interchangeably when referring to URLs. However, there is a difference. A permalink is a permanent URL of a post or page on your website. A permalink should not change once the page/post is live, hence the name.
A slug is a part of a permalink. More specifically, it’s the name of the page or post at the end of the permalink that makes it easy for readers and search engines to understand what the post/page is about.
How to Optimize a URL’s Slug in WordPress
Designing for humans and bots should be a guiding principle for everything you do as a site owner, and that includes optimizing a URL’s slug in WordPress. Consider the following URLs:
https://blog.hubspot.com/website/what-is-wordpress-slug
…versus…
https://blog.hubspot.com/website/post-id?=5726fjwenfkd
Which one makes more sense to you? Probably the first one, which is why slugs make more of a difference to the user experience than you might think.
To optimize for search engine bots as well as your readers, follow these best practices:
Include 1-2 keywords.
Make sure to include the keyword phrase you want to rank for in your slug. Both search engines and readers will look here to determine what the page or post is about. The general syntax should look like: websitename.com/topic-mentioned-here.
Match the title (but don’t replicate it).
You want a URL’s slug to closely match the title of the post or page. For example, if your post title is “Our Favorite Dachshund Puppy Photos”, and the URL slug is “how-to-get-cheap-plane-tickets”, bots and readers are going to be confused by the difference in content.
However, optimizing slugs isn’t as simple as copying and pasting the title of the post or page. Since the ideal length of titles is 60 characters or fewer, post titles are usually much longer than slugs should be. Titles also use spaces and title case, whereas slugs should use hyphens or underscores between words, and be all lowercase.
Remove unnecessary words.
You can make slugs more readable by omitting pronouns, articles, and prepositions. These are known as stop words and are generally ignored by search engines anyway. A good rule of thumb is if readers can fill in the gaps and make sense of the slug without certain words, you should omit them.
Now that we’ve covered these tips and techniques, let’s see some real ones. Here are some examples HubSpot blog post titles and their URL slugs:
|
Title |
Slug |
|
25+ Best Blogging Tools to Grow Your Blog in 2020 |
best-blogging-tools-grow-blog |
|
The Anatomy of a Search-Friendly URL [Infographic] |
url-structure-search-friendly |
|
Serverless Functions: Your Website’s New Best Friend |
serverless-functions |
|
9 Squarespace Alternatives & Why You Might Want Them |
squarespace-alternatives |
With these best practices in mind, let’s walk through the process of changing a URL slug in WordPress.
How to Change a URL Slug in WordPress
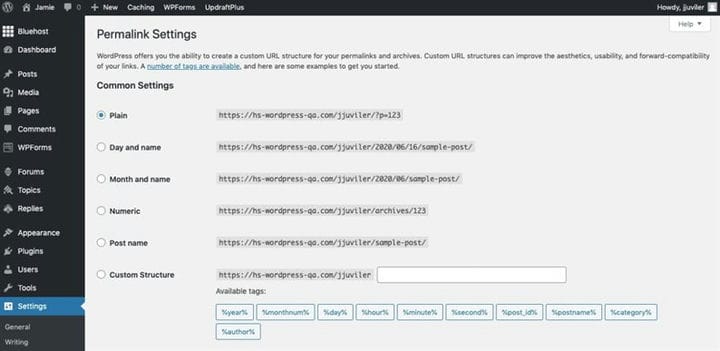
By default, WordPress uses the “plain” permalink structure, as shown below.
-1.jpeg?width=650&name=what%20is%20a%20slug%20in%20wordpress%20(update)-1.jpeg)
Because the plain structure does not contain keywords, it is not an SEO- friendly structure.
Changing this default permalink structure is an important step to make your WordPress blog SEO-friendly. You can do so by navigating to Settings > Permalinks and selecting another option. We recommend “Post name” because it is the shortest slug option while still including relevant keywords.
Note that it’s important to change your permalink settings before launching your website if possible. If you change your permalinks after your site goes live, you’ll have to set up redirects from your old URLs to your new ones. Fortunately, there are plenty of redirect WordPress plugins to simplify this process.
Once you receive a notification that your permalink structure has been updated successfully, you can edit the slugs of individual posts and pages on your site. Let’s walk through the process step by step.
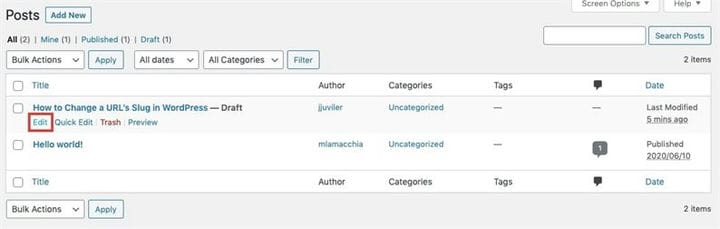
1. Navigate to Posts > All Posts to edit an existing draft or Add New to create a new draft. You can follow these steps for Pages as well.
.jpeg?width=650&name=what%20is%20a%20slug%20in%20wordpress%20(update).jpeg)
2. If you navigated to All Posts, then scroll to the draft you want and click Edit.
-2.jpeg?width=650&name=what%20is%20a%20slug%20in%20wordpress%20(update)-2.jpeg)
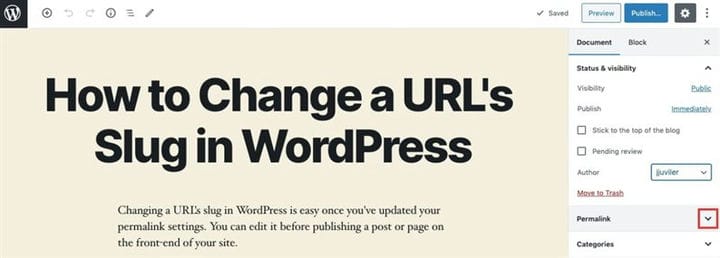
3. On the right-hand side of the screen, click the optional control next to Permalinks to open the dropdown menu.
-3.jpeg?width=650&name=what%20is%20a%20slug%20in%20wordpress%20(update)-3.jpeg)
4. Edit the slug, then click Save Draft in the toolbar at the top of the screen.
.png?width=624&name=what%20is%20a%20slug%20in%20wordpress%20(update).png)
You can repeat this process for all your posts and pages moving forward. This ensures you’re creating SEO-friendly URLs that delight search engine bots and your site visitors.
WordPress Slugs: Don’t be slow to update them!
Clean URLs are one of those small details that distinguish novice website owners from experienced ones — not only are clear URLs better for your SEO, but they also make your website look more legitimate and give visitors a better idea of how your website is structured.
Changing your URL slug isn’t difficult, but it’s essential if you want a WordPress website that both humans and search engines will love.
Editor’s note: This post was originally published in June 2020 and has been updated for comprehensiveness.

Когда поисковые системы сканируют страницу вашего сайта, они ищут повсюду ключи к разгадке содержания вашего контента: заголовок, заголовки, тело, замещающий текст изображения, метаописание и даже URL.
Фактически, URL-адреса являются одними из первых элементов, просматриваемых поисковыми системами. Они также влияют на первое впечатление ваших читателей. URL-адреса, которые слишком длинные или содержат строки случайных чисел и букв, вместо этого кажутся менее интерактивными и менее заслуживающими доверия, чем URL-адреса, передающие информацию о содержимом страницы.
По этим причинам оптимизация URL-адресов является важным шагом в улучшении SEO на странице.
В этом посте мы определим, что такое слаг и рассмотрим некоторые передовые методы их оптимизации. Затем мы рассмотрим различные способы их изменения в WordPress.
Что такое слаг в WordPress?
В WordPress слаг – это редактируемая часть URL-адреса страницы. Заголовок, расположенный в самом конце URL-адреса, чаще всего содержит ключевые слова, разделенные дефисами. Он также может содержать день, месяц, время, случайные числа, имя автора и многое другое, в зависимости от структуры постоянных ссылок сайта.
Чтобы убедиться, что мы понимаем, что такое на самом деле слаг, давайте кратко рассмотрим различные части URL-адреса. Начиная слева направо, мы разберем URL-адрес этого сообщения, изображенный ниже.

Во-первых, это схема, в которой вы чаще всего увидите https: // (или http: // – сайт небезопасен). Затем есть субдомен, например «блог» в этом URL или просто «www» в других. Далее идет домен второго уровня – имя веб-сайта – и домен верхнего уровня, которым чаще всего является .com.
После первой косой черты идет подкаталог, который указывает, в каком подразделе веб-сайта мы находимся. В этом посте подкаталог – «веб-сайт», потому что мы находимся в разделе веб-сайтов блога HubSpot.
После второй косой черты идет пуля. Прежде чем мы рассмотрим, как вы можете изменить ярлыки на своем сайте WordPress, давайте рассмотрим некоторые передовые методы их оптимизации. Таким образом, вы будете точно знать, что делаете, когда войдете в свою панель управления, чтобы изменить их.
Как оптимизировать слаг URL в WordPress
Дизайн для людей и ботов должен быть руководящим принципом для всего, что вы делаете как владелец сайта. Это включает оптимизацию заголовка URL-адреса в WordPress. Чтобы оптимизировать их для роботов поисковых систем и ваших читателей, следуйте приведенным ниже рекомендациям.
Включите 1-2 ключевых слова
Обязательно включите ключевую фразу, по которой вы хотите ранжироваться, в свой слаг. И поисковые системы, и читатели будут смотреть сюда, чтобы определить, о чем страница или сообщение. Общий синтаксис должен выглядеть так: websitename.com/topic-mentioned-here.
Сопоставьте название (но не повторяйте его)
Вы хотите, чтобы заголовок URL-адреса точно соответствовал заголовку сообщения или страницы. Например, если один о щенках таксы, а другой о WordPress SEO, боты и читатели будут сбиты с толку.
Однако оптимизировать ярлыки не так просто, как скопировать и вставить заголовок публикации или страницы. Поскольку идеальная длина заголовков составляет 60 символов или меньше, заголовки намного длиннее, чем должны быть. Они также используют пробелы и регистр заголовков, тогда как в заголовках следует использовать дефисы или подчеркивания и строчные буквы.
Удалите ненужные слова
Вы можете сделать краткие термины более читаемыми, опуская местоимения и предлоги, такие как «а», «то» и «к». Они известны как стоп-слова и обычно игнорируются поисковыми системами. Общее практическое правило: если читатели и поисковые системы могут заполнить пробелы и понять смысл заголовка без определенных слов, опустите их.
Теперь, когда мы рассмотрели эти советы и приемы, давайте посмотрим на них в действии. Вот несколько примеров сравнения заголовка и заголовка блогов HubSpot:
Помня об этих передовых методах, давайте теперь рассмотрим процесс изменения ярлыка URL-адреса в WordPress.
Как изменить слаг URL-адреса в WordPress
По умолчанию WordPress использует «простую» структуру постоянных ссылок, как показано ниже.
Поскольку он содержит имя учетной записи и некоторые случайные символы и числа, а не ключевые слова, это не оптимизированная для SEO структура.
Изменение этой структуры постоянных ссылок по умолчанию – важный шаг на пути к оптимизации вашего блога WordPress для SEO. Вы можете сделать это, перейдя в «Настройки» > «Постоянные ссылки» и выбрав другой вариант. Мы рекомендуем «Название публикации», потому что это самое короткое и включает релевантные ключевые слова.
Обратите внимание, что в процессе настройки важно изменить настройки постоянной ссылки. Если вы измените их после того, как ваш сайт заработает, вам придется настроить переадресацию, чтобы убедиться, что на вашем сайте нет неработающих ссылок. К счастью, существует множество плагинов для перенаправления WordPress, которые помогут упростить этот процесс, если они вам понадобятся.
Как только вы увидите уведомление об успешном обновлении вашей структуры постоянных ссылок, вы можете редактировать слаг отдельных сообщений и страниц на своем сайте. Давайте пройдемся по процессу шаг за шагом.
1. Перейдите в «Сообщения» > «Все сообщения», чтобы отредактировать существующий черновик, или «Добавить новый», чтобы создать новый черновик. Вы также можете выполнить эти шаги для Pages.

2. Если вы перешли ко всем сообщениям, прокрутите до нужного черновика и нажмите «Изменить».
3. В правой части экрана щелкните дополнительный элемент управления рядом с Постоянными ссылками, чтобы открыть раскрывающееся меню.
4. Отредактируйте заголовок. В этом случае я изменю исходный заголовок с «как-изменить-URL-адрес-slug-in-wordpress» на «как-изменить-слаг-wordpress».
5. Щелкните Сохранить черновик на панели инструментов в верхней части экрана.

Вы можете повторить этот процесс для всех ваших сообщений и страниц, движущихся вперед. Это гарантирует, что вы создадите удобные для SEO URL-адреса, которые понравятся роботам поисковых систем и посетителям вашего сайта.
Источник записи: https://blog.hubspot.com
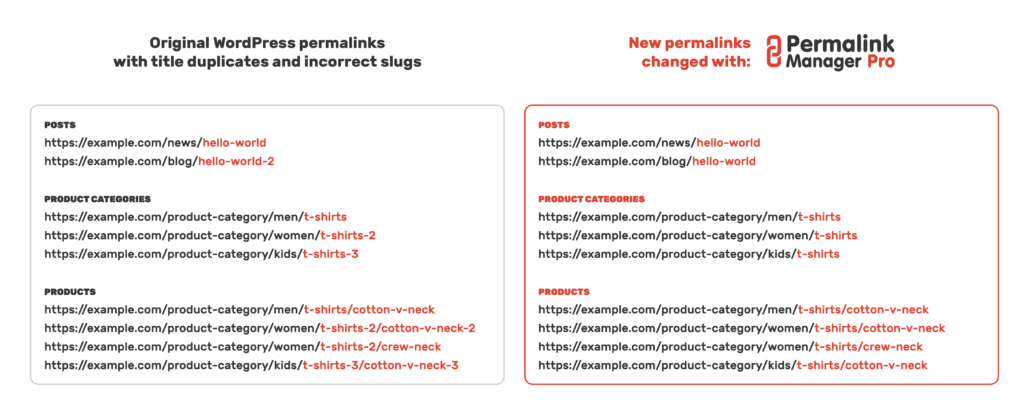
Although the answer to the question what is a WordPress slug may seem obvious to some, it is still worth going through the technicalities. If you were to sum up what a slug is in a few words, it is the text that appears after your domain name, at the very end of the URL. Of course, this is not their primary use, as you shall see below.
The following article discusses slugs, which are used by WordPress’s native permalink system. You will discover how slugs are generated and how to modify them. The second part of the article contains instructions for using Permalink Manager to better manage the slugs.
It may be pointless to describe all of the nuances of WordPress slugs to a casual user, therefore we will focus on the definition and the most important information. Slugs are, without a doubt, the most crucial aspect of a permalink since they allow WordPress to recognize each item of content on your site.
How to duplicate slugs?
If you already know what slugs are or are not interested in this topic, you may continue to the second section of the article, where you will find instructions on how to use Permalink Manager to duplicate slugs.
Unfortunately, there are certain drawbacks of customizing slugs, which are briefly discussed later in this article. One of the most frustrating shortcomings of the built-in permalink system, for example, is that the same slug cannot be reused. In other words, even if the rest of the permalink is unique and the URL is unique, you can only use them only once.
Permalink Manager, unlike the built-in permalink system, allows you to use the same slug multiple times. The plugin detects URLs using its own algorithm, which is more advanced than the built-in permalink system. It makes no difference whether or not your new custom permalinks include the slugs or not. This allows you to completely customize and update your URL addresses whatever you like.
What is a WordPress slug in a nutshell?
Simply described, a WordPress slug is a text-based identifier that is saved in the database and assigned to individual posts, pages and terms much like a numeric ID.
The primary use of the them is to identify what post, page, category or term should be loaded. This is not the only place where they show up, since WordPress also makes use of them in its URLs. In general, they are located at the end of them.
In terms of search engine optimization (SEO), the slug can play a key role in how your permalinks are perceived by search engines and how they appear in search results. By optimizing your slugs, you can make your permalinks more descriptive and relevant to your content, which can help to improve the visibility and ranking of your pages in search results.
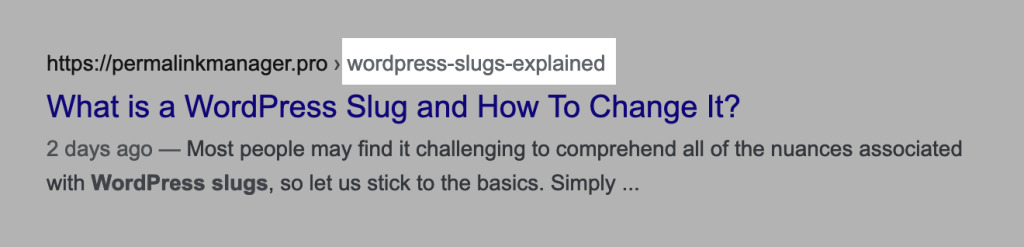
The URL with the slug may appear above the title on search engine results pages. You should be aware that long URLs are truncated in search results, and their end part containing the slug may be hidden. Either way, simple and comprehensive URL addresses will attract more clicks and visitors to your website.
If you are still unsure, the following table will help you understand the difference. The table below illustrates how the slugs are derived from the titles and then simplified for usage in canonical URLs.
| Title | Slug | Permalink |
|---|---|---|
| WordPress Tutorials | wordpress-tutorials | https://example.com/wordpress-tutorials |
| Cotton T-Shirt | cotton-t-shirt | https://example.com/products/cotton-t-shirt |
| Tutorials | shoes | https://example.com/category/tutorials |
How does WordPress create slugs?
Now that you understand what is a WordPress slug, we will go through how they are produced. The slug is based on the initial post/term title and is assigned to the post or term once it is published. As a result, even if you modify the post/term title later, it will remain the same. It means that if you wish to change so, you will have to do it manually using the admin interface.
When the slug is generated, WordPress will sanitize the title, removing non-standard characters and leaving just Latin letters and digits. If it contains more than one word separated by spaces, each one will be automatically replaced with a hyphen (–). Furthermore, for better consistency, all capital characters will be transformed to lowercase.
As you can see, there is not a lot of room for modification here. For the same reason, If that was not bad enough, WordPress does not let you use arbitrary slashes in your URLs. To include them in custom permalinks, you will need to install a 3rd party plugin like Permalink Manager.
Given that WordPress generates the slug based on the current title when publishing the post, it is important to ensure that it is optimized for potential visitors who may find your site in Google results.
SEO Tips
First of all, you should make the slugs as simple and relevant as possible. Between three and five words is considered the ideal slug length. Shortening slugs by deleting stop words or unnecessary words like «the» «and» «in» and so on might be a good idea. This is due to the fact that stop words have little to no SEO influence.
How to edit slugs from WordPress admin dashboard?
For the sake of thoroughness, we should also add that the following instructions also apply to WooCommerce slugs. Although the screenshots below illustrate a post, a custom post type item, and a category, the instructions may be applied to products, product categories, and product tags as well.
How to edit slugs with Permalink Manager?
The process for editing native slugs differs if you use Permalink Manager. You can accomplish this using the plugin’s built-in URI Editor.
Depending on whether you wish to change the slug for a page or a category, the field to do so may be located elsewhere. When using the Classic Editor, this field is not immediately displayed for posts or pages. Simply clicking on the «Edit» button should give you instant access to this useful feature. After that, you should see an input field where you may make the adjustment.


WordPress provides an additional convenient way for editing slugs. To utilize it, simply open the «Quick Edit» panel on the administrative page where the list of posts is displayed.
Gutenberg editor
In the new Gutenberg editor, changing the slug is a much simpler. To do so, just locate the input field in the sidebar’s «Permalink» section.

Custom taxonomy and category slugs
The situation is different when it comes to modifying WordPress slugs for categories, tags, and other taxonomy terms. This field will be presented directly in this instance, and you should have no problem finding it.
Via Permalink Manager
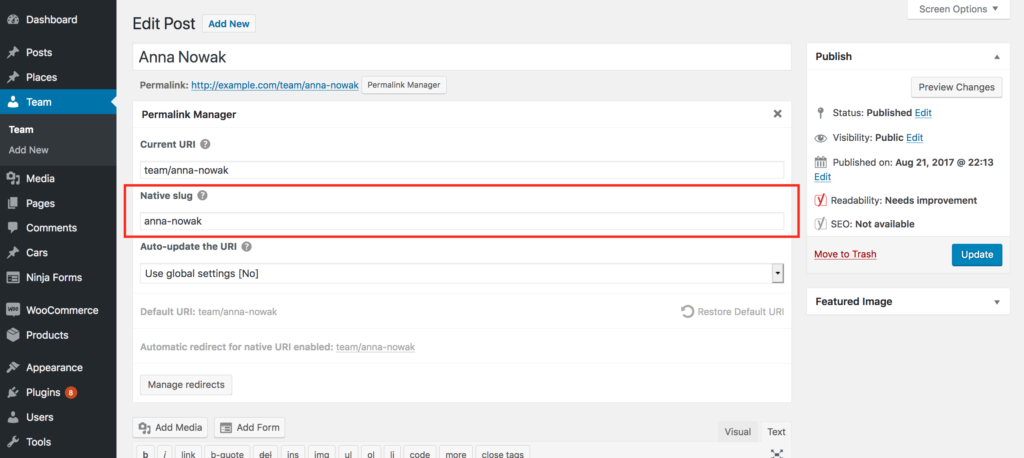
Because URLs created using Permalink Manager may be totally personalized, they do not have to include native slugs. However, if required, they may be edited straight using the URI Editor.
By default, the native editor is not shown in the admin interface. If you need to change the native slugs for whatever reason, you can utilize the URI Editor’s slug editor. To do this, turn on the ‘Show «Native slug» field‘ option in Permalink Manager settings, as shown below.
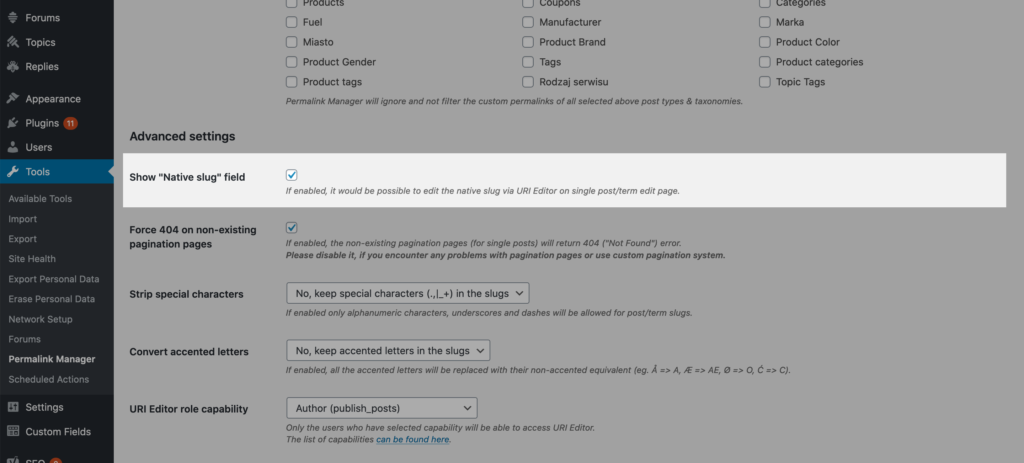
Permalink Manager will display an extra field within the URI Editor if the «Show native slug field» option is checked, as illustrated below.
What is the problem with the native WordPress slugs?
For the most part, the inbuilt permalink system based on native slugs is pretty limited. It does not provide any user-friendly solution to customize the URL addresses. This could be a real problem if you need a tailored permalink structure or simply want to quickly change URLs individually.
This may be a big issue from an SEO standpoint, however WordPress happily allows developers to fill in the missing functionality. This is exactly why Permalink Manager was created: to provide you more flexibility by extending the built-in permalink system. Before we get into some examples of how you may utilize it to your advantage, we will go through one of the most common issues with in-built WordPress slugs.
Why WordPress adds «-2» to the slugs?
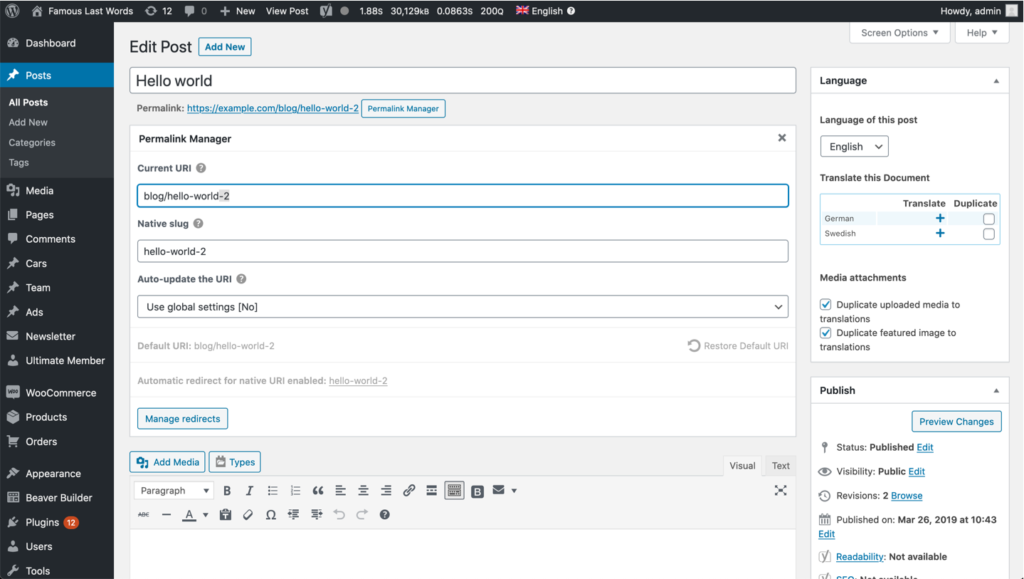
The inability to reuse the same slug for multiple posts or pages is probably the most annoying aspect of WordPress. If you have discovered that your permalinks are not quite right, and that WordPress has appended «-2» to the slugs, you are probably asking why.
Simply put, if the slugs had not been unique, WordPress would have been unable to determine which content type needs to be loaded. Technically, you cannot use the same slug for more than one post or term. It means that WordPress will automatically append the numeric index (eg. «-2») to the end of slug, if you have previously used it for another post or term.
| Post title | Post slug | The original permalink |
|---|---|---|
| Hello World | hello-world | http://example.com/2019/11/20/hello-world |
| Hello World (Duplicate) |
hello-world-2 | http://example.com/2020/11/15/hello-world-2 |
As you can see above, WordPress appended «-2» to the slugs of posts/terms with duplicated title. It does not matter if the rest of permalink is different and URL is unique as a whole. You can add as many homonymous (posts/pages/term with the same title) title, but the native slug will always be unique.
How to duplicate the slugs?
By default, it is not possible to use the same slug using inbuilt WordPress permalinks. If you try to use it more than once, WordPress will append numeric indexes to the end of permalink. It is really frustrating especially if you would like to use the same title for multiple subcategories or child pages assigned to different parents.
This issue is also mentioned in the official documentation on WordPress.com. Using Permalink Manager, however, this flaw may be readily addressed. To cut a long story short, the plugin allows you to reuse the same slug across multiple content items since it uses a unique algorithm to detect permalinks and hence does not require any of the native slugs to be included.
Keep in mind that the native slugs are also included by default in the permalinks generated by Permalink Manager. You may, however, freely edit them and overwrite the default permalinks with your own. There are two basic ways to remove the numerals appended (eg. “duplicate-slug-2“) to the permalinks:
- You can manually remove the numerals appended to the individual permalinks.
- You can make Permalink Manager use the actual titles instead of native slugs in the custom permalinks.
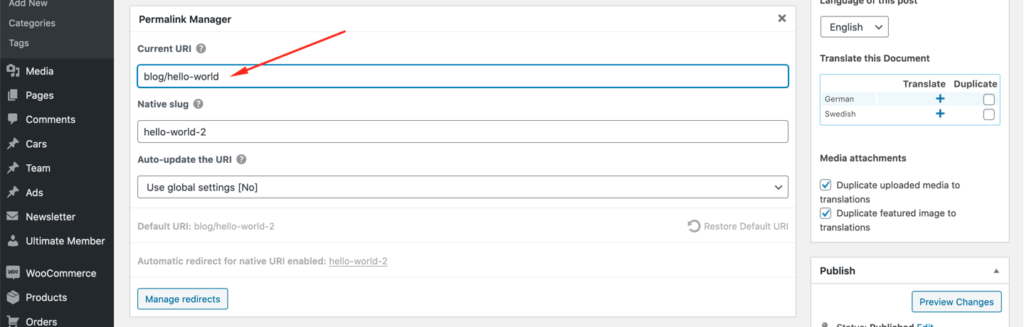
How to adjust them manually?
The easiest method to reuse the same slug is to use «Current URI» field in URI Editor:
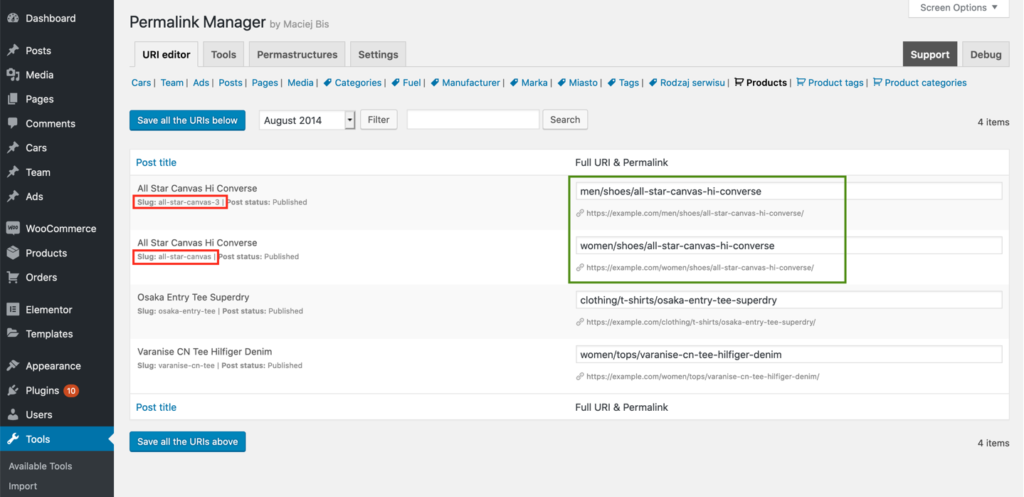
How to use actual titles instead of them?
The manual adjustments of individual custom permalinks could be time-consuming. The alternative solution to allow slug duplicates is to select “Use actual titles as slugs (Force custom slugs)” mode in «Slugs mode» in the plugin settings.
When enabled, Permalink Manager will always use the actual title (eg. “Shoes“) instead of the native slug (eg. “shoes-2“) in the custom permalink. Please keep in mind that the adjustments will only be applied to new posts and terms. If you wish to apply them to existing items, you must use the «Regenerate/reset» option.
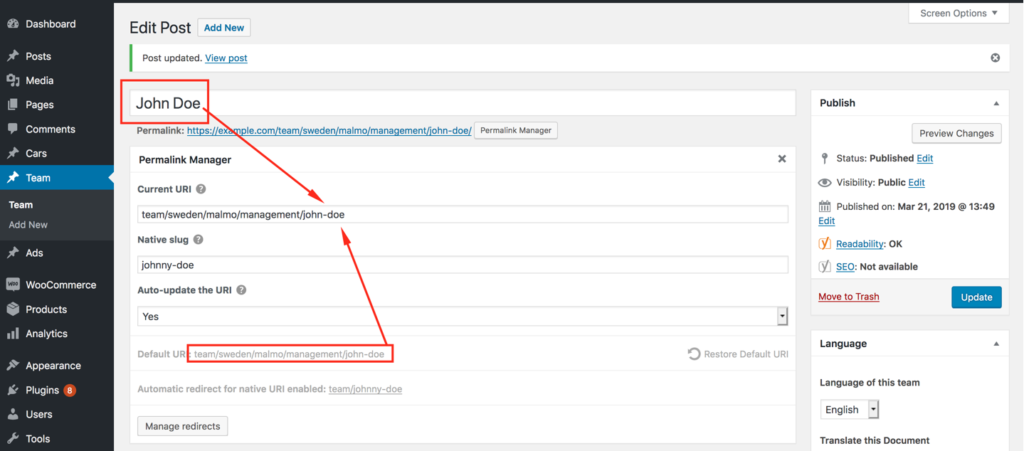
How to use titles instead of slugs and automatically update WordPress permalinks?
Please check «Slugs mode» article to find more information on this functionality. Unlike the original WordPress permalinks system, you may also have the URL automatically updated if the title changes. The more precise instructions may be found in a separate document.
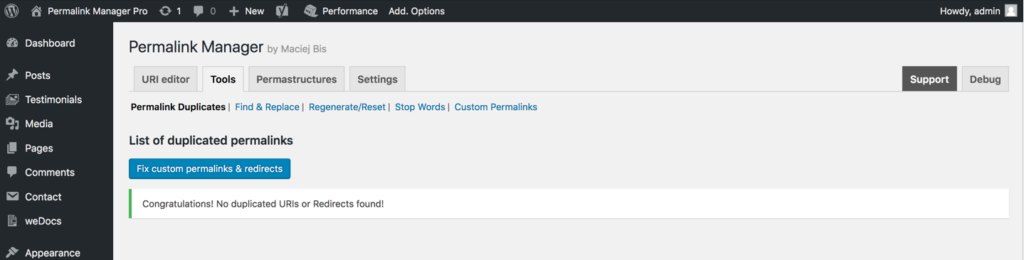
Permalink duplicates
Permalink Manager can detect permalinks with duplicated slugs because it uses a custom algorithm to detect the URLs. Shortly, it checks the full URL address instead of the native slug (part of URL). Hence, the slugs can be reused, but still you need to make sure that the full URL address is unique.

Concurrently, you can always check if any of custom permalinks is duplicated in «Permalink Duplicates» section. To display it, please go to “Tools -> Permalink Manager -> Tools -> Permalink Duplicates” admin page.