-
1.
Почему возникает “Ошибка установки соединения с базой данных” в WordPress? -
2.
Проверьте данные подключения к базе данных WordPress-
2.1.
Как узнать данные базы данных на хостинге Beget
-
2.1.
-
3.
Узнайте сервер размещения вашей базы данных -
4.
Восстановление базы данных WordPress -
5.
Проверьте работоспособность вашего сервера базы данных -
6.
Часто задаваемые вопросы
При открытии сайта вы увидели сообщение “Ошибка установки соединения с базой данных” на своём WordPress сайте? Это серьезная ошибка, которая делает ваш сайт недоступным для пользователей.
Причина ошибки установки соединения с базой данных заключается в том, что WordPress не может подключиться к вашей базе данных. На это может повлиять многое, от не правильной настройки до недоступности базы данных. С данной ошибкой сталкиваются как при установке WordPress, так и на работающем сайте.
В этой статье мы покажем вам, как легко исправить ошибку установки соединения с базой данных в WordPress.
“Ошибка установки соединения с базой данных” (Error establishing a database connection) может быть вызвана неправильной информацией о базе данных в файле wp-config.php, поврежденной базой данных или не отвечающим сервером.

База данных представляет из себя программное обеспечение, которое позволяет легко хранить, организовывать и передавать данные в другое программное обеспечение.
WordPress является CMS – системой управления контентом, поэтому использует базу данных для хранения всего вашего контента на сайте. Когда посетитель заходит на ваш сайт, WordPress подключается к базе данных, чтобы отобразить нужный контент.
Для подключения к базе данных, WordPress требуется следующая информация:
- Имя базы данных
- Имя пользователя базы данных
- Пароль пользователя базы данных
- Сервер базы данных
Эта информация хранится в файле конфигурации WordPress, который называется wp-config.php.
Если какие то данные для подключения не верны, WordPress не сможет подключиться к базе данных и выдаст ошибку “Ошибка установки соединения с базой данных” на экране.
Это одна из самых распространенных ошибок в WordPress. помимо не верно введенных данных доступа к БД, эта ошибка также может появиться, если сервер базы данных перегружен или файлы базы данных повреждены.
Давайте рассмотрим способы решения данной проблемы пошагово.
Проверьте данные подключения к базе данных WordPress
Наиболее распространенная причина ошибки соединения с базой данных в WordPress – неверные данные подключения к базе данных. Если вы только устанавливаете WordPress или перенесли свой сайт на новых хостинг, то это наиболее вероятная причина.
Данные от вашей базы данных хранятся в файле wp-config.php в корне сайта. Это файл конфигурации WordPress, который содержит важные настройки, включая информацию о БД.
Найдите следующие строки в файле wp-config.php:
Вы должны убедиться, что данные о имени базы данных, имени пользователя, пароль и имя сервера указаны верно.
Вы можете проверить информацию в панели управления хостингом.
Как узнать данные базы данных на хостинге Beget
Если вы используете хостинг Beget (мы его рекомендуем), то зайдите в панель управления в раздел MySQL.

Вы увидите список всех своих баз данных.

Мы выделили все нужные места, на которые нужно обратить внимание.
- Сервер для подключения на хостинге beget – localhost
- Имя пользователя – Совпадает с именем базы данных – wptuts_wptuts
- Имя базы данных – wptuts_wptuts
- Пароль от базы данных потребуется сгенерировать снова. Сделано это в целях безопасности, чтобы старый пароль никто не смог узнать.
Теперь когда вы знаете все данные от базы данных – впишите их в файл wp_config.php и сохраните изменения в файле.
После проделанных действия проверьте работоспособность сайта. Если всё заработало, то поздравляем, всё получилось.
Если вы всё ещё видите ошибку, значит проблема была не в правильности введенных данных для подключения. Давайте продолжим дальше изучать, в чем проблема.
Узнайте сервер размещения вашей базы данных
Если вы уверены, что имя базы данных, пользователя и пароль верны, но вы всё ещё получаете ошибку о соединении с БД, то проверьте информацию о сервере базы данных.
Большинство хостингов используют localhost в качестве хоста вашей базы данных. так делает и Beget. Однако некоторые хостинги могут использовать отдельный сервер для размещения базы данных. В этом случае localhost в качестве хоста не будет подходить.
Вам необходимо связаться с технической поддержкой вашего хостинга, чтобы уточнить правильность подключения. Они помогут решить эту проблему.
Восстановление базы данных WordPress
Если вы получаете ошибку в вашей админке “Одна или несколько таблиц базы данных недоступны. Возможно, база нуждается в ремонте.”, вам потребуется восстановить базу данных.
Вы можете это сделать, добавив следующую строку в ваш файл wp-config.php.
Обязательно добавьте эту строку перед строкой:
/* Это всё, дальше не редактируем. Успехов! */
или на английском
/* That’s all, stop editing! Happy publishing. */
Как только вы добавите эту строку, зайдите на страницу example.ru/wp-admin/maint/repair.php.

Нажмите кнопку “Починить и оптимизировать базу данных”, чтобы WordPress начал процесс восстановления базы данных.
Чтобы увидеть эту страницу, необязательно входить в панель управления под учетной записью администратора. Когда вы закончите восстановление и оптимизацию базы данных, обязательно удалите добавленную строчку из вашего wp-config.php.
Проверьте работоспособность вашего сервера базы данных
Если вам кажется, что все настроено правильно, но WordPress всё ещё выдает ошибку “Ошибка установки соединения с базой данных”, возможно дело в сервере базы данных (MySQL сервер) и он не доступен.
Это может произойти из-за перегруженности сервера. Ваш хостинг не справляется с нагрузкой, которая возникает при большом количестве трафика.
В таком случае, сайт может работать очень медленно, а для некоторых посетителей сайт вообще может быть не доступен. Лучшее, что вы можете предпринять – позвонить своему хостинг-провайдеру или написать в поддержку. Задайте им вопрос, почему ваша база данных не отвечает.
Если у вас есть другие сайты, работающие на том же хостинге, вы можете проверить их работоспособность, работают ли у них базы данных.
В случае отсутствия у вас другого сайта на вашем хостинге, попробуйте войти в панель управления и зайти в phpMyAdmin.
Если вы смогли войти в phpMyAdmin, то следует проверить, имеет ли ваш пользователь базы данных достаточно уровней доступа.
Создайте новый файл в корне вашего сайта с именем testconnections.php и вставьте в него следующий код:
Обязательно замените имя пользователя (username) и пароль (password) на свои данные. Теперь вы можете открыть этот файл в браузере.
Если вы получите сообщение “Connected successfully”, то это означает, что у вашего пользователя достаточно прав и что то не так с хостингом.
Бывают случаи, что на хостингах происходят сбои или производится обновление программной или аппаратной части. В эти моменты может быть затруднена работа сервера. Свяжитесь с технической поддержкой хостинга и выясните причины сбоя.
Часто задаваемые вопросы
Где узнать данные от базы данных?
Для того, чтобы узнать данные от базы данных, нужно зайти в панель управления хостингом. В панели управления хостингом находится информация о сервере, названии базы данных, имени пользователя, который закреплен к этой базе данных. Зачастую, пароль от базы данных не находится в панели управления. Он часто отправляется письмом на ваш Email при создании базы данных. Если такого письма нет, то потребуется сбросить пароль на новый. Новый пароль нужно будет использовать в настройках wp-config.php, чтобы избежать ошибки установки соединения с MySQL базой данных.
У меня возникает ошибка установки соединения с базой данных при установке WordPress. Что делать?
Часто эта ошибка возникает, если вы не правильно ввели данные для подключения к базе данных. Проверьте, правильно ли вы ввели адрес сервера, имя базы, имя пользователя и пароль. Адрес сервера на некоторых хостингах – localhost. Если вы подключаетесь к базе данных, которая находится на другом сервере, то следует уточнить адрес сервера.
Надеемся, что мы смогли помочь решить проблему с “Ошибка установки соединения с базой данных” на вашем WordPress сайте. Пишите в комментарии, какой способ помог лично вам и какая проблема была с базой данных.
Если вы нашли ошибку, пожалуйста, выделите фрагмент текста и нажмите Ctrl+Enter.
Having to troubleshoot and repair the WordPress database is something that happens to many of us at some time.
If you’re seeing an error message telling you that you can’t connect to your database or maybe that some files are corrupted, then there’s a good chance that you got a problem with your WordPress database.
But how do you repair the WordPress database?
In this article, we’ll show you how to diagnose problems with your WordPress database and how to fix them. You’ll also learn how to prevent your WordPress database problems from happening again in the future.
Check out our video guide to fixing WordPress Database and PHP Errors:
How To Know if Your WordPress Database Needs Repairing
As a WordPress user, you probably come across your share of WordPress errors. It’s almost impossible to run a website and not occasionally come up against a problem. But how do you know it’s the database that’s the issue?
Here are some clues that will tell you that you have a problem with your database:
- You’re seeing the ‘Error establishing database connection’ error message.
- Images are missing on your site.
- Content is missing from your site.
- You’re seeing the “No Update Required Your WordPress Database is Already Up-to-Date” error.
The ‘error establishing a database connection message’ is probably one of the most common error messages you’ll see on your WordPress site. It’s almost as scary as the so-called white screen of death you get when there’s a problem with the code.
Fixing it can be quite simple, though.
Let’s take a look at the reasons for database problems before we get into the various ways you might need to fix the problem.
6 Common Reasons Why Your Database Needs to Be Repaired
Here are some of the most common causes of database problems. For some, you’ll see a specific warning message. For others, you’ll get the generic establishing database connection message.
Let’s have a look at the most common scenarios and then how to repair your WordPress database.
1. Incorrect Database Credentials
This is possibly the most common cause of a WordPress database connection problem and, luckily, it’s the easiest to fix.
You’ll just need to make a simple amendment to your wp-config.php file or use a plugin to make the fix if you don’t want to edit the code yourself. Here’s how to check your database credentials in MyKinsta.
2. Connection Problems
One of the causes of an inaccessible database is a problem connecting to your server. If you’re using cheap hosting, you might find that your server is slow or unresponsive. A good hosting provider will give you an uptime guarantee, meaning that this shouldn’t be the cause of your problem.
But it’s worth checking with your hosting provider whether there are any issues on the server.
3. PHP Memory Limit Exceeded
This is an error that in my experience crops up most frequently when you’re uploading media to your site.
It means you’ve overloaded the memory limit that’s been set for your site. Fixing it is a case of editing some code, changing some settings with your hosting provider or using a plugin.
4. Corrupted Database Tables
If your database tables have become corrupted, you’ll need to clean up your database. If your credentials are correct, there are no problems with the connection, and you haven’t exceeded your PHP memory limit, a corrupt database is the next most likely culprit.
You can fix corrupt database tables in phpMyAdmin (we’ll see how).
5. Corrupt Files
If you have files in your WordPress installation that have become corrupted, this could cause problems in your database. This could be due to an issue with the plugin whose files are corrupted or with an edit that you one of the developers made (here’s where to find the best WordPress developers for hire).
We’ll take a look at the options you have for fixing corrupt files shortly.
6. Your Site or Database Has Been Hacked
We deliberately left this one last because it’s the one most likely to frighten you: your WordPress site or database might have been hacked. However, if your database is experiencing problems because of the hack, fixing it isn’t as difficult as you might think.
You can either get help from your hosting company (Kinsta will help with all instances of hacking) or you can fix it your self.
Now, it’s time to get cracking on some database fixing!
How to Repair the WordPress Database
Since you know now the common causes of database problems, you’re going be asking this question: how do I repair my WordPress database?
The exact steps you need to take will depend on the nature of the problem. Let’s go through the simplest steps first, as these will solve the most common problems.
If you already identified that your database is experiencing a more severe problem, skip to the relevant part of this section.
Start by Backing Up
Whichever steps you’ll be taking to repair your database, you should always start by taking a backup of your site.
Use a backup plugin or go to your hosting provider interface and take a manual backup there. Kinsta automatically backs up WordPress sites every day, but you can also take a manual backup or increase the frequency if you need to.
How To Use a Database Log File to Diagnose WordPress Database Errors
The first step is to view your error logs and identify what the problem is. There are three options for doing this:
- View the raw WordPress logs via FTP.
- Enable error logs in wp-config.php.
- Access the logs via MyKinsta (image below).
This is how easy you can access the Log viewer in MyKinsta:

The logs will tell you what’s been happening on your site and what errors have occurred. You can use these to diagnose the database connection problem.
Once you’ve done that, use the relevant fix below. Or if you aren’t able to do that, work through these fixes in order, as they start with the simplest and most common.
How To Edit Your WordPress Database Credentials
The most common cause of an error establishing a database connection is incorrect database credentials.
To edit your database credentials, make a backup copy of your wp-config.php file then open the original one. Taking a backup is essential in case you make a mistake that makes things worse.
You’ll find the wp-config.php file in the root directory of your WordPress installation. To access it, you will want to connect to your site via SFTP.
The file contains four pieces of information that need to be correct if your site is going to correctly connect to your database. These are:
- Database name.
- MySQL database username.
- MySQL database password.
- MySQL hostname.
In your wp-config.php file, these four pieces of information will look like this:
// ** MySQL settings - You can get this info from your web host ** //

/** The name of the database for WordPress */
define('DB_NAME', 'xxxxxx');

/** MySQL database username */
define('DB_USER', 'xxxxxx');

/** MySQL database password */
define('DB_PASSWORD', 'xxxxxx');

/** MySQL hostname */
define('DB_HOST', 'xxxxxx');
To find the correct database credentials, you’ll need to either check on your admin screens with your hosting provider or find the email you originally received when you set up your hosting account.
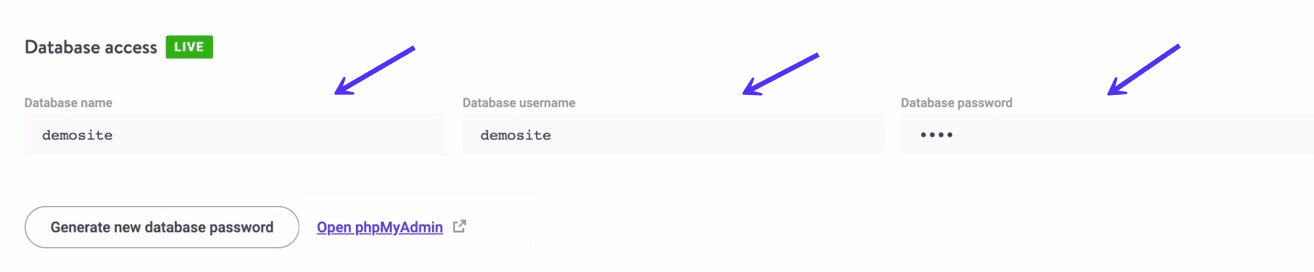
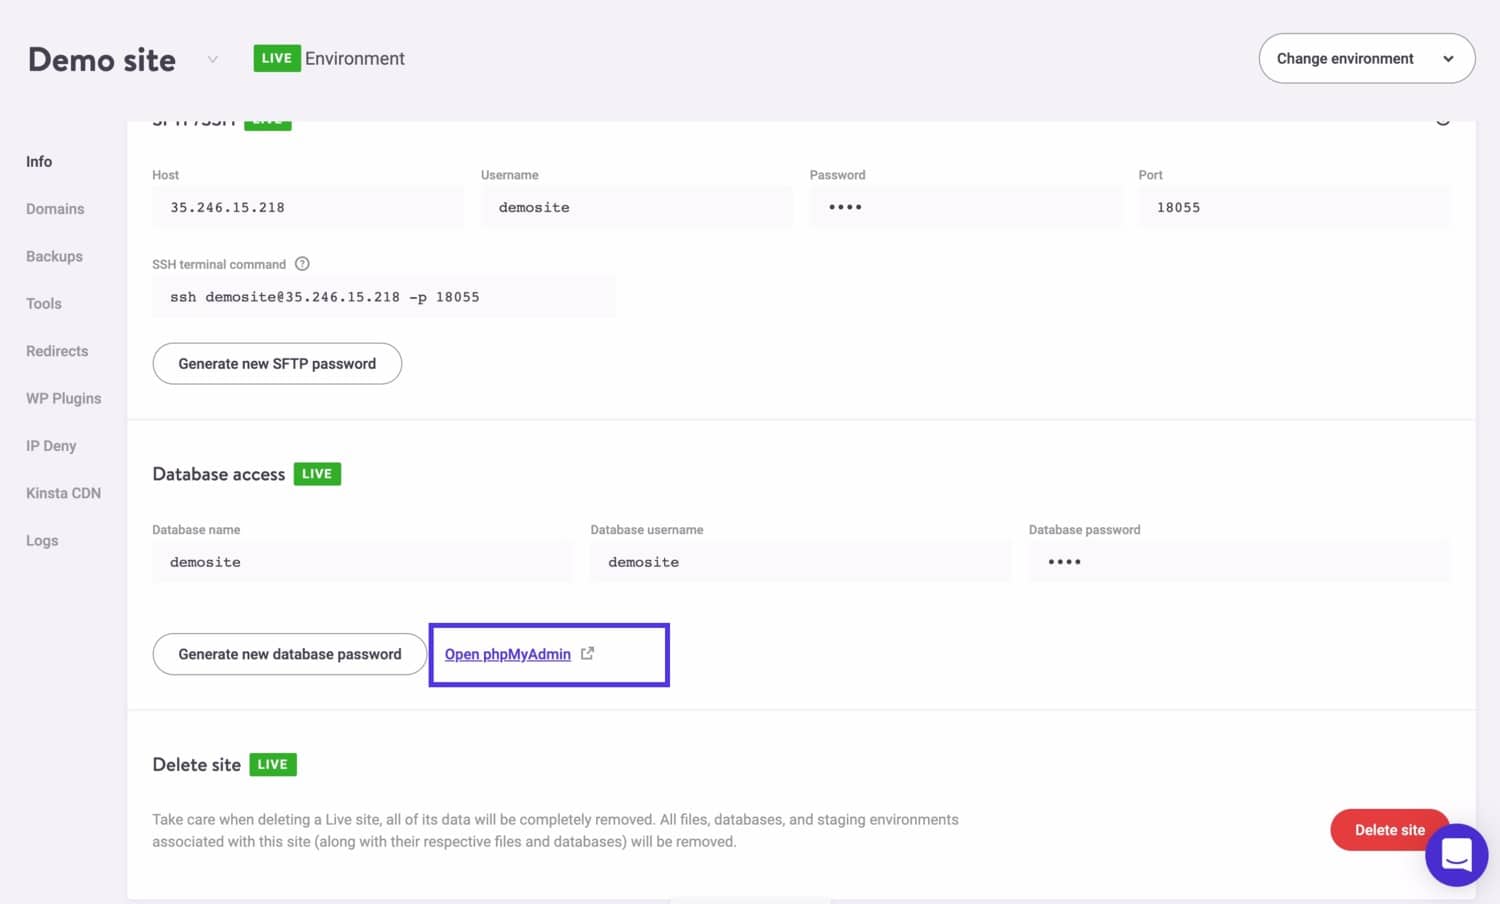
If you’re a Kinsta user, you can easily find the database credentials in MyKinsta. Specifically, go to Sites and then select the site you want to work with. After that, scroll down to the Database access section to find details related to your database.
You can also find your database credentials in phpMyAdmin, which you can access via cPanel if that’s the interface you get with your hosting provider.
Once you’ve updated correctly the database credentials, save your “new” wp-config.php file, close it down, and try accessing your site again.
If you still can’t access the database, read on for more solutions.
How To Use WP_ALLOW_REPAIR to Repair the WordPress Database
The next option is to instruct WordPress to fix any issues with your database. You do this by adding a line in your wp-config.php file.
Open the file and find this line:
/* That's all, stop editing! Happy blogging. */Add this line immediately above that line:
define ('WP_ALLOW_REPAIR', true);Now, save your wp-config.php file and close it.
Again, make sure you create a backup copy of your wp-config.php file first, just in case.
The next step is to visit the database repair page. You’ll find this at http://your-site.com/wp-admin/maint/repair.php. Replace your-site.com with the domain of your website.
This will take you to the database repair page:
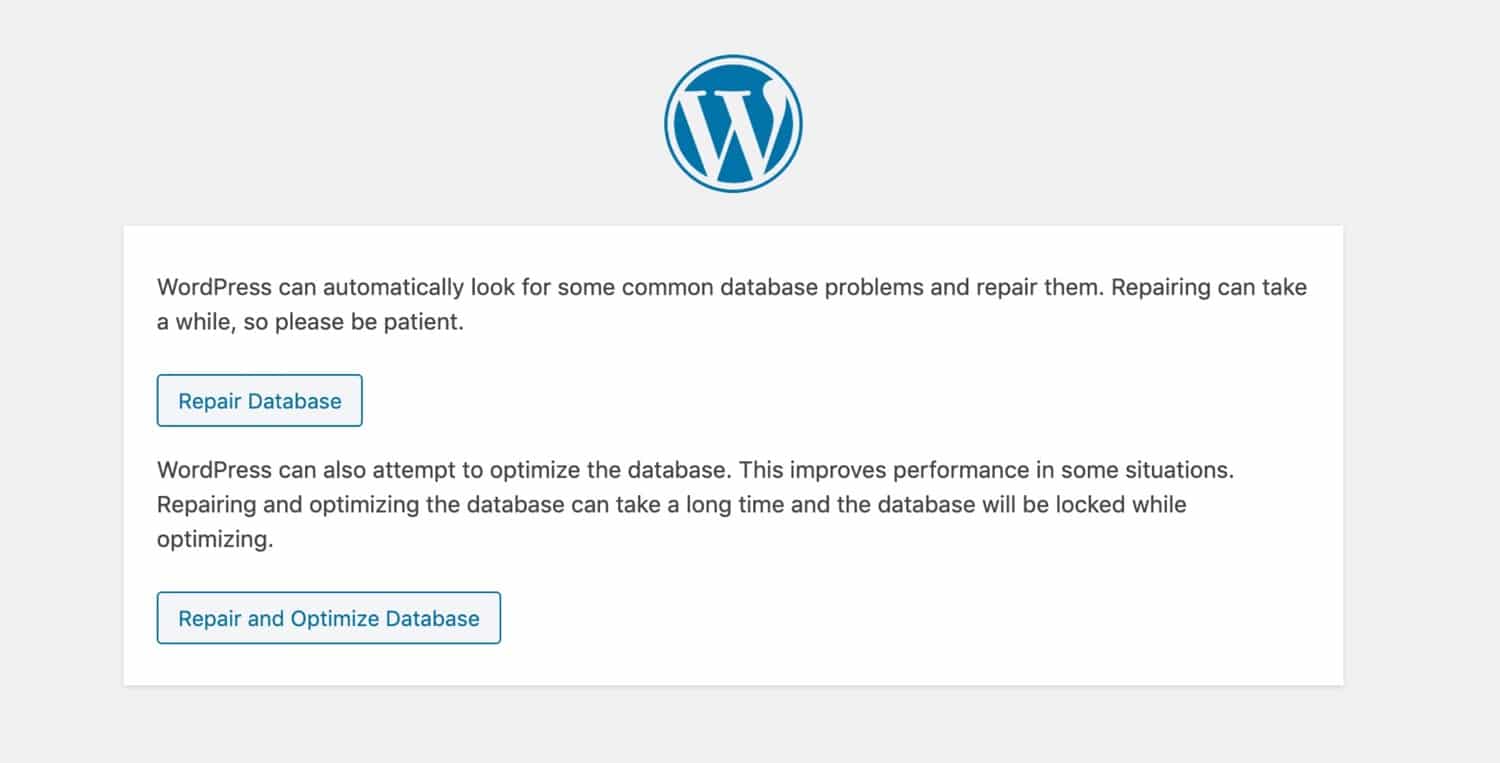
You have two options here:
- Repair the database
- Repair and optimize the database
If you choose to optimize it as well, WordPress will run through your database tables and optimize them to make your site run more efficiently.
Click whichever of those two buttons you want, and wait for WordPress to fix your database. Now, your site should be working correctly.
Once you’re finished, don’t forget to remove the line that you just added to your wp-config.php file.
But what if this doesn’t work either? The next step is to go to phpMyAdmin and attempt to repair your database there.
How To Repair the WordPress Database in phpMyAdmin
So you’ve tried the options above and your database still isn’t connecting. Let’s try fixing it via phpMyAdmin.
You’re not comfortable accessing your database directly, you might prefer to use a plugin for this. Some of the plugins that you can use to repair the WordPress database are listed later in this article.
You can access phpMyAdmin via your hosting provider’s admin screens. In MyKinsta, you get to it by clicking on Sites, selecting the site you want to work with, and clicking the Open phpMyAdmin link.
Once you’re logged into phpMyAdmin, click on the database you need to repair from the list of databases on the left. The tables in your database will load on the right:
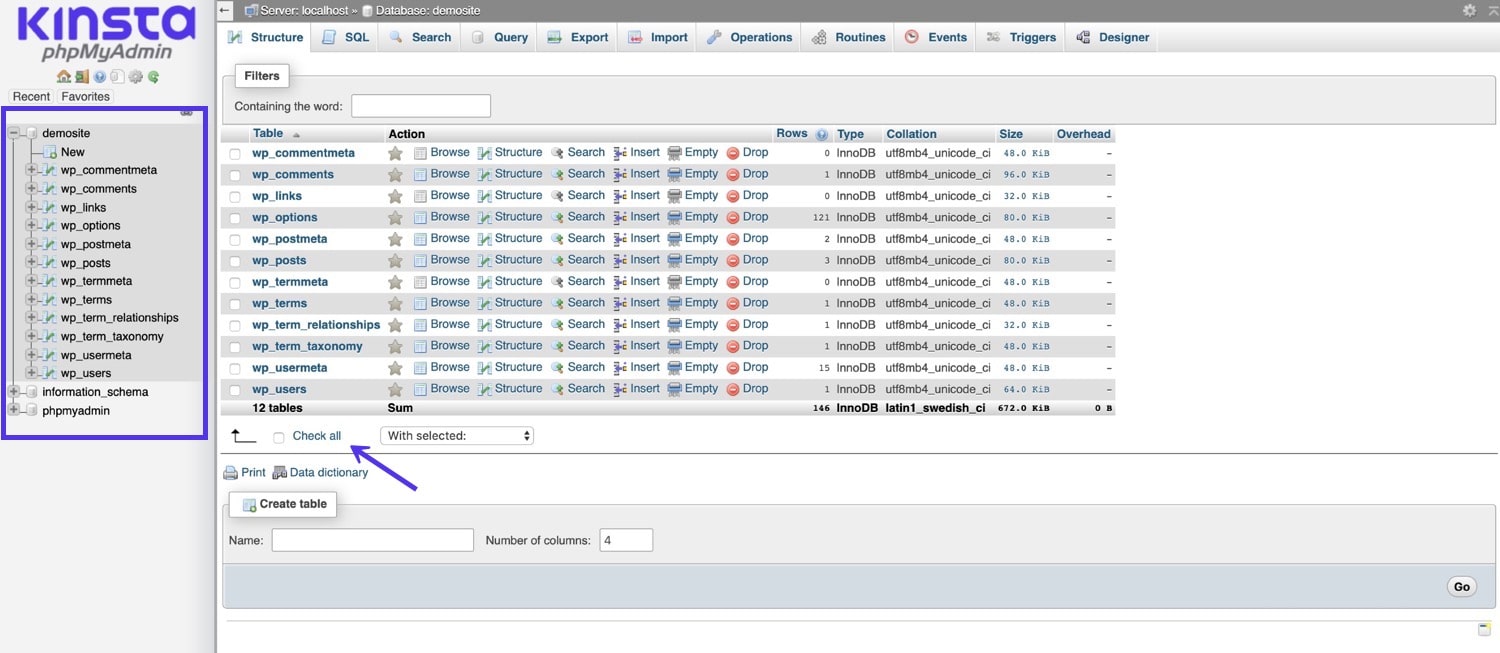
Scroll down and tick the Check All option. Then, in the With selected box, select Repair table.
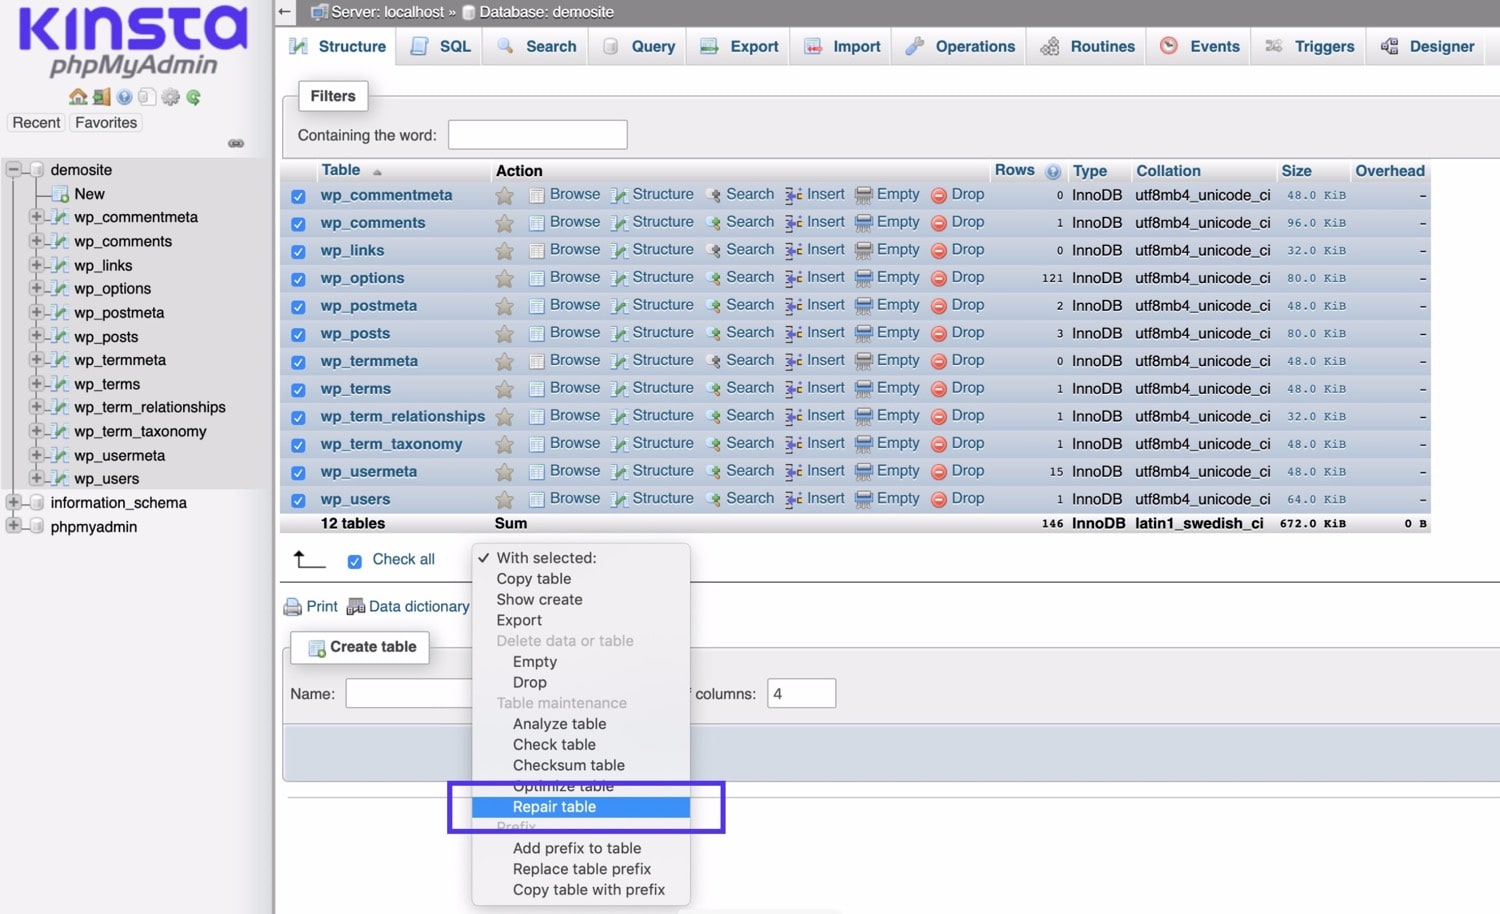
The system will then work through your database tables and make repairs.
But what if one of these options doesn’t work or you want to access your site differently? Let’s try another method.
How To Repair the WordPress Database via WP-CLI
If you’re using the command line to access your WordPress installation, you can use WP-CLI to repair the database.
To do this, use the wp db repair command. This can be the quickest way to repair the database.
How To Increase PHP Memory Limit
If you’re having problems accessing the database because your PHP memory limit has been exceeded, you can take steps to increase this limit.
In the wp-config.php file, find this line:
define( 'WP_MEMORY_LIMIT', '256M' );The 256M part relates to how much memory you have available to use. If it’s a lower number, edit it to make it higher. 256M is normally enough for a WordPress site. Note that the number may be different in your file, as it represents your site’s current memory limit. You may also not find this line at all.
Note that if you’re on a hosting plan that doesn’t allow you to access more memory, you may need to upgrade your plan to make this possible. Or you might prefer to switch to a provider who gives you more memory.
How To Repair the WordPress Database Using Database Repair Plugins
If you aren’t comfortable repairing the database using any of the options above, you can use a database plugin to fix it instead. This will only work if you have admin access to your site.
Plugins that let you repair the database include:
- WP-DBManager
- Advanced Database Cleaner
- WP Config File Editor, which lets you make the edits to your wp-config.php file without accessing it directly.
How To Optimize Your WordPress Database
Once you’ve repaired your database issues (or before it develops them in the first place), it’s a good idea to take steps to avoid problems in the future. Here are some tips to help you manage your WordPress database and protect it from future issues.
Kinsta’s Automatic Database Optimization
At Kinsta, we perform automatic weekly database optimizations for all of our customers’ WordPress sites. This means you’re much less likely to encounter problems if your site is hosted at Kinsta.
Database Optimization Plugins
If your hosting provider doesn’t optimize your databases for you, you can use a plugin to take care of this. Plugins that do this include:
- Advanced Database Cleaner
- WP-DBManager
As a reminder: if you are with Kinsta, you won’t need database optimization plugins as they will interfere with the automated optimization process we automatically have in place.
Add MySQL Index to WordPress wp_options Table
Adding the MySQL index to your wp_options table (or removing it from that table) can speed up the database connection. Use the tips in this guide to work out which option will make your site run faster.
Database Management and Security Good Practice
Good practice for managing your database is similar to good WordPress website management:
- Keep Regular Backups. If you should need to fix your database again, knowing that you have regular automated backups will make it easier and give you some peace of mind. Use a backup plugin or, if you’re with Kinsta, relax in the knowledge that your site is being backed up every day without you having to lift a finger.
- Make sure your database is always optimized and ensure it runs smoothly. Do this either via a database optimization plugin or choose a hosting provider that takes care of that for you.
- Never give out your database password unless you trust the recipient. It’s unusual to need a database password to work on a site so if you are asked for it, ask why.
- If someone else is given access to your database, change the credentials after they have finished working on it and update the wp-config.php file afterward.
- Only use secure passwords for your WordPress admin, your hosting account and your FTP/SFTP access. Use SFTP in preference to FTP when on a public connection.
- If you write a plugin that adds tables or records to the database, make sure to remove these when the plugin is deleted. Clean up your database after deleting plugins that have added their own tables.
- Take measures to keep your site secure and protect it from hacks.
Is your WordPress database giving you a hard time? Check out this handy guide with the most commons database issues and best ways to repair it 🛠🩺Click to Tweet
Summary
Having a problem connecting to your WordPress database is a headache and can be daunting. But if you follow the steps above, you should be able to repair it and get access again quickly.
Make sure you follow the guidance to prevent database problems occurring in the future and, hopefully, you won’t have to repair your database a second time.
Get all your applications, databases and WordPress sites online and under one roof. Our feature-packed, high-performance cloud platform includes:
- Easy setup and management in the MyKinsta dashboard
- 24/7 expert support
- The best Google Cloud Platform hardware and network, powered by Kubernetes for maximum scalability
- An enterprise-level Cloudflare integration for speed and security
- Global audience reach with up to 35 data centers and 275 PoPs worldwide
Test it yourself with $20 off your first month of Application Hosting or Database Hosting. Explore our plans or talk to sales to find your best fit.
Having to troubleshoot and repair the WordPress database is something that happens to many of us at some time.
If you’re seeing an error message telling you that you can’t connect to your database or maybe that some files are corrupted, then there’s a good chance that you got a problem with your WordPress database.
But how do you repair the WordPress database?
In this article, we’ll show you how to diagnose problems with your WordPress database and how to fix them. You’ll also learn how to prevent your WordPress database problems from happening again in the future.
Check out our video guide to fixing WordPress Database and PHP Errors:
How To Know if Your WordPress Database Needs Repairing
As a WordPress user, you probably come across your share of WordPress errors. It’s almost impossible to run a website and not occasionally come up against a problem. But how do you know it’s the database that’s the issue?
Here are some clues that will tell you that you have a problem with your database:
- You’re seeing the ‘Error establishing database connection’ error message.
- Images are missing on your site.
- Content is missing from your site.
- You’re seeing the “No Update Required Your WordPress Database is Already Up-to-Date” error.
The ‘error establishing a database connection message’ is probably one of the most common error messages you’ll see on your WordPress site. It’s almost as scary as the so-called white screen of death you get when there’s a problem with the code.
Fixing it can be quite simple, though.
Let’s take a look at the reasons for database problems before we get into the various ways you might need to fix the problem.
6 Common Reasons Why Your Database Needs to Be Repaired
Here are some of the most common causes of database problems. For some, you’ll see a specific warning message. For others, you’ll get the generic establishing database connection message.
Let’s have a look at the most common scenarios and then how to repair your WordPress database.
1. Incorrect Database Credentials
This is possibly the most common cause of a WordPress database connection problem and, luckily, it’s the easiest to fix.
You’ll just need to make a simple amendment to your wp-config.php file or use a plugin to make the fix if you don’t want to edit the code yourself. Here’s how to check your database credentials in MyKinsta.
2. Connection Problems
One of the causes of an inaccessible database is a problem connecting to your server. If you’re using cheap hosting, you might find that your server is slow or unresponsive. A good hosting provider will give you an uptime guarantee, meaning that this shouldn’t be the cause of your problem.
But it’s worth checking with your hosting provider whether there are any issues on the server.
3. PHP Memory Limit Exceeded
This is an error that in my experience crops up most frequently when you’re uploading media to your site.
It means you’ve overloaded the memory limit that’s been set for your site. Fixing it is a case of editing some code, changing some settings with your hosting provider or using a plugin.
4. Corrupted Database Tables
If your database tables have become corrupted, you’ll need to clean up your database. If your credentials are correct, there are no problems with the connection, and you haven’t exceeded your PHP memory limit, a corrupt database is the next most likely culprit.
You can fix corrupt database tables in phpMyAdmin (we’ll see how).
5. Corrupt Files
If you have files in your WordPress installation that have become corrupted, this could cause problems in your database. This could be due to an issue with the plugin whose files are corrupted or with an edit that you one of the developers made (here’s where to find the best WordPress developers for hire).
We’ll take a look at the options you have for fixing corrupt files shortly.
6. Your Site or Database Has Been Hacked
We deliberately left this one last because it’s the one most likely to frighten you: your WordPress site or database might have been hacked. However, if your database is experiencing problems because of the hack, fixing it isn’t as difficult as you might think.
You can either get help from your hosting company (Kinsta will help with all instances of hacking) or you can fix it your self.
Now, it’s time to get cracking on some database fixing!
How to Repair the WordPress Database
Since you know now the common causes of database problems, you’re going be asking this question: how do I repair my WordPress database?
The exact steps you need to take will depend on the nature of the problem. Let’s go through the simplest steps first, as these will solve the most common problems.
If you already identified that your database is experiencing a more severe problem, skip to the relevant part of this section.
Start by Backing Up
Whichever steps you’ll be taking to repair your database, you should always start by taking a backup of your site.
Use a backup plugin or go to your hosting provider interface and take a manual backup there. Kinsta automatically backs up WordPress sites every day, but you can also take a manual backup or increase the frequency if you need to.
How To Use a Database Log File to Diagnose WordPress Database Errors
The first step is to view your error logs and identify what the problem is. There are three options for doing this:
- View the raw WordPress logs via FTP.
- Enable error logs in wp-config.php.
- Access the logs via MyKinsta (image below).
This is how easy you can access the Log viewer in MyKinsta:
The logs will tell you what’s been happening on your site and what errors have occurred. You can use these to diagnose the database connection problem.
Once you’ve done that, use the relevant fix below. Or if you aren’t able to do that, work through these fixes in order, as they start with the simplest and most common.
How To Edit Your WordPress Database Credentials
The most common cause of an error establishing a database connection is incorrect database credentials.
To edit your database credentials, make a backup copy of your wp-config.php file then open the original one. Taking a backup is essential in case you make a mistake that makes things worse.
You’ll find the wp-config.php file in the root directory of your WordPress installation. To access it, you will want to connect to your site via SFTP.
The file contains four pieces of information that need to be correct if your site is going to correctly connect to your database. These are:
- Database name.
- MySQL database username.
- MySQL database password.
- MySQL hostname.
In your wp-config.php file, these four pieces of information will look like this:
// ** MySQL settings - You can get this info from your web host ** //

/** The name of the database for WordPress */
define('DB_NAME', 'xxxxxx');

/** MySQL database username */
define('DB_USER', 'xxxxxx');

/** MySQL database password */
define('DB_PASSWORD', 'xxxxxx');

/** MySQL hostname */
define('DB_HOST', 'xxxxxx');
To find the correct database credentials, you’ll need to either check on your admin screens with your hosting provider or find the email you originally received when you set up your hosting account.
If you’re a Kinsta user, you can easily find the database credentials in MyKinsta. Specifically, go to Sites and then select the site you want to work with. After that, scroll down to the Database access section to find details related to your database.
You can also find your database credentials in phpMyAdmin, which you can access via cPanel if that’s the interface you get with your hosting provider.
Once you’ve updated correctly the database credentials, save your “new” wp-config.php file, close it down, and try accessing your site again.
If you still can’t access the database, read on for more solutions.
How To Use WP_ALLOW_REPAIR to Repair the WordPress Database
The next option is to instruct WordPress to fix any issues with your database. You do this by adding a line in your wp-config.php file.
Open the file and find this line:
/* That's all, stop editing! Happy blogging. */Add this line immediately above that line:
define ('WP_ALLOW_REPAIR', true);Now, save your wp-config.php file and close it.
Again, make sure you create a backup copy of your wp-config.php file first, just in case.
The next step is to visit the database repair page. You’ll find this at http://your-site.com/wp-admin/maint/repair.php. Replace your-site.com with the domain of your website.
This will take you to the database repair page:
You have two options here:
- Repair the database
- Repair and optimize the database
If you choose to optimize it as well, WordPress will run through your database tables and optimize them to make your site run more efficiently.
Click whichever of those two buttons you want, and wait for WordPress to fix your database. Now, your site should be working correctly.
Once you’re finished, don’t forget to remove the line that you just added to your wp-config.php file.
But what if this doesn’t work either? The next step is to go to phpMyAdmin and attempt to repair your database there.
How To Repair the WordPress Database in phpMyAdmin
So you’ve tried the options above and your database still isn’t connecting. Let’s try fixing it via phpMyAdmin.
You’re not comfortable accessing your database directly, you might prefer to use a plugin for this. Some of the plugins that you can use to repair the WordPress database are listed later in this article.
You can access phpMyAdmin via your hosting provider’s admin screens. In MyKinsta, you get to it by clicking on Sites, selecting the site you want to work with, and clicking the Open phpMyAdmin link.
Once you’re logged into phpMyAdmin, click on the database you need to repair from the list of databases on the left. The tables in your database will load on the right:
Scroll down and tick the Check All option. Then, in the With selected box, select Repair table.
The system will then work through your database tables and make repairs.
But what if one of these options doesn’t work or you want to access your site differently? Let’s try another method.
How To Repair the WordPress Database via WP-CLI
If you’re using the command line to access your WordPress installation, you can use WP-CLI to repair the database.
To do this, use the wp db repair command. This can be the quickest way to repair the database.
How To Increase PHP Memory Limit
If you’re having problems accessing the database because your PHP memory limit has been exceeded, you can take steps to increase this limit.
In the wp-config.php file, find this line:
define( 'WP_MEMORY_LIMIT', '256M' );The 256M part relates to how much memory you have available to use. If it’s a lower number, edit it to make it higher. 256M is normally enough for a WordPress site. Note that the number may be different in your file, as it represents your site’s current memory limit. You may also not find this line at all.
Note that if you’re on a hosting plan that doesn’t allow you to access more memory, you may need to upgrade your plan to make this possible. Or you might prefer to switch to a provider who gives you more memory.
How To Repair the WordPress Database Using Database Repair Plugins
If you aren’t comfortable repairing the database using any of the options above, you can use a database plugin to fix it instead. This will only work if you have admin access to your site.
Plugins that let you repair the database include:
- WP-DBManager
- Advanced Database Cleaner
- WP Config File Editor, which lets you make the edits to your wp-config.php file without accessing it directly.
How To Optimize Your WordPress Database
Once you’ve repaired your database issues (or before it develops them in the first place), it’s a good idea to take steps to avoid problems in the future. Here are some tips to help you manage your WordPress database and protect it from future issues.
Kinsta’s Automatic Database Optimization
At Kinsta, we perform automatic weekly database optimizations for all of our customers’ WordPress sites. This means you’re much less likely to encounter problems if your site is hosted at Kinsta.
Database Optimization Plugins
If your hosting provider doesn’t optimize your databases for you, you can use a plugin to take care of this. Plugins that do this include:
- Advanced Database Cleaner
- WP-DBManager
As a reminder: if you are with Kinsta, you won’t need database optimization plugins as they will interfere with the automated optimization process we automatically have in place.
Add MySQL Index to WordPress wp_options Table
Adding the MySQL index to your wp_options table (or removing it from that table) can speed up the database connection. Use the tips in this guide to work out which option will make your site run faster.
Database Management and Security Good Practice
Good practice for managing your database is similar to good WordPress website management:
- Keep Regular Backups. If you should need to fix your database again, knowing that you have regular automated backups will make it easier and give you some peace of mind. Use a backup plugin or, if you’re with Kinsta, relax in the knowledge that your site is being backed up every day without you having to lift a finger.
- Make sure your database is always optimized and ensure it runs smoothly. Do this either via a database optimization plugin or choose a hosting provider that takes care of that for you.
- Never give out your database password unless you trust the recipient. It’s unusual to need a database password to work on a site so if you are asked for it, ask why.
- If someone else is given access to your database, change the credentials after they have finished working on it and update the wp-config.php file afterward.
- Only use secure passwords for your WordPress admin, your hosting account and your FTP/SFTP access. Use SFTP in preference to FTP when on a public connection.
- If you write a plugin that adds tables or records to the database, make sure to remove these when the plugin is deleted. Clean up your database after deleting plugins that have added their own tables.
- Take measures to keep your site secure and protect it from hacks.
Is your WordPress database giving you a hard time? Check out this handy guide with the most commons database issues and best ways to repair it 🛠🩺Click to Tweet
Summary
Having a problem connecting to your WordPress database is a headache and can be daunting. But if you follow the steps above, you should be able to repair it and get access again quickly.
Make sure you follow the guidance to prevent database problems occurring in the future and, hopefully, you won’t have to repair your database a second time.
Get all your applications, databases and WordPress sites online and under one roof. Our feature-packed, high-performance cloud platform includes:
- Easy setup and management in the MyKinsta dashboard
- 24/7 expert support
- The best Google Cloud Platform hardware and network, powered by Kubernetes for maximum scalability
- An enterprise-level Cloudflare integration for speed and security
- Global audience reach with up to 35 data centers and 275 PoPs worldwide
Test it yourself with $20 off your first month of Application Hosting or Database Hosting. Explore our plans or talk to sales to find your best fit.
В статье рассказывается:
- Суть и причины возникновения ошибки установки соединения с базой данных
- Первые шаги устранения ошибки установки соединения
- 3 способа устранения ошибки установки соединения с БД
- Дополнительные методы устранения ошибки установки соединения с БД
- Профилактика возникновения ошибки установки соединения с базой данных
-

Пройди тест и узнай, какая сфера тебе подходит:
айти, дизайн или маркетинг.Бесплатно от Geekbrains
Ошибка установки соединения с базой данных — довольно частое явление на WordPress, которое может быть вызвано различными причинами. При первом появлении она может добавить седых волос владельцу сайта, ведь доступ к ресурсу будет невозможен, включая и его «админку», и при недостатке знаний ставит в тупик.
Не стоит паниковать и сильно переживать, ошибка установки соединения может быть исправлена относительно простыми методами. В нашей статье мы расскажем, почему возникает данная неисправность, как можно ее устранить, и что делать, чтобы снизить риск ее повторного появления.
Суть и причины возникновения ошибки установки соединения с базой данных
Чтобы понять, что означает “Ошибка установки соединения с базой данных” (Error establishing a database connection) разберемся, как работает WordPress и выясним, что такое база данных.
WordPress – одна из самых популярных CMS – систем., т.е. систем управления контентом. Это программное обеспечение, позволяющее добавлять, удалять и редактировать содержание вашего сайта без знаний языков программирования. Вся информация о контенте хранится в базе данных.
База данных — это и есть совокупность информации, организованная так, чтобы при необходимости компьютер смог ее найти и обработать. Все сведения о вашем WordPress сайте хранится в базе данных на серверах вашего хостинг- провайдера. Любое действие на сайте приводит кому, что WordPress посылает запрос на нужную информацию в базу данных. Если запрос успешно обработан, то пользователь получает нужную информацию.

Одним из наиболее важных файлов в WordPress является wp-config.php файл. Он находится в корневой директории и содержит сведения о конфигурации вашего сайта, в том числе и информацию о подключении к базе данных. Важно, чтобы эта информация была прописана в строго определенном порядке:
- Database Name — Имя базы данных
- Database Username — Имя пользователя базы данных
- Database Password — Пароль пользователя базы данных
- Database Host — Сервер базы данных
Таким образом, в большинстве случаев “Ошибка установки соединения с базой данных” возникает, если информация, описанная выше, указана не верно. Кроме того, ошибка может быть вызвана повреждением базы данных или перегруженностью сервера.
Первые шаги устранения ошибки установки соединения
Рассмотрим основные причины ошибки установки соединения с базой данных и способы их устранения.
Скачать файл
Прежде всего, настоятельно рекомендуем создать резервную копию всей важной информации и обновлять ее после каждого значимого изменения. Тогда вы гарантированно не потеряете данные. А в случае серьезной ошибки и восстановления базы данных, не столкнетесь с необходимостью создания сайта с нуля. Для создания резервной копии используются плагины Duplicator или All-in-One WP Migration.
Есть много программных модулей для резервного копирования, но они не смогут вам помочь при отсутствии доступа в админку.
В такой ситуации нужен плагин ISPmanager или другой модуль, который поможет, управляя хостингом, сделать полное резервное копирование сайта.

При возникновении сложностей стоит воспользоваться технической поддержкой, которая есть на всех платных хостингах. Здесь вам окажут квалифицированную помощь с созданием резервной копии.
3 способа устранения ошибки установки соединения с БД
Проверка памяти сервера
Предположим, вы проверили учетные данные в фале wp-config.php и убедились в их корректности. Следующим шагом следует проверить сервер на наличие памяти. Довольно часто ошибка соединения возникает из-за перегруженности сервера. Если сервер хостинг-провайдера испытывает трудности, то и ваш сайт WordPress будет замедляться.
В первую очередь удостоверимся, что MySQL работает, и памяти для обработки данных WordPress достаточно.
Подключитесь к удаленному серверу через SSH, используя IP-адрес сервера:
ssh 8host@ <server IP>
Затем убедимся, работает ли MySQL с помощью утилиты netstat. Она позволяет отслеживать проблемы, связанные с производительностью сети. Чтобы увидеть список TCP-портов, которые прослушиваются, и имена программ, используйте команду:
sudo netstat -plt
где флаги –p, –l и –t означают program (программы), listening (прослушивание) и TCP соответственно.
В результате выполнения команды вы увидите список. Найдите в нем mysqld – это сервер MySQL:
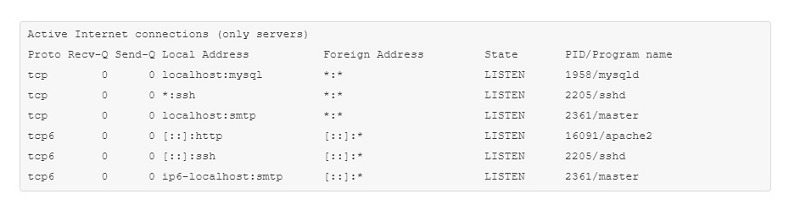
Если вы видите его в списке, значит, сервер MySQL работает и прослушивает соединения. В противном случае нужно попробовать ручной запуск сервера. Следующая команда полностью перегружает MySQL:
sudo systemctl start mysql
Заметьте, что в некоторых версиях и дистрибутивах Linux используется mysqld или mysql-server, а не mysql. Попробуйте разные варианты, чтобы определить, какой из них применяется в вашей системе.
После выполнения этой команды сервер запустится. Проверьте это с помощью sudo netstat -plt, как описано ранее.
По какой причине сервер MySQL может завершить работу? Эта система очень эффективна и производительна, но не всегда стабильна. Если количество одновременно выполняемых задач велико, то она существенно замедляется. Чтобы минимизировать возможные проблемы, нужно следить за объемом доступной памяти.

Топ-30 самых востребованных и высокооплачиваемых профессий 2023
Поможет разобраться в актуальной ситуации на рынке труда

Подборка 50+ ресурсов об IT-сфере
Только лучшие телеграм-каналы, каналы Youtube, подкасты, форумы и многое другое для того, чтобы узнавать новое про IT
ТОП 50+ сервисов и приложений от Geekbrains
Безопасные и надежные программы для работы в наши дни
Уже скачали 19538 ![]()
Проверьте log-файлы и ищите в них сообщения об ошибках. Для поиска используйте команду zgrep:
zgrep -a «allocate memory» /var/log/mysql/error.log*
В результате выполнения данной команды вы увидите все log-файлы, содержащие error.log и ‘allocate memory’. Поиск будет выполняться по файлам в директории /var/log/mysql/.
На выводе вы можете увидеть подобную строку:
2017-04-11T17:38:22.604644Z 0 [ERROR] InnoDB: Cannot allocate memory for the buffer pool
Это значит, что для корректной работы MySQL не хватает памяти. Именно это и является причиной ошибки подключения к базе данных. Если вы видите не одну такую строку, а несколько, значит, проблема нехватки памяти регулярная. Решается она переносом данных на более мощный сервер. Если сайт размещен на облачном сервере, то хостинг-провайдер в большинстве случаев может обновить сервер быстро и с минимальным простоем.


Читайте также
Если команда zgrep не выдала списка log-файлов, то сервер не испытывает проблем с нехваткой памяти. Значит проблемы установки соединения с базой данных может быть связана неверными учетными данными MySQL.
Проверка учётных данных MySQL
Если вы поменяли хостинг-провайдера или переместили установку WordPress на новый сервер, то информация в файле wp-config.php становится неактуальной. Вам необходимо поменять соответствующие строки в файле, иначе подключение к базе данных будет невозможно.
Чтобы найти этот файл используйте команду find:
sudo find / -name «wp-config.php»
Данная команда будет искать файл с указанным именем в корневой папке. Если он будет найден, то на выходе вы увидите путь к найденному файлу:
/var/www/html/wp-config.php
Чтобы открыть его в текстовом редакторе nano, напишите:
sudo nano /var/www/html/wp-config.php
В результате вы увидите файл с большим количеством строк. Первыми строками как раз и будут те, что описывают подключение к базе данных:
/** The name of the database for WordPress */
define(‘DB_NAME’, ‘database_name’);
/** MySQL database username */
define(‘DB_USER’, ‘database_username’);
/** MySQL database password */
define(‘DB_PASSWORD’, ‘database password’);
Вместо ‘database_name’, ‘database_username’ и ‘database_password’ должны быть указаны корректные данные о вашей БД. При необходимости отредактируйте их. На забудьте сохранить файл и выйти из редактора, нажатием CTRL-O, CTRL-X.
Чтобы убедиться, что проблема решена, попробуйте подключиться к базе данных. Для этого наберите команду:
mysqlshow -u database_username -p
Затем введите пароль. Если имя пользователя или пароль не верные, то вы увидите ошибку Access denied. В противном случае на экран будет выведена информация обо всех базах данных, к которым у вас есть доступ.
+———————+
|Databases |
+———————+
| information_schema |
| database_name |
+———————+
Если вы видите имя нужной базы данных в списке, то в файле wp-config.php указаны корректные данные. Теперь можно перезапустить WordPress сайт.
Если после этого ошибка подключения к базе данных не исчезла, то переходите к третьему шагу.
![]()
Точный инструмент «Колесо компетенций»
Для детального самоанализа по выбору IT-профессии
![]()
Список грубых ошибок в IT, из-за которых сразу увольняют
Об этом мало кто рассказывает, но это должен знать каждый
![]()
Мини-тест из 11 вопросов от нашего личного психолога
Вы сразу поймете, что в данный момент тормозит ваш успех
Регистрируйтесь на бесплатный интенсив, чтобы за 3 часа начать разбираться в IT лучше 90% новичков.
Только до 13 февраля
Осталось 17 мест
Восстановление базы данных WordPress
Случается, что база данных WordPress оказывается поврежденной. Причин, по которым такое происходит, может быть несколько:
- неудачное обновление;
- сбой базы данных;
- некорректный плагин.
Непосредственно на сайте в таком случае вы все также увидите сообщение — «ошибка установки соединения с базой данных».
Попытаемся восстановить БД. Откройте файл wp-config.php с помощью текстового редактора:
sudo nano /var/www/html/wp-config.php
Вставьте в файл строку:
define(‘WP_ALLOW_REPAIR’, true);
Таким образом включается функция восстановления базы данных. Сохраните файл и закройте его.
Затем откройте браузер и перейдите по следующему URL:
http://www.example.com/wp-admin/maint/repair.php
Не забудьте заменить www.example.com на URL вашего сайта или укажите IP.
Тогда вы увидите следующее сообщение на экране:
WordPress can automatically look for some common database problems and repair them.
Выберите вариант Repair Database. В появившейся странице вы увидите процент проверенных и восстановленных данных.
После восстановления вернитесь к файлу wp-config.php. Удалите из него функцию, ответственную за восстановление базы данных. Это необходимо сделать из соображений безопасности, иначе доступ к восстановлению БД будет у всех.

Если после восстановления базы данных WordPress все еще выдает ошибку о проблеме соединения, восстановите базу данных из бэкапа (резервной копии).
Если же после проверки на странице с результатами вы не увидели исправлений, то ошибка соединения с базой данных не связана с самой базой данных.
Описанные выше способы устранения ошибки соединения зачастую достаточны для решения проблемы. В редких случаях причиной могут быть также вредоносные программы и атаки.
Дополнительные методы устранения ошибки установки соединения с БД
Следующие способы устранения ошибки установки соединения с базой данных категорически не рекомендуется использовать начинающим администраторам WordPress! Переходите к ним только в том случае, если не помогли методы, описанные ранее. Не используйте их, если у вас нет валидной резервной копии вашего сайта!

Читайте также
- Обновление настройки в wp_options
Некоторые пользователи отмечали, что ошибка была устранена после выполнения запроса к БД через phpMyAdmin:
[sql]UPDATE wp_options SET option_value=’ http://your_site.ru’ WHERE option_name=’siteurl’;[/sql]
Где вместо ’your_site.ru ‘укажите URL вашего сайта.
- Подключение к базе данных с правами root
Если вы используете виртуальный сервер и можете воспользоваться root правами, то попробуйте подключиться к БД через файл test.php. В случае успеха, попробуйте также подключиться к БД вашего сайта через файл wp-config.php. Затем проверьте работу сайта.
Работать на сервере под учётной записью root – большая ошибка. Обязательно создайте нового пользователя через phpMyAdmin. Не забудьте внести в wp-config.php файл логин и пароль созданного пользователя.
Профилактика возникновения ошибки установки соединения с базой данных
Никто не застрахован от ошибки установки соединения с базой данных при работе с Вордпресс. Однако, вы можете минимизировать шанс остановки сайта, если будете следовать следующим рекомендациям:
- Тщательно выбирайте хостинг-провайдера, который подходит именно для работы с CMS WordPress. Он должен иметь хорошую техподдержку, обеспечивать высокую скорость и стабильность. Зачастую проблемы в работе сайта связаны именно с хостингом.
- Регулярно делайте бэкап. Вы можете самостоятельно выбрать один из плагинов, например, UpdraftPlus, Duplicator или All-in-One WP Migration.
К сожалению, если вы не имеете доступ в панель управления сайта, то вы не сможете воспользоваться резервной копией. Тогда вам нужно будет воспользоваться программным обеспечением для управления хостингом. Например, ISPmanager. Он позволит вам сделать полную резервную копию сайта.
Если вы не хотите самостоятельно делать бэкап, можете обратиться в техподдержку хостинг-провайдера. Они предложат вам программу для резервного копирования.
 Когда сайт перестает работать — это неприятно, особенно если это происходит само по себе не по нашей вине.
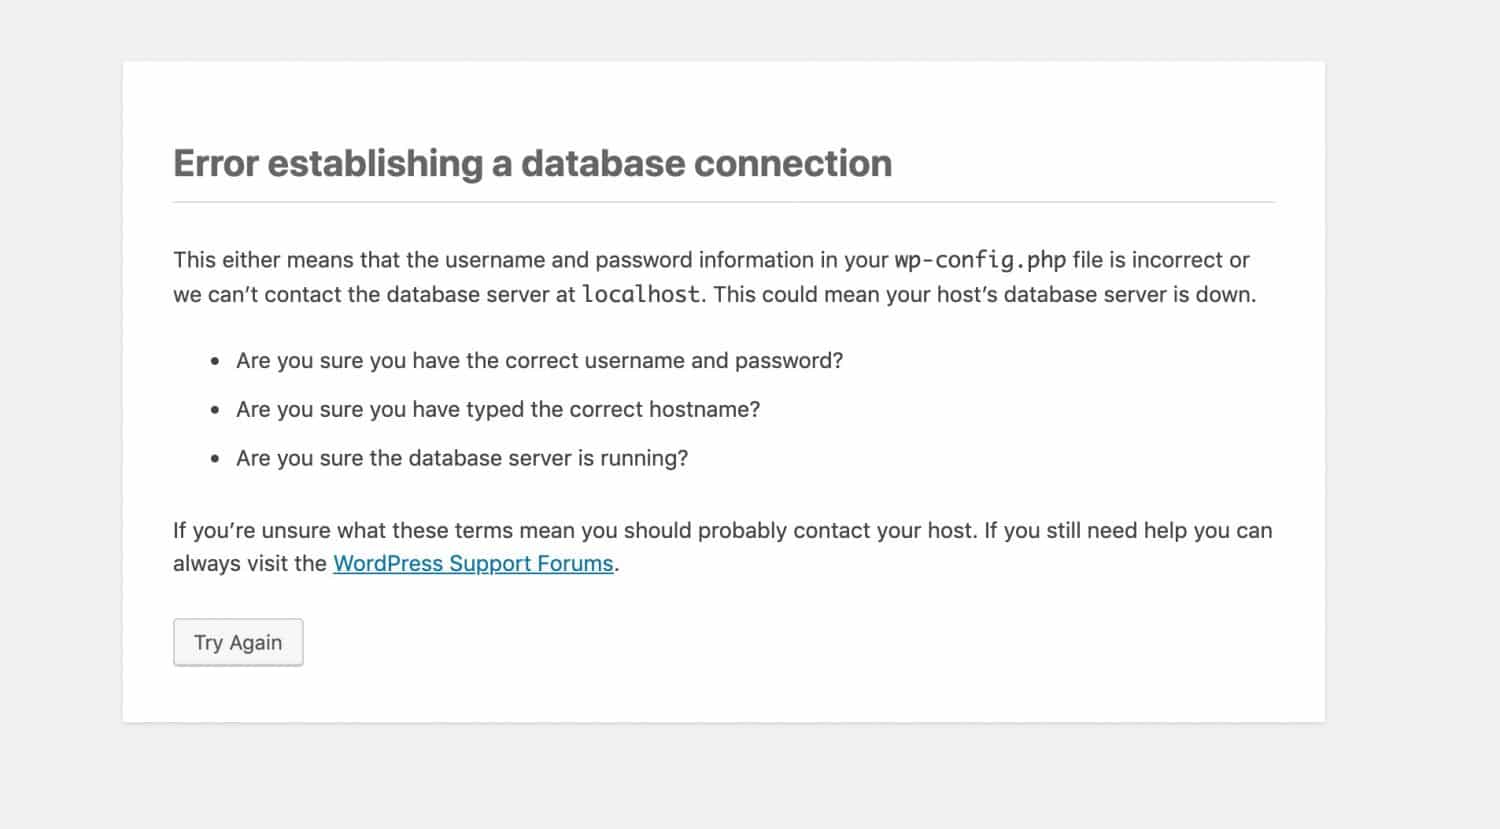
Вы заходите на сайт и получаете такую ошибку:
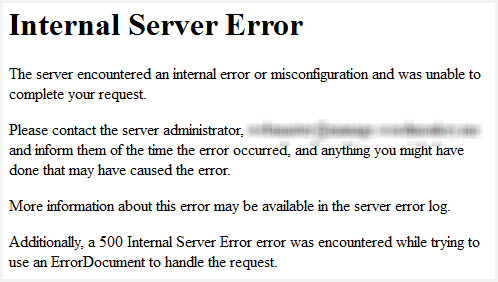
Error establishing a database connection
Ошибка соединения с базой данных Вордпресс — одна из общих ошибок, которую можно легко решить.
В этой статье пошаговая инструкция для исправления этой ошибки.
Содержание:
Суть проблемы
- Шаг 1. Свяжитесь с тех.поддержкой хостинга
- Шаг 2. Проверьте, что файлы тем и плагинов не повреждены
- Шаг 3. Проверьте, что база данных не повреждена
- Шаг 4. Проверьте логин и пароль для подключения к Базе Данных
- Шаг 5. Восстановите стандартные файлы Вордпресс
Как избежать этой ошибки в будущем
Суть проблемы
Суть проблемы в том, что сайт не может установить соединение с базой данных, в которой хранится весь контент сайта.
Вордпресс использует две основные технологии для отображения содержимого сайта: PHP и MySQL.
- PHP используется для расположения информации на странице (вместе с html и css),
- MySQL используется для хранения и выдачи информации по запросу.
Вордпресс с помощью PHP команд подключается к базе данных MySQL, получает запрашиваемую информацию и размещает ее на странице.
Если вы получили ошибку соединения с базой данных это означает, что по какой-то причине Вордпресс не может получить доступ к базе данных и не может отобразить запрашиваемый контент.
Причины могут быть разные, но основные причины такие:
- Неверные данные для подключения к базе данных. Вордпрессу нужны логин и пароль для подключения к базе данных. Если по какой-то причине они изменились, то Вордпресс не может получить данные из базы данных.
- Поврежденные файлы Вордпресс. Обычно это случается в результате неудачного обновления тем, плагинов или ядра Вордпресс.
- Поврежденная база данных. Это может случиться из-за установки плохого плагина, хакерской атаки, сбоя темы и по многим другим причинам.
- Проблема с сервером базы данных. Иногда база данных и файлы сайта могут находиться на разных серверах. По каким-то причинам сервер базы данных может лечь.
- Слишком много трафика. Хотя это хорошая проблема, но это все таки проблема. Например, вы опубликовали хороший контент, и он стал вирусным. На сайте произошел пик посещаемости, и сервер не может обработать часть запросов.
Как исправить ошибку установления соединения с базой данных
Обычно причина этой проблемы связана с самой базой данных, поэтому самое простое и быстрое решение проблемы — написать сообщение в тех.поддержку хостинга.
Шаг 1. Свяжитесь с тех.поддержкой хостинга
Если ваш сайт работал минуту назад (или день назад), а теперь не работает, то скорее всего это ошибка на стороне хостинга.
Свяжитесь с тех.поддержкой, скажите, что получили ошибку “error establishing a database connection”.
Спросите, работает ли база данных (или сервер базы данных), и спросите, не было ли пика нагрузки на сервере.
В большинстве случаев, если вы скажете техподдержке, какая именно у вас проблема, они скажут вам, что случилось, или сами исправят эту проблему.
Как минимум, они скажут вам, что база данных в порядке и на сервере нет (или есть) какая-то подозрительная активность.
Если причина не на их стороне, то есть сервер работает и на нем нет пика трафика, и они не могут вам помочь, то переходите к шагу 2.
Шаг 2. Проверьте, что файлы тем и плагинов не повреждены
Файлы сайта могут повредиться в результате нескольких неудачных событий.
Например, вы обновляли тему или плагины, и произошел обрыв соединения. Это могло случиться, если вы подключали сайт к какому-то внешнему сервису. Или вручную редактировали файлы сайта.
Если было что-то из этого, то скорее всего в этом причина ошибки соединения с базой данных. Если нет, то переходите к Шагу 3.
Как найти проблемный плагин или тему:
- Подключитесь к серверу по FTP. Одна из хороших бесплатных программ для этого FileZilla.
Чтобы подключиться к серверу, вам нужен логин и пароль. Если вы не знаете логин и пароль, попробуйте найти первое письмо, которое вы получили от хостинга после оплаты аккаунта.
Если письма нет, зайдите на хостинг, в разделе FTP вы можете найти существующее подключение и посмотреть логин и пароль. Или создайте новое подключение. Если затрудняетесь — обратитесь в техподдержку.
После подключения перейдите в корневую папку сайта. Корневая папка обычно называется «public_html» или «www», или вы уже можете быть в корневой директории после подключения к серверу.

- Зайдите в папку «wp-content» и переименуйте папку «plugins», например, в «plugins1».

- Зайдите на сайт в браузере и проверьте, пропала ли ошибка.
Если ошибка пропала, значит, проблема в каком-то плагине. Вернитесь на сервер по FTP и переименуйте папку с плагинами обратно в «plugins».
Зайдите внутрь папки с плагинами и переименуйте названия папок с отдельными плагинами одну за одной. Добавьте какой-нибудь символ к названию каждой папки, например, «1».

Отключайте плагины по одному таким образом и возвращайтесь на сайт, пока не найдете, какой плагин вызывает проблему. Удалите этот плагин или попробуйте найти решение проблемы с этим плагином в Интернете.
- Если проблема не пропала даже после переименования папки «plugins», сделайте то же самое с папкой «themes».
- Если это не помогло, переименуйте обе папки обратно в «plugins» и «themes». Проблема находится где-то еще.
Шаг 3. Проверьте, что база данных не повреждена
База данных Вордпресс довольно сложная вещь, поэтому если происходит даже небольшой сбой, вы можете увидеть ошибку соединения с базой данных.
- Проверьте, что у вас есть доступ в админку:
ваш-сайт.ru/wp-admin
Если вы видите ту же ошибку “error establishing a database connection”, пропустите это шаг.
- Если вы видите что-то другое, прочитайте что Вордпресс предлагает вам сделать. В последних версиях Вордпресс улучшил решение проблем, возникающих при использовании системы, и предлагает варианты решений. Например, вы можете увидеть такое сообщение:

Еще один вариант — вы можете увидеть сообщение, которое начинается с «Одна или несколько таблиц базы данных…». Это значит, что вам нужно восстановить базу данных.
Чтобы восстановить БД, подключитесь к серверу по FTP, зайдите корневую папку и скачайте файл wp-config.php на компьютер.
Откройте этот файл в Блокноте (или в Notepad++), и добавьте эту строку перед строкой Это все, дальше не редактируем:
Загрузите файл обратно на сервер с заменой существующего файла и перейдите по этому адресу:
ваш-сайт.ru/wp-admin/maint/repair.php
Вы должны увидеть такое сообщение:

Нажмите Починить и оптимизировать базу данных. После того, как ремонт и оптимизация закончатся, попробуйте открыть сайт в браузере. Не забудьте сбросить кеш в браузере.
Если ошибки нет, все в порядке. Удалите строку о включении ремонта в файле wp-config.php. Загрузите файл на сервер с заменой существующего файла.
Если ошибка не пропала, переходите к следующему шагу.
Шаг 4. Проверьте логин и пароль для подключения к Базе Данных
Вордпресс использует логин и пароль для подключения к базе данных, которые хранятся в файле wp-config.php.
Обычно эти данные не меняются сами по себе, но в некоторых редких случаях это может произойти. Например, после изменения каких-то файлов сайта, изменения хостинга или что-то еще.
Откройте wp-config.php и найдите эти строки:
define('DB_NAME', 'имя_базы_данных');
define('DB_USER', 'логин_пользователя');
define('DB_PASSWORD', 'пароль_пользователя');
define('DB_HOST', 'localhost');
Это данные для подключения к базе данных. Если они отличаются от данных для входа в базе данных, то соединение не будет установлено.
В зависимости от интерфейса вашего хостинга, вы можете узнать название базы данных, логин и пароль и для входа на хостинге в разделе Баз Данных.
Если вы не можете узнать эти данные на хостинге, скопируйте эти 4 строки с данными для подключения из вашего файла wp-config.php, вставьте их в сообщение тех.поддержке, и спросите, правильные ли это данные.
Техподдержка либо скажет Да, либо предоставит правильные данные для подключения к базе данных.
Если техподдержка даст другие данные, вставьте их в 4 строки в файле wp-config.php:
define('DB_NAME', 'имя_базы_данных');      /*вставьте сюда название базы данных*/
define('DB_USER', 'логин_пользователя');       /*вставьте сюда логин пользователя*/
define('DB_PASSWORD', 'пароль_пользователя');     /*пароль пользователя*/
define('DB_HOST', 'localhost');     /*адрес сервера. обычно localhost*/
Сохраните, загрузите на сервер.
Перейдите на сайт, проверьте что проблема пропала. Не забудьте сбросить кеш в браузере.
Если проблема не пропала, переходите к следующему шагу.
Шаг 5. Восстановите стандартные файлы Вордпресс
Последнее средство, которое вы можете попробовать — восстановите стандартные файлы Вордпресс.
Файлы могли быть повреждены хакером, плохим плагином или вы могли случайно их изменить.
Скачайте свежую копию Вордпресс на компьютер и распакуйте архив. В распакованном архиве удалите папку wp-content.
Скачайте с сервера на компьютер файлы wp-config.php и .htaccess и сохраните их в отдельной папке. Позже данные из этих файлов могут вам понадобиться.
Загрузите распакованные файлы на сервер с заменой старых на новые. Вставьте данные для подключения к базе данных из Шага 4 и добавьте их в новый файл wp-config.php.
Перейдите на сайт и обновите страницу.
Если это не помогло, то вернитесь на хостинг, скажите тех.поддержке что именно вы делали и попросите их помочь. На этом этапе вы попробовали сделать все, что возможно, и вам остается надеяться только на помощь хостинга.
Как избежать этой ошибки в будущем
Хотя нет 100% защиты от ошибки установления соединения с базой данных Вордпресс, вы можете применять 2 рекомендации для сведения к минимуму вероятности отключения сайта:
- Используйте хороший хостинг, который оптимизирован для работы с Вордпресс и который имеет хорошую техподдержку. Настроенный для работы с Вордпресс хостинг помогает избежать многих общих проблем с Вордпресс. Я пользуюсь хостингом Бегет.
- Настройте бэкап. Установите хороший плагин, например, UpdraftPlus и настройте бэкап на хостинге. Если что-то пойдет не так, у вас всегда будет копия для восстановления.
Читайте также:
- База данных Вордпресс
- Очистка и оптимизация базы данных
- Как изменить префикс базы данных
- Безопасность Вордпресс. Подробное описание
Надеюсь, статья была полезна. Оставляйте комментарии.
If you are encountering a WordPress error message or white screen, don’t panic. Someone has likely encountered the same message before and it can easily be solved.
This page lists the most common WordPress errors experienced by WordPress users, and provides a starting point for fixing them. At WordPress Support, you will also find links to more detailed pages or forums where a volunteer will be there to help.
The White Screen of Death
Both PHP errors and database errors can manifest as a white screen, a blank screen with no information, commonly known in the WordPress community as the WordPress White Screen of Death (WSOD).
Before resorting to desperate measures, there are a number of reasons for the WordPress white screen of death:
- A Plugin is causing compatibility issues. If you can access the Administration Screens try deactivating all of your Plugins and then reactivating them one by one. If you are unable to access your Screens, log in to your website via FTP. Locate the folder
wp-content/pluginsand rename the Plugin folderplugins_old. This will deactivate all of your Plugins. You can read more about manually deactivating your plugins in the Troubleshooting FAQ. - Your Theme may be causing the problem. This is especially likely if you are experiencing the white screen of death after you have just activated a new Theme, or created a New Site in a WordPress Network. Log in to the WordPress Administration Screens and activate a default WordPress Theme (e.g. Twenty Twenty-One). If you are using WordPress 5.8 and below, please switch to Twenty Twenty-One theme since the Twenty Twenty-Two theme requires 5.9 and above. If you can’t access your Administration Screens, access your website via FTP and navigate to the
/wp-content/themes/folder. Rename the folder for the active Theme.
The WP_DEBUG feature often provides additional information.
Internal Server Error
There can be a number of reasons for an Internal Server Error. Here are some thing you can do to solve it:
- The most likely issue is a corrupted
.htaccessfile. Log in to your site root using FTP and rename your.htaccessfile to.htaccess_old. Try loading your site to see if this has solved your problem. If it works, make sure to visit Settings > Permalinks and reset your permalinks. This will generate a new.htaccessfile for you. - Try deactivating all of your Plugins to see if it is a Plugin issue. If you are unable to access your WordPress Administration Screens, deactivate your Plugins via FTP by following these instructions.
- Switch the Theme to a WordPress default Theme (e.g. Twenty Twenty-One) to eliminate any Theme-related problems. If you are using WordPress 5.8 and below, please switch to Twenty Twenty-One theme since the Twenty Twenty-Two theme requires 5.9 and above.
- Increase the PHP Memory limit
- Try re-uploading the
wp-adminandwp-includesfolders from a fresh install of WordPress.
Error Establishing Database Connection
If you get a page featuring the message “Error Establishing Database Connection,” this means that there is a problem with the connection to your database and there could be a number of reasons for this. The following are possible reasons and solutions.
Incorrect wp-config.php Information
“Error establishing a database connection” is usually caused by an error in your wp-config.php file. Access your site in your FTP client. Open up wp-config.php and ensure that the following are correct:
- Database name
- Database username
- Database password
- Database host
Learn more about editing wp-config.php.
If you are sure your configuration is correct you could try resetting your MySQL password manually.
Problems with Your Web Host
The next step is to contact your web host. The following hosting issues may be causing the problem:
- Your database has met its quota and has been shut down.
- The server is down.
Contact your hosting provider to see if either of these issues is causing your problem.
Compromised Website
If you have checked wp-config.php for errors, and confirmed with your host for hosting issues, it is possible that your site has been hacked.
Scan your site with Sucuri SiteCheck to ensure that it hasn’t been compromised. If it has you should check out My Site was Hacked.
Failed Auto-Upgrade
There will be situations when the WordPress auto-update feature fails. Symptoms include:
- A blank white screen and no information.
- A warning that the update failed.
- A PHP error message.
The WordPress automatic upgrade feature may fail due to a glitch in the connection with the main WordPress files, a problem with your Internet connection during upgrade, or incorrect File Permissions
To update your WordPress site manually, see the Manual Update article.
Connection Timed Out
The connection timed out error appears when your website is trying to do more than your server can manage. It is particularly common on shared hosting where your memory limit is restricted. Here are some things you can try:
- Deactivate all Plugins. If deactivating all the WordPress Plugins on your site resolves the issue, reactivate them one-by-one to see which plugin is causing the problem. If you are unable to access your Administration Screens, read about how to manually deactivate your plugins.
- Switch to a default WordPress Theme. If you are using WordPress 5.8 and below, please switch to Twenty Twenty-One theme since the Twenty Twenty-Two theme requires 5.9 and above. This should rule out any Theme-related problems.
- Increase your memory limit in wp-config.php. If you are on shared hosting you may have to ask your hosting provider to increase your memory limit for you.
- Increase the maximum execution time in your php.ini file. This is not a WordPress core file so if you are not sure how to edit it, contact your hosting provider to ask them to increase your maximum execution time. See below instructions for increasing maximum execution time.
Maintenance Mode Following Upgrade

When WordPress updates, it automatically installs a .maintenance file. Following upgrade, you may receive a message that says “Briefly unavailable for scheduled maintenance. Please check back in a minute.” The maintenance file may not have been removed properly.
To remove this message do the following:
- Log in to your website using your FTP program
- Delete the
.maintenancefile, which will be found in your site root.
Read more about the maintenance mode issue.
You Make Changes and Nothing Happens
If you are making changes to your website and you do not see the changes in your browser, you may need to clear your browser cache. Your browser stores information about the websites that you visit. This makes it faster to load websites when you visit them because the browser just has to reload information already stored on your computer, rather than downloading it again.
If you make a change to a website and the browser does not think it is significant, it will simply load the data from your cache, and you won’t see your changes. To fix the problem, simply empty your browser cache or close the tab and reopen the link.
Pretty Permalinks 404 and Images not Working
If you are experiencing 404 errors with pretty permalinks and a white screen when you upload images, mod_rewrite may not be enabled in Apache by default. Mod_rewrite is an extension module of the Apache web server software which allows for “rewriting” of URLs on-the-fly. It’s what you need to make pretty permalinks work.
WordPress Multisite networks usually experience this but it can also occur on shared hosting providers or after a site migration or server move.
Reset your permalinks through Settings > Permalinks. If this does not work, you may have to edit the .htaccess file manually.
# BEGIN WordPress
<IfModule mod_rewrite.c>
RewriteEngine On
RewriteBase /
RewriteRule ^index.php$ - [L]
RewriteCond %{REQUEST_FILENAME} !-f
RewriteCond %{REQUEST_FILENAME} !-d
RewriteRule . /index.php [L]
</IfModule>
# END WordPress
If you are not familiar with editing your .htaccess file, contact your hosting provider to ask them to turn on mod_rewrite rules. There is more information on pretty permalinks in the WordPress Codex.
Custom Post Type 404 Errors
You may experience problems with 404 errors and custom post types. Try the following steps:
- Make sure that none of your Custom Post Types and single pages have the same name. If they do, rename the single page, including the slug.
- Log in to your WordPress Administration Screens, navigate to Settings > Permalinks. Select the default permalinks. Save. Then reselect your preferred permalinks. This will flush the rewrite rules and should solve your problem.
Specific Error Messages
There are a number of different errors that will appear in your error logs. To access your error logs you will need to turn on debugging and then locate your error log via FTP. The following information will help you to decipher some of the common error messages.
PHP Errors
Below are some common PHP error messages.
Fatal Errors and Warnings
If you receive a warning that WordPress cannot modify header information and headers are already sent, it usually means that you have spaces or characters before the opening tags or after the closing tags. Read how to fix the headers already sent error.
If you are experiencing this problem when you have just installed WordPress you may have introduced a syntax error into wp-config.php. These instructions will help you to fix the error.
Call to undefined function
An error reading call to undefined function could mean that a WordPress Plugin is trying to find a file or data which isn’t present or accessible in the code. Reasons for this include:
- An error when trying to auto-install or auto-upgrade a Plugin. Try installing or upgrading the Plugin manually.
- An error when trying to auto-install or auto-upgrade a Theme. Try installing or upgrading the Theme manually.
- You may be using an incompatible WordPress Plugin or incompatible Theme. This could happen with older versions of WordPress and a new WordPress Plugin, or if you are trying to use a WordPress Multisite Plugin on a single site installation. Upgrade WordPress to resolve this issue.
- You may be trying to call a function that doesn’t exist. Check
functions.phpfor misspellings.
Try deactivating the WordPress Plugin or changing the WordPress Theme that caused the error to appear. If you are unable to do this from within the Administration Screens, you may have to do this manually via FTP.
Allowed memory size exhausted
An Allowed Memory Size Exhausted error means that your WordPress installation doesn’t have enough memory to achieve what you want. You can try out the following steps:
- Increase your memory limit in wp-config.php
- Increase your memory limit by editing
php.ini. This is not a file that comes with WordPress so if you are unfamiliar with it you should contact your web host about increasing your memory limit.
Maximum execution time exceeded
You may receive a message such as “Maximum execution time of 30 seconds exceeded” or “Maximum execution time of 60 seconds exceeded”. This means that it is taking to longer for a process to complete and it is timing out. There are a number of ways to fix this error.
Editing .htaccess
Make sure you back up .htaccess before you edit it.
Add the following line to .htaccess:
php_value max_execution_time 60
Editing php.ini
Add the following to php.ini
max_execution_time = 60
If you are unsure of how to make these changes, or if you are on shared hosting that prevents you from making them yourself, you should contact your hosting provider and ask them to increase your maximum execution time.
Parse errors
Syntax Error
A syntax error means that you have made a mistake while creating your PHP structure. You could, for example, be;
- Missing a
;at the end of an individual line. - Using curly quotation marks.
- Missing a curly bracket.
When this error appears it will tell you which file the error appears in (functions.php for example) and approximately which line (it may not always be the exact line so be sure to check just before and just after) in the code.
Unexpected
If you are receiving an error which says ‘parse error: unexpected’ this usually means that you have forgotten to include a character. The most common are:
- Unexpected ‘=’ : you have forgotten to include the $ when referencing a variable
- Unexpected ‘)’ : you have forgotten to include the opening bracket (
- Unexpected ‘(‘ : you have forgotten to include the closing bracket )
- Unexpected T_STRING: you have forgotten a quotation mark or a semi-colon at the end of the previous line
- Unexpected T_ELSE: you have an else statement with no opening if statement
Use of an undefined constant
As with parse errors, “use of an undefined constant” means that you are missing a character. It could be one of the following:
- Missing a $ when referencing a viariable
- Missing quotation marks around array keys
Database Errors
The following errors may appear in relation to your WordPress database.
Error 13 – Cannot Create/Write to File
There are a number of reasons why you may be experiencing this error.
MySQL cannot create a temporary file.
The MySQL variable tmpdir is set to a directory that cannot be written to when using PHP to access MySQL. To verify this, enter MySQL at the command line and type show variables. You’ll get a long list and one of them will read: tmpdir = /somedir/ (whatever your setting is.)
To solve this, alter the tmpdir variable to point to a writable directory.
- Find the my.cnf file. On *nix systems this is usually in /etc/. On Windows system, Find the my.ini.
- Once found, open this in a simple text editor and find the [mysqld] section.
- Under this section, find the tmpdir line. If this line is commented (has a # at the start), delete the # and edit the line so that it reads: tmpdir = /writable/dir where /writable/dir is a directory to which you can write. Some use /tmp, or you might also try /var/tmp or /usr/tmp. On Windows, use C:/Windows/tmp.
- Save the file.
- Shutdown MySQL by typing
mysqlshutdown -u -p shutdown. - Start MySQL by going to the MySQL directory and typing
./bin/safe_mysqld &. Usually the MySQL directory is in /usr/local or sometimes in /usr/ on Linux systems.
The file permissions are incorrect
Correct the File Permissions.
If none of this make sense and you have someone to administrate your system for you, show the above to them and they should be able to figure it out.
CREATE Command Denied to User
This error occurs when the user assigned to the database does not have adequate permissions to perform the action to create columns and tables in the database. You will need to log in to CPanel or Plesk to give your database user adequate permissions.
Alternatively you can create a new user to assign to your database. If you do create a new user you will need to ensure that it is updated in wp-config.php.
Error 28
It could be because:
- you are out of space on /tmp (wherever tmpdir is), or,
- you have too many files in /tmp (even if there is lots of free space), or,
- Your cache on your server is full
This is a MySQL error and has nothing to do with WordPress directly; you should contact your host about it. Some users have reported that running a “repair table” command in phpMyAdmin fixed the problem.
Error 145
This indicates that a table in your database is damaged or corrupted. If you are comfortable using phpMyAdmin you can use these instructions on repairing your MySQL database tables.
Always backup your database before performing any actions on it.
If you have not used phpMyAdmin before, or are uncomfortable doing so, contact your web host and ask them to run CHECK/REPAIR on your database.
Unknown Column
An unknown column error can be caused by a missing column in the database. If you have just upgraded WordPress then try manually upgrading again. To update your WordPress site manually, see the Update article.
If you are running a database query when you encounter the error then you may by using incorrect quotation marks for the identifier quote character. This question on Stack Overflow provides more details. Also see the MySQL documentation.
Resources
- MySQL Error Codes and Messages
If you are encountering a WordPress error message or white screen, don’t panic. Someone has likely encountered the same message before and it can easily be solved.
This page lists the most common WordPress errors experienced by WordPress users, and provides a starting point for fixing them. At WordPress Support, you will also find links to more detailed pages or forums where a volunteer will be there to help.
The White Screen of Death
Both PHP errors and database errors can manifest as a white screen, a blank screen with no information, commonly known in the WordPress community as the WordPress White Screen of Death (WSOD).
Before resorting to desperate measures, there are a number of reasons for the WordPress white screen of death:
- A Plugin is causing compatibility issues. If you can access the Administration Screens try deactivating all of your Plugins and then reactivating them one by one. If you are unable to access your Screens, log in to your website via FTP. Locate the folder
wp-content/pluginsand rename the Plugin folderplugins_old. This will deactivate all of your Plugins. You can read more about manually deactivating your plugins in the Troubleshooting FAQ. - Your Theme may be causing the problem. This is especially likely if you are experiencing the white screen of death after you have just activated a new Theme, or created a New Site in a WordPress Network. Log in to the WordPress Administration Screens and activate a default WordPress Theme (e.g. Twenty Twenty-One). If you are using WordPress 5.8 and below, please switch to Twenty Twenty-One theme since the Twenty Twenty-Two theme requires 5.9 and above. If you can’t access your Administration Screens, access your website via FTP and navigate to the
/wp-content/themes/folder. Rename the folder for the active Theme.
The WP_DEBUG feature often provides additional information.
Internal Server Error
There can be a number of reasons for an Internal Server Error. Here are some thing you can do to solve it:
- The most likely issue is a corrupted
.htaccessfile. Log in to your site root using FTP and rename your.htaccessfile to.htaccess_old. Try loading your site to see if this has solved your problem. If it works, make sure to visit Settings > Permalinks and reset your permalinks. This will generate a new.htaccessfile for you. - Try deactivating all of your Plugins to see if it is a Plugin issue. If you are unable to access your WordPress Administration Screens, deactivate your Plugins via FTP by following these instructions.
- Switch the Theme to a WordPress default Theme (e.g. Twenty Twenty-One) to eliminate any Theme-related problems. If you are using WordPress 5.8 and below, please switch to Twenty Twenty-One theme since the Twenty Twenty-Two theme requires 5.9 and above.
- Increase the PHP Memory limit
- Try re-uploading the
wp-adminandwp-includesfolders from a fresh install of WordPress.
Error Establishing Database Connection
If you get a page featuring the message “Error Establishing Database Connection,” this means that there is a problem with the connection to your database and there could be a number of reasons for this. The following are possible reasons and solutions.
Incorrect wp-config.php Information
“Error establishing a database connection” is usually caused by an error in your wp-config.php file. Access your site in your FTP client. Open up wp-config.php and ensure that the following are correct:
- Database name
- Database username
- Database password
- Database host
Learn more about editing wp-config.php.
If you are sure your configuration is correct you could try resetting your MySQL password manually.
Problems with Your Web Host
The next step is to contact your web host. The following hosting issues may be causing the problem:
- Your database has met its quota and has been shut down.
- The server is down.
Contact your hosting provider to see if either of these issues is causing your problem.
Compromised Website
If you have checked wp-config.php for errors, and confirmed with your host for hosting issues, it is possible that your site has been hacked.
Scan your site with Sucuri SiteCheck to ensure that it hasn’t been compromised. If it has you should check out My Site was Hacked.
Failed Auto-Upgrade
There will be situations when the WordPress auto-update feature fails. Symptoms include:
- A blank white screen and no information.
- A warning that the update failed.
- A PHP error message.
The WordPress automatic upgrade feature may fail due to a glitch in the connection with the main WordPress files, a problem with your Internet connection during upgrade, or incorrect File Permissions
To update your WordPress site manually, see the Manual Update article.
Connection Timed Out
The connection timed out error appears when your website is trying to do more than your server can manage. It is particularly common on shared hosting where your memory limit is restricted. Here are some things you can try:
- Deactivate all Plugins. If deactivating all the WordPress Plugins on your site resolves the issue, reactivate them one-by-one to see which plugin is causing the problem. If you are unable to access your Administration Screens, read about how to manually deactivate your plugins.
- Switch to a default WordPress Theme. If you are using WordPress 5.8 and below, please switch to Twenty Twenty-One theme since the Twenty Twenty-Two theme requires 5.9 and above. This should rule out any Theme-related problems.
- Increase your memory limit in wp-config.php. If you are on shared hosting you may have to ask your hosting provider to increase your memory limit for you.
- Increase the maximum execution time in your php.ini file. This is not a WordPress core file so if you are not sure how to edit it, contact your hosting provider to ask them to increase your maximum execution time. See below instructions for increasing maximum execution time.
Maintenance Mode Following Upgrade
When WordPress updates, it automatically installs a .maintenance file. Following upgrade, you may receive a message that says “Briefly unavailable for scheduled maintenance. Please check back in a minute.” The maintenance file may not have been removed properly.
To remove this message do the following:
- Log in to your website using your FTP program
- Delete the
.maintenancefile, which will be found in your site root.
Read more about the maintenance mode issue.
You Make Changes and Nothing Happens
If you are making changes to your website and you do not see the changes in your browser, you may need to clear your browser cache. Your browser stores information about the websites that you visit. This makes it faster to load websites when you visit them because the browser just has to reload information already stored on your computer, rather than downloading it again.
If you make a change to a website and the browser does not think it is significant, it will simply load the data from your cache, and you won’t see your changes. To fix the problem, simply empty your browser cache or close the tab and reopen the link.
Pretty Permalinks 404 and Images not Working
If you are experiencing 404 errors with pretty permalinks and a white screen when you upload images, mod_rewrite may not be enabled in Apache by default. Mod_rewrite is an extension module of the Apache web server software which allows for “rewriting” of URLs on-the-fly. It’s what you need to make pretty permalinks work.
WordPress Multisite networks usually experience this but it can also occur on shared hosting providers or after a site migration or server move.
Reset your permalinks through Settings > Permalinks. If this does not work, you may have to edit the .htaccess file manually.
# BEGIN WordPress
<IfModule mod_rewrite.c>
RewriteEngine On
RewriteBase /
RewriteRule ^index.php$ - [L]
RewriteCond %{REQUEST_FILENAME} !-f
RewriteCond %{REQUEST_FILENAME} !-d
RewriteRule . /index.php [L]
</IfModule>
# END WordPress
If you are not familiar with editing your .htaccess file, contact your hosting provider to ask them to turn on mod_rewrite rules. There is more information on pretty permalinks in the WordPress Codex.
Custom Post Type 404 Errors
You may experience problems with 404 errors and custom post types. Try the following steps:
- Make sure that none of your Custom Post Types and single pages have the same name. If they do, rename the single page, including the slug.
- Log in to your WordPress Administration Screens, navigate to Settings > Permalinks. Select the default permalinks. Save. Then reselect your preferred permalinks. This will flush the rewrite rules and should solve your problem.
Specific Error Messages
There are a number of different errors that will appear in your error logs. To access your error logs you will need to turn on debugging and then locate your error log via FTP. The following information will help you to decipher some of the common error messages.
PHP Errors
Below are some common PHP error messages.
Fatal Errors and Warnings
If you receive a warning that WordPress cannot modify header information and headers are already sent, it usually means that you have spaces or characters before the opening tags or after the closing tags. Read how to fix the headers already sent error.
If you are experiencing this problem when you have just installed WordPress you may have introduced a syntax error into wp-config.php. These instructions will help you to fix the error.
Call to undefined function
An error reading call to undefined function could mean that a WordPress Plugin is trying to find a file or data which isn’t present or accessible in the code. Reasons for this include:
- An error when trying to auto-install or auto-upgrade a Plugin. Try installing or upgrading the Plugin manually.
- An error when trying to auto-install or auto-upgrade a Theme. Try installing or upgrading the Theme manually.
- You may be using an incompatible WordPress Plugin or incompatible Theme. This could happen with older versions of WordPress and a new WordPress Plugin, or if you are trying to use a WordPress Multisite Plugin on a single site installation. Upgrade WordPress to resolve this issue.
- You may be trying to call a function that doesn’t exist. Check
functions.phpfor misspellings.
Try deactivating the WordPress Plugin or changing the WordPress Theme that caused the error to appear. If you are unable to do this from within the Administration Screens, you may have to do this manually via FTP.
Allowed memory size exhausted
An Allowed Memory Size Exhausted error means that your WordPress installation doesn’t have enough memory to achieve what you want. You can try out the following steps:
- Increase your memory limit in wp-config.php
- Increase your memory limit by editing
php.ini. This is not a file that comes with WordPress so if you are unfamiliar with it you should contact your web host about increasing your memory limit.
Maximum execution time exceeded
You may receive a message such as “Maximum execution time of 30 seconds exceeded” or “Maximum execution time of 60 seconds exceeded”. This means that it is taking to longer for a process to complete and it is timing out. There are a number of ways to fix this error.
Editing .htaccess
Make sure you back up .htaccess before you edit it.
Add the following line to .htaccess:
php_value max_execution_time 60
Editing php.ini
Add the following to php.ini
max_execution_time = 60
If you are unsure of how to make these changes, or if you are on shared hosting that prevents you from making them yourself, you should contact your hosting provider and ask them to increase your maximum execution time.
Parse errors
Syntax Error
A syntax error means that you have made a mistake while creating your PHP structure. You could, for example, be;
- Missing a
;at the end of an individual line. - Using curly quotation marks.
- Missing a curly bracket.
When this error appears it will tell you which file the error appears in (functions.php for example) and approximately which line (it may not always be the exact line so be sure to check just before and just after) in the code.
Unexpected
If you are receiving an error which says ‘parse error: unexpected’ this usually means that you have forgotten to include a character. The most common are:
- Unexpected ‘=’ : you have forgotten to include the $ when referencing a variable
- Unexpected ‘)’ : you have forgotten to include the opening bracket (
- Unexpected ‘(‘ : you have forgotten to include the closing bracket )
- Unexpected T_STRING: you have forgotten a quotation mark or a semi-colon at the end of the previous line
- Unexpected T_ELSE: you have an else statement with no opening if statement
Use of an undefined constant
As with parse errors, “use of an undefined constant” means that you are missing a character. It could be one of the following:
- Missing a $ when referencing a viariable
- Missing quotation marks around array keys
Database Errors
The following errors may appear in relation to your WordPress database.
Error 13 – Cannot Create/Write to File
There are a number of reasons why you may be experiencing this error.
MySQL cannot create a temporary file.
The MySQL variable tmpdir is set to a directory that cannot be written to when using PHP to access MySQL. To verify this, enter MySQL at the command line and type show variables. You’ll get a long list and one of them will read: tmpdir = /somedir/ (whatever your setting is.)
To solve this, alter the tmpdir variable to point to a writable directory.
- Find the my.cnf file. On *nix systems this is usually in /etc/. On Windows system, Find the my.ini.
- Once found, open this in a simple text editor and find the [mysqld] section.
- Under this section, find the tmpdir line. If this line is commented (has a # at the start), delete the # and edit the line so that it reads: tmpdir = /writable/dir where /writable/dir is a directory to which you can write. Some use /tmp, or you might also try /var/tmp or /usr/tmp. On Windows, use C:/Windows/tmp.
- Save the file.
- Shutdown MySQL by typing
mysqlshutdown -u -p shutdown. - Start MySQL by going to the MySQL directory and typing
./bin/safe_mysqld &. Usually the MySQL directory is in /usr/local or sometimes in /usr/ on Linux systems.
The file permissions are incorrect
Correct the File Permissions.
If none of this make sense and you have someone to administrate your system for you, show the above to them and they should be able to figure it out.
CREATE Command Denied to User
This error occurs when the user assigned to the database does not have adequate permissions to perform the action to create columns and tables in the database. You will need to log in to CPanel or Plesk to give your database user adequate permissions.
Alternatively you can create a new user to assign to your database. If you do create a new user you will need to ensure that it is updated in wp-config.php.
Error 28
It could be because:
- you are out of space on /tmp (wherever tmpdir is), or,
- you have too many files in /tmp (even if there is lots of free space), or,
- Your cache on your server is full
This is a MySQL error and has nothing to do with WordPress directly; you should contact your host about it. Some users have reported that running a “repair table” command in phpMyAdmin fixed the problem.
Error 145
This indicates that a table in your database is damaged or corrupted. If you are comfortable using phpMyAdmin you can use these instructions on repairing your MySQL database tables.
Always backup your database before performing any actions on it.
If you have not used phpMyAdmin before, or are uncomfortable doing so, contact your web host and ask them to run CHECK/REPAIR on your database.
Unknown Column
An unknown column error can be caused by a missing column in the database. If you have just upgraded WordPress then try manually upgrading again. To update your WordPress site manually, see the Update article.
If you are running a database query when you encounter the error then you may by using incorrect quotation marks for the identifier quote character. This question on Stack Overflow provides more details. Also see the MySQL documentation.
Resources
- MySQL Error Codes and Messages
15 мая, 2017 11:51 дп
25 810 views
| 1 комментарий
MariaDB, mySQL
WordPress – одна из популярнейших открытых систем управления контентом. Изначально платформа WordPress разрабатывалась для блогов, однако со временем она стала более гибкой и производительной, и теперь подходит для обслуживания практически любого сайта. WordPress разрабатывается почти 15 лет; сегодня это очень надёжная и ошибкоустойчивая система, однако и в ней иногда случаются сбои и ошибки.
Ошибка установки соединения с базой данных (Error Establishing Database Connection) – одна из самых распространённых ошибок WordPress. Обычно её вызывает:
- Сбой БД (чаще всего из-за нехватки памяти).
- Неправильные учётные данные БД в настройках WordPress.
- Нарушение таблиц базы данных WordPress.
В этом руководстве вы узнаете, как определить причину ошибки установки соединения с БД и исправить её.
Требования
- Машина с предустановленной платформой WordPress.
- Доступ к sudo.
- База данных должна быть запущена на одной машине с WordPress.
- Учётные данные БД: имя пользователя, пароль и имя базы данных для WordPress. Эта информация была создана во время начальной настройки WordPress.
1: Проверка памяти сервера
Для начала нужно убедиться, что MySQL работает, и что на сервере достаточно памяти для обработки данных WordPress.
Подключитесь к серверу по SSH:
ssh 8host@your_server_ip
Примечание: Если вы уверены, что правильно указали учётные данные, но у вас по-прежнему возникают проблемы при входе в систему, возможно, на сервере не хватает памяти или он не справляется с большой нагрузкой. Это случается из-за неожиданного роста трафика, и этим можно объяснить ошибку WordPress. Попробуйте перезагрузить сервер и подключиться снова.
Подключившись к серверу, убедитесь, что MySQL работает:
sudo netstat -plt
Команда netstat выводит информацию о сетевой системе сервера. Приведённая выше команда выведет имена программ, которые прослушивают соединения на сокете tcp (флаги –p, –l и –t соответственно). В выводе найдите mysqld:
Active Internet connections (only servers)

Proto Recv-Q Send-Q Local Address           Foreign Address         State       PID/Program name

tcp        0      0 localhost:mysql         *:*                     LISTEN      1958/mysqld

tcp        0      0 *:ssh                   *:*                     LISTEN      2205/sshd

tcp        0      0 localhost:smtp          *:*                     LISTEN      2361/master

tcp6       0      0 [::]:http               [::]:*                  LISTEN      16091/apache2

tcp6       0      0 [::]:ssh                [::]:*                  LISTEN      2205/sshd

tcp6       0      0 ip6-localhost:smtp      [::]:*                  LISTEN      2361/master
Если такая программа есть в выводе команды, значит, сервер MySQL запущен и прослушивает соединения. Если вы не нашли MySQL в списке, попробуйте запустить сервер вручную. Обычно для этого используется команда:
sudo systemctl start mysql
Примечание: В некоторых дистрибутивах Linux (например, в CentOS) используется mysqld вместо mysql.
Сервер MySQL должен запуститься. Чтобы убедиться в этом, снова запустите netstat и найдите в выводе строку mysqld.
Для корректной работы MySQL и WordPress нужно довольно много памяти. Сервер MySQL может прекратить работу из-за нехватки памяти. Чтобы убедиться, что ошибка произошла по этой причине, проверьте логи ошибок MySQL.
zgrep -a "allocate memory" /var/log/mysql/error.log*
Команда zgrep выполнит поиск по логам, включая более старые логи в архиве с расширением .tar.gz. Команда будет искать в логах error.log* из каталога /var/log/mysql/ все строки с пометкой allocate memory.
2017-04-11T17:38:22.604644Z 0 [ERROR] InnoDB: Cannot allocate memory for the buffer pool
Если вы видите на экране такую строку (или несколько таких строк), значит, причина ошибки подключения к БД в нехватке памяти для работы MySQL. Возможно, это произошло из-за резкого роста трафика. Если в выводе много таких строк, значит, сервер сталкивается с нехваткой памяти регулярно. В таком случае рекомендуется переместить ресурс на сервер с большим объёмом памяти. Большинство провайдеров облачного хостинга позволяют просто обновить свой сервер с минимальным временем простоя.
Если команда zgrep не вернула ничего, памяти на сервер достаточно для обработки данных WordPress и MySQL. Если ошибка установки соединения с БД не исчезла, нужно проверить настройки WordPress и убедиться, что в них указаны правильные данные о MySQL.
2: Проверка учётных данных MySQL
Если вы недавно переместили установку WordPress на новый сервер (или сменили хостинг-провайдера), вам нужно обновить информацию о БД в настройках WordPress. Они хранятся в PHP-файле wp-config.php.
Найдите этот файл:
sudo find / -name "wp-config.php"
Команда выполнит поиск в root-каталоге и найдёт все файлы wp-config.php. Если такой файл существует, команда выведет путь к нему:
/var/www/html/wp-config.php
Откройте его в текстовом редакторе:
sudo nano /var/www/html/wp-config.php
Этот файл содержит много переменных и комментариев к ним. В начале файла можно найти строки, отвечающие за настройки БД:
/** The name of the database for WordPress */

define('DB_NAME', 'database_name');

/** MySQL database username */

define('DB_USER', 'database_username');

/** MySQL database password */

define('DB_PASSWORD', 'database_password');
Убедитесь, что эти три переменные содержат правильные данные. Если здесь указаны неправильные значения, откорректируйте их, а затем сохраните и закройте файл (CTRL-O, CTRL-X). Даже если теперь в файле указана валидная информация о БД, стоит попробовать подключиться к базе данных из командной строки, чтобы убедиться, что ошибка исчезла. Скопируйте из конфигурационного файла и вставьте данные в следующую команду:
mysqlshow -u database_username -p
Команда запросит пароль. Вставьте пароль и нажмите Enter. Если вы при этом получили ошибку Access denied, значит, вы указали неправильное имя пользователя или пароль.
Если учётные данные введены правильно, вы увидите на экране список баз данных, к которым есть доступ у текущего пользователя.
+--------------------+

|     Databases      |

+--------------------+

| information_schema |

| database_name      |

+--------------------+
Убедитесь, что в этом списке есть БД, указанная в конфигурации WordPress. Перезапустите сайт и убедитесь, что ошибка подключения к БД исчезла.
Если исправить ошибку не удалось, попробуйте восстановить БД.
3: Восстановление базы данных WordPress
Иногда база данных WordPress может быть повреждена во время неудачного обновления, сбоя базы данных или из-за неправильного плагина. Эта проблема может отображаться как ошибка установки соединения с базой данных. Если проблему не удалось устранить с помощью предыдущих методов, попробуйте восстановить базу данных.
WordPress предоставляет встроенную утилиту для восстановления БД. По умолчанию она отключена (поскольку к ней нельзя ограничить доступ, а значит, она представляет угрозу безопасности сервера).
Откройте wp-config.php.
sudo nano /var/www/html/wp-config.php
Вставьте в файл такую строку:
define('WP_ALLOW_REPAIR', true);
Эта строка включает функцию восстановления БД.
Сохраните и закройте файл.
Откройте браузер и перейдите по следующему адресу:
http://www.example.com/wp-admin/maint/repair.php
Примечание: Вместо www.example.com укажите свой домен или IP.
На экране появится страница восстановления базы данных:
WordPress can automatically look for some common database problems and repair them. Repairing can take a while, so please be patient. […]
Нажмите кнопку Repair Database. На экране появится страница с результатами, где вы сможете отслеживать проверку и исправления в реальном времени.
После этого снова откройте файл wp-config.php и удалите из него строку, которая включает поддержку утилиты восстановления БД.
Проверьте работу сайта. Если WordPress обнаружил в БД ошибки, которые не удалось исправить, попробуйте восстановить БД из резервной копии.
Читайте также: Импорт и экспорт баз данных MySQL и MariaDB
Если утилита WordPress не обнаружила проблем с базой данных, значит, БД также не является источником ошибки соединения. Возможно, это какая-то временная ошибка.
В большинстве случаев ошибку установки соединения можно устранить при помощи предложенных выше методов. Однако иногда источником ошибки являются атаки или нехватка серверных ресурсов.
Часто источником повышенного трафика (а также низкой производительности и ошибок) являются brute-force атаки. Чтобы узнать, как смягчить атаки WordPress, читайте статью Защита WordPress от взлома XML-RPC в Ubuntu 14.04.
Чтобы сэкономить ресурсы сервера, настройте кэширование WordPress. Полезные инструкции вы найдёте в руководстве Настройка кэширования Redis для ускорения WordPress.
Tags: MySQL, WordPress
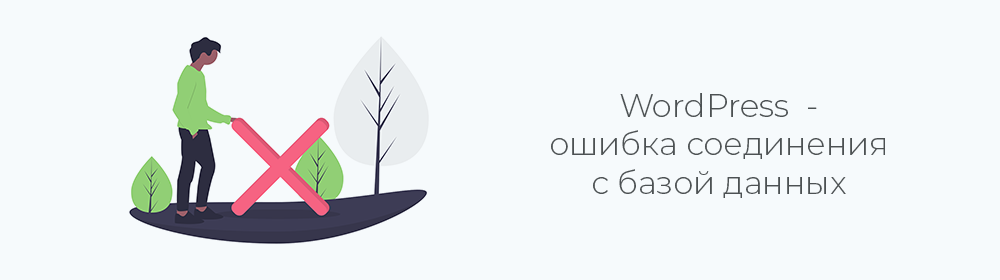
Ошибка WordPress «Error establishing database connection»
Вы пытаетесь зайти на свой сайт, созданный на WordPress, но вместо главной страницы видите пустое окно с сообщением об ошибке «Error establishing database connection» или «Ошибка установки соединения с базой данных». Рассмотрим причины появления этой ошибки и что потребуется предпринять, чтобы восстановить работоспособность сайта.

Причины возникновения ошибки установки соединения с базой данных
Ошибка установления соединения с базой данных – так расшифровывается ошибка, возникающая в WordPress, когда вместо главной страницы сайта в браузере вы видите белый экран с единственным сообщением «Error establishing database connection». Почему она возникла и что делать, чтобы привести сайт в рабочее состояние?
WordPress использует два основных компонента для работы: PHP и MySQL. PHP отвечает за функциональность вашего сайта, а в базе MySQL хранятся данные. Когда вы вводите в адресной строке имя сайта, вступает в действие PHP, который обращается к базе данных и извлекает из нее содержимое главной страницы. Когда PHP не может по каким-то причинам подключиться к MySQL, данные для отображения страницы отсутствуют и выводится сообщение об ошибке.
Эта ошибка может быть вызвана следующими причинами:
- Неверные логин и пароль для входа в базу данных. Любое изменение регистрационных данных при обращении к базе может перекрыть доступ к ней.
- Поврежденная база данных. Неудачные настройки, некорректные плагины, прерывание соединения при передаче данных в базу могли повредить ее содержимое.
- Не отвечает сервер, на котором расположена база данных. Сервер может не реагировать на запросы, если он отключен или находится в неработоспособном состоянии.
Проверка настройки конфигурации ВордПресс
Прежде всего следует проверить, используете вы правильные учетные данные для подключения к базе или они отличаются от тех, что записаны в конфигурационном файле.
- Запустите файловый менеджер (например, FileZilla) и подключитесь к серверу вашего хостинга, используя выданные вам при регистрации логин, пароль и имя сервера.
- Найдите файл wp-config.php, который расположен в корневом каталоге WordPress на сервере вашего хостинга, и откройте его для просмотра.
- Проверьте, верны ли регистрационные данные для входа в базу.
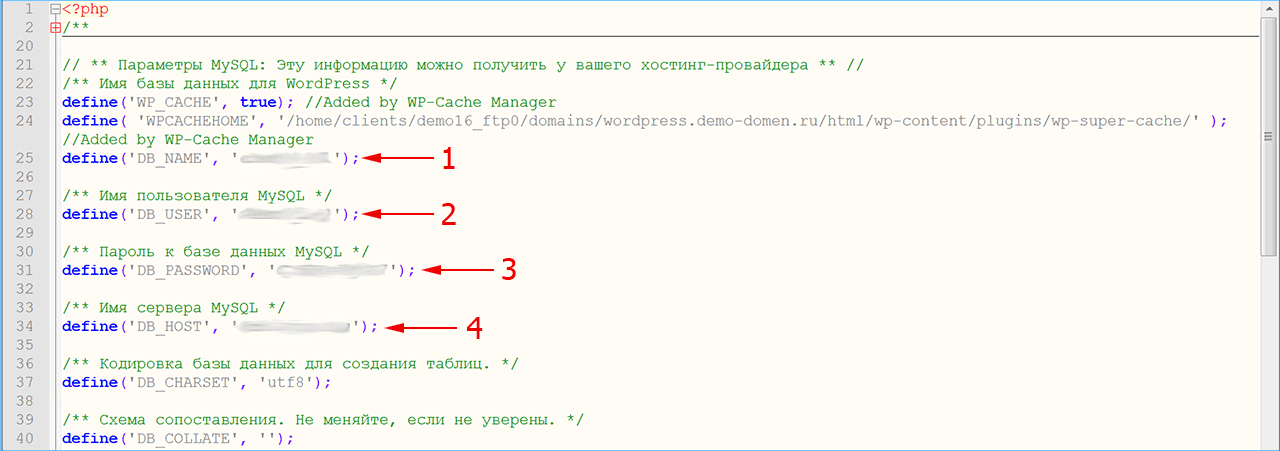
Если хотя бы один из учетных параметров – название базы данных (1), логин (2) и пароль (3) для входа, имя хоста (4) – не совпадает с данными сервера, в доступе к базе будет отказано.
Восстановление базы данных
Для восстановления базы данных средствами WordPress понадобится предпринять несколько шагов. Этот способ не требует специальных навыков и позволит восстановить базу относительно просто.
- Подключитесь к серверу через файловый менеджер.
- Откройте файл wp-config.php в режиме редактирования. Для этого щелкните правой кнопкой мыши на имени файла и выберите редактор кода. Обратите внимание, встроенный в Windows «Блокнот» не подойдет для правки кода, используйте, например, Notepad++.
- В последней строчке кода напечатайте: define (‘WP_ALLOW_REPAIR’, true);
- Сохраните изменения и закройте файл. Если потребуется, подтвердите перезапись обновленного файла wp-config.php.
Для выполнения следующего шага укажите в адресной строке браузера: имя-сайта/wp-admin/maint/repair.php, где вместо «имя-сайта» наберите название вашего сайта. В результате вы увидите экран с двумя возможными способами восстановления базы: «Починить базу данных» или «Починить и оптимизировать базу данных». Выберите один из вариантов, остальное сделает WordPress, вам нужно лишь немного подождать.
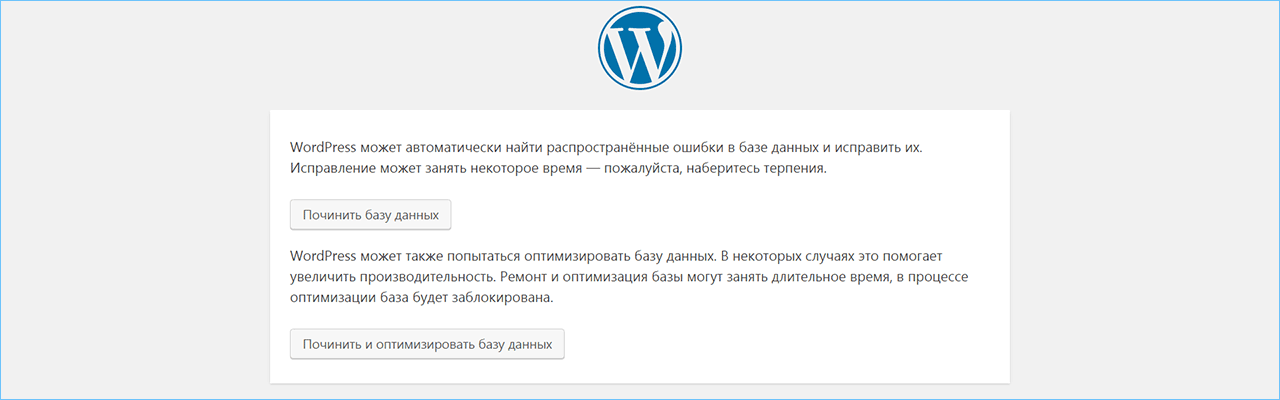
Внимание: После восстановления базы данных обязательно откройте файл wp-config.php еще раз и удалите строчку с кодом, которую вы туда добавили. В противном случае вы рискуете предоставить злоумышленникам полный доступ к вашей базе данных и потерять контроль над сайтом.
Перезапись базы из бэкапа на последнюю работоспособную версию
Если восстановление базы и проверка учетных данных решили проблему с появлением ошибки, вы можете продолжать работу над сайтом в нормальном режиме. В противном случае, возможно, ошибка возникает по причине поврежденной базы данных. Потребуется восстановить ее работоспособность из панели PHPMyAdmin, перезаписывая файлы из ранее сохраненного бэкапа.
Прежде чем приступить к процедуре восстановления, сделайте резервное копирование текущих файлов во избежание потери данных. Будьте аккуратны, выполняя действия в PHPMyAdmin, поскольку в этой панели вы напрямую работаете со служебными таблицами базы данных.
- Зайдите в PHPMyAdmin, используя логин и пароль, выданные хостинг-провайдером при регистрации.
- В левой панели показывается ваша база данных (1) с входящими в нее таблицами. В рабочей области выберите вкладку «Импорт» (2).
- Нажмите кнопку «Choose File» (3) и укажите расположение ранее сделанного бэкапа, из которого будет восстанавливаться база.
- Нажмите «ОК» (4), остальные данные, как правило, соответствуют стандартным настройкам WordPress и не требуют изменения.
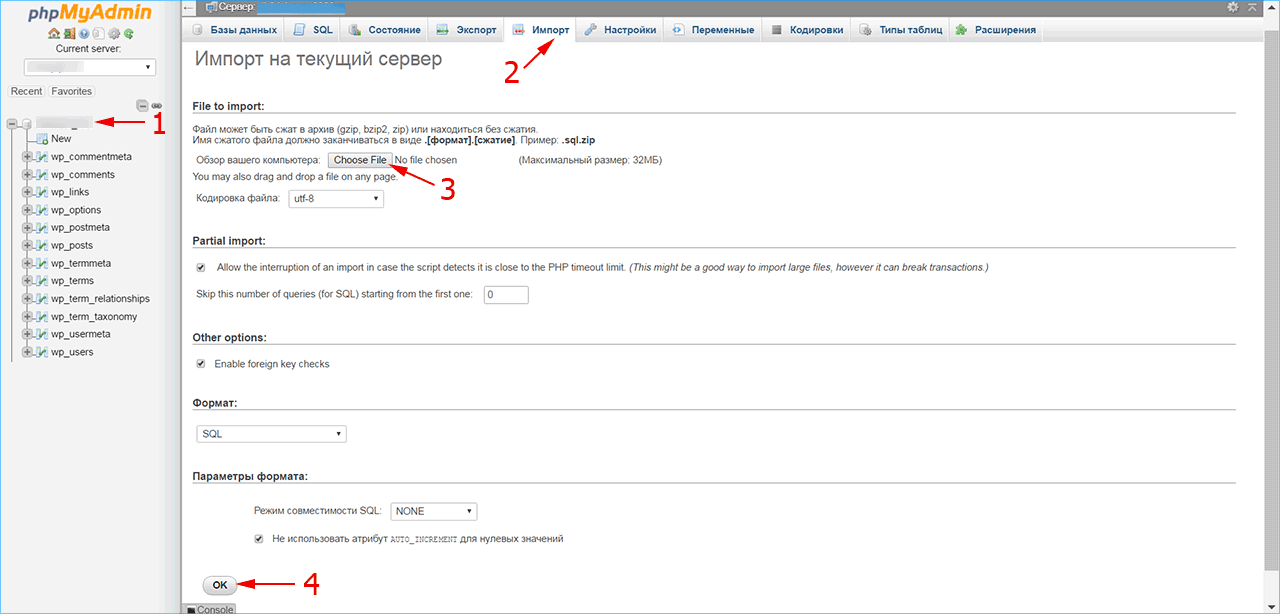
Если ничего не помогло
Следует обратиться в техподдержку хостинга, если:
- Не удалось восстановить базу данных средствами WordPress;
- В PHPMyAdmin вы не обнаружили базу данных для вашего сайта;
- При попытке восстановления базы из панели PHPMyAdmin возникают ошибки.
В случае неудачи при использовании предложенных способов, может оказаться, что сервер не отвечает на запросы или настройки сервера не соответствуют необходимым. Свяжитесь с отделом технической поддержки, чтобы разобраться в ситуации.
iPipe – надёжный хостинг-провайдер с опытом работы более 15 лет.
Мы предлагаем:
- Виртуальные серверы с NVMe SSD дисками от 299 руб/мес
- Безлимитный хостинг на SSD дисках от 142 руб/мес
- Выделенные серверы в наличии и под заказ
- Регистрацию доменов в более 350 зонах
Это сообщение об ошибке выглядит довольно серьезно.

Во-первых, перестаньте паниковать!
Но на самом деле, ошибка установки соединения с базой данных довольно распространена.
- Понимание проблемы
- Как исправить ошибку “error establishing a database connection”
- Шаг 1: Свяжитесь со своим хостинг-провайдером
- Шаг 2: Проверьте, не были ли повреждены файлы плагинов или тем
- Шаг 3: Проверьте, не была ли повреждена база данных
- Шаг 4. Проверьте учетные данные подключения к базе данных.
- Шаг 5: Восстановите файлы WordPress
- Как избежать возникновения этой ошибки в будущем?
WordPress использует две основные технологии: PHP и MySQL.
- PHP – это язык программирования. Файлы ядра WordPress написаны на нем.
- MySQL – это система управления базами данных (СУБД). WordPress использует базу данных MySQL для хранения содержимого сайта: записи, страницы, а заголовок сайта, макет виджетов и т. д.
Рассматриваемая в этой статье ошибка возникает, когда WordPress не может получить доступ к информации в базе данных с помощью команд PHP. Когда это происходит, WordPress выводит сообщение «Ошибка при установлении соединения с базой данных».
Несколько причин, из-за которых возникает эта ошибка:
- Неверные учетные данные для входа. Если пароль и изменились, WordPress не сможет получать информацию из базы данных.
- Поврежденные файлы WordPress. Это может возникать при обновлении плагинов, темы оформления и самого WordPress.
- Поврежденная база данных. Например, если вредоносный плагин повредил базу данных изнутри. А также вследствие хакерской атаки, сбоем в теме и т.д.
- Сервер базы данных не работает.
- Большой объем трафика. Из-за этого база данных не может отвечать на запросы. Например, если один из ваших постов стал «вирусным», и одновременно множество пользователей пытаются зайти на ваш сайт.
Сначала порекомендую путь, который быстро решит проблему. Затем я буду копать глубже.

Если ваш сайт работал минуту назад, а сейчас он недоступен, то ошибка может произойти на стороне хостинга. Качественные хостинги предлагают быструю поддержку через чат.
В нем расскажите, что у вас возникла ошибка “error establishing a database connection” и спросите:
- работает ли сервер базы данных;
- нет ли сейчас на сервере скачков активности или трафика.
Служба поддержки хостера сообщит, в порядке ли ваша база данных и есть ли подозрительные действия на сервере.
Если неисправность возникла не на стороне сервера, перейдите к шагу 2.
Например, может быть, вы обновили плагин или тему, и все рухнуло. Или подключили сайт к внешнему сервису, отредактировали файлы вручную. Если вы этого не делали, пропустите этот шаг.
Что можно сделать:
- Подключитесь к хостингу через FTP. Вы можете сделать это с помощью бесплатного инструмента FileZilla.
Чтобы подключиться, необходимо ввести логин и пароль к вашему FTP- аккаунту. Самый простой способ получить их — это поискать первые электронные письма, которые вы получили от провайдера. А также запросить их у службы поддержки хостера.
Затем подключитесь к серверу и перейдите в корневую папку WordPress. Обычно она называется «public_html» или «www».
Если видите перед собой подпапки типа «wp-content» и «wp-admin», то вы находитесь в корне WordPress. Пример:

- Зайдите в папку «wp-content» и переименуйте папку «plugins» . Задайте любое другое имя:

- Вернитесь на сайт и проверьте, не решилась ли проблема.
Если ошибка устранена, то теперь вы знаете, что она была вызвана каким-то плагином. Вернитесь на сервер, переименуйте папку обратно в «plugins». Зайдите в нее и измените имена папок отдельных плагинов. Самый простой способ сделать это — добавить в конце имени нижнее подчеркивание: «_»
Продолжайте, пока не выясните, когда ошибка возникает, а когда нет. Как только вы сузите круг поиска до одного конкретного плагина, удалите его или найдите решение проблемы в интернете.
- Если ошибка сохраняется и после переименования папки «plugins», выполните тот же процесс для папки «themes».
- Если это не поможет, переименуйте обе папки обратно в «plugins» и «themes». Ошибка связана с чем-то другим.
- Зайдите в панель управления WordPress — YOURSITE.com/wp-admin
Если вы видите ту же ошибку: «error establishing a database connection», пропустите шаг.
- Обратите внимание на то, что WordPress предлагает вам сделать. Один из вариантов:

Если увидите сообщение, начинающееся с «One or more database tables are unavailable […]”. Это означает, что нужно «отремонтировать» базу данных.
Сначала подключитесь к сайту через FTP. Перейдите в корневой каталог WordPress и загрузите на свой компьютер файл «wp-config.php».
Откройте его в текстовом редакторе и строку в конце (прямо перед «That’s all, stop editing”):
define('WP_ALLOW_REPAIR', true);
Теперь загрузите файл обратно на сайт (через FTP). Перейдите по адресу YOURSITE.com/wp-admin/maint/repair.php
Вот что вы должны увидеть:

Нажмите любую из кнопок. После завершения автоматического восстановления вернитесь на сайт и посмотрите, исправлена ли ошибка.
Если ошибки нет, отлично! Но вам все равно нужно вернуть файл «wp-config.php» в его предыдущее состояние. Удалите строку, которую добавили, и повторно загрузите файл.
Если ошибка не устранена, перейдите к следующему шагу.
Если пароль и логин от базы данных изменились, возникает ошибка “error establishing a database connection”! Ее Исправление выполняется в файле wp-config.php. Я говорю об этих строках:
define('DB_NAME', 'some_db');
define('DB_USER', 'some_username');
define('DB_PASSWORD', 'some_pass');
define('DB_HOST', 'localhost');
Они содержат всю информацию, необходимую WordPress для подключения к базе данных. Если что-то в ней неверно, соединение не будет установлено.
Скопируйте указанные выше строки, вставьте в окно чата и спросите у службы поддержки хостинга, верны ли данные для подключения к вашей базе данных. Если нет, то специалист предоставит корректные значения для авторизации.
Скопируйте новые учетные данные и поместите их в файл wp-config.php.
define('DB_NAME', 'some_db'); /* это имя базы данных WordPress */
define('DB_USER', 'some_username');
define('DB_PASSWORD', 'some_pass');
define('DB_HOST', 'localhost'); /* это веб-адрес сервера вашей базы данных */
Повторно загрузите файл через FTP. После этого вернитесь на сайт и посмотрите, исправлена ли ошибка. Если нет, переходим к последнему шагу.
Файлы ядра WordPress могут быть повреждены по ряду причин. Но можно восстановить стандартные файлы WordPress, используемые по умолчанию. Самый простой способ сделать это – загрузить чистую версию движка с сайта WordPress.org и установить ее поверх той, которая есть у вас.
Перейдите по этой ссылке и загрузите последнюю версию WordPress. Распакуйте архив и удалите из него папку «wp-content».
Далее подключитесь к своему сайту через FTP, перейдите в корень WordPress, загрузите новые файлы CMS. Перезапишите существующие файлы.

Когда загрузка будет завершена, вернитесь на свой сайт и проверьте результат. Если это не поможет, обратитесь еще раз в службу поддержки хостинга. Расскажите им обо всем, что вы сделали, и попросите помочь.
Идеального способа защиты сайта от ошибок соединения с базой данных нет. Но вероятность возникновения этих проблем можно минимизировать, придерживаясь некоторых правил:
- Работайте только с хостингами, которые оптимизировали свои серверы для работы с WordPress. Благодаря этому вы всегда сможете рассчитывать на квалифицированную поддержку помощь.
- Установите простой плагин резервного копирования, такой как UpdraftPlus. Благодаря ему у вас всегда будет рабочая резервная копия WordPress.
Я надеюсь, что это руководство вам поможет.