Integrating Unity into Windows applications
Windows Player build binaries
This page details the Player settings specific to Windows. For a description of the general Player settings, see Player SettingsSettings that let you set various player-specific options for the final game built by Unity. More info
See in Glossary.

You can find documentation for the properties in the following sections:
- Icon
- Resolution and Presentation
- Splash Image
- Other Settings
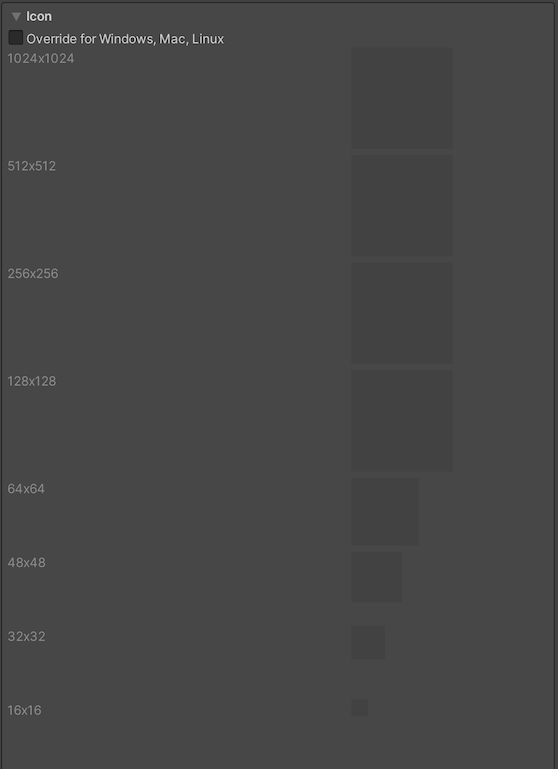
Icon
Enable the Override for Windows, Mac, Linux setting to assign a custom icon for your desktop game. You can upload different sizes of the icon to fit each of the squares provided.

Resolution and Presentation
Use the Resolution and Presentation section to customize aspects of the screen’s appearance in the Resolution and Standalone Player Options sections.
Resolution
This section allows you to customize the screen mode and default size.

| Property | Function | |
|---|---|---|
| Fullscreen Mode | Choose the full-screen mode. This defines the default window mode at startup. | |
| Fullscreen Window | Set your app window to the full-screen native display resolution, covering the whole screen. This mode is also known as borderless full-screen. Unity renders the app content at the resolution set by a script, or the native display resolution if none is set and scales it to fill the window. When scaling, Unity adds black bars to the rendered output to match the display aspect ratioThe relationship of an image’s proportional dimensions, such as its width and height. See in Glossary to prevent content stretching. This process is called letterboxing. The OS overlay UI(User Interface) Allows a user to interact with your application. Unity currently supports three UI systems. More info See in Glossary displays on top of the full-screen window (such as IME input windows). All platforms support this mode. |
|
| Exclusive Fullscreen (Windows only) | Set your app to maintain sole full-screen use of a display. Unlike Fullscreen Window, this mode changes the OS resolution of the display to match the app’s chosen resolution. This option is only supported on Windows. | |
| Maximized Window (Mac only) | Set the app window to the operating system’s definition of maximized, which is typically a full-screen window with a hidden menu bar and dock on macOS. This option is only supported on macOS. Fullscreen Window is the default setting for other platforms. | |
| Windowed | Set your app to a standard, non-full-screen movable window, the size of which is dependent on the app resolution. In this mode, the window is resizable by default. Use the Resizable Window setting to disable this. All desktop platforms support this full-screen mode. | |
| Default Is Native Resolution | Enable this option to make the game use the default resolution used on the target machine. This option isn’t available if the Fullscreen Mode is set to Windowed. | |
| Default Screen Width | Set the default width of the game screen in pixelsThe smallest unit in a computer image. Pixel size depends on your screen resolution. Pixel lighting is calculated at every screen pixel. More info See in Glossary. This option is only available if the Fullscreen Mode is set to Windowed. |
|
| Default Screen Height | Set the default height of the game screen in pixels. This option is only available if the Fullscreen Mode is set to Windowed. | |
| Mac Retina Support | Enable this option to enable support for high DPI (Retina) screens on a Mac. Unity enables this by default. This enhances Projects on a Retina display, but it’s somewhat resource-intensive when active. | |
| Run In background | Enable this option to have the game running in the background instead of pausing if the app loses focus. |
Standalone Player Options
This section allows you to specify how the user can customize the screen. For example, here you can determine whether the user can resize the screen and how many instances can run concurrently.

| Property | Function |
|---|---|
| Capture Single Screen | Enable this option to ensure standalone games in Fullscreen Mode do not darken the secondary monitor in multi-monitor setups. |
| Use Player Log | Enable this option to write a log file with debugging information. Defaults to enabled. |
| Resizable Window | Enable this option to allow resizing of the desktop player window. Note: If you disable this option, your application can’t use the Windowed Fullscreen Mode. |
| Visible in Background | Enable this option to show the application in the background if Windowed Fullscreen Mode is used (in Windows). |
| Allow Fullscreen Switch | Enable this option to allow default OS full-screen key presses to toggle between full-screen and windowed modes. |
| Force Single Instance | Enable this option to restrict desktop players to a single concurrent running instance. |
| Use DXGI flip model swap chain for D3D11 | Using the flip model ensures the best performance. This setting affects the D3D11 graphics API. Disable this option to fall back to the Windows 7-style BitBlt model. For more information, see PlayerSettings.useFlipModelSwapchain. |
Splash Image
Use the Virtual Reality Splash Image setting to select a custom splash image for Virtual RealityA system that immerses users in an artificial 3D world of realistic images and sounds, using a headset and motion tracking. More info
See in Glossary displays. For information on common Splash Screen settings, see Splash Screen.

Other Settings
This section allows you to customize a range of options organized into the following groups:
- Rendering
- Vulkan Settings
- Configuration
- Shader Variant Loading
- Optimization
- Logging
- Legacy
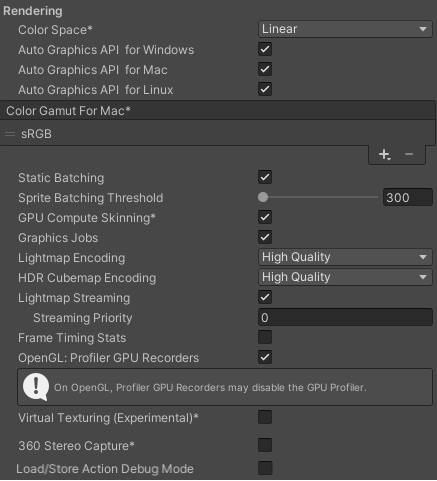
Rendering
Use these settings to customize how Unity renders your game for desktop platforms.
| Property | Function | |
|---|---|---|
| Color Space | Choose which color space should be used for rendering: Gamma or Linear. See the Linear rendering overview for an explanation of the difference between the two. |
|
| Auto Graphics API for Windows | Enable this option to use the best Graphics API on the Windows machine the game is running on. Disable it to add and remove supported Graphics APIs. | |
| Auto Graphics API for Mac | Enable this option to use the best Graphics API on the Mac the game is running on. Disable it to add and remove supported Graphics APIs. Windows does not support this property. | |
| Auto Graphics API for Linux | Enable this option to use the best Graphics API on the Linux machine it runs on. Disable it to add and remove supported Graphics APIs. | |
| Color Gamut for Mac | You can add or remove color gamuts for the Mac platform to use for rendering. Click the plus (+) icon to see a list of available gamuts. A color gamut defines a possible range of colors available for a given device (such as a monitor or screen). The sRGB gamut is the default (and required) gamut. Windows does not support this property. | |
| Metal API Validation | Enable this option when you need to debug Shader issues. Note: Validation increases CPU usage, so use it only for debugging. |
|
| Metal Write-Only Backbuffer | Allow improved performance in non-default device orientation. This sets the frameBufferOnly flag on the back buffer, which prevents readback from the back buffer but enables some driver optimization. | |
| Memoryless Depth | Choose when to use memoryless render textures. Memoryless render textures are temporarily stored in the on-tile memory when rendered, not in CPU or GPU memory. This reduces memory usage of your app but you cannot read or write to these render textures. Note: Memoryless render textures are only supported on iOS, tvOS 10.0+ Metal and Vulkan. Render textures are read/write protected and stored in CPU or GPU memory on other platforms. |
|
| Unused | Never use memoryless framebuffer depth. | |
| Forced | Always use memoryless framebuffer depth. | |
| Automatic | Let Unity decide when to use memoryless framebuffer depth. | |
| Static BatchingA technique Unity uses to draw GameObjects on the screen that combines static (non-moving) GameObjects into big Meshes, and renders them in a faster way. More info See in Glossary |
Enable this option to use Static batching. | |
| Dynamic BatchingAn automatic Unity process which attempts to render multiple meshes as if they were a single mesh for optimized graphics performance. The technique transforms all of the GameObject vertices on the CPU and groups many similar vertices together. More info See in Glossary |
Enable this option to use Dynamic Batching on your build (enabled by default). Note: Dynamic batching has no effect when a Scriptable Render Pipeline is active, so this setting is only visible when nothing is set in the Scriptable Render Pipeline Asset Graphics setting. |
|
| Compute Skinning | Enable this option to enable DX11/ES3 GPU compute skinningThe process of binding bone joints to the vertices of a character’s mesh or ‘skin’. Performed with an external tool, such as Blender or Autodesk Maya. More info See in Glossary, freeing up CPU resources. |
|
| Graphics Jobs | Enable this option to instruct Unity to offload graphics tasks (render loops) to worker threads running on other CPU cores. This is intended to reduce the time spent in Camera.Render on the main thread, which is often a bottleneck. |
|
| Lightmap Encoding | Choose Normal Quality or High Quality to set the lightmapA pre-rendered texture that contains the effects of light sources on static objects in the scene. Lightmaps are overlaid on top of scene geometry to create the effect of lighting. More info See in Glossary encoding. This setting affects the encoding scheme and compressionA method of storing data that reduces the amount of storage space it requires. See Texture Compression, Animation Compression, Audio Compression, Build Compression. See in Glossary format of the lightmaps. |
|
| HDRhigh dynamic range See in Glossary CubemapA collection of six square textures that can represent the reflections in an environment or the skybox drawn behind your geometry. The six squares form the faces of an imaginary cube that surrounds an object; each face represents the view along the directions of the world axes (up, down, left, right, forward and back). More info See in Glossary Encoding |
Choose Low Quality, Normal Quality, or High Quality to set the HDR Cubemap encoding. This setting affects the encoding scheme and compression format of the HDR Cubemaps. | |
| Lightmap Streaming | Whether to use Mipmap Streaming for lightmaps. Unity applies this setting to all lightmaps when it generates them. Note: To use this setting, you must enable the Texture Streaming Quality setting. |
|
| Streaming Priority | Set the priority for all lightmaps in the Mipmap Streaming system. Unity applies this setting to all lightmaps when it generates them. Positive numbers give higher priority. Valid values range from –128 to 127. |
|
| Frame Timing Stats | Enable this property to gather CPU and GPU frame time statistics. Use this together with the Dynamic ResolutionA Camera setting that allows you to dynamically scale individual render targets, to reduce workload on the GPU. More info See in Glossary cameraA component which creates an image of a particular viewpoint in your scene. The output is either drawn to the screen or captured as a texture. More info See in Glossary setting to determine if your application is CPU or GPU bound. |
|
| Use Display In HDR Mode (Windows Only) | Enable this checkbox to make the game automatically switch to HDR mode output when it runs. This only works on displays that support this feature. If the display does not support HDR mode, the game runs in standard mode. | |
| Swap Chain Bit Depth | Select the number of bits in each color channel for swap chain buffers. Only available if HDR Mode is enabled. | |
| Bit Depth 10 | Unity will use the R10G10B10A2 buffer format and Rec2020 primaries with ST2084 PQ encoding. | |
| Bit Depth 16 | Unity will use the R16G16B16A16 buffer format and Rec709 primaries with linear color (no encoding). |
Vulkan Settings

| Property | Description |
|---|---|
| SRGB Write Mode | Enable this option to allow Graphics.SetSRGBWrite() renderer to toggle the sRGB write mode during runtime. That is, if you want to temporarily turn off Linear-to-sRGB write color conversion, you can use this property to achieve that. Enabling this has a negative impact on performance on mobile tile-based GPUs; therefore, do NOT enable this for mobile. |
| Number of swapchain buffers | Set this option to 2 for double-buffering, or 3 for triple-buffering to use with Vulkan renderer. This setting may help with latency on some platforms, but in most cases you should not change this from the default value of 3. Double-buffering might have a negative impact on performance. Do not use this setting on Android. |
| Acquire swapchain image late as possible | If enabled, Vulkan delays acquiring the backbuffer until after it renders the frame to an offscreen image. Vulkan uses a staging image to achieve this. Enabling this setting causes an extra blit when presenting the backbuffer. This setting, in combination with double-buffering, can improve performance. However, it also can cause performance issues because the additional blit takes up bandwidth. |
| Recycle command buffers | Indicates whether to recycle or free CommandBuffers after Unity executes them. |
Configuration

| Setting | Function | |
|---|---|---|
|
Scripting BackendA framework that powers scripting in Unity. Unity supports three different scripting backends depending on target platform: Mono, .NET and IL2CPP. Universal Windows Platform, however, supports only two: .NET and IL2CPP. More info See in Glossary |
Choose the scripting backend you want to use. The scripting backend determines how Unity compiles and executes C# code in your Project. | |
| Mono | Compiles C# code into .NET Common Intermediate Language (CIL) and executes that CIL using a Common Language Runtime. See the Mono Project website for more information. | |
| IL2CPP | Compiles C# code into CIL, converts the CIL to C++ and then compiles that C++ into native machine code, which executes directly at run time. See IL2CPPA Unity-developed scripting back-end which you can use as an alternative to Mono when building projects for some platforms. More info See in Glossary for more information. |
|
| API Compatibility Level | Choose which .NET APIs you can use in your project. This setting can affect compatibility with 3rd-party libraries. Tip: If you are having problems with a third-party assembly, you can try the suggestion in the API Compatibility Level section below. |
|
| .Net Standard | Compatible with .NET Standard 2.0. Produces smaller builds and has full cross-platform support. | |
| .Net Framework | Compatible with the .NET Framework 4 (which includes everything in the .NET Standard 2.0 profile as well as additional APIs). Choose this option when usng libraries that access APIs not included in .NET Standard 2.0. Produces larger builds and any additional APIs available are not necessarily supported on all platforms. See Referencing additional class library assemblies for more information. | |
| C++ Compiler Configuration | Choose the C++ compiler configuration used when compiling IL2CPP generated code. Note: This property is disabled unless Scripting Backend is set to IL2CPP. |
|
| Use incremental GC | Enable this to use the incremental garbage collector, which spreads garbage collection over several frames to reduce gc-related spikes in frame duration. | |
| Active Input Handling | Choose how you want to handle input from users. | |
| Input Manager (old) | Use the default Input window. | |
| Input System (Preview) | Use the newer Input system. The Input System is provided as a preview packageA preview package is in development and not yet ready for production. A package in preview might be at any stage of development, from the initial stages to near completion. See in Glossary for this release. To try a preview of the Input System, install the InputSystem package. |
|
| Both | Use both systems side by side. |
API Compatibility Level
You can choose your mono API compatibility level for all targets. Sometimes a 3rd-party .NET library uses functionality that is outside of your .NET compatibility level. In order to understand what is going on in such cases, and how to best fix it, try following these suggestions:
- Install ILSpy for Windows.
- Drag the .NET assemblies for the API compatilibity level that you are having issues with into ILSpy. You can find these under
Frameworks/Mono/lib/mono/YOURSUBSET/. - Drag in your 3rd-party assembly.
- Right-click your 3rd-party assembly and select Analyze.
- In the analysis report, inspect the Depends on section. The report highlights anything that the 3rd-party assembly depends on, but that is not available in the .NET compatibility level of your choice in red.
Shader Variant Loading
Use these settings to control how much memory shadersA program that runs on the GPU. More info
See in Glossary use at runtime.
| Setting | Function |
|---|---|
| Default chunk size (MB) | Sets the maximum size of compressed shader variant data chunks Unity stores in your built application for all platforms. The default is 16. See Shader loading for more information. |
| Default chunk count | Sets the default limit on how many decompressed chunks Unity keeps in memory on all platforms. The default is 0, which means there’s no limit. |
| Override | Enables overriding Default chunk size and Default chunk count for this build target. |
| Chunk size (MB) | Overrides the value of Default chunk size (MB) on this build target. |
| Chunk count | Overrides the value of Default chunk count on this build target. |
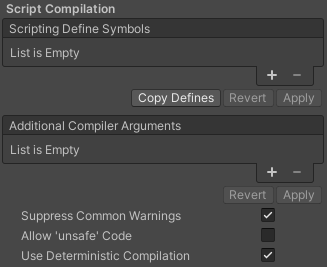
Script Compilation
| Setting | Function |
|---|---|
| Scripting Define Symbols | Set custom compilation flags. For more details, see the documentation on Platform dependent compilation. |
| Additional Compiler Arguments | Add entries to this list to pass additional arguments to the Roslyn compiler. Use one new entry for each additional argument. To create a new entry, press the ‘+’ button. To remove an entry, press the ‘-’ button. When you have added all desired arguments, click the Apply button to include your additional arguments in future compilations.The Revert button resets this list to the most recent applied state. |
| Suppress Common Warnings | Disable this setting to display the C# warnings CS0169 and CS0649. |
| Allow ‘unsafe’ Code | Enable support for compiling ‘unsafe’ C# code in a pre-defined assembly (for example, Assembly-CSharp.dll). For Assembly Definition Files ( .asmdef), click on one of your .asmdef files and enable the option in the Inspector window that appears. |
| Use Deterministic Compilation | Disable this setting to prevent compilation with the -deterministic C# flag. With this setting enabled, compiled assemblies are byte-for-byte identical each time they are compiled. For more information, see Microsoft’s deterministic compiler option documentation. |
| Enable Roslyn Analyzers | Disable this setting to compile user-written scriptsA piece of code that allows you to create your own Components, trigger game events, modify Component properties over time and respond to user input in any way you like. More info See in Glossary without Roslyn analyzer DLLs that might be present in your project. |
Optimization

| Property | Description |
|---|---|
| Prebake Collision Meshes | Adds collision data to Meshes at build time. |
| Keep Loaded Shaders Alive | Indicates whether to prevent shaders from being unloaded.
For more information, see Shader Loading. |
| Preloaded Assets | Sets an array of Assets for the player to load on startup. To add new Assets, increase the value of the Size property and then set a reference to the Asset to load in the new Element box that appears. |
| AOT compilation options | Additional options for Ahead of Time (AOT) compilation. This helps optimize the size of the built iOS player. |
| Strip Engine Code | Enable this option if you want the Unity Linker tool to remove code for Unity Engine features that your Project doesn’t use. This setting is only available with the IL2CPP scripting backend.
Most apps don’t use every available DLL. This option strips out DLLs that your app doesn’t use to reduce the size of the built Player. If your app is using one or more classes that would normally be stripped out under your current settings, Unity displays a debug message when you try to build the app. |
| Managed Stripping Level | Chooses how aggressively Unity strips unused managed (C#) code. The options are Minimal, Low, Medium, and High. When Unity builds your app, the Unity Linker process can strip unused code from the managed DLLs your Project uses. Stripping code can make the resulting executable significantly smaller, but can sometimes accidentally remove code that’s in use. For more information about these options and bytecode stripping with IL2CPP, see ManagedStrippingLevel. |
| Vertex Compression | Sets vertex compression per channel. This affects all the meshes in your project. Typically, Vertex Compression is used to reduce the size of mesh data in memory, reduce file size, and improve GPU performance. For more information on how to configure vertex compression and limitations of this setting, see Compressing mesh data. |
| Optimize Mesh Data | Enable this option to strip unused vertex attributes from the mesh used in a build. This option reduces the amount of data in the mesh, which can help reduce build size, loading times, and runtime memory usage.
Warning: If you have this setting enabled, you should remember to not change material or shader settings at runtime. See PlayerSettings.stripUnusedMeshComponents for more information. |
| Texture MipMap Stripping | Enables mipmap stripping for all platforms. This strips unused mipmaps from Textures at build time. Unity determines unused mipmaps by comparing the value of the mipmap against the Quality Settings for the current platform. If a mipmap value is excluded from every Quality Setting for the current platform, then Unity strips those mipmaps from the build at build time. If QualitySettings.masterTextureLimit is set to a mipmap value that has been stripped, Unity will set the value to the closest mipmap value that has not been stripped. |
Logging

- Select your preferred stack trace method by enabling the option that corresponds to each Log Type (Error, Assert, Warning, Log, and Exception) based on the type of logging you require. For example:
- ScriptOnly: Logs only when running scripts.
- Full: Logs all the time.
- None: No logs are ever recorded.
See stack trace logging for more information.
Legacy

| Property | Function |
|---|---|
| Clamp BlendShapes (Deprecated) | Enable the option to clamp the range of blend shape weights in SkinnedMeshRenderers. |
| Upload Cleared Texture Data | This is a legacy feature and currently not needed because it uses up the bandwidth. By default, this is enabled for debugging purposes. Enabling this setting clears the initial data and automatically uploads the Texture from script to the video memory. |
Integrating Unity into Windows applications
Windows Player build binaries
Suggest a change
Success!
Thank you for helping us improve the quality of Unity Documentation. Although we cannot accept all submissions, we do read each suggested change from our users and will make updates where applicable.
Close
Submission failed
For some reason your suggested change could not be submitted. Please <a>try again</a> in a few minutes. And thank you for taking the time to help us improve the quality of Unity Documentation.
Close
Your name
Your email
Suggestion*
Cancel
Declaration
public static void SetResolution(int width,
int height,
bool fullscreen);
Declaration
public static void SetResolution(int width,
int height,
bool fullscreen,
int preferredRefreshRate = 0);
Declaration
public static void SetResolution(int width,
int height,
FullScreenMode fullscreenMode);
Declaration
public static void SetResolution(int width,
int height,
FullScreenMode fullscreenMode,
int preferredRefreshRate = 0);
Description
Switches the screen resolution.
A width by height resolution is used.
If no matching resolution is supported, the closest one is used.
If preferredRefreshRate is 0 (default) Unity switches to the highest refresh rate that the monitor supports.
If preferredRefreshRate is not 0 Unity uses it if the monitor supports it, otherwise it chooses
the highest supported one. Changing refresh rate is only supported when using exclusive full-screen mode.
On Android fullscreen controls the SYSTEM_UI_FLAG_LOW_PROFILE flag to View.setSystemUiVisibility.
To set a specific full-screen mode on a desktop platform, use the method overload that accepts the FullScreenMode parameter. Exclusive full-screen mode is only supported on Windows standalone player.
If you use multi-display, you can only use Screen.SetResolution to set the resolution of the primary screen.
A resolution switch does not happen immediately; it happens when the current frame is finished.
Another example:
Another example:
Integrating Unity into Windows applications
Windows Player build binaries
This page details the Player settings specific to Windows. For a description of the general Player settings, see Player SettingsSettings that let you set various player-specific options for the final game built by Unity. More info
See in Glossary.

You can find documentation for the properties in the following sections:
- Icon
- Resolution and Presentation
- Splash Image
- Other Settings
Icon
Enable the Override for Windows, Mac, Linux setting to assign a custom icon for your desktop game. You can upload different sizes of the icon to fit each of the squares provided.
Resolution and Presentation
Use the Resolution and Presentation section to customize aspects of the screen’s appearance in the Resolution and Standalone Player Options sections.
Resolution
This section allows you to customize the screen mode and default size.

| Property | Function | |
|---|---|---|
| Fullscreen Mode | Choose the full-screen mode. This defines the default window mode at startup. | |
| Fullscreen Window | Set your app window to the full-screen native display resolution, covering the whole screen. This mode is also known as borderless full-screen. Unity renders the app content at the resolution set by a script, or the native display resolution if none is set and scales it to fill the window. When scaling, Unity adds black bars to the rendered output to match the display aspect ratioThe relationship of an image’s proportional dimensions, such as its width and height. See in Glossary to prevent content stretching. This process is called letterboxing. The OS overlay UI(User Interface) Allows a user to interact with your application. Unity currently supports three UI systems. More info See in Glossary displays on top of the full-screen window (such as IME input windows). All platforms support this mode. |
|
| Exclusive Fullscreen (Windows only) | Set your app to maintain sole full-screen use of a display. Unlike Fullscreen Window, this mode changes the OS resolution of the display to match the app’s chosen resolution. This option is only supported on Windows. | |
| Maximized Window (Mac only) | Set the app window to the operating system’s definition of maximized, which is typically a full-screen window with a hidden menu bar and dock on macOS. This option is only supported on macOS. Fullscreen Window is the default setting for other platforms. | |
| Windowed | Set your app to a standard, non-full-screen movable window, the size of which is dependent on the app resolution. In this mode, the window is resizable by default. Use the Resizable Window setting to disable this. All desktop platforms support this full-screen mode. | |
| Default Is Native Resolution | Enable this option to make the game use the default resolution used on the target machine. This option isn’t available if the Fullscreen Mode is set to Windowed. | |
| Default Screen Width | Set the default width of the game screen in pixelsThe smallest unit in a computer image. Pixel size depends on your screen resolution. Pixel lighting is calculated at every screen pixel. More info See in Glossary. This option is only available if the Fullscreen Mode is set to Windowed. |
|
| Default Screen Height | Set the default height of the game screen in pixels. This option is only available if the Fullscreen Mode is set to Windowed. | |
| Mac Retina Support | Enable this option to enable support for high DPI (Retina) screens on a Mac. Unity enables this by default. This enhances Projects on a Retina display, but it’s somewhat resource-intensive when active. | |
| Run In background | Enable this option to have the game running in the background instead of pausing if the app loses focus. |
Standalone Player Options
This section allows you to specify how the user can customize the screen. For example, here you can determine whether the user can resize the screen and how many instances can run concurrently.

| Property | Function |
|---|---|
| Capture Single Screen | Enable this option to ensure standalone games in Fullscreen Mode do not darken the secondary monitor in multi-monitor setups. |
| Use Player Log | Enable this option to write a log file with debugging information. Defaults to enabled. |
| Resizable Window | Enable this option to allow resizing of the desktop player window. Note: If you disable this option, your application can’t use the Windowed Fullscreen Mode. |
| Visible in Background | Enable this option to show the application in the background if Windowed Fullscreen Mode is used (in Windows). |
| Allow Fullscreen Switch | Enable this option to allow default OS full-screen key presses to toggle between full-screen and windowed modes. |
| Force Single Instance | Enable this option to restrict desktop players to a single concurrent running instance. |
| Use DXGI flip model swap chain for D3D11 | Using the flip model ensures the best performance. This setting affects the D3D11 graphics API. Disable this option to fall back to the Windows 7-style BitBlt model. For more information, see PlayerSettings.useFlipModelSwapchain. |
| Supported Aspect Ratios | Enable each aspect ratio that you want to appear in the Resolution Dialog at startup (as long as they are supported by the user’s monitor). |
Splash Image
Use the Virtual Reality Splash Image setting to select a custom splash image for Virtual Reality displays. For information on common Splash Screen settings, see Splash Screen.

Other Settings
This section allows you to customize a range of options organized into the following groups:
- Rendering
- Vulkan Settings
- Configuration
- Shader Variant Loading
- Optimization
- Logging
- Legacy
Rendering
Use these settings to customize how Unity renders your game for desktop platforms.

| Property | Function | |
|---|---|---|
| Color Space | Choose which color space should be used for rendering: Gamma or Linear. See the Linear rendering overview for an explanation of the difference between the two. |
|
| Auto Graphics API for Windows | Enable this option to use the best Graphics API on the Windows machine the game is running on. Disable it to add and remove supported Graphics APIs. | |
| Auto Graphics API for Mac | Enable this option to use the best Graphics API on the Mac the game is running on. Disable it to add and remove supported Graphics APIs. Windows does not support this property. | |
| Auto Graphics API for Linux | Enable this option to use the best Graphics API on the Linux machine it runs on. Disable it to add and remove supported Graphics APIs. | |
| Color Gamut for Mac | You can add or remove color gamuts for the Mac platform to use for rendering. Click the plus (+) icon to see a list of available gamuts. A color gamut defines a possible range of colors available for a given device (such as a monitor or screen). The sRGB gamut is the default (and required) gamut. Windows does not support this property. | |
| Metal API Validation | Enable this option when you need to debug Shader issues. Note: Validation increases CPU usage, so use it only for debugging. |
|
| Metal Write-Only Backbuffer | Allow improved performance in non-default device orientation. This sets the frameBufferOnly flag on the back buffer, which prevents readback from the back buffer but enables some driver optimization. | |
| Memoryless Depth | Choose when to use memoryless render textures. Memoryless render textures are temporarily stored in the on-tile memory when rendered, not in CPU or GPU memory. This reduces memory usage of your app but you cannot read or write to these render textures. Note: Memoryless render textures are only supported on iOS, tvOS 10.0+ Metal and Vulkan. Render textures are read/write protected and stored in CPU or GPU memory on other platforms. |
|
| Unused | Never use memoryless framebuffer depth. | |
| Forced | Always use memoryless framebuffer depth. | |
| Automatic | Let Unity decide when to use memoryless framebuffer depth. | |
| Static BatchingA technique Unity uses to draw GameObjects on the screen that combines static (non-moving) GameObjects into big Meshes, and renders them in a faster way. More info See in Glossary |
Enable this option to use Static batching. | |
| Dynamic BatchingAn automatic Unity process which attempts to render multiple meshes as if they were a single mesh for optimized graphics performance. The technique transforms all of the GameObject vertices on the CPU and groups many similar vertices together. More info See in Glossary |
Enable this option to use Dynamic Batching on your build (enabled by default). Note: Dynamic batching has no effect when a Scriptable Render Pipeline is active, so this setting is only visible when nothing is set in the Scriptable Render Pipeline Asset Graphics setting. |
|
| Compute Skinning | Enable this option to enable DX11/ES3 GPU compute skinningThe process of binding bone joints to the vertices of a character’s mesh or ‘skin’. Performed with an external tool, such as Blender or Autodesk Maya. More info See in Glossary, freeing up CPU resources. |
|
| Graphics Jobs | Enable this option to instruct Unity to offload graphics tasks (render loops) to worker threads running on other CPU cores. This is intended to reduce the time spent in Camera.Render on the main thread, which is often a bottleneck. |
|
| Lightmap Encoding | Choose Normal Quality or High Quality to set the lightmapA pre-rendered texture that contains the effects of light sources on static objects in the scene. Lightmaps are overlaid on top of scene geometry to create the effect of lighting. More info See in Glossary encoding. This setting affects the encoding scheme and compressionA method of storing data that reduces the amount of storage space it requires. See Texture Compression, Animation Compression, Audio Compression, Build Compression. See in Glossary format of the lightmaps. |
|
| HDRhigh dynamic range See in Glossary CubemapA collection of six square textures that can represent the reflections in an environment or the skybox drawn behind your geometry. The six squares form the faces of an imaginary cube that surrounds an object; each face represents the view along the directions of the world axes (up, down, left, right, forward and back). More info See in Glossary Encoding |
Choose Low Quality, Normal Quality, or High Quality to set the HDR Cubemap encoding. This setting affects the encoding scheme and compression format of the HDR Cubemaps. | |
| Lightmap Streaming | Whether to use Mipmap Streaming for lightmaps. Unity applies this setting to all lightmaps when it generates them. Note: To use this setting, you must enable the Texture Streaming Quality setting. |
|
| Streaming Priority | Set the priority for all lightmaps in the Mipmap Streaming system. Unity applies this setting to all lightmaps when it generates them. Positive numbers give higher priority. Valid values range from –128 to 127. |
|
| Frame Timing Stats | Enable this property to gather CPU and GPU frame time statistics. Use this together with the Dynamic ResolutionA Camera setting that allows you to dynamically scale individual render targets, to reduce workload on the GPU. More info See in Glossary cameraA component which creates an image of a particular viewpoint in your scene. The output is either drawn to the screen or captured as a texture. More info See in Glossary setting to determine if your application is CPU or GPU bound. |
|
| Use Display In HDR Mode (Windows Only) | Enable this checkbox to make the game automatically switch to HDR mode output when it runs. This only works on displays that support this feature. If the display does not support HDR mode, the game runs in standard mode. | |
| Swap Chain Bit Depth | Select the number of bits in each color channel for swap chain buffers. Only available if HDR Mode is enabled. | |
| Bit Depth 10 | Unity will use the R10G10B10A2 buffer format and Rec2020 primaries with ST2084 PQ encoding. | |
| Bit Depth 16 | Unity will use the R16G16B16A16 buffer format and Rec709 primaries with linear color (no encoding). |
Vulkan Settings

| Property | Description |
|---|---|
| SRGB Write Mode | Enable this option to allow Graphics.SetSRGBWrite() renderer to toggle the sRGB write mode during runtime. That is, if you want to temporarily turn off Linear-to-sRGB write color conversion, you can use this property to achieve that. Enabling this has a negative impact on performance on mobile tile-based GPUs; therefore, do NOT enable this for mobile. |
| Number of swapchain buffers | Set this option to 2 for double-buffering, or 3 for triple-buffering to use with Vulkan renderer. This setting may help with latency on some platforms, but in most cases you should not change this from the default value of 3. Double-buffering might have a negative impact on performance. Do not use this setting on Android. |
| Acquire swapchain image late as possible | If enabled, Vulkan delays acquiring the backbuffer until after it renders the frame to an offscreen image. Vulkan uses a staging image to achieve this. Enabling this setting causes an extra blit when presenting the backbuffer. This setting, in combination with double-buffering, can improve performance. However, it also can cause performance issues because the additional blit takes up bandwidth. |
| Recycle command buffers | Indicates whether to recycle or free CommandBuffers after Unity executes them. |
Configuration

| Property | Description | |
|---|---|---|
|
Scripting BackendA framework that powers scripting in Unity. Unity supports three different scripting backends depending on target platform: Mono, .NET and IL2CPP. Universal Windows Platform, however, supports only two: .NET and IL2CPP. More info See in Glossary |
Choose the scripting backend you want to use. The scripting backend determines how Unity compiles and executes C# code in your Project. | |
| Mono | Compiles C# code into .NET Common Intermediate Language (CIL) and executes that CIL using a Common Language Runtime. For more information, see MonoA scripting backend used in Unity. More info See in Glossary. |
|
| IL2CPP | Compiles C# code into CIL, converts the CIL to C++ and then compiles that C++ into native machine code, which executes directly at run time. See IL2CPPA Unity-developed scripting back-end which you can use as an alternative to Mono when building projects for some platforms. More info See in Glossary for more information. |
|
| API Compatibility Level | Choose which .NET APIs you can use in your project. This setting can affect compatibility with third-party libraries. However, it has no effect on Editor-specific code (code in an Editor directory, or within an Editor-specific Assembly Definition).
Tip: If you are having problems with a third-party assembly, you can try the suggestion in the API Compatibility Level section below. |
|
| .Net Standard | Compatible with .NET Standard 2.0. Produces smaller builds and has full cross-platform support. | |
| .Net Framework | Compatible with the .NET Framework 4 (which includes everything in the .NET Standard 2.0 profile as well as additional APIs). Choose this option when usng libraries that access APIs not included in .NET Standard 2.0. Produces larger builds and any additional APIs available are not necessarily supported on all platforms. See Referencing additional class library assemblies for more information. | |
| IL2CPP Code Generation | Defines how Unity manages IL2CPP code generation. This option is only available if you use the IL2CPP scripting backend. | |
| Faster runtime | Generates code optimized for runtime performance. This setting is enabled by default. | |
| Faster (smaller) builds) | Generates code optimized for build size and iteration. This setting generates less code and produces a smaller build, but may reduce runtime performance, especially for generic code. Use this option when faster build times are important, such as when iterating on changes. | |
| C++ Compiler Configuration | Choose the C++ compiler configuration used when compiling IL2CPP generated code. Note: This property is disabled unless Scripting Backend is set to IL2CPP. |
|
| Use incremental GC | Uses the incremental garbage collector, which spreads garbage collection over several frames to reduce garbage collection-related spikes in frame duration. For more information, see Automatic Memory Management. | |
| Allow downloads over HTTP | Indicates whether to allow downloading content over HTTP. The options are Not allowed, Allowed in Development builds only, and Always allowed. The default option is Not allowed due to the recommended protocol being HTTPS, which is more secure. | |
| Active Input Handling | Chooses how to handle input from users. | |
| Input Manager (old) | Use the default Input window. | |
| Input System (Preview) | Use the newer Input system. The Input System is provided as a preview package for this release. To try a preview of the Input System, install the InputSystem package. | |
| Both | Use both systems side by side. |
API Compatibility Level
You can choose your mono API compatibility level for all targets. Sometimes a 3rd-party .NET library uses functionality that is outside of your .NET compatibility level. In order to understand what is going on in such cases, and how to best fix it, try following these suggestions:
- Install ILSpy for Windows.
- Drag the .NET assemblies for the API compatilibity level that you are having issues with into ILSpy. You can find these under
Frameworks/Mono/lib/mono/YOURSUBSET/. - Drag in your 3rd-party assembly.
- Right-click your 3rd-party assembly and select Analyze.
- In the analysis report, inspect the Depends on section. The report highlights anything that the 3rd-party assembly depends on, but that is not available in the .NET compatibility level of your choice in red.
Shader Variant Loading
Use these settings to control how much memory shadersA program that runs on the GPU. More info
See in Glossary use at runtime.
| Setting | Function |
|---|---|
| Default chunk size (MB) | Sets the maximum size of compressed shader variant data chunks Unity stores in your built application for all platforms. The default is 16. See Shader loading for more information. |
| Default chunk count | Sets the default limit on how many decompressed chunks Unity keeps in memory on all platforms. The default is 0, which means there’s no limit. |
| Override | Enables overriding Default chunk size and Default chunk count for this build target. |
| Chunk size (MB) | Overrides the value of Default chunk size (MB) on this build target. |
| Chunk count | Overrides the value of Default chunk count on this build target. |
Script Compilation

| Setting | Function |
|---|---|
| Scripting Define Symbols | Set custom compilation flags. For more details, see the documentation on Platform dependent compilation. |
| Additional Compiler Arguments | Add entries to this list to pass additional arguments to the Roslyn compiler. Use one new entry for each additional argument. To create a new entry, press the ‘+’ button. To remove an entry, press the ‘-’ button. When you have added all desired arguments, click the Apply button to include your additional arguments in future compilations.The Revert button resets this list to the most recent applied state. |
| Suppress Common Warnings | Disable this setting to display the C# warnings CS0169 and CS0649. |
| Allow ‘unsafe’ Code | Enable support for compiling ‘unsafe’ C# code in a pre-defined assembly (for example, Assembly-CSharp.dll). For Assembly Definition Files ( .asmdef), click on one of your .asmdef files and enable the option in the Inspector window that appears. |
| Use Deterministic Compilation | Disable this setting to prevent compilation with the -deterministic C# flag. With this setting enabled, compiled assemblies are byte-for-byte identical each time they are compiled. For more information, see Microsoft’s deterministic compiler option documentation. |
| Enable Roslyn Analyzers | Disable this setting to compile user-written scriptsA piece of code that allows you to create your own Components, trigger game events, modify Component properties over time and respond to user input in any way you like. More info See in Glossary without Roslyn analyzer DLLs that might be present in your project. |
Optimization

| Property | Description |
|---|---|
| Prebake Collision Meshes | Adds collision data to Meshes at build time. |
| Keep Loaded Shaders Alive | Indicates whether to prevent shaders from being unloaded.
For more information, see Shader Loading. |
| Preloaded Assets | Sets an array of Assets for the player to load on startup. To add new Assets, increase the value of the Size property and then set a reference to the Asset to load in the new Element box that appears. |
| AOT compilation options | Additional options for Ahead of Time (AOT) compilation. This helps optimize the size of the built iOS player. |
| Strip Engine Code | Enable this option if you want the Unity Linker tool to remove code for Unity Engine features that your Project doesn’t use. This setting is only available with the IL2CPP scripting backend.
Most apps don’t use every available DLL. This option strips out DLLs that your app doesn’t use to reduce the size of the built Player. If your app is using one or more classes that would normally be stripped out under your current settings, Unity displays a debug message when you try to build the app. |
| Managed Stripping Level | Chooses how aggressively Unity strips unused managed (C#) code. The options are Minimal, Low, Medium, and High. When Unity builds your app, the Unity Linker process can strip unused code from the managed DLLs your Project uses. Stripping code can make the resulting executable significantly smaller, but can sometimes accidentally remove code that’s in use. For more information about these options and bytecode stripping with IL2CPP, see ManagedStrippingLevel. |
| Vertex Compression | Sets vertex compression per channel. This affects all the meshes in your project. Typically, Vertex Compression is used to reduce the size of mesh data in memory, reduce file size, and improve GPU performance. For more information on how to configure vertex compression and limitations of this setting, see Compressing mesh data. |
| Optimize Mesh Data | Enable this option to strip unused vertex attributes from the mesh used in a build. This option reduces the amount of data in the mesh, which can help reduce build size, loading times, and runtime memory usage.
Warning: If you have this setting enabled, you should remember to not change material or shader settings at runtime. See PlayerSettings.stripUnusedMeshComponents for more information. |
| Texture MipMap Stripping | Enables mipmap stripping for all platforms. This strips unused mipmaps from Textures at build time. Unity determines unused mipmaps by comparing the value of the mipmap against the Quality Settings for the current platform. If a mipmap value is excluded from every Quality Setting for the current platform, then Unity strips those mipmaps from the build at build time. If QualitySettings.masterTextureLimit is set to a mipmap value that has been stripped, Unity will set the value to the closest mipmap value that has not been stripped. |
Logging

- Select your preferred stack trace method by enabling the option that corresponds to each Log Type (Error, Assert, Warning, Log, and Exception) based on the type of logging you require. For example:
- ScriptOnly: Logs only when running scripts.
- Full: Logs all the time.
- None: No logs are ever recorded.
See stack trace logging for more information.
Legacy

| Property | Function |
|---|---|
| Clamp BlendShapes (Deprecated) | Enable the option to clamp the range of blend shape weights in SkinnedMeshRenderers. |
| Upload Cleared Texture Data | This is a legacy feature and currently not needed because it uses up the bandwidth. By default, this is enabled for debugging purposes. Enabling this setting clears the initial data and automatically uploads the Texture from script to the video memory. |
Integrating Unity into Windows applications
Windows Player build binaries
На старте создания игры важно сразу определиться с её основными настройками, которые связаны с разрешениями экранов и размерами окон, в которых будет запускаться игра.
Возьмём, например, мобильные игры, в которые можно играть на самых разных смартфонах и планшетах. У этих устройств разные размеры и разрешения экранов.
Разработчик должен позаботиться о том, чтобы на любом устройстве игрок хорошо видел все игровые объекты, чтобы работали все кнопки интерфейса и пр. А художник заранее знал все эти параметры и рисовал арт для игры в нужных размерах и разрешениях.
Что необходимо сделать в Unity, чтобы на разных экранах игра выглядела одинаково?
- Выбрать платформу
- Задать разрешение экрана
- Настроить Canvas Scaler
- Настроить ориентацию приложения для сборки
- Настроить спрайты (опционально, для 2D-игр и UI)
1. Выбрать платформу
Для этого перейти в пункт меню File -> Build Settings…

По умолчанию в редакторе Unity установлена платформа PC, Mac & Linux Standalone.

Если делаем мобильную игру, то сразу после создания проекта необходимо выбрать платформу Android (для смартфонов и планшетов, работающих под Android) или iOS (для айфонов и айпадов).
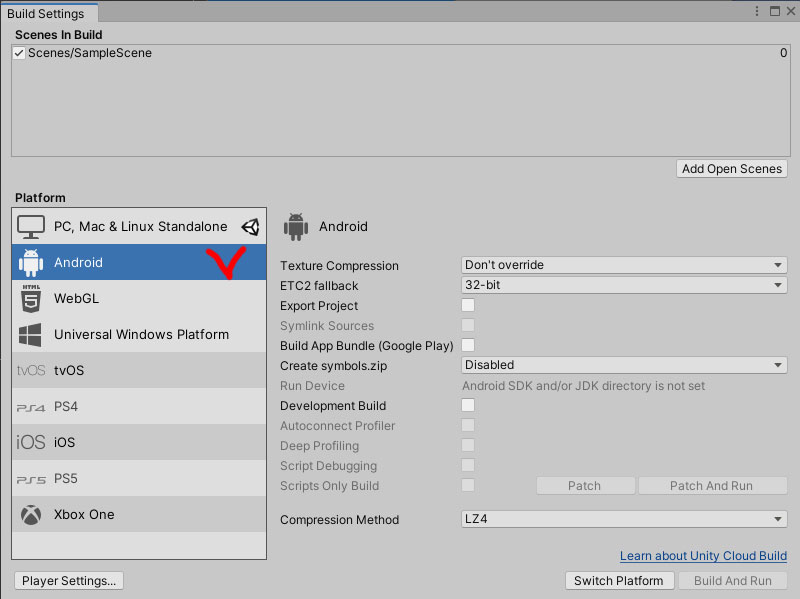
После выбора платфомы обязательно нажать на кнопку Switch Platform в правом нижнем углу!
![]()
Придётся немного подождать, пока среда разработки Unity не сконвертрует все необходимые файлы в нужный формат.
ВАЖНО! Несмотря на то, что описанную процедуру можно выполнить в любое время, рекомендуется выбор платформы делать сразу, на старте работы с проектом, чтобы не пришлось потом многое переделывать.
2. Задать разрешение экрана
Чтобы в процессе разработки тестировать свою игру, не собирая каждый раз новый билд, в окне Game редактора Unity выбираем целевое разрешение (например, Full HD (1920×1080)) или соотношение сторон (например, 16:9 Aspect). Например, для платформы PC, Mac & Linux Standalone может быть задан следующий набор вариантов:

Здесь перечислены самые популярные разрешения и соотношения сторон экранов компьютеров. Если в этом перечне нет необходимых значений, их можно ввести вручную, нажав на кнопку со знаком + в кружочке, которая расположена в самом низу:

В этом выпадающем окне есть настраиваемый параметр Type с выбором одного из двух значений:
- Fixed Resolution – для задания фиксированных значений ширины (Width) и высоты (Height) окна игры;
- Aspect Ratio – для задания соотношения сторон.
Для мобильных игр в Unity также предусмотрены самые популярные разрешения и соотношения сторон (этот набор значений постоянно обновляется, так как появляются всё новые и новые мобильные устройства):

Здесь вариантов значительно больше, т.к. а) на рынке представлено множество различных мобильных устройств с разными характеристиками; б) помимо собственно разрешения у экранов смартфонов и планшетов есть ещё характеристика ориентация – горизонтальная (Landscape) или вертикальная (Portrait).
За основу для разработки можно взять, например, одно из максимально возможных разрешений 2560х1440.
3. Настроить Canvas Scaler
У любого приложения или игры есть интерфейс, с помощью которого пользователь может управлять процессом, выполнять различные действия, делать настройки и пр. В играх интерфейс представляет собой набор различных кнопок, информационных блоков (например, количество заработанных игроком очков, уровень здоровья (HP – Health Progress) персонажа и т.д.).
Основная часть интерфейса игры, созданной в Unity, это объекты Button, Text и др. Все они размещаются как дочерние объекты для объекта Canvas.

Чтобы при запуске игры на разных устройствах с разным разрешением кнопки не «разбегались» и не исчезали, необходимо в панели Inspector настроить компонент Canvas Scaler для объекта Canvas:

Для свойства UI Scale Mode необходимо задать значение Scale With Screen Size:

А затем ввести необходимые значения X и Y для Reference Resolution:

Это те же числа ширины и высоты (разрешения) предполагаемого экрана устройства. Они отображаются в окне Game после задания разрешения экрана на шаге 2:

После этой настройки, даже если игра будет запускаться на устройствах с другим разрешением, движок Unity будет стараться максимально перестроить системы координат и размеры элементов интерфейса, чтобы они выглядели для всех пользователей примерно одинаково.
Примечание: за более точное размещение кнопок, текстов и пр. интерфейса внутри Canvas отвечают также инструменты привязки компонента Rect Transform для каждого UI-объекта:
![]()
Как с ними работать, рассмотрим в отдельном уроке.
4. Настроить ориентацию приложения для сборки
Для мобильных игр важно также заранее решить, в какой ориентации экрана смартфона или планшета будет происходить игровой процесс (геймплей): вертикально или горизонтально, либо будут поддерживаться обе ориентации. В последнем случае придётся потрудиться как над локациями, так и интерфейсом, чтобы при повороте устройства все игровые объекты распределялись на экране адекватным образом. Поэтому начинающим разработчикам рекомендуется выбрать один вариант.
При сборке проекта в файл для размещения в игровом сторе (например, Гугл Маркет) необходимо проставить соответствующие настройки.
Сначала проходим в пункт меню File -> Build Settings…

Затем в окне Build Settings нажимаем на кнопку Player Settings… (в левом нижнем углу):

Затем в окне Project Settings, в разделе Player необходимо задать необходимые свойства Resolution and Presentation -> Allowed Orientations for Auto Rotation (допустимые ориентации для автоповорота): Portrait, Portrait Upside Down (для вертикальной ориентации) либо Landscape Right, Landscape Left (для горизонтальной), проставив и убрав соответствующие галочки:

5. Настроить спрайты (опционально, для 2D-игр и UI)
Данный пункт не на столько критичен, в сравнении с рассмотренными выше. Однако выбор основного разрешения и ориентации для игры помогает художнику создавать игровой арт и элементы интерфейса в необходимых размерах и разрешениях.
На практике же (например, при разработке прототипов) могут использовать изображения разного размера и разрешения. Начинающие разработчики допускают серьёзную ошибку, когда изменяют свойство Scale компонента Transform для таких объектов на сцене. Такие преобразования создадут проблемы, когда наступит время заменить временные изображения на те, которые были созданы художником по всем правилам. Снова придется изменять Scale, координаты и прочие параметры, фактически работая над проектом заново и многое переделывая.
Чтобы избежать таких проблем, необходимо работать с исходными спрайтами и их параметрами (свойствами) из папки Assets через панель Inspector.
Рассмотрим пример. Пусть у нас имеется некоторый спрайт для 2D-игры. На скриншоте слева на темно-сером фоне этот спрайт размещён на сцене. В нижнем левом углу скриншота мы видим его из папки Assets в окне Project. А внизу и правее – предпросмотр изображения (графического файла), на основе которого создан этот спрайт. Под изображением можно прочесть реальный размер и разрешение картинки. В данном случае это изображение 31х110 пикселей размером 13,3 Килобайт.
![]()
Спрайт очень маленький. И если нам необходимо сделать его визуально большего размера на сцене, в свойствах Pixels Per Unit (количество пикселей на юнит) необходимо ввести меньшее число. Например, введём ширину картинки в пикселях 31 и нажмём на кнопку Apply в нижнем правом углу под всеми свойствами объекта.
После этого объект на сцене становится значительно большего размера:
![]()
Примечание: unit (юнит) — это виртуальная единица измерения, используемая в редакторе Unity. На скриншотах видна сетка, каждый квадрат которой имеет размер 1×1 unit. Это условная величина, которую обычно ассоциируют с 1 метром в реальном мире. Это позволяет ориентироваться в масштабах размещаемых на сцене локаций и относительных размерах объектов создаваемого виртуального мира игры.
Визуально мы видим размытие, которое произошло при увеличении объекта. Во многих играх это нормальное явление. Но если хочется получить более чёткую «пиксельную» графику, можно задать свойство Filter Mode в Point (no filter):

Сделаем сейчас значение Pixels Per Unit больше, например, 200:
![]()
В результате визуально на сцене спрайт стал значительно меньшего размера с более чёткой отрисовкой.
И всё это без изменений значений Scale у объекта на сцене! Они остались равны 1, 1, 1.
Теперь при замене изображений спрайтов риска и переделок будет значительно меньше!
Рекомендуем поэкспериментировать и с другими настройками свойств спрайтов.
На этой странице подробно описаны настройки проигрывателя для платформы Android. Описание общих настроек проигрывателя см. в разделе Настройки проигрывателяНастройки, которые позволяют вы устанавливаете различные параметры для конкретного игрока для финальной игры, созданной Unity. More info
See in Словарь.

Документация по свойствам сгруппирована в соответствии с соответствующими разделами проигрывателя. UI(пользовательский интерфейс) Позволяет пользователю взаимодействовать с вашим приложением. В настоящее время Unity поддерживает три системы пользовательского интерфейса. More info
See in Словарь:
- Icon
- Resolution and Presentation
- Splash Image
- Other Settings
- Publishing Settings
Значок
Используйте раздел Значок, чтобы указать значки, представляющие ваше приложение на устройстве.

| Setting | Описание |
|---|---|
| Adaptive | Укажите текстуры различных размеров для представления вашего приложения на устройствах под управлением Android 8.0 (уровень API 26) или выше. |
| Round | Укажите текстуры различных размеров для представления вашего приложения на устройствах под управлением Android 7.1 (уровень API 25) или выше. |
| Legacy | Укажите текстуры различных размеров для представления вашего приложения на устройствах с более ранними версиями Android, чем Android 7.1 (уровень API 25). |
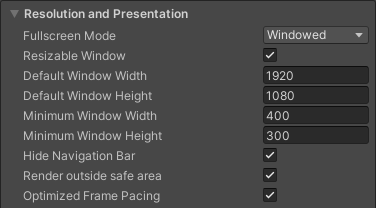
Разрешение и представление
Используйте раздел Разрешение и представление, чтобы настроить внешний вид экрана.
| Настройки | Описание | |
|---|---|---|
| Fullscreen Mode | Указывает, как окно отображается на устройстве. Это устанавливает режим окна по умолчанию при запуске. | |
| Fullscreen Window | Окно приложения заполняет полноэкранное собственное разрешение устройства. Чтобы заполнить полноэкранное окно, Unity масштабирует содержимое приложения. Чтобы соответствовать соотношению сторонсоотношению пропорциональных размеров изображения, таких как его ширина и высота. См. Словарь устройства вывода, Unity может добавить черные полосы к отображаемому вывод, чтобы содержимое не растягивалось. Этот процесс называется letterboxing. В этом режиме панель навигации всегда скрыта. |
|
| Windowed | Приложение использует стандартное неполноэкранное подвижное окно. Размер окна зависит от разрешения приложения. В этом режиме размер окна по умолчанию изменяется. Чтобы отключить это, отключите окно с изменяемым размером. | |
| Resizable Window | Указывает, может ли пользователь изменять размер окна приложения. Этот параметр включает возможности многооконности в вашем приложении на телефонах и планшетах Android. Дополнительную информацию см. в документации Google для разработчиков. |
|
| Default Window Width | Ширина окна приложения по умолчанию в пикселяхНаименьшая единица измерения компьютерного изображения. Размер пикселя зависит от разрешения вашего экрана. Пиксельное освещение рассчитывается для каждого пикселя экрана. Подробнее См. в Словарь. Этот параметр доступен, только если для параметра Полноэкранный режим установлено значение Оконный. |
|
| Default Window Height | Высота окна приложения по умолчанию в пикселях. Этот параметр доступен, только если для параметра Полноэкранный режим установлено значение Оконный. | |
| Minimum Window Width | Минимальная ширина окна приложения в пикселях. Этот параметр доступен, только если для параметра Полноэкранный режим установлено значение Оконный. | |
| Minimum Window Height | Минимальная высота окна приложения в пикселях. Этот параметр доступен, только если для параметра Полноэкранный режим установлено значение Оконный. | |
| Hide Navigation Bar | Указывает, следует ли скрывать панель навигации, которая появляется в верхней части окна. | |
| Render outside safe area | Указывает, должно ли приложение использовать для рендеринга все доступное пространство экрана, включая области дисплея, которые вырезаны (вырезаны). Дополнительную информацию см. в документации Android по поддержке вырезов дисплея. | |
| Optimized Frame Pacing | Указывает, следует ли Unity равномерно распределять кадры для уменьшения разницы в частоте кадров. Включите этот параметр, чтобы сделать процесс более плавным. |
Другие настройки разрешения и представления сгруппированы в следующих разделах:
- Resolution Scaling
- Supported Aspect Ratio
- Orientation
- Allowed Orientations for Auto Rotation
- Other
Масштабирование разрешения
Используйте раздел Масштабирование разрешения для настройки параметров, связанных с масштабированием разрешения экрана. Использование разрешения ниже исходного разрешения устройства может повысить производительность и время работы от батареи.

| Настройки | Описание | |
|---|---|---|
| Resolution Scaling Mode | Указывает, масштабирует ли приложение свое разрешение и каким образом. Вы можете установить масштаб равным или меньшим, чем собственное разрешение экрана. Использование более низкого разрешения может улучшить производительность и срок службы батареи. | |
| Disabled | Не применяет масштабирование разрешения, и приложение отображает исходное разрешение экрана устройства. | |
| FixedDPI | Применяет масштабирование разрешения с помощью целевого API. Используйте это, чтобы оптимизировать производительность и время автономной работы или настроить конкретную настройку DPI.. | |
| Target DPI | Разрешение приложения. Если собственный DPI экрана устройства выше этого значения, Unity уменьшает разрешение приложения, чтобы оно соответствовало этому параметру. Для расчета масштаба Unity использует следующее:min(Target DPI * Factor / Screen DPI, 1)Где Factor – это коэффициент фиксированного DPI масштабирования разрешения из настроек качества.Примечание. Этот параметр появляется, только если для параметра Режим масштабирования разрешения установлено значение Фиксированный DPI. |
|
| BlitСокращенный термин для «передачи битового блока». Блит-операция — это процесс передачи блоков данных из одного места в памяти в другое. См. в Словарь Type |
Определяет, использовать ли блит для рендеринга конечного изображения на экран. Использование блита совместимо с большинством устройств, но обычно медленнее, чем без блита. | |
| Always | Unity выполняет рендеринг в закадровый буфер, а затем использует блит для копирования содержимого буфера в фреймбуфер устройства. Это совместимо с большинством устройств, но обычно медленнее, чем без использования blit. | |
| Never | Unity выполняет рендеринг в фреймбуфер, предоставляемый операционной системой устройства. Если это не удается, приложение печатает однократное предупреждение в журнале устройства. Обычно это быстрее, чем использование blit, но совместимо не со всеми устройствами. | |
| Auto | Unity выполняет рендеринг в фреймбуфер, предоставляемый операционной системой устройства, если это возможно. Если это не удается, Unity выводит предупреждение на консоль устройства и использует блит для вывода окончательного изображения на экран. |
Поддерживаемое соотношение сторон
Используйте раздел Поддерживаемое соотношение сторон, чтобы настроить параметры, касающиеся поддерживаемых соотношений сторон устройства.

| Настройки | Описание | |
|---|---|---|
| Aspect Ratio Mode | Задает максимальное соотношение сторон, поддерживаемое приложением. Если соотношение сторон устройства больше, чем это соотношение сторон, Unity использует это соотношение сторон для приложения и добавляет черные полосы, чтобы приложение не растягивалось. | |
| Legacy Wide Screen (1.86) | Приложение поддерживает соотношение сторон вплоть до устаревшего широкоэкранного соотношения сторон Android. | |
| Native Aspect Ratio | Приложение поддерживает соотношения сторон вплоть до собственного соотношения сторон Android. | |
| Custom | Приложение поддерживает соотношение сторон вплоть до соотношения сторон, которое вы установили в До. | |
| Up To | Пользовательское максимальное соотношение сторон.
Этот параметр отображается, только если для параметра Режим соотношения сторон установлено значение Пользовательский. |
Ориентация
Используйте раздел Ориентация, чтобы настроить параметры, относящиеся к ориентации приложения на устройстве.

Выберите ориентацию экрана игры в раскрывающемся меню Ориентация по умолчанию:
| Настройки | Описание | |
|---|---|---|
| Default Orientation | Указывает ориентацию экрана, которую использует приложение.
Примечание. Unity использует значение, установленное для этого параметра, для Android и iOS. |
|
| Portrait | Приложение использует портретную ориентацию экрана, при которой нижняя часть окна приложения выравнивается с нижней частью экрана устройства.. | |
| Portrait Upside Down | Приложение использует портретную ориентацию экрана, при которой нижняя часть окна приложения выравнивается с верхней частью экрана устройства. | |
| Landscape Right | Приложение использует альбомную ориентацию экрана, при которой правая часть окна приложения выравнивается с нижней частью экрана устройства.. | |
| Landscape Left | Приложение использует альбомную ориентацию экрана, при которой правая часть окна приложения выравнивается с верхней частью экрана устройства.. | |
| Auto Rotation | Экран может поворачиваться в любую из ориентаций, указанных вами в разделе Разрешенные ориентации для автоматического поворота. |
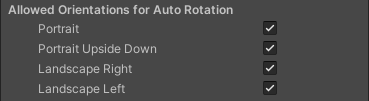
Допустимые ориентации для автоповорота
Используйте раздел Разрешенные ориентации для автоповорота, чтобы указать, какие ориентации поддерживает приложение, если для параметра Ориентация по умолчанию задано значение Автоповорот. Это полезно, например, чтобы привязать приложение к альбомной ориентации, но позволить пользователю переключаться между альбомной ориентацией слева и справа.
Этот раздел отображается, только если для параметра Ориентация по умолчанию задано значение Автоповорот.
| Настройки | Описание |
|---|---|
| Portrait | Указывает, поддерживает ли приложение портретную ориентацию экрана, при которой нижняя часть окна приложения выравнивается с нижней частью экрана устройства. |
| Portrait Upside Down | Указывает, поддерживает ли приложение портретную ориентацию экрана, при которой нижняя часть окна приложения выравнивается с верхней частью экрана устройства. |
| Landscape Right | Указывает, поддерживает ли приложение альбомную ориентацию экрана, когда правая сторона окна приложения выравнивается с нижней частью экрана устройства. |
| Landscape Left | Указывает, поддерживает ли приложение альбомную ориентацию экрана, когда правая часть окна приложения выравнивается с верхней частью экрана устройства. |
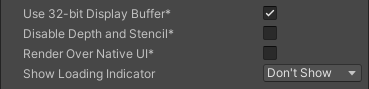
Другое
Раздел «Разрешение и представление» также содержит следующие общие настройки.
| Настройки | Описание | |
|---|---|---|
| Use 32-bit Display Buffer | Указывает, содержит ли буфер дисплея 32-битные значения цвета вместо 16-битных значений цвета. Включите этот параметр, если вы видите полосы или вам нужны альфа-значения в эффектах постобработки. Некоторая постобработкаПроцесс, улучшающий внешний вид продукта путем применения фильтров и эффектов до того, как изображение появится на экране. Вы можете использовать эффекты постобработки для имитации физических свойств камеры и пленки, например Bloom и Depth of Field. Подробнее См. в Словарь требует этого, поскольку они создают Текстуры рендерингаСпециальный тип текстуры, который создается и обновляется во время выполнения. Чтобы использовать их, сначала создайте новую текстуру рендеринга и назначьте одну из ваших камер для рендеринга в нее. Затем вы можете использовать Render Texture в материале, как обычную текстуру. Подробнее Смотрите в Словарь в том же формате, что и буфер отображения. |
|
| Disable Depth and Stencil | Указывает, следует ли отключить глубину и буферы трафаретахранилище памяти, которое содержит 8-битное значение на пиксель. В Unity вы можете использовать буфер трафарета, чтобы отметить пиксели, а затем выполнить рендеринг только для тех пикселей, которые прошли операцию трафарета.More info See in Словарь. |
|
| Render Over Native UI | Указывает, следует ли отображать поверх собственного пользовательского интерфейса на Android или iOSмобильной операционной системе Apple. Подробнее См. в Словарь. Чтобы этот параметр вступил в силу, настройте КамеруКомпонент, который создает изображение определенной точки обзора в вашей сцене. Вывод либо рисуется на экране, либо фиксируется в виде текстуры. Подробнее См. в разделе Словарь Очистить флаги, чтобы использовать сплошной цвет с альфа-значением ниже 1. |
|
| Show Loading Indicator | Указывает, появляется ли индикатор загрузки и как. | |
| Don’t Show | Индикатор загрузки не появляется. | |
| Large | Появится большой индикатор загрузки. | |
| Inversed Large | Появится большой индикатор загрузки с инвертированным цветом. | |
| Small | Появится небольшой индикатор загрузки. | |
| Inversed Small | Появится небольшой индикатор загрузки с инвертированным цветом. |
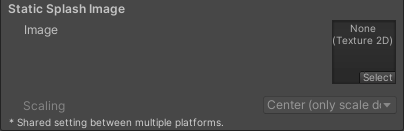
Изображение-заставка
Используйте параметр Изображение-заставка виртуальной реальности, чтобы выбрать собственное изображение-заставку для Virtual RealityСистема, которая погружает пользователей в искусственный трехмерный мир реалистичных изображений и звуков с помощью гарнитуры и отслеживания движения. Подробнее
См. на экранах Словарь. Информацию об общих настройках экрана-заставки см. в разделе Экран-заставка.

Под общими настройками экрана-заставки вы можете настроить статическую заставку для Android.
| Настройки | Описание | |
|---|---|---|
| Image | Указывает текстуру, которую приложение использует для экрана-заставки Android. Стандартный размер изображения заставки — 320×480.. | |
| Scaling | Указывает, как масштабировать изображение-заставку, чтобы оно соответствовало размеру экрана устройства. | |
| Center (only scale down | Отрисовывает изображение в исходном размере, если только оно не слишком большое, и в этом случае Unity уменьшает изображение до нужного размера. | |
| Scale to Fit (letter-boxed) | Масштабирует изображение так, чтобы более длинный размер точно соответствовал размеру экрана. Unity заполняет пустое пространство по бокам в более коротком измерении черным цветом.. | |
| Scale to Fill (cropped) | Масштабирует изображение так, чтобы меньший размер точно соответствовал размеру экрана. Unity обрезает изображение в более длинном измерении. |
Другие настройки
В этом разделе можно настроить ряд параметров, объединенных в следующие группы:
- Rendering
- Vulkan Settings
- Identification
- Configuration
- Optimization
- Logging
- Legacy
Визуализация
Используйте эти настройки, чтобы настроить визуализацию вашей игры в Unity для платформы Android.
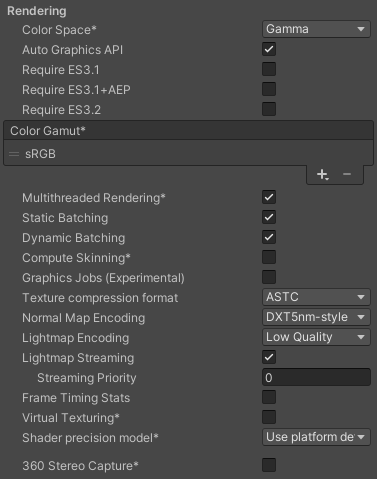
| Свойства | Описание |
|---|---|
| Color Space | Выберите цветовое пространство, которое Unity использует для рендеринга: гамма или линейное. См. обзор линейного рендеринга, чтобы узнать о различиях между ними. • Гамма: цветовое пространство гаммы обычно используется для расчета освещения на старом оборудовании, ограниченном 8 битами на канал для формата кадрового буфера. Несмотря на то, что сегодняшние мониторы являются цифровыми, они все еще могут принимать в качестве входного сигнала гамма-кодированный сигнал. • Линейный: рендеринг линейного цветового пространства дает более точные результаты. Когда вы выбираете работу в линейном цветовом пространстве, редактор по умолчанию использует выборку sRGB. Если ваши текстуры находятся в линейном цветовом пространстве, вам необходимо работать в линейном цветовом пространстве и отключить выборку sRGB для каждой текстуры. |
| Auto Graphics API | Отключите этот параметр, чтобы вручную выбрать и изменить порядок графических API. По умолчанию эта опция включена, и Unity пытается использовать Vulkan. Если устройство не поддерживает Vulkan, Unity возвращается к GLES3.2, GLES3.1 или GLES3.0. Есть три дополнительных флажка для настройки минимальной дополнительной версии OpenGL ES 3.x: Требовать ES3.1, Требовать ES3.1+AEP и Требовать ES3.2. . Важно: Unity добавляет требование GLES3/GLES3.1/AEP/3.2 в манифест вашего приложения для Android, только если GLES2 отсутствует в списке API, когда Auto Graphics API отключен. . Только в этом случае ваше приложение не появится на неподдерживаемых устройствах в магазине Google Play. |
| Color Gamut | Вы можете добавить или удалить цветовую гамму для платформы Android, чтобы использовать ее для рендеринга. Щелкните значок плюса (+), чтобы просмотреть список доступных гамм. Цветовая гамма определяет возможный диапазон цветов, доступных для данного устройства (например, монитора или экрана). Гамма sRGB является гаммой по умолчанию (и обязательной). При нацеливании на устройства с дисплеями с широкой цветовой гаммой используйте DisplayP3, чтобы использовать все возможности дисплея. |
| Multithreaded Rendering | Включите этот параметр, чтобы переместить вызовы графического API из основного потока Unity в отдельный рабочий поток. Это может помочь повысить производительность в приложениях с высокой загрузкой ЦП в основном потоке. |
|
Static BatchingТехника, которую Unity использует для отрисовки игровых объектов на экране, которая объединяет статические (неподвижные) игровые объекты в большие сетки и рендерит их более быстрым способом. Подробнее См. в Словарь |
Включите этот параметр, чтобы использовать статическую пакетную обработку. |
|
Dynamic BatchingАвтоматический процесс Unity, который пытается визуализировать несколько сеток, как если бы они были одной сеткой для оптимизации графической производительности. Этот метод преобразует все вершины GameObject на ЦП и группирует множество похожих вершин вместе. Подробнее См. в Словарь |
Включите этот параметр, чтобы использовать динамическую пакетную обработку в вашей сборке (включено по умолчанию). Примечание. Динамическая пакетная обработка не действует, если активен конвейер рендеринга с поддержкой скриптов, поэтому этот параметр виден, только если ничего не задано в конвейере рендеринга с поддержкой скриптов. Актив конвейера рендеринга Настройка графики. |
| Compute Skinning | Включите этот параметр, чтобы включить скиннинг вычислений графического процессора DX11/ES3, освобождая ресурсы ЦП. |
| Graphics Jobs | Включите этот параметр, чтобы поручить Unity разгрузить графические задачи (циклы рендеринга) рабочим потокам, работающим на других ядрах ЦП. Это предназначено для сокращения времени, затрачиваемого Camera.Render на основной поток, который часто является узким местом.. |
| Texture compression format | Выберите между ASTC, ETC2 и ETC (ETC1 для RGB, ETC2 для RGBA). Дополнительную информацию о том, как выбрать правильный формат, см. в обзоре формата сжатия текстур. См. Настройки сжатия текстур, чтобы узнать больше о том, как это взаимодействует с настройкой сжатия текстур в Настройки сборки. |
| Normal Map Encoding | Выберите стиль XYZ или DXT5nm, чтобы установить кодировку карты нормалей. Это влияет на схему кодирования и формат сжатия, используемые для карт нормалей. Карты нормалей в стиле DXT5nm имеют более высокое качество, но их декодирование в шейдерах обходится дороже. |
| Lightmap Encoding | Выберите Нормальное качество или Высокое качество, чтобы установить кодировку карты освещения. Этот параметр влияет на схему кодирования и формат сжатия карт освещения. |
| Lightmap Streaming | Использовать ли Mipmap Streaming для карт освещения. Unity применяет этот параметр ко всем картам освещения при их создании. Примечание. Чтобы использовать этот параметр, необходимо включить параметр Качество потоковой передачи текстур. |
| Streaming Priority | Установите приоритет для всех карт освещения в системе Mipmap Streaming. Unity применяет этот параметр ко всем картам освещения при их создании. Положительные числа дают более высокий приоритет. Допустимые значения находятся в диапазоне от –128 до 127. |
| Frame Timing Stats | Включите это свойство, чтобы собирать статистику времени кадра ЦП и ГП. Используйте это вместе с настройкой Динамическое разрешениеA Camera, которая позволяет динамически масштабировать отдельные цели рендеринга, чтобы снизить нагрузку на графический процессор. Подробнее См. в настройках камеры Словарь, чтобы определить, привязано ли ваше приложение к процессору или графическому процессору. |
| Virtual Texturing | Указывает, следует ли включить виртуальное текстурирование. Примечание. Виртуальное текстурирование несовместимо с Android. |
| Shader precision model | Управляет точностью по умолчанию сэмплеров, используемых в шейдерах. Дополнительные сведения см. в разделе Типы данных и точность шейдера. |
| 360 Stereo Capture | Указывает, может ли Unity захватывать стереоскопические панорамные изображения и видео. Дополнительную информацию см. в разделе Stereo 360 Image and Video Capture. Примечание. Стереоскопическая съемка 360° несовместима с Android. |
Vulkan Settings
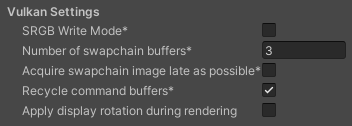
| Свойства | Описание |
|---|---|
| SRGB Write Mode | Включите этот параметр, чтобы средство визуализации Graphics.SetSRGBWrite() переключало режим записи sRGB во время выполнения. То есть, если вы хотите временно отключить преобразование линейного цвета в sRGB, вы можете использовать это свойство для достижения этой цели. Включение этого параметра негативно влияет на производительность мобильных графических процессоров на основе тайлов; поэтому НЕ включайте это для мобильных устройств. |
| Number of swapchain buffers | Установите для этого параметра значение 2 для двойной буферизации или 3 для тройной буферизации для использования с визуализатором Vulkan. Этот параметр может уменьшить задержку на некоторых платформах, но в большинстве случаев не следует менять значение по умолчанию, равное 3. Двойная буферизация может отрицательно сказаться на производительности. Не используйте этот параметр на Android. |
| Acquire swapchain image late as possible | Если этот параметр включен, Vulkan откладывает получение резервного буфера до тех пор, пока не преобразует кадр в закадровое изображение. Для этого Vulkan использует промежуточный образ. Включение этого параметра вызывает дополнительный блит при представлении заднего буфера. Этот параметр в сочетании с двойной буферизацией может повысить производительность. Однако это также может привести к проблемам с производительностью, так как дополнительный блит занимает полосу пропускания. |
| Recycle command buffers | Указывает, следует ли перерабатывать или освобождать CommandBuffers после их выполнения Unity. |
| Apply display rotation during rendering | Включите этот параметр, чтобы выполнять весь рендеринг в исходной ориентации дисплея. Это дает преимущество в производительности на многих устройствах. Для получения дополнительной информации см. документацию по предварительной ротации цепочки обмена Vulkan. |
Identification
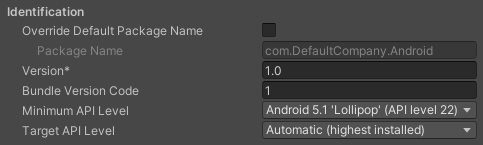
| Свойства | Функции |
|---|---|
| Переопределить Пакет по умолчаниюUnity автоматически предварительно устанавливает выбранное количество пакетов по умолчанию (например, Analytics Library, Unity Timeline и т. д.) при создании нового проекта. Он отличается от встроенного пакета тем, что его не нужно устанавливать, и отличается от встроенного пакета тем, что расширяет возможности Unity, а не позволяет включать или отключить их. См. в Словарь Название |
Указывает, следует ли переопределить имя пакета по умолчанию для вашего приложения. |
| Package Name | Установите идентификатор приложения, который однозначно идентифицирует ваше приложение на устройстве и в магазине Google Play. Базовая структура идентификатора — com.CompanyName.AppName, и ее можно выбрать произвольно. Этот параметр является общим для iOS и Android. |
| Version | Введите номер версии сборки пакета, который идентифицирует итерацию (выпущенную или невыпущенную) пакета. Версия указывается в общем формате строки, содержащей числа, разделенные точками (например, 4.3.2). (Общий доступ для iOS и Android.) |
| Bundle Version Code | Внутренний номер версии. Этот номер используется только для определения того, является ли одна версия более поздней, чем другая, причем более высокие числа указывают на более поздние версии. Это не тот номер версии, который показывается пользователям; этот номер задается атрибутом versionName. Значение должно быть задано как целое число, например «100». Вы можете определить его по своему усмотрению, если каждая последующая версия имеет более высокий номер.
Например, это может быть номер сборки. Или вы можете преобразовать номер версии в формате «x.y» в целое число, закодировав «x» и «y» отдельно в младших и старших 16 битах. Или вы можете просто увеличивать число на единицу каждый раз, когда выпускается новая версия. Не превышайте 100 000, если включен параметр Разделить APK по целевой архитектуре. Каждый APK должен иметь уникальный код версии, поэтому Unity добавляет 100 000 к номеру для ARMv7 и 200 000 для ARM64. |
| Minimum API Level | Минимальная версия Android (уровень API), необходимая для запуска приложения. |
| Target API Level | Целевая версия Android (уровень API), для которой компилируется приложение. |
Configuration

| Свойства | Описание | |
|---|---|---|
|
Scripting BackendФреймворк, поддерживающий сценарии в Unity. Unity поддерживает три различных бэкэнда для сценариев в зависимости от целевой платформы: Mono, .NET и IL2CPP. Однако универсальная платформа Windows поддерживает только два: .NET и IL2CPP. Дополнительная информация См. в Словарь |
Выберите серверную часть сценариев, которую хотите использовать. Серверная часть сценариев определяет, как Unity компилирует и выполняет код C# в вашем проекте. | |
| Mono | Компилирует код C# в .NET Common Intermediate Language (CIL) и выполняет этот CIL с помощью Common Language Runtime. Дополнительную информацию см. на веб-сайте Mono Project. | |
| IL2CPP | Компилирует код C# в CIL, преобразует CIL в C++, а затем компилирует этот C++ в собственный машинный код, который выполняется непосредственно во время выполнения. См. IL2CPPРазработанный Unity сервер сценариев, который можно использовать в качестве альтернативы на Mono при создании проектов для некоторых платформ. Подробнее Дополнительную информацию см. в Словарь. |
|
| API Compatibility Level | Выберите, какие API .NET вы можете использовать в своем проекте. Этот параметр может повлиять на совместимость со сторонними библиотеками. Однако это не влияет на код, специфичный для редактора (код в каталоге редактора или в определении сборки, специфичном для редактора). Совет. Если у вас возникли проблемы со сторонней сборкой, вы можете попробовать рекомендации из раздела Уровень совместимости API ниже. |
|
| .Net 2.0 | .Библиотеки Net 2.0. Максимальная совместимость с .net, самые большие размеры файлов. Часть устаревшей среды выполнения .NET 3.5. | |
| .Net 2.0 Subset | Подмножество полной совместимости с .net, файлы меньшего размера. Часть устаревшей среды выполнения .NET 3.5.. | |
| .Net Standard 2.0 | Совместимость с .NET Standard 2.0. Производит меньшие сборки и имеет полную кросс-платформенную поддержку. | |
| .Net 4.x | Совместим с .NET Framework 4 (который включает в себя все в профиле .NET Standard 2.0, а также дополнительные API). Выберите этот параметр при использовании библиотек, которые обращаются к API, не включенным в .NET Standard 2.0. Создает более крупные сборки, и любые дополнительные доступные API не обязательно поддерживаются на всех платформах. Дополнительную информацию см. в разделе Ссылки на дополнительные сборки библиотеки классов. | |
| C++ Compiler Configuration | Выберите конфигурацию компилятора C++, используемую при компиляции кода, сгенерированного IL2CPP. Примечание. Это свойство отключено, если для параметра Scripting Backend не задано значение IL2CPP. |
|
| Use incremental GC | Включите этот параметр, чтобы использовать добавочный сборщик мусора, который распределяет сборку мусора по нескольким кадрам, чтобы уменьшить пики продолжительности кадра, связанные с gc. | |
| Assembly Version Validation | Указывает, проверяет ли Mono типы из сборки со строгим именем.. | |
| Mute Other Audio Sources | Включите этот параметр, если вы хотите, чтобы ваше приложение Unity останавливало звук из приложений, работающих в фоновом режиме. В противном случае звук из фоновых приложений продолжит воспроизводиться вместе с вашим приложением Unity. | |
| Target Architectures | Выберите процессоры, на которых вы хотите разрешить запуск приложения (32-разрядная версия ARM, 64-разрядная версия ARM, 32-разрядная версия x86 и 64-разрядная версия x86–64). Примечание. Запуск приложений Android в 64-разрядной среде повышает производительность, а 64-разрядные приложения могут использовать более 4 ГБ памяти.. |
|
| Split APKs by target architecture (Experimental) | Включите этот параметр, чтобы создать отдельный APK для каждой архитектуры ЦП, выбранной в разделе Целевые архитектуры. Это уменьшает размер загрузки для пользователей Google Play Store. В первую очередь это функция магазина Google Play, которая может не работать в других магазинах. Дополнительные сведения см. в разделе Поддержка нескольких APK. | |
| Target Devices | Указывает целевые устройства, на которых разрешен запуск APK. | |
| All Devices | APK разрешено запускать на всех устройствах Android и Chrome OS. | |
| Phones and Tablets Only | APK разрешено запускать на телефонах и планшетах Android, но не на устройствах Chrome OS. | |
| Chrome OS Devices Only | APK разрешено запускать на устройствах Chrome OS, но не на телефонах или планшетах Android. | |
| Install Location | Указывает место установки приложения на устройстве (подробную информацию см. в документации для разработчиков Android о местах установки. | |
| Automatic | Пусть решает операционная система. Пользователь сможет перемещать приложение вперед и назад. | |
| Prefer External | Установите приложение на внешнее хранилище (SD-карту), если это возможно. Операционная система не гарантирует этого; если это невозможно, приложение будет установлено во внутреннюю память. | |
| Force Internal | Принудительно установите приложение во внутреннюю память. Пользователь не сможет переместить приложение на внешнее хранилище. | |
| Internet Access | Выберите, следует ли всегда добавлять сетевое разрешение (INTERNET) в манифест приложения Android, даже если вы не используете сетевые API. Установите значение Require по умолчанию для сборок разработки.. |
|
| Auto | Добавляйте разрешение на доступ в Интернет, только если вы используете сетевой API. | |
| Require | Всегда добавляйте разрешение на доступ в Интернет. | |
| Write Permission | Выберите, следует ли разрешить доступ на запись во внешнее хранилище (например, на SD-карту), и добавьте соответствующее разрешение в манифест приложения Android. Установите значение External(SDCard) по умолчанию для сборок разработки. | |
| Internal | Дайте разрешение на запись только во внутреннюю память. | |
| External(SDCard) | Включите разрешение на запись во внешнее хранилище. | |
| Filter Touches When Obscured | Включите этот параметр, чтобы игнорировать касания, полученные, когда другое видимое окно закрывает приложение Unity. Это сделано для предотвращения перехвата. | |
| Sustained Performance Mode | Включите этот параметр, чтобы установить предсказуемый и стабильный уровень производительности устройства в течение более длительного периода времени без теплового регулирования. Общая производительность может быть ниже, если этот параметр включен. На основе Android Sustained Performance API. | |
| Maximum Java Heap Size | Установите максимальный размер кучи Java для пользователя для сборки (в мегабайтах). По умолчанию 4096. | |
| Low Accuracy Location | Включите этот параметр, чтобы вместо этого использовать значения низкой точности с API определения местоположения Android. | |
| Chrome OS Input Emulation | Поведение Chrome OS по умолчанию заключается в преобразовании событий ввода с мыши и сенсорной панели в события ввода с сенсорного экрана. Снимите этот флажок, чтобы отключить поведение по умолчанию. | |
| Android TV Compatibility | Включите этот параметр, чтобы пометить приложение как совместимое с Android TV. | |
| Android Game | Включите этот параметр, чтобы пометить выходной пакет (APK) как игру, а не как обычное приложение. | |
| Android Gamepad Support Level | Выберите уровень поддержки вашего приложения для геймпада. Варианты: Работает с D-Pad, Поддерживает геймпад и Требуется геймпад.. | |
| Warn about App Bundle size | Включите этот параметр, чтобы получать предупреждение, когда размер набора приложений Android превышает определенный порог. Этот параметр выбран по умолчанию, и вы можете настроить его только в том случае, если вы включите параметр Build App Bundle (Google Play) в настройках сборки. | |
| App Bundle size threshold | Введите размер в Мб. Когда ваш App Bundle превысит этот размер, Unity отобразит предупреждение. | |
| Active Input Handling | Выберите, как вы хотите обрабатывать ввод от пользователей. | |
| Input Manager (old) | Используйте окно Ввод по умолчанию. | |
| Input System (Preview) | Используйте более новую систему ввода. Система ввода предоставляется в качестве предварительного пакета для этого выпуска. Чтобы попробовать предварительную версию системы ввода, установите пакет InputSystem.. | |
| Both | Используйте обе системы одновременно. |
Уровень совместимости API
Вы можете выбрать уровень совместимости моно API для всех целей. Иногда сторонние библиотеки .NET используют функциональные возможности, которые находятся за пределами вашего уровня совместимости с .NET. Чтобы понять, что происходит в таких случаях и как это исправить, попробуйте выполнить следующие рекомендации:
- Установите ILSpy для Windows .
- Перетащите сборки .NET для уровня совместимости API, с которым у вас возникли проблемы, в ILSpy. Их можно найти в разделе
Frameworks/Mono/lib/mono/YOURSUBSET/. - Перетащите стороннюю сборку.
- Нажмите правой кнопкой мыши стороннюю сборку и выберите Анализ.
- В отчете об анализе проверьте раздел Зависит от. В отчете красным цветом выделяется все, от чего зависит сторонняя сборка, но что недоступно на выбранном вами уровне совместимости .NET.
Script Compilation

| Setting | Функции |
|---|---|
| Scripting Define Symbols | Установите пользовательские флаги компиляции. Дополнительные сведения см. в документации по платформенно-зависимой компиляции. |
| Additional Compiler Arguments | Добавьте записи в этот список, чтобы передать дополнительные аргументы компилятору Roslyn. Используйте одну новую запись для каждого дополнительного аргумента. Чтобы создать новую запись, нажмите кнопку «+». Чтобы удалить запись, нажмите кнопку «-«. Когда вы добавите все нужные аргументы, нажмите кнопку Применить, чтобы включить ваши дополнительные аргументы в будущие компиляции. Кнопка Вернуть сбрасывает этот список до самого последнего примененного состояния. |
| Suppress Common Warnings | Отключите этот параметр, чтобы отображались предупреждения C# CS0169 и CS0649. |
| Allow ‘unsafe’ Code | Включить поддержку компиляции «небезопасного» кода C# в предопределенной сборке (например, Assembly-CSharp.dll). Для файлов определения сборки ( .asmdef) щелкните один из ваших файлов .asmdef и включите параметр в окне инспектора, появляется. |
| Use Deterministic Compilation | Отключите этот параметр, чтобы предотвратить компиляцию с флагом -deterministic C#. Если этот параметр включен, скомпилированные сборки байт в байт идентичны при каждой компиляции. Для получения дополнительной информации см. Deterministic Microsoft. документация по параметрам компилятора. |
| Enable Roslyn Analyzers | Отключите этот параметр, чтобы компилировать написанные пользователем скриптыфрагмент кода, позволяющий создавать собственные компоненты, запускать игровые события, изменять Свойства компонента с течением времени и реагировать на ввод пользователя любым удобным для вас способом. Подробнее См. в Словарь без библиотек DLL анализатора Roslyn, которые могут присутствовать в вашем проекте. |
| Use Roslyn Reference Assemblies | Отключите этот параметр, чтобы компилятор не пропускал эталонные сборки при компиляции, когда метаданные сборки не изменяются.. |
Optimization

| Свойства | Описание |
|---|---|
| Prebake Collision Meshes | Включите этот параметр, чтобы добавлять данные о столкновениях в Meshes во время сборки. |
| Keep Loaded Shaders Alive | Когда этот параметр включен, вы не можете выгрузить шейдер. Дополнительные сведения см. в разделе Загрузка шейдеров. |
| Preloaded Assets | Установите массив объектов, которые проигрыватель будет загружать при запуске. Чтобы добавить новые активы, увеличьте значение свойства Размер, затем установите ссылку на загружаемый актив в появившемся новом поле Элемент. |
| AOT compilation options | Дополнительные параметры компиляции Ahead of Time (AOT). Это помогает оптимизировать размер встроенного проигрывателя iOS. |
| Strip Engine Code | Включите этот параметр, если хотите, чтобы инструмент Unity Linker удалял код для функций Unity Engine, которые не используются в вашем проекте. Этот параметр доступен только с серверной частью сценариев IL2CPP.
Большинство приложений не используют все доступные библиотеки DLL. Этот параметр удаляет библиотеки DLL, которые не используются вашим приложением, чтобы уменьшить размер встроенного проигрывателя. Если ваше приложение использует один или несколько классов, которые обычно удаляются при текущих настройках, Unity отображает сообщение об отладке, когда вы пытаетесь собрать приложение. |
| Managed Stripping Level | Выберите, как Unity удаляет неиспользуемый управляемый (C#) код. Доступны следующие варианты: Отключено Низкое, Среднее и Высокое.
Когда Unity создает ваше приложение, процесс Unity Linker может удалить неиспользуемый код из управляемых библиотек DLL, которые использует ваш проект. Удаление кода может сделать результирующий исполняемый файл значительно меньше, но иногда может случайно удалить используемый код. Дополнительные сведения об этих параметрах см. в документации по управляемому удалению кода. Информацию об удалении байт-кода с помощью IL2CPP см. в документации по управляемому удалению байт-кода с помощью IL2CPP. |
| Enable Internal profiler (Deprecated) | Включите этот параметр, чтобы получать данные профилировщика с вашего устройства в выходных данных Android SDK adblogcat. при тестировании ваших проектов. Это доступно только в девелоперских сборках. |
| Vertex Compression | Выберите канал, который вы хотите установить для сжатия мешей в методе сжатия вершин, который по умолчанию установлен на Mixed. Это влияет на все сетки в вашем проекте. Как правило, сжатие вершин используется для уменьшения размера данных сетки в памяти, уменьшения размера файла и повышения производительности графического процессора. Для получения информации о том, как настроить сжатие вершин и ограничения этого параметра, см. [сжатие мешей].. |
| Optimize Mesh Data | Выбор этого параметра позволяет удалить неиспользуемые атрибуты вершин из сетки, используемой в построении. Это уменьшает объем данных в сетке, что может помочь уменьшить размер сборки, время загрузки и использование памяти во время выполнения. Однако вы должны помнить, что не следует изменять настройки материала или шейдера во время выполнения, если эта настройка включена. Дополнительные сведения см. в разделе PlayerSettings.stripUnusedMeshComponents. |
| Texture MipMap Stripping | Включите этот параметр, чтобы включить удаление мип-карт для всех платформ, что удаляет неиспользуемые мип-карты из текстур во время сборки. Unity определяет неиспользуемые мип-карты, сравнивая значение мип-карты с настройками качества для текущей платформы. Если значение MIP-карты исключено из каждой настройки качества для текущей платформы, тогда Unity удаляет эти MIP-карты из сборки во время сборки. Если для параметра QualitySettings.masterTextureLimit установлено значение MIP-карты, которое было удалено, Unity установит значение на ближайшее значение MIP-карты, которое не было удалено.. |
Logging
Выберите тип ведения журнала, который следует разрешить в определенных контекстах.
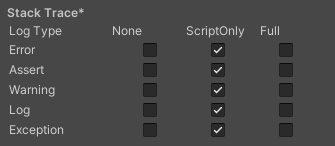
-
Выберите предпочтительный метод ведения журнала из доступных вариантов.
- Установите флажок, соответствующий каждому типу журнала (Ошибка, Подтверждение, Предупреждение, Журнал и Exception) в зависимости от требуемого типа ведения журнала. Например:
- ScriptOnly: запись в журнал только при выполнении скриптов.
- Полный: постоянно ведет журнал.
- Нет: никакие журналы не записываются.
Дополнительную информацию см. в разделе ведение журнала трассировки стека.
Наследие
Включите параметр Clamp BlendShapes (устаревший), чтобы зафиксировать диапазон весов переходных фигур в SkinnedMeshRenderers.

Настройки публикации
Используйте настройки публикации, чтобы настроить, как Unity создает ваше приложение для Android.
Чтобы открыть настройки публикации, перейдите в раздел Редактировать > Настройки проекта, выберите Проигрыватель, выберите значок Android и откройте панель Настройки публикации.
В этом разделе описываются различные части панели «Параметры публикации» и их функции. К ним относятся:
- Хранилище ключей проекта
- Ключ проекта
- СборкаПроцесс компиляции вашего проекта в готовый формат для работы на определенной платформе или платформах. Подробнее
См. в Словарь - Уменьшить
- Разделить двоичный файл приложения
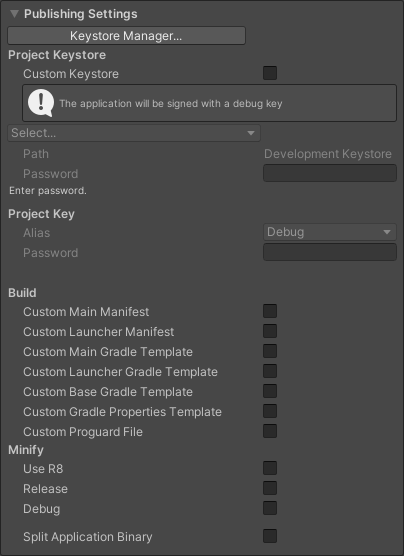
Примечание. Из соображений безопасности Unity не сохраняет ваше хранилище ключейсистему Android, позволяет хранить записи криптографических ключей для повышения безопасности устройства. Подробнее
См. Словарь или пароли Project Key.
Используйте окно Keystore Manager для создания, настройки и загрузки ключей и хранилищ ключей.
Вы можете загрузить существующие хранилища ключей и ключи либо из Keystore Manager, либо из главной панели Android Publishing. Если вы решите загрузить их из диспетчера хранилища ключей, Unity автоматически заполнит поля Project Keystore и Project Key.
Дополнительную информацию см. в документации по Диспетчеру хранилища ключей.
Хранилище ключей проекта
Хранилище ключей — это контейнер, в котором хранятся ключи подписи для обеспечения безопасности приложения. Подробности см. в документации для разработчиков Android: система хранения ключей Android
Используйте настройки Хранилище ключей проекта, чтобы выбрать, какое хранилище ключей использовать для открытого проекта. Когда вы загружаете хранилище ключей, Unity загружает все ключи в этом хранилище. Чтобы загрузить и использовать существующее хранилище ключей в открытом проекте:
- Включите Пользовательское хранилище ключей.
- Откройте раскрывающийся список Выбрать, выберите Обзор и выберите хранилище ключей в вашей файловой системе.
- Введите пароль хранилища ключей.
Если у вас нет существующего хранилища ключей, оставьте параметр Пользовательское хранилище ключей отключенным.
Unity использует хранилище ключей отладки для подписи вашего приложения.
Хранилище ключей отладки — это рабочее хранилище ключей. Он позволяет подписать приложение и протестировать его локально. Однако магазин приложений будет отклонять приложения, подписанные таким образом. Это связано с тем, что магазин приложений не может проверить действительность и принадлежность приложения с помощью хранилища ключей отладки.
| Свойства | Описание |
|---|---|
| Custom Keystore | Включите Пользовательское хранилище ключей, чтобы загружать и использовать существующее хранилище ключей. |
| Select | Когда Пользовательское хранилище ключей включено, используйте его, чтобы выбрать хранилище ключей, которое вы хотите использовать. Хранилища ключей под разделом в раскрывающемся списке Выбрать хранятся в предопределенном выделенном месте. Дополнительные сведения см. в разделе Выбор местоположения хранилища ключей. |
| Path | Вам не нужно вводить путь к хранилищу ключей. Unity предоставляет это на основе выбранного вами хранилища ключей. |
| Password | Введите пароль хранилища ключей, чтобы загрузить выбранное хранилище ключей. |
Ключ проекта
Когда вы загружаете хранилище ключей, Unity загружает все ключи в этом хранилище. Используйте настройки Ключа проекта, чтобы выбрать один ключ из этого хранилища ключей для использования в качестве активного ключа для открытого проекта.
| Свойства | Описание |
|---|---|
| Alias | Выберите ключ, который вы хотите использовать для открытого проекта. |
| Password | Введите свой ключ Пароль. |
Build
По умолчанию Unity создает ваше приложение с помощью файлов манифеста, Gradleсистемы сборки Android, которая автоматизирует несколько процессов сборки. Эта автоматизация означает, что вероятность возникновения многих распространенных ошибок сборки снижается. Подробнее
См. в Словарь шаблоны и файлы Proguard, поставляемые с установкой Unity. Чтобы изменить их, используйте раздел Сборка в настройках публикации Android.
Чтобы использовать собственный файл манифеста, шаблон Gradle или файл Proguard:
- Установите соответствующий флажок. Unity создает файл по умолчанию в вашем проекте, и местоположение файла отображается под флажком.
- Откройте новый файл и внесите изменения.
- Сохраните изменения в этом файле. Unity автоматически использует изменения, сохраненные в этом файле, при следующей сборке приложения.
Настройки в разделе «Сборка» применяются только к процессу сборки текущего проекта.
| Свойства | Описание |
|---|---|
| Custom Main Manifest | Настраиваемая версия файла Android LibraryManifest.xml. Этот файл содержит важные метаданные о вашем приложении для Android. Для получения дополнительной информации об обязанностях манифеста основной библиотеки Unity см. манифест библиотеки Unity. |
| Custom Unity Launcher Manifest | Настраиваемая версия файла Android LauncherManifest.xml. Этот файл содержит важные метаданные о средстве запуска вашего приложения Android. Для получения дополнительной информации об обязанностях манифеста Unity Launcher см. манифест Unity Launcher. |
| Custom Main Gradle Template | Настраиваемая версия файла mainTemplate.gradle. Этот файл содержит информацию о том, как создать приложение для Android в виде библиотеки. Дополнительные сведения см. в документации по предоставлению пользовательского шаблона Gradle. |
| Custom Launcher Gradle Template | Настраиваемая версия файла launcherTemplate.gradle_. Этот файл содержит инструкции по созданию приложения для Android. Дополнительные сведения см. в документации по шаблонам build.gradle. |
| Custom Base Gradle Template | Настраиваемая версия файла baseProjectTemplate.gradle. Этот файл содержит конфигурацию, которая используется всеми другими шаблонами и проектами Gradle. Дополнительные сведения см. в документации по шаблонам build.gradle. |
| Custom Gradle Properties Template | Настраиваемая версия файла gradle.properties. Этот файл содержит параметры конфигурации для среды сборки Gradle. Сюда входят: — Конфигурация памяти JVM (виртуальная машина Java). – Свойство, позволяющее Gradle выполнять сборку с использованием нескольких JVM. — Свойство для выбора инструмента для минификации. — Свойство не сжимать собственные библиотеки при создании пакета приложений. |
| Custom Proguard File | Настраиваемая версия файла proguard.txt. Этот файл содержит параметры конфигурации для процесса минификации. Если минификация удаляет некоторый код Java, который следует сохранить, вы должны добавить правило для сохранения этого кода в этом файле. Для получения дополнительной информации см. документацию по минификации. |
Уменьшить
Минификация — это процесс, который сжимает, запутывает и оптимизирует код вашего приложения. Это может уменьшить размер кода и затруднить дизассемблирование кода. Используйте настройки Minify, чтобы определить, когда и как Unity будет применять минимизацию к вашей сборке.
В большинстве случаев рекомендуется применять минимизацию только к выпускным сборкам, а не к отладочным. Это связано с тем, что минификация требует времени и может замедлить сборку. Это также может усложнить отладку из-за оптимизации кода.
Настройки в разделе Minify применяются только к процессу сборки текущего проекта.
| Свойства | Описание |
|---|---|
| Use R8 | По умолчанию Unity использует Proguard для минификации. Установите этот флажок, чтобы вместо этого использовать R8. |
| Release | Установите этот флажок, если вы хотите, чтобы Unity минимизировала код вашего приложения в релизных сборках. |
| Debug | Установите этот флажок, если вы хотите, чтобы Unity минимизировала код вашего приложения в отладочных сборках.. |
Разделить двоичный файл приложения
Включите параметр Разделить двоичный файл приложения, чтобы разделить выходной пакет на основной (APK) и дополнительный (OBB) пакеты. Google Play Store требует этого, если вы хотите публиковать приложения размером более 100 МБ.
- Обновленные функции в версии 5.5
- Режим стабильной производительности добавлен в версии 2017.3
- Среда выполнения .NET 4.x добавлена в 2018.1
- Функции несколько APK для Android добавлены в 2018.2
- Поддержка OpenGL ES 3.2 для Android добавлена в 2019.1
- Предварительный просмотр системы ввода добавлен в Unity 2019.1
- Визуализация за пределами безопасной области добавлена в Unity 2019.1
- Предупреждать о параметре размера App Bundle, добавленном в Unity 2019.2
- GPU Skinning переименован в Compute Skinning в Unity 2019.3
- Vuforia удалена из Unity 2019.3
- Поддержка встроенных XR SDK, которые устарели в Unity 2019.3
- Обновлен формат сжатия текстур
This article has been written using Unity 5.2.3 as a reference, many things could have been changed in the current version.
When it’s time to publish a standalone game made in Unity 3D, one of the things to do is ensuring that the game and its UI work fine on different display resolutions. Shipping your game with the Unity resolution dialog window turned on (Edit menu > Project settings > Player | Resolution and Presentation : Display Resolution Dialog) is an easy way to let your users choose a windowed or fullscreen resolution for the game. But if you want to let them change the resolution from an in-game menu or if you have to enforce a specific aspect ratio, than you need to understand how Unity screen resolution management works, its connection to the PlayerPrefs and how to tune cameras to target a specific aspect ratio. I’ve come up with a basic screen resolution manager for Unity, tested on OS X and Windows. Here is the project on github: UnityScreenResolutionManager[a]. In this article I will explain in detail how it works.

Edit > Project settings > Player
Let’s see how the fullscreen resolution works in Unity. A set of parameters can be edited from Edit menu > Project settings > Player | Resolution and Presentation (see image). The first thing to look is the fullscreen mode. You can choose between fullscreen window and exclusive mode on Windows. In exclusive mode your game will take control of the entire display. With this mode it is not possible to change the screen resolution at runtime, thus we have to avoid this mode and choose the fullscreen window mode instead. In fullscreen window mode, your game will run inside a maximized borderless window. This window will live in the current screen, thus inheriting the same resolution of the display where it has been created, no changes are made to the current display resolution when the application starts and when it is running. Now let’s see what this implies when you set a fullscreen resolution using the editor player settings:
- When you check Default is native resolution in player settings, native means the current display resolution, not the actual native resolution of you computer monitor which can be larger than the current screen resolution.
- When you select a Default Screen Width/Height in player settings greater than the current display resolution, Unity will use the current display resolution, even if it is smaller than your monitor native resolution (no display resolution changes are possible in fullscreen window mode). Let’s say that you have a full hd monitor and you set a 1280×720 resolution using the OS settings; when you launch a Unity application set with a default full hd resolution, the application will run inside a maximized window on your 1280×720 screen, no screen resolution change will occur.
- When you select a Default Screen Width/Height smaller than the current display resolution, Unity will use this smaller size to render the current fram in memory and then upscale it to fit the full-resolution window. You will see larger pixels, as when you set a lower display resolution, but this upscale is done in engine, not by changing the actual display resolution.
As we have seen above, when dealing with screen resolutions in Unity, it is important to distinguish between the game viewport resolution and the underlying display resolution. Unity documentation talks about a general screen resolution which can be unclear if you don’t know much about the way Unity manages screen resolutions. In this article I will always specify if I’m talking about the display resolution or the game viewport resolution. You can control the screen resolution at runtime using the Unity engine Screen class:
- Screen.fullscreen Toggles fullscreen/windowed mode.
- Screen.width, Screen.height The current width/height of the game viewport in pixel.
- Screen.resolutions
 All fullscreen resolutions supported by the monitor. The resolutions included in this array are filtered by the Supported aspect ratios setting you can find in the player settings panel. If your monitor is set to a resolution smaller than native, Screen.resolutions will contain the native resolution but that resolution will not be actually available for your game; in fact, as seen above, it is impossible to increase the display resolution at runtime.
 - Screen.currentResolution This property has a different behaviour on Windows, OS X and Linux when you are in fullscreen mode.
- On Windows it contains the current game viewport resolution (the one that you set with Screen.SetResolution), but in certain cases it can be different from (Screen.width, Screen.Height).
- On OS X it contains the current display resolution (set by the OS).
- When in windowed mode, Screen.currentResolution gives you the current display resolution both on Windows and OS X.
- On Linux (tested on Ubuntu 14.10) this parameter is pretty useless on a multiple monitor configuration cause it will always return the resolution of the screen area covered by all the monitors both in fullscreen and in windowed mode.
- Screen.SetResolution(int width, int height, bool fullscreen) Sets the game viewport width and height in pixels and switches between fullscreen and windowed mode. You are free to set a resolution not included in the array Screen.resolutions; you can choose any size smaller or equal to the current display resolution (not greater, see above). When you choose a resolution with an aspect ratio different from the current display aspect ratio, Windows can add letterbox or pillarbox black bands (only when you set the resolution in player settings, not at runtime), OSX will stretch the viewport on the entire display with no black bands thus changing the pixel aspect ratio and generating a distorted image. We’ll see below the best way to deal with aspect ratio in Unity.
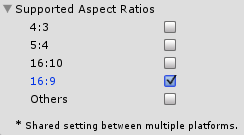 All fullscreen resolutions supported by the monitor. The resolutions included in this array are filtered by the Supported aspect ratios setting you can find in the player settings panel. If your monitor is set to a resolution smaller than native, Screen.resolutions will contain the native resolution but that resolution will not be actually available for your game; in fact, as seen above, it is impossible to increase the display resolution at runtime.
Full Screen Aspect Ratio
As seen above, when you set a fullscreen resolution with an aspect ratio different from the current display aspect, Unity can insert black bands around the screen to keep the pixel aspect ratio. Unfortunately you cannot count on this behaviour for two reasons: it only works on Windows (OS X stretches the screen), and the black bands on Windows are not refreshing (Steam popups will leave a trail over these bands). The correct way to deal with aspect ratios and insert black letterbox/pillarbox bands is working with camera settings. There is a nice script on the Internet – AspectUtility.cs[b] – which is very simple to use: just add it to every camera in your scene. If you are using Unity legacy UI or NGUI, make sure to use screen space camera render mode and add the AspectUtility.cs to the UI camera. This script will set the camera rect to create some pillarbox/letterbox bands according to the proportion between the current and desired aspect ratio. It will also add a background camera to fill these black bands and guarantee screen refreshing for these areas. It also provides some utility methods to remap screen sizes and mouse positions, useful when you are working with the game UI. Using this script, the way you enforce screen aspect ratio in your game is:
- Set a fullscreen resolution with the same aspect ratio of your display. In this way you are sure that Unity won’t stretch the screen thus preventing image distorsion.
- Add the AspectUtility.cs script to each camera in your scene, using screen space camera rendering for UI.
I did some changes to the original AspectUtility.cs script in order to intercept screen resolution changes and update the camera rect accordingly.
PlayerPrefs
Every time you change the screen resolution, Unity saves the width, height and fullscreen/windowed mode in the application PlayerPrefs storage. Unity applications read these PlayerPrefs at startup and use these values to set the screen resolution for your game. This can lead to some strange behaviours when testing your applications:
- When you make new builds of your application with different screen settings, the application will keep reading the old PlayerPrefs at startup ignoring the new player settings. You have to delete the current PlayerPrefs in order to test the behaviour of an application first run.
- If you run your application on a display with a resolution smaller than the one specified in player settings, the screen will adapt to this smaller display and the new screen size will be stored in PlayerPrefs. Now, if you close the application and then you launch it again on a monitor with higher resolution (a common case is when you have a multi monitor setup with different screen sizes), your application will keep the previous smaller resolution even if now your monitor could support the native game resolution.
On Windows PlayerPrefs are stored in the registry under HKCUSoftware[company name][product name] key, where company and product names are the names set up in Project Settings. Just delete this registry entry to make sure that your application does not read old screen settings at startup. On Mac OS X PlayerPrefs are stored in ~/Library/Preferences folder, in a file named unity.[company name].[product name].plist, where company and product names are the names set up in Project Settings. The same .plist file is used for both Projects run in the Editor and standalone players. Cleaning up PlayerPrefs on OS X is a bit harder than on Windows cause the application itself and the per user process “cfprefsd” both cache the preferences[c]. The easiest way I found to cleanup PlayerPres on OS X is to call PlayerPrefs.DeleteAll() inside an ad hoc cleanup scene in my Unity project.
Screen Resolution Manager
Now let’s see a bit of code of my screen resolution manager for Unity. Here is the project on github: UnityScreenResolutionManager. A basic screen resolution manager class should:
- Compute a set of available fullscreen/windowed resolutions for your display (according to an optional desired aspect ratio) in order to let te users choose them in a menu.
- Enforce a preferred aspect ratio at runtime.
- Manage fullscreen to windowed transitions.
To compute the available resolutions, the manager needs to know the current display resolution. On Mac OS X it’s easy, just read the Screen.currentResolution property. When running in fullscreen mode on Windows, as seen above, this property gives you the current game viewport resolution, which can be different from that of the display. The solution I used to get the current display resolution when you start fullscreen is switching to windowed mode at startup, read the Screen.currentResolution property and then switch back to fullscreen. Here is the code:
|
1 2 3 4 5 6 7 8 9 10 11 12 13 14 15 16 17 18 19 20 21 22 23 24 |
if (Application.platform == RuntimePlatform.OSXPlayer) { NativeResolution = Screen.currentResolution; } else { // If fullscreen on Windows go windowed to read the current display resolution if (Screen.fullScreen) { Resolution r = Screen.currentResolution; Screen.fullScreen = false; // goto windowed // Wait a couple of frames to make sure that // Screen.currentResolution updates its value yield return null; yield return null; NativeResolution = Screen.currentResolution; Screen.SetResolution (r.width, r.height, true); yield return null; } else { NativeResolution = Screen.currentResolution; } } |
The above code which is executed inside a coroutine, as you can guess if you notice the yield keywords. This because I need to wait one or two frames when changing resolution (the resolution is actually changed in the next frame after calling Screen.setResolution). After obtaining the current display resolution, it is possible to compute a set of resolutions, based on a list of predefined hardcoded widths.
|
// List of horizontal resolutions to include int[] resolutions = new int[] { 600, 800, 1024, 1280, 1400, 1600, 1920 }; |
I’m creating two lists, both for windowed and fullscreen resolutions. Here are the steps:
- Add to the fullscreen list all the resolutions smaller than 80% of the current resolution.
- Add to the fullscreen list half the value of the current screen resolution (only if greater than the smallest hardcoded resolution).
- Add to the fullscreen list the current display resolution.
- Add all resolutions smaller than 80% of the current resolution to the windowed list.
On Mac OS X (at least on Yosemite where I did the tests) there is a problem when you try to switch from fullscreen mode to windowed mode with a specific window size. The application, in fact, will pass from fullscreen to windowed with an animated transition of a couple of seconds. After this transition you have to call SetResolution again to ensure that the window is resized correctly. I wrote a piece of code for OS X which waits for this transition to end, here it is:
|
1 2 3 4 5 6 7 8 9 10 11 12 13 14 15 16 17 18 19 20 21 |
private IEnumerator SetResolutionAfterResize(Vector2 r) { int maxTime = 5; // Max wait for the end of the resize transition float time = Time.time; // Skipping a couple of frames during which the screen size will change yield return null; yield return null; int lastW = Screen.width; int lastH = Screen.height; // Waiting for another screen size change at the end of the transition animation while (Time.time — time < maxTime) { if(lastW != Screen.width || lastH != Screen.height) { Screen.SetResolution ((int)r.x, (int)r.y, Screen.fullScreen); yield break; } yield return null; } } |
Here is a screenshot of the UnityScreenResolutionManager:
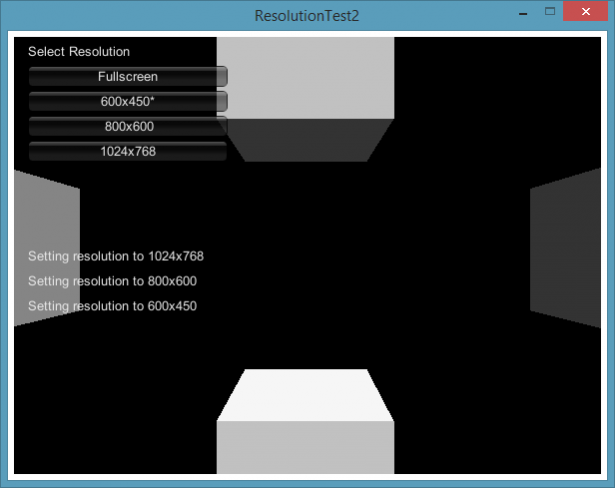
A simple test scene and UI for the screen resolution manager.
Linux
The screen resolution manager has some problems on Linux, at least on an Ubuntu 14.10 where I did the tests. The aspect ratio enforcer works fine but the screen resolution module has some issues. As seen above, on a multi monitor setup it will get a wrong current display resolution and it will set a very large resolution corresponding to the area covered by all the screens. On a single monitor setup it works fine; the only issue is when you switch for the first time from fullscreen to windowed mode. You will get a maximized window which cannot be resized by script until you manually unmaximize it. Given these issues and the fact that on Linux it is impossible to test the infinite number of different configurations, I prefer to show the Unity screen resolution dialog at startup on my Linux builds.
Notes
- UnityScreenResolutionManager project on github [↩]
- AspectUtility.cs [↩]
- Unity3d OS X Clean up player prefs / plist [↩]
В общем, пока что остановился на том, что просто растягиваю фон в зависимости от текущего разрешения экрана:
Используется csharp
const float width = 1024f;
const float height = 768f;
const float requiredProportion = width / height;
float newWidth = Screen.width;
float newHeight = Screen.height;
float newProportion = newWidth / newHeight;
if (requiredProportion != newProportion)
{
while (true)
{
if (width < newWidth)
{
transform.localScale = new Vector3(1.8f * (newWidth / width), 1f, 1.4f);
break;
}
else
{
newWidth *= 2;
newHeight *= 2;
}
}
}
Так мой фон объект с текстурой, а не UI пришлось выяснять зависимость, потому что тут обычная пропорция даёт неправильный результат, если текущее разрешение экрана меньше того, под которое игра разрабатывалась, в моём случае 1024:768. Как оказалось, изменять высоту не имеет смысла, Unity делает всегда одинаковой, поэтому по высоте подгонять не имеет смысла.
Сталкивался с аналогичной проблемой .Нарды делал,в итоге так и забросил именно из за того что не смог победить камеру,отложил так сказать проект до лучших времён.Вот мне интересно теперь чем это у Вас закончится!Наблюдаю за событием.Отпишитесь пожалуйста если найдёте решение
Ну у меня змейка, поэтому фон всё решает. В нардах в принципе тоже можно фон поставить какой-нибудь и также проблема уйдёт. Но вот если хотите, чтобы было всегда одинаковая картина, можно подумать о том, чтобы запускать приложение в каком-то определённом разрешении экрана, например в котором сделана игра, без full screen. А сделать так, чтобы камеру настроить, чтобы она видела ровно столько же при любых разрешениях, я пока такой возможности не нашёл.
По мимо этого заметил, что у меня постоянно чёрные полосы, поэтому решил сделать автоподстройку экрана в зависимости от текущего разрешения.
Попробовал так:
Используется csharp
Screen.SetResolution(Screen.width, Screen.height, true, 60);
Но почему-то оно возвращает какое-то именно одно расширение, вместо текущего. Причём ставишь, то разрешение которое выдаёт (1280:768) и даже на нём чёрные полосы (небольшие). И ещё одна странность, я ставлю 60 Гц, а оно мне вообще 75 выдаёт. Это после компиляции игры так. А в редакторе изменяю разрешение на рабочем столе и запускаю и работает правильно. Что не так пока не пойму.
Но ставлю своё:
Используется csharp
Screen.SetResolution(1366, 768, true, 60);
И на моём разрешении всё работает. Чёрных полос нет и частота такая же. Но после переключений понятное дело появляются полосы. Посмотрел парочку игр, в которые играю, те сами в зависимости от моего разрешения подгоняют игру, так как ставил разные разрешения и чёрных полос не было. Поэтому решил сделать также. Но пока не получилось.