Upgraded from 3.4.1 to 3.4.2. DB upgrade completes but Server fails to connect to DB.
1040:20171002:091617.102 Zabbix Server stopped. Zabbix 3.4.1 (revision 71734).
17484:20171002:091617.146 Starting Zabbix Server. Zabbix 3.4.2 (revision 72885).
…
17484:20171002:091617.146 using configuration file: /etc/zabbix/zabbix_server.conf
17484:20171002:091617.172 current database version (mandatory/optional): 03040000/03040000
17484:20171002:091617.172 required mandatory version: 03040000
17484:20171002:091617.172 optional patches were found
17484:20171002:091617.172 starting automatic database upgrade
17484:20171002:091617.422 completed 100% of database upgrade
17484:20171002:091617.422 database upgrade fully completed
…
17646:20171002:091619.325 [Z3001] connection to database ‘zabbix’ failed: [1040] Too many connections
17636:20171002:091619.326 [Z3001] connection to database ‘zabbix’ failed: [1040] Too many connections
17641:20171002:091619.326 [Z3001] connection to database ‘zabbix’ failed: [1040] Too many connections
17631:20171002:091619.326 [Z3001] connection to database ‘zabbix’ failed: [1040] Too many connections
17616:20171002:091619.326 [Z3001] connection to database ‘zabbix’ failed: [1040] Too many connections
17640:20171002:091619.326 [Z3001] connection to database ‘zabbix’ failed: [1040] Too many connections
17634:20171002:091619.326 [Z3001] connection to database ‘zabbix’ failed: [1040] Too many connections
17646:20171002:091619.332 Cannot connect to the database. Exiting…
17636:20171002:091619.334 Cannot connect to the database. Exiting…
17641:20171002:091619.336 Cannot connect to the database. Exiting…
17631:20171002:091619.337 Cannot connect to the database. Exiting…
17616:20171002:091619.339 Cannot connect to the database. Exiting…
17640:20171002:091619.340 Cannot connect to the database. Exiting…
17634:20171002:091619.341 Cannot connect to the database. Exiting…
After several attempts to correct the issue I had to roll back to 3.4.1 by performing a yum history undo.
Once the 3.4.1 was installed I was able to start the service and connect to the server.
I have the same issue one my two proxy servers which also run RHEL 7.4
2754:20171002:093428.504 Starting Zabbix Server. Zabbix 3.4.1 (revision 71734).
2754:20171002:093428.504 ****** Enabled features ******
2754:20171002:093428.504 SNMP monitoring: YES
2754:20171002:093428.504 IPMI monitoring: YES
2754:20171002:093428.504 Web monitoring: YES
2754:20171002:093428.504 VMware monitoring: YES
2754:20171002:093428.504 SMTP authentication: YES
2754:20171002:093428.504 Jabber notifications: YES
2754:20171002:093428.504 Ez Texting notifications: YES
2754:20171002:093428.504 ODBC: YES
2754:20171002:093428.504 SSH2 support: YES
2754:20171002:093428.504 IPv6 support: YES
2754:20171002:093428.504 TLS support: YES
2754:20171002:093428.504 ******************************
2754:20171002:093428.504 using configuration file: /etc/zabbix/zabbix_server.conf
2754:20171002:093428.516 current database version (mandatory/optional): 03040000/03040001
Zabbix server is installable on any Linux distribution, but in this tutorial, I will show you how to install and optimize the latest Zabbix Proxy 6 LTS or 6.2 standard release on 22.04 LTS (Jammy Jellyfish) / Ubuntu 20.04 (Focal) / Ubuntu 18.04 (Bionic).
Zabbix is 100% free open-source ultimate enterprise-level software designed for monitoring availability and performance of IT infrastructure components. You can read a case-study about Zabbix popularity and find out more about open-source movement in this article.
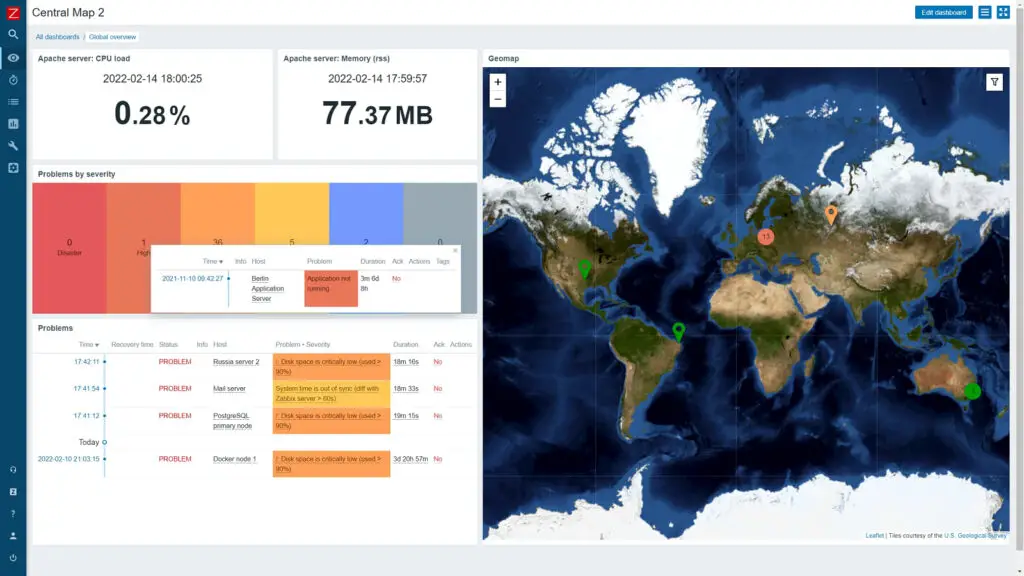
Enough of talk lets do some work! First, we will install and configure Zabbix server, then a database and lastly the frontend – check the picture bellow for a better understanding of Zabbix architecture.

This guide is for installing Zabbix monitoring system (Server) on Ubuntu, while guide for installing Zabbix-proxy on Ubuntu can be found on this link.
Note: You need to log in as a root user on your Linux server with “su -” or use “sudo” to successfully execute commands used in this tutorial.
Step 1: Install Zabbix server, frontend, and agent
Install Zabbix 6 .deb package on your Ubuntu OS (22.04, 20.04, 18.04 and 16.04 are supported).
Zabbix 6.0 LTS version (supported until February, 2027)
wget https://repo.zabbix.com/zabbix/6.0/ubuntu/pool/main/z/zabbix-release/zabbix-release_6.0-4+ubuntu$(lsb_release -rs)_all.deb
sudo dpkg -i zabbix-release_6.0-4+ubuntu$(lsb_release -rs)_all.deb
sudo apt update
sudo apt -y install zabbix-server-mysql zabbix-frontend-php zabbix-apache-conf zabbix-sql-scripts zabbix-agent

                        OR

Zabbix 6.2 standard version (supported until January, 2023)
wget https://repo.zabbix.com/zabbix/6.2/ubuntu/pool/main/z/zabbix-release/zabbix-release_6.2-2+ubuntu$(lsb_release -rs)_all.deb
sudo dpkg -i zabbix-release_6.2-2+ubuntu$(lsb_release -rs)_all.deb
sudo apt update
sudo apt -y install zabbix-server-mysql zabbix-frontend-php zabbix-apache-conf zabbix-sql-scripts zabbix-agent
You can find more information about Zabbix’s life cycle and release policies on the official website.
Step 2: Configure database
In this installation, I will use password rootDBpass as root password and zabbixDBpass as Zabbix password for DB. Consider changing your password for security reasons.
a. Install MariaDB 10.6
In your terminal, use the following command to install MariaDB 10.6.
sudo apt install software-properties-common -y
curl -LsS -O https://downloads.mariadb.com/MariaDB/mariadb_repo_setup
sudo bash mariadb_repo_setup --mariadb-server-version=10.6
sudo apt update
sudo apt -y install mariadb-common mariadb-server-10.6 mariadb-client-10.6
Once the installation is complete, start the MariaDB service and enable it to start on boot using the following commands:
sudo systemctl start mariadb
sudo systemctl enable mariadb
b. Reset root password for database
Secure MySQL/MariaDB by changing the default password for MySQL root:
sudo mysql_secure_installation
Enter current password for root (enter for none): Press Enter
Switch to unix_socket authentication [Y/n] y
Change the root password? [Y/n] y
New password: <Enter root DB password>
Re-enter new password: <Repeat root DB password>
Remove anonymous users? [Y/n]: Y
Disallow root login remotely? [Y/n]: Y
Remove test database and access to it? [Y/n]:  Y
Reload privilege tables now? [Y/n]:  Y
c. Create database
sudo mysql -uroot -p'rootDBpass' -e "create database zabbix character set utf8mb4 collate utf8mb4_bin;"
sudo mysql -uroot -p'rootDBpass' -e "grant all privileges on zabbix.* to [email protected] identified by 'zabbixDBpass';"
d. Import initial schema and data.
Import database shema for Zabbix server (could last up to 5 minutes):
sudo zcat /usr/share/zabbix-sql-scripts/mysql/server.sql.gz | mysql --default-character-set=utf8mb4 -uzabbix -p'zabbixDBpass' zabbix
e. Enter database password in Zabbix configuration file
Open zabbix_server.conf file with command:
sudo nano /etc/zabbix/zabbix_server.conf
and add database password in this format anywhere in file:
DBPassword=zabbixDBpass
Save and exit file (ctrl+x, followed by y and enter).
Step 3: Configure firewall
If you have a UFW firewall installed on Ubuntu, use these commands to open TCP ports: 10050 (agent), 10051 (server), and 80 (frontend):
ufw allow 10050/tcp
ufw allow 10051/tcp
ufw allow 80/tcp
ufw reload
Step 4: Start Zabbix server and agent processes
sudo systemctl restart zabbix-server zabbix-agent
sudo systemctl enable zabbix-server zabbix-agent
Step 5: Configure Zabbix frontend
a. Configure PHP for Zabbix frontend
Edit file /etc/zabbix/apache.conf:
sudo nano /etc/zabbix/apache.conf
Uncomment 2 lines in apache.conf that starts with “# php_value date.timezone Europe/Riga” by removing symbol # and set the right timezone for your country, for example:
php_value date.timezone Europe/Amsterdam
Save and exit file (ctrl+x, followed by y and enter)
b. Restart Apache web server and make it start at system boot
sudo systemctl restart apache2
sudo systemctl enable apache2
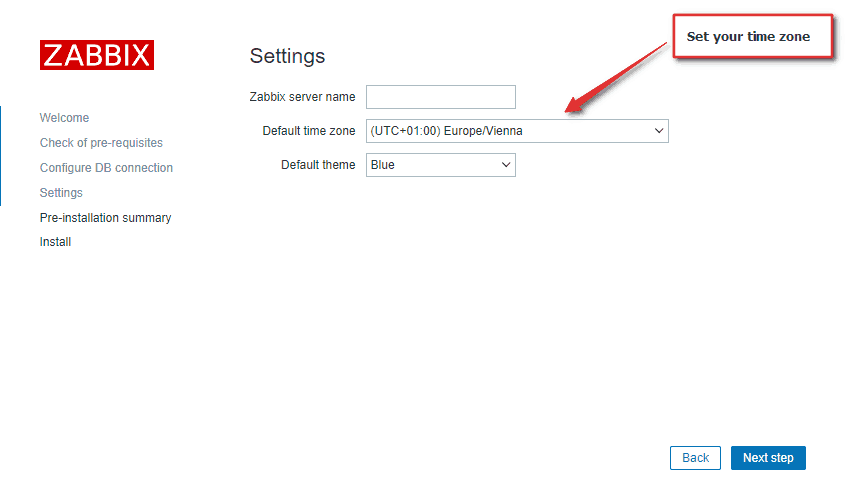
c. Configure web frontend
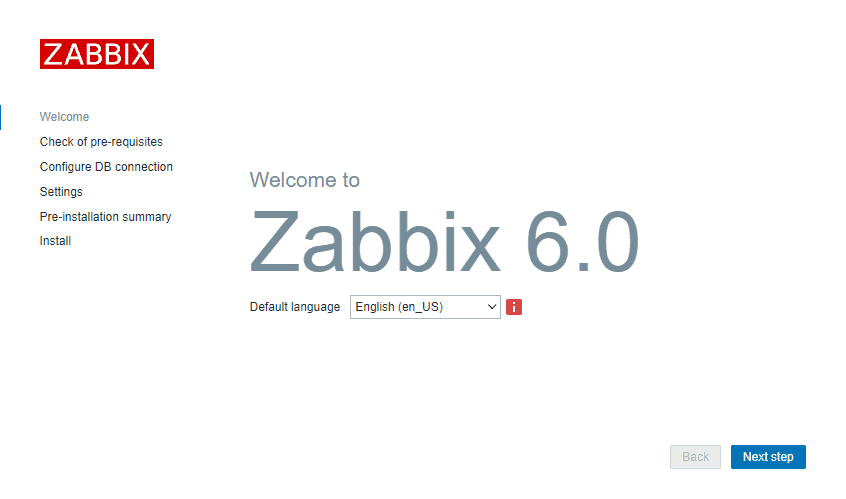
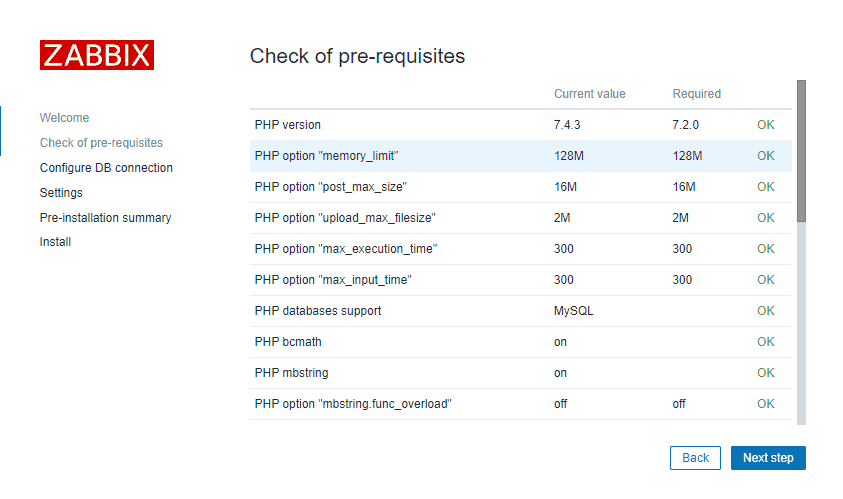
Connect to your newly installed Zabbix frontend using URL “http://server_ip_or_dns_name/zabbix” to initiate the Zabbix installation wizard.
In my case, that URL would be “http://192.168.1.161/zabbix” because I have installed Zabbix on the server with IP address 192.168.1.161 (you can find the IP address of your server by typing “ip a” command in the terminal).
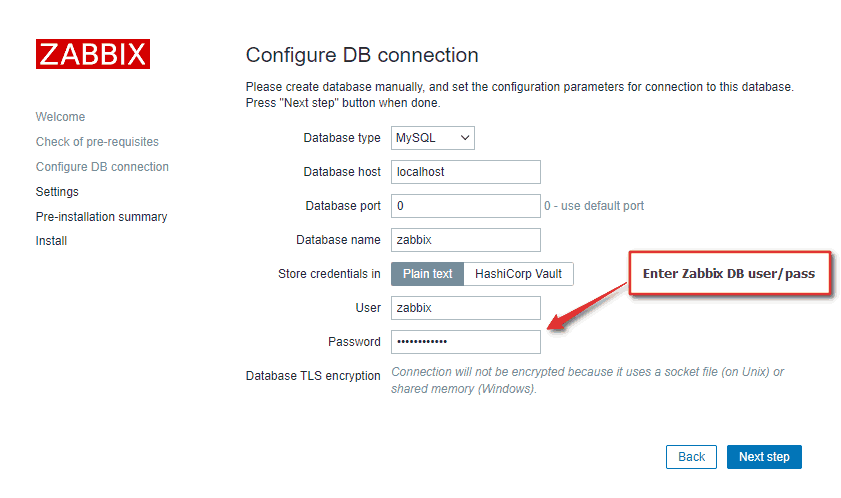
Basically, in this wizard you only need to enter a password for Zabbix DB user and just click “Next step” for everything else. In this guide, I have used a zabbixDBpass as a database password, but if you set something else, be sure to enter the correct password when prompted by the wizard.

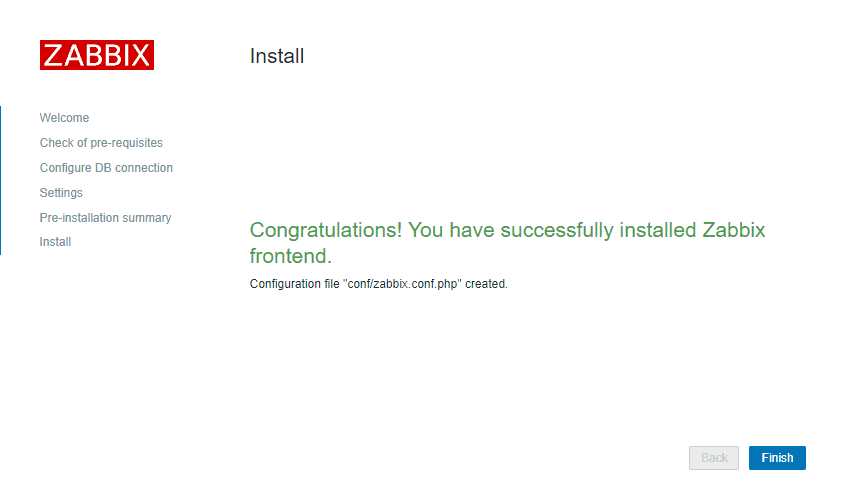
That’s it, you have installed Zabbix monitoring system!
Step 6: Login to frontend using Zabbix default login credentials
Use Zabbix default admin username “Admin” and password “zabbix” (without quotes) to login to Zabbix frontend at URL “http://server_ip_or_dns_name/zabbix” via your browser.
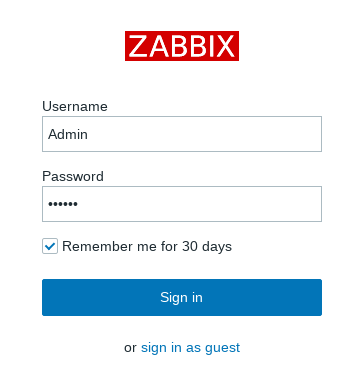
In my example, I have installed Zabbix on server 192.168.1.161 so I will enter in my browsers URL field http://192.168.1.161/zabbix (you can find the IP address of your server by typing “ip a” command in the terminal)
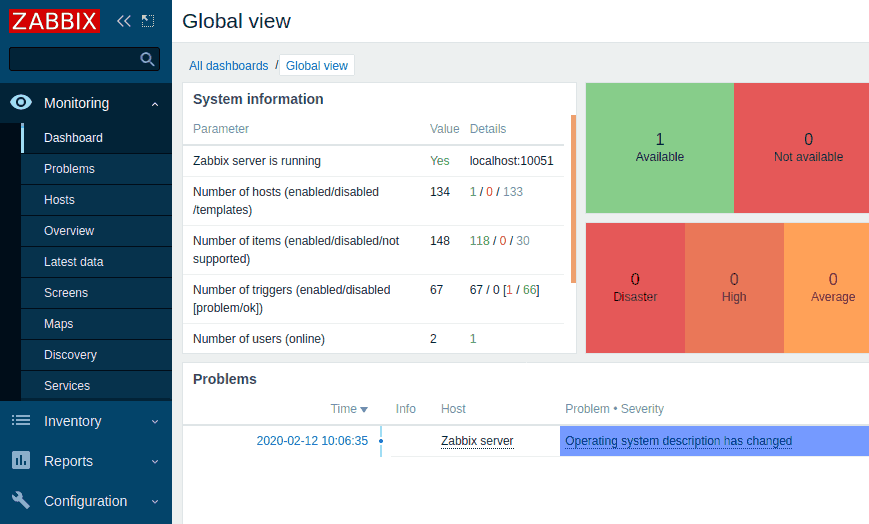
CONGRATULATIONS!
You have successfully installed Zabbix 6 on Ubuntu and now you can monitor anything!
No need to change anything else as other steps are optional.
CONTINUE TO LEARN MORE:
Optimizing Zabbix server and MySQL database
How to create MySQL partitions on History and Events tables
Managing Zabbix / MySQL / Apache service
Step 7: Optimizing Zabbix Server (optional)
Don’t bother with this optimization if you are monitoring a small number of devices, but if you are planning to monitor a large number of devices then continue with this step.
Open “zabbix_server.conf” file with command: “sudo nano /etc/zabbix/zabbix_server.conf” and add this configuration anywhere in file:
StartPollers=100
StartPollersUnreachable=50
StartPingers=50
StartTrappers=10
StartDiscoverers=15
StartPreprocessors=15
StartHTTPPollers=5
StartAlerters=5
StartTimers=2
StartEscalators=2
CacheSize=128M
HistoryCacheSize=64M
HistoryIndexCacheSize=32M
TrendCacheSize=32M
ValueCacheSize=256M
Save and exit file (ctrl+x, followed by y and enter).
This is not a perfect configuration, keep in mind that you can optimize it even more. Let’s say if you don’t use ICMP checks then set the “StartPingers” parameter to 1 or if you don’t use active agents then set “StartTrappers” to 1 and so on. You can find out more about the parameters supported in a Zabbix server configuration file in the official documentation.
If you try to start the Zabbix server you may receive an error “[Z3001] connection to database 'Zabbix' failed: [1040] Too many connections” in the log “/var/log/zabbix/zabbix_server.log” because we are using more Zabbix server processes than MySQL can handle. We need to increase the maximum permitted number of simultaneous client connections and optimize MySQL – so move to the next step.
Step 8: Optimizing MySQL / MariaDB database (optional)
a. Create custom MySQL configuration file
Create file “10_my_tweaks.cnf" with “sudo nano /etc/mysql/mariadb.conf.d/10_my_tweaks.cnf” and paste this configuration:
[mysqld]
max_connections                = 404
innodb_buffer_pool_size        = 800M

innodb-log-file-size           = 128M
innodb-log-buffer-size         = 128M
innodb-file-per-table          = 1
innodb_buffer_pool_instances   = 8
innodb_old_blocks_time         = 1000
innodb_stats_on_metadata       = off
innodb-flush-method            = O_DIRECT
innodb-log-files-in-group      = 2
innodb-flush-log-at-trx-commit = 2

tmp-table-size                 = 96M
max-heap-table-size            = 96M
open_files_limit               = 65535
max_connect_errors             = 1000000
connect_timeout                = 60
wait_timeout                   = 28800
Save and exit the file (ctrl+x, followed by y and enter) and set the correct file permission:
sudo chown mysql:mysql /etc/mysql/mariadb.conf.d/10_my_tweaks.cnf
sudo chmod 644 /etc/mysql/mariadb.conf.d/10_my_tweaks.cnf
Two things to remember!
Configuration parameter max_connections must be larger than the total number of all Zabbix proxy processes plus 150. You can use the command below to automatically check the number of Zabbix processes and add 150 to that number:
[email protected]:~ $ egrep "^Start.+=[0-9]"  /etc/zabbix/zabbix_server.conf  |  awk -F "=" '{s+=$2} END {print s+150}'
 404
The second most important parameter is innodb_buffer_pool_size, which determines how much memory can MySQL get for caching InnoDB tables and index data. You should set that parameter to 70% of system memory if only database is installed on server.
However, in this case, we are sharing a server with Zabbix and Apache processes so you should set innodb_buffer_pool_size to 40% of total system memory. That would be 800 MB because my Ubuntu server has 2 GB RAM.
I didn’t have any problems with memory, but if your Zabbix proxy crashes because of lack of memory, reduce “innodb_buffer_pool_size” and restart MySQL server.
Note that if you follow this configuration, you will receive “Too many processes on the Zabbix server” alarm in Zabbix frontend due to the new Zabbix configuration. It is safe to increase the trigger threshold or turn off that alarm (select “Problems” tab → left click on the alarm → select “Configuration” → remove the check from “Enabled” → hit the “Update” button)
b. Restart Zabbix Server and MySQL service
Stop and start the services in the same order as below:
sudo systemctl stop zabbix-server
sudo systemctl stop mysql
sudo systemctl start mysql
sudo systemctl start zabbix-server
Step 9: Create MySQL partitions on History and Events tables
Zabbix’s housekeeping process is responsible for deleting old trend and history data. Removing old data from the database using SQL delete query can negatively impact database performance. Many of us have received that annoying alarm “Zabbix housekeeper processes more than 75% busy” because of that.
That problem can be easily solved with the database partitioning. Partitioning creates tables for each hour or day and drops them when they are not needed anymore. SQL DROP is way more efficient than the DELETE statement.
You can partition MySQL tables in 5 minutes using this simple guide.
Step 10: How to manage Zabbix / MySQL / Apache service
Sometimes you will need to check or restart Zabbix, MySQL or Apache service – use commands below to do that.
Zabbix Server
sudo systemctl <status/restart/start/stop> zabbix-server

MySQL Server
sudo systemctl <status/restart/start/stop> mysql

Apache Server
sudo systemctl <status/restart/start/stop> apache2

Zabbix Agent
sudo systemctl <status/restart/start/stop> zabbix-agent
Step 11: Upgrade between minor versions
I wrote about these upgrade procedures in my post about Zabbix upgrade. Zabbix’s team releases new minor versions at least once a month. The main purpose of minor upgrades is to fix bugs (hotfix) and sometimes even bring new functionality. Therefore, try to do a minor upgrade of Zabbix at least once a month.
There is no need for backups when doing a minor upgrade, they are completely safe. With this command you can easily upgrade smaller versions of 6.0.x (for example, from 6.0.1 to 6.0.3):
sudo apt install --only-upgrade 'zabbix*'
And restart Zabbix server afterward:
sudo systemctl restart zabbix-server
Содержание
- Zabbix cannot connect to the database – Let’s fix it!
- Causes for ‘Zabbix cannot connect to the database’ Error
- Incorrect Database details
- Incorrect DBsocket
- Conclusion
- PREVENT YOUR SERVER FROM CRASHING!
- Устраняем типичные ошибки в MySQL
- Не удаётся подключиться к локальному серверу
- Не удаётся подключиться к серверу MySQL
- Ошибки запрета доступа в MySQL
- Потеря соединения с сервером MySQL
- Слишком много подключений
- Недостаточно памяти
- MySQL продолжает «падать»
- Заключение
- Zabbix 5: Database Error — Connection Refused
- Zabbix 5: Ошибка базы Данных — Отказано в подключении
- Диагностика и исправление ошибки Zabbix 5 с сообщением «Database Error — Connection Refused»
- Проблема
- Проверка причины
- Удаление логов (журналов)
- Подготовка к расширению дискового пространства
- Увеличение дискового пространства виртуальной машины
- Настройка Разделов Linux С Помощью GParted Live
- Как решить похожую проблему на VMWare
- Резюме
Zabbix cannot connect to the database – Let’s fix it!
Are you looking for a solution to “zabbix cannot connect to the database” error ? Here’s how we fix it.
Zabbix is a monitoring software tool. When using zabbix we may encounter many errors like zabbix cannot connect to the database. This may occur due to incorrect database details.
At Bobcares, we often get requests from our customers to fix ‘zabbix cannot connect to the database’ as part of our Server Management Services.
Today, we’ll see the reasons and how our Support Engineers fix this error.
Causes for ‘Zabbix cannot connect to the database’ Error
At Bobcares, where we have more than a decade of expertise in managing servers, we see many customers face problems while managing Zabbix.
Now, let’s see the major reasons for this Zabbix error to occur and we’ll also see how our Support Engineers fix this zabbix database cannot connect error.
Incorrect Database details
Recently one of our customers approached us with the same zabbix problem. He said he was getting an error in his zabbix dashboard like the one shown below in the screenshot.

When we checked in detail, our Support Engineers found that there is mismatch in the details given in database with those in zabbix_server configuration file.
We found that the DBName given in database was not the same as the one given in zabbix configuration file. So, we changed it to the right one. Finally, this fixed the error.
We also Checked and confirmed whether all other values entered were right.
Incorrect DBsocket
We got another request from some other customer. However, the error was similar. Here is the error message our customer was receiving.
We checked and found that the socket given in mysql configuration file is different from the one specified in the configuration file for zabbix. In mysql configuration DBSocket value was /var/run/mysql/mysql.sock and in zabbix_server configuration it was DBSocket=/var/run/mysql. So, we made the following corrections in zabbix configuration file:
And this fixed the problem.
[Need any further assistance in fixing zabbix errors? – We’ll help you]
Conclusion
In short, ‘Zabbix cannot connect to the database’ error may occur due to some reasons like wrong database details or when there is any mismatch in configuration file values, etc. Today, we saw how our Support Engineers fix this error.
PREVENT YOUR SERVER FROM CRASHING!
Never again lose customers to poor server speed! Let us help you.
Our server experts will monitor & maintain your server 24/7 so that it remains lightning fast and secure.
Источник
Устраняем типичные ошибки в MySQL
MySQL — система управления базами данных (СУБД) с открытым исходным кодом от компании Oracle. Она была разработана и оптимизирована специально для работы веб-приложений. MySQL является неотъемлемой частью таких веб-сервисов, как Facebook, Twitter, Wikipedia, YouTube и многих других.
Эта статья расскажет, как определять, с чем связаны частые ошибки на сервере MySQL, и устранять их.
Не удаётся подключиться к локальному серверу
Одной из распространённых ошибок подключения клиента к серверу является «ERROR 2002 (HY000): Can’t connect to local MySQL server through socket ‘/var/run/mysqld/mysqld.sock’ (2)».

Эта ошибка означает, что на хосте не запущен сервер MySQL ( mysqld ) или вы указали неправильное имя файла сокета Unix или порт TCP/IP при попытке подключения.
Убедитесь, что сервер работает. Проверьте процесс с именем mysqld на хосте сервера, используя команды ps или grep, как показано ниже.
Если эти команды не показывают выходных данных, то сервер БД не работает. Поэтому клиент не может подключиться к нему. Чтобы запустить сервер, выполните команду systemctl.
Чтобы проверить состояние службы MySQL, используйте следующую команду:
Если в результате выполнения команды произошла ошибка службы MySQL, вы можете попробовать перезапустить службу и ещё раз проверить её состояние.

Если сервер работает (как показано) и вы по-прежнему видите эту ошибку, вам следует проверить, не заблокирован ли порт TCP/IP брандмауэром или любой другой службой блокировки портов.
Для поиска порта, который прослушивается сервером, используйте команду netstat .
Не удаётся подключиться к серверу MySQL
Ещё одна похожая и часто встречающаяся ошибка подключения — «(2003) Can’t connect to MySQL server on ‘server’ (10061)». Это означает, что в сетевом соединении было отказано.
Следует проверить, работает ли в системе сервер MySQL (смотрите выше) и на тот ли порт вы подключаетесь (как найти порт, можно посмотреть выше).
Похожие частые ошибки, с которыми вы можете столкнуться при попытке подключиться к серверу MySQL:
Ошибки запрета доступа в MySQL
В MySQL учётная запись (УЗ) определяется именем пользователя и клиентским хостом, с которого пользователь может подключиться. УЗ может также иметь данные для аутентификации (например, пароль).
Причин для запрета доступа может быть много. Одна из них связана с учётными записями MySQL, которые сервер разрешает использовать клиентским программам при подключении. Это означает, что имя пользователя, указанное в соединении, может не иметь прав доступа к базе данных.
В MySQL есть возможность создавать учётные записи, позволяющие пользователям клиентских программ подключаться к серверу и получать доступ к данным. Поэтому при ошибке доступа проверьте разрешение УЗ на подключение к серверу через клиентскую программу.
Увидеть разрешённые привилегии учётной записи можно, выполнив в консоли команду SHOW GRANTS
Входим в консоль (пример для Unix, для Windows консоль можно найти в стартовом меню):
В консоли вводим команду:
Дать привилегии конкретному пользователю в БД по IP-адресу можно, используя следующие команды:
Ошибки запрещённого доступа могут также возникнуть из-за проблем с подключением к MySQL (см. выше).
Потеря соединения с сервером MySQL
С этой ошибкой можно столкнуться по одной из следующих причин:
- плохое сетевое соединение;
- истекло время ожидания соединения;
- размер BLOB больше, чем max_allowed_packet .
В первом случае убедитесь, что у вас стабильное сетевое подключение (особенно, если подключаетесь удалённо).
Если проблема с тайм-аутом соединения (особенно при первоначальном соединении MySQL с сервером), увеличьте значение параметра connect_timeout .
В случае с размером BLOB нужно установить более высокое значение для max_allowed_packet в файле конфигурации /etc/my.cnf в разделах [mysqld] или [client] как показано ниже.
Если файл конфигурации недоступен, это значение можно установить с помощью следующей команды.
Слишком много подключений
Эта ошибка означает, что все доступные соединения используются клиентскими программами. Количество соединений (по умолчанию 151) контролируется системной переменной max_connections . Устранить проблему можно, увеличив значение переменной в файле конфигурации /etc/my.cnf .
Недостаточно памяти
Если такая ошибка возникла, это может означать, что в MySQL недостаточно памяти для хранения всего результата запроса.
Сначала нужно убедиться, что запрос правильный. Если это так, то нужно выполнить одно из следующих действий:
- если клиент MySQL используется напрямую, запустите его с ключом —quick switch , чтобы отключить кешированные результаты;
- если вы используете драйвер MyODBC, пользовательский интерфейс (UI) имеет расширенную вкладку с опциями. Отметьте галочкой «Do not cache result» (не кешировать результат).
Также может помочь MySQL Tuner. Это полезный скрипт, который подключается к работающему серверу MySQL и даёт рекомендации по настройке для более высокой производительности.
MySQL продолжает «падать»
Если такая проблема возникает, необходимо выяснить, заключается она в сервере или в клиенте. Обратите внимание, что многие сбои сервера вызваны повреждёнными файлами данных или индексными файлами.
Вы можете проверить состояние сервера, чтобы определить, как долго он работал.
Чтобы узнать время безотказной работы сервера, запустите команду mysqladmin .

Кроме того, можно остановить сервер, сделать отладку MySQL и снова запустить службу. Для отображения статистики процессов MySQL во время выполнения других процессов откройте окно командной строки и введите следующее:
Заключение
Самое важное при диагностике — понять, что именно вызвало ошибку. Следующие шаги помогут вам в этом:
- Первый и самый важный шаг — просмотреть журналы MySQL, которые хранятся в каталоге /var/log/mysql/ . Вы можете использовать утилиты командной строки вроде tail для чтения файлов журнала.
- Если служба MySQL не запускается, проверьте её состояние с помощью systemctl . Или используйте команду journalctl (с флагом -xe ) в systemd.
- Вы также можете проверить файл системного журнала (например, /var/log/messages ) на предмет обнаружения ошибок.
- Попробуйте использовать такие инструменты, как Mytop, glances, top, ps или htop, чтобы проверить, какая программа использует весь ресурс процессора или блокирует машину. Они также помогут определить нехватку памяти, дискового пространства, файловых дескрипторов или какого-либо другого важного ресурса.
- Если проблема в каком-либо процессе, можно попытаться его принудительно остановить, а затем запустить (при необходимости).
- Если вы уверены, что проблемы именно на стороне сервера, можете выполнить команды: mysqladmin -u root ping или mysqladmin -u root processlist , чтобы получить от него ответ.
- Если при подключении проблема не связана с сервером, проверьте, нормально ли работает клиент. Попробуйте получить какие-либо его выходные данные для устранения неполадок.
Источник
Zabbix 5: Database Error — Connection Refused
Zabbix 5: Ошибка базы Данных — Отказано в подключении
Диагностика и исправление ошибки Zabbix 5 с сообщением «Database Error — Connection Refused»
Если вы недавно развернули Zabbix 5 с помощью загружаемого пакета Appliance, а через несколько часов, дней или недель вошли в систему и столкнулись с сообщением «Ошибка базы данных — отказано в подключении», ваше сердце упадет, и ваши планы на день, скорее всего, сорваны. Вся эта работа по его настройке, настройке шаблонов, добавлению хостов и уведомлений о действиях была потрачена впустую… Ужас. Вероятно, вы уже смирились с тем, что вам снова придется потратить целый день на его настройку с нуля… Но подождите! Прежде чем вы это сделаете, читайте дальше, так как возможно, что есть довольно простое решение!
Мы предполагаем, что вы знаете, что такое Hyper-V, что ваша виртуальная машина Linux работает под управлением Hyper-V и что вы запустили свой сервер Zabbix с помощью пакета Microsoft Hyper-V 2012 Zabbix 5 Appliance. Тем не менее, некоторые из остальной части этой статьи могут быть применимы к другим средам, хотя команды Linux могут отличаться для разных операционных систем Linux.
Проблема
Если вы входите на свой сервер Zabbix с внешнего интерфейса и сталкиваетесь с сообщением ниже, это может быть по целому ряду причин, но если все остальное работало нормально ранее, то это скорее всего означает, что у вас закончилось дисковое пространство на разделе, хранящем базу данных MySQL в Linux окружении. 
Проверка причины
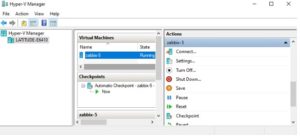
Учитывая, что ошибка может быть сгенерирована по целому ряду причин, давайте проверим дисковое пространство и посмотрим, что мы найдем. Откройте Hyper-V Manager, выберите свою виртуальную машину Zabbix и нажмите кнопку Подключиться из списка действий справа. Если компьютер не запущен, нажмите кнопку Пуск и дождитесь его загрузки.
Войдите в виртуальную машину, а теперь давайте проверим свободное место на диске, введя эту команду и нажав enter:
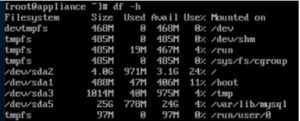
Вы должны увидеть что-то вроде приведенного ниже.
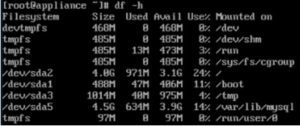
Интересующий нас раздел находится внизу, то есть в выделенном пространстве, в котором хранится база данных MySQL:
/dev/sda5 4.5G 634M 3.9G 14% /var/lib/mysql
В нашем случае наше значение «Use %» равно 14%, но если ваше значение равно или близко к 100%, значит, вы исчерпали выделенное дисковое пространство в 4,5 ГБ, и мы посмотрим, как это исправить дальше. Если ваше значение не близко к 100%, то, скорее всего, ваши проблемы кроются в чем-то другом, и, что ж, мы надеемся, что это не слишком большая головная боль — мы желаем вам удачи!
Удаление логов (журналов)
Если заполнен /dev/sda2, то стоит почистить логи.
В этой папке (/var/log/) можно удалить практически все файлы, но старайтесь сохранить структуру папок, поскольку некоторые приложения после удаления здесь папки не в состоянии создать её второй раз…
На веб-серверах могут разрастись слишком сильно журналы веб-сервера.
Для удаления логов Apache на Debian, Linux Mint, Ubuntu, Kali Linux и их производных:
Для удаления логов Apache на Arch Linux, BlackArch и их производных:
В зависимости от интенсивности использования системы, накопленные журналы могут занимать гигабайты. В зависимости от системы файлы могут называться по-разному, более точный анализ рекомендуется выполнять с помощью утилиты ncdu:
Подготовка к расширению дискового пространства
Поскольку мы определили, что у нас не хватает места на диске для базы данных, давайте сделаем пару подготовительных действий, прежде чем мы действительно исправим проблему. Сначала выключите виртуальную машину, набрав:
Виртуальная машина должна изящно завершиться. Далее, и это очень важно, сделайте резервную копию виртуальной машины. Каждый раз, когда вы начинаете взаимодействовать с дисковым пространством, это может повлиять на ваши данные. Чтобы было ясно, мы не ожидаем, что во время этого процесса произойдет что-то непредвиденное, но это возможно, поэтому вернитесь в Hyper-V Manager, выберите виртуальную машину, в параметрах действий щелкните правой кнопкой мыши «Экспорт», сохраните это на рабочем столе, а затем переместите с компьютера Windows на резервный диск или сетевая папка. Обратите внимание, что мы не можем использовать контрольные точки для этого, потому что для настройки дискового пространства виртуальной машины нам нужно будет удалить эти контрольные точки.
Увеличение дискового пространства виртуальной машины
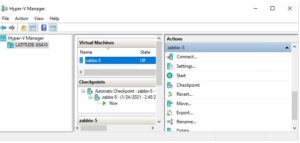
Итак, первое, что мы сделаем, это увеличим дисковое пространство виртуальной машины. Это довольно прямолинейно, но мы пройдемся по этому вопросу. Вернитесь в диспетчер Hyper-V и снова убедитесь, что выбрана ваша виртуальная машина. Если у вас есть какие-либо контрольные точки в списке, они не позволят вам редактировать дисковое пространство. Итак, предполагая, что вы уверены, что экспортировали, как указано выше, для резервного копирования вашей виртуальной машины, щелкните правой кнопкой мыши на контрольных точках и выберите «Удалить контрольную точку», пока все они не исчезнут. Затем нажмите «Настройки» прямо под кнопкой «Подключиться» в настройках действий справа. Затем в левой колонке окна настроек при необходимости разверните IDE Controller и выберите «Жесткий диск».:
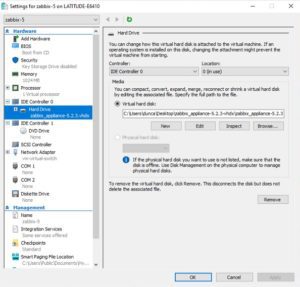
Нажмите кнопку Редактирования виртуального жесткого диска, и должен запуститься Мастер редактирования виртуального жесткого диска, хотя, возможно, он уже включен в опцию Поиска диска.

Виртуальный жесткий диск, который необходимо настроить, уже выбран.

Теперь нас спрашивают, что мы хотим сделать с виртуальным жестким диском, и, конечно же, мы хотим его расширить, поэтому выберите это и нажмите Далее:

Введите новый размер, который вы хотите, чтобы диск имел, и нажмите кнопку Далее. Мы увеличиваем наши с 10 ГБ до 30 ГБ:

Просмотрите изменения, которые будут внесены, и, если все выглядит хорошо, нажмите Готово, и мы закончим с этой частью!
Настройка Разделов Linux С Помощью GParted Live
Хотя мы увеличили доступное дисковое пространство на виртуальной машине, нам нужно выделить его для нашего раздела, в котором находится база данных MySQL, которая в настоящее время заполнена. Чтобы сделать это, мы будем использовать удобный маленький инструмент под названием GParted Live. На компьютере с Windows, на котором вы работали в Hyper-V Manager, загрузите загрузочный образ GParted Live отсюда. Более чем вероятно, что вам нужен второй в списке, имя файла которого заканчивается amd64.iso для 64-разрядной машины. Если вы используете 32-разрядную машину, то загрузите i686.iso версия.
Мы собираемся использовать этот загрузочный образ для запуска нашей виртуальной машины, а затем настроить ее разделы, поэтому вернитесь в Hyper-V Manager, откройте окно настроек виртуальной машины и в левой колонке разверните IDE Controller 1, если необходимо, и выберите DVD Drive. Как показано ниже, перейдите к файлу изображения, который вы только что загрузили, и выберите его. Последнее, что нужно проверить, — это то, что в левой колонке вверху в настройках BIOS указано «Загрузка с компакт-диска». Если это не так, перейдите туда и настройте его так, чтобы порядок загрузки был следующим: CD, IDE, Устаревший сетевой адаптер, дискета.
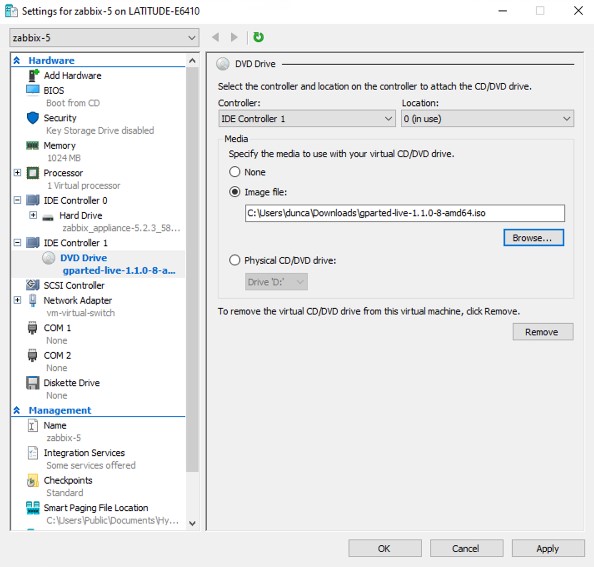
Нажмите кнопку ОК в окне настроек и запустите свою виртуальную машину. Теперь вместо загрузки в вашу ОС Linux он загружается с DVD-привода, содержащего программное обеспечение GParted Live. Нажмите enter на этом экране, чтобы выбрать параметр по умолчанию.

Снова просто нажмите enter на следующем экране, касающемся ключевой карты:

Затем вас спросят, какой язык вы предпочитаете. Нажмите enter для английского языка США по умолчанию или введите выбранный вами вариант, а затем нажмите enter.
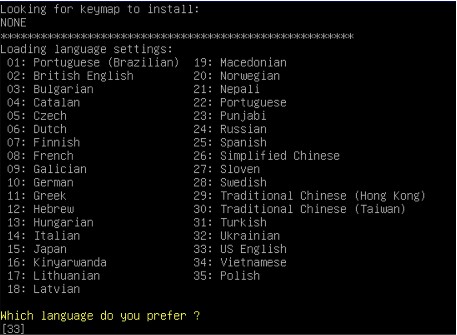
И, наконец, снова нажмите enter для параметра по умолчанию, когда вас спросят, какой режим вы предпочитаете:

И мы в деле! Вы должны смотреть на что-то похожее на приведенное ниже, хотя ваши номера дискового пространства, скорее всего, будут другими:
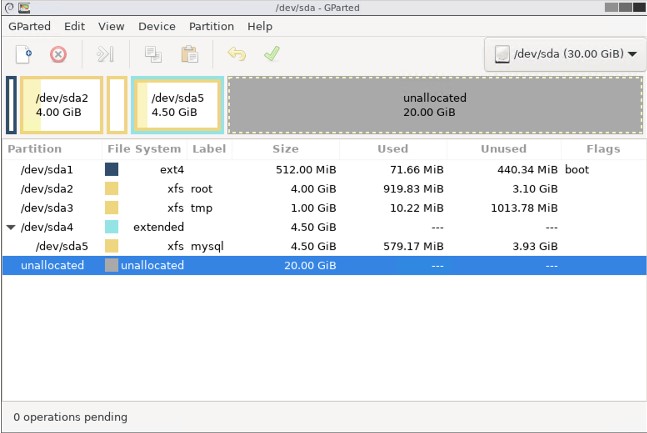
На данный момент следует отметить несколько моментов:
Добавленные нами 20 ГБ дискового пространства отображаются как нераспределенные
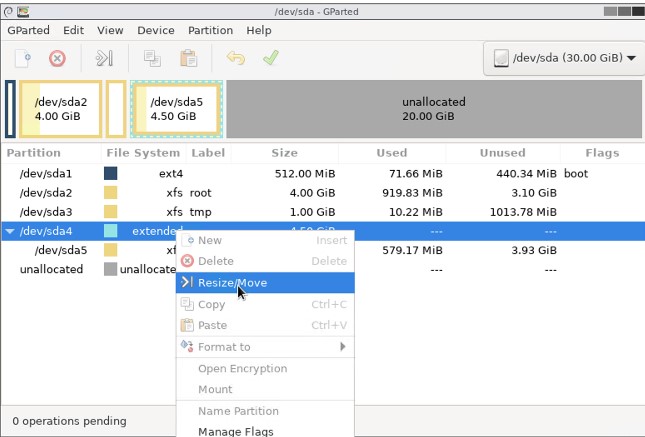
Раздел, который мы видели при проверке вашего дискового пространства в начале, был /dev / sda5, и мы можем видеть это в этом списке с меткой mysql
Этот раздел является частью /dev / sda4, поэтому нам нужно сначала расширить /dev / sda4, а затем расширить /dev / sda5
Обратите внимание на «0 ожидающих операций» в левом нижнем углу окна — мы будем настраивать действия для разделов, а затем должны будем применить эти действия в конце.
Щелкните правой кнопкой мыши на разделе /dev/sda4 и выберите в меню Изменить размер/Переместить:
Перетащите стрелку вправо до упора вправо или введите максимальное значение размера, указанное в поле Новый размер, и нажмите Изменить размер /Переместить:
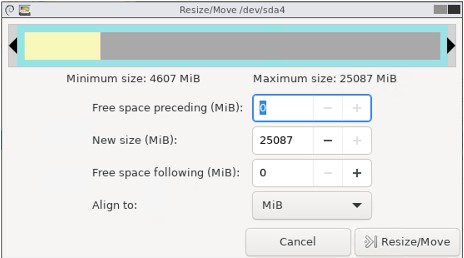
Обратите внимание, что теперь у нас есть 1 незавершенная операция в левом нижнем углу. Сделайте то же самое, что и выше, для /dev/sda5. Наконец, в меню Редактирования выберите «Apply All Operations».
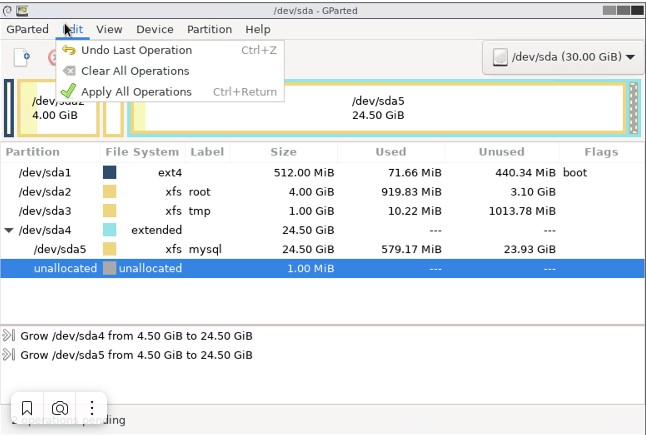
Нажмите кнопку Применить в приглашении, чтобы подтвердить действие. Это должно завершиться в течение нескольких секунд, но это будет зависеть от того, что именно вы сделали и насколько велики ваши разделы. Нажмите закрыть в запросе подтверждения завершения и выключите компьютер из меню Действий главного меню виртуальной машины:

После подтверждения запроса на завершение работы вам будет предложено «remove the live-medium» и т.д. — Просто нажмите enter, чтобы продолжить. Теперь снова запустите виртуальную машину, и на этот раз она загрузится с жесткого диска в Zabbix. Как только он загрузится, войдите в систему и давайте снова проверим наши диски с помощью команды:
Теперь вы должны увидеть, что ваш раздел / dev / sda5 увеличился в размере, а ваш «% использования» уменьшился.
Перейдите к интерфейсному адресу вашего сервера Zabbix, и вы сможете войти в систему без проблем!
Как решить похожую проблему на VMWare
Резюме
К счастью, нам не пришлось перестраивать наш сервер Zabbix с нуля, что, как вы, возможно, теперь понимаете, в конечном итоге привело бы к той же проблеме с нехваткой места в этом разделе. Мы надеемся, что это поможет всем, кто использует Zabbix и сталкивается с этой проблемой.
Источник
Are you looking for a solution to “zabbix cannot connect to the database” error ? Here’s how we fix it.
Zabbix is a monitoring software tool. When using zabbix we may encounter many errors like zabbix cannot connect to the database. This may occur due to incorrect database details.
At Bobcares, we often get requests from our customers to fix ‘zabbix cannot connect to the database’ as part of our Server Management Services.
Today, we’ll see the reasons and how our Support Engineers fix this error.
Causes for ‘Zabbix cannot connect to the database’ Error
At Bobcares, where we have more than a decade of expertise in managing servers, we see many customers face problems while managing Zabbix.
Now, let’s see the major reasons for this Zabbix error to occur and we’ll also see how our Support Engineers fix this zabbix database cannot connect error.
Incorrect Database details
Recently one of our customers approached us with the same zabbix problem. He said he was getting an error in his zabbix dashboard like the one shown below in the screenshot.

When we checked in detail, our Support Engineers found that there is mismatch in the details given in database with those in zabbix_server configuration file.
We found that the DBName given in database was not the same as the one given in zabbix configuration file. So, we changed it to the right one. Finally, this fixed the error.
We also Checked and confirmed whether all other values entered were right.
Incorrect DBsocket
We got another request from some other customer. However, the error was similar. Here is the error message our customer was receiving.
[ZXXX] connection to database 'Databasename' failed: [2002] Can't connect to local MySQL server through socket '/var/lib/mysql'We checked and found that the socket given in mysql configuration file is different from the one specified in the configuration file for zabbix. In mysql configuration DBSocket value was /var/run/mysql/mysql.sock and in zabbix_server configuration it was DBSocket=/var/run/mysql. So, we made the following corrections in zabbix configuration file:
XXXX:/usr/share/zabbix # cat /etc/zabbix/zabbix-server.conf
LogFile=/var/log/zabbix/zabbix-server.log
PidFile=/var/run/zabbix/zabbix-server.pid
DBName=*****
DBUser=*****
DBPassword=*************
DBSocket=/var/run/mysql/mysql.sock
And this fixed the problem.
[Need any further assistance in fixing zabbix errors? – We’ll help you]
Conclusion
In short, ‘Zabbix cannot connect to the database’ error may occur due to some reasons like wrong database details or when there is any mismatch in configuration file values, etc. Today, we saw how our Support Engineers fix this error.
PREVENT YOUR SERVER FROM CRASHING!
Never again lose customers to poor server speed! Let us help you.
Our server experts will monitor & maintain your server 24/7 so that it remains lightning fast and secure.
GET STARTED
var google_conversion_label = «owonCMyG5nEQ0aD71QM»;
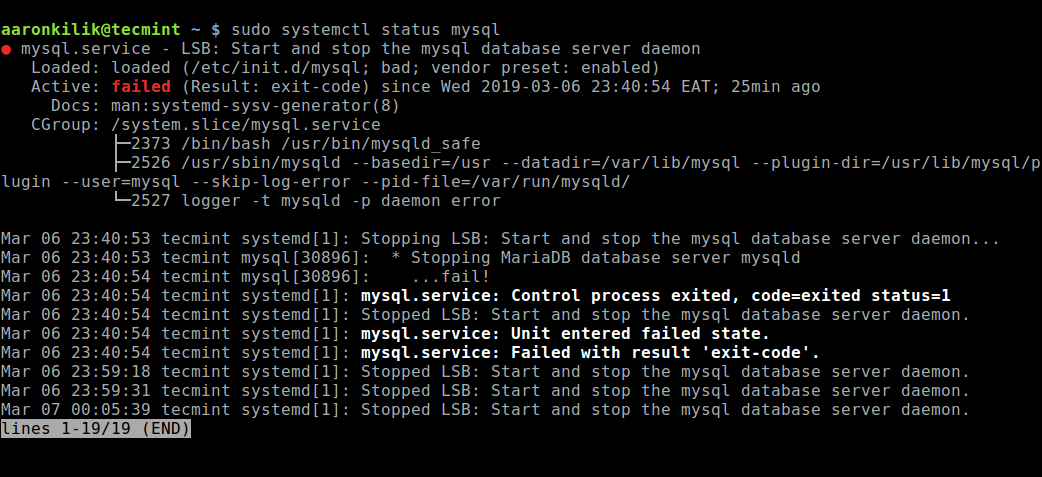
1. System log output when starting ZABBIX agent
PID file /run/zabbix/zabbix_agentd.pid not readable (yet?) after star

zabbix-agent.service never wrote its PID file. Failing
Restart zabbix agent service and it still can’t start normally. Check /log/zabbix/zabbix-agentd.log and find
zabbix_agentd [5922]: cannot open log: cannot create semaphore set: [28] No space left on device
make some changes:
#vim /etc/sysctl.conf
kernel.sem =500  64000   64      256

#sysctl -p /etc/sysctl.conf
After that, it can start normally. (reason: kernel.sem parameter setting is too small. The default setting of the original system is 250 32000 32 128)
Parameter meaning:
The above four data correspond to four core parameters: SEMMSL, SEMMNS, SEMOPM and SEMMNI. The specific meaning and configuration are as follows.
- SEMMSL: used to control the maximum number of signals per signal set.
- SEMMNS: used to control the maximum number of signals (not signal sets) in the entire Linux system.
- SEMOPM: kernel parameter is used to control the number of signal operations that each semap system call can perform.
2. zabbix unreachable poller processes more than 75 busy
unreachable poller processes are always in busy state. What does this mean? Check the official documents zabbix internal process and unreachable poller — poller for unreachable devices for polling unreachable devices.
Possible situation:
- The device collecting data through ZABBIX agent is in the state of moniting, but at this time, the machine crashes or other reasons lead to the death of ZABBIX agent, and the server cannot get the data, and the unreachable poller will rise.
- The device collecting data through Zabbix agent is in the state of moniting, but the time for the server to obtain data from the agent is too long, often exceeding the timeout time set by the server, and the unreachable poller will rise.
- It is possible that MySQL is stuck, IO of Zabbix server is stuck, and Zabbix process has insufficient memory allocation.
terms of settlement:
Increase the number of processes at the start of Zabbix Server, which reduces the busy situation
[root@localhost zabbix]#  vi /etc/zabbix/zabbix_server.conf

Set this value to StartPollers=500,Then restart zabbix-server Services. It can also restart regularly zabbix Services.
3. Zabbix alerter processes more than 75% busy
Received hundreds of zabbix alarm messages:
Zabbix alerter processes more than 75% busy
Possible causes:
- Database problems of zabbix
- IO overload of zabbix server
- The zabbix process is out of memory allocated
- Network delay or failure
Treatment method:
[root@localhost zabbix] vim /etc/zabbix/zabbix_server.conf
Change the default value of 5 to 20:
StartPollers=500
change
StartDiscoverers=1
StartDiscoverers=100
4. The zabbix-server has hung up and stopped automatically after it was started. There are many errors in the log
Alarm prompt:
Zabbix value cache working in low memory mode
Less than 25% free in the configuration cache
Log printing:
[root@localhost zabbix] cat /var/log/zabbix/zabbix_server.log

6278:20180320:190117.775 using configuration file: /etc/zabbix/zabbix_server.conf

6278:20180320:190117.807 current database version (mandatory/optional): 03020000/03020001

6278:20180320:190117.807 required mandatory version: 03020000

6278:20180320:190118.378 __mem_malloc: skipped 0 asked 136 skip_min 4294967295 skip_max 0

6278:20180320:190118.378 [file:dbconfig.c,line:653] zbx_mem_malloc(): out of memory (requested 136 bytes)

6278:20180320:190118.378 [file:dbconfig.c,line:653] zbx_mem_malloc(): please increase CacheSize configuration parameter

6354:20180320:190128.632 Starting Zabbix Server. Zabbix 3.2.10 (revision 74337).
terms of settlement:
Modify configuration, restart
[root@localhost zabbix] vi /etc/zabbix/zabbix_server.conf

### Option: CacheSize

#       Size of configuration cache, in bytes.

#       Shared memory size for storing host, item and trigger data.


# Mandatory: no

# Range: 128K-8G

# Default:

# CacheSize=8M

CacheSize=2048M

[root@localhost zabbix]# systemctl restart zabbix-server
5. zabbix server error, connection to database ‘zabbix’ failed: [1040] Too many connections, and mariadb is normal.
It should be the maximum number of connections in mysql.
1,Check the default maximum number of connections. The default is 151

[root@localhost zabbix]# /usr/bin/mysql -u root -p
Enter password:
Welcome to the MariaDB monitor.  Commands end with ; or g.
Your MariaDB connection id is 14872
Server version: 5.5.56-MariaDB MariaDB Server
Copyright (c) 2000, 2017, Oracle, MariaDB Corporation Ab and others.
Type 'help;' or 'h' for help. Type 'c' to clear the current input statement.
MariaDB [(none)]> show variables like 'max_connections';
+-----------------+-------+
| Variable_name   | Value |
+-----------------+-------+
| max_connections | 151   |
+-----------------+-------+
1 row in set (0.00 sec)

2,modify /etc/my.cnf configuration file
 Add a new line in [mysqld]:

[root@localhost zabbix]# vi /etc/my.cnf
max_connections=1000
 restart mariadb Service, and verify the maximum number of connections:

[root@localhost zabbix]# systemctl restart mariadb.service
[root@localhost zabbix]# /usr/bin/mysql -u root -p
Enter password:
Welcome to the MariaDB monitor.  Commands end with ; or g.
Your MariaDB connection id is 446
Server version: 5.5.56-MariaDB MariaDB Server
Copyright (c) 2000, 2017, Oracle, MariaDB Corporation Ab and others.
Type 'help;' or 'h' for help. Type 'c' to clear the current input statement.
MariaDB [(none)]> show variables like 'max_connections';
+-----------------+-------+
| Variable_name   | Value |
+-----------------+-------+
| max_connections | 214   |
+-----------------+-------+
1 row in set (0.00 sec)

3, change /usr/lib/systemd/system/mariadb.service to increase the number of open files.

[root@localhost zabbix]# vi /usr/lib/systemd/system/mariadb.service
Add these two lines in [Service]:
LimitNOFILE=10000
LimitNPROC=10000

4,Reload system services and restart mariadb service

[root@localhost zabbix]# systemctl --system daemon-reload
[root@localhost zabbix]# systemctl restart mariadb.service

5,Re-verify whether it is 1000

MariaDB [(none)]> show variables like 'max_connections';
ERROR 2006 (HY000): MySQL server has gone away
No connection. Trying to reconnect...
Connection id:    5
Current database: *** NONE ***
+-----------------+-------+
| Variable_name   | Value |
+-----------------+-------+
| max_connections | 1000  |
+-----------------+-------+
1 row in set (0.00 sec)
6. More than 100 items having missing data for more than 10 minutes and Zabbix poller processes more than 75% busy.
terms of settlement:
Modify the configuration file to increase the number of threads and cache
[root@localhost zabbix]#  vim /usr/local/zabbix/etc/zabbix_server.conf

StartPollers=500

StartPollersUnreachable=50

StartTrappers=30

StartDiscoverers=6

CacheSize=1G

CacheUpdateFrequency=300

StartDBSyncers=20

HistoryCacheSize=512M

TrendCacheSize=256M

HistoryTextCacheSize=80M

ValueCacheSize=1G
7. first network error, wait for 15 seconds
increased Timeout of The server configuration file, I changed it to 30s.
8. Zabbix poller processes more than 75% busy
reason:
1. A process is stuck,
2. Zombie process error, too many, resulting in slow
3. Network delay (negligible)
4.zabbix consumes too much memory
Warning hazard:
Common alarm, no harm (but best to deal with)
Treatment method:
- Simple and rude (restart ZABBIX server, which can be used in combination with cronjob)
service zabbix-server restart
crontab -e call out Cron Add a plan to the editor:
@daily service zabbix-server restart > /dev/null 2>&1
- Edit the configuration file of Zabbix Server /etc/zabbix/zabbix_server.conf, find the paragraph to configure StartPollers:
### Option: StartPollers
#       Number of pre-forked instances of pollers.
#
# Mandatory: no
# Range: 0-1000
# Default:
# StartPollers=5
StartPollers=10
It depends on the performance of the server and the number of monitors to change startfilters. After setting StartPollers change to 12, there is no alarm again. If there is enough memory, it can be set higher.
9. Error: No route to host
Configure Zabbix_agentd today, through automatic register Zabbix_Server to page, click the host list, but ZBX is shown in red and cannot be monitored
No route to host

On the client side telnet 10051 port of the server, There is no problem. but the server telnet Client port 10050 error:
telnet 1.1.1.1 10050
Trying 1.1.1.1...
telnet: connect to address 120.27.241.253: No route to host
 It was originally blocked by the client's firewall. Close the client's firewall or configure the corresponding rules
10. active check configuration update from [1.1.1.1:10051] started to fail (ZBX_TCP_READ() timed out)
Phenomenon:
check /var/log/zabbix/zabbix_agentd.log,A lot of errors

1404:20161225:183259.913 active check configuration update from [1.1.1.1:10051] started to fail (ZBX_TCP_READ() timed out)
reason:
It’s zabbix_sender needs to send data to the server actively, but the port 10051 of zabbix_sender is blocked by the firewall. The problem is solved by re-releasing the port
11. Error in startup prompt after ZABBIX installation
[root@bogon zabbix-2.2.2]# /usr/local/zabbix-2.2.2/sbin/zabbix_server
/usr/local/zabbix-2.2.2/sbin/zabbix_server: error while loading shared libraries: libmysqlclient.so.16: cannot open shared object file: No such file or directory
It’s because it can’t be found libmysqlclient.so.16 file, you can find the installation directory of mysql, find this file, and then make a soft link
#ln -s /usr/local/mysql/lib/mysql/libmysqlclient.so.16 /usr/lib

Or open it  /etc/ld.so.confrs file
# vim  /etc/ld.so.confrs
      Add:
/usr/local/mysql/lib
12.Received empty response from Zabbix Agent at [127.0.0.1]. Assuming that agent dropped connection because of access permissions.
It means that you don’t have access to agent port 10050
The solution is as follows:
Modify the agent link IP 127.0.0.1 of server to local IP
Restart service
systemctl restart zabbix-server
13.Zabbix discoverer processes more than 75% busy
Increase the number of processes at the start of Zabbix Server, which reduces the busy situation
[root@zabbix-server ~]# vim /etc/zabbix/zabbix_server.conf
 Amend to read
StartDiscoverers=5
 restart
[root@zabbix-server ~]# systemctl restart zabbix-server
14. ZABBIX agent failed to start error
# tail -20 /var/log/zabbix/zabbix_agentd.log

.........................

zabbix_agentd [1232]: cannot create PID file [/var/run/zabbix/zabbix_agentd.pid]: [2] No such file or directory

zabbix_agentd [3847]: cannot create PID file [/var/run/zabbix/zabbix_agentd.pid]: [2] No such file or directory

zabbix_agentd [1724]: cannot create PID file [/var/run/zabbix/zabbix_agentd.pid]: [13] Permission denied
solve
[root@elkstack ~]# mkdir -p /var/run/zabbix/
[root@elkstack ~]# chown zabbix.zabbix /var/run/zabbix/
[root@elkstack ~]# systemctl restart zabbix-agent.service
15. Summary of web page error reporting
Question 1: ZABBIX alert processes more than 75% busy
Cause of the problem:
zabbix server mail process is busy, generally because the interval of setting action is too short. Under special circumstances, a large number of alarms will be generated, such as the process of sending thousands of e-mails by the server, the thread is hung
Solution:
- Delete database solution (high risk, not recommended)
- Modify the e-mail script, change the action of e-mail to print time, wait for the e-mail to be completely released, and then change it back, as follows
 [root@m01 ~]# cat /usr/lib/zabbix/alertscripts/sms
 #!/bin/bash
 echo `date` >>/tmp/sms.txt
Question 2: Zabbix discoverer processes more than 75% busy
Cause of the problem:
-
01. The discovery auto discovery task is configured. Each configured discovery task takes up one process in a certain period of time, while zabbix_server.conf There is only one discovery in the default configuration (annotated, effective by default)
-
02. In order to quickly verify the automatic discovery effect, set the «Delay» of the discovery task from the default 3600s to 60s
Solution:
- 01. Modify the number of StartDiscoverers processes in the configuration file, remove # at the front, change the value to 5, and finally restart the service
(Note: according to the system hardware configuration, it can be set to a higher value, but the range is 0 ~ 250)
[root@m01 ~]# grep 'StartDiscoverers' /etc/zabbix/zabbix_server.conf

 ### Option: StartDiscoverers
  StartDiscoverers=5
  [root@m01 ~]# systemctl restart zabbix-server.service
- 02. Write cronjob task script to restart zabbix_server to reduce the load
[root@m01 ~]# crontab -e
@daily service zabbix-server restart > /dev/null 2>&1 #The plan is to restart Zabbix service automatically every day to end the zombie process and clean up memory
Question 3: Zabbix poller processes more than 75% busy
Cause of the problem:
- 01. The device that collects data through Zabbix agent crashes or other reasons cause Zabbix agent to die, and the server cannot get the data
- 02. It takes too long for the server to obtain data from the agent, which exceeds the timeout time set by the server
Solution:
- 01. Increase the number of processes initialized when Zabbix Server starts
 ### Option: StartPollers
  StartPollers=10 #How much depends on the performance of the server and the number of monitors. If there is enough memory, it can be set higher
- 02. Modify the retention period of lost resources in the template auto discovery rule to 0
Question 4: Zabbix housekeeper processes more than 75% busy
Cause of the problem:
In order to prevent the database from growing continuously, zabbix has the mechanism of automatically deleting historical data, that is, housekeeper. When mysql deletes data, the performance will be reduced and the error will be reported
Solution:
Adjusting the HousekeepingFrequency parameter
HousekeepingFrequency=1  #Interval time
MaxHousekeeperDelete=1000000 #Maximum deletion
Problem 5: Zabbix server memory overflow, unable to start
Cause of the problem:
After using zabbix for a period of time, add a batch of switch monitoring again, and zabbix server will be unable to start. The log is displayed as follows (prompt memory overflow, you need to adjust zabbix server configuration zabbix_server.conf )
1 2816:20170725:174352.675 [file:dbconfig.c,line:652] zbx_mem_realloc(): out of memory (requested 162664 bytes)2 3 2816:20170725:174352.675 [file:dbconfig.c,line:652] zbx_mem_realloc(): please increase CacheSize configuration parameter
Solution:
#vim zabbix_server.conf
CacheSize=1024M #The default is 8M
Question 6: PHP Fatal error: Allowed memory size of 134217728 bytes exhausted (tried to allocate 11 bytes)
Cause of the problem:
Some pages of zabbix can’t be opened. Looking at the php log, we find that there is an error when visiting this page. There is not enough memory
Solution:
It’s not clear if there is a memory leak. The easiest way is to increase the available memory of the php process
  [root@zabbix-master ~]# grep 'memory_limit' /etc/httpd/conf.d/zabbix.conf
 php_value memory_limit 512M #Default 128M
16.cannot connect to [[172.16.2.225]:10050]: [113] No route to host
This is usually a network connection problem
telnet 172.16.2.225 10050 on the server, if is the same error. Check whether iptables and selinux are closed
17.zabbix server is not running: the information displayed may not be current.
Edit zabbix.conf.php File, change the original value of $ZBX_SERVER localhost to local IP address.
vim /etc/zabbix/web/zabbix.conf.php
$ZBX_SERVER = '172.16.2.116';
18.
-
Open the zabbix web interface and click profile, see following error message:
scandir() has been disabled for security reasons [profile.php:198 → CView->
solve:
scandir is written in disable_functions. in disable_functions of php.ini, Just remove scandir.

(restart php-fpm and nginx)
-
Error when adding windows monitor:
Get value error: ZBX_TCP_READ() failed: [104] Connection reset by peer
solve:
Under windows agentd.conf The file IP address is not correct -
zabbix is open but there is no data to show
try another browser
-
Configure zabbix-server to monitor IPMI
Compiling with --with-openipmi parameter error.

configure: error: Invalid OPENIPMI directory - unable to find ipmiif.h
solve:
#yum install net-snmp-devel OpenIPMI OpenIPMI-devel rpm-build
19. zabbix_server dead but subsys locked error
Today, we upgraded Zabbix from 3.2 to 3.4. But when Zabbix_Server is running, appears «Server dead but subsys locked».
Cause of the problem
After checking zabbix_server log. The following alarms are found in the log
zbx_mem_malloc(): out of memory (requested 256 bytes) zbx_mem_malloc(): please increase CacheSize configuration parameter
The cause of the error is very clear, memory overflow, please adjust the CacheSize.
Problem solving
Edit zabbix_server.conf configuration file, positioned to the CacheSize keyword location, increase CacheSize according to the environment.
# Size of configuration cache, in bytes. # Shared memory size for storing host, item and trigger data. # Mandatory: no # Range: 128K-8G # Default: CacheSize=32M
Finally, restart zabbix_server service.
Zabbix value cache working in low memory mode
Problem solving:
Edit zabbix_server.conf configuration file, positioned to the ValueCacheSize keyword location, increase the ValueCacheSize according to the environment.
# Option: ValueCacheSize # Size of history value cache, in bytes. # Shared memory size for caching item history data requests. # Setting to 0 disables value cache. # # Mandatory: no # Range: 0,128K-64G # Default: ValueCacheSize=2048M
20. Error resolution:
-
Error installing zabbix:
① Error: always prompt gcc not find when compiling zabbix
Solution: install development tools, command:
yum -y groupinstall «Delvelopment Tools»
② Error: when compiling zabbix, it prompts mysqlclient not find
Solution: install MySQL devel, command:
yum -y install mysql-devel
③ Error: enter 127.0.0.1/zabbix/setup.php Prompt 403 for hidden
Solution: close Selinux, use setenforce 0 command, or vim /etc/selinux/config, change SELINUX=enforcing to SELINUX=disabled, and then restart linux. -
Error occurred during use:
① Error: zabbix running status shows no, not running
Solution: first check whether the ZABBIX service is not started, and use /etc/init.d/zabbix_server start to starts ZABBIX service;
If still not working, vim/var/www/html/zabbix/conf/zabbix.conf.php , change the $ZBX_SERVER in configuration to the IP address of the server. The default value is 127.0.0.1, and then restart zabbix_server service;
② Error: zabbix agent unreachable.
Solution: vim /usr/local/etc/zabbix_agentd.conf (the path could be different according to personal conditions) check whether the Hostname is the same as the configuration host name. If it is different, change the host name and change the Server to ip.
③ Error: Lack of free swap space
Solutions: 1. Check the Swap space,
Command: free -m
If the returned information is empty, means Swap file does not exist.
2. Check the file system,
Command: df -hal
Check the returned information, and make sure there is enough hard disk space left.
3. Create and allow Swap files,
Command: dd if=/dev/zero of=/swapfile bs=1024 count=2048000
Parameter interpretation:
If=file_name: enter the file name, which is the standard input by default. Specifies the source file. < if=input file >
Of=file_name: output file name, default to standard output. The destination file is specified. < of=output file >
bs=bytes: set the read in / output block size to bytes at the same time
count=blocks: only blocks are copied, and the block size is equal to the number of bytes specified by bs.
4. Format and activate the Swap file,
Command:
format Swap: mkswap /swapfile
Activate swap: swapon /swapfile
View swap: swapon -s
Modify fstab configuration: vim /etc/fstab, add /swapfile swap swap defaults 0 0 at the end
Authorized by:
chown root:root /swapfile
chmod 0600 /swapfile
④ Error: zabbix custom key display is not enabled, bad interpreter error in log
Solution: when sh file created in windows runs in linux, because the hidden character ^M is added after each line in window, the bad interpreter error is caused when linux compiles because ^M cannot be compiled. Use vi -b to find ^M and then delete it.
21.Zabbix is an enterprise level open source distributed monitoring software based on WEB interface. Many people will repeatedly encounter various problems when deploying and configuring zabbix, and forget to make records after temporary solutions. This is a very bad habit. This paper summarizes the solutions to common errors for your reference.
Question 1:
After using the source code to install, can’t use MySQL database on zabbix’s web page.
resolvent:
zabbix needs php to support mysqli; when using the source code to install php, you need to add the –with-mysqli=mysqlnd parameter.
Question 2:
When ./configure, prompt configure: error: configure: error: Invalid Net-SNMP directory – unable to find net-snmp-config
resolvent:
yum install -y net-snmp-devel libxml2-devel libcurl-devel
Question 3:
After filling in MySQL information on zabbix web page, the next step is to prompt: The frontend does not match Zabbix database
resolvent:
After confirming that the mysql account information is correct, check whether the initialization of zabbix database is successful. If an error is still, reinitialize zabbix database.
Question 4:
When installing zabbix on the web page, Unable to create the configuration file error
resolvent:
Set the web server user to have write permission in the conf/ directory of zabbix web page, and the configuration file will be saved automatically.
Question 5:
After the installation of zabbix, the Chinese language cannot be selected in the page of admin > admin profile
**Solution: * modify zabbix/include/locales.inc.php in the directory of zabbix website, (Chinese language is supported default)
Find ‘zh_CN’ => [‘name’ => _(‘Chinese (zh_CN)’), ‘display’ => false] change false to true
Question 6:
After the background language is changed to Chinese, the Chinese characters in the graphics are displayed as random squares
resolvent:
[root@eazence ~]# cd /etc/nginx/html/zabbix/fonts/  #This is the font path of the zabbix web page

[root@eazence fonts]# ls

DejaVuSans.ttf

[root@eazence fonts]# wget -c http://www.138096.com/simkai.ttf

[root@eazence fonts]# cp -p DejaVuSans.ttf DejaVuSans.ttf.bak

[root@eazence fonts]# mv -f simkai.ttf DejaVuSans.ttf     #After completing this step, refresh the web page
22.
-
In Zabbix’s Dashboard, the Status of Zabbix:
Zabbix server is running’s value is «No»Solutions:
Consider that the account connected to the database in the configuration file of ZABBIX server does not have enough permission to the ZABBIX database, and modify the permission of the account to the database; -
ITEM cannot receive data and report the following error:
Received value [0.05] is not suitable for value type [Numeric (unsigned)]
Solutions:
Modify the default value of CacheSize in Zabbix Server configuration file to rise the CacheSize as much as possible;
Or there is an error in the configuration of Type of information in the ITEM, and change it to an appropriate format
23. Error in importing percona template
 Import failed

    Invalid XML tag "/zabbix_export/date": "YYYY-MM-DDThh:mm:ssZ" is expected.
terms of settlement
import zabbix_agent_template_percona_mysql_server_ht_2.0.9-sver1.1.6.xml into zabbix2.4 and exported. After that, the new exported XML is imported into 3.0 to solve the problem.
Percona template exported from zabbix3.0: Percona-MySQL-Server-Template
24.Zabbix Server suddenly hangs up. Check the log and report the following error:
using configuration file: /etc/zabbix/zabbix_server.conf...[file:dbconfig.c,line:545] zbx_mem_malloc(): out of memory (requested 16 bytes)[file:dbconfig.c,line:545] zbx_mem_malloc(): please increase CacheSize configuration parameter
The repair method has been clearly indicated in the error report: please increase cache size configuration parameter
So we went to zabbix_server.conf The CacheSize field was found in
### Option: CacheSize#   Size of configuration cache, in bytes.
#   Shared memory size for storing host, item and trigger data
.## Mandatory: no# Range: 128K-8G# Default:
# CacheSize=8M

According to the server configuration, modify the CacheSize

### Option: CacheSize
#   Size of configuration cache, in bytes.
#   Shared memory size for storing host, item and trigger data.
## Mandatory: no
# Range: 128K-8G#
Default:CacheSize=2048M

restart Zabbix Server that will do
25.Zabbix log error summary
zabbix_agentd.log
Error one
no active checks on server [*.*.*.*:10051]: host [*] not found
The reason for this error is usually the Hostname of zabbix_agentd.conf is different with the front-end zabbix web (Monitoring->Configuration->Hosts Name)
Solution: change the Host name in the Monitoring->Configuration->Hosts page, the same as the Hostname in zabbix_agentd.conf.
Error two
activecheck configuration update from [127.0.0.1:10051] started to fail (cannotconnect to [[127.0.0.1]:10051]: [111] Connection refused)
solve:
There are errors in the places marked above. We can edit them
etc/zabbix/zabbix_agentd.conf
#ServerActive=127.0.0.1
And restart zabbix agent.
zabbix_server.log
1,failed to accept an incoming connection: connection from “. . . ” rejected, allowed hosts: «127.0.0.1» this is zabbix_agentd.conf File configuration error
vim /usr/local/zabbix/etc/zabbix_agentd.conf
Revision:
Server=your server address ServerActive=your server address
Hostname=your client name
27.zabbix_agentd.log
- Error one
no active checks on server [*.*.*.*:10051]: host [*] not found
The reason for this error is usually the Hostname in zabbix_agentd.conf is different with configuration of the host Name in the front-end zabbix web (Monitoring->Configuration->Hosts Name)
solve
On the zabbix web page Monitoring->Configuration->Hosts, change the Host name to the same as Host name in zabbix_agentd.conf
- Error two
activecheck configuration update from [127.0.0.1:10051] started to fail (cannotconnect to [[127.0.0.1]:10051]: [111] Connection refused)solve:
edit etc/zabbix/zabbix_agentd.conf
#ServerActive=127.0.0.1
and restart zabbix agent
28. failed to accept an incoming connection: connection from «. . . » rejected, allowed hosts: «127.0.0.1»
This is zabbix_agentd.conf File configuration error
# vim /usr/local/zabbix/etc/zabbix_agentd.conf

Revision:
Server=Your server address ServerActive=Your server address Hostname=Your client name
 in especial Hostname
Hostname in zabbix_agentd.conf must be the same with the
Hostname in web management interface
29. Before logging into Zabbix, confirm that Nginx service is turned on, php-fpm is turned on, service zabbix_server start server_agentd start
The following error occurred in Zabbix login due to unexpected power off
Database error
Error connecting to database: Can’t connect to local MySQL server through socket ‘/tmp/mysql.sock’ (2)
Unable to connect to the database. Please make sure the database is running
When I want to start the database service, the database error again, because I didn’t start the hot backup….
[root@dep5 ~]# service mysqld statusMySQL is not running, but lock file (/var/lock/subsys/mysql[fail]ts[root@dep5 ~]# service mysqld startStarting MySQL...The server quit without updating PID file mysql.pid).
#View log
#[root@dep5 ~]# vim /data/mysqldb/log/mysql-error.log 2016-09-03 16:26:43 10550 [ERROR] InnoDB: Attempted to open a previously opened tablespace. Previous tablespace zabbix/groups uses space ID: 3 at filepath: ./zabbix/groups.ibd. Cannot open tablespace mysql/slave_relay_log_info which uses space ID: 3 at filepath: ./mysql/slave_relay_log_info.ibd2016-09-03 16:26:43 7f4097e0a720 InnoDB: Operating system error number 2 in a file operation.InnoDB: The error means the system cannot find the path specified.InnoDB: If you are installing InnoDB, remember that you must createInnoDB: directories yourself, InnoDB does not create them.InnoDB: Error: could not open single-table tablespace file ./mysql/slave_relay_log_info.ibdInnoDB: We do not continue the crash recovery, because the table may becomeInnoDB: corrupt if we cannot apply the log records in the InnoDB log to it.InnoDB: To fix the problem and start mysqld:InnoDB: 1) If there is a permission problem in the file and mysqld cannotInnoDB: open the file, you should modify the permissions.InnoDB: 2) If the table is not needed, or you can restore it from a backup,InnoDB: then you can remove the .ibd file, and InnoDB will do a normalInnoDB: crash recovery and ignore that table.InnoDB: 3) If the file system or the disk is broken, and you cannot removeInnoDB: the .ibd file, you can set innodb_force_recovery > 0 in my.cnfInnoDB: and force InnoDB to continue crash recovery here.160903 16:26:43 mysqld_safe mysqld from pid file /tmp/mysql.pid ended
mysql log gives their respective solutions
1) Authority problem, modify authority OK
2) If it’s a file system or magnetic damage, you can’t remove it. You can do it in your my.cnf innodb_force_recovery > 0
solve:
[root@dep5 ~]# vim /etc/my.cnf
#innodbinnodb_file_per_table = 1
innodb_data_file_path = ibdata1:2048M:autoextend
innodb_log_file_size = 128m
innodb_log_files_in_group = 3
innodb_buffer_pool_size = 60M
innodb_buffer_pool_instances = -1
innodb_max_dirty_pages_pct = 70
#innodb_thread_concurrency = 8
innodb_flush_method = O_DIRECT
innodb_log_buffer_size = 16m
innodb_flush_log_at_trx_commit = 2
innodb_force_recovery = 1 # add this to Ok
#[root@dep5 ~]# vim /etc/my.cnf
#[root@dep5 ~]# service mysqld start
#Starting MySQL…
I have a look at the following fragments in the database log after the successful startup. I guess Zabbix can’t open normally
2016-09-03 16:41:33 18646 [Warning] Info table is not ready to be used. Table 'mysql.slave_master_info' cannot be opened.2016-09-03 16:41:33 18646 [Warning] InnoDB: Cannot open table mysql/slave_worker_info from the internal data dictionary of InnoDB though the .frm file for the table exists. See http://dev.mysql.com/doc/refman/5.6/en/innodb-troubleshooting.html for how you can resolve the problem.2016-09-03 16:41:33 18646 [Warning] InnoDB: Cannot open table mysql/slave_relay_log_info from the internal data dictionary of InnoDB though the .frm file for the table exists. See http://dev.mysql.com/doc/refman/5.6/en/innodb-troubleshooting.html for how you can resolve the problem.2016-09-03 16:41:33 18646 [Warning] Info table is not ready to be used. Table 'mysql.slave_relay_log_info' cannot be opened.2016-09-03 16:41:34 18646 [Note] Event Scheduler: Loaded 0 events2016-09-03 16:41:34 18646 [Note] /usr/local/mysql/bin/mysqld: ready for connections.Version: '5.6.31-log' socket: '/tmp/mysql.sock' port: 3306 Source distribution2016-09-03 16:41:34 18646 [Note] Event Scheduler: scheduler thread started with id 12016-09-03 16:41:39 7feb5261e700 InnoDB: Error: Table "mysql"."innodb_table_stats" not found.2016-09-03 16:41:39 7feb5261e700 InnoDB: Error: Fetch of persistent statistics requested for table "zabbix"."users" but the required system tables mysql.innodb_table_stats and mysql.innodb_index_stats are not present or have unexpected structure. Using transient stats instead.2016-09-03 16:41:39 7feb5261e700 InnoDB: Error: Table "mysql"."innodb_table_stats" not found.
This is the interface that Zabbix opens,
I’m thinking about the comments my.cnf Which line to add,
Although the restart of mysql is OK, the mysql log is refreshed once
2016-09-03 16:48:11 7f37cdfb7700 InnoDB: Error: Table "mysql"."innodb_table_stats" not found.2016-09-03 16:48:11 7f37cdfb7700 InnoDB: Error: Fetch of persistent statistics requested for table "zabbix"."media_type" but the required system tables mysql.innodb_table_stats and mysql.innodb_index_stats are not present or have unexpected structure. Using transient stats instead.
I just want to fix the table…
[root@dep5 ~]# mysqlcheck -r zabbixzabbix.acknowledgesnote : The storage engine for the table doesn't support repairzabbix.actionsnote : The storage engine for the table doesn't support repairzabbix.alerts
Tragedy, I guess the engine of zabbix database should be myisam, no engine..
Using MySQL 5.6 or higher, since MySQL was acquired by Oracle, its performance has improved a lot. Please choose innodb instead of myisam, because the performance of zabbix in innodb is 1.5 times faster than that in myisam, and myisam is not safe. zabbix has a large amount of monitoring data. Once the table is broken, it will be a tragedy.
Tragedy!!!!!!!!!!!!!!!!!!!!!!!!!!!!!!!!!!!!!!!!!!!!
be careful:
After all, the most stupid way I can think of is to do it all over again (no configuration backup, no engine modification, so embarrassing)
31.
- System log output when starting ZABBIX agent
PID file /run/zabbix/zabbix_agentd.pid not readable (yet?) after star

zabbix-agent.service never wrote its PID file. Failing
At the same time, run systemctl status zabbix-agent.service, See that selinux is there. run getenforce command, it is found that selinux is open,then close selinux
Restart zabbix-agent service and it still can’t start normally. Check /var/log/zabbix/zabbix-agentd.log, The system prompts zabbix shared memory error
zabbix_agentd [5922]: cannot open log: cannot create semaphore set: [28] No space left on device
As shown in the figure:
After that, vim /etc/sysctl.conf
kernel.sem =500 64000 64 256
After sysctl -p /etc/sysctl.conf, it can start normally. (error reason: kernel.sem parameter setting is too small. The default setting of the original system is 250 32000 32 128)
Parameter meaning
The above four data correspond to four core parameters: SEMMSL, SEMMNS, SEMOPM and SEMMNI. The specific meaning and configuration are as follows.
1.SEMMSL: used to control the maximum number of signals in each signal set.
2.SEMMNS: used to control the maximum number of signals (not signal sets) in the whole Linux system.
3.SEMOPM: kernel parameters are used to control the number of signal operations that each semop system call can perform.
4.SEMMNI: kernel parameters are used to control the maximum number of signal sets in the whole Linux system.
32.1. zabbix dashboard error
Question:
zabbix server is not running: the information displayed may not be current
Solution:
This error can be caused by several situations: 1) zabbix-server does not install zabbix-agent, or it installs the port 2 on which the agent is not detected;)
2. Error in log
Question:
172730.555 [Z3001] connection to database ‘zabbix’ failed: [1045] Access denied for
Solution:
Modify configuration file
shell->vim/etc/zabbix/zabbix-server.confDBPassword=zabbix
Restart service
shell->/etc/init.d/zabbix-server restart
view log
shell->tail -f /var/log/zabbix/zabbix-server.log
- There is no Chinese environment
Question:
You are not able to choose some of the languages, because locales for them are not installed on the
Solution:
-
Enable Chinese
vi /usr/share/zabbix/include/locales.inc.php change zh_CN to true, and then go to the web interface to select the language. You are not able to choose some of the languages, because locales for them are not installed on the web server. it’s because there is no CN env in your system. So the first step is to set up the Chinese environment, install the Chinese package:
apt-get install language-pack-zh-hant language-pack-zh-hans
The second step is to configure the relevant environment variables: vi /etc/environment, and add the language and coding settings in the file: LANG=»zh_CN.UTF-8″ LANGUAGE=»zh_CN:zh:en_US:en», The third step is to reset the local configuration: dpkg-reconfigure locales. Now restart Apache & zabbix_serve two services, should be able to choose..
4. The important mibs library must be updated, otherwise the mib will report an error when snmp monitors the switch. (unmeasured)
apt-get install snmp-mibs-downloade
- Apt get update error
Question:
Failed to fetch
http://ubuntu.kurento.org/dists/trusty/kms6/binary-i386/Packages 403 Forbidden [IP: 112.124.140.210 80]
Solution:
There is no permission (403) problem in apt-get update. 112.124.140.210 is apt proxy address. It is best to modify (or delete) apt.conf, delete this proxy, your ubuntu must be able to access the Internet.
32. zabbix3.2 upgrade to 3.4: Database error
After upgrading from zabbix3.2 to zabbix3.4, open the page and report an error. The error content is as follows
Database error
The frontend does not match Zabbix database. Current database version (mandatory/optional): 3020000/3020000. Required mandatory version: 3040000. Contact your system administrator.
terms of settlement:
Enter database
mysql> show databases;

mysql> use zabbix;

mysql> update dbversion set mandatory=3040000;

mysql> flush privileges;

Reopen web It can be solved
34.zabbix error: cannot connect to [[192.168.119.110]: 10050]: [111] connection reused
Error analysis: Connection refused!
(1) The network between client and server is not connected;
(2) The client service is blocked by firewall;
(3) The network segment is blocked by physical firewall.
resolvent:
(1) View log: view and analyze error causes
root@a-desktop:~# tail /var/log/zabbix-agent/zabbix_agentd.log

  5927:20160913:101039.428 agent #2 started [listener #2]

  5923:20160913:102113.808 Got signal [signal:15(SIGTERM),sender_pid:5999,sender_uid:0,reason:0]. Exiting ...

  5923:20160913:102113.810 Zabbix Agent stopped. Zabbix 2.2.2 (revision 42525).

  6004:20160913:102113.824 Starting Zabbix Agent [Cloud_platform002]. Zabbix 2.2.2 (revision 42525).

  6004:20160913:102113.824 using configuration file: /etc/zabbix/zabbix_agentd.conf

  6005:20160913:102113.824 agent #0 started [collector]

  6006:20160913:102113.825 agent #1 started [listener #1]

  6007:20160913:102113.825 agent #2 started [listener #2]

  6008:20160913:102113.825 agent #3 started [listener #3]

  6009:20160913:102113.825 agent #4 started [active checks #1]
(2) If the network is blocked, you can do domain name resolution or realize data collection through zabbix-agent
(3) firewall
Add rule: iptables -I INPUT -p tcp -m multiport —destination-port 80,10050:10051 -j ACCEPT
(4) Physical firewall
Similarly, open a 10050 TCP port on the wall
35. zabbix broken graph caused by sudo bug
I’ve always found that the update value of a machine will become lower after a period of time. I haven’t found rc before. I just restart the agent to repair it. Recently, my colleagues carefully found that it may be related to sudo’s bug.
Let’s go back and verify the whole troubleshooting process.
- Get the missing data item through zabbix database, and take out the list of missing (not updated in 20 minutes) values
select b.key_,b.lastvalue,from_unixtime(b.lastclock) from hosts a,

 items b where a.hostid=b.hostid and a.host='xxxxxx' and

 b.lastclock < (unix_timestamp() - 1200) limit 10;
Like here agent.ping :
Observe the monitoring chart and find that the data is lost after 18:20
- Analyzing the log of zabbix agent
It is found that the following log appears around 18:24, and there are only a large number of update_cpustats status. At the same time, one line of kill command failed log is found
27589:20141021:182442.143 In zbx_popen() command:'sudo hadoop_stats.sh nodemanager StopContainerAvgTime'

27589:20141021:182442.143 End of zbx_popen():5

48430:20141021:182442.143 zbx_popen(): executing script

27585:20141021:182442.284 In update_cpustats()

27585:20141021:182442.285 End of update_cpustats()

27585:20141021:182443.285 In update_cpustats()

27585:20141021:182443.286 End of update_cpustats()

27585:20141021:182444.286 In update_cpustats()

27585:20141021:182444.287 End of update_cpustats()

27585:20141021:182445.287 In update_cpustats()

27585:20141021:182445.287 End of update_cpustats()

27585:20141021:182446.288 In update_cpustats()

27585:20141021:182446.288 End of update_cpustats()

..........

27585:20141021:182508.305 In update_cpustats()

27585:20141021:182508.305 End of update_cpustats()

27585:20141021:182509.306 In update_cpustats()

27585:20141021:182509.306 End of update_cpustats()

27585:20141021:182510.306 In update_cpustats()

27585:20141021:182510.307 End of update_cpustats()

27585:20141021:182511.307 In update_cpustats()

27585:20141021:182511.308 End of update_cpustats()

27589:20141021:182512.154 failed to kill [sudo hadoop_stats.sh nodemanager StopContainerAvgTime]: [1] Operation not permitted

27589:20141021:182512.155 In zbx_waitpid()

27585:20141021:182512.308 In update_cpustats()

27585:20141021:182512.309 End of update_cpustats()

27585:20141021:182513.309 In update_cpustats()

27585:20141021:182513.309 End of update_cpustats()
Compared with the normal log:
27589:20141021:180054.376 In zbx_popen() command:'sudo hadoop_stats.sh nodemanager StopContainerAvgTime'

27589:20141021:180054.377 End of zbx_popen():5

18798:20141021:180054.377 zbx_popen(): executing script

27589:20141021:180054.384 In zbx_waitpid()

27589:20141021:180054.384 zbx_waitpid() exited, status:1

27589:20141021:180054.384 End of zbx_waitpid():18798

27589:20141021:180054.384 Run remote command [sudo  hadoop_stats.sh nodemanager StopContainerAvgTime] Result [2] [-1]...

27589:20141021:180054.384 For key [hadoop_stats[nodemanager,StopContainerAvgTime]] received value [-1]

27589:20141021:180054.384 In process_value() key:'gd6g203s80-hadoop-datanode.idc.vipshop.com:hadoop_stats[nodemanager,StopContainerAvgTime]' value:'-1'

27589:20141021:180054.384 In send_buffer() host:'10.200.100.28' port:10051 values:37/50

27589:20141021:180054.384 Will not send now. Now 1413885654 lastsent 1413885654 < 1

27589:20141021:180054.385 End of send_buffer():SUCCEED

27589:20141021:180054.385 buffer: new element 37

27589:20141021:180054.385 End of process_value():SUCCEED
You can see that under normal circumstances, the script will have a return value, but when there is a problem, the script does not have a return value. Moreover, because the script is run with sudo, zabbix started by an ordinary user can’t kill this command(Operation not permitted error) at timeout
- Suppose that the ordinary user who starts zabbix agent here is apps user, let’s take a look at the current state of the script
# ps -ef|grep hadoop_stats.sh

root     34494 31429  0 12:54 pts/0    00:00:00 grep 48430

root     48430 27589  0 Oct21 ?        00:00:00 sudo hadoop_stats.sh nodemanager StopContainerAvgTime

root     48431 48430  0 Oct21 ?        00:00:00 [hadoop_stats.sh] <defunct>
As you can see, a zombie process is generated here http://en.wikipedia.org/wiki/Zombie_process)
Zombie process is caused by sending SIGCHLD to the parent process after the child process finishes running, but the parent process does not process the signal normally.
You have killed the process, but a dead process doesn't disappear from the process table

until its parent process performs a task called "reaping" (essentially calling wait(3)

 for that process to read its exit status). Dead processes that haven't been reaped are

  called "zombie processes."

The parent process id you see for 31756 is process id 1, which always belongs to init.

That process should reap its zombie processes periodically, but if it can't, they will

 remain zombies in the process table until you reboot.
Under normal process conditions, we use strace attach to the parent process, and then kill the child process to see the following information:
Process 3036 attached - interrupt to quit

select(6, [5], [], NULL, NULL

)          = ? ERESTARTNOHAND (To be restarted)

--- SIGCHLD (Child exited) @ 0 (0) ---

rt_sigreturn(0x11)                      = -1 EINTR (Interrupted system call)

wait4(3037, [{WIFSIGNALED(s) && WTERMSIG(s) == SIGTERM}], WNOHANG|WSTOPPED, NULL) = 3037

exit_group(143)                         = ?

Process 3036 detached
After a zombie process is generated, it can be orphaned by killing the parent process (the parent process is init process)
However, because the script is started with sudo, the startup user is root, and the apps user has no authority to kill the startup command. As a result, the child process is always a zombie process
- Take a look at the process started by zabbix agent
# ps -ef|grep zabbix

apps     27583     1  0 Sep09 ?        00:00:00 /apps/svr/zabbix/sbin/zabbix_agentd -c /apps/conf/zabbix_agentd.conf

apps     27585 27583  0 Sep09 ?        00:33:25 /apps/svr/zabbix/sbin/zabbix_agentd -c /apps/conf/zabbix_agentd.conf

apps     27586 27583  0 Sep09 ?        00:00:14 /apps/svr/zabbix/sbin/zabbix_agentd -c /apps/conf/zabbix_agentd.conf

apps     27587 27583  0 Sep09 ?        00:00:14 /apps/svr/zabbix/sbin/zabbix_agentd -c /apps/conf/zabbix_agentd.conf

apps     27588 27583  0 Sep09 ?        00:00:14 /apps/svr/zabbix/sbin/zabbix_agentd -c /apps/conf/zabbix_agentd.conf

apps     27589 27583  0 Sep09 ?        02:28:12 /apps/svr/zabbix/sbin/zabbix_agentd -c /apps/conf/zabbix_agentd.conf

root     34207 31429  0 12:54 pts/0    00:00:00 grep zabbix

root     48430 27589  0 Oct21 ?        00:00:00 sudo /apps/sh/zabbix_scripts/hadoop/hadoop_stats.sh nodemanager StopContainerAvgTime
Through strace, we find that the process of 27589 has been waiting for the process of 48430
strace  -p 27589

Process 27589 attached - interrupt to quit

wait4(48430, ^C <unfinished ...>

Process 27589 detached
The process of 48430 is the parent process of the zombie process. Through strace attach, you can see it’s waiting for fd of #5
#strace  -p 48430

Process 48430 attached - interrupt to quit

select(6, [5], [], NULL, NULL^C <unfinished ...>

Process 48430 detached
From lsof, we can see that the fd of #5 is actually a socket
#lsof  -p 48430

COMMAND   PID USER   FD   TYPE             DEVICE  SIZE/OFF       NODE NAME

sudo    48430 root  cwd    DIR                8,2      4096          2 /

sudo    48430 root  rtd    DIR                8,2      4096          2 /

sudo    48430 root  txt    REG                8,2    212904    1578739 /usr/bin/sudo

sudo    48430 root  mem    REG                8,2     65928    1441822 /lib64/libnss_files-2.12.so

sudo    48430 root  mem    REG                8,2  99158704    1573509 /usr/lib/locale/locale-archive

sudo    48430 root  mem    REG                8,2     91096    1441832 /lib64/libz.so.1.2.3

sudo    48430 root  mem    REG                8,2    141576    1442145 /lib64/libpthread-2.12.so

sudo    48430 root  mem    REG                8,2    386040    1442172 /lib64/libfreebl3.so

sudo    48430 root  mem    REG                8,2    108728    1575924 /usr/lib64/libsasl2.so.2.0.23

sudo    48430 root  mem    REG                8,2    243064    1441896 /lib64/libnspr4.so

sudo    48430 root  mem    REG                8,2     21256    1442186 /lib64/libplc4.so

sudo    48430 root  mem    REG                8,2     17096    1442187 /lib64/libplds4.so

sudo    48430 root  mem    REG                8,2    128368    1577789 /usr/lib64/libnssutil3.so

sudo    48430 root  mem    REG                8,2   1290648    1582418 /usr/lib64/libnss3.so

sudo    48430 root  mem    REG                8,2    188072    1575925 /usr/lib64/libsmime3.so

sudo    48430 root  mem    REG                8,2    220200    1587191 /usr/lib64/libssl3.so

sudo    48430 root  mem    REG                8,2    113952    1442182 /lib64/libresolv-2.12.so

sudo    48430 root  mem    REG                8,2     43392    1442173 /lib64/libcrypt-2.12.so

sudo    48430 root  mem    REG                8,2     63304    1442180 /lib64/liblber-2.4.so.2.5.6

sudo    48430 root  mem    REG                8,2   1979000    1442169 /lib64/libc-2.12.so

sudo    48430 root  mem    REG                8,2    308912    1442181 /lib64/libldap-2.4.so.2.5.6

sudo    48430 root  mem    REG                8,2     22536    1442171 /lib64/libdl-2.12.so

sudo    48430 root  mem    REG                8,2     58480    1442174 /lib64/libpam.so.0.82.2

sudo    48430 root  mem    REG                8,2     17520    1441884 /lib64/libutil-2.12.so

sudo    48430 root  mem    REG                8,2    124624    1441798 /lib64/libselinux.so.1

sudo    48430 root  mem    REG                8,2     99112    1442170 /lib64/libaudit.so.1.0.0

sudo    48430 root  mem    REG                8,2    156872    1442168 /lib64/ld-2.12.so

sudo    48430 root    0r   CHR                1,3       0t0       3916 /dev/null

sudo    48430 root    1w  FIFO                0,8       0t0 1429910151 pipe

sudo    48430 root    2w   REG                8,3 376639626     524292 /apps/logs/zabbix/zabbix_agentd.log

sudo    48430 root    3u  sock                0,6       0t0 1429910161 can't identify protocol

sudo    48430 root    4r   REG                8,2       764    2240617 /etc/group

sudo    48430 root    5u  unix 0xffff880179ee4680       0t0 1429910162 socket
Here, by looking at the status of the file descriptor under /proc/pid/fd, we find that the fd is actually closed.
In this case, it is possible that the child process has completed running, but the parent process does not correctly handle the return information of the child process, which leads to the parent process always thinking that the child process is still running, and eventually produces a zombie process.
This is actually a bug of sudo. Related bug id:
http://www.gratisoft.us/bugzilla/show_bug.cgi?id=447
Description of bug:
If the parent process gets re-scheduled after the "if" was executed, and at this very

time the child process finishes and SIGCHLD is sent to the parent process, sudo gets

in trouble. The SIGCHLD handler accounts in the variable "recvsig[]" that the signal

 was received, and then the parent process calls select(). This select will never be

 interrupted, as the author had it in mind. In 99% of the cases, the parent process

 will enter in the select() blocking state before the child process ended.

 The child would then send SIGCHLD, which will be accounted in the handler procedure,

 and will also interrupt select() which will return -1 in "nready", and "errno"

  will be set to EINTR.
The problem lies in sudo’s code sudo/file/tip/src/exec.c, all the versions before 1.7.5 or 1.8.0 have this issue. When the subprocess exits just before the system call select(), the handle has been exited, so sudo will be stuck here
patch:
http://www.sudo.ws/repos/sudo/rev/99adc5ea7f0a
Avoid a potential race condition if SIGCHLD is received immediately before we call select().
Someone has the same problem:
sudo hangs and leaves the executed program as “zombie”
36 phenomenon:
The configuration of zabbix has not been changed. Suddenly, an error is reported when zabbix server starts
Can't open PID file /run/zabbix/zabbix_server.pid (yet?) after start: No such file or directory
solution:
Restart virtual machine