Содержание
- Help with Zbrush — Brush stroke fail
- Replies
- DOCUMENTATION
- Record
- Strokes Count
- ReplayAll
- ReplayAllRel
- ExportLast
- ExportAll
- DOCUMENTATION
- Stroke type selection slider
- Current Stroke thumbnail
- Mouse Avg
- Stroke Jitter
- Brush Imperfection
- Modifiers
- ReplayLast
- ReplayLastRel
- Sculptris Pro
- Adaptive Size
- Combined
- SubDivide Size
- UnDivide Ratio
- Lazy Mouse
- LazyMouse
- Relative
- LazyStep
- LazySmooth
- LazyRadius
- LazySnap
- DOCUMENTATION
- ReplayLast
- ReplayLastRel
- Directional
- Spacing
- Placement
- Scale
- Color
- M Repeat
- S Repeat
- Square
- Center
- Roll Dist
- DOCUMENTATION
- Stroke Interpolate
- Using Stroke Interpolate
- Interpolate
- Strokes Count
Help with Zbrush — Brush stroke fail
![]()
I did a search, finding some similar posts, but never an answer that worked for me. Hopefully it’s not out there and I’m missing it and adding an unnecessary thread. Sorry if so.
Been trying to refine my Zbrush skills as of late, cause they are lacking :poly122: . And for as long as I can remember, I’ve ALWAYS have trouble sculpting small cracks/dents/scars etc etc. Even on a plane that is evenly subdivided, I still get the same result. For example :

My strokes come out as dotted messes, no matter how slow I move my pen over my tablet.
I’ve tinkered with almost every setting in Zbrush and cannot seem to get a fix. My tablet is very, very old. Perhaps that is the problem?
If anyone has any ideas, that would be great. Thanks in advance.
![]()
1.4m points isn’t a very high resolution for such a tiny detail, after having pushed points around to sculpt that rock in the first place. Give it another division.
Bear in mind what your final map size will be, and if your details should even be that small in the first place.
If you know you’ve got the resolution but a stroke is skipping, turn on LazyMouse in the Strokes menu, turn up LazyRadius and turn down LazyStep. Using Projection Master is another option, the DecoBrush can produce interesting results for small fissures/cracks/folds depending on the look you’re going for. If you don’t have the resolution, it will still look like crap after picking it up though.

I did a search, finding some similar posts, but never an answer that worked for me. Hopefully it’s not out there and I’m missing it and adding an unnecessary thread. Sorry if so.
Been trying to refine my Zbrush skills as of late, cause they are lacking :poly122: . And for as long as I can remember, I’ve ALWAYS have trouble sculpting small cracks/dents/scars etc etc. Even on a plane that is evenly subdivided, I still get the same result. For example :
My strokes come out as dotted messes, no matter how slow I move my pen over my tablet.
I’ve tinkered with almost every setting in Zbrush and cannot seem to get a fix. My tablet is very, very old. Perhaps that is the problem?
If anyone has any ideas, that would be great. Thanks in advance.
Are you using the lazy mouse and a free hand stroke instead of the dotted one?
For more detailed sculpting you should try dividing it until your mesh is 5 mil, than you can retopo it to reduce some of the resolution but keep the resolution you want visible to the viewer.
Источник
DOCUMENTATION
The Curve > Inventory sub-palette has controls for recording and playback of strokes.
Record
Record Brush Strokes. The Record Strokes button enables you to capture a series of brushstrokes, replay them later, and save them to a disk file. Unless the Add Recording button is pressed, pressing this button erases previously-recorded brush strokes.
Add Recording. Press the Add Recording button to record additional brush strokes without erasing previously-recorded ones.
Strokes Count
The Strokes Count slider displays the number of single strokes (from mouse/pen click to release) that have been recorded.
ReplayAll
The Replay All button re-traces all recorded brush strokes, regardless whether they were created using the same tool or settings.
ReplayAllRel
The Replay All Relative button will replay all recorded strokes at a new cursor position, even if the mesh has been rotated. The hotkey Shift+2 must be used as the start is dependent on the cursor position. (The button is provided so a new hotkey can be assigned if desired.)
ExportLast
Export Last Stroke. Press Export Last Stroke to save the most recent brush stroke to a disk file. Stroke files can only be loaded as part of a ZScript or Macro using the [StrokeLoad] command.
ExportAll
Export All Strokes. Press Export All Strokes to save recorded brush strokes to a disk file. Stroke files can only be loaded as part of a ZScript or Macro using the [StrokesLoad] command.
Источник
DOCUMENTATION

The Stroke palette
The Stroke palette provides a variety of stroke types which determine how each brush is applied when the cursor is dragged on the model. By default, most brushes are applied with the Dots or Freehand stroke selected — these produce lines which follow the cursor drag.
Stroke type selection slider
Strokes can be selected by their numerical ID using this slider.
Current Stroke thumbnail
The large thumbnail displays the selected Stroke. Clicking the thumbnail will show a pop-up window for choosing a different stroke.
Mouse Avg
Mouse Input Average Count. The Mouse Average slider affects the way cursor input is processed by ZBrushCore. A value of 1 means the actual mouse position is used at all times. A value of 2 or higher means a number of mouse positions are read and averaged before arriving at a final value. This can result in smoother drawing movement.
Stroke Jitter
Stroke >> Jitter will randomly place the alpha along the brush stroke path. The higher the value the more variation will be applied.
Brush Imperfection
Stroke >> Imperfections will introduce what is essentially noise along the brush stroke. The higher the slider value the greater the number of imperfections.
Modifiers
ReplayLast
The Replay Last button re-traces the last brush stroke (from mouse/pen click to release), regardless of whether it was created using the same tool or settings.
ReplayLastRel
The Replay Last Relative button will replay the last brush stroke at the new cursor position, as long as the mesh has not been rotated. The hotkey Shift+1 must be used as the start is dependent on the cursor position. (The button is provided so a new hotkey can be assigned if desired.)
Sculptris Pro
When the Sculptris Pro button is enabled all brushes that are compatible with Sculptris Pro mode will add triangle tesselation with each brush stroke. This mode will also deciamte where needed as the brush is applied to the surface.
Adaptive Size
When the Adaptive Size button is activated the Draw Size will control the amount of tesselation being added with each brush stroke. This ia a global setting that will affect all brushes that can use Sculptris Pro mode.
With the Adaptive Size button activated, a larger Draw Size will add less tesselation and a smaller Draw Size will add more tesselation.
Combined
When the Combined button is activated, each brush stroke will add tesselation relative to the SubDivide Size slider and decimate relative to the UnDivide Ratio slider.
If the Combined button is not activated then each brush stroke will only add tesselation.
This is a global setting that will affect all brushes that can use Sculptris Pro mode.
SubDivide Size
The SubDivide Size slider controls the degree of tesselation that will be added to the mesh when applying a brush stroke. A lower setting will add more small triangles; a higher setting will add fewer and larger triangles.
This is a global setting that will affect all brushes that can use Sculptris Pro mode.
UnDivide Ratio
The UnDivide Ratio slider controls the amount of decimation that will be applied with each brush stroke. A higher setting will add larger triangles. This is especially noticeable when smoothing the mesh when Sculptris Pro mode is activated.
This is a global setting that will affect all brushes that can use Sculptris Pro mode.
Lazy Mouse
LazyMouse
When LazyMouse is on, drawing will take place not under the mouse cursor, but under a brush point that is being ‘dragged behind’ the mouse cursor by a virtual string (shown onscreen as a red line.) This allows for very precise control of the brush point, and is ideal for drawing smooth, predictable curves, or any sort of detail work.
Relative
Steps Relative To Brush Size. When the Relative button is on the LazyMouse stepping will be set by the brush size.
LazyStep
Allows lazy mousing to be applied in discrete steps. As you pull the brush around, the brush effect will be applied at intervals determined by LazyStep.
LazySmooth
LazySmooth makes the lazy mouse effect stronger or weaker.
LazyRadius
When the LazyMouse feature is on, LazyRadius sets the length of the ‘string’ connecting the mouse cursor to the drawing point. The longer the string, the more precise the stroke, but the further you’ll have to move your hand to make it.
LazySnap
LazySnap makes the lazy mouse snap to the model.
Источник
DOCUMENTATION
ReplayLast
The Replay Last button re-traces the last brush stroke (from mouse/pen click to release), regardless whether it was created using the same tool or settings.
ReplayLastRel
The Replay Last Relative button will replay the last brush stroke at the new cursor position, as long as the mesh has not been rotated. The hotkey Shift+1 must be used as the start is dependent on the cursor position. (The button is provided so a new hotkey can be assigned if desired.)
Directional
Directional Brush Stroke specifies that continuous brush strokes are only applied while traveling away from the point of first click.
Spacing
The Spacing slider determines how many instances of the current tool are added by certain brush strokes.
Placement
Placement Variance. Used by the Spray and Colorized Spray strokes, the Placement slider determines the maximum distance each random dot strays from the center of the cursor drag. Dot placement is also governed by the Draw Size.
Changing this value also affects the relative size of each dot drawn.
Scale
Scale Variance. If the selected stroke is a Spray or Colorized Spray stroke, the Scale slider determines the maximum variance in dot size. If this value is 0, all dots are drawn at the same size. If the selected stroke is a DrawRectangle stroke: normally when drawing 3D objects, a click+drag outward defines a certain overall size, then a drag inward again shrinks only the X and Y axes. Setting this slider to 0 causes all three axes to grow and shrink equally while drawing.
Color
Color Intensity Variance. Used by the Spray and Colorized Spray strokes, the Color slider determines the maximum variance in color (for Colorized Spray stroke) or color intensity (Spray stroke). If this value is 0, all dots are drawn with the same color.
Flow Variance. Used by the Spray and Colorized Spray strokes, the Flow slider determines the density of dots drawn. Smaller values result in fewer dots, larger values result in more dots.
M Repeat
Main Repeat Count. For strokes which apply multiple instances of the tool in a pattern (such as Radial and Grid strokes), the Main Repeat Count slider determines the number of instances applied.
For the Radial stroke, this slider determines the number of instances placed around the circle; for the Grid stroke, this slider determines the number of columns in the grid.
S Repeat
Secondary Repeat Count. For strokes which apply multiple instances of the tool in a pattern (such as the Grid stroke), the Secondary Repeat Count slider provides the secondary count of instances applied, if one is needed.
For the Grid stroke, this slider determines the number of rows in the grid.
Square
Keep Square. Turn on the Square button to keep the texture/alpha/selection/or masking a perfect ratio as it is drawn onto the surface.
Center
Drag From Center. Turn on the Center button to draw out the texture/alpha/selection/or masking starting at the center of the brush stoke.
Roll mode. Press Roll to tile your currently selected alpha in your brush stroke. This is very useful if your alpha is already tileable.
Roll Dist
The Roll Distance slider will adjust the roll of an alpha or texture to stretch out to a larger distance. If the slider is set higher then ZBrush will apply the texture/alpha to cover a further distance along the surface.
Источник
DOCUMENTATION
Stroke Interpolate
Create stroke patterns!

A simple interpolation between two strokes

Example of using Interpolate with the ScribeChisel brush
With the Stroke Interpolation feature, you can morph a series of strokes between the last two strokes on a surface. Create striking patterns as one stroke transforms into the other over the specified number of iterations!
The Stroke Interpolation feature can now use ZIntensity, Brush Size, RGB Intensity, and Front and Back Colors to transition between strokes with a set number of steps. Create dazzling blends and intricate patterns of color and detail between two strokes on the surface of your mesh.
Using Stroke Interpolate

The Interpolate button and Strokes Count slider are in the Stroke palette
- Draw out the first stroke.
- Draw out the second stroke.
- Set the Strokes Count slider to the number of in-between strokes you want.
- Press the Interpolate button.
Interpolate
Press the button to create the in-between strokes.
Stroke Interpolate has two modes:
-
- Closed Circle (shown above): will space the strokes evenly.
- Open Circle: will space the strokes relative to their size. Smaller strokes will be spaced closer together than larger strokes. This mode is especially useful when using Insert Mesh brushes.
Strokes Count
Adjust the Strokes Count slider to the number of in-between strokes you want.
Источник
Feeds
HomePopular
Topics
ValheimGenshin ImpactMinecraftPokimaneHalo InfiniteCall of Duty: WarzonePath of ExileHollow Knight: SilksongEscape from TarkovWatch Dogs: Legion
NFLNBAMegan AndersonAtlanta HawksLos Angeles LakersBoston CelticsArsenal F.C.Philadelphia 76ersPremier LeagueUFC
GameStopModernaPfizerJohnson & JohnsonAstraZenecaWalgreensBest BuyNovavaxSpaceXTesla
CardanoDogecoinAlgorandBitcoinLitecoinBasic Attention TokenBitcoin Cash
The Real Housewives of AtlantaThe BachelorSister Wives90 Day FianceWife SwapThe Amazing Race AustraliaMarried at First SightThe Real Housewives of DallasMy 600-lb LifeLast Week Tonight with John Oliver
Kim KardashianDoja CatIggy AzaleaAnya Taylor-JoyJamie Lee CurtisNatalie PortmanHenry CavillMillie Bobby BrownTom HiddlestonKeanu Reeves
Animals and PetsAnimeArtCars and Motor VehiclesCrafts and DIYCulture, Race, and EthnicityEthics and PhilosophyFashionFood and DrinkHistoryHobbiesLawLearning and EducationMilitaryMoviesMusicPlacePodcasts and StreamersPoliticsProgrammingReading, Writing, and LiteratureReligion and SpiritualityScienceTabletop GamesTechnologyTravel
Create an account to follow your favorite communities and start taking part in conversations.
r/ZBrush
PostsJoin Our Discord
r/ZBrush
3
Posted by3 years ago
![]()

5 comments
81% Upvoted
![]()
level 1
· 1 yr. ago
Stroke>Inventory>Record
Or press 3 (shortcut) to turn on/off
7
level 1
· 3 yr. ago
Is your file saved on a USB hard drive or worst (like the network)?
1
level 1
· 3 yr. ago
Hey, did u solve your problem? If yes — how) thanks!
1
level 2
Op · 3 yr. ago
Yeah I went into the record option and turned it off. I think I misspressed a hotkey for it without realising it because I’m only new to zbrush. The error stopped coming up
1
Continue this thread
About Community
r/ZBrush
All things ZBrush
Created Jan 20, 2012
48.2k
Members
117
Online
Top posts december 9th 2019Top posts of december, 2019Top posts 2019
User AgreementPrivacy policy
Content policyModerator Code of Conduct
Reddit Inc © 2023. All rights reserved
Stroke и Lazy Mouse ZBrush — это основные режимы работы кистей. В этом уроке рассмотрим возможности этих опций, а так же Inventory и Modifiers — субпалитры.
Stroke в ZBrush. Режимы работы кисти
Для кистей предусмотрено несколько режимов работы, можно выбирать из панели Stroke, кликнув по второй иконке в левом шелфе (рис.1)

В данном курсе нас интересуют режимы работы для кистей скульптинга:
- Dots — размещает две точки на определённом расстоянии друг от друга и простраивает между ними инстансы (точно такие же точки). От чего мазок кажется непрерывным, если быстро вести мышкой
- Drag Rect — растягивание формы кисти из цента. Зависит от альфы и типа кисти. Этот режим активен по-умолчанию при создании 3D-объектов
- Freehand — похож на режим Dots. Отличие составляет параметр Spacing — добавляется больше инстансов между соседними точками, от чего мазок будет чуть более насыщенным. Но в то же время этот режим будет более чувствительным к дрожанию руки и требовать больше вычислительного ресурса
- Опция Mouse Avg — определяет момент считывания данных из-под курсора мыши. Значение 1 означает, что данные считываются в каждой позиции курсора. 2 и выше между сколькими позициями будет происходить усреднение. Более высокий параметр может давать результаты плавнее
- Color Spray — напыление по типу паттернов. Добавляется хаотичная геометрия и рандомный цвет. Форма зависит от типа кисти
- Spray — кисть, которая добавляет рандомную геометрию на основе Alfa и типа кисти. Похожа на предыдущую кисть, но добавляет цвет только в пределах выбранного цвета в палитре (от светлого к тёмному). Кисть Color Spray и Spray имеют следующие модификаторы:
- Placement — расстояние расползания точек от центра кисти и относительный размер каждой точки. Чем выше — тем больше
- Scale — вариация размера создаваемых точек. Если = 0, точки будут одинакового размера
- Color — рандомность цвета для диапазона каждой кисти. Чем ниже — тем меньше спектр используемых цветов. Нулевое значение будет использовать только цвет, указанный в палитре
- Flow — сила потока. Чем ниже, тем меньше интенсивность цвета и геометрии
- Drag — добавление и одновременное позиционирование мазка на модели. Форма зависит от типа кисти и альфы
Сбросить все настройки кисти или всех кистей можно из палитры Brush → Reset Current/All brush
Палитра Stroke. Modifiers, Lazy Mouse, Inventory
Рассмотрим разделы Modifiers, Inventory и Lazy Mouse палитры Stroke (рис.2)
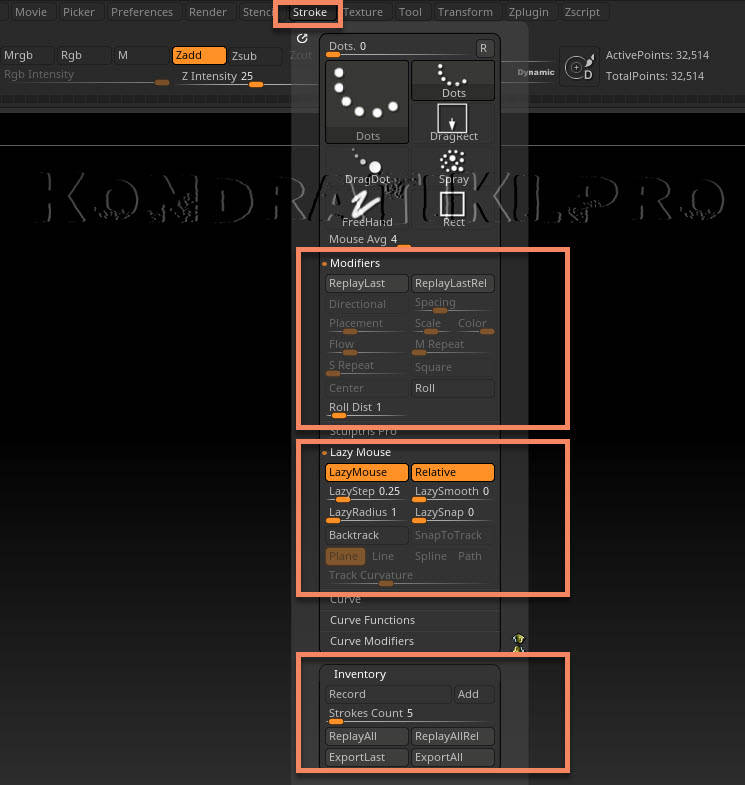
Субпалитра Modifiers
- ReplayLast — воспроизвести последнее действие. Положение модели в документе не должно меняться перед использованием этой функции. Горячая клавиша 1
- ReplayLastRelative — повторяет прошлое действие, опираясь на новую позицию курсора. Нужно использовать горячую клавишу Shift+1, а кнопку использовать нельзя (она нужна только для перезаписи горячей клавиши), потому что новый штрих будет считываться с текущей позиции курсора. Так же, положение в документе не должно меняться перед использованием этой функции
- Directional — мазок кисти (или растягивание нового примитива) будет непрерывным только по мере удаления от начала этого мазка. При движении в строну стартовой точки, создание прекратится и начнётся заново при новом удалении, либо при пересечении оси начальной позиции в другую сторону
- Параметр Scale — при создании и растаскивании 3D-объектов определяет степень сжатия при обратном движении. Если равен нулю, сжатие будет происходить по всем осям. Увеличение параметра будет приводить к воздействию обратного движения мышью только по осям X/Y
- M Repeat — количество повторяемых элементов для режима Radial и Grid. Для режима Grid этот параметр определяет количество столбцов в сетке
- S Repeat — дополнительное количество повторяемых элементов. Для режима Grid определяет количество строк в сетке
- Square — для разных режимов, которые используют фигуры создаёт правильной формы шейпы
- Center — рисование фигуры из центра с равномерным увеличением
- Roll — соединяет используемую Alfa или текстуру в непрерывную последовательность
- Roll Dist — расстояние растягивание Alfa или текстуры. Чем выше параметр, тем на большую площадь ляжет одна альфа до состыковки со следующим своим повтором
Чтобы продолжить мазок в другом месте, не изменяя угла и направления движения, нужно зажать пробел → переместить кисть в новое место → продолжить движение кисти, отпустив пробел
Чтобы получить прямолинейное движение, нужно зажать Shift после начала движения кисти. Зелёная линия покажет угол приращения
Субпалитра Inventory
Позволяет записывать последовательность движения кисти по холсту. Для записи нужно нажать кнопку Record (или горячую клавишу 3)
-
- Кнопка Add при её активной фазе дописывает новые мазки к ранее существующим, при переактивации функции записи
- Strokes Count — количество штрихов, записанных и содержащихся в буфере. При новой активации Record этот счётчик будет сброшен, либо продолжен (при активной Add)
- ReplayAll — воспроизводит мазки кисти в том же месте документа, и, если модель попадает в эту зону, на ней будут переданы эти мазки. Кисть можно менять в процессе, даже если запись прошла с другой кисти. Положение модели так же можно изменять, так как данные уже хранятся в буфере
- ReplayAllRel — воспроизводит записанную последовательность движения кисти в любом месте, начиная с позиции курсора. Кнопку использовать нельзя, только сочетание клавиш — Shift+2
- ExportLast — экспортировать последний мазок кистью в текстовый файл. Пригодится для подгрузки через StrokeLoad при создании скриптов
- ExportAll — то же, что предыдущая команда, но экспортирует всю последовательность штрихов
Субпалитра Lazy Mouse ZBrush
Позволяет получать более плавные формы. Взаимодействие модели происходит не с курсором, а с виртуальной соединительной линией красного цвета. Чем больше длина линии, тем более плавного движения можно добиться
- Lazy Mouse — активирует функцию ленивой мыши
- Relative — шаг взаимодействия кисти с поверхностью будет зависеть от размера кисти
- LazyStep — кисть будет дискретно взаимодействовать с поверхностью (то есть создавать прерывистый штрих). Чем выше значение, тем больше интервал
- LazySmooth — делает сглаживающий эффект более выраженным
- LazySnap — позволяет продолжить новый мазок точно с того места, где окончился предыдущий. Число определяет расстояние, на котором курсор будет обнаруживать окончание предыдущего мазка. Если новое положение курсора будет попадать в этот диапазон, то курсор автоматически переместиться в конец предыдущего мазка при начале движения
- При работе с планшетом могут появляться артефакты в местах соединения двух штрихов. Этот эффект возникает из-за контроля давления при работе пером-стилусом. Чтобы этого избежать можно использовать мышь. Либо переключить в меню Brush → Tablet Presure → ползунки Size и Zintensity на 100
- Для кистей, основанных на типе Layer или Chisel будет полезно включить функцию StoreMT из палитры Tool → субпалитры Morph Target. Это позволит избежать артефактов при соединении или пересечении штрихов. После завершения, можно удалить Morph Target, нажав кнопку DelMT
- BackTrack — функция изменения при обратном движении кисти. Опирается на параметры ниже
- SnapToTrack — движение кисти будет привязано к изначально нарисованной линии. Чтобы изменить линию во время растаскивания маркеров и чтобы не начался наноситься штрих, нужно удерживать Ctrl
- Plane — добавляет виртуальную плоскость, вдоль которой проходит воздействие кисти. Хорошо видно на кисти Planar, которая по-умолчанию активирует этот режим
- Line — прямая линия, вдоль которой будет действовать кисть при обратном движении. Чтобы определить точный угол, зажимаем Shift при растягивании линии
- Spline — похож на предыдущий режим, но работает по скруглённой траектории сплайна. Можно проверить на кисти Planar Spline из Ligthbox, скругляя рёбра куба от одной грани к другой
- Path — рисует путь, по которому будет строиться мазок
- Track Curvature — определяет кривизну пути для режимов выше. Например, для сплайна большее значение будет давать меньшее расхождение с геометрией. Значение ниже будет сильнее сглаживать кривую
Stroke и Lazy Mouse ZBrush — основные режимы работы кистей для скульптинга мы рассмотрели в этом уроке. В следующем продолжим знакомиться с левым шелфом — Alfa и текстурами.
Официальный сайт Pixologic
Задать вопрос в нашей группе ВК