Содержание
- Zebra zm400 error cleared
- Zebra zm400 error cleared
- Zebra zm400 — проблема : Zebra
- Zebra printer Zm400 — error condition (paper out and ribbon out) when fresh install
- 3 Answers
- Anonymous
- Устранение неполадок Сообщения об ошибках на ЖК.
- Устранение неполадокСообщения об ошибках на ЖК.
- Устранение неполадок Сообщения об ошибках на ЖК.
- Устранение неполадокСообщения об ошибках на ЖК.
Zebra zm400 error cleared
КОНФЕРЕНЦИЯ СТАРТКОПИ
Принтеры, копировальные аппараты, МФУ, факсы и другая офисная техника:
вопросы ремонта, обслуживания, заправки, выбора
При включении выдает ошибку Ribbon in printer idle (по-русски лента в принтере стоит (простаивает)). Лента вставлена, и, при включении, протягивается до разделительной полоски между отдельными этикетками. В чем может быть причина?
Визуально лента двигается нормально, равномерно?
Какие варианты для начала:
1. отрегулировать давление печатающей головки — поставить давление на минимум, проверить равномерность.
2. в мануалах пишут, что можно уменьшить значение тёмности. хз, не проверял.
3. сделать калибровку ленты и носителя.
Кажется, я запутался в терминологии. Под лентой я имел ввиду полосу-подложку, на которой наклеены липучки — этикетки, и предназначенную для direct thermal печати. А это есть носитель. А вот ribbon, видимо, есть лента для thermal transfer печати. Этот самый ribbon в принтере не установлен, т.к. используется direct thermal метод печати, и он же выставлен в настройках принтера. Непонятно, зачем в таком режиме принтер контролирует ribbon.
Прошу сильно не пинать, это практически первый раз я столкнулся с принтером для термопечати.
(2)Тогда нужно начать с того, что откалибровать аппарат для печати на этикетках без риббона.
Поищите мануал в сети, юзер-мануала будет достаточно. Там подробно сказано как калибровать и какие настройки выставить.
То ли глюк в прошивке V53.16.3Z, то ли даже не знаю что.
В принтере нет ribbon (ленты), но когда в меню установил неподходящий метод печати THERMAL-TRANSFER, пропала ошибка Ribbon in printer idle. В другом экземпляре такого же принтера с прошивкой V53.15.8Z установлен метод печати DIRECT-TERMAL, как и должно быть.
Вот так с разными установками они работают оба одинаково.
чуднО..
Попробуйте написать(или позвонить) в техподдержку Zebra, чтобы они выслали самую свежую прошивку.
Источник
Zebra zm400 error cleared


Shopping Cart is Empty

1. Error message displayed on the LCD screen
When an error occurs, the LCD displays a message. Errors, possible reasons, and recommended solutions are listed below.
Displayed information 1: Invalid Head
Possible reason: The original Zebra ZM400 printhead was not used when replacing the printhead.
Solution: Install the original Zebra ZM400 printhead.
Displayed information 2: Ribbon Out
Possible reason 1: In thermal transfer mode, the ribbon is not loaded or loaded incorrectly.
Solution: please load the media correctly.
Possible reason2: In thermal transfer mode, the ribbon sensor does not detect the correctly loaded ribbon.
Solution: Please load the media correctly and calibrate the sensor.
Possible reason 3: In thermal transfer mode, the media blocks the ribbon sensor.
Solution: Please load the media correctly and calibrate the sensor.
Possible reason 4: In thermal transfer mode, the printer does not detect the ribbon even if the ribbon has been loaded.
Solution: Please print the sensor chart, calibrate the sensor or load the printer defaults.
Displayed information 3: Ribbon In
Possible reason: The ribbon is loaded, but the printer is set to thermal mode.
Solution: Thermal media does not require ribbon. If you want to use thermal transfer media that requires ribbon, set the printer to use in the «thermal transfer mode».
Displayed information 4: Paper Out
Possible reason 1: The media is not loaded or the media is not loaded properly.
Solution: Please load the media correctly.
Possible reason 2: The media sensor is misaligned.
Solution: Check the media sensor position.
Possible reason 3: The printer has been set up for non-continuous media, but contiguous media is loaded.
Solution: Please install the correct media type, or reset the printer to the current media type and perform calibration.
Displayed information 5: Head Open
Possible reason 1: The print head is not completely closed.
Solution: please completely close the print head.
Possible reason 2: The print head opening sensor is not working properly. Solution: please replace the sensor.
2. Calibration failure
Phenomenon 1: The print alignment mark on the label is missing, and the vertical offset of the top alignment mark on the form is too much.
Possible reason 1: The platen roller is too dirty.
Solution: Please clean the platen roller.
Possible reason 2: The position of the media guide is not correct.
Solution: Please ensure that the media guide is correctly positioned.
Possible reason3: The media type is incorrect.
Solution: Set the printer to use for the correct media type.
Possible reason 4: The media is not loaded correctly.
Solution: Please load the media correctly.
Phenomenon 2: Auto calibration failed.
Possible reason 1: The media or ribbon is not loaded correctly.
Solution: Please load the media and ribbon correctly.
Possible reason 2: The ribbon or media is not detected by the sensor. Solution: Please calibrate the printer manually.
Possible reason 3: The sensor is too dirty, or the positioning is not correct, the sensor cannot be detected.
Solution: Please make sure the sensor is clean and the media position is correct.
Possible reason 4: The media type setting is incorrect.
Solution: Set the printer to use for the correct media type.
3. Zebra ZM400 Communication failure
Phenomenon 1: The label format has been sent to the printer, but it is not recognized and the data indicator is not flashing.
Possible reason: The communication parameters are incorrect.
Solution 1: Check the printer driver or software communication settings. Solution 2: If using a serial port, check the port settings in the control panel menu.
Solution 3: If you use a driver, check the driver communication settings related to the connection.
Phenomenon 2: The label format has been sent to the printer. After printing multiple labels, the printer skips, misplaces, loses images, or distorts the image on the label.
Possible reason: The serial communication setting is incorrect.
Solution 1: Make sure the flow control settings match.
Solution 2: Check the length of the communication cable.
Solution 3: Check the printer driver or software communication settings.
Phenomenon 3: The format has been sent to the printer, but it is not recognized, the data light flashes, but it does not print.
Possible reason 1: The prefix and separator character set in the printer do not match the character set in the label format.
Solution: Please check the prefix and separator characters.
Possible reason 2: Incorrect data is being sent to the printer.
Solution: Please check the communication settings on the computer to make sure these settings match the settings on the printer. If the problem persists, check the label format.
4. Ribbon failure
Phenomenon 1: The ribbon is broken or melted.
Possible reason: The depth setting value is too high.
Solution 1: Reduce the depth setting value.
Solution 2: Thoroughly clean the print head.
Phenomenon 2: The printer has not checked that the ribbon has run out. Possible reason: The printer is calibrated without a ribbon loaded, then the ribbon is inserted without performing a user recalibration of the printer, or the printer defaults are not loaded.
Solution: Use the ribbon to calibrate the printer, or load the printer defaults.
Phenomenon 3: In thermal transfer mode, the ribbon is not detected by the printer even though the ribbon is loaded correctly.
Possible reason: The printer is calibrated without a ribbon loaded, then the ribbon is inserted without performing a user recalibration of the printer, or the printer defaults are not loaded.
Solution: Use the ribbon to calibrate the printer, or load the printer defaults.
Phenomenon 4: The ribbon indicator illuminates even if the ribbon is loaded correctly.
Possible reason: The printer is not calibrated for the label and ribbon to be used.
Solution: Perform calibration media and ribbon sensor sensitivity.
Источник
Zebra zm400 — проблема : Zebra
определить просто:
если вы заправляете только ленту с бумагой — у вас прямая термопечать.
бумага должна темнеть, если по ней энергично провести твердым предметом (даже просто ногтем) или при нагреве.
потому и прямая термопечать, что бумагу принтер нагрел где надо — в этом месте появилось изображение
если же вы заправляете обычную бумагу (не темнеет) и дополнительно красящую ленту (риббон) — у вас термоперенос: красящая лента совмещается с бумагой, нагревается и в месте нагрева «краска» переносится на бумагу.
Купил сегодня такой принтер Zebra Zm400. Решил его испытать, вроде бы все нормально, всё настроил, выставил все параметры, уже собирался идти домой, как замечаю, что как то штрих код не корректно расспечатан. А иммено, пропускат линии штрих кода. Раннее до этого стояла Zebra TLP2824, печатала нормально. Бывали такие же пропуски на первой этикете, но это было терпимо.
Схема подключения принтера
Принтер zm400 подключен к Win XP через USB и разшарен в сеть. Этикетки кидаются из 1С по виндовой шаре. Принтер пока что печатает без риббона.
Штрих код который печатает 2824 
Штрих код который печатает zm400
На второй фотке видно, что пропуски на толстых плосах.
Посоветуйте в чем может быть проблема.
За ранее всем благодарен!
ПС. Фотки штрих кода брал из инета, вручную примерно вытерал полосы. Если надо будут оригенальный штрих код, могу отсканировать и вложить.
Источник
Zebra printer Zm400 — error condition (paper out and ribbon out) when fresh install
Posted by mohan728 on Aug 21, 2009
3 Answers
Anonymous
An expert who has achieved level 1.
An expert that has 1 follower.
This solution is for the Zebra Xi II and the Zebra Xi III , so the wording may be different in different models, but here is the solution:
Press the SETUP button.
Scroll through until you see MEDIA AND RIBBON .
Press the CALIBRATE button.
It will say LOAD BACKING . At this point you must REMOVE the tags completely .
It will then say REMOVE RIBBON .
Just pull the ribbon to the side so that it does not block the ribbon sensor .
After pulling the ribbon away from the sensor,
CLOSE THE PRINT HEAD .
It will now say CALIBRATING PLEASE WAIT
It will then display RELOAD ALL
Reload the labels, making sure to position the end of one label and the beginning of the next label between the red optical sensor .
Then, while keeping the label in that position, move the ribbon back to the normal position, and close the print head. Then hit CONTINUE .
It will then display MEDIA AND RIBBON CALIBRATE
It will calibrate automatically at this point.
Hit the SETUP button.
Hit the NEXT/SAVE button.
You are all done.
Note that this is the intermediate way of calibrating the unit; normally it is done with the CALIBRATE button at the bottom of the front panel. If both of the above do not work, read below (in blue) FIRST-if that doesn’t do the trick, then you can do a «hard reset» by powering the unit down, holding the PAUSE and the FEED button at the same time, and while holding them down, turning back on the power. This should only be used as a last resort, however, because it resets everything to factory settings. (NOT a good thing!)
Please be advised that if the intermediate calibration does not correct the issue, then you should use a bottle of 92% rubbing alcohol/Isopropyl alcohol (you can buy at CVS or any pharmacy for less than 2 dollars) and cotton swabs to clean both the top sensor and the bottom sensor-make sure to turn off the power FIRST, and make sure to allow a minute or so for the alcohol to dry after doing the cleaning. The combination of cleaning the sensor and doing the intermediate calibration procedure is about 95% effective.
I am passing this on from experience. The first time we got the ‘ribbion out’ error, we had to call the big service company in excess of 400.00 to come out. So when she did the above and had it runing in about 2 minutes, I asked the serice person to let me document the procedure. So you get the benefit without having to spend the big bucks!
Источник
Устранение неполадок Сообщения об ошибках на ЖК.
Сообщения об ошибках на ЖК-дисплее
S4M Руководство пользователя
13290L-154 Вер. A
Принтер останавливает
работу; индикатор ERROR
(ОШИБКА) горит; на
дисплее принтера по
очереди отображаются эти
три сообщения.
Предупреждение • Эти сообщения об ошибках могут
появляться, если неправильно подключен кабель данных или
питания. Печатающая головка может быть достаточно горячей;
прикосновение может привести к серьезному ожогу. Подождите, пока
печатающая головка остынет.
Кабель данных печатающей
головки подсоединен
неправильно.
Предупреждение • Выключите (O)
принтер перед выполнением этой
процедуры. В противном случае
печатающая головка может быть
повреждена.
Отключите и повторно
подключите кабель данных к
печатающей головке.
Убедитесь, что разъем кабеля
полностью вставлен в разъем
печатающей головки.
В печатающей головке
неисправен термистор.
Обратитесь к специалисту по
обслуживанию.
Таблица 17 • Сообщения об ошибках на ЖК-дисплее (продолжение)
HEAD ELEMENT BAD

Устранение неполадокСообщения об ошибках на ЖК.
Устранение неполадок
Сообщения об ошибках на ЖК-дисплее
13290L-154 Вер. A
S4M Руководство пользователя
Принтер выполняет печать;
индикатор
предупреждения ALERT
мигает.
Предупреждение • Это сообщение об ошибке может
появляться, если неправильно подсоединен кабель данных
или питания. Печатающая головка может быть достаточно
горячей; прикосновение может привести к серьезному ожогу.
Подождите, пока печатающая головка остынет.
Температура печатающей
головки приближается к
нижнему рабочему пределу.
Продолжайте печать, пока
печатающая головка нагреется до
необходимой рабочей температуры.
Если ошибка сохраняется,
возможно, температура окружающей
среды слишком низкая для
правильной печати. Перенесите
принтер в более теплое место.
Кабель данных печатающей
головки подсоединен
неправильно.
Предупреждение • Выключите (O)
принтер перед выполнением этой
процедуры. В противном случае
печатающая головка может быть
повреждена.
Отключите и повторно
подключите кабель данных к
печатающей головке.
Убедитесь, что разъем кабеля
полностью вставлен в разъем
печатающей головки.
В печатающей головке
неисправен термистор.
Обратитесь к специалисту по
обслуживанию.
Принтер останавливает
работу; индикатор
предупреждения ALERT
мигает.
Предупреждение • Печатающая головка может быть
достаточно горячей; прикосновение может привести к
серьезному ожогу. Подождите, пока печатающая головка
остынет.
Перегрев печатающей головки.
Подождите, пока принтер остынет.
Печать автоматически
возобновляется, когда элементы
печатающей головки остынут до
приемлемой рабочей температуры.
Таблица 17 • Сообщения об ошибках на ЖК-дисплее (продолжение)

Устранение неполадок Сообщения об ошибках на ЖК.
Сообщения об ошибках на ЖК-дисплее
S4M Руководство пользователя
13290L-154 Вер. A
Принтер останавливает
работу.
Предупреждение • Печатающая головка может быть
достаточно горячей; прикосновение может привести к
серьезному ожогу. Подождите, пока печатающая головка
Предупреждение • Прежде чем прикасаться к узлу
печатающей головки, снимите заряд статического
электричества, прикоснувшись к металлической части корпуса
принтера или с помощью антистатической заземляющей манжеты и
коврика.
Печатающая головка не
установлена.
Кабель данных печатающей
головки не подсоединен.
Печатающая головка
неисправна.
перед выполнением этой
процедуры. В противном
случае печатающая головка
может быть повреждена.
Отключите и повторно
подключите кабель данных к
печатающей головке.
Убедитесь, что разъем кабеля
полностью вставлен в разъем
печатающей головки.
Если неисправность не исчезнет,
замените печатающую головку.
Таблица 17 • Сообщения об ошибках на ЖК-дисплее (продолжение)

Устранение неполадокСообщения об ошибках на ЖК.
Устранение неполадок
Сообщения об ошибках на ЖК-дисплее
13290L-154 Вер. A
S4M Руководство пользователя
Принтер останавливает
работу.
Принтер выполняет
дефрагментацию памяти.
Предупреждение • НЕ выключайте
питание принтерa во время
дефрагментации. Это может
повредить принтер.
Подождите, пока принтер завершит
дефрагментацию. Если это
сообщение об ошибке появляется
часто, проверьте форматы этикеток.
Форматы, часто записываемые в
память или удаляемые из нее, могут
стать причиной частого выполнения
дефрагментации. Обычно
использование правильно
закодированных форматов этикеток
позволяет минимизировать
потребность в дефрагментации.
Если это сообщение об ошибке
сохраняется, обратитесь в службу
технической поддержки.
Необходимо обслуживание
принтера.
Принтер останавливает
работу; индикатор
предупреждения ALERT
мигает.
Предупреждение • Лезвие резака очень острое. Не
прикасайтесь к лезвию и не протирайте его пальцами.
Лезвие резака находится на пути
прохождения носителя.
Выключите питание принтера и
отключите принтер от сети.
Проверьте модуль резака на наличие
сколов и загрязнения, следуя
инструкциям по очистке, описанным
в разделе
Таблица 17 • Сообщения об ошибках на ЖК-дисплее (продолжение)
Источник
Содержание
- Warning ribbon in ошибка на принтере zebra
- Инструкция по эксплуатации Zebra S4M
- Страница 110
- Zebra S4M — Warning RIBBON IN
- Video: Loading Ribbon and Resolving Ribbon Issues on ZT400
- Issue / Question
- Applicable To
- Resolution / Answer
- Helpful Details
- How it works
- Video: Loading Ribbon and Resolving Ribbon Issues on ZT400
- Issue / Question
- Applicable To
- Resolution / Answer
- Helpful Details
- How it works
Warning ribbon in ошибка на принтере zebra
КОНФЕРЕНЦИЯ СТАРТКОПИ
Принтеры, копировальные аппараты, МФУ, факсы и другая офисная техника:
вопросы ремонта, обслуживания, заправки, выбора
При включении выдает ошибку Ribbon in printer idle (по-русски лента в принтере стоит (простаивает)). Лента вставлена, и, при включении, протягивается до разделительной полоски между отдельными этикетками. В чем может быть причина?
Визуально лента двигается нормально, равномерно?
Какие варианты для начала:
1. отрегулировать давление печатающей головки — поставить давление на минимум, проверить равномерность.
2. в мануалах пишут, что можно уменьшить значение тёмности. хз, не проверял.
3. сделать калибровку ленты и носителя.
Кажется, я запутался в терминологии. Под лентой я имел ввиду полосу-подложку, на которой наклеены липучки — этикетки, и предназначенную для direct thermal печати. А это есть носитель. А вот ribbon, видимо, есть лента для thermal transfer печати. Этот самый ribbon в принтере не установлен, т.к. используется direct thermal метод печати, и он же выставлен в настройках принтера. Непонятно, зачем в таком режиме принтер контролирует ribbon.
Прошу сильно не пинать, это практически первый раз я столкнулся с принтером для термопечати.
(2)Тогда нужно начать с того, что откалибровать аппарат для печати на этикетках без риббона.
Поищите мануал в сети, юзер-мануала будет достаточно. Там подробно сказано как калибровать и какие настройки выставить.
То ли глюк в прошивке V53.16.3Z, то ли даже не знаю что.
В принтере нет ribbon (ленты), но когда в меню установил неподходящий метод печати THERMAL-TRANSFER, пропала ошибка Ribbon in printer idle. В другом экземпляре такого же принтера с прошивкой V53.15.8Z установлен метод печати DIRECT-TERMAL, как и должно быть.
Вот так с разными установками они работают оба одинаково.
чуднО..
Попробуйте написать(или позвонить) в техподдержку Zebra, чтобы они выслали самую свежую прошивку.
Источник
Инструкция по эксплуатации Zebra S4M
Страница 110

Устранение неполадок
Сообщения об ошибках на ЖК-дисплее
13290L-154 Вер. A
S4M Руководство пользователя
Индикатор RIBBON
(ЛЕНТА) горит; индикатор
ERROR (ОШИБКА)
мигает. Индикатор
предупреждения ALERT
мигает.
Лента установлена, однако
принтер настроен на режим
прямой термопечати.
Лента не требуется при
использовании носителя для прямой
термопечати. Если используется
носитель для прямой термопечати,
извлеките ленту. Это сообщение об
ошибке не повлияет на печать.
Если используется носитель для
термопереноса, для которого
требуется лента, настройте принтер
для работы в режиме термопереноса.
См. раздел
Принтер останавливает
работу; индикатор
предупреждения ALERT
мигает.
Носитель не загружен или
загружен неправильно.
Загрузите носитель правильно.
Неправильно выровнен датчик
носителя.
Проверьте расположение датчика
носителя.
принтер настроен на
несплошной носитель, однако
загружен сплошной носитель.
Загрузите носитель подходящего
типа или настройте принтер на
текущий тип носителя и выполните
калибровку.
Принтер останавливает
работу; индикатор
предупреждения ALERT
мигает.
Печатающая головка закрыта не
полностью.
Полностью закройте печатающую
головку.
Датчик открытия головки
работает неправильно.
Обратитесь к специалисту по
обслуживанию.
Индикатор ERROR
(ОШИБКА) мигает.
В печатающей головке
неисправен термистор.
Обратитесь к специалисту по
обслуживанию.
Таблица 17 • Сообщения об ошибках на ЖК-дисплее (продолжение)
Источник
Zebra S4M — Warning RIBBON IN
Принтер этикеток Zebra S4m, Warning RIBBON IN
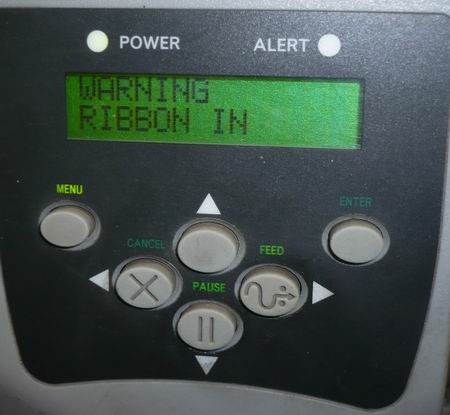
Введение. Простенькая ошибка помноженная на плохую память получаем +30 минут к наипростейшему ремонту. Постараемся исправить эту ошибку, что бы впредь не терять время на листание документации и ненужной регулировки датчиков.
Неисправность со слов заказчика. Принтер Zebra S4M выдает на дисплей предупреждение «Warning RIBBON IN».
Первичная диагностика. Подобная ошибка/предупреждение после выхода второй этикетки. Память подсказывает что ошибка настолько примитивная, что ее устранить дело 1 минуты, вот только как, память почему то не подсказывала. Поэтому начинаем с простых действий – чистим все датчики и смотри профили датчиков, профиль датчика риббона в полном порядке, хотя датчик этикетки шалит, принтер явно не видит этикетку.
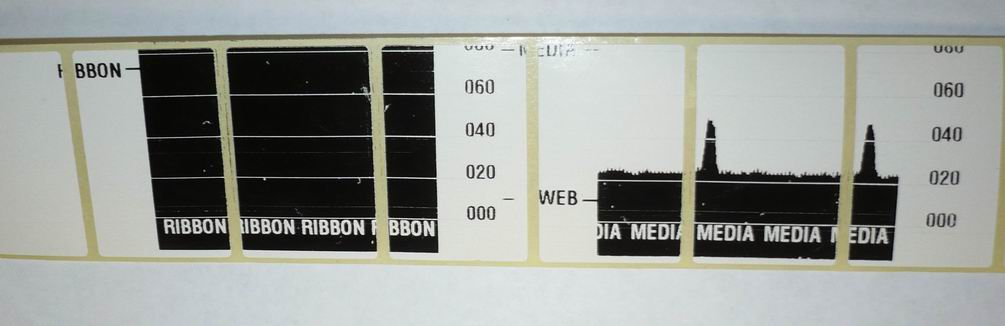
Датчик Ribbon в полном порядке (слева), а вот датчик этикетки не радует (справа).
Делаем калибровку, хотя и ищем ошибку датчика Ribbon. Из за риббона профиль датчика этикетки напрягает глаз и создается впечатление датчик калибровали без риббона.
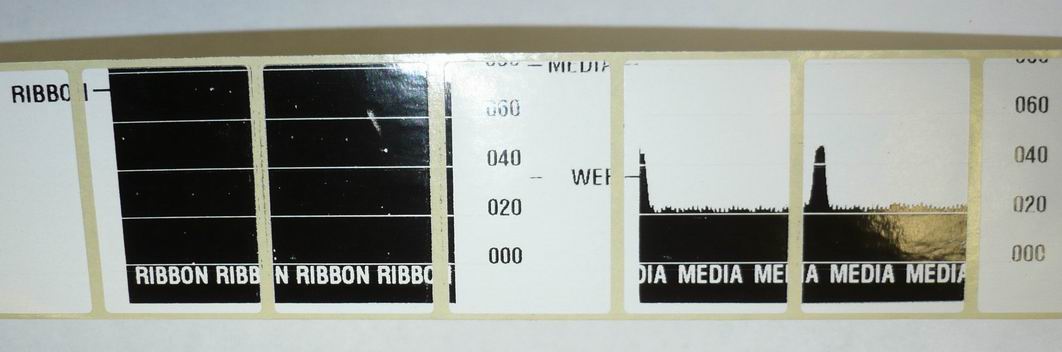
Датчик Ribbon (слева) и датчик этикетки (справа) после калибровки.
Калибровка и чистка датчиков проблему не устранила, хотя и не помешала.
Ремонт. Так как память подсказывает, что ошибка устраняется просто, поэтому забираемся в меню и смотрим, что там не так. В третьем setup (пароль 1234) натыкаемся на такую надпись Ribbon NO, и сразу вспоминаем Warning RIBBON IN говорит нам о сработке датчика риббона (тот который на риперном диске), но при этом работа риббоном в настройках принтера не выставлена.
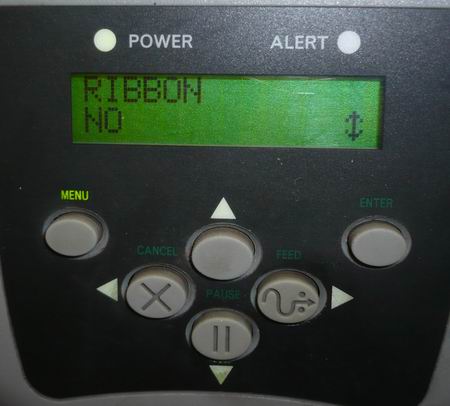
Вот такая настройка принтера при использовании термотрансферной ленты вызовет ошибку Warning RIBBON IN (надо выставлять Ribbon YES).
Заключение. Рассматриваемая «поломка» была не единственной в этом принтере была еще куча рукотворных ошибок из области – а что будет если покрутить эту фиговину, но рассматривать мы их не будем, так как они устраняются на автомате любым линейщиком по принтерам. Для любителей докопаться до истины руководство по эксплуатации.
Источник
Video: Loading Ribbon and Resolving Ribbon Issues on ZT400
Article ID: 02967455
Issue / Question
This solution discusses resolving symptoms related to the following:
• Ribbon In error
• Ribbon Out error
• Not detecting a ribbon out condition
• Ribbon wrinkle causing random diagonal lines in print
• Ribbon stalling or sticking
• Ribbon breaking or tearing
Applicable To
ZT400 Printers experiencing ribbon related problems or errors.
Resolution / Answer
The printer can be used for a wide variety of printing applications. Printing can be done with and without ribbon and for each method, the printer (and driver/software) must be properly configured. The most common term used when the ribbon is required is ”Thermal Transfer” while “Direct Thermal” refers to applications that do not use ribbon. For non-ribbon applications, a heat sensitive label must be used referred to as Direct Thermal labels.
The ribbon used in the printer consists of a wax or resin-based ink on a plastic film called the carrier that is rolled onto a cardboard core. The width of the roll varies based on the width of the labels and should always be slightly wider. This provides protection for the printhead to prevent wear. On Zebra printers the ink is on the outside of the ribbon roll (see note) and this is the surface that should be facing the labels so ink transfer is accomplished.
NOTE There is a reverse-wound spindle available for the ZT410 P/N 79830M. Contact your Zebra Reseller for details.
Common Issues and Resolutions:

| Problem | Resolution |
| Ribbon Out Error
|
|
| Ribbon In Error Ribbon Not Expected The Supplies Light is Flashing Yellow
|
|
|
|
| Not detecting a ribbon out condition |
|
| Ribbon Breaking or Tearing |
|
| Ribbon Stalling |
|


Helpful Details
| Click here to view video -> | Printer Media and Ribbon Loading Video |
Load the ribbon following the diagram that is printed on the inside wall of the supplies compartment. This will ensure the ribbon sensor detects the presence of ribbon correctly. Improper loading can cause false ribbon out errors and also lead to wrinkling.
Ribbon Spindle Replacement Instructions Read More>>
How it works
Ribbon Mechanics
There are two spindles, Ribbon Supply and Ribbon Take-up, that guide the ribbon during printing. The actual movement of the ribbon is controlled by the printhead pressure at the print line. Back tension is applied from the Ribbon Supply spindle to help prevent wrinkle and take up slack during back feed operation. Printhead pressure moves the ribbon keeping it synchronized with the labels and the Ribbon Take-up spindle removes the ribbon from the labels and rewinds the spent ribbon.
Ribbon Detection
The printer uses a combination of an optical sensor and reflector plate (the silver plate under the print mech you load the labels under) to detect the ribbon as it blocks the ribbon sensor light path. The ribbon sensor is used in Thermal Transfer applications to detect the state of the ribbon and will provide a Ribbon Out condition when the ribbon reaches the end of the roll or is not installed. A clear ribbon trailer allows the light to reach the reflector plate or the ribbon has a reflective chrome trailer that acts as a light reflector for the ribbon sensor. For Direct Thermal applications (where the ribbon is not required) the sensor will warn if the ribbon is detected by displaying a Ribbon In a warning on the LCD Display (or yellow flashing supplies light ZT220). To avoid ribbon errors, proper loading, and configuration of the printer and driver/software are required.
Источник
Video: Loading Ribbon and Resolving Ribbon Issues on ZT400
Article ID: 02967455
Issue / Question
This solution discusses resolving symptoms related to the following:
• Ribbon In error
• Ribbon Out error
• Not detecting a ribbon out condition
• Ribbon wrinkle causing random diagonal lines in print
• Ribbon stalling or sticking
• Ribbon breaking or tearing
Applicable To
ZT400 Printers experiencing ribbon related problems or errors.
Resolution / Answer
The printer can be used for a wide variety of printing applications. Printing can be done with and without ribbon and for each method, the printer (and driver/software) must be properly configured. The most common term used when the ribbon is required is ”Thermal Transfer” while “Direct Thermal” refers to applications that do not use ribbon. For non-ribbon applications, a heat sensitive label must be used referred to as Direct Thermal labels.
The ribbon used in the printer consists of a wax or resin-based ink on a plastic film called the carrier that is rolled onto a cardboard core. The width of the roll varies based on the width of the labels and should always be slightly wider. This provides protection for the printhead to prevent wear. On Zebra printers the ink is on the outside of the ribbon roll (see note) and this is the surface that should be facing the labels so ink transfer is accomplished.
NOTE There is a reverse-wound spindle available for the ZT410 P/N 79830M. Contact your Zebra Reseller for details.
Common Issues and Resolutions:
| Problem | Resolution |
| Ribbon Out Error
|
|
| Ribbon In Error Ribbon Not Expected The Supplies Light is Flashing Yellow
|
|
|
|
| Not detecting a ribbon out condition |
|
| Ribbon Breaking or Tearing |
|
| Ribbon Stalling |
|
Helpful Details
| Click here to view video -> | Printer Media and Ribbon Loading Video |
Load the ribbon following the diagram that is printed on the inside wall of the supplies compartment. This will ensure the ribbon sensor detects the presence of ribbon correctly. Improper loading can cause false ribbon out errors and also lead to wrinkling.
Ribbon Spindle Replacement Instructions Read More>>
How it works
Ribbon Mechanics
There are two spindles, Ribbon Supply and Ribbon Take-up, that guide the ribbon during printing. The actual movement of the ribbon is controlled by the printhead pressure at the print line. Back tension is applied from the Ribbon Supply spindle to help prevent wrinkle and take up slack during back feed operation. Printhead pressure moves the ribbon keeping it synchronized with the labels and the Ribbon Take-up spindle removes the ribbon from the labels and rewinds the spent ribbon.
Ribbon Detection
The printer uses a combination of an optical sensor and reflector plate (the silver plate under the print mech you load the labels under) to detect the ribbon as it blocks the ribbon sensor light path. The ribbon sensor is used in Thermal Transfer applications to detect the state of the ribbon and will provide a Ribbon Out condition when the ribbon reaches the end of the roll or is not installed. A clear ribbon trailer allows the light to reach the reflector plate or the ribbon has a reflective chrome trailer that acts as a light reflector for the ribbon sensor. For Direct Thermal applications (where the ribbon is not required) the sensor will warn if the ribbon is detected by displaying a Ribbon In a warning on the LCD Display (or yellow flashing supplies light ZT220). To avoid ribbon errors, proper loading, and configuration of the printer and driver/software are required.
Источник
1. Error message displayed on the LCD screen
When an error occurs, the LCD displays a message. Errors, possible reasons, and recommended solutions are listed below.
Displayed information 1: Invalid Head
Possible reason: The original Zebra ZM400 printhead was not used when replacing the printhead.
Solution: Install the original Zebra ZM400 printhead.
Displayed information 2: Ribbon Out
Possible reason 1: In thermal transfer mode, the ribbon is not loaded or loaded incorrectly.
Solution: please load the media correctly.
Possible reason2: In thermal transfer mode, the ribbon sensor does not detect the correctly loaded ribbon.
Solution: Please load the media correctly and calibrate the sensor.
Possible reason 3: In thermal transfer mode, the media blocks the ribbon sensor.
Solution: Please load the media correctly and calibrate the sensor.
Possible reason 4: In thermal transfer mode, the printer does not detect the ribbon even if the ribbon has been loaded.
Solution: Please print the sensor chart, calibrate the sensor or load the printer defaults.
Displayed information 3: Ribbon In
Possible reason: The ribbon is loaded, but the printer is set to thermal mode.
Solution: Thermal media does not require ribbon. If you want to use thermal transfer media that requires ribbon, set the printer to use in the «thermal transfer mode».
Displayed information 4: Paper Out
Possible reason 1: The media is not loaded or the media is not loaded properly.
Solution: Please load the media correctly.
Possible reason 2: The media sensor is misaligned.
Solution: Check the media sensor position.
Possible reason 3: The printer has been set up for non-continuous media, but contiguous media is loaded.
Solution: Please install the correct media type, or reset the printer to the current media type and perform calibration.
Displayed information 5: Head Open
Possible reason 1: The print head is not completely closed.
Solution: please completely close the print head.
Possible reason 2: The print head opening sensor is not working properly. Solution: please replace the sensor.
2. Calibration failure
Phenomenon 1: The print alignment mark on the label is missing, and the vertical offset of the top alignment mark on the form is too much.
Possible reason 1: The platen roller is too dirty.
Solution: Please clean the platen roller.
Possible reason 2: The position of the media guide is not correct.
Solution: Please ensure that the media guide is correctly positioned.
Possible reason3: The media type is incorrect.
Solution: Set the printer to use for the correct media type.
Possible reason 4: The media is not loaded correctly.
Solution: Please load the media correctly.
Phenomenon 2: Auto calibration failed.
Possible reason 1: The media or ribbon is not loaded correctly.
Solution: Please load the media and ribbon correctly.
Possible reason 2: The ribbon or media is not detected by the sensor. Solution: Please calibrate the printer manually.
Possible reason 3: The sensor is too dirty, or the positioning is not correct, the sensor cannot be detected.
Solution: Please make sure the sensor is clean and the media position is correct.
Possible reason 4: The media type setting is incorrect.
Solution: Set the printer to use for the correct media type.
3. Zebra ZM400 Communication failure
Phenomenon 1: The label format has been sent to the printer, but it is not recognized and the data indicator is not flashing.
Possible reason: The communication parameters are incorrect.
Solution 1: Check the printer driver or software communication settings. Solution 2: If using a serial port, check the port settings in the control panel menu.
Solution 3: If you use a driver, check the driver communication settings related to the connection.
Phenomenon 2: The label format has been sent to the printer. After printing multiple labels, the printer skips, misplaces, loses images, or distorts the image on the label.
Possible reason: The serial communication setting is incorrect.
Solution 1: Make sure the flow control settings match.
Solution 2: Check the length of the communication cable.
Solution 3: Check the printer driver or software communication settings.
Phenomenon 3: The format has been sent to the printer, but it is not recognized, the data light flashes, but it does not print.
Possible reason 1: The prefix and separator character set in the printer do not match the character set in the label format.
Solution: Please check the prefix and separator characters.
Possible reason 2: Incorrect data is being sent to the printer.
Solution: Please check the communication settings on the computer to make sure these settings match the settings on the printer. If the problem persists, check the label format.
4. Ribbon failure
Phenomenon 1: The ribbon is broken or melted.
Possible reason: The depth setting value is too high.
Solution 1: Reduce the depth setting value.
Solution 2: Thoroughly clean the print head.
Phenomenon 2: The printer has not checked that the ribbon has run out. Possible reason: The printer is calibrated without a ribbon loaded, then the ribbon is inserted without performing a user recalibration of the printer, or the printer defaults are not loaded.
Solution: Use the ribbon to calibrate the printer, or load the printer defaults.
Phenomenon 3: In thermal transfer mode, the ribbon is not detected by the printer even though the ribbon is loaded correctly.
Possible reason: The printer is calibrated without a ribbon loaded, then the ribbon is inserted without performing a user recalibration of the printer, or the printer defaults are not loaded.
Solution: Use the ribbon to calibrate the printer, or load the printer defaults.
Phenomenon 4: The ribbon indicator illuminates even if the ribbon is loaded correctly.
Possible reason: The printer is not calibrated for the label and ribbon to be used.
Solution: Perform calibration media and ribbon sensor sensitivity.