Содержание
- PhpSpreadsheet: разрешения | ZipArchive :: close (): сбой при создании временного файла
- 3 ответа
- Clonezilla Discussion
- A partition and disk imaging/cloning program
- Forums
- Custom Script on USB drive
- PhpSpreadsheet: разрешения | ZipArchive :: close (): сбой при создании временного файла
- Решение
- Другие решения
PhpSpreadsheet: разрешения | ZipArchive :: close (): сбой при создании временного файла
Я хотел бы предложить Excel-файл для загрузки с PhpSpreadsheet
Я получаю следующее сообщение об ошибке:
PhpOffice PhpSpreadsheet Writer Xlsx использует временное хранилище при записи в вывод php: //. По умолчанию временные файлы хранятся в рабочем каталоге скрипта. Когда нет доступа, он возвращается к расположению временных файлов операционной системы.
Какие разрешения для папок я должен проверить? Или что вызывает проблему?
3 ответа
Общие правила для каталога в PHP, чтобы написать в него:
Он должен существовать ,
Доступно для записи в процессе PHP ,
Это разрешено open_basedir директива php.ini.
Поэтому установите некоторый путь к файлу в качестве аргумента в методе $writer->save() и убедитесь, что эти 3 правила соблюдены.
Если вы хотите использовать только php://output или php://stdout значение в методе $writer->save() , проверьте следующие правила:
1) Каталог, возвращаемый функцией sys_get_temp_dir() . В Windows sys_get_temp_dir() по умолчанию возвращает временный каталог текущего пользователя ОС. Значение можно изменить с помощью директивы sys_temp_dir php.ini.
2) Каталог, возвращенный upload_tmp_dir php Директива .ini. $useUploadTempDirectory имеет значение false по умолчанию. Чтобы установить значение true , добавьте эту строку в код перед сохранением файла:
Вот код, который отвечает за выбор пути сохранения:
Из метода PhpOfficePhpSpreadsheetWriterXlsx::save (» source/Xlx.hlx. а> ) :
Из PhpOfficePhpSpreadsheetSharedFile::sysGetTempDir метода ( ) :
Я не знаю, если ваш код из включенного файла, но у меня была похожая проблема. Я пытался использовать константу __DIR__ , и это сработало, мой код выглядит так:
Проблема заключалась в том, что каталог tmp использовался phpSpreadSheet и не был доступен для записи в процессе PHP. Я изменил каталог tmp, чтобы загрузить каталог tmp, и теперь проблема решена. Я решил проблему с помощью
Источник
Clonezilla Discussion
A partition and disk imaging/cloning program
Forums
Custom Script on USB drive
I am a newbee and I apologise if this has been asked before but I’m struggling to make sense of this. I can boot off USB and use Clonezilla to save/restore no problems.
But what I’m trying to do is create a way of booting off USB and it automatically load a script which will set up a restore and load the image. I bonus would also be if I could get it to expand the image into the full size of the disk.
The command I have so far is:
/opt/drbl/sbin/ocs-sr -g auto -c -p true restoredisk «image» «sda»
I have read the Advanced Modes in the documentation but I’m still having problems for instance I don’t understand how or where the custom script gets stored on USB.
Any help appreciated and please don’t be afraid to ‘over-explain’ your suggestions to me! I am by no means a Linux expert.
If you think any place which is not clear, please let me know.
Did you use the create ISO/ZIP menu option?
I think you get the behavior you’re looking for without a custom script.
I have used this option to create both a bootable USB and DVD that automatically loads an image onto the HD after booting. IIRC the only input required was «y» to continue.
Steven — thanks for that, with a bit of help I’ve managed to create a custom script though it’s still a bit problematic
Frank — that sounds great! where’s the ISO/ZIP menu creation option? I’ve booted into 1.2.1-39 from CD but I can’t find the option anywhere
As a note, «Recovery-ISO-ZIP» menu will be shown only when there is image in dir /home/partimag/.
Boot with Clonezilla Live and look for it on the «Clonezilla: Select Mode» menu screen. It’s the «Recovery-ISO-ZIP» menu item.
If your image is over 2GB I suggest you use clonezilla -48 when running the Recovery-ISO-ZIP wizard. The image can be created with an older version like -39.
I found making an ISO and burning to a DVD even easier than the USB route. But after you do the usb thing once it’s easy also.
The saga continues.
So I’m trying to create a bootable USB pen drive which automatically prompts for a input of «Y» then loads the Clonezilla image.
I found the create ISO/ZIP menu option, followed through the restore procedure, plugged in my (16GB) memory stick containing the image (7GB — 9GB free) hoping it would then update the memory stick with the required menu boot option.
This is the command it gave me: ocs-live-dev -c -g en_US.UTF-8 -t -k NONE -e «-g auto -e1 auto -c -j3 -k1 -r -p reboot restoredisk TAS_BUILD_V7 sda» TAS_BUILD_V7
PROBLEM IS IT FAILED!
My first errors were Downloading http://free.nchc.org.tw/syslinux/syslinux-3.72.tar.bz2.
Extracting files.
tar: syslinux-3.72.tar.bz2: Cannot open: No such file or directory
— Is it supposed to download syslinux? Should the PC be routed into broadband?
mv: cannot stat ‘syslinux-3.72/win32/syslinux.exe’: No such file or directory
strings: ‘/tmp/sysl_dir.amdzQz/syslinux’: No such file
cp: cannot stat ‘/tmp/sysl_dir.amdzQz/syslinux.exe’: No such file or directory
— Is the above happening because it couldn’t contact http://free.nchc.org.
Then I get a few more errors
adding: home/partimag/TAS_BUILD_V7/hda-mbr (stored 0%)
adding: home/partimag/TAS_BUILD_V7/hda-pt.parted (stored 0%)
adding: home/partimag/TAS_BUILD_V7/hda1.ntfs-img.aa
zip I/O error: No space left on device
zip error: Temporary file failure (was zipping home/partimag/TAS_BUILD_V7/hda1.ntfs-img.aa)
The created release file is clonezilla-live-TAS_BUILD_V7.zip. You can extract all the files into your pendrive, and run makeboot.bat from pendrive in MS windows.
PLEASE tell me what I’m doing wrong — have I maybe got something the wrong way round.
Wellurs,
Yes, syslinux is required to create such a zip file. Did you connect to network on the machine you run ocs-live-dev ?
I’m sure there are several ways to do this. This one worked fro me.
Do you have a Windows machine you can use?
1- Use clonezilla live to make an image of the machine you want to clone. Make sure the image is broken down into files no larger than 2000MB. Save the image on your flash drive.
2- Use the ISO-ZIP-Recovery menu item to create a «USB ZIP» file. You will need to specify the image you created in step 1. Save this ZIP file on your flash drive also.
3- Plug your flash drive into a windows machine and copy the image and the zip files created in steps 1 and 2 onto your windows machine («c/:» or whatever). The image is contained in the zip file but anyway.
Download Live USB Helper to help you to create this Live USB flash drive or USB hard drive. Just install the program in MS windows, then you can follow the GUI to create the Clonezilla live. PS. To run this Live USB helper program on MS windows, you need a dll file «vb6stkit.dll». If Live USB helper complains about no vb6stkit.dll was found, you can download it on http://www.dll-files.com.
The HELPER may ask you to install a HP utility. It will give you a link to download it.
5- (THIS IS GOING TO WIPE YOUR USB DRIVE!) The Helper has four buttons. Go through them from the top to the bottom:
format the usb,
install the zip file
make usb bootable
exit
6- Give the usb a try and see how you make out.
Good Luck,
FRank
Note: Versions -47 and below have trouble creating a zip file over 2 GB. That’s why I suggested using -48. But I haven’t tried -48 yet. See this thread. https://sourceforge.net/forum/forum.php?thread_id=3108515&forum_id=663168
thanks very much for that Frank those instructions are clear and is what I’ve been attempting to do but the problem for me is it fails at Step2.
I’m using -48 now to avoid possible file size issues.
I have a 6.6GB image in folder TAS_BUILD_V7 on flash drive which is split into 2GB sections. I choose «ISO-ZIP-Recovery» then go through all the options I want followed by «zip Create_a_zip_file_for_USB_flash_drive_use»
Estimated necessary space size in target dev: 6920MB
Starts saving as a tar file.
cp: cannot create regular file ‘/home/partimag/usb-dev.KsudBm/COPYING’: File exists
Copying clonezilla image to workig dir. TAS_BUILD_V7
home/partimag/TAS_BUILD_V7/hda1.ntfs-img.aa
/tar: /home/partimag/clonezilla-live-TAS_BUILD_V7.tar: Wrote only 4096 of 10240 bytes
tar: Error is not recoverable: exiting now
tar: /home/partimag/clonezilla-live-TAS_BUILD_V7.tar. You can extract all the files into your pendrive, and run makeboot.bat from pendrive in MS windows.
Now I really don’t understand what’s going wrong at what stage!? This time and for the first time ever since upgrading to -48 it has actually written something to the flash drive (clonezilla-live-TAS_BUILD_V7.tar — though only contains a few files as it Exited after attempting to write hda1.ntfs-img.aa)
-Clonezilla-Live-Version
-Copying
-disk
-hda-chs.sf
-hda-mbr
-hda-pt.parted
-hda-pt.sf
-hda1.ntfs-img.aa (this file is corrupted and doesn’t extract anyway)
The reason your having trouble is you are one of the first to use this feature in -48. In -39 there is a bug with the ZIP utility that effectively sets a file size limit of 2GB. Steven changed -48 to use tar instead of zip but it seems there is a problem with it. I’m sure Steven will fix it. We can help by defining the problem (as you did).
Don’t get discouraged you’re going to love it when it works.
A couple things to try (take your pick 🙂
Move on to step three and complete the other steps. I don’t know if the USB Helper can extract a .tar file onto the USD drive though. After you complete the other steps if you can go back and manually copy the drive image files onto the usb drive. (i.e. copy xxx-img.aa .ab .ac into /home/partimage)
if that doesn’t work (this is what I did I didn’t have -48 at the time):
Make another image of the drive. Do NOT split the image up (set the size limit to 0). Use -39 for the ISO-ZIP-Recovery. Specify the size unlimited image files to make the zip file. You will will get a zip error when you do this but a zip file will be created. Complete the other steps.
Then go back and manually copy the drive image files onto the usb drive. Use image files that you previously made that are split to less than or equal to 2GB (i.e. copy xxx-img.aa .ab .ac into /home/partimage)
Your next message will tell us how great it is. (fingers crossed)
FRank
Wellurs,
We released another testing Clonezilla live 1.2.1-50, on which a bug about creating recovery iso from USB flash drive clonezilla live was fixed.
Please test it and let us know your results.
Something that came up in another thread is I always boot from the CD version of live. Maybe the USB version doesn’t behave the same.
actually I moved from USB booting to CD back when I was using -39 to see if it’d make a difference but it didn’t 🙂
When I created the image I set the file size limit to 2000, in windows they measure 2048 (I think that’s right. I’m not in the office now!). Maybe I should have set the file size limit down to 1900 then -39 would run better?
Ok so I’m not back in the office for a couple of days now (it’s the weekend wahooo!) so I’ll get my plan of action sorted now to make a good head start on Monday:
option1
I’m not sure how I can move to Step 3 because the rest of the Clonezilla files you’d expect to be able to boot with aren’t there i.e the four main directories. Are you suggesting I integrate what was created in the tar file + a usb clonezilla download plus the image directory? Will that be enough you think?
option2
So let me get this straight
— make a new image using -39 boot CD
— specify 0 as file size (unlimited) — presumably I’ll need to save this to a NTFS USB hard drive (only fat/fat32 available on flash drive)
— boot up again using -39 and choose ISO-ZIP-RECOVERY — Restore?
-===== this is where I’m lost because I’ve already got my image and there’s no prompt at this stage to set any file sizes?
— I kind of get the last instruction that once you’ve got your zip file with the menu stuff built in you just need to replace the image folder with the previous 2GB portions.
Hey I already think Clonezilla is amazing and I love opensource you guys are doing great things, I will be a very happy man if I can just create a simple system of loading images then I can release it to my team.
I tried setting the file size limit to 1900. It still didn’t work. GZIP won’t let the zip file grow beyond 2GB.
I’d say give option 2 a try. That’s what worked for me. I haven’t tried with tar yet but I want to.
It’s sounds like you have the idea.
Yes, save it to an external ntfs drive.
The part you don’t get: ISO-ZIP asks for an image to restore. Give it the unlimited image you just made. This way the zip file will be created correctly minus the the drive image. If you use the 2GB files the zip file doesn’t get created.
After you create the bootable usb go back and copy the 2GB limited image files into /home/partimag.
I agree it’s very cool. I’m a noob user myself. I saw your original post and wanted to help because I was successful at putting a restore USB together and it works very well. My image was 3.6GB so I was able to burn it to a single layer DVD. That worked the first try without any of this tinkering. The ISO image the ISO-ZIP-Recovery option made was flawless.
I have been playing with the server version the last week or so. It’s also very cool. Just boot a machine from the network and it’s drive gets restored automatically. No usb, no cd, no options to select, just bang done. (I’d like to buy this Steven guy a shot and a beer.)
Источник
PhpSpreadsheet: разрешения | ZipArchive :: close (): сбой при создании временного файла
Я хотел бы предложить Excel-файл для загрузки с PhpSpreadsheet
Я получаю следующее сообщение об ошибке:
PhpOffice PhpSpreadsheet Writer Xlsx использует временное хранилище при записи в вывод php: //. По умолчанию временные файлы хранятся в рабочем каталоге скрипта. Когда нет доступа, он возвращается к расположению временных файлов операционной системы.
Какие папки я должен проверить?
Или что вызывает проблему?
Решение
Общие правила для каталога в PHP, чтобы написать в него:
Должно существовать,
Это доступно для записи в процессе PHP,
Это разрешено open_basedir директива php.ini
Поэтому, установите некоторый путь к файлу как аргумент в $writer->save() метод и убедитесь, что эти 3 правила соблюдены.
Если вы хотите использовать только php://output или же php://stdout значение в $writer->save() метод, проверьте эти правила для:
1) Каталог, возвращенный sys_get_temp_dir() функция. В винде sys_get_temp_dir() по умолчанию возвращает временный каталог текущего пользователя ОС. Значение может быть изменено sys_temp_dir директива php.ini
2) Каталог, возвращенный upload_tmp_dir директива php.ini $useUploadTempDirectory имеет false значение по умолчанию. Чтобы установить это значение true добавьте эту строку в ваш код перед сохранением файла:
Вот код, который отвечает за выбор пути сохранения:
От PhpOfficePhpSpreadsheetWriterXlsx::save метод (источник ):
От PhpOfficePhpSpreadsheetSharedFile::sysGetTempDir метод (источник ):
Другие решения
Я не знаю, если ваш код из включенного файла, но у меня была похожая проблема. Я пытался использовать __DIR__ константа, и это работает, мой код выглядит так:
Источник
Collectives™ on Stack Overflow
Find centralized, trusted content and collaborate around the technologies you use most.
Learn more about Collectives
Ask Question
Asked
5 months ago
Modified
5 months ago
Viewed
128 times
Part of AWS Collective
0
I have a s3fs mounted in a filesystem in Ubuntu. Often when i zip large files, i an error below:
zip I/O error: Input/output error
zip error: Temporary file failure (zivyOwPF)
free(): double free detected in tcache 2
Any idea why?
- amazon-web-services
- zip
- s3fs
Improve this question
edited Aug 28, 2022 at 11:53
![]()
Andrew Gaul
2,2561 gold badge12 silver badges19 bronze badges
asked Aug 18, 2022 at 20:49
![]()
SnoopSnoop
1
3
-
Could you give some more specific instructions to reproduce this behavior? The double free comes from zip itself which is a pretty wild error. Unless s3fs is returning some bogus data and zip does not handle bad input correctly.
– Andrew Gaul
Aug 20, 2022 at 12:48
-
Hi Andrew, i mounted a s3 bucket using s3fs to my Ubuntu 18.x machine and i go inside a prefix from Ubuntu CLI and zip it (the file is 5GB+) and it throws an error. #zip -v -r -dc TestZipFile7 Day=20211012 —> throws error as : zip I/O error: Input/output error zip error: Temporary file failure (zivyOwPF) free(): double free detected in tcache 2
– Snoop
Aug 23, 2022 at 19:10
-
Could you share the exact command line and roughly the numbers and sizes of files? this appears to be a bug within zip itself that I will investigate. If you can run zip under Valgrind it will help me.
– Andrew Gaul
Aug 28, 2022 at 22:33
Add a comment
|
Sorted by:
Reset to default
Your Answer
Sign up or log in
Sign up using Google
Sign up using Facebook
Sign up using Email and Password
Post as a guest
Name
Required, but never shown
By clicking “Post Your Answer”, you agree to our terms of service, privacy policy and cookie policy
Browse other questions tagged
- amazon-web-services
- zip
- s3fs
or ask your own question.
Browse other questions tagged
- amazon-web-services
- zip
- s3fs
or ask your own question.
AWS
Collective
See more
This question is in a collective:
a subcommunity defined by tags with relevant content and experts.
- The Overflow Blog
-
Engineering’s hidden bottleneck: pull requests
sponsored post
-
Three layers to secure a software development organization
- Featured on Meta
-
Accessibility Update: Colors
-
Collectives: The next iteration
-
Temporary policy: ChatGPT is banned
-
We’ve made changes to our Privacy Notice for Collectives™
Related
941
«UNPROTECTED PRIVATE KEY FILE!» Error using SSH into Amazon EC2 Instance (AWS)
1
Accessing mounted S3 on ubuntu using s3fs — using apache
4
Zipping a binary file in python
2
When using s3fs, ‘ls’ command shows nothing
1
Unable to read files using s3fs when uploaded via management console
0
FFMPEG trouble with mounted s3fs (fuse) drive «failed to rename file __.stream.tmp to __.stream: Operation not supported»
Hot Network Questions
-
Why is 1Password sign-in to new device secure without MFA?
-
Why is mind interacting with matter any more problematic than matter interacting with matter?
-
First work to depict Mr. Hyde as superhuman
-
Threading arguments from lists of different size
-
How should variables in statistics be understood?
-
What does this Field Hospital joke mean in Blackadder Goes Forth?
-
«I am select for the job» «I got/became select for the job»
-
Converting an older motor to ethanol has significant risk of damage?
-
De Gruyter and De Gruyter Mouton: the difference
-
How to get rid of lot of thin long tree branches that have been cut off?
-
.ssh Directory has no id files after installing ssh service
-
Why are some pH standard solutions 6.86 and 9.18?
-
How to get better at taking constructive criticism
-
Added an eye for the Newman projection
-
Example of a parametric test with no normality assumptions?
-
My cat is fighting for his life with chronic calicivirus
-
First science fiction story to use the word «laser»?
-
Designing a portable space elevator
-
How can I solve this algorithmic task in Python?
-
Why all the warnings about failure to raise the U.S. debt ceiling when some argue that Biden could just ignore it?
-
How can we exactly calculate the volume?
-
When targeted by a Nightwalker, can a Monk get rid of Finger of Doom effect by using Stillness of Mind?
-
How does the ability to solve a new problem comes to a person?
-
In TCL SCRIPT, how to add dict or array
more hot questions
Question feed
Your privacy
By clicking “Accept all cookies”, you agree Stack Exchange can store cookies on your device and disclose information in accordance with our Cookie Policy.
Возникли проблемы с установкой программного обеспечения? Вы получаете всплывающее сообщение об ошибке «7-Zip не может создать архив временных папок»? Не волнуйся. У нас есть четыре различных исправления, которые помогут вам избавиться от ошибки «Невозможно создать временную папку в архиве».
Исправление 1: Очистить временную папку
Шаг 1. Нажмите Win + R, чтобы открыть команду «Выполнить».
Шаг 2: Введите temp и нажмите Enter.
Шаг 3: Выделите все, нажав Ctrl + A, и нажмите Delete.
Шаг 4: Нажмите Win + R, чтобы открыть команду «Выполнить».
Шаг 5: Введите% temp% и нажмите Enter.
Шаг 6: Выделите все, нажав Ctrl + A, и нажмите Delete.
Шаг 7: Нажмите Win + R, чтобы открыть команду «Выполнить».
Шаг 8: Введите предварительную выборку и нажмите Enter.
Шаг 9: Выделите все, нажав Ctrl + A, и нажмите Delete.
Шаг 10: Попробуйте еще раз установить приложение с установочным файлом.
Исправление 2: изменение переменной среды на C: Windows Temp
Шаг 1. Нажмите Win + R, чтобы открыть команду «Выполнить».
Шаг 2: Введите sysdm.cpl и нажмите Enter.
Шаг 3. В окне «Свойства системы» перейдите на вкладку «Дополнительно» и нажмите «Переменные среды».
Шаг 4: Дважды щелкните TEMP в пользовательских переменных, чтобы отредактировать его.
Шаг 5: В окне «Изменить пользовательскую переменную» установите значение переменной C: Windows Temp и нажмите «ОК».
Шаг 6: Точно так же дважды щелкните TMP в пользовательских переменных, чтобы отредактировать его.
Шаг 7. В окне «Изменить пользовательскую переменную» установите для переменной TMP значение C: Windows Temp и нажмите «ОК».
Шаг 8: Перезагрузите систему, чтобы изменения вступили в силу.
Шаг 9: Попробуйте еще раз установить приложение с установочным файлом.
Исправление 3: изменение переменной среды на C: Temp
Шаг 1. Нажмите Win + R, чтобы открыть команду «Выполнить».
Шаг 2: Введите sysdm.cpl и нажмите Enter.
Шаг 3. В окне «Свойства системы» перейдите на вкладку «Дополнительно» и нажмите «Переменные среды».
Шаг 4: Дважды щелкните TEMP в пользовательских переменных, чтобы отредактировать его.
Шаг 5: В окне «Редактировать пользовательскую переменную» установите значение переменной C: Temp и нажмите «ОК».
Шаг 6: Точно так же дважды щелкните TMP в пользовательских переменных, чтобы отредактировать его.
Шаг 7: В окне «Изменить пользовательскую переменную» установите значение переменной C: Temp и нажмите «ОК».
Шаг 8: Перезагрузите систему, чтобы изменения вступили в силу.
Шаг 9: Попробуйте еще раз установить приложение с установочным файлом.
Исправление 4: Запуск от имени администратора
Шаг 1. Щелкните файл установки правой кнопкой мыши и выберите «Запуск от имени администратора».
Это все. Надеемся, эта статья была информативной.
Пожалуйста, прокомментируйте и сообщите нам, смогли ли вы решить проблему с помощью этих исправлений.
Спасибо за чтение.
Я хотел бы предложить Excel-файл для загрузки с PhpSpreadsheet
Вот мой код:
    require 'vendor/autoload.php';

    use PhpOfficePhpSpreadsheetSpreadsheet;
    use PhpOfficePhpSpreadsheetWriterXlsx;

    $spreadsheet = new Spreadsheet();
    $sheet = $spreadsheet->getActiveSheet();
    $sheet->setCellValue('A1', 'Hello World !');

    $writer = new Xlsx($spreadsheet);
    $writer = PhpOfficePhpSpreadsheetIOFactory::createWriter($spreadsheet, 'Xlsx');

    header('Content-Type: application/vnd.ms-excel');
    header('Content-Disposition: attachment; filename="hello_world.xlsx"');
    $writer->save("php://output");
Я получаю следующее сообщение об ошибке:
    PHP Warning:  ZipArchive::close(): Failure to create temporary file: No such file or directory in /Users/sg/GitWorkingCopies/xxx1/xxx2/library/phpoffice/phpspreadsheet/src/PhpSpreadsheet/Writer/Xlsx.php on line 374
    PHP Fatal error:  Uncaught exception 'PhpOfficePhpSpreadsheetWriterException' with message 'Could not close zip file php://output.' in /Users/sg/GitWorkingCopies/xxx1/xxx2/library/phpoffice/phpspreadsheet/src/PhpSpreadsheet/Writer/Xlsx.php:375
документация PHPSpreadsheet гласит:
PhpOffice PhpSpreadsheet Writer Xlsx использует временное хранилище при записи в вывод php: //. По умолчанию временные файлы хранятся в рабочем каталоге скрипта. Когда нет доступа, он возвращается к расположению временных файлов операционной системы.
Upload_tmp_dir: /Applications/XAMPP/xamppfiles/temp/
Какие разрешения для папок я должен проверить? Или что вызывает проблему?
3 ответа
Лучший ответ
Общие правила для каталога в PHP, чтобы написать в него:
Он должен существовать ,
Доступно для записи в процессе PHP ,
Это разрешено open_basedir директива php.ini.
Поэтому установите некоторый путь к файлу в качестве аргумента в методе $writer->save() и убедитесь, что эти 3 правила соблюдены.
Если вы хотите использовать только php://output или php://stdout значение в методе $writer->save(), проверьте следующие правила:
1) Каталог, возвращаемый функцией sys_get_temp_dir(). В Windows sys_get_temp_dir() по умолчанию возвращает временный каталог текущего пользователя ОС. Значение можно изменить с помощью директивы sys_temp_dir php.ini.
Или
2) Каталог, возвращенный upload_tmp_dir php Директива .ini. $useUploadTempDirectory имеет значение false по умолчанию. Чтобы установить значение true, добавьте эту строку в код перед сохранением файла:
PhpOfficePhpSpreadsheetSharedFile::setUseUploadTempDirectory(true);
Вот код, который отвечает за выбор пути сохранения:
Из метода PhpOfficePhpSpreadsheetWriterXlsx::save ( ) :
// If $pFilename is php://output or php://stdout, make it a temporary file...
$originalFilename = $pFilename;
if (strtolower($pFilename) == 'php://output' || strtolower($pFilename) == 'php://stdout') {
    $pFilename = @tempnam(File::sysGetTempDir(), 'phpxltmp');
    if ($pFilename == '') {
        $pFilename = $originalFilename;
    }
}
Из PhpOfficePhpSpreadsheetSharedFile::sysGetTempDir метода ( ) :
/**
 * Get the systems temporary directory.
 *
 * @return string
 */
public static function sysGetTempDir()
{
    if (self::$useUploadTempDirectory) {
        //  use upload-directory when defined to allow
        // running on environments having very restricted open_basedir configs
        if (ini_get('upload_tmp_dir') !== false) {
            if ($temp = ini_get('upload_tmp_dir')) {
                if (file_exists($temp)) {
                    return realpath($temp);
                }
            }
        }
    }
    return realpath(sys_get_temp_dir());
}
6
camelsWriteInCamelCase
22 Май 2018 в 21:16
Я не знаю, если ваш код из включенного файла, но у меня была похожая проблема. Я пытался использовать константу __DIR__, и это сработало, мой код выглядит так:
$filepath = __DIR__ . "/reports/${filename}_".date("Ymd_Gis").".xlsx";
$writer = new PhpOfficePhpSpreadsheetWriterXlsx($spreadsheet);
$writer->save($filepath);
0
Szél Lajos
3 Ноя 2018 в 00:29
Проблема заключалась в том, что каталог tmp использовался phpSpreadSheet и не был доступен для записи в процессе PHP. Я изменил каталог tmp, чтобы загрузить каталог tmp, и теперь проблема решена. Я решил проблему с помощью
PhpOfficePhpSpreadsheetSharedFile::setUseUploadTempDirectory(true);
0
monsur.hoq
15 Ноя 2019 в 08:52
 Всем здравия!
Сегодняшняя заметка будет посвящена проблемным архивам, главным образом формату ZIP (как одному из самых популярных форматов для сжатия…).
Вообще, если вы нередко работаете с архивами, то уже наверняка сталкивались с ошибками, при их извлечении (или попытке просмотра). Хорошо, если в архиве были файлы, которые без труда можно загрузить с другого сервера, а если там был бэкап с личными документами (и его второй копии больше нет)?… 👀
Вот именно из второго случая и буду исходить в этой заметке. Приведу несколько рекомендаций, которые иногда могут выручить и всё-таки открыть «проблемный» ZIP-файл. 👌
*
Примечание: файлы и документы, сжатые в ZIP-«папку», обладают рядом преимуществ — они меньше занимают места, их быстрее можно передать с одного устройства на другое, в т.ч. по сети (да и в целом, куда удобнее иметь дело с одним ZIP-файлом, чем со множеством мелких…).
*
Содержание статьи
- 1 Что можно сделать с проблемным ZIP-архивом
- 1.1 Первое
- 1.2 Второе
- 1.3 Третье
- 1.4 Четвертое
- 1.5 Пятое
- 1.6 👉 Как защитить себя от повреждения архивов в будущем

→ Задать вопрос | дополнить
Что можно сделать с проблемным ZIP-архивом
Первое
Для начала следует сказать, что архивы ZIP могут быть сжаты с использованием разных алгоритмов (и разными программами). Я уж не говорю о «новом» продвинутом формате ZIPX… (который многие путают с тем же ZIP…)
И в ряде случаев (по этим причинам) определенные архиваторы не способны открывать некоторые ZIP-файлы!
Какой выход: попробуйте установить программу WinZIP (ссылочка на офиц. сайт). Эта программа поддерживает практически «всё», что связано с ZIP-форматом. 👌
После ее установки нажмите правой кнопкой по архиву и выберите функцию извлечь. См. мой пример ниже. 👇
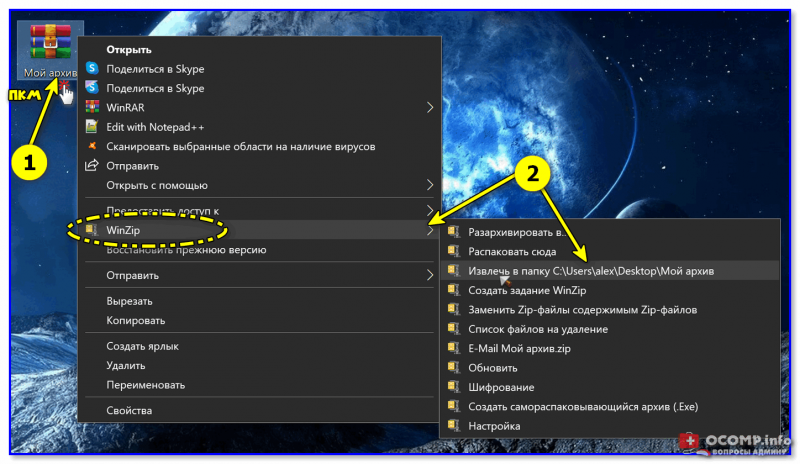
Извлечь в текущую папку — WinZIP
Разумеется, не лишним будет попробовать разархивировать файлы из проблемного ZIP-файла и др. программами: WinRAR, Total Commander и пр.
*
Второе
У архиватора WinRAR есть спец. режим извлечения, при котором архиватор попробует «проигнорировать» ряд ошибок (своего рода «восстановление»).
Как этом режим запустить: открыть архив в WinRAR (не закрывайте окно, даже если появится ошибка). Далее нажать сочетание «левый ALT+R», выбрать формат архива, указать папку для извлечения и нажать OK. Пример ниже. 👇
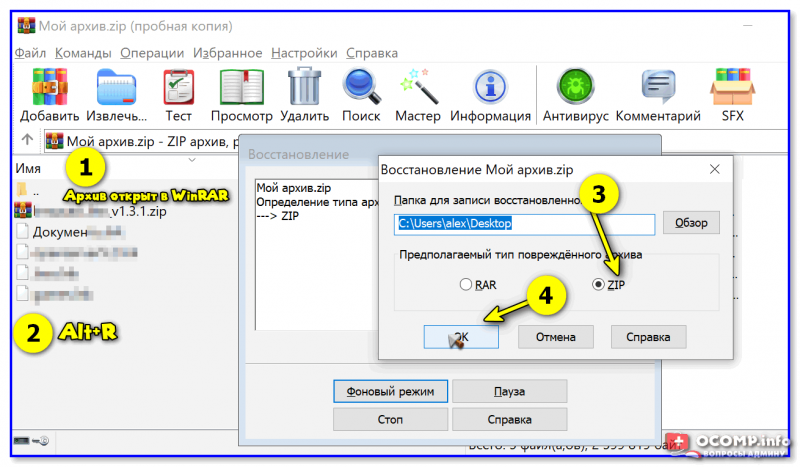
Архив открыт в WinRAR
*
Третье
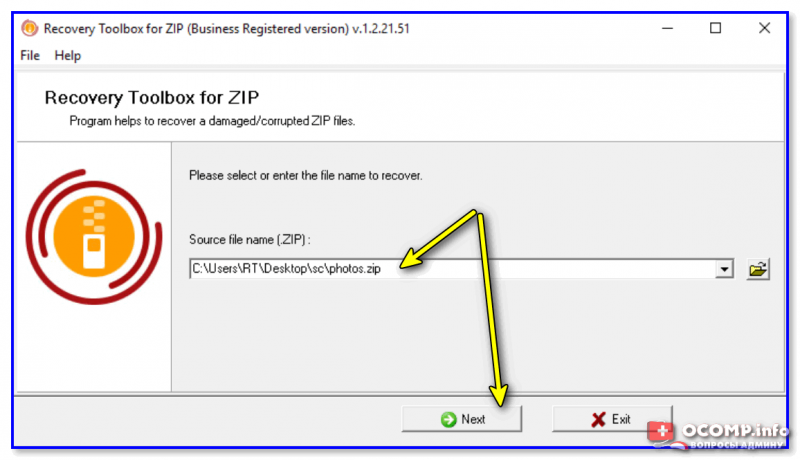
Если вышеприведенные советы с архиваторами не помогли — рекомендую воспользоваться утилитой Recovery Toolbox for ZIP (о компании Recovery Toolbox).
Она предназначена для восстановления файлов из поврежденных архивов (даже тех, с которыми отказываются работать WinZIP / WinRAR и др. архиваторы).
*
👉 Как ей пользоваться:
- скачать последнюю версию Recovery Toolbox for ZIP по ссылке: https://zip.recoverytoolbox.com/ru/;
- установить программу на ПК (с ОС Windows);
- запустить программу и выбрать архив ZIP-формата для обработки (см. скрин ниже 👇);
- нажать на кнопку анализа;
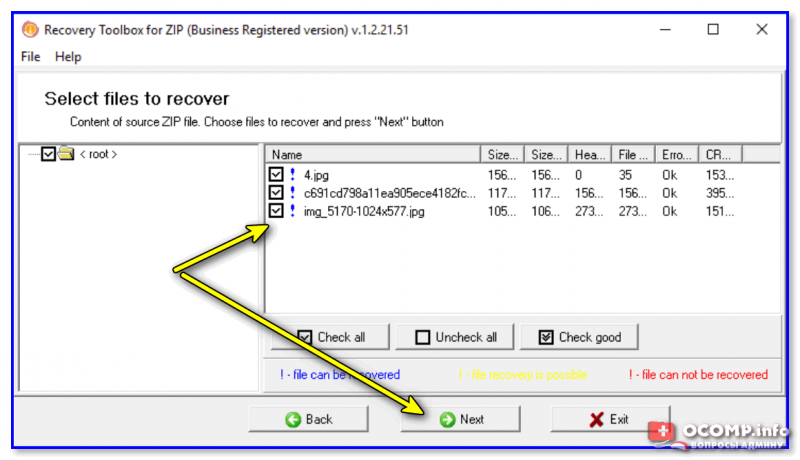
- дождаться окончания анализа и просмотреть восстановленные файлы;
- распаковать восстановленные документы и сохранить их на диск.
Recovery Toolbox for ZIP — скриншот работы программы
Примечание: все опции, кроме последней, доступны в режиме демо-версии. Пользователи могут делать все, что угодно, кроме сохранения восстановленных данных на диск. Логично, что это требует оплаты и регистрации Recovery Toolbox for ZIP.
После регистрации программу можно использовать без ограничений (для работы с десятками архивов). Доступ к интернету для ее работы — не требуется.
Recovery Toolbox for ZIP — восстановление файлов
*
Четвертое
В рамках текущей заметки не могу не отметить один момент с которым часто сталкиваюсь сам — встроенный защитник иногда «обезвреживает» архив (или вовсе его удаляет с диска) с целью недопущения заражения ПК вирусами. Кстати, это могут делать и сторонние антивирусы…
*
👉 Т.е. в ряде случаев архив портит антивирус (иногда даже в том случае, когда он не несет никакой угрозы!).
*
Совет: попробуйте проверить журнал защитника — для этого достаточно нажать на Win+i, и перейти в раздел «Обновление и безопасность / Безопасность Windows / Защита от вирусов и угроз / журнал» (👇).
Если в журнале будет отображаться строка, в которой значится что «такая-то угроза обезврежена…» — попробуйте восстановить файл (отменить это действие).
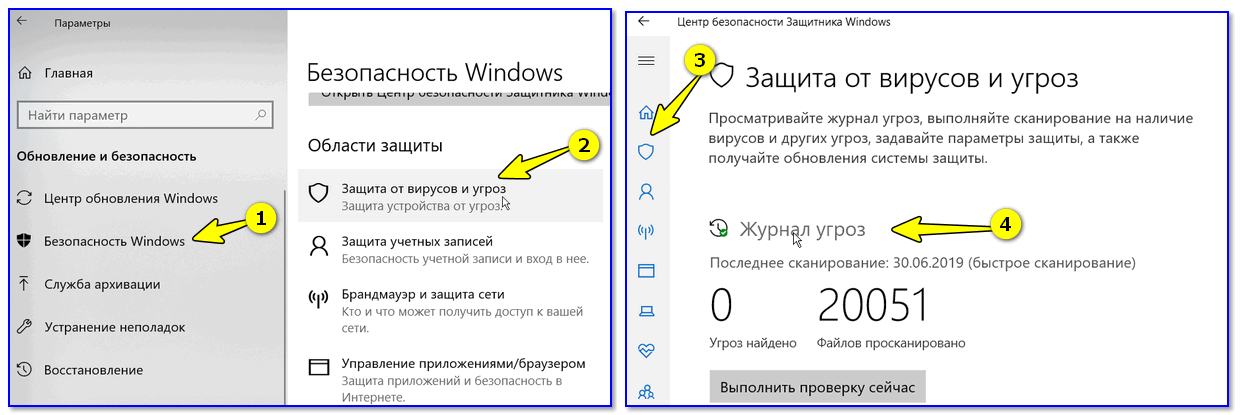
Журнал угроз защитника в ОС Windows 10
Кроме этого, также порекомендую открыть свойства папки с документами (если проблемный архив хранился там) и посмотреть нет ли у нее копий (некоторые версии Windows такие копии делают по умолчанию!).

Мой компьютер — открываем свойства документов
Разумеется, если копия системной папки есть — ее можно восстановить…
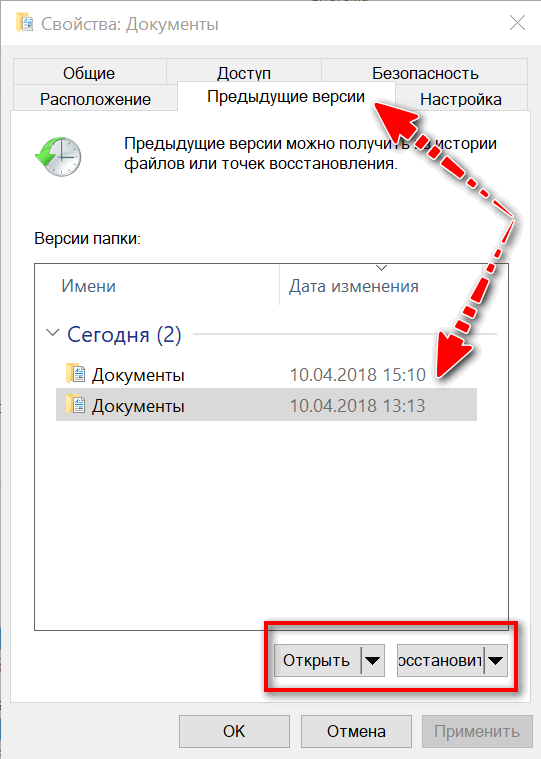
Предыдущие версии файлов
*
Пятое
Если у вас когда-то была нормальная копия не открывающегося ZIP-архива где-нибудь на жестком диске или флешке (но вы ее удалили) — имейте ввиду, что есть шанс, что тот «старый» файл возможно удастся восстановить с помощью спец. утилит (прим.: т.е. мы будем пытаться не открыть проблемный ZIP; а найти «старую» копию архива, на тот момент, когда все работало).
О том, как это всё можно сделать — рассказано в одной моей прошлой заметке (ссылочка на нее ниже). Рекомендую попробовать! 👌
👉 В помощь!
Как восстановить фото, файлы, документы с жесткого диска, MicroSD карты памяти или USB-флешки
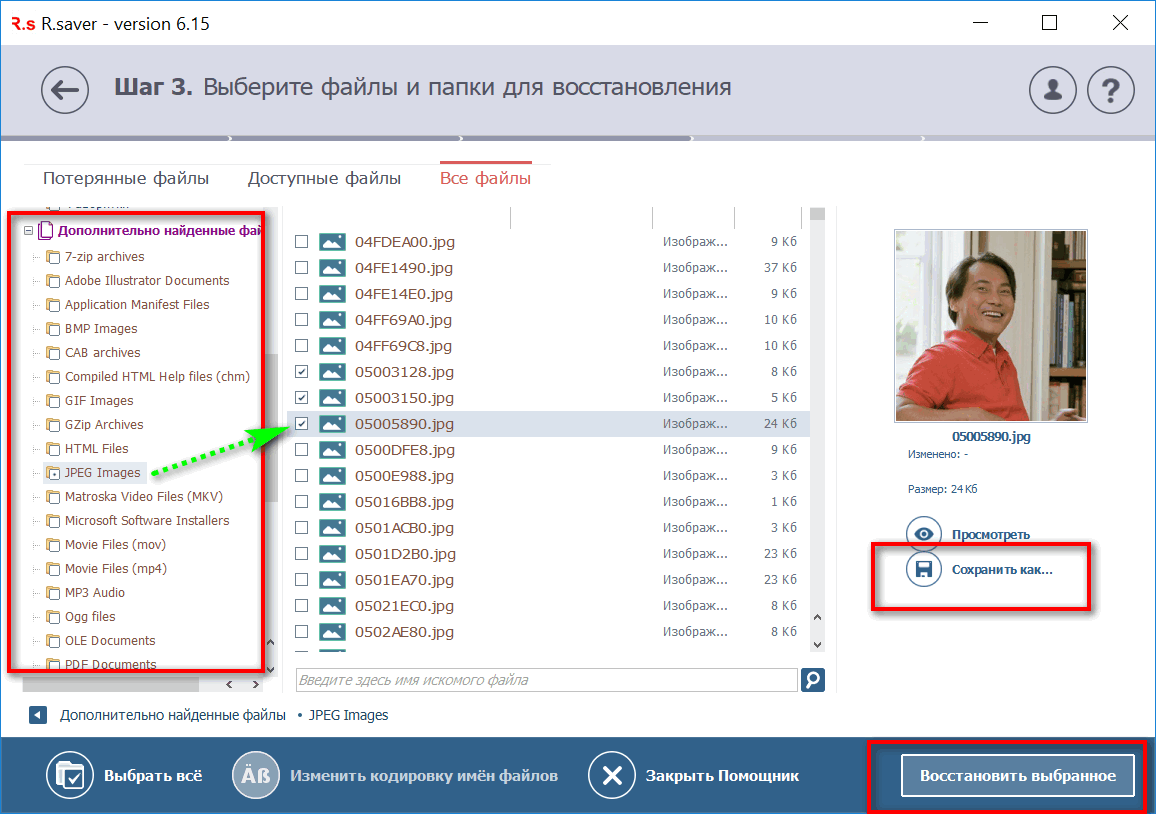
Найденные файлы, которые можно восстановить // утилита R.Saver
*
👉 Как защитить себя от повреждения архивов в будущем
Довольно интересный вопрос…
Для начала следует сказать, что есть довольно много причин, которые могут привести к порче ZIP-файлов (да и не только их, кстати):
- сбои при загрузке файлов: тут можно посоветовать просто перезагрузить файл или скачать его с другого источника;
- вирусное заражение: здесь самый очевидный совет — использование современного антивируса + регулярное создание бэкапов (кстати, при заражении некоторыми видами вирусов — архивы вовсе уже нельзя извлечь — вирус их портит окончательно);
- ошибки программ при запаковке файлов: после того, как вы создали архив с файлами — проверьте, можно ли открыть его… В WinRAR для этого есть спец. функция тестирования архива;

WinRAR — ошибок не обнаружено!
- сбои в электропитании: если в процессе создания архива (до его проверки ☝) отключилось электричество — пересоздайте архив заново. Весьма неплохим выходом может стать покупка UPS (источник бесперебойного питания).

*
В общем-то, соблюдение этих нехитрых правил, конечно, не дает 100% гарантии, но риски снижает значительно. Кстати, я бы в этом плане еще порекомендовал сделать копию документов на облачный диск (это и удобно — можно получить доступ с любого устройства; и довольно надежно).
*
Если вы смогли спасти данные др. способом — поделитесь в комментариях!
Успехов!
👋


Полезный софт:
-

- Видео-Монтаж

Отличное ПО для создания своих первых видеороликов (все действия идут по шагам!).
Видео сделает даже новичок!
-
- Ускоритель компьютера

Программа для очистки Windows от «мусора» (удаляет временные файлы, ускоряет систему, оптимизирует реестр).